

1. Pengantar
Dalam codelab ini, Anda akan membangun dan men-deploy aplikasi web kalkulator gCurrenC di Google Cloud, lalu mengamankannya dari akses yang tidak diinginkan. Dengan menggunakan Google Antigravity, plugin Google Cloud Developer, dan server MCP Developer Knowledge (DK), Anda akan mendesain dan menerapkan arsitektur keamanan yang mengontrol siapa saja yang dapat mengakses aplikasi dan melindunginya dari penggunaan yang tidak sah.
Sepanjang lab ini, Anda akan menghubungkan Google Antigravity ke server MCP DK, yang mendasarkan Antigravity pada dokumentasi Google Cloud resmi dan real-time. Alih-alih mengandalkan data pelatihan statis atau bobot model yang sudah usang, Antigravity secara dinamis mengambil pola arsitektur saat ini, sintaksis gcloud CLI terbaru, dan parameter keamanan, yang mengurangi halusinasi dan meng-grounding respons dalam pengetahuan terbaru.
Yang akan Anda build
- Workload komputasi pribadi: Dua virtual machine (VM) Compute Engine yang menjalankan aplikasi web kalkulator gCurrenC di dalam jaringan Virtual Private Cloud (VPC) kustom tanpa alamat IP publik.
- Pipeline ingress yang aman: Load Balancer Aplikasi eksternal global dengan subnet khusus proxy yang merutekan traffic internet melalui Google Front End (GFE) ke VM pribadi Anda tanpa mengeksposnya ke internet publik.
- Pipeline egress yang aman: Gateway Cloud Router dan Cloud NAT yang dipasangkan dengan Cloud Next Generation Firewall (Cloud NGFW) Enterprise dan Certificate Authority Service (CAS) level project untuk melakukan pemeriksaan TLS dan pemindaian Intrusion Prevention Service (IPS) secara langsung pada traffic API penukaran mata uang HTTPS keluar.
Yang akan Anda pelajari
- Menginstal plugin
google-cloud-developermenggunakan Antigravity CLI dan mengonfigurasi server MCP DK di Antigravity. - Men-deploy dan menguji aplikasi web pribadi yang terisolasi di Compute Engine menggunakan penerusan TCP Identity-Aware Proxy (IAP).
- Gunakan perintah multi-turn yang di-grounding di Antigravity untuk mendesain arsitektur keamanan ingress dan egress tingkat project.
- Buat, audit mandiri, dan jalankan skrip deployment
bashuntuk Load Balancing Aplikasi eksternal global, Cloud NAT, CAS, dan Cloud NGFW Enterprise.
2. Sebelum memulai
Prasyarat
Sebelum memulai codelab ini, pastikan Anda memiliki hal berikut:
- Akun Google dan browser Google Chrome.
- Project Google Cloud baru dengan penagihan diaktifkan. Catat Project ID (
PROJECT_ID) Anda, karena Anda akan menggunakannya di sepanjang codelab ini untuk mengaktifkan API, membuat kunci API, dan men-deploy resource Google Cloud. - Izin Identity and Access Management (IAM) di project Google Cloud Anda untuk membuat kunci API, resource Compute Engine, jaringan VPC, kumpulan CAS, tunnel IAP, dan endpoint Cloud NGFW.
- Lakukan autentikasi dengan
gcloudCLI, tetapkan project Google Cloud aktif Anda, dan aktifkan API yang diperlukan:- Di terminal atau Cloud Shell, pastikan Anda sudah diautentikasi:
gcloud auth listgcloud auth login - Pastikan
gcloudCLI dikonfigurasi untuk menggunakan project Anda:gcloud config list projectPROJECT_IDdengan ID project Google Cloud Anda:export PROJECT_ID=PROJECT_ID gcloud config set project PROJECT_ID - Aktifkan API yang diperlukan di project Google Cloud Anda:
gcloud services enable \
   compute.googleapis.com \
   iap.googleapis.com \
   networksecurity.googleapis.com \
   privateca.googleapis.com \
   developerknowledge.googleapis.com \
   apikeys.googleapis.com
- Di terminal atau Cloud Shell, pastikan Anda sudah diautentikasi:
- Instal Antigravity 2.0 di sistem lokal Anda dari halaman download Google Antigravity.
Menginstal plugin Google Cloud Developer menggunakan Antigravity CLI
Untuk menginstal plugin Google Cloud Developer menggunakan Antigravity CLI, lakukan hal berikut:
- Untuk menginstal Antigravity CLI di workstation lokal Anda, lakukan hal berikut:
- Buka terminal lokal Anda.
- Jalankan skrip penginstal:
curl -fsSL https://antigravity.google/cli/install.sh | bash - Tutup dan buka kembali sesi terminal Anda agar biner CLI Antigravity
agytersedia diPATHsistem Anda.
- Di terminal lokal Anda, jalankan perintah berikut untuk menginstal plugin
google-cloud-developer:agy plugin install https://github.com/google/skills/plugins/cloud/google-cloud-developerCloning plugin from https://github.com/google/skills.git... [ok] google-cloud-developer ✔ skills : 5 processed - agents : skipped (not found) - commands : skipped (not found) ✔ mcpServers : 1 processed - hooks : skipped (not found)
3. Menyiapkan Antigravity dan server MCP DK
Di bagian ini, Anda akan mengonfigurasi server MCP DK di Antigravity menggunakan kunci Google Cloud API yang dibatasi.
- Buka Antigravity, ketik
/goaldan tekan Enter untuk mengaktifkan mode sasaran, lalu tempelkan perintah berikut untuk membuat kunci API yang dibatasi dan mengonfigurasi server MCP DK. GantiPROJECT_IDdengan project ID Google Cloud Anda dari bagian Sebelum memulai. Untuk mengetahui informasi selengkapnya, lihat plugin google-cloud-developer.Set up Antigravity to use the Developer Knowledge MCP server on my local machine. Run the necessary terminal commands to complete the following: 1. Create a restricted API key named 'DKP-MCP-Key' that can only target the Developer Knowledge API. Use the PROJECT_ID to create the API key. 2. Retrieve the actual key string of the newly created API key. 3. Create or safely update my ~/.gemini/config/mcp_config.json file (preserve any existing MCP servers) with the correct JSON structure to connect the developer-knowledge server using that API key in the headers. You MUST use the following JSON structure for the new server: "developer-knowledge": { "serverUrl": "https://developerknowledge.googleapis.com/mcp", "headers": { "x-goog-api-key": "<INSERT_RETRIEVED_API_KEY_HERE>" } } When you are done, confirm that the setup is complete. - Untuk memastikan server MCP DK aktif, masukkan perintah berikut di jendela chat Antigravity:
Which MCP servers are available?developer-knowledgedan alat yang tersedia (search_documents,answer_query, danget_documents):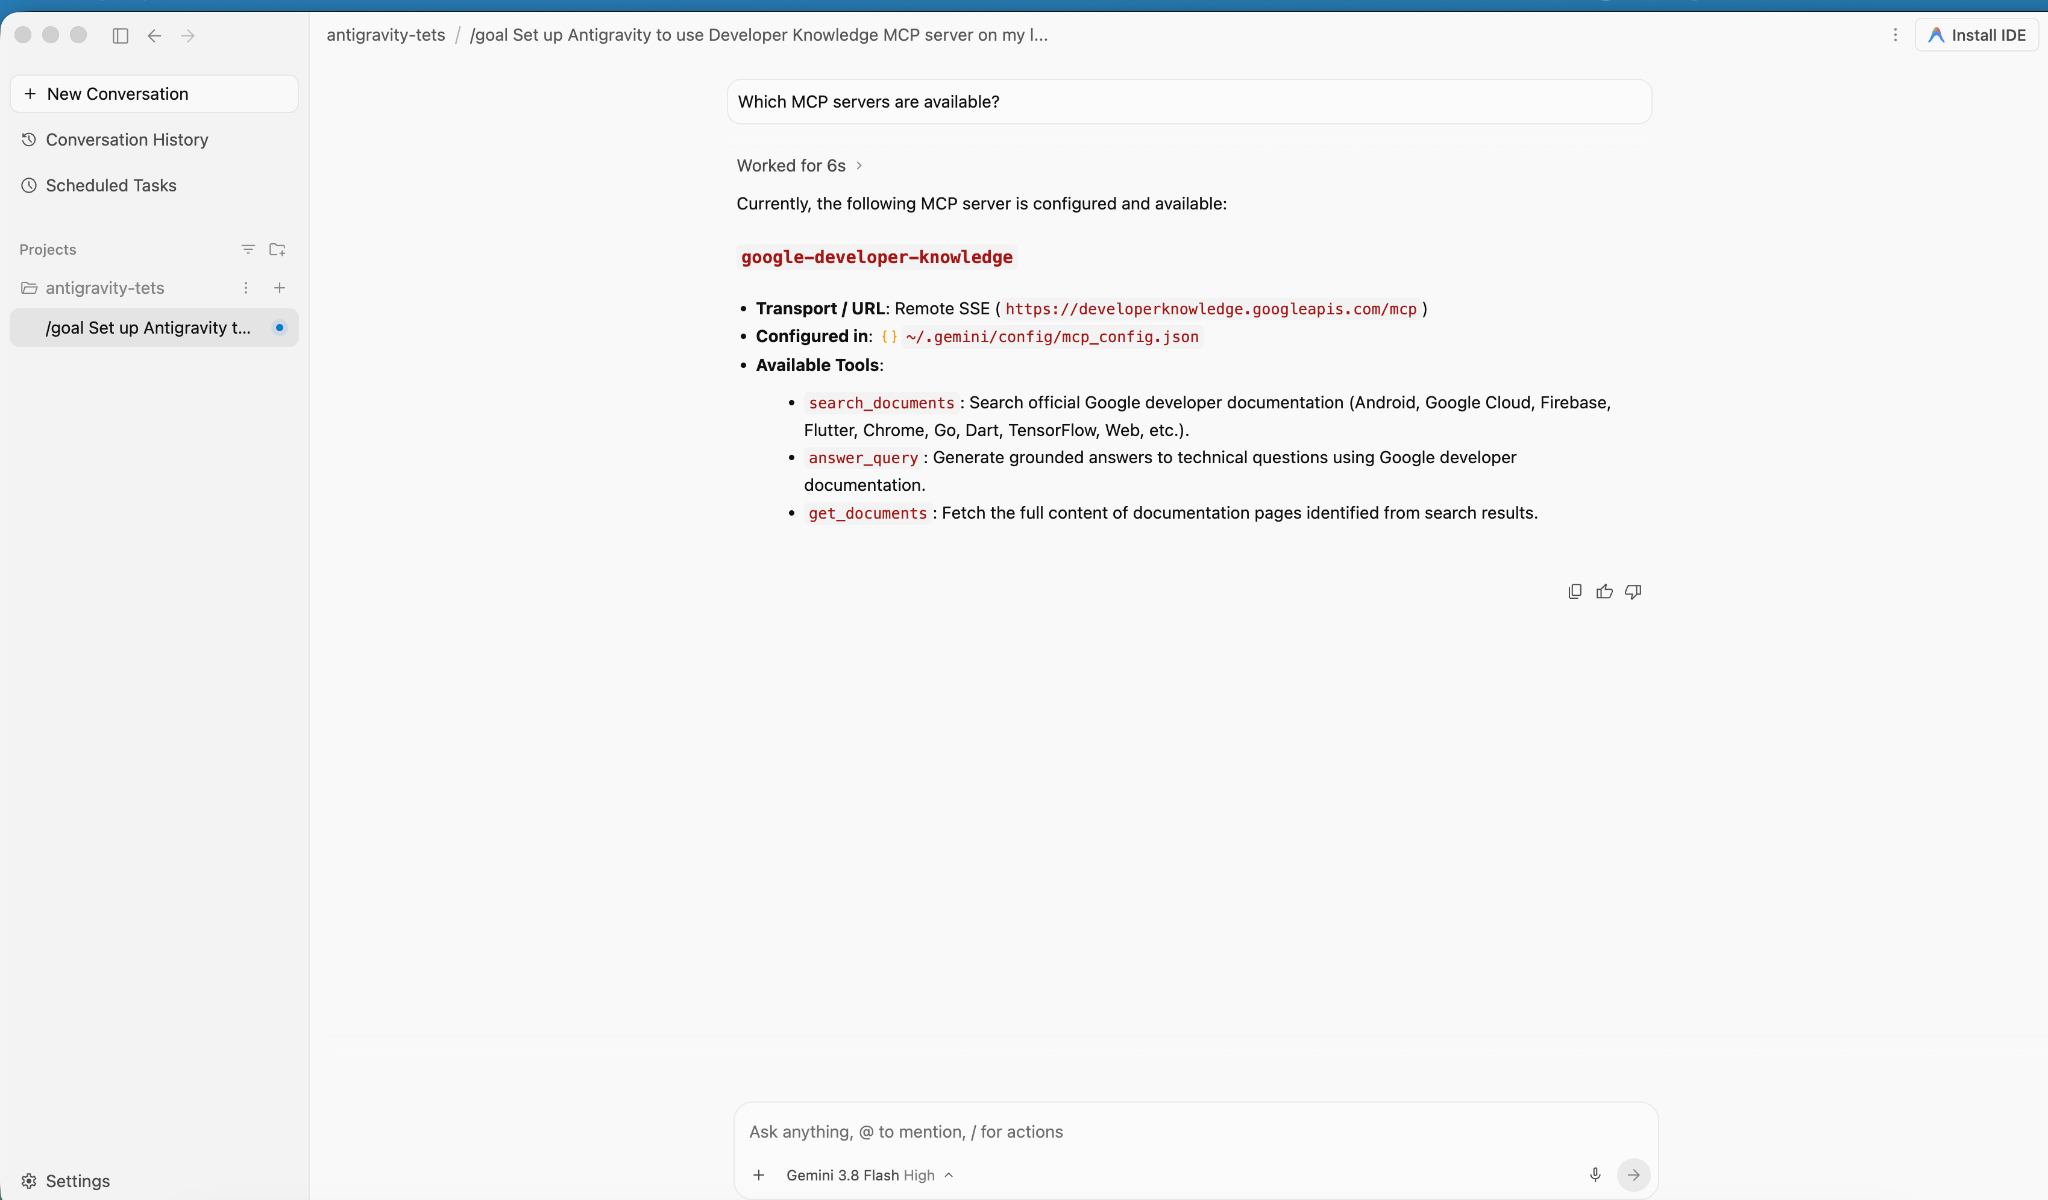
4. Membuat dan men-deploy aplikasi
Di bagian ini, Anda akan men-deploy aplikasi kalkulator gCurrenC di dua VM Compute Engine pribadi di dalam jaringan VPC kustom.
Aplikasi ini menyediakan:
- Konverter mata uang real-time yang mendukung
USD,EUR,GBP,JPY,CAD,INR, danAUDmenggunakan library standarhttp.serverbawaan Python di port8080dengan endpoint health check/healthz. - Konsol verifikasi keamanan untuk menjalankan konektivitas API keluar real-time dan pemeriksaan pencegahan ancaman terenkripsi.
- Aturan firewall traffic masuk yang mengizinkan rentang IAP Google menjangkau port
22dan8080untuk pengujian administratif tanpa mengekspos alamat IP publik.
Men-deploy aplikasi
- Di jendela chat Antigravity, masukkan
/goal, lalu jalankan perintah berikut:You are a Cloud developer. Deploy the "gCurrenC calculator" app onto two (2) Compute Engine VMs with no external IP addresses (`--no-address`) inside a dedicated custom VPC network and private subnet. CRITICAL INSTRUCTIONS ON OUTPUT: - The VMs are strictly private with no external IP addresses and the local IAP tunnel has NOT been started yet. Any web URL is completely unreachable and will fail with a connection error. - In your final response, simply confirm that the private VMs and Managed Instance Group are deployed, and state that the user should establish the IAP tunnel. Do not output, format, or suggest any web preview link or URL (such as http://localhost:8080 or internal IP addresses) in your final response. Run this script in the terminal: ```bash #!/usr/bin/env bash set -euxo pipefail # Disable any interactive confirmation prompts so execution never hangs export CLOUDSDK_CORE_DISABLE_PROMPTS=1 # --- User Configuration --- PROJECT_ID="[PROJECT_ID]" REGION="us-central1" ZONE="us-central1-a" NETWORK="gcurrenc-vpc" SUBNET="gcurrenc-app-subnet" SUBNET_RANGE="10.10.1.0/24" # -------------------------- echo "==> [1/5] Configuring project, default region/zone, and enabling APIs..." gcloud config set project "${PROJECT_ID}" gcloud config set compute/region "${REGION}" gcloud config set compute/zone "${ZONE}" gcloud services enable compute.googleapis.com echo "==> [2/5] Creating custom VPC network and private workload subnet..." gcloud compute networks create "${NETWORK}" \ --subnet-mode=custom \ --description="Dedicated VPC for currency exchange app demo" 2>/dev/null || true gcloud compute networks subnets create "${SUBNET}" \ --network="${NETWORK}" \ --region="${REGION}" \ --range="${SUBNET_RANGE}" \ --enable-private-ip-google-access \ --description="Private subnet hosting backend compute instances" 2>/dev/null || true echo "==> [3/5] Generating standalone Python standard-library startup script..." cat << 'STARTUP_EOF' > /tmp/private_app_startup.sh #!/bin/bash set -euxo pipefail mkdir -p /opt/gcurrenc-app # Pure Python standard-library application (zero pip/apt dependencies needed at boot) cat << 'APPEOF' > /opt/gcurrenc-app/app.py import os import sys import json import socket import urllib.request import urllib.parse import ssl from http.server import BaseHTTPRequestHandler, ThreadingHTTPServer SUPPORTED_CURRENCIES = ["USD", "EUR", "GBP", "JPY", "CAD", "INR", "AUD"] class CurrencyAppHandler(BaseHTTPRequestHandler): def address_string(self): return str(self.client_address[0]) def do_GET(self): parsed = urllib.parse.urlparse(self.path) path = parsed.path params = urllib.parse.parse_qs(parsed.query) if path == "/favicon.ico": self.send_response(204) self.end_headers() return if path == "/healthz": self.send_response(200) self.send_header("Content-Type", "text/plain") self.end_headers() self.wfile.write(b"OK") return if path == "/api/security-test": mode = params.get("mode", ["safe"])[0] target = "https://secure.eicar.org/eicar.com.txt" if mode == "threat" else "https://api.frankfurter.dev/v1/latest?from=USD&to=EUR" try: req = urllib.request.Request(target, headers={"User-Agent": "SecureCurrencyApp/1.0"}) ctx = ssl.create_default_context() with urllib.request.urlopen(req, timeout=5, context=ctx) as resp: data = {"verdict": "PERMITTED", "target": target, "http_status": resp.status} code = 200 except Exception as e: data = {"verdict": "BLOCKED_OR_FAILED", "target": target, "error": str(e)} code = 502 self.send_response(code) self.send_header("Content-Type", "application/json") self.end_headers() self.wfile.write(json.dumps(data, indent=2).encode("utf-8")) return self.render_page() def do_POST(self): parsed = urllib.parse.urlparse(self.path) if parsed.path == "/generate": content_length = int(self.headers.get("Content-Length", 0)) post_body = self.rfile.read(content_length).decode("utf-8") form = urllib.parse.parse_qs(post_body) base_curr = form.get("base_curr", ["USD"])[0] target_curr = form.get("target_curr", ["EUR"])[0] try: amount = float(form.get("amount", ["2500.00"])[0]) except ValueError: amount = 2500.00 rate_str = "Unavailable" total_str = "Rate lookup pending outbound internet activation" try: if base_curr == target_curr: rate = 1.0 else: url = f"https://api.frankfurter.dev/v1/latest?from={base_curr}&to={target_curr}" req = urllib.request.Request(url, headers={"User-Agent": "SecureCurrencyApp/1.0"}) with urllib.request.urlopen(req, timeout=4) as resp: res_json = json.loads(resp.read().decode("utf-8")) rate = res_json["rates"][target_curr] rate_str = str(rate) total_str = f"{round(amount * rate, 2):,.2f} {target_curr}" except Exception as e: total_str = f"Outbound connection unavailable {str(e)}" self.render_page(base_curr, target_curr, amount, rate_str, total_str) return self.send_response(404) self.end_headers() def render_page(self, base_curr="USD", target_curr="EUR", amount=2500.00, fx_rate="1.00", total_str=""): hostname = socket.gethostname() curr_options_base = "".join([f'<option value="{c}" {"selected" if c == base_curr else ""}>{c}</option>' for c in SUPPORTED_CURRENCIES]) curr_options_target = "".join([f'<option value="{c}" {"selected" if c == target_curr else ""}>{c}</option>' for c in SUPPORTED_CURRENCIES]) result_block = "" if total_str: if fx_rate == "Unavailable": rate_line = "<p style='margin: 6px 0;'>Exchange Rate: <span style='color: #d93025; font-weight: bold;'>⚠️ Offline-Outbound internet blocked</span></p>" else: rate_line = f"<p style='margin: 6px 0; font-size: 14px; color: #137333;'>🟢 Exchange Rate: <strong>1 {base_curr} = {fx_rate} {target_curr}</strong> (Secured via Cloud NAT & Cloud NGFW)</p>" result_block = f""" <div style="margin-top: 22px; background: #e6f4ea; border: 1px solid #c6e1c6; border-left: 5px solid #34a853; padding: 18px 20px; border-radius: 8px;"> <h4 style="margin: 0 0 6px 0; text-transform: uppercase; font-size: 12px; color: #137333; letter-spacing: 0.5px;">Conversion Result</h4> <div style="font-size: 24px; font-weight: 700; color: #202124; margin-bottom: 6px;"> {amount:,.2f} {base_curr} = <span style="color: #1a73e8;">{total_str}</span> </div> {rate_line} </div> """ html = ("""<!DOCTYPE html> <html lang="en"> <head> <meta charset="UTF-8"> <meta name="viewport" content="width=device-width, initial-scale=1.0"> <title>gCurrenC calculator</title> <style> body { font-family: -apple-system, BlinkMacSystemFont, "Segoe UI", Roboto, "Helvetica Neue", Arial, sans-serif; background: #f8f9fa; margin: 30px 15px; color: #202124; display: flex; justify-content: center; } .container { width: 100%; max-width: 860px; } .card { background: white; padding: 24px 28px; border-radius: 12px; box-shadow: 0 1px 3px rgba(60,64,67,0.12), 0 4px 8px rgba(60,64,67,0.06); border: 1px solid #dadce0; margin-bottom: 20px; } .header { display: flex; justify-content: space-between; align-items: center; border-bottom: 1px solid #e8eaed; padding-bottom: 14px; margin-bottom: 20px; } .header h2 { margin: 0 0 4px 0; font-size: 20px; font-weight: 600; } .header p { margin: 0; font-size: 13px; color: #5f6368; } .badge { background: #e8f0fe; color: #1a73e8; padding: 6px 12px; border-radius: 16px; font-weight: 600; font-size: 12px; border: 1px solid #d2e3fc; display: flex; align-items: center; gap: 6px; } .badge::before { content: ""; width: 8px; height: 8px; border-radius: 50%; background-color: #34a853; } .form-row { display: flex; gap: 14px; align-items: flex-end; flex-wrap: wrap; } .form-group { display: flex; flex-direction: column; gap: 6px; } .form-group label { font-size: 12px; font-weight: 600; color: #5f6368; text-transform: uppercase; letter-spacing: 0.5px; } input, select { padding: 10px 14px; border: 1px solid #dadce0; border-radius: 6px; font-size: 14px; color: #202124; background-color: #fff; box-sizing: border-box; transition: border-color 0.15s, box-shadow 0.15s; } input:focus, select:focus { outline: none; border-color: #1a73e8; box-shadow: 0 0 0 3px rgba(26, 115, 232, 0.15); } button { padding: 11px 20px; background: #1a73e8; color: white; border: none; border-radius: 6px; font-size: 14px; font-weight: 500; cursor: pointer; transition: background 0.15s, box-shadow 0.15s; } button:hover { background: #1557b0; box-shadow: 0 1px 2px rgba(60,64,67,0.3); } .danger-btn { background: #d93025; } .danger-btn:hover { background: #b31412; } pre { background: #202124; color: #8ab4f8; padding: 14px; border-radius: 6px; overflow-x: auto; font-family: "SF Mono", "Fira Code", Consolas, monospace; font-size: 13px; line-height: 1.5; margin: 0; } /* Collapsible Security Console */ details.security-drawer { background: white; border-radius: 12px; box-shadow: 0 1px 3px rgba(60,64,67,0.12); border: 1px solid #dadce0; overflow: hidden; margin-bottom: 24px; } details.security-drawer summary { padding: 16px 20px; font-size: 14px; font-weight: 600; cursor: pointer; list-style: none; display: flex; justify-content: space-between; align-items: center; user-select: none; background: #fafafa; transition: background 0.15s; } details.security-drawer summary::-webkit-details-marker { display: none; } details.security-drawer summary:hover { background: #f1f3f4; } details.security-drawer[open] summary { border-bottom: 1px solid #dadce0; background: #ffffff; } .expand-toggle { font-size: 13px; font-weight: 500; } details.security-drawer summary .expand-toggle::before { content: "▶ Click to Expand"; color: #1a73e8; } details.security-drawer[open] summary .expand-toggle::before { content: "▼ Click to Collapse"; color: #5f6368; } .drawer-body { padding: 20px; background: #ffffff; } .drawer-body p { margin-top: 0; font-size: 13px; color: #5f6368; } .probe-buttons { display: flex; gap: 10px; margin-bottom: 14px; } </style> </head> <body> <div class="container"> <div class="card"> <div class="header"> <div> <h2>💱 gCurrenC calculator</h2> </div> <div class="badge">Serving host: {hostname}</div> </div> <form method="POST" action="/generate"> <div class="form-row"> <div class="form-group" style="flex: 1.5; min-width: 140px;"> <label>Amount</label> <input type="number" step="0.01" name="amount" value="{amount}" required> </div> <div class="form-group" style="flex: 1; min-width: 100px;"> <label>From</label> <select name="base_curr">{curr_options_base}</select> </div> <div class="form-group" style="flex: 1; min-width: 100px;"> <label>To (Target)</label> <select name="target_curr">{curr_options_target}</select> </div> <div class="form-group"> <button type="submit">Convert currency ➔</button> </div> </div> </form> {result_block} </div> <!-- Collapsible Security Verification Console --> <details class="security-drawer"> <summary> <span>🛡️ Security verification console</span> <span class="expand-toggle"></span> </summary> <div class="drawer-body"> <p>Test outbound HTTPS traffic and threat prevention capabilities in real time:</p> <div class="probe-buttons"> <button type="button" onclick="runProbe('safe')">Test Outbound API Connection</button> <button type="button" class="danger-btn" onclick="runProbe('threat')">Simulate Encrypted Threat (EICAR)</button> </div> <pre id="output">Waiting for command...</pre> </div> </details> </div> <script> function runProbe(mode) { const el = document.getElementById('output'); el.innerText = 'Executing outbound request...'; fetch('/api/security-test?mode=' + mode) .then(res => res.json()) .then(data => el.innerText = JSON.stringify(data, null, 2)) .catch(err => el.innerText = 'Connection dropped / reset by Firewall: ' + err); } </script> </body> </html>""" .replace("{hostname}", str(hostname)) .replace("{amount}", str(amount)) .replace("{curr_options_base}", curr_options_base) .replace("{curr_options_target}", curr_options_target) .replace("{result_block}", result_block) ) self.send_response(200) self.send_header("Content-Type", "text/html; charset=utf-8") self.end_headers() self.wfile.write(html.encode("utf-8")) def run(): server_address = ('0.0.0.0', 8080) httpd = ThreadingHTTPServer(server_address, CurrencyAppHandler) httpd.serve_forever() if __name__ == '__main__': run() APPEOF # Register and start systemd unit cat << 'SERVICEEOF' > /etc/systemd/system/gcurrenc-app.service [Unit] Description=Currency exchange calculator web application After=network.target [Service] Type=simple User=root WorkingDirectory=/opt/gcurrenc-app ExecStart=/usr/bin/python3 /opt/gcurrenc-app/app.py Restart=always [Install] WantedBy=multi-user.target SERVICEEOF systemctl daemon-reload systemctl enable gcurrenc-app systemctl start gcurrenc-app STARTUP_EOF echo "==> [4/5] Creating Firewall, Regional Instance Template, and 2-VM MIG..." gcloud compute firewall-rules create allow-iap-admin \ --network="${NETWORK}" \ --allow=tcp:22,tcp:8080 \ --source-ranges=35.235.240.0/20 \ --target-tags=gcurrenc-app-vm \ --description="Allow IAP SSH and port 8080 access to private VMs" \ --quiet 2>/dev/null || true # Explicitly pass both --region and --instance-template-region to avoid prompt gcloud compute instance-templates create gcurrenc-app-template \ --instance-template-region="${REGION}" \ --region="${REGION}" \ --network="${NETWORK}" \ --subnet="${SUBNET}" \ --machine-type=e2-medium \ --no-address \ --tags=gcurrenc-app-vm \ --metadata-from-file=startup-script=/tmp/private_app_startup.sh \ --quiet gcloud compute instance-groups managed create gcurrenc-app-mig \ --base-instance-name=gcurrenc-vm \ --template="projects/${PROJECT_ID}/regions/${REGION}/instanceTemplates/gcurrenc-app-template" \ --size=2 \ --zone="${ZONE}" \ --quiet gcloud compute instance-groups managed set-named-ports gcurrenc-app-mig \ --named-ports=http-port:8080 \ --zone="${ZONE}" \ --quiet echo "==> [5/5] Verifying private VM deployment and internal status..." sleep 30 gcloud compute instances list \ --filter="name ~ '^gcurrenc-vm-'" \ --zones="${ZONE}" \ --format="table(name,zone.basename():label=ZONE,networkInterfaces[0].networkIP:label=INTERNAL_IP,status)" FIRST_VM=$(gcloud compute instances list \ --filter="name ~ '^gcurrenc-vm-'" \ --zones="${ZONE}" \ --format="value(name)" \ --limit=1) echo "Testing healthz on ${FIRST_VM} via IAP tunnel..." gcloud compute ssh "${FIRST_VM}" \ --zone="${ZONE}" \ --tunnel-through-iap \ --quiet \ --command="curl -fsS http://localhost:8080/healthz" echo "" echo "==========================================================================" echo "PREREQUISITE COMPLETE: 2 private VMs deployed with no external IPs." echo "VPC: ${NETWORK} | Subnet: ${SUBNET} (${SUBNET_RANGE})" echo "Instance Group: gcurrenc-app-mig (Zone: ${ZONE}, Port: 8080)" echo "" echo "The VMs are private and the IAP tunnel is not active. Set up the background IAP tunnel first to access the deployed app." echo "" echo "==========================================================================" ```
Memverifikasi pembuatan instance VM
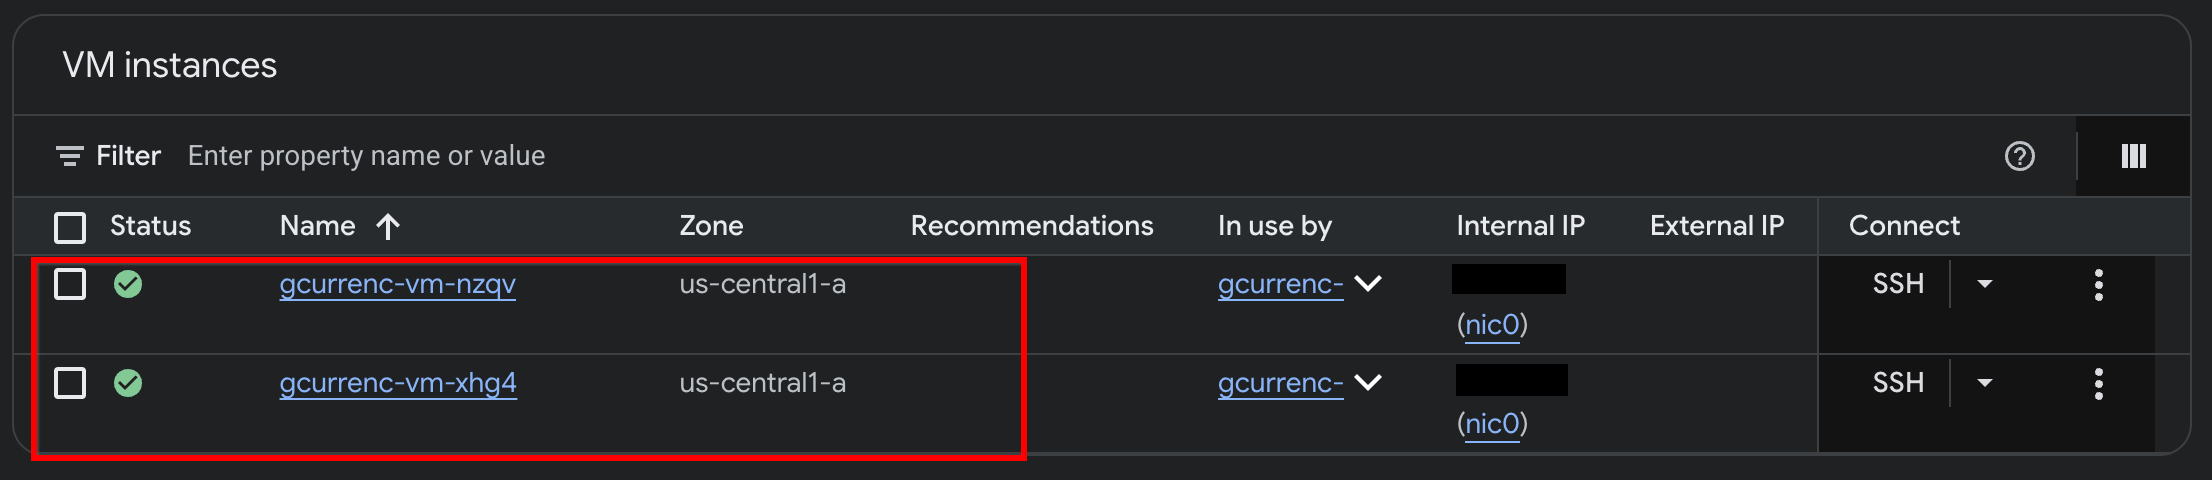
Setelah Antigravity selesai men-deploy aplikasi di dua VM Compute Engine pribadi, verifikasi instance di Konsol Google Cloud:
- Di Konsol Google Cloud, buka VM instances.
- Pastikan kedua instance VM berjalan dengan alamat IP internal dan tanpa alamat IP eksternal:
5. Menguji aplikasi
Karena VM pribadi tidak memiliki alamat IP eksternal (--no-address) dan gateway Cloud NAT, VM tersebut tidak memiliki rute ke internet dan tidak dapat menjangkau API penukaran mata uang eksternal. Sebelum mengonfigurasi akses keluar yang aman, uji aplikasi melalui tunnel IAP lokal untuk memverifikasi bahwa tidak ada akses internet.
- Dalam mode
/goal, jalankan perintah berikut di jendela chat Antigravity:Automate the IAP tunnel configuration and health verification for the web app, then output the live test URL. Run a terminal script that performs the following steps non-interactively: 1. Firewall Check: - Identify the active network ('gcurrenc-vpc' if it exists, otherwise 'default'). - Idempotently ensure an ingress firewall rule exists permitting 'tcp:22,tcp:8080' from the Google IAP range '35.235.240.0/20' targeting 'gcurrenc-app-vm'. 2. VM Health Verification: - Find the first running instance matching '^gcurrenc-vm-' in zone 'us-central1-a'. - Via 'gcloud compute ssh --tunnel-through-iap', verify that the 'gcurrenc-app' systemd service is active. If not active, restart it. 3. Background IAP Tunnel: - Free up local port 8080 if an old tunnel or process is lingering (e.g., using 'lsof -ti:8080 | xargs kill -9' or 'fuser -k 8080/tcp'). - Launch 'gcloud compute start-iap-tunnel <VM_NAME> 8080 --local-host-port=localhost:8080 --zone=us-central1-a' in the background using nohup, redirecting output to '/tmp/iap_tunnel.log'. - Wait up to 10 seconds for the tunnel to establish, checking with 'curl -fsS http://localhost:8080/healthz'. 4. Output Web Preview URL: - Detect whether the environment is Google Cloud Shell (check if $CLOUD_SHELL is true) or a local workstation. - If Cloud Shell, print instructions and the direct web preview link. - If local machine, provide the clickable 'http://localhost:8080' URL. - Setelah tunnel dimulai, buka
http://localhost:8080/di browser web Anda: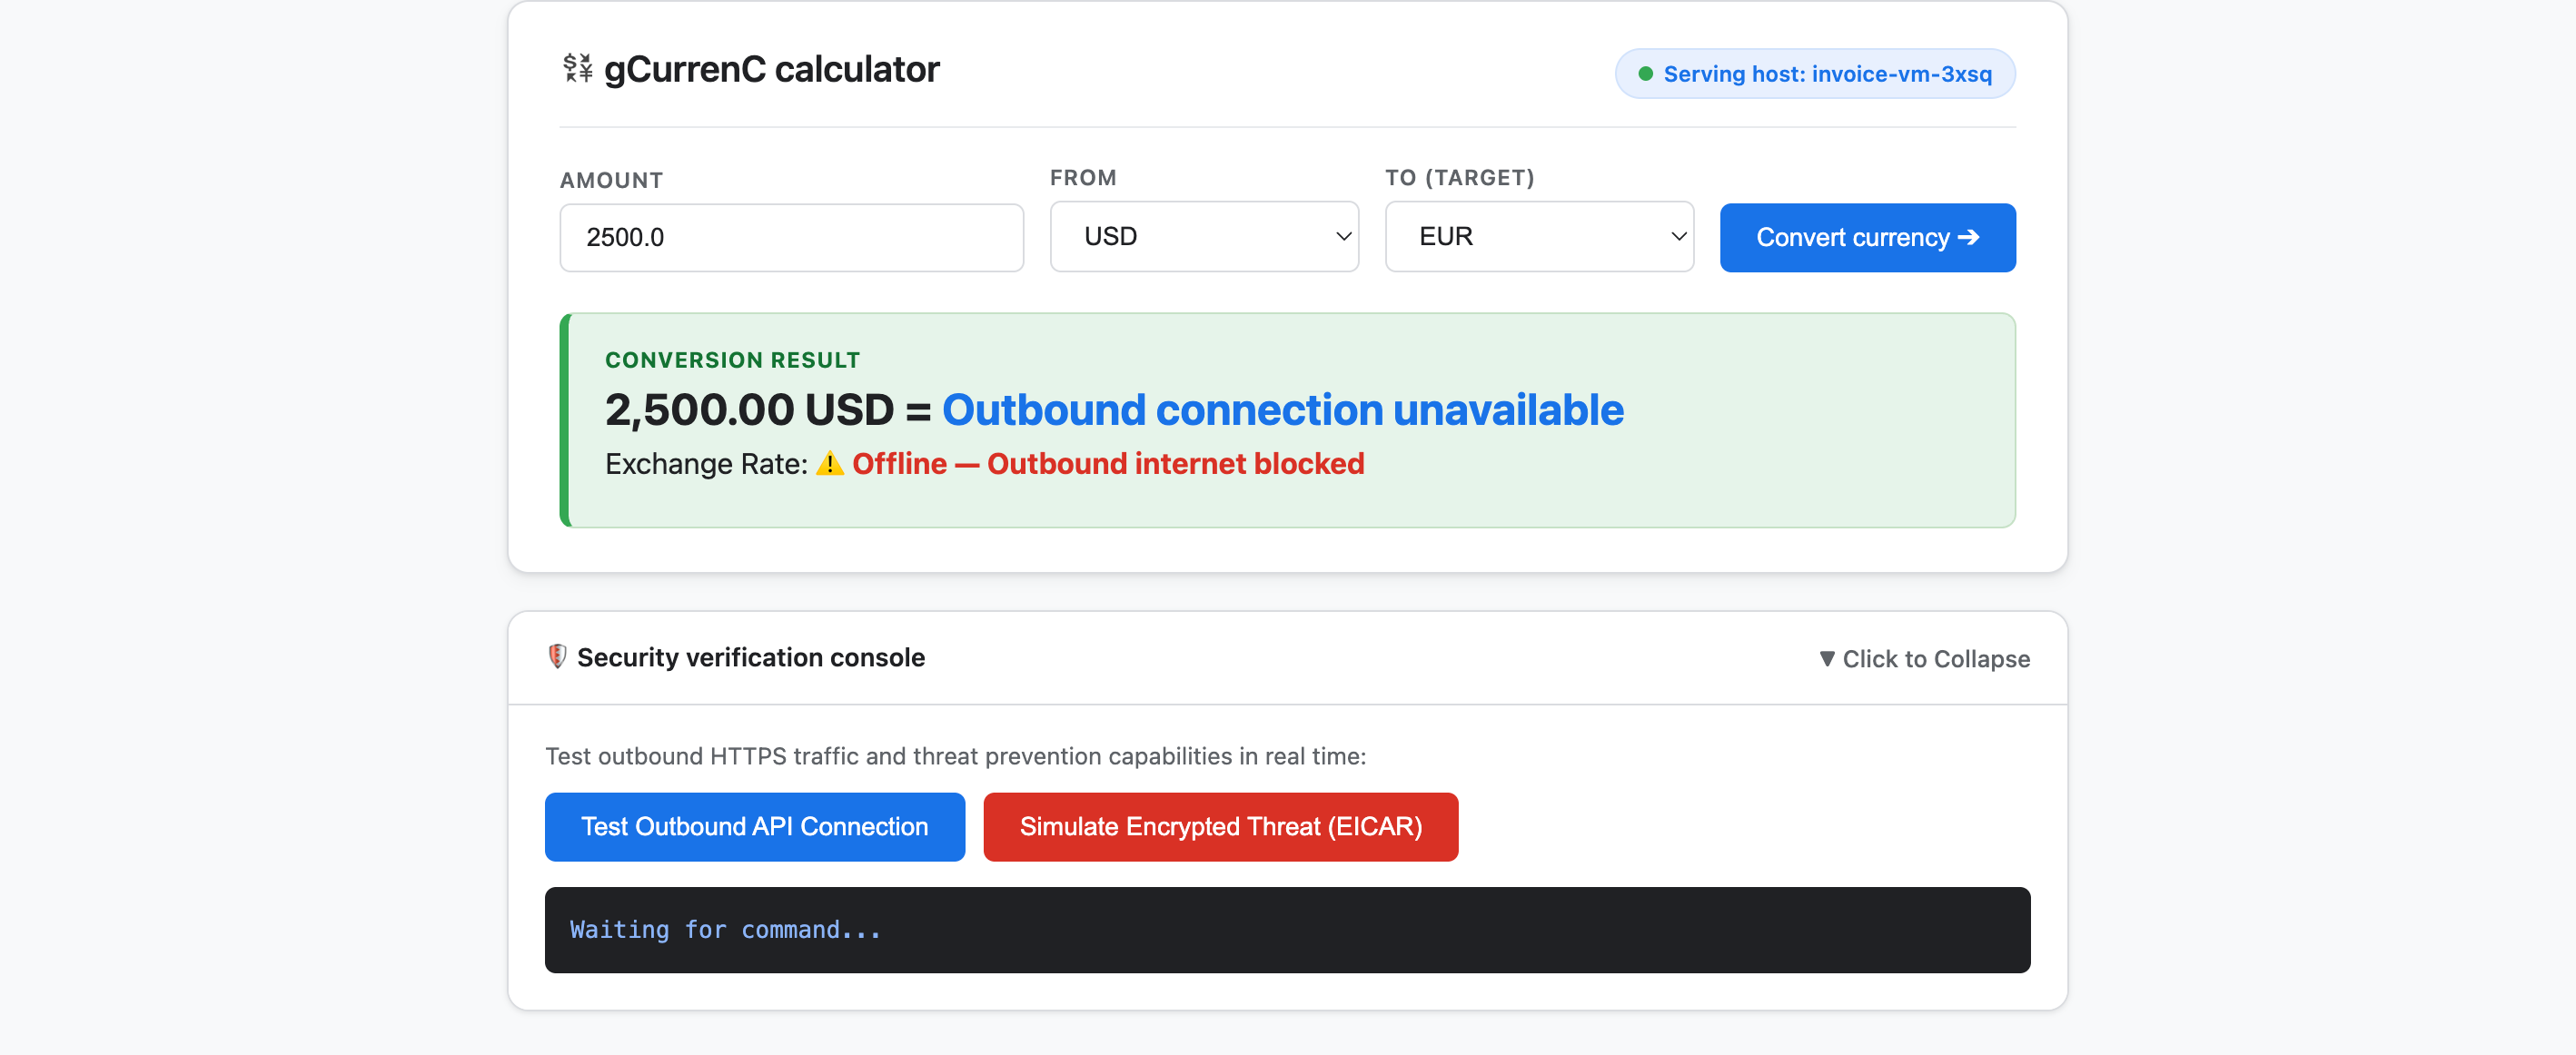
- Menguji aplikasi:
- Klik Konversi mata uang. Hasil konversi menampilkan
Offline - Outbound internet blockeddanOutbound connection unavailable. Hasil ini sudah diperkirakan karena VM pribadi tidak dapat terhubung ke internet untuk mengambil nilai tukar terbaru. - Luaskan Security verification console dan klik Test outbound API connection. Output menampilkan
verdict: BLOCKED_OR_FAILED(https://api.frankfurter.dev/v1/latest. Hasil ini sudah diperkirakan karena VM pribadi tidak dapat terhubung ke internet dan mengambil nilai tukar darihttps://api.frankfurter.dev/v1/latest. - Klik Simulasikan ancaman terenkripsi (EICAR). Output juga menampilkan
verdict: BLOCKED_OR_FAILEDuntukhttps://secure.eicar.org/eicar.com.txt. Hasil ini juga sudah diperkirakan karena VM pribadi tidak memiliki konektivitas internet.
- Klik Konversi mata uang. Hasil konversi menampilkan
Menghentikan tunnel IAP lokal
Sebelum mendesain dan men-deploy arsitektur keamanan, hentikan tunnel IAP lokal untuk mengosongkan port 8080:
- Dalam mode
/goal, jalankan perintah berikut:Free up local port 8080 and terminate any running Google Cloud IAP tunnels (e.g., kill processes matching 'start-iap-tunnel' or listening on port 8080).8080bebas.
6. Mengamankan aplikasi
Di bagian sebelumnya, Anda telah membuat VM Compute Engine pribadi tanpa alamat IP publik dan memverifikasi dua tantangan jaringan dan keamanan inti:
- Akses masuk (ingress): Pengguna internet tidak dapat menjangkau instance VM pribadi secara langsung, dan mengekspos aplikasi web memerlukan proxy traffic melalui Load Balancer Aplikasi eksternal global dan subnet khusus khusus proxy tanpa mengekspos VM ke internet publik.
- Akses keluar (egress): VM pribadi tidak memiliki rute ke internet untuk mengkueri API penukaran mata uang HTTPS secara langsung, dan mengaktifkan akses keluar memerlukan pemeriksaan traffic terenkripsi untuk malware dan pemindahan data yang tidak sah tanpa merusak kepercayaan SSL/TLS.
Di bagian ini, Anda akan memandu Antigravity melalui alur kerja yang disederhanakan dan didasarkan pada dokumentasi resmi Google Cloud (@retrieving-developer-knowledge) untuk mendesain, mengaudit sendiri, dan men-deploy arsitektur keamanan ingress dan egress level project untuk aplikasi Anda.
Mendesain arsitektur keamanan terpadu
- Dalam mode
/goal, jalankan perintah berikut untuk membuat diagram arsitektur dan penjelasan menyeluruh yang mencakup alur traffic masuk dan keluar:You are a Google Cloud Network and Security Architect. We need to design an end-to-end security architecture for our "gCurrenC calculator" app running on private Compute Engine VMs with no external IP addresses inside 'gcurrenc-vpc'. We are operating in a standalone Google Cloud project without an Organization resource, so all security resources must be scoped at the project level. Use the @retrieving-developer-knowledge skill to consult official Google Cloud documentation and suggest an architecture diagram and explanation covering both flows: 1. Ingress Flow: - How internet users securely reach the private VMs via a global external Application Load Balancer. - Why Envoy-based external Application Load Balancers require a dedicated proxy-only subnet, and how Google Front Ends (GFEs) proxy traffic to private backends without exposing VMs to the public internet. 2. Egress Flow: - How private VMs reach the internet via Cloud NAT to query live currency exchange APIs, such as frankfurter.dev. - How Cloud NGFW Enterprise provides Layer 7 deep packet inspection and intrusion prevention (IPS) for outbound encrypted HTTPS traffic. - How TLS inspection backed by Certificate Authority Service (CAS) decrypts outbound HTTPS sessions on the fly, and what Root CA trust configuration the private VMs require. Provide a clear diagram and explain how these components connect together.
Membuat garis besar resource arsitektur
- Masukkan perintah berikut untuk menyusun desain menjadi garis besar resource level project yang dikategorikan sebelum membuat skrip deployment:
Act as a Lead Network Security Architect. Using the @retrieving-developer-knowledge skill, provide an architectural outline of all the Google Cloud resources required to secure the "gCurrenC calculator" app.

Our starting state:
- The custom VPC ('gcurrenc-vpc'), workload subnet ('gcurrenc-app-subnet'), and 2-instance MIG ('gcurrenc-app-mig', port 8080) are already deployed.
- All newly added security components must be project-level resources (no organization resources).

Structure your resource outline into three distinct categories, indicating which resources are new additions:
1. Core VPC Infrastructure: proxy-only subnet ('gcurrenc-proxy-subnet', 10.10.2.0/24), Cloud Router, and Cloud NAT gateway.
2. Inbound security (ingress): global external ALB components (forwarding rule on port 443, target HTTPS proxy, SSL certificate, URL map, backend service attached to 'gcurrenc-app-mig' on port 8080, and HTTP health check on '/healthz') and ingress firewall rules.
3. Outbound security (egress): CAS DevOps CA pool and root CA, project-level Cloud NGFW Enterprise components (Threat Prevention profile, Security Profile Group, Firewall Endpoint in zone us-central1-a, and Endpoint Association attaching the TLS policy), and global network firewall policy egress rules.

For each resource, briefly state its role in the security boundary and how it connects to adjacent components.
Membuat dan mengaudit sendiri skrip deployment
- Dalam mode
/goal, jalankan perintah berikut untuk membuat skrip deploymentbashyang lengkap dan non-interaktif, serta otomatis mengauditnya sendiri berdasarkan persyaratan kepatuhan dalam giliran yang sama:Act as a Principal Infrastructure Engineer. Using the @retrieving-developer-knowledge skill, generate a complete, non-interactive Bash script to deploy this entire security architecture for our "gCurrenC calculator" app, and self-audit the script before outputting it. Requirements: - Discover the project ID, region, and zone dynamically from the existing 'gcurrenc-app-subnet' and 'gcurrenc-app-mig'. - Keep all resources scoped strictly to the project level (no Organization resource). - Deploy the proxy-only subnet, global external Application Load Balancer, Cloud Router, and Cloud NAT. Don't use Cloud Armor. - Deploy project-level Cloud NGFW Enterprise with CAS TLS inspection ('--tls-inspect' on the firewall policy egress rule and 'gcloud beta' for the project-level firewall endpoint association) and an explicit DENY override for malware and antivirus threats. - Distribute the root CA to the private VMs over IAP SSH with connection timeouts so the guest OS trust store is updated. - Print the final Load Balancer URL ('https://${LB_IP}') at the end. Wrap the script in 'set -euxo pipefail' and output only the single executable bash script block.bashlengkap, mengaudit sendiri setiap perintah terhadap batasan kepatuhan, dan menghasilkan satu blok skrip yang dapat dieksekusi yang digabungkan dalamset -euxo pipefail.
Menjalankan skrip deployment keamanan
- Dalam mode
/goal, tempel skripbashyang dihasilkan dari perintah sebelumnya ke jendela chat Antigravity dalam format berikut untuk menjalankan deployment dan menampilkan URL aplikasi aktif (https://<LB_IP>):Run this script. <PASTED-SCRIPT>
7. Memverifikasi aplikasi yang diamankan
Setelah skrip deployment selesai, Antigravity akan menampilkan URL HTTPS eksternal dari Load Balancer Aplikasi eksternal global (https://<LB_IP>).
- Buka
https://<LB_IP>di browser web Anda dan abaikan peringatan sertifikat yang ditandatangani sendiri oleh browser untuk memuat antarmuka kalkulator gCurrenC: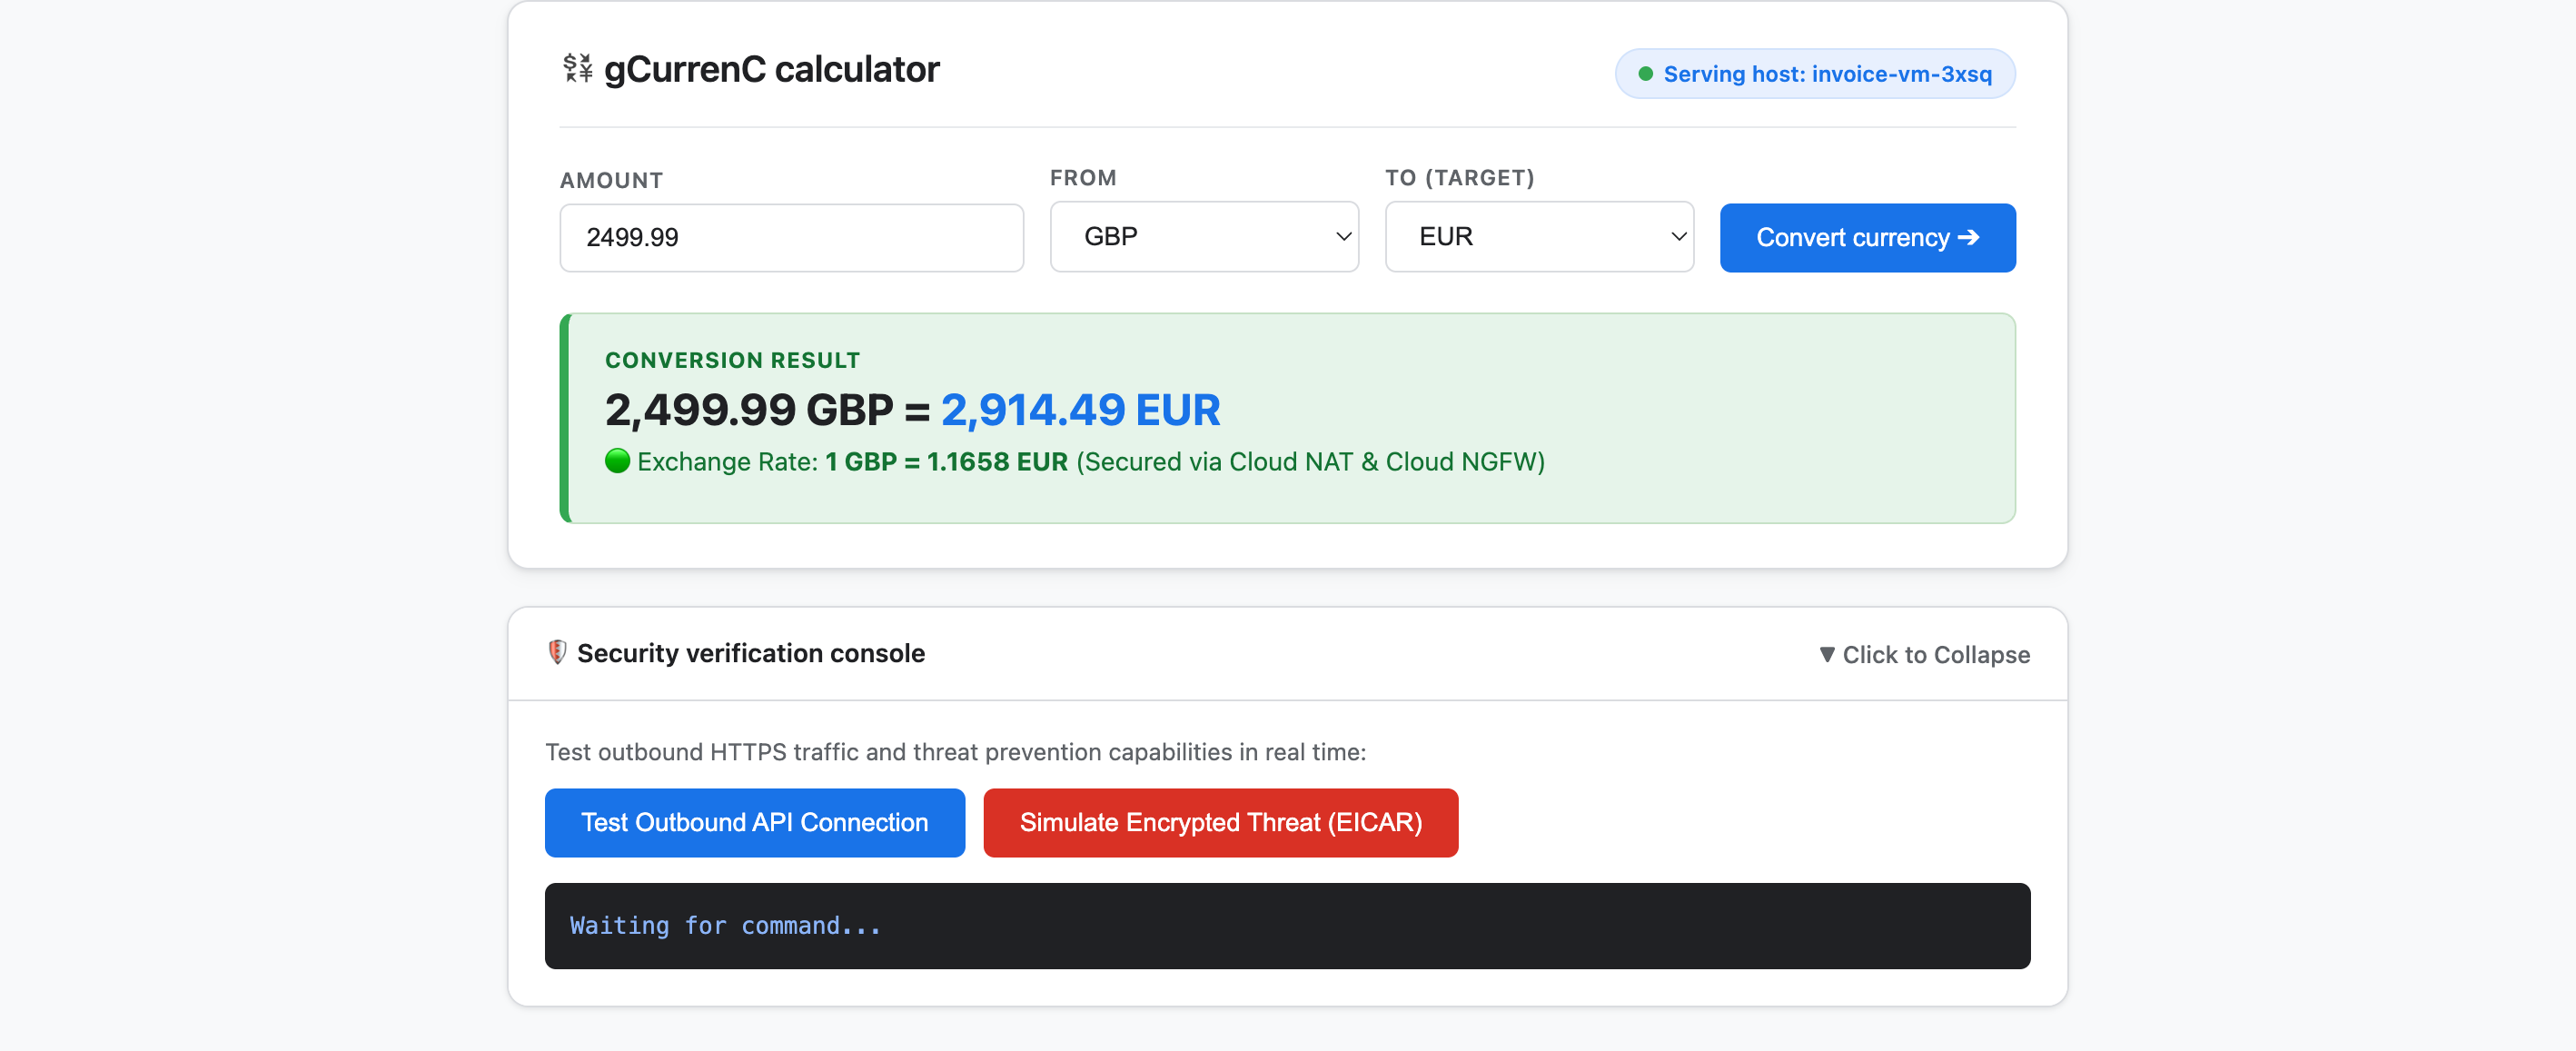
- Uji aplikasi untuk memverifikasi konektivitas keluar dan pencegahan ancaman:
- Klik Konversi mata uang. Aplikasi akan langsung menampilkan nilai tukar yang dikonversi secara real-time. Hal ini mengonfirmasi bahwa load balancing traffic masuk dirutekan dengan lancar melalui Google Front End (GFE) dan subnet khusus proxy, sementara Cloud NAT mengambil nilai tukar langsung dari
api.frankfurter.dev. - Luaskan Security verification console dan klik Test outbound API connection. Aplikasi akan menampilkan
verdict: PERMITTED(HTTP 200). Hal ini mengonfirmasi bahwa pemilihan rute Cloud NAT berfungsi, dan sistem operasi VM memercayai Root CA CAS pribadi untuk sesi HTTPS yang didekripsi. - Klik Simulasikan ancaman terenkripsi (EICAR). Aplikasi menampilkan
verdict: PERMITTED. Hal ini mengonfirmasi bahwa Cloud NGFW Enterprise mendekripsi permintaan HTTPS keluar menggunakan pemeriksaan TLS yang didukung oleh CAS dan memeriksa tanda tangan pengujian EICAR dengan Intrusion Prevention Service (IPS).
- Klik Konversi mata uang. Aplikasi akan langsung menampilkan nilai tukar yang dikonversi secara real-time. Hal ini mengonfirmasi bahwa load balancing traffic masuk dirutekan dengan lancar melalui Google Front End (GFE) dan subnet khusus proxy, sementara Cloud NAT mengambil nilai tukar langsung dari
8. Pembersihan
Agar akun Google Cloud Anda tidak dikenai biaya berkelanjutan untuk resource yang dibuat dalam codelab ini, Anda dapat menghapus resource codelab saja atau menghapus project Google Cloud Anda.
- Jika Anda ingin mempertahankan project Google Cloud dan hanya menghapus resource yang dibuat selama codelab ini, jalankan perintah berikut dalam mode
/goaldi jendela chat Antigravity:Remove all resources created in this session, including the gcurrenc app and its resources. Don't delete the project. - Jika Anda membuat project Google Cloud khusus untuk codelab ini dan ingin menghapus seluruh project, jalankan perintah berikut dalam mode
/goaldi jendela chat Antigravity:Clean up the demo environment by deleting the Google Cloud project. Run the following command in the terminal: gcloud projects delete "$(gcloud config get-value project 2>/dev/null)" --quiet
9. Selamat
Selamat! Anda telah men-deploy dan mengamankan aplikasi web kalkulator gCurrenC di Google Cloud menggunakan plugin Google Cloud Developer (server MCP DK) di Google Antigravity.
Langkah berikutnya
Pelajari dokumentasi resmi Google Cloud untuk mempelajari lebih lanjut layanan yang digunakan dalam codelab ini: