

1. Introdução
Neste codelab, você vai criar e implantar o aplicativo da web de calculadora gCurrenC no Google Cloud e protegê-lo contra acessos indesejados. Usando o Google Antigravity, o plug-in do Google Cloud Developer e o servidor MCP do Developer Knowledge (DK), você vai projetar e implementar uma arquitetura de segurança que controla quem pode acessar o aplicativo e o protege contra uso não autorizado.
Neste laboratório, você vai conectar o Google Antigravity ao servidor MCP do DK, que embasa o Antigravity na documentação oficial e em tempo real do Google Cloud. Em vez de depender de dados de treinamento estáticos ou pesos de modelo desatualizados, o Antigravity recupera dinamicamente padrões arquitetônicos atuais, a sintaxe mais recente da CLI gcloud e parâmetros de segurança, o que reduz as alucinações e fundamenta as respostas em conhecimento atualizado.
O que você vai criar
- Carga de trabalho de computação particular:duas máquinas virtuais (VMs) do Compute Engine que executam o app da Web gCurrenC calculator em uma rede de nuvem privada virtual (VPC) personalizada sem endereços IP públicos.
- Pipeline de entrada seguro:um balanceador de carga de aplicativo externo global com uma sub-rede dedicada somente proxy que roteia o tráfego da Internet pelos Google Front Ends (GFEs) para suas VMs privadas sem expô-las à Internet pública.
- Pipeline de saída seguro:um gateway do Cloud Router e do Cloud NAT pareado com o Cloud Next Generation Firewall (Cloud NGFW) Enterprise e o Certificate Authority Service (CAS) no nível do projeto para realizar inspeção de TLS em tempo real e verificação do serviço de prevenção de invasões (IPS) no tráfego de saída da API de câmbio de moedas HTTPS.
O que você vai aprender
- Instalar o plug-in
google-cloud-developerusando a CLI do Antigravity e configurar o servidor MCP do DK no Antigravity. - Implantar e testar um aplicativo da Web particular isolado no Compute Engine usando o encaminhamento de TCP do Identity-Aware Proxy (IAP).
- Use comandos multiturno embasados no Antigravity para projetar uma arquitetura de segurança de entrada e saída para envolvidos no projeto.
- Gerar, auditar e executar um script de implantação do
bashpara balanceamento de carga de aplicativo externo global, Cloud NAT, CAS e Cloud NGFW Enterprise.
2. Antes de começar
Pré-requisitos
Antes de iniciar este codelab, verifique se você tem o seguinte:
- Uma Conta do Google e o navegador Google Chrome.
- Um novo projeto do Google Cloud com o faturamento ativado. Anote o ID do projeto (
PROJECT_ID), porque você vai usá-lo ao longo deste codelab para ativar APIs, criar sua chave de API e implantar recursos do Google Cloud. - Permissões do Identity and Access Management (IAM) no projeto na nuvem do Google Cloud para criar chaves de API, recursos do Compute Engine, redes VPC, pools de CAS, túnel do IAP e endpoints do Cloud NGFW.
- Faça a autenticação com a CLI
gcloud, defina o projeto na nuvem ativo do Google Cloud e ative as APIs necessárias:- No terminal ou no Cloud Shell, verifique se você já está autenticado:
gcloud auth listgcloud auth login - Verifique se a CLI
gcloudestá configurada para usar seu projeto:gcloud config list projectPROJECT_IDpelo ID do projeto do Google Cloud:export PROJECT_ID=PROJECT_ID gcloud config set project PROJECT_ID - Ative as APIs necessárias no seu projeto do Google Cloud:
gcloud services enable \
   compute.googleapis.com \
   iap.googleapis.com \
   networksecurity.googleapis.com \
   privateca.googleapis.com \
   developerknowledge.googleapis.com \
   apikeys.googleapis.com
- No terminal ou no Cloud Shell, verifique se você já está autenticado:
- Instale o Antigravity 2.0 no seu sistema local pela página de download do Google Antigravity.
Instalar o plug-in do Google Cloud Developer usando a CLI do Antigravity
Para instalar o plug-in do Google Cloud Developer usando a CLI do Antigravity, faça o seguinte:
- Para instalar a CLI do Antigravity na estação de trabalho local, faça o seguinte:
- Abra o terminal local.
- Execute o script do instalador:
curl -fsSL https://antigravity.google/cli/install.sh | bash - Feche e reabra a sessão do terminal para que o binário da CLI do Antigravity
agyfique disponível noPATHdo sistema.
- No terminal local, execute o seguinte comando para instalar o plug-in
google-cloud-developer:agy plugin install https://github.com/google/skills/plugins/cloud/google-cloud-developerCloning plugin from https://github.com/google/skills.git... [ok] google-cloud-developer ✔ skills : 5 processed - agents : skipped (not found) - commands : skipped (not found) ✔ mcpServers : 1 processed - hooks : skipped (not found)
3. Configurar o Antigravity e o servidor MCP do DK
Nesta seção, você vai configurar o servidor MCP do DK no Antigravity usando uma chave de API restrita do Google Cloud.
- Abra o Antigravity, digite
/goale pressione Enter para ativar o modo de meta. Em seguida, cole o comando abaixo para criar uma chave de API restrita e configurar o servidor MCP do DK. SubstituaPROJECT_IDpelo ID do projeto do Google Cloud da seção Antes de começar. Para mais informações, consulte o plug-in google-cloud-developer.Set up Antigravity to use the Developer Knowledge MCP server on my local machine. Run the necessary terminal commands to complete the following: 1. Create a restricted API key named 'DKP-MCP-Key' that can only target the Developer Knowledge API. Use the PROJECT_ID to create the API key. 2. Retrieve the actual key string of the newly created API key. 3. Create or safely update my ~/.gemini/config/mcp_config.json file (preserve any existing MCP servers) with the correct JSON structure to connect the developer-knowledge server using that API key in the headers. You MUST use the following JSON structure for the new server: "developer-knowledge": { "serverUrl": "https://developerknowledge.googleapis.com/mcp", "headers": { "x-goog-api-key": "<INSERT_RETRIEVED_API_KEY_HERE>" } } When you are done, confirm that the setup is complete. - Para verificar se o servidor MCP do DK está ativo, insira o seguinte comando na janela de chat do Antigravity:
Which MCP servers are available?developer-knowledgee as ferramentas disponíveis (search_documents,answer_queryeget_documents):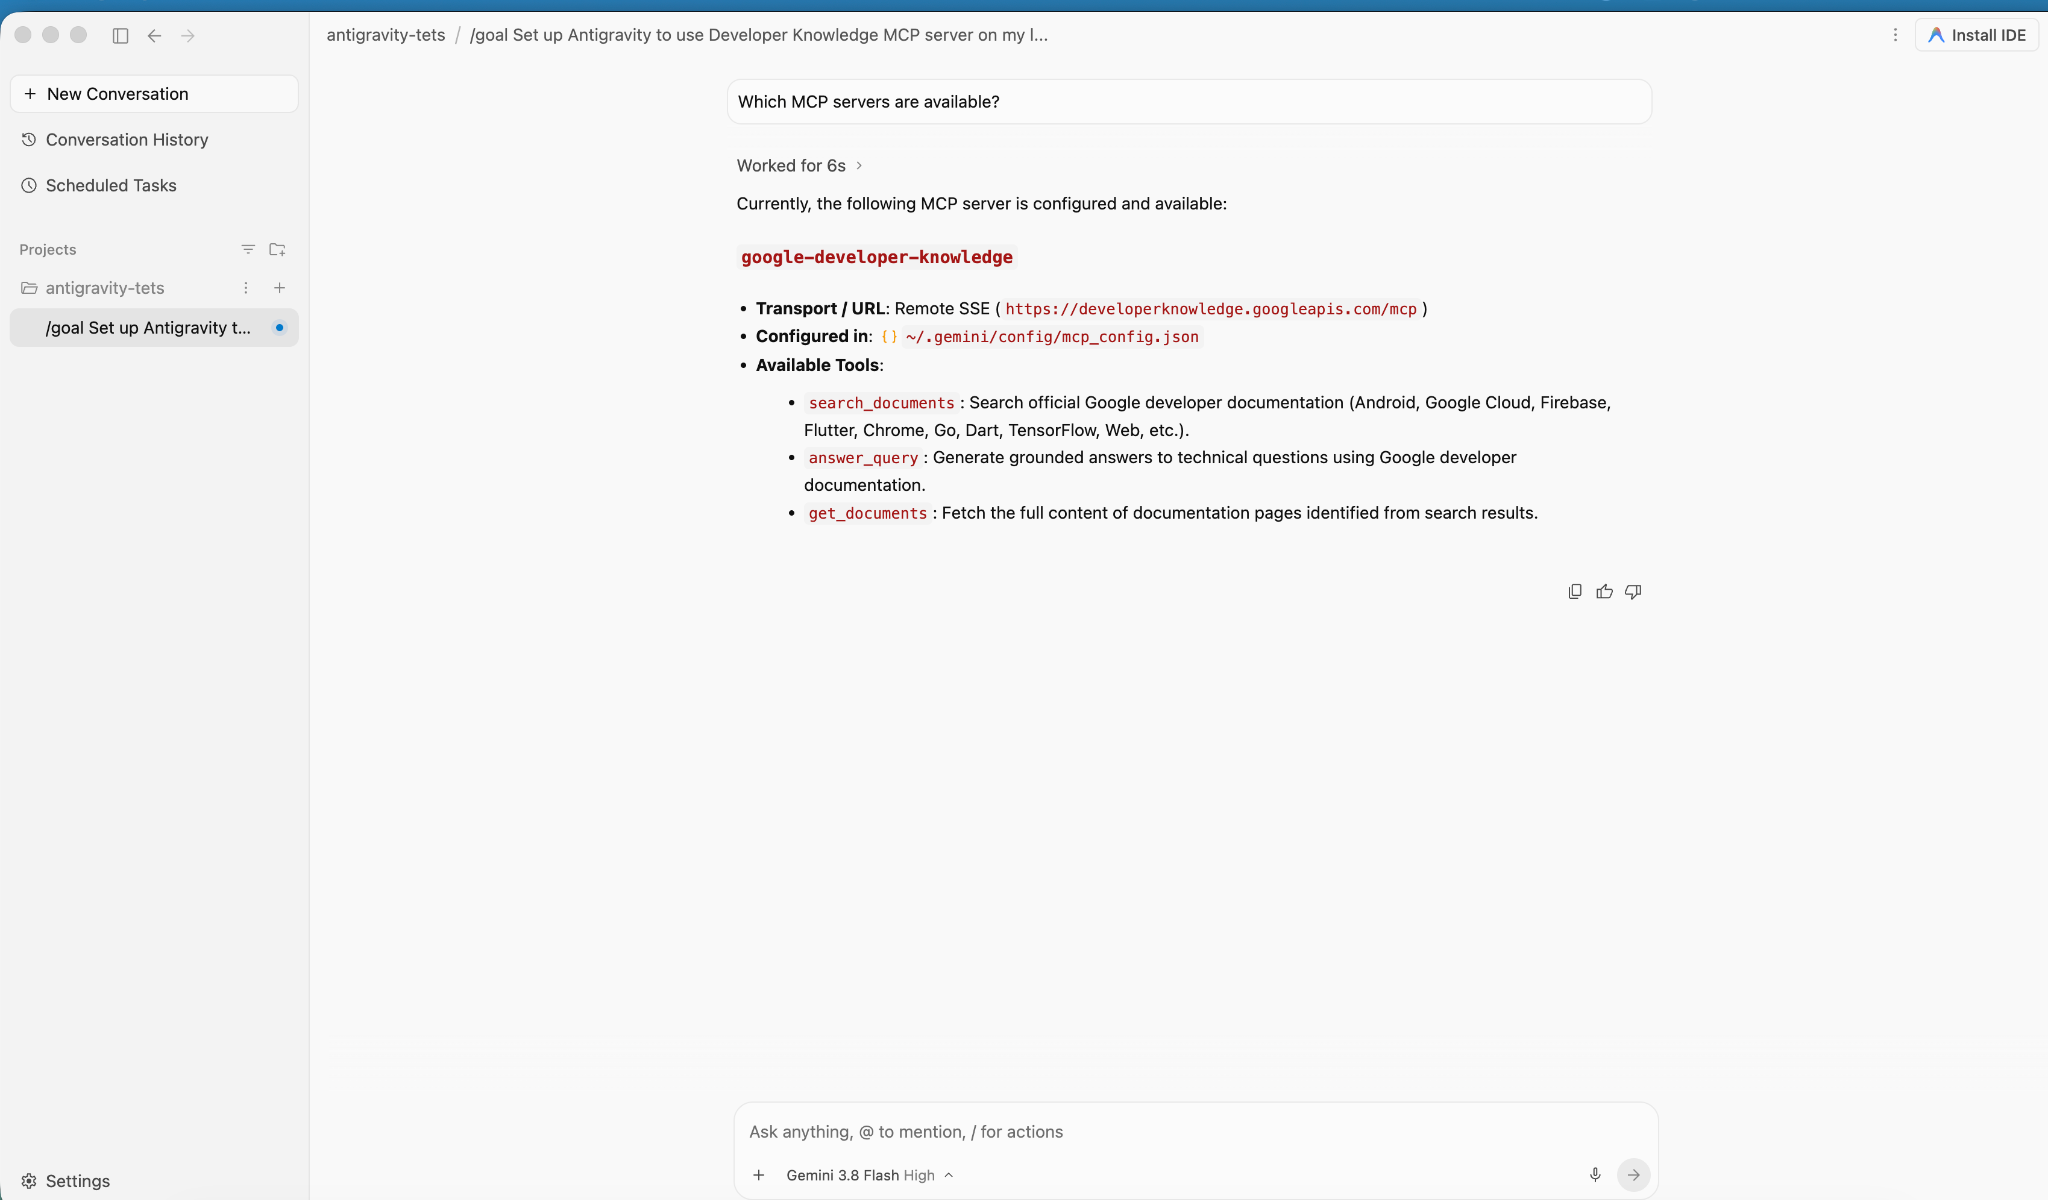
4. Criar e implantar o aplicativo
Nesta seção, você vai implantar o aplicativo gCurrenC calculator em duas VMs particulares do Compute Engine em uma rede VPC personalizada.
O aplicativo oferece:
- Um conversor de moedas em tempo real que aceita
USD,EUR,GBP,JPY,CAD,INReAUDusando a biblioteca padrãohttp.serverintegrada do Python na porta8080com um endpoint de verificação de integridade/healthz. - Um console de verificação de segurança para executar conectividade de API de saída em tempo real e sondagens criptografadas de prevenção de ameaças.
- Uma regra de firewall de entrada que permite que o intervalo do IAP do Google alcance as portas
22e8080para testes administrativos sem expor endereços IP públicos.
Implantar o aplicativo
- Na janela de chat do Antigravity, digite
/goale execute o seguinte comando:You are a Cloud developer. Deploy the "gCurrenC calculator" app onto two (2) Compute Engine VMs with no external IP addresses (`--no-address`) inside a dedicated custom VPC network and private subnet. CRITICAL INSTRUCTIONS ON OUTPUT: - The VMs are strictly private with no external IP addresses and the local IAP tunnel has NOT been started yet. Any web URL is completely unreachable and will fail with a connection error. - In your final response, simply confirm that the private VMs and Managed Instance Group are deployed, and state that the user should establish the IAP tunnel. Do not output, format, or suggest any web preview link or URL (such as http://localhost:8080 or internal IP addresses) in your final response. Run this script in the terminal: ```bash #!/usr/bin/env bash set -euxo pipefail # Disable any interactive confirmation prompts so execution never hangs export CLOUDSDK_CORE_DISABLE_PROMPTS=1 # --- User Configuration --- PROJECT_ID="[PROJECT_ID]" REGION="us-central1" ZONE="us-central1-a" NETWORK="gcurrenc-vpc" SUBNET="gcurrenc-app-subnet" SUBNET_RANGE="10.10.1.0/24" # -------------------------- echo "==> [1/5] Configuring project, default region/zone, and enabling APIs..." gcloud config set project "${PROJECT_ID}" gcloud config set compute/region "${REGION}" gcloud config set compute/zone "${ZONE}" gcloud services enable compute.googleapis.com echo "==> [2/5] Creating custom VPC network and private workload subnet..." gcloud compute networks create "${NETWORK}" \ --subnet-mode=custom \ --description="Dedicated VPC for currency exchange app demo" 2>/dev/null || true gcloud compute networks subnets create "${SUBNET}" \ --network="${NETWORK}" \ --region="${REGION}" \ --range="${SUBNET_RANGE}" \ --enable-private-ip-google-access \ --description="Private subnet hosting backend compute instances" 2>/dev/null || true echo "==> [3/5] Generating standalone Python standard-library startup script..." cat << 'STARTUP_EOF' > /tmp/private_app_startup.sh #!/bin/bash set -euxo pipefail mkdir -p /opt/gcurrenc-app # Pure Python standard-library application (zero pip/apt dependencies needed at boot) cat << 'APPEOF' > /opt/gcurrenc-app/app.py import os import sys import json import socket import urllib.request import urllib.parse import ssl from http.server import BaseHTTPRequestHandler, ThreadingHTTPServer SUPPORTED_CURRENCIES = ["USD", "EUR", "GBP", "JPY", "CAD", "INR", "AUD"] class CurrencyAppHandler(BaseHTTPRequestHandler): def address_string(self): return str(self.client_address[0]) def do_GET(self): parsed = urllib.parse.urlparse(self.path) path = parsed.path params = urllib.parse.parse_qs(parsed.query) if path == "/favicon.ico": self.send_response(204) self.end_headers() return if path == "/healthz": self.send_response(200) self.send_header("Content-Type", "text/plain") self.end_headers() self.wfile.write(b"OK") return if path == "/api/security-test": mode = params.get("mode", ["safe"])[0] target = "https://secure.eicar.org/eicar.com.txt" if mode == "threat" else "https://api.frankfurter.dev/v1/latest?from=USD&to=EUR" try: req = urllib.request.Request(target, headers={"User-Agent": "SecureCurrencyApp/1.0"}) ctx = ssl.create_default_context() with urllib.request.urlopen(req, timeout=5, context=ctx) as resp: data = {"verdict": "PERMITTED", "target": target, "http_status": resp.status} code = 200 except Exception as e: data = {"verdict": "BLOCKED_OR_FAILED", "target": target, "error": str(e)} code = 502 self.send_response(code) self.send_header("Content-Type", "application/json") self.end_headers() self.wfile.write(json.dumps(data, indent=2).encode("utf-8")) return self.render_page() def do_POST(self): parsed = urllib.parse.urlparse(self.path) if parsed.path == "/generate": content_length = int(self.headers.get("Content-Length", 0)) post_body = self.rfile.read(content_length).decode("utf-8") form = urllib.parse.parse_qs(post_body) base_curr = form.get("base_curr", ["USD"])[0] target_curr = form.get("target_curr", ["EUR"])[0] try: amount = float(form.get("amount", ["2500.00"])[0]) except ValueError: amount = 2500.00 rate_str = "Unavailable" total_str = "Rate lookup pending outbound internet activation" try: if base_curr == target_curr: rate = 1.0 else: url = f"https://api.frankfurter.dev/v1/latest?from={base_curr}&to={target_curr}" req = urllib.request.Request(url, headers={"User-Agent": "SecureCurrencyApp/1.0"}) with urllib.request.urlopen(req, timeout=4) as resp: res_json = json.loads(resp.read().decode("utf-8")) rate = res_json["rates"][target_curr] rate_str = str(rate) total_str = f"{round(amount * rate, 2):,.2f} {target_curr}" except Exception as e: total_str = f"Outbound connection unavailable {str(e)}" self.render_page(base_curr, target_curr, amount, rate_str, total_str) return self.send_response(404) self.end_headers() def render_page(self, base_curr="USD", target_curr="EUR", amount=2500.00, fx_rate="1.00", total_str=""): hostname = socket.gethostname() curr_options_base = "".join([f'<option value="{c}" {"selected" if c == base_curr else ""}>{c}</option>' for c in SUPPORTED_CURRENCIES]) curr_options_target = "".join([f'<option value="{c}" {"selected" if c == target_curr else ""}>{c}</option>' for c in SUPPORTED_CURRENCIES]) result_block = "" if total_str: if fx_rate == "Unavailable": rate_line = "<p style='margin: 6px 0;'>Exchange Rate: <span style='color: #d93025; font-weight: bold;'>⚠️ Offline-Outbound internet blocked</span></p>" else: rate_line = f"<p style='margin: 6px 0; font-size: 14px; color: #137333;'>🟢 Exchange Rate: <strong>1 {base_curr} = {fx_rate} {target_curr}</strong> (Secured via Cloud NAT & Cloud NGFW)</p>" result_block = f""" <div style="margin-top: 22px; background: #e6f4ea; border: 1px solid #c6e1c6; border-left: 5px solid #34a853; padding: 18px 20px; border-radius: 8px;"> <h4 style="margin: 0 0 6px 0; text-transform: uppercase; font-size: 12px; color: #137333; letter-spacing: 0.5px;">Conversion Result</h4> <div style="font-size: 24px; font-weight: 700; color: #202124; margin-bottom: 6px;"> {amount:,.2f} {base_curr} = <span style="color: #1a73e8;">{total_str}</span> </div> {rate_line} </div> """ html = ("""<!DOCTYPE html> <html lang="en"> <head> <meta charset="UTF-8"> <meta name="viewport" content="width=device-width, initial-scale=1.0"> <title>gCurrenC calculator</title> <style> body { font-family: -apple-system, BlinkMacSystemFont, "Segoe UI", Roboto, "Helvetica Neue", Arial, sans-serif; background: #f8f9fa; margin: 30px 15px; color: #202124; display: flex; justify-content: center; } .container { width: 100%; max-width: 860px; } .card { background: white; padding: 24px 28px; border-radius: 12px; box-shadow: 0 1px 3px rgba(60,64,67,0.12), 0 4px 8px rgba(60,64,67,0.06); border: 1px solid #dadce0; margin-bottom: 20px; } .header { display: flex; justify-content: space-between; align-items: center; border-bottom: 1px solid #e8eaed; padding-bottom: 14px; margin-bottom: 20px; } .header h2 { margin: 0 0 4px 0; font-size: 20px; font-weight: 600; } .header p { margin: 0; font-size: 13px; color: #5f6368; } .badge { background: #e8f0fe; color: #1a73e8; padding: 6px 12px; border-radius: 16px; font-weight: 600; font-size: 12px; border: 1px solid #d2e3fc; display: flex; align-items: center; gap: 6px; } .badge::before { content: ""; width: 8px; height: 8px; border-radius: 50%; background-color: #34a853; } .form-row { display: flex; gap: 14px; align-items: flex-end; flex-wrap: wrap; } .form-group { display: flex; flex-direction: column; gap: 6px; } .form-group label { font-size: 12px; font-weight: 600; color: #5f6368; text-transform: uppercase; letter-spacing: 0.5px; } input, select { padding: 10px 14px; border: 1px solid #dadce0; border-radius: 6px; font-size: 14px; color: #202124; background-color: #fff; box-sizing: border-box; transition: border-color 0.15s, box-shadow 0.15s; } input:focus, select:focus { outline: none; border-color: #1a73e8; box-shadow: 0 0 0 3px rgba(26, 115, 232, 0.15); } button { padding: 11px 20px; background: #1a73e8; color: white; border: none; border-radius: 6px; font-size: 14px; font-weight: 500; cursor: pointer; transition: background 0.15s, box-shadow 0.15s; } button:hover { background: #1557b0; box-shadow: 0 1px 2px rgba(60,64,67,0.3); } .danger-btn { background: #d93025; } .danger-btn:hover { background: #b31412; } pre { background: #202124; color: #8ab4f8; padding: 14px; border-radius: 6px; overflow-x: auto; font-family: "SF Mono", "Fira Code", Consolas, monospace; font-size: 13px; line-height: 1.5; margin: 0; } /* Collapsible Security Console */ details.security-drawer { background: white; border-radius: 12px; box-shadow: 0 1px 3px rgba(60,64,67,0.12); border: 1px solid #dadce0; overflow: hidden; margin-bottom: 24px; } details.security-drawer summary { padding: 16px 20px; font-size: 14px; font-weight: 600; cursor: pointer; list-style: none; display: flex; justify-content: space-between; align-items: center; user-select: none; background: #fafafa; transition: background 0.15s; } details.security-drawer summary::-webkit-details-marker { display: none; } details.security-drawer summary:hover { background: #f1f3f4; } details.security-drawer[open] summary { border-bottom: 1px solid #dadce0; background: #ffffff; } .expand-toggle { font-size: 13px; font-weight: 500; } details.security-drawer summary .expand-toggle::before { content: "▶ Click to Expand"; color: #1a73e8; } details.security-drawer[open] summary .expand-toggle::before { content: "▼ Click to Collapse"; color: #5f6368; } .drawer-body { padding: 20px; background: #ffffff; } .drawer-body p { margin-top: 0; font-size: 13px; color: #5f6368; } .probe-buttons { display: flex; gap: 10px; margin-bottom: 14px; } </style> </head> <body> <div class="container"> <div class="card"> <div class="header"> <div> <h2>💱 gCurrenC calculator</h2> </div> <div class="badge">Serving host: {hostname}</div> </div> <form method="POST" action="/generate"> <div class="form-row"> <div class="form-group" style="flex: 1.5; min-width: 140px;"> <label>Amount</label> <input type="number" step="0.01" name="amount" value="{amount}" required> </div> <div class="form-group" style="flex: 1; min-width: 100px;"> <label>From</label> <select name="base_curr">{curr_options_base}</select> </div> <div class="form-group" style="flex: 1; min-width: 100px;"> <label>To (Target)</label> <select name="target_curr">{curr_options_target}</select> </div> <div class="form-group"> <button type="submit">Convert currency ➔</button> </div> </div> </form> {result_block} </div> <!-- Collapsible Security Verification Console --> <details class="security-drawer"> <summary> <span>🛡️ Security verification console</span> <span class="expand-toggle"></span> </summary> <div class="drawer-body"> <p>Test outbound HTTPS traffic and threat prevention capabilities in real time:</p> <div class="probe-buttons"> <button type="button" onclick="runProbe('safe')">Test Outbound API Connection</button> <button type="button" class="danger-btn" onclick="runProbe('threat')">Simulate Encrypted Threat (EICAR)</button> </div> <pre id="output">Waiting for command...</pre> </div> </details> </div> <script> function runProbe(mode) { const el = document.getElementById('output'); el.innerText = 'Executing outbound request...'; fetch('/api/security-test?mode=' + mode) .then(res => res.json()) .then(data => el.innerText = JSON.stringify(data, null, 2)) .catch(err => el.innerText = 'Connection dropped / reset by Firewall: ' + err); } </script> </body> </html>""" .replace("{hostname}", str(hostname)) .replace("{amount}", str(amount)) .replace("{curr_options_base}", curr_options_base) .replace("{curr_options_target}", curr_options_target) .replace("{result_block}", result_block) ) self.send_response(200) self.send_header("Content-Type", "text/html; charset=utf-8") self.end_headers() self.wfile.write(html.encode("utf-8")) def run(): server_address = ('0.0.0.0', 8080) httpd = ThreadingHTTPServer(server_address, CurrencyAppHandler) httpd.serve_forever() if __name__ == '__main__': run() APPEOF # Register and start systemd unit cat << 'SERVICEEOF' > /etc/systemd/system/gcurrenc-app.service [Unit] Description=Currency exchange calculator web application After=network.target [Service] Type=simple User=root WorkingDirectory=/opt/gcurrenc-app ExecStart=/usr/bin/python3 /opt/gcurrenc-app/app.py Restart=always [Install] WantedBy=multi-user.target SERVICEEOF systemctl daemon-reload systemctl enable gcurrenc-app systemctl start gcurrenc-app STARTUP_EOF echo "==> [4/5] Creating Firewall, Regional Instance Template, and 2-VM MIG..." gcloud compute firewall-rules create allow-iap-admin \ --network="${NETWORK}" \ --allow=tcp:22,tcp:8080 \ --source-ranges=35.235.240.0/20 \ --target-tags=gcurrenc-app-vm \ --description="Allow IAP SSH and port 8080 access to private VMs" \ --quiet 2>/dev/null || true # Explicitly pass both --region and --instance-template-region to avoid prompt gcloud compute instance-templates create gcurrenc-app-template \ --instance-template-region="${REGION}" \ --region="${REGION}" \ --network="${NETWORK}" \ --subnet="${SUBNET}" \ --machine-type=e2-medium \ --no-address \ --tags=gcurrenc-app-vm \ --metadata-from-file=startup-script=/tmp/private_app_startup.sh \ --quiet gcloud compute instance-groups managed create gcurrenc-app-mig \ --base-instance-name=gcurrenc-vm \ --template="projects/${PROJECT_ID}/regions/${REGION}/instanceTemplates/gcurrenc-app-template" \ --size=2 \ --zone="${ZONE}" \ --quiet gcloud compute instance-groups managed set-named-ports gcurrenc-app-mig \ --named-ports=http-port:8080 \ --zone="${ZONE}" \ --quiet echo "==> [5/5] Verifying private VM deployment and internal status..." sleep 30 gcloud compute instances list \ --filter="name ~ '^gcurrenc-vm-'" \ --zones="${ZONE}" \ --format="table(name,zone.basename():label=ZONE,networkInterfaces[0].networkIP:label=INTERNAL_IP,status)" FIRST_VM=$(gcloud compute instances list \ --filter="name ~ '^gcurrenc-vm-'" \ --zones="${ZONE}" \ --format="value(name)" \ --limit=1) echo "Testing healthz on ${FIRST_VM} via IAP tunnel..." gcloud compute ssh "${FIRST_VM}" \ --zone="${ZONE}" \ --tunnel-through-iap \ --quiet \ --command="curl -fsS http://localhost:8080/healthz" echo "" echo "==========================================================================" echo "PREREQUISITE COMPLETE: 2 private VMs deployed with no external IPs." echo "VPC: ${NETWORK} | Subnet: ${SUBNET} (${SUBNET_RANGE})" echo "Instance Group: gcurrenc-app-mig (Zone: ${ZONE}, Port: 8080)" echo "" echo "The VMs are private and the IAP tunnel is not active. Set up the background IAP tunnel first to access the deployed app." echo "" echo "==========================================================================" ```
Verificar a criação da instância de VM
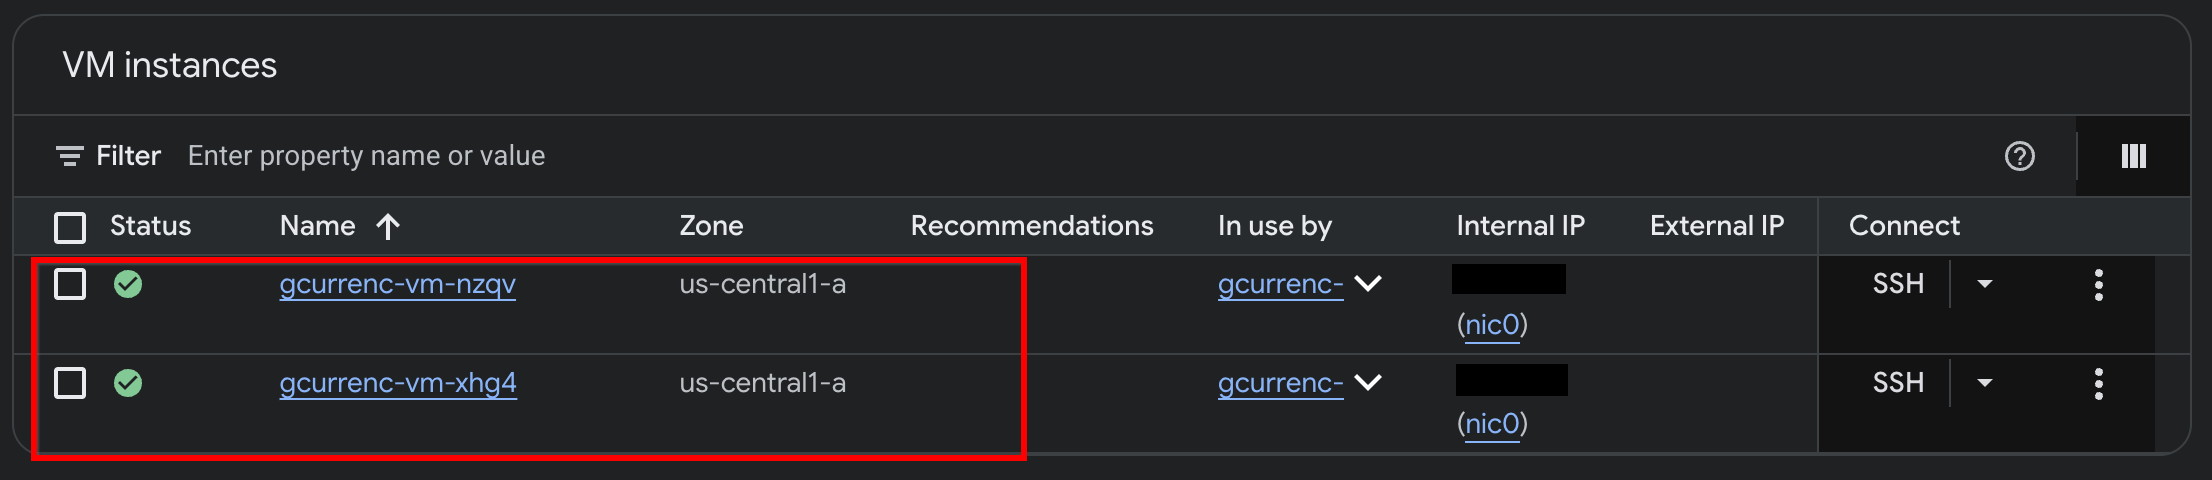
Depois que a Antigravity terminar de implantar o aplicativo nas duas VMs privadas do Compute Engine, verifique as instâncias no console do Google Cloud:
- No console do Google Cloud, acesse Instâncias de VM.
- Verifique se as duas instâncias de VM estão em execução com endereços IP internos e sem endereços IP externos:
5. Testar o aplicativo
Como as VMs particulares não têm endereços IP externos (--no-address) nem gateway do Cloud NAT, elas não têm rota para a Internet e não podem acessar APIs externas de câmbio. Antes de configurar o acesso de saída seguro, teste o aplicativo em um túnel local do IAP para verificar se não há acesso à Internet.
- No modo
/goal, execute o seguinte comando na janela de chat do Antigravity:Automate the IAP tunnel configuration and health verification for the web app, then output the live test URL. Run a terminal script that performs the following steps non-interactively: 1. Firewall Check: - Identify the active network ('gcurrenc-vpc' if it exists, otherwise 'default'). - Idempotently ensure an ingress firewall rule exists permitting 'tcp:22,tcp:8080' from the Google IAP range '35.235.240.0/20' targeting 'gcurrenc-app-vm'. 2. VM Health Verification: - Find the first running instance matching '^gcurrenc-vm-' in zone 'us-central1-a'. - Via 'gcloud compute ssh --tunnel-through-iap', verify that the 'gcurrenc-app' systemd service is active. If not active, restart it. 3. Background IAP Tunnel: - Free up local port 8080 if an old tunnel or process is lingering (e.g., using 'lsof -ti:8080 | xargs kill -9' or 'fuser -k 8080/tcp'). - Launch 'gcloud compute start-iap-tunnel <VM_NAME> 8080 --local-host-port=localhost:8080 --zone=us-central1-a' in the background using nohup, redirecting output to '/tmp/iap_tunnel.log'. - Wait up to 10 seconds for the tunnel to establish, checking with 'curl -fsS http://localhost:8080/healthz'. 4. Output Web Preview URL: - Detect whether the environment is Google Cloud Shell (check if $CLOUD_SHELL is true) or a local workstation. - If Cloud Shell, print instructions and the direct web preview link. - If local machine, provide the clickable 'http://localhost:8080' URL. - Depois que o túnel for iniciado, abra
http://localhost:8080/no navegador da Web: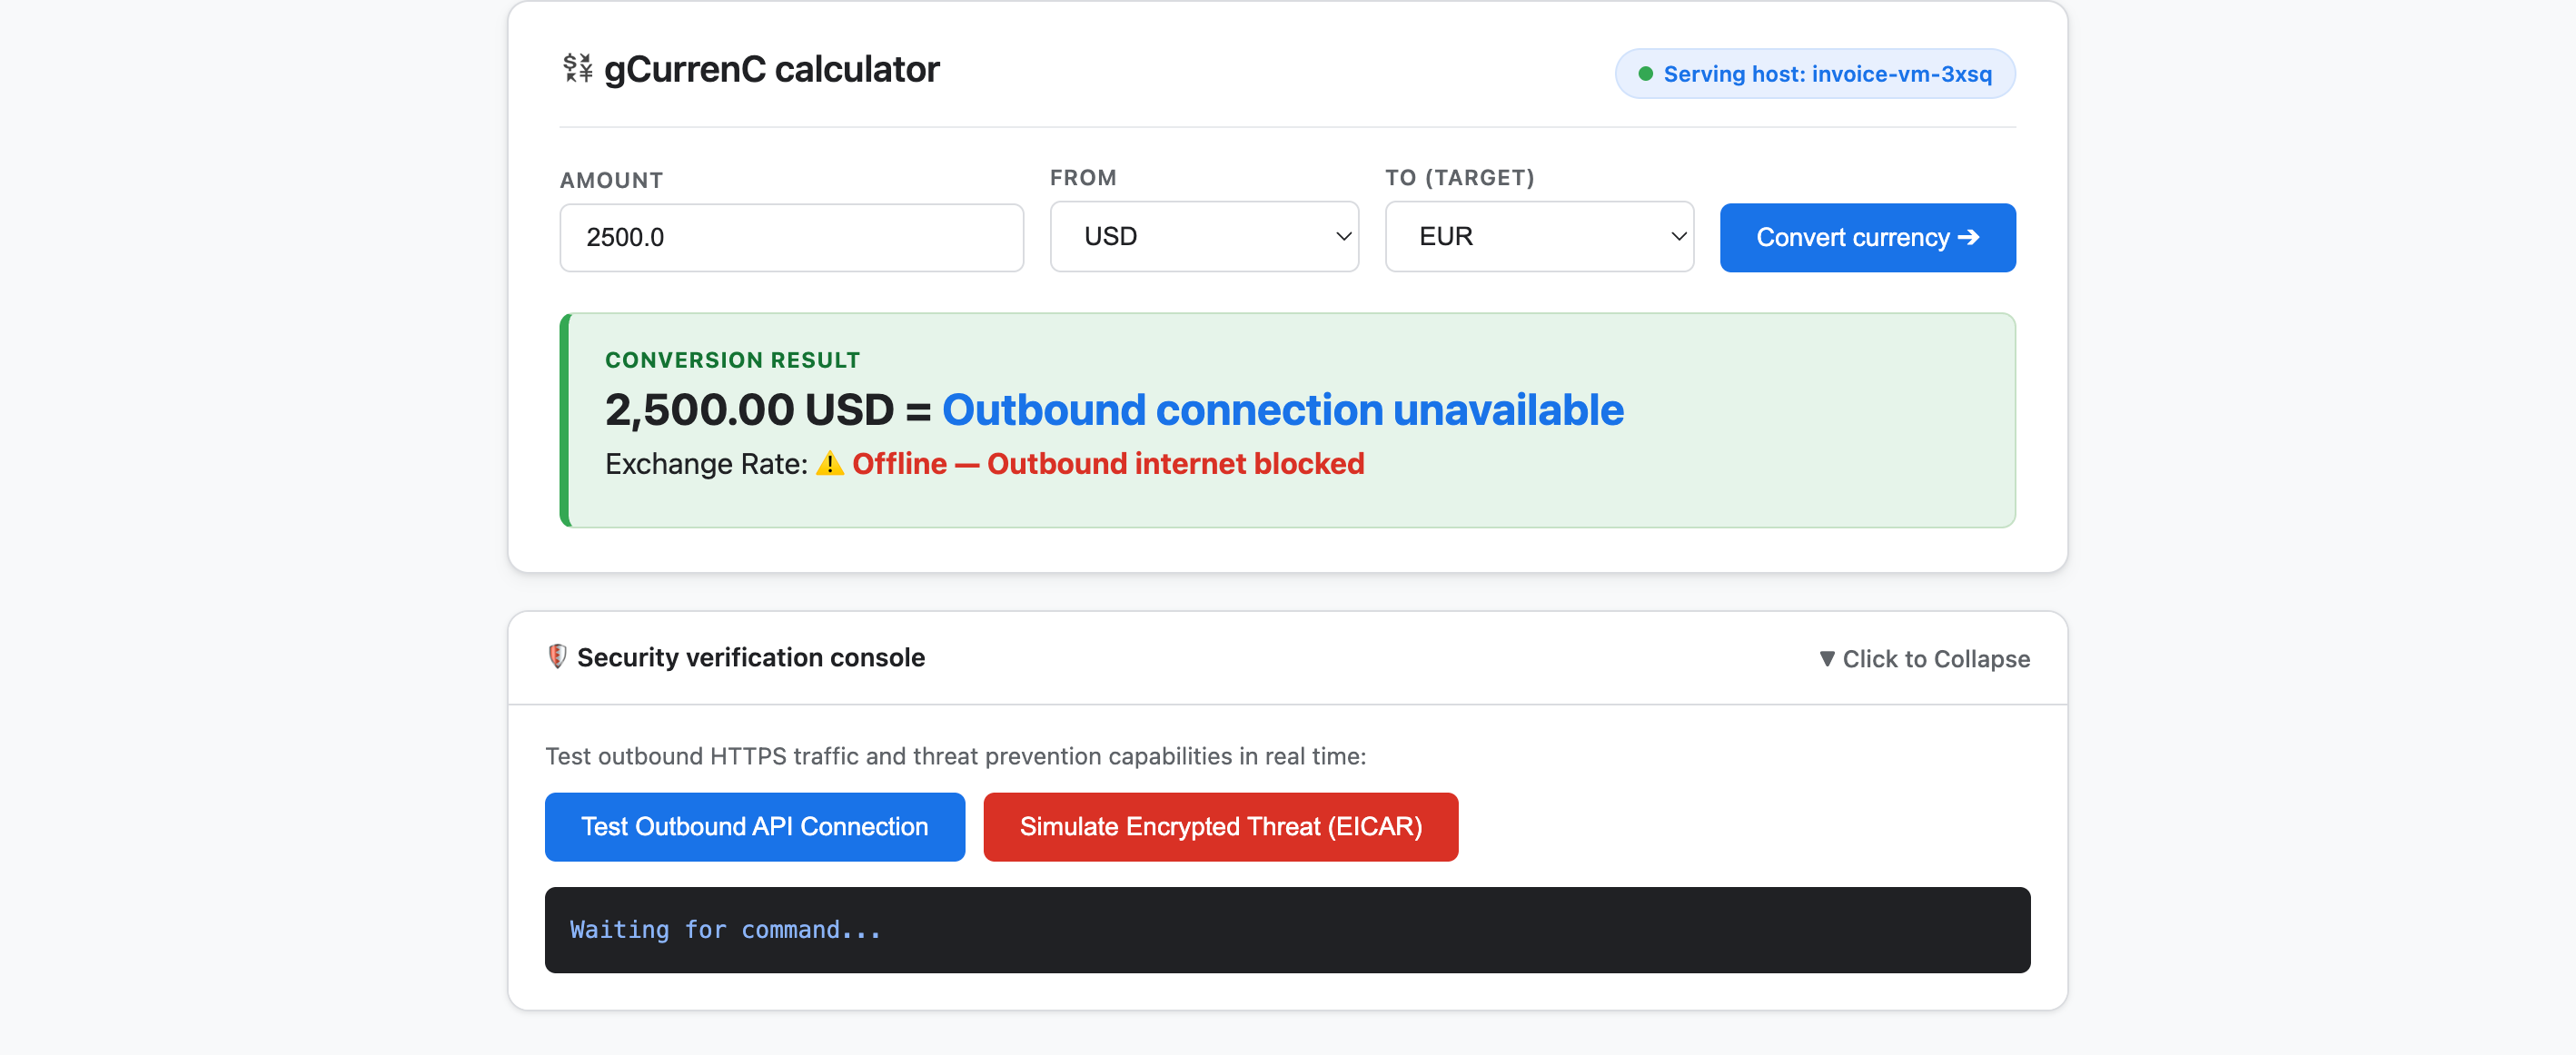
- Teste o aplicativo:
- Clique em Converter moeda. O resultado da conversão mostra
Offline - Outbound internet blockedeOutbound connection unavailable. Esse resultado é esperado porque as VMs particulares não podem se conectar à Internet para buscar as taxas de câmbio mais recentes. - Expanda o Console de verificação de segurança e clique em Testar conexão de API de saída. A saída mostra
verdict: BLOCKED_OR_FAILED(https://api.frankfurter.dev/v1/latest. Esse resultado é esperado porque as VMs particulares não podem se conectar à Internet e buscar taxas de câmbio dehttps://api.frankfurter.dev/v1/latest. - Clique em Simular ameaça criptografada (EICAR). A saída também exibe
verdict: BLOCKED_OR_FAILEDparahttps://secure.eicar.org/eicar.com.txt. Esse resultado também é esperado porque as VMs particulares não têm conectividade com a Internet.
- Clique em Converter moeda. O resultado da conversão mostra
Interromper o túnel local do IAP
Antes de projetar e implantar a arquitetura de segurança, encerre o túnel local do IAP para liberar a porta 8080:
- No modo
/goal, execute o seguinte comando:Free up local port 8080 and terminate any running Google Cloud IAP tunnels (e.g., kill processes matching 'start-iap-tunnel' or listening on port 8080).8080está livre.
6. Proteger o aplicativo
Nas seções anteriores, você criou VMs particulares do Compute Engine sem endereços IP públicos e verificou dois desafios principais de rede e segurança:
- Acesso de entrada (entrada): os usuários da Internet não podem acessar as instâncias de VM privadas diretamente. Para expor o aplicativo da Web, é necessário fazer proxy do tráfego por um balanceador de carga de aplicativo externo global e uma sub-rede dedicada somente proxy sem expor as VMs à Internet pública.
- Acesso de saída (saída): as VMs particulares não têm rota para a Internet para consultar APIs de câmbio de moedas HTTPS em tempo real. Para ativar o acesso de saída, é necessário inspecionar o tráfego criptografado em busca de malware e exfiltração de dados sem quebrar a confiança de SSL/TLS.
Nesta seção, você vai orientar a Antigravity em um fluxo de trabalho simplificado com base na documentação oficial do Google Cloud (@retrieving-developer-knowledge) para projetar, auditar e implantar uma arquitetura de segurança de entrada e saída para envolvidos no projeto para o aplicativo.
Projetar a arquitetura de segurança unificada
- No modo
/goal, execute o seguinte comando para gerar um diagrama de arquitetura completo e uma explicação que abranja os fluxos de tráfego de entrada e saída:You are a Google Cloud Network and Security Architect. We need to design an end-to-end security architecture for our "gCurrenC calculator" app running on private Compute Engine VMs with no external IP addresses inside 'gcurrenc-vpc'. We are operating in a standalone Google Cloud project without an Organization resource, so all security resources must be scoped at the project level. Use the @retrieving-developer-knowledge skill to consult official Google Cloud documentation and suggest an architecture diagram and explanation covering both flows: 1. Ingress Flow: - How internet users securely reach the private VMs via a global external Application Load Balancer. - Why Envoy-based external Application Load Balancers require a dedicated proxy-only subnet, and how Google Front Ends (GFEs) proxy traffic to private backends without exposing VMs to the public internet. 2. Egress Flow: - How private VMs reach the internet via Cloud NAT to query live currency exchange APIs, such as frankfurter.dev. - How Cloud NGFW Enterprise provides Layer 7 deep packet inspection and intrusion prevention (IPS) for outbound encrypted HTTPS traffic. - How TLS inspection backed by Certificate Authority Service (CAS) decrypts outbound HTTPS sessions on the fly, and what Root CA trust configuration the private VMs require. Provide a clear diagram and explain how these components connect together.
Gerar a estrutura de tópicos do recurso de arquitetura
- Insira o comando a seguir para estruturar o design em um esboço de recursos categorizados para envolvidos no projeto antes de gerar o script de implantação:
Act as a Lead Network Security Architect. Using the @retrieving-developer-knowledge skill, provide an architectural outline of all the Google Cloud resources required to secure the "gCurrenC calculator" app.

Our starting state:
- The custom VPC ('gcurrenc-vpc'), workload subnet ('gcurrenc-app-subnet'), and 2-instance MIG ('gcurrenc-app-mig', port 8080) are already deployed.
- All newly added security components must be project-level resources (no organization resources).

Structure your resource outline into three distinct categories, indicating which resources are new additions:
1. Core VPC Infrastructure: proxy-only subnet ('gcurrenc-proxy-subnet', 10.10.2.0/24), Cloud Router, and Cloud NAT gateway.
2. Inbound security (ingress): global external ALB components (forwarding rule on port 443, target HTTPS proxy, SSL certificate, URL map, backend service attached to 'gcurrenc-app-mig' on port 8080, and HTTP health check on '/healthz') and ingress firewall rules.
3. Outbound security (egress): CAS DevOps CA pool and root CA, project-level Cloud NGFW Enterprise components (Threat Prevention profile, Security Profile Group, Firewall Endpoint in zone us-central1-a, and Endpoint Association attaching the TLS policy), and global network firewall policy egress rules.

For each resource, briefly state its role in the security boundary and how it connects to adjacent components.
Gerar e auditar o script de implantação
- No modo
/goal, execute o comando a seguir para gerar um script de implantaçãobashcompleto e não interativo e fazer uma auditoria automática dele de acordo com os requisitos de compliance na mesma vez:Act as a Principal Infrastructure Engineer. Using the @retrieving-developer-knowledge skill, generate a complete, non-interactive Bash script to deploy this entire security architecture for our "gCurrenC calculator" app, and self-audit the script before outputting it. Requirements: - Discover the project ID, region, and zone dynamically from the existing 'gcurrenc-app-subnet' and 'gcurrenc-app-mig'. - Keep all resources scoped strictly to the project level (no Organization resource). - Deploy the proxy-only subnet, global external Application Load Balancer, Cloud Router, and Cloud NAT. Don't use Cloud Armor. - Deploy project-level Cloud NGFW Enterprise with CAS TLS inspection ('--tls-inspect' on the firewall policy egress rule and 'gcloud beta' for the project-level firewall endpoint association) and an explicit DENY override for malware and antivirus threats. - Distribute the root CA to the private VMs over IAP SSH with connection timeouts so the guest OS trust store is updated. - Print the final Load Balancer URL ('https://${LB_IP}') at the end. Wrap the script in 'set -euxo pipefail' and output only the single executable bash script block.bashcompleto, faz uma auditoria automática de cada comando em relação às restrições de compliance e gera o bloco de script executável único envolvido emset -euxo pipefail.
Executar o script de implantação de segurança
- No modo
/goal, cole o scriptbashgerado no comando anterior na janela de chat do Antigravity no formato a seguir para executar a implantação e gerar o URL do aplicativo ativo (https://<LB_IP>):Run this script. <PASTED-SCRIPT>
7. Verificar o aplicativo protegido
Quando o script de implantação é concluído, o Antigravity gera o URL HTTPS externo do balanceador de carga de aplicativo externo global (https://<LB_IP>).
- Abra
https://<LB_IP>no navegador da Web e ignore o aviso de certificado autoassinado do navegador para carregar a interface da calculadora gCurrenC: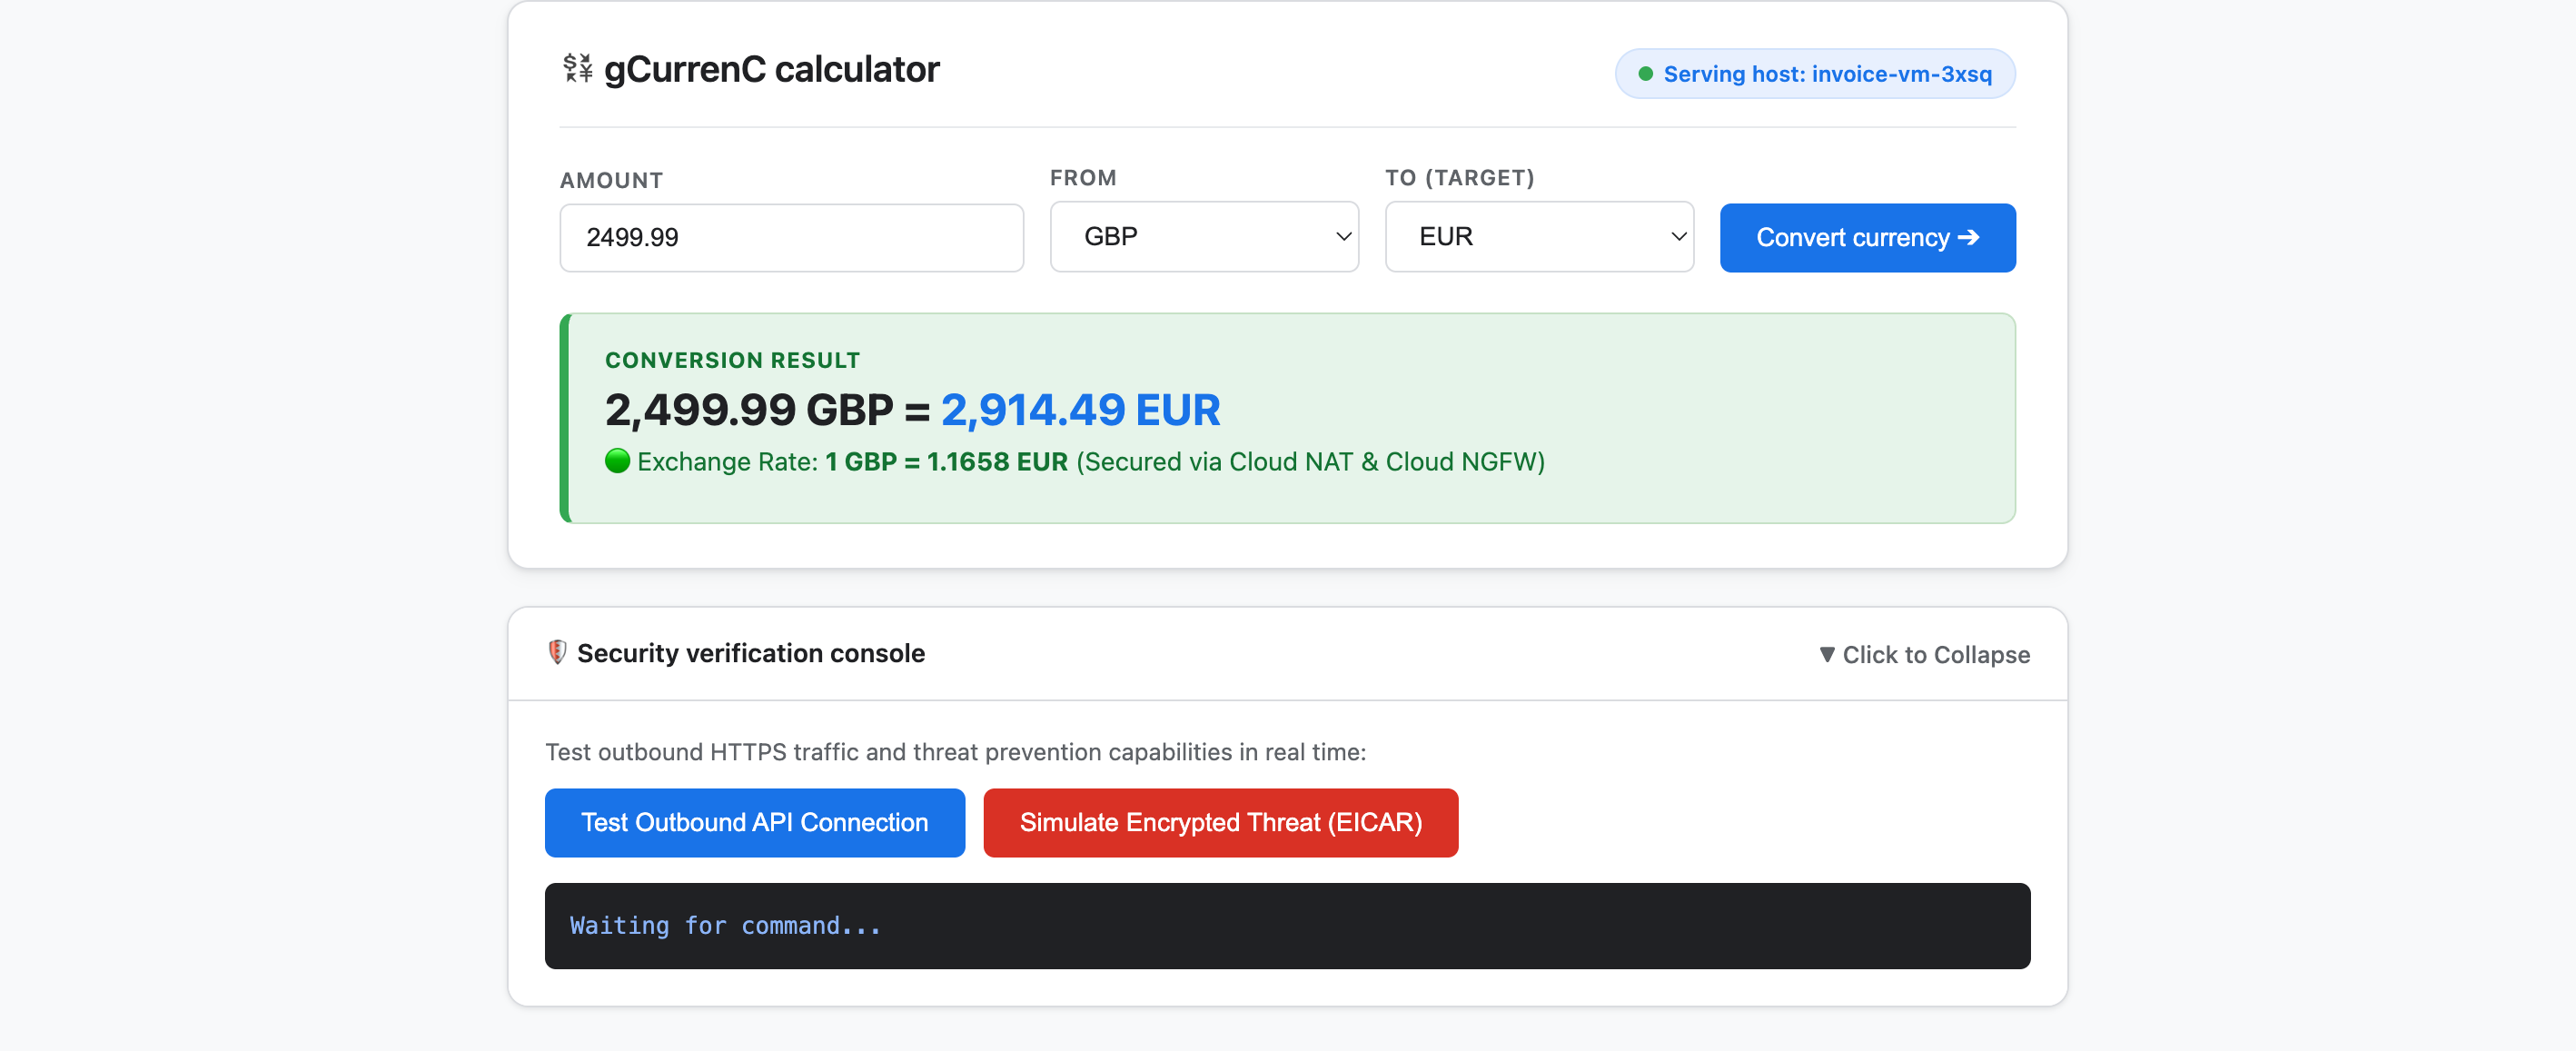
- Teste o aplicativo para verificar a conectividade de saída e a prevenção de ameaças:
- Clique em Converter moeda. O aplicativo mostra a taxa de câmbio convertida em tempo real imediatamente. Isso confirma que as rotas de balanceamento de carga de entrada são encaminhadas sem problemas pelos Google Front Ends (GFEs) e pela sub-rede somente proxy, enquanto o Cloud NAT busca as taxas de câmbio em tempo real de
api.frankfurter.dev. - Expanda o Console de verificação de segurança e clique em Testar conexão de API de saída. O aplicativo exibe
verdict: PERMITTED(HTTP 200). Isso confirma que o roteamento do Cloud NAT funciona e que o sistema operacional da VM confia na CA raiz do CAS particular para sessões HTTPS descriptografadas. - Clique em Simular ameaça criptografada (EICAR). O aplicativo exibe
verdict: PERMITTED. Isso confirma que o Cloud NGFW Enterprise descriptografa a solicitação HTTPS de saída usando a inspeção de TLS com suporte do CAS e inspeciona a assinatura de teste do EICAR com o serviço de prevenção de invasões (IPS).
- Clique em Converter moeda. O aplicativo mostra a taxa de câmbio convertida em tempo real imediatamente. Isso confirma que as rotas de balanceamento de carga de entrada são encaminhadas sem problemas pelos Google Front Ends (GFEs) e pela sub-rede somente proxy, enquanto o Cloud NAT busca as taxas de câmbio em tempo real de
8. Limpar
Para evitar cobranças contínuas na sua conta do Google Cloud pelos recursos criados neste codelab, exclua apenas os recursos do codelab ou exclua o projeto na nuvem do Google Cloud.
- Se você quiser manter o projeto na nuvem do Google Cloud e remover apenas os recursos criados durante este codelab, execute o seguinte comando no modo
/goalna janela de chat do Antigravity:Remove all resources created in this session, including the gcurrenc app and its resources. Don't delete the project. - Se você criou um projeto na nuvem dedicado do Google Cloud para este codelab e quer excluí-lo, execute o seguinte comando no modo
/goalna janela de chat do Antigravity:Clean up the demo environment by deleting the Google Cloud project. Run the following command in the terminal: gcloud projects delete "$(gcloud config get-value project 2>/dev/null)" --quiet
9. Parabéns
Parabéns! Você implantou e protegeu o aplicativo da Web calculadora gCurrenC no Google Cloud usando o plug-in do Google Cloud Developer (servidor MCP do DK) no Google Antigravity.
A seguir
Confira a documentação oficial do Google Cloud para saber mais sobre os serviços usados neste codelab:
- Instalar e usar o plug-in do Google Cloud Developer no Antigravity
- Conectar-se ao servidor MCP de conhecimento do desenvolvedor
- Biblioteca de habilidades do agente
- Plug-in de conhecimento para desenvolvedores
- Visão geral do balanceador de carga de aplicativo
- Documentação do Certificate Authority Service
- Visão geral do Cloud Next Generation Firewall