

1. Введение
В этой практической работе вы создадите и развернете веб-приложение gCurrenC в Google Cloud, а затем защитите его от нежелательного доступа. Используя Google Antigravity, плагин Google Cloud Developer и сервер MCP Developer Knowledge (DK), вы разработаете и внедрите архитектуру безопасности, которая контролирует доступ к приложению и защищает его от несанкционированного использования.
В этой лабораторной работе вы подключите Google Antigravity к MCP-серверу DK, который заземляет Antigravity в официальной документации Google Cloud, обновляемой в реальном времени. Вместо того чтобы полагаться на статические данные для обучения или устаревшие веса моделей, Antigravity динамически извлекает текущие архитектурные шаблоны, последний синтаксис CLI gcloud и параметры безопасности, что снижает количество галлюцинаций и обосновывает ответы на основе актуальных знаний.
Что вы создадите
- Частная вычислительная рабочая нагрузка. Две виртуальные машины Compute Engine, на которых запущено веб-приложение gCurrenC calculator в пользовательской сети VPC без общедоступных IP-адресов.
- Защищенный конвейер входящего трафика. Глобальный внешний балансировщик нагрузки приложений со специальной подсетью только для прокси-серверов, которая направляет интернет-трафик через Google Front End (GFE) на ваши частные виртуальные машины, не открывая их для общедоступного интернета.
- Защищенный конвейер исходящего трафика. Cloud Router и шлюз Cloud NAT в сочетании с Cloud Next Generation Firewall (Cloud NGFW) Enterprise на уровне проекта и Certificate Authority Service (CAS) для оперативной проверки TLS и сканирования Intrusion Prevention Service (IPS) исходящего трафика API обмена валют по протоколу HTTPS.
Что вы узнаете
- Установите плагин
google-cloud-developerс помощью Antigravity CLI и настройте сервер DK MCP в Antigravity. - Разверните и протестируйте изолированное частное веб-приложение в Compute Engine, используя переадресацию TCP через прокси-сервер с идентификацией (IAP).
- Используйте обоснованные многоэтапные запросы в Antigravity, чтобы разработать архитектуру безопасности входящего и исходящего трафика на уровне проекта.
- Создайте, проверьте и запустите скрипт развертывания
bashдля глобальной внешней балансировки нагрузки приложений, Cloud NAT, CAS и Cloud NGFW Enterprise.
2. Подготовка
Требования
Прежде чем начать практическую работу, убедитесь, что у вас есть:
- Аккаунт Google и браузер Google Chrome.
- Новый проект Google Cloud с включенными платежными функциями. Запишите идентификатор проекта (
PROJECT_ID). Он понадобится вам в ходе этой практической работы, чтобы включить API, создать ключ API и развернуть ресурсы Google Cloud. - Разрешения Identity and Access Management (IAM) в облачном проекте Google Cloud для создания ключей API, ресурсов Compute Engine, сетей VPC, пулов CAS, туннеля IAP и конечных точек Cloud NGFW.
- Выполните аутентификацию с помощью
gcloudCLI, задайте активный облачный проект Google Cloud и включите необходимые API:- В терминале или Cloud Shell проверьте, выполнена ли аутентификация:
gcloud auth listgcloud auth login - Убедитесь, что интерфейс командной строки
gcloudнастроен на использование вашего проекта:gcloud config list projectPROJECT_IDна идентификатор проекта Google Cloud:export PROJECT_ID=PROJECT_ID gcloud config set project PROJECT_ID - Включите необходимые API в проекте Google Cloud:
gcloud services enable \
   compute.googleapis.com \
   iap.googleapis.com \
   networksecurity.googleapis.com \
   privateca.googleapis.com \
   developerknowledge.googleapis.com \
   apikeys.googleapis.com
- В терминале или Cloud Shell проверьте, выполнена ли аутентификация:
- Установите Antigravity 2.0 на локальный компьютер со страницы скачивания Google Antigravity.
Как установить плагин Google Cloud Developer с помощью Antigravity CLI
Чтобы установить плагин Google Cloud Developer с помощью Antigravity CLI, выполните следующие действия:
- Чтобы установить Antigravity CLI на локальную рабочую станцию, выполните следующие действия:
- Откройте локальный терминал.
- Запустите скрипт установки:
curl -fsSL https://antigravity.google/cli/install.sh | bash - Закройте и снова откройте сеанс терминала, чтобы двоичный файл Antigravity CLI
agyстал доступен в вашей системеPATH.
- В локальном терминале выполните следующую команду, чтобы установить плагин
google-cloud-developer:agy plugin install https://github.com/google/skills/plugins/cloud/google-cloud-developerCloning plugin from https://github.com/google/skills.git... [ok] google-cloud-developer ✔ skills : 5 processed - agents : skipped (not found) - commands : skipped (not found) ✔ mcpServers : 1 processed - hooks : skipped (not found)
3. Как настроить Antigravity и MCP-сервер DK
В этом разделе вы настроите сервер MCP DK в Antigravity, используя ограниченный ключ Google Cloud API.
- Откройте Antigravity, введите
/goalи нажмите Ввод, чтобы активировать режим цели. Затем вставьте следующий запрос, чтобы создать ключ API с ограниченным доступом и настроить сервер MCP для DK. ЗаменитеPROJECT_IDидентификатором проекта Google Cloud из раздела Подготовка. Дополнительную информацию можно найти в статье Плагин google-cloud-developer.Set up Antigravity to use the Developer Knowledge MCP server on my local machine. Run the necessary terminal commands to complete the following: 1. Create a restricted API key named 'DKP-MCP-Key' that can only target the Developer Knowledge API. Use the PROJECT_ID to create the API key. 2. Retrieve the actual key string of the newly created API key. 3. Create or safely update my ~/.gemini/config/mcp_config.json file (preserve any existing MCP servers) with the correct JSON structure to connect the developer-knowledge server using that API key in the headers. You MUST use the following JSON structure for the new server: "developer-knowledge": { "serverUrl": "https://developerknowledge.googleapis.com/mcp", "headers": { "x-goog-api-key": "<INSERT_RETRIEVED_API_KEY_HERE>" } } When you are done, confirm that the setup is complete. - Чтобы проверить, активен ли сервер MCP DK, введите в окне чата Antigravity следующий запрос:
Which MCP servers are available?developer-knowledgeи доступные инструменты (search_documents,answer_queryиget_documents):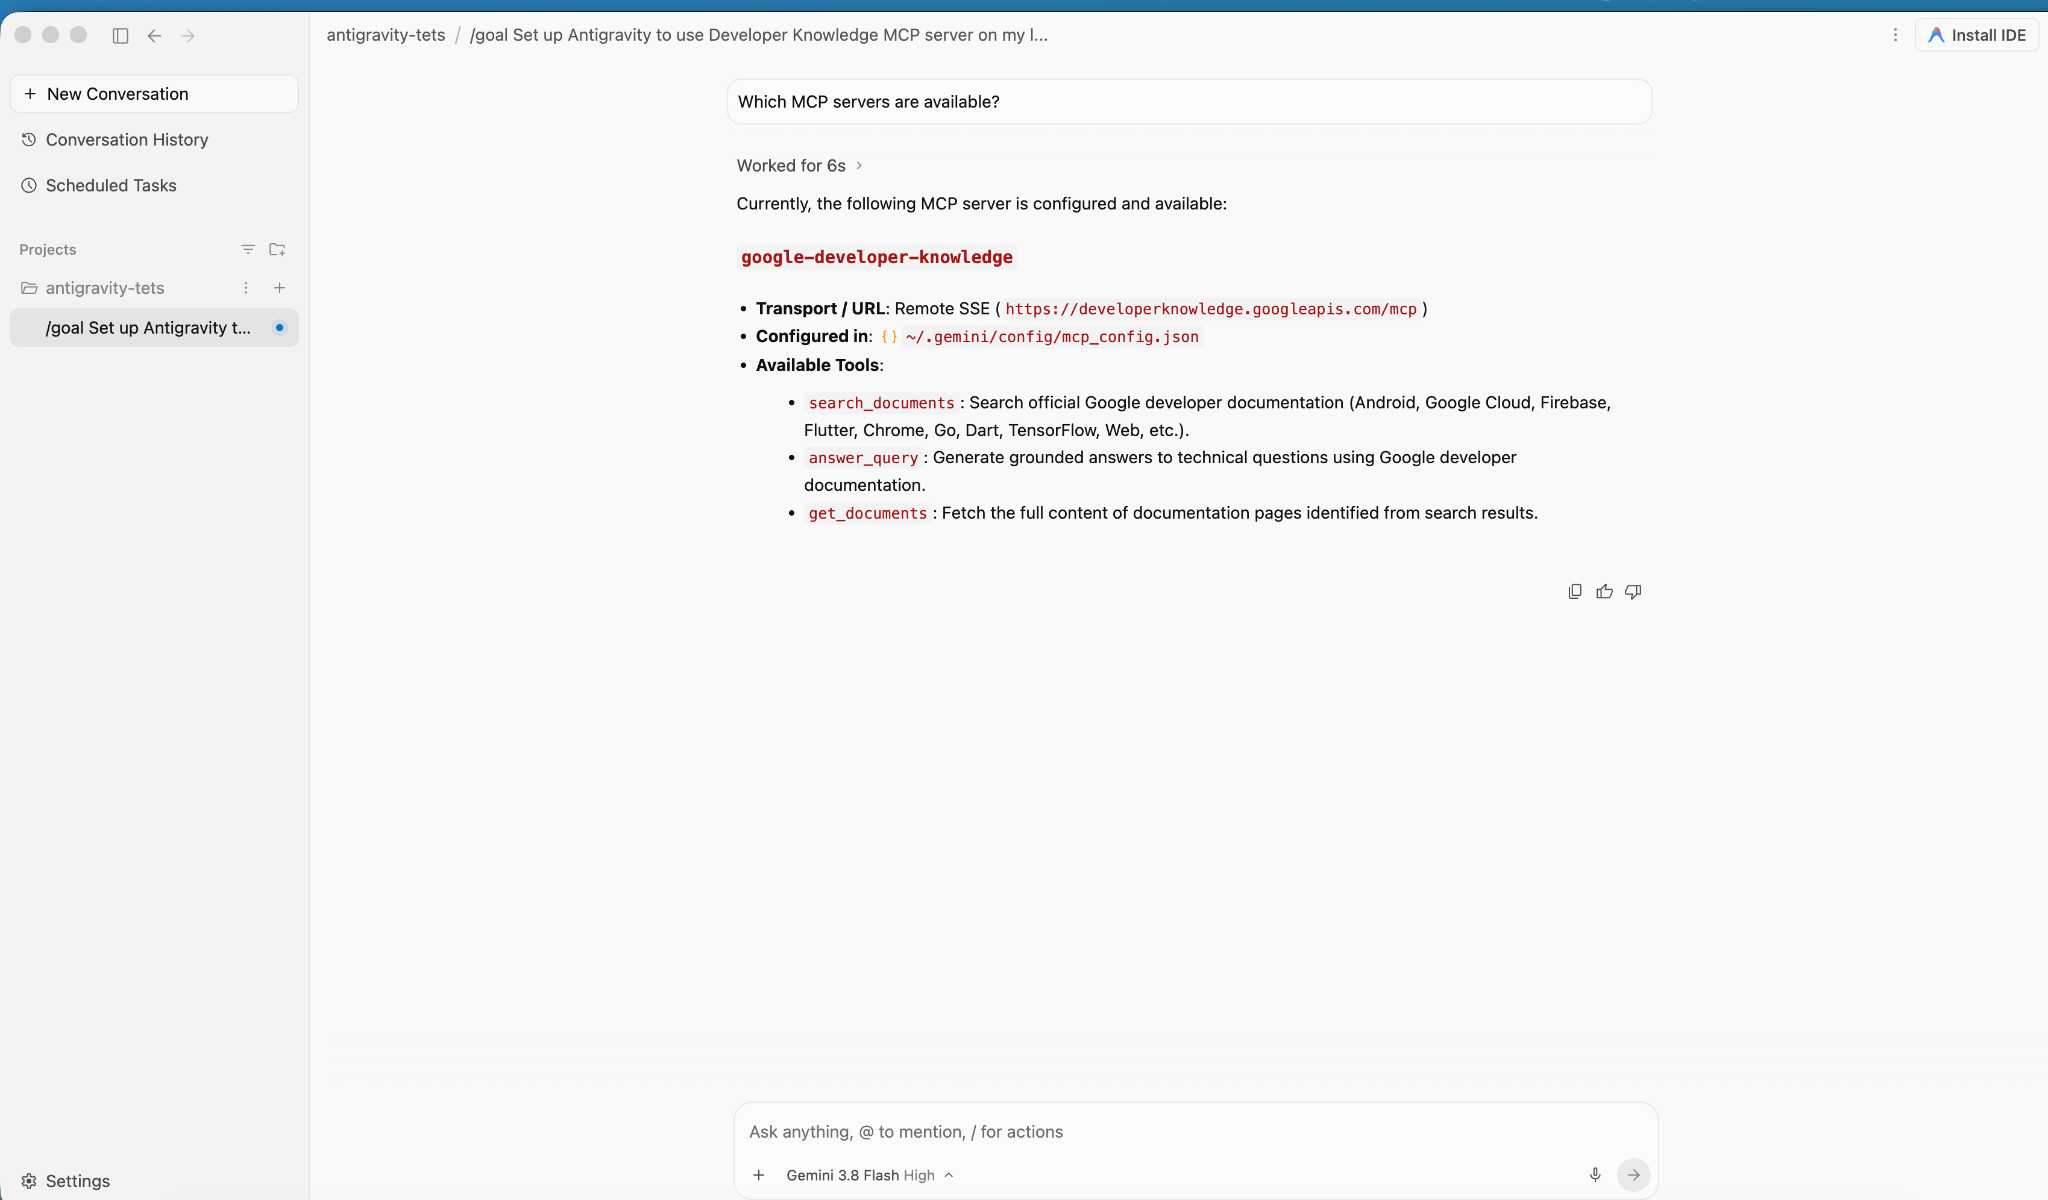
4. Как создать и развернуть приложение
В этом разделе вы развернете приложение gCurrenC calculator на двух частных виртуальных машинах Compute Engine в пользовательской сети VPC.
Приложение предоставляет:
- Конвертер валют, работающий в реальном времени и поддерживающий
USD,EUR,GBP,JPY,CAD,INRиAUD. Он использует встроенную стандартную библиотеку Pythonhttp.serverна порте8080с конечной точкой проверки работоспособности/healthz. - Консоль проверки безопасности для проверки в реальном времени исходящих подключений API и зашифрованных зондов для предотвращения угроз.
- Правило брандмауэра для входящего трафика, разрешающее диапазону IAP Google доступ к портам
22и8080для административного тестирования без раскрытия общедоступных IP-адресов.
Развертывание приложения
- В окне чата Antigravity введите
/goalи выполните следующий запрос:You are a Cloud developer. Deploy the "gCurrenC calculator" app onto two (2) Compute Engine VMs with no external IP addresses (`--no-address`) inside a dedicated custom VPC network and private subnet. CRITICAL INSTRUCTIONS ON OUTPUT: - The VMs are strictly private with no external IP addresses and the local IAP tunnel has NOT been started yet. Any web URL is completely unreachable and will fail with a connection error. - In your final response, simply confirm that the private VMs and Managed Instance Group are deployed, and state that the user should establish the IAP tunnel. Do not output, format, or suggest any web preview link or URL (such as http://localhost:8080 or internal IP addresses) in your final response. Run this script in the terminal: ```bash #!/usr/bin/env bash set -euxo pipefail # Disable any interactive confirmation prompts so execution never hangs export CLOUDSDK_CORE_DISABLE_PROMPTS=1 # --- User Configuration --- PROJECT_ID="[PROJECT_ID]" REGION="us-central1" ZONE="us-central1-a" NETWORK="gcurrenc-vpc" SUBNET="gcurrenc-app-subnet" SUBNET_RANGE="10.10.1.0/24" # -------------------------- echo "==> [1/5] Configuring project, default region/zone, and enabling APIs..." gcloud config set project "${PROJECT_ID}" gcloud config set compute/region "${REGION}" gcloud config set compute/zone "${ZONE}" gcloud services enable compute.googleapis.com echo "==> [2/5] Creating custom VPC network and private workload subnet..." gcloud compute networks create "${NETWORK}" \ --subnet-mode=custom \ --description="Dedicated VPC for currency exchange app demo" 2>/dev/null || true gcloud compute networks subnets create "${SUBNET}" \ --network="${NETWORK}" \ --region="${REGION}" \ --range="${SUBNET_RANGE}" \ --enable-private-ip-google-access \ --description="Private subnet hosting backend compute instances" 2>/dev/null || true echo "==> [3/5] Generating standalone Python standard-library startup script..." cat << 'STARTUP_EOF' > /tmp/private_app_startup.sh #!/bin/bash set -euxo pipefail mkdir -p /opt/gcurrenc-app # Pure Python standard-library application (zero pip/apt dependencies needed at boot) cat << 'APPEOF' > /opt/gcurrenc-app/app.py import os import sys import json import socket import urllib.request import urllib.parse import ssl from http.server import BaseHTTPRequestHandler, ThreadingHTTPServer SUPPORTED_CURRENCIES = ["USD", "EUR", "GBP", "JPY", "CAD", "INR", "AUD"] class CurrencyAppHandler(BaseHTTPRequestHandler): def address_string(self): return str(self.client_address[0]) def do_GET(self): parsed = urllib.parse.urlparse(self.path) path = parsed.path params = urllib.parse.parse_qs(parsed.query) if path == "/favicon.ico": self.send_response(204) self.end_headers() return if path == "/healthz": self.send_response(200) self.send_header("Content-Type", "text/plain") self.end_headers() self.wfile.write(b"OK") return if path == "/api/security-test": mode = params.get("mode", ["safe"])[0] target = "https://secure.eicar.org/eicar.com.txt" if mode == "threat" else "https://api.frankfurter.dev/v1/latest?from=USD&to=EUR" try: req = urllib.request.Request(target, headers={"User-Agent": "SecureCurrencyApp/1.0"}) ctx = ssl.create_default_context() with urllib.request.urlopen(req, timeout=5, context=ctx) as resp: data = {"verdict": "PERMITTED", "target": target, "http_status": resp.status} code = 200 except Exception as e: data = {"verdict": "BLOCKED_OR_FAILED", "target": target, "error": str(e)} code = 502 self.send_response(code) self.send_header("Content-Type", "application/json") self.end_headers() self.wfile.write(json.dumps(data, indent=2).encode("utf-8")) return self.render_page() def do_POST(self): parsed = urllib.parse.urlparse(self.path) if parsed.path == "/generate": content_length = int(self.headers.get("Content-Length", 0)) post_body = self.rfile.read(content_length).decode("utf-8") form = urllib.parse.parse_qs(post_body) base_curr = form.get("base_curr", ["USD"])[0] target_curr = form.get("target_curr", ["EUR"])[0] try: amount = float(form.get("amount", ["2500.00"])[0]) except ValueError: amount = 2500.00 rate_str = "Unavailable" total_str = "Rate lookup pending outbound internet activation" try: if base_curr == target_curr: rate = 1.0 else: url = f"https://api.frankfurter.dev/v1/latest?from={base_curr}&to={target_curr}" req = urllib.request.Request(url, headers={"User-Agent": "SecureCurrencyApp/1.0"}) with urllib.request.urlopen(req, timeout=4) as resp: res_json = json.loads(resp.read().decode("utf-8")) rate = res_json["rates"][target_curr] rate_str = str(rate) total_str = f"{round(amount * rate, 2):,.2f} {target_curr}" except Exception as e: total_str = f"Outbound connection unavailable {str(e)}" self.render_page(base_curr, target_curr, amount, rate_str, total_str) return self.send_response(404) self.end_headers() def render_page(self, base_curr="USD", target_curr="EUR", amount=2500.00, fx_rate="1.00", total_str=""): hostname = socket.gethostname() curr_options_base = "".join([f'<option value="{c}" {"selected" if c == base_curr else ""}>{c}</option>' for c in SUPPORTED_CURRENCIES]) curr_options_target = "".join([f'<option value="{c}" {"selected" if c == target_curr else ""}>{c}</option>' for c in SUPPORTED_CURRENCIES]) result_block = "" if total_str: if fx_rate == "Unavailable": rate_line = "<p style='margin: 6px 0;'>Exchange Rate: <span style='color: #d93025; font-weight: bold;'>⚠️ Offline-Outbound internet blocked</span></p>" else: rate_line = f"<p style='margin: 6px 0; font-size: 14px; color: #137333;'>🟢 Exchange Rate: <strong>1 {base_curr} = {fx_rate} {target_curr}</strong> (Secured via Cloud NAT & Cloud NGFW)</p>" result_block = f""" <div style="margin-top: 22px; background: #e6f4ea; border: 1px solid #c6e1c6; border-left: 5px solid #34a853; padding: 18px 20px; border-radius: 8px;"> <h4 style="margin: 0 0 6px 0; text-transform: uppercase; font-size: 12px; color: #137333; letter-spacing: 0.5px;">Conversion Result</h4> <div style="font-size: 24px; font-weight: 700; color: #202124; margin-bottom: 6px;"> {amount:,.2f} {base_curr} = <span style="color: #1a73e8;">{total_str}</span> </div> {rate_line} </div> """ html = ("""<!DOCTYPE html> <html lang="en"> <head> <meta charset="UTF-8"> <meta name="viewport" content="width=device-width, initial-scale=1.0"> <title>gCurrenC calculator</title> <style> body { font-family: -apple-system, BlinkMacSystemFont, "Segoe UI", Roboto, "Helvetica Neue", Arial, sans-serif; background: #f8f9fa; margin: 30px 15px; color: #202124; display: flex; justify-content: center; } .container { width: 100%; max-width: 860px; } .card { background: white; padding: 24px 28px; border-radius: 12px; box-shadow: 0 1px 3px rgba(60,64,67,0.12), 0 4px 8px rgba(60,64,67,0.06); border: 1px solid #dadce0; margin-bottom: 20px; } .header { display: flex; justify-content: space-between; align-items: center; border-bottom: 1px solid #e8eaed; padding-bottom: 14px; margin-bottom: 20px; } .header h2 { margin: 0 0 4px 0; font-size: 20px; font-weight: 600; } .header p { margin: 0; font-size: 13px; color: #5f6368; } .badge { background: #e8f0fe; color: #1a73e8; padding: 6px 12px; border-radius: 16px; font-weight: 600; font-size: 12px; border: 1px solid #d2e3fc; display: flex; align-items: center; gap: 6px; } .badge::before { content: ""; width: 8px; height: 8px; border-radius: 50%; background-color: #34a853; } .form-row { display: flex; gap: 14px; align-items: flex-end; flex-wrap: wrap; } .form-group { display: flex; flex-direction: column; gap: 6px; } .form-group label { font-size: 12px; font-weight: 600; color: #5f6368; text-transform: uppercase; letter-spacing: 0.5px; } input, select { padding: 10px 14px; border: 1px solid #dadce0; border-radius: 6px; font-size: 14px; color: #202124; background-color: #fff; box-sizing: border-box; transition: border-color 0.15s, box-shadow 0.15s; } input:focus, select:focus { outline: none; border-color: #1a73e8; box-shadow: 0 0 0 3px rgba(26, 115, 232, 0.15); } button { padding: 11px 20px; background: #1a73e8; color: white; border: none; border-radius: 6px; font-size: 14px; font-weight: 500; cursor: pointer; transition: background 0.15s, box-shadow 0.15s; } button:hover { background: #1557b0; box-shadow: 0 1px 2px rgba(60,64,67,0.3); } .danger-btn { background: #d93025; } .danger-btn:hover { background: #b31412; } pre { background: #202124; color: #8ab4f8; padding: 14px; border-radius: 6px; overflow-x: auto; font-family: "SF Mono", "Fira Code", Consolas, monospace; font-size: 13px; line-height: 1.5; margin: 0; } /* Collapsible Security Console */ details.security-drawer { background: white; border-radius: 12px; box-shadow: 0 1px 3px rgba(60,64,67,0.12); border: 1px solid #dadce0; overflow: hidden; margin-bottom: 24px; } details.security-drawer summary { padding: 16px 20px; font-size: 14px; font-weight: 600; cursor: pointer; list-style: none; display: flex; justify-content: space-between; align-items: center; user-select: none; background: #fafafa; transition: background 0.15s; } details.security-drawer summary::-webkit-details-marker { display: none; } details.security-drawer summary:hover { background: #f1f3f4; } details.security-drawer[open] summary { border-bottom: 1px solid #dadce0; background: #ffffff; } .expand-toggle { font-size: 13px; font-weight: 500; } details.security-drawer summary .expand-toggle::before { content: "▶ Click to Expand"; color: #1a73e8; } details.security-drawer[open] summary .expand-toggle::before { content: "▼ Click to Collapse"; color: #5f6368; } .drawer-body { padding: 20px; background: #ffffff; } .drawer-body p { margin-top: 0; font-size: 13px; color: #5f6368; } .probe-buttons { display: flex; gap: 10px; margin-bottom: 14px; } </style> </head> <body> <div class="container"> <div class="card"> <div class="header"> <div> <h2>💱 gCurrenC calculator</h2> </div> <div class="badge">Serving host: {hostname}</div> </div> <form method="POST" action="/generate"> <div class="form-row"> <div class="form-group" style="flex: 1.5; min-width: 140px;"> <label>Amount</label> <input type="number" step="0.01" name="amount" value="{amount}" required> </div> <div class="form-group" style="flex: 1; min-width: 100px;"> <label>From</label> <select name="base_curr">{curr_options_base}</select> </div> <div class="form-group" style="flex: 1; min-width: 100px;"> <label>To (Target)</label> <select name="target_curr">{curr_options_target}</select> </div> <div class="form-group"> <button type="submit">Convert currency ➔</button> </div> </div> </form> {result_block} </div> <!-- Collapsible Security Verification Console --> <details class="security-drawer"> <summary> <span>🛡️ Security verification console</span> <span class="expand-toggle"></span> </summary> <div class="drawer-body"> <p>Test outbound HTTPS traffic and threat prevention capabilities in real time:</p> <div class="probe-buttons"> <button type="button" onclick="runProbe('safe')">Test Outbound API Connection</button> <button type="button" class="danger-btn" onclick="runProbe('threat')">Simulate Encrypted Threat (EICAR)</button> </div> <pre id="output">Waiting for command...</pre> </div> </details> </div> <script> function runProbe(mode) { const el = document.getElementById('output'); el.innerText = 'Executing outbound request...'; fetch('/api/security-test?mode=' + mode) .then(res => res.json()) .then(data => el.innerText = JSON.stringify(data, null, 2)) .catch(err => el.innerText = 'Connection dropped / reset by Firewall: ' + err); } </script> </body> </html>""" .replace("{hostname}", str(hostname)) .replace("{amount}", str(amount)) .replace("{curr_options_base}", curr_options_base) .replace("{curr_options_target}", curr_options_target) .replace("{result_block}", result_block) ) self.send_response(200) self.send_header("Content-Type", "text/html; charset=utf-8") self.end_headers() self.wfile.write(html.encode("utf-8")) def run(): server_address = ('0.0.0.0', 8080) httpd = ThreadingHTTPServer(server_address, CurrencyAppHandler) httpd.serve_forever() if __name__ == '__main__': run() APPEOF # Register and start systemd unit cat << 'SERVICEEOF' > /etc/systemd/system/gcurrenc-app.service [Unit] Description=Currency exchange calculator web application After=network.target [Service] Type=simple User=root WorkingDirectory=/opt/gcurrenc-app ExecStart=/usr/bin/python3 /opt/gcurrenc-app/app.py Restart=always [Install] WantedBy=multi-user.target SERVICEEOF systemctl daemon-reload systemctl enable gcurrenc-app systemctl start gcurrenc-app STARTUP_EOF echo "==> [4/5] Creating Firewall, Regional Instance Template, and 2-VM MIG..." gcloud compute firewall-rules create allow-iap-admin \ --network="${NETWORK}" \ --allow=tcp:22,tcp:8080 \ --source-ranges=35.235.240.0/20 \ --target-tags=gcurrenc-app-vm \ --description="Allow IAP SSH and port 8080 access to private VMs" \ --quiet 2>/dev/null || true # Explicitly pass both --region and --instance-template-region to avoid prompt gcloud compute instance-templates create gcurrenc-app-template \ --instance-template-region="${REGION}" \ --region="${REGION}" \ --network="${NETWORK}" \ --subnet="${SUBNET}" \ --machine-type=e2-medium \ --no-address \ --tags=gcurrenc-app-vm \ --metadata-from-file=startup-script=/tmp/private_app_startup.sh \ --quiet gcloud compute instance-groups managed create gcurrenc-app-mig \ --base-instance-name=gcurrenc-vm \ --template="projects/${PROJECT_ID}/regions/${REGION}/instanceTemplates/gcurrenc-app-template" \ --size=2 \ --zone="${ZONE}" \ --quiet gcloud compute instance-groups managed set-named-ports gcurrenc-app-mig \ --named-ports=http-port:8080 \ --zone="${ZONE}" \ --quiet echo "==> [5/5] Verifying private VM deployment and internal status..." sleep 30 gcloud compute instances list \ --filter="name ~ '^gcurrenc-vm-'" \ --zones="${ZONE}" \ --format="table(name,zone.basename():label=ZONE,networkInterfaces[0].networkIP:label=INTERNAL_IP,status)" FIRST_VM=$(gcloud compute instances list \ --filter="name ~ '^gcurrenc-vm-'" \ --zones="${ZONE}" \ --format="value(name)" \ --limit=1) echo "Testing healthz on ${FIRST_VM} via IAP tunnel..." gcloud compute ssh "${FIRST_VM}" \ --zone="${ZONE}" \ --tunnel-through-iap \ --quiet \ --command="curl -fsS http://localhost:8080/healthz" echo "" echo "==========================================================================" echo "PREREQUISITE COMPLETE: 2 private VMs deployed with no external IPs." echo "VPC: ${NETWORK} | Subnet: ${SUBNET} (${SUBNET_RANGE})" echo "Instance Group: gcurrenc-app-mig (Zone: ${ZONE}, Port: 8080)" echo "" echo "The VMs are private and the IAP tunnel is not active. Set up the background IAP tunnel first to access the deployed app." echo "" echo "==========================================================================" ```
Проверка создания экземпляра ВМ
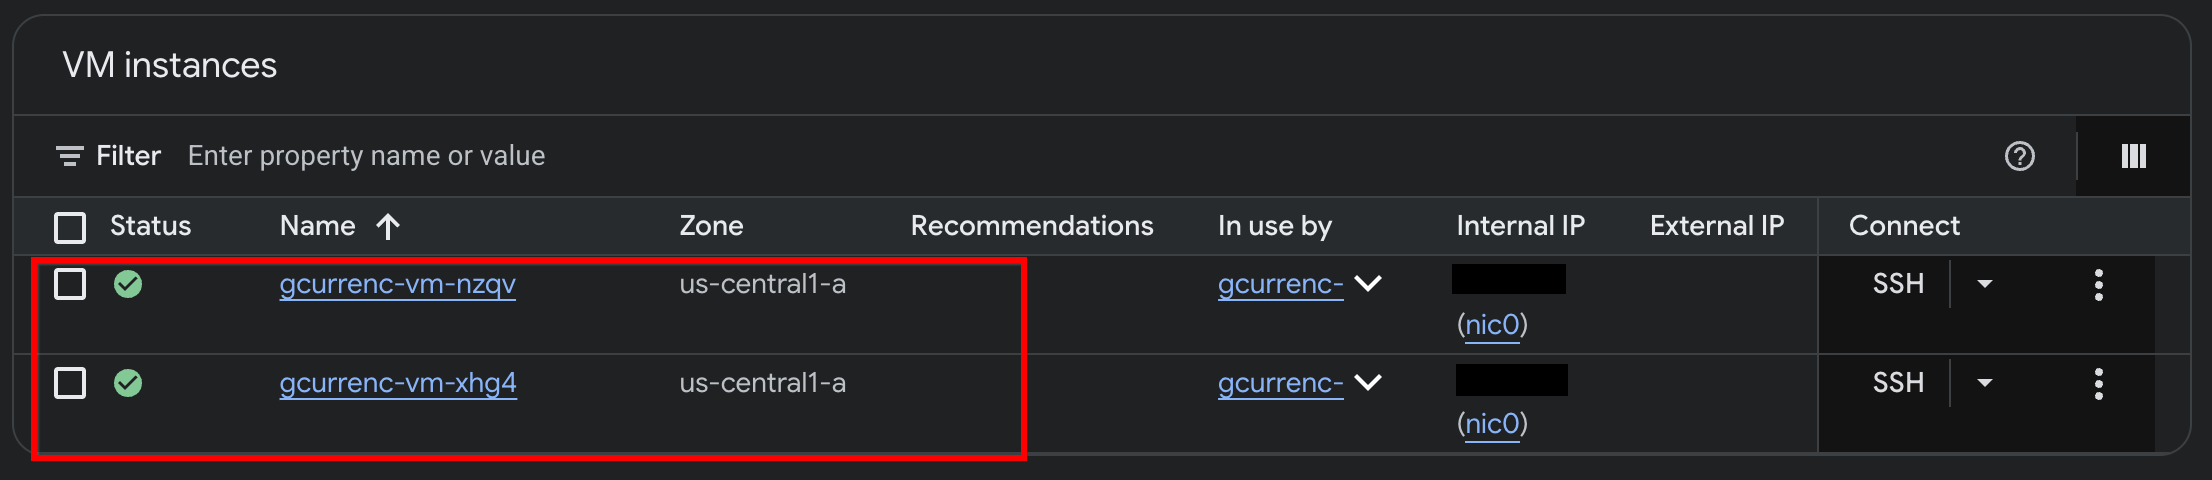
После того как Antigravity завершит развертывание приложения на двух частных виртуальных машинах Compute Engine, проверьте экземпляры в консоли Google Cloud:
- В консоли Google Cloud перейдите в раздел Экземпляры ВМ.
- Убедитесь, что у двух экземпляров виртуальных машин есть внутренние IP-адреса и нет внешних IP-адресов:
5. Тестирование приложения
Поскольку у частных виртуальных машин нет внешних IP-адресов (--no-address) и шлюза Cloud NAT, у них нет маршрута к интернету и они не могут получить доступ к внешним API обмена валют. Прежде чем настраивать безопасный исходящий доступ, протестируйте приложение через локальный туннель IAP, чтобы убедиться, что доступа к интернету нет.
- В режиме
/goalвведите в окне чата Antigravity следующий запрос:Automate the IAP tunnel configuration and health verification for the web app, then output the live test URL. Run a terminal script that performs the following steps non-interactively: 1. Firewall Check: - Identify the active network ('gcurrenc-vpc' if it exists, otherwise 'default'). - Idempotently ensure an ingress firewall rule exists permitting 'tcp:22,tcp:8080' from the Google IAP range '35.235.240.0/20' targeting 'gcurrenc-app-vm'. 2. VM Health Verification: - Find the first running instance matching '^gcurrenc-vm-' in zone 'us-central1-a'. - Via 'gcloud compute ssh --tunnel-through-iap', verify that the 'gcurrenc-app' systemd service is active. If not active, restart it. 3. Background IAP Tunnel: - Free up local port 8080 if an old tunnel or process is lingering (e.g., using 'lsof -ti:8080 | xargs kill -9' or 'fuser -k 8080/tcp'). - Launch 'gcloud compute start-iap-tunnel <VM_NAME> 8080 --local-host-port=localhost:8080 --zone=us-central1-a' in the background using nohup, redirecting output to '/tmp/iap_tunnel.log'. - Wait up to 10 seconds for the tunnel to establish, checking with 'curl -fsS http://localhost:8080/healthz'. 4. Output Web Preview URL: - Detect whether the environment is Google Cloud Shell (check if $CLOUD_SHELL is true) or a local workstation. - If Cloud Shell, print instructions and the direct web preview link. - If local machine, provide the clickable 'http://localhost:8080' URL. - После запуска туннеля откройте в браузере
http://localhost:8080/: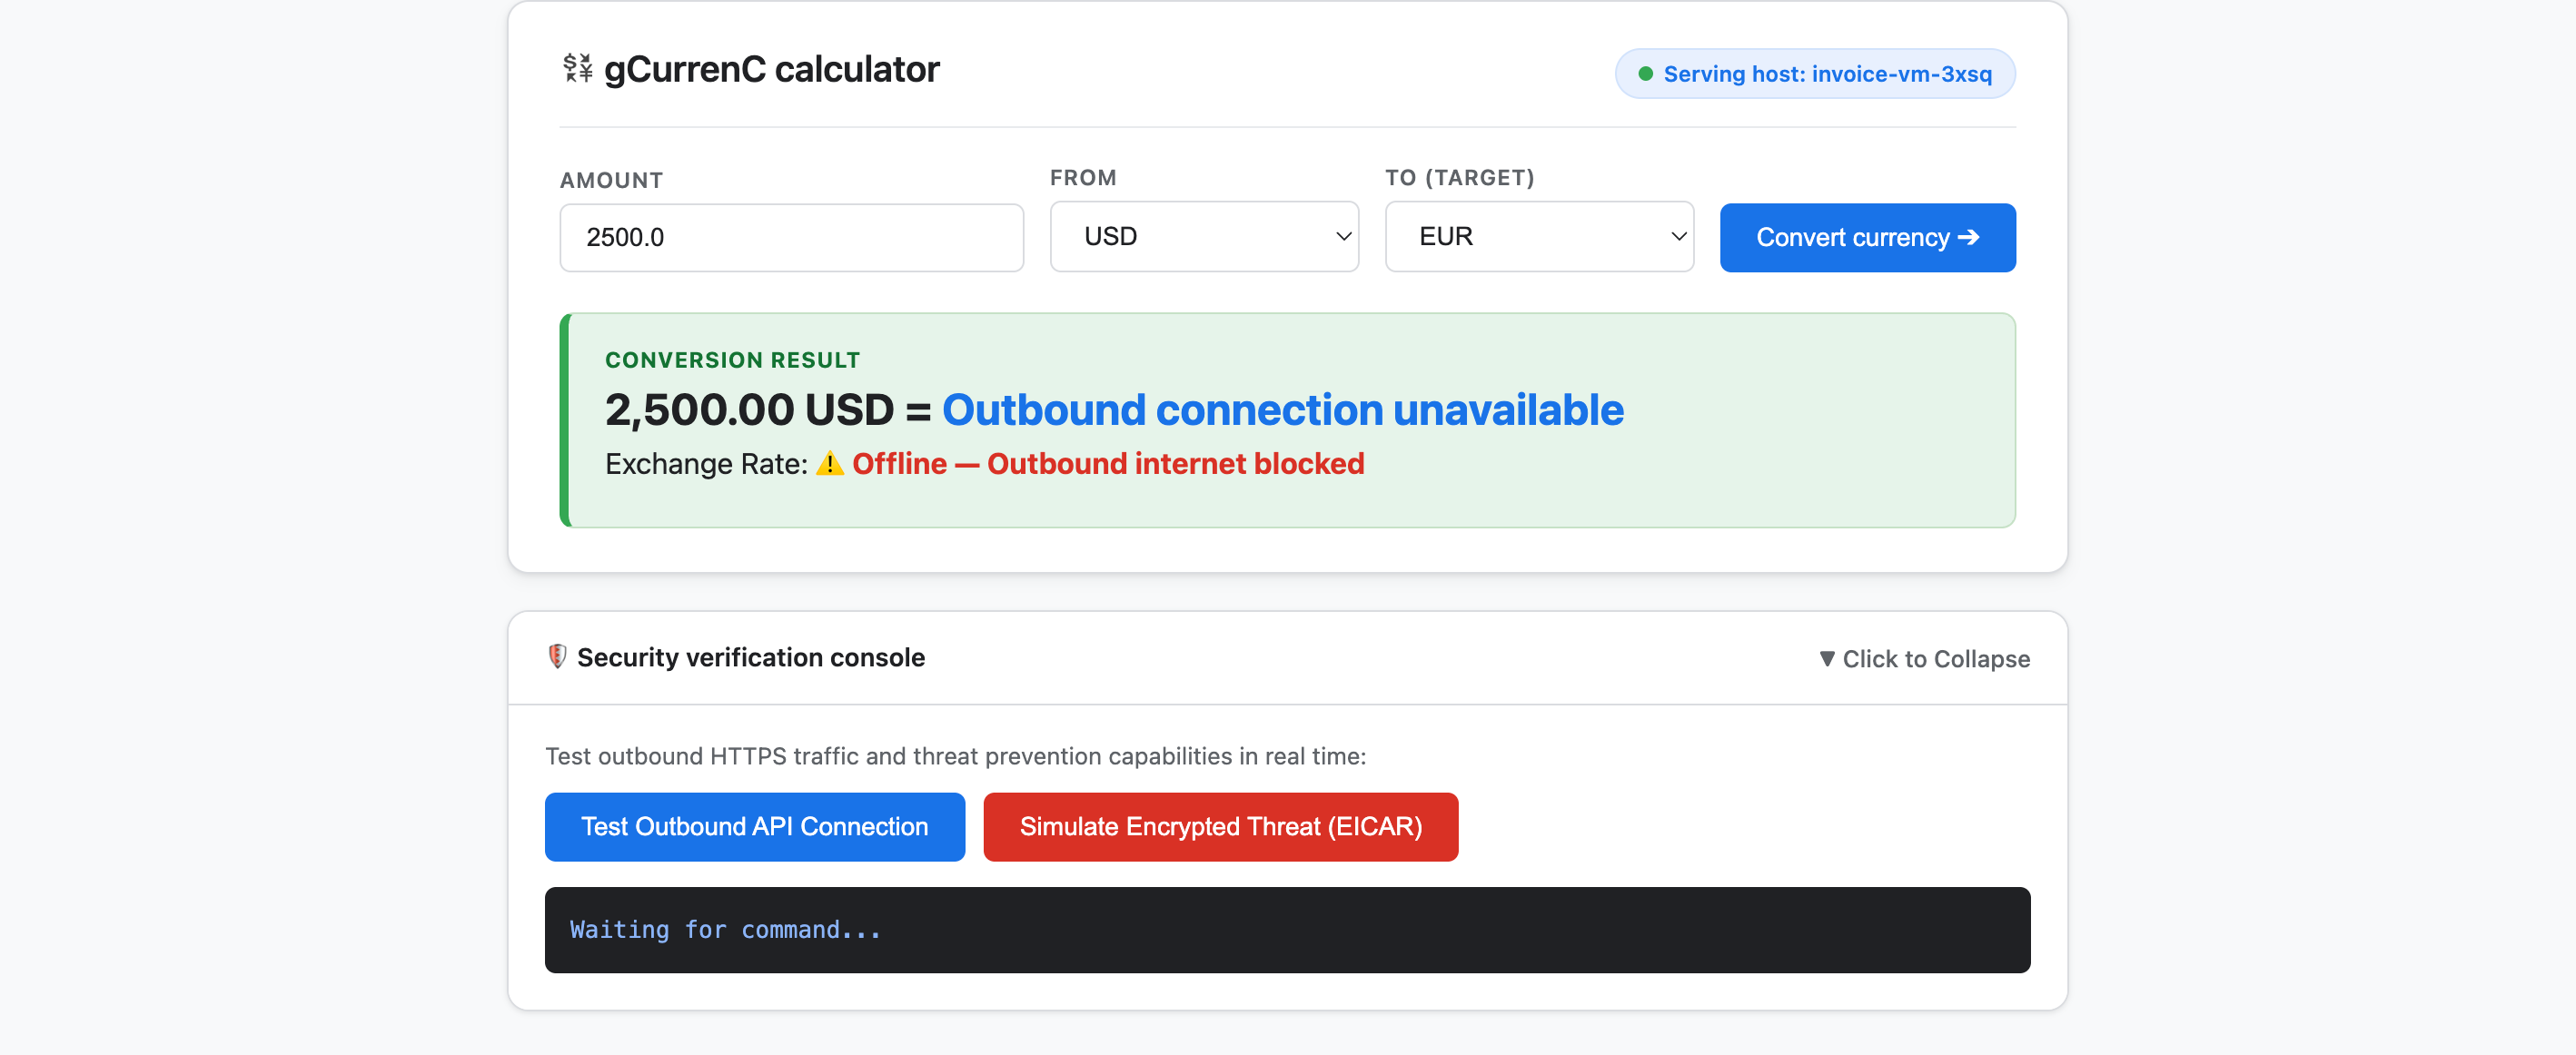
- Протестируйте приложение.
- Нажмите Конвертировать валюту. В результате конвертации отображаются
Offline - Outbound internet blockedиOutbound connection unavailable. Это ожидаемый результат, поскольку частные виртуальные машины не могут подключиться к интернету, чтобы получить последние курсы обмена валют. - Разверните раздел Консоль проверки безопасности и нажмите Проверить исходящее подключение API. В выходных данных отображается
verdict: BLOCKED_OR_FAILED(https://api.frankfurter.dev/v1/latest. Это ожидаемый результат, поскольку частные виртуальные машины не могут подключиться к интернету и получить курсы валют изhttps://api.frankfurter.dev/v1/latest. - Нажмите Имитировать зашифрованную угрозу (EICAR). В выходных данных также отображается
verdict: BLOCKED_OR_FAILEDдляhttps://secure.eicar.org/eicar.com.txt. Это также ожидаемый результат, поскольку у частных виртуальных машин нет подключения к интернету.
- Нажмите Конвертировать валюту. В результате конвертации отображаются
Остановите локальный туннель IAP
Прежде чем проектировать и развертывать архитектуру безопасности, закройте локальный туннель IAP, чтобы освободить порт 8080:
- В режиме
/goalвыполните следующий запрос:Free up local port 8080 and terminate any running Google Cloud IAP tunnels (e.g., kill processes matching 'start-iap-tunnel' or listening on port 8080).8080свободен.
6. Защита приложения
В предыдущих разделах вы создали частные виртуальные машины Compute Engine без общедоступных IP-адресов и проверили две основные проблемы с сетью и безопасностью:
- Входящий доступ (входной трафик). Пользователи интернета не могут напрямую подключаться к частным экземплярам ВМ. Чтобы предоставить доступ к веб-приложению, необходимо проксировать трафик через глобальный внешний балансировщик нагрузки приложений и выделенную подсеть только для прокси, не предоставляя доступ к ВМ через общедоступный интернет.
- Исходящий доступ (исходящий трафик). У частных виртуальных машин нет маршрута к интернету для запроса API обмена валют по HTTPS. Чтобы включить исходящий доступ, необходимо проверить зашифрованный трафик на наличие вредоносного ПО и утечки данных, не нарушая доверие SSL/TLS.
В этом разделе вы будете использовать Antigravity, чтобы разработать, проверить и развернуть архитектуру безопасности входящего и исходящего трафика на уровне проекта для своего приложения. При этом вы будете опираться на официальную документацию Google Cloud (@retrieving-developer-knowledge).
Разработка единой архитектуры безопасности
- В режиме
/goalвыполните следующий запрос, чтобы создать сквозную схему архитектуры и пояснение, охватывающее как входящие, так и исходящие потоки трафика:You are a Google Cloud Network and Security Architect. We need to design an end-to-end security architecture for our "gCurrenC calculator" app running on private Compute Engine VMs with no external IP addresses inside 'gcurrenc-vpc'. We are operating in a standalone Google Cloud project without an Organization resource, so all security resources must be scoped at the project level. Use the @retrieving-developer-knowledge skill to consult official Google Cloud documentation and suggest an architecture diagram and explanation covering both flows: 1. Ingress Flow: - How internet users securely reach the private VMs via a global external Application Load Balancer. - Why Envoy-based external Application Load Balancers require a dedicated proxy-only subnet, and how Google Front Ends (GFEs) proxy traffic to private backends without exposing VMs to the public internet. 2. Egress Flow: - How private VMs reach the internet via Cloud NAT to query live currency exchange APIs, such as frankfurter.dev. - How Cloud NGFW Enterprise provides Layer 7 deep packet inspection and intrusion prevention (IPS) for outbound encrypted HTTPS traffic. - How TLS inspection backed by Certificate Authority Service (CAS) decrypts outbound HTTPS sessions on the fly, and what Root CA trust configuration the private VMs require. Provide a clear diagram and explain how these components connect together.
Сгенерируй структуру архитектурного ресурса
- Введите следующий запрос, чтобы структурировать проект в виде категоризированного плана ресурсов на уровне проекта, прежде чем генерировать скрипт развертывания:
Act as a Lead Network Security Architect. Using the @retrieving-developer-knowledge skill, provide an architectural outline of all the Google Cloud resources required to secure the "gCurrenC calculator" app.

Our starting state:
- The custom VPC ('gcurrenc-vpc'), workload subnet ('gcurrenc-app-subnet'), and 2-instance MIG ('gcurrenc-app-mig', port 8080) are already deployed.
- All newly added security components must be project-level resources (no organization resources).

Structure your resource outline into three distinct categories, indicating which resources are new additions:
1. Core VPC Infrastructure: proxy-only subnet ('gcurrenc-proxy-subnet', 10.10.2.0/24), Cloud Router, and Cloud NAT gateway.
2. Inbound security (ingress): global external ALB components (forwarding rule on port 443, target HTTPS proxy, SSL certificate, URL map, backend service attached to 'gcurrenc-app-mig' on port 8080, and HTTP health check on '/healthz') and ingress firewall rules.
3. Outbound security (egress): CAS DevOps CA pool and root CA, project-level Cloud NGFW Enterprise components (Threat Prevention profile, Security Profile Group, Firewall Endpoint in zone us-central1-a, and Endpoint Association attaching the TLS policy), and global network firewall policy egress rules.

For each resource, briefly state its role in the security boundary and how it connects to adjacent components.
Как создать и проверить скрипт развертывания
- В режиме
/goalвыполните следующий запрос, чтобы сгенерировать полный неинтерактивный скрипт развертыванияbashи автоматически проверить его на соответствие требованиям в том же цикле:Act as a Principal Infrastructure Engineer. Using the @retrieving-developer-knowledge skill, generate a complete, non-interactive Bash script to deploy this entire security architecture for our "gCurrenC calculator" app, and self-audit the script before outputting it. Requirements: - Discover the project ID, region, and zone dynamically from the existing 'gcurrenc-app-subnet' and 'gcurrenc-app-mig'. - Keep all resources scoped strictly to the project level (no Organization resource). - Deploy the proxy-only subnet, global external Application Load Balancer, Cloud Router, and Cloud NAT. Don't use Cloud Armor. - Deploy project-level Cloud NGFW Enterprise with CAS TLS inspection ('--tls-inspect' on the firewall policy egress rule and 'gcloud beta' for the project-level firewall endpoint association) and an explicit DENY override for malware and antivirus threats. - Distribute the root CA to the private VMs over IAP SSH with connection timeouts so the guest OS trust store is updated. - Print the final Load Balancer URL ('https://${LB_IP}') at the end. Wrap the script in 'set -euxo pipefail' and output only the single executable bash script block.bash, проверяет каждую команду на соответствие ограничениям и выводит один исполняемый блок скрипта, заключенный вset -euxo pipefail.
Запустите скрипт развертывания безопасности
- В режиме
/goalвставьте сгенерированный скриптbashиз предыдущего запроса в окно чата Antigravity в следующем формате, чтобы запустить развертывание и вывести URL опубликованного приложения (https://<LB_IP>):Run this script. <PASTED-SCRIPT>
7. Проверьте защищенное приложение
Когда скрипт развертывания завершит работу, Antigravity выведет внешний URL по HTTPS глобального внешнего балансировщика нагрузки приложений (https://<LB_IP>).
- Откройте
https://<LB_IP>в браузере и проигнорируйте предупреждение о самозаверяющемся сертификате, чтобы загрузить интерфейс калькулятора gCurrenC.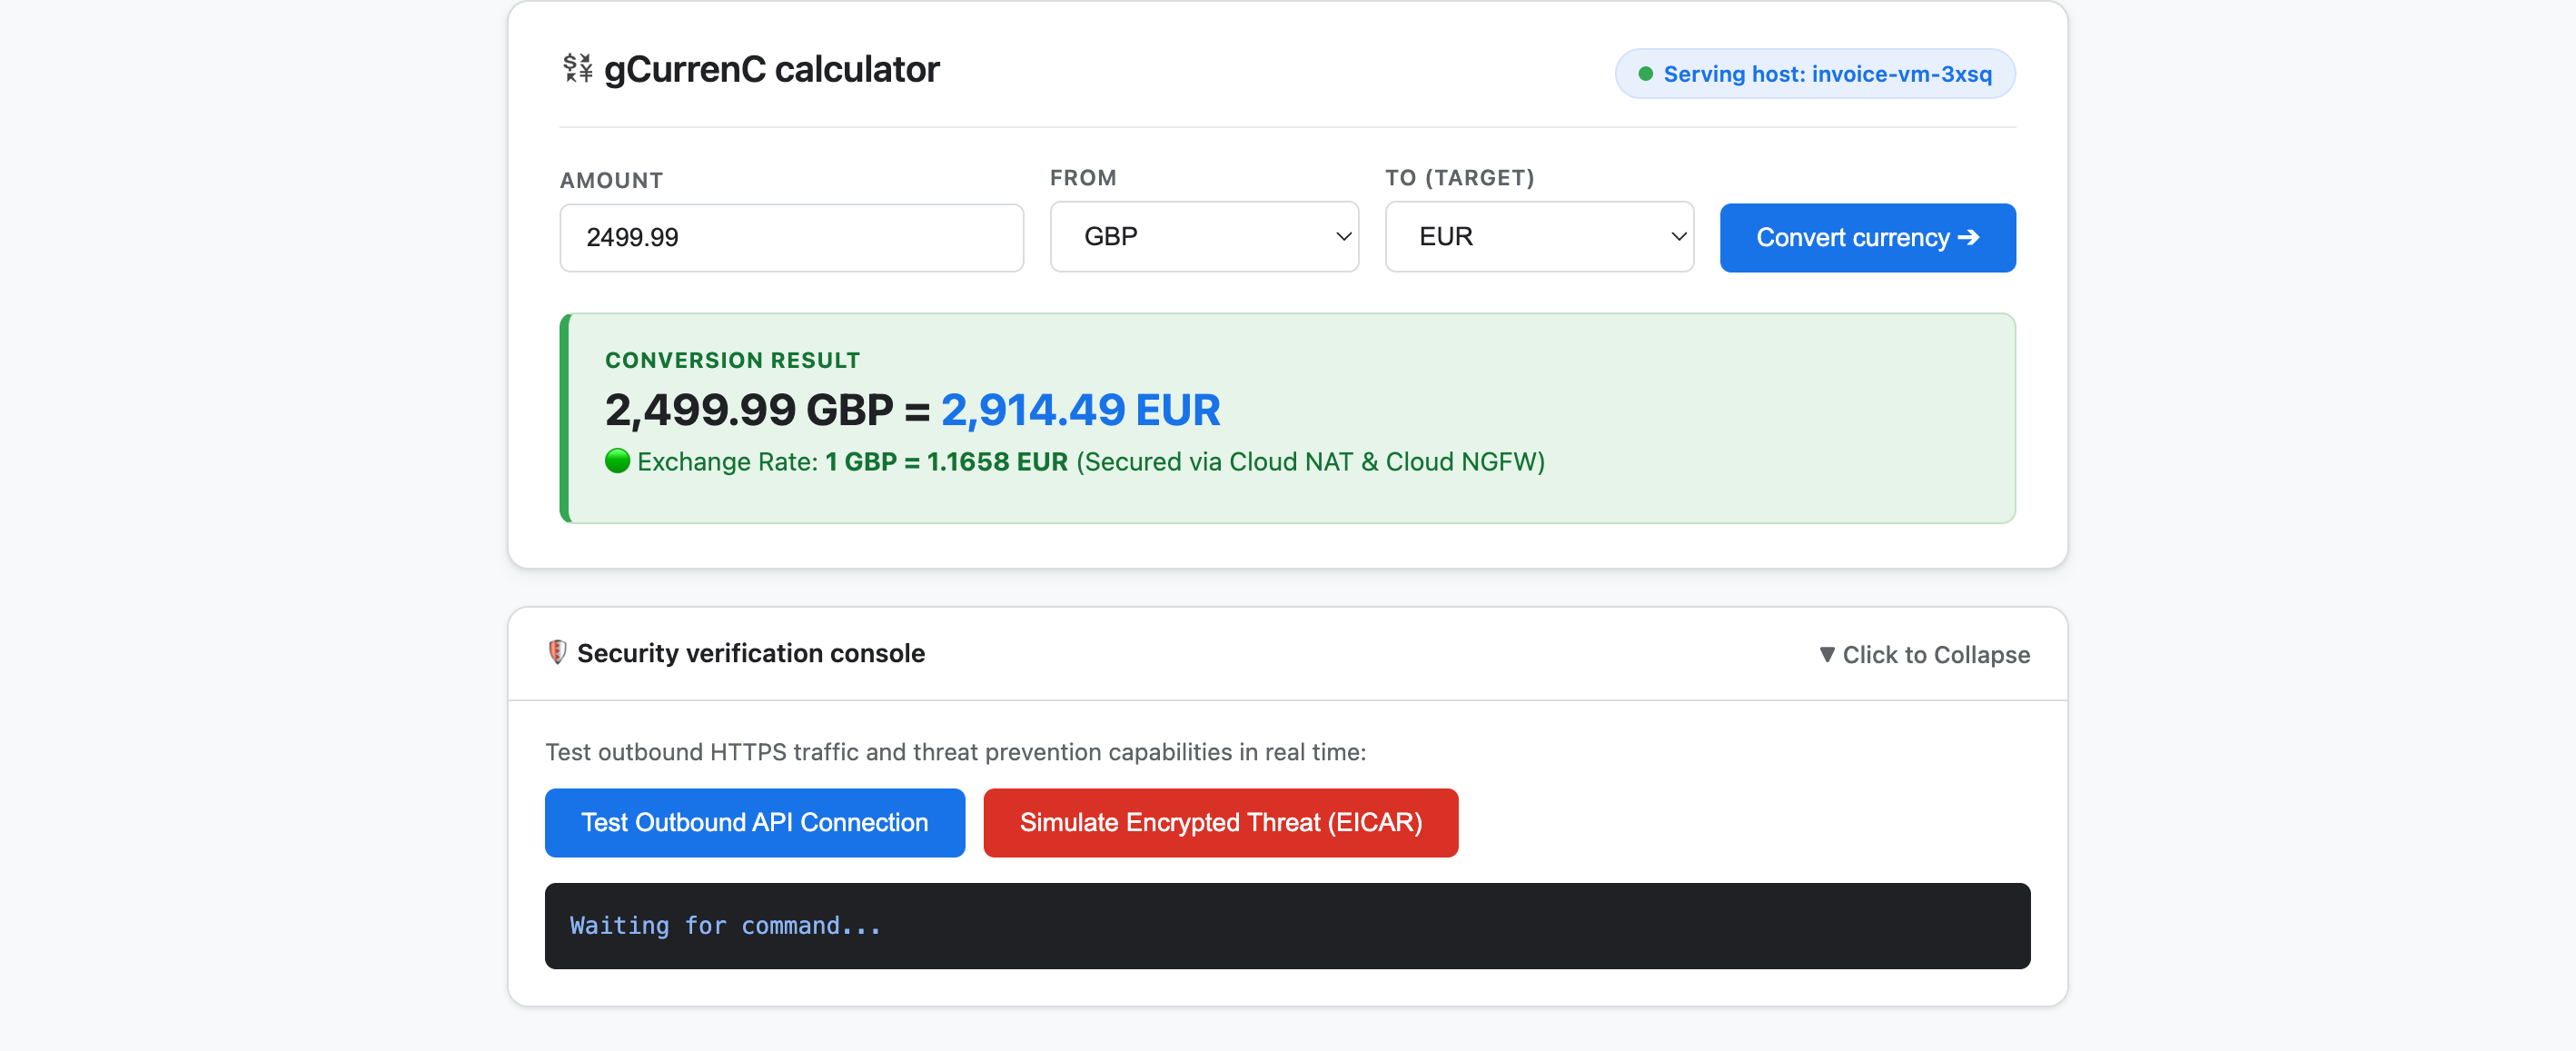
- Протестируйте приложение, чтобы проверить исходящее подключение и защиту от угроз:
- Нажмите Конвертировать валюту. Приложение сразу же покажет конвертированную сумму. Это подтверждает, что балансировка нагрузки входящего трафика маршрутизируется через Google Front End (GFE) и подсеть только для прокси-серверов, а Cloud NAT получает текущие курсы обмена валют от
api.frankfurter.dev. - Разверните раздел Консоль проверки безопасности и нажмите Проверить исходящее подключение API. Приложение показывает
verdict: PERMITTED(HTTP 200). Это подтверждает, что маршрутизация Cloud NAT работает и операционная система виртуальной машины доверяет частному корневому центру сертификации CAS для расшифрованных сеансов HTTPS. - Нажмите Имитировать зашифрованную угрозу (EICAR). В приложении появится сообщение
verdict: PERMITTED. Это подтверждает, что Cloud NGFW Enterprise расшифровывает исходящий HTTPS-запрос с помощью проверки TLS, поддерживаемой CAS, и проверяет тестовую сигнатуру EICAR с помощью сервиса предотвращения вторжений (IPS).
- Нажмите Конвертировать валюту. Приложение сразу же покажет конвертированную сумму. Это подтверждает, что балансировка нагрузки входящего трафика маршрутизируется через Google Front End (GFE) и подсеть только для прокси-серверов, а Cloud NAT получает текущие курсы обмена валют от
8. Организовать
Чтобы избежать дальнейших списаний средств с вашего аккаунта Google Cloud за ресурсы, созданные в рамках этой практической работы, вы можете удалить только ресурсы практической работы или удалить облачный проект Google Cloud.
- Если вы хотите сохранить облачный проект Google Cloud и удалить только ресурсы, созданные в ходе этой практической работы, выполните следующий запрос в режиме
/goalв окне чата Antigravity:Remove all resources created in this session, including the gcurrenc app and its resources. Don't delete the project. - Если вы создали отдельный проект Google Cloud для этой практической работы и хотите удалить его целиком, выполните следующий запрос в режиме
/goalв окне чата Antigravity:Clean up the demo environment by deleting the Google Cloud project. Run the following command in the terminal: gcloud projects delete "$(gcloud config get-value project 2>/dev/null)" --quiet
9. Поздравляю!
Поздравляем! Вы развернули и защитили веб-приложение gCurrenC calculator в Google Cloud, используя плагин Google Cloud Developer (сервер DK MCP) в Google Antigravity.
Дальнейшие действия
Чтобы узнать больше о сервисах, используемых в этой практической работе, изучите официальную документацию Google Cloud:
- Как установить и использовать плагин Google Cloud Developer в Antigravity
- Как подключиться к MCP-серверу Developer Knowledge
- Библиотека навыков агента
- Плагин Developer Knowledge
- Обзор балансировщика нагрузки приложений
- Документация по Certificate Authority Service
- Обзор Cloud Next Generation Firewall