

1. Giriş
Bu codelab'de, gCurrenC hesap makinesi web uygulamasını Google Cloud'da oluşturup dağıtacak ve ardından istenmeyen erişime karşı güvenliğini sağlayacaksınız. Google Antigravity, Google Cloud Developer eklentisi ve Developer Knowledge (DK) MCP sunucusunu kullanarak uygulamaya kimlerin erişebileceğini kontrol eden ve uygulamayı yetkisiz kullanıma karşı koruyan bir güvenlik mimarisi tasarlayıp uygulayacaksınız.
Bu laboratuvarda, Google Antigravity'yi DK MCP sunucusuna bağlayacaksınız. Bu sunucu, Antigravity'yi resmi ve gerçek zamanlı Google Cloud belgelerine dayandırır. Antigravity, statik eğitim verilerine veya güncel olmayan model ağırlıklarına güvenmek yerine mevcut mimari kalıpları, en son gcloud CLI söz dizimini ve güvenlik parametrelerini dinamik olarak alır. Bu sayede halüsinasyonlar azalır ve yanıtlar güncel bilgilere dayandırılır.
Ne oluşturacaksınız?
- Özel işlem iş yükü: Herkese açık IP adresi olmayan özel bir Sanal Özel Bulut (VPC) ağında gCurrenC hesap makinesi web uygulamasını çalıştıran iki Compute Engine sanal makinesi (VM).
- Güvenli giriş ardışık düzeni: İnternet trafiğini Google Front End'ler (GFE'ler) üzerinden özel sanal makinelerinize yönlendiren ve bunları herkese açık internete maruz bırakmayan, özel bir yalnızca proxy alt ağına sahip global harici uygulama yük dengeleyicisi.
- Güvenli çıkış ardışık düzeni: Giden HTTPS döviz kuru API trafiğinde anında TLS denetimi ve Yetkisiz Girişi Önleme Hizmeti (IPS) taraması gerçekleştirmek için proje düzeyinde Cloud Next Generation Firewall (Cloud NGFW) Enterprise ve Certificate Authority Service (CAS) ile eşlenen bir Cloud Router ve Cloud NAT ağ geçidi.
Neler öğreneceksiniz?
- Antigravity CLI'yı kullanarak
google-cloud-developereklentisini yükleyin ve Antigravity'de DK MCP sunucusunu yapılandırın. - Identity-Aware Proxy (IAP) TCP yönlendirmeyi kullanarak Compute Engine'de yalıtılmış bir özel web uygulaması dağıtma ve test etme
- Antigravity'de, proje düzeyinde giriş ve çıkış güvenlik mimarisi tasarlamak için dayanaklı çok turlu istemleri kullanın.
- Global harici uygulama yük dengeleme, Cloud NAT, CAS ve Cloud NGFW Enterprise için
bashdağıtım komut dosyası oluşturun, kendi kendinize denetleyin ve çalıştırın.
2. Başlamadan önce
Ön koşullar
Bu codelab'e başlamadan önce aşağıdakilere sahip olduğunuzdan emin olun:
- Google Hesabı ve Google Chrome tarayıcı.
- Faturalandırmanın etkin olduğu yeni bir Google Cloud projesi. API'leri etkinleştirmek, API anahtarınızı oluşturmak ve Google Cloud kaynaklarını dağıtmak için bu codelab'de kullanacağınız proje kimliğinizi (
PROJECT_ID) not edin. - API anahtarları, Compute Engine kaynakları, VPC ağları, CAS havuzları, IAP tüneli ve Cloud NGFW uç noktaları oluşturmak için Google Cloud projenizde Identity and Access Management (IAM) izinleri.
gcloudKSA ile kimlik doğrulayın, etkin Google Cloud projenizi ayarlayın ve gerekli API'leri etkinleştirin:- Terminalinizde veya Cloud Shell'de kimliğinizin doğrulanıp doğrulanmadığını kontrol edin:
gcloud auth listgcloud auth login gcloudKSA'nın projenizi kullanacak şekilde yapılandırıldığını doğrulayın:gcloud config list projectPROJECT_IDyerine Google Cloud proje kimliğinizi yazın:export PROJECT_ID=PROJECT_ID gcloud config set project PROJECT_ID- Google Cloud projenizde gerekli API'leri etkinleştirin:
gcloud services enable \
   compute.googleapis.com \
   iap.googleapis.com \
   networksecurity.googleapis.com \
   privateca.googleapis.com \
   developerknowledge.googleapis.com \
   apikeys.googleapis.com
- Terminalinizde veya Cloud Shell'de kimliğinizin doğrulanıp doğrulanmadığını kontrol edin:
- Google Antigravity indirme sayfasından Antigravity 2.0'ı yerel sisteminize yükleyin.
Antigravity CLI'yı kullanarak Google Cloud Developer eklentisini yükleme
Antigravity CLI'yı kullanarak Google Cloud Developer eklentisini yüklemek için aşağıdaki adımları uygulayın:
- Antigravity CLI'yı yerel iş istasyonunuza yüklemek için aşağıdaki adımları uygulayın:
- Yerel terminalinizi açın.
- Yükleyici komut dosyasını çalıştırın:
curl -fsSL https://antigravity.google/cli/install.sh | bash - Antigravity CLI ikili programının
agysisteminizdePATHkullanılabilmesi için terminal oturumunuzu kapatıp yeniden açın.
- Yerel terminalinizde aşağıdaki komutu çalıştırarak
google-cloud-developereklentisini yükleyin:agy plugin install https://github.com/google/skills/plugins/cloud/google-cloud-developerCloning plugin from https://github.com/google/skills.git... [ok] google-cloud-developer ✔ skills : 5 processed - agents : skipped (not found) - commands : skipped (not found) ✔ mcpServers : 1 processed - hooks : skipped (not found)
3. Antigravity ve DK MCP sunucusunu kurma
Bu bölümde, kısıtlanmış bir Google Cloud API anahtarı kullanarak Antigravity'de DK MCP sunucusunu yapılandıracaksınız.
- Antigravity'yi açın,
/goalyazıp Enter tuşuna basarak hedef modunu etkinleştirin, ardından aşağıdaki istemi yapıştırarak kısıtlanmış bir API anahtarı oluşturun ve DK MCP sunucusunu yapılandırın.PROJECT_IDyerine Başlamadan önce bölümündeki Google Cloud proje kimliğinizi yazın. Daka fazla bilgi için google-cloud-developer eklentisi başlıklı makaleyi inceleyin.Set up Antigravity to use the Developer Knowledge MCP server on my local machine. Run the necessary terminal commands to complete the following: 1. Create a restricted API key named 'DKP-MCP-Key' that can only target the Developer Knowledge API. Use the PROJECT_ID to create the API key. 2. Retrieve the actual key string of the newly created API key. 3. Create or safely update my ~/.gemini/config/mcp_config.json file (preserve any existing MCP servers) with the correct JSON structure to connect the developer-knowledge server using that API key in the headers. You MUST use the following JSON structure for the new server: "developer-knowledge": { "serverUrl": "https://developerknowledge.googleapis.com/mcp", "headers": { "x-goog-api-key": "<INSERT_RETRIEVED_API_KEY_HERE>" } } When you are done, confirm that the setup is complete. - DK MCP sunucusunun etkin olduğunu doğrulamak için Antigravity sohbet penceresine aşağıdaki istemi girin:
Which MCP servers are available?developer-knowledgeve kullanılabilir araçlarını (search_documents,answer_queryveget_documents) listeler: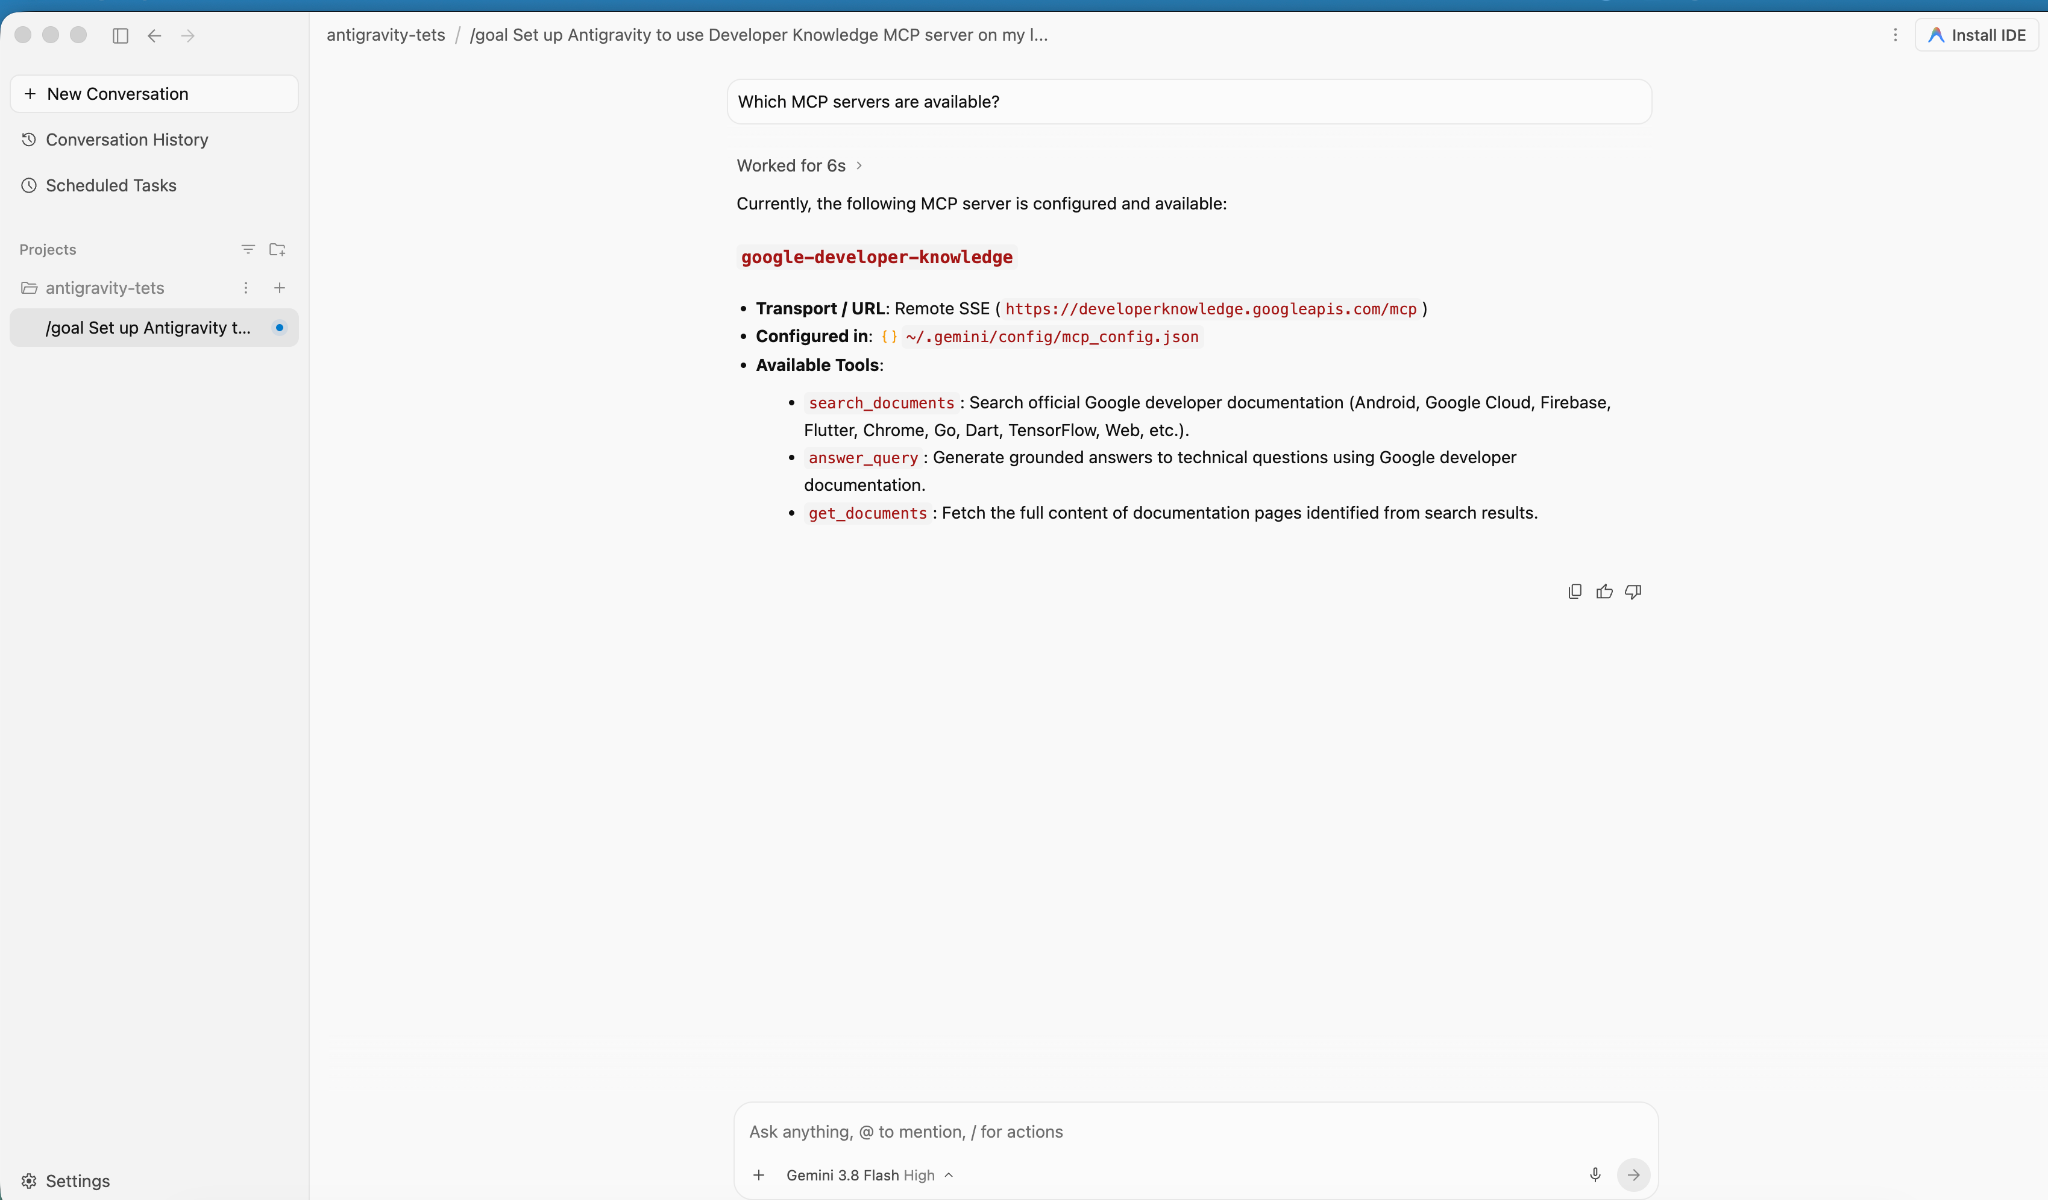
4. Uygulamayı oluşturma ve dağıtma
Bu bölümde, gCurrenC hesap makinesi uygulamasını özel bir VPC ağındaki iki özel Compute Engine sanal makinesine dağıtacaksınız.
Uygulama şunları sağlar:
- Python'un yerleşik
http.serverstandart kitaplığını kullanarak8080bağlantı noktasında/healthzdurum denetimi uç noktasıylaUSD,EUR,GBP,JPY,CAD,INRveAUDpara birimlerini destekleyen canlı bir para birimi dönüştürücü. - Gerçek zamanlı giden API bağlantısı ve şifrelenmiş tehdit önleme probları çalıştırmak için güvenlik doğrulama konsolu.
- Google'ın IAP aralığının, herkese açık IP adreslerini göstermeden yönetim testleri için
22ve8080bağlantı noktalarına erişmesine izin veren bir giriş güvenlik duvarı kuralı.
Uygulamayı dağıtın
- Antigravity sohbet penceresine
/goalyazın ve aşağıdaki istemi çalıştırın:You are a Cloud developer. Deploy the "gCurrenC calculator" app onto two (2) Compute Engine VMs with no external IP addresses (`--no-address`) inside a dedicated custom VPC network and private subnet. CRITICAL INSTRUCTIONS ON OUTPUT: - The VMs are strictly private with no external IP addresses and the local IAP tunnel has NOT been started yet. Any web URL is completely unreachable and will fail with a connection error. - In your final response, simply confirm that the private VMs and Managed Instance Group are deployed, and state that the user should establish the IAP tunnel. Do not output, format, or suggest any web preview link or URL (such as http://localhost:8080 or internal IP addresses) in your final response. Run this script in the terminal: ```bash #!/usr/bin/env bash set -euxo pipefail # Disable any interactive confirmation prompts so execution never hangs export CLOUDSDK_CORE_DISABLE_PROMPTS=1 # --- User Configuration --- PROJECT_ID="[PROJECT_ID]" REGION="us-central1" ZONE="us-central1-a" NETWORK="gcurrenc-vpc" SUBNET="gcurrenc-app-subnet" SUBNET_RANGE="10.10.1.0/24" # -------------------------- echo "==> [1/5] Configuring project, default region/zone, and enabling APIs..." gcloud config set project "${PROJECT_ID}" gcloud config set compute/region "${REGION}" gcloud config set compute/zone "${ZONE}" gcloud services enable compute.googleapis.com echo "==> [2/5] Creating custom VPC network and private workload subnet..." gcloud compute networks create "${NETWORK}" \ --subnet-mode=custom \ --description="Dedicated VPC for currency exchange app demo" 2>/dev/null || true gcloud compute networks subnets create "${SUBNET}" \ --network="${NETWORK}" \ --region="${REGION}" \ --range="${SUBNET_RANGE}" \ --enable-private-ip-google-access \ --description="Private subnet hosting backend compute instances" 2>/dev/null || true echo "==> [3/5] Generating standalone Python standard-library startup script..." cat << 'STARTUP_EOF' > /tmp/private_app_startup.sh #!/bin/bash set -euxo pipefail mkdir -p /opt/gcurrenc-app # Pure Python standard-library application (zero pip/apt dependencies needed at boot) cat << 'APPEOF' > /opt/gcurrenc-app/app.py import os import sys import json import socket import urllib.request import urllib.parse import ssl from http.server import BaseHTTPRequestHandler, ThreadingHTTPServer SUPPORTED_CURRENCIES = ["USD", "EUR", "GBP", "JPY", "CAD", "INR", "AUD"] class CurrencyAppHandler(BaseHTTPRequestHandler): def address_string(self): return str(self.client_address[0]) def do_GET(self): parsed = urllib.parse.urlparse(self.path) path = parsed.path params = urllib.parse.parse_qs(parsed.query) if path == "/favicon.ico": self.send_response(204) self.end_headers() return if path == "/healthz": self.send_response(200) self.send_header("Content-Type", "text/plain") self.end_headers() self.wfile.write(b"OK") return if path == "/api/security-test": mode = params.get("mode", ["safe"])[0] target = "https://secure.eicar.org/eicar.com.txt" if mode == "threat" else "https://api.frankfurter.dev/v1/latest?from=USD&to=EUR" try: req = urllib.request.Request(target, headers={"User-Agent": "SecureCurrencyApp/1.0"}) ctx = ssl.create_default_context() with urllib.request.urlopen(req, timeout=5, context=ctx) as resp: data = {"verdict": "PERMITTED", "target": target, "http_status": resp.status} code = 200 except Exception as e: data = {"verdict": "BLOCKED_OR_FAILED", "target": target, "error": str(e)} code = 502 self.send_response(code) self.send_header("Content-Type", "application/json") self.end_headers() self.wfile.write(json.dumps(data, indent=2).encode("utf-8")) return self.render_page() def do_POST(self): parsed = urllib.parse.urlparse(self.path) if parsed.path == "/generate": content_length = int(self.headers.get("Content-Length", 0)) post_body = self.rfile.read(content_length).decode("utf-8") form = urllib.parse.parse_qs(post_body) base_curr = form.get("base_curr", ["USD"])[0] target_curr = form.get("target_curr", ["EUR"])[0] try: amount = float(form.get("amount", ["2500.00"])[0]) except ValueError: amount = 2500.00 rate_str = "Unavailable" total_str = "Rate lookup pending outbound internet activation" try: if base_curr == target_curr: rate = 1.0 else: url = f"https://api.frankfurter.dev/v1/latest?from={base_curr}&to={target_curr}" req = urllib.request.Request(url, headers={"User-Agent": "SecureCurrencyApp/1.0"}) with urllib.request.urlopen(req, timeout=4) as resp: res_json = json.loads(resp.read().decode("utf-8")) rate = res_json["rates"][target_curr] rate_str = str(rate) total_str = f"{round(amount * rate, 2):,.2f} {target_curr}" except Exception as e: total_str = f"Outbound connection unavailable {str(e)}" self.render_page(base_curr, target_curr, amount, rate_str, total_str) return self.send_response(404) self.end_headers() def render_page(self, base_curr="USD", target_curr="EUR", amount=2500.00, fx_rate="1.00", total_str=""): hostname = socket.gethostname() curr_options_base = "".join([f'<option value="{c}" {"selected" if c == base_curr else ""}>{c}</option>' for c in SUPPORTED_CURRENCIES]) curr_options_target = "".join([f'<option value="{c}" {"selected" if c == target_curr else ""}>{c}</option>' for c in SUPPORTED_CURRENCIES]) result_block = "" if total_str: if fx_rate == "Unavailable": rate_line = "<p style='margin: 6px 0;'>Exchange Rate: <span style='color: #d93025; font-weight: bold;'>⚠️ Offline-Outbound internet blocked</span></p>" else: rate_line = f"<p style='margin: 6px 0; font-size: 14px; color: #137333;'>🟢 Exchange Rate: <strong>1 {base_curr} = {fx_rate} {target_curr}</strong> (Secured via Cloud NAT & Cloud NGFW)</p>" result_block = f""" <div style="margin-top: 22px; background: #e6f4ea; border: 1px solid #c6e1c6; border-left: 5px solid #34a853; padding: 18px 20px; border-radius: 8px;"> <h4 style="margin: 0 0 6px 0; text-transform: uppercase; font-size: 12px; color: #137333; letter-spacing: 0.5px;">Conversion Result</h4> <div style="font-size: 24px; font-weight: 700; color: #202124; margin-bottom: 6px;"> {amount:,.2f} {base_curr} = <span style="color: #1a73e8;">{total_str}</span> </div> {rate_line} </div> """ html = ("""<!DOCTYPE html> <html lang="en"> <head> <meta charset="UTF-8"> <meta name="viewport" content="width=device-width, initial-scale=1.0"> <title>gCurrenC calculator</title> <style> body { font-family: -apple-system, BlinkMacSystemFont, "Segoe UI", Roboto, "Helvetica Neue", Arial, sans-serif; background: #f8f9fa; margin: 30px 15px; color: #202124; display: flex; justify-content: center; } .container { width: 100%; max-width: 860px; } .card { background: white; padding: 24px 28px; border-radius: 12px; box-shadow: 0 1px 3px rgba(60,64,67,0.12), 0 4px 8px rgba(60,64,67,0.06); border: 1px solid #dadce0; margin-bottom: 20px; } .header { display: flex; justify-content: space-between; align-items: center; border-bottom: 1px solid #e8eaed; padding-bottom: 14px; margin-bottom: 20px; } .header h2 { margin: 0 0 4px 0; font-size: 20px; font-weight: 600; } .header p { margin: 0; font-size: 13px; color: #5f6368; } .badge { background: #e8f0fe; color: #1a73e8; padding: 6px 12px; border-radius: 16px; font-weight: 600; font-size: 12px; border: 1px solid #d2e3fc; display: flex; align-items: center; gap: 6px; } .badge::before { content: ""; width: 8px; height: 8px; border-radius: 50%; background-color: #34a853; } .form-row { display: flex; gap: 14px; align-items: flex-end; flex-wrap: wrap; } .form-group { display: flex; flex-direction: column; gap: 6px; } .form-group label { font-size: 12px; font-weight: 600; color: #5f6368; text-transform: uppercase; letter-spacing: 0.5px; } input, select { padding: 10px 14px; border: 1px solid #dadce0; border-radius: 6px; font-size: 14px; color: #202124; background-color: #fff; box-sizing: border-box; transition: border-color 0.15s, box-shadow 0.15s; } input:focus, select:focus { outline: none; border-color: #1a73e8; box-shadow: 0 0 0 3px rgba(26, 115, 232, 0.15); } button { padding: 11px 20px; background: #1a73e8; color: white; border: none; border-radius: 6px; font-size: 14px; font-weight: 500; cursor: pointer; transition: background 0.15s, box-shadow 0.15s; } button:hover { background: #1557b0; box-shadow: 0 1px 2px rgba(60,64,67,0.3); } .danger-btn { background: #d93025; } .danger-btn:hover { background: #b31412; } pre { background: #202124; color: #8ab4f8; padding: 14px; border-radius: 6px; overflow-x: auto; font-family: "SF Mono", "Fira Code", Consolas, monospace; font-size: 13px; line-height: 1.5; margin: 0; } /* Collapsible Security Console */ details.security-drawer { background: white; border-radius: 12px; box-shadow: 0 1px 3px rgba(60,64,67,0.12); border: 1px solid #dadce0; overflow: hidden; margin-bottom: 24px; } details.security-drawer summary { padding: 16px 20px; font-size: 14px; font-weight: 600; cursor: pointer; list-style: none; display: flex; justify-content: space-between; align-items: center; user-select: none; background: #fafafa; transition: background 0.15s; } details.security-drawer summary::-webkit-details-marker { display: none; } details.security-drawer summary:hover { background: #f1f3f4; } details.security-drawer[open] summary { border-bottom: 1px solid #dadce0; background: #ffffff; } .expand-toggle { font-size: 13px; font-weight: 500; } details.security-drawer summary .expand-toggle::before { content: "▶ Click to Expand"; color: #1a73e8; } details.security-drawer[open] summary .expand-toggle::before { content: "▼ Click to Collapse"; color: #5f6368; } .drawer-body { padding: 20px; background: #ffffff; } .drawer-body p { margin-top: 0; font-size: 13px; color: #5f6368; } .probe-buttons { display: flex; gap: 10px; margin-bottom: 14px; } </style> </head> <body> <div class="container"> <div class="card"> <div class="header"> <div> <h2>💱 gCurrenC calculator</h2> </div> <div class="badge">Serving host: {hostname}</div> </div> <form method="POST" action="/generate"> <div class="form-row"> <div class="form-group" style="flex: 1.5; min-width: 140px;"> <label>Amount</label> <input type="number" step="0.01" name="amount" value="{amount}" required> </div> <div class="form-group" style="flex: 1; min-width: 100px;"> <label>From</label> <select name="base_curr">{curr_options_base}</select> </div> <div class="form-group" style="flex: 1; min-width: 100px;"> <label>To (Target)</label> <select name="target_curr">{curr_options_target}</select> </div> <div class="form-group"> <button type="submit">Convert currency ➔</button> </div> </div> </form> {result_block} </div> <!-- Collapsible Security Verification Console --> <details class="security-drawer"> <summary> <span>🛡️ Security verification console</span> <span class="expand-toggle"></span> </summary> <div class="drawer-body"> <p>Test outbound HTTPS traffic and threat prevention capabilities in real time:</p> <div class="probe-buttons"> <button type="button" onclick="runProbe('safe')">Test Outbound API Connection</button> <button type="button" class="danger-btn" onclick="runProbe('threat')">Simulate Encrypted Threat (EICAR)</button> </div> <pre id="output">Waiting for command...</pre> </div> </details> </div> <script> function runProbe(mode) { const el = document.getElementById('output'); el.innerText = 'Executing outbound request...'; fetch('/api/security-test?mode=' + mode) .then(res => res.json()) .then(data => el.innerText = JSON.stringify(data, null, 2)) .catch(err => el.innerText = 'Connection dropped / reset by Firewall: ' + err); } </script> </body> </html>""" .replace("{hostname}", str(hostname)) .replace("{amount}", str(amount)) .replace("{curr_options_base}", curr_options_base) .replace("{curr_options_target}", curr_options_target) .replace("{result_block}", result_block) ) self.send_response(200) self.send_header("Content-Type", "text/html; charset=utf-8") self.end_headers() self.wfile.write(html.encode("utf-8")) def run(): server_address = ('0.0.0.0', 8080) httpd = ThreadingHTTPServer(server_address, CurrencyAppHandler) httpd.serve_forever() if __name__ == '__main__': run() APPEOF # Register and start systemd unit cat << 'SERVICEEOF' > /etc/systemd/system/gcurrenc-app.service [Unit] Description=Currency exchange calculator web application After=network.target [Service] Type=simple User=root WorkingDirectory=/opt/gcurrenc-app ExecStart=/usr/bin/python3 /opt/gcurrenc-app/app.py Restart=always [Install] WantedBy=multi-user.target SERVICEEOF systemctl daemon-reload systemctl enable gcurrenc-app systemctl start gcurrenc-app STARTUP_EOF echo "==> [4/5] Creating Firewall, Regional Instance Template, and 2-VM MIG..." gcloud compute firewall-rules create allow-iap-admin \ --network="${NETWORK}" \ --allow=tcp:22,tcp:8080 \ --source-ranges=35.235.240.0/20 \ --target-tags=gcurrenc-app-vm \ --description="Allow IAP SSH and port 8080 access to private VMs" \ --quiet 2>/dev/null || true # Explicitly pass both --region and --instance-template-region to avoid prompt gcloud compute instance-templates create gcurrenc-app-template \ --instance-template-region="${REGION}" \ --region="${REGION}" \ --network="${NETWORK}" \ --subnet="${SUBNET}" \ --machine-type=e2-medium \ --no-address \ --tags=gcurrenc-app-vm \ --metadata-from-file=startup-script=/tmp/private_app_startup.sh \ --quiet gcloud compute instance-groups managed create gcurrenc-app-mig \ --base-instance-name=gcurrenc-vm \ --template="projects/${PROJECT_ID}/regions/${REGION}/instanceTemplates/gcurrenc-app-template" \ --size=2 \ --zone="${ZONE}" \ --quiet gcloud compute instance-groups managed set-named-ports gcurrenc-app-mig \ --named-ports=http-port:8080 \ --zone="${ZONE}" \ --quiet echo "==> [5/5] Verifying private VM deployment and internal status..." sleep 30 gcloud compute instances list \ --filter="name ~ '^gcurrenc-vm-'" \ --zones="${ZONE}" \ --format="table(name,zone.basename():label=ZONE,networkInterfaces[0].networkIP:label=INTERNAL_IP,status)" FIRST_VM=$(gcloud compute instances list \ --filter="name ~ '^gcurrenc-vm-'" \ --zones="${ZONE}" \ --format="value(name)" \ --limit=1) echo "Testing healthz on ${FIRST_VM} via IAP tunnel..." gcloud compute ssh "${FIRST_VM}" \ --zone="${ZONE}" \ --tunnel-through-iap \ --quiet \ --command="curl -fsS http://localhost:8080/healthz" echo "" echo "==========================================================================" echo "PREREQUISITE COMPLETE: 2 private VMs deployed with no external IPs." echo "VPC: ${NETWORK} | Subnet: ${SUBNET} (${SUBNET_RANGE})" echo "Instance Group: gcurrenc-app-mig (Zone: ${ZONE}, Port: 8080)" echo "" echo "The VMs are private and the IAP tunnel is not active. Set up the background IAP tunnel first to access the deployed app." echo "" echo "==========================================================================" ```
Sanal makine örneği oluşturma işlemini doğrulama
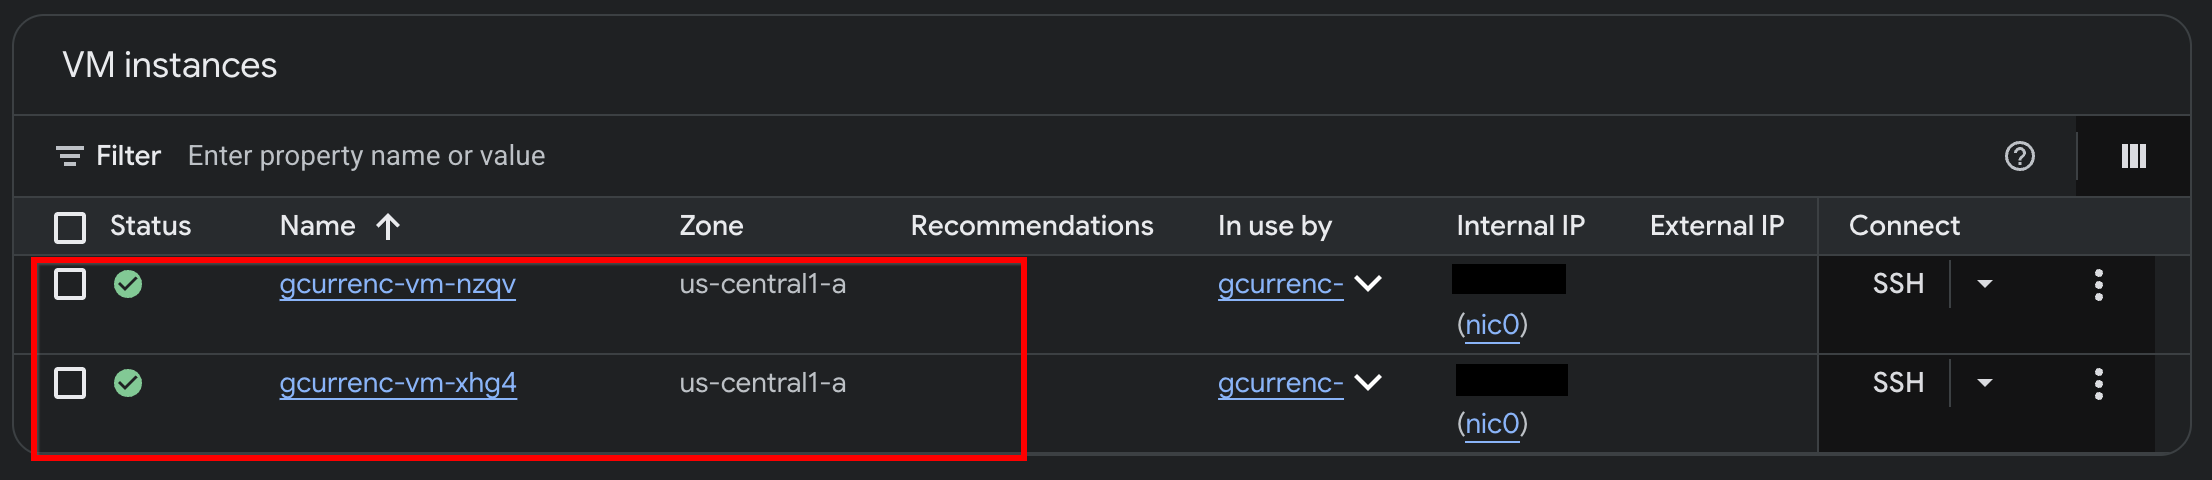
Antigravity, uygulamayı iki özel Compute Engine sanal makinesine dağıtmayı tamamladıktan sonra Google Cloud Console'da örnekleri doğrulayın:
- Google Cloud Console'da Sanal makine örnekleri'ne gidin.
- İki sanal makine örneğinin dahili IP adresleriyle çalıştığını ve harici IP adreslerinin olmadığını doğrulayın:
5. Uygulamayı test etme
Özel sanal makinelerin harici IP adresi (--no-address) ve Cloud NAT ağ geçidi olmadığından internete giden bir rotaları yoktur ve harici döviz kuru API'lerine erişemezler. Güvenli giden erişimi yapılandırmadan önce, internet erişimi olmadığını doğrulamak için uygulamayı yerel bir IAP tüneli üzerinden test edin.
/goalmodunda, Antigravity sohbet penceresinde aşağıdaki istemi çalıştırın:Automate the IAP tunnel configuration and health verification for the web app, then output the live test URL. Run a terminal script that performs the following steps non-interactively: 1. Firewall Check: - Identify the active network ('gcurrenc-vpc' if it exists, otherwise 'default'). - Idempotently ensure an ingress firewall rule exists permitting 'tcp:22,tcp:8080' from the Google IAP range '35.235.240.0/20' targeting 'gcurrenc-app-vm'. 2. VM Health Verification: - Find the first running instance matching '^gcurrenc-vm-' in zone 'us-central1-a'. - Via 'gcloud compute ssh --tunnel-through-iap', verify that the 'gcurrenc-app' systemd service is active. If not active, restart it. 3. Background IAP Tunnel: - Free up local port 8080 if an old tunnel or process is lingering (e.g., using 'lsof -ti:8080 | xargs kill -9' or 'fuser -k 8080/tcp'). - Launch 'gcloud compute start-iap-tunnel <VM_NAME> 8080 --local-host-port=localhost:8080 --zone=us-central1-a' in the background using nohup, redirecting output to '/tmp/iap_tunnel.log'. - Wait up to 10 seconds for the tunnel to establish, checking with 'curl -fsS http://localhost:8080/healthz'. 4. Output Web Preview URL: - Detect whether the environment is Google Cloud Shell (check if $CLOUD_SHELL is true) or a local workstation. - If Cloud Shell, print instructions and the direct web preview link. - If local machine, provide the clickable 'http://localhost:8080' URL.- Tünel başlatıldıktan sonra web tarayıcınızda
http://localhost:8080/adresini açın: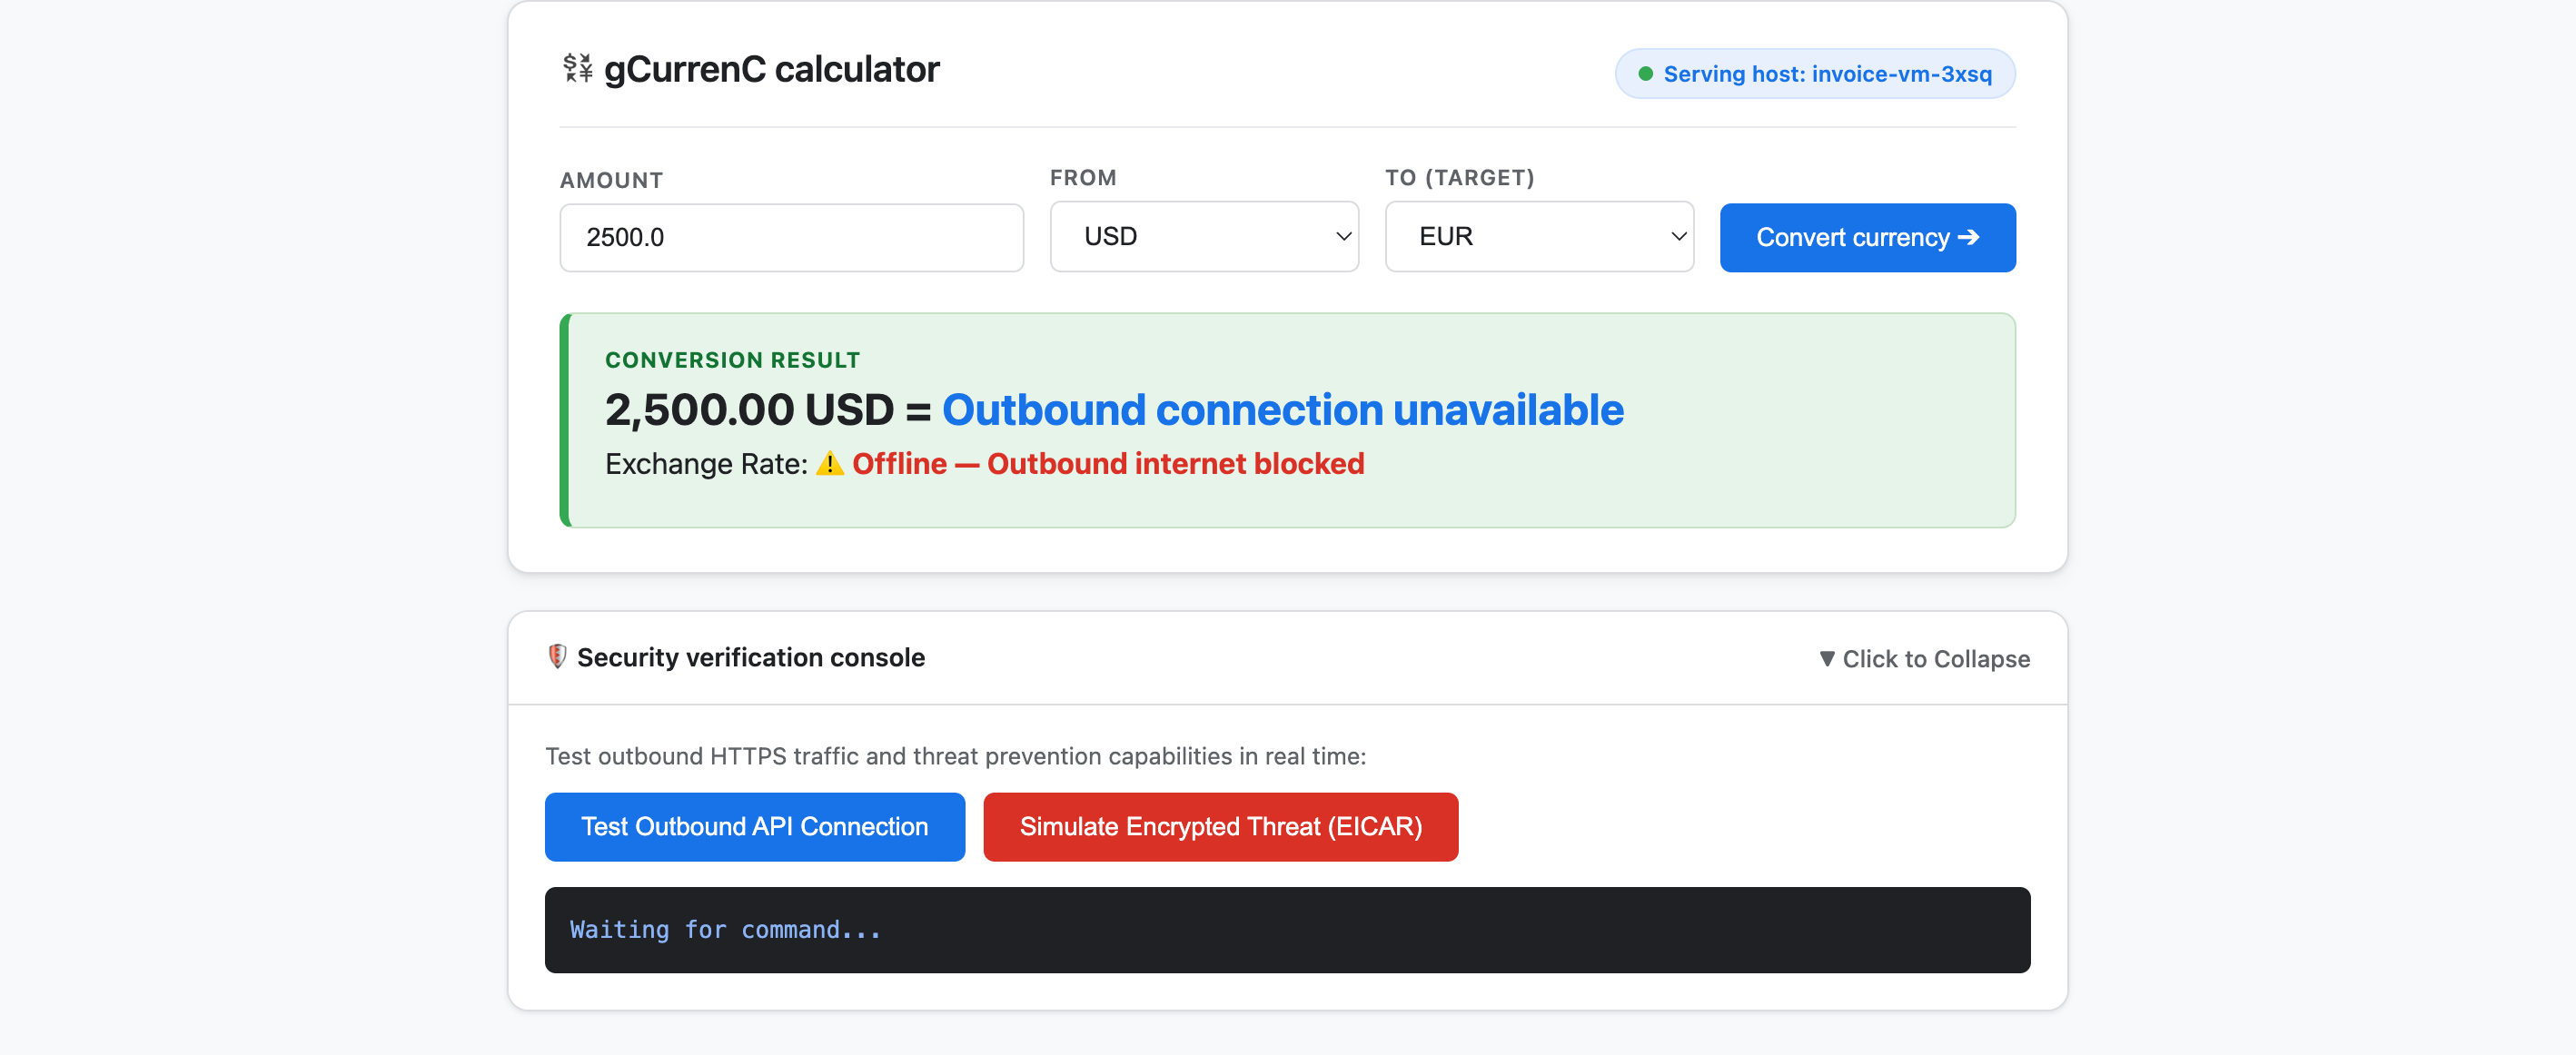
- Uygulamayı test edin:
- Para birimini dönüştür'ü tıklayın. Dönüşüm sonucu
Offline - Outbound internet blockedveOutbound connection unavailableolarak gösterilir. Özel sanal makineler en son döviz kurlarını almak için internete bağlanamadığından bu sonuç beklenir. - Security verification console'u (Güvenlik doğrulama konsolu) genişletin ve Test outbound API connection'ı (Giden API bağlantısını test et) tıklayın. Çıkışta
https://api.frankfurter.dev/v1/latestiçinverdict: BLOCKED_OR_FAILED(https://api.frankfurter.dev/v1/latestadresinden döviz kurlarını alamadığı için bu sonuç beklenir. - Şifrelenmiş tehdidi simüle et (EICAR) seçeneğini tıklayın. Çıkışta
https://secure.eicar.org/eicar.com.txtiçinverdict: BLOCKED_OR_FAILEDda gösterilir. Özel sanal makinelerin internet bağlantısı olmadığından bu sonuç da beklenen bir durumdur.
- Para birimini dönüştür'ü tıklayın. Dönüşüm sonucu
Yerel IAP tünelini durdurma
Güvenlik mimarisini tasarlayıp dağıtmadan önce 8080 numaralı bağlantı noktasını boşaltmak için yerel IAP tünelini sonlandırın:
/goalmodunda aşağıdaki istemi çalıştırın:Free up local port 8080 and terminate any running Google Cloud IAP tunnels (e.g., kill processes matching 'start-iap-tunnel' or listening on port 8080).8080'ün boş olduğunu onaylar.
6. Uygulamanın güvenliğini sağlama
Önceki bölümlerde, herkese açık IP adresi olmayan özel Compute Engine sanal makineleri oluşturdunuz ve iki temel ağ ve güvenlik sorununu doğruladınız:
- Gelen erişim (giriş): İnternet kullanıcıları özel sanal makine örneklerine doğrudan erişemez. Web uygulamasını kullanıma sunmak için trafiğin, sanal makineleri herkese açık internete sunmadan global harici uygulama yük dengeleyicisi ve özel bir yalnızca proxy alt ağı üzerinden proxy'lenmesi gerekir.
- Giden erişim (çıkış): Özel sanal makinelerin, canlı HTTPS döviz kuru API'lerini sorgulamak için internete erişimi yoktur. Giden erişimi etkinleştirmek için şifrelenmiş trafiğin kötü amaçlı yazılım ve veri hırsızlığı açısından incelenmesi gerekir. Bu inceleme, SSL/TLS güvenini bozmadan yapılmalıdır.
Bu bölümde, uygulamanız için proje düzeyinde giriş ve çıkış güvenlik mimarisi tasarlamak, kendi kendine denetlemek ve dağıtmak üzere Antigravity'yi resmi Google Cloud belgelerine (@retrieving-developer-knowledge) dayalı, kolaylaştırılmış bir iş akışı üzerinden yönlendireceksiniz.
Birleşik güvenlik mimarisini tasarlama
/goalmodunda, hem gelen hem de giden trafik akışlarını kapsayan uçtan uca bir mimari diyagramı ve açıklaması oluşturmak için aşağıdaki istemi çalıştırın:You are a Google Cloud Network and Security Architect. We need to design an end-to-end security architecture for our "gCurrenC calculator" app running on private Compute Engine VMs with no external IP addresses inside 'gcurrenc-vpc'. We are operating in a standalone Google Cloud project without an Organization resource, so all security resources must be scoped at the project level. Use the @retrieving-developer-knowledge skill to consult official Google Cloud documentation and suggest an architecture diagram and explanation covering both flows: 1. Ingress Flow: - How internet users securely reach the private VMs via a global external Application Load Balancer. - Why Envoy-based external Application Load Balancers require a dedicated proxy-only subnet, and how Google Front Ends (GFEs) proxy traffic to private backends without exposing VMs to the public internet. 2. Egress Flow: - How private VMs reach the internet via Cloud NAT to query live currency exchange APIs, such as frankfurter.dev. - How Cloud NGFW Enterprise provides Layer 7 deep packet inspection and intrusion prevention (IPS) for outbound encrypted HTTPS traffic. - How TLS inspection backed by Certificate Authority Service (CAS) decrypts outbound HTTPS sessions on the fly, and what Root CA trust configuration the private VMs require. Provide a clear diagram and explain how these components connect together.
Mimari kaynak taslağını oluşturma
- Dağıtım komut dosyasını oluşturmadan önce tasarımı kategorilere ayrılmış proje düzeyinde kaynak ana hattı olarak yapılandırmak için aşağıdaki istemi girin:
Act as a Lead Network Security Architect. Using the @retrieving-developer-knowledge skill, provide an architectural outline of all the Google Cloud resources required to secure the "gCurrenC calculator" app.

Our starting state:
- The custom VPC ('gcurrenc-vpc'), workload subnet ('gcurrenc-app-subnet'), and 2-instance MIG ('gcurrenc-app-mig', port 8080) are already deployed.
- All newly added security components must be project-level resources (no organization resources).

Structure your resource outline into three distinct categories, indicating which resources are new additions:
1. Core VPC Infrastructure: proxy-only subnet ('gcurrenc-proxy-subnet', 10.10.2.0/24), Cloud Router, and Cloud NAT gateway.
2. Inbound security (ingress): global external ALB components (forwarding rule on port 443, target HTTPS proxy, SSL certificate, URL map, backend service attached to 'gcurrenc-app-mig' on port 8080, and HTTP health check on '/healthz') and ingress firewall rules.
3. Outbound security (egress): CAS DevOps CA pool and root CA, project-level Cloud NGFW Enterprise components (Threat Prevention profile, Security Profile Group, Firewall Endpoint in zone us-central1-a, and Endpoint Association attaching the TLS policy), and global network firewall policy egress rules.

For each resource, briefly state its role in the security boundary and how it connects to adjacent components.
Dağıtım komut dosyasını oluşturma ve kendi kendine denetleme
/goalmodunda, eksiksiz ve etkileşimli olmayan birbashdağıtım komut dosyası oluşturmak ve aynı adımda uyumluluk koşullarına göre otomatik olarak denetlemek için aşağıdaki istemi çalıştırın:Act as a Principal Infrastructure Engineer. Using the @retrieving-developer-knowledge skill, generate a complete, non-interactive Bash script to deploy this entire security architecture for our "gCurrenC calculator" app, and self-audit the script before outputting it. Requirements: - Discover the project ID, region, and zone dynamically from the existing 'gcurrenc-app-subnet' and 'gcurrenc-app-mig'. - Keep all resources scoped strictly to the project level (no Organization resource). - Deploy the proxy-only subnet, global external Application Load Balancer, Cloud Router, and Cloud NAT. Don't use Cloud Armor. - Deploy project-level Cloud NGFW Enterprise with CAS TLS inspection ('--tls-inspect' on the firewall policy egress rule and 'gcloud beta' for the project-level firewall endpoint association) and an explicit DENY override for malware and antivirus threats. - Distribute the root CA to the private VMs over IAP SSH with connection timeouts so the guest OS trust store is updated. - Print the final Load Balancer URL ('https://${LB_IP}') at the end. Wrap the script in 'set -euxo pipefail' and output only the single executable bash script block.bashkomut dosyasının tamamını oluşturur, her komutu uygunluk kısıtlamalarına göre kendi kendine denetler veset -euxo pipefailile sarmalanmış tek bir yürütülebilir komut dosyası bloğu oluşturur.
Güvenlik dağıtım komut dosyasını çalıştırma
/goalmodunda, önceki istemden oluşturulanbashkomut dosyasını Antigravity sohbet penceresine aşağıdaki biçimde yapıştırarak dağıtımı çalıştırın ve canlı uygulama URL'sini (https://<LB_IP>) oluşturun:Run this script. <PASTED-SCRIPT>
7. Güvenli uygulamayı doğrulama
Dağıtım komut dosyası tamamlandığında Antigravity, global harici uygulama yük dengeleyicinin (https://<LB_IP>) harici HTTPS URL'sini verir.
- Web tarayıcınızda
https://<LB_IP>adresini açın ve gCurrenC hesap makinesi arayüzünü yüklemek için tarayıcının kendinden imzalı sertifika uyarısını atlayın: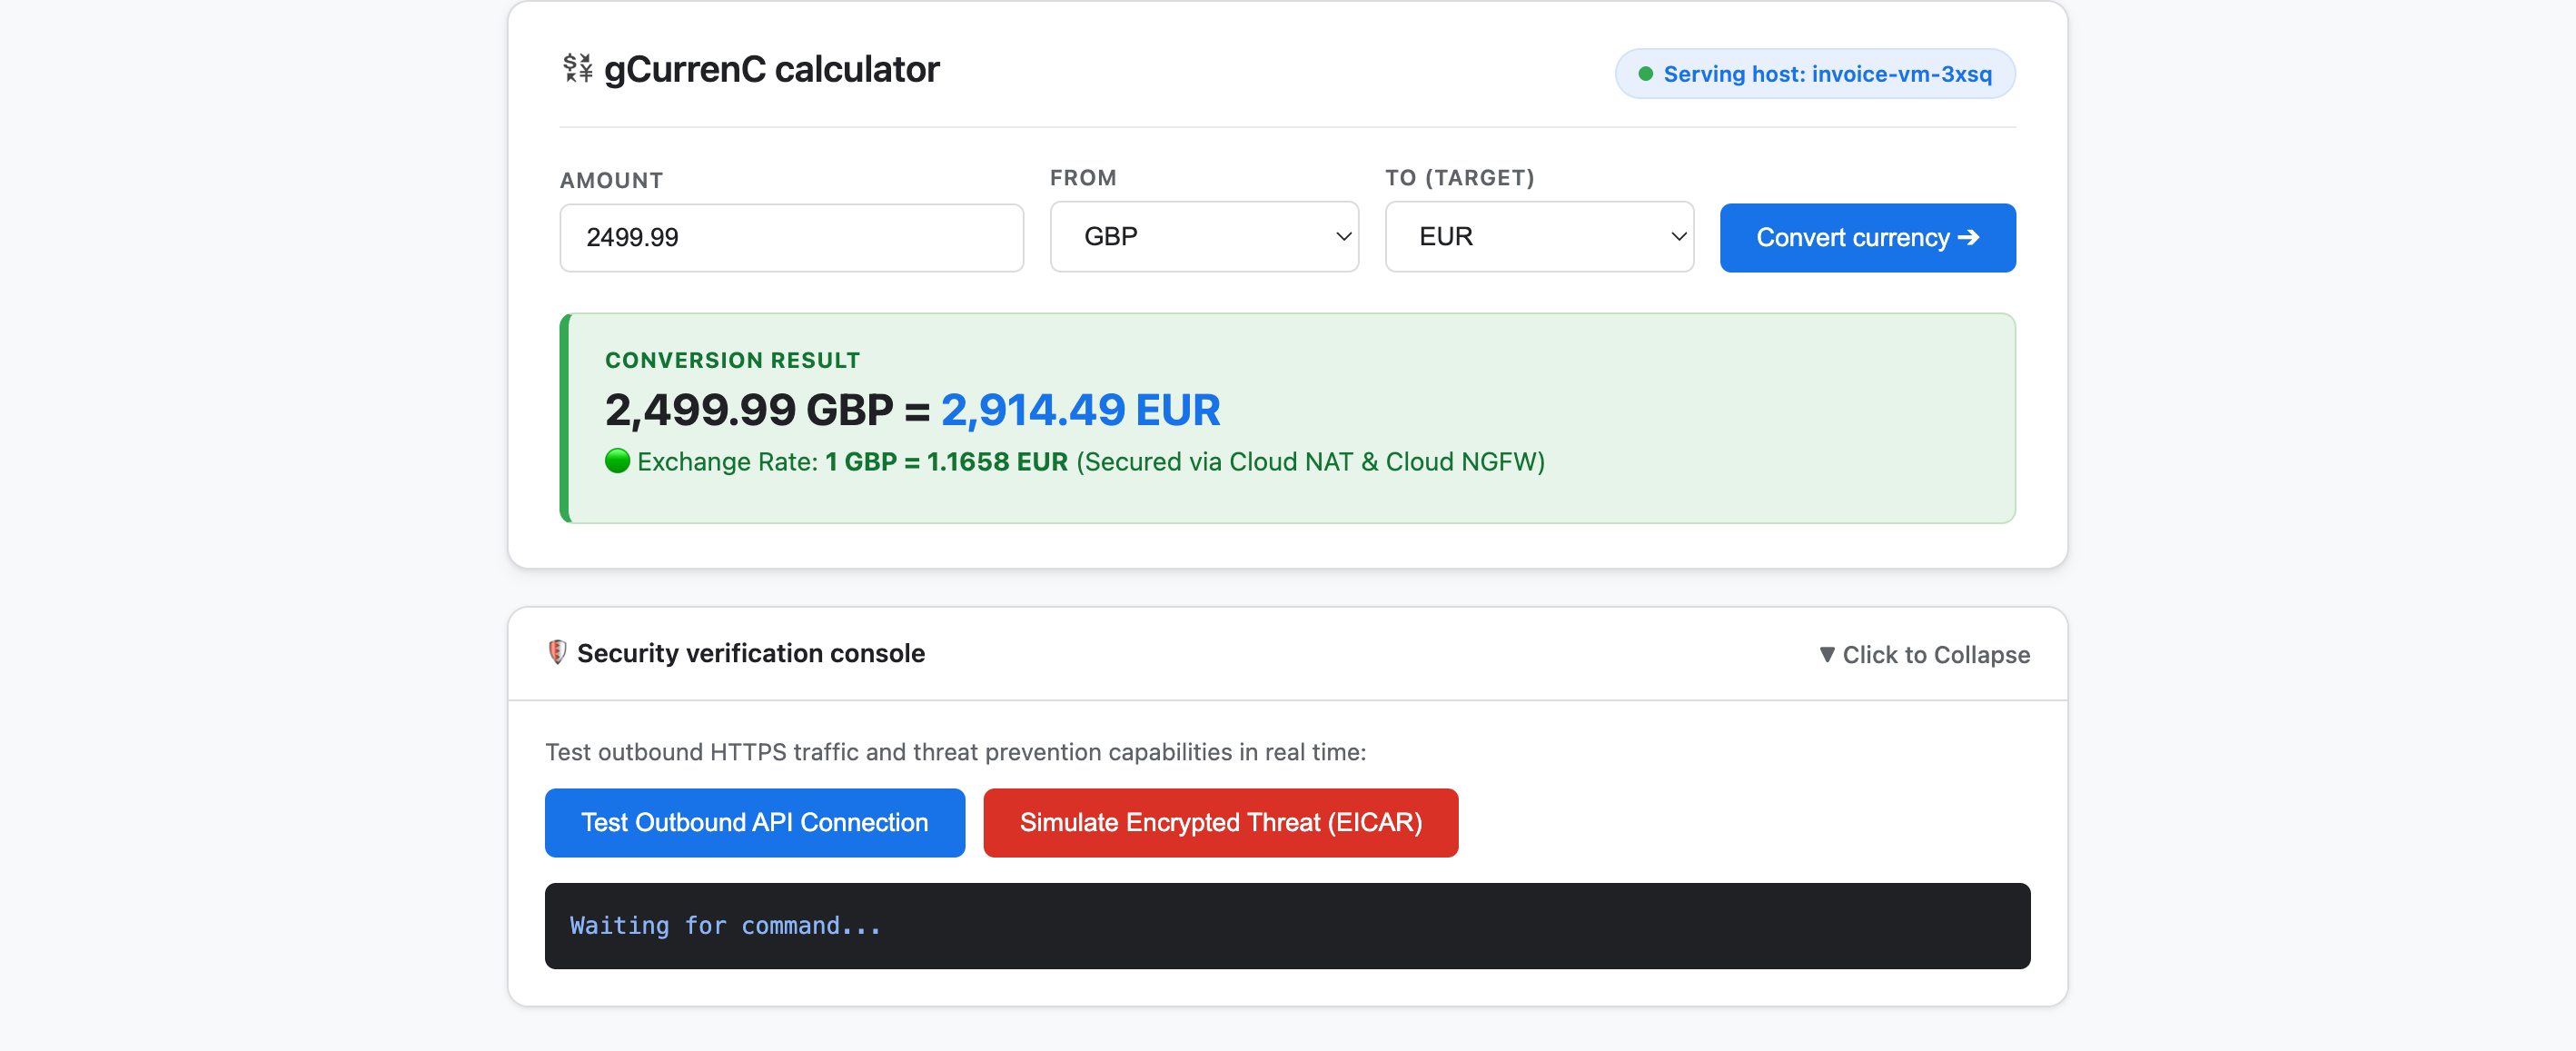
- Hem giden bağlantıyı hem de tehdit önlemeyi doğrulamak için uygulamayı test edin:
- Para birimini dönüştür'ü tıklayın. Uygulama, canlı dönüştürülen döviz kurunu hemen gösterir. Bu, giriş yük dengelemenin Google Front End'ler (GFE'ler) ve yalnızca proxy kullanılan alt ağ üzerinden sorunsuz bir şekilde yönlendirildiğini, Cloud NAT'ın ise
api.frankfurter.devadresinden canlı döviz kurlarını aldığını doğrular. - Security verification console'u (Güvenlik doğrulama konsolu) genişletin ve Test outbound API connection'ı (Giden API bağlantısını test et) tıklayın. Uygulama,
verdict: PERMITTED(HTTP 200) değerini gösterir. Bu, Cloud NAT yönlendirmenin çalıştığını ve sanal makine işletim sisteminin, şifresi çözülmüş HTTPS oturumları için özel CAS kök CA'ya güvendiğini doğrular. - Şifrelenmiş tehdidi simüle et (EICAR) seçeneğini tıklayın. Uygulamada
verdict: PERMITTEDgösterilir. Bu, Cloud NGFW Enterprise'ın CAS tarafından desteklenen TLS denetimini kullanarak giden HTTPS isteğinin şifresini çözdüğünü ve Yetkisiz Girişi Önleme Hizmeti (IPS) ile EICAR test imzasını denetlediğini doğrular.
- Para birimini dönüştür'ü tıklayın. Uygulama, canlı dönüştürülen döviz kurunu hemen gösterir. Bu, giriş yük dengelemenin Google Front End'ler (GFE'ler) ve yalnızca proxy kullanılan alt ağ üzerinden sorunsuz bir şekilde yönlendirildiğini, Cloud NAT'ın ise
8. Temizleme
Bu codelab'de oluşturulan kaynaklar için Google Cloud hesabınızdan sürekli ücret alınmasını önlemek istiyorsanız yalnızca codelab kaynaklarını veya Google Cloud projenizi silebilirsiniz.
- Google Cloud projenizi saklamak ve yalnızca bu codelab sırasında oluşturulan kaynakları kaldırmak istiyorsanız Antigravity sohbet penceresinde
/goalmodunda aşağıdaki istemi çalıştırın:Remove all resources created in this session, including the gcurrenc app and its resources. Don't delete the project. - Bu codelab için özel bir Google Cloud projesi oluşturduysanız ve projenin tamamını silmek istiyorsanız Antigravity sohbet penceresinde
/goalmodunda aşağıdaki istemi çalıştırın:Clean up the demo environment by deleting the Google Cloud project. Run the following command in the terminal: gcloud projects delete "$(gcloud config get-value project 2>/dev/null)" --quiet
9. Tebrikler
Tebrikler! Google Antigravity'de Google Cloud Developer eklentisini (DK MCP sunucusu) kullanarak gCurrenC hesap makinesi web uygulamasını Google Cloud'da dağıttınız ve güvenliğini sağladınız.
Sırada ne var?
Bu codelab'de kullanılan hizmetler hakkında daha fazla bilgi edinmek için resmi Google Cloud belgelerini inceleyin: