

1. Giới thiệu
Trong lớp học lập trình này, bạn sẽ xây dựng và triển khai ứng dụng web máy tính gCurrenC trên Google Cloud, sau đó bảo mật ứng dụng này khỏi quyền truy cập không mong muốn. Bằng cách sử dụng Google Antigravity, Trình bổ trợ Google Cloud Developer và máy chủ MCP Developer Knowledge (DK), bạn sẽ thiết kế và triển khai một cấu trúc bảo mật giúp kiểm soát những ai có thể truy cập vào ứng dụng và bảo vệ ứng dụng khỏi hành vi sử dụng trái phép.
Trong suốt phòng thí nghiệm này, bạn sẽ kết nối Google Antigravity với máy chủ DK MCP, giúp Antigravity có được thông tin chính thức, theo thời gian thực trong tài liệu về Google Cloud. Thay vì dựa vào dữ liệu huấn luyện tĩnh hoặc trọng số mô hình đã lỗi thời, Antigravity truy xuất linh động các mẫu kiến trúc hiện tại, cú pháp gcloud CLI mới nhất và các tham số bảo mật, giúp giảm thiểu ảo tưởng và cung cấp câu trả lời dựa trên kiến thức mới nhất.
Sản phẩm bạn sẽ tạo ra
- Khối lượng công việc điện toán riêng tư: Hai máy ảo (VM) Compute Engine chạy ứng dụng web máy tính gCurrenC bên trong một mạng Đám mây riêng tư ảo (VPC) tuỳ chỉnh không có địa chỉ IP công khai.
- Quy trình vào bảo mật: Trình cân bằng tải ứng dụng bên ngoài toàn cầu có mạng con chỉ có proxy chuyên dụng, giúp định tuyến lưu lượng truy cập Internet thông qua Google Front End (GFE) đến các máy ảo riêng tư mà không hiển thị các máy ảo đó với Internet công cộng.
- Đường ống dữ liệu đầu ra bảo mật: Một Cloud Router và cổng Cloud NAT được kết hợp với Cloud Next Generation Firewall (Cloud NGFW) Enterprise và Certificate Authority Service (CAS) ở cấp dự án để thực hiện kiểm tra TLS nhanh chóng và quét Dịch vụ ngăn chặn xâm nhập (IPS) trên lưu lượng truy cập API trao đổi tiền tệ HTTPS đi ra ngoài.
Kiến thức bạn sẽ học được
- Cài đặt trình bổ trợ
google-cloud-developerbằng Antigravity CLI và định cấu hình máy chủ DK MCP trong Antigravity. - Triển khai và thử nghiệm một ứng dụng web riêng tư tách biệt trên Compute Engine bằng tính năng chuyển tiếp TCP của Identity-Aware Proxy (IAP).
- Sử dụng câu lệnh nhiều lượt có căn cứ trong Antigravity để thiết kế kiến trúc bảo mật cho lưu lượng truy cập vào và ra ở cấp dự án.
- Tạo, tự kiểm tra và chạy tập lệnh triển khai
bashcho Cân bằng tải ứng dụng bên ngoài toàn cầu, Cloud NAT, CAS và Cloud NGFW Enterprise.
2. Trước khi bắt đầu
Điều kiện tiên quyết
Trước khi bắt đầu lớp học lập trình này, hãy đảm bảo rằng bạn có:
- Một Tài khoản Google và trình duyệt Google Chrome.
- Một dự án Google Cloud mới đã bật tính năng thanh toán. Ghi lại Mã dự án (
PROJECT_ID) vì bạn sẽ sử dụng mã này trong suốt lớp học lập trình này để bật API, tạo khoá API và triển khai tài nguyên Google Cloud. - Quyền Quản lý danh tính và quyền truy cập (IAM) trong dự án trên đám mây Google Cloud để tạo khoá API, tài nguyên Compute Engine, mạng VPC, nhóm CAS, đường hầm IAP và điểm cuối Cloud NGFW.
- Xác thực bằng
gcloudCLI, đặt dự án trên đám mây của Google đang hoạt động và bật các API cần thiết:- Trong thiết bị đầu cuối hoặc Cloud Shell, hãy kiểm tra xem bạn đã được xác thực chưa:
gcloud auth listgcloud auth login - Xác minh rằng CLI
gcloudđược định cấu hình để sử dụng dự án của bạn:gcloud config list projectPROJECT_IDbằng mã dự án trên đám mây của bạn trên Google Cloud:export PROJECT_ID=PROJECT_ID gcloud config set project PROJECT_ID - Bật các API bắt buộc trong dự án Google Cloud:
gcloud services enable \
   compute.googleapis.com \
   iap.googleapis.com \
   networksecurity.googleapis.com \
   privateca.googleapis.com \
   developerknowledge.googleapis.com \
   apikeys.googleapis.com
- Trong thiết bị đầu cuối hoặc Cloud Shell, hãy kiểm tra xem bạn đã được xác thực chưa:
- Cài đặt Antigravity 2.0 trên hệ thống cục bộ của bạn từ trang tải xuống Google Antigravity.
Cài đặt trình bổ trợ Google Cloud Developer bằng Antigravity CLI
Để cài đặt trình bổ trợ Google Cloud Developer bằng Antigravity CLI, hãy làm như sau:
- Để cài đặt Antigravity CLI trên máy trạm cục bộ, hãy làm như sau:
- Mở cửa sổ dòng lệnh trên máy.
- Chạy tập lệnh của trình cài đặt:
curl -fsSL https://antigravity.google/cli/install.sh | bash - Đóng rồi mở lại phiên dòng lệnh để tệp nhị phân
agycủa Antigravity CLI có sẵn trong hệ thốngPATHcủa bạn.
- Trong dòng lệnh cục bộ, hãy chạy lệnh sau để cài đặt trình bổ trợ
google-cloud-developer:agy plugin install https://github.com/google/skills/plugins/cloud/google-cloud-developerCloning plugin from https://github.com/google/skills.git... [ok] google-cloud-developer ✔ skills : 5 processed - agents : skipped (not found) - commands : skipped (not found) ✔ mcpServers : 1 processed - hooks : skipped (not found)
3. Thiết lập Antigravity và máy chủ DK MCP
Trong phần này, bạn sẽ định cấu hình máy chủ DK MCP trong Antigravity bằng một khoá API Google Cloud bị hạn chế.
- Mở Antigravity, nhập
/goalrồi nhấn Enter để kích hoạt chế độ mục tiêu, sau đó dán câu lệnh sau để tạo khoá API bị hạn chế và định cấu hình máy chủ DK MCP. Thay thếPROJECT_IDbằng mã dự án Google Cloud của bạn trong phần Trước khi bắt đầu. Để biết thêm thông tin, hãy xem phần Trình bổ trợ google-cloud-developer.Set up Antigravity to use the Developer Knowledge MCP server on my local machine. Run the necessary terminal commands to complete the following: 1. Create a restricted API key named 'DKP-MCP-Key' that can only target the Developer Knowledge API. Use the PROJECT_ID to create the API key. 2. Retrieve the actual key string of the newly created API key. 3. Create or safely update my ~/.gemini/config/mcp_config.json file (preserve any existing MCP servers) with the correct JSON structure to connect the developer-knowledge server using that API key in the headers. You MUST use the following JSON structure for the new server: "developer-knowledge": { "serverUrl": "https://developerknowledge.googleapis.com/mcp", "headers": { "x-goog-api-key": "<INSERT_RETRIEVED_API_KEY_HERE>" } } When you are done, confirm that the setup is complete. - Để xác minh rằng máy chủ DK MCP đang hoạt động, hãy nhập câu lệnh sau vào cửa sổ trò chuyện Antigravity:
Which MCP servers are available?developer-knowledgevà các công cụ có sẵn (search_documents,answer_queryvàget_documents):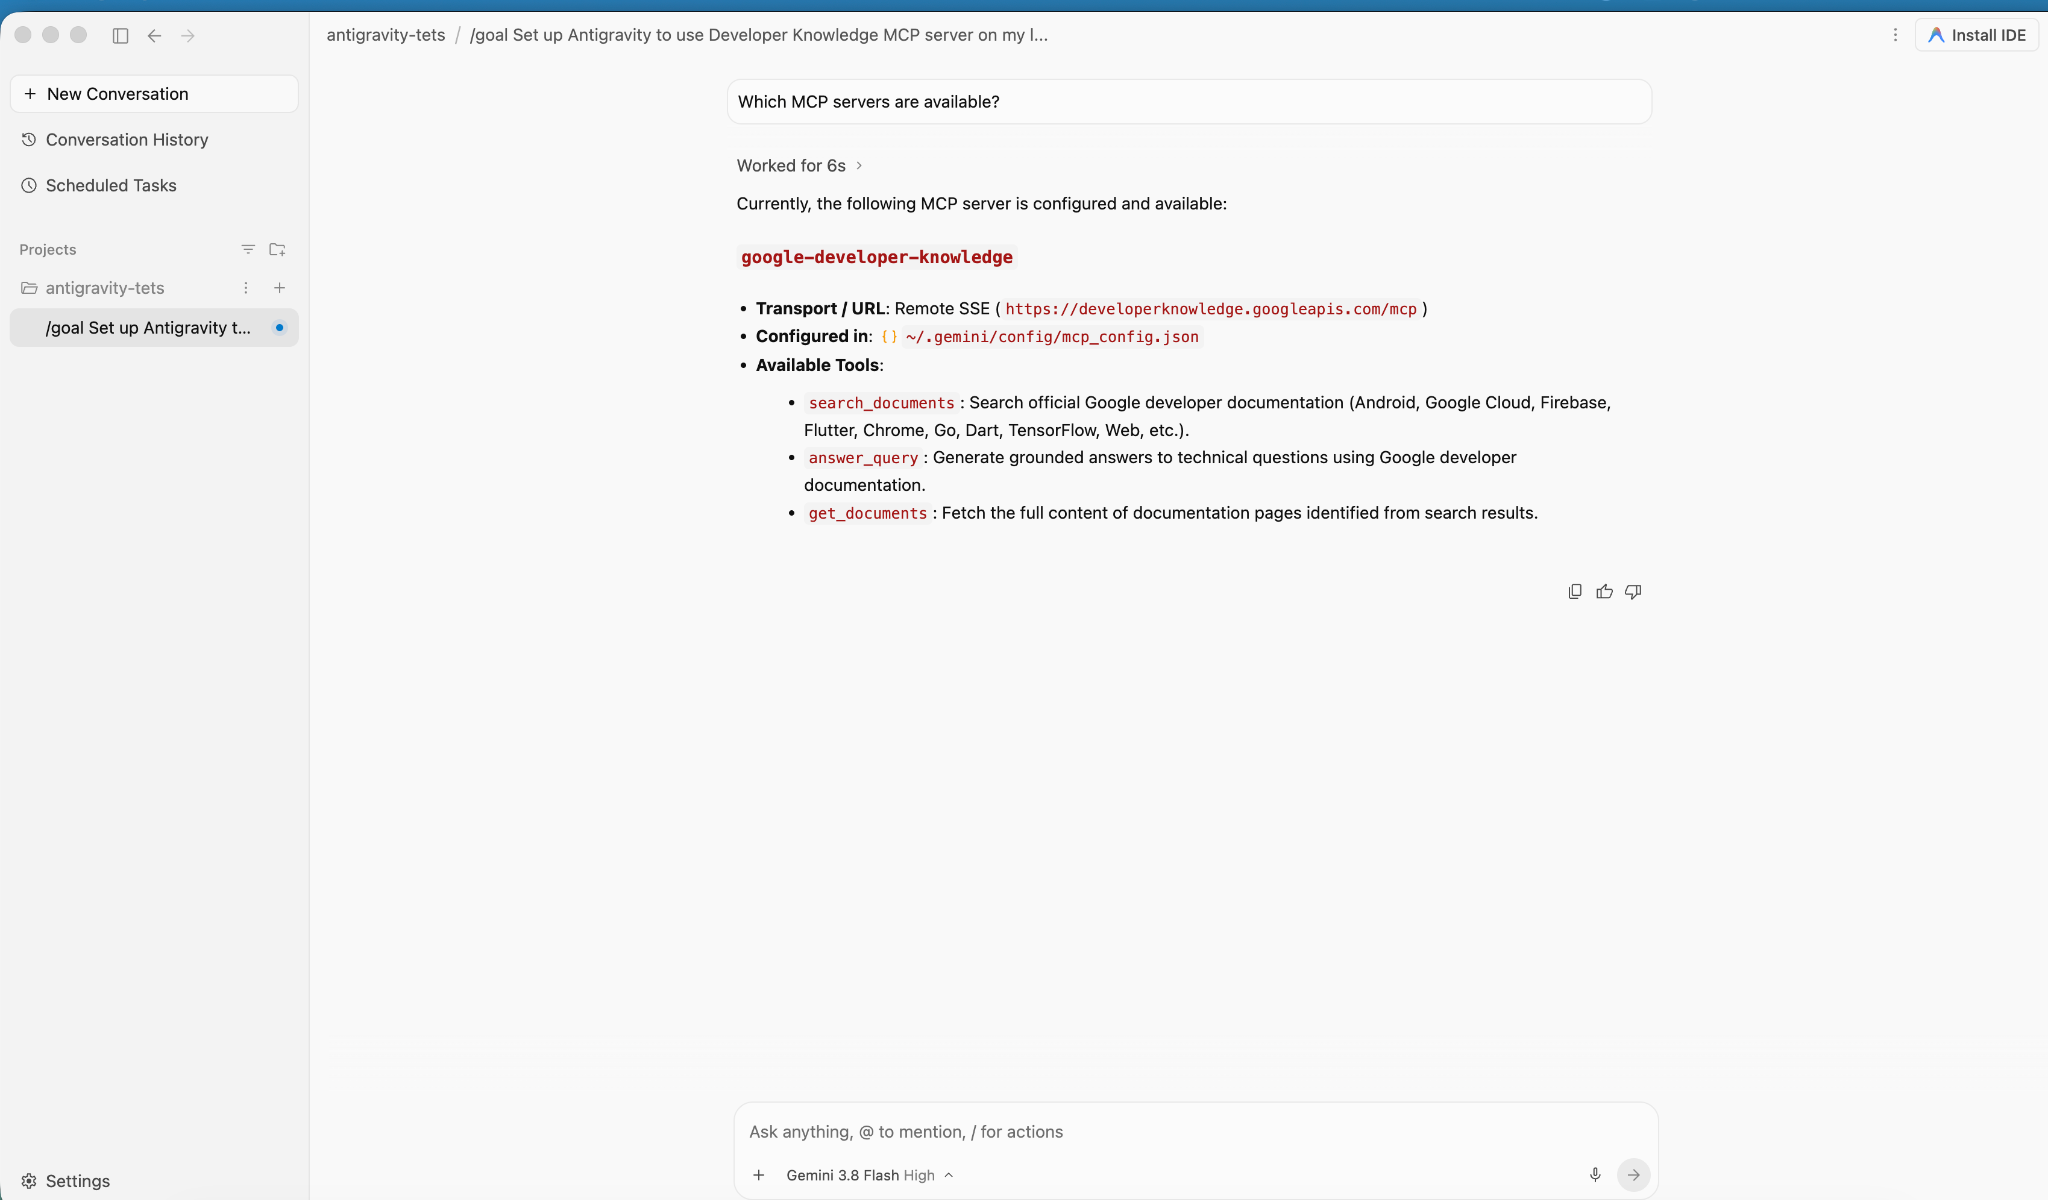
4. Tạo và triển khai ứng dụng
Trong phần này, bạn sẽ triển khai ứng dụng máy tính gCurrenC trên hai máy ảo Compute Engine riêng tư trong một mạng VPC tuỳ chỉnh.
Ứng dụng này cung cấp:
- Một công cụ chuyển đổi tiền tệ trực tiếp hỗ trợ
USD,EUR,GBP,JPY,CAD,INRvàAUDbằng cách sử dụng thư viện chuẩnhttp.servertích hợp sẵn của Python trên cổng8080với điểm cuối kiểm tra tình trạng/healthz. - Bảng điều khiển xác minh bảo mật để chạy các quy trình kiểm tra khả năng kết nối API gửi đi theo thời gian thực và ngăn chặn mối đe doạ đã mã hoá.
- Quy tắc tường lửa cho lưu lượng truy cập vào cho phép dải IAP của Google truy cập vào cổng
22và8080để kiểm thử quản trị mà không hiển thị địa chỉ IP công khai.
Triển khai ứng dụng
- Trong cửa sổ trò chuyện Antigravity, hãy nhập
/goalrồi chạy câu lệnh sau:You are a Cloud developer. Deploy the "gCurrenC calculator" app onto two (2) Compute Engine VMs with no external IP addresses (`--no-address`) inside a dedicated custom VPC network and private subnet. CRITICAL INSTRUCTIONS ON OUTPUT: - The VMs are strictly private with no external IP addresses and the local IAP tunnel has NOT been started yet. Any web URL is completely unreachable and will fail with a connection error. - In your final response, simply confirm that the private VMs and Managed Instance Group are deployed, and state that the user should establish the IAP tunnel. Do not output, format, or suggest any web preview link or URL (such as http://localhost:8080 or internal IP addresses) in your final response. Run this script in the terminal: ```bash #!/usr/bin/env bash set -euxo pipefail # Disable any interactive confirmation prompts so execution never hangs export CLOUDSDK_CORE_DISABLE_PROMPTS=1 # --- User Configuration --- PROJECT_ID="[PROJECT_ID]" REGION="us-central1" ZONE="us-central1-a" NETWORK="gcurrenc-vpc" SUBNET="gcurrenc-app-subnet" SUBNET_RANGE="10.10.1.0/24" # -------------------------- echo "==> [1/5] Configuring project, default region/zone, and enabling APIs..." gcloud config set project "${PROJECT_ID}" gcloud config set compute/region "${REGION}" gcloud config set compute/zone "${ZONE}" gcloud services enable compute.googleapis.com echo "==> [2/5] Creating custom VPC network and private workload subnet..." gcloud compute networks create "${NETWORK}" \ --subnet-mode=custom \ --description="Dedicated VPC for currency exchange app demo" 2>/dev/null || true gcloud compute networks subnets create "${SUBNET}" \ --network="${NETWORK}" \ --region="${REGION}" \ --range="${SUBNET_RANGE}" \ --enable-private-ip-google-access \ --description="Private subnet hosting backend compute instances" 2>/dev/null || true echo "==> [3/5] Generating standalone Python standard-library startup script..." cat << 'STARTUP_EOF' > /tmp/private_app_startup.sh #!/bin/bash set -euxo pipefail mkdir -p /opt/gcurrenc-app # Pure Python standard-library application (zero pip/apt dependencies needed at boot) cat << 'APPEOF' > /opt/gcurrenc-app/app.py import os import sys import json import socket import urllib.request import urllib.parse import ssl from http.server import BaseHTTPRequestHandler, ThreadingHTTPServer SUPPORTED_CURRENCIES = ["USD", "EUR", "GBP", "JPY", "CAD", "INR", "AUD"] class CurrencyAppHandler(BaseHTTPRequestHandler): def address_string(self): return str(self.client_address[0]) def do_GET(self): parsed = urllib.parse.urlparse(self.path) path = parsed.path params = urllib.parse.parse_qs(parsed.query) if path == "/favicon.ico": self.send_response(204) self.end_headers() return if path == "/healthz": self.send_response(200) self.send_header("Content-Type", "text/plain") self.end_headers() self.wfile.write(b"OK") return if path == "/api/security-test": mode = params.get("mode", ["safe"])[0] target = "https://secure.eicar.org/eicar.com.txt" if mode == "threat" else "https://api.frankfurter.dev/v1/latest?from=USD&to=EUR" try: req = urllib.request.Request(target, headers={"User-Agent": "SecureCurrencyApp/1.0"}) ctx = ssl.create_default_context() with urllib.request.urlopen(req, timeout=5, context=ctx) as resp: data = {"verdict": "PERMITTED", "target": target, "http_status": resp.status} code = 200 except Exception as e: data = {"verdict": "BLOCKED_OR_FAILED", "target": target, "error": str(e)} code = 502 self.send_response(code) self.send_header("Content-Type", "application/json") self.end_headers() self.wfile.write(json.dumps(data, indent=2).encode("utf-8")) return self.render_page() def do_POST(self): parsed = urllib.parse.urlparse(self.path) if parsed.path == "/generate": content_length = int(self.headers.get("Content-Length", 0)) post_body = self.rfile.read(content_length).decode("utf-8") form = urllib.parse.parse_qs(post_body) base_curr = form.get("base_curr", ["USD"])[0] target_curr = form.get("target_curr", ["EUR"])[0] try: amount = float(form.get("amount", ["2500.00"])[0]) except ValueError: amount = 2500.00 rate_str = "Unavailable" total_str = "Rate lookup pending outbound internet activation" try: if base_curr == target_curr: rate = 1.0 else: url = f"https://api.frankfurter.dev/v1/latest?from={base_curr}&to={target_curr}" req = urllib.request.Request(url, headers={"User-Agent": "SecureCurrencyApp/1.0"}) with urllib.request.urlopen(req, timeout=4) as resp: res_json = json.loads(resp.read().decode("utf-8")) rate = res_json["rates"][target_curr] rate_str = str(rate) total_str = f"{round(amount * rate, 2):,.2f} {target_curr}" except Exception as e: total_str = f"Outbound connection unavailable {str(e)}" self.render_page(base_curr, target_curr, amount, rate_str, total_str) return self.send_response(404) self.end_headers() def render_page(self, base_curr="USD", target_curr="EUR", amount=2500.00, fx_rate="1.00", total_str=""): hostname = socket.gethostname() curr_options_base = "".join([f'<option value="{c}" {"selected" if c == base_curr else ""}>{c}</option>' for c in SUPPORTED_CURRENCIES]) curr_options_target = "".join([f'<option value="{c}" {"selected" if c == target_curr else ""}>{c}</option>' for c in SUPPORTED_CURRENCIES]) result_block = "" if total_str: if fx_rate == "Unavailable": rate_line = "<p style='margin: 6px 0;'>Exchange Rate: <span style='color: #d93025; font-weight: bold;'>⚠️ Offline-Outbound internet blocked</span></p>" else: rate_line = f"<p style='margin: 6px 0; font-size: 14px; color: #137333;'>🟢 Exchange Rate: <strong>1 {base_curr} = {fx_rate} {target_curr}</strong> (Secured via Cloud NAT & Cloud NGFW)</p>" result_block = f""" <div style="margin-top: 22px; background: #e6f4ea; border: 1px solid #c6e1c6; border-left: 5px solid #34a853; padding: 18px 20px; border-radius: 8px;"> <h4 style="margin: 0 0 6px 0; text-transform: uppercase; font-size: 12px; color: #137333; letter-spacing: 0.5px;">Conversion Result</h4> <div style="font-size: 24px; font-weight: 700; color: #202124; margin-bottom: 6px;"> {amount:,.2f} {base_curr} = <span style="color: #1a73e8;">{total_str}</span> </div> {rate_line} </div> """ html = ("""<!DOCTYPE html> <html lang="en"> <head> <meta charset="UTF-8"> <meta name="viewport" content="width=device-width, initial-scale=1.0"> <title>gCurrenC calculator</title> <style> body { font-family: -apple-system, BlinkMacSystemFont, "Segoe UI", Roboto, "Helvetica Neue", Arial, sans-serif; background: #f8f9fa; margin: 30px 15px; color: #202124; display: flex; justify-content: center; } .container { width: 100%; max-width: 860px; } .card { background: white; padding: 24px 28px; border-radius: 12px; box-shadow: 0 1px 3px rgba(60,64,67,0.12), 0 4px 8px rgba(60,64,67,0.06); border: 1px solid #dadce0; margin-bottom: 20px; } .header { display: flex; justify-content: space-between; align-items: center; border-bottom: 1px solid #e8eaed; padding-bottom: 14px; margin-bottom: 20px; } .header h2 { margin: 0 0 4px 0; font-size: 20px; font-weight: 600; } .header p { margin: 0; font-size: 13px; color: #5f6368; } .badge { background: #e8f0fe; color: #1a73e8; padding: 6px 12px; border-radius: 16px; font-weight: 600; font-size: 12px; border: 1px solid #d2e3fc; display: flex; align-items: center; gap: 6px; } .badge::before { content: ""; width: 8px; height: 8px; border-radius: 50%; background-color: #34a853; } .form-row { display: flex; gap: 14px; align-items: flex-end; flex-wrap: wrap; } .form-group { display: flex; flex-direction: column; gap: 6px; } .form-group label { font-size: 12px; font-weight: 600; color: #5f6368; text-transform: uppercase; letter-spacing: 0.5px; } input, select { padding: 10px 14px; border: 1px solid #dadce0; border-radius: 6px; font-size: 14px; color: #202124; background-color: #fff; box-sizing: border-box; transition: border-color 0.15s, box-shadow 0.15s; } input:focus, select:focus { outline: none; border-color: #1a73e8; box-shadow: 0 0 0 3px rgba(26, 115, 232, 0.15); } button { padding: 11px 20px; background: #1a73e8; color: white; border: none; border-radius: 6px; font-size: 14px; font-weight: 500; cursor: pointer; transition: background 0.15s, box-shadow 0.15s; } button:hover { background: #1557b0; box-shadow: 0 1px 2px rgba(60,64,67,0.3); } .danger-btn { background: #d93025; } .danger-btn:hover { background: #b31412; } pre { background: #202124; color: #8ab4f8; padding: 14px; border-radius: 6px; overflow-x: auto; font-family: "SF Mono", "Fira Code", Consolas, monospace; font-size: 13px; line-height: 1.5; margin: 0; } /* Collapsible Security Console */ details.security-drawer { background: white; border-radius: 12px; box-shadow: 0 1px 3px rgba(60,64,67,0.12); border: 1px solid #dadce0; overflow: hidden; margin-bottom: 24px; } details.security-drawer summary { padding: 16px 20px; font-size: 14px; font-weight: 600; cursor: pointer; list-style: none; display: flex; justify-content: space-between; align-items: center; user-select: none; background: #fafafa; transition: background 0.15s; } details.security-drawer summary::-webkit-details-marker { display: none; } details.security-drawer summary:hover { background: #f1f3f4; } details.security-drawer[open] summary { border-bottom: 1px solid #dadce0; background: #ffffff; } .expand-toggle { font-size: 13px; font-weight: 500; } details.security-drawer summary .expand-toggle::before { content: "▶ Click to Expand"; color: #1a73e8; } details.security-drawer[open] summary .expand-toggle::before { content: "▼ Click to Collapse"; color: #5f6368; } .drawer-body { padding: 20px; background: #ffffff; } .drawer-body p { margin-top: 0; font-size: 13px; color: #5f6368; } .probe-buttons { display: flex; gap: 10px; margin-bottom: 14px; } </style> </head> <body> <div class="container"> <div class="card"> <div class="header"> <div> <h2>💱 gCurrenC calculator</h2> </div> <div class="badge">Serving host: {hostname}</div> </div> <form method="POST" action="/generate"> <div class="form-row"> <div class="form-group" style="flex: 1.5; min-width: 140px;"> <label>Amount</label> <input type="number" step="0.01" name="amount" value="{amount}" required> </div> <div class="form-group" style="flex: 1; min-width: 100px;"> <label>From</label> <select name="base_curr">{curr_options_base}</select> </div> <div class="form-group" style="flex: 1; min-width: 100px;"> <label>To (Target)</label> <select name="target_curr">{curr_options_target}</select> </div> <div class="form-group"> <button type="submit">Convert currency ➔</button> </div> </div> </form> {result_block} </div> <!-- Collapsible Security Verification Console --> <details class="security-drawer"> <summary> <span>🛡️ Security verification console</span> <span class="expand-toggle"></span> </summary> <div class="drawer-body"> <p>Test outbound HTTPS traffic and threat prevention capabilities in real time:</p> <div class="probe-buttons"> <button type="button" onclick="runProbe('safe')">Test Outbound API Connection</button> <button type="button" class="danger-btn" onclick="runProbe('threat')">Simulate Encrypted Threat (EICAR)</button> </div> <pre id="output">Waiting for command...</pre> </div> </details> </div> <script> function runProbe(mode) { const el = document.getElementById('output'); el.innerText = 'Executing outbound request...'; fetch('/api/security-test?mode=' + mode) .then(res => res.json()) .then(data => el.innerText = JSON.stringify(data, null, 2)) .catch(err => el.innerText = 'Connection dropped / reset by Firewall: ' + err); } </script> </body> </html>""" .replace("{hostname}", str(hostname)) .replace("{amount}", str(amount)) .replace("{curr_options_base}", curr_options_base) .replace("{curr_options_target}", curr_options_target) .replace("{result_block}", result_block) ) self.send_response(200) self.send_header("Content-Type", "text/html; charset=utf-8") self.end_headers() self.wfile.write(html.encode("utf-8")) def run(): server_address = ('0.0.0.0', 8080) httpd = ThreadingHTTPServer(server_address, CurrencyAppHandler) httpd.serve_forever() if __name__ == '__main__': run() APPEOF # Register and start systemd unit cat << 'SERVICEEOF' > /etc/systemd/system/gcurrenc-app.service [Unit] Description=Currency exchange calculator web application After=network.target [Service] Type=simple User=root WorkingDirectory=/opt/gcurrenc-app ExecStart=/usr/bin/python3 /opt/gcurrenc-app/app.py Restart=always [Install] WantedBy=multi-user.target SERVICEEOF systemctl daemon-reload systemctl enable gcurrenc-app systemctl start gcurrenc-app STARTUP_EOF echo "==> [4/5] Creating Firewall, Regional Instance Template, and 2-VM MIG..." gcloud compute firewall-rules create allow-iap-admin \ --network="${NETWORK}" \ --allow=tcp:22,tcp:8080 \ --source-ranges=35.235.240.0/20 \ --target-tags=gcurrenc-app-vm \ --description="Allow IAP SSH and port 8080 access to private VMs" \ --quiet 2>/dev/null || true # Explicitly pass both --region and --instance-template-region to avoid prompt gcloud compute instance-templates create gcurrenc-app-template \ --instance-template-region="${REGION}" \ --region="${REGION}" \ --network="${NETWORK}" \ --subnet="${SUBNET}" \ --machine-type=e2-medium \ --no-address \ --tags=gcurrenc-app-vm \ --metadata-from-file=startup-script=/tmp/private_app_startup.sh \ --quiet gcloud compute instance-groups managed create gcurrenc-app-mig \ --base-instance-name=gcurrenc-vm \ --template="projects/${PROJECT_ID}/regions/${REGION}/instanceTemplates/gcurrenc-app-template" \ --size=2 \ --zone="${ZONE}" \ --quiet gcloud compute instance-groups managed set-named-ports gcurrenc-app-mig \ --named-ports=http-port:8080 \ --zone="${ZONE}" \ --quiet echo "==> [5/5] Verifying private VM deployment and internal status..." sleep 30 gcloud compute instances list \ --filter="name ~ '^gcurrenc-vm-'" \ --zones="${ZONE}" \ --format="table(name,zone.basename():label=ZONE,networkInterfaces[0].networkIP:label=INTERNAL_IP,status)" FIRST_VM=$(gcloud compute instances list \ --filter="name ~ '^gcurrenc-vm-'" \ --zones="${ZONE}" \ --format="value(name)" \ --limit=1) echo "Testing healthz on ${FIRST_VM} via IAP tunnel..." gcloud compute ssh "${FIRST_VM}" \ --zone="${ZONE}" \ --tunnel-through-iap \ --quiet \ --command="curl -fsS http://localhost:8080/healthz" echo "" echo "==========================================================================" echo "PREREQUISITE COMPLETE: 2 private VMs deployed with no external IPs." echo "VPC: ${NETWORK} | Subnet: ${SUBNET} (${SUBNET_RANGE})" echo "Instance Group: gcurrenc-app-mig (Zone: ${ZONE}, Port: 8080)" echo "" echo "The VMs are private and the IAP tunnel is not active. Set up the background IAP tunnel first to access the deployed app." echo "" echo "==========================================================================" ```
Xác minh việc tạo thực thể máy ảo
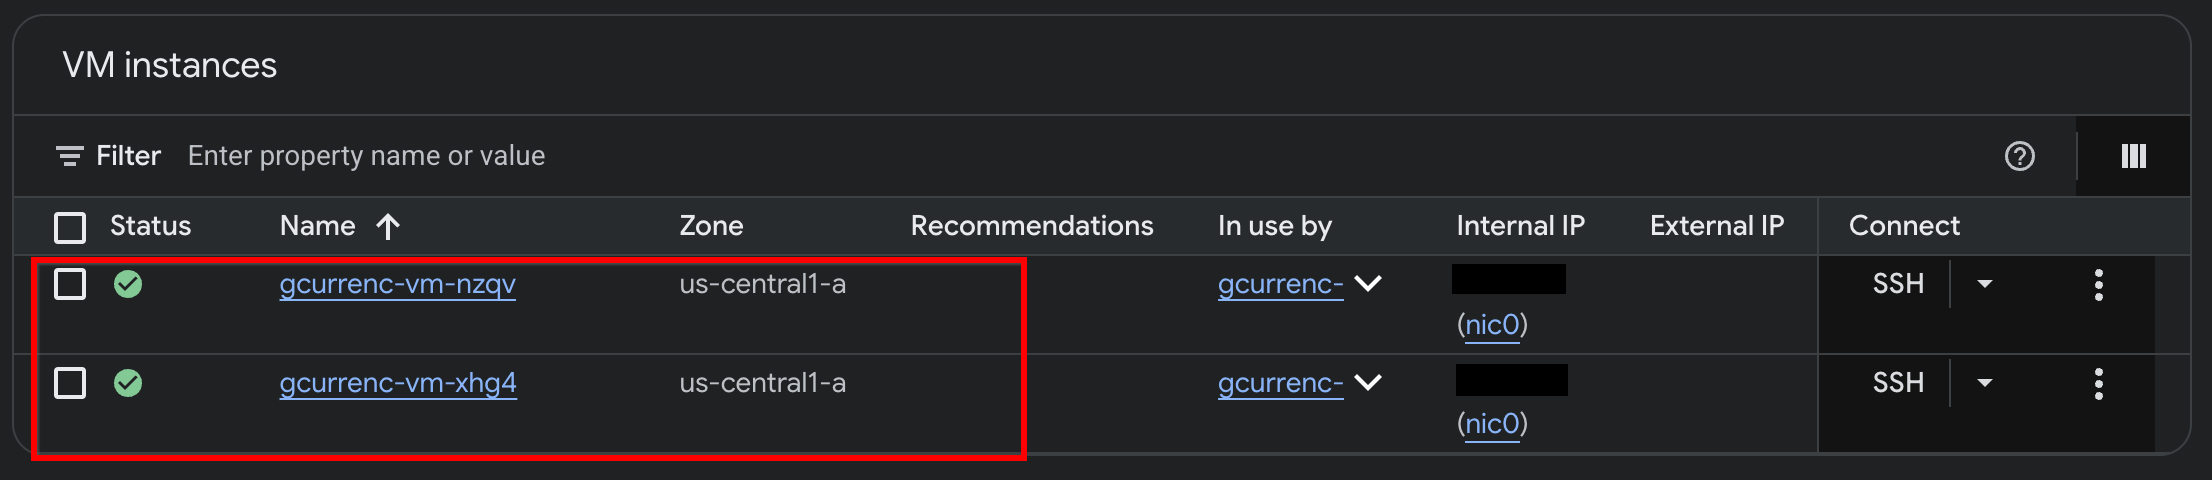
Sau khi Antigravity hoàn tất việc triển khai ứng dụng trên hai máy ảo Compute Engine riêng tư, hãy xác minh các phiên bản trong Google Cloud Console:
- Trong Google Cloud Console, hãy chuyển đến phần VM instances (Phiên bản máy ảo).
- Xác minh rằng hai phiên bản máy ảo đang chạy bằng địa chỉ IP nội bộ và không có địa chỉ IP bên ngoài:
5. Kiểm thử ứng dụng
Vì các máy ảo riêng tư không có địa chỉ IP ngoài (--no-address) và không có cổng Cloud NAT, nên chúng không có tuyến đến Internet và không thể truy cập vào các API quy đổi tiền tệ bên ngoài. Trước khi định cấu hình quyền truy cập an toàn ra bên ngoài, hãy kiểm thử ứng dụng qua đường hầm IAP cục bộ để xác minh rằng không có quyền truy cập Internet.
- Trong chế độ
/goal, hãy chạy câu lệnh sau trong cửa sổ trò chuyện Antigravity:Automate the IAP tunnel configuration and health verification for the web app, then output the live test URL. Run a terminal script that performs the following steps non-interactively: 1. Firewall Check: - Identify the active network ('gcurrenc-vpc' if it exists, otherwise 'default'). - Idempotently ensure an ingress firewall rule exists permitting 'tcp:22,tcp:8080' from the Google IAP range '35.235.240.0/20' targeting 'gcurrenc-app-vm'. 2. VM Health Verification: - Find the first running instance matching '^gcurrenc-vm-' in zone 'us-central1-a'. - Via 'gcloud compute ssh --tunnel-through-iap', verify that the 'gcurrenc-app' systemd service is active. If not active, restart it. 3. Background IAP Tunnel: - Free up local port 8080 if an old tunnel or process is lingering (e.g., using 'lsof -ti:8080 | xargs kill -9' or 'fuser -k 8080/tcp'). - Launch 'gcloud compute start-iap-tunnel <VM_NAME> 8080 --local-host-port=localhost:8080 --zone=us-central1-a' in the background using nohup, redirecting output to '/tmp/iap_tunnel.log'. - Wait up to 10 seconds for the tunnel to establish, checking with 'curl -fsS http://localhost:8080/healthz'. 4. Output Web Preview URL: - Detect whether the environment is Google Cloud Shell (check if $CLOUD_SHELL is true) or a local workstation. - If Cloud Shell, print instructions and the direct web preview link. - If local machine, provide the clickable 'http://localhost:8080' URL. - Sau khi đường hầm bắt đầu, hãy mở
http://localhost:8080/trong trình duyệt web: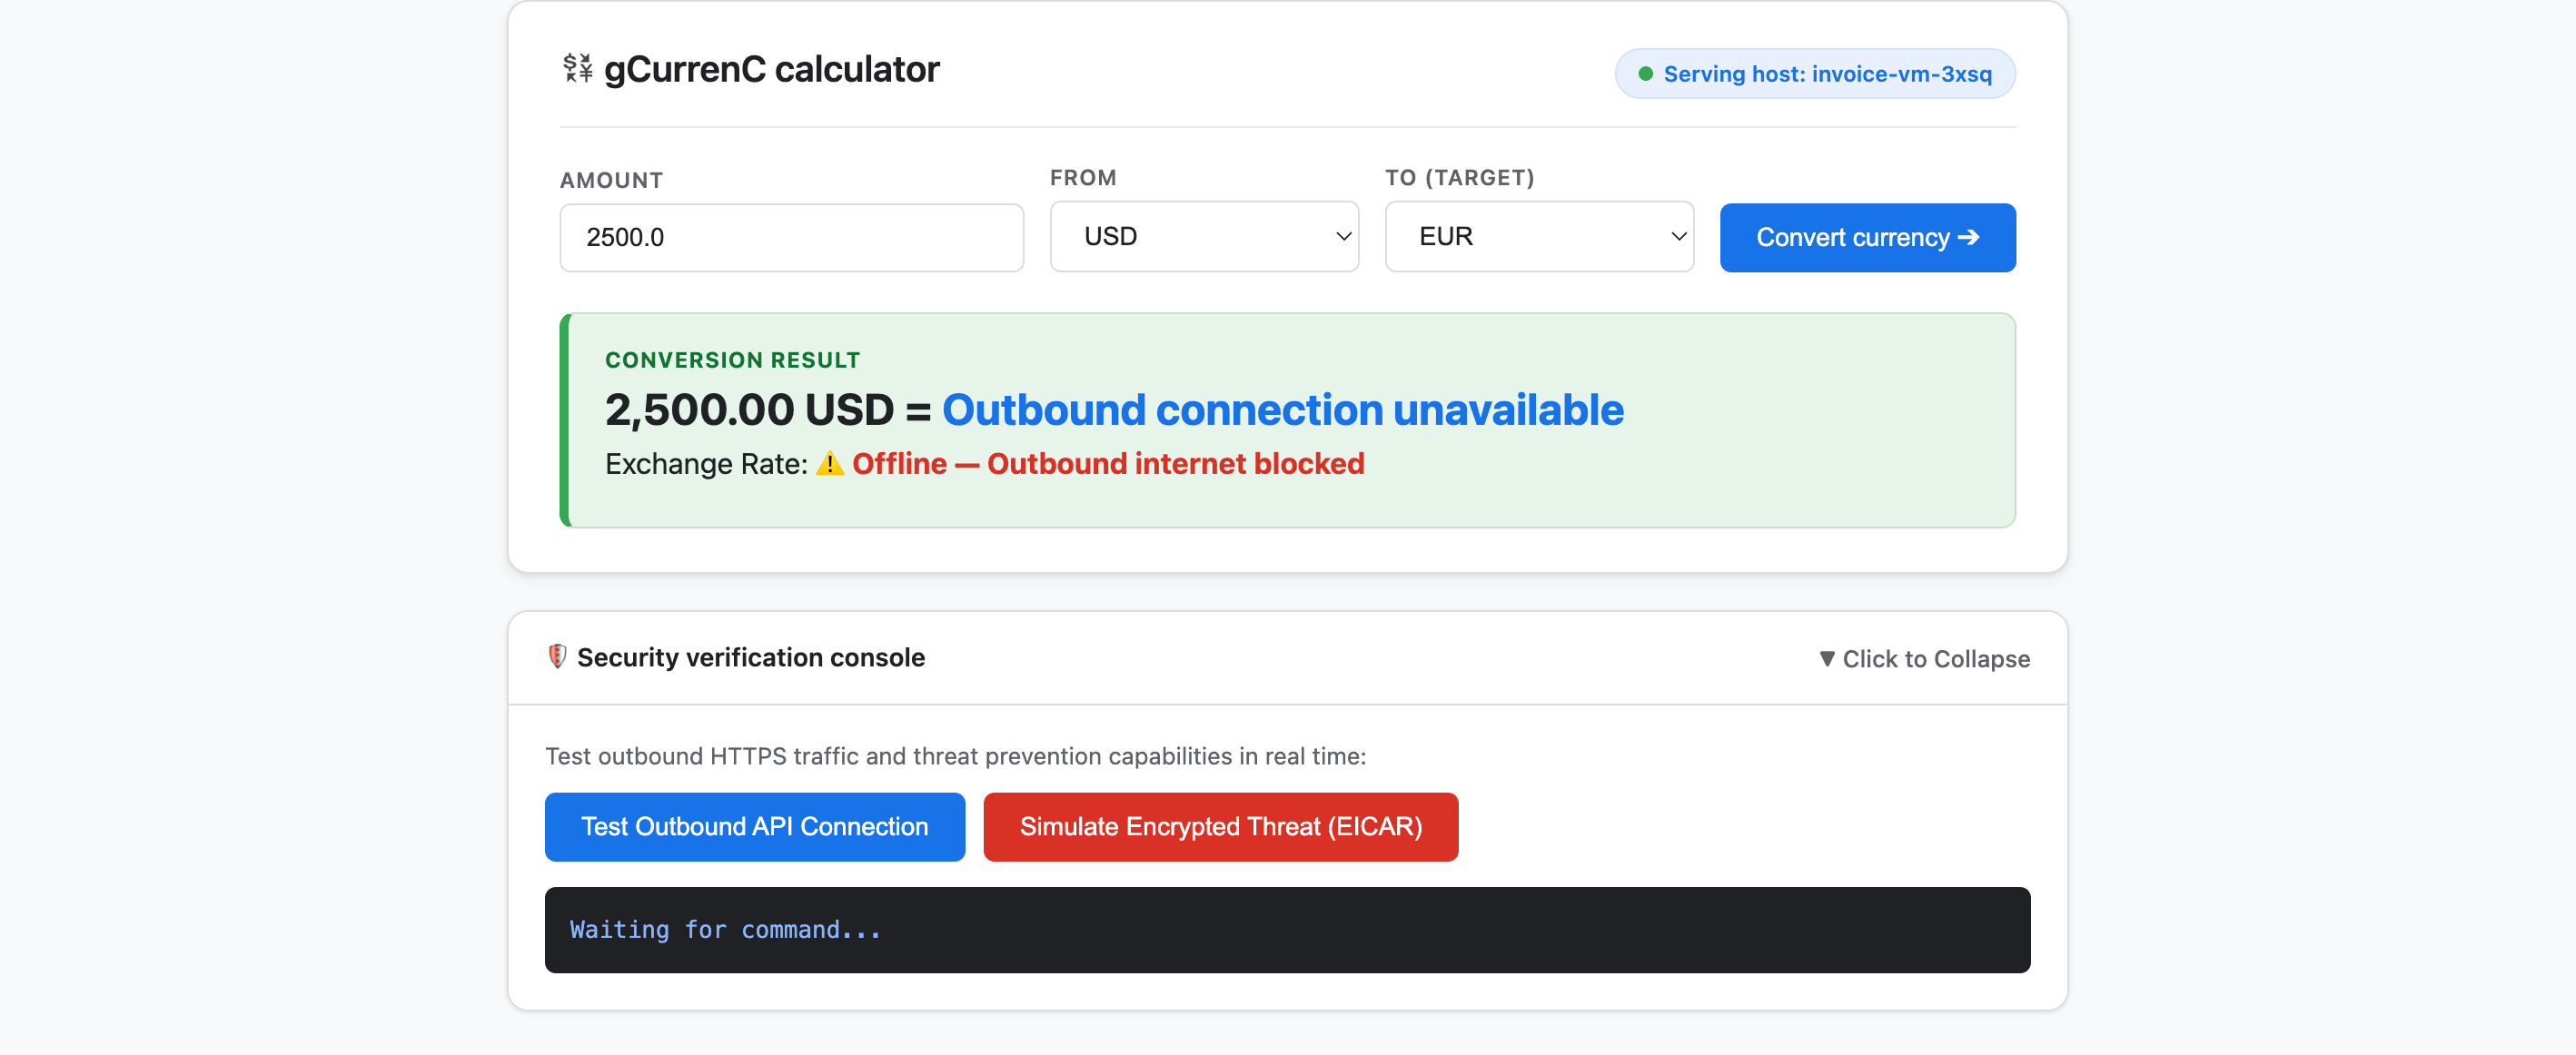
- Kiểm thử ứng dụng:
- Nhấp vào Chuyển đổi đơn vị tiền tệ. Kết quả chuyển đổi cho thấy
Offline - Outbound internet blockedvàOutbound connection unavailable. Kết quả này là bình thường vì máy ảo riêng tư không thể kết nối với Internet để tìm nạp tỷ giá hối đoái mới nhất. - Mở rộng Bảng điều khiển xác minh bảo mật rồi nhấp vào Kiểm tra kết nối API gửi đi. Kết quả hiển thị
verdict: BLOCKED_OR_FAILED(https://api.frankfurter.dev/v1/latest. Đây là kết quả dự kiến vì các máy ảo riêng tư không thể kết nối với Internet và tìm nạp tỷ giá hối đoái từhttps://api.frankfurter.dev/v1/latest. - Nhấp vào Mô phỏng mối đe doạ đã mã hoá (EICAR). Kết quả cũng cho thấy
verdict: BLOCKED_OR_FAILEDchohttps://secure.eicar.org/eicar.com.txt. Kết quả này cũng đúng như dự kiến vì các máy ảo riêng tư không có kết nối Internet.
- Nhấp vào Chuyển đổi đơn vị tiền tệ. Kết quả chuyển đổi cho thấy
Dừng đường hầm IAP cục bộ
Trước khi thiết kế và triển khai cấu trúc bảo mật, hãy chấm dứt đường hầm IAP cục bộ để giải phóng cổng 8080:
- Trong chế độ
/goal, hãy chạy câu lệnh sau:Free up local port 8080 and terminate any running Google Cloud IAP tunnels (e.g., kill processes matching 'start-iap-tunnel' or listening on port 8080).8080đang rảnh.
6. Bảo mật ứng dụng
Trong các phần trước, bạn đã tạo máy ảo Compute Engine riêng tư không có địa chỉ IP công khai và xác minh hai thách thức chính về mạng và bảo mật:
- Quyền truy cập vào (ingress): Người dùng Internet không thể truy cập trực tiếp vào các phiên bản máy ảo riêng tư. Để hiển thị ứng dụng web, bạn cần phải định tuyến lưu lượng truy cập qua một Trình cân bằng tải ứng dụng bên ngoài toàn cầu và một mạng con chỉ dành cho proxy chuyên dụng mà không hiển thị máy ảo với Internet công cộng.
- Quyền truy cập ra ngoài (chiều đi): Các máy ảo riêng tư không có tuyến đến Internet để truy vấn các API tỷ giá hối đoái HTTPS trực tiếp. Việc bật quyền truy cập ra ngoài đòi hỏi phải kiểm tra lưu lượng truy cập được mã hoá để tìm phần mềm độc hại và hành vi đánh cắp dữ liệu mà không làm mất lòng tin về SSL/TLS.
Trong phần này, bạn sẽ hướng dẫn Antigravity thực hiện một quy trình làm việc tinh gọn dựa trên tài liệu chính thức của Google Cloud (@retrieving-developer-knowledge) để thiết kế, tự kiểm tra và triển khai cấu trúc bảo mật cho lưu lượng truy cập vào và ra ở cấp dự án cho ứng dụng của bạn.
Thiết kế kiến trúc bảo mật hợp nhất
- Trong chế độ
/goal, hãy chạy câu lệnh sau để tạo sơ đồ kiến trúc toàn diện và nội dung giải thích về cả luồng lưu lượng truy cập vào và ra:You are a Google Cloud Network and Security Architect. We need to design an end-to-end security architecture for our "gCurrenC calculator" app running on private Compute Engine VMs with no external IP addresses inside 'gcurrenc-vpc'. We are operating in a standalone Google Cloud project without an Organization resource, so all security resources must be scoped at the project level. Use the @retrieving-developer-knowledge skill to consult official Google Cloud documentation and suggest an architecture diagram and explanation covering both flows: 1. Ingress Flow: - How internet users securely reach the private VMs via a global external Application Load Balancer. - Why Envoy-based external Application Load Balancers require a dedicated proxy-only subnet, and how Google Front Ends (GFEs) proxy traffic to private backends without exposing VMs to the public internet. 2. Egress Flow: - How private VMs reach the internet via Cloud NAT to query live currency exchange APIs, such as frankfurter.dev. - How Cloud NGFW Enterprise provides Layer 7 deep packet inspection and intrusion prevention (IPS) for outbound encrypted HTTPS traffic. - How TLS inspection backed by Certificate Authority Service (CAS) decrypts outbound HTTPS sessions on the fly, and what Root CA trust configuration the private VMs require. Provide a clear diagram and explain how these components connect together.
Tạo dàn ý cho tài nguyên kiến trúc
- Nhập câu lệnh sau để sắp xếp thiết kế thành một dàn ý tài nguyên cấp dự án được phân loại trước khi tạo tập lệnh triển khai:
Act as a Lead Network Security Architect. Using the @retrieving-developer-knowledge skill, provide an architectural outline of all the Google Cloud resources required to secure the "gCurrenC calculator" app.

Our starting state:
- The custom VPC ('gcurrenc-vpc'), workload subnet ('gcurrenc-app-subnet'), and 2-instance MIG ('gcurrenc-app-mig', port 8080) are already deployed.
- All newly added security components must be project-level resources (no organization resources).

Structure your resource outline into three distinct categories, indicating which resources are new additions:
1. Core VPC Infrastructure: proxy-only subnet ('gcurrenc-proxy-subnet', 10.10.2.0/24), Cloud Router, and Cloud NAT gateway.
2. Inbound security (ingress): global external ALB components (forwarding rule on port 443, target HTTPS proxy, SSL certificate, URL map, backend service attached to 'gcurrenc-app-mig' on port 8080, and HTTP health check on '/healthz') and ingress firewall rules.
3. Outbound security (egress): CAS DevOps CA pool and root CA, project-level Cloud NGFW Enterprise components (Threat Prevention profile, Security Profile Group, Firewall Endpoint in zone us-central1-a, and Endpoint Association attaching the TLS policy), and global network firewall policy egress rules.

For each resource, briefly state its role in the security boundary and how it connects to adjacent components.
Tạo và tự kiểm tra tập lệnh triển khai
- Ở chế độ
/goal, hãy chạy câu lệnh sau để tạo một tập lệnh triển khaibashhoàn chỉnh, không tương tác và tự động tự kiểm tra tập lệnh đó theo các yêu cầu tuân thủ trong cùng một lượt:Act as a Principal Infrastructure Engineer. Using the @retrieving-developer-knowledge skill, generate a complete, non-interactive Bash script to deploy this entire security architecture for our "gCurrenC calculator" app, and self-audit the script before outputting it. Requirements: - Discover the project ID, region, and zone dynamically from the existing 'gcurrenc-app-subnet' and 'gcurrenc-app-mig'. - Keep all resources scoped strictly to the project level (no Organization resource). - Deploy the proxy-only subnet, global external Application Load Balancer, Cloud Router, and Cloud NAT. Don't use Cloud Armor. - Deploy project-level Cloud NGFW Enterprise with CAS TLS inspection ('--tls-inspect' on the firewall policy egress rule and 'gcloud beta' for the project-level firewall endpoint association) and an explicit DENY override for malware and antivirus threats. - Distribute the root CA to the private VMs over IAP SSH with connection timeouts so the guest OS trust store is updated. - Print the final Load Balancer URL ('https://${LB_IP}') at the end. Wrap the script in 'set -euxo pipefail' and output only the single executable bash script block.bashhoàn chỉnh, tự kiểm tra mọi lệnh theo các quy tắc ràng buộc về việc tuân thủ và xuất khối tập lệnh thực thi duy nhất được gói trongset -euxo pipefail.
Chạy tập lệnh triển khai bảo mật
- Ở chế độ
/goal, hãy dán tập lệnhbashđã tạo từ câu lệnh trước vào cửa sổ trò chuyện Antigravity theo định dạng sau để chạy quá trình triển khai và xuất URL ứng dụng đang hoạt động (https://<LB_IP>):Run this script. <PASTED-SCRIPT>
7. Xác minh ứng dụng được bảo mật
Khi tập lệnh triển khai hoàn tất, Antigravity sẽ xuất URL loại HTTPS bên ngoài của Trình cân bằng tải ứng dụng bên ngoài (toàn cầu) (https://<LB_IP>).
- Mở
https://<LB_IP>trong trình duyệt web và bỏ qua cảnh báo chứng chỉ tự ký của trình duyệt để tải giao diện máy tính gCurrenC: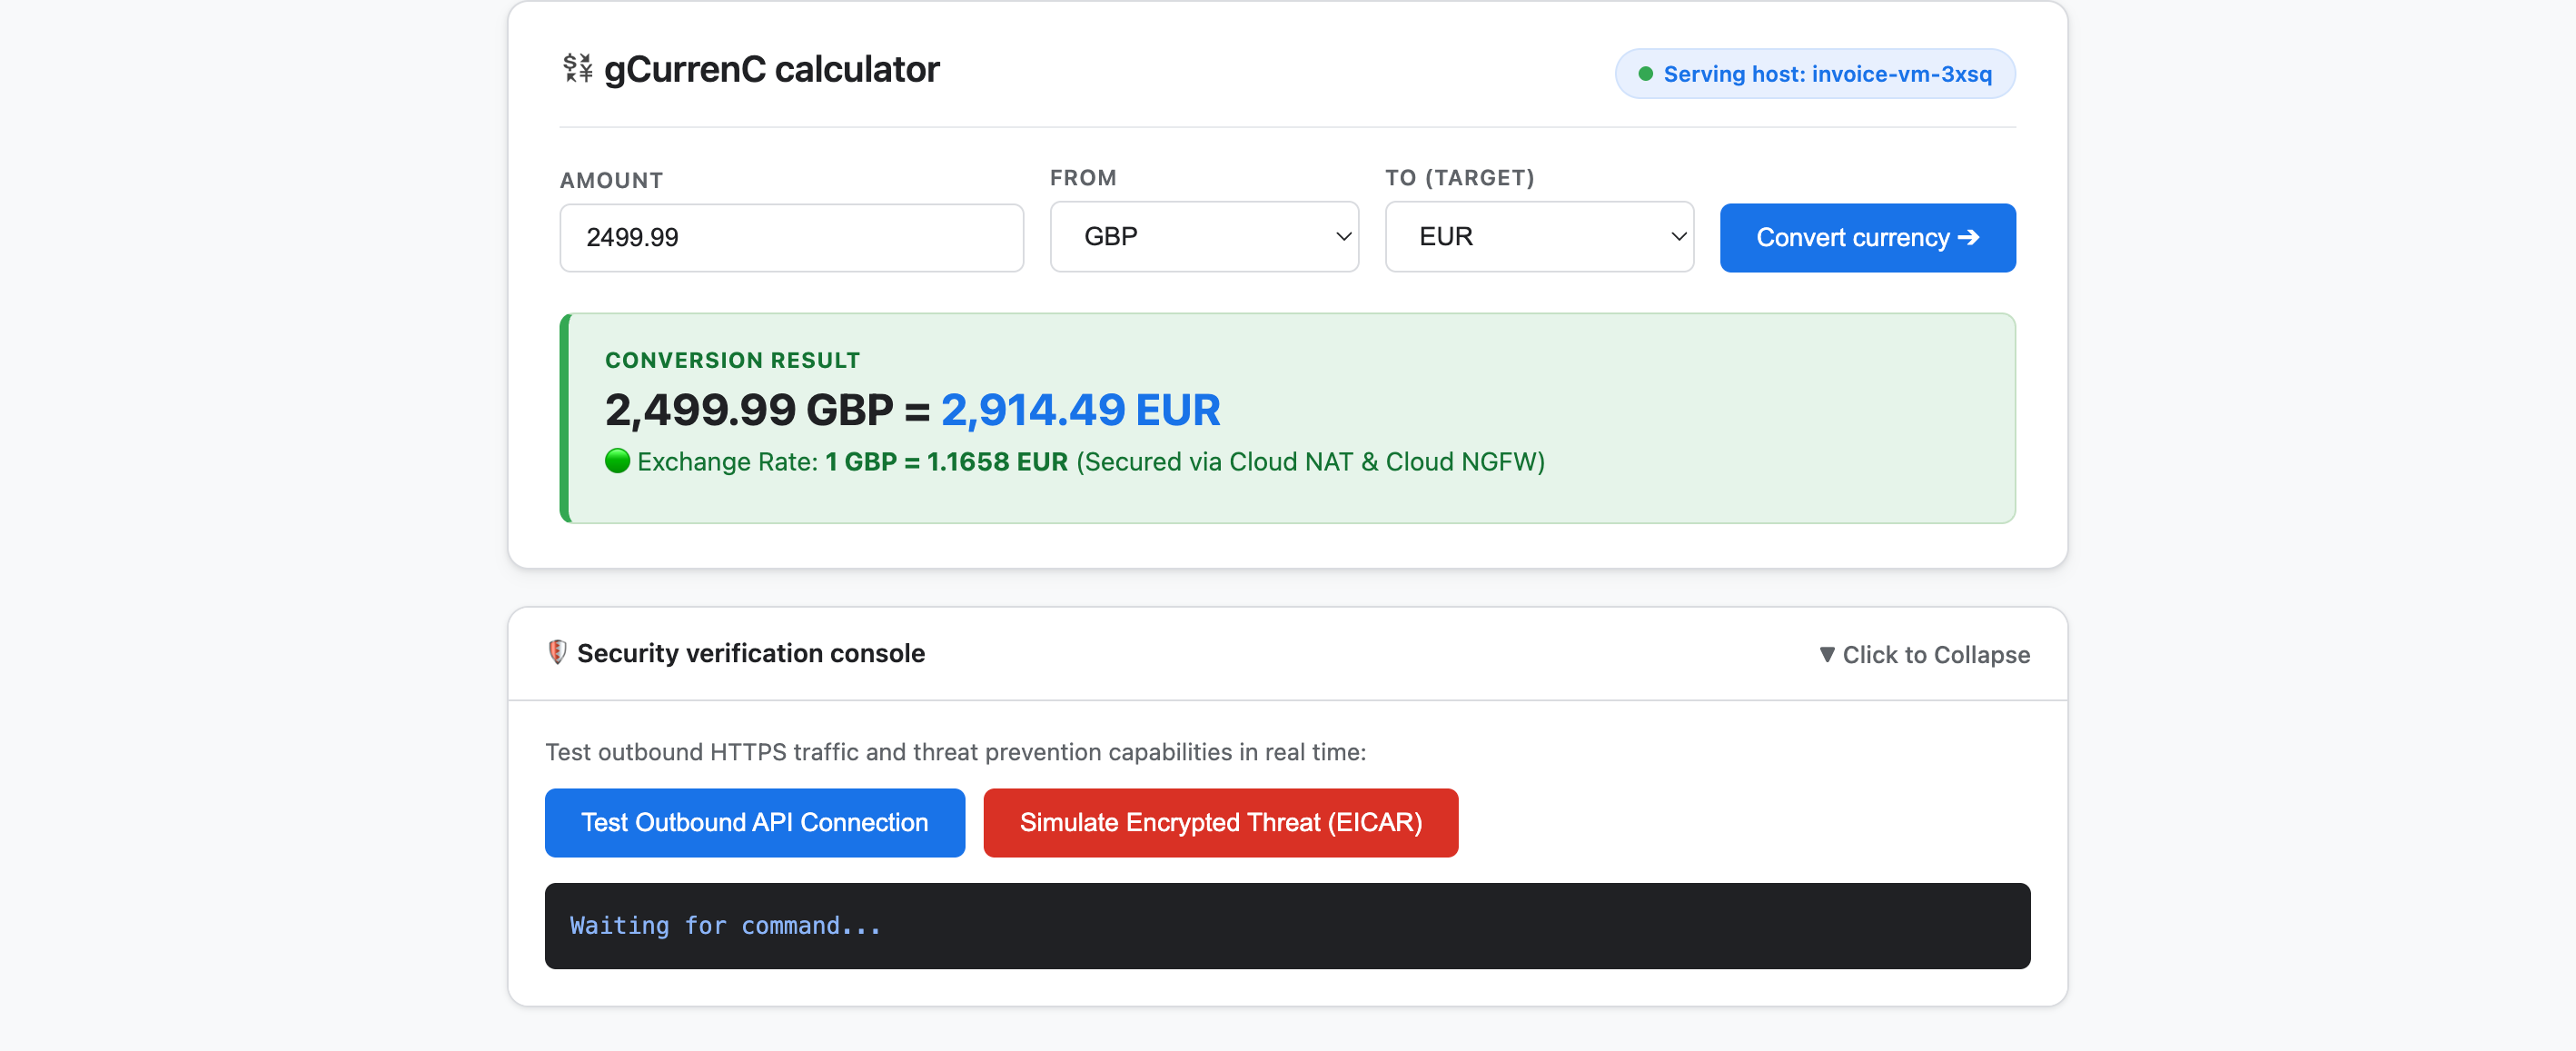
- Kiểm thử ứng dụng để xác minh cả khả năng kết nối ra bên ngoài và khả năng ngăn chặn mối đe doạ:
- Nhấp vào Chuyển đổi đơn vị tiền tệ. Ứng dụng sẽ hiển thị ngay tỷ giá hối đoái được chuyển đổi trực tiếp. Điều này xác nhận rằng định tuyến cân bằng tải lưu lượng vào diễn ra suôn sẻ thông qua Google Front End (GFE) và mạng con chỉ có proxy, trong khi Cloud NAT tìm nạp tỷ giá hối đoái trực tiếp từ
api.frankfurter.dev. - Mở rộng Bảng điều khiển xác minh bảo mật rồi nhấp vào Kiểm tra kết nối API gửi đi. Ứng dụng sẽ hiển thị
verdict: PERMITTED(HTTP 200). Điều này xác nhận rằng tính năng định tuyến Cloud NAT hoạt động và hệ điều hành máy ảo tin tưởng CA gốc CAS riêng tư cho các phiên HTTPS đã giải mã. - Nhấp vào Mô phỏng mối đe doạ đã mã hoá (EICAR). Ứng dụng sẽ hiển thị
verdict: PERMITTED. Điều này xác nhận rằng Cloud NGFW Enterprise giải mã yêu cầu HTTPS gửi đi bằng tính năng kiểm tra TLS do CAS hỗ trợ và kiểm tra chữ ký kiểm thử EICAR bằng Dịch vụ ngăn chặn xâm nhập (IPS).
- Nhấp vào Chuyển đổi đơn vị tiền tệ. Ứng dụng sẽ hiển thị ngay tỷ giá hối đoái được chuyển đổi trực tiếp. Điều này xác nhận rằng định tuyến cân bằng tải lưu lượng vào diễn ra suôn sẻ thông qua Google Front End (GFE) và mạng con chỉ có proxy, trong khi Cloud NAT tìm nạp tỷ giá hối đoái trực tiếp từ
8. Dọn dẹp
Để tránh bị tính phí liên tục vào tài khoản Google Cloud cho các tài nguyên được tạo trong lớp học lập trình này, bạn có thể xoá riêng tài nguyên của lớp học lập trình hoặc xoá dự án trên đám mây Google Cloud.
- Nếu bạn muốn giữ lại dự án trên đám mây của Google Cloud và chỉ xoá những tài nguyên được tạo trong lớp học lập trình này, hãy chạy câu lệnh sau ở chế độ
/goaltrong cửa sổ trò chuyện Antigravity:Remove all resources created in this session, including the gcurrenc app and its resources. Don't delete the project. - Nếu bạn đã tạo một dự án trên đám mây Google Cloud riêng cho lớp học lập trình này và muốn xoá toàn bộ dự án, hãy chạy câu lệnh sau ở chế độ
/goaltrong cửa sổ trò chuyện Antigravity:Clean up the demo environment by deleting the Google Cloud project. Run the following command in the terminal: gcloud projects delete "$(gcloud config get-value project 2>/dev/null)" --quiet
9. Xin chúc mừng
Xin chúc mừng! Bạn đã triển khai và bảo mật ứng dụng web máy tính gCurrenC trên Google Cloud bằng trình bổ trợ Nhà phát triển Google Cloud (máy chủ DK MCP) trong Google Antigravity.
Bước tiếp theo
Hãy khám phá tài liệu chính thức của Google Cloud để tìm hiểu thêm về các dịch vụ được dùng trong lớp học lập trình này:
- Cài đặt và sử dụng trình bổ trợ Google Cloud Developer trong Antigravity
- Kết nối với máy chủ MCP Kiến thức cho nhà phát triển
- Thư viện kỹ năng của nhân viên hỗ trợ
- Trình bổ trợ Kiến thức cho nhà phát triển
- Tổng quan về Trình cân bằng tải ứng dụng
- Tài liệu về Dịch vụ tổ chức phát hành chứng chỉ
- Tổng quan về Tường lửa thế hệ mới trên đám mây