
1. Before you begin
This codelab guides you through migrating a sharded on-prem MySQL database to a Cloud Spanner database with the GoogleSQL dialect. You will use Google Cloud services including the Spanner Migration Tool (SMT), Dataflow, Datastream, PubSub and Google Cloud Storage.
What you'll learn:
- What is a sharded environment and how to set it up.
- How to use the Spanner Migration Tool (SMT) Web UI to convert a MySQL schema to a Spanner-compatible schema and perform advanced schema modifications.
- How to perform bulk data migration from sharded MySQL instance to Cloud Spanner using Dataflow.
- How to set up continuous replication (CDC) from sharded MySQL instance to Cloud Spanner using Datastream and Dataflow.
- How to configure Reverse Replication from Spanner back to the sharded MySQL instances.
- How to use Custom Transformations to populate extra columns during bulk, live, and reverse migrations.
- How to configure sharding transformations using Primary Keys.
What this codelab does NOT cover:
- Advanced custom networking.
- Building custom Dataflow templates from scratch.
- Migration performance tuning.
- Application Migration: This codelab focuses on the database layer (schema and data). It does not cover the operational process of redeploying or migrating your application services.
What you'll need
- A Google Cloud project with billing enabled.
- Sufficient IAM permissions to enable APIs and create/manage Spanner, Dataflow, Datastream, and GCS resources. While the Project
Ownerrole is simplest for a codelab, more specific roles will be covered in the "Environment Setup". - We will provision a small Compute Engine VM during the setup phase to simulate our on-premise server. Ensure your project quota allows for VM creation.
- A web browser, such as Google Chrome.
- Basic familiarity with the Google Cloud Console and command-line tools like
gcloud. - Access to a shell environment. Cloud Shell is recommended as it includes
gcloud.
More details on the above setup is covered in the Environment Setup section.
2. Understanding the Migration Process
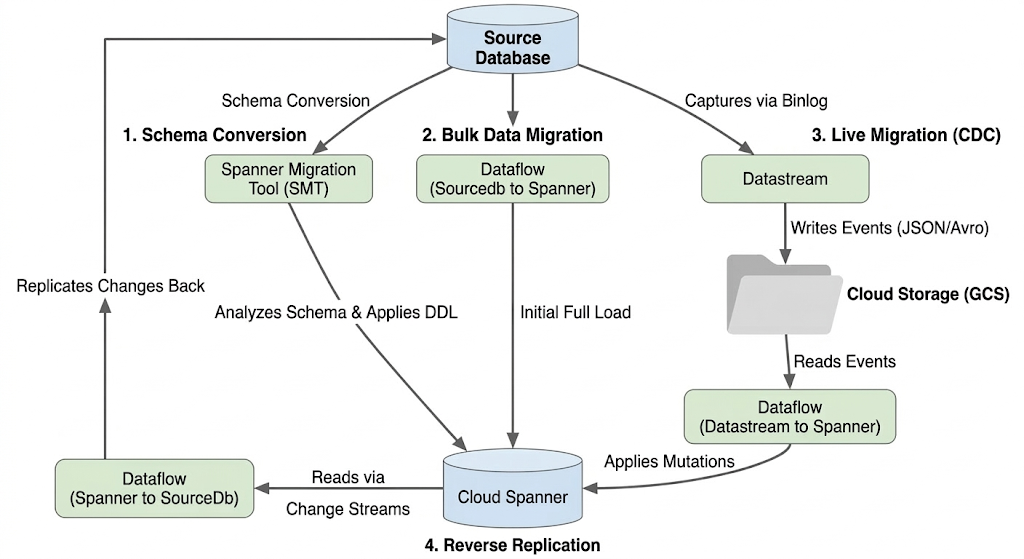
Migrating a sharded database involves consolidating multiple physical and logical MySQL instances into a single, horizontally scalable Spanner database. This section outlines the architecture and key tools used in the migration.
Migration Flow Architecture
The migration process involves these stages:
1. Schema Conversion:
- Purpose: To convert the source database schema to a compatible Cloud Spanner schema.
- Tool: Spanner Migration Tool (SMT)
- Process: SMT analyzes the source database schema and generates the equivalent Spanner Data Definition Language (DDL). In the target Spanner instance, a database is created and the DDL is then automatically applied.
2. Bulk Data Migration:
- Purpose: To perform an initial, full load of existing data from the source database to the provisioned Spanner tables.
- Tool: Dataflow, using the Google-provided
Sourcedb to Spannertemplate. - Process: This Dataflow job reads all data from the specified source tables and writes it into the corresponding Spanner tables. This is done after the Spanner schema is created.
3. Live Migration (CDC):
- Purpose: To capture and apply ongoing changes from the source database to Cloud Spanner in near real-time, minimizing downtime during the migration.
- Tools:
- Datastream: Captures changes (Inserts, Updates, Deletes) from the source database and writes them to Cloud Storage (GCS).
- Dataflow: Uses the
Datastream to Spannertemplate to read the change events from GCS and apply them to Cloud Spanner.
4. Reverse Replication:
- Purpose: To replicate data changes from Cloud Spanner back to the source database. This can be useful for fallback strategies, phased migrations, or maintaining a replica in the source for specific use cases.
- Tool: Dataflow, using the
Spanner to SourceDbtemplate. - Process: This job utilizes Spanner change streams to capture modifications in Spanner and write them back to the source database instance.
The following diagram illustrates the components and data flow:
Key Terminology:
- Physical Shard: The actual underlying server or compute instance hosting the database (in our case, the simulated on-prem GCE VM).
- Logical Shard: The individual database schema within a physical server.
- Compute Engine (GCE) VM: A virtual machine hosted on Google Cloud infrastructure. In this codelab, we use a GCE VM to simulate a standalone, "on-premise" bare-metal server hosting our source MySQL database.
- Spanner Migration Tool (SMT): A tool used to assess MySQL schemas, suggest Spanner schema equivalents, and generate the Spanner Data Definition Language (DDL).
- Data Definition Language (DDL): Statements used to define and modify database structure, such as
CREATE TABLEstatements. SMT generates Spanner DDL based on the Cloud SQL schema. - Dataflow: A fully managed, serverless data processing service. In this codelab, it's used to run Google-provided templates for bulk data transfer, applying Datastream changes, and reverse replication.
- Datastream: A serverless Change Data Capture (CDC) and replication service. It's used to stream changes from the locally hosted MySQL instance into Cloud Storage in this codelab.
- Spanner Change Streams: A Spanner feature that allows streaming out changes to data (inserts, updates, deletes) in real-time, used as the source for reverse replication.
- Pub/Sub: A messaging service used to decouple services that produce events from services that process them. In this codelab, it triggers Dataflow to process updates whenever Datastream uploads new change files to Cloud Storage.
3. Environment Setup
Before you can start the migration, you need to set up your Google Cloud project and enable the necessary services.
1. Select or Create a Google Cloud Project
You need a Google Cloud project with billing enabled to use the services in this codelab.
- In the Google Cloud Console, go to the project selector page: Go to Project Selector
- Select or create a Google Cloud project.
- Make sure that billing is enabled for your project. Learn how to confirm that billing is enabled for your project.
2. Open Cloud Shell
Cloud Shell is a command-line environment running in Google Cloud that comes preloaded with the gcloud CLI and other tools you need.
- Click the Activate Cloud Shell button at the top right of the Google Cloud Console.
- A Cloud Shell session opens inside a new frame at the bottom of the console and displays a command-line prompt.

3. Set Project and Environment Variables
In Cloud Shell, set up some environment variables for your project ID and the region you will use.
export PROJECT_ID=$(gcloud config get-value project)
export REGION="us-central1" # Or your preferred region
export ZONE="us-central1-a" # Or a zone within your selected region

gcloud config set project $PROJECT_ID
gcloud config set compute/region $REGION
gcloud config set compute/zone $ZONE

echo "Project ID: $PROJECT_ID"
echo "Region: $REGION"
echo "Zone: $ZONE"
4. Enable Required Google Cloud APIs
Enable the APIs necessary for Cloud Spanner, Dataflow, Datastream, and other related services.
gcloud services enable \
  spanner.googleapis.com \
  dataflow.googleapis.com \
  datastream.googleapis.com \
  pubsub.googleapis.com \
  storage.googleapis.com \
  compute.googleapis.com \
  sqladmin.googleapis.com \
  servicenetworking.googleapis.com \
  cloudresourcemanager.googleapis.com
This command might take a few minutes to complete.
4. Set Up the Source MySQL Database
In this section, we will simulate an on-premise sharded MySQL architecture by provisioning two Compute Engine virtual machines (our 2 "physical shards"). We will then install MySQL on both and create two databases (our "logical shards") on each VM.
1. Create the Compute Engine VMs (Physical Shards)
Run the following commands in Cloud Shell to create two VMs with Ubuntu. We will assign them network tags to allow inbound MySQL traffic later.
# Create Physical Shard 1
gcloud compute instances create mysql-physical-1 \
    --zone=$ZONE \
    --machine-type=e2-small \
    --image-family=ubuntu-2204-lts \
    --image-project=ubuntu-os-cloud \
    --tags=mysql-server

# Create Physical Shard 2
gcloud compute instances create mysql-physical-2 \
    --zone=$ZONE \
    --machine-type=e2-small \
    --image-family=ubuntu-2204-lts \
    --image-project=ubuntu-os-cloud \
    --tags=mysql-server
2. Configure Firewall Rules
To allow secure SSH access without public exposure and to enable Datastream connectivity:
Create Firewall Rule for SSH via IAP:
This rule allows Identity-Aware Proxy to reach your VMs on the SSH port (22).
gcloud compute firewall-rules create allow-ssh-iap \
    --direction=INGRESS \
    --priority=1000 \
    --network=default \
    --action=ALLOW \
    --rules=tcp:22 \
    --source-ranges=35.235.240.0/20 \
    --target-tags=mysql-server
Create Firewall Rule for Datastream (MySQL Port):
Datastream needs to be able to reach these VMs on the standard MySQL port (3306).
gcloud compute firewall-rules create allow-mysql-datastream \
    --direction=INGRESS \
    --priority=1000 \
    --network=default \
    --action=ALLOW \
    --rules=tcp:3306 \
    --source-ranges=0.0.0.0/0 \
    --target-tags=mysql-server
3. Install and Configure MySQL on Physical Shard 1
SSH into your first VM to install MySQL and configure binary logging (which is required by Datastream for live replication).
- SSH into the first VM:
gcloud compute ssh mysql-physical-1 --zone=$ZONE --tunnel-through-iap
- Install MySQL:
sudo apt-get update
sudo apt-get install mysql-server-8.0 -y

# Verify the installation and version
sudo mysql --version
- Configure the
mysqld.cnffile to enable binary logging and allow external connections:
sudo sed -i 's/bind-address.*/bind-address = 0.0.0.0/' /etc/mysql/mysql.conf.d/mysqld.cnf
echo -e "[mysqld]\nserver-id=1\nlog_bin=/var/log/mysql/mysql-bin.log\nbinlog_format=ROW" | sudo tee -a /etc/mysql/mysql.conf.d/mysqld.cnf
- Restart MySQL to apply changes:
sudo systemctl restart mysql
4. Create Logical Shards, Insert Data, and Create Datastream User (Shard 1)
While still SSH'd into mysql-physical-1, log into the MySQL prompt:
sudo mysql
Run the following SQL commands. This script creates two distinct logical shards (shard0_db and shard1_db), sets up the identical schema in both, inserts uniquely identifiable data into each (to demonstrate sharding), and creates the replication user for Datastream.
Run the following SQL commands to create your first two logical shards, a table, and the replication user for Datastream:
CREATE DATABASE shard0_db;
CREATE DATABASE shard1_db;

USE shard0_db;
CREATE TABLE Customers (
    CustomerId INT NOT NULL,
    CustomerName VARCHAR(255),
    CreditLimit DECIMAL(10, 2) NOT NULL,
    LegacyRegion VARCHAR(50), -- Renamed to LoyaltyTier in Spanner

    PRIMARY KEY (CustomerId),
    CONSTRAINT CHK_CreditLimit CHECK (CreditLimit > 1000) -- Relaxed in Spanner to > 0
);

CREATE TABLE Orders (
    CustomerId INT NOT NULL,  -- Logically references Customers.CustomerId in Spanner
    OrderId INT NOT NULL,
    OrderValue DECIMAL(10, 2),
    LegacyOrderSystem VARCHAR(50), -- Extra column in Source, to be dropped in Spanner

    PRIMARY KEY (CustomerId, OrderId) -- Spanner PK will have one additional column in PK
);

INSERT INTO Customers (CustomerId, CustomerName, CreditLimit, LegacyRegion) VALUES
(4, 'David E.', 2000.00, 'EAST'),
(8, 'Eleanor F.', 8100.00, 'WEST'),
(12, 'Frank G.', 12000.00, 'NORTH'),
(16, 'Grace H.', 6500.00, 'SOUTH');

INSERT INTO Orders (CustomerId, OrderId, OrderValue, LegacyOrderSystem) VALUES
(4, 101, 150.00, 'WebStore_v1'),
(4, 102, 25.50, 'InStore_POS'),
(8, 103, 75.00, 'MobileApp_Legacy'),
(12, 104, 3000.00, 'WebStore_v1'),
(16, 105, 120.00, 'Partner_API');

USE shard1_db;
CREATE TABLE Customers (
    CustomerId INT NOT NULL,
    CustomerName VARCHAR(255),
    CreditLimit DECIMAL(10, 2) NOT NULL,
    LegacyRegion VARCHAR(50), -- Renamed to LoyaltyTier in Spanner
    PRIMARY KEY (CustomerId),
    CONSTRAINT CHK_CreditLimit CHECK (CreditLimit > 1000) -- Relaxed in Spanner to > 0
);

CREATE TABLE Orders (
    CustomerId INT NOT NULL,  -- Logically references Customers.CustomerId in Spanner
    OrderId INT NOT NULL,
    OrderValue DECIMAL(10, 2),
    LegacyOrderSystem VARCHAR(50), -- Extra column in Source, to be dropped in Spanner
    PRIMARY KEY (CustomerId, OrderId) -- Spanner PK will have one additional column in PK
);

INSERT INTO Customers (CustomerId, CustomerName, CreditLimit, LegacyRegion) VALUES
(1, 'Agnes N.', 5100.00, 'NORTHEAST'),(5, 'Alice I.', 15000.00, 'EAST'),
(9, 'Bob J.', 7500.00, 'WEST'),
(13, 'Charlie K.', 2200.00, 'CENTRAL');

INSERT INTO Orders (CustomerId, OrderId, OrderValue, LegacyOrderSystem) VALUES
(1, 201, 50.00, 'MobileApp_Legacy'),
(5, 202, 1250.00, 'WebStore_v1'),
(5, 203, 80.00, 'Partner_API'),
(9, 204, 600.00, 'InStore_POS'),
(13, 205, 199.99, 'WebStore_v1');


-- Create Datastream Replication User
CREATE USER 'datastream_user'@'%' IDENTIFIED BY 'complex_password_123';
GRANT REPLICATION SLAVE, REPLICATION CLIENT, SELECT, INSERT, UPDATE, DELETE ON *.* TO 'datastream_user'@'%';
FLUSH PRIVILEGES;
The dump file for the above schema can be found here. It's important to create the datastream replication user separately as that is not included in the dump file.
5. Verify Data
Quickly check that the data is present:
SELECT 'Customers shard0_db' AS tbl, COUNT(*) FROM shard0_db.Customers
UNION ALL
SELECT 'Orders shard0_db', COUNT(*) FROM shard0_db.Orders
UNION ALL
SELECT 'Customers shard1_db', COUNT(*) FROM shard1_db.Customers
UNION ALL
SELECT 'Orders shard1_db', COUNT(*) FROM shard1_db.Orders;
EXIT;
Expected Output:
+---------------------+----------+
| tbl                 | COUNT(*) |
+---------------------+----------+
| Customers shard0_db |        4 |
| Orders shard0_db    |        5 |
| Customers shard1_db |        4 |
| Orders shard1_db    |        5 |
+---------------------+----------+
Enter exit to exit the connection to physical shard 1 VM.
6. Repeat for Physical Shard 2
You will now repeat the exact same process for the second VM, but you will create shard2_db and shard3_db, and change the server-id.
- SSH into the second VM:
gcloud compute ssh mysql-physical-2 --zone=$ZONE --tunnel-through-iap
- Install MySQL:
sudo apt-get update
sudo apt-get install mysql-server-8.0 -y
- Configure the
mysqld.cnffile to enable binary logging and allow external connections [Note that the server-id must be different (e.g., 2)]
sudo sed -i 's/bind-address.*/bind-address = 0.0.0.0/' /etc/mysql/mysql.conf.d/mysqld.cnf

echo -e "[mysqld]\nserver-id=2\nlog_bin=/var/log/mysql/mysql-bin.log\nbinlog_format=ROW" | sudo tee -a /etc/mysql/mysql.conf.d/mysqld.cnf
- Restart MySQL to apply changes:
sudo systemctl restart mysql
- Enter MySQL (
sudo mysql) and run a slightly modified version of the SQL from Step 4:
CREATE DATABASE shard2_db;
CREATE DATABASE shard3_db;

USE shard2_db;
CREATE TABLE Customers (
    CustomerId INT NOT NULL,
    CustomerName VARCHAR(255),
    CreditLimit DECIMAL(10, 2) NOT NULL,
    LegacyRegion VARCHAR(50), -- Renamed to LoyaltyTier in Spanner
    PRIMARY KEY (CustomerId),
    CONSTRAINT CHK_CreditLimit CHECK (CreditLimit > 1000) -- Relaxed in Spanner to > 0
);

CREATE TABLE Orders (
    CustomerId INT NOT NULL,  -- Logically references Customers.CustomerId in Spanner
    OrderId INT NOT NULL,
    OrderValue DECIMAL(10, 2),
    LegacyOrderSystem VARCHAR(50), -- Extra column in Source, to be dropped in Spanner
    PRIMARY KEY (CustomerId, OrderId) -- Spanner PK will have one additional column in PK
);

INSERT INTO Customers (CustomerId, CustomerName, CreditLimit, LegacyRegion) VALUES
(2, 'Brian K.', 2500.00, 'SOUTHWEST'),
(6, 'Diana L.', 1999.00, 'NORTH'),
(10, 'Edward M.', 11000.00, 'EAST'),
(14, 'Fiona N.', 3000.00, 'WEST');

INSERT INTO Orders (CustomerId, OrderId, OrderValue, LegacyOrderSystem) VALUES
(2, 301, 100.00, 'CallCenter_System'),
(6, 302, 99.00, 'MobileApp_Legacy'),
(10, 303, 1000.00, 'WebStore_v1'),
(10, 304, 2500.00, 'InStore_POS'),
(14, 305, 130.00, 'MobileApp_Legacy');

USE shard3_db;
CREATE TABLE Customers (
    CustomerId INT NOT NULL,
    CustomerName VARCHAR(255),
    CreditLimit DECIMAL(10, 2) NOT NULL,
    LegacyRegion VARCHAR(50), -- Renamed to LoyaltyTier in Spanner
    PRIMARY KEY (CustomerId),
    CONSTRAINT CHK_CreditLimit CHECK (CreditLimit > 1000) -- Relaxed in Spanner to > 0
);

CREATE TABLE Orders (
    CustomerId INT NOT NULL,  -- Logically references Customers.CustomerId in Spanner
    OrderId INT NOT NULL,
    OrderValue DECIMAL(10, 2),
    LegacyOrderSystem VARCHAR(50), -- Extra column in Source, to be dropped in Spanner
    PRIMARY KEY (CustomerId, OrderId) -- Spanner PK will have one additional column in PK
);

INSERT INTO Customers (CustomerId, CustomerName, CreditLimit, LegacyRegion) VALUES
(3, 'Cathy Z.', 6000.00, 'CENTRAL'),
(7, 'George O.', 18000.00, 'SOUTH'),
(11, 'Helen P.', 4000.00, 'NORTHEAST'),
(15, 'Ivy Q.', 9500.00, 'SOUTHWEST');

INSERT INTO Orders (CustomerId, OrderId, OrderValue, LegacyOrderSystem) VALUES
(3, 401, 600.00, 'InStore_POS'),
(7, 402, 1200.00, 'CallCenter_System'),
(11, 403, 350.00, 'MobileApp_Legacy'),
(15, 404, 800.00, 'WebStore_v1'),
(99, 999, 25.00, 'CallCenter_System'); -- Failure row during Bulk Migration due to violation of interleaving

-- Create Datastream Replication User
CREATE USER 'datastream_user'@'%' IDENTIFIED BY 'complex_password_123';
GRANT REPLICATION SLAVE, REPLICATION CLIENT, SELECT, INSERT, UPDATE, DELETE ON *.* TO 'datastream_user'@'%';
FLUSH PRIVILEGES;

-- Verify Data
SELECT 'Customers shard2_db' AS tbl, COUNT(*) FROM shard2_db.Customers
UNION ALL
SELECT 'Orders shard2_db', COUNT(*) FROM shard2_db.Orders
UNION ALL
SELECT 'Customers shard3_db', COUNT(*) FROM shard3_db.Customers
UNION ALL
SELECT 'Orders shard3_db', COUNT(*) FROM shard3_db.Orders;

EXIT;
Expected Output:
+---------------------+----------+
| tbl                 | COUNT(*) |
+---------------------+----------+
| Customers shard2_db |        4 |
| Orders shard2_db    |        5 |
| Customers shard3_db |        4 |
| Orders shard3_db    |        5 |
+---------------------+----------+
The dump file for the above schema can be found here. It's important to create the datastream replication user separately as that is not included in the dump file.
Enter exit to exit the connection to the VM.
5. Set Up Cloud Spanner
Now, you'll set up the target Cloud Spanner instance where the data will be migrated.
1. Create a Cloud Spanner Instance
Create a Cloud Spanner instance in the same region as your Compute Engine VMs to minimize latency. This command creates a small instance suitable for this codelab, using 100 processing units.
export SPANNER_INSTANCE_NAME="target-spanner-instance"
export SPANNER_DATABASE_NAME="sharded-target-db"
export SPANNER_CONFIG="regional-${REGION}"

gcloud spanner instances create $SPANNER_INSTANCE_NAME \
  --config=$SPANNER_CONFIG \
  --description="Target Spanner Instance" \
  --processing-units=100
Instance creation might take a minute or two.
6. Convert the Schema using Spanner Migration Tool (SMT)
Use the Spanner Migration Tool (SMT) Web UI to connect to one of our logical shards (shard0_db), analyze its schema, and apply several advanced modifications before converting it to Cloud Spanner.
1. Install SMT
We will run the SMT Web UI directly from Cloud Shell. In your Cloud Shell terminal, download and extract the latest SMT release:
sudo apt-get update && sudo apt-get install google-cloud-cli-spanner-migration-tool

# Verify installation
gcloud alpha spanner migrate web --help
2. Connect to the Source Database
- Authenticate your session
# Authenticate your Google Cloud account
gcloud auth login

# Set up Application Default Credentials (ADC) for SMT
gcloud auth application-default login

# Ensure your current project is set correctly
gcloud config set project $PROJECT_ID
(Note: When prompted, follow the provided URL to authorize your account and paste the verification code back into the terminal.)
- First, find the external IP of your first physical shard by running this in a new Cloud Shell tab:
gcloud compute instances describe mysql-physical-1 --zone=$ZONE --format='get(networkInterfaces[0].accessConfigs[0].natIP)'
- Print Target Spanner Instance details to be used while configuring SMT.
echo "Project ID: $PROJECT_ID"
echo "Instance ID: $SPANNER_INSTANCE_NAME"
echo "Database Name: $SPANNER_DATABASE_NAME"
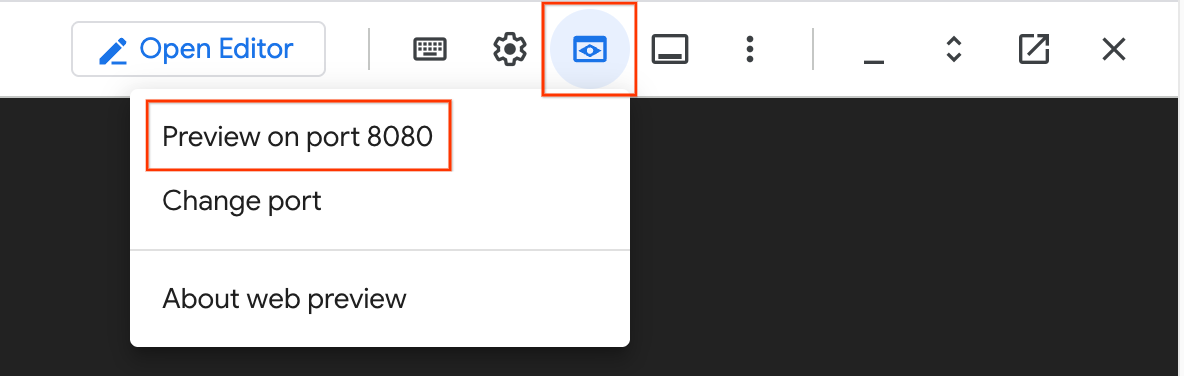
- Launch the Web UI:
gcloud alpha spanner migrate web --port=8080
- In the top right of your Cloud Shell window, click the Web Preview icon (it looks like an eye) and select Preview on port 8080. This will open the SMT UI in a new browser tab.
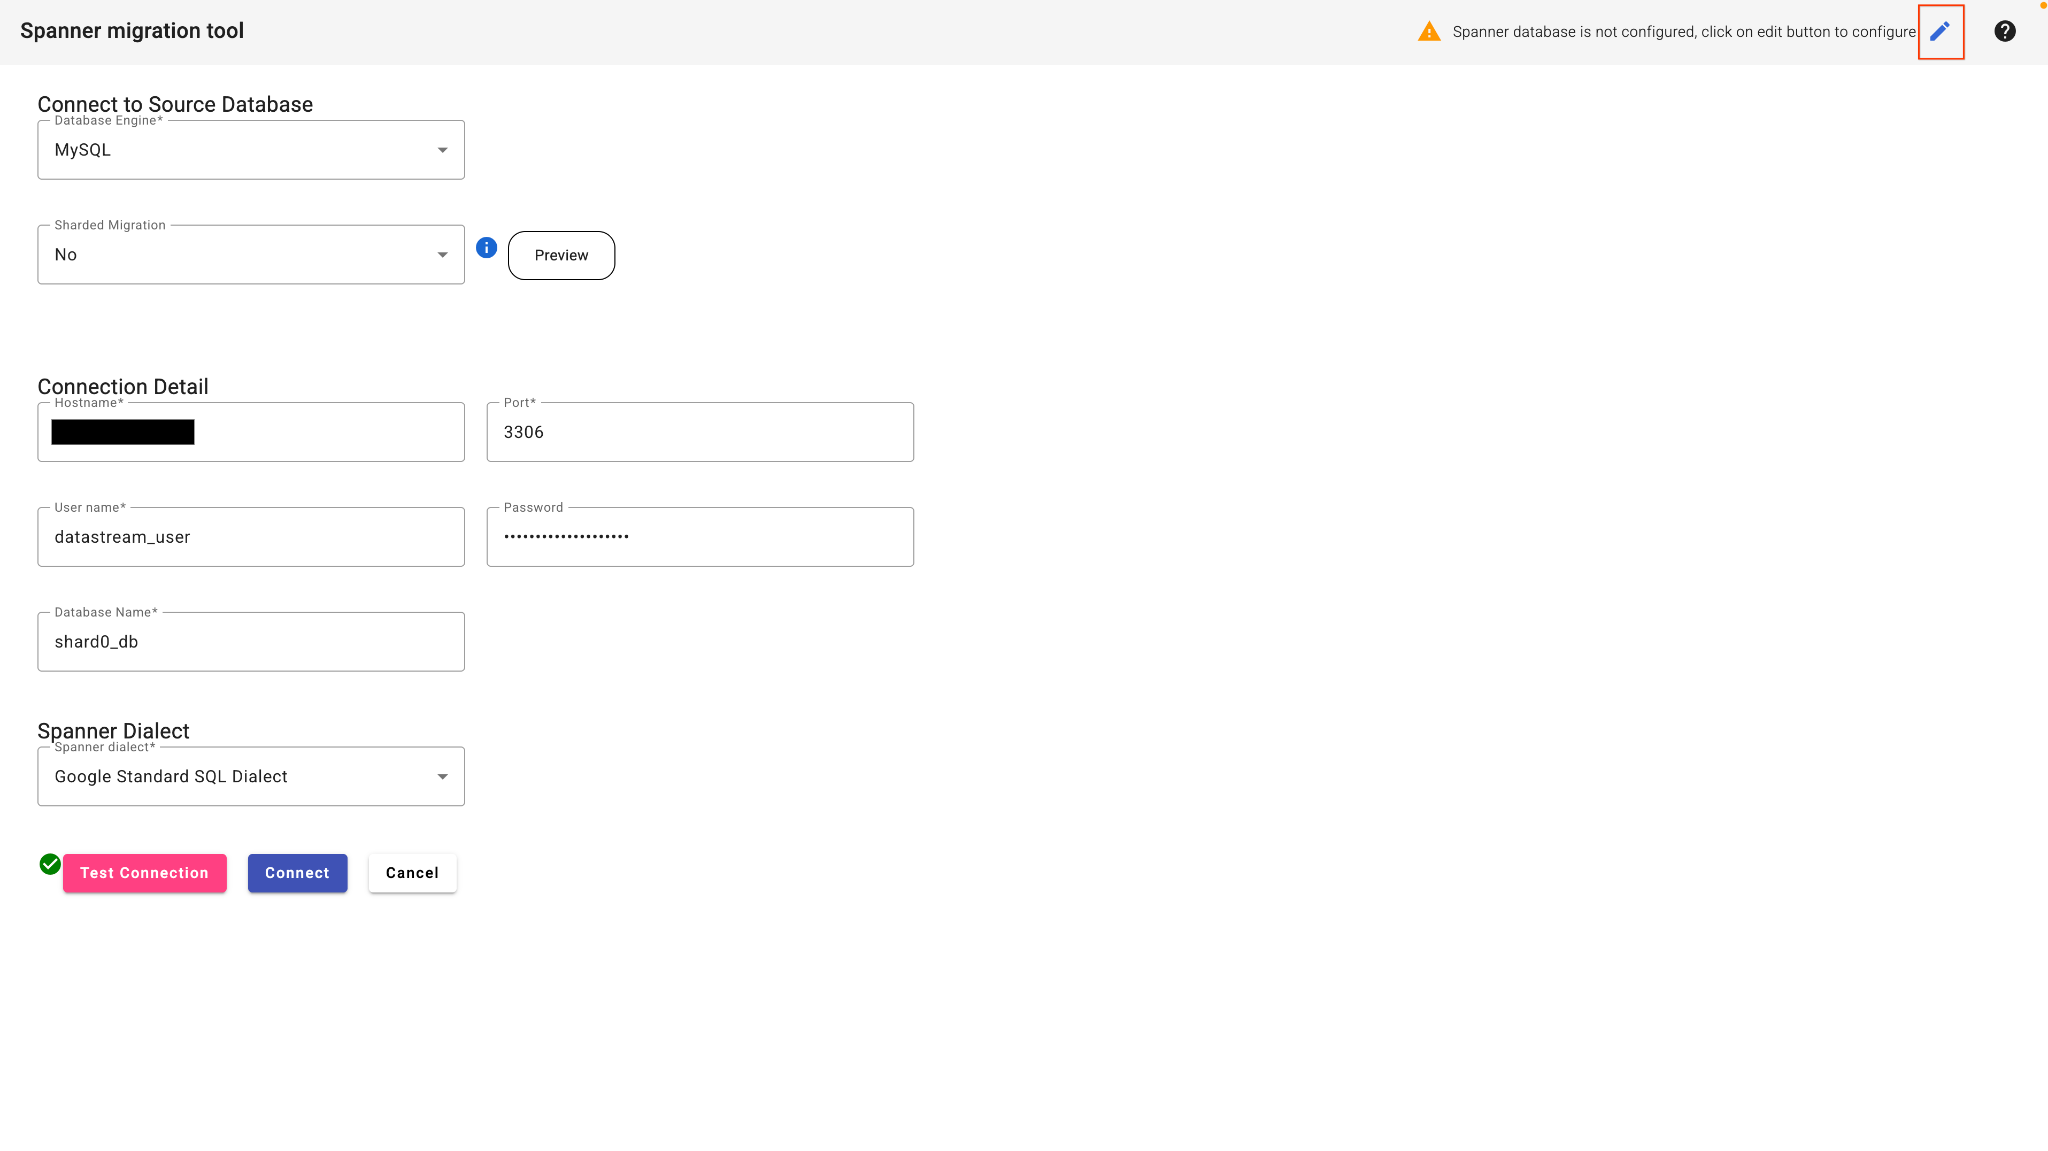
- In the SMT Web UI, select Connect to database.
- Fill in the connection details:
- Database Type: MySQL
- Host: (Paste the IP address from step 2)
- Port: 3306
- User:
datastream_user - Password:
complex_password_123 - Database Name:
shard0_db
- Click the edit button in the top right corner to configure the Spanner Database.
- Enter your Target Spanner details:
- Project ID: (Paste Project ID from step 3)
- Spanner Instance: (Paste Instance ID from step 3)
- Click Test Connection.
- Once this passes, click Connect. SMT will analyze the source database and present a baseline Spanner schema.
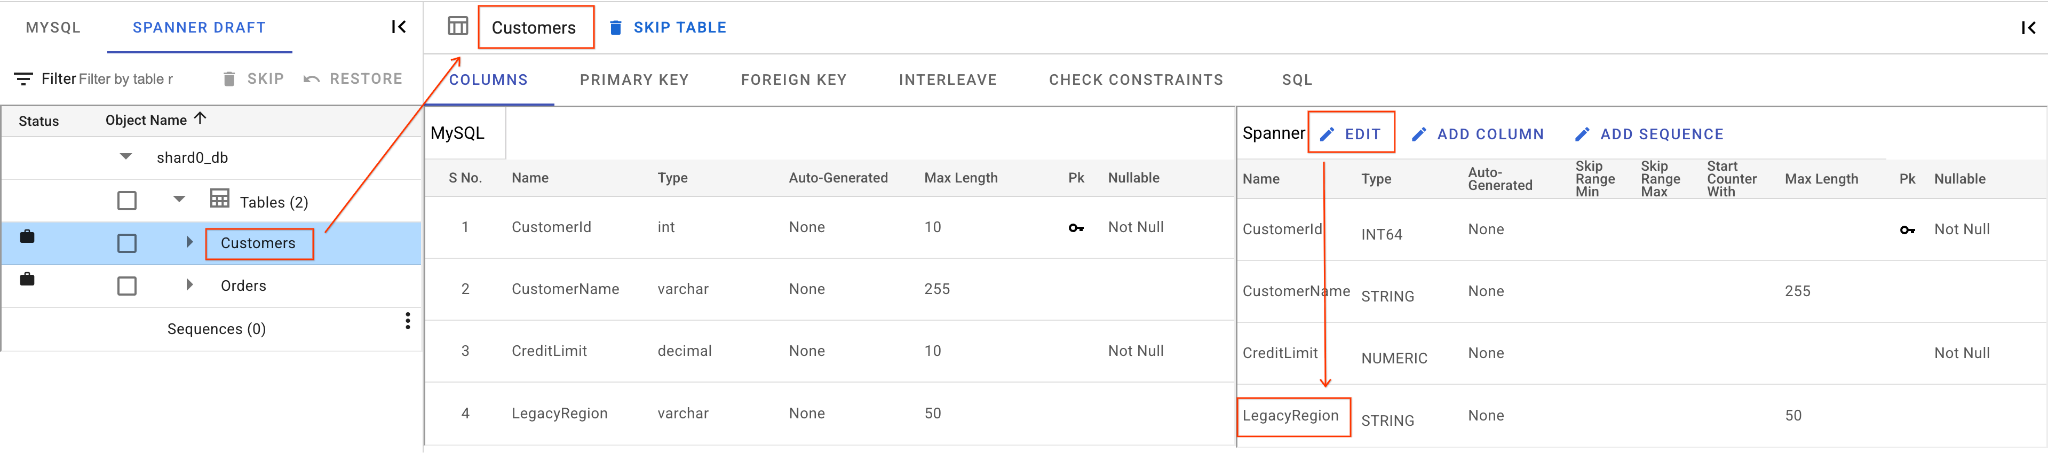
3. Apply Schema Modifications
We will now reshape the schema to cover our complex migration scenarios.
In the SMT UI's schema editor, perform the following actions:
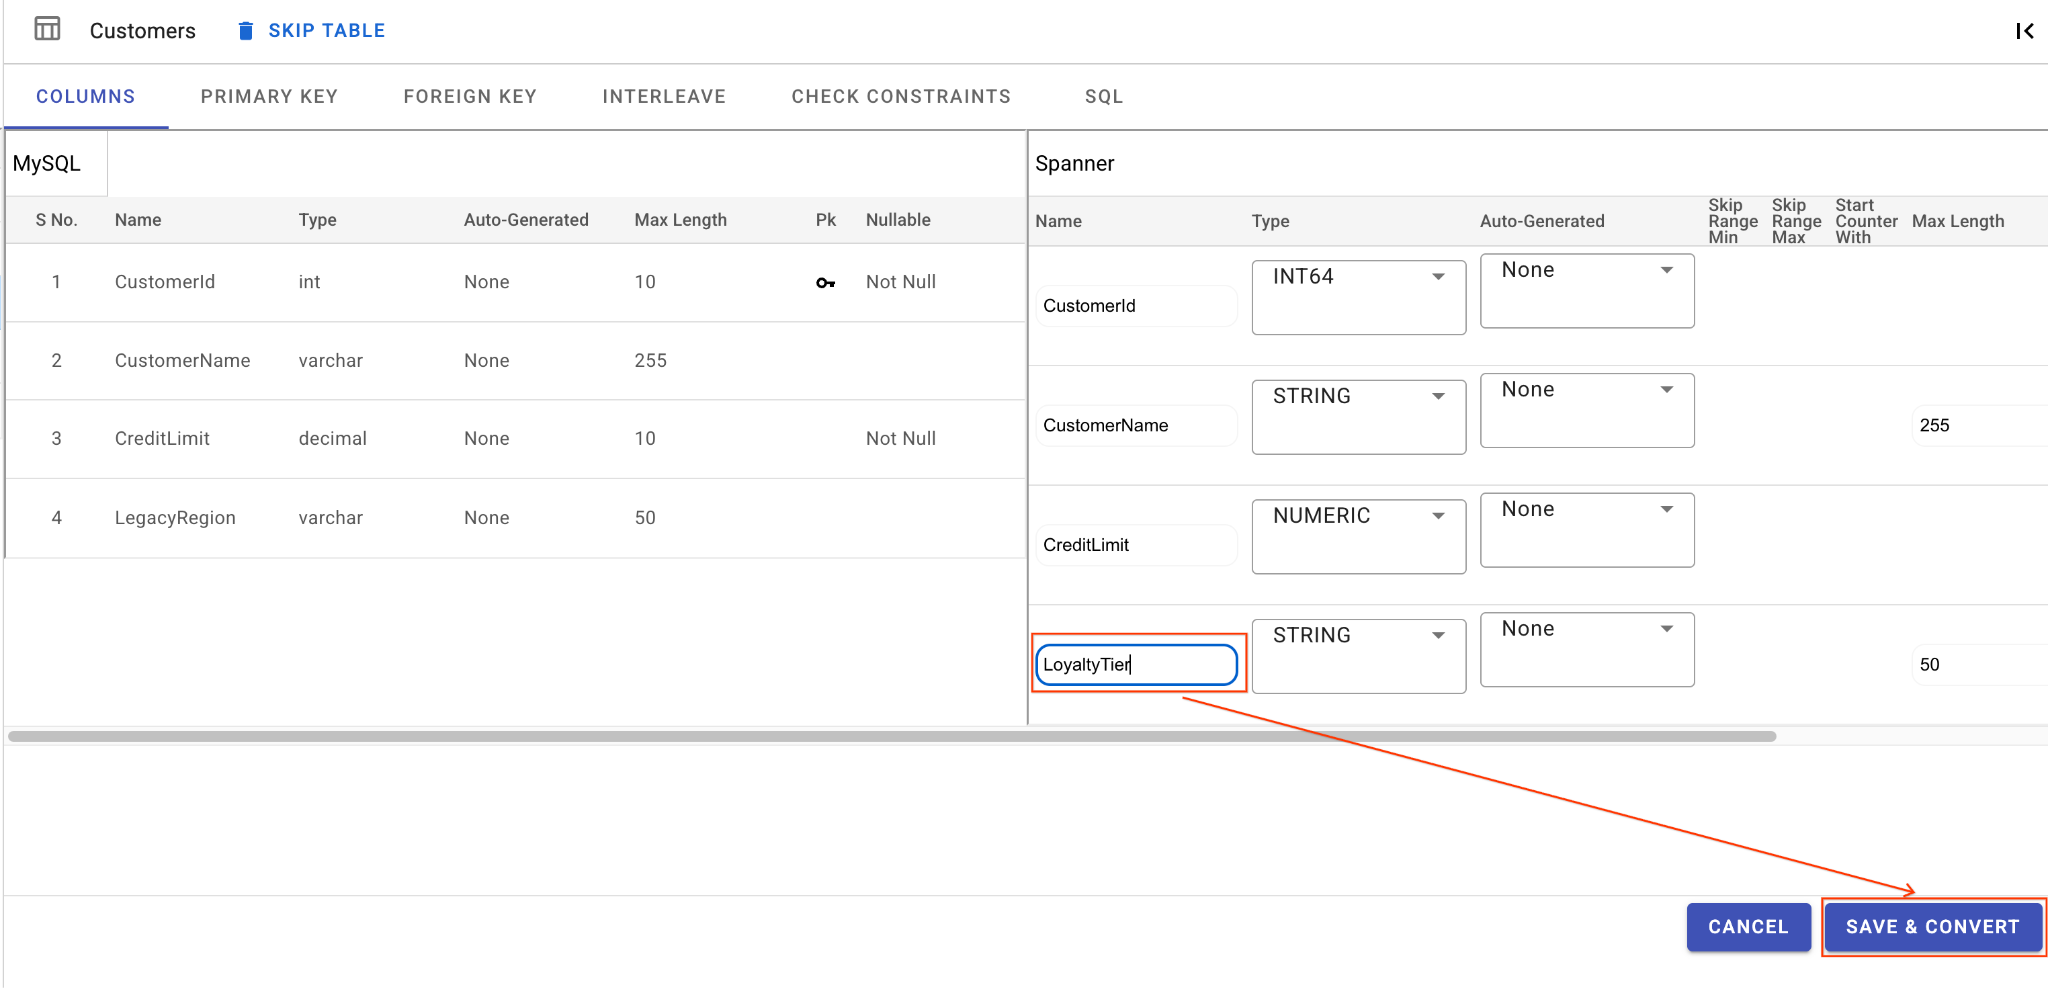
A. Rename the LegacyRegion Column:
- Click on the
Customerstable in the left navigation pane. It will open the Columns tab by default. - Click on the Edit button in the Spanner section.
- Locate the
LegacyRegioncolumn in the Spanner schema view. - Change the Spanner column name to
LoyaltyTierby typing in the column name dialog. - Click Save & Convert.
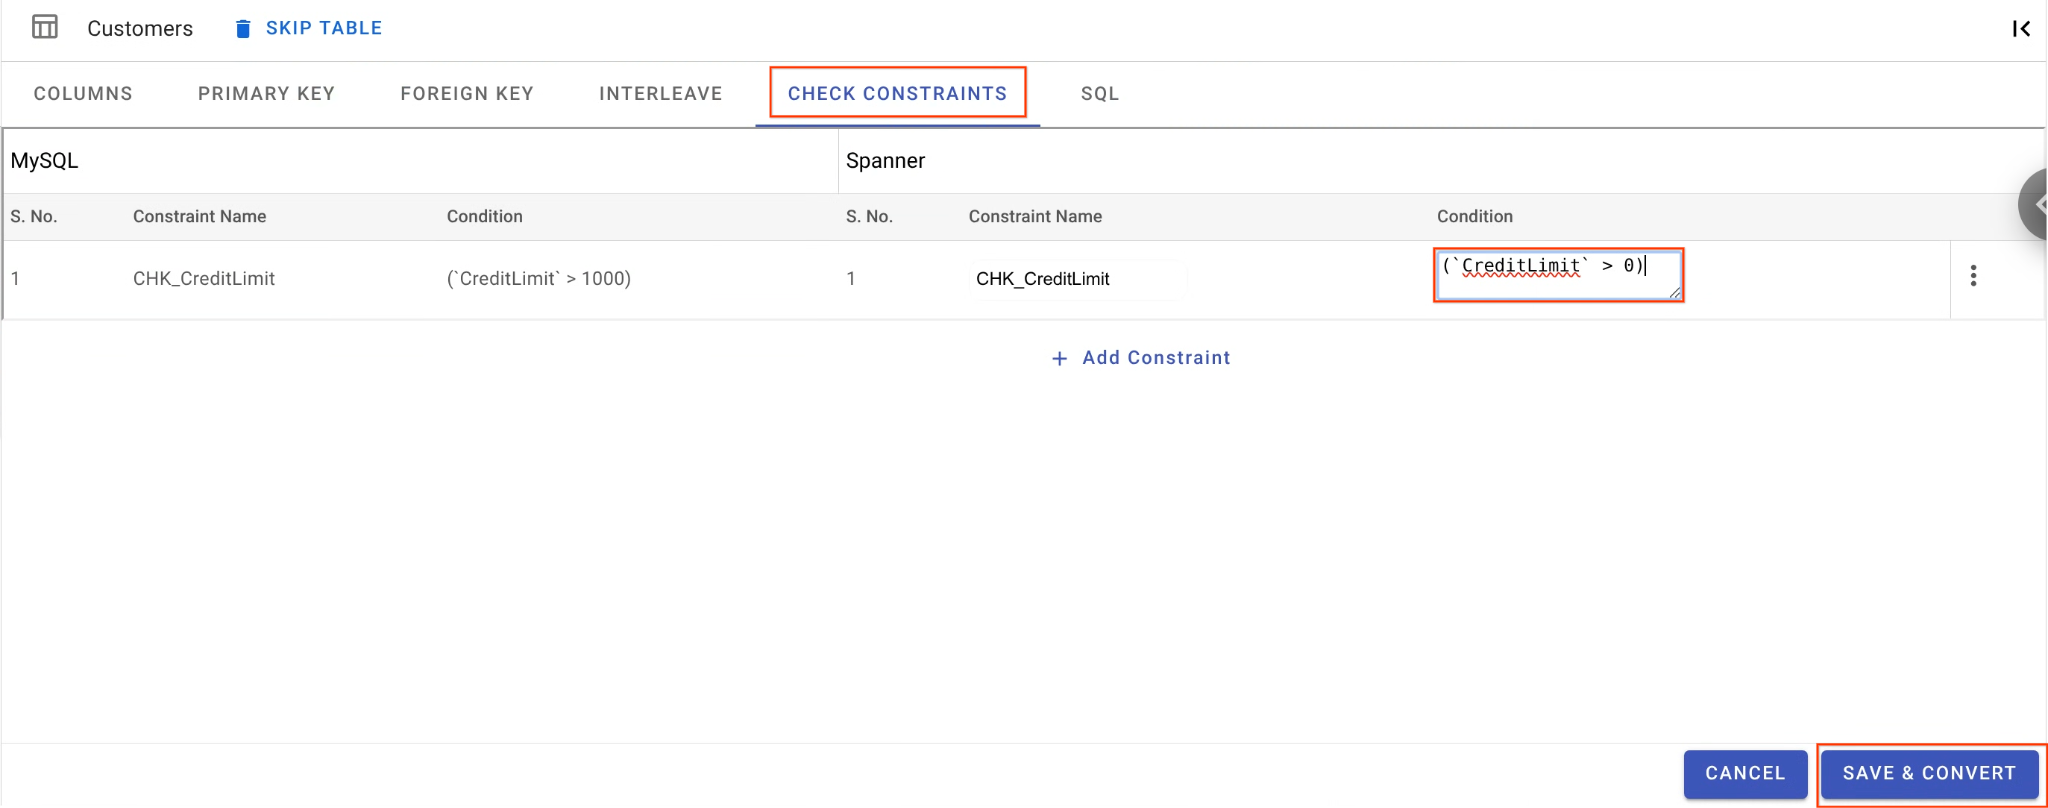
B. Relax the Check Constraint:
- Still on the
Customerstable, navigate to the Check Constraints tab. - Find the
CHK_CreditLimitconstraint. Click the Edit (pencil) icon. - Change the condition from
CreditLimit > 1000toCreditLimit > 0. (This will intentionally cause rows with lower credit limits to fail reverse migration and drop into the DLQ).
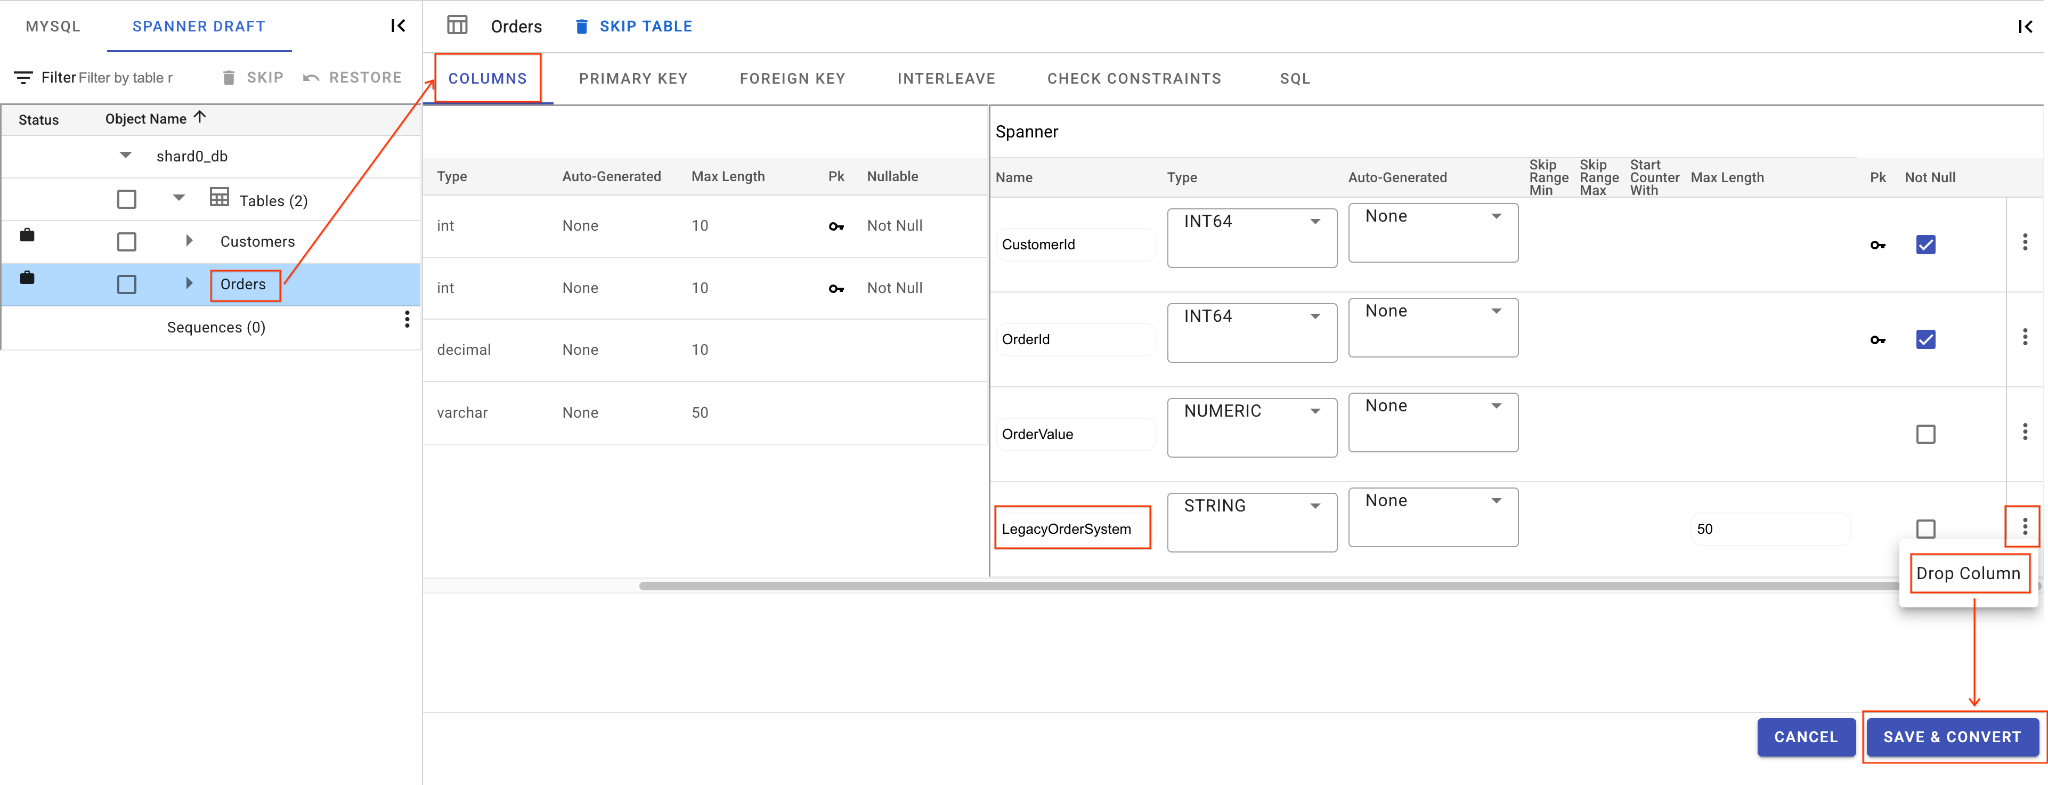
C. Drop the LegacyOrderSystem Column:
- Click on the
Orderstable, it will open the Columns tab by default. - Click on the Edit button in the Spanner section.
- Locate the
LegacyOrderSystemcolumn in the Spanner schema view. - Click the 3-dot menu icon next to it and select Drop Column.
- Click Save and Convert.
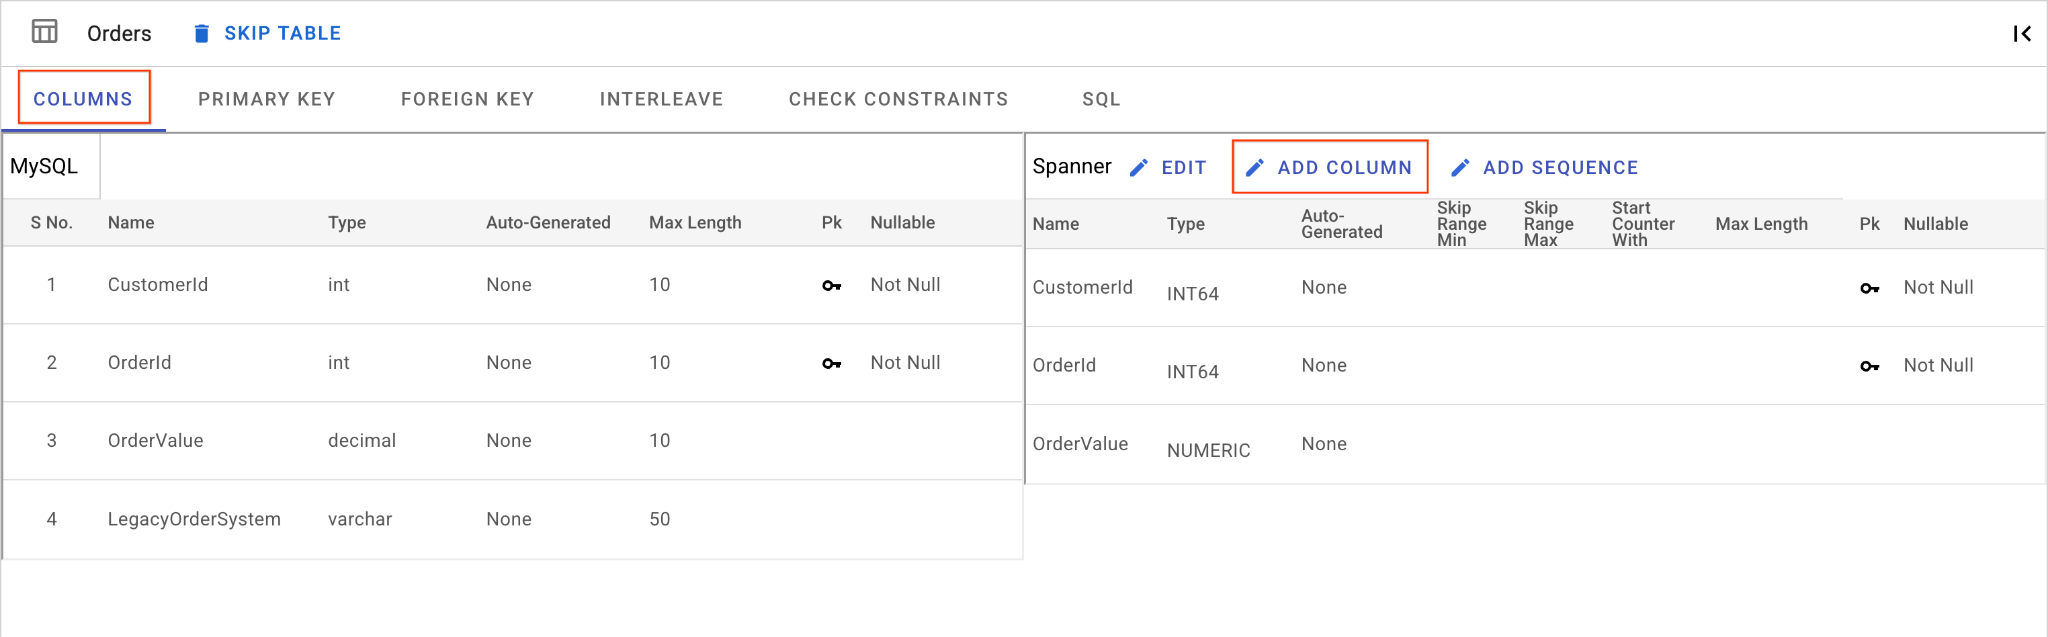
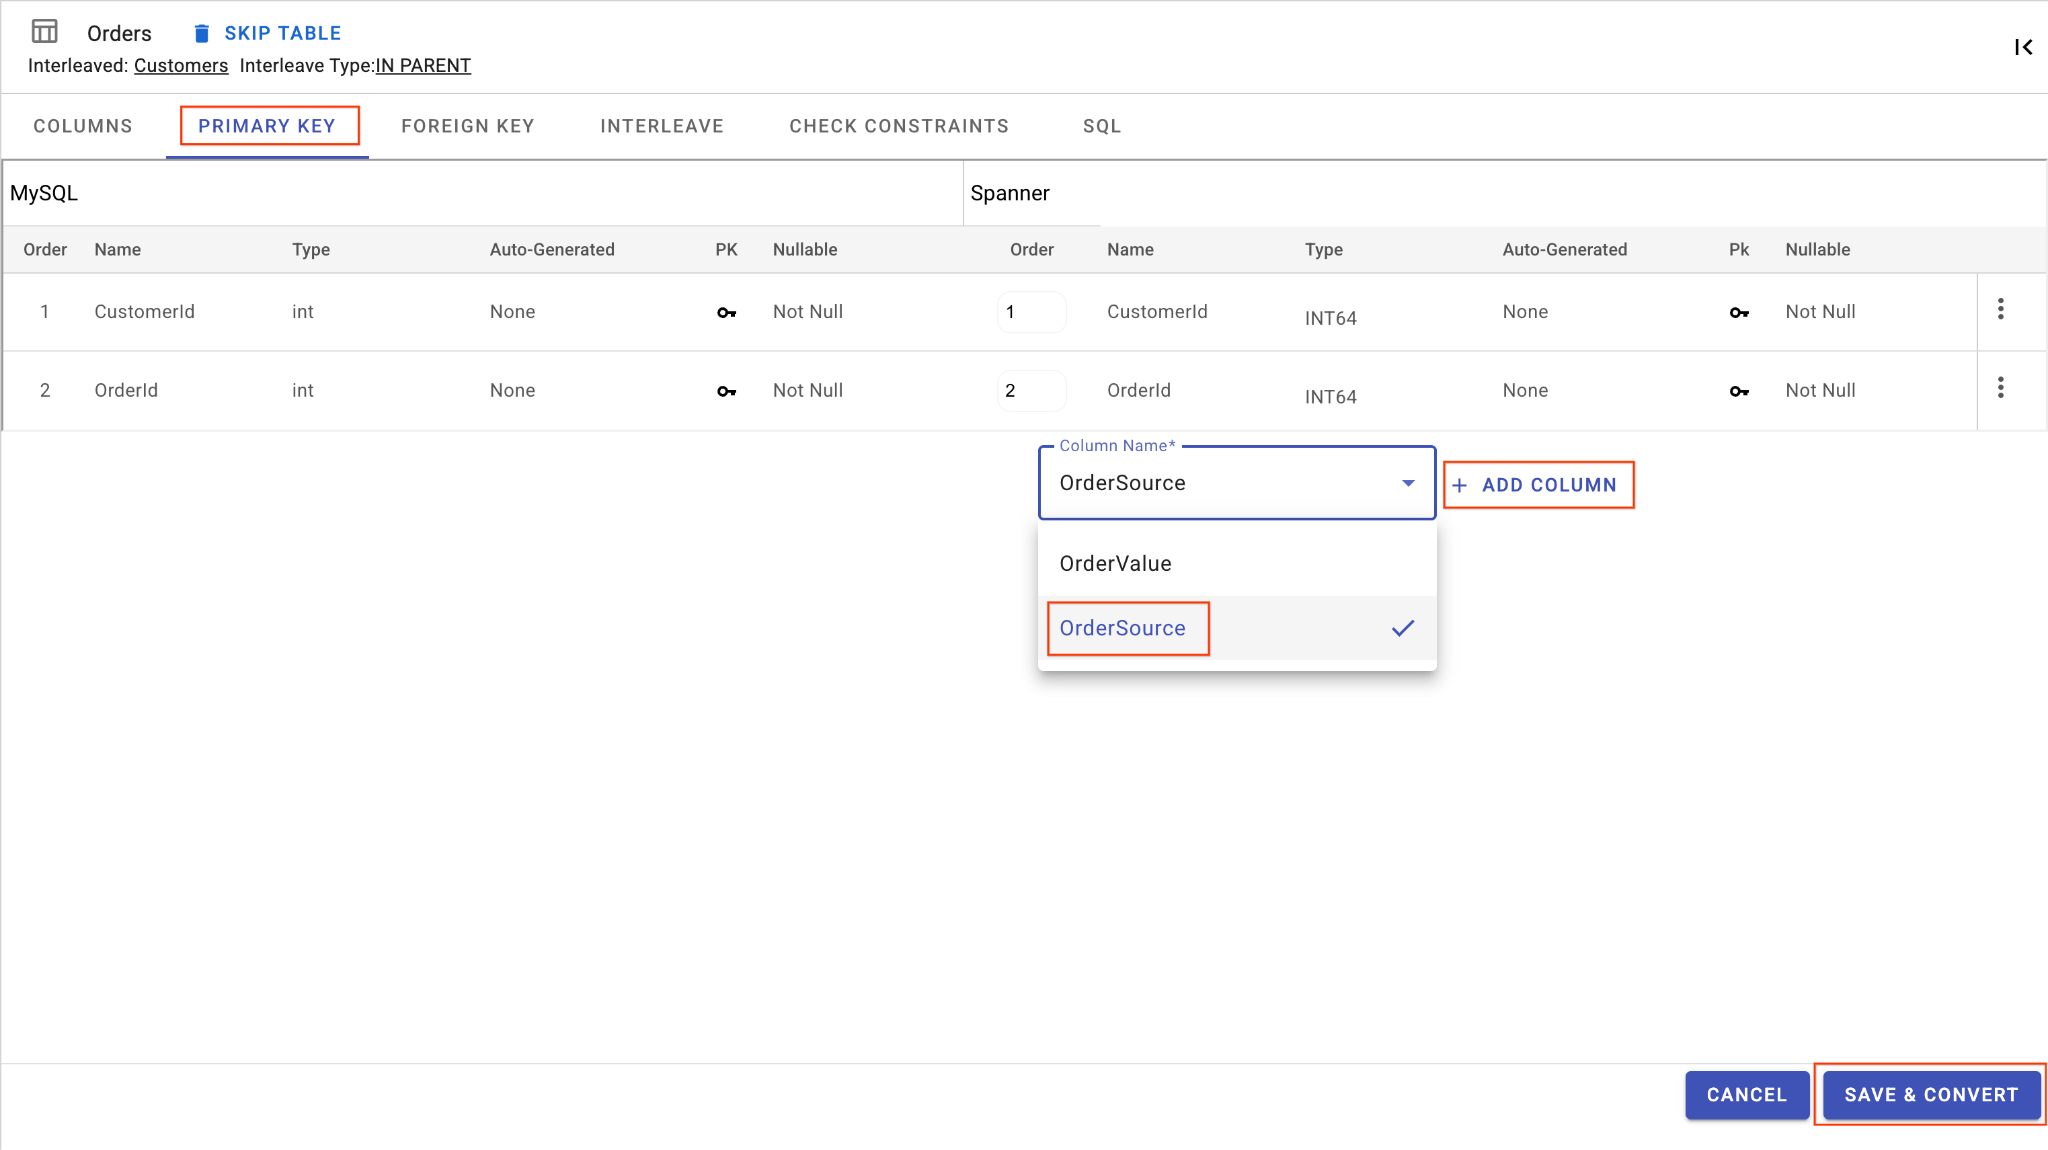
D. Add OrderSource Column and Make it a Primary Key:
- Still on the
Orderstable, click Add Column. Name itOrderSourceand set the type toSTRINGwith length50, no auto-generation, and setIsNullabletoNo. - Go to the Primary Key tab.
- Click Edit and choose
OrderSourcefrom the Column Name dropdown. - Click on Add Column and then Save & Convert.
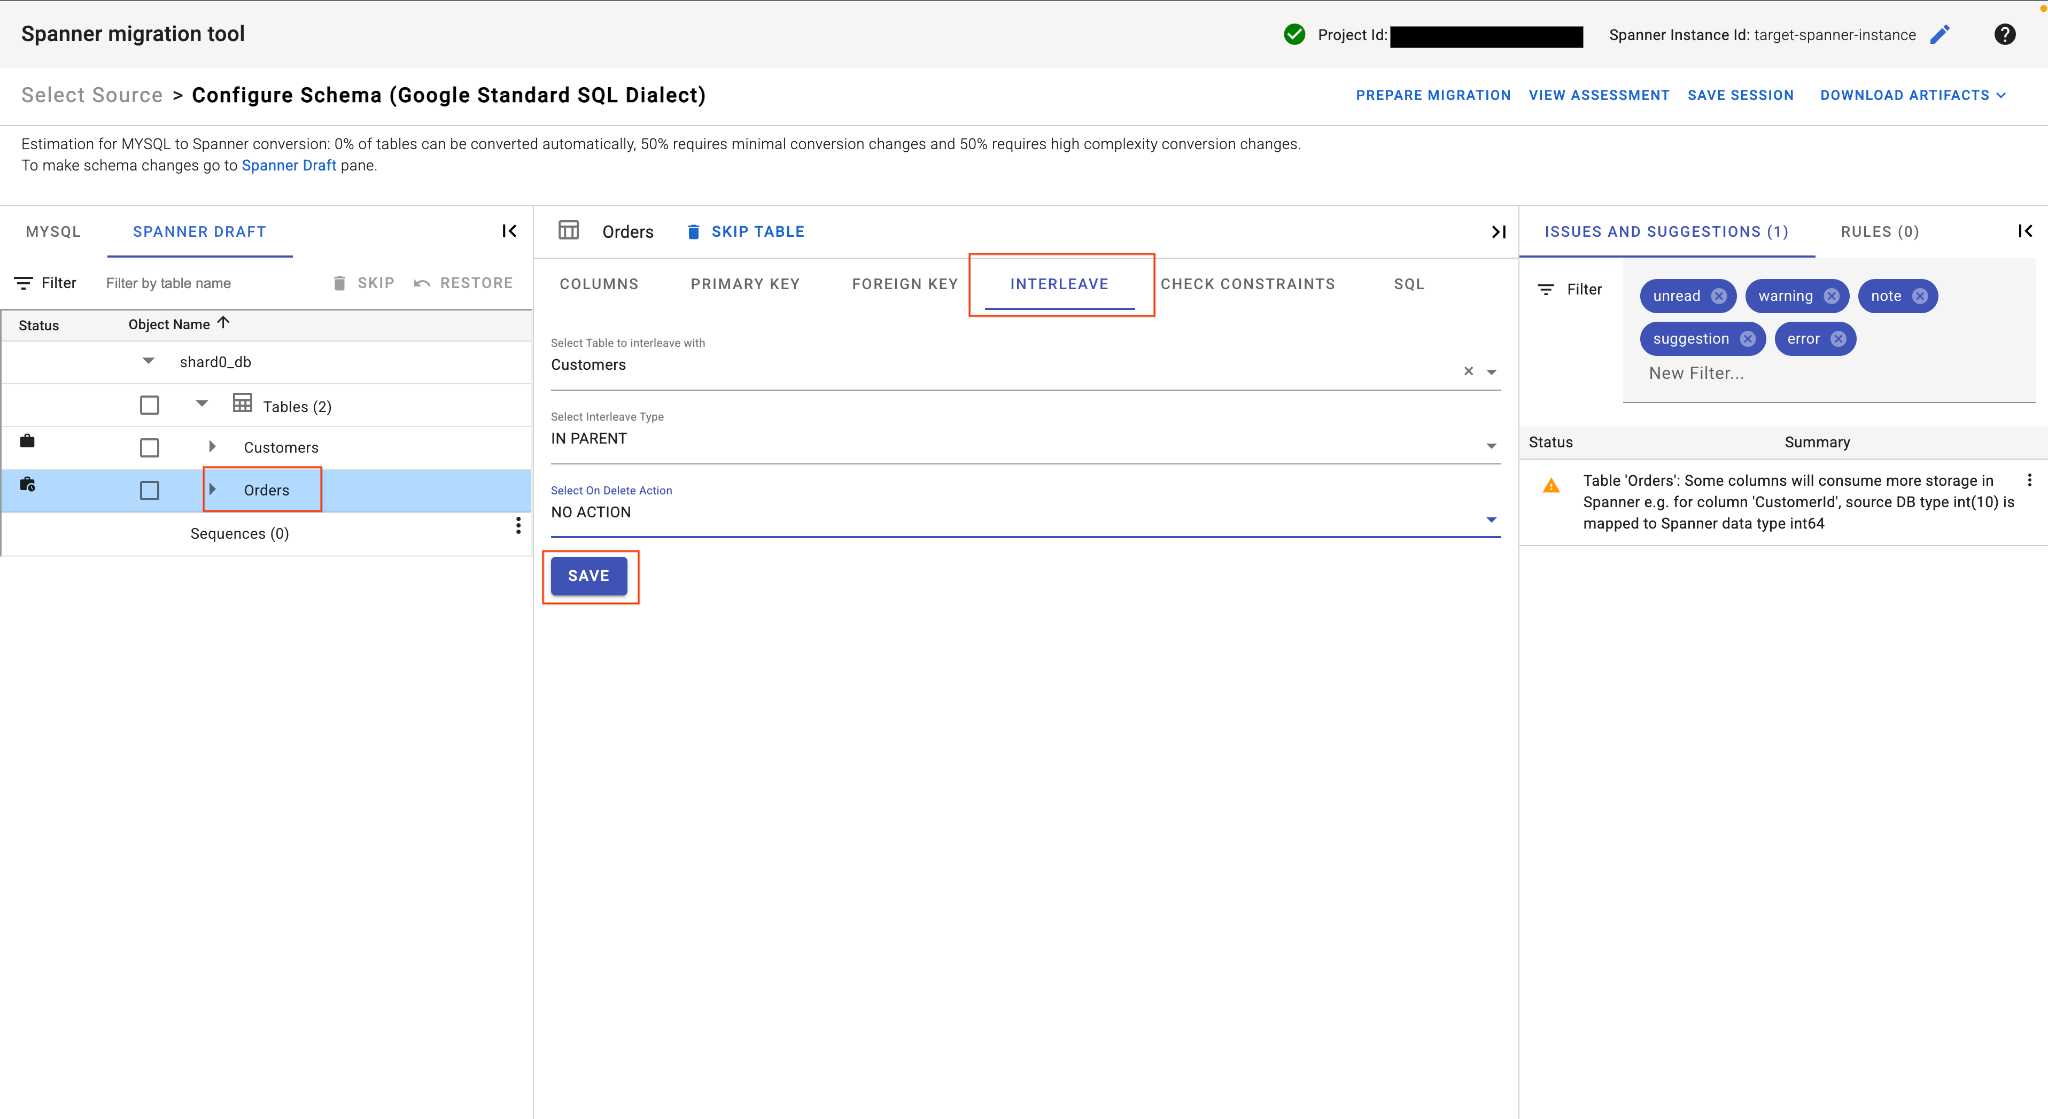
E. Interleave the Orders Table:
- Still on the
Orderstable, in the main table view locate the Interleave tab. - Set the parent table to
Customers. - Choose
IN PARENTInterleave type andNO ACTIONOn Delete Action. - Click Save.
4. Download Overrides File & Apply Schema
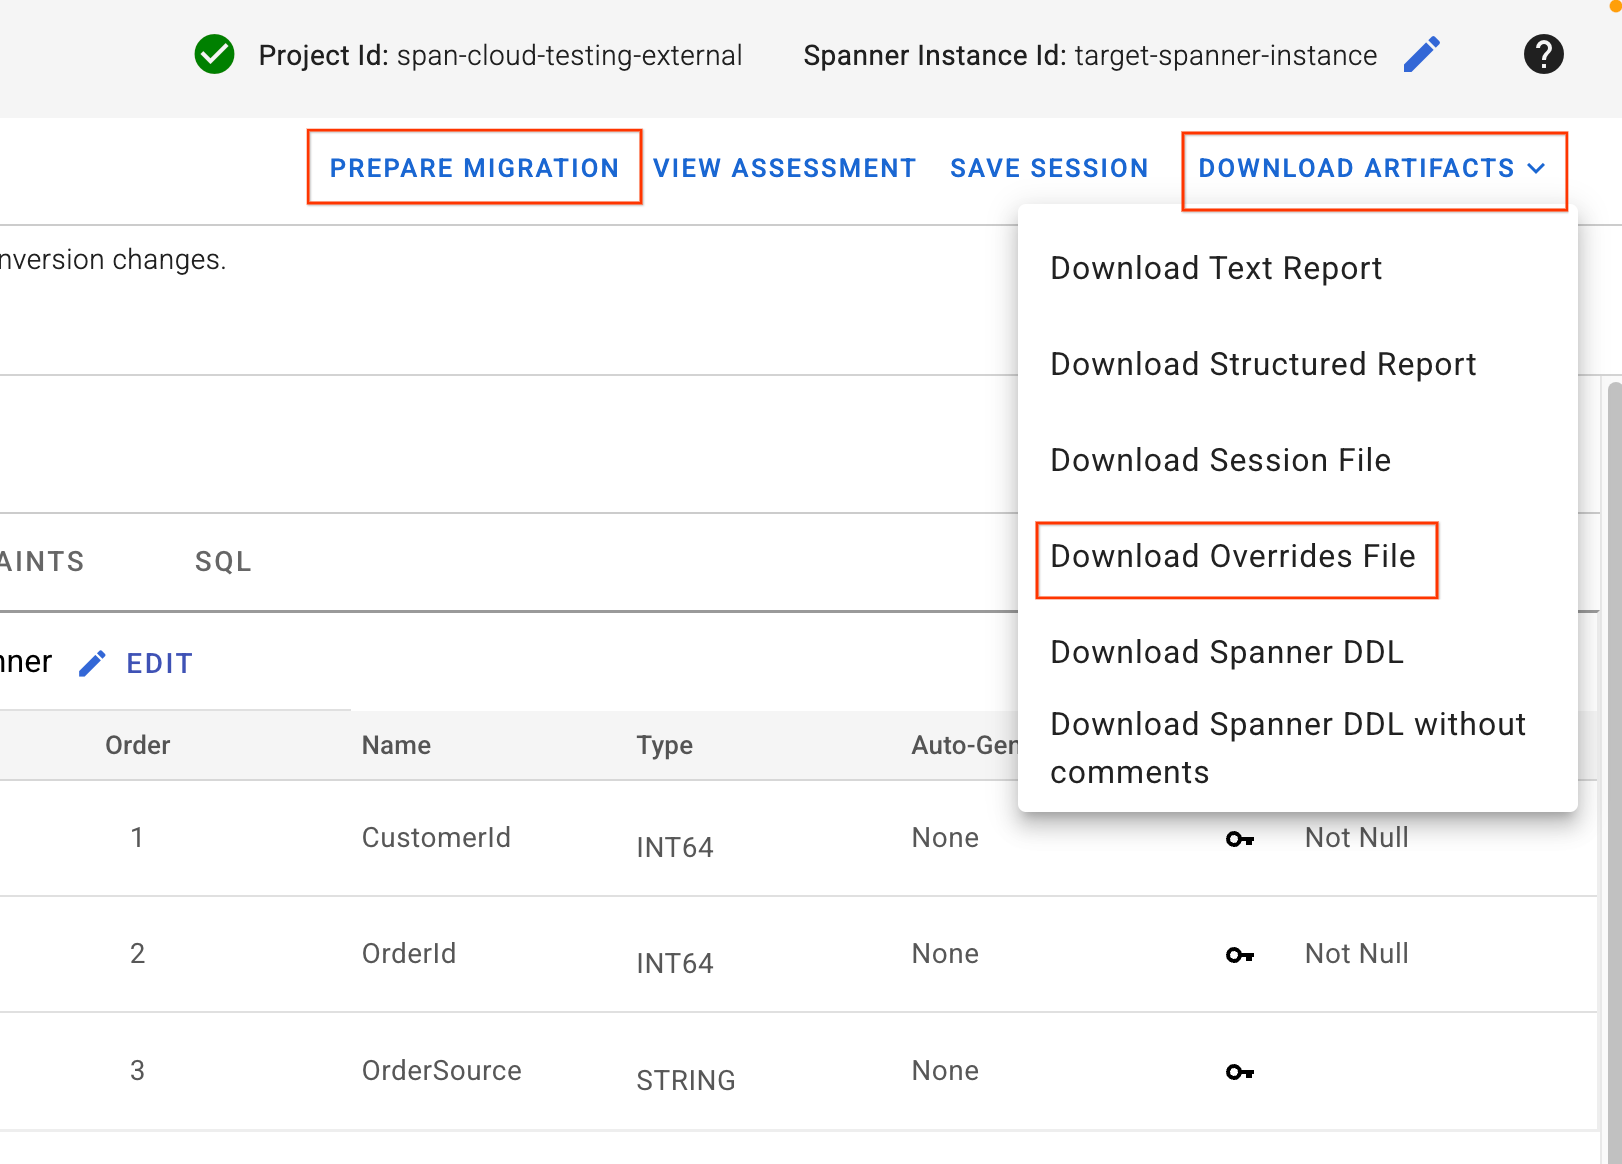
- In the top right corner of the SMT UI, locate the Download Artifacts button. Select the option Download Overrides File. Save this file to your local machine. This file contains all the schema mapping changes we just made and will be used by our Dataflow pipelines.
- Click Prepare Migration.
- Choose Migration Mode as
Schemafrom the dropdown. - Enter your Target Spanner Database:
sharded-target-db
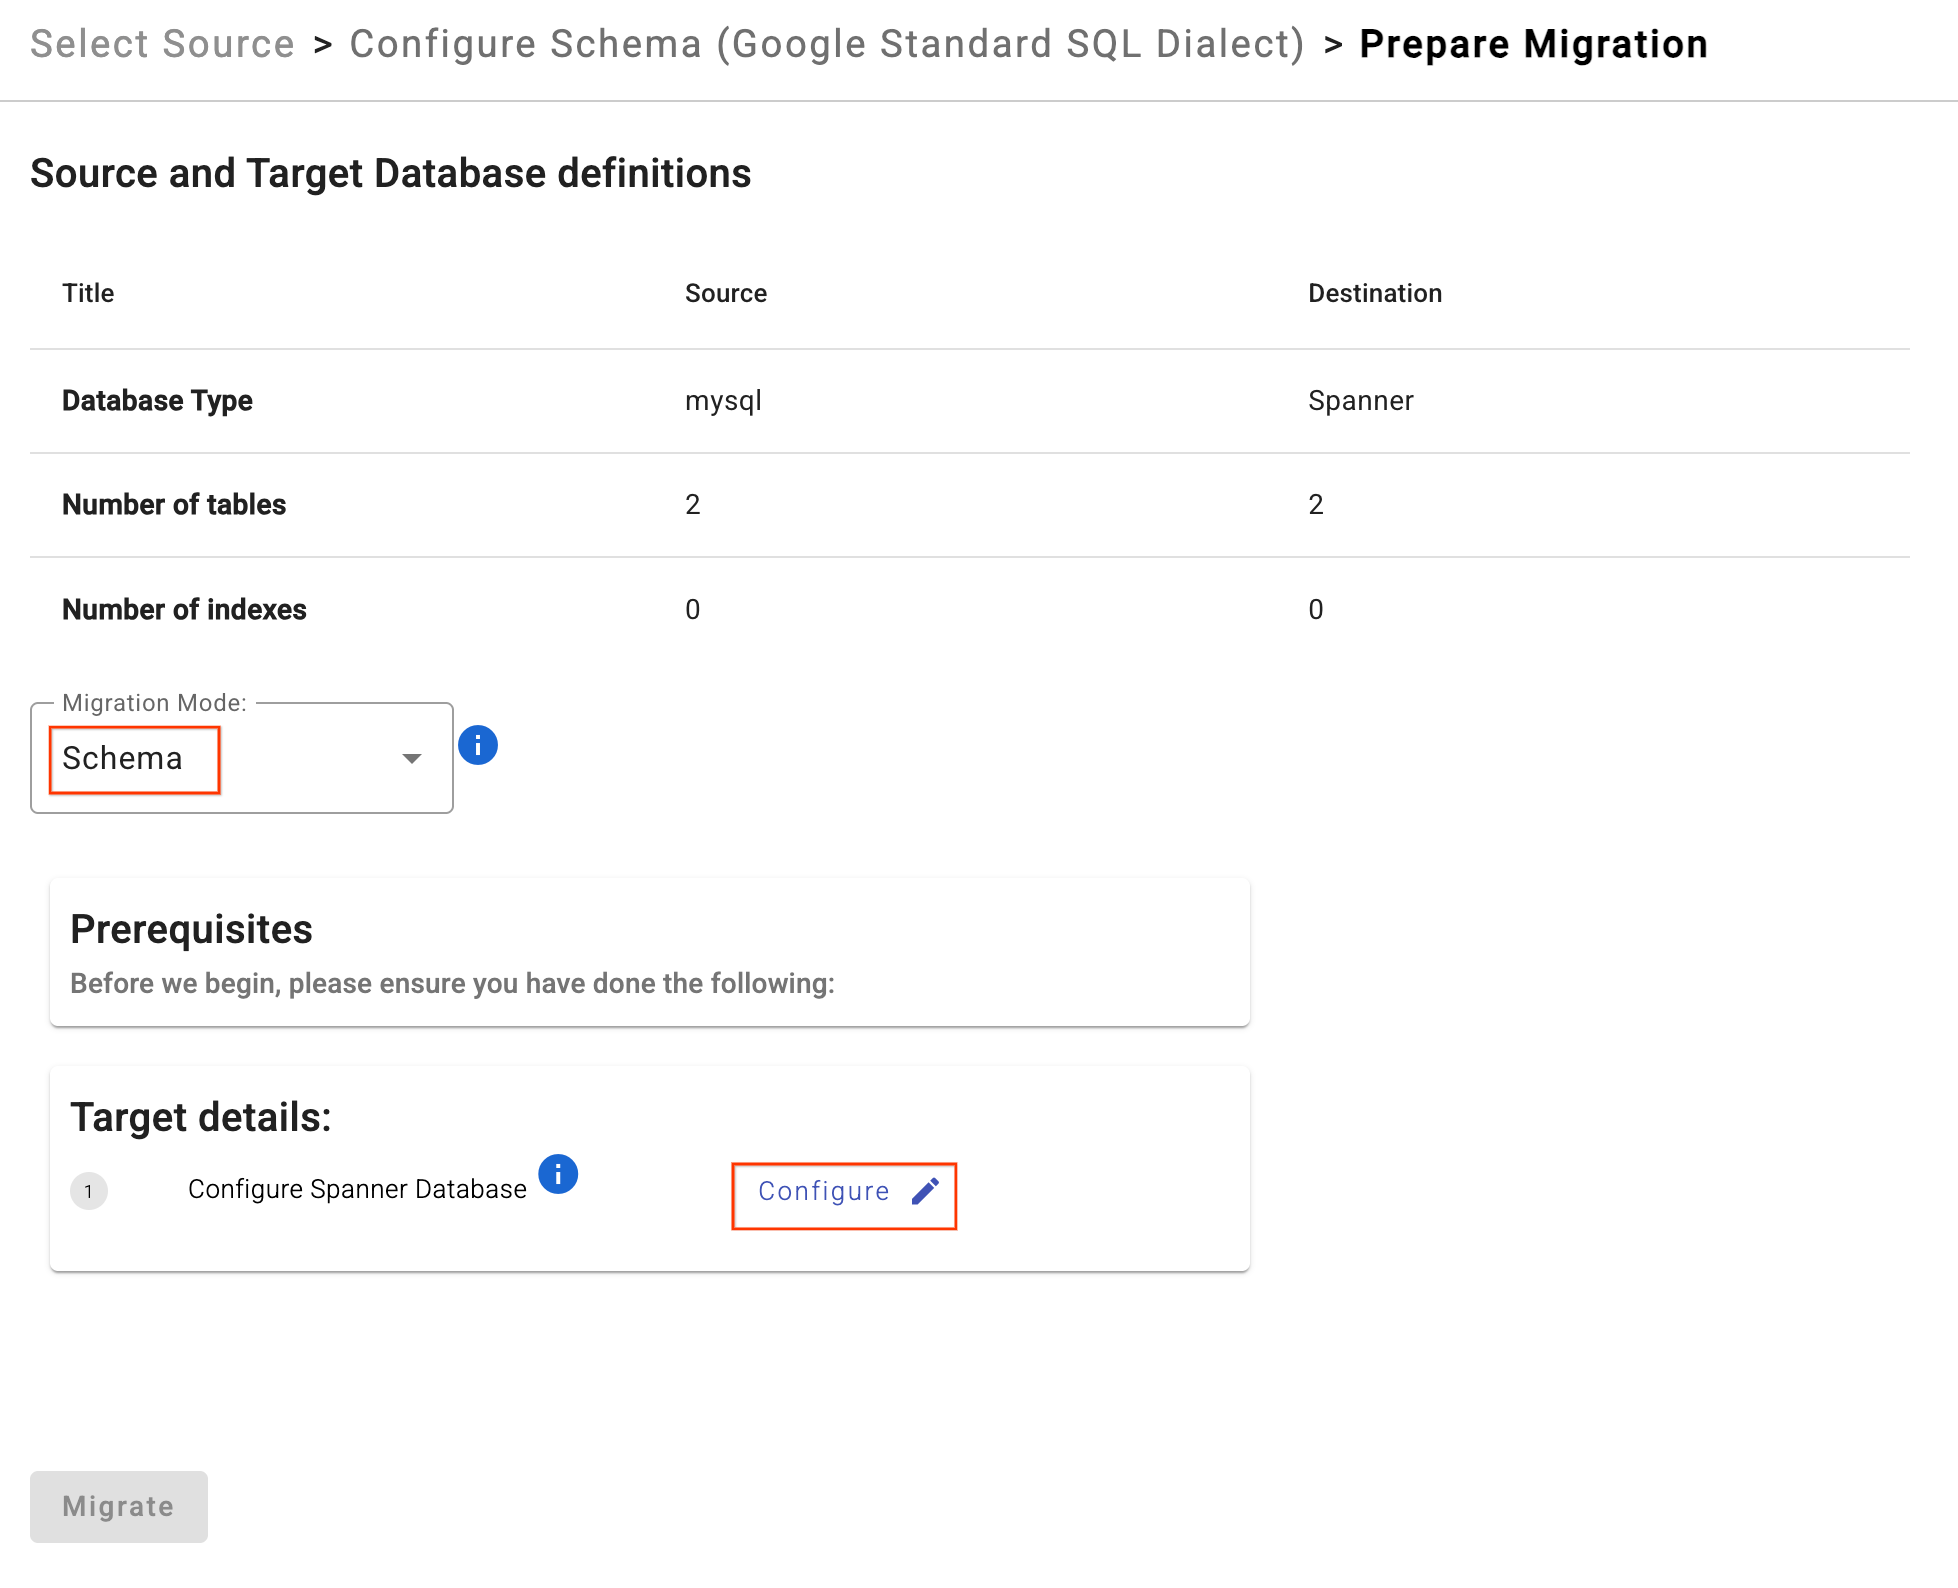
- Click Migrate.
- SMT will apply the DDL and create the Spanner database. You can safely stop the SMT process in Cloud Shell (
Ctrl+C) once it completes.
5. Verify Schema in Cloud Spanner
Check that the tables have been created in the Spanner database.
gcloud spanner databases execute-sql $SPANNER_DATABASE_NAME \
  --instance=$SPANNER_INSTANCE_NAME \
  --sql="SELECT table_name FROM information_schema.tables WHERE table_schema = '' ORDER BY table_name"
You should see the following output:
table_name: Customers
table_name: Orders
Optional: If you want to check the actual Spanner DDL to verify that your check constraints, interleaving, and extra columns were applied, run the following command:
gcloud spanner databases ddl describe $SPANNER_DATABASE_NAME \
  --instance=$SPANNER_INSTANCE_NAME
Expected Output:
CREATE TABLE Customers (
  CustomerId INT64 NOT NULL,
  CustomerName STRING(255),
  CreditLimit NUMERIC NOT NULL,
  LoyaltyTier STRING(50),
  CONSTRAINT CHK_CreditLimit CHECK(`CreditLimit` > 0),
) PRIMARY KEY(CustomerId);

CREATE TABLE Orders (
  CustomerId INT64 NOT NULL,
  OrderId INT64 NOT NULL,
  OrderValue NUMERIC,
  OrderSource STRING(50) NOT NULL,
) PRIMARY KEY(CustomerId, OrderId, OrderSource),
  INTERLEAVE IN PARENT Customers ON DELETE NO ACTION;
7. Initialize Change Data Capture (CDC)
In this section, you will set up the "recorder" for your migration. By configuring Datastream and Pub/Sub before the bulk data load starts, you ensure that every change made to the source databases is captured and queued, preventing any data loss during the transition. This setup is required for the Live Migration.
Because our architecture involves two physical servers, we must create two separate Datastream source profiles and two Datastream streams. Both streams will write to a single Google Cloud Storage (GCS) bucket, which will act as the unified source for our Dataflow pipeline.
1. Create a Cloud Storage Bucket
Datastream requires a destination to store the captured change events. Let's create a GCS bucket.
export BUCKET_NAME="migration-${PROJECT_ID}-bucket"
gcloud storage buckets create gs://${BUCKET_NAME} --location=$REGION
2. Create Datastream Connection Profiles
We need two distinct MySQL source connection profiles (one for each physical shard) and one target connection profile for Cloud Storage.
Get Source IP Addresses
First, fetch the external IP addresses of our two Compute Engine VMs and store them as environment variables:
export MYSQL_IP_1=$(gcloud compute instances describe mysql-physical-1 --zone=$ZONE --format='get(networkInterfaces[0].accessConfigs[0].natIP)')

export MYSQL_IP_2=$(gcloud compute instances describe mysql-physical-2 --zone=$ZONE --format='get(networkInterfaces[0].accessConfigs[0].natIP)')
Create Source Connection Profiles (MySQL on Compute Engine)
Create the Datastream connection profiles using the datastream_user created earlier.
# Create Source Profile for Physical Shard 1
export SQL_CP_NAME_1="mysql-src-cp-1"
gcloud datastream connection-profiles create $SQL_CP_NAME_1 \
    --location=$REGION \
    --type=mysql \
    --mysql-hostname=$MYSQL_IP_1 \
    --mysql-port=3306 \
    --mysql-username=datastream_user \
    --mysql-password=complex_password_123 \
    --display-name="MySQL Source 1 (Physical Shard 1)"

# Create Source Profile for Physical Shard 2
export SQL_CP_NAME_2="mysql-src-cp-2"
gcloud datastream connection-profiles create $SQL_CP_NAME_2 \
    --location=$REGION \
    --type=mysql \
    --mysql-hostname=$MYSQL_IP_2 \
    --mysql-port=3306 \
    --mysql-username=datastream_user \
    --mysql-password=complex_password_123 \
    --display-name="MySQL Source 2 (Physical Shard 2)"
Note: Datastream connects to these VMs via their public IPs, which is permitted because we added 0.0.0.0/0 to our firewall rules earlier. In a production environment, you would strictly allowlist Datastream's specific public IP ranges.
Create Destination Connection Profile (Cloud Storage):
This points to the root of your newly created bucket.
export GCS_CP_NAME="gcs-dest-cp"
gcloud datastream connection-profiles create $GCS_CP_NAME \
    --location=$REGION \
    --type=google-cloud-storage \
    --bucket=$BUCKET_NAME \
    --root-path=/ \
    --display-name="GCS Destination" --force
3. Create Datastream Streams
We will now create two CDC streams. Stream 1 will capture shard0_db and shard1_db. Stream 2 will capture shard2_db and shard3_db. Both streams write to the same GCS bucket in Avro format.
# Stream for Physical Shard 1
export STREAM_NAME_1="mysql-to-spanner-stream-1"
export GCS_STREAM_PATH_1="data/${STREAM_NAME_1}"

gcloud datastream streams create $STREAM_NAME_1 \
    --location=$REGION \
    --display-name="MySQL Source 1 CDC Stream" \
    --source=$SQL_CP_NAME_1 \
    --destination=$GCS_CP_NAME \
    --mysql-source-config=<(echo "includeObjects:
  mysqlDatabases:
  - database: 'shard0_db'
  - database: 'shard1_db'") \
    --gcs-destination-config=<(echo "path: ${GCS_STREAM_PATH_1}/
fileRotationMb: 5
fileRotationInterval: 15s
avroFileFormat: {}") \
    --backfill-none

# Stream for Physical Shard 2
export STREAM_NAME_2="mysql-to-spanner-stream-2"
export GCS_STREAM_PATH_2="data/${STREAM_NAME_2}"

gcloud datastream streams create $STREAM_NAME_2 \
    --location=$REGION \
    --display-name="MySQL Source 2 CDC Stream" \
    --source=$SQL_CP_NAME_2 \
    --destination=$GCS_CP_NAME \
    --mysql-source-config=<(echo "includeObjects:
  mysqlDatabases:
  - database: 'shard2_db'
  - database: 'shard3_db'") \
    --gcs-destination-config=<(echo "path: ${GCS_STREAM_PATH_2}/
fileRotationMb: 5
fileRotationInterval: 15s
avroFileFormat: {}") \
    --backfill-none
Using smaller file rotation settings (5 MB or 15 seconds) helps us see replicated changes faster during the codelab.
This command might take some time to complete. Check status: gcloud datastream streams describe $STREAM_NAME_1 --location=$REGION.
4. Start the Datastream Streams
Activate both streams so they begin recording changes.
gcloud datastream streams update $STREAM_NAME_1 \
    --location=$REGION \
    --state=RUNNING

gcloud datastream streams update $STREAM_NAME_2 \
    --location=$REGION \
    --state=RUNNING
Check status: You can run gcloud datastream streams describe $STREAM_NAME_1 --location=$REGION. The state will initially be STARTING and will change to RUNNING after a few moments. Wait until both are fully running before starting the Live Migration.
5. Set Up Pub/Sub for GCS Notifications
Dataflow needs to be notified immediately when either Datastream stream writes a new file to the GCS bucket. We will configure GCS to send notifications to a single Pub/Sub topic.
Create a Pub/Sub Topic:
export PUBSUB_TOPIC="datastream-gcs-updates"
gcloud pubsub topics create $PUBSUB_TOPIC
Create GCS Notification
Notify the topic upon any object creation under the data/ prefix (which covers both of our streams).
gcloud storage buckets notifications create gs://${BUCKET_NAME} --topic=projects/$PROJECT_ID/topics/$PUBSUB_TOPIC --payload-format=json --object-prefix=data/
Create a Pub/Sub Subscription
Create the subscription with a recommended acknowledgement deadline for Dataflow.
export PUBSUB_SUBSCRIPTION="datastream-gcs-sub"
gcloud pubsub subscriptions create $PUBSUB_SUBSCRIPTION \
  --topic=$PUBSUB_TOPIC \
  --ack-deadline=600
8. Custom Transformation
Since our Spanner schema differs from our MySQL schema (due to the columns we added and dropped via the SMT Web UI), the out-of-the-box Dataflow migration will fail. Dataflow needs instructions on how to map these differences during the forward (MySQL to Spanner) and reverse (Spanner to MySQL) pipelines.
Additionally, because we are doing a sharded reverse migration, Dataflow needs a routing mechanism to know which logical shard (shard0_db, shard1_db, etc.) an updated Spanner row belongs to during reverse replication.
We will achieve this by writing a Custom Transformation JAR using the Google-provided Spanner Custom Shard template.
1. Download the Custom Shard Template
In your Cloud Shell, download the Google Cloud Dataflow Templates repository and navigate to the custom shard folder:
git clone https://github.com/GoogleCloudPlatform/DataflowTemplates.git
cd DataflowTemplates/v2/spanner-custom-shard
2. Configure the Data Transformation Logic
We need to edit the CustomTransformationFetcher.java file.
- Forward Migration (
toSpannerRow): Populates the newly addedOrderSourcecolumn using theLegacyOrderSystemcolumn from MySQL. - Reverse Migration (
toSourceRow): Repopulates the droppedLegacyOrderSystemcolumn that MySQL requires, deriving it from Spanner'sOrderSource.
Edit the CustomTransformationFetcher.java file. Instead of manually opening a text editor, run the following command to automatically overwrite the template file with our custom logic:
cat << 'EOF' > src/main/java/com/custom/CustomTransformationFetcher.java
package com.custom;

import com.google.cloud.teleport.v2.spanner.exceptions.InvalidTransformationException;
import com.google.cloud.teleport.v2.spanner.utils.ISpannerMigrationTransformer;
import com.google.cloud.teleport.v2.spanner.utils.MigrationTransformationRequest;
import com.google.cloud.teleport.v2.spanner.utils.MigrationTransformationResponse;
import java.util.HashMap;
import java.util.Map;

public class CustomTransformationFetcher implements ISpannerMigrationTransformer {

 @Override
 public void init(String customParameters) {}

 @Override
 public MigrationTransformationResponse toSpannerRow(MigrationTransformationRequest request)
     throws InvalidTransformationException {
   if (request.getTableName().equals("Orders")) {
     Map<String, Object> requestRow = request.getRequestRow();
     Map<String, Object> responseRow = new HashMap<>();

     Object legacySysObj = requestRow.get("LegacyOrderSystem");
     String legacySys = (legacySysObj != null) ? (String) legacySysObj : "UNKNOWN_SYSTEM";

     // Transform: Trim the string to remove everything after the first underscore
     String orderSource = legacySys;
     if (legacySys.contains("_")) {
       orderSource = legacySys.substring(0, legacySys.indexOf('_'));
     }

     // Populate the new Spanner column (e.g., "WebStore_v1" becomes "WebStore")
     responseRow.put("OrderSource", orderSource);

     return new MigrationTransformationResponse(responseRow, false);
   }

   return new MigrationTransformationResponse(new HashMap<>(), false);
 }

 @Override
 public MigrationTransformationResponse toSourceRow(MigrationTransformationRequest request)
     throws InvalidTransformationException {
   if (request.getTableName().equals("Orders")) {
     Map<String, Object> requestRow = request.getRequestRow();
     Map<String, Object> responseRow = new HashMap<>();

     // Safely fetch the Spanner OrderSource
     Object sourceObj = requestRow.get("OrderSource");
     String source = (sourceObj != null) ? (String) sourceObj : "UNKNOWN_SYSTEM";
     String legacySys = "'" + source + "_v1'";

     // Transform: Append a suffix to visibly prove the reverse transformation worked
     // e.g., "WebStore" becomes "WebStore_v1"
     responseRow.put("LegacyOrderSystem", legacySys);

     return new MigrationTransformationResponse(responseRow, false);
   }

   return new MigrationTransformationResponse(new HashMap<>(), false);
 }

 @Override
 public MigrationTransformationResponse transformFailedSpannerMutation(
     MigrationTransformationRequest request) throws InvalidTransformationException {
   return new MigrationTransformationResponse(new HashMap<>(), false);
 }
}
EOF
3. Configure the Reverse Sharding Logic
Dataflow uses CustomShardIdFetcher.java during reverse replication to determine where a Spanner mutation should be routed. We will use the CustomerId primary key and modulo (%4) logic to dynamically route records back to their correct logical shard.
Edit the CustomShardIdFetcher.java file using cat and replace its contents entirely with the following code:
cat << 'EOF' > src/main/java/com/custom/CustomShardIdFetcher.java
package com.custom;

import com.google.cloud.teleport.v2.spanner.utils.IShardIdFetcher;
import com.google.cloud.teleport.v2.spanner.utils.ShardIdRequest;
import com.google.cloud.teleport.v2.spanner.utils.ShardIdResponse;
import java.util.Map;

public class CustomShardIdFetcher implements IShardIdFetcher {

    @Override
    public void init(String parameters) {}

    @Override
    public ShardIdResponse getShardId(ShardIdRequest shardIdRequest) {
        Map<String, Object> keys = shardIdRequest.getSpannerRecord
();

        // Use the Primary Key to identify the correct logical shard
        if (keys != null && keys.containsKey("CustomerId")) {
            long customerId = Long.parseLong(keys.get("CustomerId").toString());
            long shardIdx = customerId % 4;

            ShardIdResponse response = new ShardIdResponse();
            response.setLogicalShardId("shard" + shardIdx + "_db");
            return response;
        }

        return new ShardIdResponse();
    }
}
EOF
4. Build and Upload the JAR
Now that our custom Java logic is written, we need to compile it into a JAR file and upload it to the Google Cloud Storage bucket we created earlier so Dataflow can access it.
Run the following commands in Cloud Shell:
# Return to DataflowTemplates directory
cd ../..

# Build the JAR using Maven
mvn clean install -DskipTests -Dcheckstyle.skip -Dspotless.check.skip=true -Djib.skip -pl v2/spanner-custom-shard -am

# Upload the JAR to GCS
export CUSTOM_JAR_PATH="gs://${BUCKET_NAME}/custom-logic/spanner-custom-shard-1.0.jar"

gcloud storage cp v2/spanner-custom-shard/target/spanner-custom-shard-1.0-SNAPSHOT.jar $CUSTOM_JAR_PATH

# Return to home directory
cd ~
9. Bulk Migrate Data from MySQL to Spanner
With the Spanner schema in place and our Custom Transformation JAR built, we can now copy the existing data from your MySQL database to Cloud Spanner. You'll use the Sourcedb to Spanner Dataflow Flex Template, which is designed for bulk copying data from JDBC-accessible databases to Spanner.
1. Upload the Schema Overrides File
In Section 6, you downloaded the Spanner Overrides JSON file using the SMT Web UI. We need to upload this to our GCS bucket so Dataflow can use it to map the schema differences (like renamed columns).
- In your Cloud Shell, click the three-dot menu (More) and select Upload.
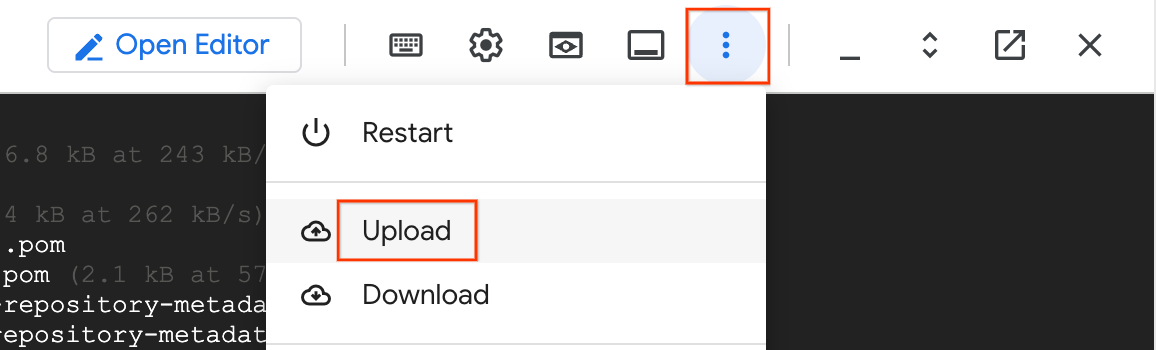
- Select the Overrides JSON file you downloaded earlier (e.g.,
spanner_overrides.json). - Move it to your GCS bucket:
export OVERRIDES_FILE="spanner_overrides.json" # Change this if your downloaded file has a different name

export GCS_OVERRIDES_PATH="gs://${BUCKET_NAME}/config/${OVERRIDES_FILE}"

gcloud storage cp ~/${OVERRIDES_FILE} $GCS_OVERRIDES_PATH
2. Create and Upload the Sharding Config File
Dataflow needs to know how to connect to all four logical shards across your two physical VMs. We will create a sharding.json file for this.
Run the following in Cloud Shell to generate and upload the configuration:
cat <<EOF > sharding.json
{
  "configType": "dataflow",
  "shardConfigurationBulk": {
    "schemaSource": {
      "dataShardId": "mysql-physical-1",
      "host": "${MYSQL_IP_1}",
      "user": "datastream_user",
      "password": "complex_password_123",
      "port": "3306",
      "dbName": "shard0_db"
    },
    "dataShards": [
      {
        "dataShardId": "mysql-physical-1",
        "host": "${MYSQL_IP_1}",
        "user": "datastream_user",
        "password": "complex_password_123",
        "port": "3306",
        "dbName": "",
        "namespace": "namespace-mysql-1",
        "databases": [
          {
            "dbName": "shard0_db",
            "databaseId": "shard0_db",
            "refDataShardId": "mysql-physical-1"
          },
          {
            "dbName": "shard1_db",
            "databaseId": "shard1_db",
            "refDataShardId": "mysql-physical-1"
          }
        ]
      },
      {
        "dataShardId": "mysql-physical-2",
        "host": "${MYSQL_IP_2}",
        "user": "datastream_user",
        "password": "complex_password_123",
        "port": "3306",
        "dbName": "",
        "namespace": "namespace-mysql-2",
        "databases": [
          {
            "dbName": "shard2_db",
            "databaseId": "shard2_db",
            "refDataShardId": "mysql-physical-2"
          },
          {
            "dbName": "shard3_db",
            "databaseId": "shard3_db",
            "refDataShardId": "mysql-physical-2"
          }
        ]
      }
    ]
  }
}
EOF


export GCS_SHARDING_PATH="gs://${BUCKET_NAME}/config/sharding.json"
gcloud storage cp sharding.json $GCS_SHARDING_PATH
3. Run the Bulk Migration Dataflow Job
We will use the Sourcedb to Spanner Flex Template. Because this is a sharded migration with custom transformations, we pass the Overrides file, the Sharding config, and our custom Java JAR.
export JOB_NAME="mysql-sharded-bulk-to-spanner-$(date +%Y%m%d-%H%M%S)"
export OUTPUT_DIR="gs://${BUCKET_NAME}/bulk-migration"

gcloud dataflow flex-template run $JOB_NAME \
  --project=$PROJECT_ID \
  --region=$REGION \
--template-file-gcs-location="gs://dataflow-templates-${REGION}/latest/flex/Sourcedb_to_Spanner_Flex" \
--max-workers=2 \
--num-workers=1 \
--worker-machine-type=n2-highmem-8 \
  --parameters \
sourceConfigURL=$GCS_SHARDING_PATH,\
instanceId=$SPANNER_INSTANCE_NAME,\
databaseId=$SPANNER_DATABASE_NAME,\
projectId=$PROJECT_ID,\
outputDirectory=$OUTPUT_DIR,\
username=datastream_user,\
password=complex_password_123,\
schemaOverridesFilePath=$GCS_OVERRIDES_PATH,\
transformationJarPath=$CUSTOM_JAR_PATH,\
transformationClassName=com.custom.CustomTransformationFetcher
Key Parameters Explained:
sourceConfigURL: The path to thesharding.jsonfile we created. This tells Dataflow how to connect to all four of our logical MySQL shards across the two physical VMs.schemaOverridesFilePath: The path to the JSON file we downloaded from the SMT Web UI. This instructs Dataflow on how to handle the schema modifications we made (like the droppedLegacyRegioncolumn and the tightened check constraint).transformationJarPath: The GCS path to the compiled Java JAR file we built in the previous section. This contains the actual code to execute our custom transformations.transformationClassName: The fully qualified name of the Java class inside our JAR that implements the forward migration logic (com.custom.CustomTransformationFetcher).outputDirectory: The GCS location where Dataflow will write its temporary files and, most importantly, the Dead Letter Queue (DLQ) files.maxWorkers,numWorkers: Controls the scaling of the Dataflow job. Kept low for this small dataset.instanceId,databaseId,projectId: Specifies the target Cloud Spanner instance and database.
Network Note: This job connects to the Cloud SQL instance over its Public IP. This is possible because you previously added 0.0.0.0/0 to the instance's Authorized Networks. This allows the Dataflow worker VMs, which have external IPs, to reach the database.
4. Monitor the Dataflow Job
You can track the job's progress in the Google Cloud Console:
- Navigate to the Dataflow Jobs page: Go to Dataflow Jobs
- Locate the job named
mysql-sharded-bulk-to-spanner-...and click on it. - Observe the job graph and metrics. Wait for the job status to change to Succeeded. This should take approximately 5-15 minutes.
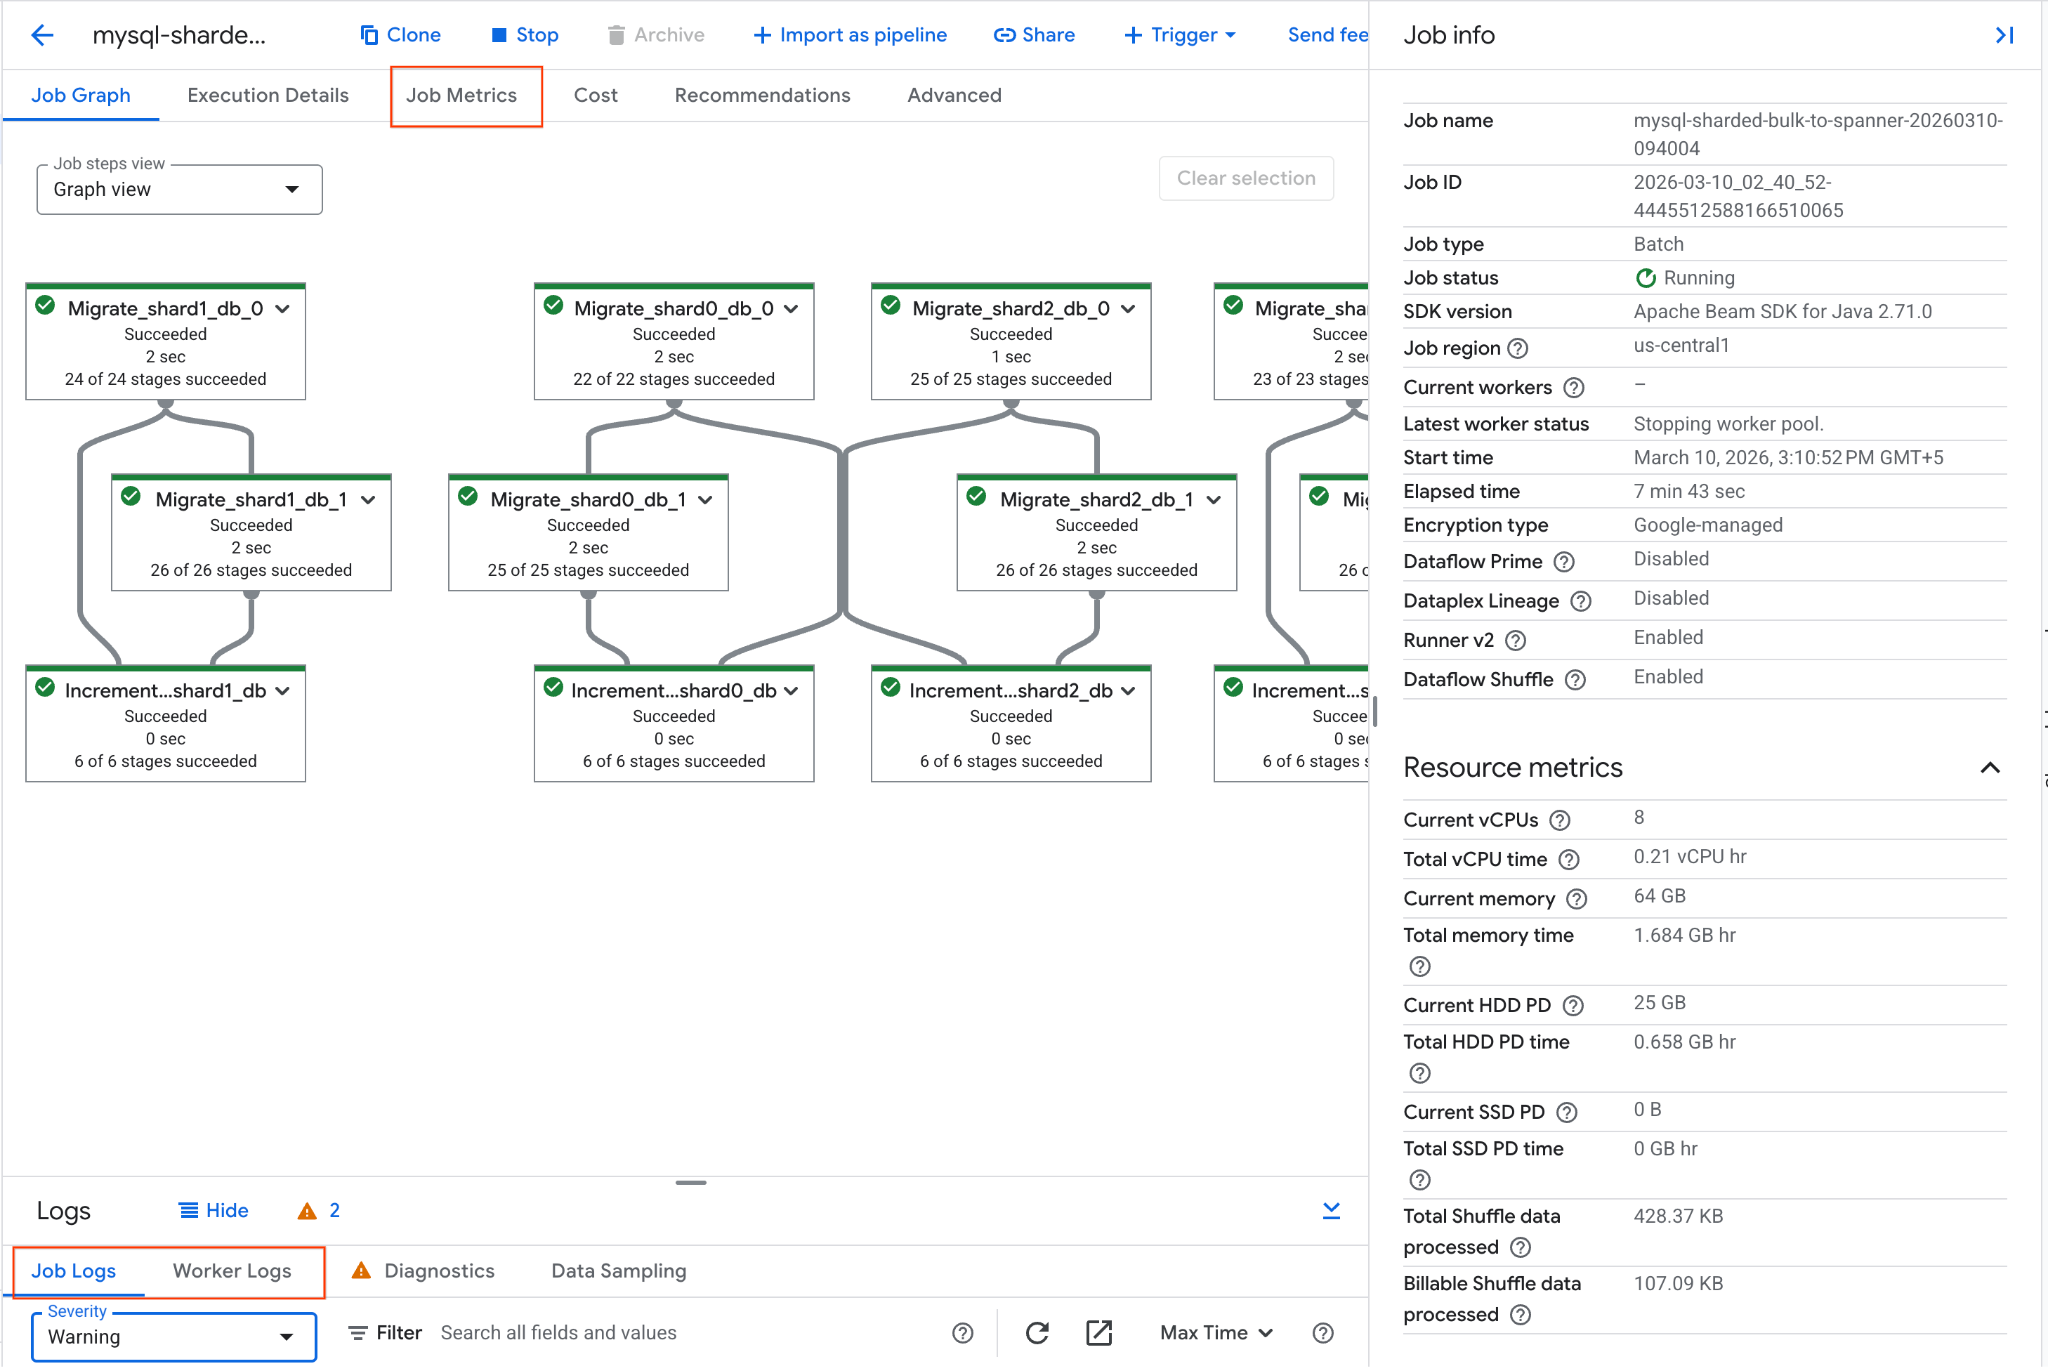
- If the job encounters issues, review the Logs tab within the Dataflow job details page for error messages.
- Job Metrics gives more information regarding the progress of the job and resource consumption like throughput and CPU utilization.
5. Verify Data in Cloud Spanner and Inspect Dead Letter Queue (DLQ)
Once the Dataflow job completes successfully, we need to verify that our data arrived safely and inspect the records we intentionally engineered to fail.
A. Verify the Overall Health of the Migrated Data:
Use the gcloud CLI to run a few quick health checks on your consolidated Spanner database to ensure the valid records migrated correctly and our custom JAR populated the extra column.
# 1. Verify total Customer count
gcloud spanner databases execute-sql $SPANNER_DATABASE_NAME \
    --instance=$SPANNER_INSTANCE_NAME \
    --sql="SELECT COUNT(*) as TotalCustomers FROM Customers"

# 2. Verify total Orders count (Total minus the orphan record)
gcloud spanner databases execute-sql $SPANNER_DATABASE_NAME \
    --instance=$SPANNER_INSTANCE_NAME \
    --sql="SELECT COUNT(*) as TotalOrders FROM Orders"

# 3. Verify the Custom Transformation on OrderSource worked
gcloud spanner databases execute-sql $SPANNER_DATABASE_NAME \
    --instance=$SPANNER_INSTANCE_NAME \
    --sql="SELECT CustomerId, OrderId, OrderSource FROM Orders LIMIT 3"

# 4. Verify that renamed column LoyaltyTier has the correct data
gcloud spanner databases execute-sql $SPANNER_DATABASE_NAME \
    --instance=$SPANNER_INSTANCE_NAME \
    --sql="SELECT CustomerId, CustomerName, LoyaltyTier FROM Customers LIMIT 3"
Expected Output:
TotalCustomers: 16
TotalOrders: 19

CustomerId: 1
OrderId: 201
OrderSource: MobileApp

CustomerId: 2
OrderId: 301
OrderSource: CallCenter

CustomerId: 3
OrderId: 401
OrderSource: InStore

CustomerId: 1
CustomerName: Agnes N.
LoyaltyTier: NORTHEAST

CustomerId: 2
CustomerName: Brian K.
LoyaltyTier: SOUTHWEST

CustomerId: 3
CustomerName: Cathy Z.
LoyaltyTier: CENTRAL
- All rows in the Customers table were successfully migrated.
- We see 1 row failure in
Orderstable due toINTERLEAVE IN PARENTon Spanner -CustomerId 99is an orphan child due to no corresponding row inCustomerstable.
B. Check the Intentional Failures in the DLQ:
The above failure is documented in the Dead Letter Queue (DLQ) folder created by the Bulk Migration pipeline.
- Navigate to Cloud Storage in the Google Cloud Console.
- Go to your bucket and open the
bulk-migration/dlq/severefolder. - Inspect the JSON files inside. You will find the
Ordersrow with the orphanCustomerId. - Bulk Migration DLQ errors can be retried by following the steps mentioned here.
The initial bulk load of data from Cloud SQL to Cloud Spanner is now complete. The next step is to set up live replication to capture ongoing changes.
10. Start Live Migration (CDC)
Now that the bulk data load is complete, you will launch a continuous Dataflow streaming job. This job will read the Change Data Capture (CDC) events that Datastream is writing to your GCS bucket and apply those changes to Cloud Spanner in near real-time.
We will also test this pipeline by injecting both valid and intentionally invalid data to observe how Dataflow handles live replication and routes failures to the Dead Letter Queue (DLQ).
1. Create the Live Migration Sharding Config File
Unlike the bulk migration (which uses JDBC connection strings), the live migration pipeline reads Datastream events from GCS. It needs a completely different JSON configuration that maps Datastream stream names and databases to your logical Spanner shards.
Run the following in Cloud Shell to create and upload the live sharding config:
cat <<EOF > live-sharding.json
{
  "StreamToDbAndShardMap": {
    "${STREAM_NAME_1}": {
      "shard0_db": "shard0_db",
      "shard1_db": "shard1_db"
    },
    "${STREAM_NAME_2}": {
      "shard2_db": "shard2_db",
      "shard3_db": "shard3_db"
    }
  }
}
EOF

export GCS_LIVE_SHARDING_PATH="gs://${BUCKET_NAME}/config/live-sharding.json"
gcloud storage cp live-sharding.json $GCS_LIVE_SHARDING_PATH
2. Run the Live Migration Dataflow Job
Launch the streaming Dataflow job to read from GCS and write to Spanner. This template will use GCS Pub/Sub notifications to instantly process new files.
export JOB_NAME_CDC="mysql-sharded-cdc-to-spanner-$(date +%Y%m%d-%H%M%S)"
export DLQ_DIR_CDC="gs://${BUCKET_NAME}/live-migration"

gcloud dataflow flex-template run $JOB_NAME_CDC \
  --project=$PROJECT_ID \
  --region=$REGION \
--worker-machine-type=n2-highmem-8 \
--template-file-gcs-location="gs://dataflow-templates-${REGION}/latest/flex/Cloud_Datastream_to_Spanner" \
  --parameters \
instanceId="$SPANNER_INSTANCE_NAME",\
databaseId="$SPANNER_DATABASE_NAME",\
projectId="$PROJECT_ID",\
inputFileFormat="avro",\
gcsPubSubSubscription="projects/${PROJECT_ID}/subscriptions/${PUBSUB_SUBSCRIPTION}",\
shardingContextFilePath=$GCS_LIVE_SHARDING_PATH,\
deadLetterQueueDirectory="$DLQ_DIR_CDC",\
transformationJarPath=$CUSTOM_JAR_PATH,\
transformationClassName="com.custom.CustomTransformationFetcher",\
schemaOverridesFilePath=$GCS_OVERRIDES_PATH,\
datastreamSourceType="mysql",\
dlqRetryMinutes=1,\
dlqMaxRetryCount=2
Key Parameters
gcsPubSubSubscription: The Pub/Sub subscription that listens for new file notifications from GCS. This allows the job to process changes instantly as Datastream writes them.inputFileFormat="avro": Tells Dataflow to expect Avro files from Datastream. This must match your Datastream "Destination" configuration (e.g.,avroFileFormatvs.jsonFileFormat).shardingContextFilePath: A JSON file mapping Datastream streams to logical shards.dlqRetryMinutes: The number of minutes between dead letter queue retries. Defaults to10.dlqMaxRetryCount: The max number of times temporary errors can be retried through DLQ. Defaults to500.
Monitor the job startup in the Dataflow Jobs Console.
3. Inject Live Data and Trigger Intentional Failures
While the Dataflow streaming job is starting up (this can take 3-5 minutes), let's SSH into our first physical MySQL VM and insert some new records. We will insert one valid record and one invalid record.
SSH into the first physical shard:
gcloud compute ssh mysql-physical-1 --zone=$ZONE
Log into MySQL:
sudo mysql
Run the following inserts on shard1_db:
USE shard1_db;

-- 1. Valid Insert: 'MobileApp_v2' will be trimmed to 'MobileApp'
INSERT INTO Orders (CustomerId, OrderId, OrderValue, LegacyOrderSystem)
VALUES (4, 501, 99.99, 'MobileApp_v2');

-- 2. Invalid Insert (DLQ Test): This violates Interleave constraint as CustomerId 99999 doesn't exist in Customers table.
INSERT INTO Orders (CustomerId, OrderId, OrderValue, LegacyOrderSystem)
VALUES (99999, 502, 50.00, 'WebStore_v1');

-- 3. Valid Update
UPDATE Orders SET OrderValue = '1500' WHERE CustomerId = 5 AND OrderId = 202;

-- 4. Valid Delete
DELETE FROM Orders WHERE CustomerId = 5 AND OrderId = 203;

EXIT;
Type exit again to return to your Cloud Shell prompt.
4. Verify Live Migration Data and Inspect the CDC DLQ
Now that we have injected the data, Datastream will capture the CDC events, and Dataflow will attempt to apply them to Spanner.
A. Verify the Valid DML Changes in Spanner
Run the following queries to verify that the INSERT, UPDATE, and DELETE events successfully reached Spanner, and that the Custom Transformation fired on both the insert and the update.
# 1. Verify INSERT: Should return the new row with transformed OrderSource
gcloud spanner databases execute-sql $SPANNER_DATABASE_NAME \
    --instance=$SPANNER_INSTANCE_NAME \
    --sql="SELECT CustomerId, OrderId, OrderValue, OrderSource FROM Orders WHERE CustomerId = 4 AND OrderId = 501"

# 2. Verify UPDATE: Should show OrderValue changed to 1500
gcloud spanner databases execute-sql $SPANNER_DATABASE_NAME \
    --instance=$SPANNER_INSTANCE_NAME \
    --sql="SELECT CustomerId, OrderId, OrderValue, OrderSource FROM Orders WHERE CustomerId = 5 AND OrderId = 202"

# 3. Verify DELETE: Should return 0, confirming the order was deleted
gcloud spanner databases execute-sql $SPANNER_DATABASE_NAME \
    --instance=$SPANNER_INSTANCE_NAME \
    --sql="SELECT COUNT(*) FROM Orders WHERE CustomerId = 5 AND OrderId = 203"

# 4. Verify DLQ Failure: Should return 0, confirming the row migration failed
gcloud spanner databases execute-sql $SPANNER_DATABASE_NAME \
    --instance=$SPANNER_INSTANCE_NAME \
    --sql="SELECT COUNT(*) FROM Orders WHERE CustomerId = 99999 AND OrderId = 502"
Expected Output:
CustomerId: 4
OrderId: 501
OrderValue: 99.99
OrderSource: MobileApp

CustomerId: 5
OrderId: 202
OrderValue: 1500
OrderSource: WebStore

0
0
Note: If any query doesn't show the expected result, wait a minute and try again, as the streaming workers might still be processing the queue.
B. Check the Intentional Failure in the DLQ:
Because CustomerId = 99999 doesn't have a parent in Customers table, it should have been rejected by Spanner and safely routed to the DLQ by Dataflow.
- Navigate to Cloud Storage in the Google Cloud Console.
- Go to your bucket and open the
live-migration/dlq/severe/folder. - You should see newly generated JSON files. Click on them to inspect the contents. You will see the details of
CustomerId = 99999and the specific Spanner error message:NOT_FOUND: Parent row for row [99999,502,WebStore] in table Orders is missing. Row cannot be written." - Live Migration DLQ errors can be retried by running the dataflow template with
runMode=retryDLQset.
5. Handling DLQ Errors
Errors in the severe/ directory require manual intervention. Let's fix the data issue and reprocess the failed event.
A. Fix the Data in the Source
The error occurred because the parent customer record CustomerId = 99999 is missing. Let's insert it into the source MySQL database.
SSH into the MySQL instance again:
gcloud compute ssh mysql-physical-1 --zone=$ZONE
Log into MySQL using sudo mysql and insert the missing parent row into shard1_db:
USE shard1_db;

INSERT INTO Customers (CustomerId, CustomerName, CreditLimit, LegacyRegion) VALUES
(99999, 'DLQ Parent Holder', 5000.00, 'NORTH_AMERICA');

EXIT;
Type exit to return to Cloud Shell.
B. Run the retryDLQ Dataflow Job
To reprocess events from the severe/ DLQ, you launch the same Dataflow template but in retryDLQ mode. This mode specifically reads from the deadLetterQueueDirectory/severe path, re-runs them through your custom transformations, and applies them to Spanner.
Launch the job in retryDLQ mode:
export JOB_NAME_RETRY="mysql-sharded-cdc-retry-$(date +%Y%m%d-%H%M%S)"

gcloud dataflow flex-template run $JOB_NAME_RETRY \
  --project=$PROJECT_ID \
  --region=$REGION \
  --worker-machine-type=n2-highmem-8 \
--template-file-gcs-location="gs://dataflow-templates-${REGION}/latest/flex/Cloud_Datastream_to_Spanner" \
  --parameters \
instanceId="$SPANNER_INSTANCE_NAME",\
databaseId="$SPANNER_DATABASE_NAME",\
projectId="$PROJECT_ID",\
runMode="retryDLQ",\
deadLetterQueueDirectory="$DLQ_DIR_CDC",\
datastreamSourceType="mysql",\
transformationJarPath=$CUSTOM_JAR_PATH,\
transformationClassName="com.custom.CustomTransformationFetcher",\
schemaOverridesFilePath=$GCS_OVERRIDES_PATH,\
shardingContextFilePath=$GCS_LIVE_SHARDING_PATH
Key Parameter Changes for Retry
runMode="retryDLQ": Tells the template to read from thesevereDLQ directory.- Removed
gcsPubSubSubscription: Not needed as we are not reading from the live Datastream GCS bucket.
Monitor the Retry Process:
Like the main CDC pipeline, retryDLQ is a streaming pipeline that will remain RUNNING till manually cancelled.
- Go to the Dataflow Job page for
$JOB_NAME_RETRY. - Under the Metrics pane, look for these two counters:
elementsReconsumedFromDeadLetterQueue: Evaluates when the error files are being fetched.Successful events: Increments when the record is written into Spanner.- Check the
severe/directory for recurring failures. - Once Successful events has incremented by the number of items you wanted to retry (1 in our test case), go to the next verification step.
C. Verify the Retried Data
After the failed record is retried (might take some time to succeed), check Spanner to see if the child row was migrated successfully:
gcloud spanner databases execute-sql $SPANNER_DATABASE_NAME \
    --instance=$SPANNER_INSTANCE_NAME \
    --sql="SELECT CustomerId, OrderId, OrderValue, OrderSource FROM Orders WHERE CustomerId = 99999 AND OrderId = 502"
You should now see the row:
CustomerId: 99999
OrderId: 502
OrderValue: 50
OrderSource: WebStore
Also, check the $DLQ_DIR_CDC/severe/ folder in GCS. The processed files should have been moved or deleted, indicating successful reprocessing.
11. Set Up Reverse Replication (Spanner to MySQL)
To handle scenarios where you might need to rollback or keep the original MySQL database in sync with Spanner for a transitional period, you can set up reverse replication.
This pipeline uses Spanner Change Streams to capture live modifications in Spanner. It then uses our Custom Transformation JAR to reverse-map the schema differences, and our Custom Sharding JAR to calculate exactly which physical MySQL VM and logical shard the update should be written back to.
1. Create a Spanner Change Stream
First, you need to create a change stream in your Spanner database to track changes on the Customers and Orders tables.
export CHANGE_STREAM_NAME="CustomersOrdersChangeStream"

gcloud spanner databases ddl update $SPANNER_DATABASE_NAME \
  --instance=$SPANNER_INSTANCE_NAME \
  --ddl="CREATE CHANGE STREAM $CHANGE_STREAM_NAME FOR Customers, Orders"
This change stream will now record all data modifications to the specified tables.
2. Create a Spanner Database for Dataflow Metadata
The Spanner to SourceDB Dataflow template requires a separate Spanner database to store metadata for managing the change stream consumption.
export SPANNER_METADATA_DB_NAME="migration-metadata-db"

gcloud spanner databases create $SPANNER_METADATA_DB_NAME \
  --instance=$SPANNER_INSTANCE_NAME
3. Prepare Cloud SQL Connection Configuration for Dataflow
The Dataflow template needs a JSON file in Cloud Storage containing the connection details for the target Cloud SQL database.
Create a local file named shard_config.json:
cat <<EOF > reverse-sharding.json
[
  {
    "logicalShardId": "shard0_db",
    "host": "${MYSQL_IP_1}",
    "port": "3306",
    "user": "datastream_user",
    "password": "complex_password_123",
    "dbName": "shard0_db"
  },
  {
    "logicalShardId": "shard1_db",
    "host": "${MYSQL_IP_1}",
    "port": "3306",
    "user": "datastream_user",
    "password": "complex_password_123",
    "dbName": "shard1_db"
  },
  {
    "logicalShardId": "shard2_db",
    "host": "${MYSQL_IP_2}",
    "port": "3306",
    "user": "datastream_user",
    "password": "complex_password_123",
    "dbName": "shard2_db"
  },
  {
    "logicalShardId": "shard3_db",
    "host": "${MYSQL_IP_2}",
    "port": "3306",
    "user": "datastream_user",
    "password": "complex_password_123",
    "dbName": "shard3_db"
  }
]
EOF
Upload this file to your GCS bucket:
export GCS_REVERSE_SHARDING_PATH="gs://${BUCKET_NAME}/config/reverse-sharding.json"
gcloud storage cp reverse-sharding.json $GCS_REVERSE_SHARDING_PATH
4. Run the Reverse Replication Dataflow Job
Launch the Dataflow job using the Spanner_to_SourceDb Flex Template.
export JOB_NAME_REVERSE="spanner-sharded-reverse-to-mysql-$(date +%Y%m%d-%H%M%S)"
export DLQ_DIR_REVERSE="gs://${BUCKET_NAME}/reverse-replication"

gcloud dataflow flex-template run $JOB_NAME_REVERSE \
  --project=$PROJECT_ID \
  --region=$REGION \
--worker-machine-type=n2-highmem-8 \
--max-workers=2 \
--num-workers=1 \
--additional-experiments=use_runner_v2 \
--template-file-gcs-location="gs://dataflow-templates-${REGION}/latest/flex/Spanner_to_SourceDb" \
  --parameters \
changeStreamName="$CHANGE_STREAM_NAME",\
instanceId="$SPANNER_INSTANCE_NAME",\
databaseId="$SPANNER_DATABASE_NAME",\
spannerProjectId="$PROJECT_ID",\
metadataInstance="$SPANNER_INSTANCE_NAME",\
metadataDatabase="$SPANNER_METADATA_DB_NAME",\
sourceShardsFilePath="$GCS_REVERSE_SHARDING_PATH",\
transformationJarPath=$CUSTOM_JAR_PATH,\
transformationClassName="com.custom.CustomTransformationFetcher",\
shardingCustomJarPath=$CUSTOM_JAR_PATH,\
shardingCustomClassName="com.custom.CustomShardIdFetcher",\
schemaOverridesFilePath=$GCS_OVERRIDES_PATH,\
deadLetterQueueDirectory=$DLQ_DIR_REVERSE
Key Parameters
changeStreamName: The name of the Spanner change stream to read from.metadataInstance, metadataDatabase: The Spanner instance/database to store the metadata used by the connector to control the consumption of the change stream API data.sourceShardsFilePath: The GCS path to yourshard_config.json.filtrationMode: Specifies how to drop certain records based on a criteria. Defaults toforward_migration(filter records written using the forward migration pipeline)shardingCustomJarPath: The GCS path to the compiled Java JAR file we built earlier.shardingCustomClassName: The fully qualified class name (com.custom.CustomShardIdFetcher) that executes our custom%4modulo math to dynamically determine which logical shard should receive the record.
Network Note: The Dataflow workers will connect to the Cloud SQL instance using the Public IP specified in shard_config.json. This connection is permitted due to the 0.0.0.0/0 entry in the Cloud SQL instance's Authorized Networks.
Monitor the job startup in the Dataflow Jobs Console.
5. Inject Spanner Data and Trigger Intentional Failures
Wait for the Dataflow job to enter the Running state (this can take ~5 minutes). Then, let's execute a full suite of queries (INSERT, UPDATE, DELETE) directly into Spanner, along with an intentional failure to test the reverse DLQ.
Run the following in Cloud Shell:
# All these operations are done on rows mapping to shard0_db for convenience

# Valid INSERT: Insert parent row in Customers
gcloud spanner databases execute-sql $SPANNER_DATABASE_NAME \
    --instance=$SPANNER_INSTANCE_NAME \
    --sql="INSERT INTO Customers (CustomerId, CustomerName, CreditLimit, LoyaltyTier) VALUES (88, 'Reverse Tester', 5000, 'GOLD_TIER')"

# 1. Valid INSERT (Orders): 'WebStore' transformed to 'WebStore_v1'
gcloud spanner databases execute-sql $SPANNER_DATABASE_NAME \
    --instance=$SPANNER_INSTANCE_NAME \
    --sql="INSERT INTO Orders (CustomerId, OrderId, OrderValue, OrderSource) VALUES (88, 9001, 150.00, 'WebStore')"

# 2. Valid UPDATE (Orders)
gcloud spanner databases execute-sql $SPANNER_DATABASE_NAME \
    --instance=$SPANNER_INSTANCE_NAME \
    --sql="UPDATE Orders SET OrderValue = 200.00 WHERE CustomerId = 16 AND OrderId = 105 AND OrderSource = 'Partner'"

# 3. Valid DELETE (Orders)
gcloud spanner databases execute-sql $SPANNER_DATABASE_NAME \
    --instance=$SPANNER_INSTANCE_NAME \
    --sql="DELETE FROM Orders WHERE CustomerId = 12 AND OrderId = 104 AND OrderSource = 'WebStore'"

# 4. INVALID Insert- DLQ Test: CreditLimit=500 will fail check constraint of >1000 at source
gcloud spanner databases execute-sql $SPANNER_DATABASE_NAME \
    --instance=$SPANNER_INSTANCE_NAME \
    --sql="INSERT INTO Customers (CustomerId, CustomerName, CreditLimit, LoyaltyTier) VALUES (44, 'DLQ Test Customer', 500, 'GOLD_TIER')"
6. Verify Reverse Replication Data and Inspect the DLQ
Let's confirm that our Custom Sharding JAR successfully routed CustomerId 88 to shard0_db on our first physical VM, and that the Custom Transformation JAR successfully stripped "_TIER" from the region.
A. Verify the Valid Record in MySQL:
SSH into the first physical shard:
gcloud compute ssh mysql-physical-1 --zone=$ZONE
Log into MySQL and query shard0_db:
sudo mysql
USE shard0_db;

-- 1. Verify INSERT: Row migrated with transformed LegacyOrderSystem
SELECT CustomerId, OrderId, OrderValue, LegacyOrderSystem
FROM Orders
WHERE CustomerId = 88 AND OrderId = 9001;

-- 2. Verify UPDATE: The OrderValue should now be updated to 200.00.
SELECT CustomerId, OrderId, OrderValue, LegacyOrderSystem
FROM Orders
WHERE CustomerId = 16 AND OrderId = 105;

-- 3. Verify DELETE: Returns 0 rows, confirming the order was successfully deleted from MySQL.
SELECT CustomerId, OrderId
FROM Orders
WHERE CustomerId = 12 AND OrderId = 104;

-- 4. Verify failed replication - this should be in DLQ as CreditLimit < 1000 and will fail stricter check constraint at source
SELECT CustomerId, CustomerName, CreditLimit, LegacyRegion
FROM Customers
WHERE CustomerId = 44;

EXIT;
Expected output in Cloud SQL should reflect the changes made in Spanner.
+------------+---------+------------+-------------------+
| CustomerId | OrderId | OrderValue | LegacyOrderSystem |
+------------+---------+------------+-------------------+
|         88 |    9001 |     150.00 | Webstore_v1       |
+------------+---------+------------+-------------------+

+------------+---------+------------+-------------------+
| CustomerId | OrderId | OrderValue | LegacyOrderSystem |
+------------+---------+------------+-------------------+
|         16 |     105 |     200.00 | Partner_v1        |
+------------+---------+------------+-------------------+

Empty set (0.00 sec)
Empty set (0.00 sec)
Type
exit
to return to Cloud Shell.
This confirms that the reverse replication pipeline is functioning, synchronizing changes from Spanner back to Cloud SQL.
B. Check the Intentional Failure in the DLQ
Because our new Customers record has a CreditLimit of 500 (which violates the strict > 1000 check constraint we defined in our source MySQL database), Dataflow safely caught the error.
- Navigate to Cloud Storage in the Google Cloud Console.
- Go to your bucket and open the
dlq/severe/folder. - Open the JSON file to see the rejected
Customersrecord and the exact check constraint violation error. - Reverse Replication DLQ errors can be retried by running the dataflow template with
runMode=retryDLQset.
12. Clean Up Resources
To avoid incurring further charges to your Google Cloud account, delete the resources created during this codelab.
Set Environment Variables (if needed)
If your Cloud Shell session timed out or you opened a new terminal, you will need to re-export your environment variables before running the cleanup commands.
export PROJECT_ID=$(gcloud config get-value project)
export REGION="us-central1" # Or your preferred region
export ZONE="us-central1-a" # Or a zone within your selected region
export SPANNER_INSTANCE_NAME="target-spanner-instance"
export SPANNER_DATABASE_NAME="sharded-target-db"
export SPANNER_CONFIG="regional-${REGION}"
export BUCKET_NAME="migration-${PROJECT_ID}-bucket"
export MYSQL_IP_1=$(gcloud compute instances describe mysql-physical-1 --zone=$ZONE --format='get(networkInterfaces[0].accessConfigs[0].natIP)')
export MYSQL_IP_2=$(gcloud compute instances describe mysql-physical-2 --zone=$ZONE --format='get(networkInterfaces[0].accessConfigs[0].natIP)')
export SQL_CP_NAME_1="mysql-src-cp-1"
export SQL_CP_NAME_2="mysql-src-cp-2"
export GCS_CP_NAME="gcs-dest-cp"
export STREAM_NAME_1="mysql-to-spanner-stream-1"
export GCS_STREAM_PATH_1="data/${STREAM_NAME_1}"
export STREAM_NAME_2="mysql-to-spanner-stream-2"
export GCS_STREAM_PATH_2="data/${STREAM_NAME_2}"
export PUBSUB_TOPIC="datastream-gcs-updates"
export PUBSUB_SUBSCRIPTION="datastream-gcs-sub"
export CUSTOM_JAR_PATH="gs://${BUCKET_NAME}/custom-logic/spanner-custom-shard-1.0.jar"
export OVERRIDES_FILE="spanner_overrides.json"
export GCS_OVERRIDES_PATH="gs://${BUCKET_NAME}/config/${OVERRIDES_FILE}"
export GCS_SHARDING_PATH="gs://${BUCKET_NAME}/config/sharding.json"
export OUTPUT_DIR="gs://${BUCKET_NAME}/bulk-migration"
export GCS_LIVE_SHARDING_PATH="gs://${BUCKET_NAME}/config/live-sharding.json"
export DLQ_DIR_CDC="gs://${BUCKET_NAME}/live-migration"
export CHANGE_STREAM_NAME="CustomersOrdersChangeStream"
export SPANNER_METADATA_DB_NAME="migration-metadata-db"
export GCS_REVERSE_SHARDING_PATH="gs://${BUCKET_NAME}/config/reverse-sharding.json"
export DLQ_DIR_REVERSE="gs://${BUCKET_NAME}/reverse-replication"
Stop Dataflow Streaming Jobs
List your jobs to find the Job IDs of the running dataflow jobs. Export JOB_ID_CDC and JOB_ID_REVERSE accordingly.
gcloud dataflow jobs list --region=$REGION --filter="state=Running"
export JOB_ID_CDC=<PASTE_JOB_ID_HERE>
export JOB_ID_CDC_RETRY=<PASTE_JOB_ID_HERE>
export JOB_ID_REVERSE=<PASTE_JOB_ID_HERE>
Cancel the Datastream to Spanner (Live Migration) job and its retry job:
gcloud dataflow jobs cancel $JOB_ID_CDC --region=$REGION --project=$PROJECT_ID

gcloud dataflow jobs cancel $JOB_ID_CDC_RETRY --region=$REGION --project=$PROJECT_ID
Cancel the Spanner to Cloud SQL (Reverse Replication) job:
gcloud dataflow jobs cancel $JOB_ID_REVERSE --region=$REGION --project=$PROJECT_ID
Delete Datastream Resources
Stop and Delete the Stream:
gcloud datastream streams update $STREAM_NAME_1 \
  --location=$REGION --state=PAUSED --project=$PROJECT_ID
# Wait a moment for the stream to pause
gcloud datastream streams delete $STREAM_NAME_1 \
  --location=$REGION --project=$PROJECT_ID --quiet

gcloud datastream streams update $STREAM_NAME_2 \
  --location=$REGION --state=PAUSED --project=$PROJECT_ID
# Wait a moment for the stream to pause
gcloud datastream streams delete $STREAM_NAME_2 \
  --location=$REGION --project=$PROJECT_ID --quiet

# Delete Connection Profiles
gcloud datastream connection-profiles delete $SQL_CP_NAME_1 \
  --location=$REGION --project=$PROJECT_ID --quiet
gcloud datastream connection-profiles delete $SQL_CP_NAME_2 \
  --location=$REGION --project=$PROJECT_ID --quiet
gcloud datastream connection-profiles delete $GCS_CP_NAME \
  --location=$REGION --project=$PROJECT_ID --quiet
Delete the Source MySQL VMs (Compute Engine)
Delete the two Compute Engine instances that simulated the on-prem MySQL physical shards.
gcloud compute instances delete mysql-physical-1 mysql-physical-2 --zone=$ZONE --quiet
Delete Firewall Rules
Remove the network firewall rules created to allow SSH access and Datastream connectivity to your VMs. (Note: If you used different names for your firewall rules earlier in the codelab, adjust them here).
gcloud compute firewall-rules delete allow-ssh-iap --quiet
gcloud compute firewall-rules delete allow-mysql-datastream --quiet
Delete Pub/Sub Resources
Delete Subscription:
gcloud pubsub subscriptions delete $PUBSUB_SUBSCRIPTION \
  --project=$PROJECT_ID --quiet
Delete Topic:
gcloud pubsub topics delete $PUBSUB_TOPIC \
  --project=$PROJECT_ID --quiet
Delete Cloud Spanner Instance
Delete the Cloud Spanner instance (this automatically deletes both the sharded-target-db and the migration-metadata-db databases inside it).
gcloud spanner instances delete $SPANNER_INSTANCE_NAME \
  --project=$PROJECT_ID --quiet
Delete GCS Bucket and Contents
Finally, delete the Cloud Storage bucket that holds the Datastream files, Dataflow configs, and Dead Letter Queues. The rm -r command recursively deletes the bucket and all its contents.
gcloud storage rm --recursive gs://${BUCKET_NAME}
Delete Local Cloud Shell Files
To clean up the local files and directories generated in your Cloud Shell during this codelab, run the following commands:
# Remove the JSON configuration files
rm -f sharding.json live-sharding.json reverse-sharding.json spanner_overrides.json

# Remove the cloned Google Cloud DataflowTemplates repository
rm -rf DataflowTemplates