
1. 事前準備
在本程式碼研究室中,您將瞭解如何使用 Credential Manager,在 Android 上實作「使用 Google 帳戶登入」功能。
必要條件
課程內容
- 如何建立 Google Cloud 專案
- 如何在 Google Cloud 控制台中建立 OAuth 用戶端
- 如何使用底部功能表流程導入「使用 Google 帳戶登入」功能
- 如何使用按鈕流程導入「使用 Google 帳戶登入」功能
需求條件
- Android Studio (請前往這個網頁下載)
- 符合 Android Studio 系統需求的電腦
- 符合 Android Emulator 系統需求的電腦
- 安裝 Java 和 Java 開發套件 (JDK)
2. 建立 Android Studio 專案
時間長度 3:00 - 5:00
如要開始使用,請在 Android Studio 中建立新專案:
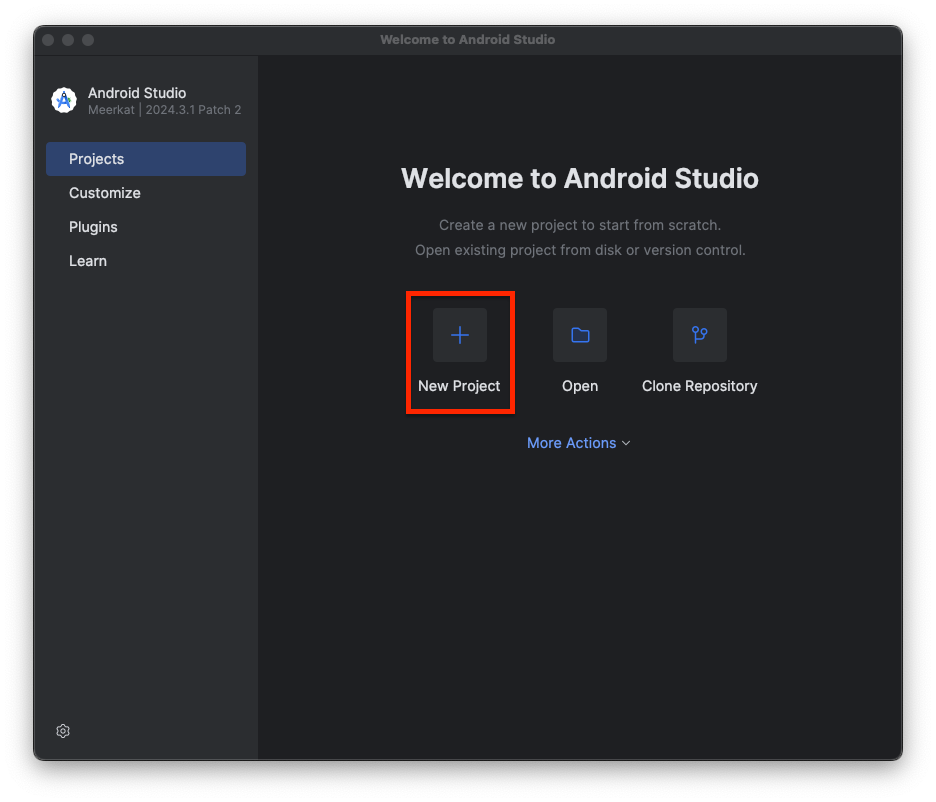
- 開啟 Android Studio
- 按一下「New Project」
- 選取「Phone and Tablet」和「Empty Activity」

- 點選 [下一步]。
- 現在請設定專案的幾個部分:
- 名稱:這是專案的名稱
- 套件名稱:系統會根據專案名稱自動填入
- 「Save location」:預設應為 Android Studio 儲存專案的資料夾。你可以視需要變更。
- 最低 SDK:這是應用程式建構時使用的最低 Android SDK 版本。在本程式碼研究室中,我們將使用 API 36 (Baklava)
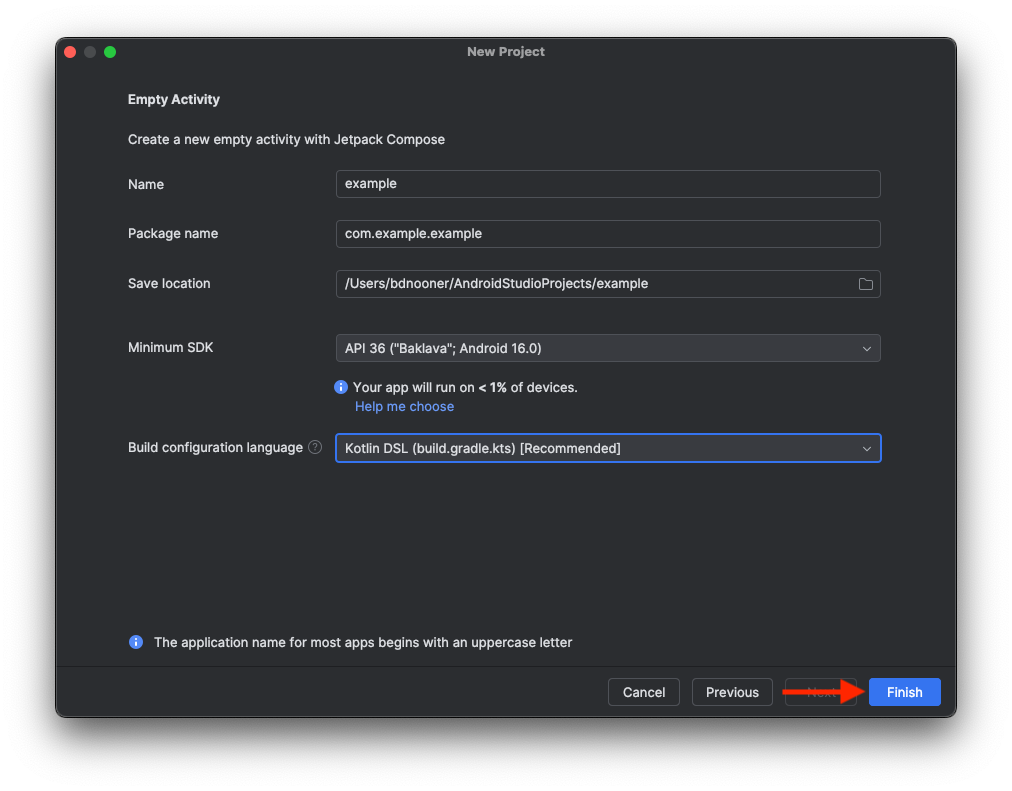
- 按一下「Finish」
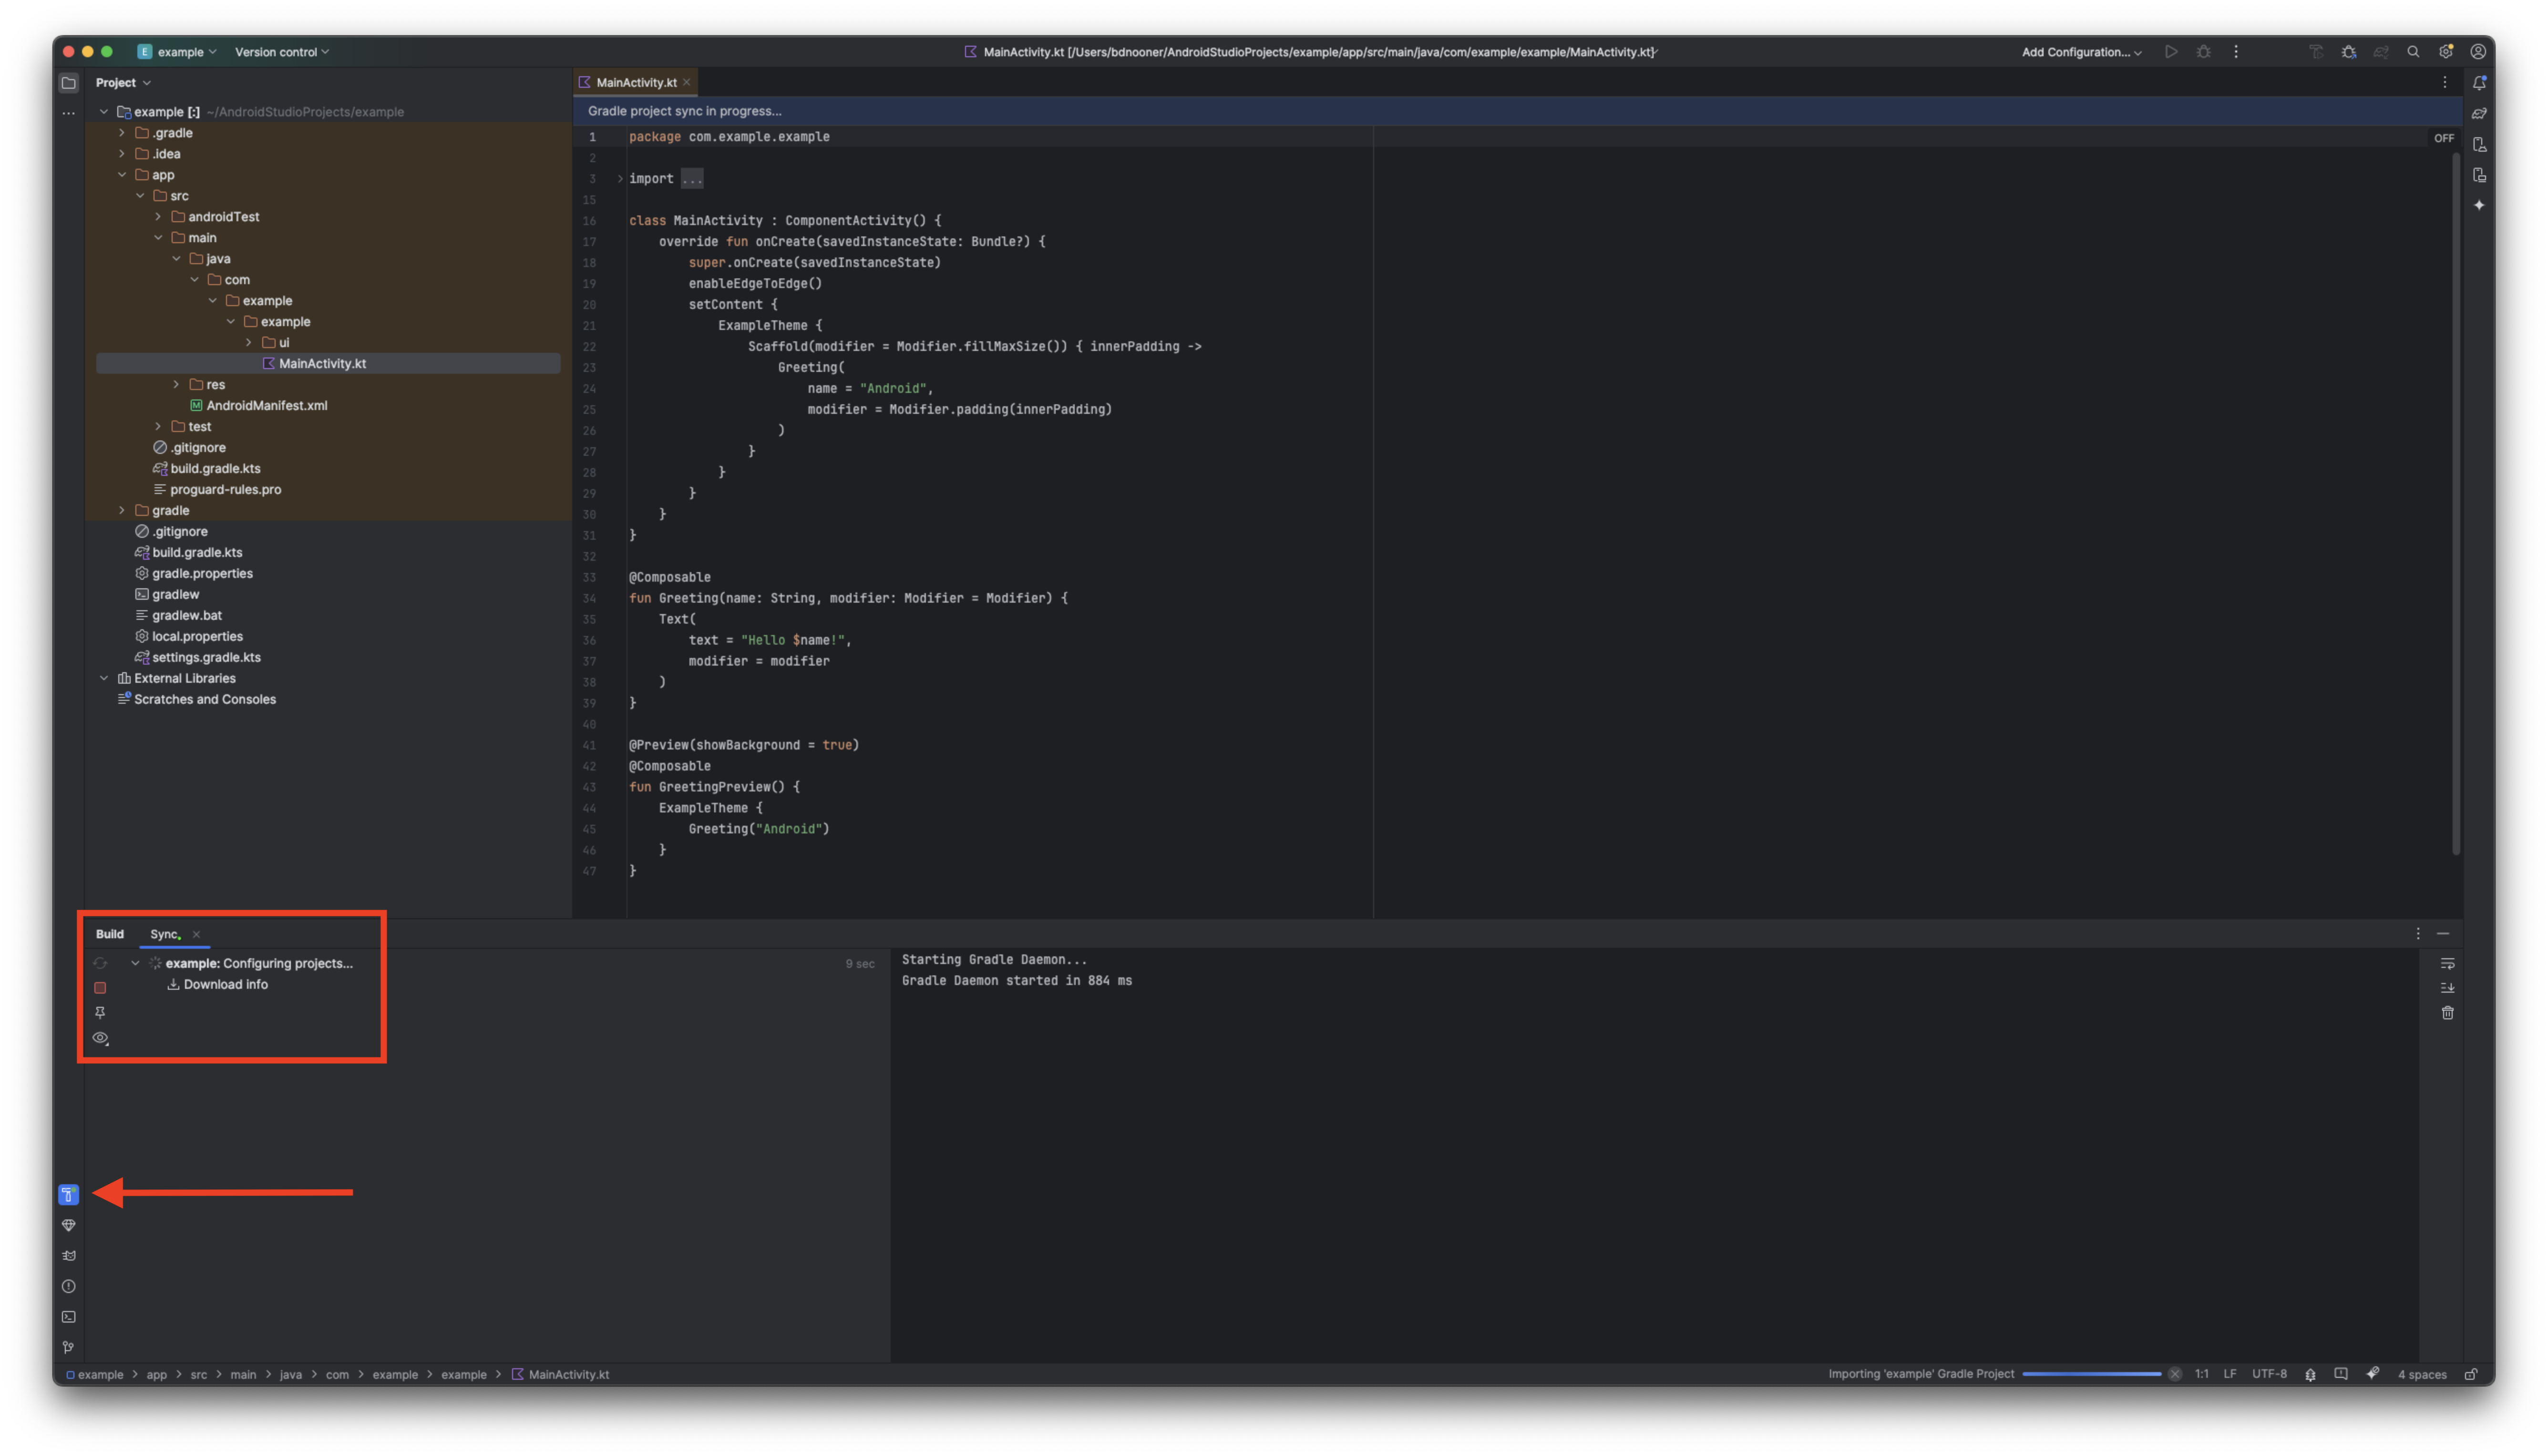
- Android Studio 會建立專案,並下載基本應用程式的所有必要依附元件,這可能需要幾分鐘的時間。如要查看這個過程,只要按一下建構圖示:
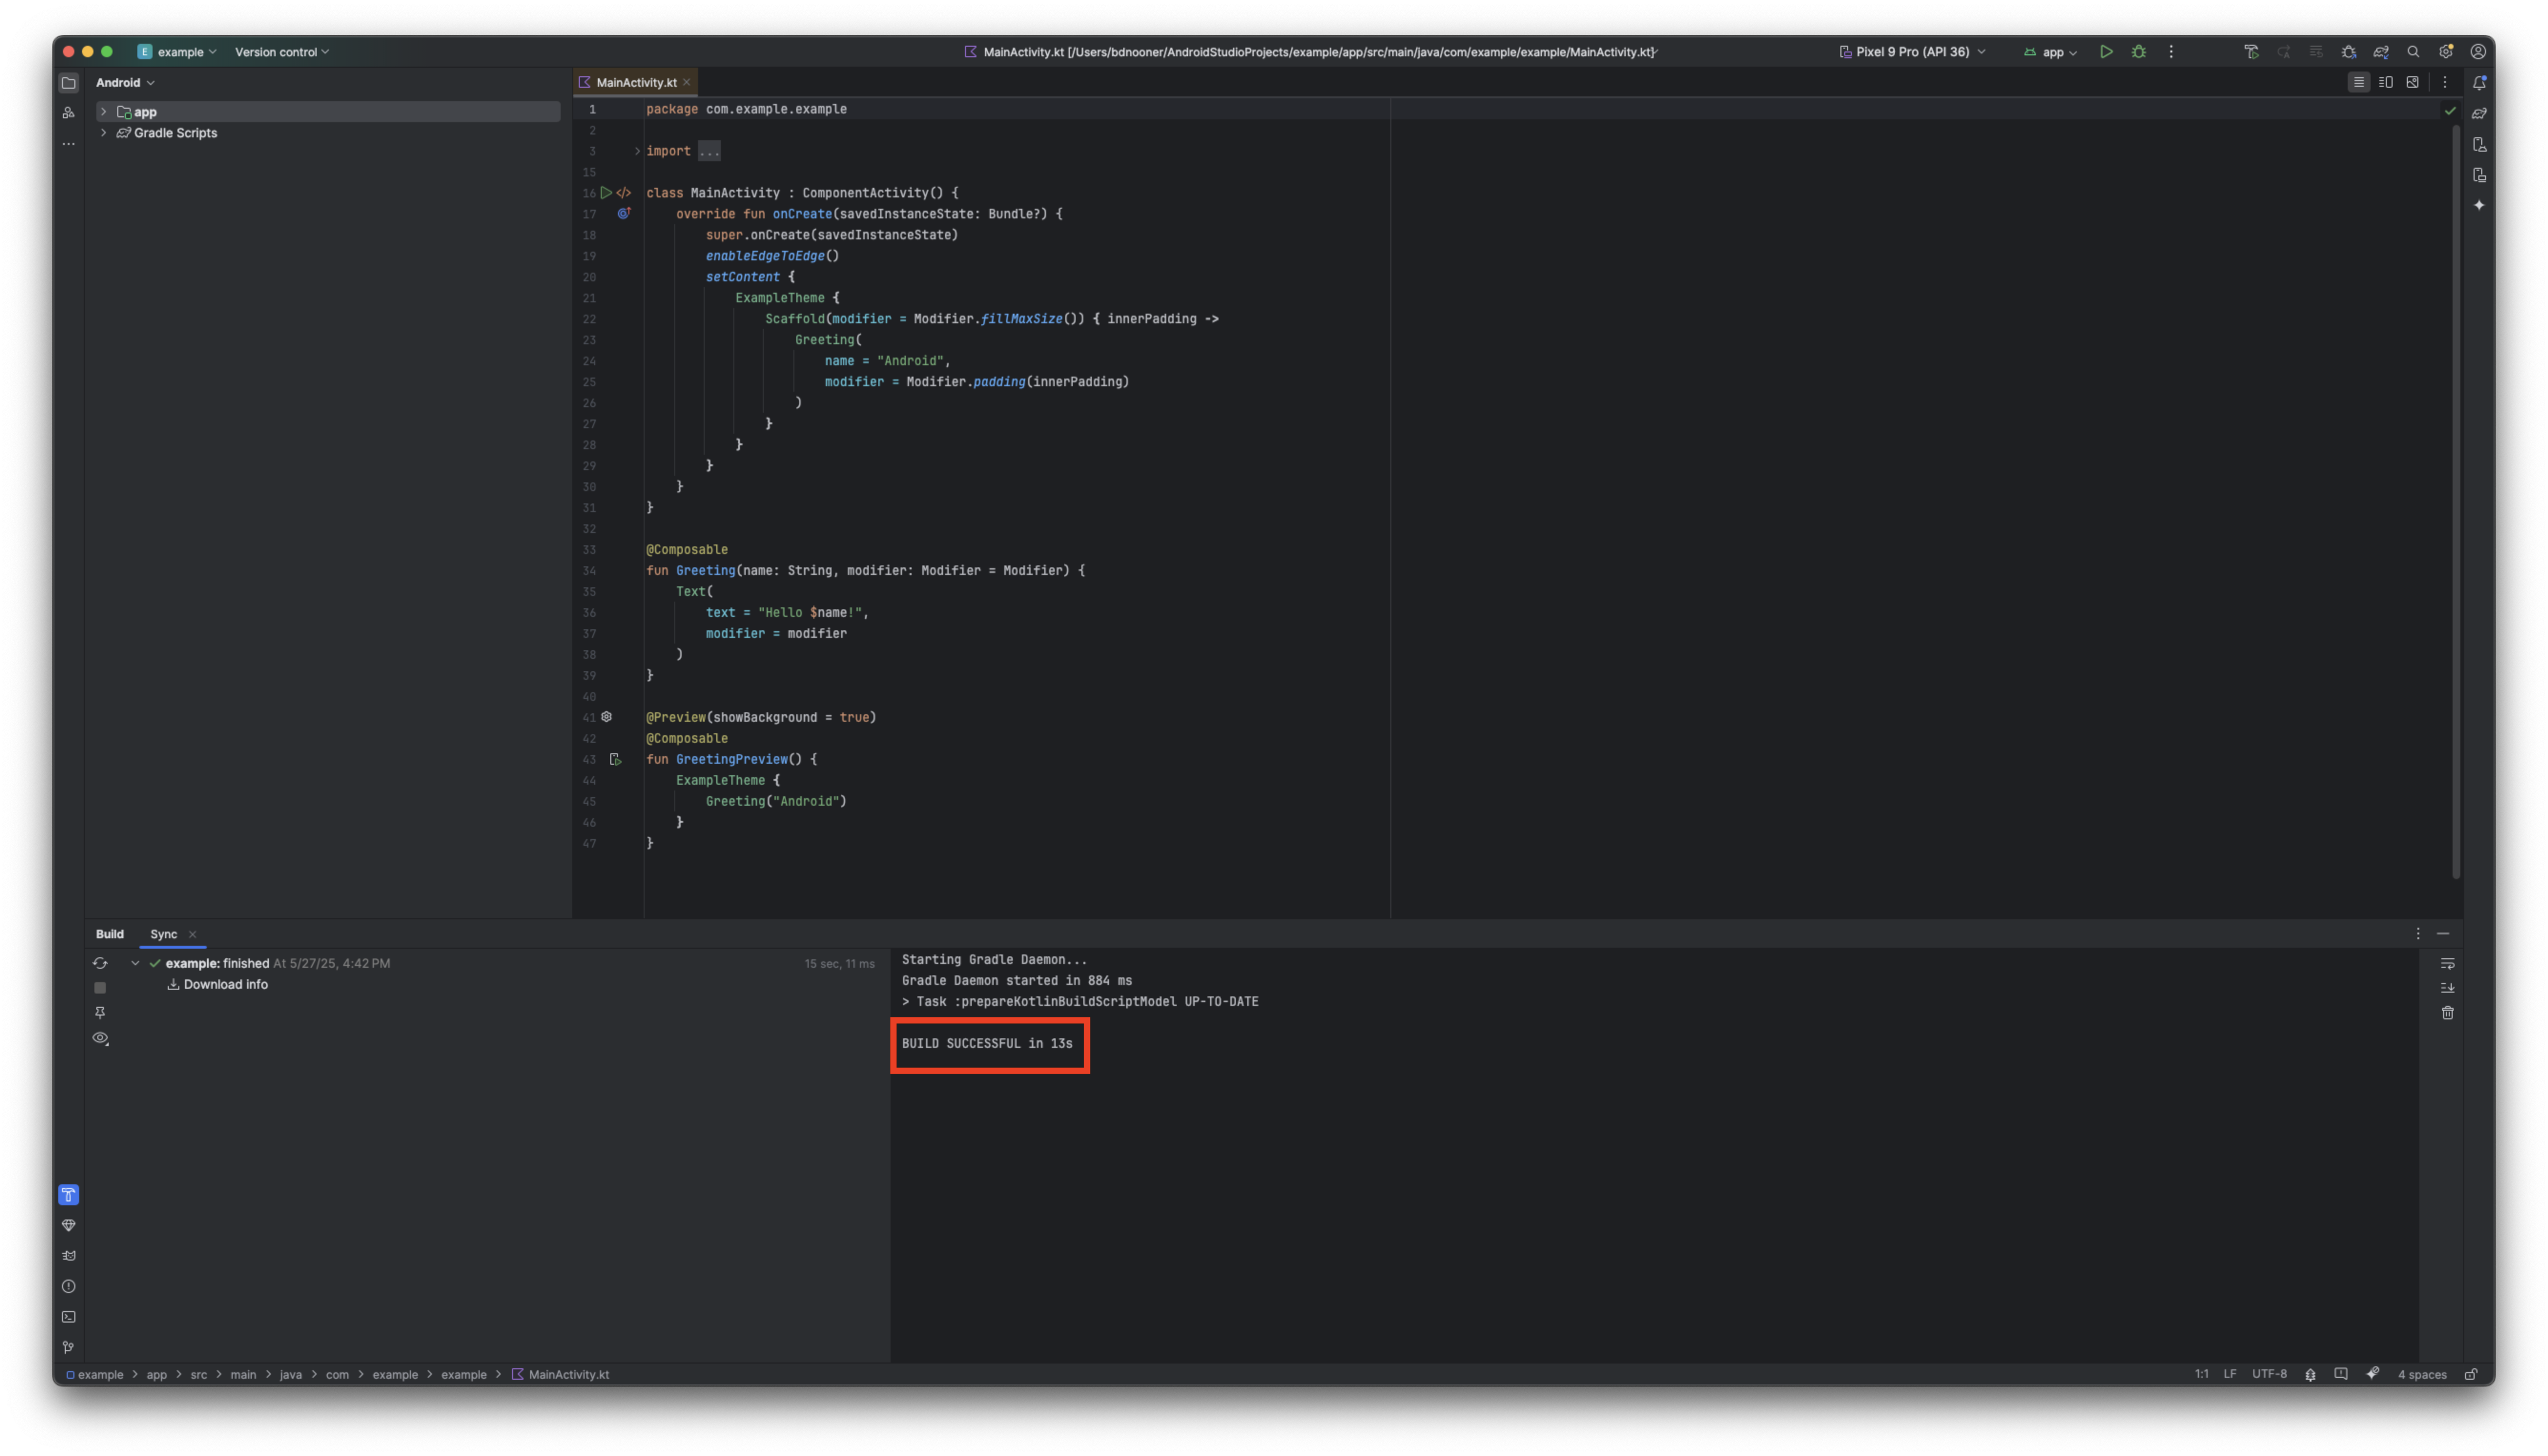
- 完成後,Android Studio 應如下所示:
3. 設定 Google Cloud 專案
建立 Google Cloud 專案
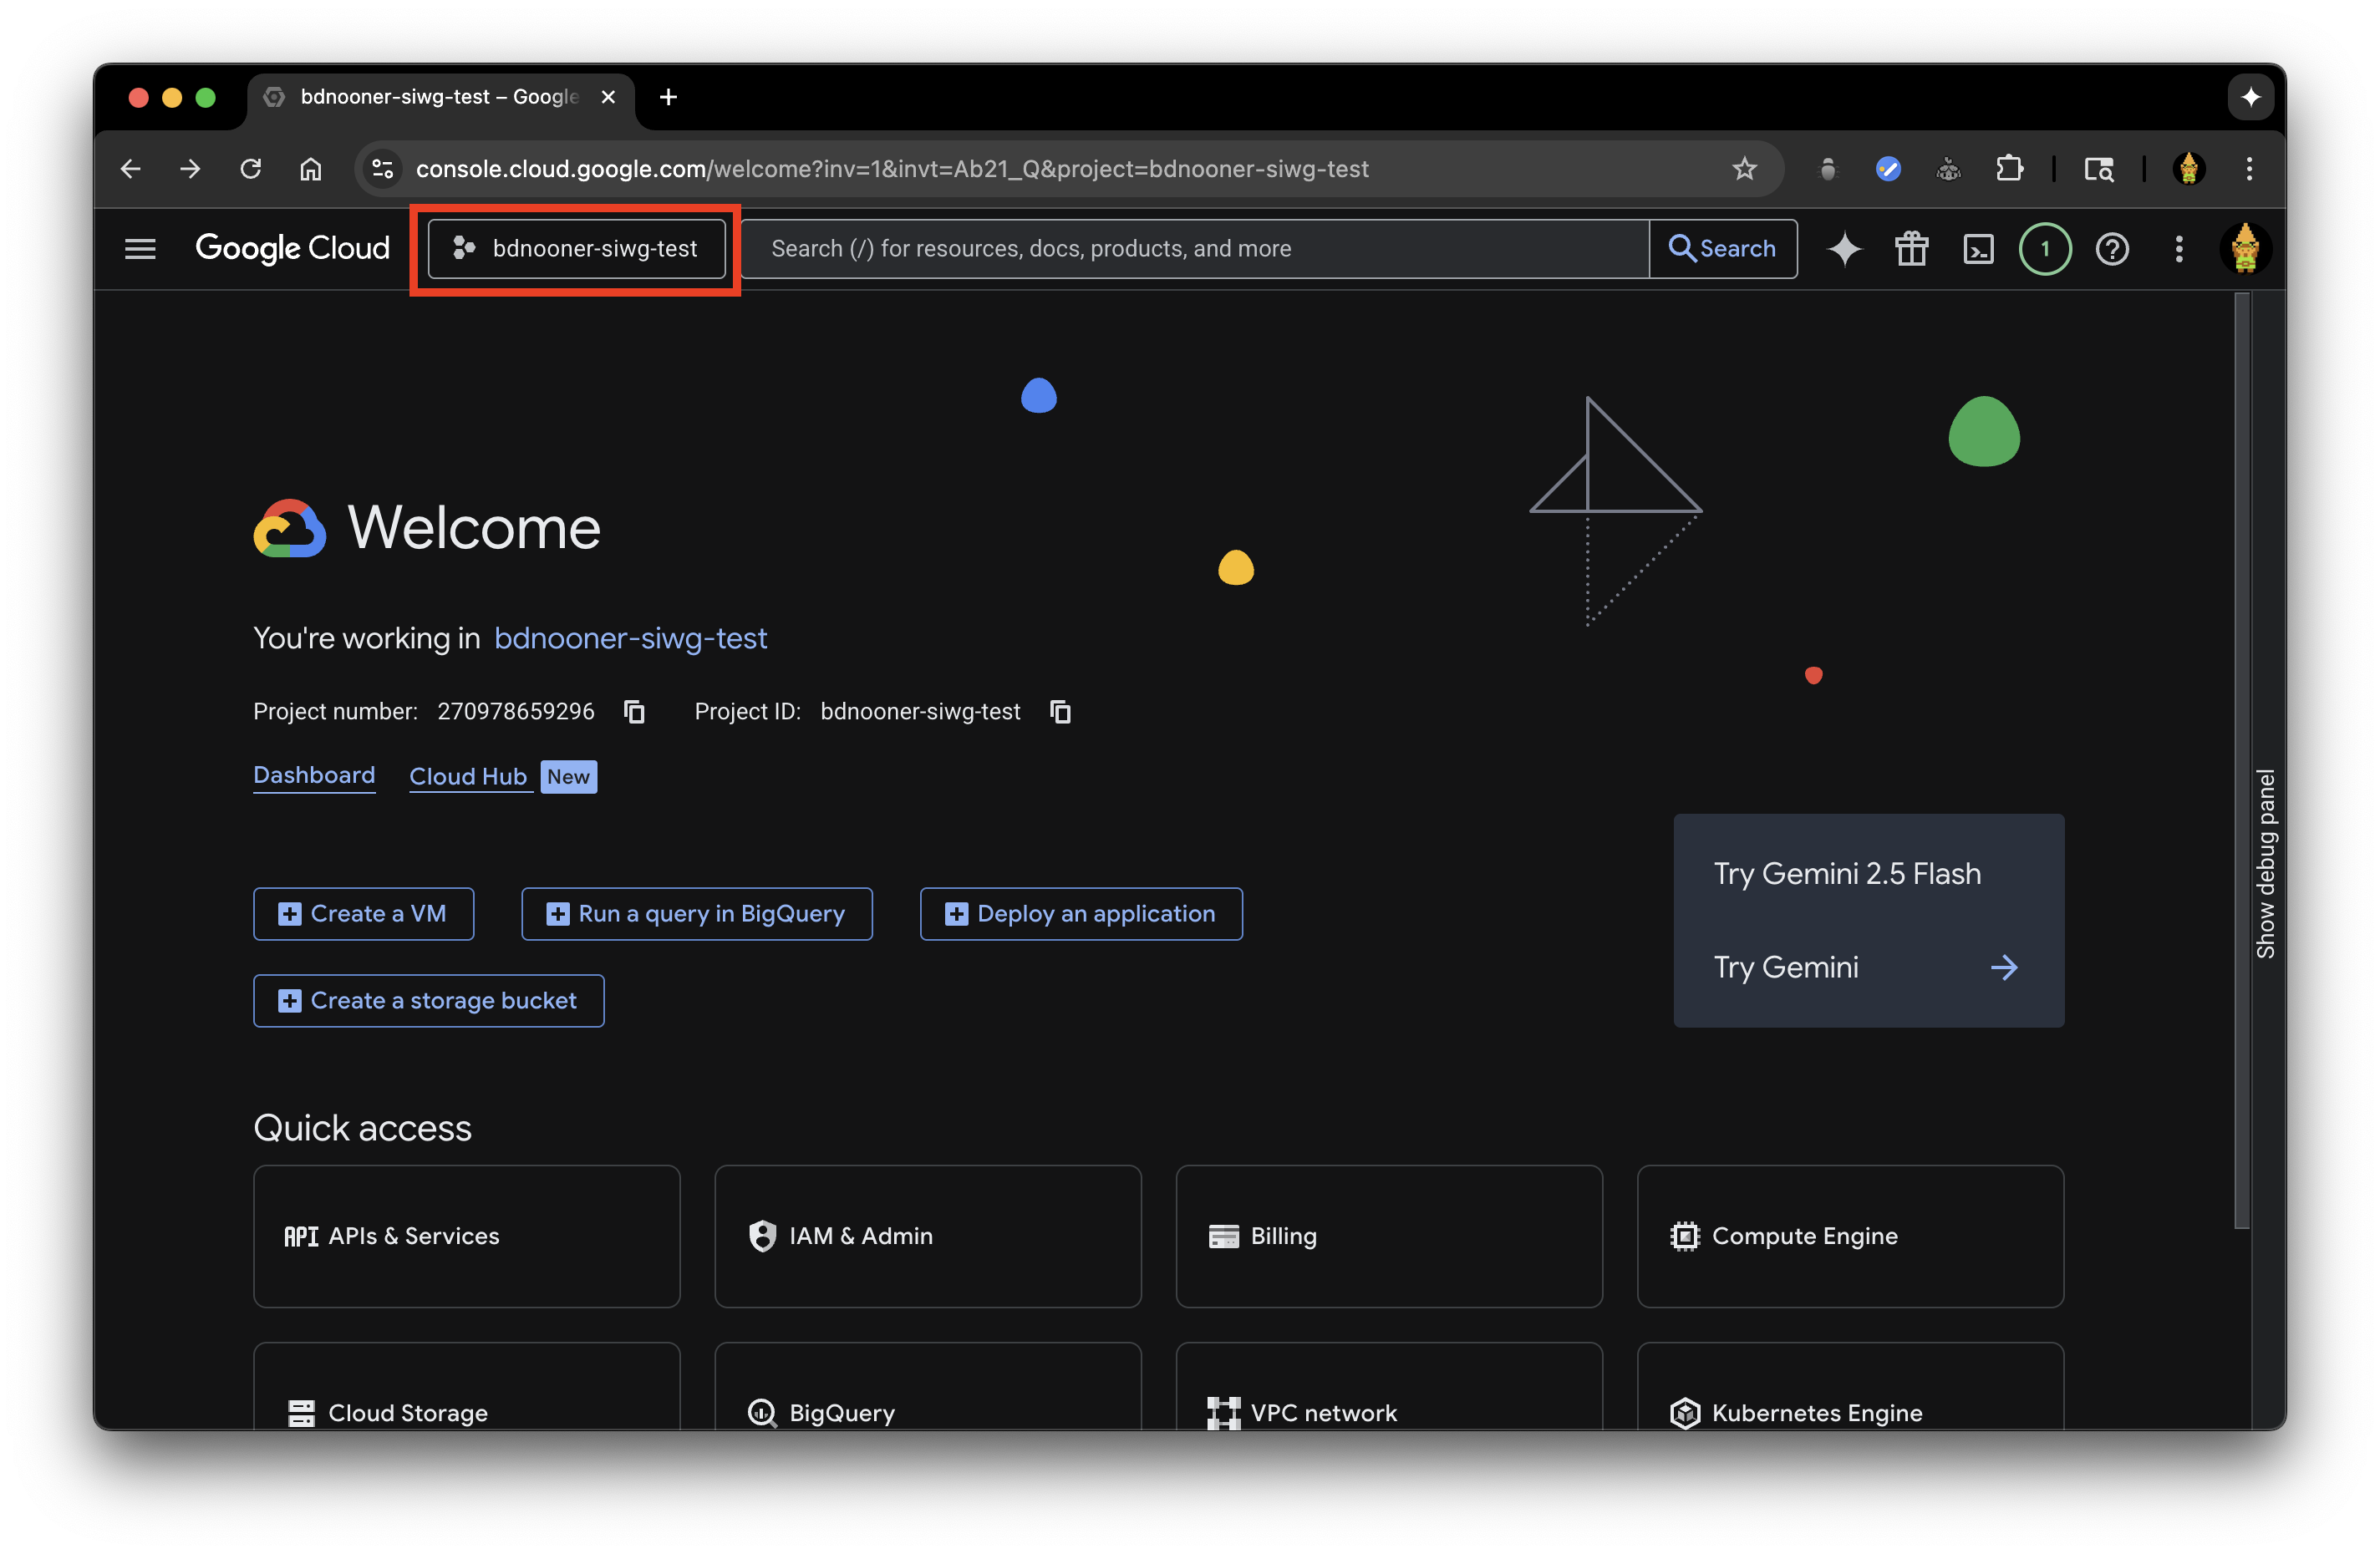
- 前往 Google Cloud 控制台
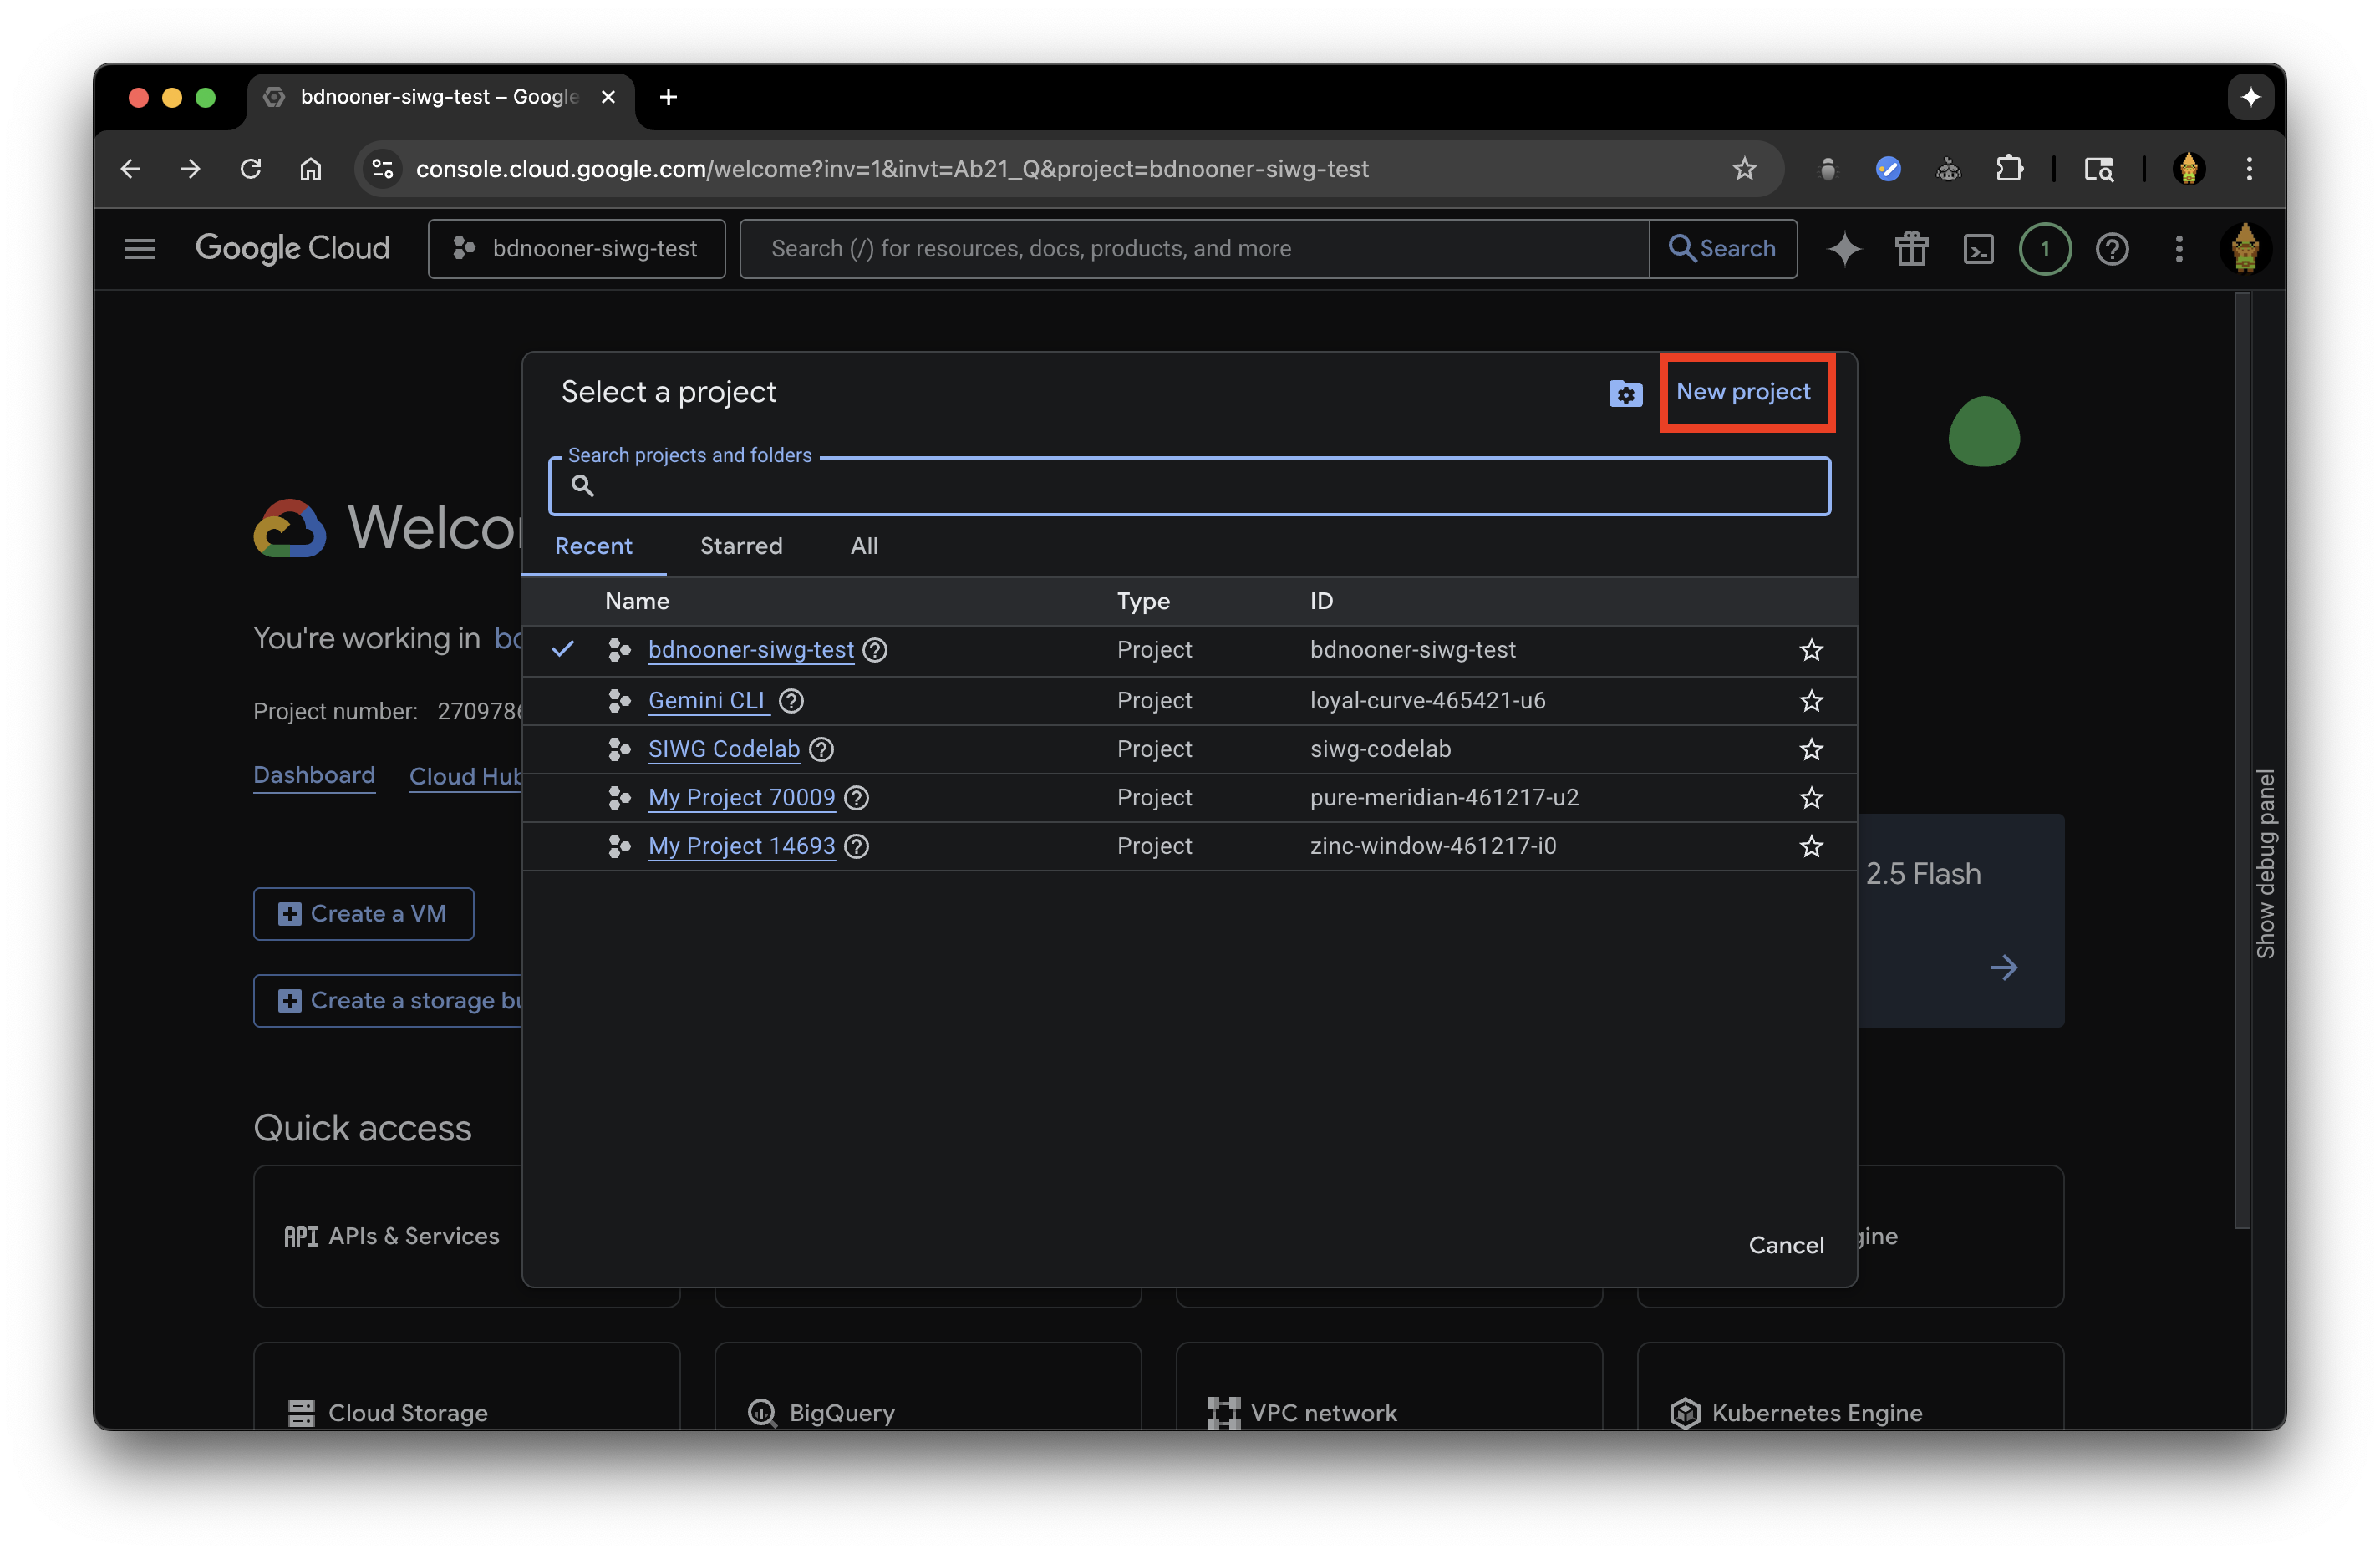
- 開啟專案或建立新專案
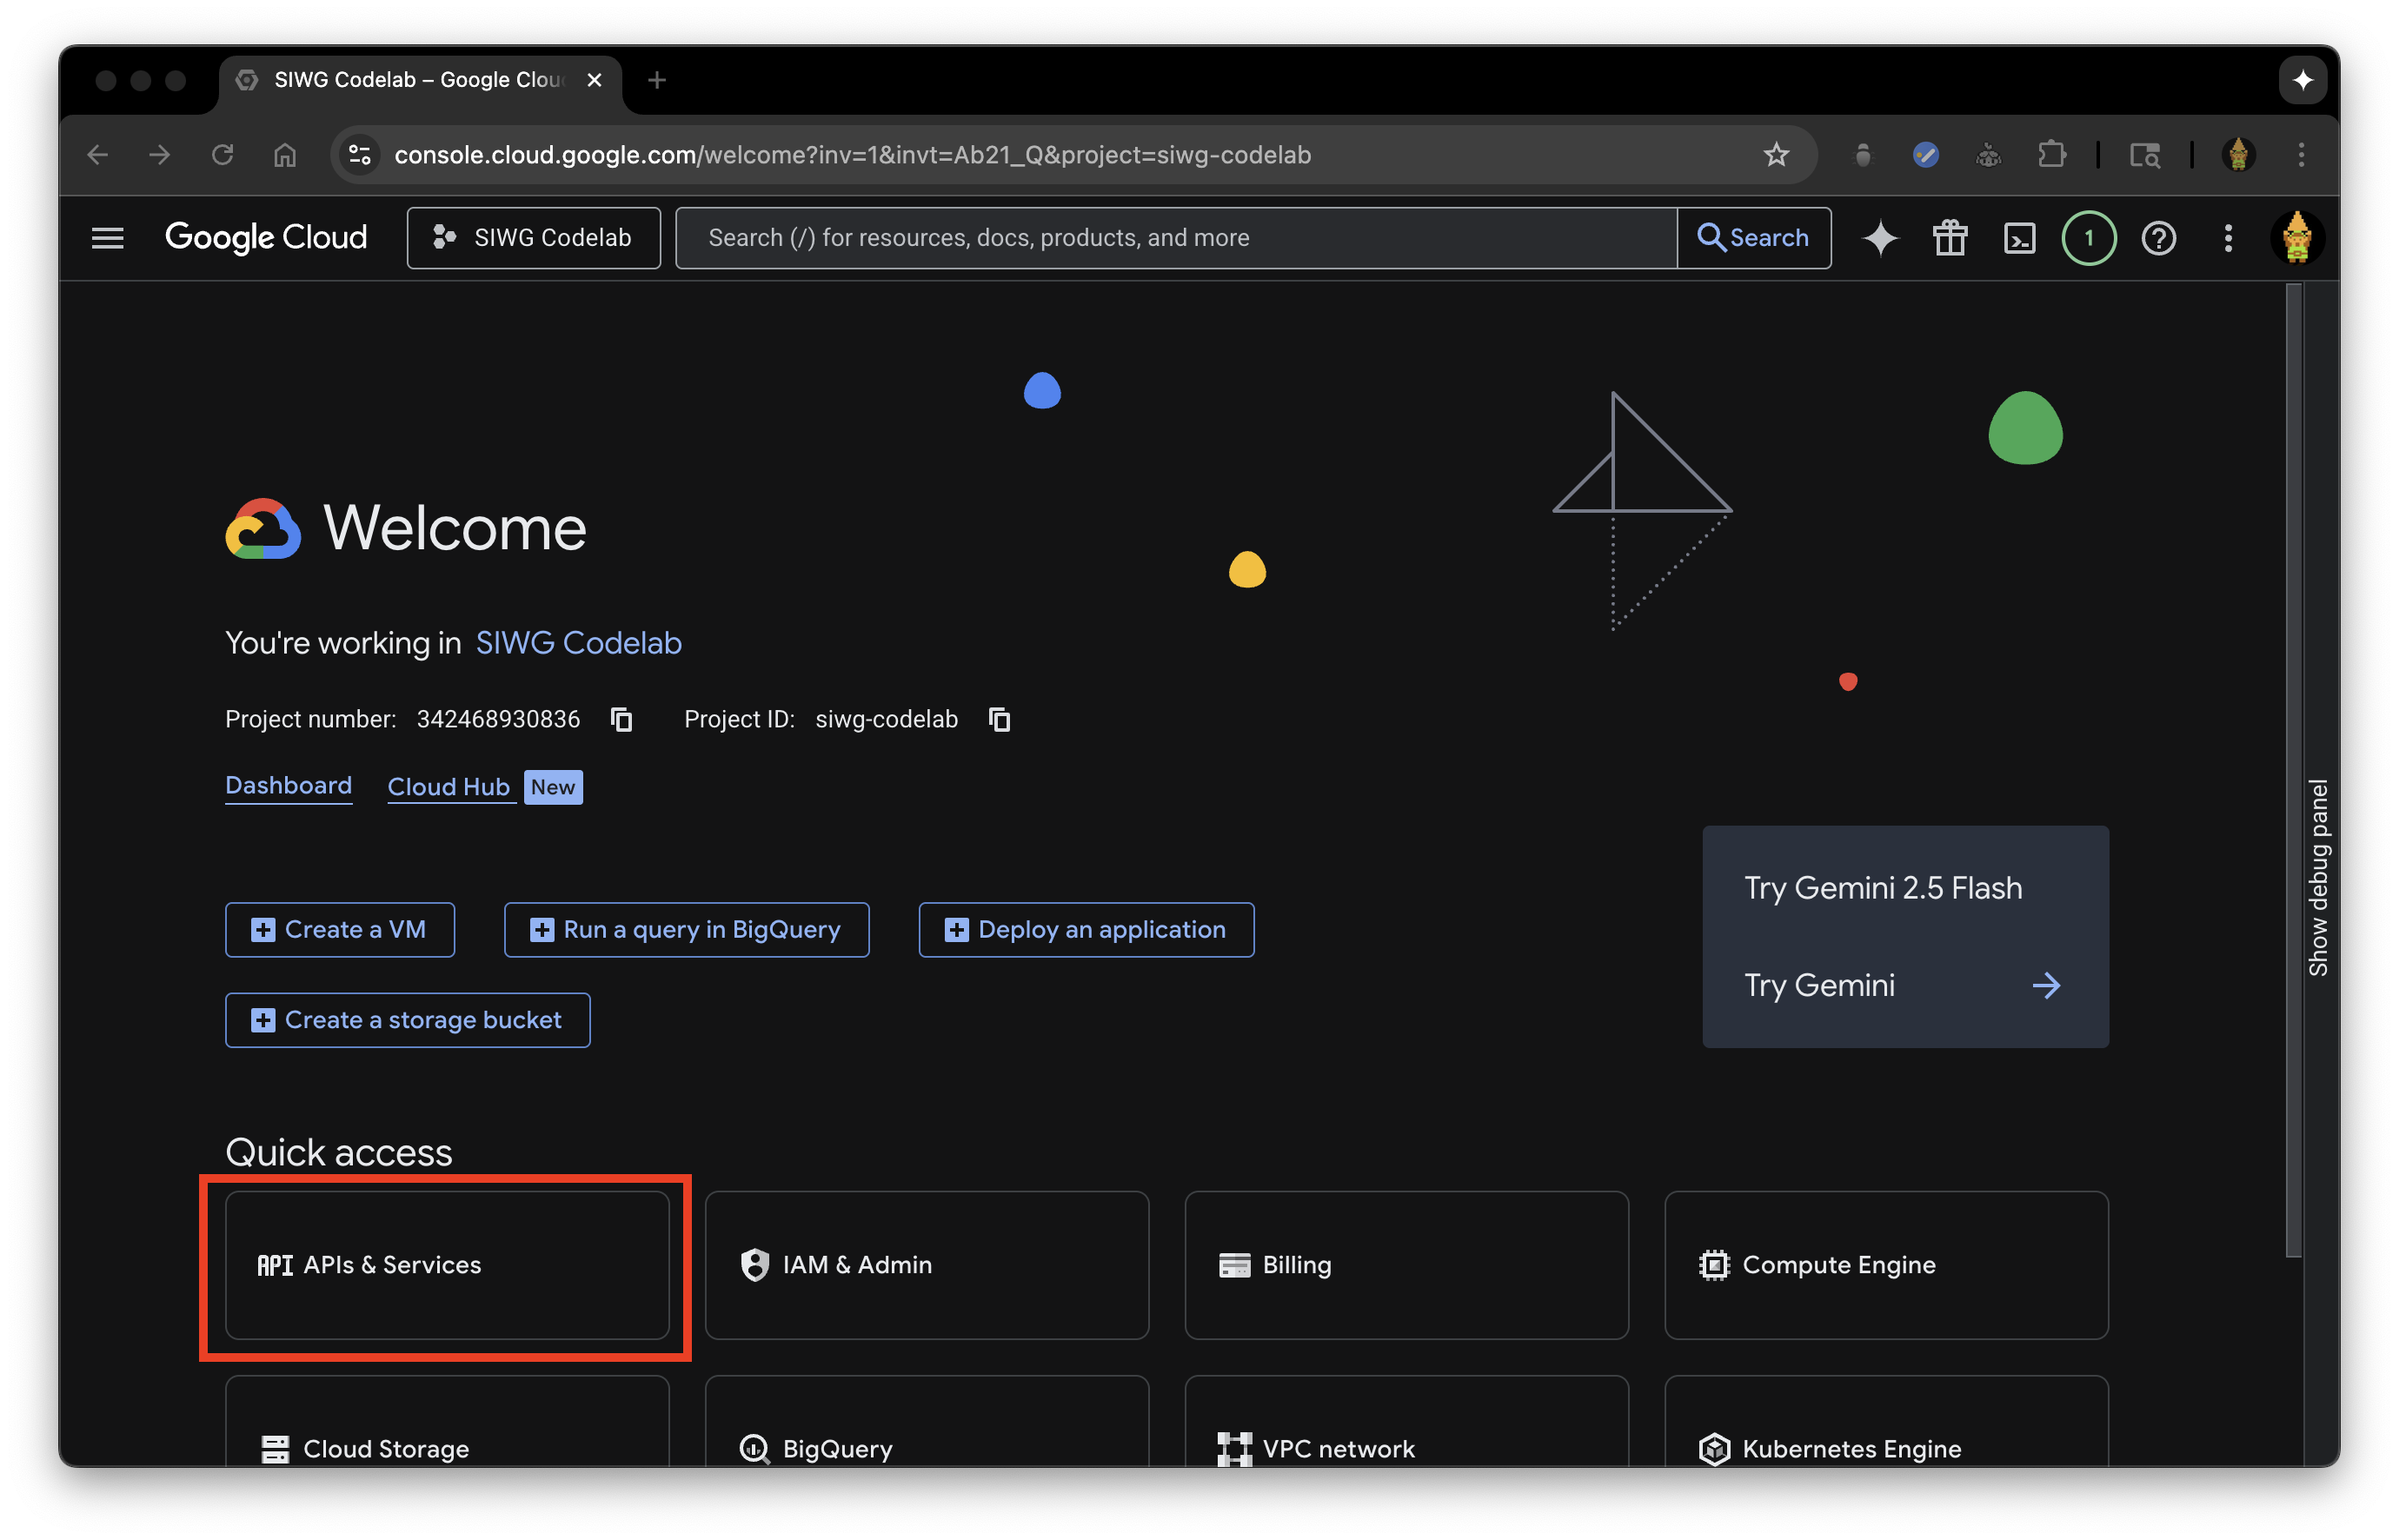
- 按一下「API 和服務」
- 前往 OAuth 同意畫面
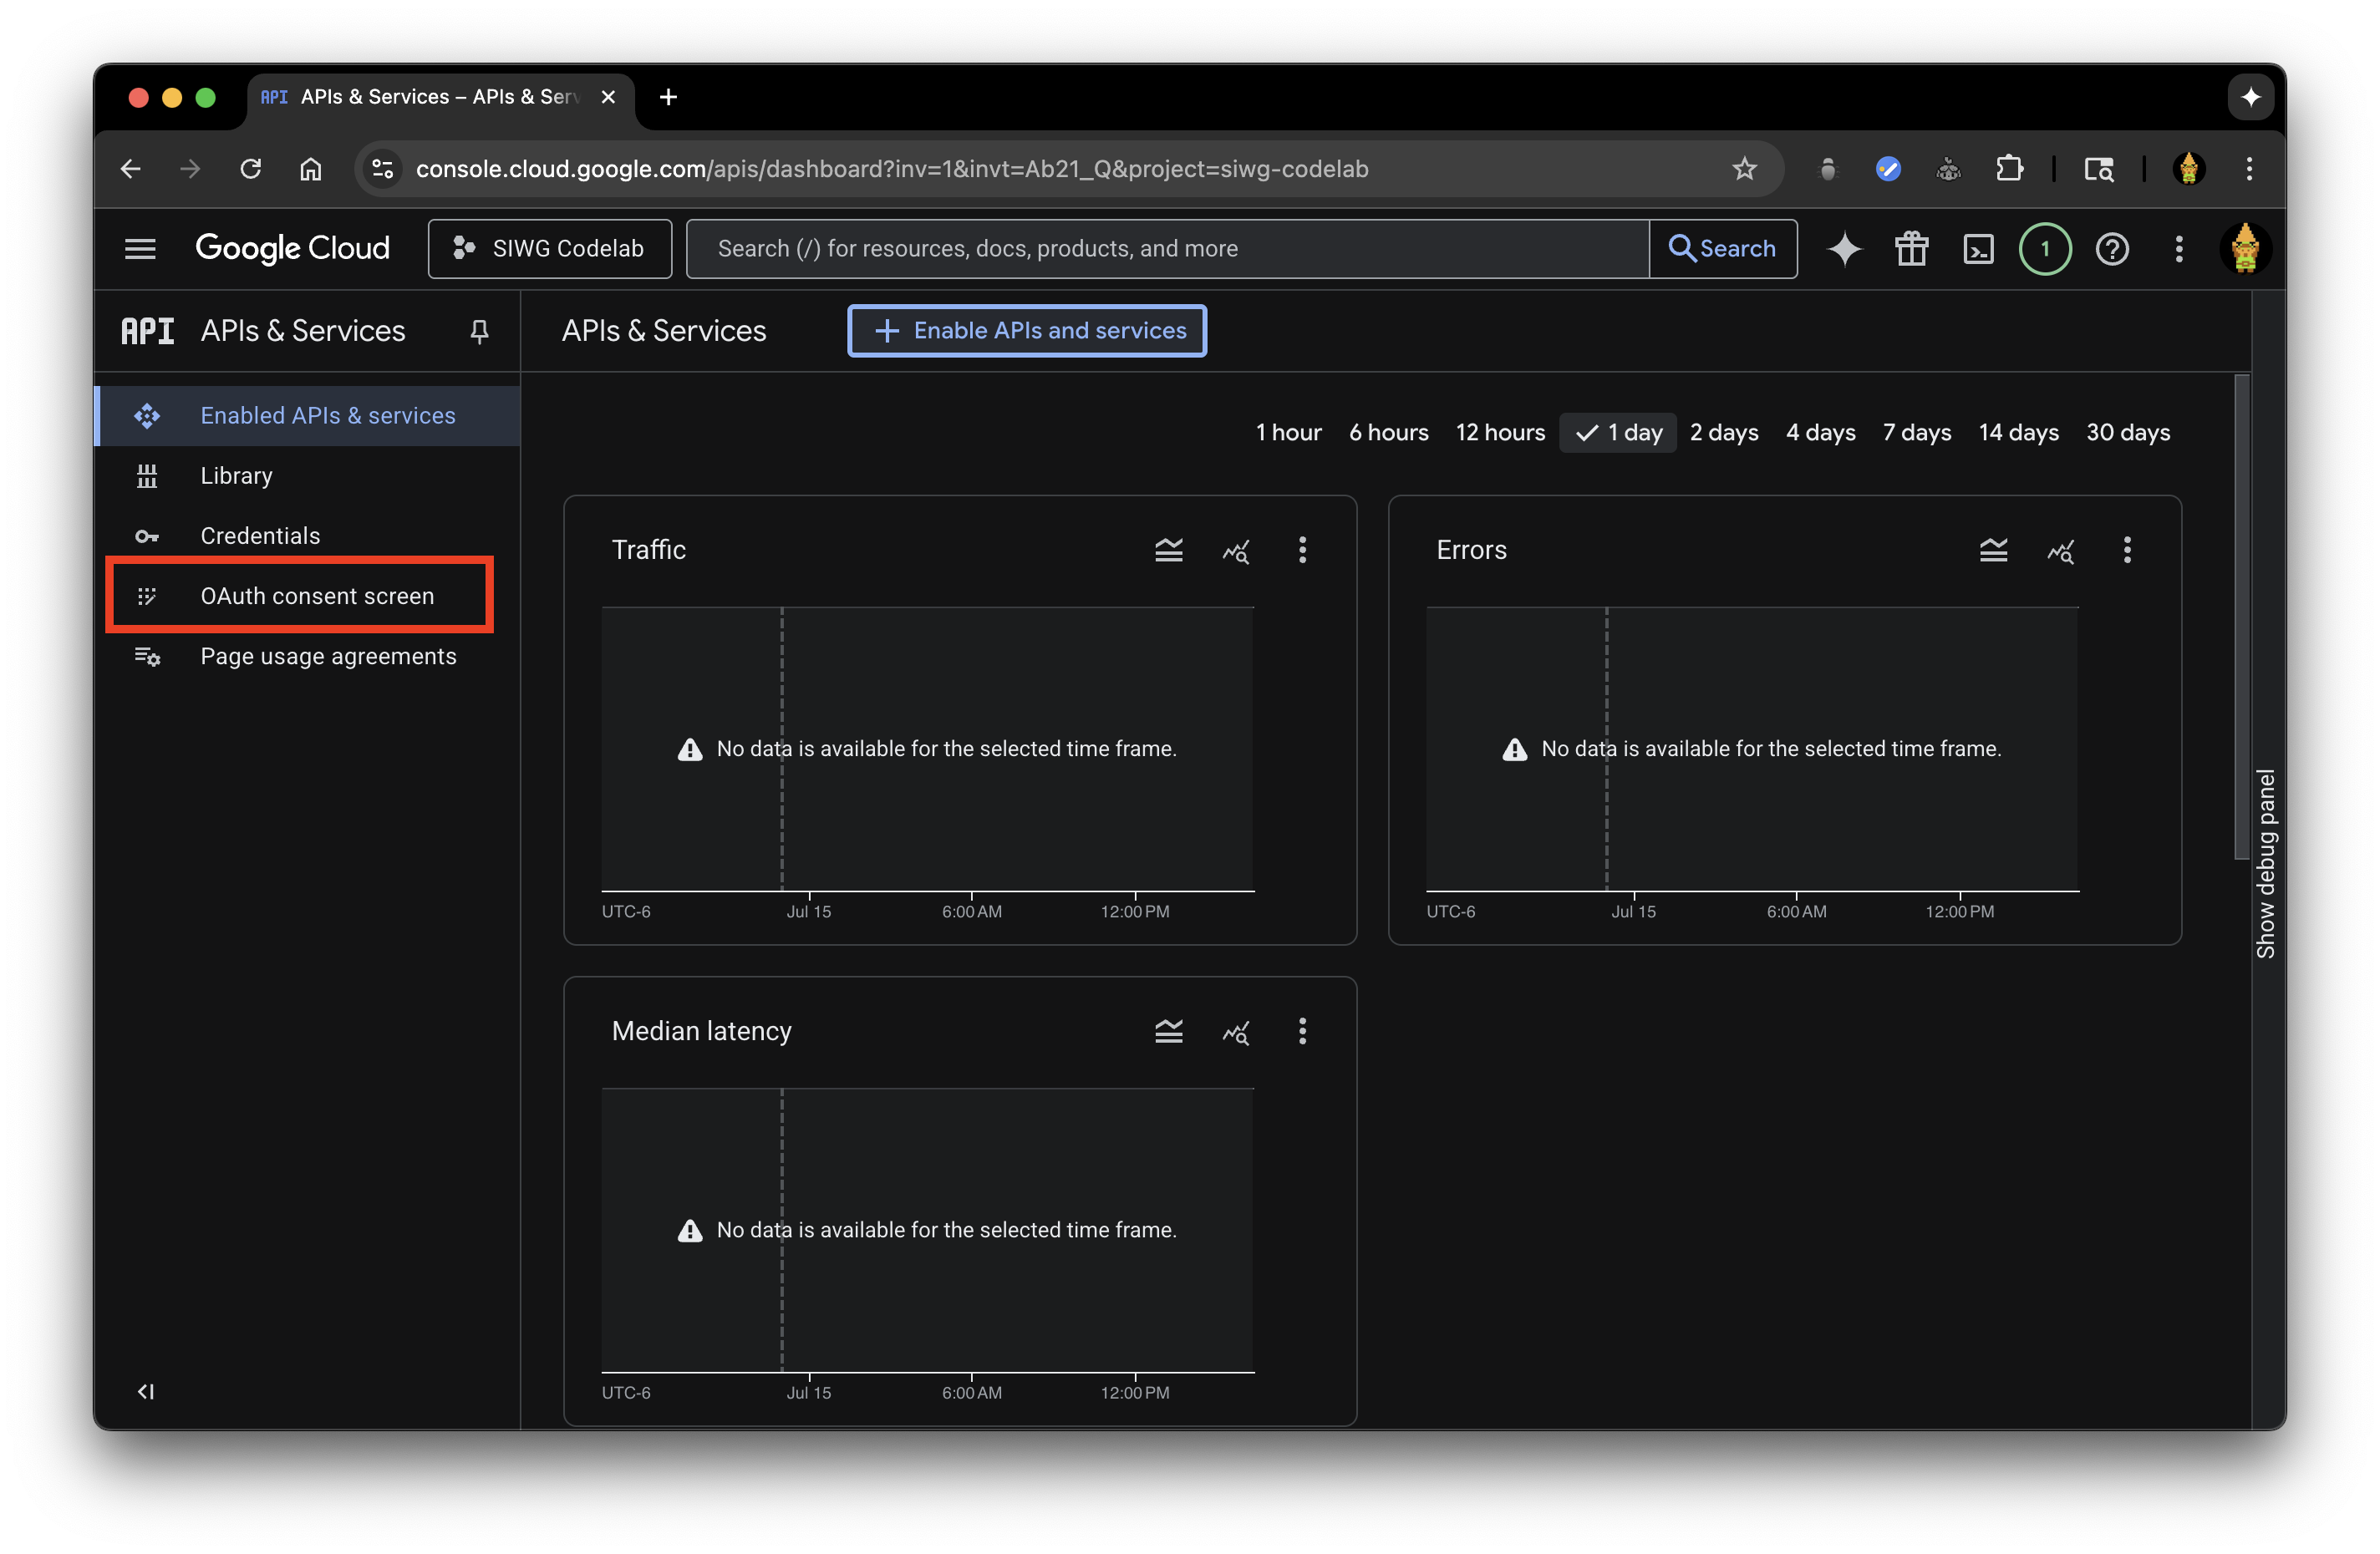
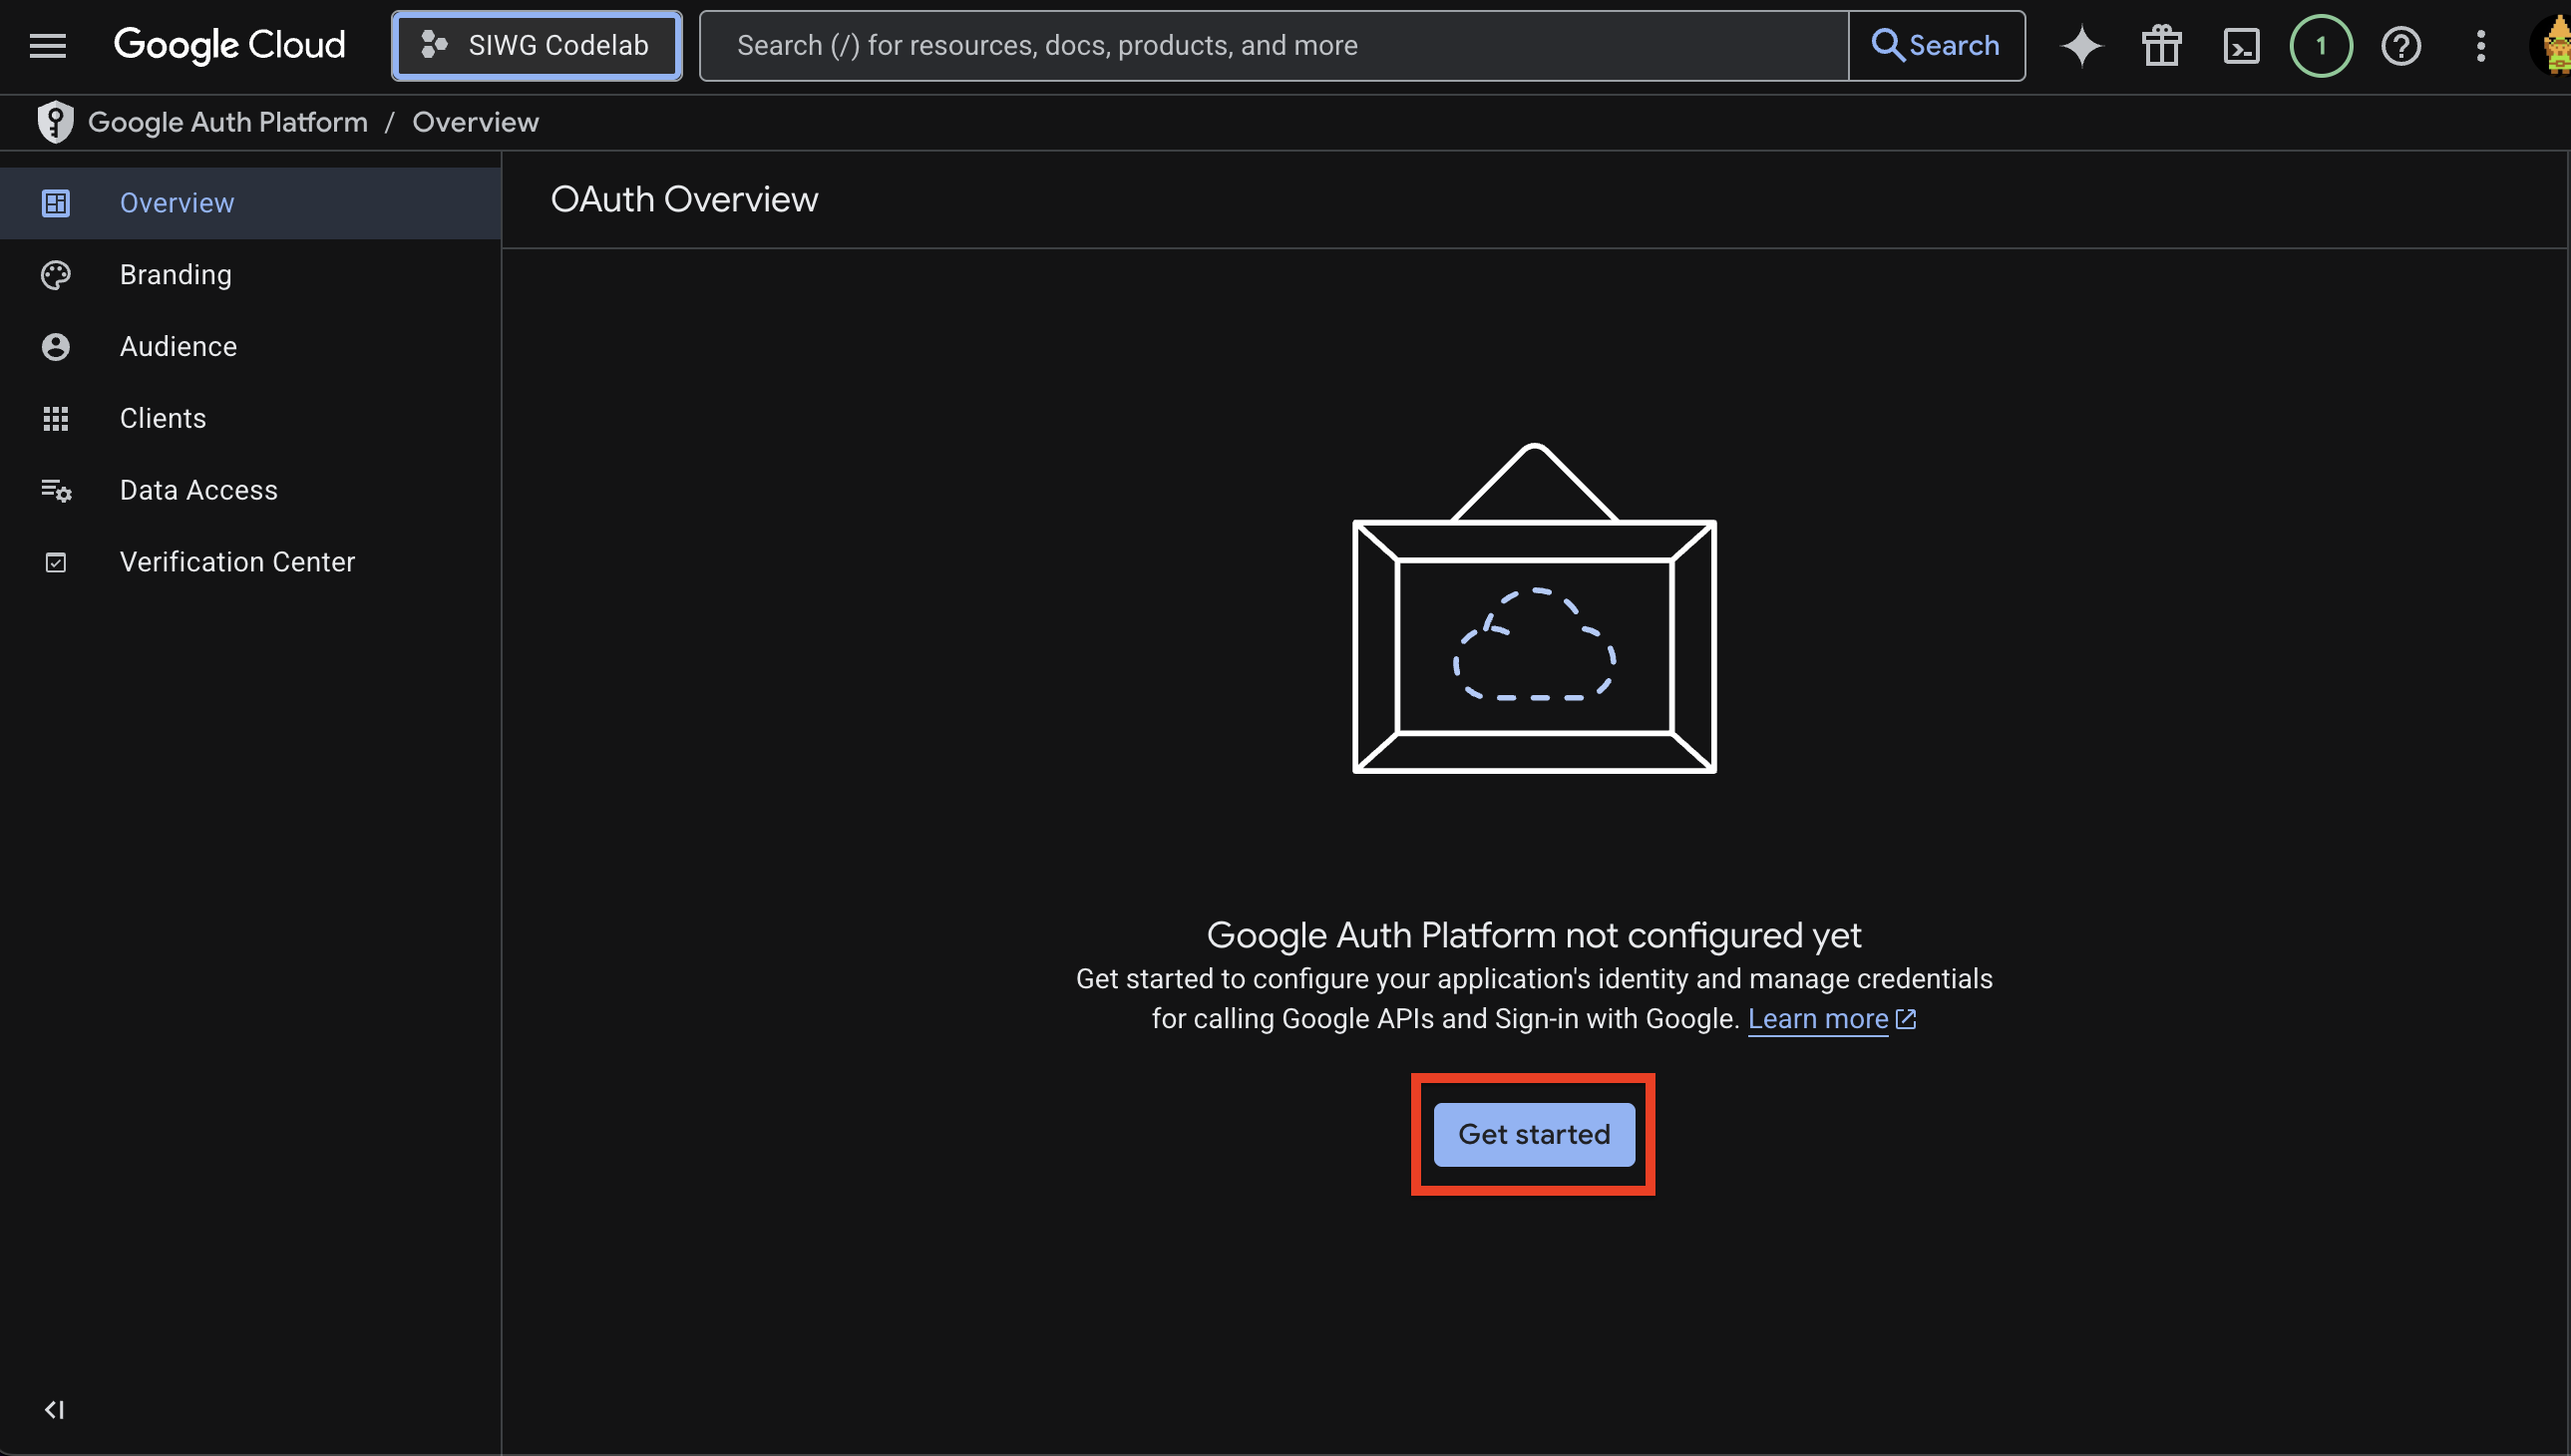
- 你必須填寫「總覽」中的欄位才能繼續。按一下「開始使用」,開始填寫下列資訊:
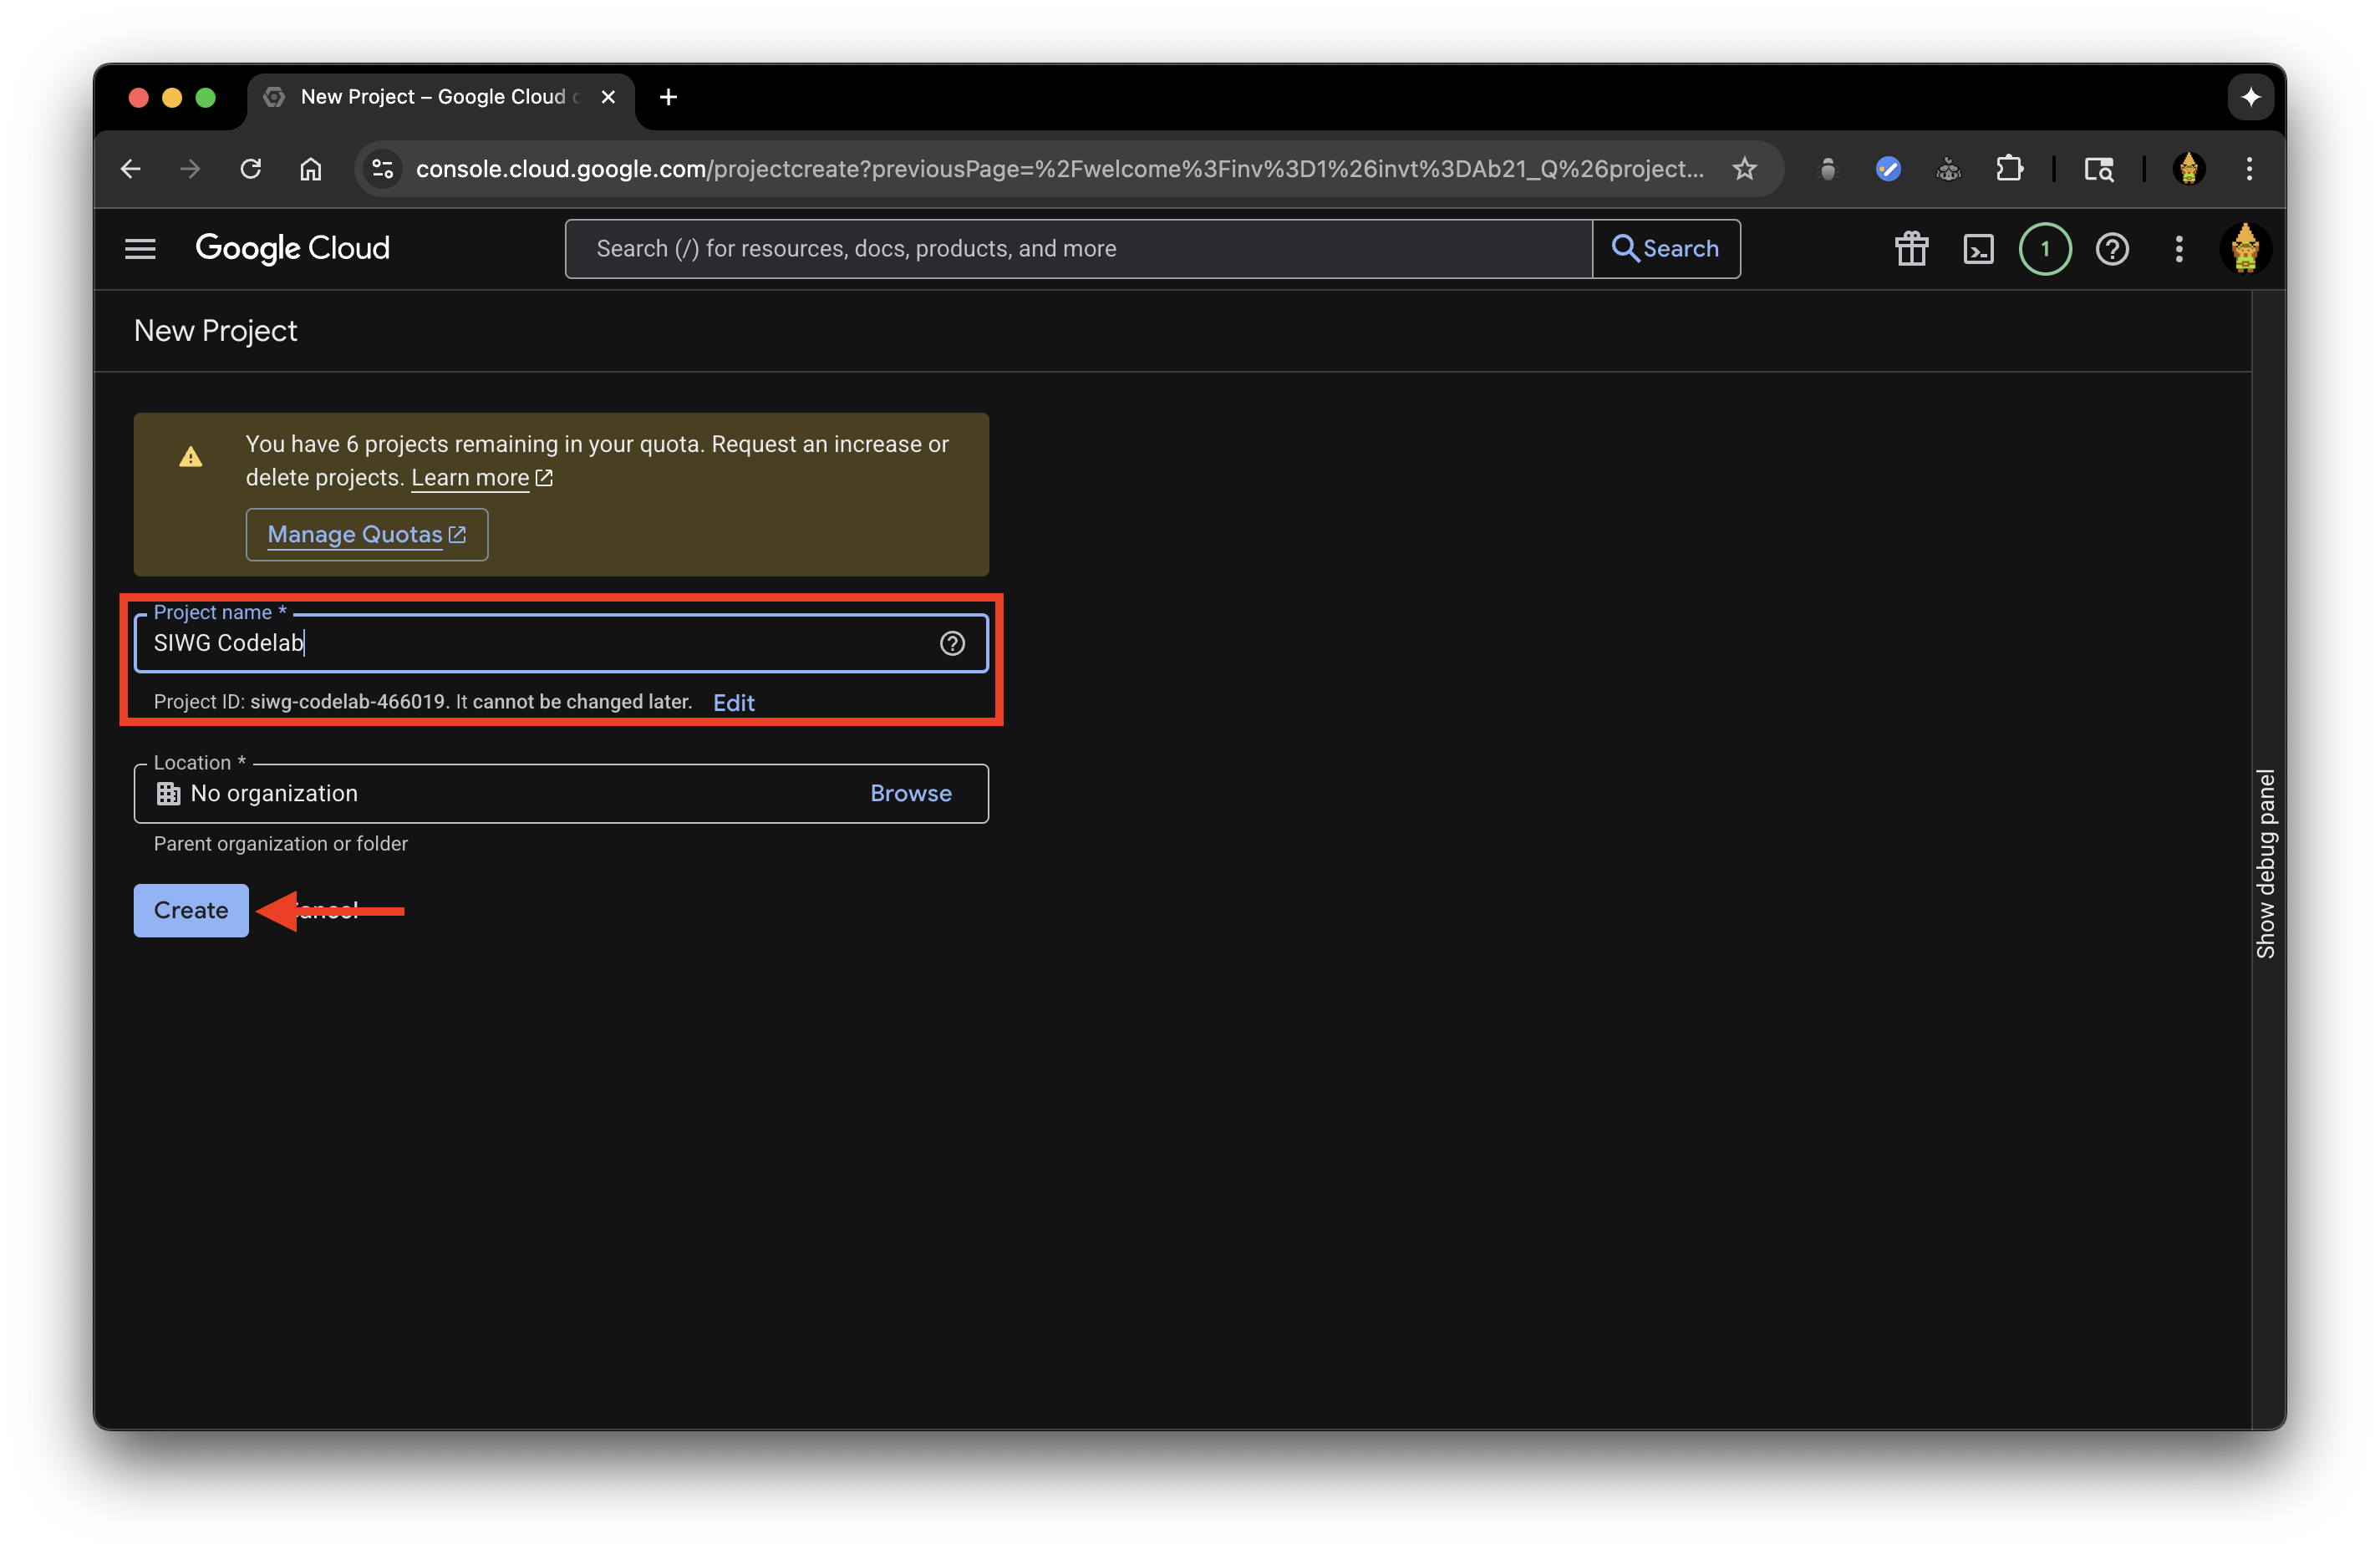
- 應用程式名稱:這個應用程式的名稱,應與您在 Android Studio 中建立專案時使用的名稱相同
- 使用者支援電子郵件地址:系統會顯示您登入的 Google 帳戶,以及您管理的任何 Google 網路論壇
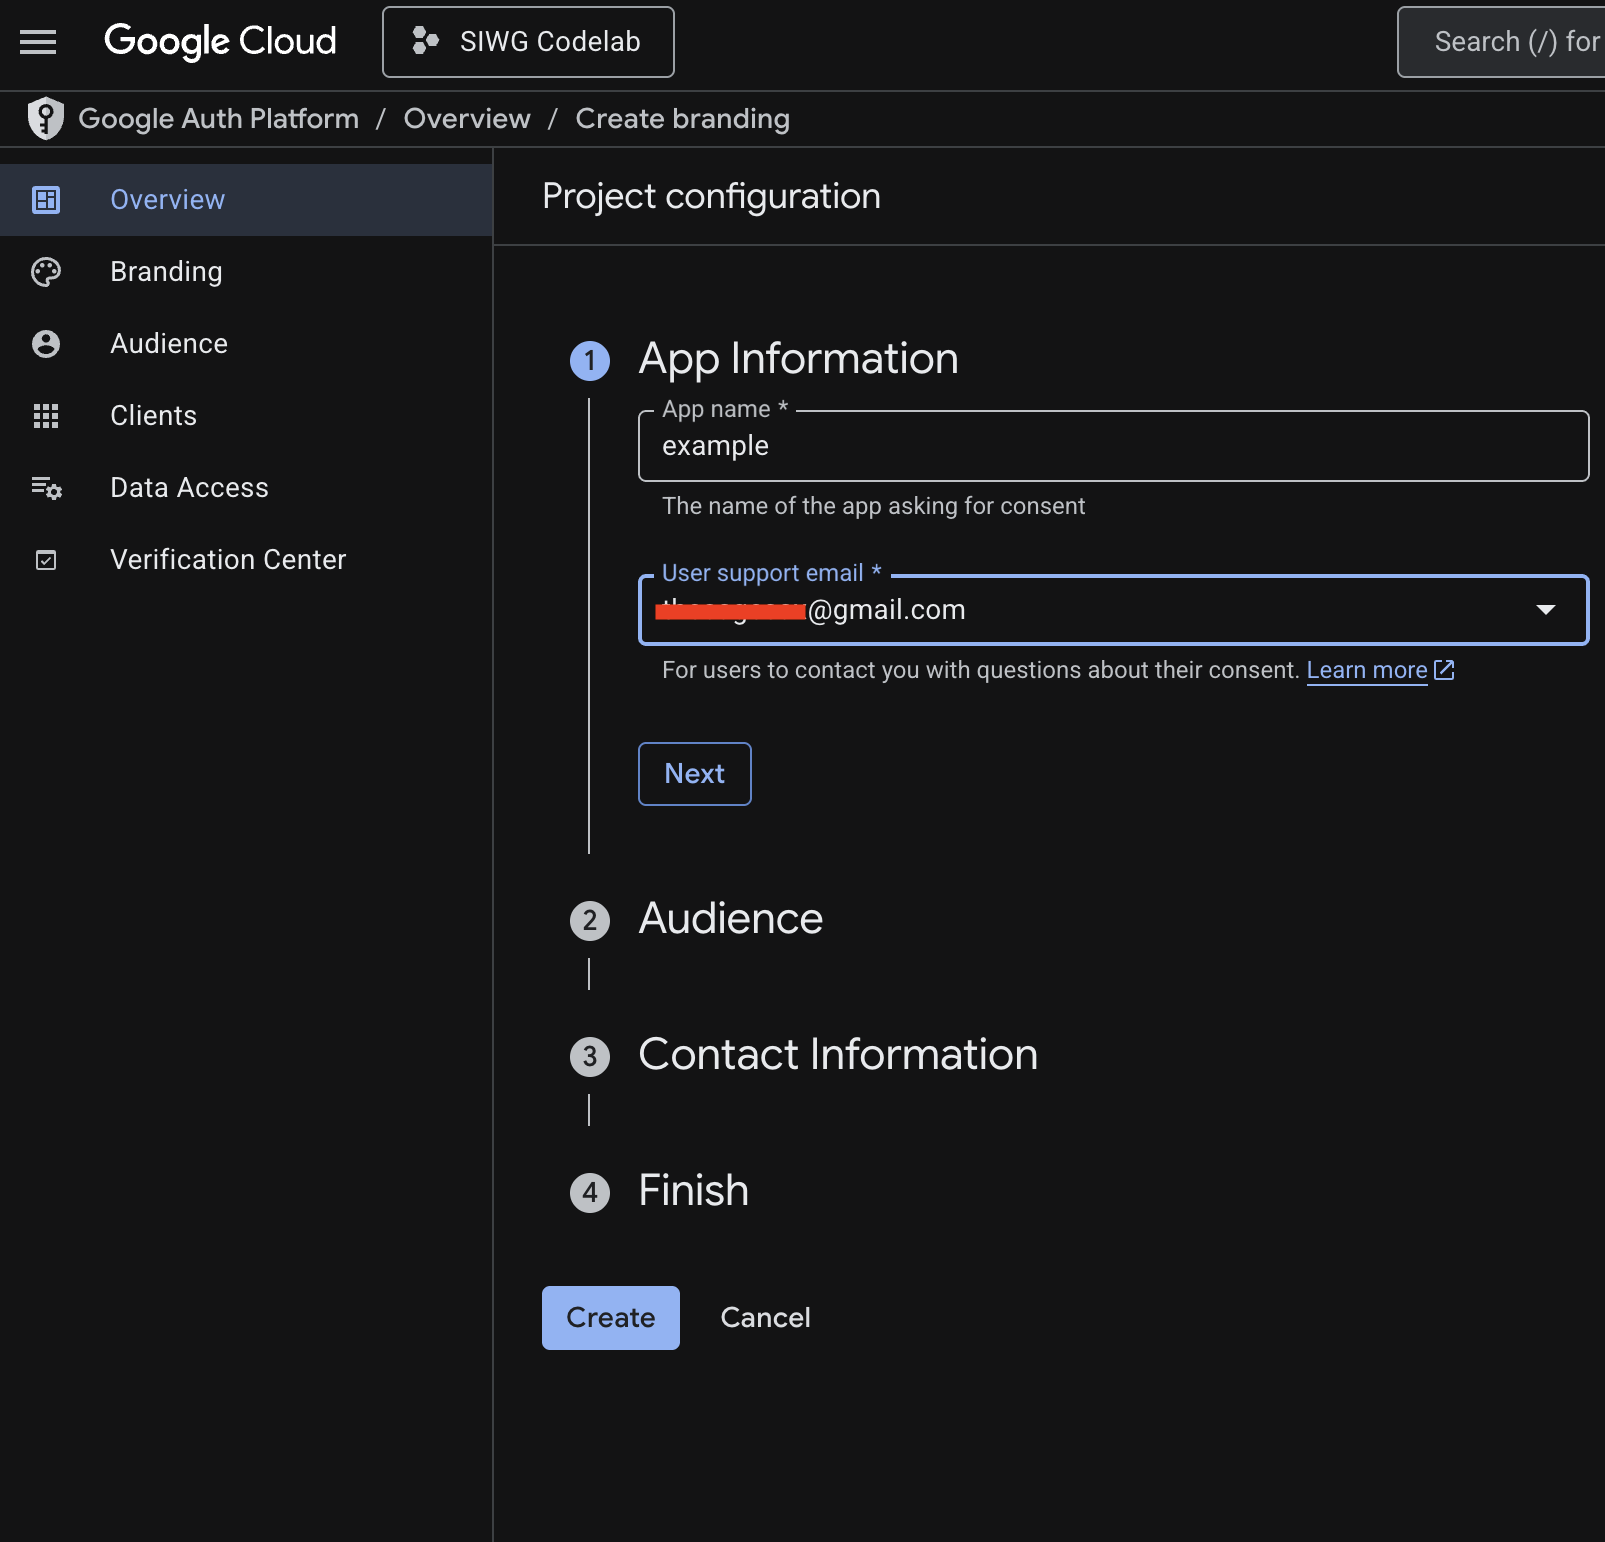
- 目標對象:
- 內部:應用程式僅供貴機構內部使用。如果 Google Cloud 專案未與任何機構相關聯,您就無法選取這個選項。
- 我們將使用「外部」。

- 聯絡資訊:您可以提供任何電子郵件地址,做為應用程式的聯絡窗口

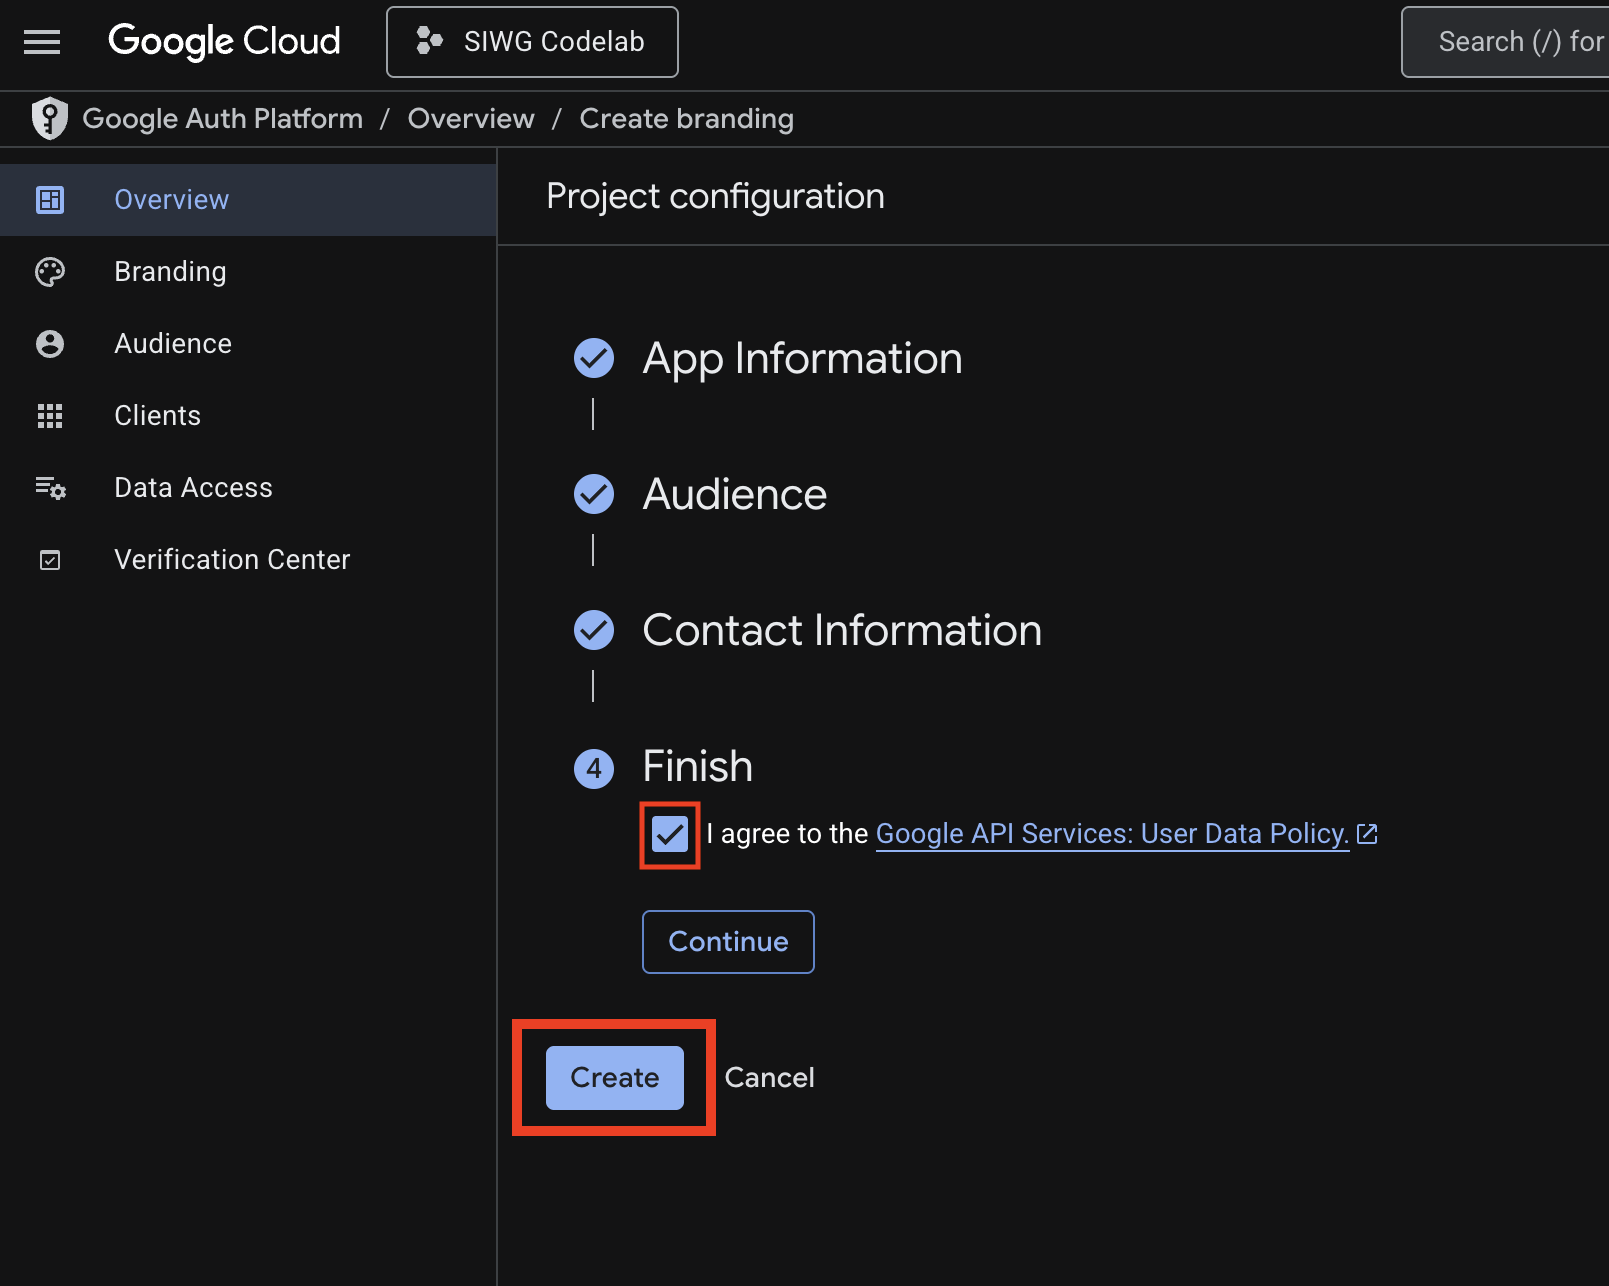
- 詳閱《Google API 服務:使用者資料政策》。
- 詳閱並同意《使用者資料政策》後,按一下「建立」
設定 OAuth 用戶端
我們已設定 Google Cloud 專案,現在需要新增網頁用戶端和 Android 用戶端,才能使用用戶端 ID 向 OAuth 後端伺服器發出 API 呼叫。
Android 網頁用戶端需要:
- 應用程式的套件名稱 (例如:com.example.example)
- 應用程式的 SHA-1 簽章
- 什麼是 SHA-1 簽章?
- SHA-1 指紋是從應用程式的簽署金鑰產生的加密雜湊。做為特定應用程式簽署憑證的專屬 ID。這就像是應用程式的數位「簽章」。
- 為什麼需要 SHA-1 簽章?
- SHA-1 指紋可確保只有以特定簽署金鑰簽署的應用程式,才能使用 OAuth 2.0 用戶端 ID 要求存取權杖,防止其他應用程式 (即使套件名稱相同) 存取專案資源和使用者資料。
- 你可以這樣想:
- 應用程式的簽署金鑰就像應用程式「大門」的實體鑰匙,這項權限可讓您存取應用程式的內部運作方式。
- SHA-1 指紋就像與實體鑰匙連結的專屬房卡 ID,這是用來識別特定金鑰的專屬代碼。
- OAuth 2.0 用戶端 ID 就像特定 Google 資源或服務 (例如 Google 登入) 的進入代碼。
- 在 OAuth 用戶端設定期間提供 SHA-1 指紋時,您基本上是在告訴 Google:「只有具有這個特定 ID (SHA-1) 的鑰匙卡,才能開啟這個存取碼 (用戶端 ID)」。這樣一來,只有您的應用程式可以存取與該驗證碼連結的 Google 服務。」
- 什麼是 SHA-1 簽章?
如果是網頁用戶端,您只需要在控制台中識別用戶端時使用的名稱。
建立 Android OAuth 2.0 用戶端
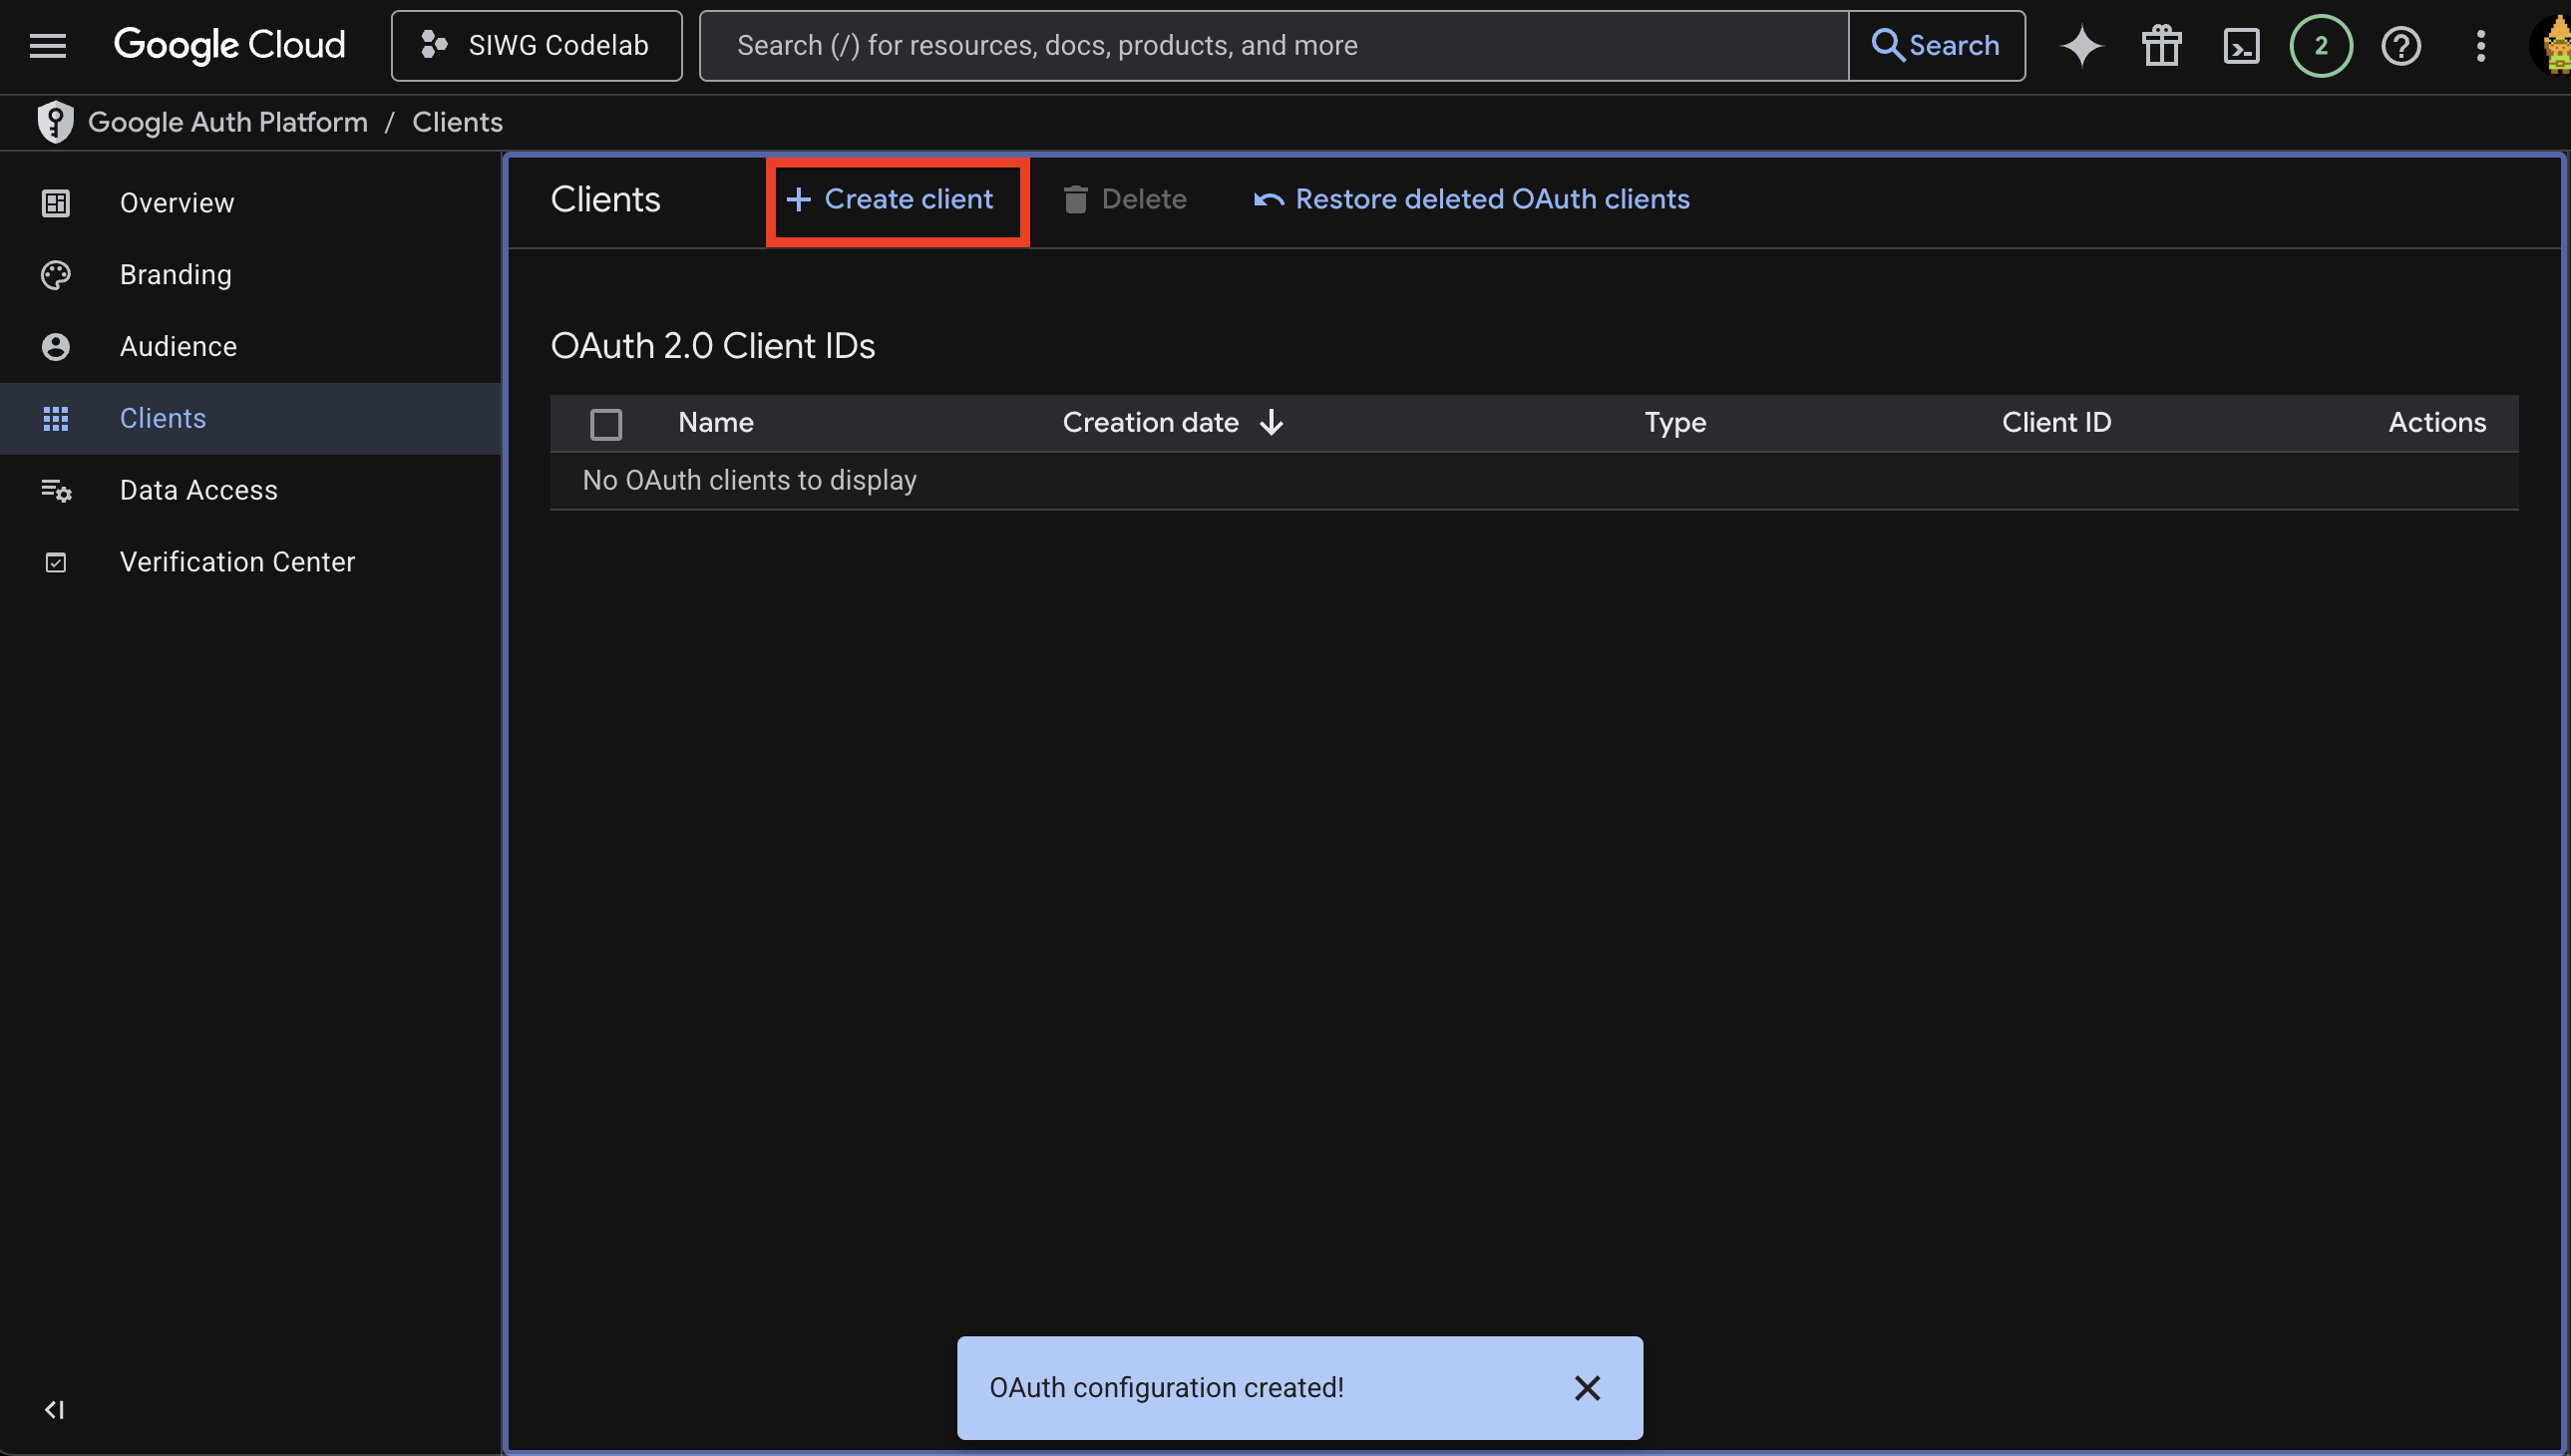
- 前往「Clients」(用戶端) 頁面
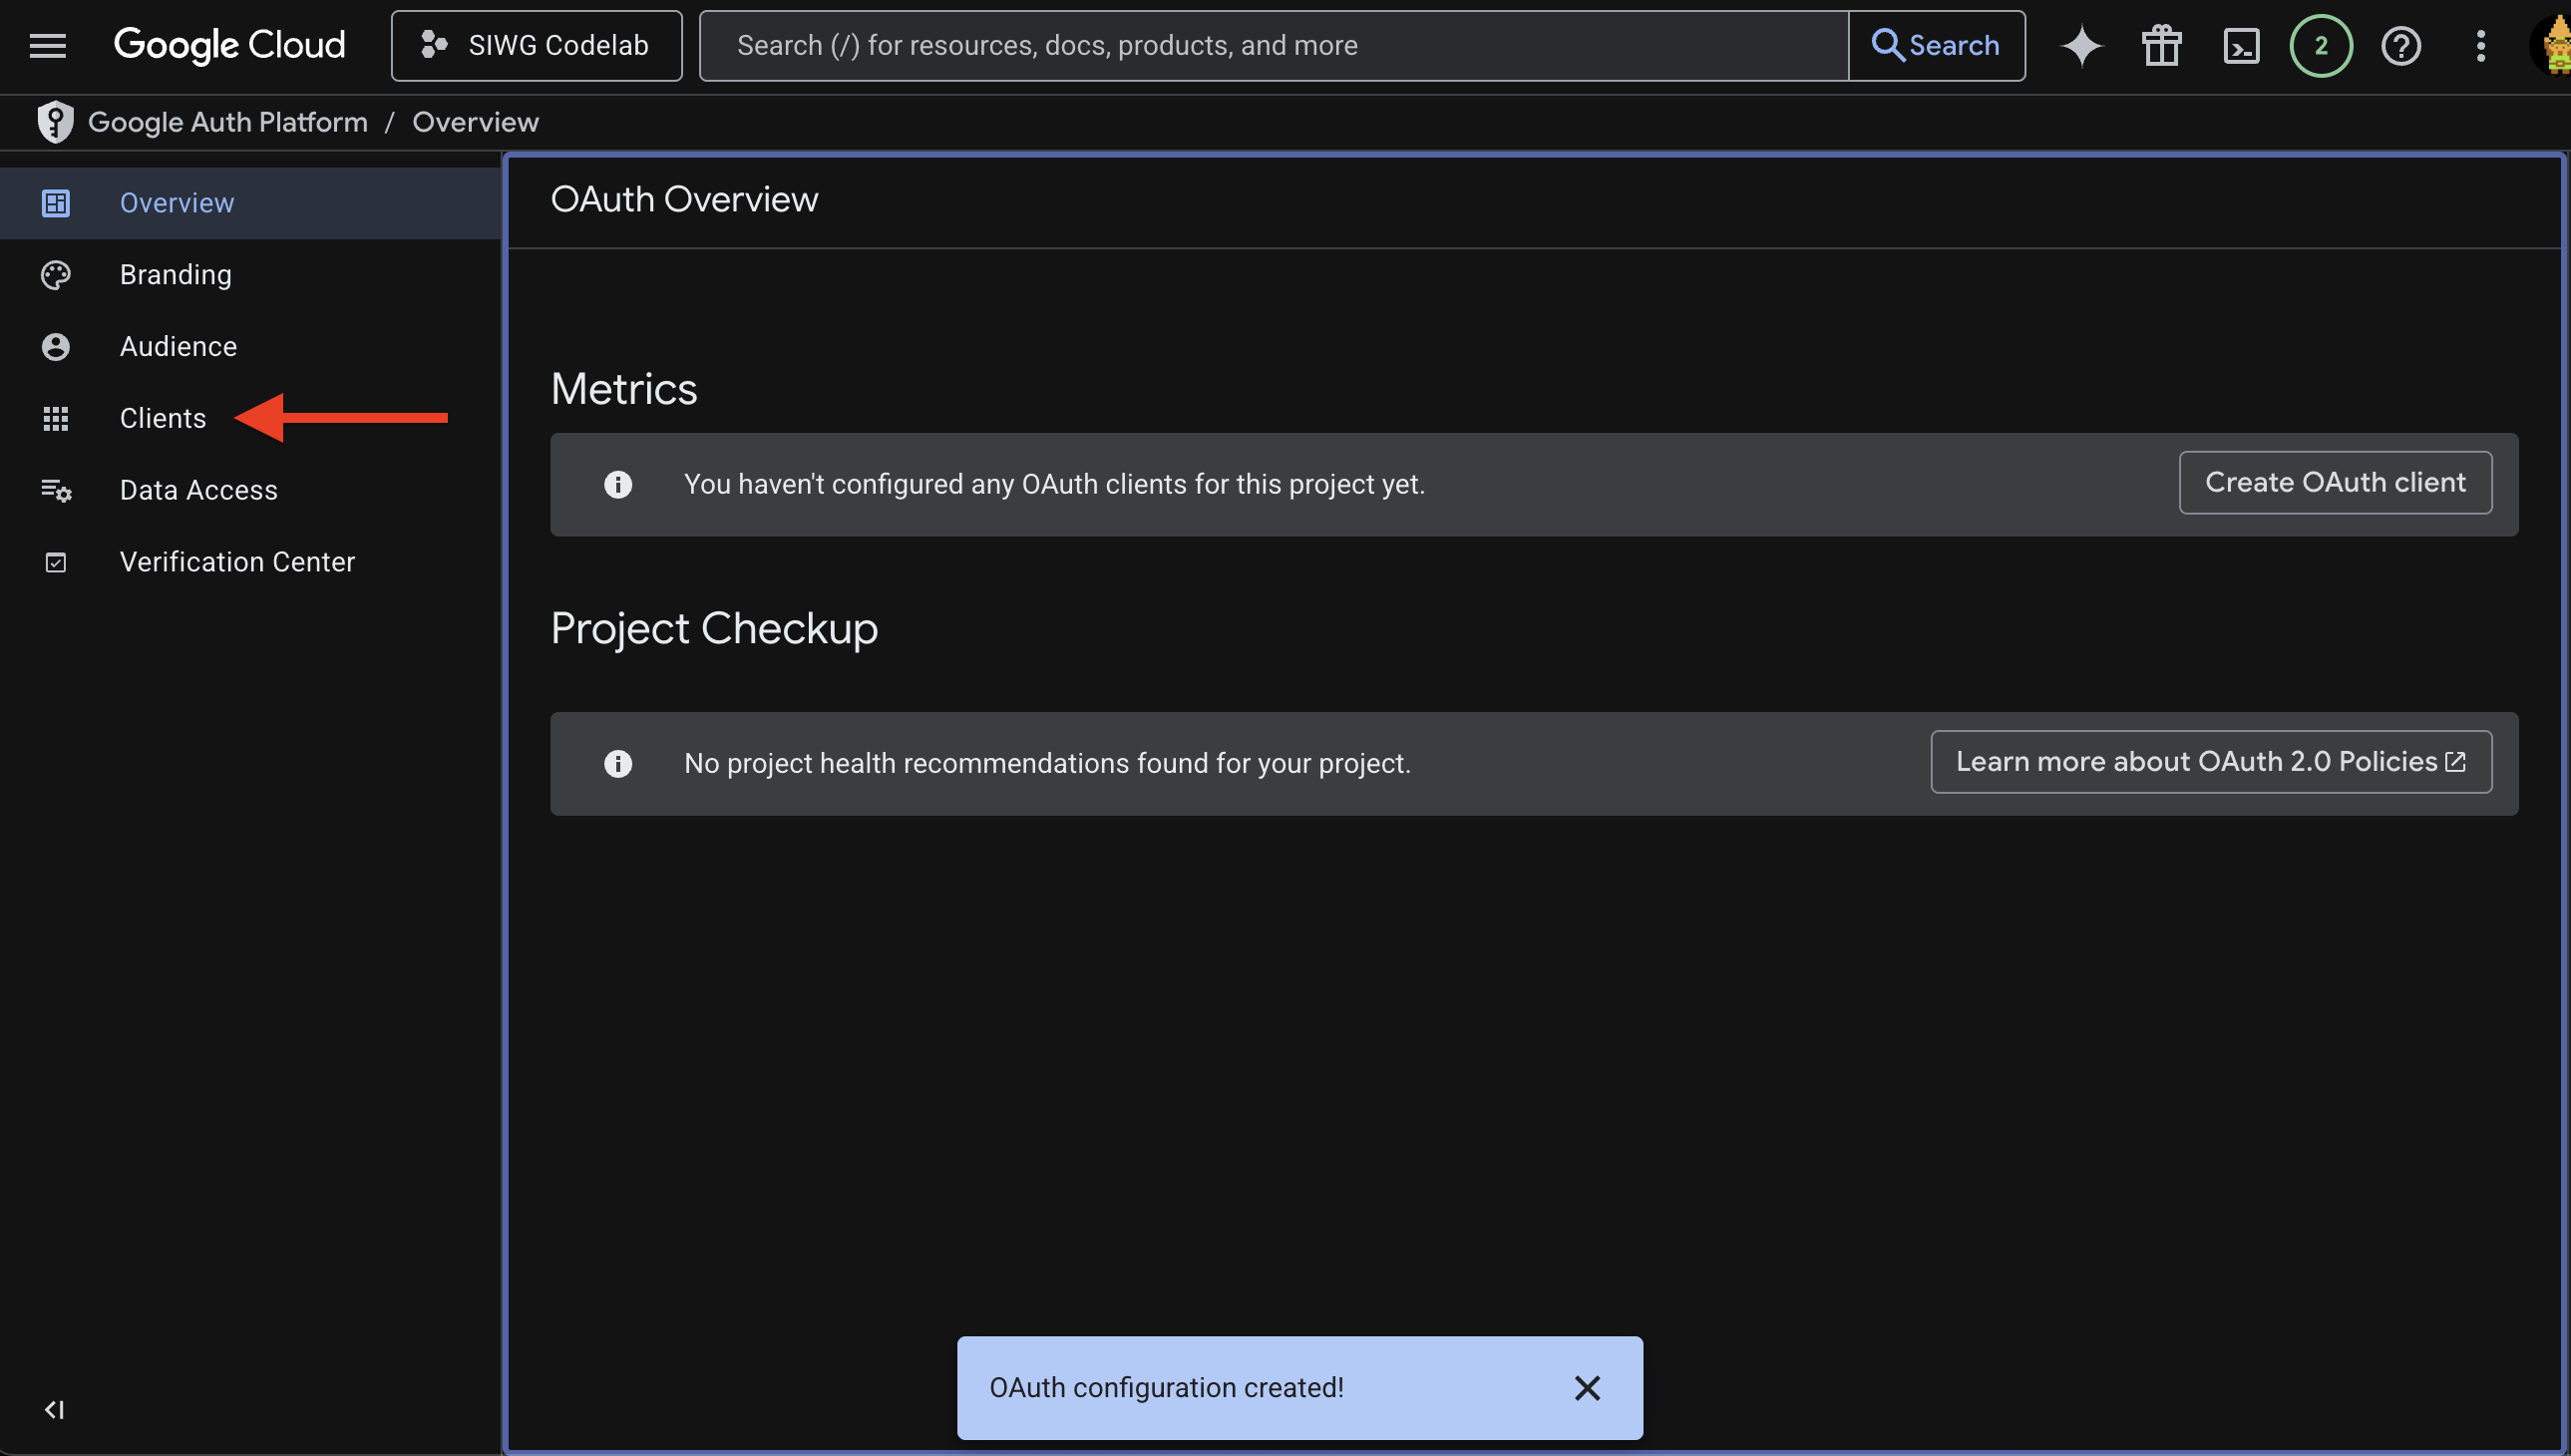
- 按一下「建立用戶端」
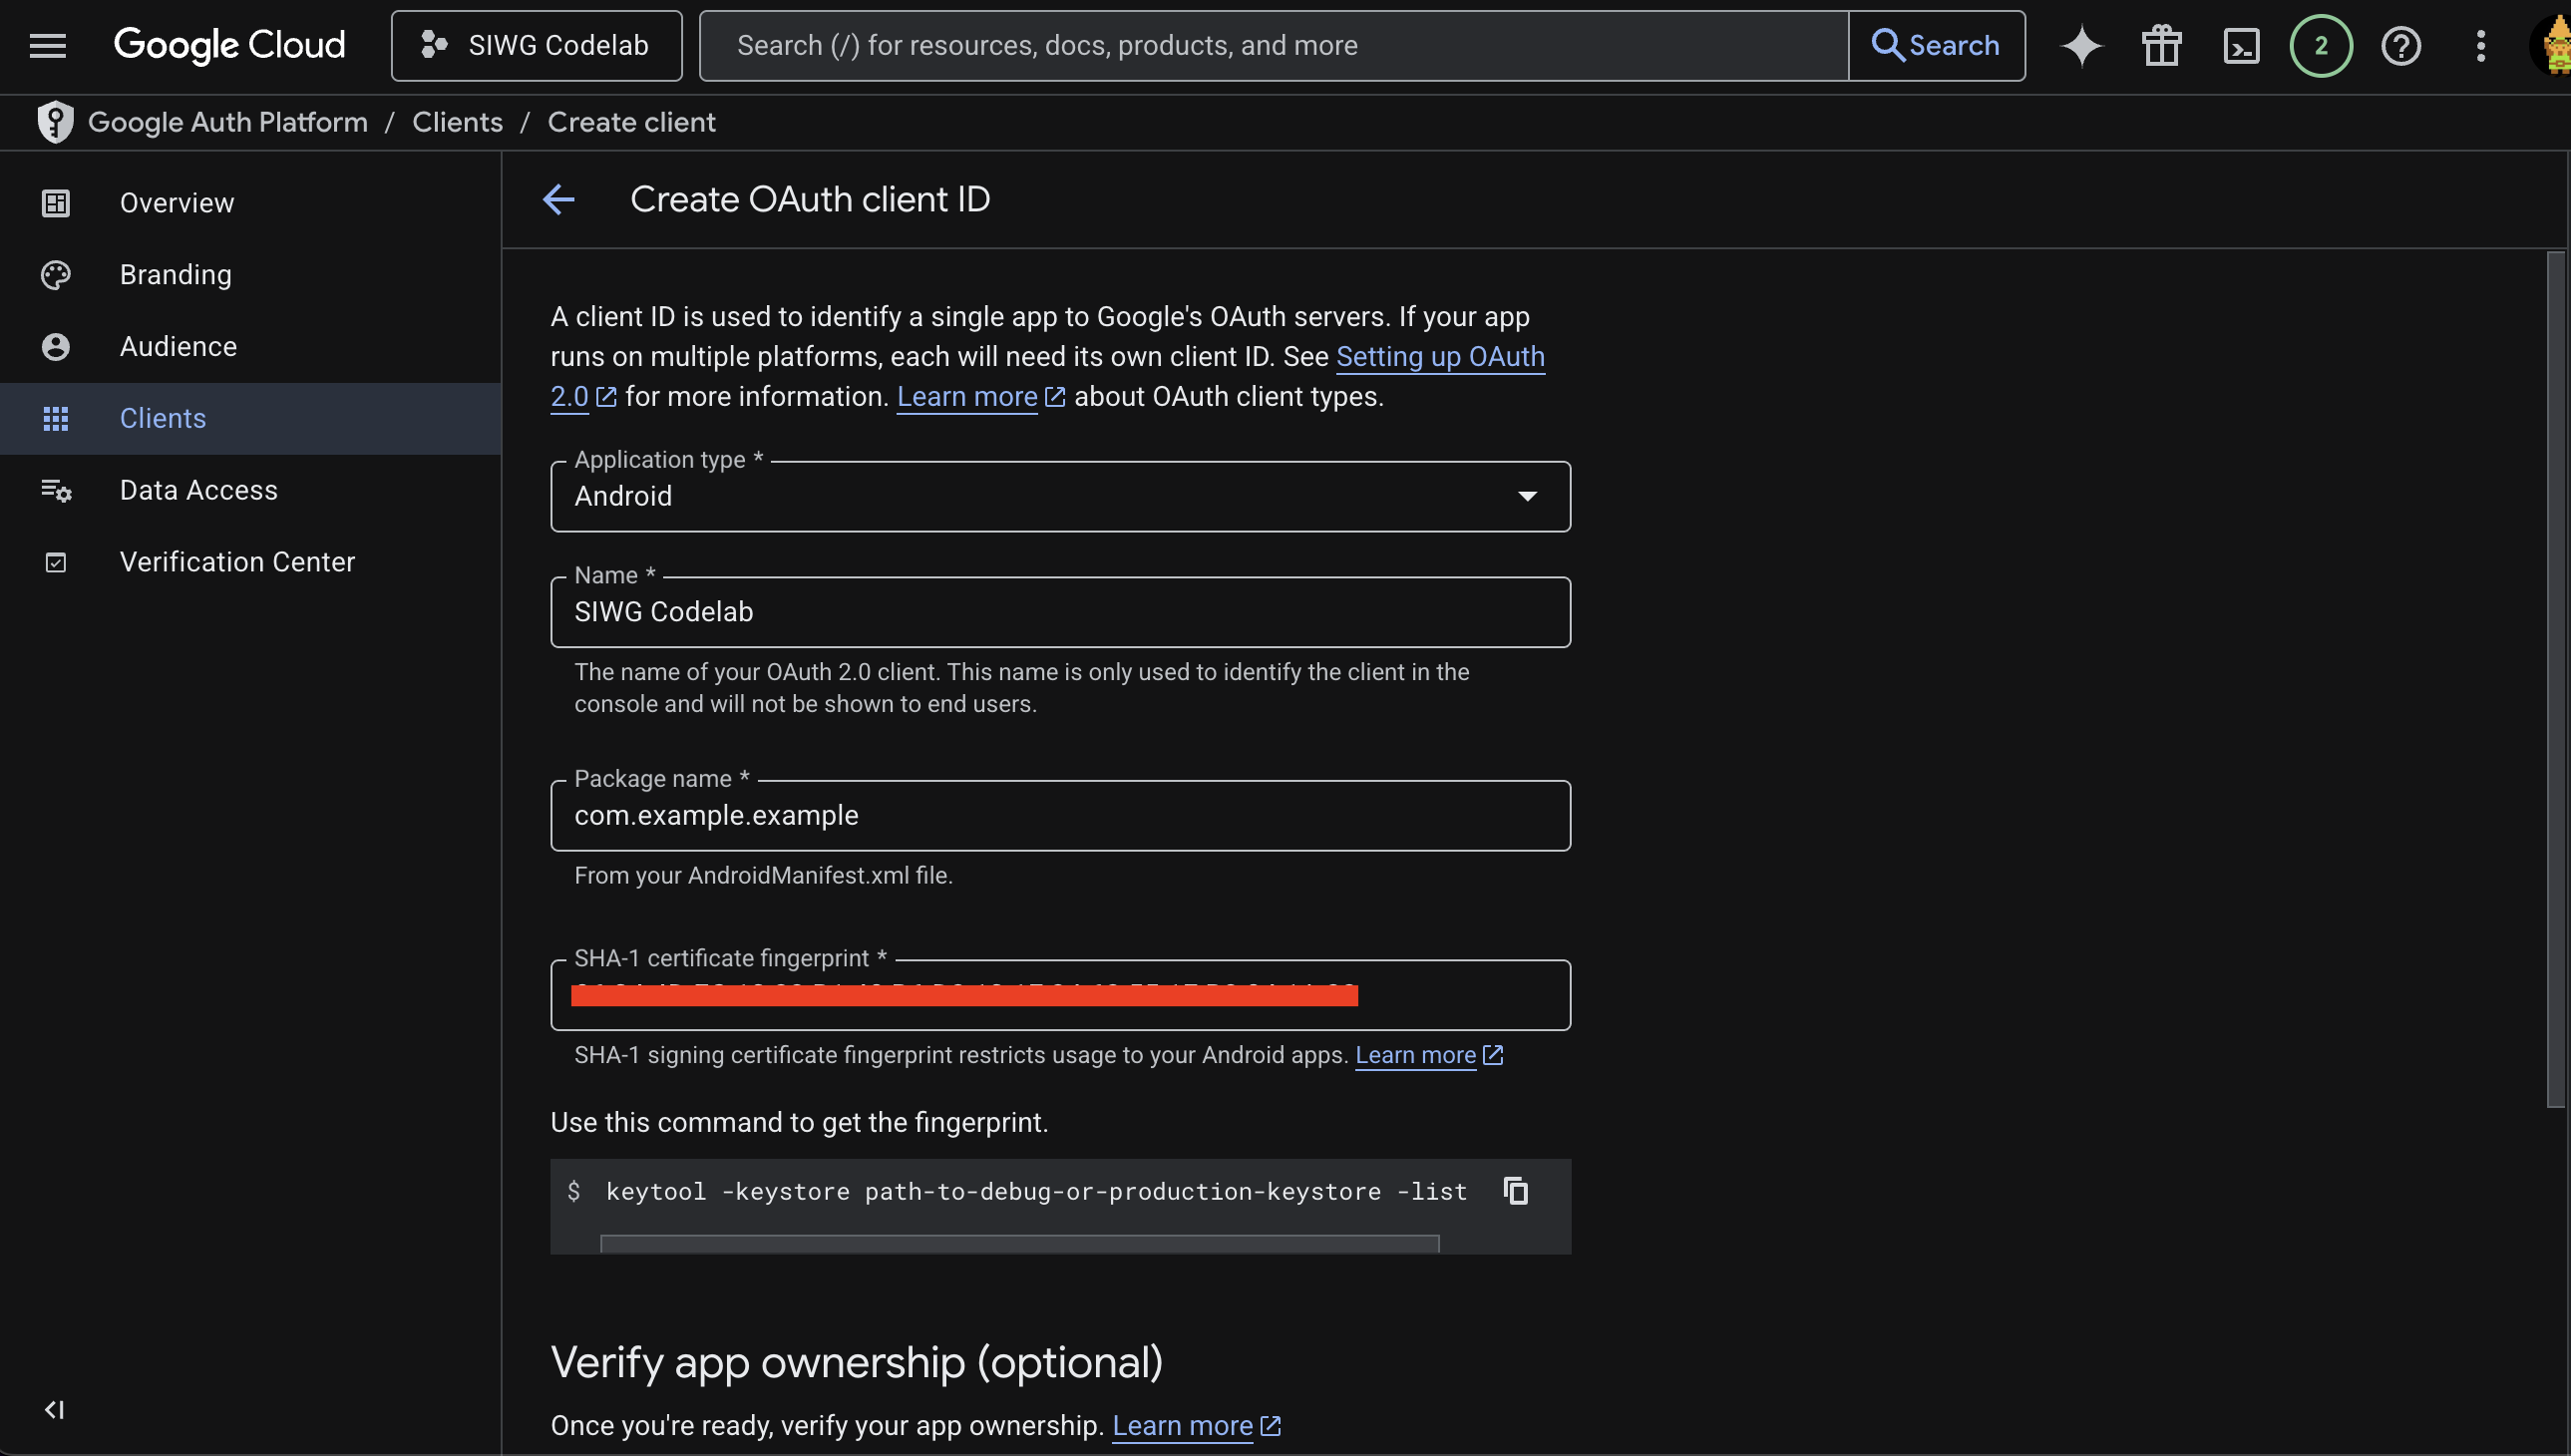
- 選取「Android」Android做為應用程式類型
- 您需要指定應用程式的套件名稱
- 在 Android Studio 中,我們需要取得應用程式的 SHA-1 簽章,然後複製/貼到這裡:
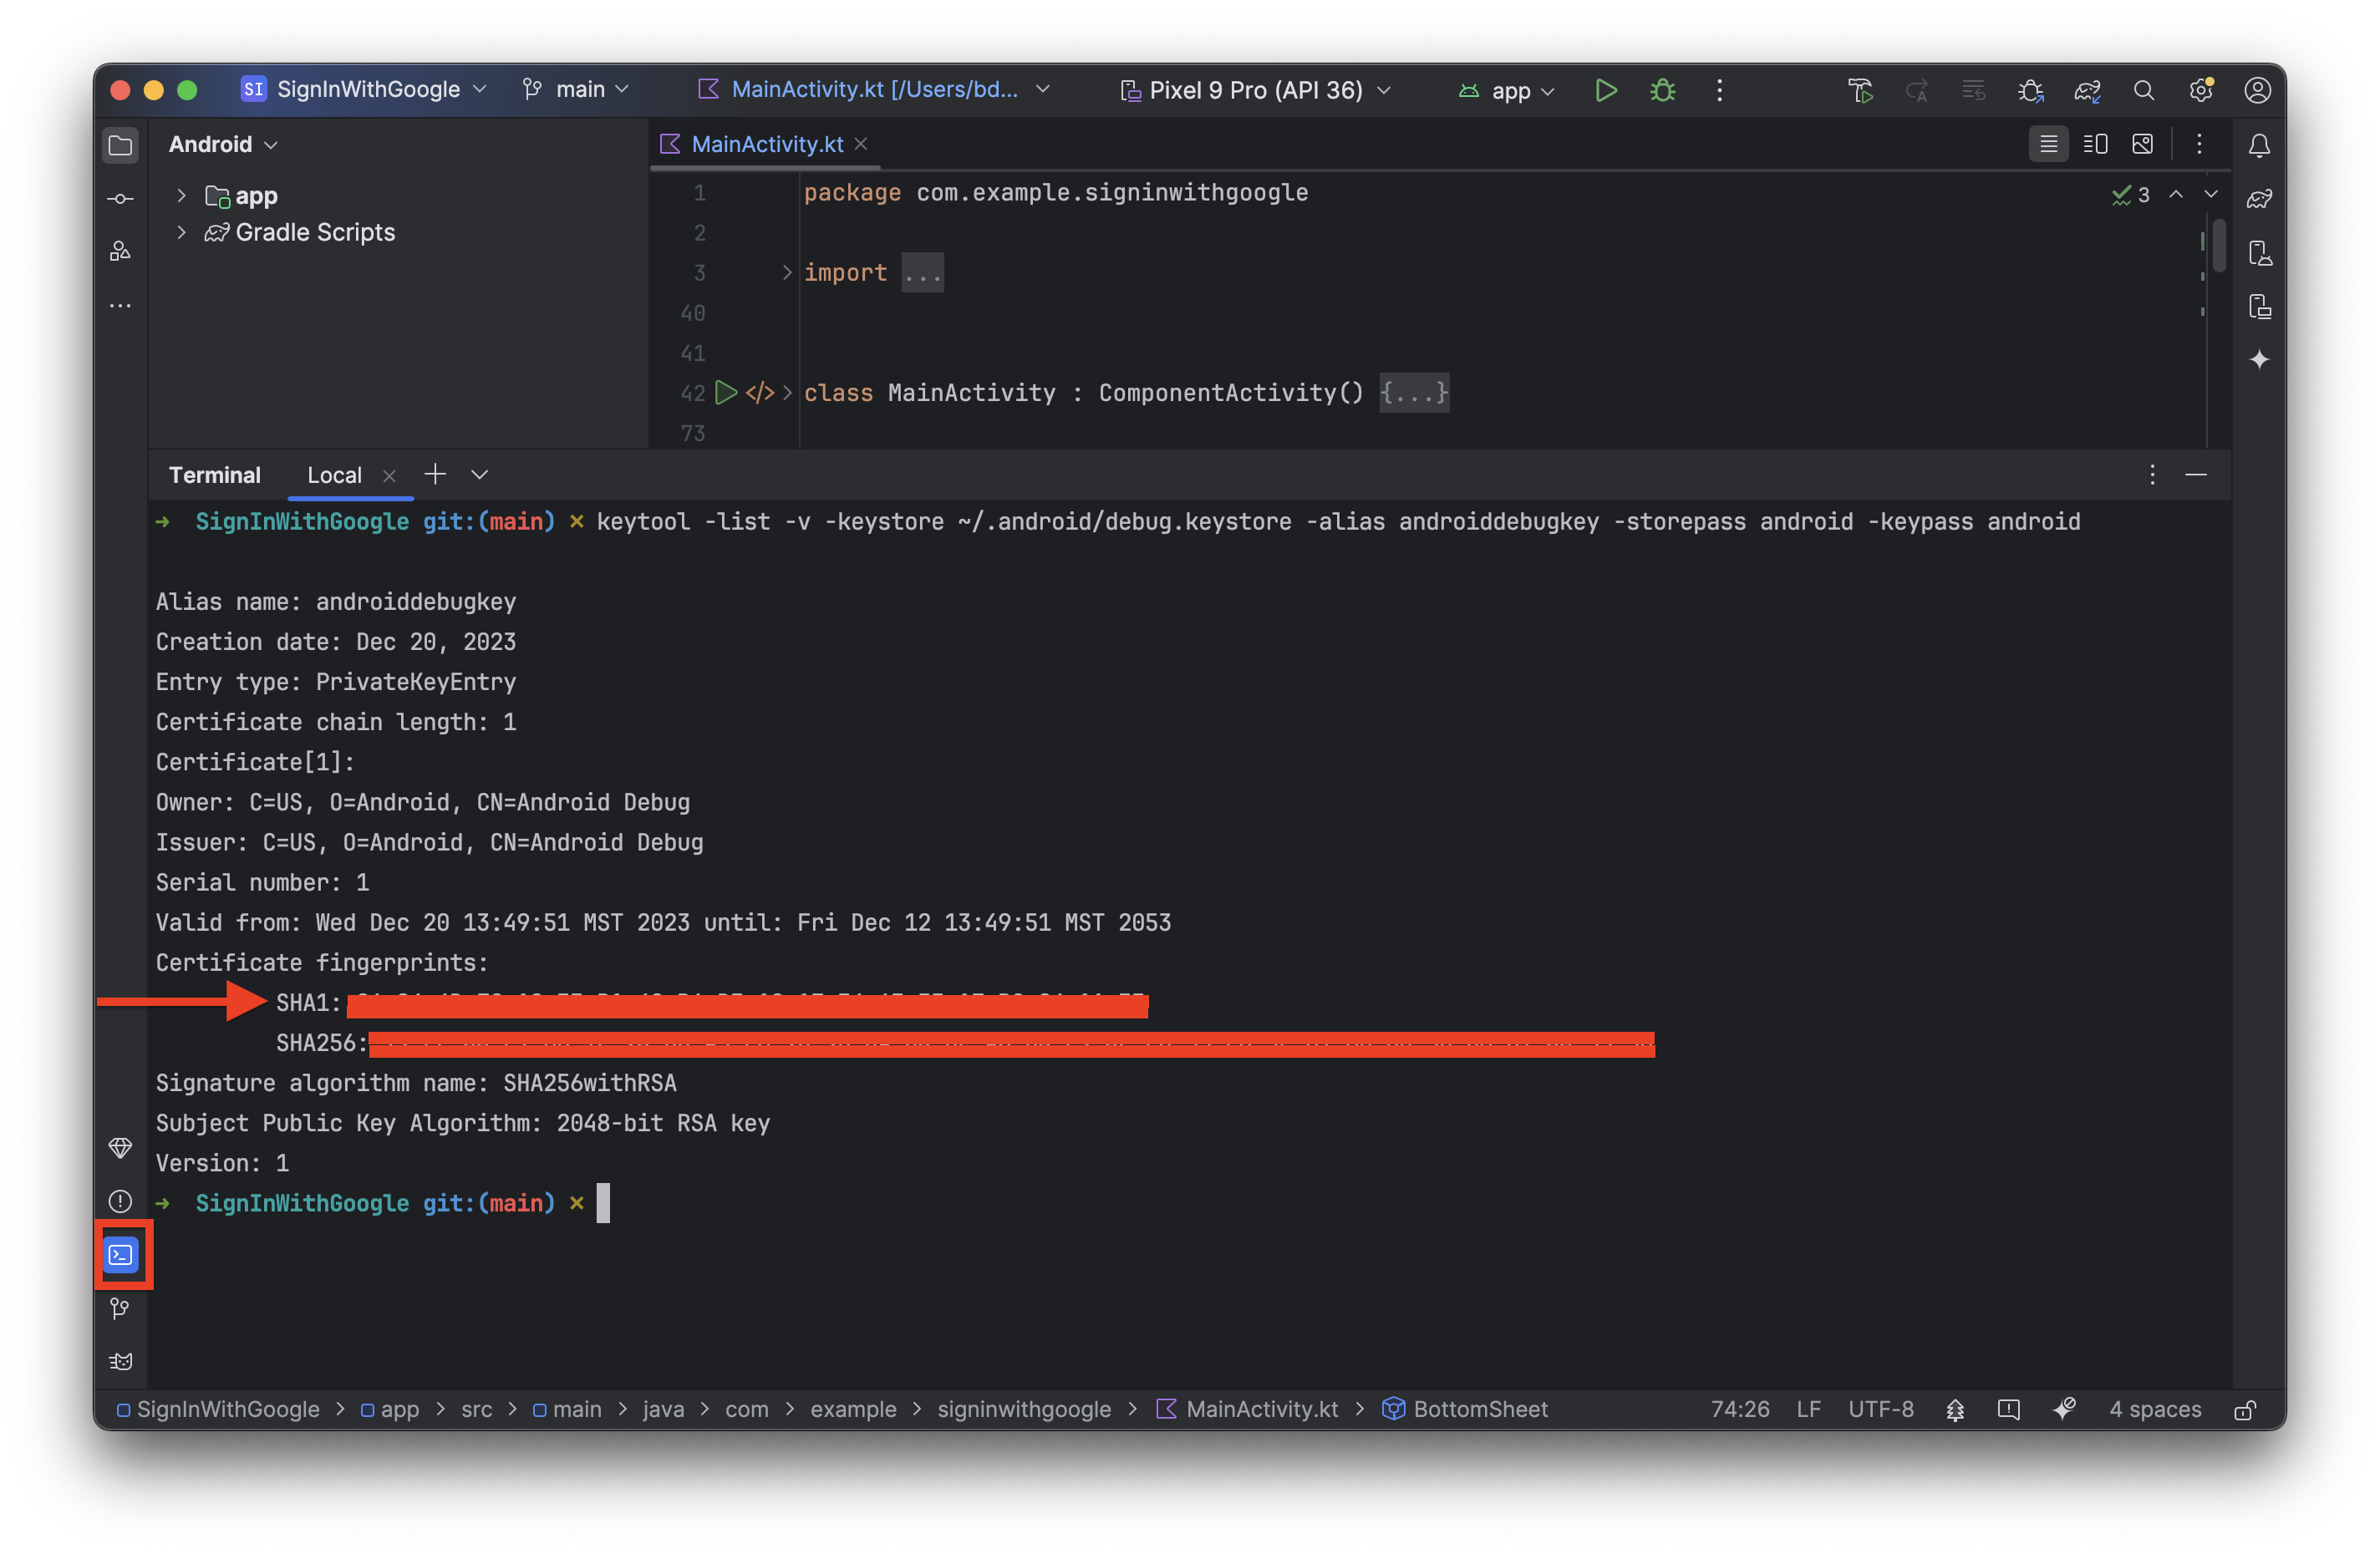
- 前往 Android Studio 並開啟終端機
- 執行下列指令:Mac/Linux:
keytool -list -v -keystore ~/.android/debug.keystore -alias androiddebugkey -storepass android -keypass android
keytool -list -v -keystore "C:\Users\USERNAME\.android\debug.keystore" -alias androiddebugkey -storepass android -keypass android
-list:這個選項會指示 keytool 列出金鑰存放區的內容。-v:這個選項會啟用詳細輸出,提供項目的詳細資訊。-keystore ~/.android/debug.keystore:指定 KeyStore 檔案的路徑。-alias androiddebugkey:指定要檢查的金鑰別名 (項目名稱)。-storepass android:提供 KeyStore 檔案的密碼。-keypass android:提供指定別名的私密金鑰密碼。
- 複製 SHA-1 簽章的值:
- 返回 Google Cloud 視窗,然後貼上 SHA-1 簽章值:
- 畫面現在應會類似這樣,您可以按一下「建立」:

建立網頁 OAuth 2.0 用戶端
- 如要建立網頁應用程式用戶端 ID,請重複「建立 Android 用戶端」一節中的步驟 1 至 2,並選取「網頁應用程式」做為應用程式類型。
- 為用戶端命名 (這會是 OAuth 用戶端):
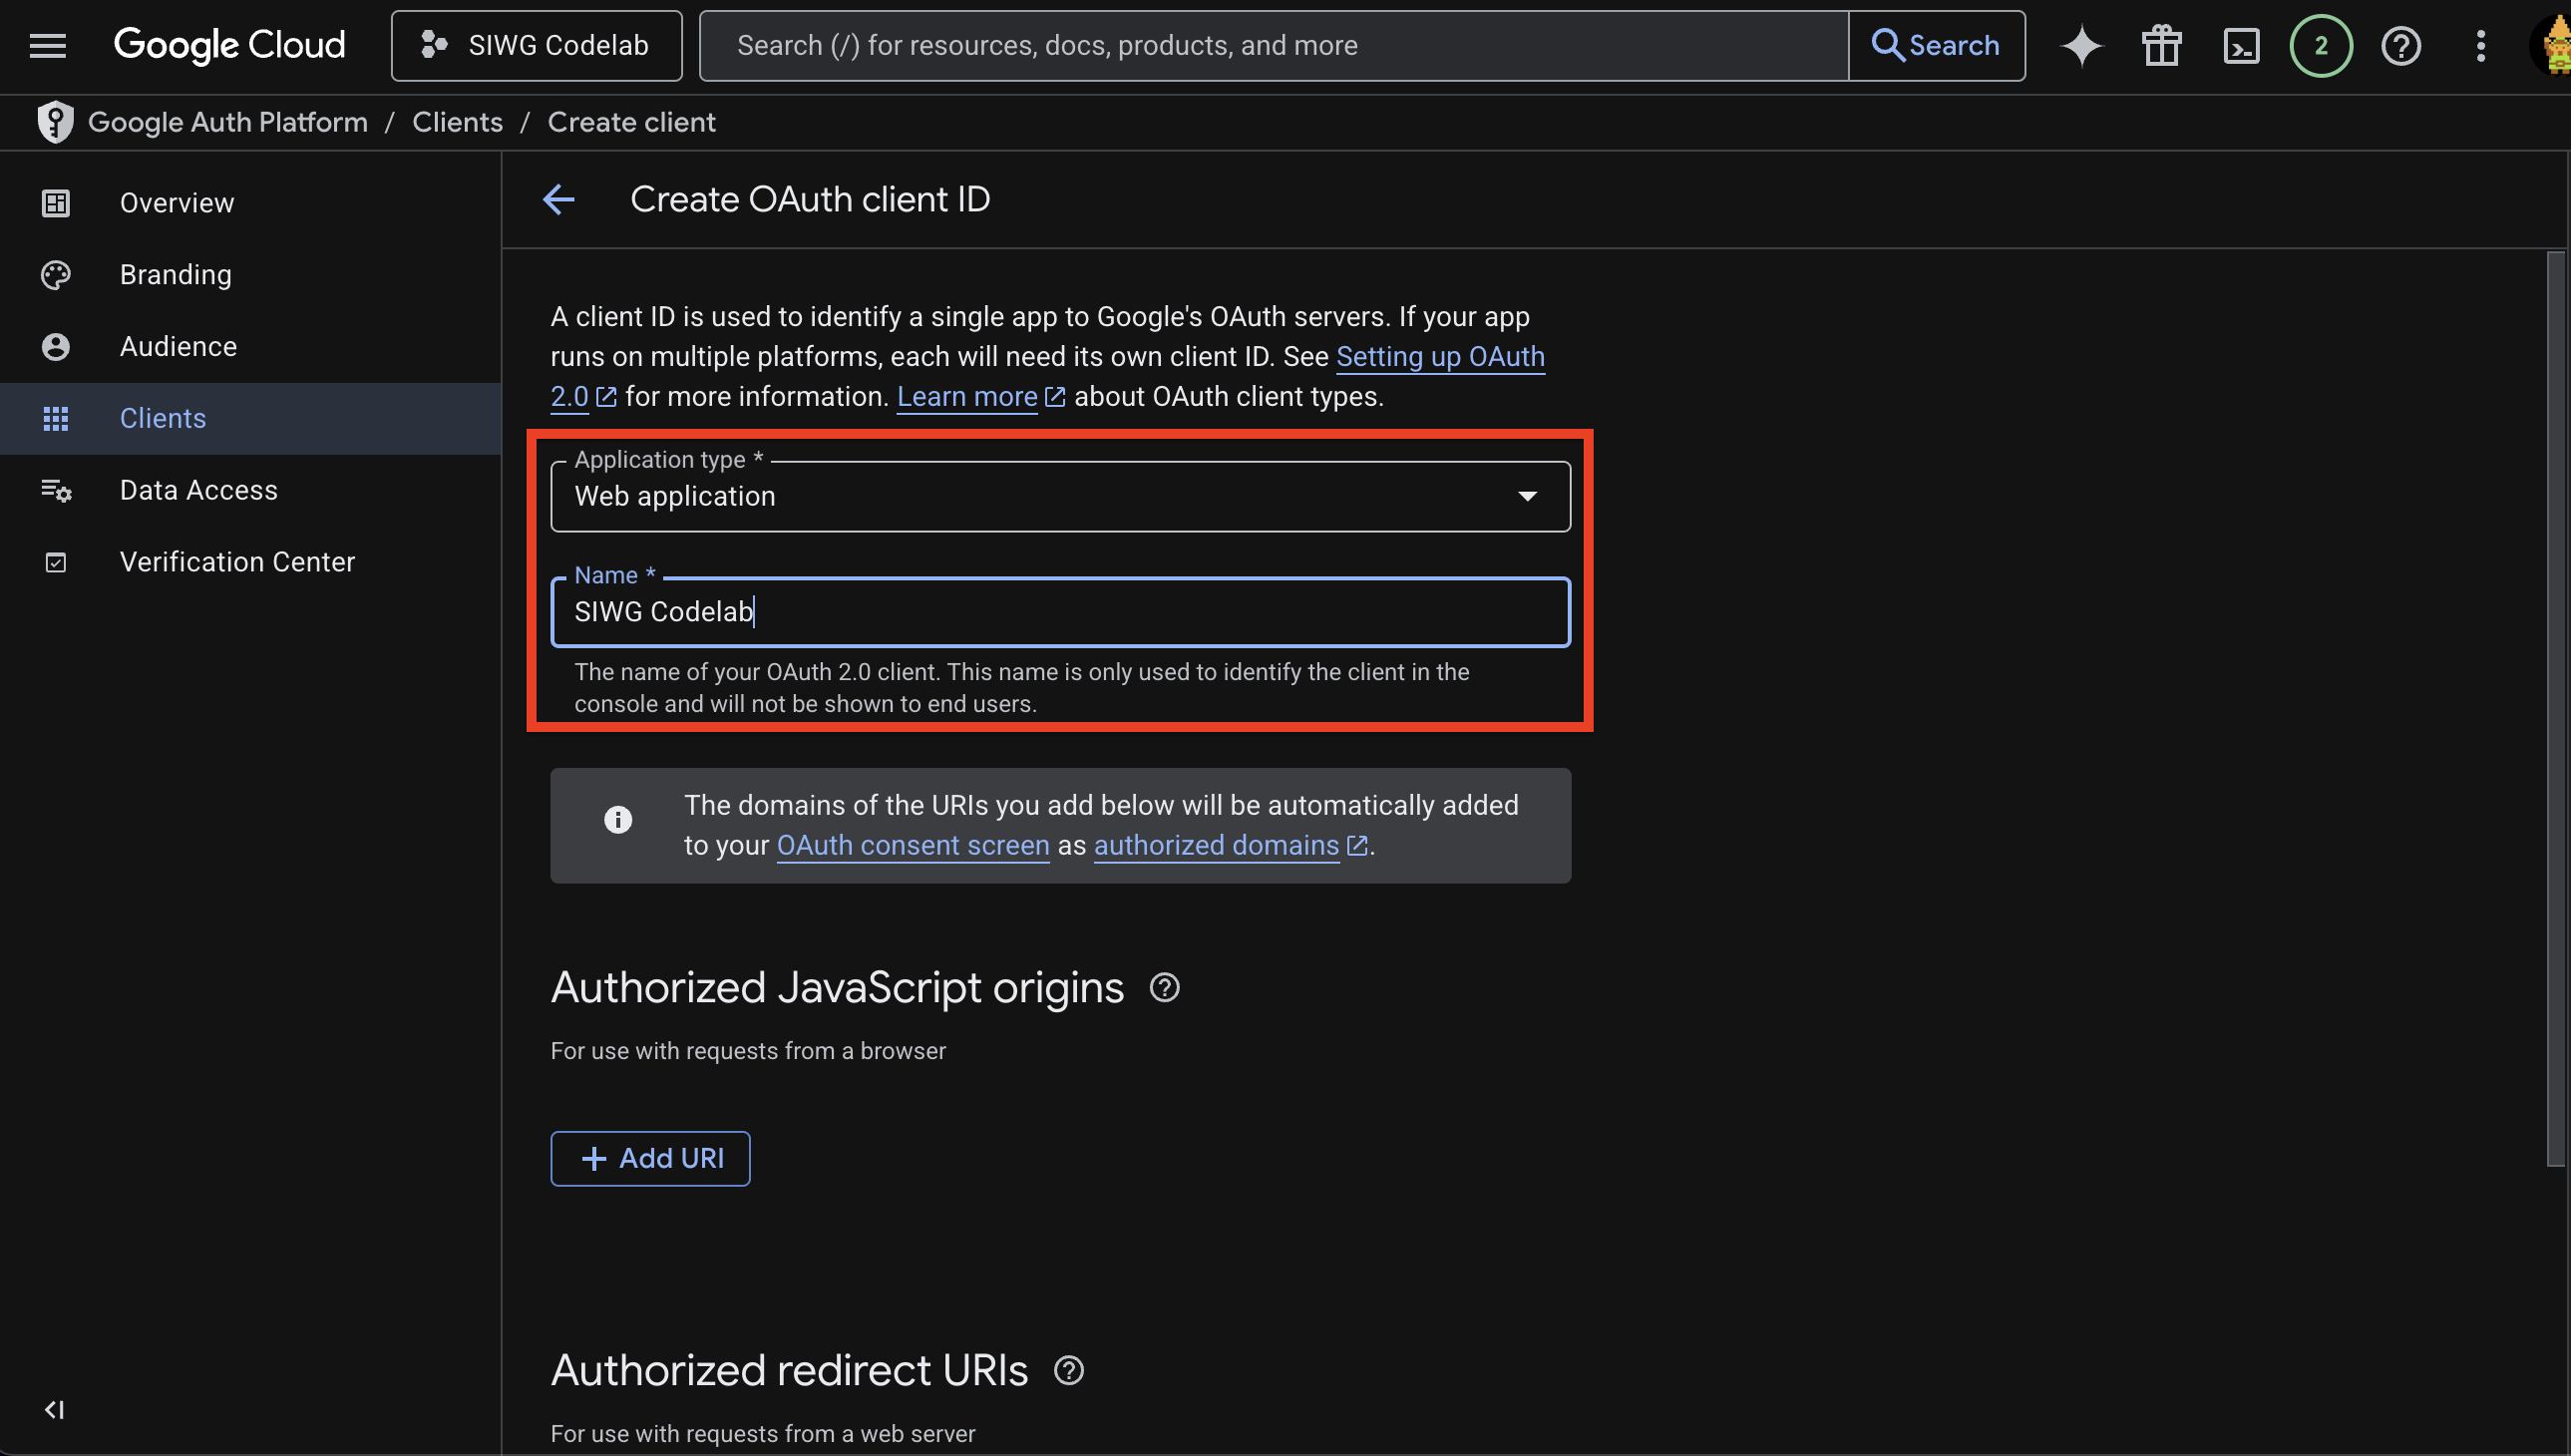
- 按一下「建立」
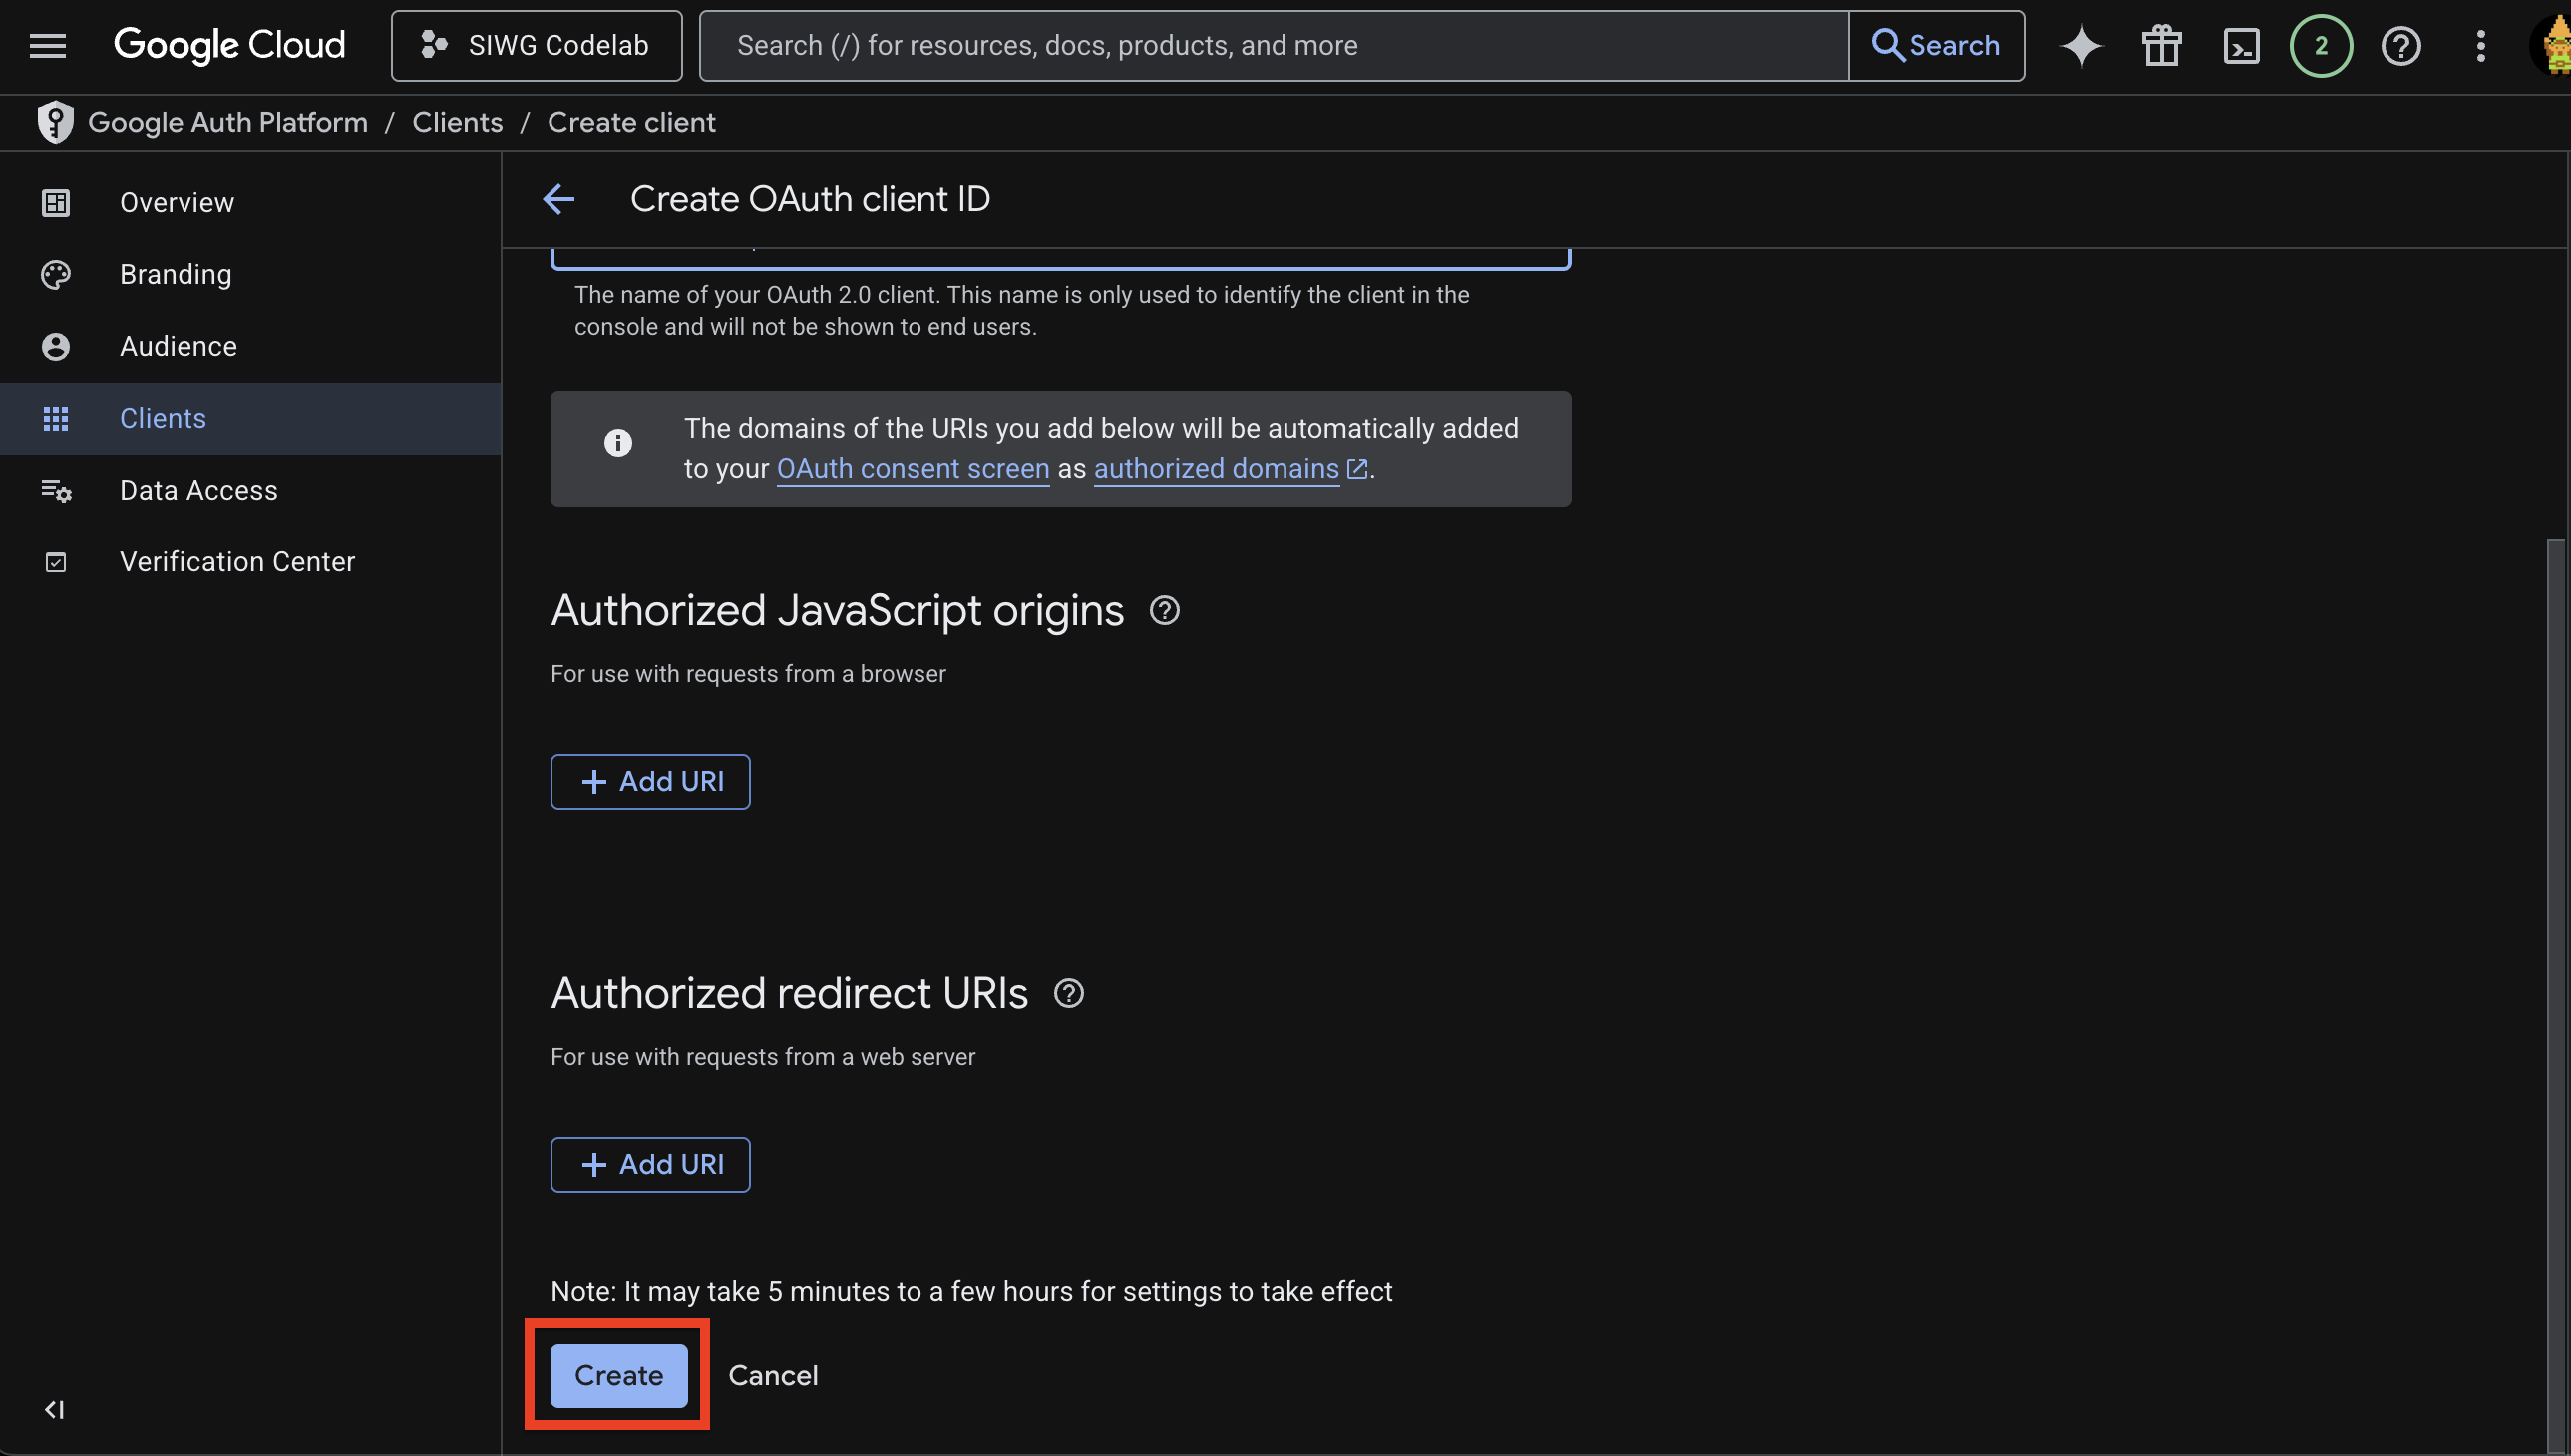 。
。 - 請從彈出式視窗複製用戶端 ID,稍後會用到

OAuth 用戶端設定完成後,我們就可以返回 Android Studio,製作「使用 Google 帳戶登入」Android 應用程式!
4. 設定 Android 虛擬裝置
如要快速測試應用程式,但沒有 Android 實體裝置,建議您建立 Android 虛擬裝置,以便從 Android Studio 建構及立即執行應用程式。如要使用實體 Android 裝置進行測試,請按照 Android 開發人員說明文件的指示操作。
建立 Android 虛擬裝置
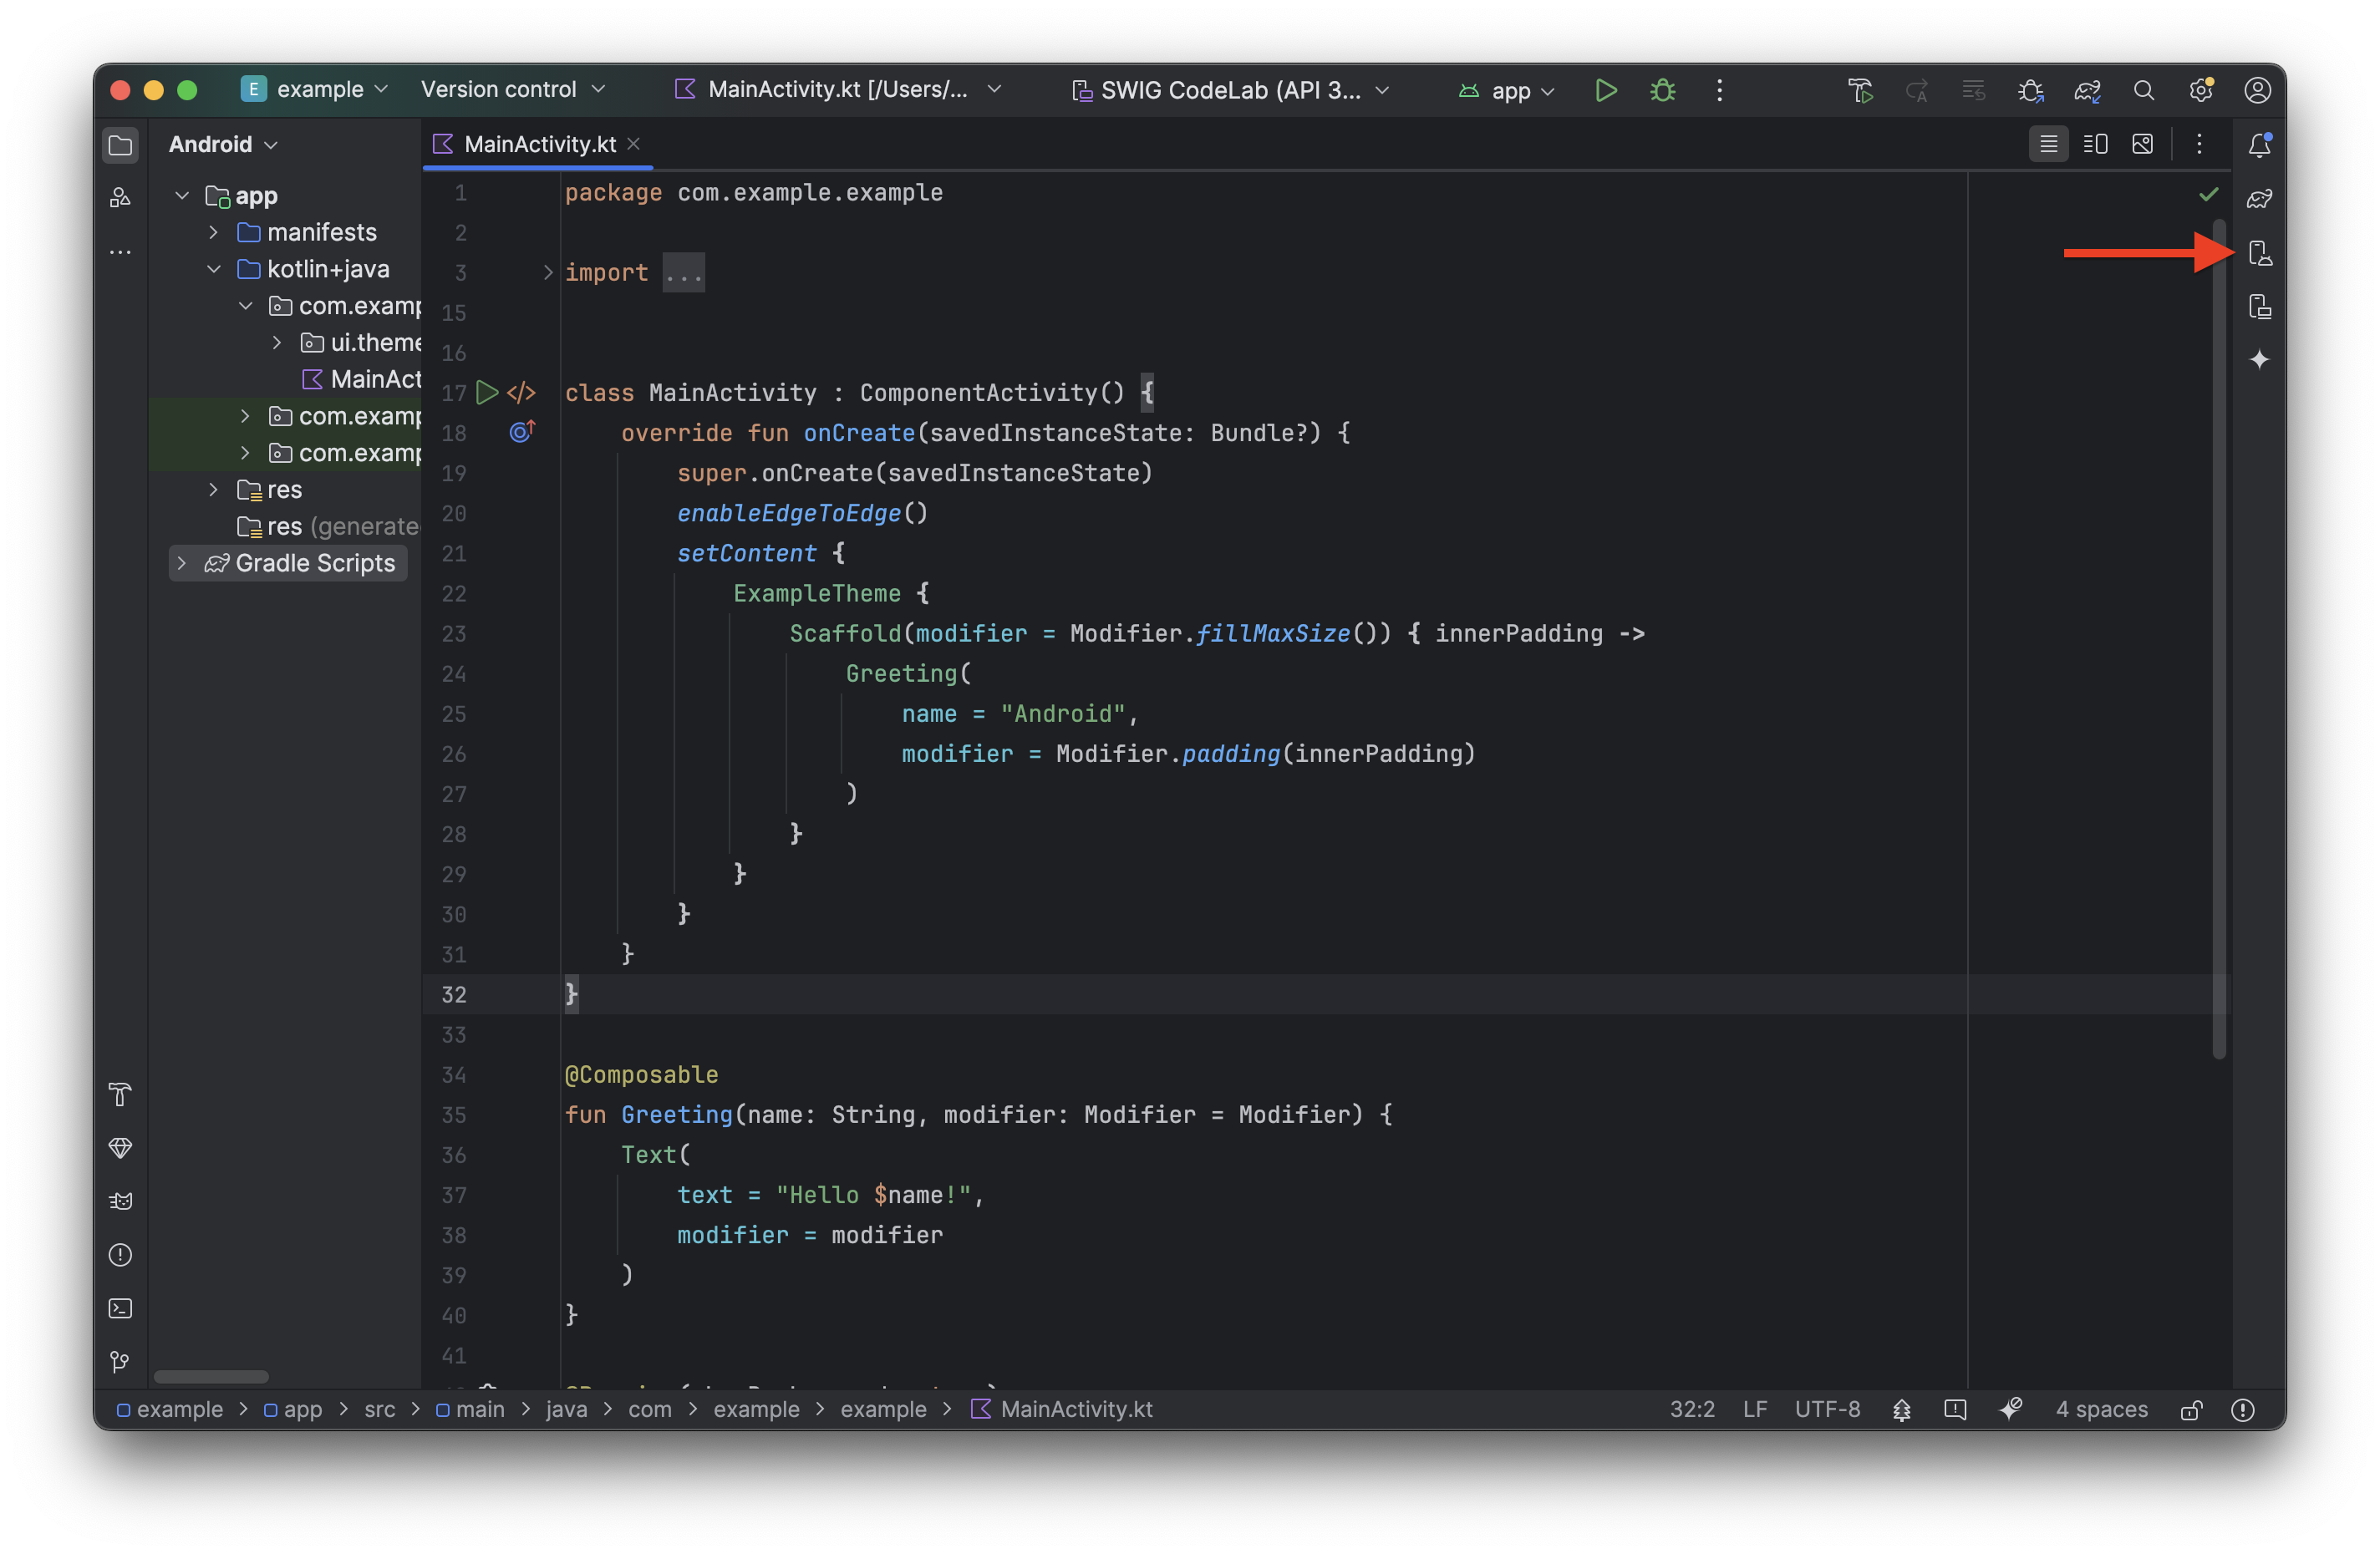
- 在 Android Studio 中開啟裝置管理工具
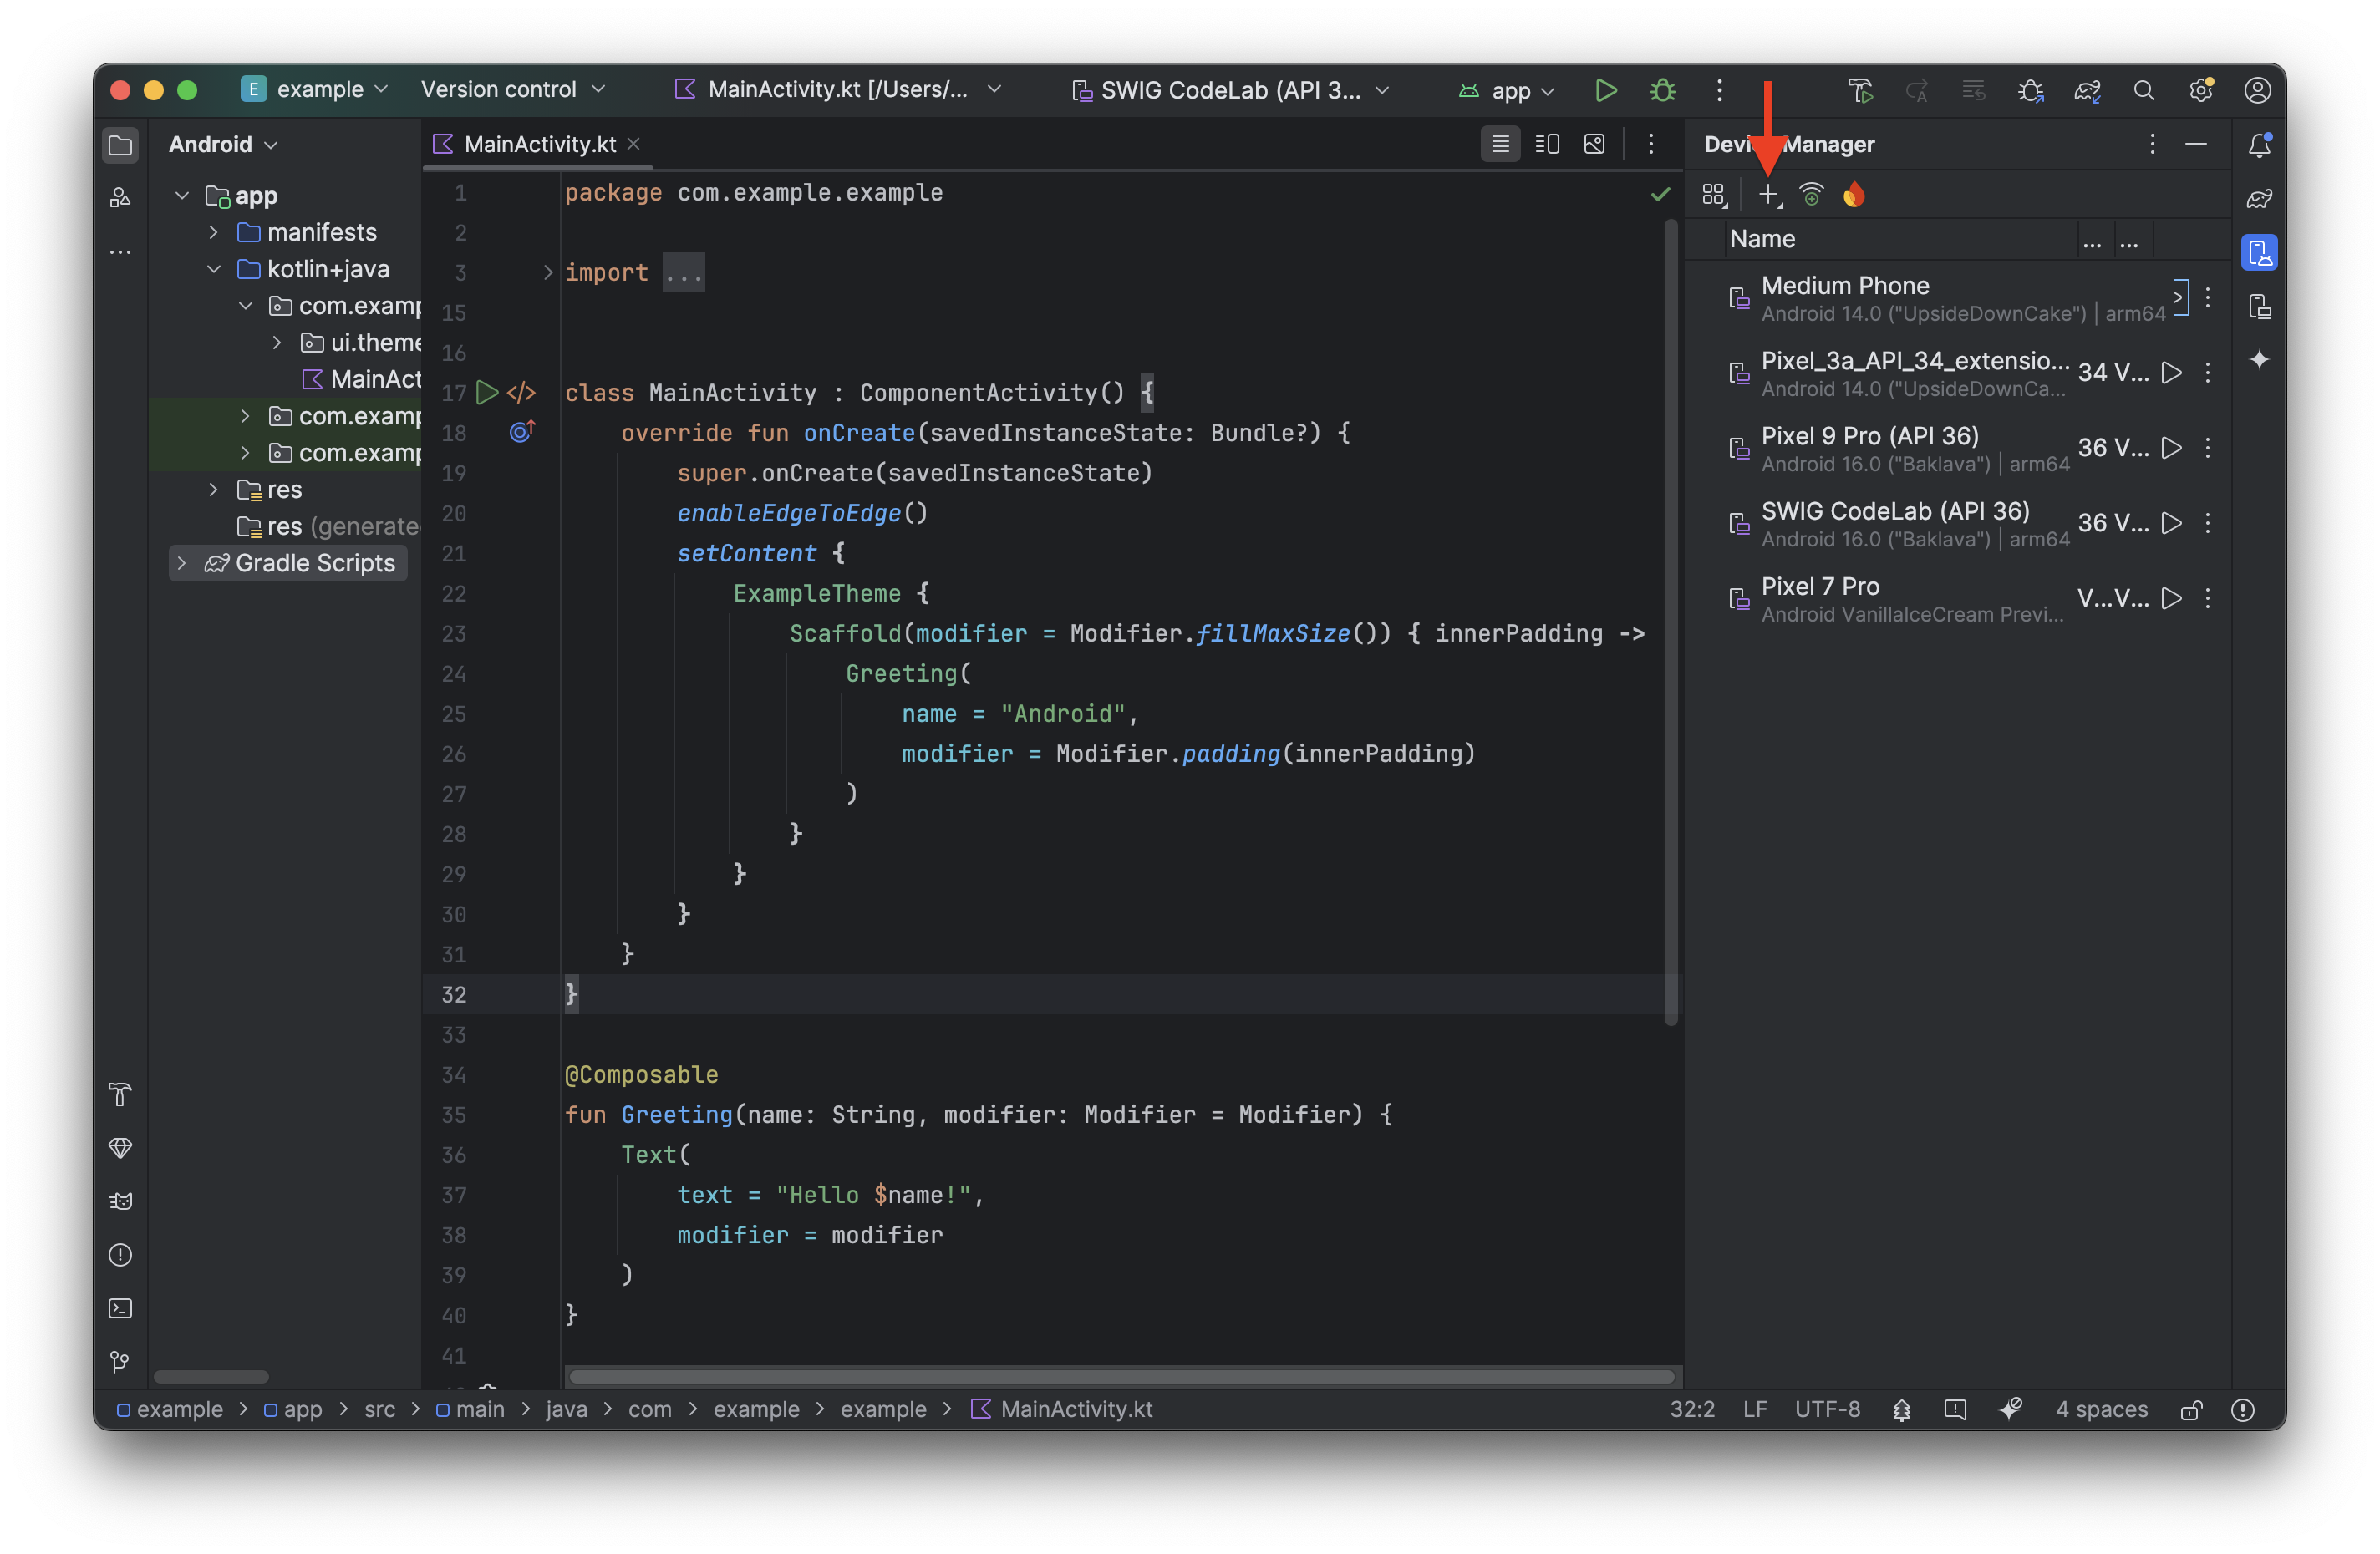
- 按一下「+」按鈕 >「建立虛擬裝置」
- 接著,你可以新增專案所需的任何裝置。在本程式碼研究室中,請選取「Medium Phone」,然後按一下「Next」
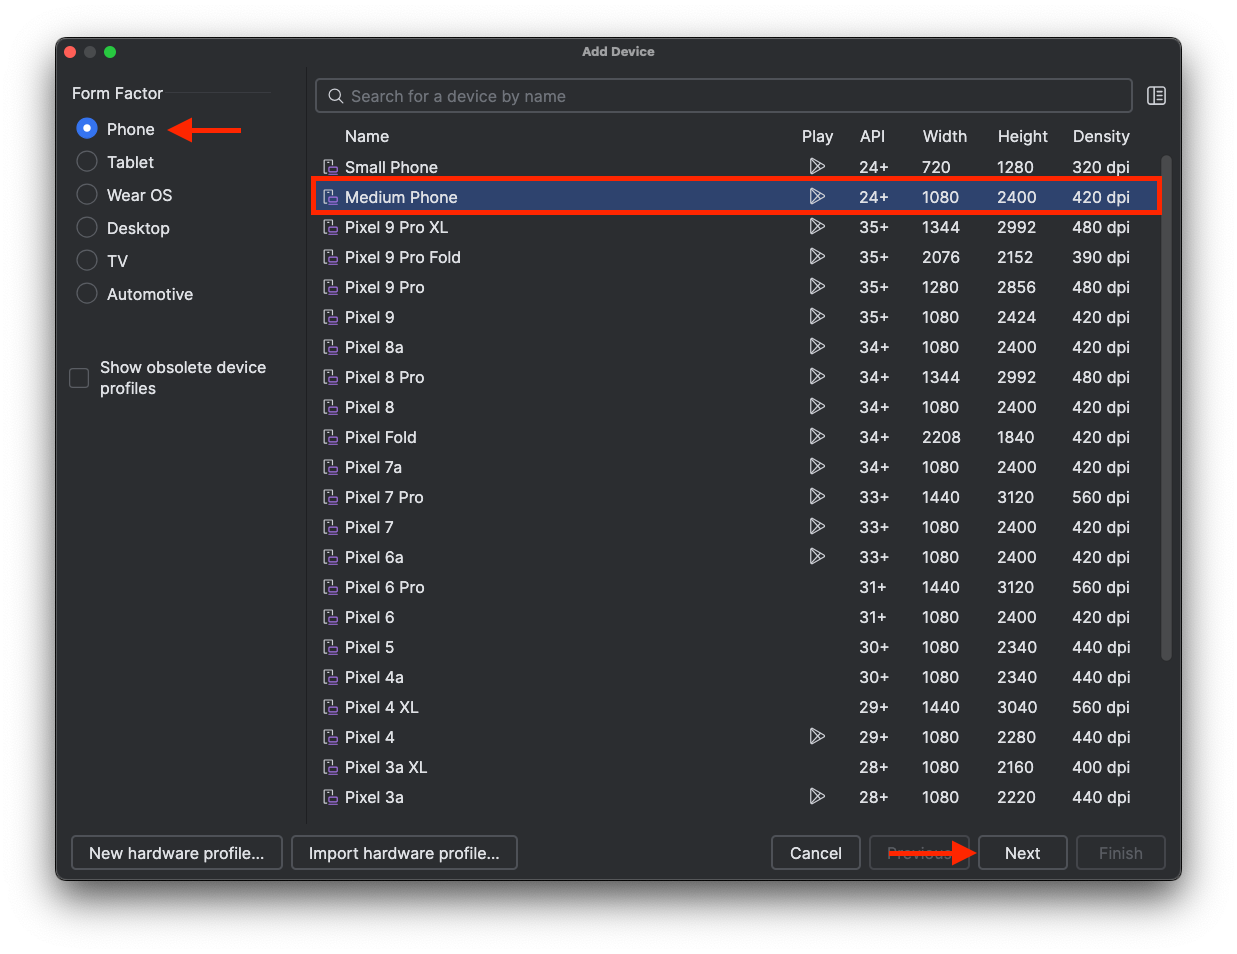 。
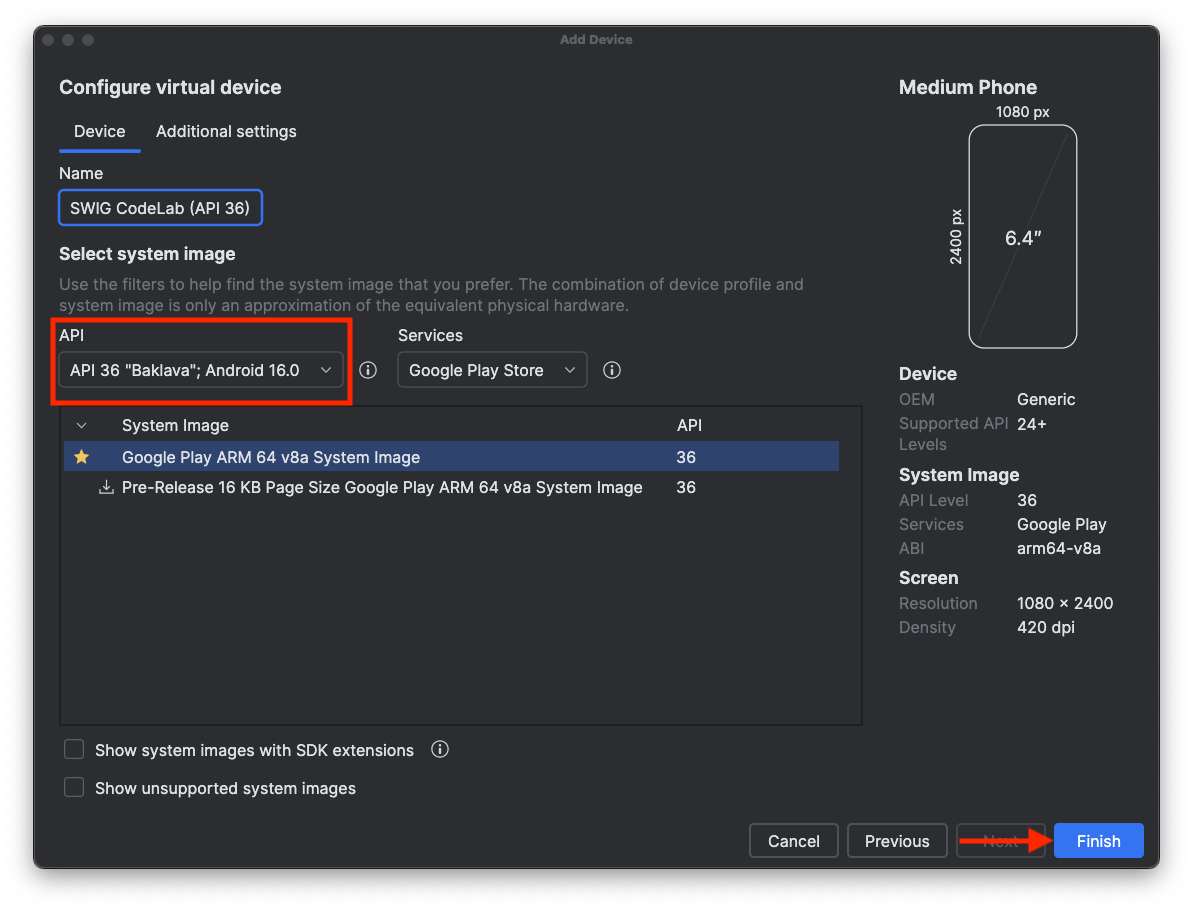
。 - 現在您可以為裝置指定專屬名稱、選擇裝置執行的 Android 版本等,為專案設定裝置。確認 API 設為 API 36「Baklava」;Android 16,然後按一下「完成」
- 裝置管理工具中應該會顯示新裝置。如要確認裝置是否正常運作,請點選剛建立裝置旁的
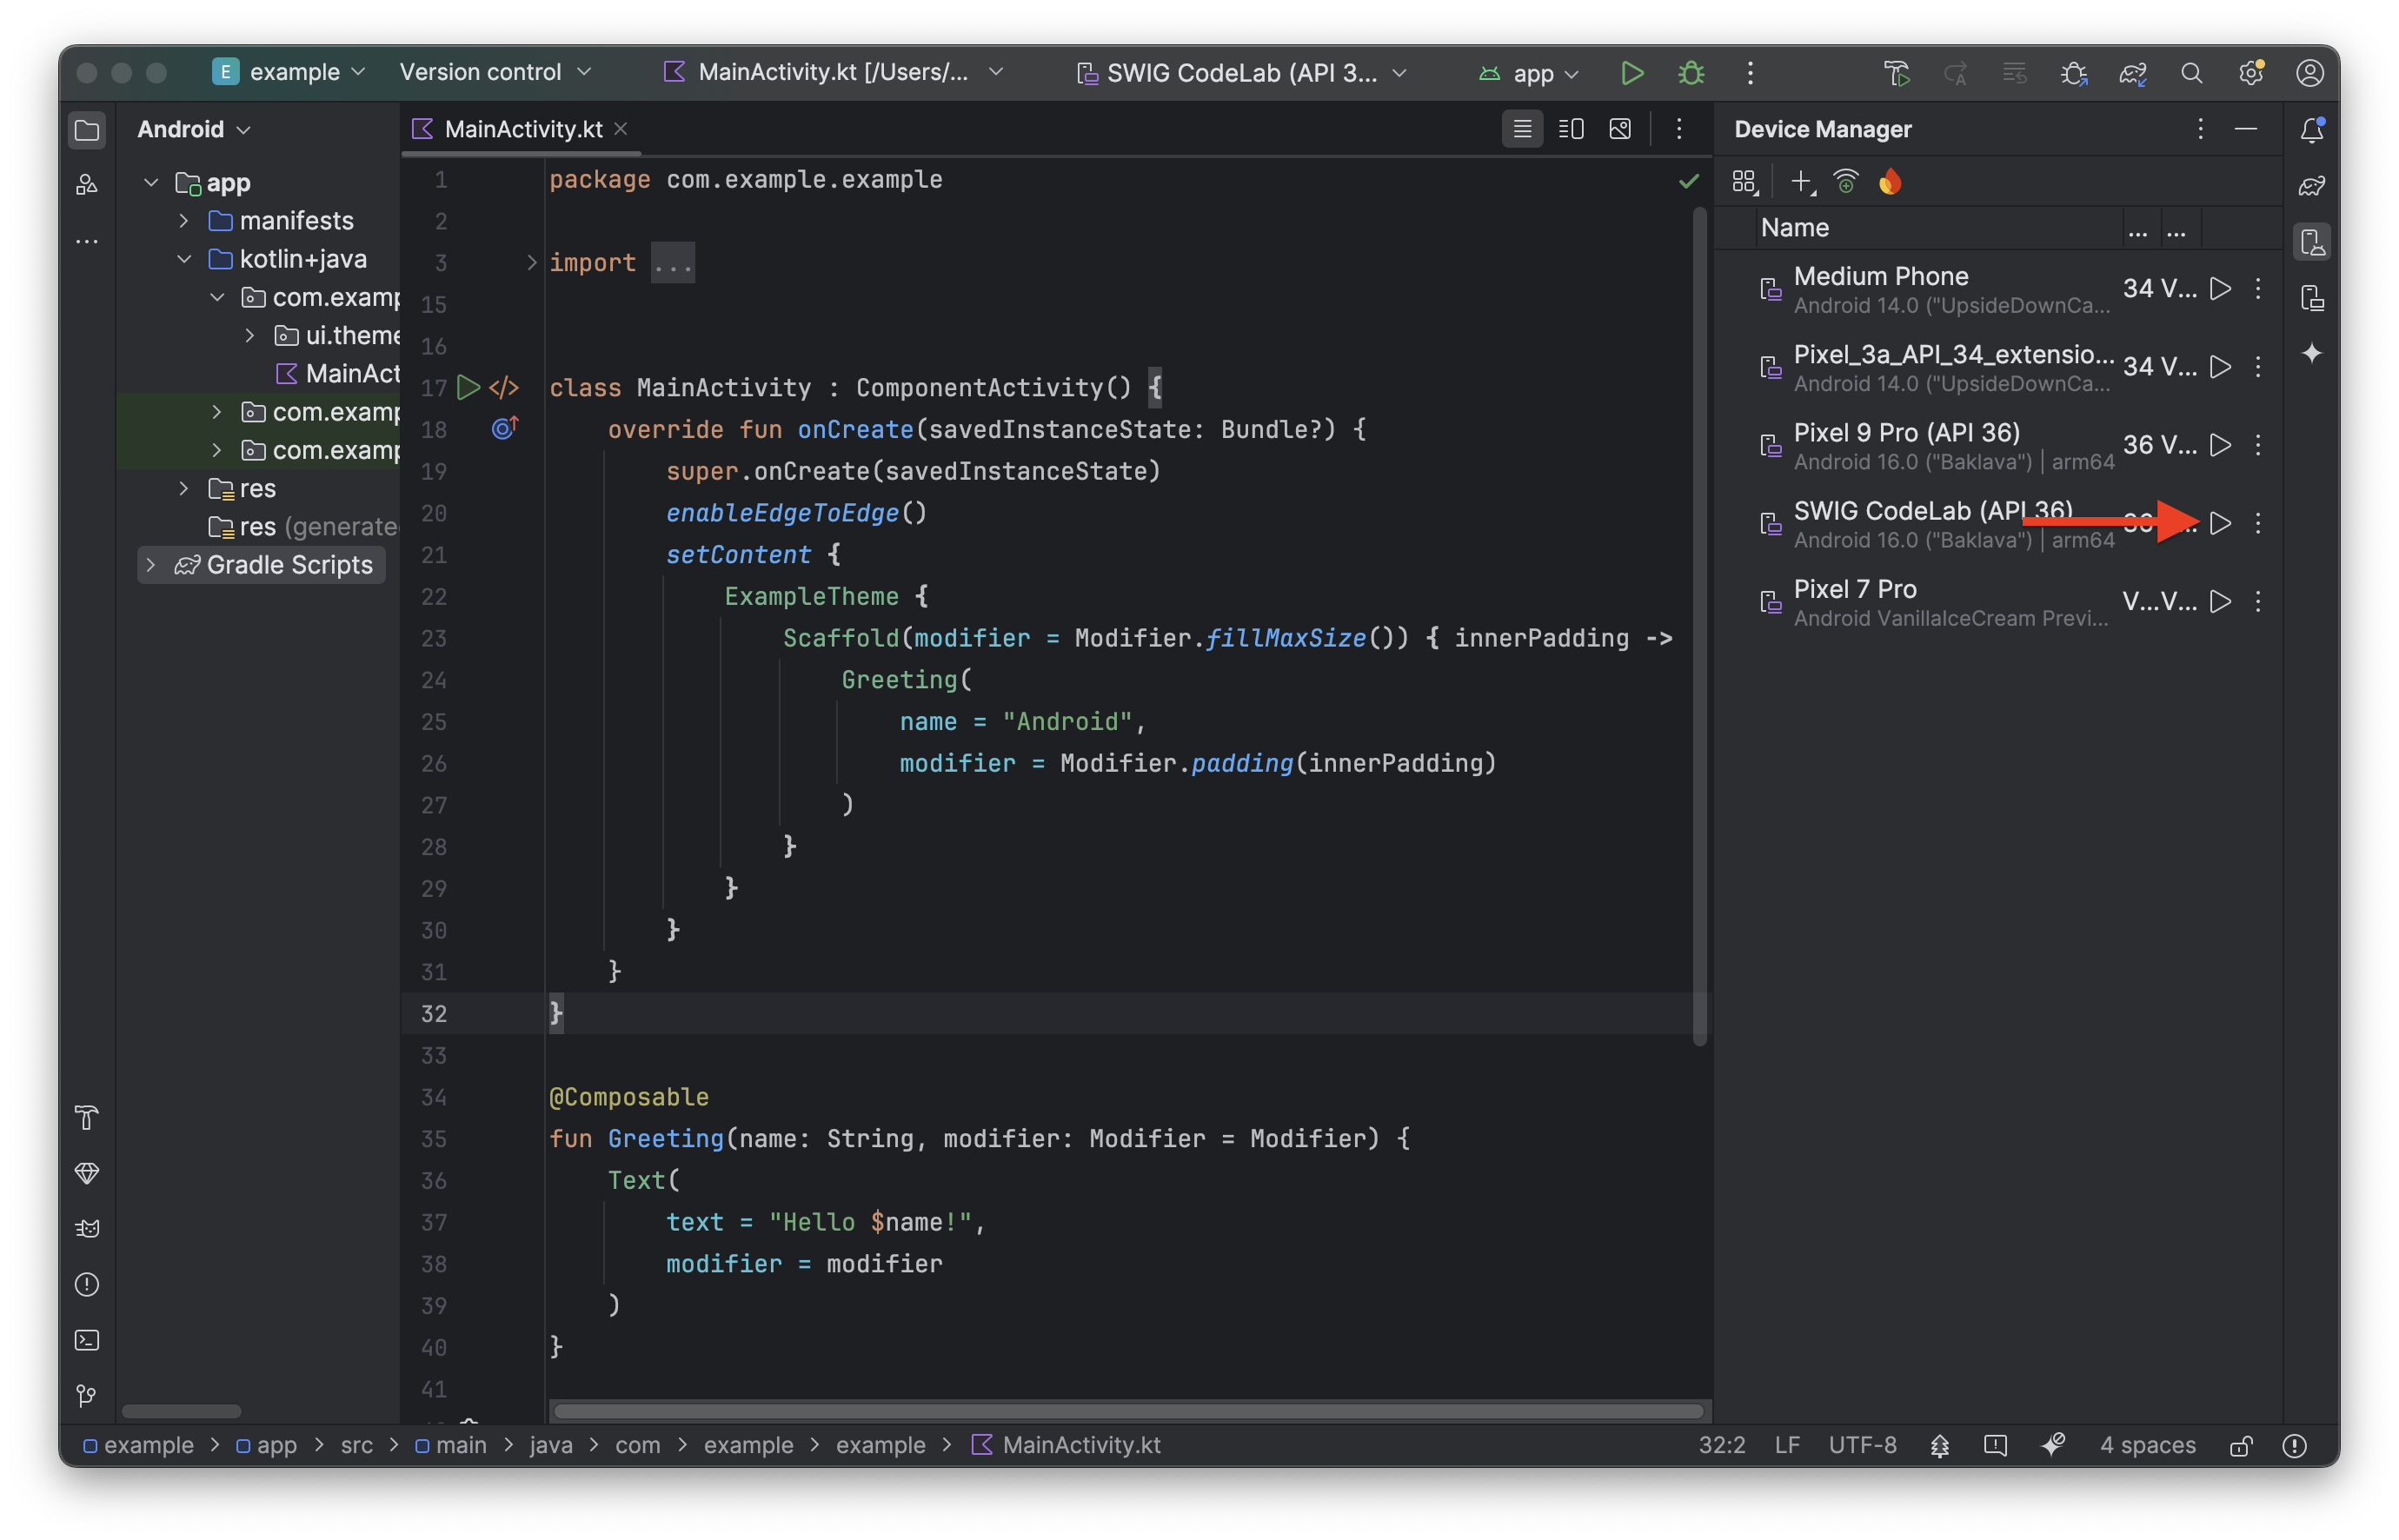 。
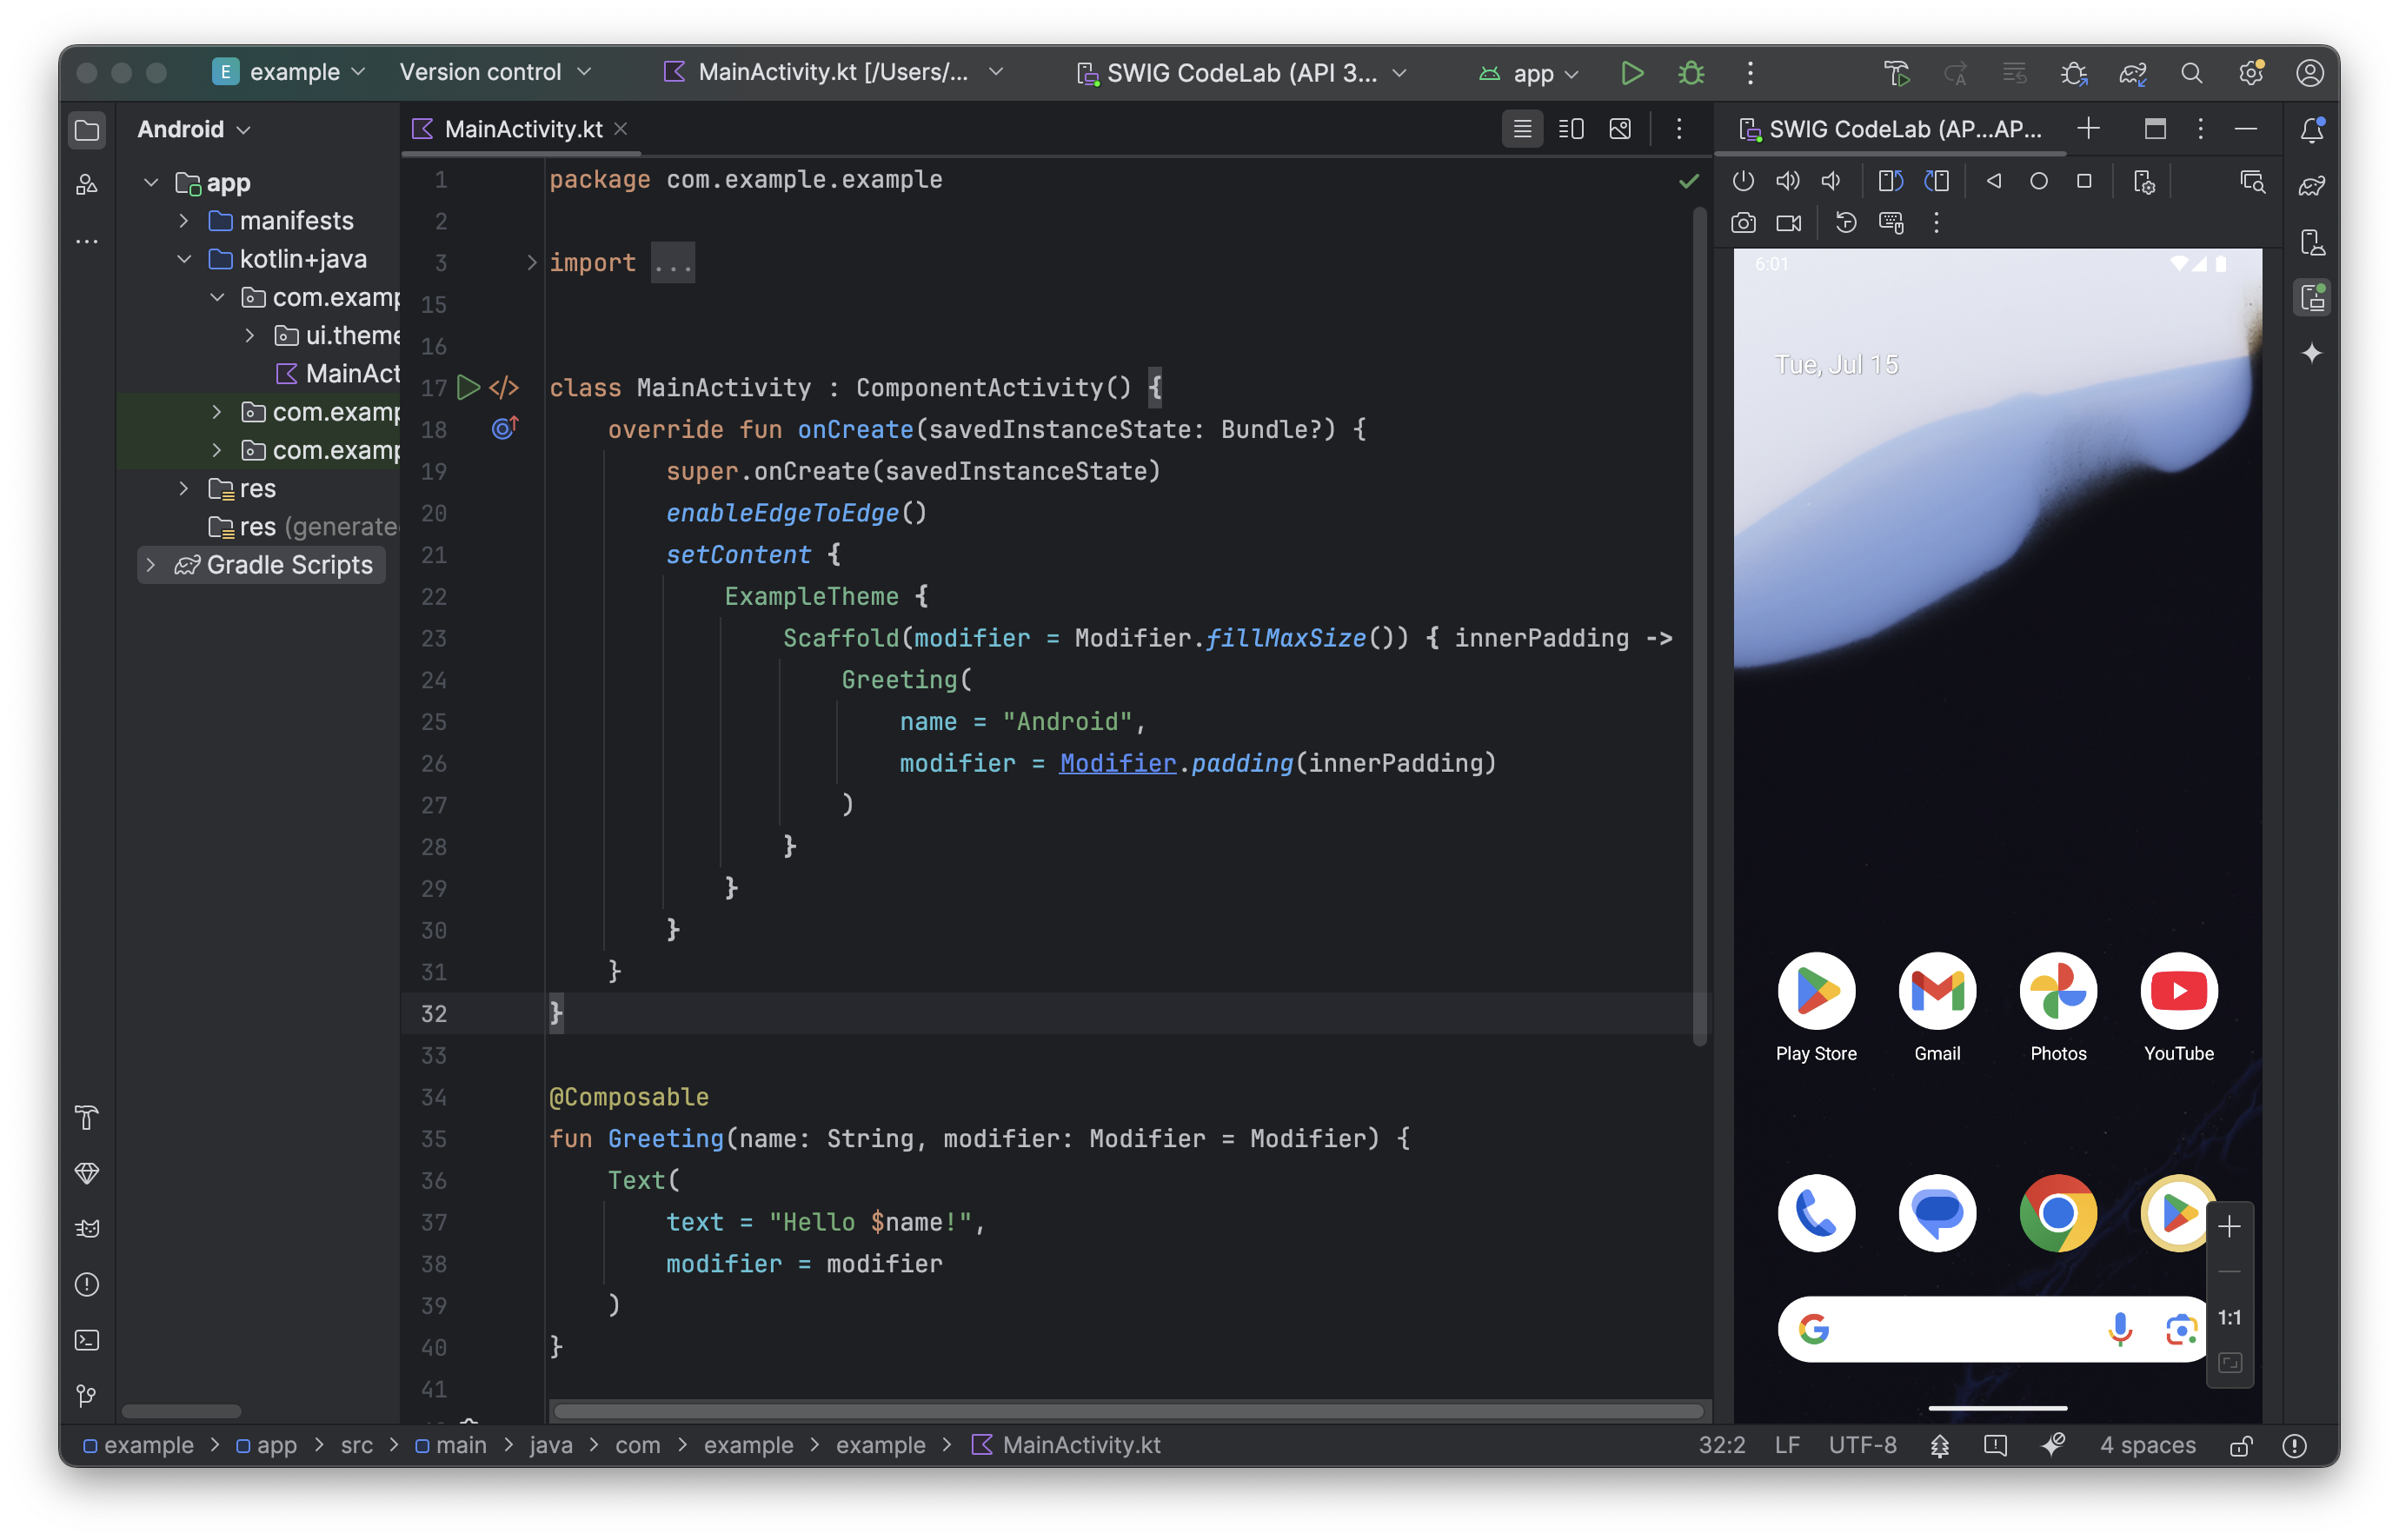
。 - 裝置現在應該可以運作了!
登入 Android 虛擬裝置
您剛建立的裝置可以運作,現在為了避免測試「使用 Google 帳戶登入」時發生錯誤,我們需要使用 Google 帳戶登入裝置。
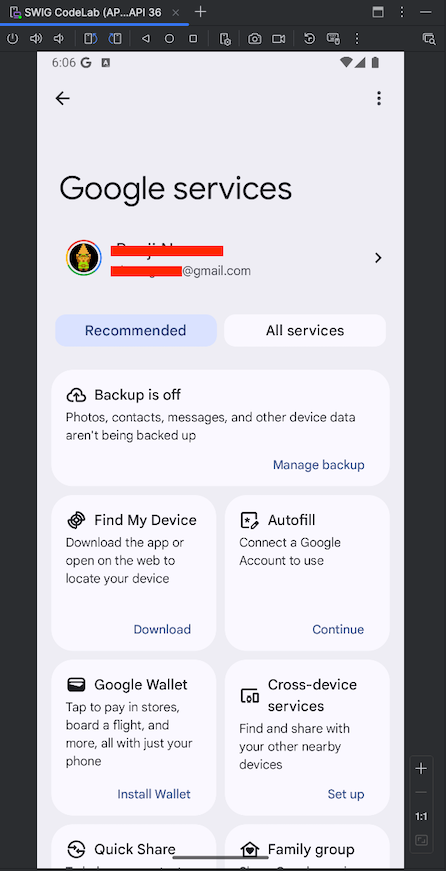
- 前往「設定」:
- 按一下虛擬裝置畫面中央並向上滑動
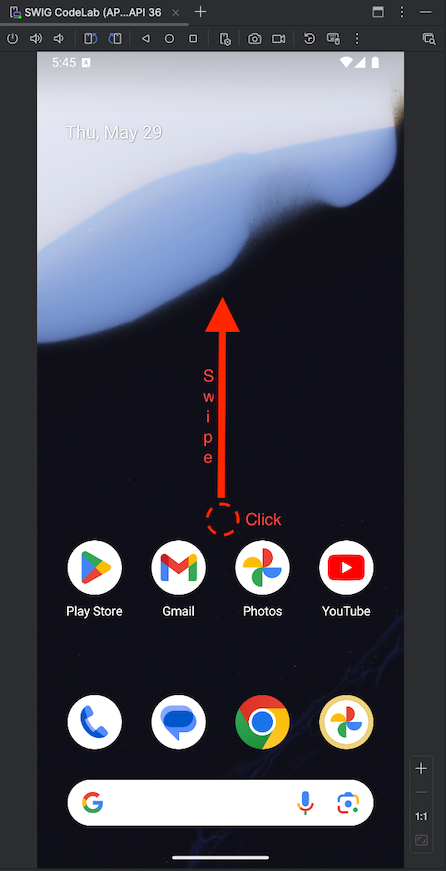
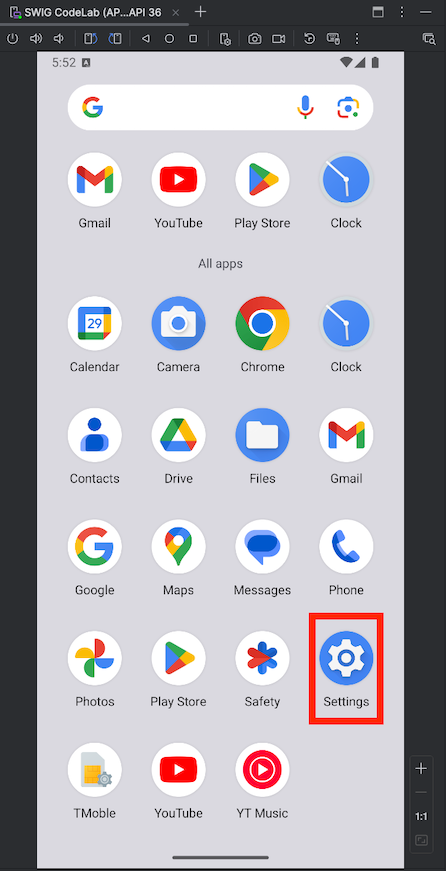
- 找到並點選「設定」應用程式
- 在「設定」
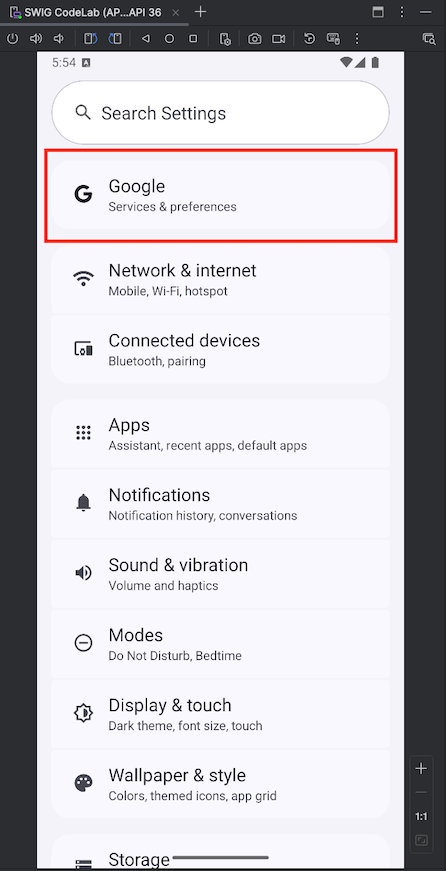 中按一下「Google」
 - 按一下「登入」,然後按照提示登入 Google 帳戶
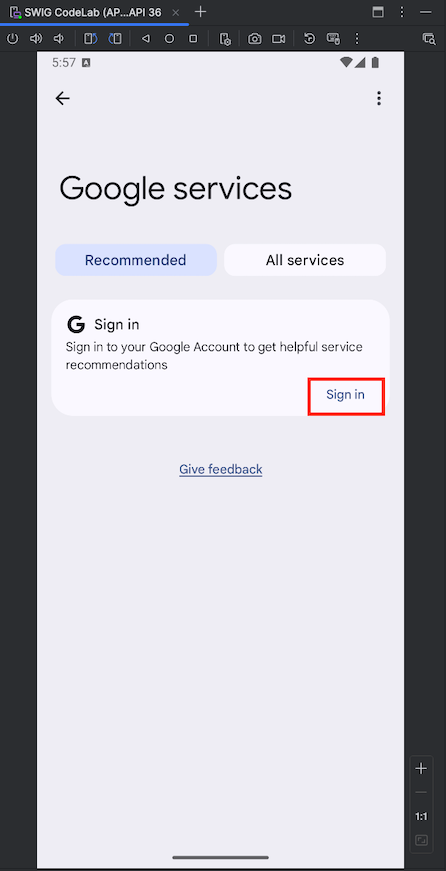
- 你現在應該已在裝置上登入帳戶
虛擬 Android 裝置現在已可供測試!
5. 新增依附元件
時間長度 5:00
如要發出 OAuth API 呼叫,我們必須先整合必要的程式庫,以便發出驗證要求,並使用 Google ID 發出這些要求:
- libs.googleid
- libs.play.services.auth
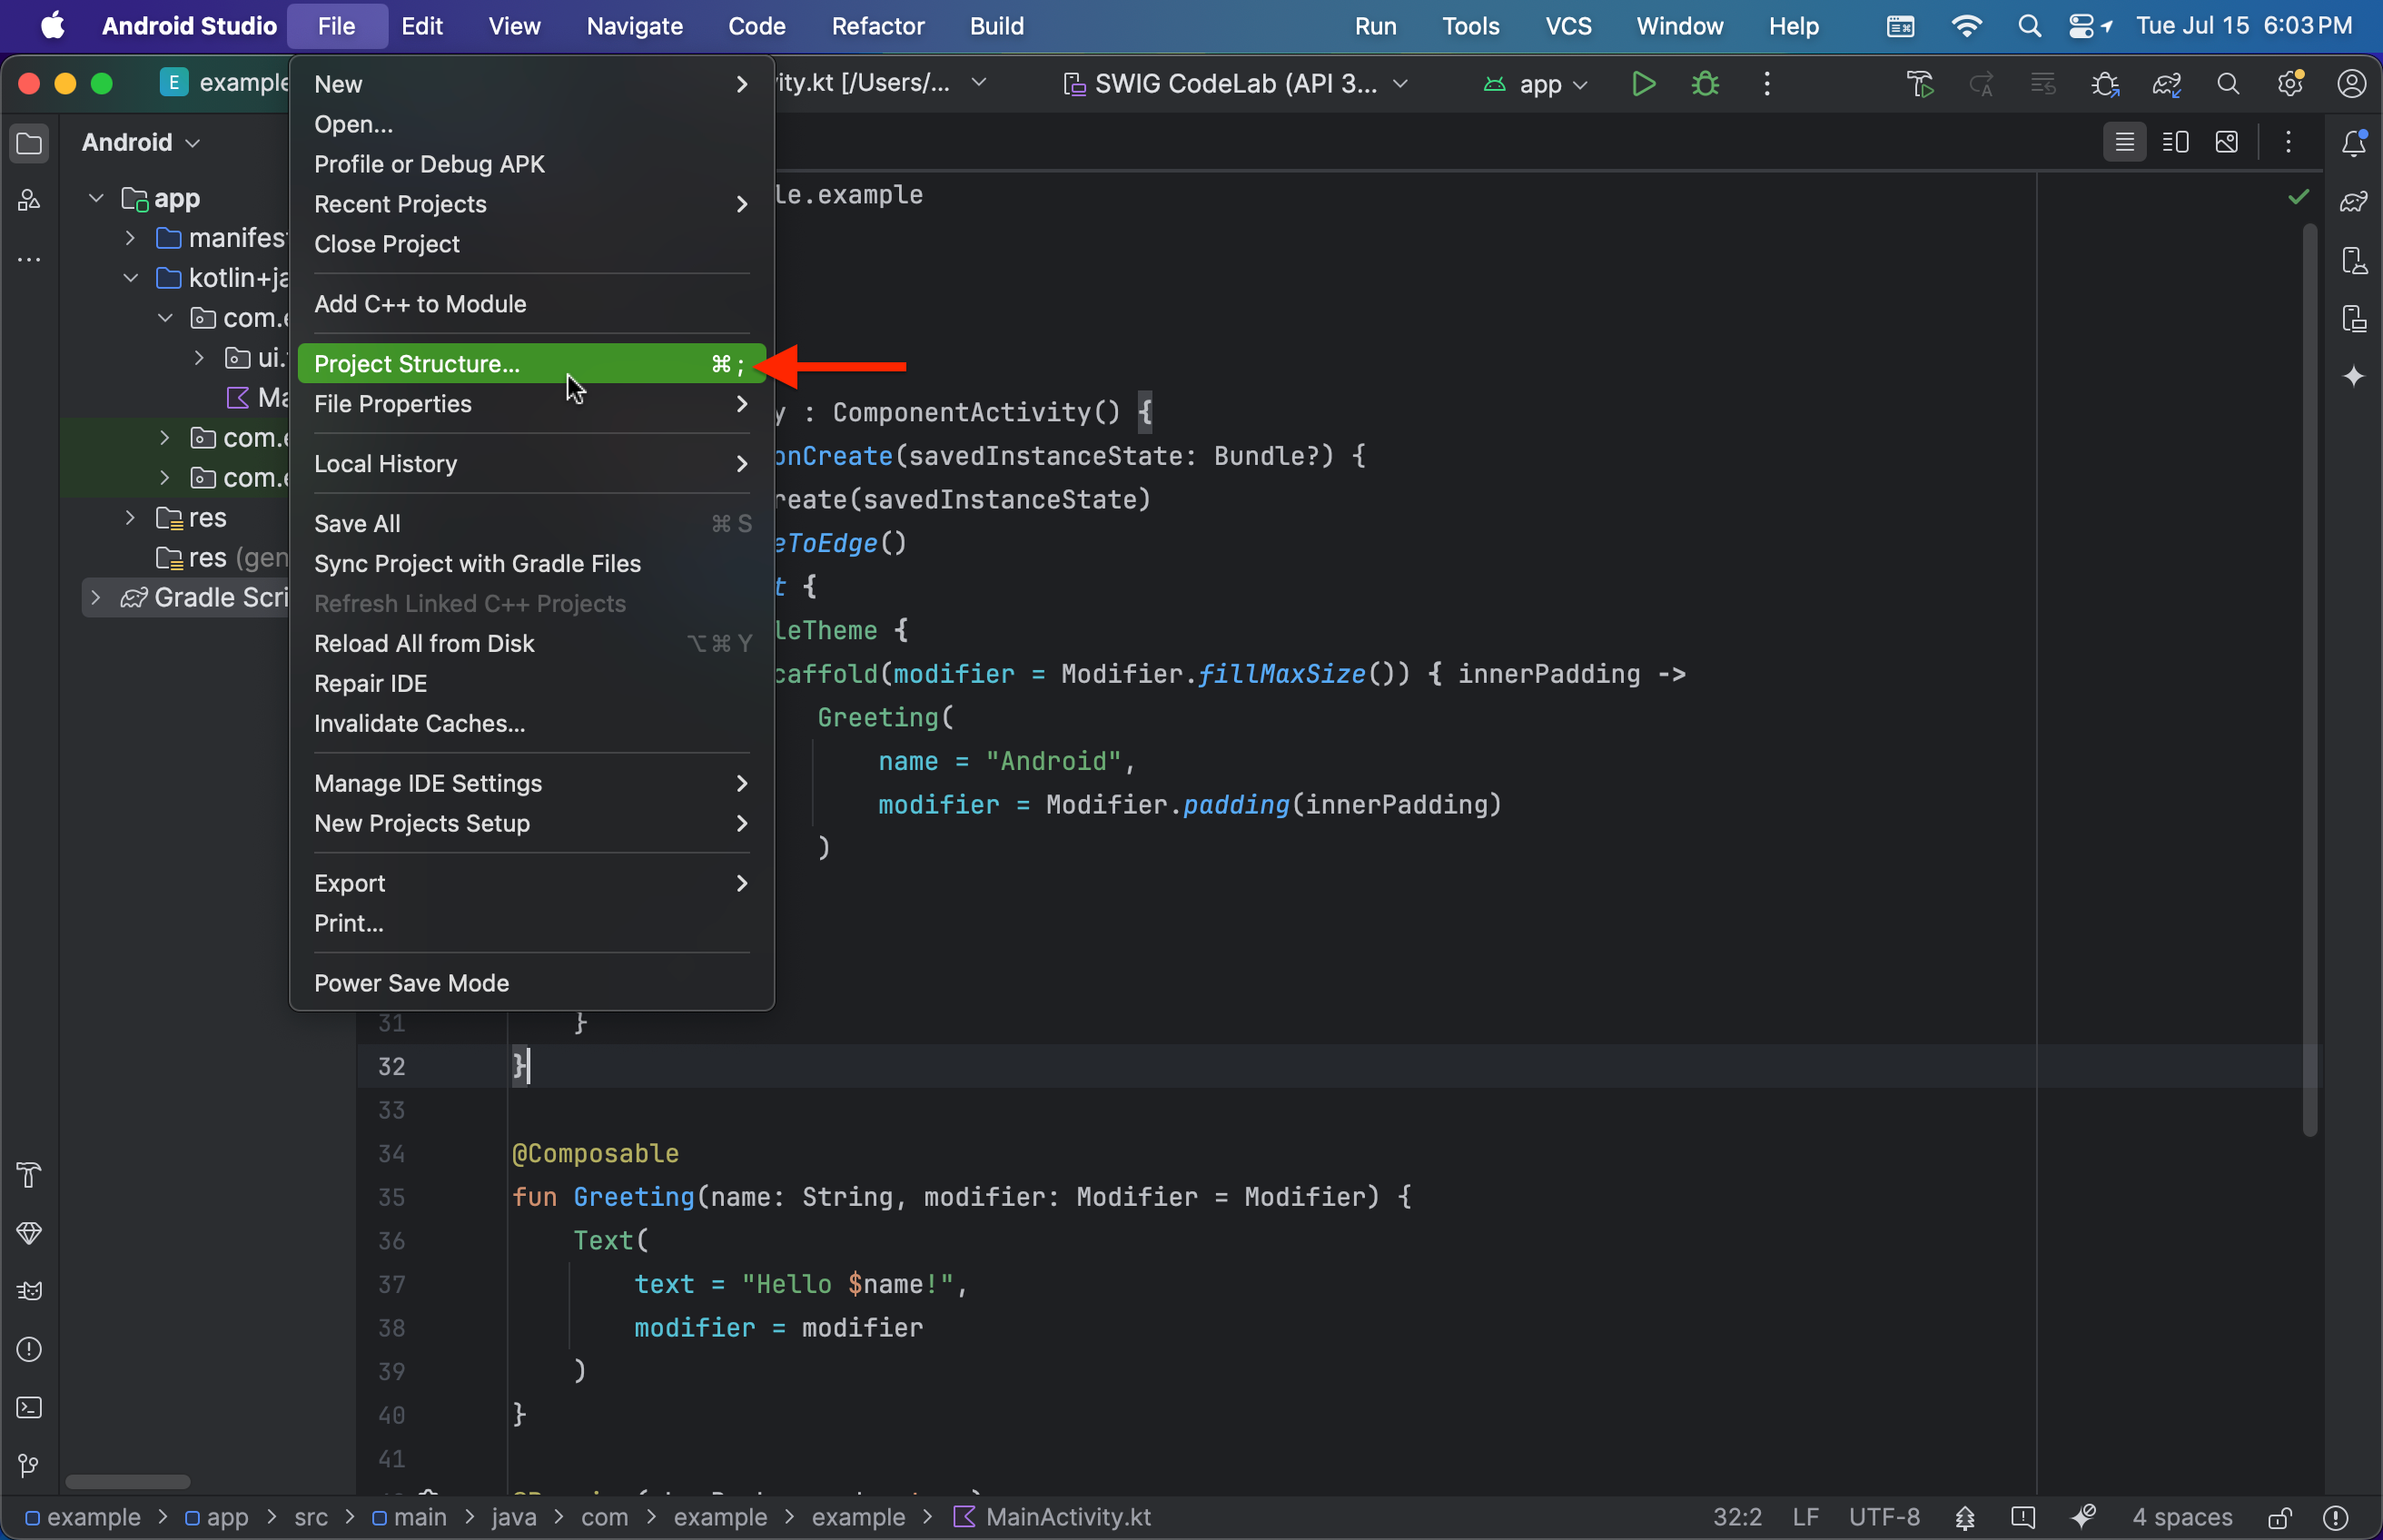
- 依序前往「File」>「Project Structure」:
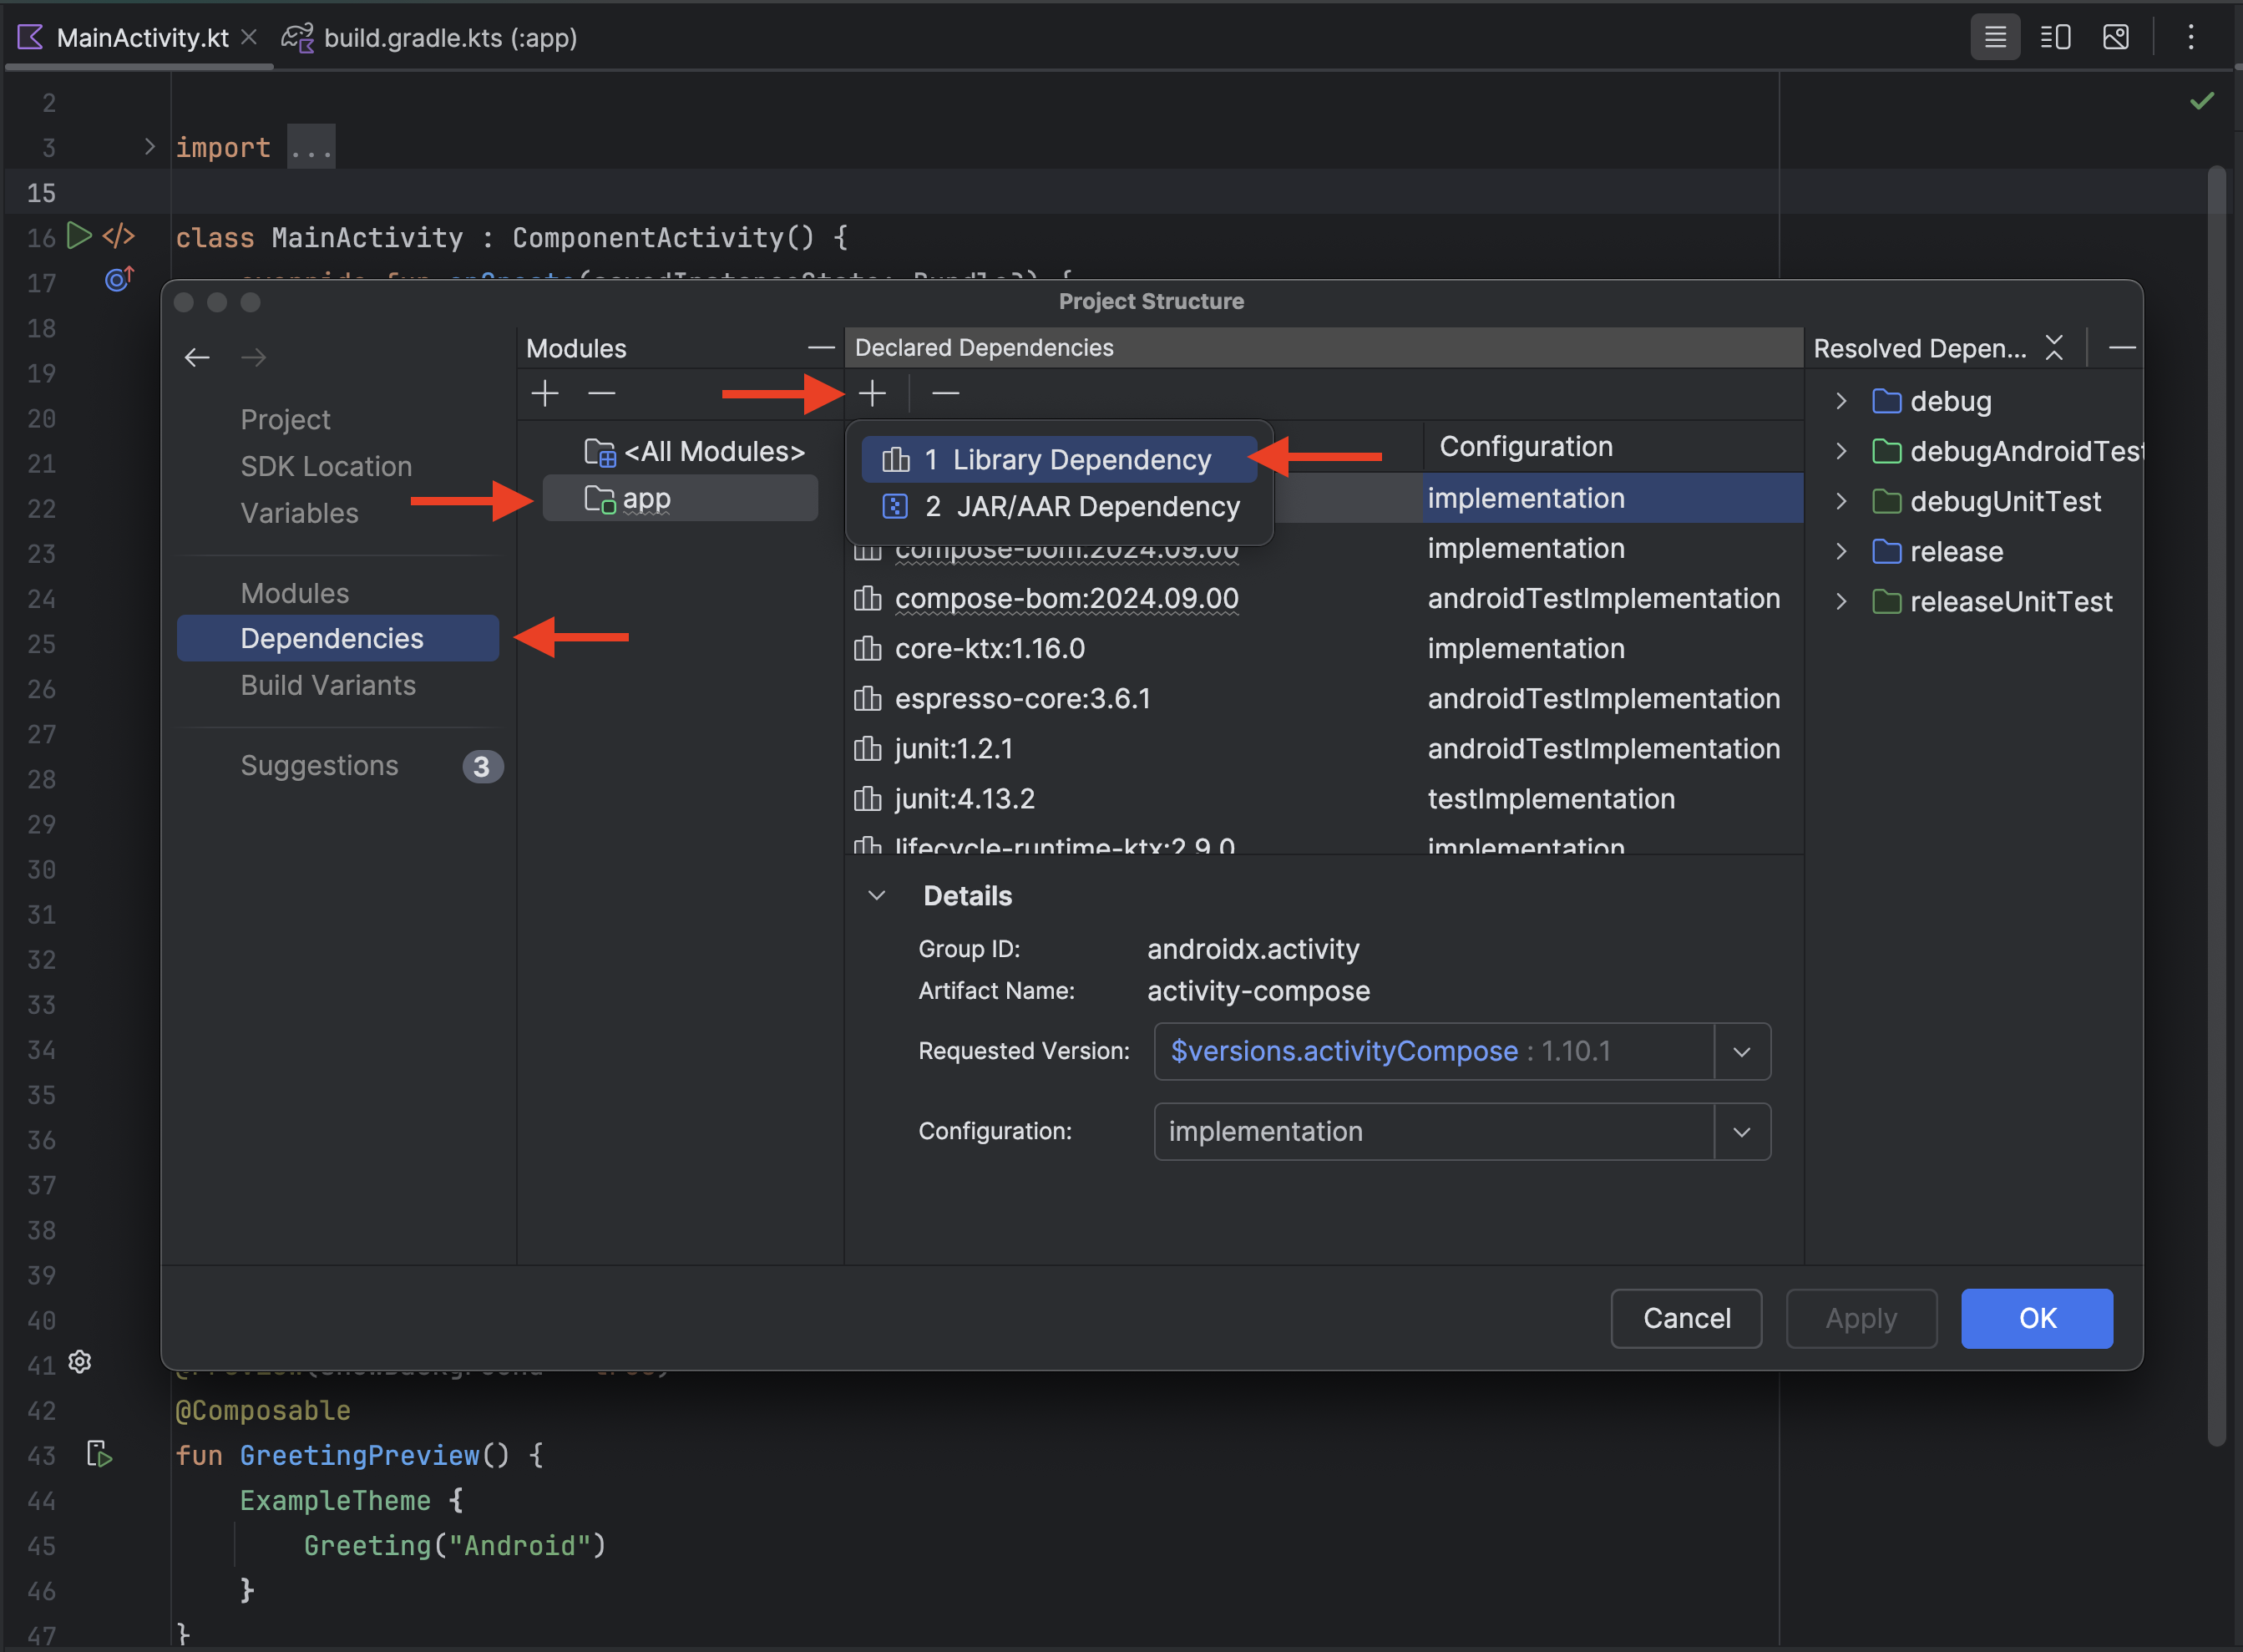
- 然後依序前往「Dependencies」 >「app」 >「'+'」 >「Library Dependency」
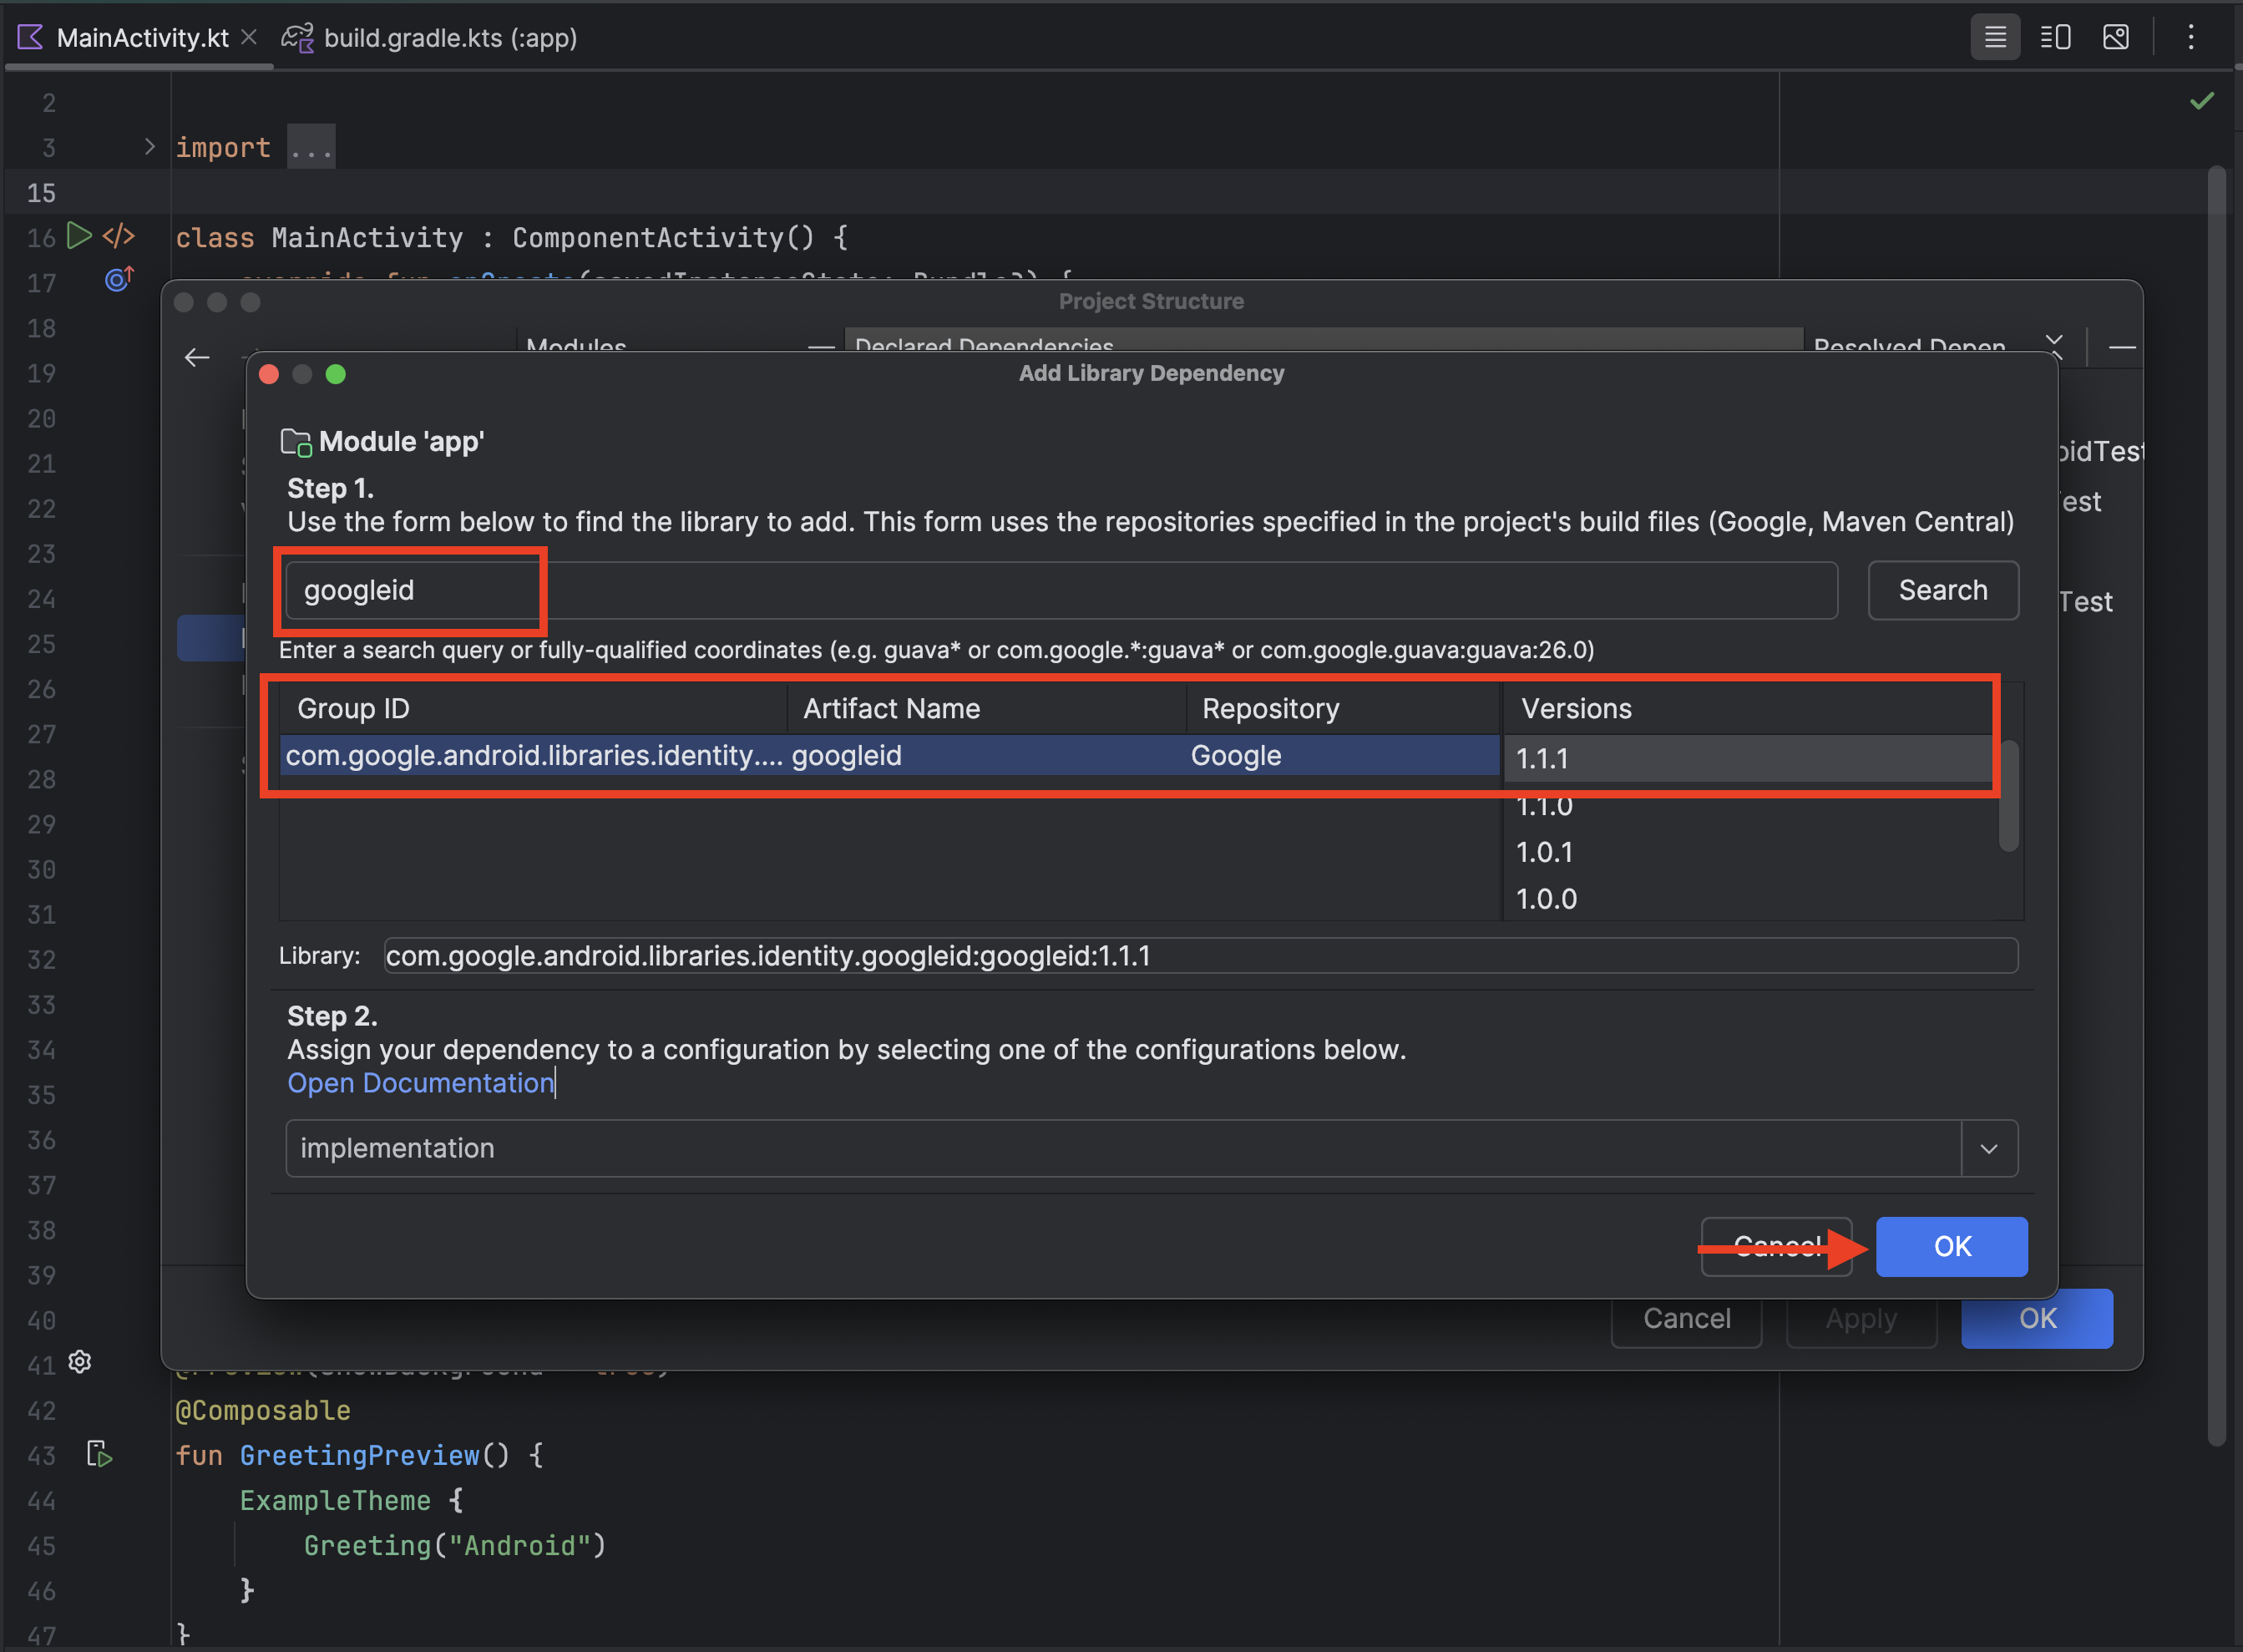
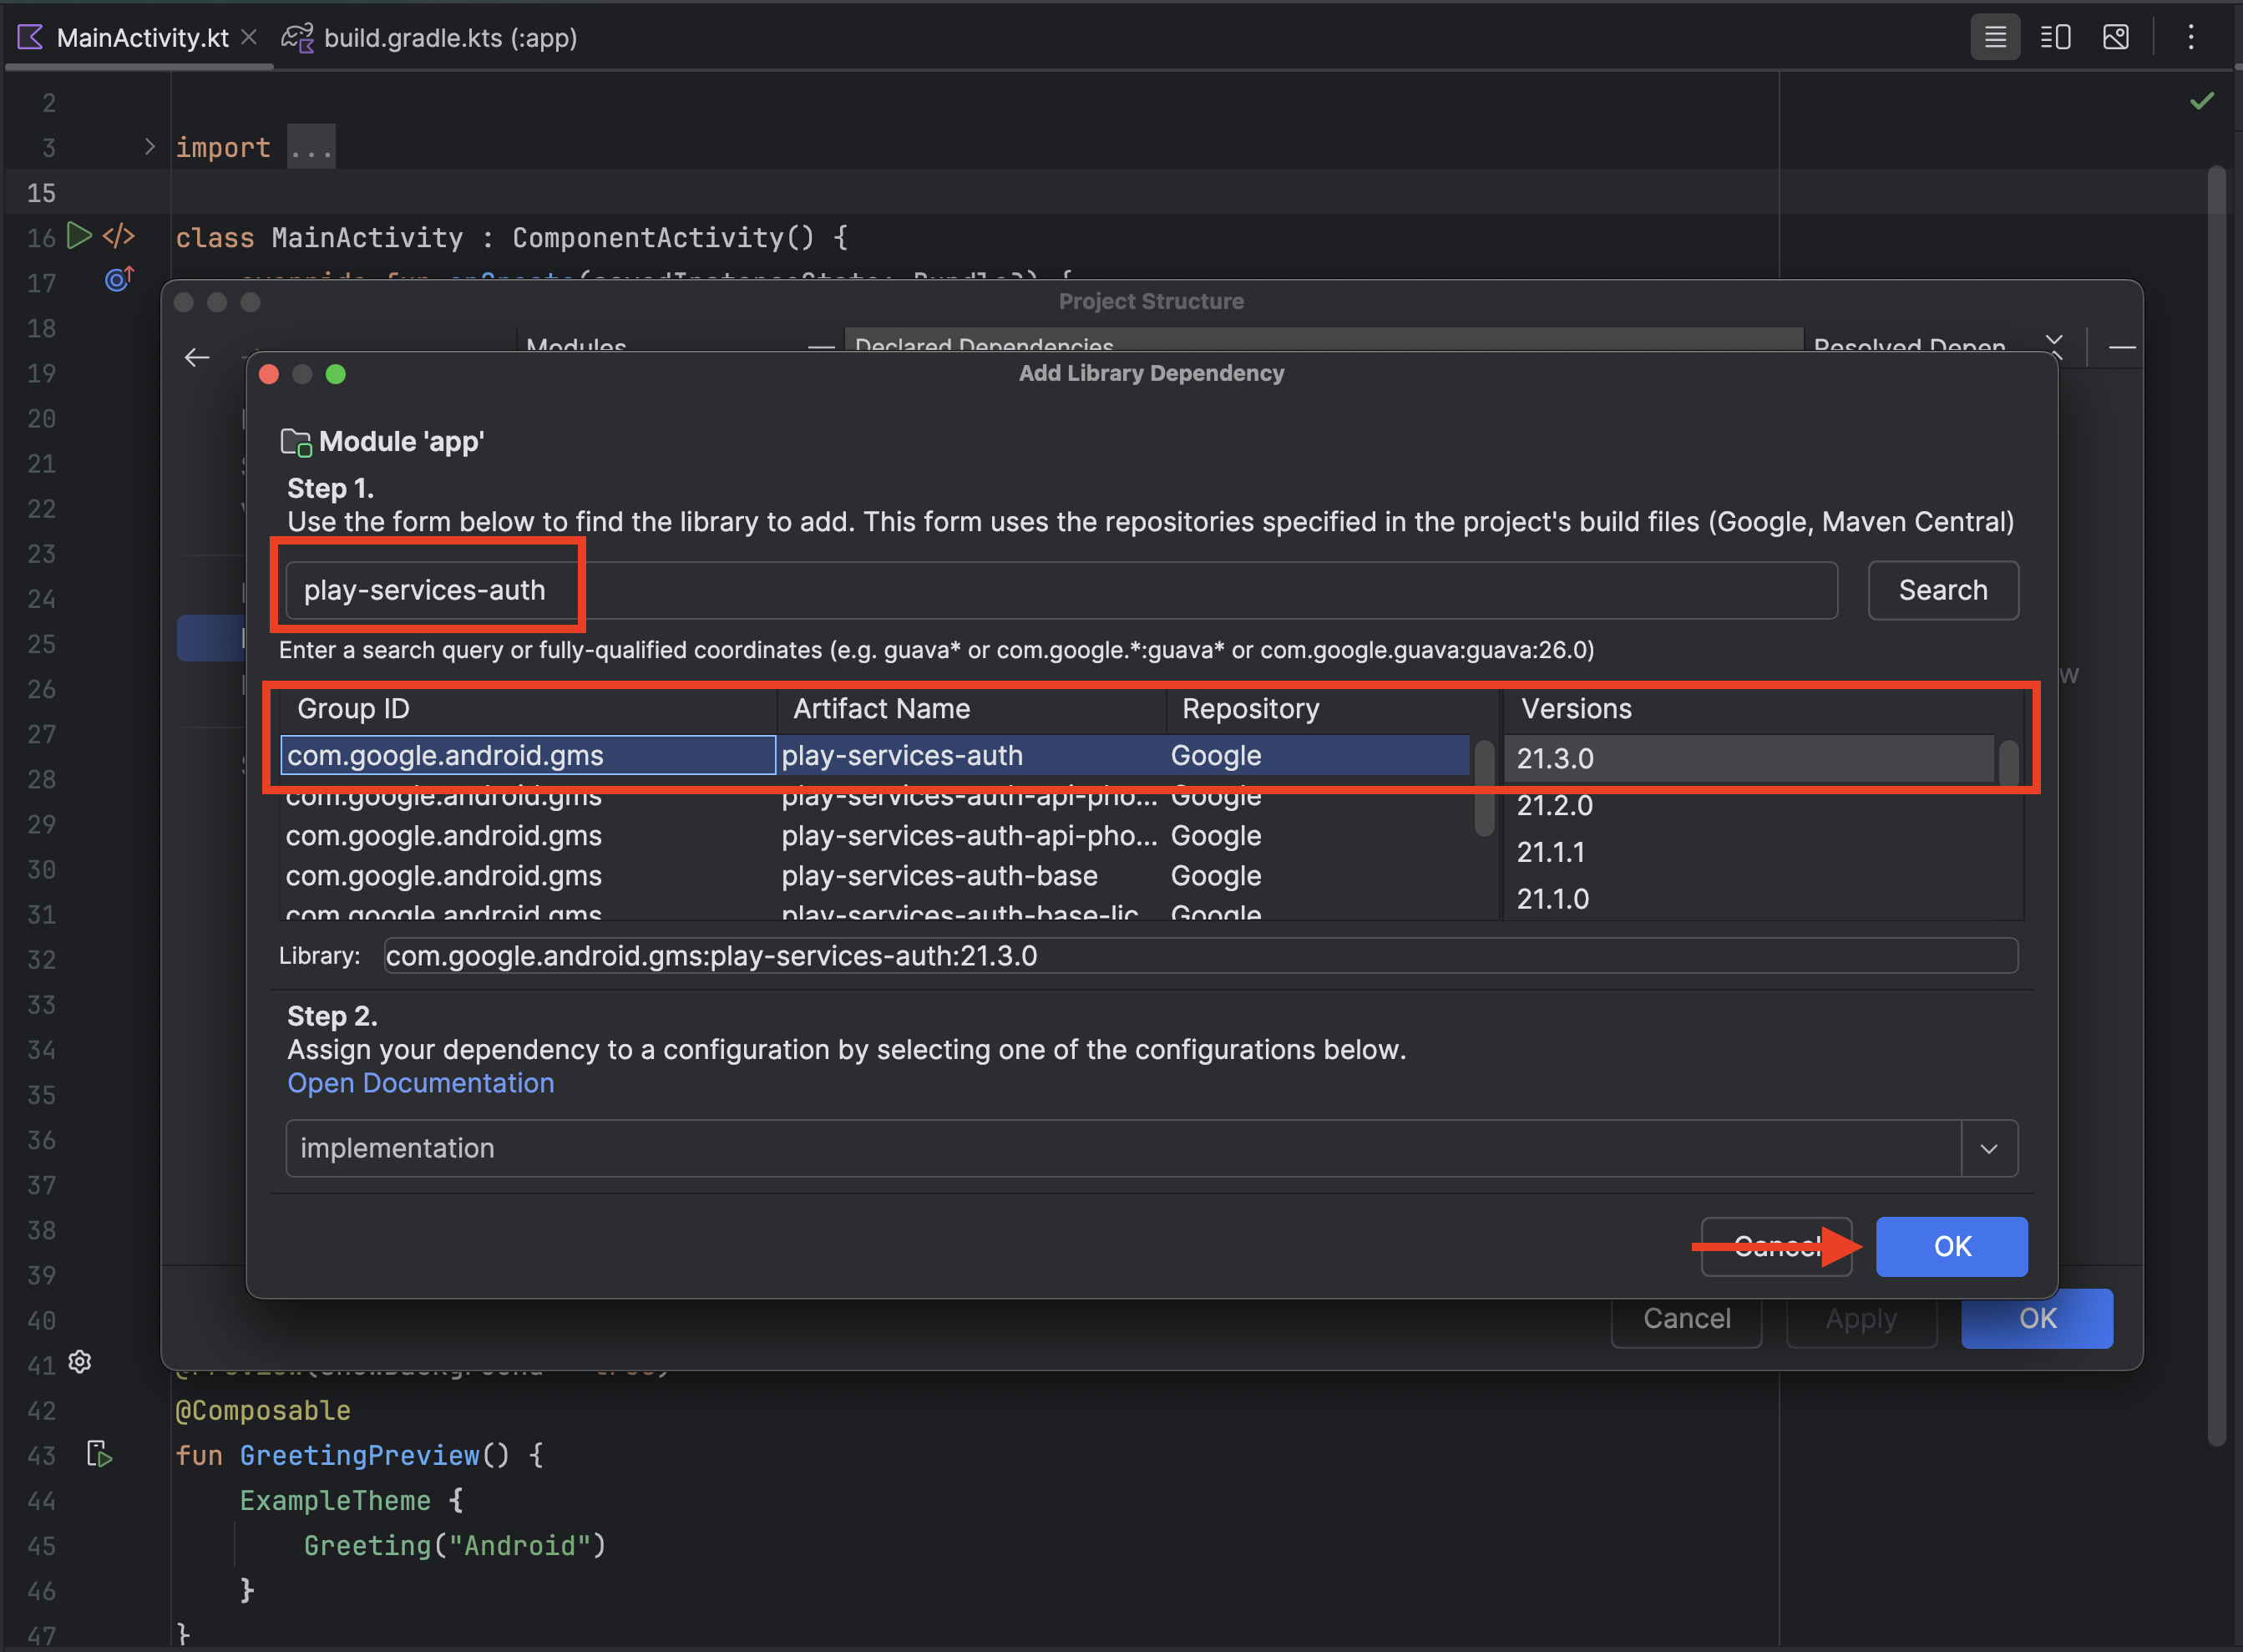
- 現在我們需要新增程式庫:
- 在搜尋對話方塊中輸入 googleid,然後按一下「搜尋」
- 應該只會有一個項目,請選取該項目和可用的最高版本 (本程式碼研究室當時的最高版本為 1.1.1)。
- 按一下「確定」
 。
。 - 重複步驟 1 至 3,但這次請搜尋「play-services-auth」,然後選取「com.google.android.gms」為「群組 ID」、「play-services-auth」為「構件名稱」的行
- 按一下「確定」
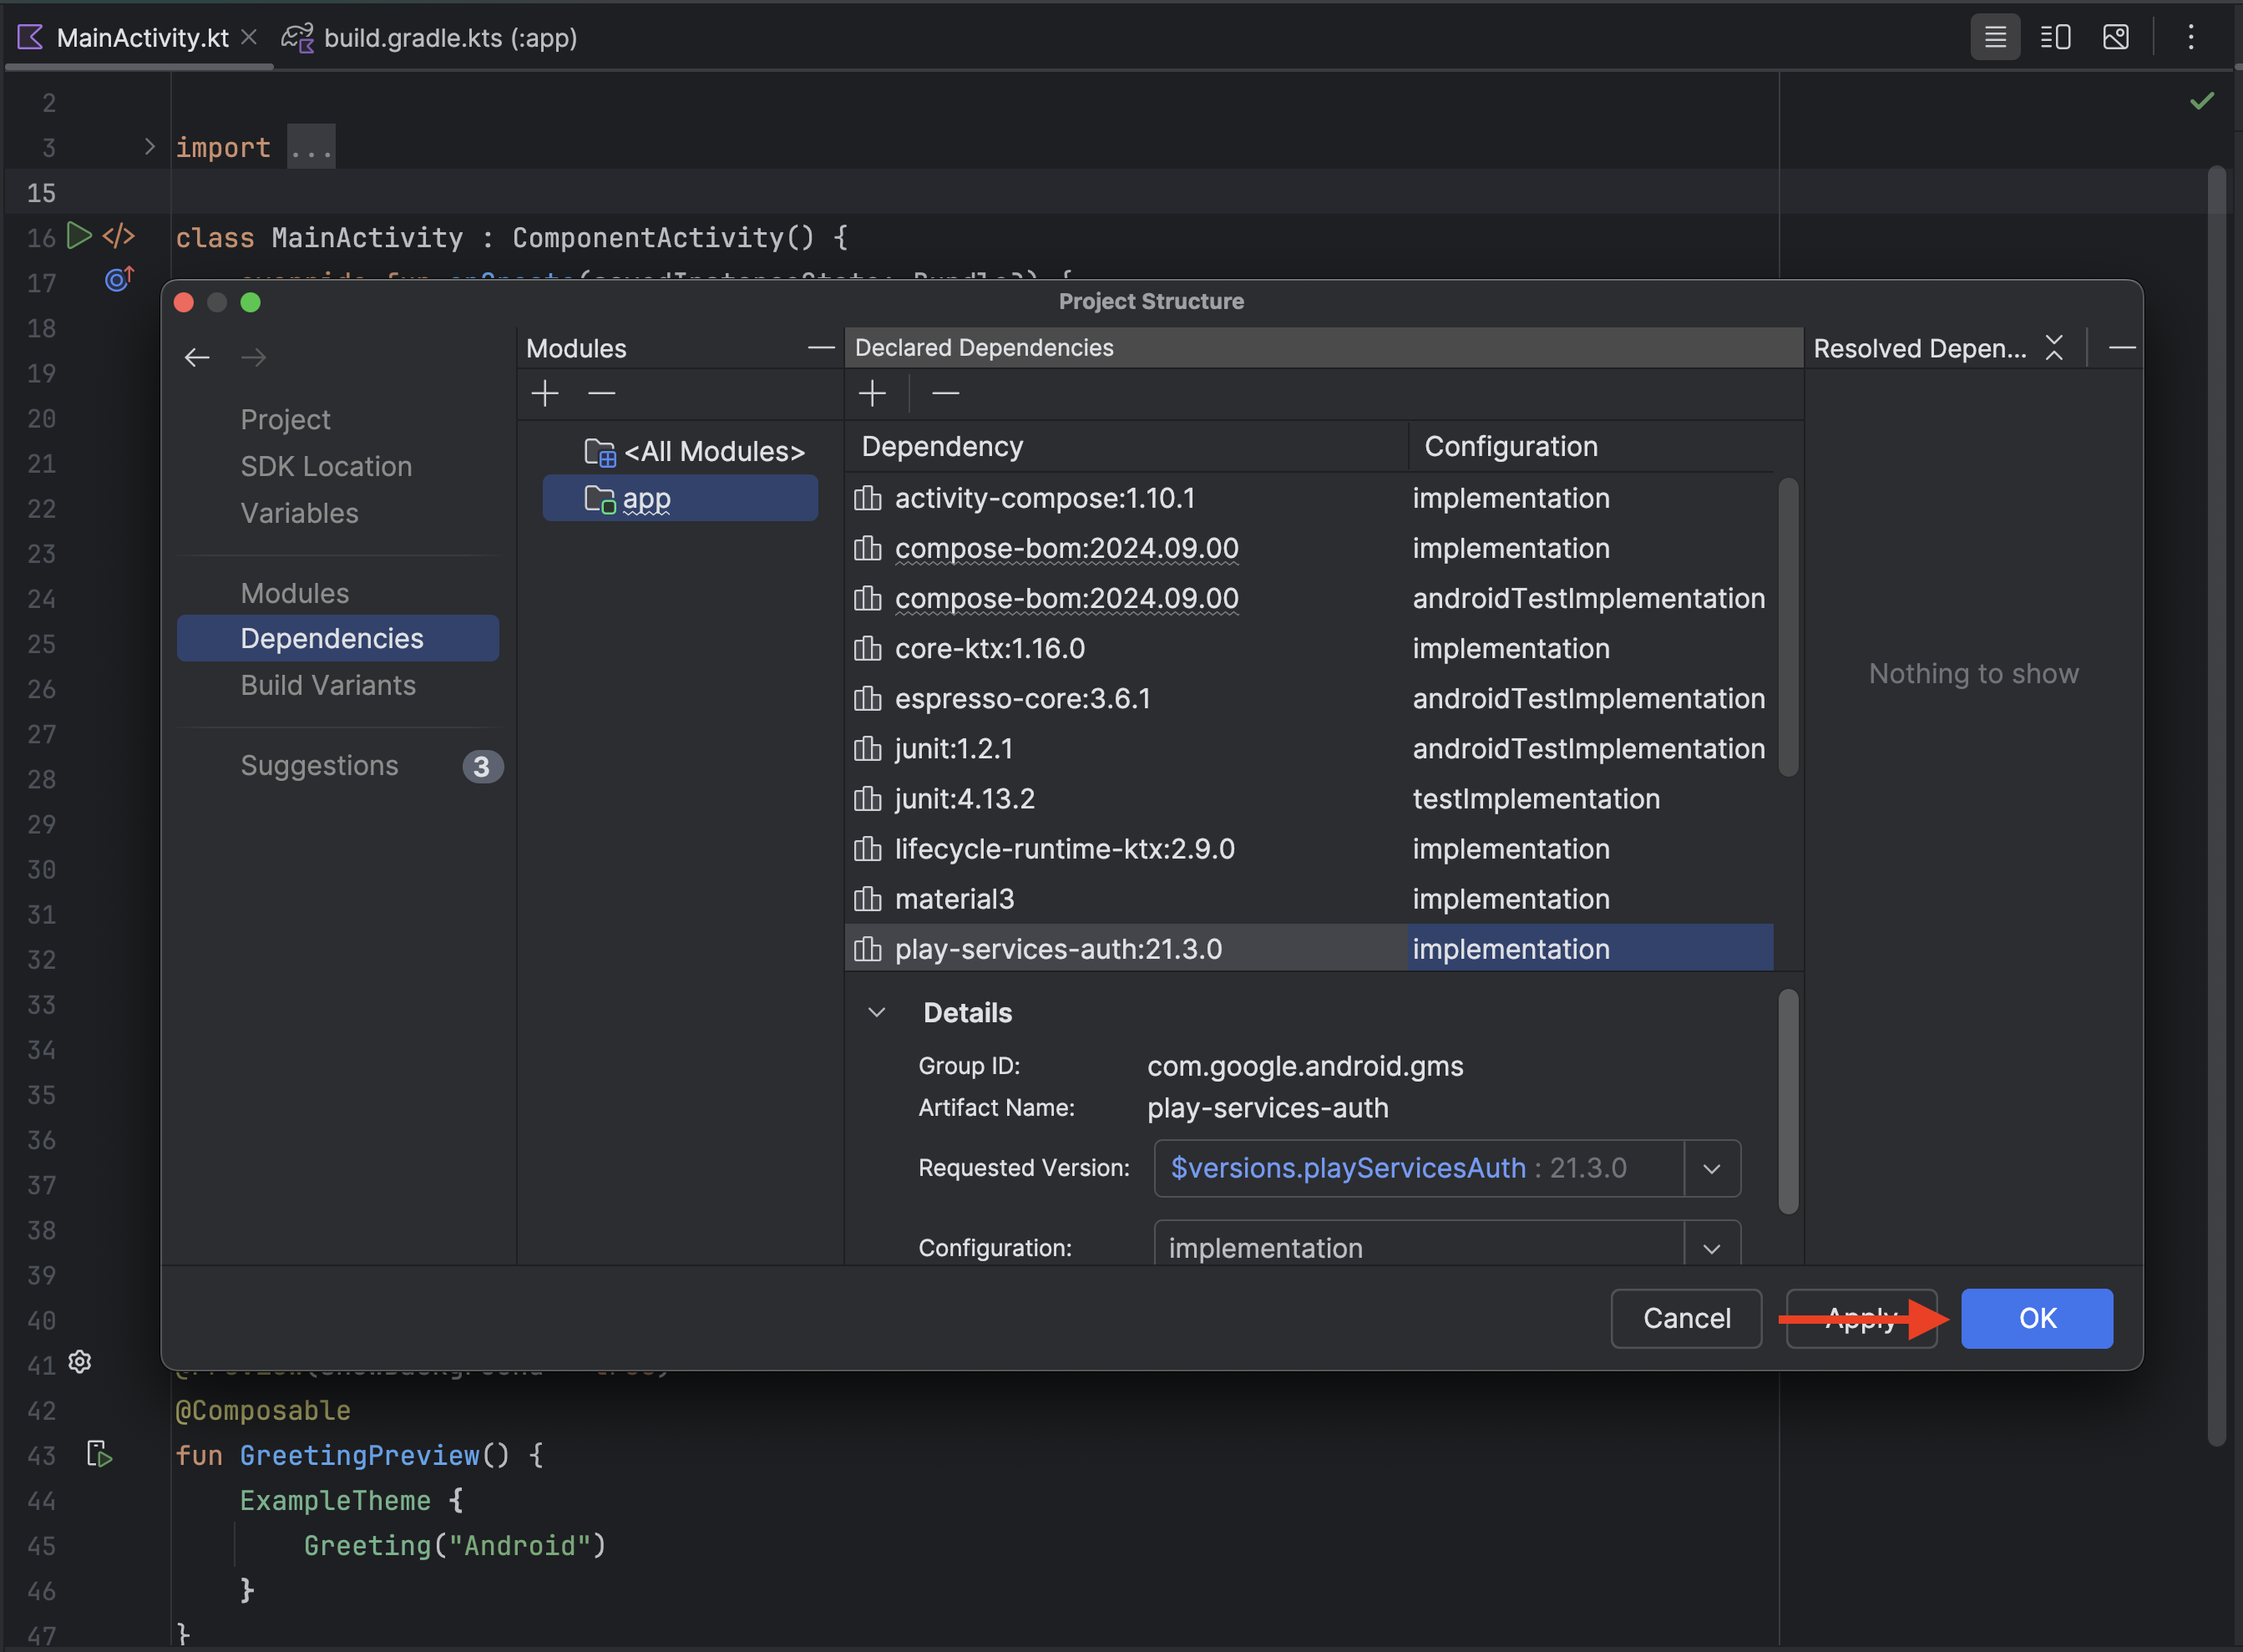 。
。
6. 底部功能表流程
底部功能表流程會運用 Credential Manager API,讓使用者在 Android 裝置上透過 Google 帳戶登入應用程式,流程更加簡化。這項功能旨在提供快速便利的體驗,特別是回訪者。這個流程應在應用程式啟動時觸發。
建立登入要求
- 首先,請從
MainActivity.kt中移除Greeting()和GreetingPreview()函式,我們不需要這些函式。 - 現在,我們需要確保這個專案已匯入所需套件。請在第 3 行開始的現有
import陳述式後方,新增下列import陳述式:import android.content.ContentValues.TAG import android.content.Context import android.credentials.GetCredentialException import android.os.Build import android.util.Log import android.widget.Toast import androidx.annotation.RequiresApi import androidx.compose.foundation.clickable import androidx.compose.foundation.Image import androidx.compose.foundation.layout.Arrangement import androidx.compose.foundation.layout.Column import androidx.compose.material3.MaterialTheme import androidx.compose.material3.Surface import androidx.compose.runtime.rememberCoroutineScope import androidx.compose.ui.Alignment import androidx.compose.ui.platform.LocalContext import androidx.compose.ui.res.painterResource import androidx.credentials.CredentialManager import androidx.credentials.exceptions.GetCredentialCancellationException import androidx.credentials.exceptions.GetCredentialCustomException import androidx.credentials.exceptions.NoCredentialException import androidx.credentials.GetCredentialRequest import com.google.android.libraries.identity.googleid.GetGoogleIdOption import com.google.android.libraries.identity.googleid.GetSignInWithGoogleOption import com.google.android.libraries.identity.googleid.GoogleIdTokenParsingException import java.security.SecureRandom import java.util.Base64 import kotlinx.coroutines.CoroutineScope import androidx.compose.runtime.LaunchedEffect import kotlinx.coroutines.delay import kotlinx.coroutines.launch - 接著,我們必須建立函式,用於建構 Bottom Sheet 要求。將這段程式碼貼到 MainActivity 類別下方
//This line is not needed for the project to build, but you will see errors if it is not present.
//This code will not work on Android versions < UpsideDownCake
@RequiresApi(Build.VERSION_CODES.UPSIDE_DOWN_CAKE)
@Composable
fun BottomSheet(webClientId: String) {
val context = LocalContext.current
// LaunchedEffect is used to run a suspend function when the composable is first launched.
LaunchedEffect(Unit) {
// Create a Google ID option with filtering by authorized accounts enabled.
val googleIdOption: GetGoogleIdOption = GetGoogleIdOption.Builder()
.setFilterByAuthorizedAccounts(true)
.setServerClientId(webClientId)
.setNonce(generateSecureRandomNonce())
.build()
// Create a credential request with the Google ID option.
val request: GetCredentialRequest = GetCredentialRequest.Builder()
.addCredentialOption(googleIdOption)
.build()
// Attempt to sign in with the created request using an authorized account
val e = signIn(request, context)
// If the sign-in fails with NoCredentialException, there are no authorized accounts.
// In this case, we attempt to sign in again with filtering disabled.
if (e is NoCredentialException) {
val googleIdOptionFalse: GetGoogleIdOption = GetGoogleIdOption.Builder()
.setFilterByAuthorizedAccounts(false)
.setServerClientId(webClientId)
.setNonce(generateSecureRandomNonce())
.build()
val requestFalse: GetCredentialRequest = GetCredentialRequest.Builder()
.addCredentialOption(googleIdOptionFalse)
.build()
//We will build out this function in a moment
signIn(requestFalse, context)
}
}
}
//This function is used to generate a secure nonce to pass in with our request
fun generateSecureRandomNonce(byteLength: Int = 32): String {
val randomBytes = ByteArray(byteLength)
SecureRandom.getInstanceStrong().nextBytes(randomBytes)
return Base64.getUrlEncoder().withoutPadding().encodeToString(randomBytes)
}
讓我們來細分這段程式碼的作用:
fun BottomSheet(webClientId: String) {...}:建立名為 BottomSheet 的函式,該函式會採用名為 webClientid 的字串引數
val context = LocalContext.current:擷取目前的 Android 內容。這是啟動 UI 元件等各種作業的必要條件。LaunchedEffect(Unit) { ... }:LaunchedEffect是 Jetpack Compose 可組合函式,可讓您在可組合函式的生命週期內執行暫停函式 (可暫停及繼續執行的函式)。以 Unit 做為鍵表示這項效果只會在首次啟動可組合函式時執行一次。val googleIdOption: GetGoogleIdOption = ...:建立GetGoogleIdOption物件。這個物件會設定要向 Google 要求的憑證類型。.Builder():建構工具模式用於設定選項。.setFilterByAuthorizedAccounts(true):指定是否允許使用者從所有 Google 帳戶中選取,或僅限已授權應用程式的帳戶。在本例中,此值設為 true,表示如果使用者先前已授權應用程式使用憑證,系統就會使用這些憑證提出要求。.setServerClientId(webClientId):設定伺服器用戶端 ID,這是應用程式後端的專屬 ID。這是取得 ID 權杖的必要條件。.setNonce(generateSecureRandomNonce()):設定隨機值 Nonce,防止重送攻擊,並確保 ID 權杖與特定要求相關聯。.build():使用指定設定建立GetGoogleIdOption物件。
val request: GetCredentialRequest = ...:建立GetCredentialRequest物件。這個物件會封裝整個憑證要求。.Builder():啟動建構工具模式,設定要求。.addCredentialOption(googleIdOption):將 googleIdOption 新增至要求,指定我們要要求 Google ID 權杖。.build():建立GetCredentialRequest物件。
val e = signIn(request, context):這會嘗試使用建立的要求和目前環境登入使用者。signIn 函式的結果會儲存在 e 中。這個變數會包含成功結果或例外狀況。if (e is NoCredentialException) { ... }:這是條件式檢查。如果 signIn 函式失敗並出現 NoCredentialException,表示沒有可用的先前授權帳戶。val googleIdOptionFalse: GetGoogleIdOption = ...:如果先前的signIn失敗,這個部分會建立新的GetGoogleIdOption。.setFilterByAuthorizedAccounts(false):這是與第一個選項的重大差異。這會停用授權帳戶的篩選功能,也就是說,裝置上的任何 Google 帳戶都能用於登入。val requestFalse: GetCredentialRequest = ...:系統會使用googleIdOptionFalse建立新的GetCredentialRequest。signIn(requestFalse, context):這會嘗試使用新要求登入使用者,允許使用任何帳戶。
基本上,這段程式碼會使用提供的設定,準備向 Credential Manager API 提出要求,以擷取使用者的 Google ID 權杖。接著,您可以使用 GetCredentialRequest 啟動憑證管理工具 UI,讓使用者選取 Google 帳戶並授予必要權限。
fun generateSecureRandomNonce(byteLength: Int = 32): String:這會定義名為 generateSecureRandomNonce 的函式。此函式接受整數引數 byteLength (預設值為 32),指定以位元組為單位的隨機數長度。傳回的字串會是隨機位元組的 Base64 編碼表示法。
val randomBytes = ByteArray(byteLength):建立指定 byteLength 的位元組陣列,以保存隨機位元組。SecureRandom.getInstanceStrong().nextBytes(randomBytes):SecureRandom.getInstanceStrong():取得高強度的加密編譯隨機數字產生器。這對安全性至關重要,因為可確保產生的數字確實是隨機,而非可預測。這項功能會使用系統中最強大的可用熵來源。.nextBytes(randomBytes):這個方法會使用 SecureRandom 執行個體產生的隨機位元組,填入 randomBytes 陣列。
return Base64.getUrlEncoder().withoutPadding().encodeToString(randomBytes):Base64.getUrlEncoder():取得使用網址安全字母的 Base64 編碼器 (使用 - 和 _,而非 + 和 /)。這很重要,因為可確保產生的字串能安全地用於網址,不需進一步編碼。.withoutPadding():這會從 Base64 編碼字串中移除所有填補字元。這通常是理想做法,可讓 Nonce 稍微縮短,更為精簡。.encodeToString(randomBytes):這會將 randomBytes 編碼為 Base64 字串,並傳回該字串。
總而言之,這個函式會產生指定長度的加密隨機 Nonce,並使用安全網址 Base64 編碼,然後傳回產生的字串。這是產生隨機值的標準做法,適用於安全性敏感的環境。
發出登入要求
現在我們能夠建構登入要求,因此可以使用 Credential Manager 登入。為此,我們需要建立函式,處理使用 Credential Manager 傳遞的登入要求,同時處理可能遇到的常見例外狀況。
如要完成這項操作,請將這個函式貼到 BottomSheet() 函式下方。
//This code will not work on Android versions < UPSIDE_DOWN_CAKE when GetCredentialException is
//is thrown.
@RequiresApi(Build.VERSION_CODES.UPSIDE_DOWN_CAKE)
suspend fun signIn(request: GetCredentialRequest, context: Context): Exception? {
val credentialManager = CredentialManager.create(context)
val failureMessage = "Sign in failed!"
var e: Exception? = null
//using delay() here helps prevent NoCredentialException when the BottomSheet Flow is triggered
//on the initial running of our app
delay(250)
try {
// The getCredential is called to request a credential from Credential Manager.
val result = credentialManager.getCredential(
request = request,
context = context,
)
Log.i(TAG, result.toString())
Toast.makeText(context, "Sign in successful!", Toast.LENGTH_SHORT).show()
Log.i(TAG, "(☞゚ヮ゚)☞ Sign in Successful! ☜(゚ヮ゚☜)")
} catch (e: GetCredentialException) {
Toast.makeText(context, failureMessage, Toast.LENGTH_SHORT).show()
Log.e(TAG, failureMessage + ": Failure getting credentials", e)
} catch (e: GoogleIdTokenParsingException) {
Toast.makeText(context, failureMessage, Toast.LENGTH_SHORT).show()
Log.e(TAG, failureMessage + ": Issue with parsing received GoogleIdToken", e)
} catch (e: NoCredentialException) {
Toast.makeText(context, failureMessage, Toast.LENGTH_SHORT).show()
Log.e(TAG, failureMessage + ": No credentials found", e)
return e
} catch (e: GetCredentialCustomException) {
Toast.makeText(context, failureMessage, Toast.LENGTH_SHORT).show()
Log.e(TAG, failureMessage + ": Issue with custom credential request", e)
} catch (e: GetCredentialCancellationException) {
Toast.makeText(context, ": Sign-in cancelled", Toast.LENGTH_SHORT).show()
Log.e(TAG, failureMessage + ": Sign-in was cancelled", e)
}
return e
}
現在來細分這段程式碼的作用:
suspend fun signIn(request: GetCredentialRequest, context: Context): Exception?:這會定義名為 signIn 的懸置函式。也就是說,這項作業可以暫停及繼續,不會阻斷主執行緒。如果登入成功,這項作業會傳回 Exception?,如果登入失敗,則會傳回特定例外狀況。
這個函式會使用兩個參數:
request:GetCredentialRequest物件,包含要擷取的憑證類型設定 (例如 Google ID)。context:與系統互動所需的 Android Context。
函式主體:
val credentialManager = CredentialManager.create(context):建立 CredentialManager 的執行個體,這是與 Credential Manager API 互動的主要介面。應用程式會透過這種方式啟動登入流程。val failureMessage = "Sign in failed!":定義登入失敗時要在浮動式訊息中顯示的字串 (failureMessage)。var e: Exception? = null:這行會初始化變數 e,以儲存程序中可能發生的任何例外狀況,從空值開始。delay(250):導入 250 毫秒的延遲時間。這項解決方法可避免應用程式啟動時立即擲回 NoCredentialException (特別是使用 BottomSheet 流程時)。這樣系統才有時間初始化憑證管理工具。try { ... } catch (e: Exception) { ... }:try-catch 區塊用於完善的錯誤處理機制。這樣一來,登入程序發生任何錯誤時,應用程式就不會當機,而且可以妥善處理例外狀況。val result = credentialManager.getCredential(request = request, context = context):實際呼叫 Credential Manager API 的位置,並啟動憑證擷取程序。這個方法會將要求和內容做為輸入內容,並向使用者顯示 UI,供使用者選取憑證。如果成功,系統會傳回包含所選憑證的結果。這項作業的結果GetCredentialResponse會儲存在result變數中。Toast.makeText(context, "Sign in successful!", Toast.LENGTH_SHORT).show():顯示簡短的浮動式訊息,指出登入成功。Log.i(TAG, "Sign in Successful!"):將有趣的成功訊息記錄到 Logcat。catch (e: GetCredentialException):處理GetCredentialException類型的例外狀況。這是多個特定例外狀況的父項類別,這些例外狀況可能會在憑證擷取程序中發生。catch (e: GoogleIdTokenParsingException):處理剖析 Google ID 權杖時發生錯誤的例外狀況。catch (e: NoCredentialException):處理NoCredentialException,當使用者沒有可用的憑證時 (例如未儲存任何憑證,或沒有 Google 帳戶),系統會擲回這個例外狀況。- 重要事項:這個函式會傳回儲存在
e、NoCredentialException中的例外狀況,讓呼叫端在沒有憑證時處理特定情況。
- 重要事項:這個函式會傳回儲存在
catch (e: GetCredentialCustomException):處理憑證提供者可能擲回的自訂例外狀況。catch (e: GetCredentialCancellationException):處理GetCredentialCancellationException,使用者取消登入程序時會擲回此例外狀況。Toast.makeText(context, failureMessage, Toast.LENGTH_SHORT).show():顯示表示登入失敗的浮動式訊息 (使用 failureMessage)。Log.e(TAG, "", e):使用 Log.e 將例外狀況記錄到 Android Logcat,這項作業適用於錯誤。這包括例外狀況的堆疊追蹤,有助於偵錯。還包含生氣的表情符號,增添趣味。
return e:如果擷取到任何例外狀況,函式會傳回例外狀況;如果登入成功,則會傳回空值。
總而言之,這段程式碼提供使用 Credential Manager API 處理使用者登入作業的方法、管理非同步作業、處理潛在錯誤,以及透過浮動式訊息和記錄檔向使用者提供意見回饋,同時在錯誤處理程序中加入幽默元素。
在應用程式中實作底部功能表流程
現在,我們可以使用下列程式碼和稍早從 Google Cloud 控制台複製的網頁應用程式用戶端 ID,在 MainActivity 類別中設定呼叫,觸發 BottomSheet 流程:
class MainActivity : ComponentActivity() {
@RequiresApi(Build.VERSION_CODES.UPSIDE_DOWN_CAKE)
override fun onCreate(savedInstanceState: Bundle?) {
super.onCreate(savedInstanceState)
//replace with your own web client ID from Google Cloud Console
val webClientId = "YOUR_CLIENT_ID_HERE"
setContent {
//ExampleTheme - this is derived from the name of the project not any added library
//e.g. if this project was named "Testing" it would be generated as TestingTheme
ExampleTheme {
Surface(
modifier = Modifier.fillMaxSize(), color = MaterialTheme.colorScheme.background,
) {
//This will trigger on launch
BottomSheet(webClientId)
}
}
}
}
}
現在我們可以儲存專案 (依序點選「檔案」>「儲存」),然後運作執行專案:
- 按下執行按鈕:
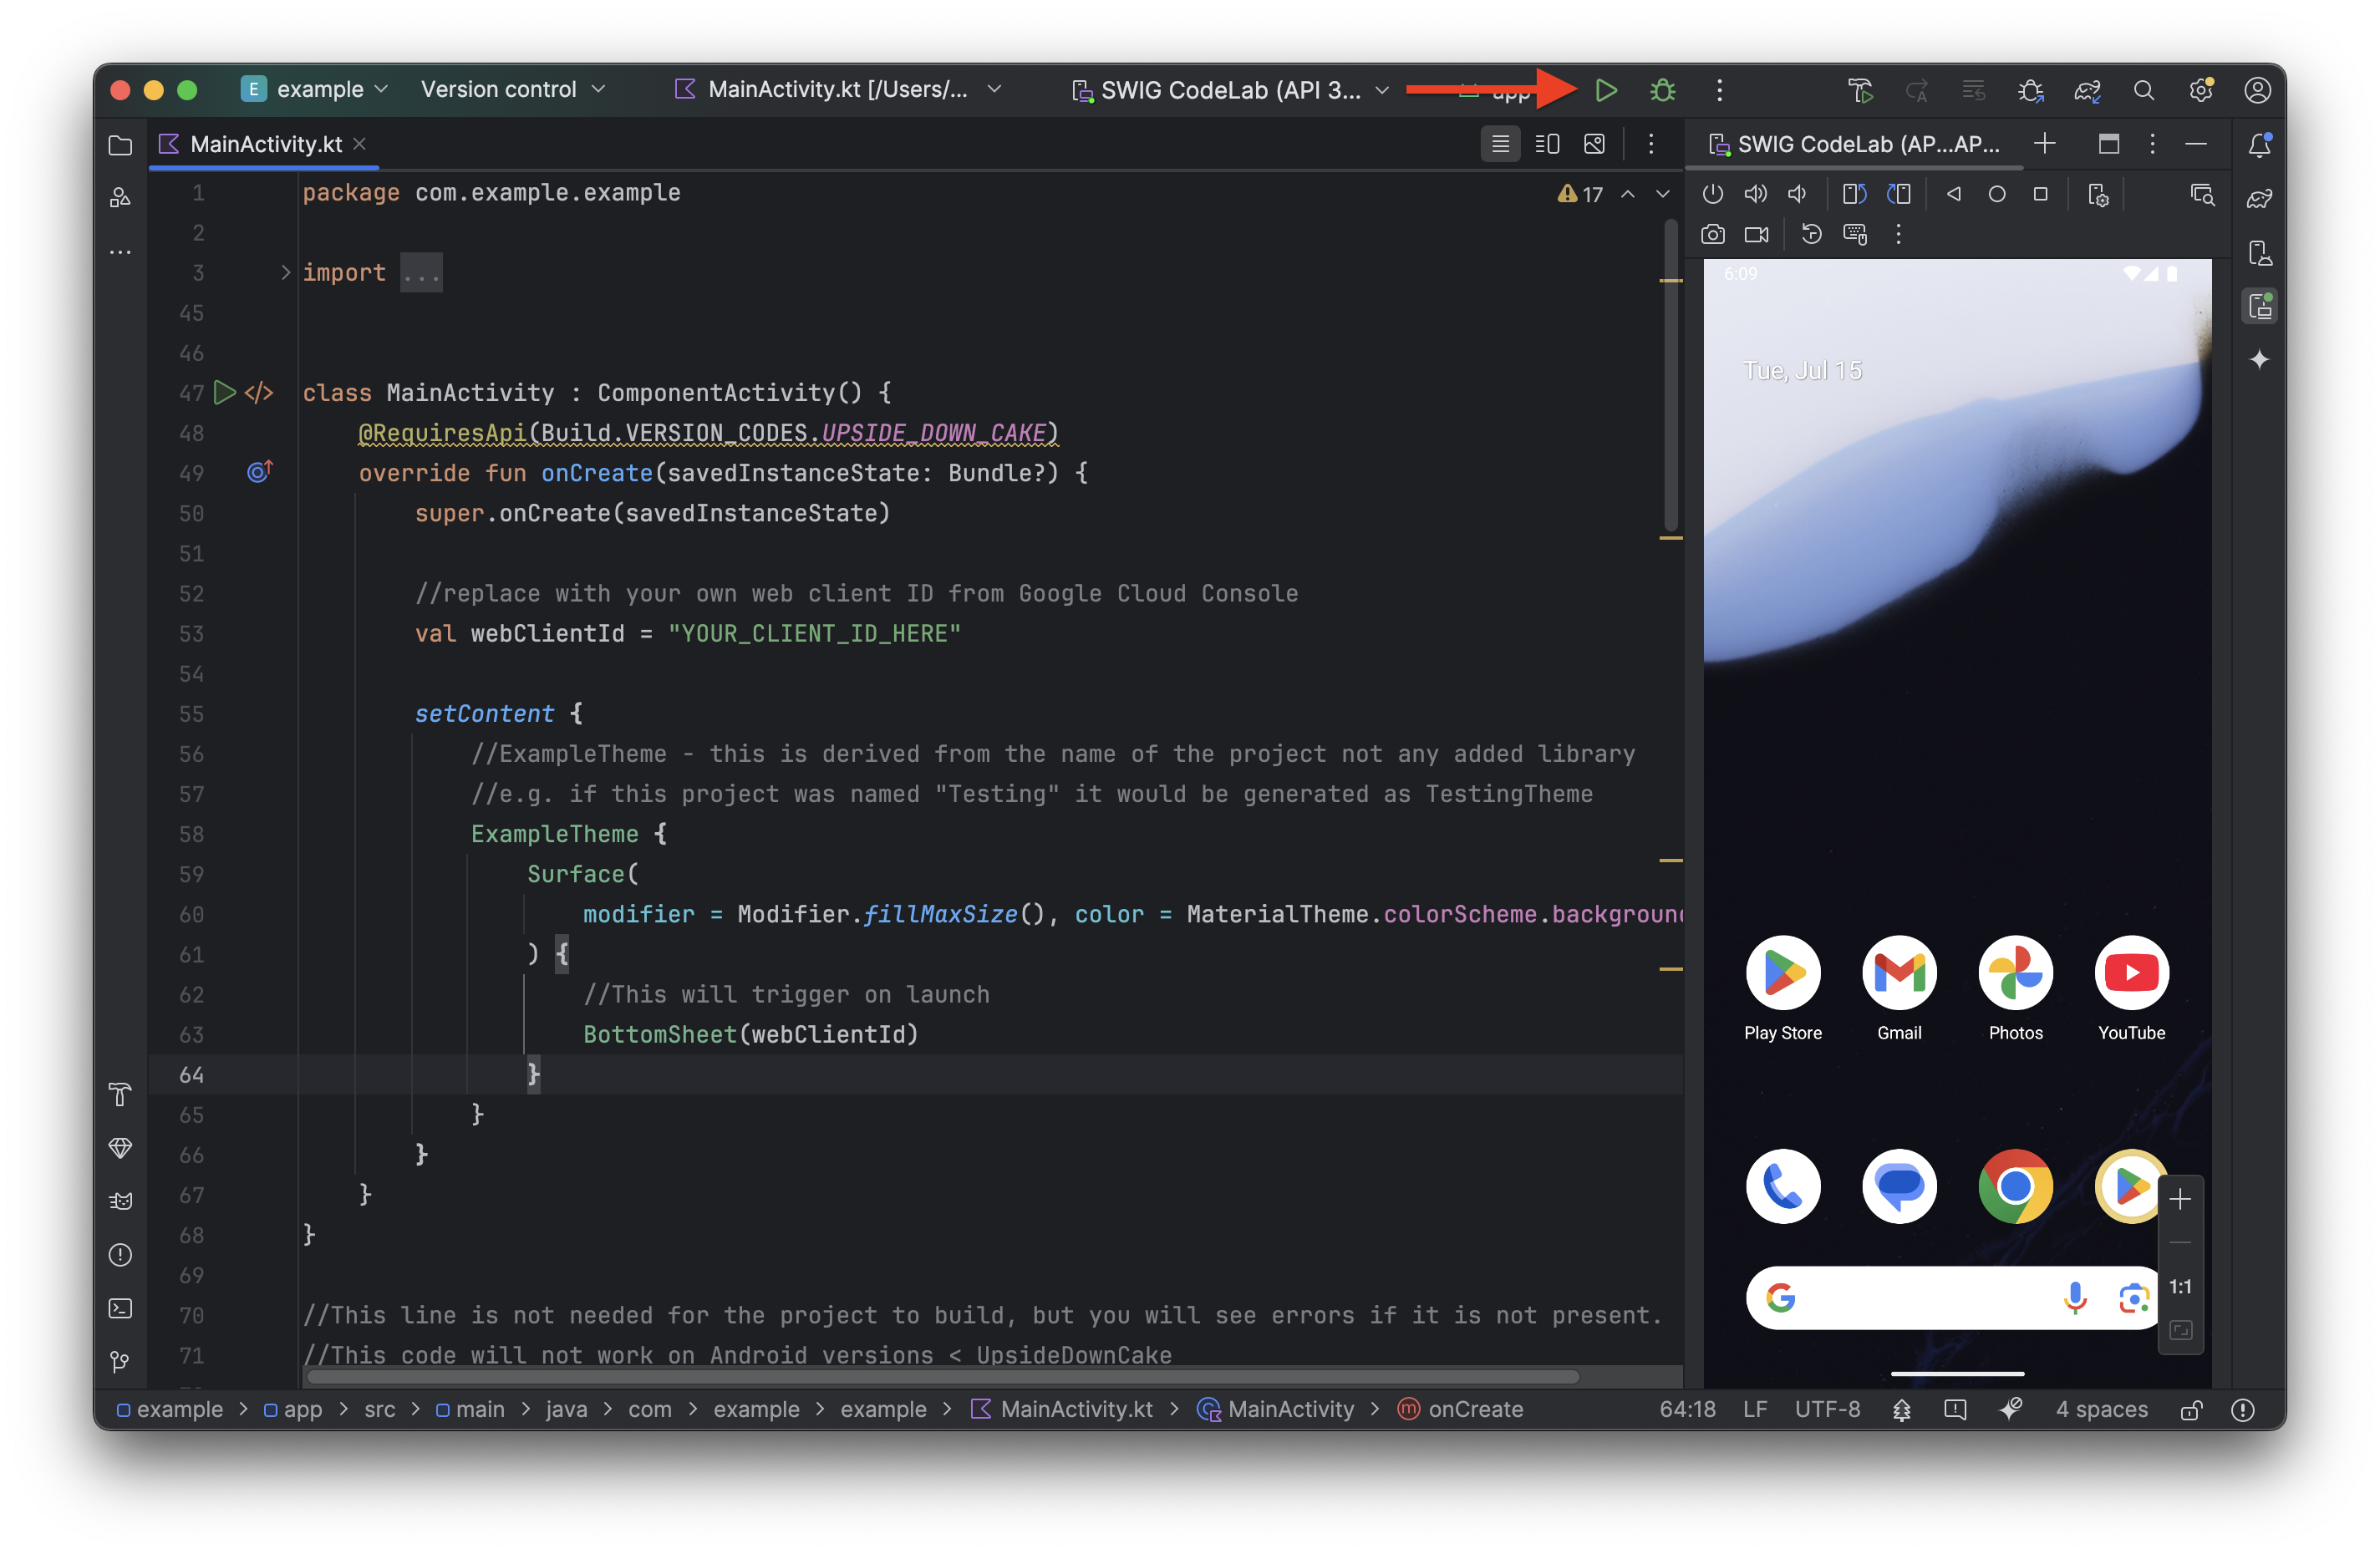
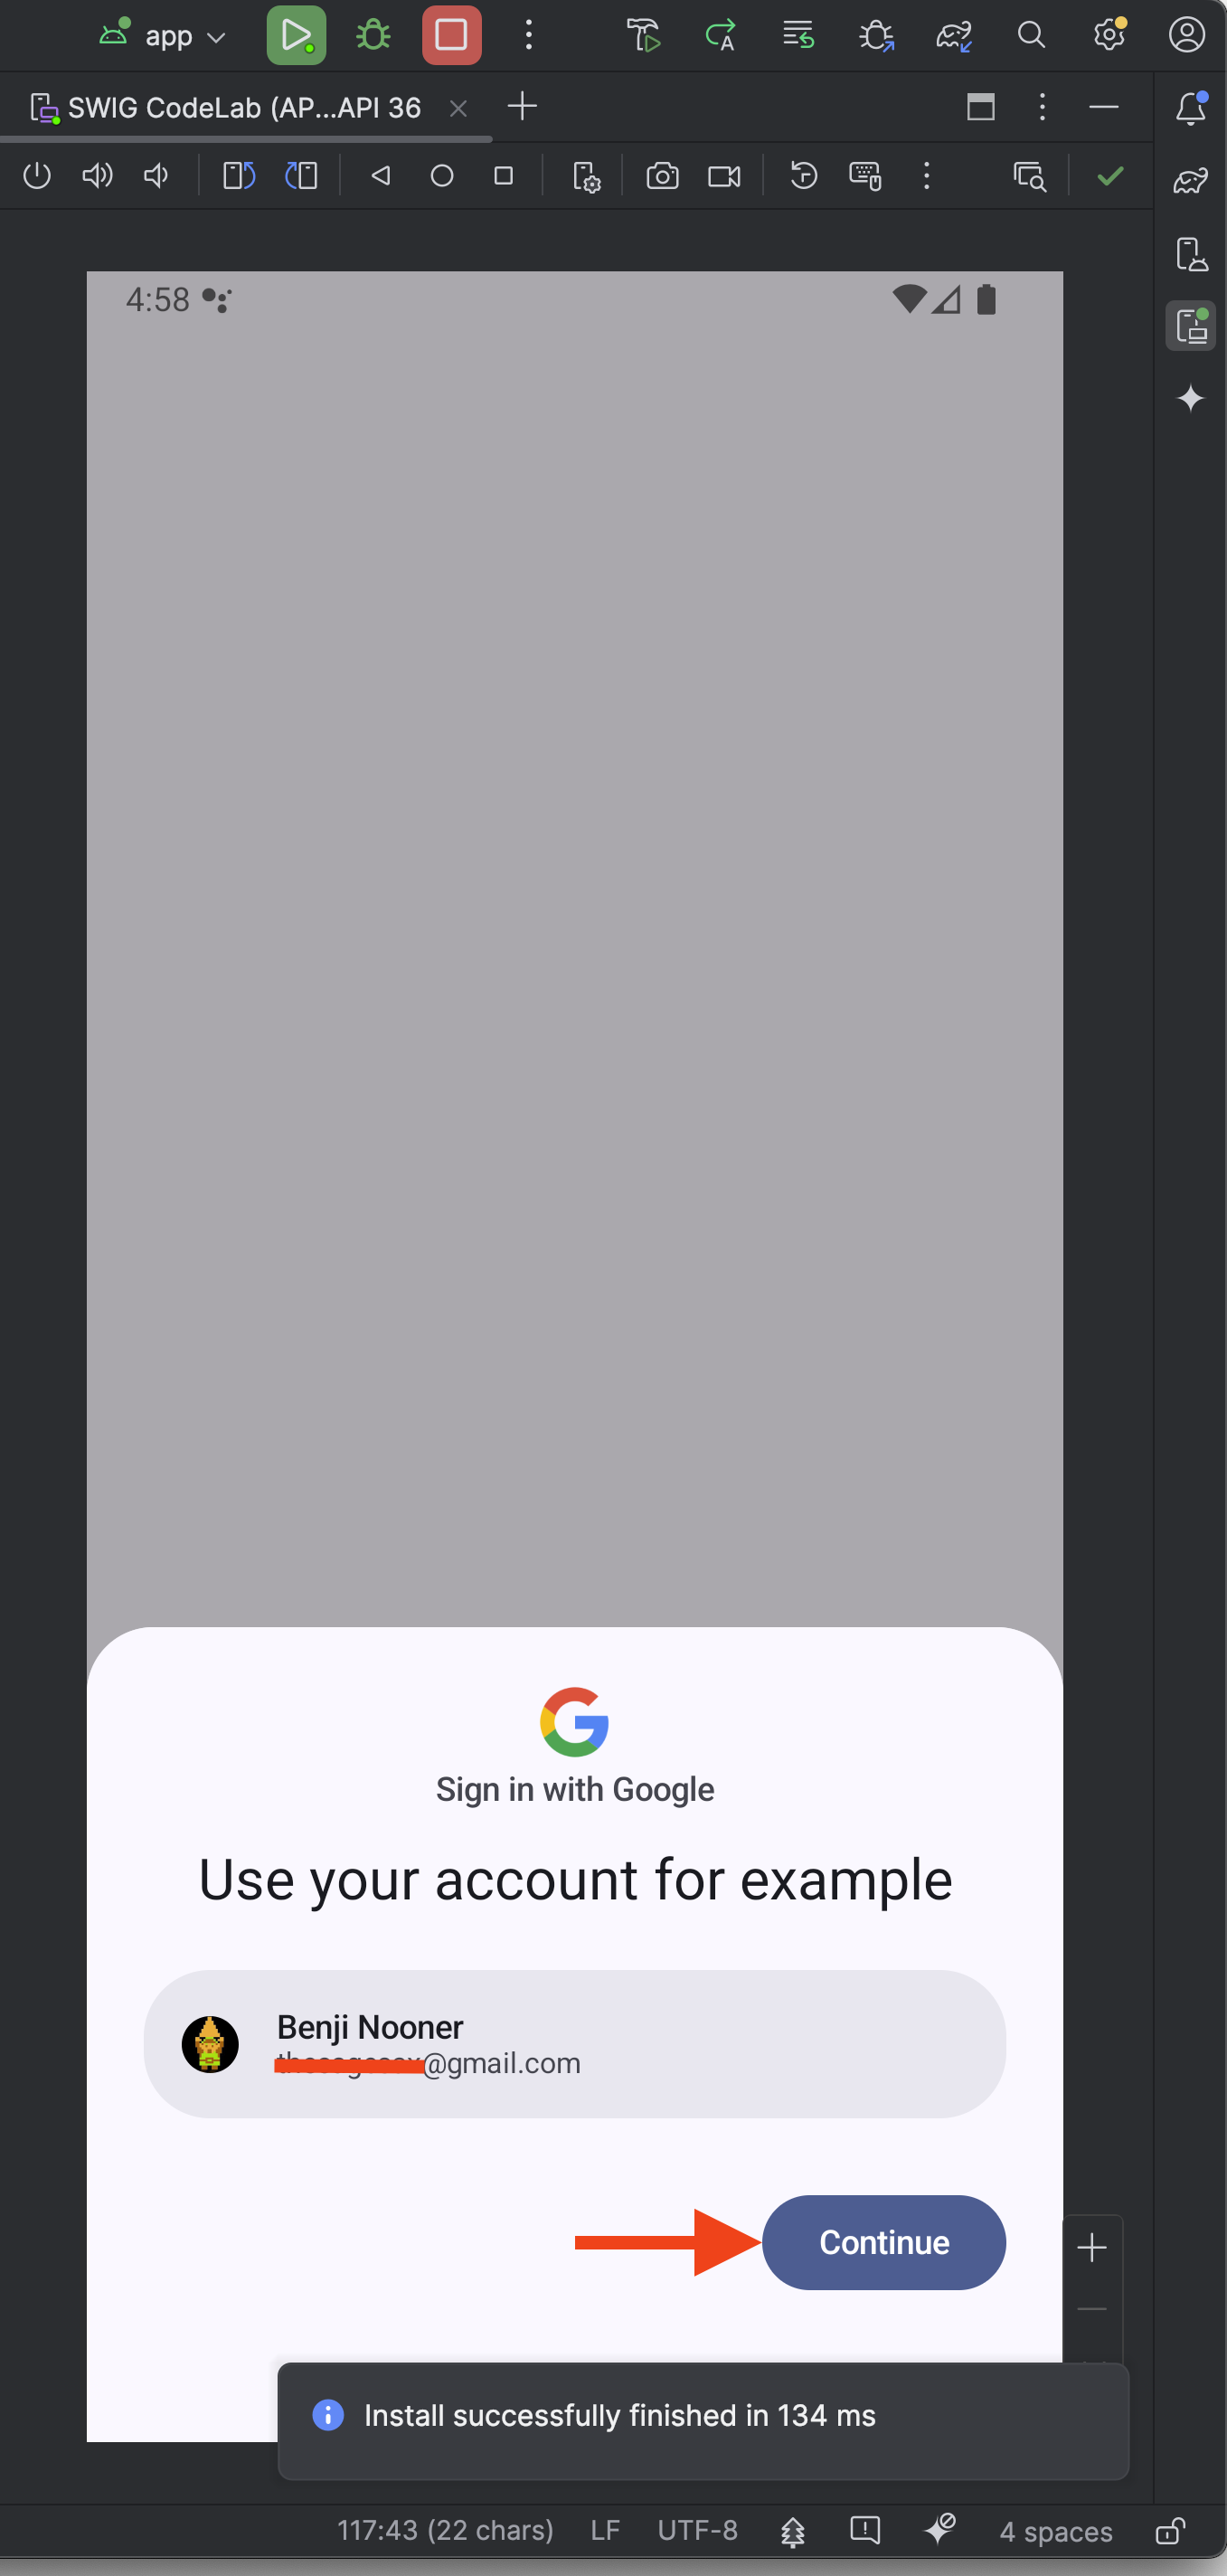
- 應用程式在模擬器上執行後,您應該會看到登入 BottomSheet 彈出視窗。按一下「繼續」,測試登入
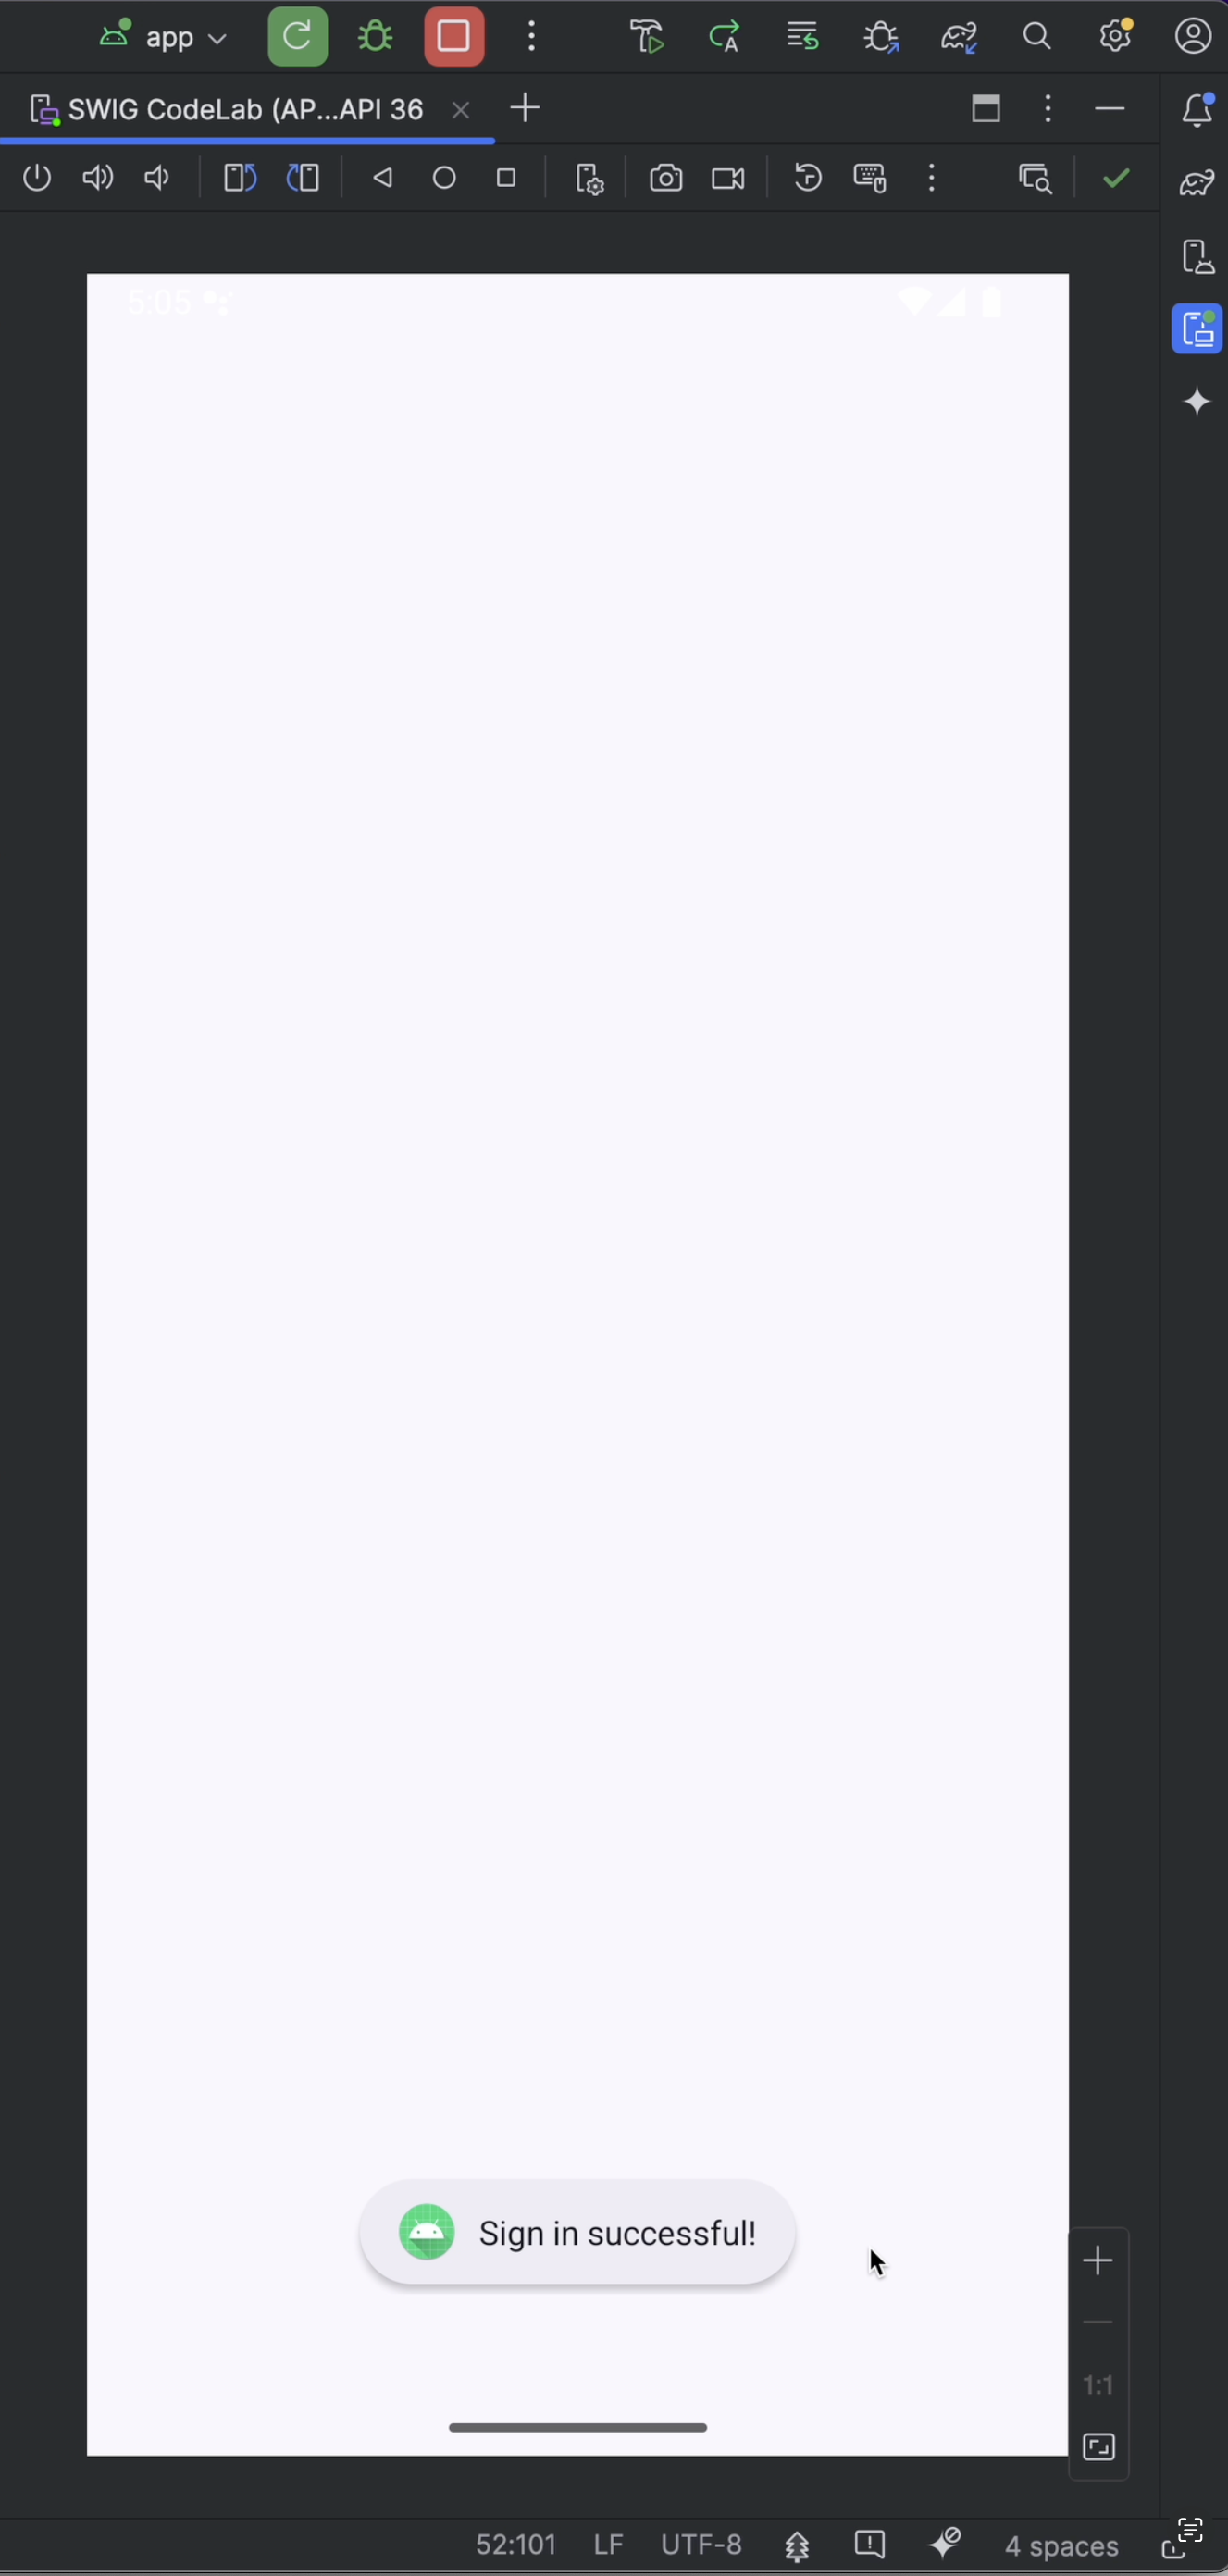
- 畫面上應會顯示 Toast 訊息,指出登入成功!
7. 按鈕流程
「使用 Google 帳戶登入」按鈕流程可讓使用者透過現有的 Google 帳戶,更輕鬆地註冊或登入 Android 應用程式。如果使用者關閉底部功能表,或偏好明確使用 Google 帳戶登入或註冊,就會觸發這項事件。對開發人員來說,這代表註冊時可享有更順暢的體驗,並減少阻礙。
雖然可以使用 Jetpack Compose 隨附的按鈕完成這項操作,但我們會使用「使用 Google 帳戶登入品牌宣傳指南」頁面中預先核准的品牌圖示。
在專案中新增品牌圖示
- 按這裡下載預先核准的品牌圖示 ZIP 檔案
- 從下載內容中解壓縮 signin-assest.zip (這會因電腦的作業系統而異)。現在你可以開啟 signin-assets 資料夾,查看可用的圖示。在本程式碼研究室中,我們將使用
signin-assets/Android/png@2x/neutral/android_neutral_sq_SI@2x.png。 - 複製檔案
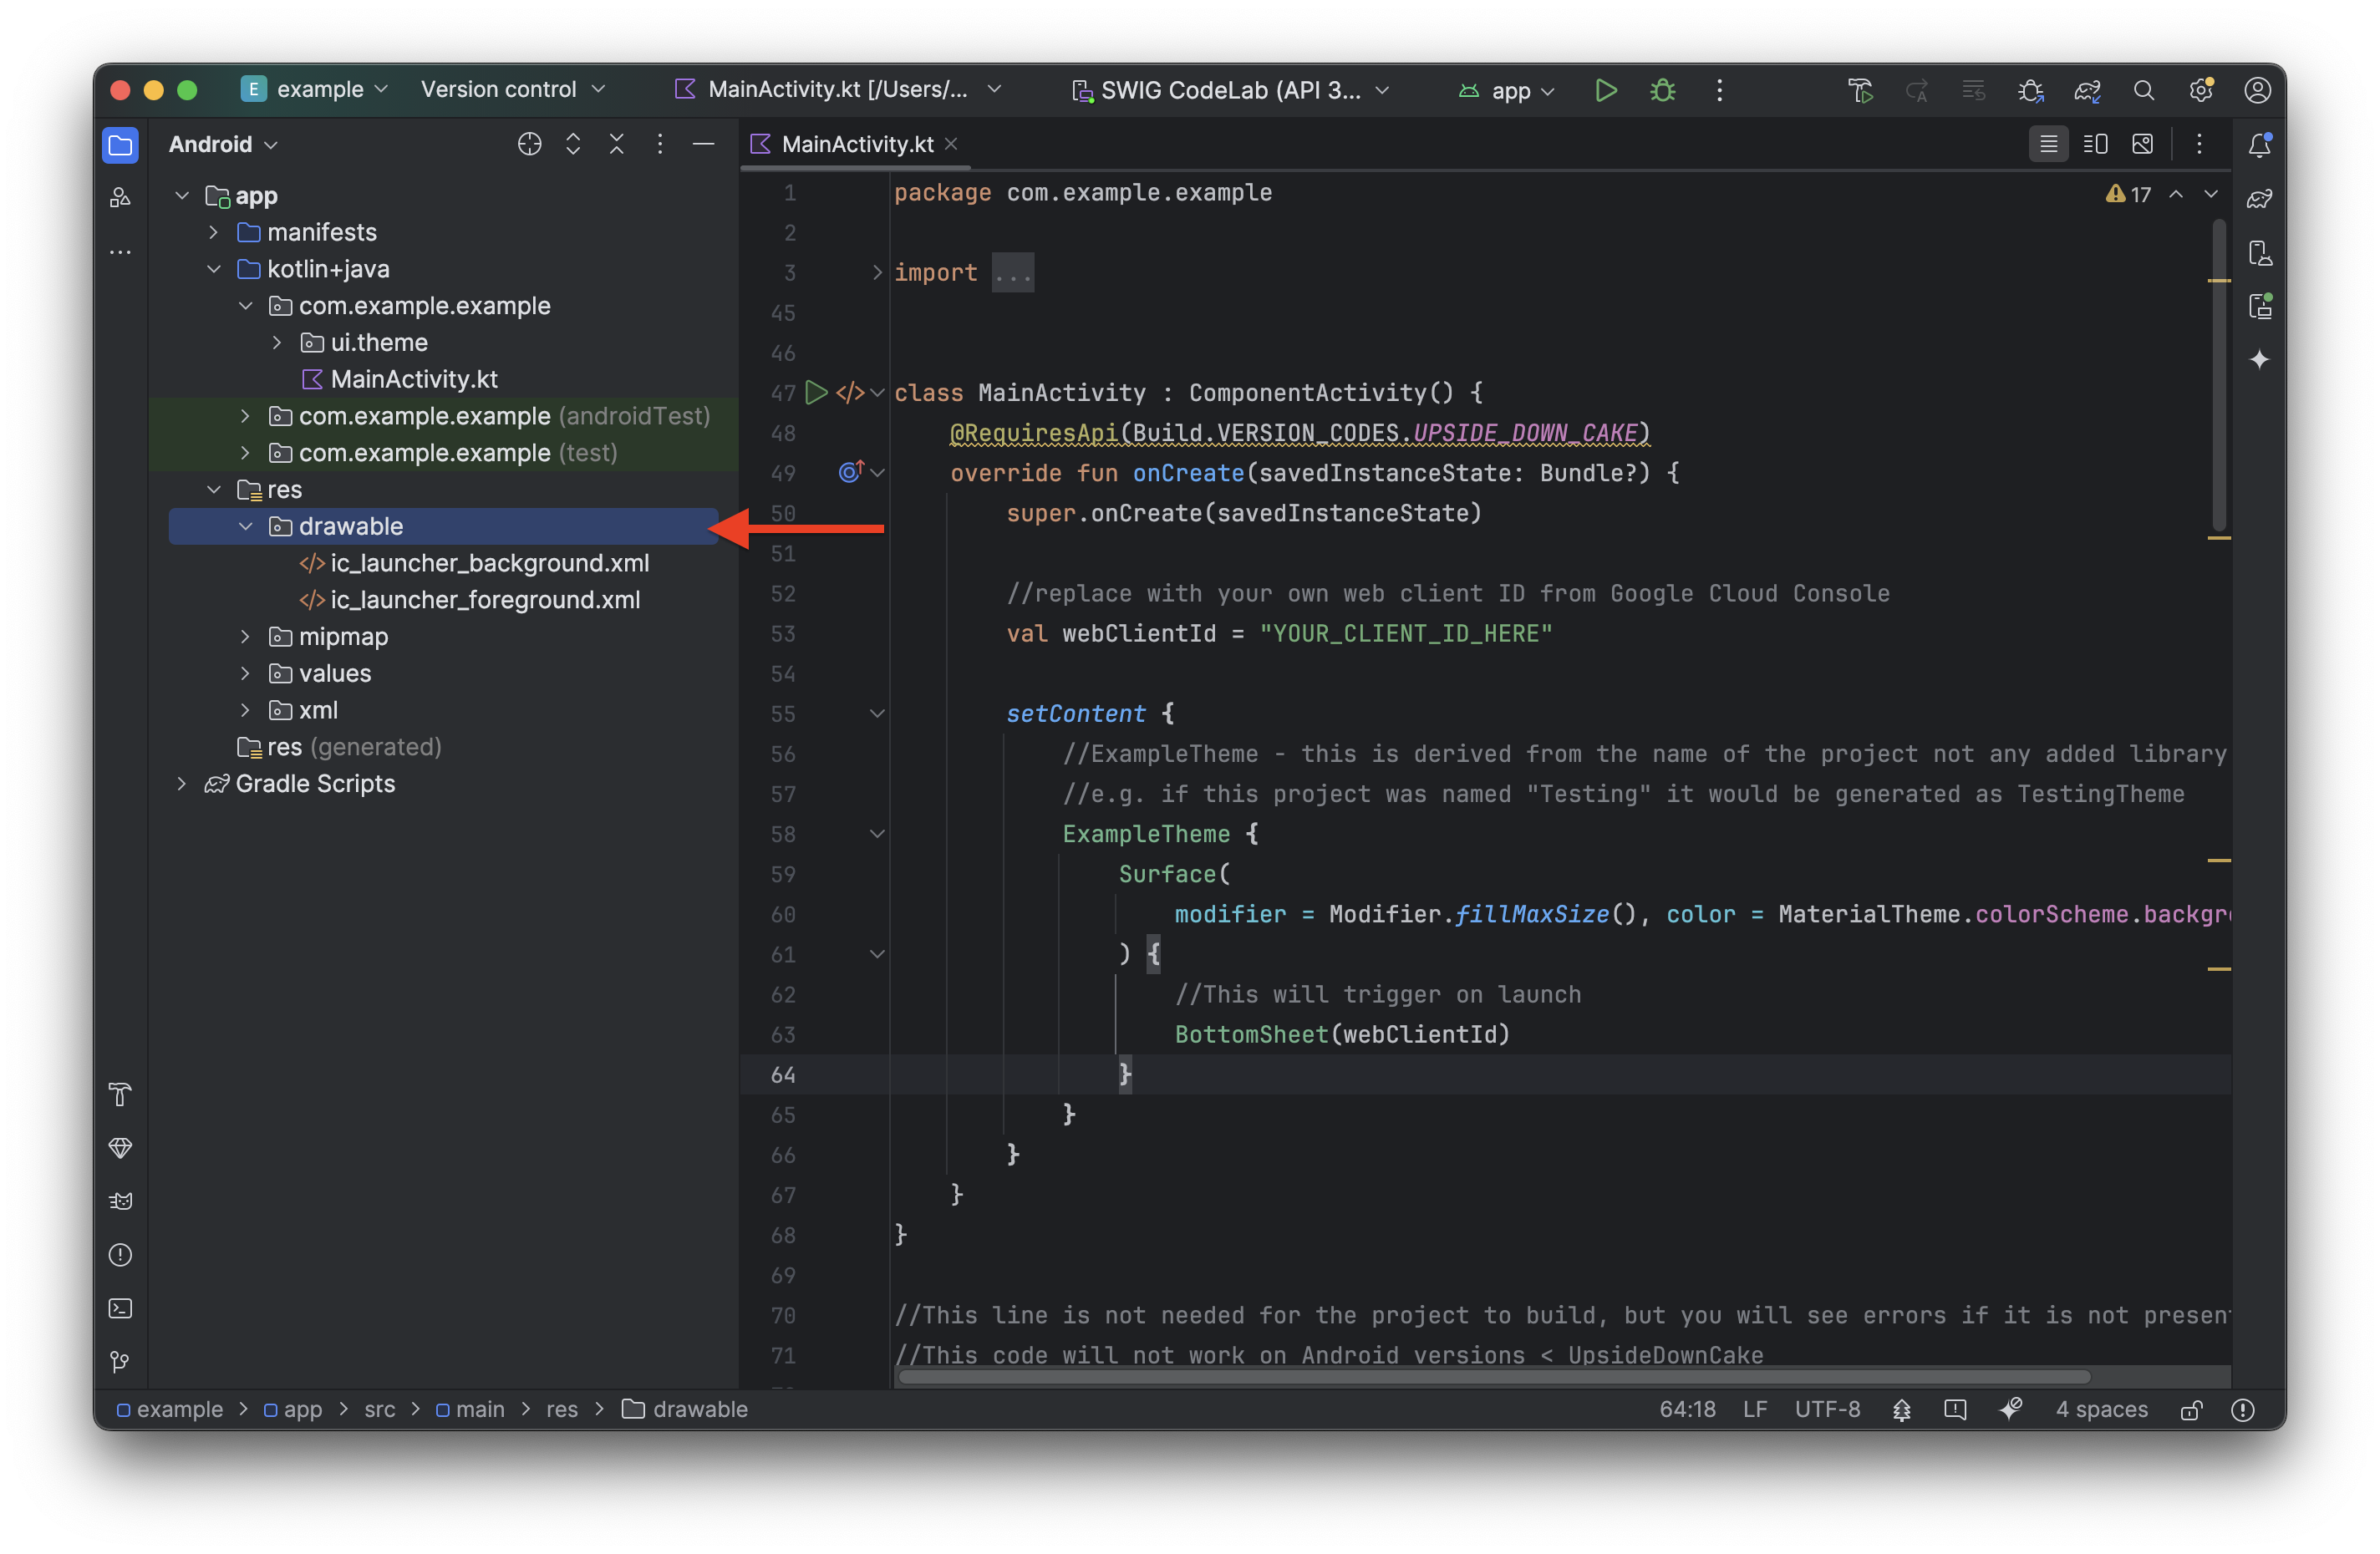
- 在 Android Studio 中,依序前往「res」 >「drawable」,然後在「drawable」資料夾上按一下滑鼠右鍵,並點選「Paste」,即可將圖片貼到專案中 (您可能需要展開「res」資料夾才能看到「drawable」資料夾)
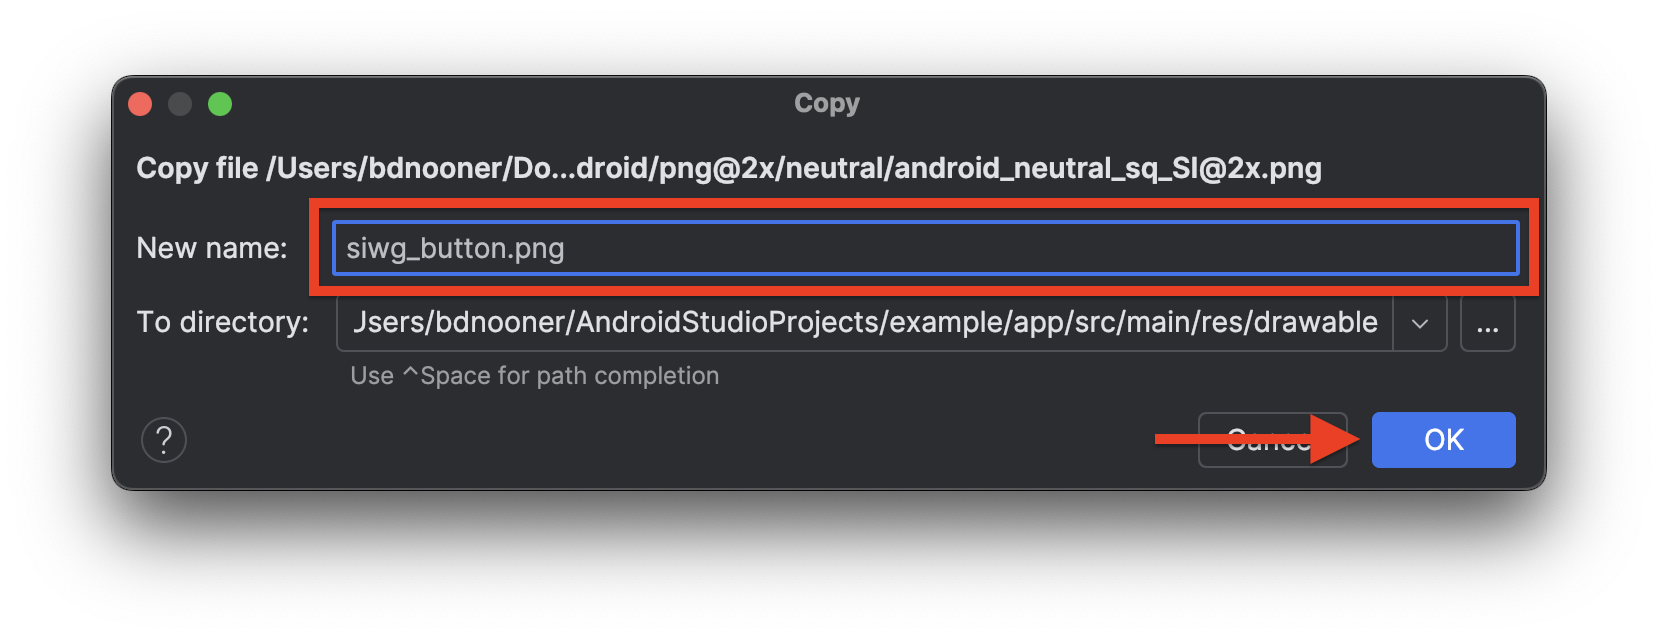
- 系統會顯示對話方塊,提示您重新命名檔案,並確認要加入的目錄。將資產重新命名為 siwg_button.png,然後按一下「確定」
按鈕流程程式碼
這段程式碼會使用與 BottomSheet() 相同的 signIn() 函式,但會使用 GetSignInWithGoogleOption 而不是 GetGoogleIdOption,因為這個流程不會利用裝置上儲存的憑證和密碼金鑰顯示登入選項。以下程式碼可貼到 BottomSheet() 函式下方:
@RequiresApi(Build.VERSION_CODES.UPSIDE_DOWN_CAKE)
@Composable
fun ButtonUI(webClientId: String) {
val context = LocalContext.current
val coroutineScope = rememberCoroutineScope()
val onClick: () -> Unit = {
val signInWithGoogleOption: GetSignInWithGoogleOption = GetSignInWithGoogleOption
.Builder(serverClientId = webClientId)
.setNonce(generateSecureRandomNonce())
.build()
val request: GetCredentialRequest = GetCredentialRequest.Builder()
.addCredentialOption(signInWithGoogleOption)
.build()
coroutineScope.launch {
signIn(request, context)
}
}
Image(
painter = painterResource(id = R.drawable.siwg_button),
contentDescription = "",
modifier = Modifier
.fillMaxSize()
.clickable(enabled = true, onClick = onClick)
)
}
程式碼的運作方式如下:
fun ButtonUI(webClientId: String):這會宣告名為 ButtonUI 的函式,並接受 webClientId (Google Cloud 專案的用戶端 ID) 做為引數。
val context = LocalContext.current:擷取目前的 Android 內容。這是啟動 UI 元件等各種作業的必要條件。
val coroutineScope = rememberCoroutineScope():建立協同程式範圍。這項工具用於管理非同步工作,讓程式碼在執行時不會封鎖主執行緒。rememberCoroutineScope() 是 Jetpack Compose 的可組合函式,可提供與可組合項生命週期繫結的範圍。
val onClick: () -> Unit = { ... }:這會建立 lambda 函式,在點選按鈕時執行。Lambda 函式會執行下列動作:
val signInWithGoogleOption: GetSignInWithGoogleOption = GetSignInWithGoogleOption.Builder(serverClientId = webClientId).setNonce(generateSecureRandomNonce()).build():這個部分會建立GetSignInWithGoogleOption物件。這個物件用於指定「使用 Google 帳戶登入」程序的參數,需要webClientId和隨機值 (用於安全性的隨機字串)。val request: GetCredentialRequest = GetCredentialRequest.Builder().addCredentialOption(signInWithGoogleOption).build():這會建構GetCredentialRequest物件。這項要求會用於透過 Credential Manager 取得使用者憑證。GetCredentialRequest會將先前建立的GetSignInWithGoogleOption新增為選項,以便要求「使用 Google 帳戶登入」憑證。
coroutineScope.launch { ... }:用於管理非同步作業 (使用協同程式) 的CoroutineScope。signIn(request, context):呼叫先前定義的signIn() 函式
Image(...):這會使用載入圖片的 painterResource 轉譯圖片 R.drawable.siwg_button
Modifier.fillMaxSize().clickable(enabled = true, onClick = onClick):fillMaxSize():讓圖片填滿可用空間。clickable(enabled = true, onClick = onClick):讓圖片可供點選,點選後會執行先前定義的 onClick lambda 函式。
總而言之,這段程式碼會在 Jetpack Compose UI 中設定「使用 Google 帳戶登入」按鈕。點選按鈕後,系統會準備憑證要求,啟動 Credential Manager,並允許使用者透過 Google 帳戶登入。
現在需要更新 MainActivity 類別,才能執行 ButtonUI() 函式:
class MainActivity : ComponentActivity() {
@RequiresApi(Build.VERSION_CODES.UPSIDE_DOWN_CAKE)
override fun onCreate(savedInstanceState: Bundle?) {
super.onCreate(savedInstanceState)
//replace with your own web client ID from Google Cloud Console
val webClientId = "YOUR_CLIENT_ID_HERE"
setContent {
//ExampleTheme - this is derived from the name of the project not any added library
//e.g. if this project was named "Testing" it would be generated as TestingTheme
ExampleTheme {
Surface(
modifier = Modifier.fillMaxSize(), color = MaterialTheme.colorScheme.background,
) {
Column(
verticalArrangement = Arrangement.Center,
horizontalAlignment = Alignment.CenterHorizontally
) {
//This will trigger on launch
BottomSheet(webClientId)
//This requires the user to press the button
ButtonUI(webClientId)
}
}
}
}
}
}
現在我們可以儲存專案 (依序點選「檔案」>「儲存」),然後運作執行專案:
- 按下執行按鈕:
- 應用程式在模擬器上執行後,應該會顯示 BottomSheet。點選方塊外的任一處即可關閉。
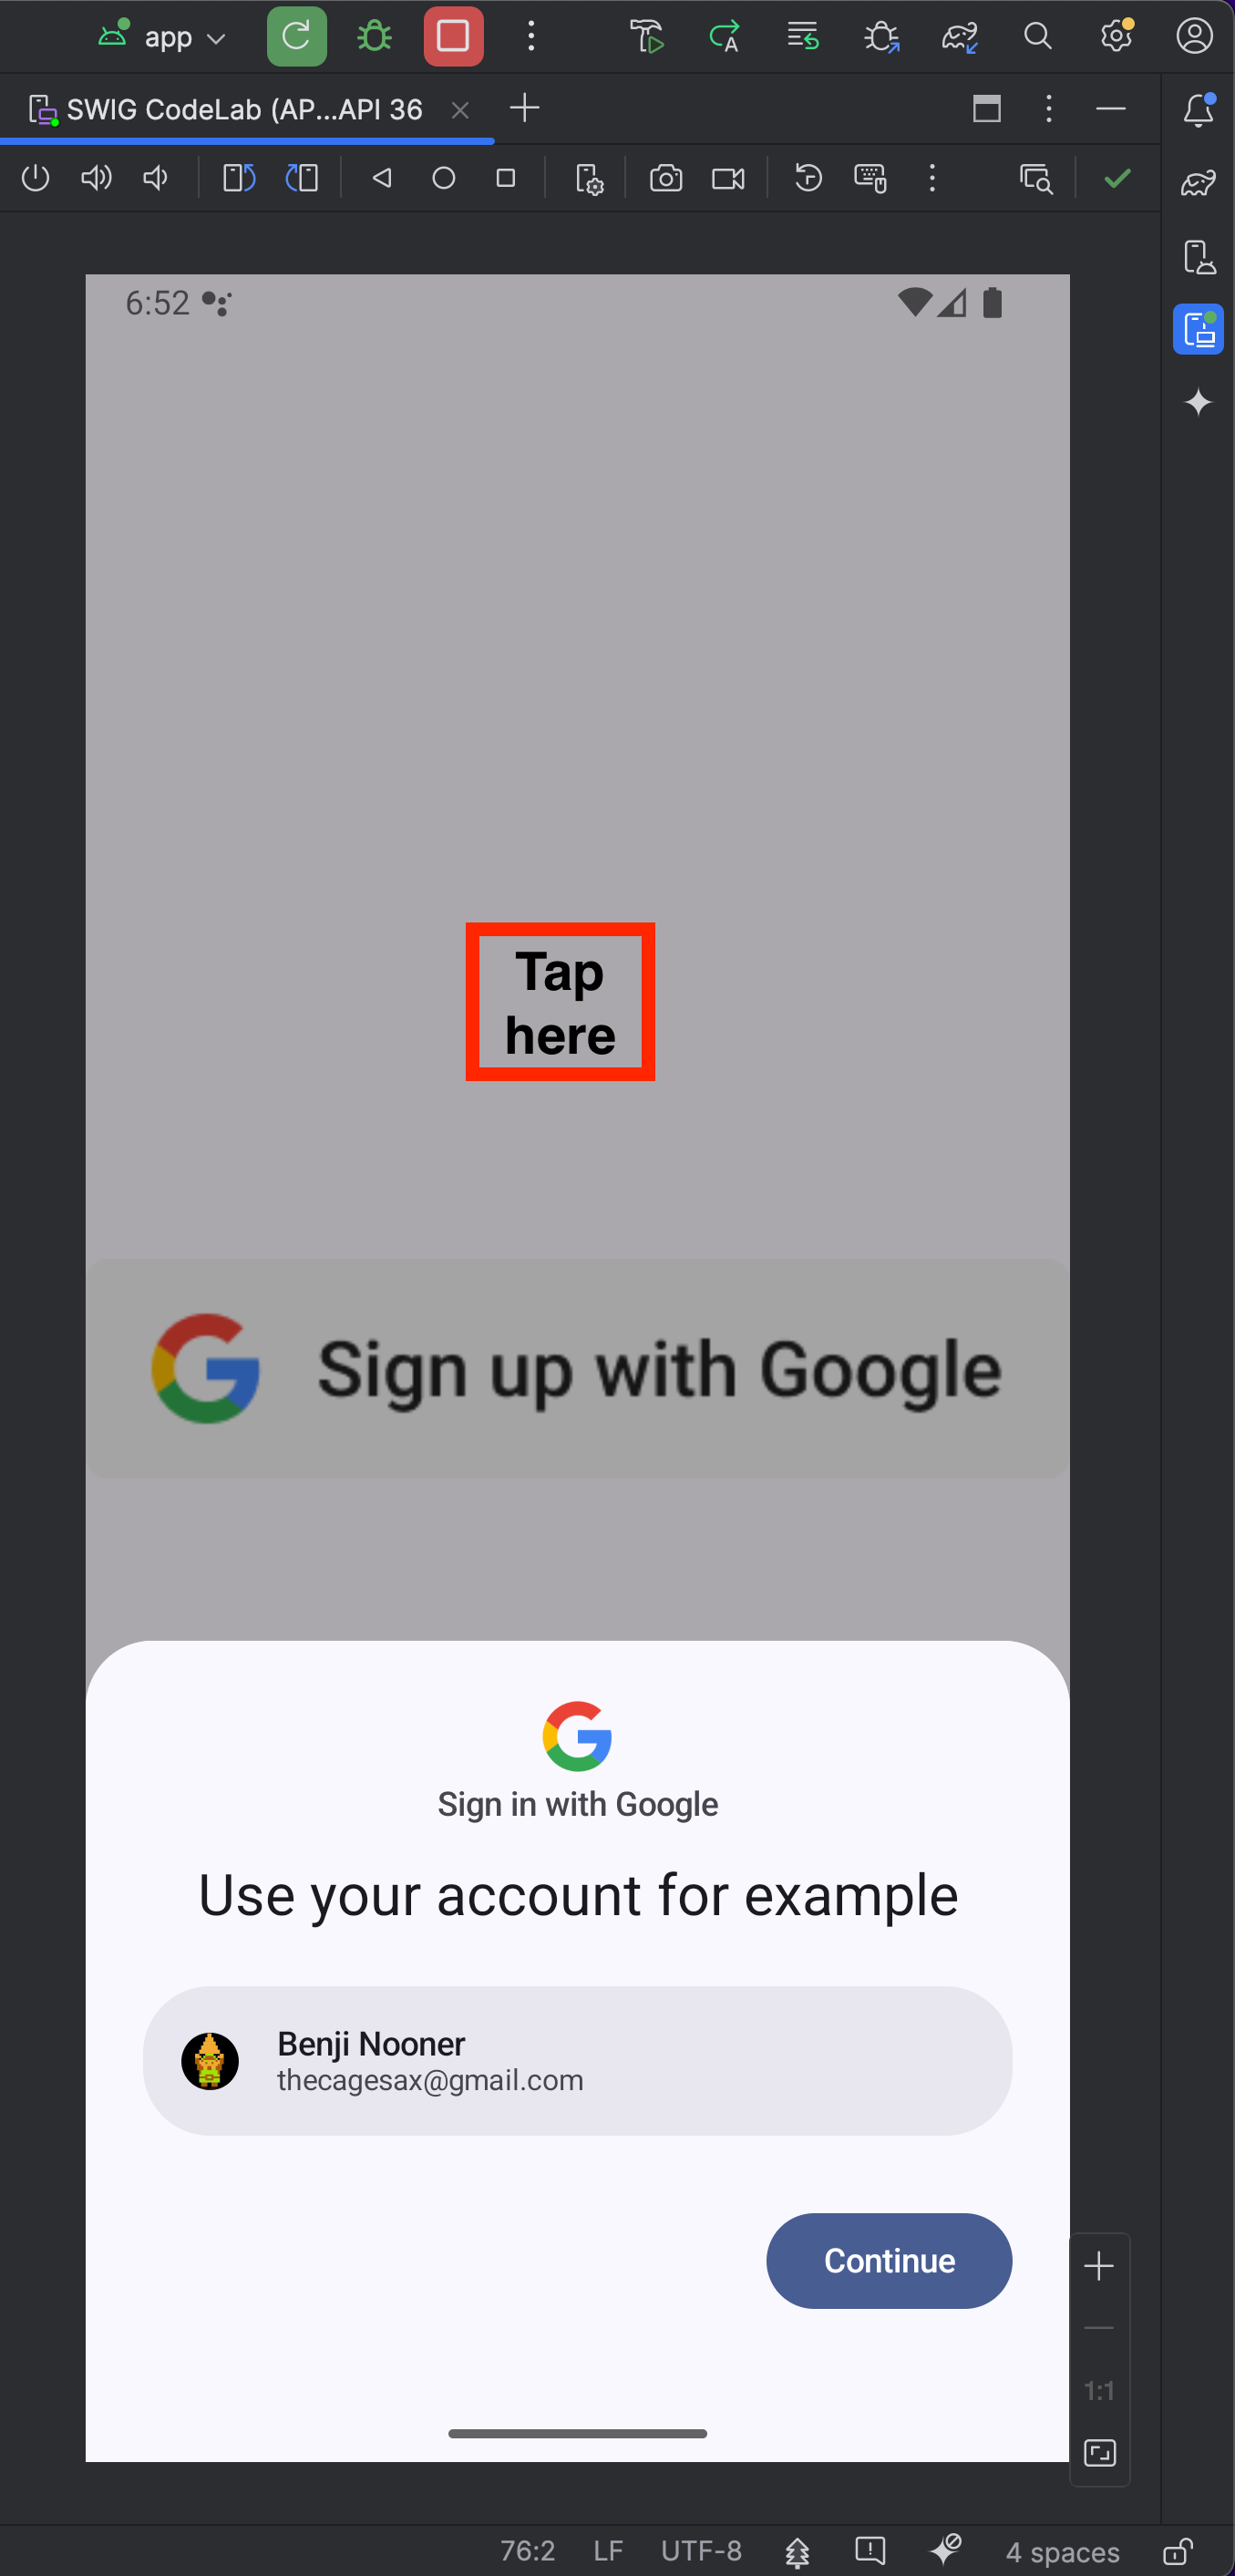
- 現在您應該會在應用程式中看到我們建立的按鈕。請點選該按鈕,查看登入對話方塊
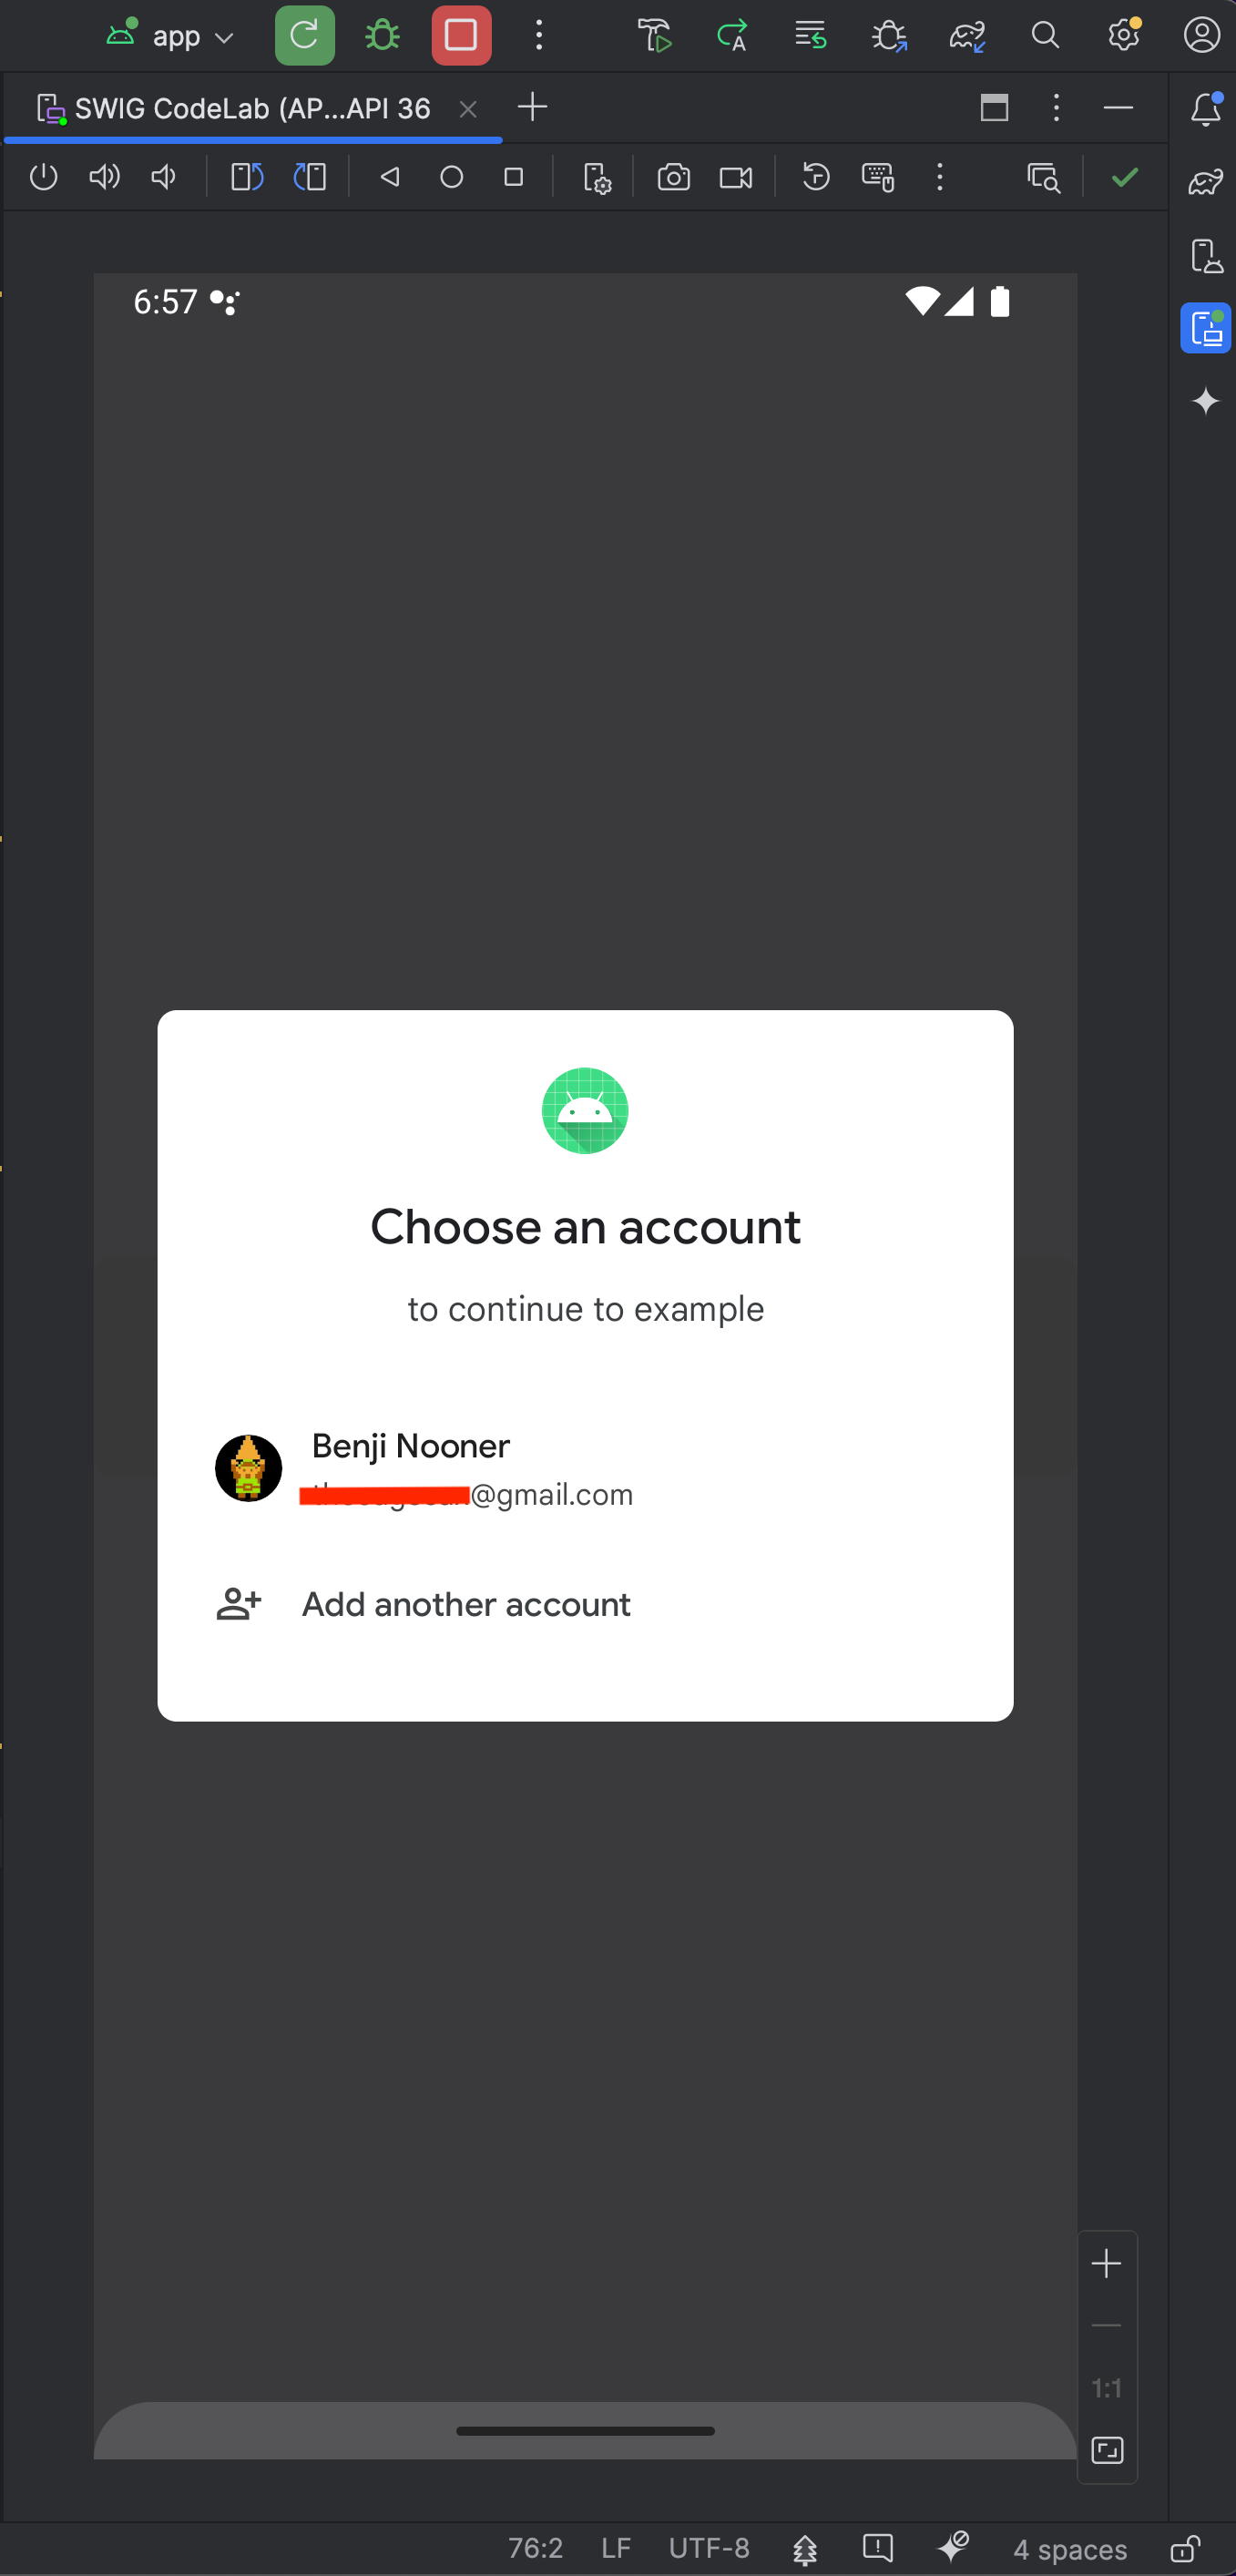
- 按一下帳戶即可登入!
8. 結語
你已完成本程式碼研究室!如要進一步瞭解或取得 Android 裝置上「使用 Google 帳戶登入」功能的相關說明,請參閱下方的「常見問題」一節:
常見問題
完整的 MainActivity.kt 程式碼
以下是 MainActivity.kt 的完整程式碼,供您參考:
package com.example.example
import android.os.Bundle
import androidx.activity.ComponentActivity
import androidx.activity.compose.setContent
import androidx.compose.foundation.layout.fillMaxSize
import androidx.compose.runtime.Composable
import androidx.compose.ui.Modifier
import com.example.example.ui.theme.ExampleTheme
import android.content.ContentValues.TAG
import android.content.Context
import android.credentials.GetCredentialException
import android.os.Build
import android.util.Log
import android.widget.Toast
import androidx.annotation.RequiresApi
import androidx.compose.foundation.clickable
import androidx.compose.foundation.Image
import androidx.compose.foundation.layout.Arrangement
import androidx.compose.foundation.layout.Column
import androidx.compose.material3.MaterialTheme
import androidx.compose.material3.Surface
import androidx.compose.runtime.rememberCoroutineScope
import androidx.compose.ui.Alignment
import androidx.compose.ui.platform.LocalContext
import androidx.compose.ui.res.painterResource
import androidx.credentials.CredentialManager
import androidx.credentials.exceptions.GetCredentialCancellationException
import androidx.credentials.exceptions.GetCredentialCustomException
import androidx.credentials.exceptions.NoCredentialException
import androidx.credentials.GetCredentialRequest
import com.google.android.libraries.identity.googleid.GetGoogleIdOption
import com.google.android.libraries.identity.googleid.GetSignInWithGoogleOption
import com.google.android.libraries.identity.googleid.GoogleIdTokenParsingException
import java.security.SecureRandom
import java.util.Base64
import kotlinx.coroutines.CoroutineScope
import androidx.compose.runtime.LaunchedEffect
import kotlinx.coroutines.delay
import kotlinx.coroutines.launch
class MainActivity : ComponentActivity() {
@RequiresApi(Build.VERSION_CODES.UPSIDE_DOWN_CAKE)
override fun onCreate(savedInstanceState: Bundle?) {
super.onCreate(savedInstanceState)
//replace with your own web client ID from Google Cloud Console
val webClientId = "YOUR_CLIENT_ID_HERE"
setContent {
//ExampleTheme - this is derived from the name of the project not any added library
//e.g. if this project was named "Testing" it would be generated as TestingTheme
ExampleTheme {
Surface(
modifier = Modifier.fillMaxSize(), color = MaterialTheme.colorScheme.background,
) {
Column(
verticalArrangement = Arrangement.Center,
horizontalAlignment = Alignment.CenterHorizontally
) {
//This will trigger on launch
BottomSheet(webClientId)
//This requires the user to press the button
ButtonUI(webClientId)
}
}
}
}
}
}
//This line is not needed for the project to build, but you will see errors if it is not present.
//This code will not work on Android versions < UpsideDownCake
@RequiresApi(Build.VERSION_CODES.UPSIDE_DOWN_CAKE)
@Composable
fun BottomSheet(webClientId: String) {
val context = LocalContext.current
// LaunchedEffect is used to run a suspend function when the composable is first launched.
LaunchedEffect(Unit) {
// Create a Google ID option with filtering by authorized accounts enabled.
val googleIdOption: GetGoogleIdOption = GetGoogleIdOption.Builder()
.setFilterByAuthorizedAccounts(true)
.setServerClientId(webClientId)
.setNonce(generateSecureRandomNonce())
.build()
// Create a credential request with the Google ID option.
val request: GetCredentialRequest = GetCredentialRequest.Builder()
.addCredentialOption(googleIdOption)
.build()
// Attempt to sign in with the created request using an authorized account
val e = signIn(request, context)
// If the sign-in fails with NoCredentialException, there are no authorized accounts.
// In this case, we attempt to sign in again with filtering disabled.
if (e is NoCredentialException) {
val googleIdOptionFalse: GetGoogleIdOption = GetGoogleIdOption.Builder()
.setFilterByAuthorizedAccounts(false)
.setServerClientId(webClientId)
.setNonce(generateSecureRandomNonce())
.build()
val requestFalse: GetCredentialRequest = GetCredentialRequest.Builder()
.addCredentialOption(googleIdOptionFalse)
.build()
signIn(requestFalse, context)
}
}
}
@RequiresApi(Build.VERSION_CODES.UPSIDE_DOWN_CAKE)
@Composable
fun ButtonUI(webClientId: String) {
val context = LocalContext.current
val coroutineScope = rememberCoroutineScope()
val onClick: () -> Unit = {
val signInWithGoogleOption: GetSignInWithGoogleOption = GetSignInWithGoogleOption
.Builder(serverClientId = webClientId)
.setNonce(generateSecureRandomNonce())
.build()
val request: GetCredentialRequest = GetCredentialRequest.Builder()
.addCredentialOption(signInWithGoogleOption)
.build()
signIn(coroutineScope, request, context)
}
Image(
painter = painterResource(id = R.drawable.siwg_button),
contentDescription = "",
modifier = Modifier
.fillMaxSize()
.clickable(enabled = true, onClick = onClick)
)
}
fun generateSecureRandomNonce(byteLength: Int = 32): String {
val randomBytes = ByteArray(byteLength)
SecureRandom.getInstanceStrong().nextBytes(randomBytes)
return Base64.getUrlEncoder().withoutPadding().encodeToString(randomBytes)
}
//This code will not work on Android versions < UPSIDE_DOWN_CAKE when GetCredentialException is
//is thrown.
@RequiresApi(Build.VERSION_CODES.UPSIDE_DOWN_CAKE)
suspend fun signIn(request: GetCredentialRequest, context: Context): Exception? {
    val credentialManager = CredentialManager.create(context)
    val failureMessage = "Sign in failed!"
    var e: Exception? = null
    //using delay() here helps prevent NoCredentialException when the BottomSheet Flow is triggered
    //on the initial running of our app
    delay(250)
    try {
        // The getCredential is called to request a credential from Credential Manager.
        val result = credentialManager.getCredential(
            request = request,
            context = context,
        )
        Log.i(TAG, result.toString())

        Toast.makeText(context, "Sign in successful!", Toast.LENGTH_SHORT).show()
        Log.i(TAG, "(☞゚ヮ゚)☞  Sign in Successful!  ☜(゚ヮ゚☜)")

    } catch (e: GetCredentialException) {
        Toast.makeText(context, failureMessage, Toast.LENGTH_SHORT).show()
        Log.e(TAG, failureMessage + ": Failure getting credentials", e)

    } catch (e: GoogleIdTokenParsingException) {
        Toast.makeText(context, failureMessage, Toast.LENGTH_SHORT).show()
        Log.e(TAG, failureMessage + ": Issue with parsing received GoogleIdToken", e)

    } catch (e: NoCredentialException) {
        Toast.makeText(context, failureMessage, Toast.LENGTH_SHORT).show()
        Log.e(TAG, failureMessage + ": No credentials found", e)
        return e

    } catch (e: GetCredentialCustomException) {
        Toast.makeText(context, failureMessage, Toast.LENGTH_SHORT).show()
        Log.e(TAG, failureMessage + ": Issue with custom credential request", e)

    } catch (e: GetCredentialCancellationException) {
        Toast.makeText(context, ": Sign-in cancelled", Toast.LENGTH_SHORT).show()
        Log.e(TAG, failureMessage + ": Sign-in was cancelled", e)
    }
    return e
}