1. Overview
In today's fast-paced retail landscape, delivering exceptional customer service while enabling personalized shopping experiences is paramount. We'll take you on a technical journey through the creation of a knowledge-driven chat application designed to answer customer questions, guide product discovery, and tailor search results. This innovative solution combines the power of AlloyDB for data storage, an in-house analytics engine for contextual understanding, Gemini (Large Language Model) for relevance validation, and Google's Agent Builder for quickly bootstrapping an intelligent conversational assistant.
The Challenge: Modern retail customers expect instant answers and product recommendations that align with their unique preferences. Traditional search methods often fall short of providing this level of personalization.
The Solution: Our knowledge-driven chat application tackles this challenge head-on. It leverages a rich knowledge base derived from your retail data to understand customer intent, respond intelligently, and deliver hyper-relevant results.
What you'll build
As part of this lab (Part 1), you will:
- Create an AlloyDB instance and load Ecommerce Dataset
- Enable the pgvector and generative AI model extensions in AlloyDB
- Generate embeddings from the product description
- Perform real time Cosine similarity search for user search text
- Deploy the solution in serverless Cloud Run Functions
The second part of the lab will cover the Agent Builder steps.
Requirements
2. Architecture
Data Flow: Let's take a closer look at how data moves through our system:
Ingestion:
Our first step is to ingest the Retail data (inventory, product descriptions, customer interactions) into AlloyDB.
Analytics Engine:
We will use AlloyDB as the analytics engine to perform the below:
- Context Extraction: The engine analyzes the data stored within AlloyDB to understand relationships between products, categories, customer behavior, etc as applicable.
- Embedding Creation: Embeddings (mathematical representations of text) are generated for both the user's query and the information stored in AlloyDB.
- Vector Search: The engine performs a similarity search, comparing the query embedding to the embeddings of product descriptions, reviews, and other relevant data. This identifies the 25 most relevant "nearest neighbors."
Gemini Validation:
These potential responses are sent to Gemini for assessment. Gemini determines if they are truly relevant and safe to share with the user.
Response Generation:
The validated responses are structured into a JSON array and the whole engine is packaged into a serverless Cloud Run Function that is invoked from the Agent Builder.
Conversational Interaction:
Agent Builder presents the responses to the user in a natural language format, facilitating a back-and-forth dialogue. This part will be covered in a follow-up lab.
3. Before you begin
Create a project
- In the Google Cloud Console, on the project selector page, select or create a Google Cloud project.
- Make sure that billing is enabled for your Cloud project. Learn how to check if billing is enabled on a project .
- You'll use Cloud Shell, a command-line environment running in Google Cloud that comes preloaded with bq. Click Activate Cloud Shell at the top of the Google Cloud console.

- Once connected to Cloud Shell, you check that you're already authenticated and that the project is set to your project ID using the following command:
gcloud auth list
- Run the following command in Cloud Shell to confirm that the gcloud command knows about your project.
gcloud config list project
- If your project is not set, use the following command to set it:
gcloud config set project <YOUR_PROJECT_ID>
- Enable the required APIs.
gcloud services enable alloydb.googleapis.com \
                       compute.googleapis.com \
                       cloudresourcemanager.googleapis.com \
                       servicenetworking.googleapis.com \
                       run.googleapis.com \
                       cloudbuild.googleapis.com \
                       cloudfunctions.googleapis.com \
                       aiplatform.googleapis.com
The alternative to the gcloud command is through the console by searching for each product or using this link.
If any API is missed, you can always enable it during the course of the implementation.
Refer documentation for gcloud commands and usage.
4. Database setup
In this lab we'll use AlloyDB as the database to hold the retail data. It uses clusters to hold all of the resources, such as databases and logs. Each cluster has a primary instance that provides an access point to the data. Tables will hold the actual data.
Let's create an AlloyDB cluster, instance and table where the ecommerce dataset will be loaded.
Create a cluster and instance
- Navigate the AlloyDB page in the Cloud Console. An easy way to find most pages in Cloud Console is to search for them using the search bar of the console.
- Select CREATE CLUSTER from that page:
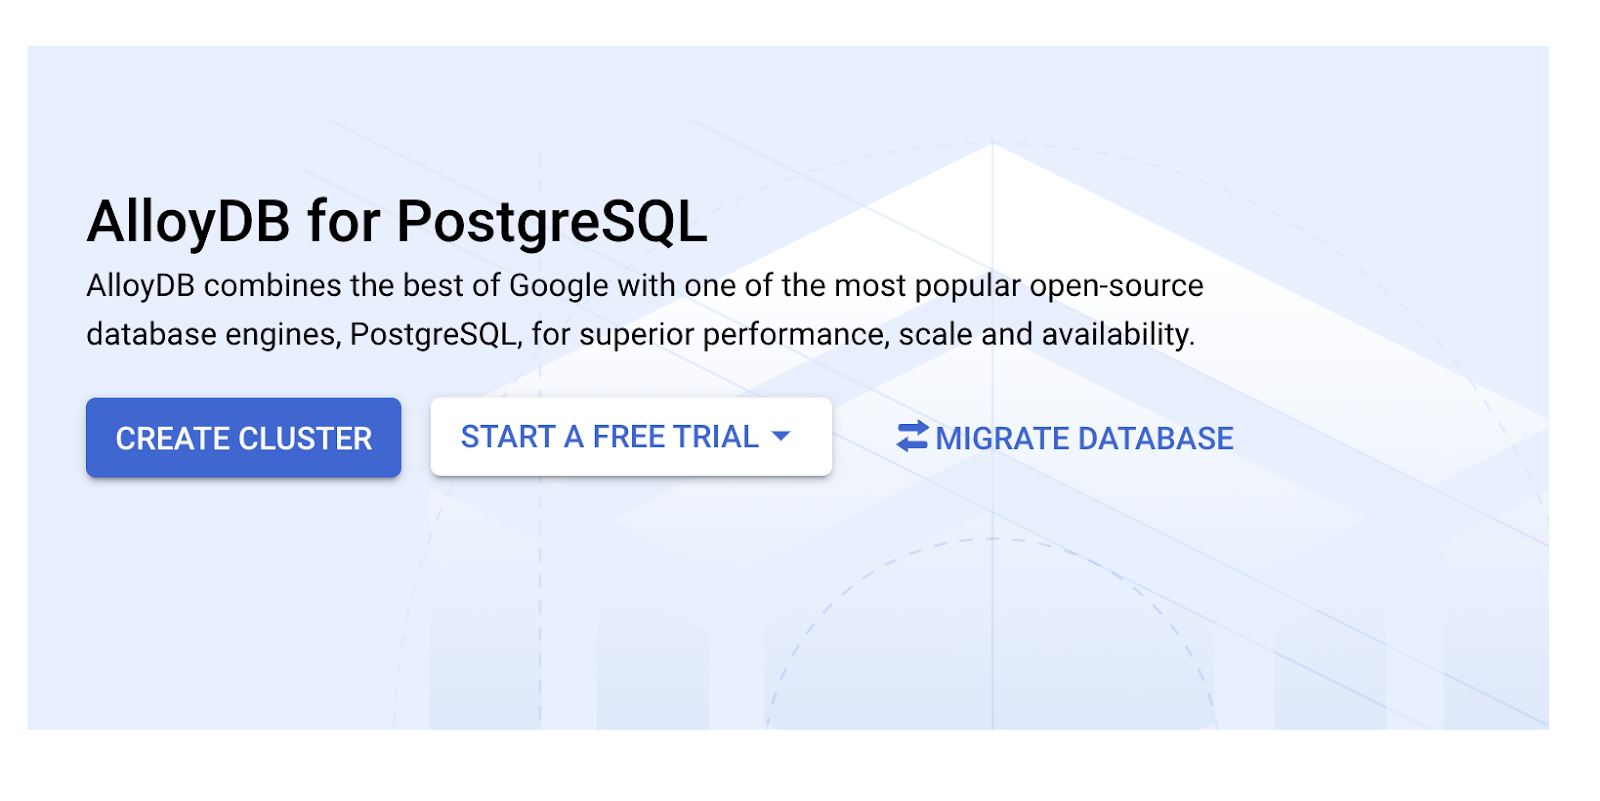
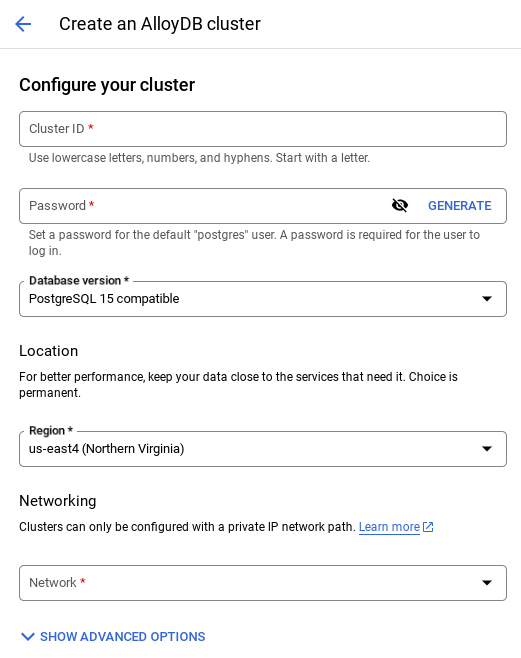
- You'll see a screen like the one below. Create a cluster and instance with the following values:
- cluster id: "
shopping-cluster" - password: "
alloydb" - PostgreSQL 15 compatible
- Region: "
us-central1" - Networking: "
default"
- When you select the default network, you'll see a screen like the one below. Select SET UP CONNECTION.
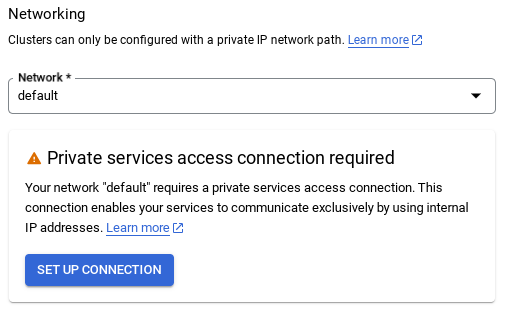
- From there, select "Use an automatically allocated IP range" and Continue. After reviewing the information, select CREATE CONNECTION.
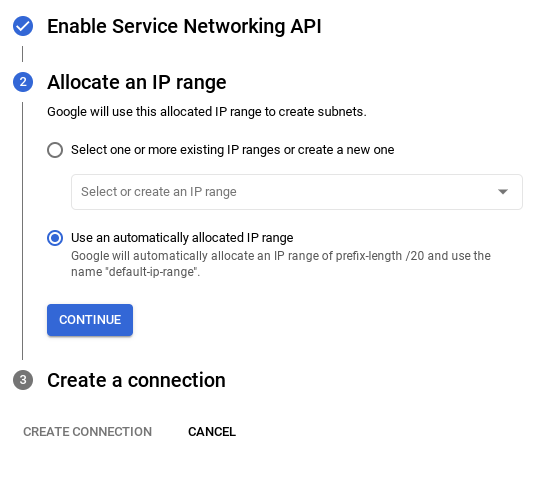
- Once your network is set up, you can continue to create your cluster. Click on CREATE CLUSTER to complete setting up of the cluster as shown below:
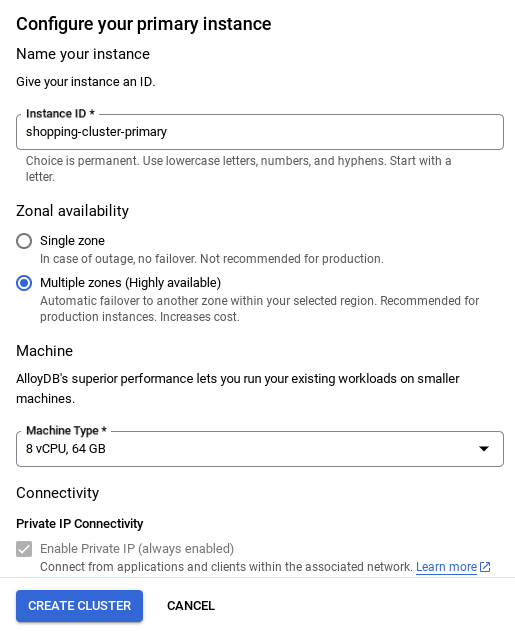
Make sure to change the instance id to "shopping-instance".
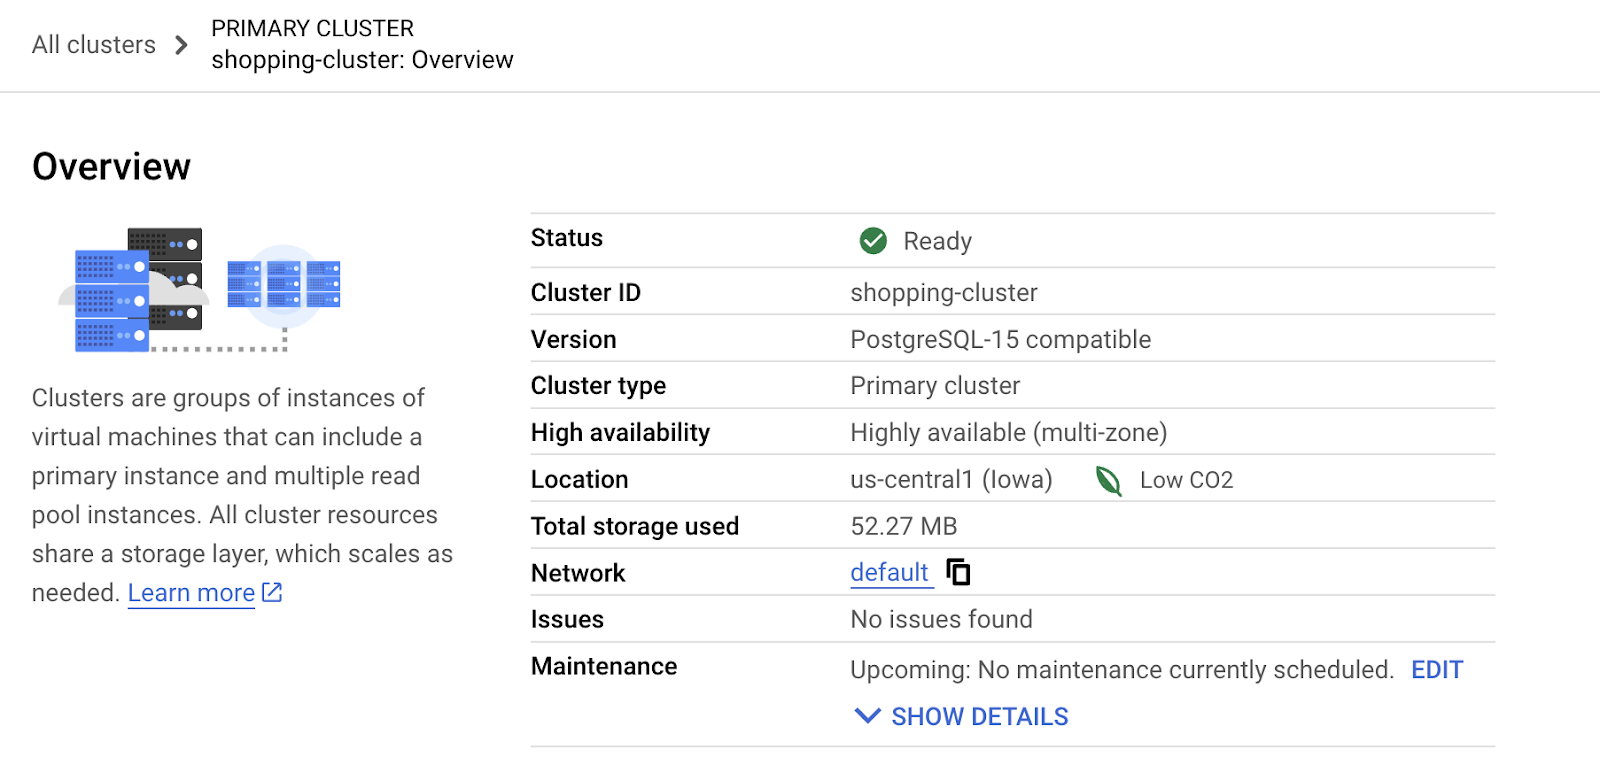
Note that the Cluster creation will take around 10 minutes. Once it is successful, you should see a screen that looks similar to this one:
5. Data ingestion
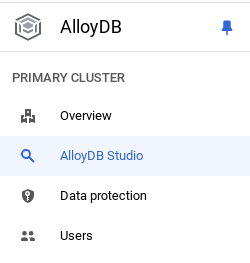
Now it's time to add a table with the data about the store. Navigate to AlloyDB, select the primary cluster and then AlloyDB Studio:
You may need to wait for your instance to finish being created. Once it is, sign into AlloyDB using the credentials you created when you created the cluster. Use the following data for authenticating to PostgreSQL:
- Username : "
postgres" - Database : "
postgres" - Password : "
alloydb"
Once you have authenticated successfully into AlloyDB Studio, SQL commands are entered in the Editor. You can add multiple Editor windows using the plus to the right of the last window.
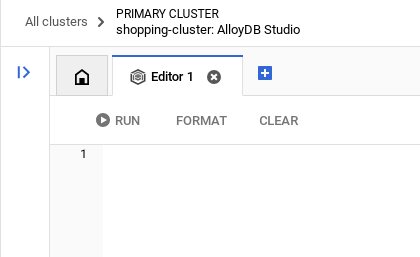
You'll enter commands for AlloyDB in editor windows, using the Run, Format, and Clear options as necessary.
Enable Extensions
For building this app, we will use the extensions pgvector and google_ml_integration. The pgvector extension allows you to store and search vector embeddings. The google_ml_integration extension provides functions you use to access Vertex AI prediction endpoints to get predictions in SQL. Enable these extensions by running the following DDLs:
CREATE EXTENSION IF NOT EXISTS google_ml_integration CASCADE;
CREATE EXTENSION IF NOT EXISTS vector;
If you would like to check the extensions that have been enabled on your database, run this SQL command:
select extname, extversion from pg_extension;
Create a table
Create a table using the DDL statement below:
CREATE TABLE
 apparels ( id BIGINT,
   category VARCHAR(100),
   sub_category VARCHAR(50),
   uri VARCHAR(200),
   image VARCHAR(100),
   content VARCHAR(2000),
   pdt_desc VARCHAR(5000),
   embedding vector(768) );
On successful execution of the above command, you should be able to view the table in the database. A sample screenshot is shown below:
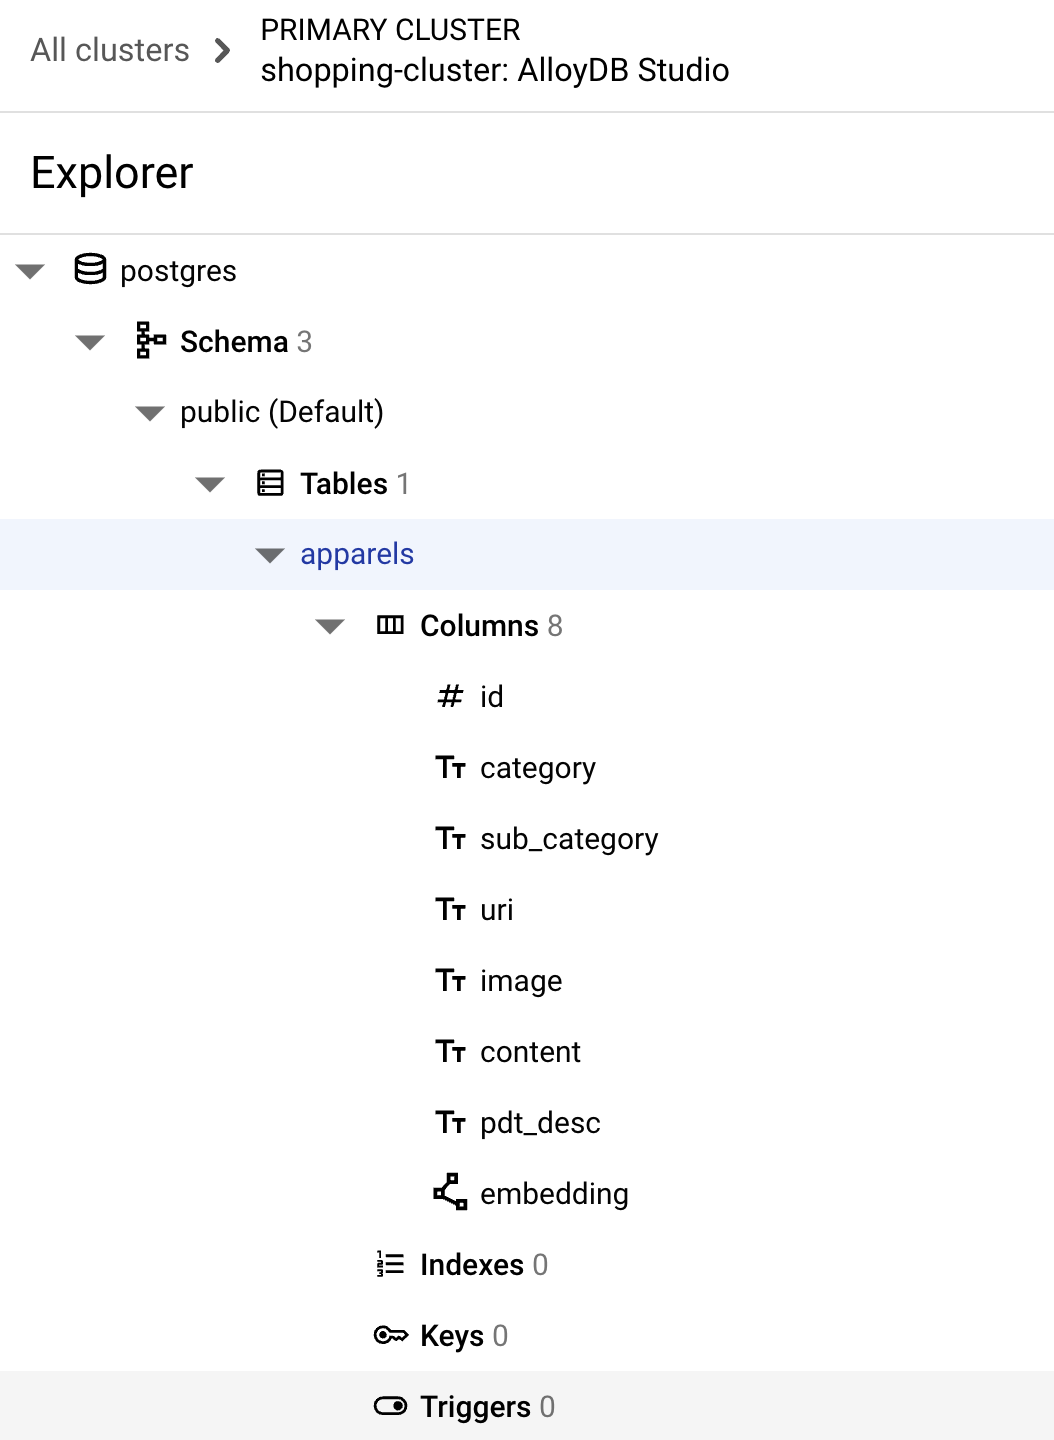
Ingest data
For this lab, we have test data of about 200 records in this SQL file. It contains the id, category, sub_category, uri, image, and content. The other fields will be filled in later in the lab.
Copy the 20 lines/insert statements from there and then paste those lines in a blank editor tab and select RUN.
To see the table contents, expand the Explorer section until you can see the table named apparels. Select the tricolon (⋮) to see the option to Query the table. A SELECT statement will open in a new Editor tab.
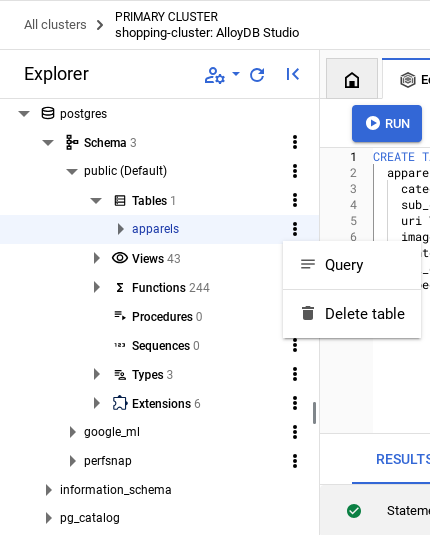
Grant Permission
Run the below statement to grant execute rights on the embedding function to the user postgres:
GRANT EXECUTE ON FUNCTION embedding TO postgres;
Grant Vertex AI User ROLE to the AlloyDB service account
Go to Cloud Shell terminal and give the following command:
PROJECT_ID=$(gcloud config get-value project)

gcloud projects add-iam-policy-binding $PROJECT_ID \
  --member="serviceAccount:service-$(gcloud projects describe $PROJECT_ID --format="value(projectNumber)")@gcp-sa-alloydb.iam.gserviceaccount.com" \
--role="roles/aiplatform.user"
6. Context
Return to the AlloyDB Instance page.
To create an embedding, we'll need to have a context i.e. all of the information we want to include in a single field. We'll do this by creating a product description (which we'll call pdt_desc). In our case, we'll use all the information about each product, but when you do this with your own data, feel free to engineer the data in any way that you find meaningful for your business.
Run the following statement from AlloyDB studio of your newly created instance. This will update the pdt_desc field with context data:
UPDATE
 apparels
SET
 pdt_desc = CONCAT('This product category is: ', category, ' and sub_category is: ', sub_category, '. The description of the product is as follows: ', content, '. The product image is stored at: ', uri)
WHERE
 id IS NOT NULL;
This DML creates a simple context summary using the information from all the fields available in the table and other dependencies (if any in your use case). For a more precise assortment of information and context creation, feel free to engineer the data in any way that you find meaningful for your business.
7. Create embeddings for the context
It's much easier for computers to process numbers than to process text. An embedding system converts text into a series of floating point numbers that should represent the text, no matter how it's worded, what language it uses, etc.
Consider describing a seaside location. It might be called "on the water", "beachfront", "walk from your room to the ocean", "sur la mer", "на берегу океана" etc. These terms all look different, but their semantic meaning or in machine learning terminology, their embeddings should be very close to each other.
Now that the data and context are ready, we will run the SQL to add the embeddings of the product description to the table in the field embedding. There are a variety of embedding models you can use. We're using text-embedding-004 from Vertex AI. Be sure to use the same embedding model throughout the project!
Note: If you are using an existing Google Cloud Project created a while ago, you might need to continue to use older versions of the text-embedding model like textembedding-gecko.
UPDATE
 apparels
SET
 embedding = embedding( 'text-embedding-004',
   pdt_desc)
WHERE
 TRUE;
Look at the apparels table again to see some embeddings. Be sure to rerun the SELECT statement to see the changes.
SELECT
 id,
 category,
 sub_category,
 content,
 embedding
FROM
 apparels;
This should return the embeddings vector, that looks like an array of floats, for the sample text in the query as shown below:
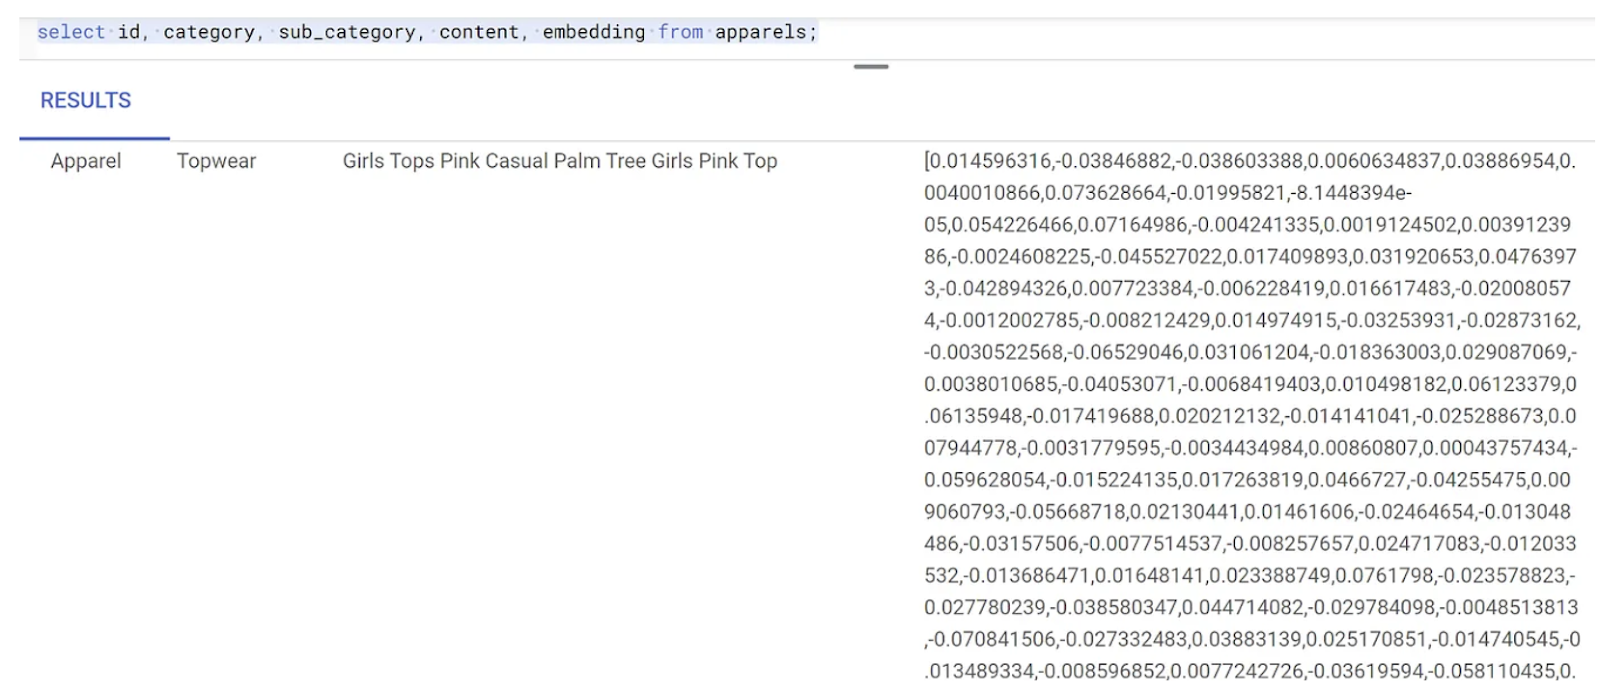
Note: Newly created Google Cloud Projects under the free tier might face quota issues when it comes to the number of embedding requests allowed per second to the Embedding models. We suggest that you use a filter query for the ID and then selectively choose 1-5 records and so on, while generating the embedding.
8. Perform Vector search
Now that the table, data, and embeddings are all ready, let's perform the real time vector search for the user search text.
Suppose the user asks:
"I want womens tops, pink casual only pure cotton."
You can find matches for this by running the query below:
SELECT
id,
category,
sub_category,
content,
pdt_desc AS description
FROM
apparels
ORDER BY
embedding <=> embedding('text-embedding-004',
  'I want womens tops, pink casual only pure cotton.')::vector
LIMIT
5;
Let's look at this query in detail:
In this query,
- The user's search text is: "I want womens tops, pink casual only pure cotton."
- We are converting it to embeddings in the
embedding()method using the model:text-embedding-004. This step should look familiar after the last step, where we applied the embedding function to all of the items in the table. - "
<=>" represents the use of the COSINE SIMILARITY distance method. You can find all the similarity measures available in the documentation of pgvector. - We are converting the embedding method's result to vector type to make it compatible with the vectors stored in the database.
- LIMIT 5 represents that we want to extract 5 nearest neighbors for the search text.
Result looks like this:

As you can observe in your results, the matches are pretty close to the search text. Try changing the color to see how the results change.
Important Note:
Now let's say we want to increase the performance (query time), efficiency and recall of this Vector Search result using ScaNN index. Please read the steps in this blog to compare the difference in result with and without the index. Just listing the index creation steps here for convenience:
- Since we already have the cluster, instance, context and embeddings created, we just have to install the ScaNN extension using the following statement:
CREATE EXTENSION IF NOT EXISTS alloydb_scann;
- Next we will create the index (ScaNN):
CREATE INDEX apparel_index ON apparels
USING scann (embedding cosine)
WITH (num_leaves=54);
In the above DDL, apparel_index is the name of the index
"apparels" is my table
"scann" is the index method
"embedding" is the column in the table I want to index
"cosine" is the distance method I want to use with the index
"54" is the number of partitions to apply to this index. Set to any value between 1 to 1048576. For more information about how to decide this value, see Tune a ScaNN index.
I used a SQUARE ROOT of the number of data points as recommended in the ScaNN repo (When partitioning, num_leaves should be roughly the square root of the number of datapoints.).
- Check if the index is created using the query:
SELECT * FROM pg_stat_ann_indexes;
- Perform Vector Search using the same query we used without the index:
select * from apparels
ORDER BY embedding <=> CAST(embedding('textembedding-gecko', 'white tops for girls without any print') as vector(768))
LIMIT 20
The above query is the same one that we used in the lab in step 8. However now we have the field indexed.
- Test with a simple search query with and without the index (by dropping the index):
white tops for girls without any print
The above search text in the Vector Search query on the INDEXED embeddings data results in quality search results and efficiency. The efficiency is vastly improved (in terms of time for execution: 10.37ms without ScaNN and 0.87ms with ScaNN) with the index. For more information on this topic, please refer to this blog.
9. Match Validation with the LLM
Before moving on and creating a service to return the best matches to an application, let's use a generative AI model to validate if these potential responses are truly relevant and safe to share with the user.
Ensuring the instance is set up for Gemini
First check if the Google ML Integration is already enabled for your Cluster and Instance. In AlloyDB Studio, give the following command:
show google_ml_integration.enable_model_support;
If the value is shown as "on", you can skip the next 2 steps and go directly to setting up the AlloyDB and Vertex AI Model integration.
- Go to your AlloyDB cluster's primary instance and click EDIT PRIMARY INSTANCE
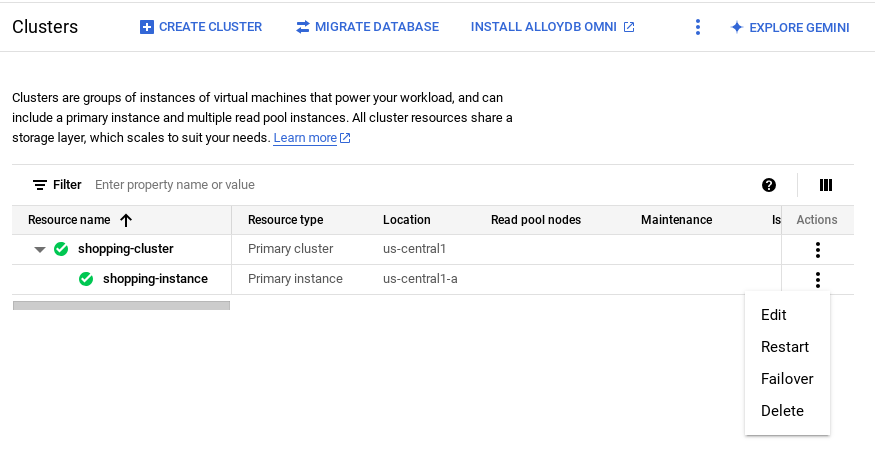
- Navigate to the Flags section in the Advanced Configuration Options. and ensure that the
google_ml_integration.enable_model_support flagis set to "on" as shown below:
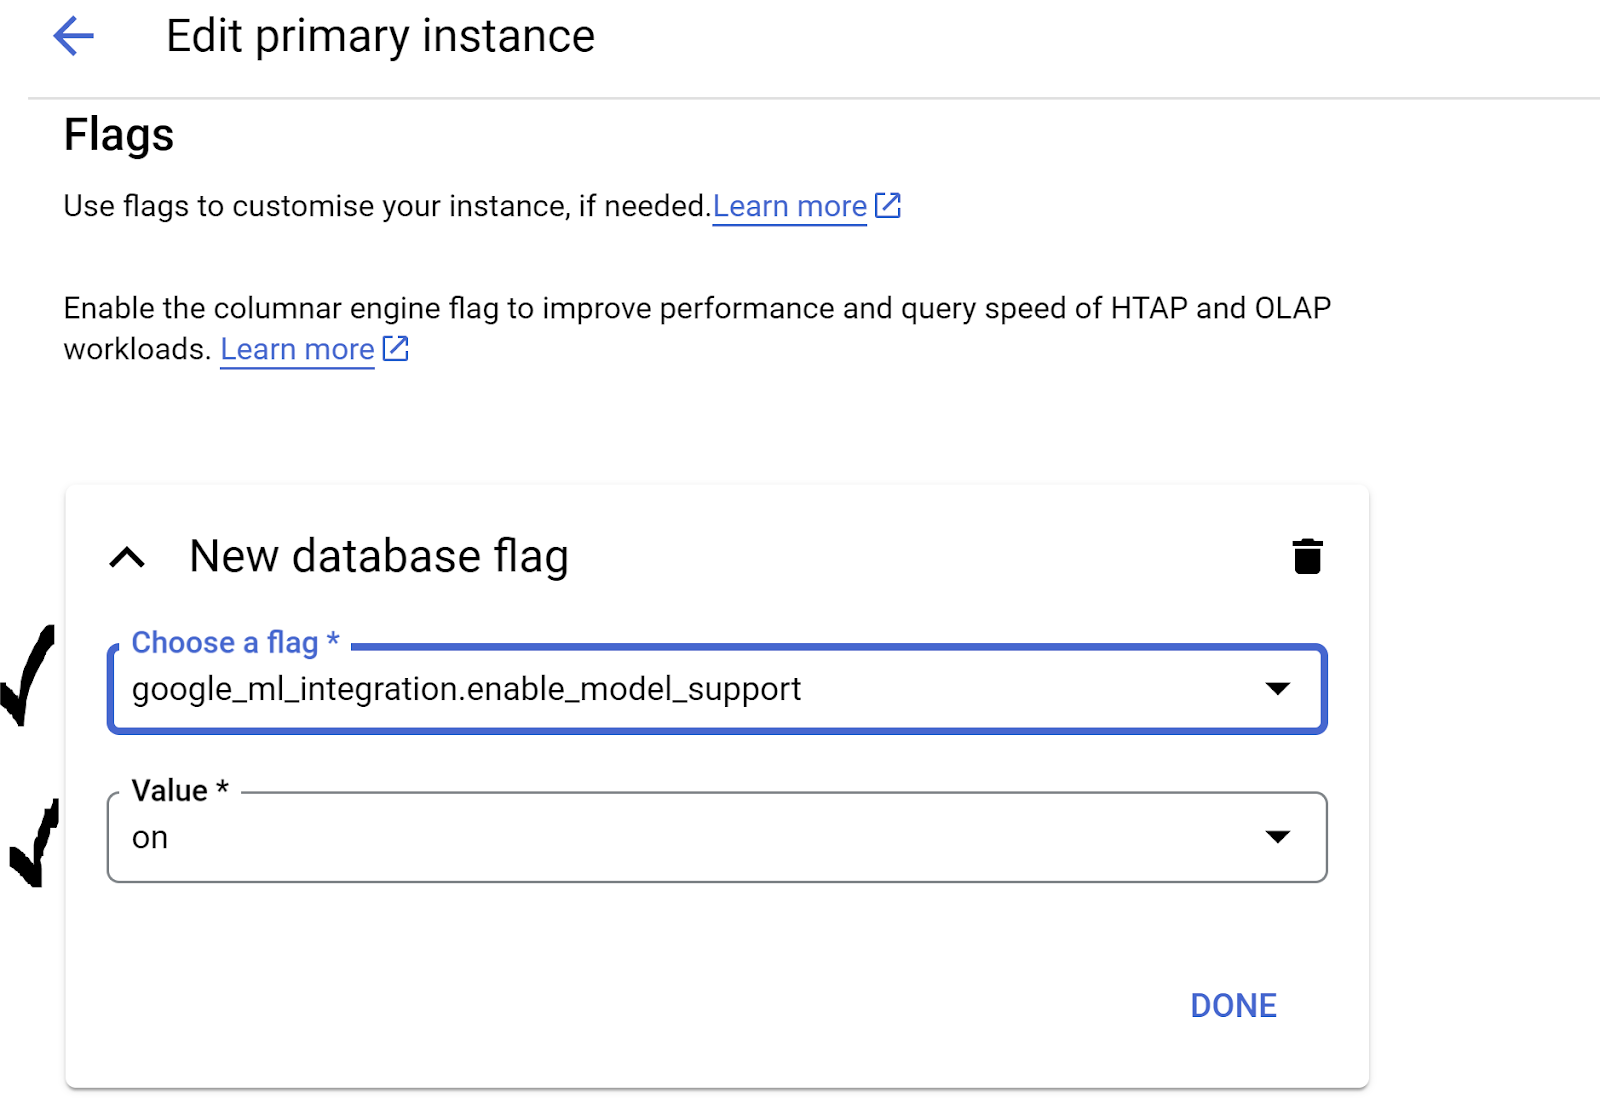
If it is not set to "on", set it to "on" and then click the UPDATE INSTANCE button. This step will take a few minutes.
AlloyDB and Vertex AI Model integration
Now you can connect to AlloyDB Studio and run the following DML statement to set up Gemini model access from AlloyDB, using your project ID where indicated. You may be warned of a syntax error before running the command, but it should run fine.
First up, we create the Gemini 1.5 model connection as shown below. Remember to replace $PROJECT_ID in the command below with your Google Cloud Project Id.
CALL
 google_ml.create_model( model_id => 'gemini-1.5',
   model_request_url => 'https://us-central1-aiplatform.googleapis.com/v1/projects/$PROJECT_ID/locations/us-central1/publishers/google/models/gemini-1.5-pro:streamGenerateContent',
   model_provider => 'google',
   model_auth_type => 'alloydb_service_agent_iam');
You can check on the models configured for access via the following command in AlloyDB Studio:
select model_id,model_type from google_ml.model_info_view;
Finally, we need to grant permission for database users to execute the ml_predict_row function to run predictions via Google Vertex AI models. Run the following command:
GRANT EXECUTE ON FUNCTION ml_predict_row to postgres;
Note: If you are using an existing Google Cloud Project and an existing cluster/instance of AlloyDB created a while ago, you might need to drop the old references to the gemini-1.5 model and create again with the above CALL statement and run grant execute on function ml_predict_row again in case you face issues in the upcoming invocations of gemini-1.5.
Evaluating the responses
While we'll end up using one large query in the next section to ensure the responses from the query are reasonable, the query can be difficult to understand. We'll look at the pieces now and see how they come together in a few minutes.
- First we'll send a request to the database to get the 5 closest matches to a user query. We're hardcoding the query to keep this simple, but don't worry, we'll interpolate it into the query later. We're including the product description from the
apparelstable and adding two new fields–one that combines the description with the index and another with the original request. This is all being saved in a table calledxyz(just a temporary table name).
CREATE TABLE
 xyz AS
SELECT
 id || ' - ' || pdt_desc AS literature,
 pdt_desc AS content,
 'I want womens tops, pink casual only pure cotton.' AS  user_text
FROM
 apparels
ORDER BY
 embedding <=> embedding('text-embedding-004',
   'I want womens tops, pink casual only pure cotton.')::vector
LIMIT
 5;
The output of this query will be 5 most similar rows pertaining to the users query. The new table xyz will contain 5 rows where each row will have the following columns:
literaturecontentuser_text
- To determine how valid responses are, we'll use a complicated query where we explain how to evaluate the responses. It uses the
user_textandcontentin thexyztable as part of the query.
"Read this user search text: ', user_text,
' Compare it against the product inventory data set: ', content,
' Return a response with 3 values: 1) MATCH: if the 2 contexts are at least 85% matching or not: YES or NO 2) PERCENTAGE: percentage of match, make sure that this percentage is accurate 3) DIFFERENCE: A clear short easy description of the difference between the 2 products. Remember if the user search text says that some attribute should not be there, and the record has it, it should be a NO match."
- Using that query, we'll then review the "goodness" of responses in the
xyztable.
CREATE TABLE
  x AS
SELECT
  json_array_elements( google_ml.predict_row( model_id => 'gemini-1.5',
      request_body => CONCAT('{
 "contents": [
        { "role": "user",
          "parts":
             [ { "text": "Read this user search text: ', user_text, ' Compare it against the product inventory data set: ', content, ' Return a response with 3 values: 1) MATCH: if the 2 contexts are at least 85% matching or not: YES or NO 2) PERCENTAGE: percentage of match, make sure that this percentage is accurate 3) DIFFERENCE: A clear short easy description of the difference between the 2 products. Remember if the user search text says that some attribute should not be there, and the record has it, it should be a NO match."
             } ]
         }
] }'
)::json))-> 'candidates' -> 0 -> 'content' -> 'parts' -> 0 -> 'text'
AS LLM_RESPONSE
FROM
    xyz;
- The
predict_rowreturns its result in JSON format. The code "-> 'candidates' -> 0 -> 'content' -> 'parts' -> 0 -> 'text'"is used to extract the actual text from that JSON. To see the actual JSON that is returned, you can remove this code. - Finally, to get the LLM field, you just need to extract it from the x table:
SELECT
LLM_RESPONSE
FROM
        x;
- This can be combined into a single next query as follows.
You'll need to delete/remove the xyz and x tables from the AlloyDB database before running this, if you have run the above queries to check on the intermediate results.
SELECT
 LLM_RESPONSE
FROM (
 SELECT
 json_array_elements( google_ml.predict_row( model_id => 'gemini-1.5',
     request_body => CONCAT('{
     "contents": [
       { "role": "user",
         "parts":
            [ { "text": "Read this user search text: ', user_text, ' Compare it against the product inventory data set: ', content, ' Return a response with 3 values: 1) MATCH: if the 2 contexts are at least 85% matching or not: YES or NO 2) PERCENTAGE: percentage of match, make sure that this percentage is accurate 3) DIFFERENCE: A clear short easy description of the difference between the 2 products. Remember if the user search text says that some attribute should not be there, and the record has it, it should be a NO match."
            } ]
        }
] }'
)::json))-> 'candidates' -> 0 -> 'content' -> 'parts' -> 0 -> 'text'
AS LLM_RESPONSE
   FROM (
         SELECT
           id || ' - ' || pdt_desc AS literature,
           pdt_desc AS content,
         'I want womens tops, pink casual only pure cotton.' user_text
         FROM
           apparels
         ORDER BY
             embedding <=> embedding('text-embedding-004',
             'I want womens tops, pink casual only pure cotton.')::vector
         LIMIT
           5 ) AS xyz ) AS X;
While that still might look daunting, hopefully you can make a bit more sense out of it. The results tell whether or not there's a match, what percentage the match is, and some explanation of the rating.
Notice that the Gemini model has streaming on by default, so the actual response is spread across multiple lines: 
10. Take the application to web
Ready for taking this app to the web? Follow the steps below to make this Knowledge Engine Serverless with Cloud Run Functions:
- Go to Cloud Run Functions in Google Cloud Console to CREATE a new Cloud Run Function or use the link: https://console.cloud.google.com/functions/add.
- Select the Environment as "Cloud Run function". Provide Function Name "retail-engine" and choose Region as "us-central1". Set Authentication to "Allow unauthenticated invocations" and click NEXT. Choose Java 17 as runtime and Inline Editor for the source code.
- By default it would set the Entry Point to "
gcfv2.HelloHttpFunction". Replace the placeholder code inHelloHttpFunction.javaandpom.xmlof your Cloud Run Function with the code from Java file and the XML respectively. - Remember to change the $PROJECT_ID placeholder and the AlloyDB connection credentials with your values in the Java file. The AlloyDB credentials are the ones that we had used at the start of this codelab. If you have used different values, please modify the same in the Java file.
- Click on Deploy.
Once deployed, in order to allow the Cloud Function to access our AlloyDB database instance, we'll create the VPC connector.
IMPORTANT STEP:
Once you have set out for deployment, you should be able to see the functions in the Google Cloud Run Functions console. Search for the newly created function (retail-engine), click on it, then click EDIT and change the following:
- Go to Runtime, build, connections and security settings
- Increase the timeout to 180 seconds
- Go to the CONNECTIONS tab:
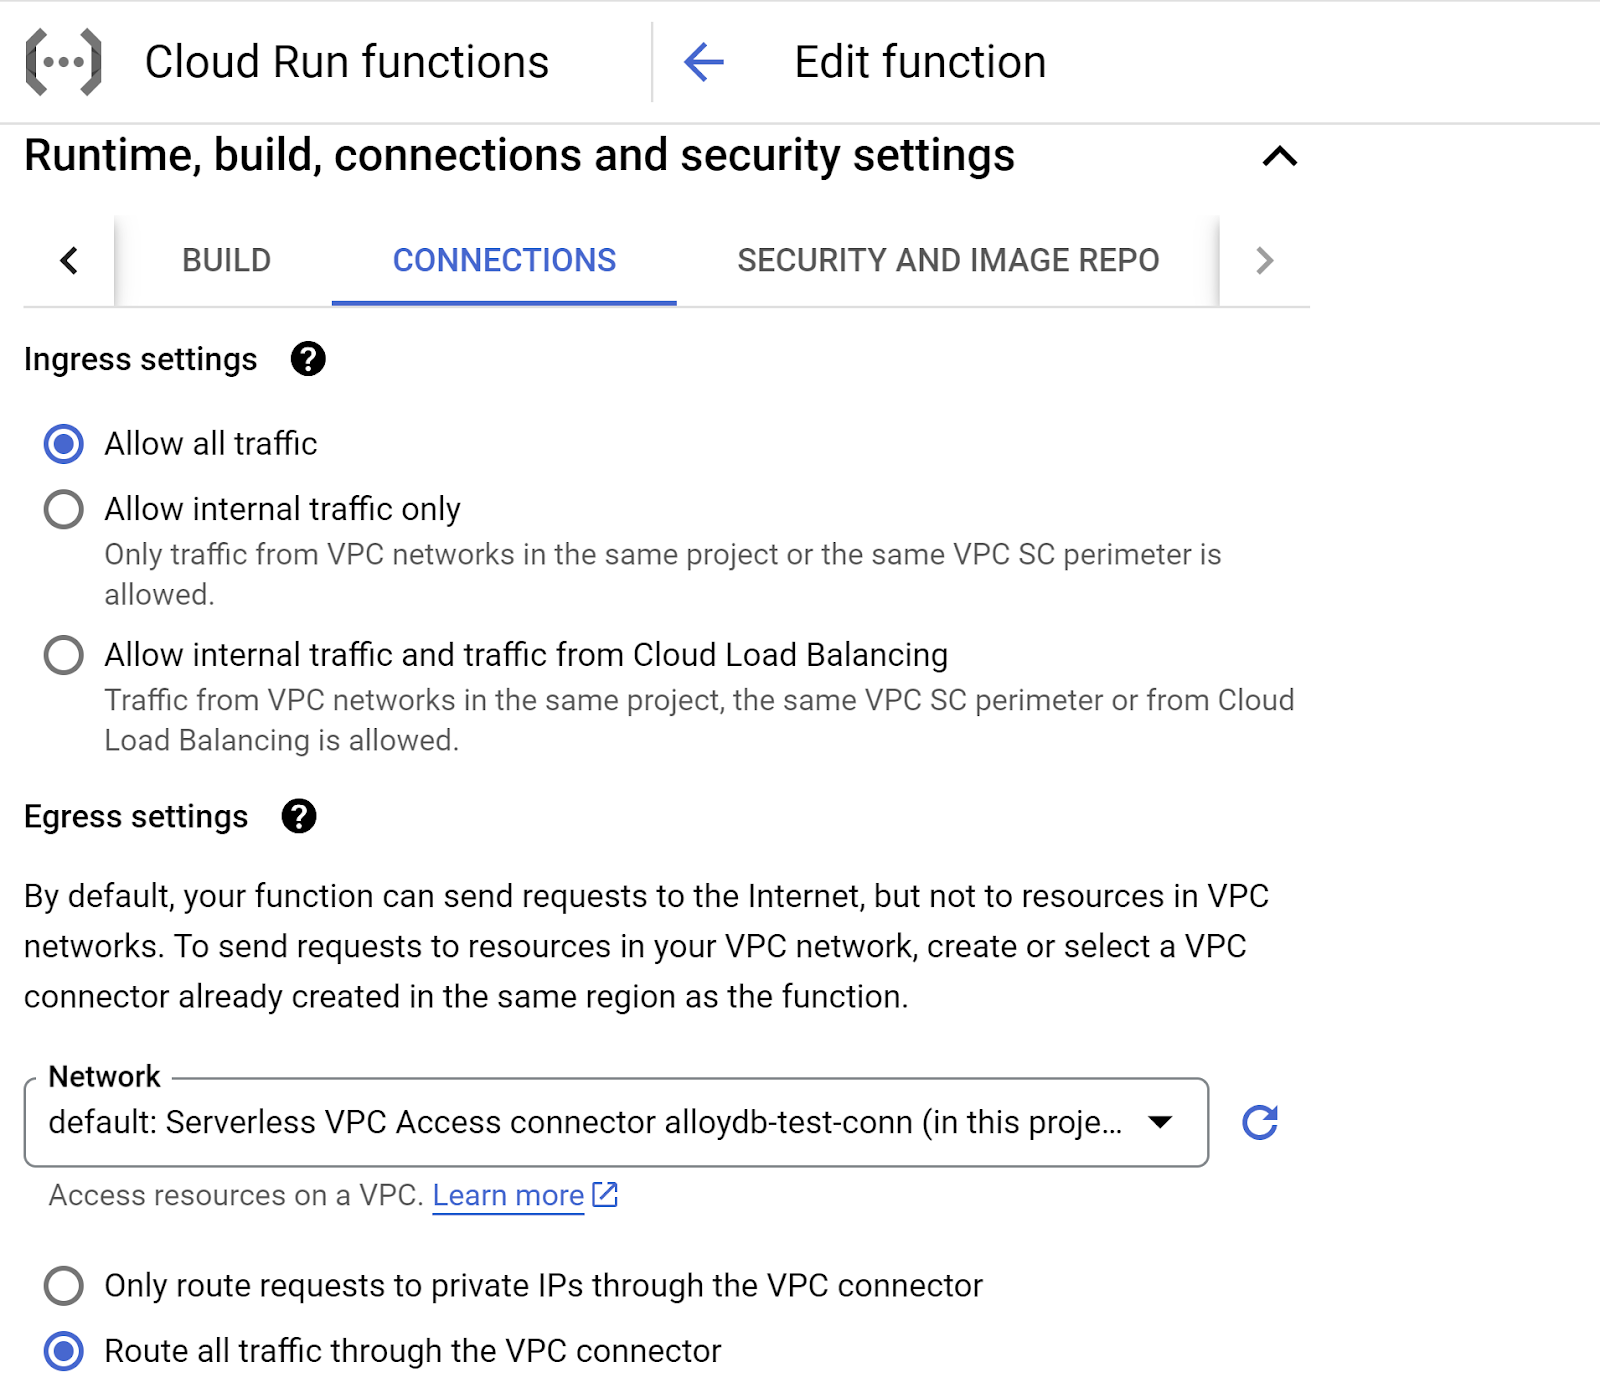
- Under the Ingress settings, make sure "Allow all traffic" is selected.
- Under the Egress settings, Click on the Network dropdown and select "Add New VPC Connector" option and follow the instructions you see on the dialog box that pops-up:
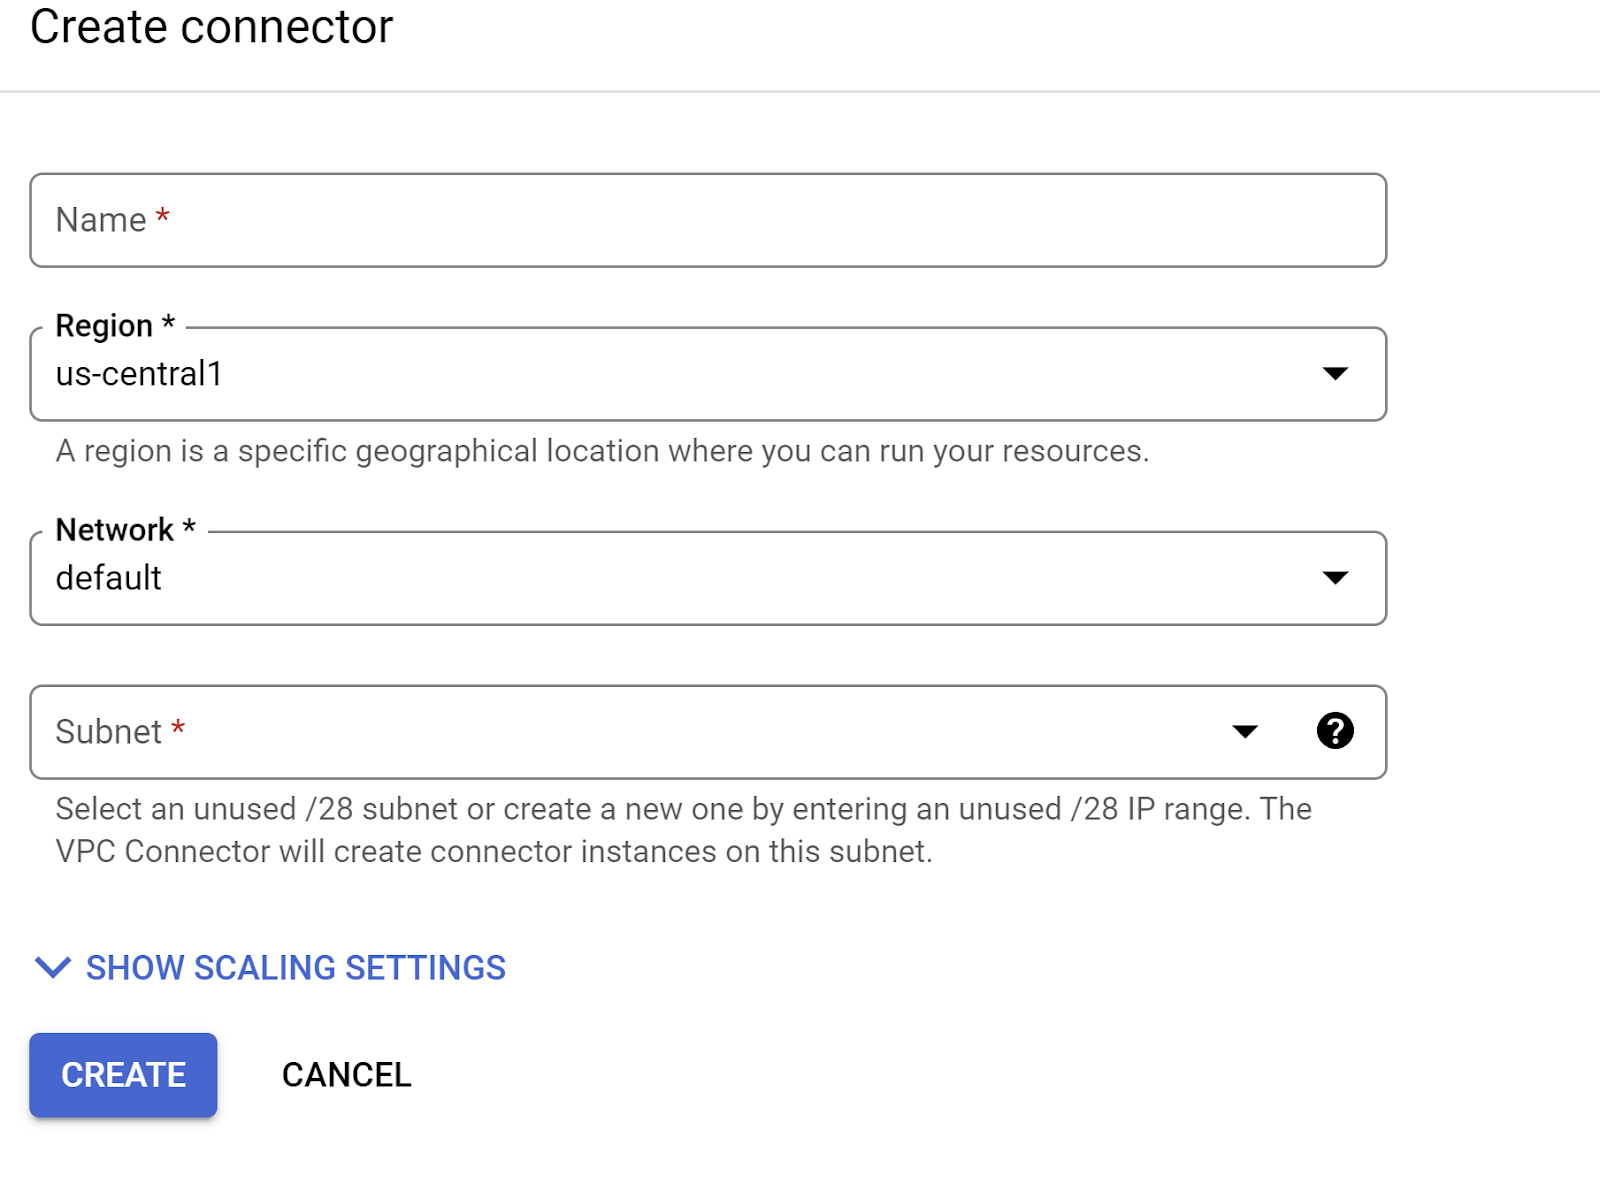
- Provide a name for the VPC Connector and make sure the region is the same as your instance. Leave the Network value as default and set Subnet as Custom IP Range with the IP range of 10.8.0.0 or something similar that is available.
- Expand SHOW SCALING SETTINGS and make sure you have the configuration set to exactly the following:
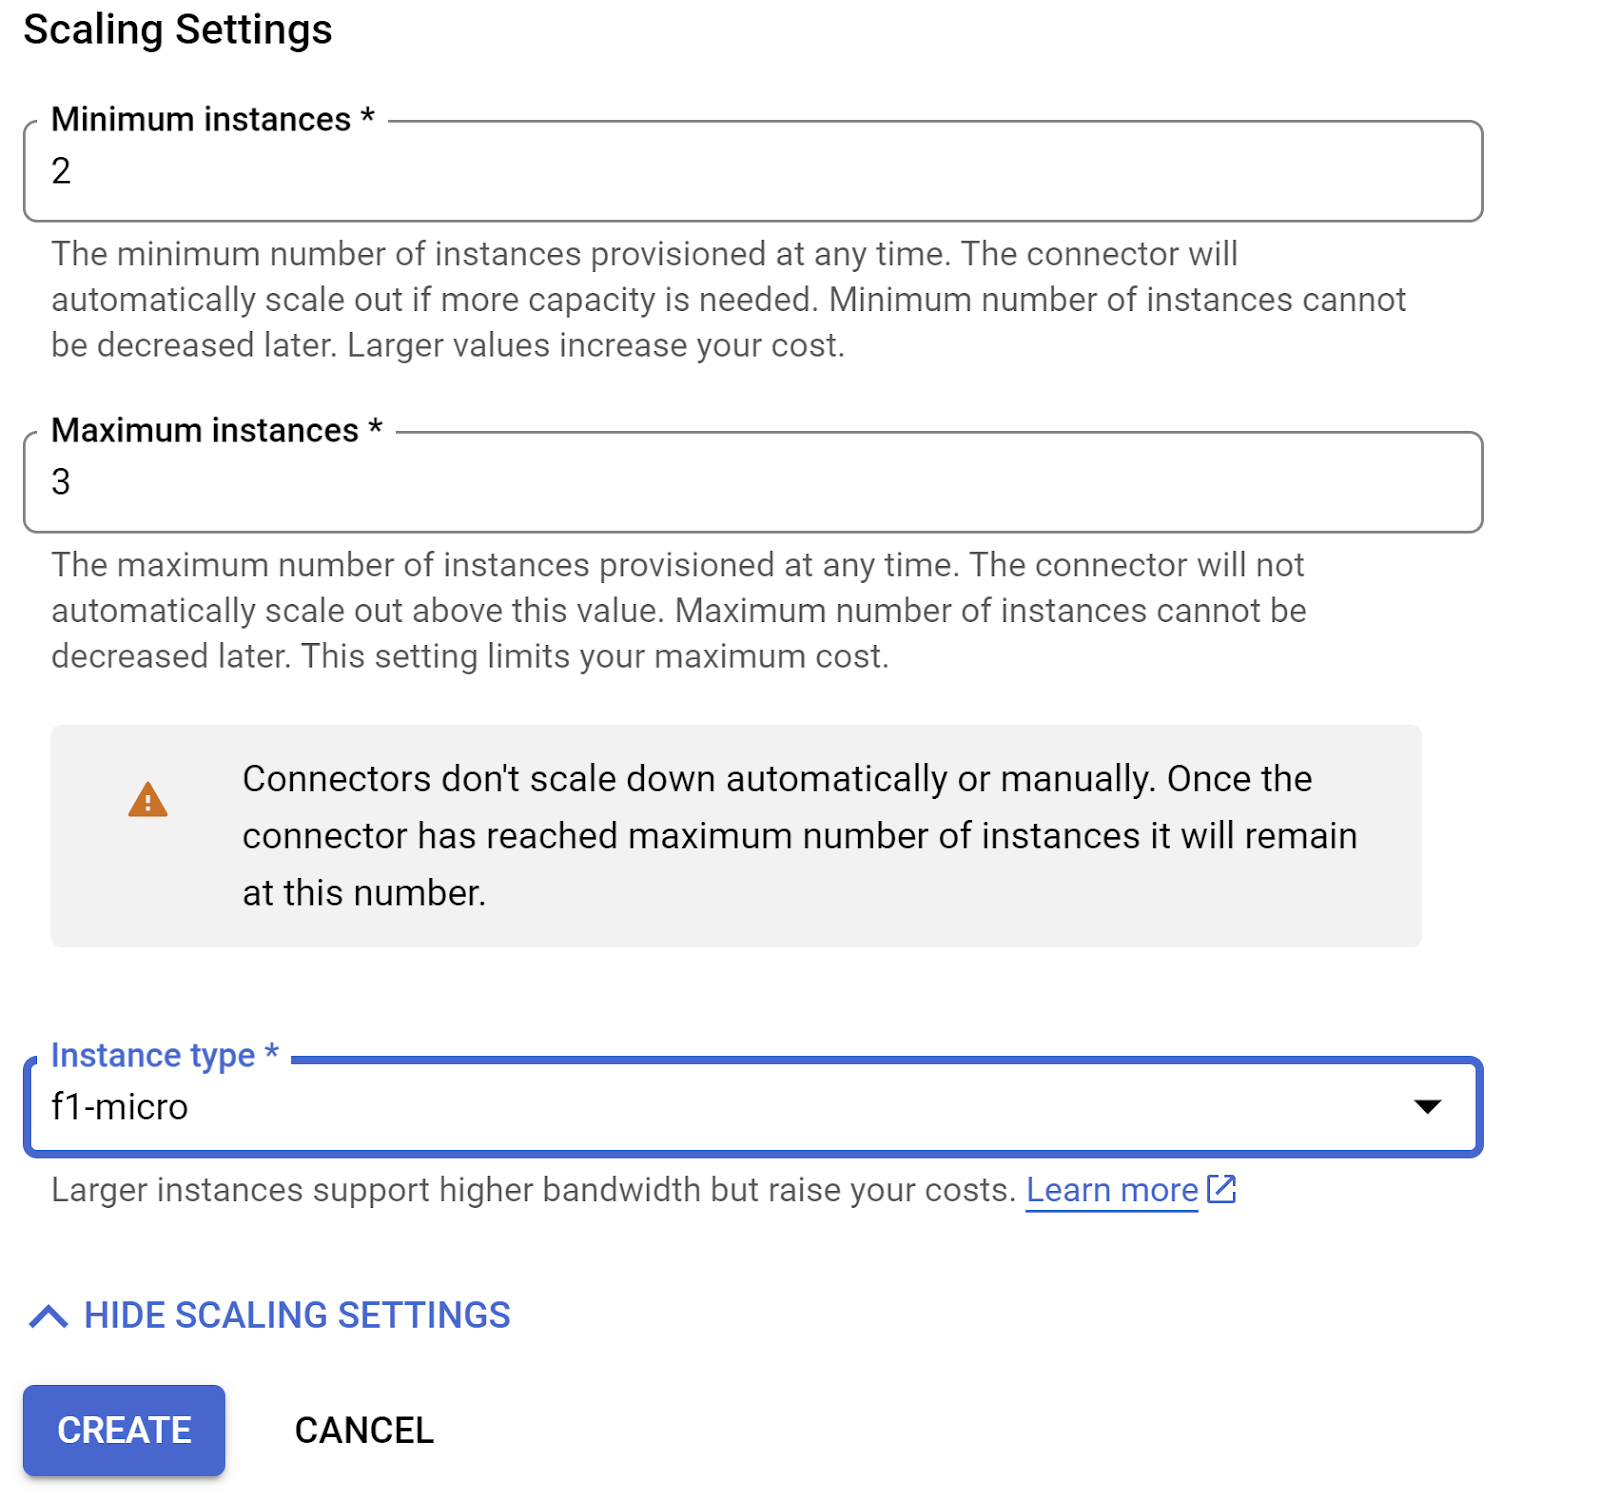
- Click CREATE and this connector should be listed in the egress settings now.
- Select the newly created connector
- Opt for all traffic to be routed through this VPC connector.
- Click on NEXT and then DEPLOY.
11. Test the application
Once the updated Cloud Function is deployed, you should see the endpoint in the following format:
https://us-central1-YOUR_PROJECT_ID.cloudfunctions.net/retail-engine
You can test it from the Cloud Shell Terminal by running following command:
gcloud functions call retail-engine --region=us-central1 --gen2 --data '{"search": "I want some kids clothes themed on Disney"}'
Alternatively, you can test the Cloud Run Function as follows:
PROJECT_ID=$(gcloud config get-value project)

curl -X POST https://us-central1-$PROJECT_ID.cloudfunctions.net/retail-engine \
  -H 'Content-Type: application/json' \
  -d '{"search":"I want some kids clothes themed on Disney"}' \
  | jq .
And the result:
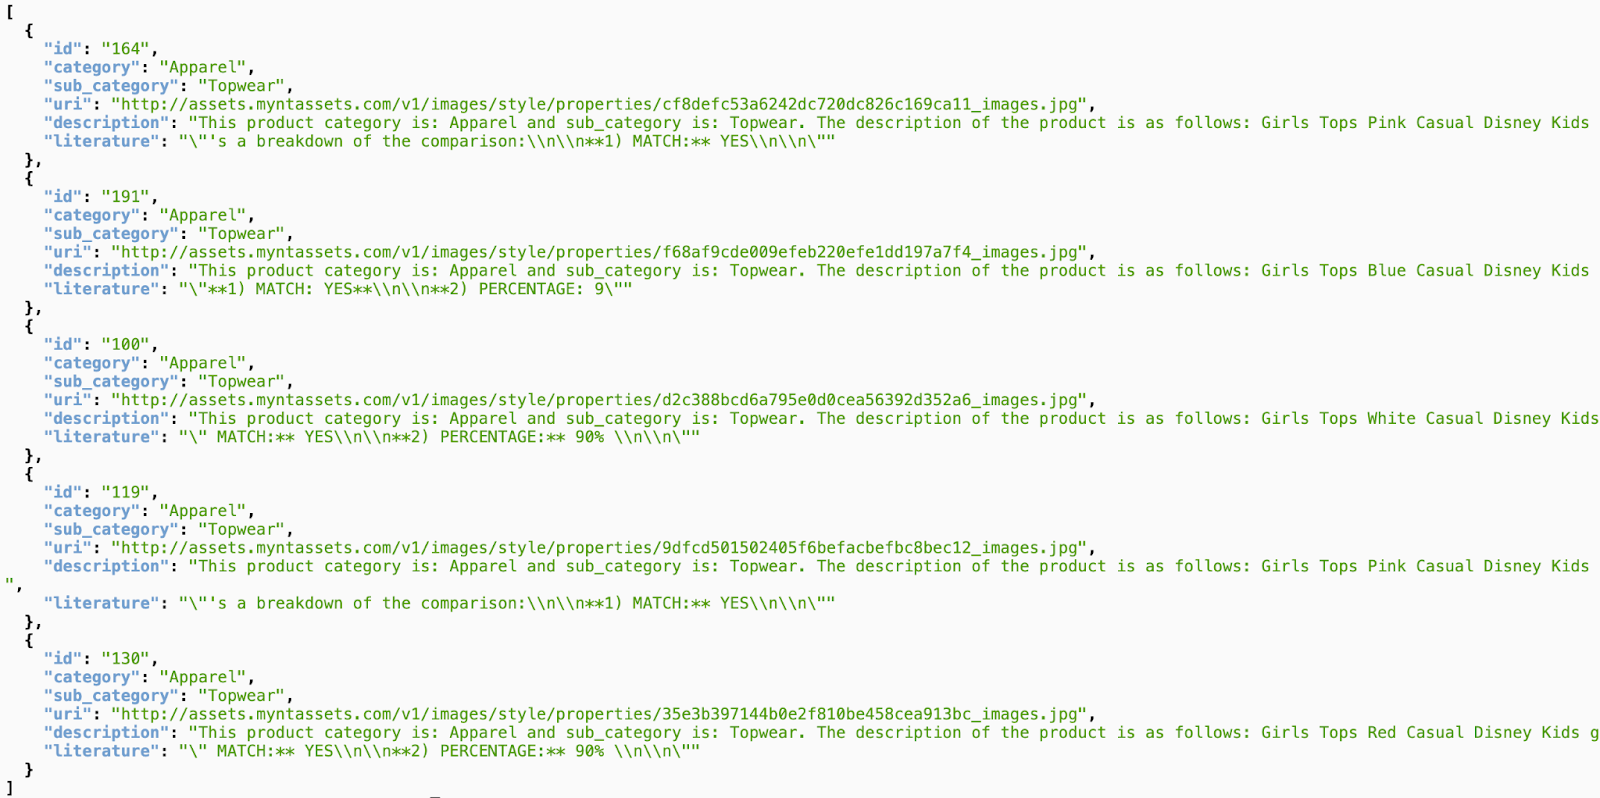
That's it! It is that simple to perform Similarity Vector Search using the Embeddings model on AlloyDB data.
Building the Conversational Agent!
Agent is built in part 2 of this lab.
12. Clean up
If you plan to complete Part 2 of this lab, skip this step since this will delete the current project.
To avoid incurring charges to your Google Cloud account for the resources used in this post, follow these steps:
- In the Google Cloud console, go to the Manage resources page.
- In the project list, select the project that you want to delete, and then click Delete.
- In the dialog, type the project ID, and then click Shut down to delete the project.
13. Congratulations
Congratulations! You have successfully performed a similarity search using AlloyDB, pgvector and Vector search. By combining the capabilities of AlloyDB, Vertex AI, and Vector Search, we've taken a giant leap forward in making contextual and vector searches accessible, efficient, and truly meaning-driven. The next part of this lab covers the agent building steps.
