Создайте приложение для рекомендаций по экипировке на базе ИИ с помощью AlloyDB и бессерверных сред выполнения. Создайте приложение для рекомендаций по экипировке на основе ИИ с помощью AlloyDB и бессерверных сред выполнения. Создайте приложение для рекомендаций по экипировке на базе ИИ с помощью AlloyDB и бессерверных сред выполнения. Создайте приложение для рекомендаций по экипировке на основе ИИ с помощью AlloyDB и бессерверных сред выполнения.

Создайте приложение для рекомендаций по экипировке на базе искусственного интеллекта с помощью AlloyDB и бессерверных сред выполнения.

О практической работе

subjectПоследнее обновление: мар. 28, 2025
account_circleАвторы: Abirami Sukumaran, Shweta Shetye

1. Обзор

Представьте себе модное приложение, которое не только поможет вам подобрать идеальный наряд, но и даст советы по стилю в режиме реального времени, и все это благодаря возможностям передовой интеграции genAI! В этом докладе мы рассмотрим, как мы создали такое приложение, используя возможности векторного поиска AlloyDB в сочетании с индексом Google ScaNN, что позволяет молниеносно искать подходящие наряды и мгновенно предоставлять рекомендации по моде.

Мы также углубимся в то, как индекс ScaNN AlloyDB оптимизирует сложные запросы для создания персонализированных предложений по стилю. Мы также будем использовать Gemini и Imagen, мощные генеративные модели искусственного интеллекта, чтобы вдохновлять вас на творческий стиль и даже визуализировать ваш индивидуальный образ. Все это приложение построено на бессерверной архитектуре, обеспечивая пользователям бесперебойную и масштабируемую работу.

Задача: предлагая персонализированные предложения по одежде, приложение призвано помочь людям, которые борются с нерешительностью в моде. Это также помогает избежать усталости от принятия решений при планировании экипировки.

Решение: Приложение рекомендации одежды решает проблему предоставления пользователям интеллектуального, персонализированного и увлекательного опыта моды, одновременно демонстрируя возможности AlloyDB, генеративного искусственного интеллекта и бессерверных технологий.

Что ты построишь

В рамках этой лабораторной работы вы:

  1. Создайте экземпляр AlloyDB и загрузите набор данных электронной торговли.
  2. Включите расширения pgvector и генеративной модели искусственного интеллекта в AlloyDB.
  3. Генерация вложений из описания продукта
  4. Разверните решение в бессерверных функциях Cloud Run.
  5. Загрузите изображение в Gemini и создайте запрос описания изображения.
  6. Генерируйте результаты поиска на основе подсказок в сочетании с внедренными наборами данных электронной торговли.
  7. Добавьте дополнительные подсказки, чтобы настроить подсказку и создать рекомендации по стилю.
  8. Разверните решение в бессерверных функциях Cloud Run.

Требования

  • Браузер, например Chrome или Firefox.
  • Проект Google Cloud с включенной оплатой.

2. Архитектура

Высокоуровневая архитектура приложения выглядит следующим образом:

ce32f865dfe59142.png

В следующих разделах описывается контекстуальная последовательность урока:

Проглатывание :

Наш первый шаг — загрузить данные о розничной торговле (инвентарь, описания продуктов, взаимодействие с клиентами) в AlloyDB.

Аналитический механизм:

Мы будем использовать AlloyDB в качестве аналитической системы для выполнения следующих задач:

  1. Извлечение контекста: механизм анализирует данные, хранящиеся в AlloyDB, чтобы понять взаимосвязи между продуктами, категориями, поведением клиентов и т. д., если это применимо.
  2. Создание встраивания: встраивания (математические представления текста) создаются как для запроса пользователя, так и для информации, хранящейся в AlloyDB.
  3. Векторный поиск: механизм выполняет поиск по сходству, сравнивая встраивание запроса с встраиванием описаний продуктов, обзоров и других соответствующих данных. Это определяет 25 наиболее важных «ближайших соседей».

Рекомендации Близнецам:

Массив байтов изображения передается в модель Gemini через API Vertex AI вместе с запросом текстового описания верхнего износа и рекомендаций по нижнему износу.

AlloyDB RAG и векторный поиск:

Описание верхней одежды используется для запроса в базу данных. Запрос преобразует текст поиска (рекомендацию модели Gemini для сопоставления износа нижней части) во вложения и выполняет векторный поиск по вложениям, хранящимся в базе данных, чтобы найти ближайших соседей (совпадающие результаты). Векторные вложения в базе данных AlloyDB индексируются с использованием индекса ScaNN для лучшего поиска.

Генерация ответного изображения:

Проверенные ответы структурируются в массив JSON, а весь механизм упаковывается в бессерверную функцию запуска облака, которая вызывается из Agent Builder.

Генерация изображения изображения:

Подсказка пользователя о стиле, выбранная пользователем рекомендация и любые запросы на персонализацию объединяются, чтобы предложить Imagen 3 существующее изображение. Изображение стиля создается на основе этого запроса с использованием API Vertex AI.

3. Прежде чем начать

Создать проект

  1. В Google Cloud Console на странице выбора проекта выберите или создайте проект Google Cloud.
  2. Убедитесь, что для вашего облачного проекта включена оплата. Узнайте, как проверить, включена ли оплата в проекте .
  3. Вы будете использовать Cloud Shell , среду командной строки, работающую в Google Cloud, в которую предварительно загружен bq. Нажмите «Активировать Cloud Shell» ( f2ae85166a716c5c.png ) в верхней части консоли Google Cloud.
  4. После подключения к Cloud Shell убедитесь, что вы уже прошли аутентификацию и что для проекта установлен идентификатор вашего проекта, используя следующую команду:
gcloud auth list
  1. Выполните следующую команду, чтобы убедиться, что будущие команды gcloud правильно идентифицируют ваш проект.
gcloud config list project
  1. Если ваш проект не установлен, используйте следующую команду, чтобы установить его явно:
gcloud config set project <YOUR_PROJECT_ID>
  1. Включите необходимые API.

Перейдите по ссылке , чтобы включить API.

Если вы пропустили включение какого-либо API, вы всегда можете включить его в ходе реализации.

Дополнительную информацию о командах и использовании gcloud можно найти в документации .

4. Настройка базы данных

В этой лабораторной работе мы будем использовать AlloyDB в качестве базы данных для хранения набора данных розничной электронной торговли. Он использует кластеры для хранения всех ресурсов, таких как базы данных и журналы. Каждый кластер имеет основной экземпляр , который предоставляет точку доступа к данным. Таблицы — это реальный ресурс, в котором хранятся данные.

Давайте создадим кластер, экземпляр и таблицу AlloyDB, куда будет загружен набор данных электронной коммерции.

Создайте кластер и экземпляр

  1. В Google Cloud Console найдите AlloyDB . Самый простой способ найти большинство страниц в Cloud Console — это выполнить их поиск с помощью панели поиска консоли.
  2. Нажмите СОЗДАТЬ КЛАСТЕР .

f76ff480c8c889aa.png

  1. Создайте кластер и экземпляр со следующими значениями:
  • идентификатор кластера: " shopping-cluster "
  • пароль: " alloydb "
  • Совместимость с PostgreSQL 15
  • Регион: " us-central1 "
  • Сеть: « default »

538dba58908162fb.png

  1. В разделе «Сеть» при выборе сети по умолчанию появляется следующая опция. Нажмите НАСТРОЙКА СОЕДИНЕНИЯ , чтобы настроить сеть по умолчанию.
    7939bbb6802a91bf.png
  2. Выберите « Использовать автоматически выделенный диапазон IP-адресов» и нажмите «Продолжить» . Ознакомившись с информацией, нажмите СОЗДАТЬ СОЕДИНЕНИЕ . 768ff5210e79676f.png

Дождитесь завершения создания сети по умолчанию.

  1. В разделе «Настройка основного экземпляра» установите для идентификатора экземпляра « shopping-instance" .

2bddecf6b7c7407b.png

  1. Нажмите CREATE CLUSTER , чтобы завершить настройку кластера следующим образом:

24eec29fa5cfdb3e.png

5. Прием данных

Теперь пришло время добавить таблицу с данными о магазине. Подождите, пока ваш экземпляр завершится. После его создания вы можете войти в AlloyDB, используя учетные данные, которые вы указали при создании кластера.

Аутентификация в базе данных AlloyDB

  1. В Google Cloud Console перейдите в AlloyDB . Выберите основной кластер и нажмите AlloyDB Studio на панели навигации слева:

847e35f1bf8a8bd8.png

  1. Введите следующие данные для аутентификации в базе данных AlloyDB:
  • Имя пользователя: « postgres »
  • База данных: « postgres ».
  • Пароль: « alloydb »

После успешной аутентификации в AlloyDB Studio команды SQL будут введены на вкладках редактора . Вы можете добавить несколько окон редактора, используя плюс справа от первой вкладки редактора.

91a86d9469d499c4.png

Вы будете вводить команды для AlloyDB в окнах редактора, используя при необходимости параметры «Выполнить», «Форматировать» и «Очистить».

Включить расширения

Для создания этого приложения мы будем использовать расширения « pgvector" и « google_ml_integration" .

  • Расширение pgvector позволяет хранить и искать вложения векторов.
  • Расширение google_ml_integration предоставляет функции, которые вы используете для доступа к конечным точкам прогнозирования Vertex AI для получения прогнозов в SQL.
  1. Включите эти расширения, запустив следующие DDL:
CREATE EXTENSION IF NOT EXISTS google_ml_integration CASCADE;
CREATE EXTENSION IF NOT EXISTS vector
;
  1. Проверьте, установлены ли расширения, выполнив эту команду SQL:
select extname, extversion from pg_extension;

Создать таблицу

  1. Создайте таблицу, используя следующий оператор DDL:
CREATE TABLE
 apparels
( id BIGINT,
   category VARCHAR
(100),
   sub_category VARCHAR
(50),
   uri VARCHAR
(200),
   image VARCHAR
(100),
   content VARCHAR
(2000),
   pdt_desc VARCHAR
(5000),
   embedding vector
(768) );

При успешном выполнении приведенной выше команды вы сможете просмотреть таблицу в

база данных. На следующем изображении показан пример:

908e33bbff58a6d.png

Прием данных

Для этой лабораторной работы у нас есть тестовые данные примерно из 200 записей в этом файле SQL . Он содержит id, category, sub_category, uri, image и content . Остальные поля будут заполнены позже в лабораторной работе.

  1. Скопируйте 20 строк/операторов вставки из файла SQL на новую вкладку «Редактор» в AlloyDB Studio и нажмите «Выполнить» .
  1. Разверните раздел «Проводник», пока не увидите таблицу с именем apparels .
  2. Щелкните значок меню [ ] и выберите «Запрос» . Оператор SELECT откроется на новой вкладке редактора.

b31ece70e670ab89.png

  1. Нажмите «Выполнить» , чтобы убедиться, что строки вставлены.

Предоставить разрешение пользователю

Мы предоставим пользователю postgres разрешение на создание вложений из AlloyDB . В AlloyDB Studio выполните следующий оператор, чтобы предоставить пользователю postgres права на выполнение функции embedding :

GRANT EXECUTE ON FUNCTION embedding TO postgres;

Предоставьте РОЛЬ пользователя Vertex AI сервисной учетной записи AlloyDB.

Мы будем использовать модели внедрения текста из Vertex AI для создания внедрений, для которых РОЛЬ пользователя Vertex AI привязана к учетной записи службы AlloyDB.

В Google Cloud Console щелкните терминал Cloud Shell [ f2ae85166a716c5c.png ] и выполните следующую команду:

PROJECT_ID=$(gcloud config get-value project)

gcloud projects add-iam-policy-binding $PROJECT_ID \
  --member="serviceAccount:service-$(gcloud projects describe $PROJECT_ID --format="value(projectNumber)")@gcp-sa-alloydb.iam.gserviceaccount.com" \
--role="roles/aiplatform.user"

6. Создать контекст

Чтобы создать встраивание, нам понадобится context , то есть вся информация, которую мы хотим включить в одно поле. Мы сделаем это, создав описание продукта, которое будем хранить в столбце pdt_desc таблицы apparels .

В нашем случае мы будем использовать всю информацию о каждом продукте, но когда вы делаете это со своими собственными данными, вы можете создавать данные любым способом, который вы считаете значимым для вашего бизнеса.

На вкладке редактора AlloyDB Studio выполните следующую команду, которая обновит поле pdt_desc контекстными данными:

UPDATE
 apparels
SET
 pdt_desc = CONCAT('This product category is: ', category, ' and sub_category is: ', sub_category, '. The description of the product is as follows: ', content, '. The product image is stored at: ', uri)
WHERE
 id IS NOT NULL;

Этот DML создает простую контекстную сводку, используя информацию из всех полей, доступных в таблице, и других зависимостей (если таковые имеются в вашем случае). Для более точного набора информации и создания контекста вы можете формировать данные любым способом, который вы считаете значимым для вашего бизнеса.

7. Создание вложений для контекста

Компьютерам гораздо проще обрабатывать числа, чем текст. Система внедрения преобразует текст в ряд чисел с плавающей запятой, которые должны представлять текст, независимо от того, как он сформулирован, на каком языке он используется и т. д.

Рассмотрим описание прибрежного места. Его можно назвать "on the water », « beachfront », « walk from your room to the ocean », « sur la mer », « на берегу океана » и т. д. Все эти термины выглядят по-разному, но их семантическое значение или, в терминологии машинного обучения, их вложения должны быть очень близки друг к другу.

Теперь, когда данные и контекст готовы, мы запустим SQL, чтобы добавить внедрения столбца описания продукта (pdt_desc ) в таблицу в поле embedding . Вы можете использовать различные модели внедрения. Мы используем text-embedding-005 от Vertex AI.

  1. В AlloyDB Studio выполните следующую команду, чтобы сгенерировать внедрения, и обновите столбец pdt_desc , добавив внедрения для хранящихся в нем данных:
UPDATE
 apparels
SET
 embedding
= embedding( 'text-embedding-005',
   pdt_desc
)
WHERE
 TRUE
;
  1. Убедитесь, что внедрения создаются, выполнив следующую команду:
SELECT
 id
,
 category
,
 sub_category
,
 content
,
 embedding
FROM
 
Apparels
LIMIT
5;

Ниже приведен пример вектора внедрения, который выглядит как массив чисел с плавающей запятой для примера текста в запросе следующим образом:

c69c08d085389f74.png

8. Выполнить векторный поиск

Теперь, когда таблица, данные и внедрения готовы, давайте выполним векторный поиск в реальном времени для текста поиска пользователя.

Предположим, что поисковый текст пользователя: « pink color, casual, pure cotton tops for women ».

Чтобы найти совпадения для этого запроса, выполните следующий SQL-запрос:

SELECT
id
,
category
,
sub_category
,
content
,
pdt_desc AS description
FROM
apparels
ORDER BY
embedding
<=> embedding('text-embedding-005',
 
'pink color, casual, pure cotton tops for women')::vector
LIMIT
5;

Давайте рассмотрим этот запрос подробно:

В этом запросе

  1. Текст поиска пользователя: « I want womens tops, pink casual only pure cotton.
  2. Мы преобразуем этот искомый текст во встраивания, используя метод embedding() вместе с моделью: text-embedding-005 . Этот шаг должен выглядеть знакомо после предыдущего шага, где мы применили функцию внедрения ко всем элементам таблицы.
  3. " <=> " представляет собой использование метода расстояния COSINE SIMILARITY . Вы можете найти все доступные меры сходства в документации pgvector .
  4. Мы преобразуем результат метода внедрения в векторный тип данных, чтобы сделать его совместимым с векторами, хранящимися в базе данных.
  5. LIMIT 5 означает, что мы хотим извлечь 5 ближайших соседей для искомого текста.

Ниже показан пример ответа на этот SQL-запрос:

4193a68737400535.png

Как вы можете видеть по результатам, совпадения довольно близки к искомому тексту. Попробуйте изменить цвет, чтобы увидеть, как изменятся результаты.

Индекс AlloyDB ScaNN для оценки производительности запросов

Теперь предположим, что мы хотим повысить производительность (время запроса), эффективность и запоминаемость результатов векторного поиска с помощью индекса ScaNN .

Если вы хотите использовать индекс ScanNN, попробуйте выполнить следующие действия:

  1. Поскольку у нас уже созданы кластер, экземпляр, контекст и внедрения, нам просто нужно установить расширение ScaNN, используя следующий оператор:
CREATE EXTENSION IF NOT EXISTS alloydb_scann;
  1. Создайте индекс ScanNN:
CREATE INDEX apparel_index ON apparels
USING scann
(embedding cosine)
WITH
(num_leaves=54);

В приведенном выше DDL:

  • apparel_index — это имя индекса.
  • apparels — это название таблицы.
  • scann — это индексный метод.
  • embedding — это столбец таблицы, который вы хотите проиндексировать.
  • cosine — это метод расстояния, который вы хотите использовать с индексом.
  • 54 — это количество разделов, которые можно применить к этому индексу. Установите любое значение от 1 до 1048576. Дополнительные сведения о том, как определить это значение, см . в разделе Настройка индекса ScanNN .

Согласно рекомендации репозитория ScanN , мы использовали КВАДРАТНЫЙ КОРЕНЬ из количества точек данных. При секционировании num_leaves должно примерно равняться квадратному корню из количества точек данных.

  1. Проверьте, создан ли индекс с помощью запроса:
SELECT * FROM pg_stat_ann_indexes;
  1. Выполните векторный поиск, используя тот же запрос, который мы использовали без индекса:
select * from apparels
   ORDER BY embedding
<=> CAST(embedding('textembedding-gecko', 'white tops for girls without any print') as vector(768))
   LIMIT
20

Приведенный выше запрос аналогичен тому, который мы использовали в лабораторной работе на шаге 8. Однако теперь у нас есть поле, проиндексированное с использованием индекса ScaNN.

  1. Протестируйте с помощью простого поискового запроса с индексом и без него. Для тестирования без индекса необходимо удалить индекс:

white tops for girls without any print

Приведенный выше текст поиска в запросе векторного поиска по ИНДЕКСИРОВАННЫМ данным внедрения приводит к качественным результатам поиска и эффективности. Эффективность значительно повышается (с точки зрения времени выполнения: 10,37 мс без ScaNN и 0,87 мс с ScaNN) с помощью индекса. Для получения дополнительной информации по этой теме, пожалуйста, обратитесь к этому блогу .

9. Проверка соответствия с LLM

Прежде чем двигаться дальше и создавать сервис для возврата лучших совпадений в приложение, давайте воспользуемся генеративной моделью ИИ, чтобы проверить, действительно ли эти потенциальные ответы актуальны и безопасны ли для обмена ими с пользователем.

Обеспечение настройки экземпляра для Gemini

  1. Убедитесь, что google_ml_integration уже включена для вашего кластера и экземпляра. В AlloyDB Studio выполните следующую команду:
show google_ml_integration.enable_model_support;

Если значение отображается как «включено» , вы можете пропустить следующие 2 шага и сразу перейти к настройке.

интеграция AlloyDB и модели Vertex AI.

  1. Перейдите к основному экземпляру вашего кластера AlloyDB и нажмите «РЕДАКТИРОВАТЬ ОСНОВНОЙ ЭКЗЕМПЛЯР» .

456ffdf292d3c0e0.png

  1. В разделе «Параметры расширенной конфигурации» разверните раздел «Новый флаг базы данных» и убедитесь, что google_ml_integration.enable_model_support flag установлено значение « on » следующим образом:

6a59351fcd2a9d35.png 3. Если для него не установлено значение « on », установите для него значение « on », а затем нажмите «ОБНОВИТЬ ЭКЗЕМПЛЯР» .

Этот шаг займет несколько минут.

Интеграция моделей AlloyDB и Vertex AI

Теперь вы можете подключиться к AlloyDB Studio и запустить следующую инструкцию DML, чтобы настроить доступ к модели Gemini из AlloyDB, используя идентификатор вашего проекта, где указано. Перед запуском команды вас могут предупредить о синтаксической ошибке, но она должна работать нормально.

  1. В Google Cloud Console перейдите в AlloyDB . Выберите основной кластер и нажмите AlloyDB Studio на панели навигации слева.
  2. Мы будем использовать gemini-1.5-pro:generateContent , который доступен по умолчанию с расширением google_ml_integration . cdb5af753a625777.png
  3. Вы можете проверить модели, настроенные для доступа, с помощью следующей команды в AlloyDB Studio:
select model_id,model_type from google_ml.model_info_view;        
  1. Предоставьте пользователям базы данных разрешение на выполнение функции ml_predict_row для выполнения прогнозов с использованием моделей Google Vertex AI, выполнив следующую команду:
GRANT EXECUTE ON FUNCTION ml_predict_row to postgres;

Оценка ответов

Хотя в следующем разделе, где мы фактически перенесем приложение в Cloud Run, нам придется использовать один большой запрос, чтобы гарантировать, что ответы на запрос являются разумными, запрос может быть трудным для понимания.

Мы рассмотрим отдельные разделы, которые помогут построить более крупный запрос, который мы в конечном итоге используем.

  1. Сначала мы отправим запрос в базу данных, чтобы получить 5 наиболее близких совпадений с пользовательским запросом. Мы жестко запрограммировали запрос, чтобы сделать его простым, но не волнуйтесь, мы интерполируем его в запрос позже.

Мы включаем описание продукта из таблицы apparels и добавляем два новых поля: одно объединяет описание с индексом, а другое — с исходным запросом. Эти данные сохраняются в таблице с именем xyz , которая является временным именем таблицы.

CREATE TABLE
 xyz AS
SELECT
 id || ' - ' || pdt_desc AS literature,
 pdt_desc AS content,
 'I want womens tops, pink casual only pure cotton.' AS  user_text
FROM
 apparels
ORDER BY
 embedding <=> embedding('text-embedding-005',
   'I want womens tops, pink casual only pure cotton.')::vector
LIMIT
 5;

Результатом этого запроса будут 5 наиболее похожих строк, относящихся к запросу пользователя.

новая таблица xyz будет содержать 5 строк, каждая из которых будет иметь следующие столбцы:

  • literature
  • content
  • user_text
  1. Чтобы определить, насколько действительны ответы, мы воспользуемся сложным запросом, в котором объясним, как оценивать ответы. Он использует user_text и content таблицы xyz как часть запроса.
"Read this user search text: ', user_text, 
' Compare it against the product inventory data set: ', content,
' Return a response with 3 values: 1) MATCH: if the 2 contexts are at least 85% matching or not: YES or NO 2) PERCENTAGE: percentage of match, make sure that this percentage is accurate 3) DIFFERENCE: A clear short easy description of the difference between the 2 products. Remember if the user search text says that some attribute should not be there, and the record has it, it should be a NO match."

  1. Используя этот запрос, мы затем проверим «качественность» ответов в таблице xyz . Когда мы говорим «хорошо», мы имеем в виду, насколько точно генерируемые реакции соответствуют нашим ожиданиям.
CREATE TABLE
  x AS
SELECT
  json_array_elements( google_ml.predict_row( model_id => 'gemini-1.5',
      request_body => CONCAT('{
 "contents": [
        { "role": "user",
          "parts":
             [ { "text": "Read this user search text: ', user_text, ' Compare it against the product inventory data set: ', content, ' Return a response with 3 values: 1) MATCH: if the 2 contexts are at least 85% matching or not: YES or NO 2) PERCENTAGE: percentage of match, make sure that this percentage is accurate 3) DIFFERENCE: A clear short easy description of the difference between the 2 products. Remember if the user search text says that some attribute should not be there, and the record has it, it should be a NO match."
             } ]
         }
] }'
)::json))-> 'candidates' -> 0 -> 'content' -> 'parts' -> 0 -> 'text'
AS LLM_RESPONSE
FROM
    xyz;
  1. predict_row возвращает результат в формате JSON. Код « -> 'candidates' -> 0 -> 'content' -> 'parts' -> 0 -> 'text'" используется для извлечения фактического текста из этого JSON. Чтобы увидеть фактический возвращаемый JSON, вы можете удалить этот код.
  2. Наконец, чтобы получить поле LLM, вам просто нужно извлечь его из таблицы x:
SELECT 
LLM_RESPONSE
FROM
        x
;
  1. Это можно объединить в один запрос следующим образом:

Предупреждение . Если вы выполнили приведенные выше запросы для проверки промежуточных результатов,

убедитесь, что вы удалили таблицы xyz и x из базы данных AlloyDB перед выполнением этого запроса,

SELECT
 LLM_RESPONSE
FROM (
 SELECT
 json_array_elements( google_ml.predict_row( model_id => 'gemini-1.5',
     request_body => CONCAT('{
     "contents": [
       { "role": "user",
         "parts":
            [ { "text": "Read this user search text: ', user_text, ' Compare it against the product inventory data set: ', content, ' Return a response with 3 values: 1) MATCH: if the 2 contexts are at least 85% matching or not: YES or NO 2) PERCENTAGE: percentage of match, make sure that this percentage is accurate 3) DIFFERENCE: A clear short easy description of the difference between the 2 products. Remember if the user search text says that some attribute should not be there, and the record has it, it should be a NO match."
            } ]
        }
] }'
)::json))-> 'candidates' -> 0 -> 'content' -> 'parts' -> 0 -> 'text'
AS LLM_RESPONSE
   FROM (
         SELECT
           id || ' - ' || pdt_desc AS literature,
           pdt_desc AS content,
         'I want womens tops, pink casual only pure cotton.' user_text
         FROM
           apparels
         ORDER BY
             embedding <=> embedding('text-embedding-005',
             'I want womens tops, pink casual only pure cotton.')::vector
         LIMIT
           5 ) AS xyz ) AS X;

Более крупный запрос представляет собой комбинацию всех запросов, которые мы выполняли на предыдущих шагах. Результаты показывают, есть ли совпадение, какой процент совпадения, а также некоторые пояснения к рейтингу.

Обратите внимание, что в модели Gemini потоковая передача включена по умолчанию, поэтому фактический ответ распределяется по нескольким строкам: 14e74d71293b7b9.png

10. Перенесите приложение в Интернет

Теперь мы разместим это приложение, чтобы к нему можно было получить доступ из Интернета.

Создайте функцию Cloud Run

  1. В Google Cloud Console перейдите в раздел «Функции запуска облака», используя следующую ссылку:

https://console.cloud.google.com/run/create?deploymentType=function

  1. В Configuration установите имя функции « retail-engine » и выберите регион « us-central1 ».
  2. В URL-адресе конечной точки выберите среду выполнения Java 17 .
  3. В разделе «Аутентификация» выберите «Разрешить неаутентифицированные вызовы» .
  4. Разверните Контейнер(ы), Тома, Сеть, Безопасность и перейдите на вкладку Сеть .
  5. Выберите «Подключиться к VPC для исходящего трафика» , а затем нажмите « Использовать соединители бессерверного доступа к VPC» .
  6. В разделе «Сеть» нажмите «Добавить новый соединитель VPC» . Включите API-интерфейс бессерверного доступа к VPC , если он еще не включен.
  7. В соединителе «Создать» задайте имя alloydb-test-conn .
  8. Установите регион us-central .
  9. Оставьте значение «Сеть» по умолчанию и установите «Подсеть» в качестве «Пользовательский диапазон IP-адресов» с доступным диапазоном IP-адресов 10.8.0.0 или чем-то подобным.
  10. Разверните «Показать настройки масштабирования» и установите для параметра «Минимум экземпляров» значение 2, а для параметра «Максимум экземпляров» — 3.
  11. Выберите тип экземпляра f1-micro . Ниже показаны параметры создания соединителя:

кровать4b2af6795a8ba.png

  1. Нажмите «Создать», чтобы создать соединитель.
  2. В разделе «Маршрутизация трафика» выберите «Направить весь трафик в VPC» .
  3. Нажмите «Создать» , чтобы создать функцию.

Развертывание приложения

После создания функции обновите исходный код и повторно разверните приложение.

  1. В Cloud Run перейдите на вкладку «Сервисы» и выберите функцию «Retail-Engine» .
  2. Откройте вкладку «Источник». Оставьте для точки входа функции по умолчанию значение « gcfv2.HelloHttpFunction ».
  3. Замените содержимое файла HelloHttpFunction.java содержимым из этого файла Java .
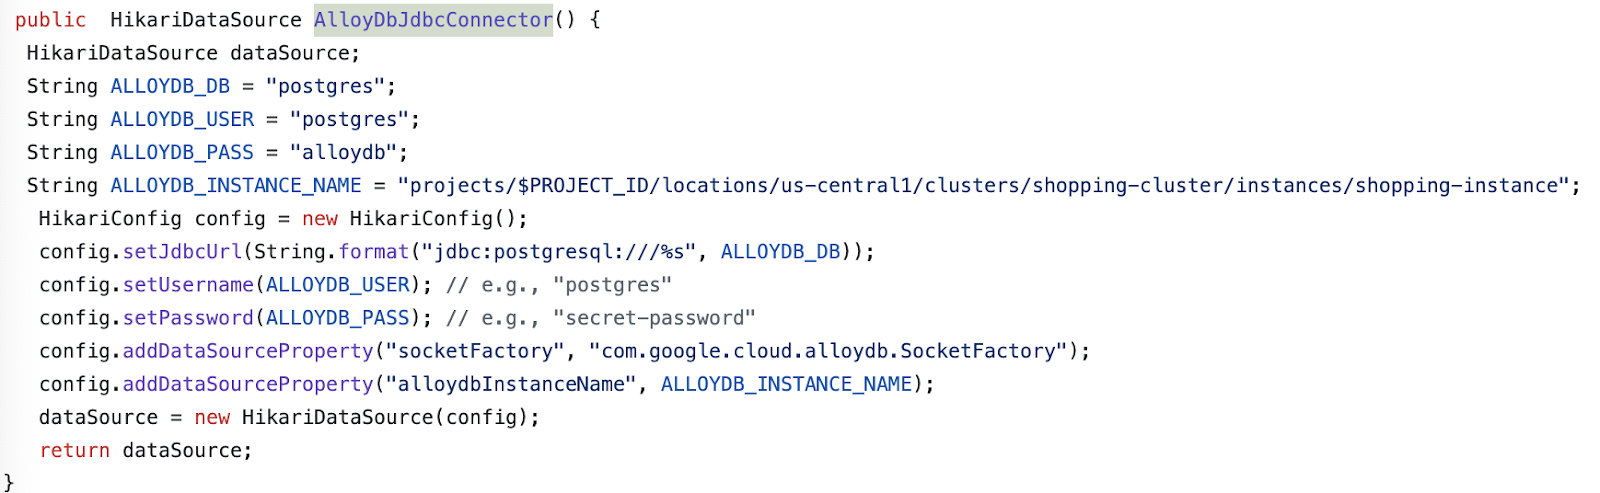
  4. Обновите данные AlloyDbJdbcConnector в файле в соответствии с данными вашего экземпляра и кластера AlloyDB. Замените $PROJECT_ID идентификатором проекта вашего кластера и экземпляра AlloyDB.

a89dc5af3580fbcf.png

  1. Замените содержимое файла pom.xml содержимым этого XML- файла.
  2. Нажмите «Сохранить и повторно развернуть» , чтобы развернуть функцию.

11. Протестируйте приложение для розничной торговли

После развертывания обновленной облачной функции вы должны увидеть конечную точку в следующем формате:

https://retail-engine-PROJECT_NUMBER.us-central1.run.app

Вы можете протестировать его из терминала Cloud Shell, выполнив следующую команду:

gcloud functions call retail-engine --region=us-central1 --gen2 --data '{"search": "I want some kids clothes themed on Disney"}'

Альтернативно вы можете протестировать функцию Cloud Run следующим образом:

PROJECT_ID=$(gcloud config get-value project)

curl
-X POST https://retail-engine-$PROJECT_NUMBER.us-central1.run.app \
 
-H 'Content-Type: application/json' \
 
-d '{"search":"I want some kids clothes themed on Disney"}' \
 
| jq .

И результат:

88bc1ddfb5644a28.png

Теперь, когда мы запустили поиск вектора сходства с использованием модели встраивания для данных AlloyDB, мы можем перейти к созданию приложения, которое использует эти встраивания вместе с вашим изображением и предлагает генерировать предложения по стилю.

12. Понять порядок рекомендаций по одежде

Приложение рекомендаций по экипировке — это приложение для загрузки спринта, которое настроено для работы с встраиваниями, которые мы создали в приложении розничной торговли AlloyDB вместе с Gemini и Imagen, для создания вариантов визуального стиля экипировки. Он также позволяет добавлять собственные подсказки и импровизировать рекомендации.

Подумайте об этом так: вы загружаете в это приложение изображение ярко-розового топа из вашего гардероба. Когда вы нажимаете «Показать», на основе подсказки, заданной в коде приложения, и встроенных данных в базе данных AlloyDB, приложение генерирует несколько параметров, соответствующих исходному изображению. Теперь вам интересно, как предложенные варианты могут выглядеть с синим ожерельем, поэтому вы добавляете подсказку в эти строки и нажимаете «Стиль». Создается окончательное изображение, сочетающее в себе мощное сочетание исходного изображения и рекомендаций по созданию подходящего наряда.

Чтобы начать создавать приложение с рекомендациями по одежде, выполните следующие действия:

  1. В Cloud Run откройте приложение розничной торговли и запишите URL-адрес вашего приложения. Это репозиторий вложений, который мы будем использовать для генерации подобных предложений.
  2. В своей IDE клонируйте репозиторий https://github.com/AbiramiSukumaran/outfit-recommender/ . В этом упражнении показанные шаги выполняются в Visual Studio Code IDE.
git clone https://github.com/AbiramiSukumaran/outfit-recommender/

Ниже приведены некоторые важные файлы в каталоге приложения:

  • src/main : Исходный каталог, в котором находятся файлы приложения и HTML:
  • HelloWorldApplication.java : основная точка входа для приложения весенней загрузки.
  • HelloWorldController.java : контроллер REST Spring Boot, который обрабатывает HTTP-запросы, связанные с приложением рекомендации одежды. Этот файл обрабатывает запросы GET и POST, обрабатывает запросы пользователя, анализирует изображения, взаимодействует с встраиваниями AlloyDB и возвращает окончательный ответ пользовательскому интерфейсу. Этот контроллер вызывает класс GenerateImageSample.
  • GenerateImageSample.java : содержит класс генерации изображений, который подключается к Vertex AI, форматирует пользовательское приглашение, выполняет вызовы API к модели Imagen, возвращает прогнозируемое изображение в класс контроллера.
  • Resources : этот каталог содержит изображения и файлы HTML, необходимые для создания пользовательского интерфейса приложения.
  • Pom.xml : определяет зависимости и конфигурации проекта.
  1. В коде Visual Studio откройте HelloWorldController.java и обновите экземпляры идентификатора проекта и местоположения в соответствии с местом создания вашего экземпляра AlloyDB.

9fff8f5cbb62567.png

  1. Обновите endpoint , указав URL-адрес приложения для розничной торговли, который вы разместили ранее.

ae6227e88eec5485.png

  1. Откройте GenerateImageSample.java и обновите идентификатор проекта и местоположение в соответствии с местом создания вашего экземпляра AlloyDB.

db1f81a6f51d80de.png

  1. Сохраните все файлы.

Теперь мы развернем это приложение в бессерверной среде выполнения Cloud Run.

13. Перенесите приложение в Интернет

Теперь, когда мы добавили соответствующий проект, местоположение и сведения о приложении для розничной торговли в приложение весенней загрузки рекомендации по оборудованию, мы можем развернуть приложение в Cloud Run.

Мы будем использовать команду gcloud run deploy в терминале Visual Code Studio для развертывания приложения. Для Visual Studio Code вы можете установить расширение Google Cloud Code, чтобы начать использовать интерфейс командной строки gcloud.

Чтобы развернуть приложение, выполните следующие действия:

  1. В вашей IDE откройте клонированный каталог и запустите терминал. В Visual Code Studio нажмите «Терминал» > «Новый терминал» .
  2. Следуйте инструкциям в этом документе , чтобы установить интерфейс командной строки gcloud.
  3. Если вы используете Visual Code Studio, нажмите «Расширения» , найдите Google Cloud Code и установите расширение.
  4. В терминале IDE подтвердите свою учетную запись Google, выполнив следующую команду:
gcloud auth application-default login
  1. Установите идентификатор проекта в тот же проект, в котором находится ваш экземпляр AlloyDB.
gcloud config set project PROJECT_ID
  1. Запустите процесс развертывания.
gcloud run deploy
  1. В Source code location нажмите Enter, чтобы выбрать клонированный каталог GitHub.
  2. В Service name » введите имя службы, например Outfit-Recommender, и нажмите Enter.
  3. В Please specify a region введите местоположение, где размещен ваш экземпляр AlloyDB и приложение для розничной торговли, например 32 для us-central1, и нажмите Enter.

12c0de4248660d4d.png

  1. В поле Allow unauthenticated invocations to [..] введите Y и нажмите Enter.

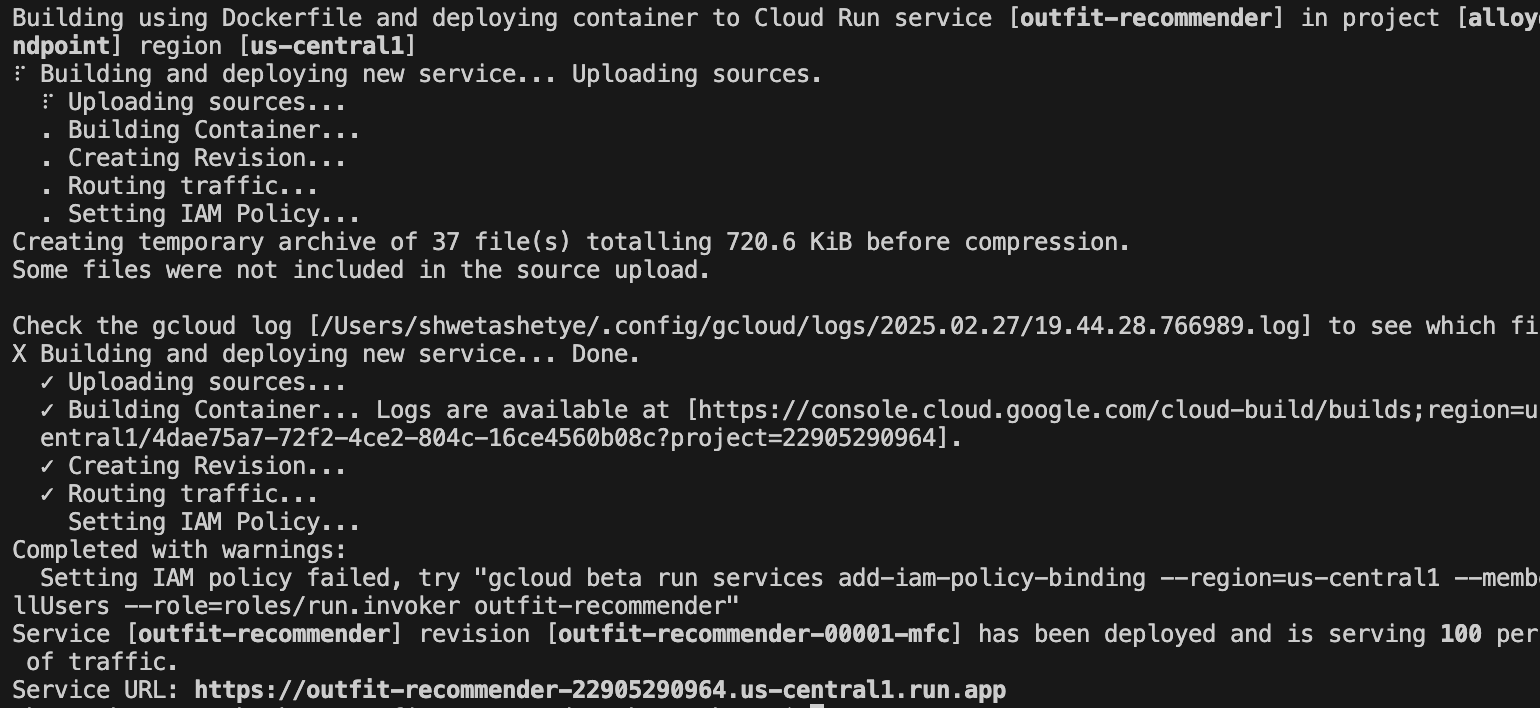
На следующем изображении показан ход развертывания вашего приложения:

1babbb82faa31fce.png

14. Протестируйте приложение рекомендации нарядов

После успешного развертывания приложения в Cloud Run вы сможете увидеть сервис в Google Cloud Console следующим образом:

  1. В Google Cloud Console перейдите в Cloud Run .
  2. В разделе «Службы» щелкните развернутую службу рекомендации по оборудованию . Вы должны увидеть как розничный движок , так и службу рекомендации одежды следующим образом:

24dd0aebe224059e.png

  1. Щелкните URL-адрес приложения, чтобы открыть пользовательский интерфейс приложения-рекомендатора.

cdc9c1625b1648d2.png

    The following is a sample URL that you will use:

https://outfit-recommender-22905290964.us-central1.run.app/style

Развернутое приложение можно увидеть следующим образом:

76245d1a6152d313.png

Использование приложения

Чтобы начать использовать приложение, выполните следующие действия:

  1. Нажмите «Загрузить» и загрузите изображение предмета одежды.
  2. После загрузки изображения нажмите «Стиль» . Приложение использует изображение в качестве подсказки и генерирует нижние параметры на основе подсказки приложения для розничной торговли, которая включает в себя встраивания для набора розничных данных.

Приложение генерирует предложения изображений, а также подсказку на основе изображения с рекомендациями по стилю. Например, A white semi-sheer button up blouse with pink floral patterns on it, with balloon sleeves.

  1. Вы можете передать дополнительные запросы в эту автоматически созданную рекомендацию по стилю. Например, STYLE RECOMMENDATION: Cute brown skirt on a curly updo. Make it photo realistic. Accessorize with cherry earrings and burgundy plastic case sling bag.
  2. Нажмите «Показать» , чтобы увидеть окончательный стиль.

38d6d08e9a0a44c0.png

15. Очистить

Чтобы избежать списания средств с вашей учетной записи Google Cloud за ресурсы, используемые в этом посте, выполните следующие действия:

  1. В консоли Google Cloud перейдите на страницу «Управление ресурсами» .
  2. В списке проектов выберите проект, который хотите удалить, и нажмите «Удалить» .
  3. В диалоговом окне введите идентификатор проекта, а затем нажмите «Завершить работу» , чтобы удалить проект.

16. Поздравления

Поздравляем! Вы успешно выполнили поиск по сходству с помощью поиска AlloyDB, pgvector и Vector, а также использовали результаты поиска с мощной моделью Imagen для генерации рекомендаций по стилю.

,
Создайте приложение для рекомендаций по экипировке на базе искусственного интеллекта с помощью AlloyDB и бессерверных сред выполнения.

О практической работе

subjectПоследнее обновление: мар. 28, 2025
account_circleАвторы: Abirami Sukumaran, Shweta Shetye

1. Обзор

Представьте себе модное приложение, которое не только поможет вам подобрать идеальный наряд, но и даст советы по стилю в режиме реального времени, и все это благодаря возможностям передовой интеграции genAI! В этом докладе мы рассмотрим, как мы создали такое приложение, используя возможности векторного поиска AlloyDB в сочетании с индексом Google ScaNN, что позволяет молниеносно искать подходящие наряды и мгновенно предоставлять рекомендации по моде.

Мы также углубимся в то, как индекс ScaNN AlloyDB оптимизирует сложные запросы для создания персонализированных предложений по стилю. Мы также будем использовать Gemini и Imagen, мощные генеративные модели искусственного интеллекта, чтобы вдохновлять вас на творческий стиль и даже визуализировать ваш индивидуальный образ. Все это приложение построено на бессерверной архитектуре, обеспечивая пользователям бесперебойную и масштабируемую работу.

Задача: предлагая персонализированные предложения по одежде, приложение призвано помочь людям, которые борются с нерешительностью в моде. Это также помогает избежать усталости от принятия решений при планировании экипировки.

Решение: Приложение рекомендации одежды решает проблему предоставления пользователям интеллектуального, персонализированного и увлекательного опыта моды, одновременно демонстрируя возможности AlloyDB, генеративного искусственного интеллекта и бессерверных технологий.

Что ты построишь

В рамках этой лабораторной работы вы:

  1. Создайте экземпляр AlloyDB и загрузите набор данных электронной торговли.
  2. Включите расширения pgvector и генеративной модели искусственного интеллекта в AlloyDB.
  3. Генерация вложений из описания продукта
  4. Разверните решение в бессерверных функциях Cloud Run.
  5. Загрузите изображение в Gemini и создайте запрос описания изображения.
  6. Генерируйте результаты поиска на основе подсказок в сочетании с внедренными наборами данных электронной торговли.
  7. Добавьте дополнительные подсказки, чтобы настроить подсказку и создать рекомендации по стилю.
  8. Развернуть решение в функциях без сервера Cloud Run

Требования

  • Браузер, такой как хром или Firefox
  • Облачный проект Google с включенным выставлением счетов.

2. Архитектура

Архитектура приложения высокого уровня заключается в следующем:

CE32F865DFE59142.png

В следующих разделах подчеркивается контекстуальный поток учебника:

Приглашение :

Наш первый шаг - прогласить данные розничной торговли (инвентаризацию, описания продуктов, взаимодействие с клиентами) в AlloyDB.

Аналитический двигатель:

Мы будем использовать AlloyDB в качестве механизма Analytics для выполнения ниже:

  1. Извлечение контекста: двигатель анализирует данные, хранящиеся в AlloyDB, чтобы понять отношения между продуктами, категориями, поведением клиентов и т. Д.
  2. Создание встраивания: встраивание (математические представления текста) генерируются как для запроса пользователя, так и для информации, хранящейся в AlloyDB.
  3. Векторный поиск: двигатель выполняет поиск сходства, сравнивая запрос, внедряющий встроенные встроенные продукты, обзоры и другие соответствующие данные. Это идентифицирует 25 наиболее актуальных «ближайших соседей».

Рекомендация Близнецов:

Массив байтов изображения передается в модель Близнецов через API вершины AI, а также подсказку с просьбой о текстовом описании верхнего износа вместе с рекомендациями нижней одежды.

AlloyDB Rag и Vector Search:

Описание верхней одежды используется для запроса базы данных. Запрос преобразует текст поиска (рекомендация из модели Gemini для сопоставления нижнего износа) в встраивание и выполняет векторный поиск по вставкам, хранящимся в базе данных, чтобы найти ближайших соседей (соответствующие результаты). Вторжения векторов в базе данных AlloyDB индексируются с использованием индекса скана для лучшего отзыва.

Генерация изображений ответа:

Проверенные ответы структурированы в массив JSON, а весь двигатель упакован в функцию без сервера облачного запуска, которая вызывает у Agent Builder.

Генерация изображений Imagen:

Пользовательская приглашение пользователя, выбранная пользователем рекомендация и любые запросы персонализации объединены, чтобы предпринять Imagen 3 с существующим изображением. Изображение стиля генерируется на основе этой подсказки, используя API Vertex AI.

3. Прежде чем начать

Создать проект

  1. На консоли Google Cloud , на странице выбора проектов выберите или создайте Google Cloud Project .
  2. Убедитесь, что выставление счета включено для вашего облачного проекта. Узнайте, как проверить, включен ли выставление счетов на проекте .
  3. Вы используете Cloud Shell , среду командной строки, работающая в Google Cloud, которая поставляется с предварительно загруженной BQ. Нажмите «Активировать облачную оболочку» ( F2AE85166A716C5C.PNG ) в верхней части облачной консоли Google.
  4. После подключения к облачной оболочке убедитесь, что вы уже аутентифицировали и что проект устанавливается на идентификатор вашего проекта, используя следующую команду:
gcloud auth list
  1. Запустите следующую команду, чтобы подтвердить, что будущие команды GCLOUD правильно определили ваш проект.
gcloud config list project
  1. Если ваш проект не установлен, используйте следующую команду, чтобы явно установить ее:
gcloud config set project <YOUR_PROJECT_ID>
  1. Включить требуемые API.

Перейдите по ссылке , чтобы включить API.

Если вы скучаете по включению любого API, вы всегда можете включить его в ходе реализации.

Для получения дополнительной информации о командах GCLOUD и использовании, обратитесь к документации .

4. Настройка базы данных

В этой лаборатории мы будем использовать AlloyDB в качестве базы данных для хранения набора данных в розничной торговле. Он использует кластеры для хранения всех ресурсов, таких как базы данных и журналы. Каждый кластер имеет основной экземпляр , который обеспечивает точку доступа к данным. Таблицы - это фактический ресурс, который хранит данные.

Давайте создадим кластер AlloyDB, экземпляр и таблицу, где будет загружен набор данных электронной коммерции.

Создать кластер и экземпляр

  1. В Cloud Console Google найдите AlloyDB . Простой способ найти большинство страниц в облачной консоли - искать их, используя строку поиска консоли.
  2. Нажмите «Создать кластер» .

F76FF480C8C889AA.PNG

  1. Создайте кластер и экземпляр со следующими значениями:
  • идентификатор кластера: « shopping-cluster »
  • пароль: " alloydb "
  • Postgresql 15 совместимо
  • Регион: " us-central1 "
  • Сеть: " default "

538DBA58908162FB.PNG

  1. В сети, когда вы выбираете сеть по умолчанию, появляется следующая опция. Нажмите «Настройка соединения» , чтобы настроить сеть по умолчанию.
    7939bbb6802a91bf.png
  2. Выберите Используйте автоматически выделенный диапазон IP и нажмите «Продолжить» . После просмотра информации нажмите «Создать соединение» . 768ff5210e79676f.png

Подождите, пока создание сети по умолчанию завершит.

  1. В настройке своего основного экземпляра установите идентификатор экземпляра как « shopping-instance" .

2BDDECF6B7C7407B.PNG

  1. Нажмите «Создать кластер» , чтобы завершить настройку кластера следующим образом:

24EEC29FA5CFDB3E.PNG

5. Проглатывание данных

Теперь пришло время добавить таблицу с данными о магазине. Подождите, пока ваш экземпляр закончит создание. После того, как он будет создан, вы можете войти в AlloyDB, используя учетные данные, которые вы устанавливаете при создании кластера.

Аутентификация в базу данных AlloyDB

  1. В Google Cloud Console перейдите в AlloyDB . Выберите первичный кластер, а затем нажмите Alloydb Studio в левой навигации:

847e35f1bf8a8bd8.png

  1. Введите следующие данные для аутентификации в базу данных AlloyDB:
  • Имя пользователя: " postgres "
  • База данных: " postgres "
  • Пароль: " alloydb "

После того, как вы успешно пройдете подлинность в Studio AlloyDB, команды SQL введены в вкладки редактора . Вы можете добавить несколько Windows редактора, используя плюс справа от первой вкладки редактора.

91A86D9469D499C4.png

Вы введете команды для AlloyDB в Windows Editor, используя параметры Run, Format и Clean Acsome.

Включить расширения

Для создания этого приложения мы будем использовать расширения « pgvector" и « google_ml_integration" .

  • Расширение PGVector позволяет хранить и искать векторы.
  • Расширение Google_ml_integration предоставляет функции, которые вы используете для доступа к конечным точкам прогнозирования вершины AI, чтобы получить прогнозы в SQL.
  1. Включите эти расширения, выполнив следующие DDL:
CREATE EXTENSION IF NOT EXISTS google_ml_integration CASCADE;
CREATE EXTENSION IF NOT EXISTS vector
;
  1. Убедитесь, установлены ли расширения с помощью этой команды SQL:
select extname, extversion from pg_extension;

Создать таблицу

  1. Создайте таблицу с помощью следующего оператора DDL:
CREATE TABLE
 apparels
( id BIGINT,
   category VARCHAR
(100),
   sub_category VARCHAR
(50),
   uri VARCHAR
(200),
   image VARCHAR
(100),
   content VARCHAR
(2000),
   pdt_desc VARCHAR
(5000),
   embedding vector
(768) );

При успешном выполнении вышеуказанной команды вы сможете просмотреть таблицу в

база данных. На следующем изображении показан пример:

908E33BBFF58A6D.PNG

Проглатывание данных

Для этой лаборатории у нас есть тестовые данные о 200 записях в этом файле SQL . Он содержит id, category, sub_category, uri, image и content . Другие поля будут заполнены позже в лаборатории.

  1. Скопируйте операторы 20 строк/вставки из файла SQL на новой вкладке редактора в AlloyDB Studio и нажмите «Запуск» .
  1. Разверните раздел Explorer, пока не увидите таблицу с именем apparels .
  2. Нажмите значок меню [ ] и нажмите «Запрос» . Оператор SELECT откроется на новой вкладке редактора.

B31ECE70E670AB89.png

  1. Нажмите запустить , чтобы убедиться, что строки вставлены.

Предоставить разрешение пользователю

Мы предоставим разрешение пользователю postgres на генерацию внедрения из AlloyDB . В Studio Alloydb запустите следующее оператор для предоставления прав выполнять функцию embedding пользователю postgres :

GRANT EXECUTE ON FUNCTION embedding TO postgres;

Предоставьте роли пользователя AI Vertex AI в учетную запись Service AlloyDB

Мы будем использовать модели встроенного текста из AI Vertex для генерации встроений, для которых пользовательская роль Vertex AI в учетную запись службы AlloyDB.

В консоли Cloud Google нажмите на терминал Cloud Shell [ F2AE85166A716C5C.PNG ] значок и запустите следующую команду:

PROJECT_ID=$(gcloud config get-value project)

gcloud projects add-iam-policy-binding $PROJECT_ID \
  --member="serviceAccount:service-$(gcloud projects describe $PROJECT_ID --format="value(projectNumber)")@gcp-sa-alloydb.iam.gserviceaccount.com" \
--role="roles/aiplatform.user"

6. Построить контекст

Чтобы создать внедрение, нам нужно иметь context , то есть вся информация, которую мы хотим включить в одну область. Мы сделаем это, создав описание продукта, которое мы храним в столбце pdt_desc в таблице apparels .

В нашем случае мы будем использовать всю информацию о каждом продукте, но когда вы делаете это со своими собственными данными, не стесняйтесь разработать данные любым способом, которым вы находите значимыми для своего бизнеса.

На вкладке AlloyDB Studio Editor запустите следующую команду, которая обновляет поле pdt_desc с данными контекста:

UPDATE
 apparels
SET
 pdt_desc = CONCAT('This product category is: ', category, ' and sub_category is: ', sub_category, '. The description of the product is as follows: ', content, '. The product image is stored at: ', uri)
WHERE
 id IS NOT NULL;

Этот DML создает простой резюме контекста, используя информацию из всех полей, доступных в таблице, и других зависимостей (если таковые имеются в вашем варианте использования). Для более точного ассортимента информации и создания контекста не стесняйтесь разработать данные любым способом, которым вы считаете значимыми для своего бизнеса.

7. Создать встроения для контекста

Для компьютеров гораздо проще обрабатывать числа, чем обрабатывать текст. Система встраивания преобразует текст в серию номеров с плавающими темпами, которые должны представлять текст, независимо от того, как он сформулирован, какой язык он использует и т. Д.

Подумайте о том, чтобы описать приморское местоположение. Это можно назвать "on the water », « beachfront », « walk from your room to the ocean », « sur la mer », « на берегу океана Бьюре -окране» и т. Д. Все эти термины выглядят по -разному, но их семантическое значение или в терминологии машинного обучения, их вступители должны быть очень близки друг к другу.

Теперь, когда данные и контекст готовы, мы запустим SQL, чтобы добавить встроенные вставки столбца описания продукта (pdt_desc ) в таблицу во embedding поля. Есть множество моделей встраивания, которые вы можете использовать. Мы используем text-embedding-005 из вершины AI.

  1. В Studio AlloyDB запустите следующую команду для генерации встроений и обновите столбец pdt_desc с помощью вставки для данных, которые он хранит:
UPDATE
 apparels
SET
 embedding
= embedding( 'text-embedding-005',
   pdt_desc
)
WHERE
 TRUE
;
  1. Убедитесь, что встраивания генерируются путем выполнения следующей команды:
SELECT
 id
,
 category
,
 sub_category
,
 content
,
 embedding
FROM
 
Apparels
LIMIT
5;

Ниже приведен пример вектора Entrydings, который выглядит как массив поплавков, для образца текста в запросе следующим образом:

C69C08D085389F74.PNG

8. Выполнить векторный поиск

Теперь, когда таблица, данные и внедрения готовы, давайте выполним поиск вектора в реальном времени для текста поиска пользователя.

Предположим, что текст поиска пользователя - « pink color, casual, pure cotton tops for women »

Чтобы найти совпадения для этого запроса, запустите следующий SQL -запрос:

SELECT
id
,
category
,
sub_category
,
content
,
pdt_desc AS description
FROM
apparels
ORDER BY
embedding
<=> embedding('text-embedding-005',
 
'pink color, casual, pure cotton tops for women')::vector
LIMIT
5;

Давайте подробно рассмотрим этот запрос:

В этом запросе,

  1. Текст поиска пользователя: « I want womens tops, pink casual only pure cotton.
  2. Мы преобразуем этот текст поиска в встраивание с использованием метода embedding() вместе с моделью: text-embedding-005 . Этот шаг должен выглядеть знакомо после последнего шага, где мы применили функцию встраивания ко всем элементам в таблице.
  3. « <=> » представляет использование метода расстояния сходства косинуса . Вы можете найти все меры сходства, доступные в документации PGVector .
  4. Мы преобразуем результат метода встраивания в тип векторных данных, чтобы сделать его совместимым с векторами, хранящимися в базе данных.
  5. Предел 5 представляет, что мы хотим извлечь 5 ближайших соседей для текста поиска.

Следующее показывает пример ответа этого запроса SQL:

4193a68737400535.png

Как вы можете наблюдать в своих результатах, матчи довольно близки к тексту поиска. Попробуйте изменить цвет, чтобы увидеть, как меняются результаты.

Индекс Scann Scann AlloyDB для производительности запроса

Теперь допустим, мы хотим повысить производительность (время запроса), эффективность и вспомнить этот результат поиска вектора с использованием индекса скана .

Если вы хотите использовать индекс скана, попробуйте следующие шаги:

  1. Поскольку у нас уже созданы кластер, экземпляр, контекст и встраивание, нам просто нужно установить расширение Scann, используя следующее оператор:
CREATE EXTENSION IF NOT EXISTS alloydb_scann;
  1. Создайте индекс скана:
CREATE INDEX apparel_index ON apparels
USING scann
(embedding cosine)
WITH
(num_leaves=54);

В вышеупомянутом DDL:

  • apparel_index - это имя индекса.
  • apparels - это название таблицы.
  • scann - это метод индекса.
  • embedding столбец в таблице, которую вы хотите индексировать.
  • cosine - это метод расстояния, который вы хотите использовать с индексом.
  • 54 - это количество разделов для применения к этому индексу. Установите любое значение от 1 до 1048576. Для получения дополнительной информации о том, как решить это значение, см . Tune A Scann Index .

Согласно рекомендации в Scann Repo , мы использовали квадратный корень из количества точек данных. При распределении num_leaves должен быть примерно квадратным корнем количества данных.

  1. Проверьте, создается ли индекс с помощью запроса:
SELECT * FROM pg_stat_ann_indexes;
  1. Выполните векторный поиск, используя тот же запрос, который мы использовали без индекса:
select * from apparels
   ORDER BY embedding
<=> CAST(embedding('textembedding-gecko', 'white tops for girls without any print') as vector(768))
   LIMIT
20

Приведенный выше запрос - тот же, который мы использовали в лаборатории на шаге 8. Однако теперь у нас есть поле, с использованием индекса скана.

  1. Проверьте с помощью простого поискового запроса с индексом и без него. Для тестирования без индекса вы должны отказаться от индекса:

white tops for girls without any print

Приведенный выше текст поиска в запросе поиска вектора на индексированных данных встроенных встроенных данных приводит к результатам качества поиска и эффективности. Эффективность значительно улучшается (с точки зрения времени для выполнения: 10,37 мс без скачкования и 0,87 мс со сканом) с индексом. Для получения дополнительной информации по этой теме, пожалуйста, обратитесь к этому блогу .

9. Соответствие проверки с LLM

Прежде чем двигаться дальше и создать услугу, чтобы вернуть лучшие совпадения с приложением, давайте использовать генеративную модель ИИ для проверки, действительно ли эти потенциальные ответы являются действительно актуальными и безопасными для поделиться пользователем.

Обеспечение установки экземпляра для Близнецов

  1. Убедитесь, что google_ml_integration уже включена для вашего кластера и экземпляра. В студии Alloydb запустите следующую команду:
show google_ml_integration.enable_model_support;

Если значение показано как «включение» , вы можете пропустить следующие 2 шага и перейти непосредственно к настройке

Интеграция модели AlyDB и Vertex AI.

  1. Перейдите в основной экземпляр кластера AlloyDB и нажмите «Редактировать первичный экземпляр» .

456ffdf292d3c0e0.png

  1. В расширенных параметрах конфигурации разверните новый раздел флага базы данных и убедитесь, что google_ml_integration.enable_model_support flag устанавливается на « on » следующим образом:

6A59351FCD2A9D35.PNG 3. Если он не установлен на « on », установите его на « on », а затем нажмите Endute Encement .

Этот шаг займет несколько минут.

Интеграция модели ALOYDB и Vertex AI

Теперь вы можете подключиться к AlloyDB Studio и запустить следующее оператор DML, чтобы настроить доступ к модели Gemini из AlloyDB, используя свой идентификатор проекта, где указано. Вы можете быть предупреждены о синтаксической ошибке перед запуском команды, но она должна работать нормально.

  1. В Google Cloud Console перейдите в AlloyDB . Выберите первичный кластер, а затем нажмите Alloydb Studio в левой навигации.
  2. Мы будем использовать gemini-1.5-pro:generateContent , который доступен по умолчанию с расширением google_ml_integration . CDB5AF753A625777.png
  3. Вы можете проверить модели, настроенные для доступа через следующую команду в Alloydb Studio:
select model_id,model_type from google_ml.model_info_view;        
  1. Дайте разрешение для пользователей базы данных выполнить функцию ML_PREDICT_ROW , чтобы запустить прогнозы, используя модели Google Vertex AI, выполнив следующую команду:
GRANT EXECUTE ON FUNCTION ml_predict_row to postgres;

Оценка ответов

В то время как мы в конечном итоге используем один большой запрос для следующего раздела, где мы фактически возьмем приложение для Cloud Run, чтобы гарантировать, что ответы из запроса являются разумными, запрос может быть трудно понять.

Мы посмотрим на отдельные разделы, которые продолжаются, чтобы построить больший запрос, который мы наконец используем.

  1. Сначала мы отправим запрос в базу данных, чтобы получить 5 самых близких совпадений с пользовательским запросом. Мы жестко кодируем запрос, чтобы сохранить этот простой, но не волнуйтесь, мы позже интерполируем его в запрос.

Мы включаем описание продукта из таблицы apparels и добавляем два новых поля - один, который объединяет описание с индексом, а другой с исходным запросом. Эти данные сохраняются в таблице под названием xyz , которая является временным названием таблицы.

CREATE TABLE
 xyz AS
SELECT
 id || ' - ' || pdt_desc AS literature,
 pdt_desc AS content,
 'I want womens tops, pink casual only pure cotton.' AS  user_text
FROM
 apparels
ORDER BY
 embedding <=> embedding('text-embedding-005',
   'I want womens tops, pink casual only pure cotton.')::vector
LIMIT
 5;

Вывод этого запроса будет 5 самых похожих строк, относящихся к запросу пользователей.

Новая таблица xyz будет содержать 5 строк, где каждая строка будет иметь следующие столбцы:

  • literature
  • content
  • user_text
  1. Чтобы определить, насколько действительны ответы, мы будем использовать сложный запрос, в котором объясняем, как оценить ответы. Он использует user_text и content в таблице xyz как часть запроса.
"Read this user search text: ', user_text, 
' Compare it against the product inventory data set: ', content,
' Return a response with 3 values: 1) MATCH: if the 2 contexts are at least 85% matching or not: YES or NO 2) PERCENTAGE: percentage of match, make sure that this percentage is accurate 3) DIFFERENCE: A clear short easy description of the difference between the 2 products. Remember if the user search text says that some attribute should not be there, and the record has it, it should be a NO match."

  1. Используя этот запрос, мы рассмотрим «доброта» ответов в таблице xyz . Когда мы говорим доброту, мы подразумеваем, насколько близко точны ответы на то, что мы ожидаем.
CREATE TABLE
  x AS
SELECT
  json_array_elements( google_ml.predict_row( model_id => 'gemini-1.5',
      request_body => CONCAT('{
 "contents": [
        { "role": "user",
          "parts":
             [ { "text": "Read this user search text: ', user_text, ' Compare it against the product inventory data set: ', content, ' Return a response with 3 values: 1) MATCH: if the 2 contexts are at least 85% matching or not: YES or NO 2) PERCENTAGE: percentage of match, make sure that this percentage is accurate 3) DIFFERENCE: A clear short easy description of the difference between the 2 products. Remember if the user search text says that some attribute should not be there, and the record has it, it should be a NO match."
             } ]
         }
] }'
)::json))-> 'candidates' -> 0 -> 'content' -> 'parts' -> 0 -> 'text'
AS LLM_RESPONSE
FROM
    xyz;
  1. predict_row возвращает свой результат в формате JSON. Код " -> 'candidates' -> 0 -> 'content' -> 'parts' -> 0 -> 'text'" используется для извлечения фактического текста из этого JSON. Чтобы увидеть фактический JSON, который возвращается, вы можете удалить этот код.
  2. Наконец, чтобы получить поле LLM, вам просто нужно извлечь его из таблицы X:
SELECT 
LLM_RESPONSE
FROM
        x
;
  1. Это можно объединить в один запрос следующим образом:

Предупреждение : если вы запустили приведенные выше запросы, чтобы проверить промежуточные результаты,

Убедитесь, что вы удаляете/удалили таблицы xyz и x из базы данных AlloyDB перед запуска этим запроса,

SELECT
 LLM_RESPONSE
FROM (
 SELECT
 json_array_elements( google_ml.predict_row( model_id => 'gemini-1.5',
     request_body => CONCAT('{
     "contents": [
       { "role": "user",
         "parts":
            [ { "text": "Read this user search text: ', user_text, ' Compare it against the product inventory data set: ', content, ' Return a response with 3 values: 1) MATCH: if the 2 contexts are at least 85% matching or not: YES or NO 2) PERCENTAGE: percentage of match, make sure that this percentage is accurate 3) DIFFERENCE: A clear short easy description of the difference between the 2 products. Remember if the user search text says that some attribute should not be there, and the record has it, it should be a NO match."
            } ]
        }
] }'
)::json))-> 'candidates' -> 0 -> 'content' -> 'parts' -> 0 -> 'text'
AS LLM_RESPONSE
   FROM (
         SELECT
           id || ' - ' || pdt_desc AS literature,
           pdt_desc AS content,
         'I want womens tops, pink casual only pure cotton.' user_text
         FROM
           apparels
         ORDER BY
             embedding <=> embedding('text-embedding-005',
             'I want womens tops, pink casual only pure cotton.')::vector
         LIMIT
           5 ) AS xyz ) AS X;

Большой запрос - это комбинация всех запросов, которые мы запускаем на предыдущих шагах. Результаты сообщают, есть ли совпадение или нет, какой процент матча, и некоторые объяснения рейтинга.

Обратите внимание, что модель Близнецов имеет потоковую передачу по умолчанию, поэтому фактический ответ распространяется по нескольким линиям: 14e74d71293b7b9.png

10. Возьмите приложение в Интернет

Теперь мы будем размещать это приложение, чтобы его можно было получить из Интернета.

Создать функцию Cloud Run

  1. В консоли Cloud Google перейдите на функции Cloud Run, используя следующую ссылку:

https://console.cloud.google.com/run/create?deploymenttype=function

  1. В Configure установите имя функции как « розничный двигатель » и выберите регион как « US-Central1 ».
  2. В URL -адресе конечной точки выберите время выполнения как Java 17 .
  3. В аутентификации выберите «Разрешить неаутентированные призывы» .
  4. Разверните контейнер (ы), объемы, сеть, безопасность и нажмите на вкладку «Сеть» .
  5. Выберите «Подключиться к VPC» для исходящего трафика , а затем нажмите «Использовать бессерновые разъемы VPC Access» .
  6. В сети нажмите «Добавить новый контакт VPC» . Включите API VPC без сервера , если он еще не включен.
  7. В разъеме Create, установите имя в alloydb-test-conn .
  8. Установите регион в us-central .
  9. Оставьте значение сети в качестве по умолчанию и установите подсеть как пользовательский диапазон IP с диапазоном IP 10.8.0.0 или что -то подобное, что доступно.
  10. Расширить настройки масштабирования показывать и установить минимальные экземпляры на 2 и максимальные экземпляры до 3.
  11. Выберите тип экземпляра как f1-micro . Следующее показывает параметры Create Connector:

Bed4b2af6795a8ba.png

  1. Нажмите «Создать», чтобы создать разъем.
  2. В маршрутизации трафика выберите маршрут весь трафик в VPC .
  3. Нажмите «Создать» , чтобы создать функцию.

Развернуть приложение

После того, как функция создана, обновите источник и повторно разверните приложение.

  1. В Cloud Run нажмите на вкладку «Сервис» и нажмите функцию розничной торговли двигателя .
  2. Нажмите на вкладку «Источник». Оставьте точку записи функции по умолчанию, установленную на « gcfv2.HelloHttpFunction ».
  3. Замените содержимое файла hellohttpfunction.java содержимым из этого файла Java .
  4. Обновите подробную информацию о AlloyDBJDBCConnector в файле в соответствии с подробностями вашего экземпляра AlloyDB и кластера. Замените $PROJECT_ID на идентификатор проекта вашего кластера и экземпляра AlloyDB.

A89DC5AF3580FBCF.PNG

  1. Замените содержимое файла pom.xml на содержимое этого XML -файла.
  2. Нажмите «Сохранить» и перераспределение, чтобы развернуть функцию.

11. Проверьте приложение для розничной торговли двигателя

После развертывания обновленной облачной функции вы должны увидеть конечную точку в следующем формате:

https://retail-engine-PROJECT_NUMBER.us-central1.run.app

Вы можете проверить его из терминала облачной оболочки, выполнив следующую команду:

gcloud functions call retail-engine --region=us-central1 --gen2 --data '{"search": "I want some kids clothes themed on Disney"}'

В качестве альтернативы, вы можете проверить функцию Cloud Run следующим образом:

PROJECT_ID=$(gcloud config get-value project)

curl
-X POST https://retail-engine-$PROJECT_NUMBER.us-central1.run.app \
 
-H 'Content-Type: application/json' \
 
-d '{"search":"I want some kids clothes themed on Disney"}' \
 
| jq .

И результат:

88BC1DDFB5644A28.PNG

Теперь, когда мы выполняем поиск вектора сходства, используя модель Enterdings на данных AlloyDB, мы можем перейти к созданию приложения, которое использует эти вставки вместе с вашим изображением, и побуждает генерировать предложения по стилю

12. Понять поток рекомендаций на одежде

Приложение для рекомендаций наряда представляет собой приложение Sprint Boot, которое настроено для работы с вставками, которые мы создали в приложении AlloyDB в сфере розничной торговли, вместе с Gemini и Imagen для генерации параметров стиля визуального наряда. Это также позволяет добавлять пользовательские подсказки и импровизировать рекомендацию.

Подумайте об этом таким образом, вы загружаете изображение ярко -розового топа в своем гардеробе в это приложение. Когда вы нажимаете Show, на основе подсказки, установленной в коде приложения и встроения в базе данных AlloyDB, приложение генерирует несколько параметров, которые соответствуют исходному изображению. Теперь вы задаетесь вопросом, как предлагаемые варианты могут выглядеть с синим ожерельем, поэтому вы добавляете подсказку на эти линии и нажимаете стиль. Создается конечное изображение, которое объединяет мощную комбинацию исходного изображения и рекомендаций для создания соответствующей одежды.

Чтобы начать создание приложения для рекомендаций одежды, выполните следующие действия:

  1. В Cloud Run откройте приложение для розничной торговли и обратите внимание на URL вашего приложения. Это репозиторий построений, который мы будем использовать для получения аналогичных предложений.
  2. В вашей IDE Clone the https://github.com/abiramisukumaran/outfit-recommender/ Repository. Для этого упражнения показанные шаги выполняются в IDE Visual Studio Code.
git clone https://github.com/AbiramiSukumaran/outfit-recommender/

Ниже приведены некоторые из важных файлов в каталоге приложения:

  • src/main : Source Directory, где проживают файлы приложений и HTML:
  • HelloWorldApplication.java : основная точка входа для приложения Spring Boot.
  • HelloWorldController.java : Spring Boot Rest Controller, который обрабатывает HTTP -запросы, связанные с приложением для рекомендации для одежды. Этот файл обрабатывает и публикует запросы, обрабатывает подсказки пользователей, анализирует изображения, взаимодействует с Enterdings AlloyDB и возвращает окончательный ответ на пользовательский интерфейс. Этот контроллер вызывает класс GenerateImagesample.
  • GenerateImageSample.java : содержит класс генерации изображений, который подключается к AI Vertex AI, форматирует пользовательскую подсказку, делает вызовы API в модель Imagen, возвращает прогнозируемое изображение в класс контроллера.
  • Resources : этот каталог содержит изображения и HTML -файлы, необходимые для генерации пользовательского интерфейса приложения.
  • Pom.xml : определяет зависимости и конфигурации проекта.
  1. В коде Visual Studio откройте HelloWorldController.java и обновите экземпляры идентификатора и местоположения проекта в соответствии с тем, где создается ваш экземпляр AlloyDB.

9fff8f5cbb62567.png

  1. Обновите endpoint до URL-адреса приложения для розничной торговли, который вы размещали ранее.

AE6227E88EEC5485.PNG

  1. Откройте GenerateImageSample.java и обновите идентификатор проекта и местоположение в соответствии с тем, где создается ваш экземпляр AlloyDB.

db1f81a6f51d80de.png

  1. Сохраните все файлы.

Теперь мы будем развернуть это приложение для выполнения Cloud Run без сервера.

13. Возьмите приложение в Интернет

Теперь, когда мы добавили соответствующий проект, местоположение и данные приложения для розничной торговли двигателями в приложение для Spring Boot Recument, мы можем развернуть приложение для Cloud Run.

Мы будем использовать команду gcloud run deploy в терминале Visual Code Studio для развертывания приложения. Для кода Visual Studio вы можете установить расширение Cloud Code Google, чтобы начать использовать GCLOUD CLI.

Чтобы развернуть приложение, выполните следующие действия:

  1. В своей IDE откройте клонированный каталог и запустите терминал. Для Visual Code Studio щелкните терминал > Новый терминал .
  2. Следуйте инструкциям в этом документе , чтобы установить Gcloud CLI.
  3. Если вы используете Visual Code Studio, нажмите «Расширения» , поиск облачного кода Google и установите расширение.
  4. В вашем терминале IDE аутентифицируйте свою учетную запись Google, выполнив следующую команду:
gcloud auth application-default login
  1. Установите свой идентификатор проекта в тот же проект, где находится ваш экземпляр AlloyDB.
gcloud config set project PROJECT_ID
  1. Начните процесс развертывания.
gcloud run deploy
  1. В Source code location нажмите Enter, чтобы выбрать клонированный каталог GitHub.
  2. В Service name введите имя для Сервиса, например, наряд-рекогмер, и нажмите Enter.
  3. В, Please specify a region , введите место, где размещается ваш экземпляр AlloyDB и приложение для розничной торговли двигателя, например, 32 для US-Central1, и нажмите Enter.

12C0DE4248660D4D.PNG

  1. В Allow unauthenticated invocations to [..] , введите Y и нажмите Enter.

Следующее изображение показывает прогресс развертывания вашего приложения:

1BABBB82FAA31FCE.PNG

14. Проверьте приложение для рекомендации наряда

После того, как приложение будет успешно развернуто в Cloud Run, вы можете увидеть службу в облачной консоли Google следующим образом:

  1. В Google Cloud Console перейдите в Cloud Run .
  2. В услугах нажмите на развернутую услугу Erderender . Вы должны увидеть и услугу розничной торговли , и сервис- наряд-рекогментеров следующим образом:

24dd0aebe224059e.png

  1. Нажмите на URL -адрес приложения, чтобы открыть пользовательский интерфейс приложения Recurederder.

CDC9C1625B1648D2.png

    The following is a sample URL that you will use:

https://outfit-recommender-22905290964.us-central1.run.app/style

Развернутое приложение можно увидеть следующим образом:

76245D1A6152D313.png

Использование приложения

Чтобы начать использовать приложение, выполните следующие действия:

  1. Нажмите «Загрузить» и загрузите изображение предмета одежды.
  2. После того, как изображение загружено, щелкните стиль . Приложение использует изображение в качестве подсказки и генерирует нижние параметры на основе приложения при приложении для розничной торговли, которое включает в себя встроенные наборы данных для розничной торговли.

Приложение генерирует предложения изображения, а также подсказку, основанную на изображении с рекомендациями по стилю. Например, A white semi-sheer button up blouse with pink floral patterns on it, with balloon sleeves.

  1. Вы можете передать дополнительные подсказки этой рекомендации с автоматическим стилем. Например, STYLE RECOMMENDATION: Cute brown skirt on a curly updo. Make it photo realistic. Accessorize with cherry earrings and burgundy plastic case sling bag.
  2. Нажмите «Показать» , чтобы увидеть окончательный стиль.

38D6D08E9A0A44C0.png

15. Очистить

Чтобы избежать внесения сборов в вашей учетной записи Google Cloud за ресурсы, используемые в этом посте, выполните следующие действия:

  1. В консоли Cloud Google перейдите на страницу управления ресурсами .
  2. В списке проектов выберите проект, который вы хотите удалить, а затем нажмите «Удалить» .
  3. В диалоговом окне введите идентификатор проекта, а затем нажмите «Выключить» , чтобы удалить проект.

16. Поздравления

Поздравляем! Вы успешно выполнили поиск сходства, используя AlloyDB, PGVector и Vector Search в сочетании с использованием результата поиска с мощной моделью Imagen для генерации рекомендаций по стилю.

,
Создайте приложение для рекомендаций по наряду с AI с помощью AlloyDB и без сервера.

О практической работе

subjectПоследнее обновление: мар. 28, 2025
account_circleАвторы: Abirami Sukumaran, Shweta Shetye

1. Обзор

Представьте себе приложение для моды, которое не только помогает вам найти идеальный наряд, но и дает советы по стилю в реальном времени, все благодаря силе передовой интеграции Genai! В этом выступлении мы рассмотрим, как мы создали такое приложение, используя возможности поиска AlloyDB в сочетании с индексом скана Google, обеспечивая молниеносные поиски для сопоставления нарядов и предоставления мгновенных рекомендаций моды.

Мы также углубимся в то, как индекс Scann AlloyDB оптимизирует сложные запросы для создания персонализированных предложений в стиле. Мы также будем использовать Gemini & Imagen, мощные генеративные модели искусственного интеллекта, чтобы обеспечить творческое вдохновение стиль и даже визуализировать ваш персонализированный внешний вид. Все это приложение построено на без серверов архитектуры, обеспечивая бесшовный и масштабируемый опыт для пользователей.

Задача: предлагая персонализированные предложения по одежде, приложение намерено помогать людям, которые борются с нерешительной модой. Это также помогает избежать усталости от принятия решений от планирования одежды.

Решение: приложение Erderender наряда решает проблему предоставления пользователям интеллектуального, персонализированного и привлекательного модного опыта, демонстрируя возможности технологий AlloyDB, Generative AI и без серверов.

Что вы построите

Как часть этой лаборатории, вы будете:

  1. Создайте экземпляр AlloyDB и загрузите набор данных электронной коммерции
  2. Включить PGVector и генеративные расширения модели ИИ в AlloyDB
  3. Генерировать встроения из описания продукта
  4. Развернуть решение в функциях без сервера Cloud Run
  5. Загрузите изображение в Близнецы и генерируйте приглашение описания изображения.
  6. Сгенерировать результаты поиска на основе подсказок в сочетании с вставками набора данных электронной коммерции.
  7. Добавьте дополнительные подсказки для настройки приглашения и генерации рекомендаций стиля.
  8. Развернуть решение в функциях без сервера Cloud Run

Требования

  • Браузер, такой как хром или Firefox
  • Облачный проект Google с включенным выставлением счетов.

2. Архитектура

Архитектура приложения высокого уровня заключается в следующем:

CE32F865DFE59142.png

В следующих разделах подчеркивается контекстуальный поток учебника:

Приглашение :

Наш первый шаг - прогласить данные розничной торговли (инвентаризацию, описания продуктов, взаимодействие с клиентами) в AlloyDB.

Аналитический двигатель:

Мы будем использовать AlloyDB в качестве механизма Analytics для выполнения ниже:

  1. Извлечение контекста: двигатель анализирует данные, хранящиеся в AlloyDB, чтобы понять отношения между продуктами, категориями, поведением клиентов и т. Д.
  2. Создание встраивания: встраивание (математические представления текста) генерируются как для запроса пользователя, так и для информации, хранящейся в AlloyDB.
  3. Векторный поиск: двигатель выполняет поиск сходства, сравнивая запрос, внедряющий встроенные встроенные продукты, обзоры и другие соответствующие данные. Это идентифицирует 25 наиболее актуальных «ближайших соседей».

Рекомендация Близнецов:

Массив байтов изображения передается в модель Близнецов через API вершины AI, а также подсказку с просьбой о текстовом описании верхнего износа вместе с рекомендациями нижней одежды.

AlloyDB Rag и Vector Search:

Описание верхней одежды используется для запроса базы данных. Запрос преобразует текст поиска (рекомендация из модели Gemini для сопоставления нижнего износа) в встраивание и выполняет векторный поиск по вставкам, хранящимся в базе данных, чтобы найти ближайших соседей (соответствующие результаты). Вторжения векторов в базе данных AlloyDB индексируются с использованием индекса скана для лучшего отзыва.

Генерация изображений ответа:

Проверенные ответы структурированы в массив JSON, а весь двигатель упакован в функцию без сервера облачного запуска, которая вызывает у Agent Builder.

Генерация изображений Imagen:

The user's styling prompt, a user-selected recommendation and any personalization requests are combined to prompt Imagen 3 with an existing image. The styling image is generated based on this prompt, using the Vertex AI API.

3. Прежде чем начать

Create a project

  1. In the Google Cloud Console , on the project selector page, select or create a Google Cloud project .
  2. Make sure that billing is enabled for your Cloud project. Learn how to check if billing is enabled on a project .
  3. You'll use Cloud Shell , a command-line environment running in Google Cloud that comes preloaded with bq. Click Activate Cloud Shell ( f2ae85166a716c5c.png ) at the top of the Google Cloud console.
  4. Once connected to Cloud Shell, verify that you're already authenticated and that the project is set to your project ID using the following command:
gcloud auth list
  1. Run the following command to confirm that the future gcloud commands will identify your project correctly.
gcloud config list project
  1. If your project is not set, use the following command to set it explicitly:
gcloud config set project <YOUR_PROJECT_ID>
  1. Enable the required APIs.

Follow the link to enable APIs.

If you miss enabling any API, you can always enable it during the course of the implementation.

For more information about gcloud commands and usage, refer to the documentation .

4. Database setup

In this lab we'll use AlloyDB as the database to store the retail ecommerce dataset. It uses clusters to store all of the resources, such as databases and logs. Each cluster has a primary instance that provides an access point to the data. Tables are the actual resource that stores data.

Let's create an AlloyDB cluster, instance, and table where the ecommerce dataset will be loaded.

Create a cluster and instance

  1. In the Google Cloud Console, search for AlloyDB . An easy way to find most pages in Cloud Console is to search for them using the search bar of the console.
  2. Click CREATE CLUSTER .

f76ff480c8c889aa.png

  1. Create a cluster and instance with the following values:
  • cluster id: " shopping-cluster "
  • password: " alloydb "
  • PostgreSQL 15 compatible
  • Region: " us-central1 "
  • Networking: " default "

538dba58908162fb.png

  1. In Network, when you select the default network, the following option appears. Click SET UP CONNECTION to set up a default network.
    7939bbb6802a91bf.png
  2. Select Use an automatically allocated IP range and click Continue . After reviewing the information, click CREATE CONNECTION . 768ff5210e79676f.png

Wait for the default network creation to complete.

  1. In Configure your primary instance, set the Instance ID as " shopping-instance" .

2bddecf6b7c7407b.png

  1. Click CREATE CLUSTER to complete setting up of the cluster as follows:

24eec29fa5cfdb3e.png

5. Data ingestion

Now it's time to add a table with the data about the store. Wait for your instance to finish being created. Once it is created, you can sign into AlloyDB using the credentials you set when you created the cluster.

Authenticate to AlloyDB database

  1. In Google Cloud Console, go to AlloyDB . Select the primary cluster, and then click AlloyDB Studio in the left-hand navigation:

847e35f1bf8a8bd8.png

  1. Enter the following details to authenticate to AlloyDB database:
  • Username : " postgres "
  • Database : " postgres "
  • Password : " alloydb "

Once you have authenticated successfully into AlloyDB Studio, SQL commands are entered in the Editor tabs. You can add multiple Editor windows using the plus to the right of the first Editor tab.

91a86d9469d499c4.png

You'll enter commands for AlloyDB in Editor windows, using the Run, Format, and Clear options as necessary.

Enable Extensions

For building this app, we will use the " pgvector" and " google_ml_integration" extensions.

  • pgvector extension allows you to store and search vector embeddings.
  • google_ml_integration extension provides functions you use to access Vertex AI prediction endpoints to get predictions in SQL.
  1. Enable these extensions by running the following DDLs:
CREATE EXTENSION IF NOT EXISTS google_ml_integration CASCADE;
CREATE EXTENSION IF NOT EXISTS vector
;
  1. Verify if the extensions are installed by running this SQL command:
select extname, extversion from pg_extension;

Create a table

  1. Create a table using the following DDL statement:
CREATE TABLE
 apparels
( id BIGINT,
   category VARCHAR
(100),
   sub_category VARCHAR
(50),
   uri VARCHAR
(200),
   image VARCHAR
(100),
   content VARCHAR
(2000),
   pdt_desc VARCHAR
(5000),
   embedding vector
(768) );

On successful execution of the above command, you should be able to view the table in

the database. The following image shows an example:

908e33bbff58a6d.png

Ingest data

For this lab, we have test data of about 200 records in this SQL file . It contains the id, category, sub_category, uri, image , and content . The other fields will be filled in later in the lab.

  1. Copy the 20 lines/insert statements from the SQL file in a new Editor tab in AlloyDB Studio, and click RUN .
  1. Expand the Explorer section until you can see the table named apparels .
  2. Click the menu icon [ ] and click Query . A SELECT statement will open in a new Editor tab.

b31ece70e670ab89.png

  1. Click Run to verify that the rows are inserted.

Grant Permission to user

We will grant permission to the postgres user to generate embeddings from within AlloyDB . In AlloyDB Studio, run the following statement to grant execute rights on the embedding function to the user postgres :

GRANT EXECUTE ON FUNCTION embedding TO postgres;

Grant Vertex AI User ROLE to the AlloyDB service account

We will be using the text embedding models from Vertex AI to generate embeddings for which Vertex AI User ROLE to the AlloyDB service account.

In the Google Cloud Console, click the Cloud Shell terminal [ f2ae85166a716c5c.png ] icon and run the following command:

PROJECT_ID=$(gcloud config get-value project)

gcloud projects add-iam-policy-binding $PROJECT_ID \
  --member="serviceAccount:service-$(gcloud projects describe $PROJECT_ID --format="value(projectNumber)")@gcp-sa-alloydb.iam.gserviceaccount.com" \
--role="roles/aiplatform.user"

6. Build Context

To create an embedding, we'll need to have a context ie all of the information we want to include in a single field. We'll do this by creating a product description that we'll store in the pdt_desc column in the apparels table.

In our case, we'll use all the information about each product, but when you do this with your own data, feel free to engineer the data in any way that you find meaningful for your business.

In the AlloyDB Studio Editor tab, run the following command that updates the pdt_desc field with context data:

UPDATE
 apparels
SET
 pdt_desc = CONCAT('This product category is: ', category, ' and sub_category is: ', sub_category, '. The description of the product is as follows: ', content, '. The product image is stored at: ', uri)
WHERE
 id IS NOT NULL;

This DML creates a simple context summary using the information from all the fields available in the table and other dependencies (if any in your use case). For a more precise assortment of information and context creation, feel free to engineer the data in any way that you find meaningful for your business.

7. Create embeddings for the context

It's much easier for computers to process numbers than to process text. An embedding system converts text into a series of floating point numbers that should represent the text, no matter how it's worded, what language it uses, etc.

Consider describing a seaside location. It might be called "on the water ", " beachfront ", " walk from your room to the ocean ", " sur la mer ", " на берегу океана " etc. These terms all look different, but their semantic meaning or in machine learning terminology, their embeddings should be very close to each other.

Now that the data and context are ready, we will run the SQL to add the embeddings of the product description (pdt_desc ) column to the table in the field embedding . There are a variety of embedding models you can use. We're using text-embedding-005 from Vertex AI.

  1. In AlloyDB Studio, run the following command to generate embeddings, and update the pdt_desc column with embeddings for the data it stores:
UPDATE
 apparels
SET
 embedding
= embedding( 'text-embedding-005',
   pdt_desc
)
WHERE
 TRUE
;
  1. Verify that embeddings are generated by running the following command:
SELECT
 id
,
 category
,
 sub_category
,
 content
,
 embedding
FROM
 
Apparels
LIMIT
5;

The following is an example embeddings vector, that looks like an array of floats, for the sample text in the query as follows:

c69c08d085389f74.png

8. Perform Vector search

Now that the table, data, and embeddings are all ready, let's perform the real time vector search for the user search text.

Assume that the user's search text is " pink color, casual, pure cotton tops for women "

To find matches for this query, run the following SQL query:

SELECT
id
,
category
,
sub_category
,
content
,
pdt_desc AS description
FROM
apparels
ORDER BY
embedding
<=> embedding('text-embedding-005',
 
'pink color, casual, pure cotton tops for women')::vector
LIMIT
5;

Let's look at this query in detail:

In this query,

  1. The user's search text is: " I want womens tops, pink casual only pure cotton. "
  2. We are converting this search text to embeddings using the embedding() method along with the model: text-embedding-005 . This step should look familiar after the last step, where we applied the embedding function to all of the items in the table.
  3. " <=> " represents the use of the COSINE SIMILARITY distance method. You can find all the similarity measures available in the documentation of pgvector .
  4. We are converting the embedding method's result to vector data type to make it compatible with the vectors stored in the database.
  5. LIMIT 5 represents that we want to extract 5 nearest neighbors for the search text.

The following shows example response of this SQL query:

4193a68737400535.png

As you can observe in your results, the matches are pretty close to the search text. Try changing the color to see how the results change.

AlloyDB ScaNN index for query performance

Now let's say we want to increase the performance (query time), efficiency, and recall of this Vector Search result using the ScaNN index.

If you want to use ScaNN index, try the following steps:

  1. Since we already have the cluster, instance, context and embeddings created, we just have to install the ScaNN extension using the following statement:
CREATE EXTENSION IF NOT EXISTS alloydb_scann;
  1. Create the ScaNN index:
CREATE INDEX apparel_index ON apparels
USING scann
(embedding cosine)
WITH
(num_leaves=54);

In the above DDL:

  • apparel_index is the name of the index.
  • apparels is the table name.
  • scann is the index method.
  • embedding is the column in the table you want to index.
  • cosine is the distance method you want to use with the index.
  • 54 is the number of partitions to apply to this index. Set to any value between 1 to 1048576. For more information about how to decide this value, see Tune a ScaNN index .

As per the recommendation in the ScaNN repo , we have used a SQUARE ROOT of the number of data points. When partitioning, num_leaves should be roughly the square root of the number of datapoints.

  1. Check if the index is created using the query:
SELECT * FROM pg_stat_ann_indexes;
  1. Perform Vector Search using the same query we used without the index:
select * from apparels
   ORDER BY embedding
<=> CAST(embedding('textembedding-gecko', 'white tops for girls without any print') as vector(768))
   LIMIT
20

The above query is the same one that we used in the lab in step 8. However, now we have the field indexed using the ScaNN index.

  1. Test with a simple search query with and without the index. For testing without index, you must drop the index:

white tops for girls without any print

The above search text in the Vector Search query on the INDEXED embeddings data results in quality search results and efficiency. The efficiency is vastly improved (in terms of time for execution: 10.37ms without ScaNN and 0.87ms with ScaNN) with the index. For more information on this topic, please refer to this blog .

9. Match Validation with the LLM

Before moving on and creating a service to return the best matches to an application, let's use a generative AI model to validate if these potential responses are truly relevant and safe to share with the user.

Ensuring the instance is set up for Gemini

  1. Verify that the google_ml_integration is already enabled for your Cluster and Instance. In AlloyDB Studio, run the following command:
show google_ml_integration.enable_model_support;

If the value is shown as "on" , you can skip the next 2 steps and go directly to setting up

the AlloyDB and Vertex AI Model integration.

  1. Go to your AlloyDB cluster's primary instance, and click EDIT PRIMARY INSTANCE .

456ffdf292d3c0e0.png

  1. In Advanced configuration options , expand the New database flag section, and ensure that the google_ml_integration.enable_model_support flag is set to " on " as follows:

6a59351fcd2a9d35.png 3. If it is not set to " on ", set it to " on " and then click UPDATE INSTANCE .

This step will take a few minutes.

AlloyDB and Vertex AI Model integration

Now you can connect to AlloyDB Studio and run the following DML statement to set up Gemini model access from AlloyDB, using your project ID where indicated. You may be warned of a syntax error before running the command, but it should run fine.

  1. In Google Cloud Console, go to AlloyDB . Select the primary cluster, and then click AlloyDB Studio in the left-hand navigation.
  2. We will use the gemini-1.5-pro:generateContent that is available by default with the google_ml_integration extension. cdb5af753a625777.png
  3. You can check on the models configured for access via the following command in AlloyDB Studio:
select model_id,model_type from google_ml.model_info_view;        
  1. Grant permission for database users to execute the ml_predict_row function to run predictions using the Google Vertex AI models by running the following command:
GRANT EXECUTE ON FUNCTION ml_predict_row to postgres;

Evaluating the responses

While we'll end up using one large query for the next section where we actually take the application to Cloud Run, to ensure the responses from the query are reasonable, the query can be difficult to understand.

We'll look at the individual sections that go on to build the larger query we finally use.

  1. First we'll send a request to the database to get the 5 closest matches to a user query. We're hardcoding the query to keep this simple, but don't worry, we'll interpolate it into the query later.

We're including the product description from the apparels table and adding two new fields–one that combines the description with the index and another with the original request. This data is being saved in a table called xyz , which is a temporary table name.

CREATE TABLE
 xyz AS
SELECT
 id || ' - ' || pdt_desc AS literature,
 pdt_desc AS content,
 'I want womens tops, pink casual only pure cotton.' AS  user_text
FROM
 apparels
ORDER BY
 embedding <=> embedding('text-embedding-005',
   'I want womens tops, pink casual only pure cotton.')::vector
LIMIT
 5;

The output of this query will be 5 most similar rows pertaining to the users query.

new table xyz will contain 5 rows where each row will have the following columns:

  • literature
  • content
  • user_text
  1. To determine how valid responses are, we'll use a complicated query where we explain how to evaluate the responses. It uses the user_text and content in the xyz table as part of the query.
"Read this user search text: ', user_text, 
' Compare it against the product inventory data set: ', content,
' Return a response with 3 values: 1) MATCH: if the 2 contexts are at least 85% matching or not: YES or NO 2) PERCENTAGE: percentage of match, make sure that this percentage is accurate 3) DIFFERENCE: A clear short easy description of the difference between the 2 products. Remember if the user search text says that some attribute should not be there, and the record has it, it should be a NO match."

  1. Using that query, we'll then review the "goodness" of responses in the xyz table. When we say goodness, we mean how closely accurate are the responses generated to what we expect them to be.
CREATE TABLE
  x AS
SELECT
  json_array_elements( google_ml.predict_row( model_id => 'gemini-1.5',
      request_body => CONCAT('{
 "contents": [
        { "role": "user",
          "parts":
             [ { "text": "Read this user search text: ', user_text, ' Compare it against the product inventory data set: ', content, ' Return a response with 3 values: 1) MATCH: if the 2 contexts are at least 85% matching or not: YES or NO 2) PERCENTAGE: percentage of match, make sure that this percentage is accurate 3) DIFFERENCE: A clear short easy description of the difference between the 2 products. Remember if the user search text says that some attribute should not be there, and the record has it, it should be a NO match."
             } ]
         }
] }'
)::json))-> 'candidates' -> 0 -> 'content' -> 'parts' -> 0 -> 'text'
AS LLM_RESPONSE
FROM
    xyz;
  1. The predict_row returns its result in JSON format. The code " -> 'candidates' -> 0 -> 'content' -> 'parts' -> 0 -> 'text'" is used to extract the actual text from that JSON. To see the actual JSON that is returned, you can remove this code.
  2. Finally, to get the LLM field, you just need to extract it from the x table:
SELECT 
LLM_RESPONSE
FROM
        x
;
  1. This can be combined into a single query as follows:

Warning : If you have run the above queries to check on the intermediate results,

ensure that you delete/remove the xyz and x tables from the AlloyDB database before running this query,

SELECT
 LLM_RESPONSE
FROM (
 SELECT
 json_array_elements( google_ml.predict_row( model_id => 'gemini-1.5',
     request_body => CONCAT('{
     "contents": [
       { "role": "user",
         "parts":
            [ { "text": "Read this user search text: ', user_text, ' Compare it against the product inventory data set: ', content, ' Return a response with 3 values: 1) MATCH: if the 2 contexts are at least 85% matching or not: YES or NO 2) PERCENTAGE: percentage of match, make sure that this percentage is accurate 3) DIFFERENCE: A clear short easy description of the difference between the 2 products. Remember if the user search text says that some attribute should not be there, and the record has it, it should be a NO match."
            } ]
        }
] }'
)::json))-> 'candidates' -> 0 -> 'content' -> 'parts' -> 0 -> 'text'
AS LLM_RESPONSE
   FROM (
         SELECT
           id || ' - ' || pdt_desc AS literature,
           pdt_desc AS content,
         'I want womens tops, pink casual only pure cotton.' user_text
         FROM
           apparels
         ORDER BY
             embedding <=> embedding('text-embedding-005',
             'I want womens tops, pink casual only pure cotton.')::vector
         LIMIT
           5 ) AS xyz ) AS X;

The larger query is a combination of all the queries we run in the earlier steps. The results tell whether or not there's a match, what percentage the match is, and some explanation of the rating.

Notice that the Gemini model has streaming on by default, so the actual response is spread across multiple lines: 14e74d71293b7b9.png

10. Take the application to web

We will now host this application so that it can be accessed from the internet.

Create the Cloud Run Function

  1. In the Google Cloud Console, go to Cloud Run Functions using the following link:

https://console.cloud.google.com/run/create?deploymentType=function

  1. In Configure, set the Function Name as " retail-engine " and select the region as " us-central1 ".
  2. In Endpoint URL, select runtime as Java 17 .
  3. In Authentication, select Allow unauthenticated invocations .
  4. Expand Container(s), Volumes, Networking, Security , and click the Networking tab.
  5. Select Connect to a VPC for outbound traffic , and then click Use Serverless VPC Access connectors .
  6. In Network, click Add New VPC Connector . Enable the Serverless VPC Access API , if not already enabled.
  7. In the Create connector, set name to alloydb-test-conn .
  8. Set the region to us-central .
  9. Leave the Network value as default and set Subnet as Custom IP Range with the IP range of 10.8.0.0 or something similar that is available.
  10. Expand Show scaling settings, and set Minimum instances to 2 and the Maximum instances to 3.
  11. Select the Instance type as f1-micro . The following shows the Create connector options:

bed4b2af6795a8ba.png

  1. Click Create to create the connector.
  2. In Traffic routing, select Route all traffic to the VPC .
  3. Click Create to create the function.

Deploy the application

After the function is created, update the source and redeploy the application.

  1. In Cloud Run , click the Services tab, and click the retail-engine function.
  2. Click the Source tab. Leave the default Function entry point set to " gcfv2.HelloHttpFunction ".
  3. Replace the contents of the HelloHttpFunction.java file with the contents from this Java file .
  4. Update the AlloyDbJdbcConnector details in the file as per the details of your AlloyDB instance and cluster. Replace the $PROJECT_ID with the project ID of your AlloyDB cluster and instance.

a89dc5af3580fbcf.png

  1. Replace the contents of the pom.xml file with the contents of this XML file.
  2. Click Save and redeploy to deploy the function.

11. Test the retail-engine application

Once the updated Cloud Function is deployed, you should see the endpoint in the following format:

https://retail-engine-PROJECT_NUMBER.us-central1.run.app

You can test it from the Cloud Shell Terminal by running following command:

gcloud functions call retail-engine --region=us-central1 --gen2 --data '{"search": "I want some kids clothes themed on Disney"}'

Alternatively, you can test the Cloud Run Function as follows:

PROJECT_ID=$(gcloud config get-value project)

curl
-X POST https://retail-engine-$PROJECT_NUMBER.us-central1.run.app \
 
-H 'Content-Type: application/json' \
 
-d '{"search":"I want some kids clothes themed on Disney"}' \
 
| jq .

And the result:

88bc1ddfb5644a28.png

Now that we have run similarity vector search using the embeddings model on AlloyDB data, we can move towards creating the application that uses these embeddings along with your image, and prompts to generate styling suggestions

12. Understand outfit recommendation flow

The outfit recommendation app is a sprint boot application that is configured to work with the embeddings we created in the AlloyDB retail-engine application along with Gemini and Imagen to generate visual outfit styling options. It also lets you add custom prompts and improvise the recommendation.

Think of it this way, you upload an image of a hot pink top in your wardrobe to this app. When you click Show, based on the prompt set in the application code and the embeddings in the AlloyDB database, the application generates multiple options that match the original image. Now you wonder how the suggested options might look with a blue necklace, so you add a prompt on those lines, and click Style. The final image is generated that combines the powerful combination of the original image and recommendations to create a matching outfit.

To start creating the outfit recommendation app, follow these steps:

  1. In Cloud Run , open the retail-engine app, and note the URL of your application. This is the embeddings repository that we will use to generate similar suggestions.
  2. In your IDE, clone the https://github.com/AbiramiSukumaran/outfit-recommender/ repository. For this exercise, the steps shown are performed in Visual Studio Code IDE.
git clone https://github.com/AbiramiSukumaran/outfit-recommender/

The following are some of the important files in the directory of the app:

  • src/main : Source directory where application files and HTML reside:
  • HelloWorldApplication.java : Main entry point for the spring boot application.
  • HelloWorldController.java : Spring Boot REST controller that handles HTTP requests related to an outfit recommender application. This file handles GET and POST requests, processes user prompts, analyzes images, interacts with AlloyDB embeddings, and returns final response to the UI. This controller calls the GenerateImageSample class.
  • GenerateImageSample.java : Contains the image generation class that connects to Vertex AI, formats user prompt, makes API calls to Imagen model, returns predicted image to the controller class.
  • Resources : This directory contains images and HTML files required to generate the application UI.
  • Pom.xml : Defines the project dependencies and configurations.
  1. In Visual Studio code, open the HelloWorldController.java and update instances of the project ID and location as per where your AlloyDB instance is created.

9fff8f5cbb62567.png

  1. Update the endpoint to the retail-engine app URL that you hosted earlier.

ae6227e88eec5485.png

  1. Open the GenerateImageSample.java , and update the project ID and the location as per where your AlloyDB instance is created.

db1f81a6f51d80de.png

  1. Save all files.

We will now deploy this application to Cloud Run serverless runtime.

13. Take the application to the web

Now that we have added the relevant project, location, and the retail-engine app details to the outfit recommender spring boot application, we can deploy the application to Cloud Run.

We will use the gcloud run deploy command in the Visual Code Studio terminal to deploy the application. For Visual Studio Code, you can install the Google Cloud Code extension to start using the gcloud CLI.

To deploy the application, follow these steps:

  1. In your IDE, open the cloned directory and start the terminal. For Visual Code Studio, click Terminal > New Terminal .
  2. Follow the instructions in this document to install the gcloud CLI.
  3. If you are using Visual Code Studio, click Extensions , search for Google Cloud Code and install the extension.
  4. In your IDE terminal, authenticate your Google account by running the following command:
gcloud auth application-default login
  1. Set your project ID to the same project where your AlloyDB instance is located.
gcloud config set project PROJECT_ID
  1. Start the deploy process.
gcloud run deploy
  1. In Source code location , press Enter to select the cloned GitHub directory.
  2. In Service name , enter a name for the service, such as outfit-recommender, and press Enter.
  3. In Please specify a region , enter the location where your AlloyDB instance and retail-engine application is hosted, such as 32 for us-central1, and press Enter.

12c0de4248660d4d.png

  1. In Allow unauthenticated invocations to [..] , enter Y , and press Enter.

The following image shows the deployment progress of your application:

1babbb82faa31fce.png

14. Test the outfit recommender application

After the application is successfully deployed to Cloud Run, you can see the service in the Google Cloud Console as follows:

  1. In Google Cloud Console, go to Cloud Run .
  2. In Services, click the outfit recommender service you deployed. You should see both the retail-engine and the outfit-recommender service as follows:

24dd0aebe224059e.png

  1. Click the application URL to open the recommender app UI.

cdc9c1625b1648d2.png

    The following is a sample URL that you will use:

https://outfit-recommender-22905290964.us-central1.run.app/style

The deployed application can be seen as follows:

76245d1a6152d313.png

Using the application

To start using the application, follow these steps:

  1. Click Upload and upload a picture of a clothing item.
  2. After the image is uploaded, click Style . The application uses the image as a prompt and generates bottom options based on the prompt from the retail-engine app that includes embeddings for the retail dataset.

The app generates image suggestions along with a prompt based on the image with styling recommendations. For example, A white semi-sheer button up blouse with pink floral patterns on it, with balloon sleeves.

  1. You can pass additional prompts to this auto-generated style recommendation. For example, STYLE RECOMMENDATION: Cute brown skirt on a curly updo. Make it photo realistic. Accessorize with cherry earrings and burgundy plastic case sling bag.
  2. Click Show to see the final styling.

38d6d08e9a0a44c0.png

15. Очистить

To avoid incurring charges to your Google Cloud account for the resources used in this post, follow these steps:

  1. In the Google Cloud console, go to the Manage resources page.
  2. In the project list, select the project that you want to delete, and then click Delete .
  3. In the dialog, type the project ID, and then click Shut down to delete the project.

16. Поздравления

Поздравляем! You have successfully performed a similarity search using AlloyDB, pgvector and Vector search coupled with using the search result with the powerful Imagen model to generate styling recommendations.

,
Build an AI-powered outfit recommendation app with AlloyDB and serverless runtimes

О практической работе

subjectПоследнее обновление: мар. 28, 2025
account_circleАвторы: Abirami Sukumaran, Shweta Shetye

1. Обзор

Imagine a fashion app that not only helps you find the perfect outfit but also provides real-time styling advice, all thanks to the power of cutting-edge genAI integration! In this talk, we'll explore how we built such an app using AlloyDB's vector search capabilities, coupled with Google's ScaNN index, enabling lightning-fast searches for matching outfits and delivering instant fashion recommendations.

We'll also delve into how AlloyDB's ScaNN index optimizes complex queries to generate personalized style suggestions. We will also use Gemini & Imagen, powerful generative AI models, to provide creative styling inspiration and even visualize your personalized looks. This entire application is built on a serverless architecture, ensuring a seamless and scalable experience for users.

The Challenge: By offering personalized outfit suggestions, the app intends to help out people who struggle with fashion indecisiveness. It also helps avoid decision fatigue from outfit planning.

The Solution: The outfit recommender app solves the problem of providing users with an intelligent, personalized, and engaging fashion experience while showcasing the capabilities of AlloyDB, generative AI, and serverless technologies.

What you'll build

As part of this lab, you will:

  1. Create an AlloyDB instance and load Ecommerce Dataset
  2. Enable the pgvector and generative AI model extensions in AlloyDB
  3. Generate embeddings from the product description
  4. Deploy the solution in serverless Cloud Run Functions
  5. Upload an image to Gemini and generate an image description prompt.
  6. Generate search results based on prompts coupled with ecommerce dataset embeddings.
  7. Add additional prompts to customize the prompt and generate style recommendations.
  8. Deploy the solution in serverless Cloud Run Functions

Требования

  • A browser, such as Chrome or Firefox
  • A Google Cloud project with billing enabled.

2. Архитектура

The high-level architecture of the app is as follows:

ce32f865dfe59142.png

The following sections highlight the contextual flow of the tutorial:

Ingestion :

Our first step is to ingest the Retail data (inventory, product descriptions, customer interactions) into AlloyDB.

Analytics Engine:

We will use AlloyDB as the analytics engine to perform the below:

  1. Context Extraction: The engine analyzes the data stored within AlloyDB to understand relationships between products, categories, customer behavior, etc as applicable.
  2. Embedding Creation: Embeddings (mathematical representations of text) are generated for both the user's query and the information stored in AlloyDB.
  3. Vector Search: The engine performs a similarity search, comparing the query embedding to the embeddings of product descriptions, reviews, and other relevant data. This identifies the 25 most relevant "nearest neighbors."

Gemini recommendation:

The image byte array is passed to Gemini model via the Vertex AI API, along with the prompt asking for a textual description of the top wear along with the bottom-wear recommendation suggestions.

AlloyDB RAG and vector search:

The description of the topwear is used to query the database. The query converts the search text (recommendation from Gemini model for matching bottom wear) into embeddings and performs a Vector Search on the embeddings stored in the database to find the nearest neighbors (matching results). The vector embeddings in the AlloyDB database are indexed using the ScaNN index for better recall.

Response Image Generation:

The validated responses are structured into a JSON array and the whole engine is packaged into a serverless Cloud Run Function that is invoked from the Agent Builder.

Imagen image generation:

The user's styling prompt, a user-selected recommendation and any personalization requests are combined to prompt Imagen 3 with an existing image. The styling image is generated based on this prompt, using the Vertex AI API.

3. Прежде чем начать

Create a project

  1. In the Google Cloud Console , on the project selector page, select or create a Google Cloud project .
  2. Make sure that billing is enabled for your Cloud project. Learn how to check if billing is enabled on a project .
  3. You'll use Cloud Shell , a command-line environment running in Google Cloud that comes preloaded with bq. Click Activate Cloud Shell ( f2ae85166a716c5c.png ) at the top of the Google Cloud console.
  4. Once connected to Cloud Shell, verify that you're already authenticated and that the project is set to your project ID using the following command:
gcloud auth list
  1. Run the following command to confirm that the future gcloud commands will identify your project correctly.
gcloud config list project
  1. If your project is not set, use the following command to set it explicitly:
gcloud config set project <YOUR_PROJECT_ID>
  1. Enable the required APIs.

Follow the link to enable APIs.

If you miss enabling any API, you can always enable it during the course of the implementation.

For more information about gcloud commands and usage, refer to the documentation .

4. Database setup

In this lab we'll use AlloyDB as the database to store the retail ecommerce dataset. It uses clusters to store all of the resources, such as databases and logs. Each cluster has a primary instance that provides an access point to the data. Tables are the actual resource that stores data.

Let's create an AlloyDB cluster, instance, and table where the ecommerce dataset will be loaded.

Create a cluster and instance

  1. In the Google Cloud Console, search for AlloyDB . An easy way to find most pages in Cloud Console is to search for them using the search bar of the console.
  2. Click CREATE CLUSTER .

f76ff480c8c889aa.png

  1. Create a cluster and instance with the following values:
  • cluster id: " shopping-cluster "
  • password: " alloydb "
  • PostgreSQL 15 compatible
  • Region: " us-central1 "
  • Networking: " default "

538dba58908162fb.png

  1. In Network, when you select the default network, the following option appears. Click SET UP CONNECTION to set up a default network.
    7939bbb6802a91bf.png
  2. Select Use an automatically allocated IP range and click Continue . After reviewing the information, click CREATE CONNECTION . 768ff5210e79676f.png

Wait for the default network creation to complete.

  1. In Configure your primary instance, set the Instance ID as " shopping-instance" .

2bddecf6b7c7407b.png

  1. Click CREATE CLUSTER to complete setting up of the cluster as follows:

24eec29fa5cfdb3e.png

5. Data ingestion

Now it's time to add a table with the data about the store. Wait for your instance to finish being created. Once it is created, you can sign into AlloyDB using the credentials you set when you created the cluster.

Authenticate to AlloyDB database

  1. In Google Cloud Console, go to AlloyDB . Select the primary cluster, and then click AlloyDB Studio in the left-hand navigation:

847e35f1bf8a8bd8.png

  1. Enter the following details to authenticate to AlloyDB database:
  • Username : " postgres "
  • Database : " postgres "
  • Password : " alloydb "

Once you have authenticated successfully into AlloyDB Studio, SQL commands are entered in the Editor tabs. You can add multiple Editor windows using the plus to the right of the first Editor tab.

91a86d9469d499c4.png

You'll enter commands for AlloyDB in Editor windows, using the Run, Format, and Clear options as necessary.

Enable Extensions

For building this app, we will use the " pgvector" and " google_ml_integration" extensions.

  • pgvector extension allows you to store and search vector embeddings.
  • google_ml_integration extension provides functions you use to access Vertex AI prediction endpoints to get predictions in SQL.
  1. Enable these extensions by running the following DDLs:
CREATE EXTENSION IF NOT EXISTS google_ml_integration CASCADE;
CREATE EXTENSION IF NOT EXISTS vector
;
  1. Verify if the extensions are installed by running this SQL command:
select extname, extversion from pg_extension;

Create a table

  1. Create a table using the following DDL statement:
CREATE TABLE
 apparels
( id BIGINT,
   category VARCHAR
(100),
   sub_category VARCHAR
(50),
   uri VARCHAR
(200),
   image VARCHAR
(100),
   content VARCHAR
(2000),
   pdt_desc VARCHAR
(5000),
   embedding vector
(768) );

On successful execution of the above command, you should be able to view the table in

the database. The following image shows an example:

908e33bbff58a6d.png

Ingest data

For this lab, we have test data of about 200 records in this SQL file . It contains the id, category, sub_category, uri, image , and content . The other fields will be filled in later in the lab.

  1. Copy the 20 lines/insert statements from the SQL file in a new Editor tab in AlloyDB Studio, and click RUN .
  1. Expand the Explorer section until you can see the table named apparels .
  2. Click the menu icon [ ] and click Query . A SELECT statement will open in a new Editor tab.

b31ece70e670ab89.png

  1. Click Run to verify that the rows are inserted.

Grant Permission to user

We will grant permission to the postgres user to generate embeddings from within AlloyDB . In AlloyDB Studio, run the following statement to grant execute rights on the embedding function to the user postgres :

GRANT EXECUTE ON FUNCTION embedding TO postgres;

Grant Vertex AI User ROLE to the AlloyDB service account

We will be using the text embedding models from Vertex AI to generate embeddings for which Vertex AI User ROLE to the AlloyDB service account.

In the Google Cloud Console, click the Cloud Shell terminal [ f2ae85166a716c5c.png ] icon and run the following command:

PROJECT_ID=$(gcloud config get-value project)

gcloud projects add-iam-policy-binding $PROJECT_ID \
  --member="serviceAccount:service-$(gcloud projects describe $PROJECT_ID --format="value(projectNumber)")@gcp-sa-alloydb.iam.gserviceaccount.com" \
--role="roles/aiplatform.user"

6. Build Context

To create an embedding, we'll need to have a context ie all of the information we want to include in a single field. We'll do this by creating a product description that we'll store in the pdt_desc column in the apparels table.

In our case, we'll use all the information about each product, but when you do this with your own data, feel free to engineer the data in any way that you find meaningful for your business.

In the AlloyDB Studio Editor tab, run the following command that updates the pdt_desc field with context data:

UPDATE
 apparels
SET
 pdt_desc = CONCAT('This product category is: ', category, ' and sub_category is: ', sub_category, '. The description of the product is as follows: ', content, '. The product image is stored at: ', uri)
WHERE
 id IS NOT NULL;

This DML creates a simple context summary using the information from all the fields available in the table and other dependencies (if any in your use case). For a more precise assortment of information and context creation, feel free to engineer the data in any way that you find meaningful for your business.

7. Create embeddings for the context

It's much easier for computers to process numbers than to process text. An embedding system converts text into a series of floating point numbers that should represent the text, no matter how it's worded, what language it uses, etc.

Consider describing a seaside location. It might be called "on the water ", " beachfront ", " walk from your room to the ocean ", " sur la mer ", " на берегу океана " etc. These terms all look different, but their semantic meaning or in machine learning terminology, their embeddings should be very close to each other.

Now that the data and context are ready, we will run the SQL to add the embeddings of the product description (pdt_desc ) column to the table in the field embedding . There are a variety of embedding models you can use. We're using text-embedding-005 from Vertex AI.

  1. In AlloyDB Studio, run the following command to generate embeddings, and update the pdt_desc column with embeddings for the data it stores:
UPDATE
 apparels
SET
 embedding
= embedding( 'text-embedding-005',
   pdt_desc
)
WHERE
 TRUE
;
  1. Verify that embeddings are generated by running the following command:
SELECT
 id
,
 category
,
 sub_category
,
 content
,
 embedding
FROM
 
Apparels
LIMIT
5;

The following is an example embeddings vector, that looks like an array of floats, for the sample text in the query as follows:

c69c08d085389f74.png

8. Perform Vector search

Now that the table, data, and embeddings are all ready, let's perform the real time vector search for the user search text.

Assume that the user's search text is " pink color, casual, pure cotton tops for women "

To find matches for this query, run the following SQL query:

SELECT
id
,
category
,
sub_category
,
content
,
pdt_desc AS description
FROM
apparels
ORDER BY
embedding
<=> embedding('text-embedding-005',
 
'pink color, casual, pure cotton tops for women')::vector
LIMIT
5;

Let's look at this query in detail:

In this query,

  1. The user's search text is: " I want womens tops, pink casual only pure cotton. "
  2. We are converting this search text to embeddings using the embedding() method along with the model: text-embedding-005 . This step should look familiar after the last step, where we applied the embedding function to all of the items in the table.
  3. " <=> " represents the use of the COSINE SIMILARITY distance method. You can find all the similarity measures available in the documentation of pgvector .
  4. We are converting the embedding method's result to vector data type to make it compatible with the vectors stored in the database.
  5. LIMIT 5 represents that we want to extract 5 nearest neighbors for the search text.

The following shows example response of this SQL query:

4193a68737400535.png

As you can observe in your results, the matches are pretty close to the search text. Try changing the color to see how the results change.

AlloyDB ScaNN index for query performance

Now let's say we want to increase the performance (query time), efficiency, and recall of this Vector Search result using the ScaNN index.

If you want to use ScaNN index, try the following steps:

  1. Since we already have the cluster, instance, context and embeddings created, we just have to install the ScaNN extension using the following statement:
CREATE EXTENSION IF NOT EXISTS alloydb_scann;
  1. Create the ScaNN index:
CREATE INDEX apparel_index ON apparels
USING scann
(embedding cosine)
WITH
(num_leaves=54);

In the above DDL:

  • apparel_index is the name of the index.
  • apparels is the table name.
  • scann is the index method.
  • embedding is the column in the table you want to index.
  • cosine is the distance method you want to use with the index.
  • 54 is the number of partitions to apply to this index. Set to any value between 1 to 1048576. For more information about how to decide this value, see Tune a ScaNN index .

As per the recommendation in the ScaNN repo , we have used a SQUARE ROOT of the number of data points. When partitioning, num_leaves should be roughly the square root of the number of datapoints.

  1. Check if the index is created using the query:
SELECT * FROM pg_stat_ann_indexes;
  1. Perform Vector Search using the same query we used without the index:
select * from apparels
   ORDER BY embedding
<=> CAST(embedding('textembedding-gecko', 'white tops for girls without any print') as vector(768))
   LIMIT
20

The above query is the same one that we used in the lab in step 8. However, now we have the field indexed using the ScaNN index.

  1. Test with a simple search query with and without the index. For testing without index, you must drop the index:

white tops for girls without any print

The above search text in the Vector Search query on the INDEXED embeddings data results in quality search results and efficiency. The efficiency is vastly improved (in terms of time for execution: 10.37ms without ScaNN and 0.87ms with ScaNN) with the index. For more information on this topic, please refer to this blog .

9. Match Validation with the LLM

Before moving on and creating a service to return the best matches to an application, let's use a generative AI model to validate if these potential responses are truly relevant and safe to share with the user.

Ensuring the instance is set up for Gemini

  1. Verify that the google_ml_integration is already enabled for your Cluster and Instance. In AlloyDB Studio, run the following command:
show google_ml_integration.enable_model_support;

If the value is shown as "on" , you can skip the next 2 steps and go directly to setting up

the AlloyDB and Vertex AI Model integration.

  1. Go to your AlloyDB cluster's primary instance, and click EDIT PRIMARY INSTANCE .

456ffdf292d3c0e0.png

  1. In Advanced configuration options , expand the New database flag section, and ensure that the google_ml_integration.enable_model_support flag is set to " on " as follows:

6a59351fcd2a9d35.png 3. If it is not set to " on ", set it to " on " and then click UPDATE INSTANCE .

This step will take a few minutes.

AlloyDB and Vertex AI Model integration

Now you can connect to AlloyDB Studio and run the following DML statement to set up Gemini model access from AlloyDB, using your project ID where indicated. You may be warned of a syntax error before running the command, but it should run fine.

  1. In Google Cloud Console, go to AlloyDB . Select the primary cluster, and then click AlloyDB Studio in the left-hand navigation.
  2. We will use the gemini-1.5-pro:generateContent that is available by default with the google_ml_integration extension. cdb5af753a625777.png
  3. You can check on the models configured for access via the following command in AlloyDB Studio:
select model_id,model_type from google_ml.model_info_view;        
  1. Grant permission for database users to execute the ml_predict_row function to run predictions using the Google Vertex AI models by running the following command:
GRANT EXECUTE ON FUNCTION ml_predict_row to postgres;

Evaluating the responses

While we'll end up using one large query for the next section where we actually take the application to Cloud Run, to ensure the responses from the query are reasonable, the query can be difficult to understand.

We'll look at the individual sections that go on to build the larger query we finally use.

  1. First we'll send a request to the database to get the 5 closest matches to a user query. We're hardcoding the query to keep this simple, but don't worry, we'll interpolate it into the query later.

We're including the product description from the apparels table and adding two new fields–one that combines the description with the index and another with the original request. This data is being saved in a table called xyz , which is a temporary table name.

CREATE TABLE
 xyz AS
SELECT
 id || ' - ' || pdt_desc AS literature,
 pdt_desc AS content,
 'I want womens tops, pink casual only pure cotton.' AS  user_text
FROM
 apparels
ORDER BY
 embedding <=> embedding('text-embedding-005',
   'I want womens tops, pink casual only pure cotton.')::vector
LIMIT
 5;

The output of this query will be 5 most similar rows pertaining to the users query.

new table xyz will contain 5 rows where each row will have the following columns:

  • literature
  • content
  • user_text
  1. To determine how valid responses are, we'll use a complicated query where we explain how to evaluate the responses. It uses the user_text and content in the xyz table as part of the query.
"Read this user search text: ', user_text, 
' Compare it against the product inventory data set: ', content,
' Return a response with 3 values: 1) MATCH: if the 2 contexts are at least 85% matching or not: YES or NO 2) PERCENTAGE: percentage of match, make sure that this percentage is accurate 3) DIFFERENCE: A clear short easy description of the difference between the 2 products. Remember if the user search text says that some attribute should not be there, and the record has it, it should be a NO match."

  1. Using that query, we'll then review the "goodness" of responses in the xyz table. When we say goodness, we mean how closely accurate are the responses generated to what we expect them to be.
CREATE TABLE
  x AS
SELECT
  json_array_elements( google_ml.predict_row( model_id => 'gemini-1.5',
      request_body => CONCAT('{
 "contents": [
        { "role": "user",
          "parts":
             [ { "text": "Read this user search text: ', user_text, ' Compare it against the product inventory data set: ', content, ' Return a response with 3 values: 1) MATCH: if the 2 contexts are at least 85% matching or not: YES or NO 2) PERCENTAGE: percentage of match, make sure that this percentage is accurate 3) DIFFERENCE: A clear short easy description of the difference between the 2 products. Remember if the user search text says that some attribute should not be there, and the record has it, it should be a NO match."
             } ]
         }
] }'
)::json))-> 'candidates' -> 0 -> 'content' -> 'parts' -> 0 -> 'text'
AS LLM_RESPONSE
FROM
    xyz;
  1. The predict_row returns its result in JSON format. The code " -> 'candidates' -> 0 -> 'content' -> 'parts' -> 0 -> 'text'" is used to extract the actual text from that JSON. To see the actual JSON that is returned, you can remove this code.
  2. Finally, to get the LLM field, you just need to extract it from the x table:
SELECT 
LLM_RESPONSE
FROM
        x
;
  1. This can be combined into a single query as follows:

Warning : If you have run the above queries to check on the intermediate results,

ensure that you delete/remove the xyz and x tables from the AlloyDB database before running this query,

SELECT
 LLM_RESPONSE
FROM (
 SELECT
 json_array_elements( google_ml.predict_row( model_id => 'gemini-1.5',
     request_body => CONCAT('{
     "contents": [
       { "role": "user",
         "parts":
            [ { "text": "Read this user search text: ', user_text, ' Compare it against the product inventory data set: ', content, ' Return a response with 3 values: 1) MATCH: if the 2 contexts are at least 85% matching or not: YES or NO 2) PERCENTAGE: percentage of match, make sure that this percentage is accurate 3) DIFFERENCE: A clear short easy description of the difference between the 2 products. Remember if the user search text says that some attribute should not be there, and the record has it, it should be a NO match."
            } ]
        }
] }'
)::json))-> 'candidates' -> 0 -> 'content' -> 'parts' -> 0 -> 'text'
AS LLM_RESPONSE
   FROM (
         SELECT
           id || ' - ' || pdt_desc AS literature,
           pdt_desc AS content,
         'I want womens tops, pink casual only pure cotton.' user_text
         FROM
           apparels
         ORDER BY
             embedding <=> embedding('text-embedding-005',
             'I want womens tops, pink casual only pure cotton.')::vector
         LIMIT
           5 ) AS xyz ) AS X;

The larger query is a combination of all the queries we run in the earlier steps. The results tell whether or not there's a match, what percentage the match is, and some explanation of the rating.

Notice that the Gemini model has streaming on by default, so the actual response is spread across multiple lines: 14e74d71293b7b9.png

10. Take the application to web

We will now host this application so that it can be accessed from the internet.

Create the Cloud Run Function

  1. In the Google Cloud Console, go to Cloud Run Functions using the following link:

https://console.cloud.google.com/run/create?deploymentType=function

  1. In Configure, set the Function Name as " retail-engine " and select the region as " us-central1 ".
  2. In Endpoint URL, select runtime as Java 17 .
  3. In Authentication, select Allow unauthenticated invocations .
  4. Expand Container(s), Volumes, Networking, Security , and click the Networking tab.
  5. Select Connect to a VPC for outbound traffic , and then click Use Serverless VPC Access connectors .
  6. In Network, click Add New VPC Connector . Enable the Serverless VPC Access API , if not already enabled.
  7. In the Create connector, set name to alloydb-test-conn .
  8. Set the region to us-central .
  9. Leave the Network value as default and set Subnet as Custom IP Range with the IP range of 10.8.0.0 or something similar that is available.
  10. Expand Show scaling settings, and set Minimum instances to 2 and the Maximum instances to 3.
  11. Select the Instance type as f1-micro . The following shows the Create connector options:

bed4b2af6795a8ba.png

  1. Click Create to create the connector.
  2. In Traffic routing, select Route all traffic to the VPC .
  3. Click Create to create the function.

Deploy the application

After the function is created, update the source and redeploy the application.

  1. In Cloud Run , click the Services tab, and click the retail-engine function.
  2. Click the Source tab. Leave the default Function entry point set to " gcfv2.HelloHttpFunction ".
  3. Replace the contents of the HelloHttpFunction.java file with the contents from this Java file .
  4. Update the AlloyDbJdbcConnector details in the file as per the details of your AlloyDB instance and cluster. Replace the $PROJECT_ID with the project ID of your AlloyDB cluster and instance.

a89dc5af3580fbcf.png

  1. Replace the contents of the pom.xml file with the contents of this XML file.
  2. Click Save and redeploy to deploy the function.

11. Test the retail-engine application

Once the updated Cloud Function is deployed, you should see the endpoint in the following format:

https://retail-engine-PROJECT_NUMBER.us-central1.run.app

You can test it from the Cloud Shell Terminal by running following command:

gcloud functions call retail-engine --region=us-central1 --gen2 --data '{"search": "I want some kids clothes themed on Disney"}'

Alternatively, you can test the Cloud Run Function as follows:

PROJECT_ID=$(gcloud config get-value project)

curl
-X POST https://retail-engine-$PROJECT_NUMBER.us-central1.run.app \
 
-H 'Content-Type: application/json' \
 
-d '{"search":"I want some kids clothes themed on Disney"}' \
 
| jq .

And the result:

88bc1ddfb5644a28.png

Now that we have run similarity vector search using the embeddings model on AlloyDB data, we can move towards creating the application that uses these embeddings along with your image, and prompts to generate styling suggestions

12. Understand outfit recommendation flow

The outfit recommendation app is a sprint boot application that is configured to work with the embeddings we created in the AlloyDB retail-engine application along with Gemini and Imagen to generate visual outfit styling options. It also lets you add custom prompts and improvise the recommendation.

Think of it this way, you upload an image of a hot pink top in your wardrobe to this app. When you click Show, based on the prompt set in the application code and the embeddings in the AlloyDB database, the application generates multiple options that match the original image. Now you wonder how the suggested options might look with a blue necklace, so you add a prompt on those lines, and click Style. The final image is generated that combines the powerful combination of the original image and recommendations to create a matching outfit.

To start creating the outfit recommendation app, follow these steps:

  1. In Cloud Run , open the retail-engine app, and note the URL of your application. This is the embeddings repository that we will use to generate similar suggestions.
  2. In your IDE, clone the https://github.com/AbiramiSukumaran/outfit-recommender/ repository. For this exercise, the steps shown are performed in Visual Studio Code IDE.
git clone https://github.com/AbiramiSukumaran/outfit-recommender/

The following are some of the important files in the directory of the app:

  • src/main : Source directory where application files and HTML reside:
  • HelloWorldApplication.java : Main entry point for the spring boot application.
  • HelloWorldController.java : Spring Boot REST controller that handles HTTP requests related to an outfit recommender application. This file handles GET and POST requests, processes user prompts, analyzes images, interacts with AlloyDB embeddings, and returns final response to the UI. This controller calls the GenerateImageSample class.
  • GenerateImageSample.java : Contains the image generation class that connects to Vertex AI, formats user prompt, makes API calls to Imagen model, returns predicted image to the controller class.
  • Resources : This directory contains images and HTML files required to generate the application UI.
  • Pom.xml : Defines the project dependencies and configurations.
  1. In Visual Studio code, open the HelloWorldController.java and update instances of the project ID and location as per where your AlloyDB instance is created.

9fff8f5cbb62567.png

  1. Update the endpoint to the retail-engine app URL that you hosted earlier.

ae6227e88eec5485.png

  1. Open the GenerateImageSample.java , and update the project ID and the location as per where your AlloyDB instance is created.

db1f81a6f51d80de.png

  1. Save all files.

We will now deploy this application to Cloud Run serverless runtime.

13. Take the application to the web

Now that we have added the relevant project, location, and the retail-engine app details to the outfit recommender spring boot application, we can deploy the application to Cloud Run.

We will use the gcloud run deploy command in the Visual Code Studio terminal to deploy the application. For Visual Studio Code, you can install the Google Cloud Code extension to start using the gcloud CLI.

To deploy the application, follow these steps:

  1. In your IDE, open the cloned directory and start the terminal. For Visual Code Studio, click Terminal > New Terminal .
  2. Follow the instructions in this document to install the gcloud CLI.
  3. If you are using Visual Code Studio, click Extensions , search for Google Cloud Code and install the extension.
  4. In your IDE terminal, authenticate your Google account by running the following command:
gcloud auth application-default login
  1. Set your project ID to the same project where your AlloyDB instance is located.
gcloud config set project PROJECT_ID
  1. Start the deploy process.
gcloud run deploy
  1. In Source code location , press Enter to select the cloned GitHub directory.
  2. In Service name , enter a name for the service, such as outfit-recommender, and press Enter.
  3. In Please specify a region , enter the location where your AlloyDB instance and retail-engine application is hosted, such as 32 for us-central1, and press Enter.

12c0de4248660d4d.png

  1. In Allow unauthenticated invocations to [..] , enter Y , and press Enter.

The following image shows the deployment progress of your application:

1babbb82faa31fce.png

14. Test the outfit recommender application

After the application is successfully deployed to Cloud Run, you can see the service in the Google Cloud Console as follows:

  1. In Google Cloud Console, go to Cloud Run .
  2. In Services, click the outfit recommender service you deployed. You should see both the retail-engine and the outfit-recommender service as follows:

24dd0aebe224059e.png

  1. Click the application URL to open the recommender app UI.

cdc9c1625b1648d2.png

    The following is a sample URL that you will use:

https://outfit-recommender-22905290964.us-central1.run.app/style

The deployed application can be seen as follows:

76245d1a6152d313.png

Using the application

To start using the application, follow these steps:

  1. Click Upload and upload a picture of a clothing item.
  2. After the image is uploaded, click Style . The application uses the image as a prompt and generates bottom options based on the prompt from the retail-engine app that includes embeddings for the retail dataset.

The app generates image suggestions along with a prompt based on the image with styling recommendations. For example, A white semi-sheer button up blouse with pink floral patterns on it, with balloon sleeves.

  1. You can pass additional prompts to this auto-generated style recommendation. For example, STYLE RECOMMENDATION: Cute brown skirt on a curly updo. Make it photo realistic. Accessorize with cherry earrings and burgundy plastic case sling bag.
  2. Click Show to see the final styling.

38d6d08e9a0a44c0.png

15. Очистить

To avoid incurring charges to your Google Cloud account for the resources used in this post, follow these steps:

  1. In the Google Cloud console, go to the Manage resources page.
  2. In the project list, select the project that you want to delete, and then click Delete .
  3. In the dialog, type the project ID, and then click Shut down to delete the project.

16. Поздравления

Поздравляем! You have successfully performed a similarity search using AlloyDB, pgvector and Vector search coupled with using the search result with the powerful Imagen model to generate styling recommendations.