
1. 總覽
Spanner 是全代管、可水平擴充的全球分散式資料庫服務,非常適合關聯式和非關聯式作業工作負載。除了核心功能,Spanner 還提供強大的進階功能,可協助您建構智慧型資料驅動應用程式。
本程式碼研究室會以網路銀行應用程式為基礎,深入探討如何運用 Spanner 的進階整合功能,提升資料處理和數據分析能力。
我們將著重於三項重要的進階功能:
- 整合 Vertex AI:瞭解如何將 Spanner 與 Google Cloud 的 AI 平台 Vertex AI 完美整合。您將瞭解如何直接從 Spanner SQL 查詢中叫用 Vertex AI 模型,以進行強大的資料庫內轉換和預測,讓銀行應用程式自動分類交易,用於預算追蹤和異常偵測等用途。
- 全文搜尋:瞭解如何在 Spanner 中實作全文搜尋功能。您將探索如何為文字資料建立索引,以及編寫有效率的查詢,以便在營運資料中執行以關鍵字為準的搜尋,進而發掘實用資料,例如在銀行系統中依電子郵件地址有效率地尋找客戶。
- BigQuery 聯合查詢:瞭解如何運用 Spanner 的聯合查詢功能,直接查詢 BigQuery 中的資料。這樣一來,您就能將 Spanner 的即時作業資料與 BigQuery 的分析資料集結合,取得全面的洞察資料和報表,不必複製資料或執行複雜的 ETL 程序,進而為銀行應用程式中的各種用途提供支援,例如結合即時客戶資料與 BigQuery 中更廣泛的歷史趨勢,推出目標式行銷廣告活動。
課程內容
- 如何設定 Spanner 執行個體。
- 如何建立資料庫和資料表。
- 如何將資料載入 Spanner 資料庫資料表。
- 如何從 Spanner 呼叫 Vertex AI 模型。
- 如何使用模糊搜尋和全文搜尋功能查詢 Spanner 資料庫。
- 如何從 BigQuery 對 Spanner 執行聯合查詢。
- 如何刪除 Spanner 執行個體。
軟硬體需求
2. 設定和需求條件
建立專案
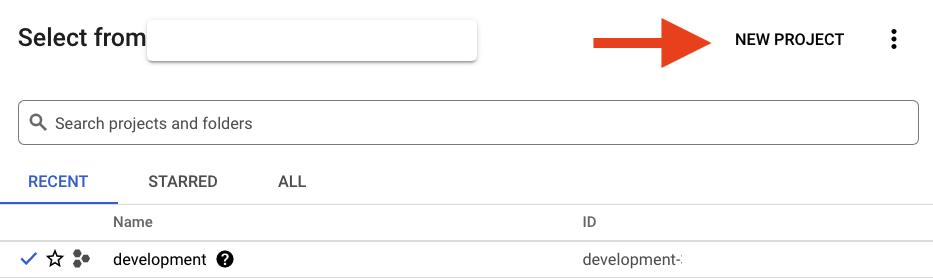
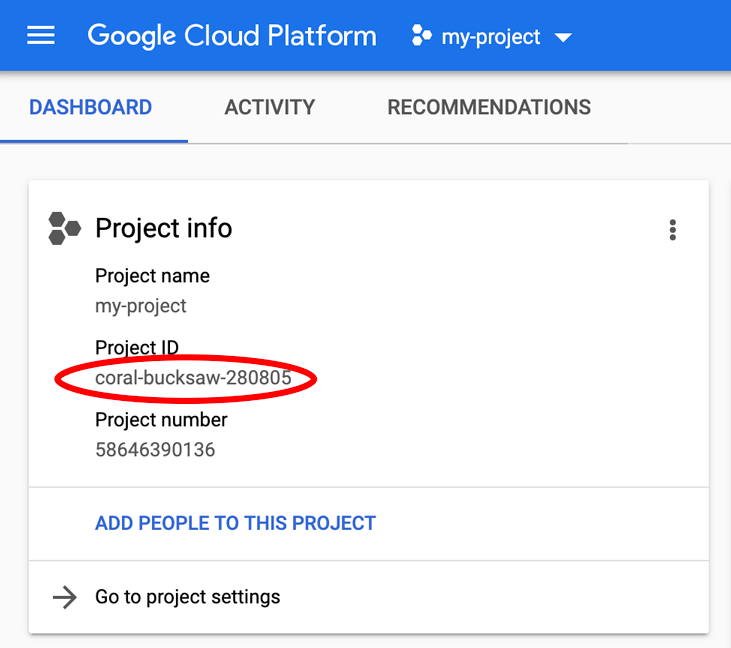
如果您已有啟用計費功能的 Google Cloud 雲端專案,請點選控制台左上方的專案選單下拉式選單:

選取專案後,請跳至「啟用必要的 API」。
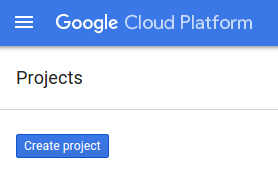
如果您沒有 Google 帳戶 (Gmail 或 Google 應用程式),請先建立帳戶。登入 Google Cloud Platform 主控台 (console.cloud.google.com),然後建立新專案。
在隨即顯示的對話方塊中,按一下「NEW PROJECT」(新專案) 按鈕,即可建立新專案:
如果您還沒有專案,應該會看到如下對話方塊,請建立第一個專案:
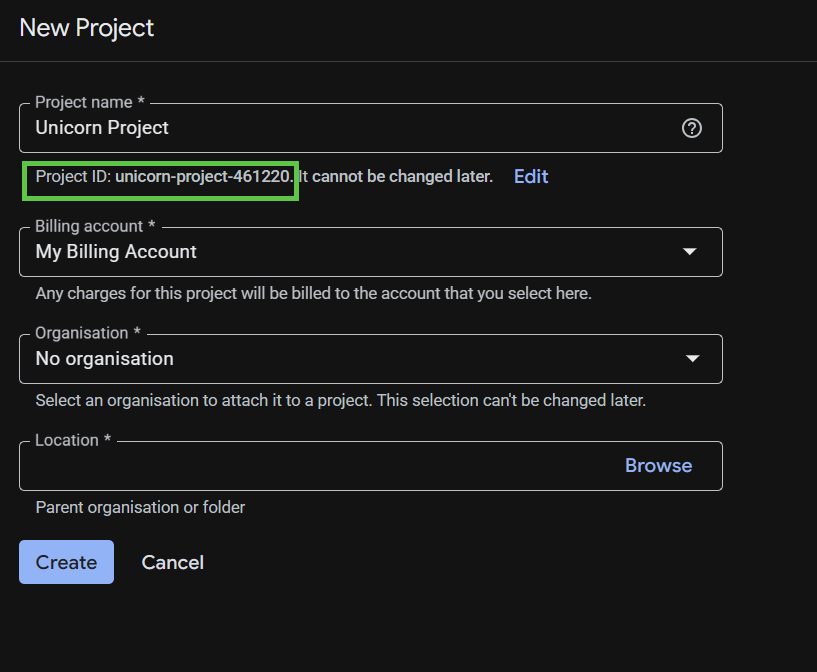
在隨後的專案建立對話方塊中,輸入新專案的詳細資料。
記住專案 ID,所有 Google Cloud 專案的專案 ID 都是不重複的名稱。本程式碼研究室稍後會將其稱為 PROJECT_ID。
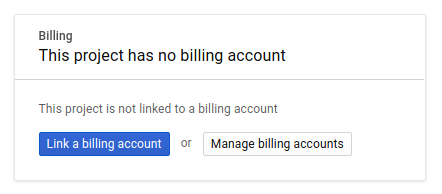
接著,如果尚未啟用,您需要在開發人員控制台中啟用帳單,才能使用 Google Cloud 資源,並啟用 Spanner API、Vertex AI API、BigQuery API 和 BigQuery Connection API。
如要瞭解 Spanner 的計費方式,請參閱這篇文章。其他資源的相關費用會記錄在各自的定價頁面。
Google Cloud Platform 新使用者享有價值 $300 美元的免費試用期。
設定 Google Cloud Shell
在本程式碼研究室中,我們將使用 Google Cloud Shell,這是可在雲端執行的指令列環境。
這部以 Debian 為基礎的虛擬機器,搭載各種您需要的開發工具,並提供永久的 5 GB 主目錄,而且可在 Google Cloud 運作,大幅提升網路效能並強化驗證功能。也就是說,您只需要瀏覽器即可完成本程式碼研究室。
如要從 Cloud 控制台啟用 Cloud Shell,只要按一下「啟用 Cloud Shell」圖示 ![]() 即可 (佈建並連線至環境的作業需要一些時間才能完成)。
即可 (佈建並連線至環境的作業需要一些時間才能完成)。

連至 Cloud Shell 後,您應該會看到驗證已完成,專案也已設為獲派的專案 ID PROJECT_ID。
gcloud auth list
預期輸出內容:
Credentialed Accounts

ACTIVE: *
ACCOUNT: <myaccount>@<mydomain>.com
gcloud config list project
預期輸出內容:
[core]
project = <PROJECT_ID>
如果專案未設定,請發出下列指令:
gcloud config set project <PROJECT_ID>
在尋找「PROJECT_ID」嗎?請檢查您在設定步驟中使用的 ID,或在 Cloud 控制台資訊主頁中查詢:
Cloud Shell 也會預設設定部分環境變數,這些變數在您執行後續指令時可能很有用。
echo $GOOGLE_CLOUD_PROJECT
預期輸出內容:
<PROJECT_ID>
啟用必用的 API。
為專案啟用 Spanner、Vertex AI 和 BigQuery API:
gcloud services enable spanner.googleapis.com
gcloud services enable aiplatform.googleapis.com
gcloud services enable bigquery.googleapis.com
gcloud services enable bigqueryconnection.googleapis.com
摘要
在這個步驟中,您已設定專案 (如果沒有的話)、啟動 Cloud Shell,並啟用必要的 API。
下一步
接著,您將設定 Spanner 執行個體。
3. 設定 Spanner 執行個體
建立 Spanner 執行個體
在這個步驟中,您將為本程式碼研究室設定 Spanner 執行個體。如要這麼做,請開啟 Cloud Shell 並執行下列指令:
export SPANNER_INSTANCE=cloudspanner-onlinebanking
gcloud spanner instances create $SPANNER_INSTANCE \
  --config=regional-us-central1 \
  --description="Spanner Online Banking" \
  --nodes=1 \
  --edition=ENTERPRISE \
  --default-backup-schedule-type=NONE
預期輸出內容:
Creating instance...done.
摘要
您已在這個步驟中建立 Spanner 執行個體。
下一步
接下來,您要準備初始應用程式,並建立資料庫和結構定義。
4. 建立資料庫和結構定義
準備初始應用程式
在這個步驟中,您將透過程式碼建立資料庫和結構定義。
首先,請使用 Maven 建立名為 onlinebanking 的 Java 應用程式:
mvn -B archetype:generate \
  -DarchetypeGroupId=org.apache.maven.archetypes \
  -DgroupId=com.google.codelabs \
  -DartifactId=onlinebanking \
  -DjavaCompilerVersion=1.8 \
  -DjunitVersion=4.13.2 \
  -DarchetypeVersion=1.5
簽出並複製要新增至資料庫的資料檔案 (如需程式碼存放區,請參閱這裡):
git clone https://github.com/GoogleCloudPlatform/cloud-spanner-samples.git
cp -r ./cloud-spanner-samples/banking/data ./onlinebanking
前往應用程式資料夾:
cd onlinebanking
開啟 Maven pom.xml 檔案。新增依附元件管理區段,使用 Maven BOM 管理 Google Cloud 程式庫的版本:
<dependencyManagement>
  <dependencies>
    <dependency>
      <groupId>com.google.cloud</groupId>
      <artifactId>libraries-bom</artifactId>
      <version>26.56.0</version>
      <type>pom</type>
      <scope>import</scope>
    </dependency>
  </dependencies>
</dependencyManagement>
編輯器和檔案應如下所示: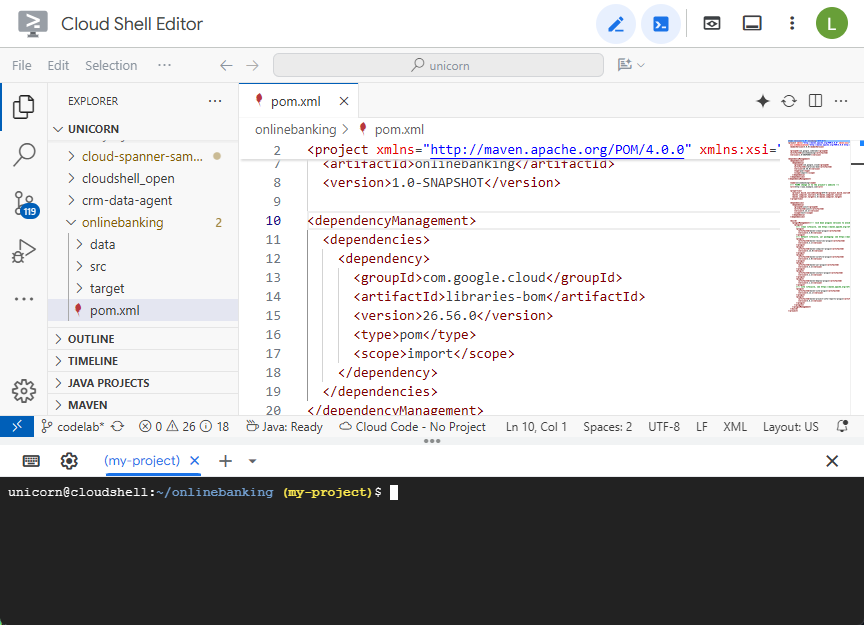
確認 dependencies 區段包含應用程式將使用的程式庫:
<dependencies>
  <dependency>
    <groupId>junit</groupId>
    <artifactId>junit</artifactId>
    <version>4.13.2</version>
    <scope>test</scope>
  </dependency>
  <dependency>
    <groupId>org.slf4j</groupId>
    <artifactId>slf4j-nop</artifactId>
    <version>2.0.9</version>
  </dependency>
  <dependency>
    <groupId>com.opencsv</groupId>
    <artifactId>opencsv</artifactId>
    <version>5.10</version>
  </dependency>
  <dependency>
    <groupId>com.google.cloud</groupId>
    <artifactId>google-cloud-spanner</artifactId>
  </dependency>
  <dependency>
    <groupId>com.google.cloud</groupId>
    <artifactId>google-cloud-bigquery</artifactId>
  </dependency>
  <dependency>
    <groupId>com.google.cloud</groupId>
    <artifactId>google-cloud-bigqueryconnection</artifactId>
  </dependency>
</dependencies>
最後,請替換建構外掛程式,讓應用程式封裝成可執行的 JAR:
<build>
  <plugins>
    <plugin>
      <artifactId>maven-resources-plugin</artifactId>
      <version>3.3.1</version>
      <executions>
        <execution>
          <id>copy-resources</id>
          <phase>process-resources</phase>
          <goals>
            <goal>copy-resources</goal>
          </goals>
          <configuration>
            <outputDirectory>${project.build.directory}/${project.artifactId}-resources</outputDirectory>
            <resources>
              <resource>
                <directory>resources</directory>
                <filtering>true</filtering>
              </resource>
            </resources>
          </configuration>
        </execution>
      </executions>
    </plugin>
    <plugin>
      <groupId>org.apache.maven.plugins</groupId>
      <artifactId>maven-dependency-plugin</artifactId>
      <version>3.8.1</version>
      <executions>
        <execution>
          <id>copy-dependencies</id>
          <phase>prepare-package</phase>
          <goals>
            <goal>copy-dependencies</goal>
          </goals>
          <configuration>
            <outputDirectory>${project.build.directory}/${project.artifactId}-resources/lib</outputDirectory>
            <overWriteReleases>false</overWriteReleases>
            <overWriteSnapshots>false</overWriteSnapshots>
            <overWriteIfNewer>true</overWriteIfNewer>
          </configuration>
        </execution>
      </executions>
    </plugin>
    <plugin>
      <groupId>org.apache.maven.plugins</groupId>
      <artifactId>maven-jar-plugin</artifactId>
      <version>3.4.2</version>
      <configuration>
        <finalName>${project.artifactId}</finalName>
        <outputDirectory>${project.build.directory}</outputDirectory>
        <archive>
          <index>false</index>
          <manifest>
            <mainClass>com.google.codelabs.App</mainClass>
            <addClasspath>true</addClasspath>
            <classpathPrefix>${project.artifactId}-resources/lib/</classpathPrefix>
          </manifest>
        </archive>
      </configuration>
    </plugin>
    <plugin>
      <groupId>org.apache.maven.plugins</groupId>
      <artifactId>maven-failsafe-plugin</artifactId>
      <version>3.2.5</version>
      <executions>
        <execution>
          <goals>
            <goal>integration-test</goal>
          </goals>
        </execution>
      </executions>
    </plugin>
    <plugin>
      <groupId>org.apache.maven.plugins</groupId>
      <artifactId>maven-surefire-plugin</artifactId>
      <version>3.2.5</version>
      <configuration>
        <useSystemClassLoader>false</useSystemClassLoader>
      </configuration>
    </plugin>
  </plugins>
</build>
選取 Cloud Shell 編輯器「檔案」選單中的「儲存」,或按下 Ctrl+S,即可儲存對 pom.xml 檔案所做的變更。
依附元件準備就緒後,您將在應用程式中新增程式碼,建立結構定義、一些索引 (包括搜尋) 和連線至遠端端點的 AI 模型。您將在本程式碼研究室中,以這些構件為基礎,為這個類別新增更多方法。
開啟 onlinebanking/src/main/java/com/google/codelabs 下方的 App.java,然後將內容替換為下列程式碼:
package com.google.codelabs;
import java.util.Arrays;
import java.util.List;
import java.util.concurrent.ExecutionException;
import com.google.api.gax.longrunning.OperationFuture;
import com.google.cloud.bigquery.BigQuery;
import com.google.cloud.bigquery.BigQueryOptions;
import com.google.cloud.spanner.Database;
import com.google.cloud.spanner.DatabaseAdminClient;
import com.google.cloud.spanner.DatabaseClient;
import com.google.cloud.spanner.DatabaseId;
import com.google.cloud.spanner.Spanner;
import com.google.cloud.spanner.SpannerException;
import com.google.cloud.spanner.SpannerExceptionFactory;
import com.google.cloud.spanner.SpannerOptions;
import com.google.spanner.admin.database.v1.CreateDatabaseMetadata;
public class App {
// Create the Spanner database and schema
public static void create(DatabaseAdminClient dbAdminClient, DatabaseId db,
String location, String model) {
System.out.println("Creating Spanner database...");
List<String> statements = Arrays.asList(
"CREATE TABLE Customers (\n"
+ " CustomerId INT64 NOT NULL,\n"
+ " FirstName STRING(256) NOT NULL,\n"
+ " LastName STRING(256) NOT NULL,\n"
+ " FullName STRING(512) AS (FirstName || ' ' || LastName) STORED,\n"
+ " Email STRING(512) NOT NULL,\n"
+ " EmailTokens TOKENLIST AS\n"
+ " (TOKENIZE_SUBSTRING(Email, ngram_size_min=>2, ngram_size_max=>3,\n"
+ " relative_search_types=>[\"all\"])) HIDDEN,\n"
+ " Address STRING(MAX)\n"
+ ") PRIMARY KEY (CustomerId)",
"CREATE INDEX CustomersByEmail\n"
+ "ON Customers(Email)",
"CREATE SEARCH INDEX CustomersFuzzyEmail\n"
+ "ON Customers(EmailTokens)",
"CREATE TABLE Accounts (\n"
+ " AccountId INT64 NOT NULL,\n"
+ " CustomerId INT64 NOT NULL,\n"
+ " AccountType STRING(256) NOT NULL,\n"
+ " Balance NUMERIC NOT NULL,\n"
+ " OpenDate TIMESTAMP NOT NULL\n"
+ ") PRIMARY KEY (AccountId)",
"CREATE INDEX AccountsByCustomer\n"
+ "ON Accounts (CustomerId)",
"CREATE TABLE TransactionLedger (\n"
+ " TransactionId INT64 NOT NULL,\n"
+ " AccountId INT64 NOT NULL,\n"
+ " TransactionType STRING(256) NOT NULL,\n"
+ " Amount NUMERIC NOT NULL,\n"
+ " Timestamp TIMESTAMP NOT NULL"
+ " OPTIONS(allow_commit_timestamp=true),\n"
+ " Category STRING(256),\n"
+ " Description STRING(MAX),\n"
+ " CategoryTokens TOKENLIST AS (TOKENIZE_FULLTEXT(Category)) HIDDEN,\n"
+ " DescriptionTokens TOKENLIST AS (TOKENIZE_FULLTEXT(Description)) HIDDEN\n"
+ ") PRIMARY KEY (AccountId, TransactionId),\n"
+ "INTERLEAVE IN PARENT Accounts ON DELETE CASCADE",
"CREATE INDEX TransactionLedgerByAccountType\n"
+ "ON TransactionLedger(AccountId, TransactionType)",
"CREATE INDEX TransactionLedgerByCategory\n"
+ "ON TransactionLedger(AccountId, Category)",
"CREATE SEARCH INDEX TransactionLedgerTextSearch\n"
+ "ON TransactionLedger(CategoryTokens, DescriptionTokens)",
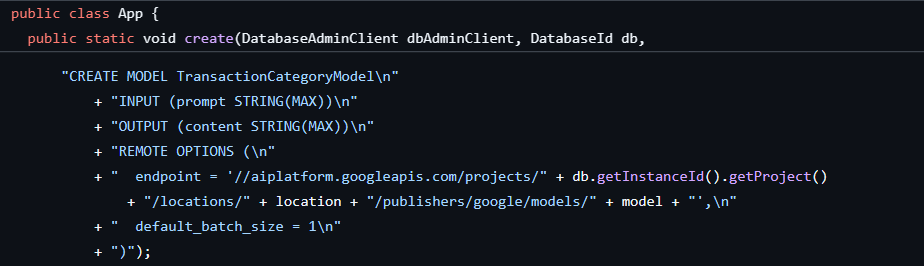
"CREATE MODEL TransactionCategoryModel\n"
+ "INPUT (prompt STRING(MAX))\n"
+ "OUTPUT (content STRING(MAX))\n"
+ "REMOTE OPTIONS (\n"
+ " endpoint = '//aiplatform.googleapis.com/projects/" + db.getInstanceId().getProject()
+ "/locations/" + location + "/publishers/google/models/" + model + "',\n"
+ " default_batch_size = 1\n"
+ ")");
OperationFuture<Database, CreateDatabaseMetadata> op = dbAdminClient.createDatabase(
db.getInstanceId().getInstance(),
db.getDatabase(),
statements);
try {
Database dbOperation = op.get();
System.out.println("Created Spanner database [" + dbOperation.getId() + "]");
} catch (ExecutionException e) {
throw (SpannerException) e.getCause();
} catch (InterruptedException e) {
throw SpannerExceptionFactory.propagateInterrupt(e);
}
}
static void printUsageAndExit() {
System.out.println("Online Online Banking Application 1.0.0");
System.out.println("Usage:");
System.out.println(" java -jar target/onlinebanking.jar <command> [command_option(s)]");
System.out.println("");
System.out.println("Examples:");
System.out.println(" java -jar target/onlinebanking.jar create");
System.out.println(" - Create a sample Spanner database and schema in your "
+ "project.\n");
System.exit(1);
}
public static void main(String[] args) {
if (args.length < 1) {
printUsageAndExit();
}
String instanceId = System.getProperty("SPANNER_INSTANCE", System.getenv("SPANNER_INSTANCE"));
String databaseId = System.getProperty("SPANNER_DATABASE", System.getenv("SPANNER_DATABASE"));
String location = System.getenv().getOrDefault("SPANNER_LOCATION", "us-central1");
String model = System.getenv().getOrDefault("SPANNER_MODEL", "gemini-2.0-flash-lite");
if (instanceId == null || databaseId == null) {
System.err.println("Missing one or more required environment variables: SPANNER_INSTANCE or "
+ "SPANNER_DATABASE");
System.exit(1);
}
BigQueryOptions bigqueryOptions = BigQueryOptions.newBuilder().build();
BigQuery bigquery = bigqueryOptions.getService();
SpannerOptions spannerOptions = SpannerOptions.newBuilder().build();
try (Spanner spanner = spannerOptions.getService()) {
String command = args[0];
DatabaseId db = DatabaseId.of(spannerOptions.getProjectId(), instanceId, databaseId);
DatabaseClient dbClient = spanner.getDatabaseClient(db);
DatabaseAdminClient dbAdminClient = spanner.getDatabaseAdminClient();
switch (command) {
case "create":
create(dbAdminClient, db, location, model);
break;
default:
printUsageAndExit();
}
}
}
}
儲存對「App.java」所做的變更。
查看程式碼建立的不同實體,並建構應用程式 JAR:
mvn package
預期輸出內容:
[INFO] Building jar: /home/your_user/onlinebanking/target/onlinebanking.jar
[INFO] ------------------------------------------------------------------------
[INFO] BUILD SUCCESS
執行應用程式,查看使用量資訊:
java -jar target/onlinebanking.jar
預期輸出內容:
Online Banking Application 1.0.0
Usage:
  java -jar target/onlinebanking.jar <command> [command_option(s)]

Examples:
  java -jar target/onlinebanking.jar create
      - Create a sample Spanner database and schema in your project.
建立資料庫和結構定義
設定必要的應用程式環境變數:
export SPANNER_INSTANCE=cloudspanner-onlinebanking
export SPANNER_DATABASE=onlinebanking
執行 create 指令來建立資料庫和結構定義:
java -jar target/onlinebanking.jar create
預期輸出內容:
Creating Spanner database...
Created Spanner database [<DATABASE_RESOURCE_NAME>]
檢查 Spanner 中的結構定義
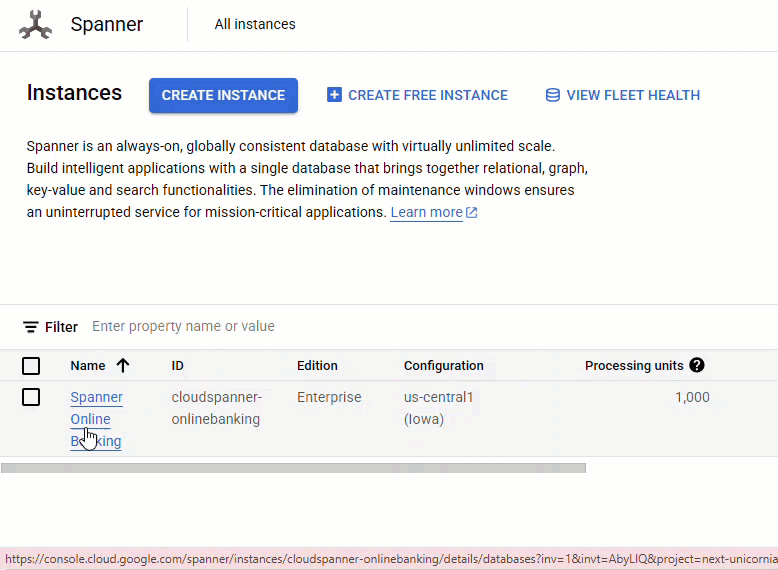
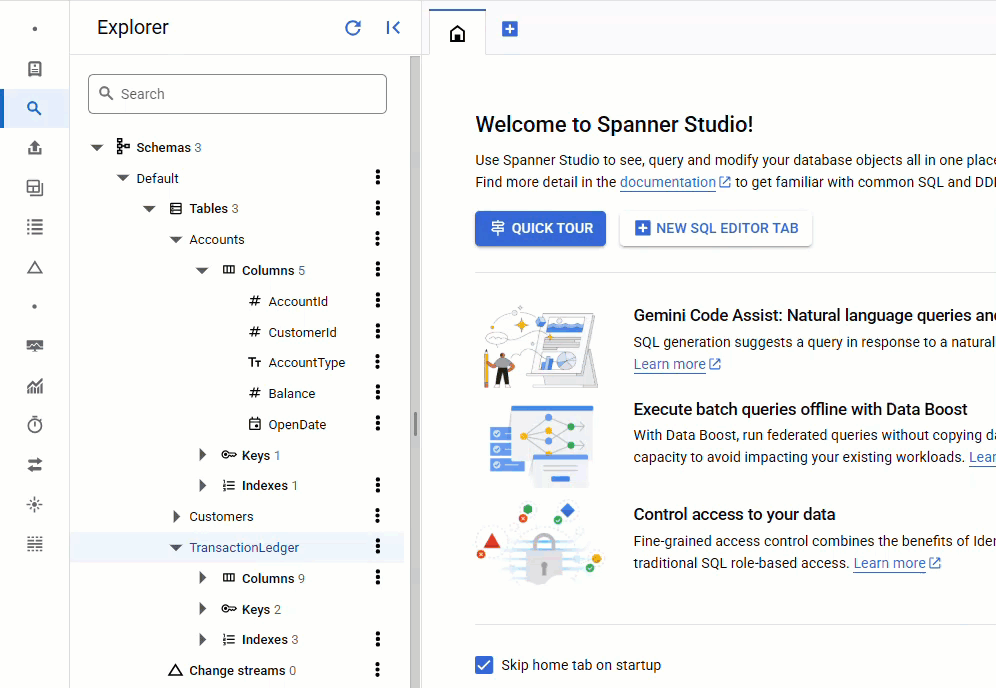
在 Spanner 控制台中,前往剛建立的執行個體和資料庫。
您應該會看到所有 3 個資料表 - Accounts、Customers 和 TransactionLedger。
這項動作會建立資料庫結構定義,包括 Accounts、Customers 和 TransactionLedger 資料表,以及用於最佳化資料擷取的次要索引,和 Vertex AI 模型參照。
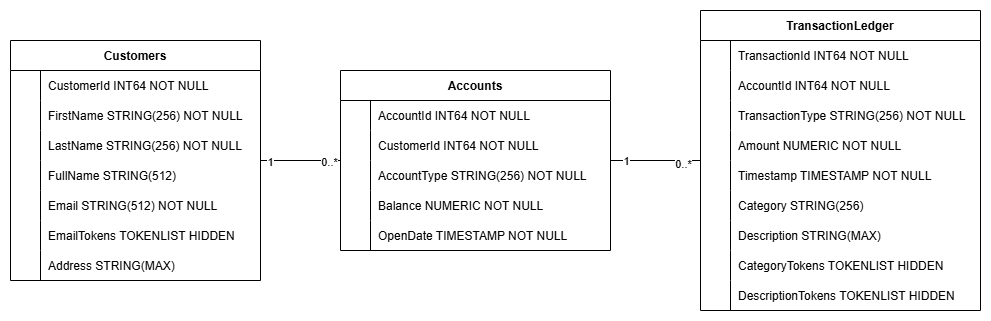
TransactionLedger 資料表會交錯於帳戶中,透過改善資料區域性,提升帳戶專屬交易的查詢效能。
我們實作了次要索引 (CustomersByEmail、CustomersFuzzyEmail、AccountsByCustomer、TransactionLedgerByAccountType、TransactionLedgerByCategory、TransactionLedgerTextSearch),以最佳化本程式碼研究室中常用的資料存取模式,例如依確切和模糊的電子郵件地址查詢客戶、依客戶擷取帳戶,以及有效率地查詢和搜尋交易資料。
TransactionCategoryModel 會運用 Vertex AI,直接對 LLM 進行 SQL 呼叫,在本程式碼研究室中,這項功能用於動態交易分類。
摘要
在這個步驟中,您已建立 Spanner 資料庫和結構定義。
下一步
接著,載入範例應用程式資料。
5. 載入資料
現在,您要新增功能,將 CSV 檔案中的範例資料載入資料庫。
開啟 App.java,然後開始替換匯入項目:
package com.google.codelabs;

import java.io.FileReader;
import java.math.BigDecimal;
import java.time.Duration;
import java.time.Instant;
import java.time.temporal.ChronoUnit;
import java.util.ArrayList;
import java.util.Arrays;
import java.util.HashMap;
import java.util.List;
import java.util.Map;
import java.util.Random;
import java.util.concurrent.ExecutionException;

import com.google.api.gax.longrunning.OperationFuture;
import com.google.cloud.Timestamp;
import com.google.cloud.bigquery.BigQuery;
import com.google.cloud.bigquery.BigQueryOptions;
import com.google.cloud.spanner.Database;
import com.google.cloud.spanner.DatabaseAdminClient;
import com.google.cloud.spanner.DatabaseClient;
import com.google.cloud.spanner.DatabaseId;
import com.google.cloud.spanner.Key;
import com.google.cloud.spanner.Spanner;
import com.google.cloud.spanner.SpannerException;
import com.google.cloud.spanner.SpannerExceptionFactory;
import com.google.cloud.spanner.SpannerOptions;
import com.google.cloud.spanner.Statement;
import com.google.cloud.spanner.Struct;
import com.google.spanner.admin.database.v1.CreateDatabaseMetadata;
import com.opencsv.CSVReader;
然後將插入方法新增至 App 類別:
  // Insert customers from CSV
  public static void insertCustomers(DatabaseClient dbClient) {
    System.out.println("Inserting customers...");
    dbClient
        .readWriteTransaction()
        .run(transaction -> {
          int count = 0;
          List<Statement> statements = new ArrayList<>();
          try (CSVReader reader = new CSVReader(new FileReader("data/customers.csv"))) {
            reader.skip(1);
            String[] line;
            while ((line = reader.readNext()) != null) {
              Statement statement = Statement.newBuilder(
                  "INSERT INTO Customers (CustomerId, FirstName, LastName, Email, Address) "
                      + "VALUES (@customerId, @firstName, @lastName, @email, @address)")
                  .bind("customerId").to(Long.parseLong(line[0]))
                  .bind("firstName").to(line[1])
                  .bind("lastName").to(line[2])
                  .bind("email").to(line[3])
                  .bind("address").to(line[4])
                  .build();
              statements.add(statement);
              count++;
            }
            transaction.batchUpdate(statements);
            System.out.println("Inserted " + count + " customers");
            return null;
          }
        });
  }

  // Insert accounts from CSV
  public static void insertAccounts(DatabaseClient dbClient) {
    System.out.println("Inserting accounts...");
    dbClient
        .readWriteTransaction()
        .run(transaction -> {
          int count = 0;
          List<Statement> statements = new ArrayList<>();
          try (CSVReader reader = new CSVReader(new FileReader("data/accounts.csv"))) {
            reader.skip(1);
            String[] line;
            while ((line = reader.readNext()) != null) {
              Statement statement = Statement.newBuilder(
                "INSERT INTO Accounts (AccountId, CustomerId, AccountType, Balance, OpenDate) "
                    + "VALUES (@accountId, @customerId, @accountType, @balance, @openDate)")
                .bind("accountId").to(Long.parseLong(line[0]))
                .bind("customerId").to(Long.parseLong(line[1]))
                .bind("accountType").to(line[2])
                .bind("balance").to(new BigDecimal(line[3]))
                .bind("openDate").to(line[4])
                .build();
              statements.add(statement);
              count++;
            }
            transaction.batchUpdate(statements);
            System.out.println("Inserted " + count + " accounts");
            return null;
          }
        });
  }

  // Insert transactions from CSV
  public static void insertTransactions(DatabaseClient dbClient) {
    System.out.println("Inserting transactions...");
    dbClient
        .readWriteTransaction()
        .run(transaction -> {
          int count = 0;
          List<Statement> statements = new ArrayList<>();
          try (CSVReader reader = new CSVReader(new FileReader("data/transactions.csv"))) {
            reader.skip(1);
            String[] line;

            // Specify timestamps that are within last 30 days
            Random random = new Random();
            Instant startTime = Instant.now().minus(15, ChronoUnit.DAYS);
            Instant currentTimestamp = startTime;

            Map<Long, BigDecimal> balanceChanges = new HashMap<>();
            while ((line = reader.readNext()) != null) {
              long accountId = Long.parseLong(line[1]);
              String transactionType = line[2];
              BigDecimal amount = new BigDecimal(line[3]);
              int randomMinutes = random.nextInt(60) + 1;
              currentTimestamp = currentTimestamp.plus(Duration.ofMinutes(randomMinutes));
              Timestamp timestamp = Timestamp.ofTimeSecondsAndNanos(
                  currentTimestamp.getEpochSecond(), currentTimestamp.getNano());
              Statement statement = Statement.newBuilder(
                "INSERT INTO TransactionLedger (TransactionId, AccountId, TransactionType, Amount,"
                    + "Timestamp, Category, Description) "
                    + "VALUES (@transactionId, @accountId, @transactionType, @amount, @timestamp,"
                    + "@category, @description)")
                .bind("transactionId").to(Long.parseLong(line[0]))
                .bind("accountId").to(accountId)
                .bind("transactionType").to(transactionType)
                .bind("amount").to(amount)
                .bind("timestamp").to(timestamp)
                .bind("category").to(line[5])
                .bind("description").to(line[6])
                .build();
              statements.add(statement);

              // Track balance changes per account
              BigDecimal balanceChange = balanceChanges.getOrDefault(accountId,
                  BigDecimal.ZERO);
              if ("Credit".equalsIgnoreCase(transactionType)) {
                balanceChanges.put(accountId, balanceChange.add(amount));
              } else if ("Debit".equalsIgnoreCase(transactionType)) {
                balanceChanges.put(accountId, balanceChange.subtract(amount));
              } else {
                System.err.println("Unsupported transaction type: " + transactionType);
                continue;
              }

              count++;
            }

            // Apply final balance updates
            for (Map.Entry<Long, BigDecimal> entry : balanceChanges.entrySet()) {
              long accountId = entry.getKey();
              BigDecimal balanceChange = entry.getValue();

              Struct row = transaction.readRow(
                  "Accounts",
                  Key.of(accountId),
                  List.of("Balance"));
              if (row != null) {
                BigDecimal currentBalance = row.getBigDecimal("Balance");
                BigDecimal updatedBalance = currentBalance.add(balanceChange);
                Statement statement = Statement.newBuilder(
                  "UPDATE Accounts SET Balance = @balance WHERE AccountId = @accountId")
                  .bind("accountId").to(accountId)
                  .bind("balance").to(updatedBalance)
                  .build();
                statements.add(statement);
              }
            }

            transaction.batchUpdate(statements);
            System.out.println("Inserted " + count + " transactions");
          }
          return null;
        });
  }
在 switch (command) 中,為插入作業的 main 方法新增另一個 case 陳述式:
        case "insert":
          String insertType = (args.length >= 2) ? args[1] : "";
          if (insertType.equals("customers")) {
            insertCustomers(dbClient);
          } else if (insertType.equals("accounts")) {
            insertAccounts(dbClient);
          } else if (insertType.equals("transactions")) {
            insertTransactions(dbClient);
          } else {
            insertCustomers(dbClient);
            insertAccounts(dbClient);
            insertTransactions(dbClient);
          }
          break;
最後,將插入方式附加至 printUsageAndExit 方法:
    System.out.println("  java -jar target/onlinebanking.jar insert");
    System.out.println("      - Insert sample Customers, Accounts, and Transactions into the "
        + "database.\n");
儲存對 App.java 所做的變更。
重新建構應用程式:
mvn package
執行 insert 指令,插入範例資料:
java -jar target/onlinebanking.jar insert
預期輸出內容:
Inserting customers...
Inserted 100 customers
Inserting accounts...
Inserted 125 accounts
Inserting transactions...
Inserted 200 transactions
在 Spanner 控制台中,返回執行個體和資料庫的 Spanner Studio。然後選取「TransactionLedger」資料表,並按一下側欄中的「資料」,確認資料已載入。表格中應有 200 列。
摘要
在這個步驟中,您已將範例資料插入資料庫。
下一步
接著,您將運用 Vertex AI 整合功能,直接在 Spanner SQL 中自動分類銀行交易。
6. 使用 Vertex AI 分類資料
在本步驟中,您將運用 Vertex AI 的強大功能,直接在 Spanner SQL 中自動分類金融交易。您可以使用 Vertex AI 選擇現有的預先訓練模型,也可以訓練及部署自有模型。請參閱 Vertex AI Model Garden 中的可用模型。
在本程式碼研究室中,我們將使用其中一個 Gemini 模型 Gemini Flash Lite。這個版本的 Gemini 經濟實惠,但仍可處理大多數日常工作負載。
目前我們有許多金融交易,想根據說明分類 (groceries、transportation 等)。方法是在 Spanner 中註冊模型,然後使用 ML.PREDICT 呼叫 AI 模型。
在銀行應用程式中,我們可能會想將交易分類,深入瞭解顧客行為,以便提供個人化服務、更有效地偵測異常狀況,或讓顧客追蹤每月預算。
建立資料庫和結構定義時,我們已完成第一個步驟,並建立如下模型:
接著,我們會在應用程式中新增方法,呼叫 ML.PREDICT。
開啟 App.java 並新增 categorize 方法:
  // Use Vertex AI to set the category of transactions
  public static void categorize(DatabaseClient dbClient) {
    System.out.println("Categorizing transactions...");
    try {
      // Create a prompt to instruct the LLM how to categorize the transactions
      String categories = String.join(", ", Arrays.asList("Entertainment", "Gifts", "Groceries",
          "Investment", "Medical", "Movies", "Online Shopping", "Other", "Purchases", "Refund",
          "Restaurants", "Salary", "Transfer", "Transportation", "Utilities"));
      String prompt = "Categorize the following financial activity into one of these "
          + "categories: " +  categories + ". Return Other if the description cannot be mapped to "
          + "one of these categories.  Only return the exact category string, no other text or "
          + "punctuation or reasoning. Description: ";
      String sql = "UPDATE TransactionLedger SET Category = (\n"
          + "  SELECT content FROM ML.PREDICT(MODEL `TransactionCategoryModel`, (\n"
          + "    SELECT CONCAT('" + prompt + "', CASE WHEN TRIM(Description) = ''\n"
          + "    THEN 'Other' ELSE Description END) AS prompt\n"
          + "  ))\n"
          + ") WHERE TRUE";

      // Use partitioned update to batch update a large number of rows
      dbClient.executePartitionedUpdate(Statement.of(sql));
      System.out.println("Completed categorizing transactions");
    } catch (SpannerException e) {
      throw e;
    }
  }
在 main 方法中新增另一個案例陳述式,用於分類:
        case "categorize":
          categorize(dbClient);
          break;
最後,將如何使用分類附加至 printUsageAndExit 方法:
    System.out.println("  java -jar target/onlinebanking.jar categorize");
    System.out.println("      - Use AI to categorize transactions in the database.\n");
儲存對 App.java 所做的變更。
重新建構應用程式:
mvn package
執行 categorize 指令,將資料庫中的交易分類:
java -jar target/onlinebanking.jar categorize
預期輸出內容:
Categorizing transactions...
Completed categorizing transactions
在 Spanner Studio 中,對 TransactionLedger 資料表執行「預覽資料」陳述式。現在所有資料列都應該會填入 Category 欄。
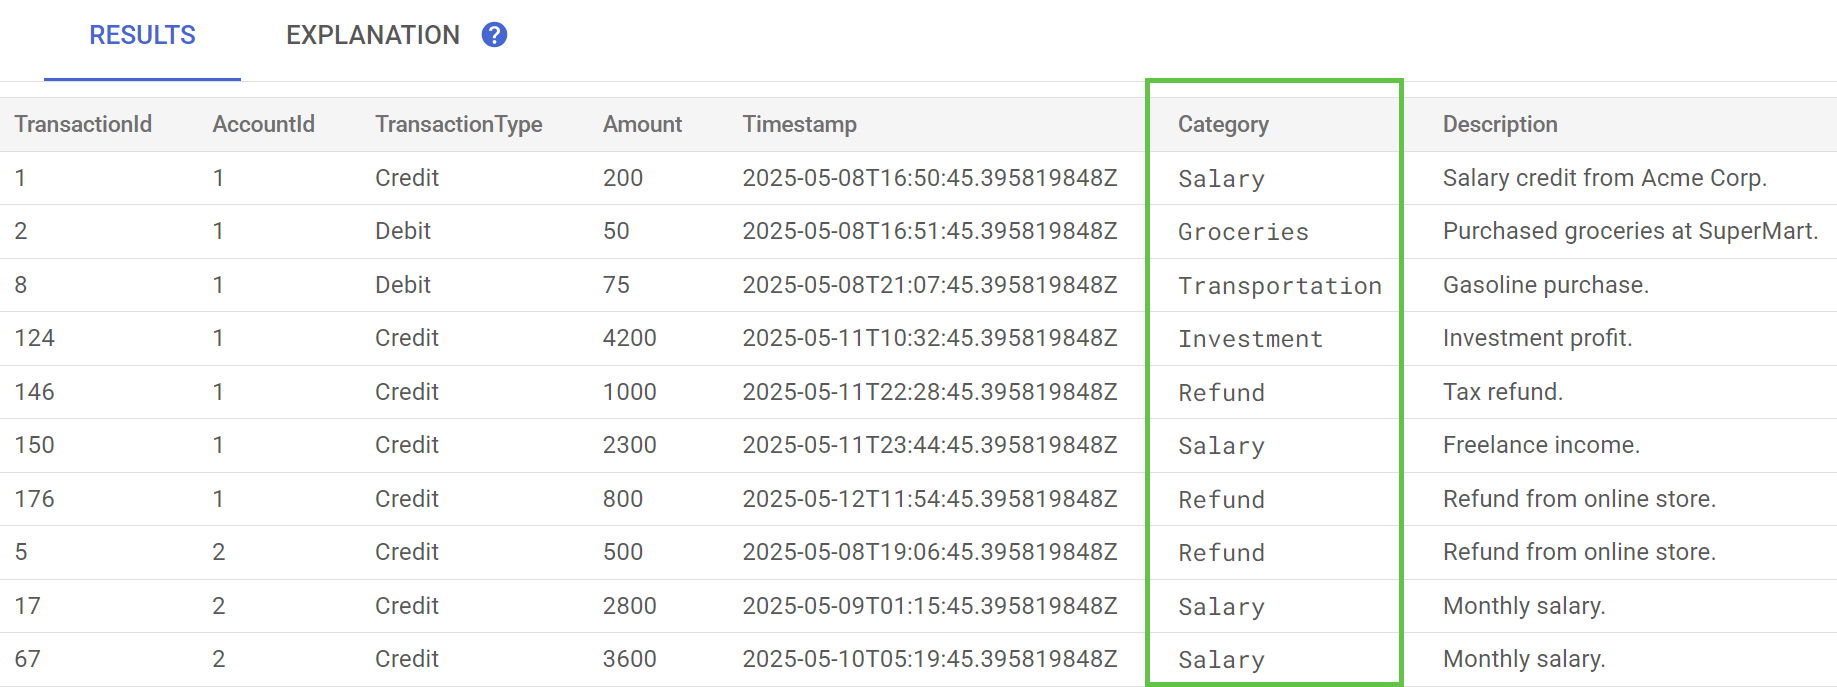
現在我們已將交易分類,接下來的步驟會說明如何查詢特定顧客在某個類別的月支出金額,以便用於內部或對外的查詢。
摘要
在本步驟中,您使用預先訓練的模型,對資料執行 AI 輔助分類。
下一步
接著,您將使用權杖化功能執行模糊搜尋和全文搜尋。
7. 使用全文搜尋查詢
新增查詢程式碼
Spanner 提供許多全文搜尋查詢。在本步驟中,您將執行完全比對搜尋、模糊搜尋和全文搜尋。
開啟 App.java,然後開始替換匯入項目:
package com.google.codelabs;

import java.io.FileReader;
import java.math.BigDecimal;
import java.time.Duration;
import java.time.Instant;
import java.time.temporal.ChronoUnit;
import java.util.ArrayList;
import java.util.Arrays;
import java.util.HashMap;
import java.util.List;
import java.util.Map;
import java.util.Random;
import java.util.concurrent.ExecutionException;
import java.util.concurrent.TimeUnit;

import com.google.api.gax.longrunning.OperationFuture;
import com.google.cloud.Timestamp;
import com.google.cloud.bigquery.BigQuery;
import com.google.cloud.bigquery.BigQueryOptions;
import com.google.cloud.spanner.Database;
import com.google.cloud.spanner.DatabaseAdminClient;
import com.google.cloud.spanner.DatabaseClient;
import com.google.cloud.spanner.DatabaseId;
import com.google.cloud.spanner.Key;
import com.google.cloud.spanner.ReadOnlyTransaction;
import com.google.cloud.spanner.ResultSet;
import com.google.cloud.spanner.Spanner;
import com.google.cloud.spanner.SpannerException;
import com.google.cloud.spanner.SpannerExceptionFactory;
import com.google.cloud.spanner.SpannerOptions;
import com.google.cloud.spanner.Statement;
import com.google.cloud.spanner.Struct;
import com.google.cloud.spanner.TimestampBound;
import com.google.spanner.admin.database.v1.CreateDatabaseMetadata;
import com.opencsv.CSVReader;
然後新增查詢方法:
  // Get current account balance(s) by customer
  public static void getBalance(DatabaseClient dbClient, long customerId) {
    String query = "SELECT AccountId, Balance\n"
        + "FROM Accounts\n"
        + "WHERE CustomerId = @customerId";
    Statement statement = Statement.newBuilder(query)
        .bind("customerId").to(customerId)
        .build();

    // Ignore ongoing transactions, use stale reads as seconds-old data is sufficient
    TimestampBound stalenessBound = TimestampBound.ofMaxStaleness(5, TimeUnit.SECONDS);
    try (ReadOnlyTransaction transaction = dbClient.singleUseReadOnlyTransaction(stalenessBound);
        ResultSet resultSet = transaction.executeQuery(statement);) {
      System.out.println("Account balances for customer " + customerId + ":");
      while (resultSet.next()) {
        System.out.println("  Account " + resultSet.getLong("AccountId") + ": "
            + resultSet.getBigDecimal("Balance"));
      }
    }
  }

  // Find customers by email
  public static void findCustomers(DatabaseClient dbClient, String email) {
    // Query using fuzzy search (ngrams) to allow for spelling mistakes
    String query = "SELECT CustomerId, Email\n"
        + "FROM Customers\n"
        + "WHERE SEARCH_NGRAMS(EmailTokens, @email)\n"
        + "ORDER BY SCORE_NGRAMS(EmailTokens, @email) DESC\n"
        + "LIMIT 10";
    Statement statement = Statement.newBuilder(query)
        .bind("email").to(email)
        .build();

    try (ReadOnlyTransaction transaction = dbClient.singleUseReadOnlyTransaction();
        ResultSet resultSet = transaction.executeQuery(statement)) {
      System.out.println("Customer emails matching " + email + " (top 10 matches):");
      while (resultSet.next()) {
        System.out.println("  Customer " + resultSet.getLong("CustomerId") + ": "
            + resultSet.getString("Email"));
      }
    }
  }

  // Get total monthly spending for a customer by category
  public static void getSpending(DatabaseClient dbClient, long customerId, String category) {
    // Query category using full-text search
    String query = "SELECT SUM(Amount) as TotalSpending\n"
        + "FROM TransactionLedger t\n"
        + "JOIN Accounts a\n"
        + "  ON t.AccountId = a.AccountId\n"
        + "WHERE t.TransactionType = 'Debit'\n"
        + "  AND a.CustomerId = @customerId\n"
        + "  AND t.Timestamp >= TIMESTAMP_ADD(CURRENT_TIMESTAMP(), INTERVAL -30 DAY)\n"
        + "  AND (SEARCH(t.CategoryTokens, @category) OR SEARCH(t.DescriptionTokens, @category))";
    Statement statement = Statement.newBuilder(query)
        .bind("customerId").to(customerId)
        .bind("category").to(category)
        .build();

    try (ReadOnlyTransaction transaction = dbClient.singleUseReadOnlyTransaction();
        ResultSet resultSet = transaction.executeQuery(statement);) {
      System.out.println("Total spending for customer " + customerId + " under category "
          + category + ":");
      while (resultSet.next()) {
        BigDecimal totalSpending = BigDecimal.ZERO;
        if (!resultSet.isNull("TotalSpending")) {
          totalSpending = resultSet.getBigDecimal("TotalSpending");
        }
        System.out.println("  " + totalSpending);
      }
    }
  }
在 main 方法中新增另一個 case 陳述式,用於查詢:
        case "query":
          String queryType = (args.length >= 2) ? args[1] : "";
          if (queryType.equals("balance")) {
            long customerId = (args.length >= 3) ? Long.parseLong(args[2]) : 1L;
            getBalance(dbClient, customerId);
          } else if (queryType.equals("email")) {
            String email = (args.length >= 3) ? args[2] : "";
            findCustomers(dbClient, email);
          } else if (queryType.equals("spending")) {
            long customerId = (args.length >= 3) ? Long.parseLong(args[2]) : 1L;
            String category = (args.length >= 4) ? args[3] : "";
            getSpending(dbClient, customerId, category);
          } else {
            printUsageAndExit();
          }
          break;
最後,將查詢指令的使用方式附加至 printUsageAndExit 方法:
    System.out.println("  java -jar target/onlinebanking.jar query balance 1");
    System.out.println("      - Query customer account balance(s) by customer id.\n");
    System.out.println("  java -jar target/onlinebanking.jar query email madi");
    System.out.println("      - Find customers by email using fuzzy search.\n");
    System.out.println("  java -jar target/onlinebanking.jar query spending 1 groceries");
    System.out.println("      - Query customer spending by customer id and category using "
        + "full-text search.\n");
儲存對 App.java 所做的變更。
重新建構應用程式:
mvn package
完全比對搜尋顧客帳戶餘額
完全比對查詢會尋找與字詞完全相符的相符資料列。
建立資料庫和結構定義時,系統已新增索引,以提升效能:
  "CREATE INDEX AccountsByCustomer\n"
          + "ON Accounts (CustomerId)",
getBalance 方法會隱含使用這個索引,找出與提供的 customerId 相符的客戶,並加入屬於該客戶的帳戶。
直接在 Spanner Studio 中執行查詢時,查詢會如下所示: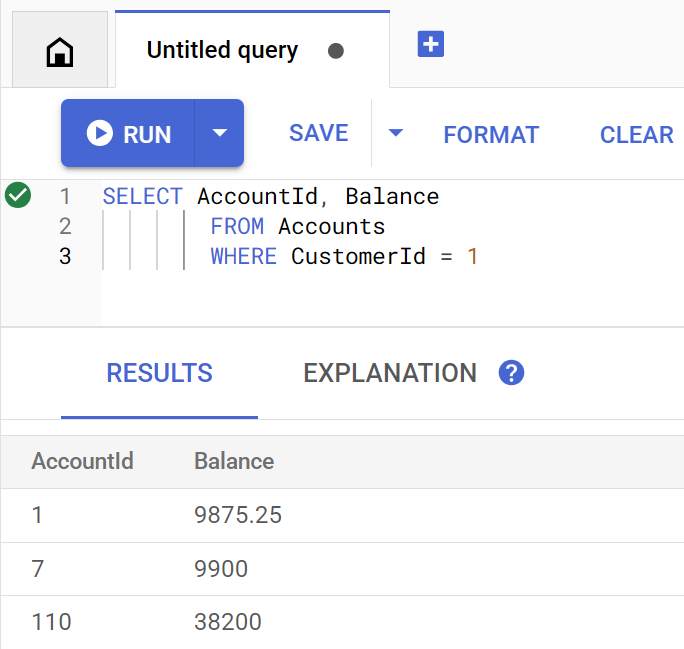
執行下列指令,列出客戶 1 的帳戶餘額:
java -jar target/onlinebanking.jar query balance 1
預期輸出內容:
Account balances for customer 1:
  Account 1: 9875.25
  Account 7: 9900
  Account 110: 38200
共有 100 位顧客,因此您也可以指定其他客戶 ID,查詢任何其他顧客的帳戶餘額:
java -jar target/onlinebanking.jar query balance 5
java -jar target/onlinebanking.jar query balance 10
java -jar target/onlinebanking.jar query balance 99
對顧客電子郵件執行模糊搜尋
模糊搜尋可找出搜尋字詞的近似相符項目,包括拼字變化和錯別字。
建立資料庫和結構定義時,系統已新增 n 元索引:
CREATE TABLE Customers (
  ...
  EmailTokens TOKENLIST AS (TOKENIZE_SUBSTRING(Email,
    ngram_size_min=>2,
    ngram_size_max=>3,
    relative_search_types=>["all"])) HIDDEN,
) PRIMARY KEY(CustomerId);

CREATE SEARCH INDEX CustomersFuzzyEmail ON Customers(EmailTokens);
findCustomers 方法會使用 SEARCH_NGRAMS 和 SCORE_NGRAMS 查詢這個索引,依電子郵件尋找顧客。由於電子郵件地址欄已進行 n-gram 斷詞,因此這項查詢可能含有拼字錯誤,但仍會傳回正確答案。搜尋結果會依相符程度排序。
執行下列指令,找出包含 madi 的相符顧客電子郵件地址:
java -jar target/onlinebanking.jar query email madi
預期輸出內容:
Customer emails matching madi (top 10 matches):
  Customer 39: madison.perez@example.com
  Customer 64: mason.gray@example.com
  Customer 91: mabel.alexander@example.com
這項回應會依排名順序顯示最接近的相符項目,包括 madi 或類似字串。
如果直接在 Spanner Studio 中執行查詢,查詢看起來會像這樣: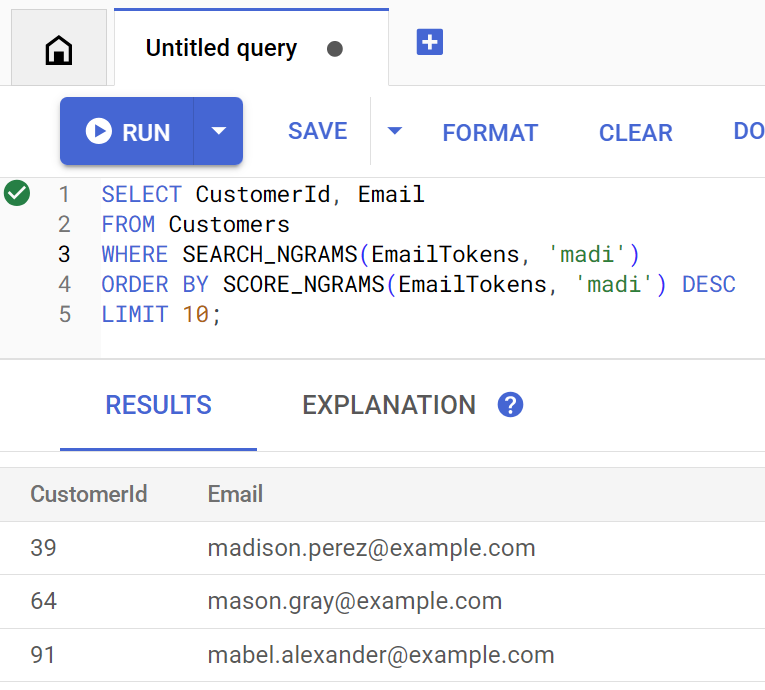
模糊搜尋也能協助修正拼字錯誤,例如:emily
java -jar target/onlinebanking.jar query email emily
java -jar target/onlinebanking.jar query email emliy
java -jar target/onlinebanking.jar query email emilee
預期輸出內容:
Customer emails matching emliy (top 10 matches):
  Customer 31: emily.lopez@example.com
在上述兩種情況下,系統都會將預期的客戶電子郵件列為最相關的結果。
使用全文搜尋功能搜尋交易
Spanner 的全文搜尋功能可用於根據關鍵字或詞組擷取記錄。這項功能可修正拼字錯誤或搜尋同義詞。
建立資料庫和結構定義時,系統已新增全文搜尋索引:
CREATE TABLE TransactionLedger (
  ...
  CategoryTokens TOKENLIST AS (TOKENIZE_FULLTEXT(Category)) HIDDEN,
  DescriptionTokens TOKENLIST AS (TOKENIZE_FULLTEXT(Description)) HIDDEN,
) PRIMARY KEY(AccountId, TransactionId),
  INTERLEAVE IN PARENT Accounts ON DELETE CASCADE;

CREATE SEARCH INDEX TransactionLedgerTextSearch ON TransactionLedger(CategoryTokens, DescriptionTokens);
getSpending 方法會使用 SEARCH 全文搜尋功能,比對該索引。系統會找出指定客戶 ID 在過去 30 天內的所有支出 (扣款)。
執行下列指令,取得groceries類別中客戶 1 上個月的總支出:
java -jar target/onlinebanking.jar query spending 1 groceries
預期輸出內容:
Total spending for customer 1 under category groceries:
  50
您也可以查看其他類別的支出 (我們在先前的步驟中分類),或使用其他客戶 ID:
java -jar target/onlinebanking.jar query spending 1 transportation
java -jar target/onlinebanking.jar query spending 1 restaurants
java -jar target/onlinebanking.jar query spending 12 entertainment
摘要
在本步驟中,您執行了完全比對查詢,以及模糊和全文搜尋。
下一步
接著,您會整合 Spanner 與 Google BigQuery 來執行聯合查詢,以便合併 Spanner 即時資料與 BigQuery 資料。
8. 使用 BigQuery 執行聯合查詢
建立 BigQuery 資料集
在這個步驟中,您會使用聯合查詢,將 BigQuery 和 Spanner 資料匯集在一起。
如要這麼做,請先在 Cloud Shell 指令列中建立 MarketingCampaigns 資料集:
bq mk --location=us-central1 MarketingCampaigns
預期輸出內容:
Dataset '<PROJECT_ID>:MarketingCampaigns' successfully created.
以及資料集中的 CustomerSegments 資料表:
bq mk --table MarketingCampaigns.CustomerSegments CampaignId:STRING,CampaignName:STRING,CustomerId:INT64
預期輸出內容:
Table '<PROJECT_ID>:MarketingCampaigns.CustomerSegments' successfully created.
接著,從 BigQuery 建立與 Spanner 的連線:
bq mk --connection \
  --connection_type=CLOUD_SPANNER \
  --properties="{\"database\": \"projects/$GOOGLE_CLOUD_PROJECT/instances/cloudspanner-onlinebanking/databases/onlinebanking\", \"useParallelism\": true, \"useDataBoost\": true}" \
  --location=us-central1 \
  spanner-connection
預期輸出內容:
Connection <PROJECT_NUMBER>.us-central1.spanner-connection successfully created
最後,將一些客戶新增至 BigQuery 資料表,以便與 Spanner 資料聯結:
bq query --use_legacy_sql=false '
INSERT INTO MarketingCampaigns.CustomerSegments (CampaignId, CampaignName, CustomerId)
VALUES
  ("campaign1", "Spring Promotion", 1),
  ("campaign1", "Spring Promotion", 3),
  ("campaign1", "Spring Promotion", 5),
  ("campaign1", "Spring Promotion", 7),
  ("campaign1", "Spring Promotion", 9),
  ("campaign1", "Spring Promotion", 11)'
預期輸出內容:
Waiting on bqjob_r76a7ce76c5ec948f_0000019644bda052_1 ... (0s) Current status: DONE
Number of affected rows: 6
您可以查詢 BigQuery,確認資料是否可用:
bq query --use_legacy_sql=false "SELECT * FROM MarketingCampaigns.CustomerSegments"
預期輸出內容:
+------------+------------------+------------+
| CampaignId |   CampaignName   | CustomerId |
+------------+------------------+------------+
| campaign1  | Spring Promotion |          1 |
| campaign1  | Spring Promotion |          5 |
| campaign1  | Spring Promotion |          7 |
| campaign1  | Spring Promotion |          9 |
| campaign1  | Spring Promotion |         11 |
| campaign1  | Spring Promotion |          3 |
+------------+------------------+------------+
BigQuery 中的這項資料代表透過各種銀行工作流程新增的資料。舉例來說,這可能是最近開戶或註冊行銷促銷活動的顧客名單。如要判斷行銷廣告活動的目標客群,我們需要查詢 BigQuery 中的資料和 Spanner 中的即時資料,而聯合查詢功能可讓我們透過單一查詢完成這項作業。
使用 BigQuery 執行聯合查詢
接下來,我們會在應用程式中新增方法,呼叫 EXTERNAL_QUERY 執行聯合查詢。這樣一來,您就能在 BigQuery 和 Spanner 中聯結及分析客戶資料,例如根據客戶近期的消費金額,判斷哪些客戶符合行銷廣告活動的條件。
開啟 App.java,然後開始替換匯入項目:
package com.google.codelabs;

import java.io.FileReader;
import java.math.BigDecimal;
import java.time.Duration;
import java.time.Instant;
import java.time.temporal.ChronoUnit;
import java.util.ArrayList;
import java.util.Arrays;
import java.util.HashMap;
import java.util.List;
import java.util.Map;
import java.util.Random;
import java.util.concurrent.ExecutionException;
import java.util.concurrent.TimeUnit;

import com.google.api.gax.longrunning.OperationFuture;
import com.google.cloud.Timestamp;
import com.google.cloud.bigquery.BigQuery;
import com.google.cloud.bigquery.BigQueryException;
import com.google.cloud.bigquery.BigQueryOptions;
import com.google.cloud.bigquery.connection.v1.ConnectionName;
import com.google.cloud.bigquery.JobException;
import com.google.cloud.bigquery.QueryJobConfiguration;
import com.google.cloud.bigquery.TableResult;
import com.google.cloud.spanner.Database;
import com.google.cloud.spanner.DatabaseAdminClient;
import com.google.cloud.spanner.DatabaseClient;
import com.google.cloud.spanner.DatabaseId;
import com.google.cloud.spanner.Key;
import com.google.cloud.spanner.ReadOnlyTransaction;
import com.google.cloud.spanner.ResultSet;
import com.google.cloud.spanner.Spanner;
import com.google.cloud.spanner.SpannerException;
import com.google.cloud.spanner.SpannerExceptionFactory;
import com.google.cloud.spanner.SpannerOptions;
import com.google.cloud.spanner.Statement;
import com.google.cloud.spanner.Struct;
import com.google.cloud.spanner.TimestampBound;
import com.google.spanner.admin.database.v1.CreateDatabaseMetadata;
import com.opencsv.CSVReader;
然後新增 campaign 方法:
  // Get customers for quarterly marketing campaign in BigQuery using Spanner data
  public static void campaign(BigQuery bq, DatabaseId db, String location, String campaignId,
      int threshold) {
    // The BigQuery dataset, table, and Spanner connection must already exist for this to succeed
    ConnectionName connection = ConnectionName.of(db.getInstanceId().getProject(), location,
        "spanner-connection");

    // Use a federated query to bring Spanner data into BigQuery
    String bqQuery = "SELECT cs.CampaignName, c.CustomerId, c.FullName, t.TotalSpending\n"
        + "FROM MarketingCampaigns.CustomerSegments cs\n"
        + "JOIN EXTERNAL_QUERY('" + connection.toString() + "',\n"
        + "  \"SELECT t.AccountId, SUM(t.Amount) AS TotalSpending"
        + "   FROM TransactionLedger t"
        + "   WHERE t.Timestamp >= TIMESTAMP_ADD(CURRENT_TIMESTAMP(), INTERVAL -90 DAY)"
        + "   GROUP BY t.AccountId"
        + "   HAVING SUM(t.Amount) > " + threshold + "\"\n"
        + ") t ON cs.CustomerId = t.AccountId\n"
        + "JOIN EXTERNAL_QUERY('" + connection.toString() + "',\n"
        + "  \"SELECT CustomerId, FullName"
        + "   FROM Customers\"\n"
        + ") c ON c.CustomerId = cs.CustomerId\n"
        + "WHERE cs.CampaignId = '" + campaignId + "'";
    try {
      QueryJobConfiguration queryConfig = QueryJobConfiguration.newBuilder(bqQuery).build();
      TableResult results = bq.query(queryConfig);

      System.out.println("Customers for campaign (" + campaignId + "):");
      results.iterateAll().forEach(row -> {
        System.out.println("  " + row.get("FullName").getStringValue()
            + " (" + row.get("CustomerId").getStringValue() + ")");
      });
    } catch (JobException e) {
      throw (BigQueryException) e.getCause();
    } catch (InterruptedException e) {
      throw SpannerExceptionFactory.propagateInterrupt(e);
    }
  }
在廣告活動的 main 方法中新增另一個 case 陳述式:
        case "campaign":
          String campaignId = (args.length >= 2) ? args[1] : "";
          int threshold = (args.length >= 3) ? Integer.parseInt(args[2]) : 5000;
          campaign(bigquery, db, location, campaignId, threshold);
          break;
最後,將如何使用廣告活動附加至 printUsageAndExit 方法:
    System.out.println("  java -jar target/onlinebanking.jar campaign campaign1 5000");
    System.out.println("      - Use Federated Queries (BigQuery) to find customers that match a "
        + "marketing campaign by name based on a recent spending threshold.\n");
儲存對 App.java 所做的變更。
重新建構應用程式:
mvn package
執行聯合查詢,判斷哪些顧客應納入行銷廣告活動 (campaign1),前提是他們在過去 3 個月內至少消費 $5000,方法是執行 campaign 指令:
java -jar target/onlinebanking.jar campaign campaign1 5000
預期輸出內容:
Customers for campaign (campaign1):
  Alice Smith (1)
  Eve Davis (5)
  Kelly Thomas (11)
現在可以向這些顧客提供專屬優惠或獎勵。
或者,我們也可以尋找過去 3 個月內達到較低支出門檻的更多顧客:
java -jar target/onlinebanking.jar campaign campaign1 2500
預期輸出內容:
Customers for campaign (campaign1):
  Alice Smith (1)
  Charlie Williams (3)
  Eve Davis (5)
  Ivy Taylor (9)
  Kelly Thomas (11)
摘要
在這個步驟中,您已成功從 BigQuery 執行聯合查詢,並取得即時的 Spanner 資料。
下一步
接著,您可以清理為這個程式碼研究室建立的資源,以免產生費用。
9. 清除 (選填)
您可以跳過這個步驟,如要繼續試用 Spanner 執行個體,目前不需要清除。不過,您使用的專案仍會繼續收取執行個體費用。如果您不再需要這個執行個體,請立即刪除,以免產生這些費用。除了 Spanner 執行個體,本程式碼研究室也建立了 BigQuery 資料集和連線,不再需要時應一併清除。
刪除 Spanner 執行個體:
gcloud spanner instances delete cloudspanner-onlinebanking
確認要繼續操作 (輸入 Y):
Delete instance [cloudspanner-onlinebanking]. Are you sure?

Do you want to continue (Y/n)?
刪除 BigQuery 連線和資料集:
bq rm --connection --location=us-central1 spanner-connection
bq rm -r MarketingCampaigns
確認刪除 BigQuery 資料集 (輸入 Y):
rm: remove dataset '<PROJECT_ID>:MarketingCampaigns'? (y/N)
10. 恭喜
🚀 您已建立新的 Cloud Spanner 執行個體、建立空白資料庫、載入範例資料、執行進階作業和查詢,以及 (選擇性) 刪除 Cloud Spanner 執行個體。
涵蓋內容
- 如何設定 Spanner 執行個體。
- 如何建立資料庫和資料表。
- 如何將資料載入 Spanner 資料庫資料表。
- 如何從 Spanner 呼叫 Vertex AI 模型。
- 如何使用模糊搜尋和全文搜尋功能查詢 Spanner 資料庫。
- 如何從 BigQuery 對 Spanner 執行聯合查詢。
- 如何刪除 Spanner 執行個體。
後續步驟
- 進一步瞭解 Spanner 進階功能,包括:
- 請參閱可用的 Spanner 用戶端程式庫。