
1. ภาพรวม
Spanner เป็นบริการฐานข้อมูลที่มีการจัดการครบวงจร ปรับขนาดในแนวนอนได้ และมีการกระจายทั่วโลก ซึ่งเหมาะสำหรับภาระงานด้านการดำเนินงานทั้งแบบเชิงสัมพันธ์และไม่ใช่เชิงสัมพันธ์ นอกเหนือจากความสามารถหลักแล้ว Spanner ยังมีฟีเจอร์ขั้นสูงอันทรงพลังที่ช่วยให้สร้างแอปพลิเคชันอัจฉริยะที่อิงตามข้อมูลได้
Codelab นี้สร้างขึ้นจากความเข้าใจพื้นฐานเกี่ยวกับ Spanner และเจาะลึกถึงการใช้ประโยชน์จากการผสานรวมขั้นสูงเพื่อเพิ่มประสิทธิภาพการประมวลผลข้อมูลและความสามารถในการวิเคราะห์ โดยใช้แอปพลิเคชันธนาคารออนไลน์เป็นพื้นฐาน
เราจะมุ่งเน้นที่ฟีเจอร์ขั้นสูงที่สำคัญ 3 อย่างต่อไปนี้
- การผสานรวม Vertex AI: ดูวิธีผสานรวม Spanner กับแพลตฟอร์ม AI ของ Google Cloud อย่าง Vertex AI ได้อย่างราบรื่น คุณจะได้เรียนรู้วิธีเรียกใช้โมเดล Vertex AI โดยตรงจากภายในคำค้นหา Spanner SQL ซึ่งช่วยให้การเปลี่ยนรูปแบบและการคาดการณ์ในฐานข้อมูลมีประสิทธิภาพ และช่วยให้แอปพลิเคชันธนาคารของเราจัดหมวดหมู่ธุรกรรมโดยอัตโนมัติสำหรับกรณีการใช้งานต่างๆ เช่น การติดตามงบประมาณและการตรวจหาความผิดปกติ
- การค้นหาข้อความแบบเต็ม: ดูวิธีใช้ฟังก์ชันการค้นหาข้อความแบบเต็มภายใน Spanner คุณจะได้สำรวจการจัดทำดัชนีข้อมูลข้อความและการเขียนคําค้นหาที่มีประสิทธิภาพเพื่อทําการค้นหาตามคีย์เวิร์ดในข้อมูลการดำเนินงาน ซึ่งจะช่วยให้ค้นพบข้อมูลที่มีประสิทธิภาพ เช่น การค้นหาลูกค้าตามอีเมลภายในระบบธนาคารได้อย่างมีประสิทธิภาพ
- การค้นหาแบบรวมของ BigQuery: ดูวิธีใช้ประโยชน์จากความสามารถในการค้นหาแบบรวมของ Spanner เพื่อค้นหาข้อมูลที่อยู่ใน BigQuery โดยตรง ซึ่งช่วยให้คุณรวมข้อมูลด้านการดำเนินงานแบบเรียลไทม์ของ Spanner เข้ากับชุดข้อมูลวิเคราะห์ของ BigQuery เพื่อรับข้อมูลเชิงลึกและการรายงานที่ครอบคลุมโดยไม่ต้องทำซ้ำข้อมูลหรือมีกระบวนการ ETL ที่ซับซ้อน ซึ่งจะช่วยขับเคลื่อน Use Case ต่างๆ ในแอปพลิเคชันธนาคารของเรา เช่น แคมเปญการตลาดที่กำหนดเป้าหมายโดยการรวมข้อมูลลูกค้าแบบเรียลไทม์เข้ากับแนวโน้มในอดีตที่กว้างขึ้นจาก BigQuery
สิ่งที่คุณจะได้เรียนรู้
- วิธีตั้งค่าอินสแตนซ์ Spanner
- วิธีสร้างฐานข้อมูลและตาราง
- วิธีโหลดข้อมูลลงในตารางฐานข้อมูล Spanner
- วิธีเรียกใช้โมเดล Vertex AI จาก Spanner
- วิธีค้นหาฐานข้อมูล Spanner โดยใช้การค้นหาแบบคลุมเครือและการค้นหาแบบข้อความเต็ม
- วิธีทำการค้นหาแบบรวมกับ Spanner จาก BigQuery
- วิธีลบอินสแตนซ์ Spanner
สิ่งที่คุณต้องมี
2. การตั้งค่าและข้อกำหนด
สร้างโปรเจ็กต์
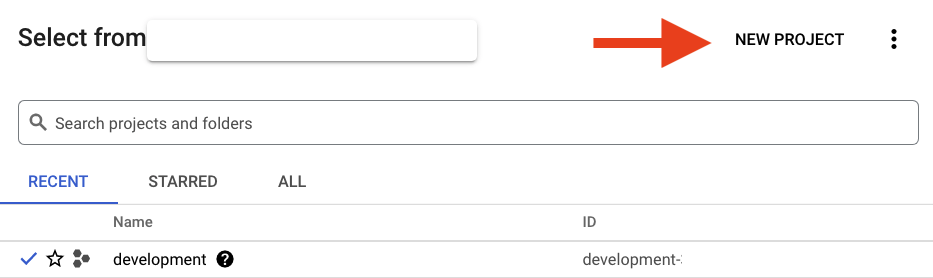
หากมีโปรเจ็กต์ Google Cloud ที่เปิดใช้การเรียกเก็บเงินอยู่แล้ว ให้คลิกเมนูแบบเลื่อนลงเพื่อเลือกโปรเจ็กต์ที่ด้านซ้ายบนของคอนโซล

หากเลือกโปรเจ็กต์แล้ว ให้ข้ามไปที่เปิดใช้ API ที่จำเป็น
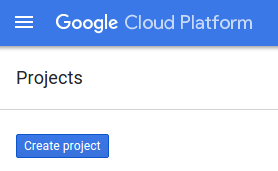
หากยังไม่มีบัญชี Google (Gmail หรือ Google Apps) คุณต้องสร้างบัญชี ลงชื่อเข้าใช้คอนโซล Google Cloud Platform (console.cloud.google.com) แล้วสร้างโปรเจ็กต์ใหม่
คลิกปุ่ม "โปรเจ็กต์ใหม่" ในกล่องโต้ตอบที่ปรากฏขึ้นเพื่อสร้างโปรเจ็กต์ใหม่
หากยังไม่มีโปรเจ็กต์ คุณจะเห็นกล่องโต้ตอบแบบนี้เพื่อสร้างโปรเจ็กต์แรก
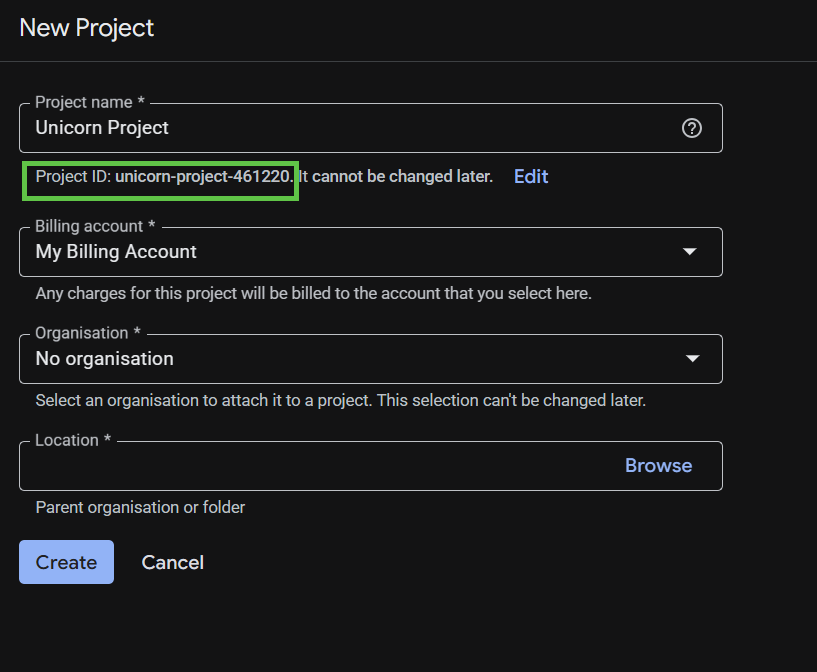
กล่องโต้ตอบการสร้างโปรเจ็กต์ถัดไปจะช่วยให้คุณป้อนรายละเอียดของโปรเจ็กต์ใหม่ได้
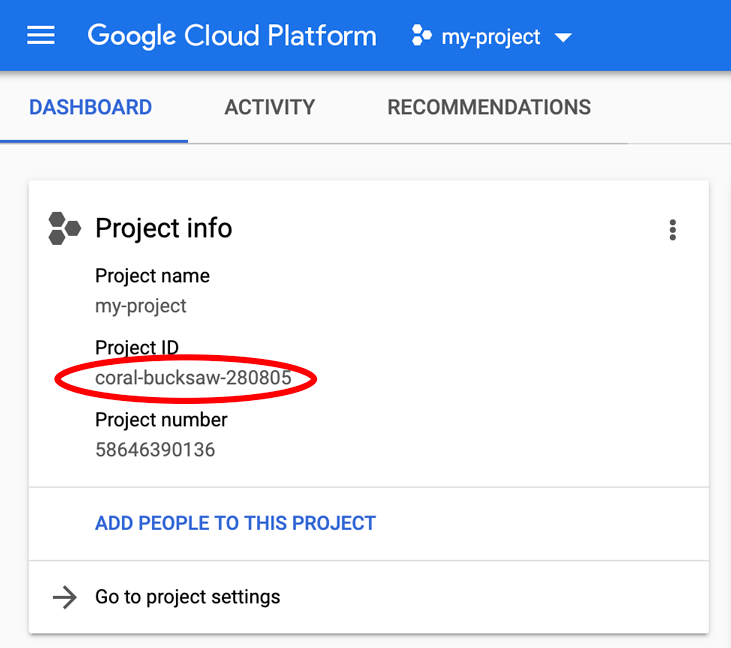
โปรดจดจำรหัสโปรเจ็กต์ ซึ่งเป็นชื่อที่ไม่ซ้ำกันในโปรเจ็กต์ Google Cloud ทั้งหมด ซึ่งจะเรียกว่า PROJECT_ID ในภายหลังใน Codelab นี้
จากนั้น หากยังไม่ได้ดำเนินการ คุณจะต้องเปิดใช้การเรียกเก็บเงินใน Developers Console เพื่อใช้ทรัพยากร Google Cloud และเปิดใช้ Spanner API, Vertex AI API, BigQuery API และ BigQuery Connection API
ดูเอกสารเกี่ยวกับราคาของ Spanner ได้ที่นี่ ค่าใช้จ่ายอื่นๆ ที่เกี่ยวข้องกับทรัพยากรอื่นๆ จะมีการบันทึกไว้ในหน้าการกำหนดราคาที่เฉพาะเจาะจง
ผู้ใช้ใหม่ของ Google Cloud Platform มีสิทธิ์รับช่วงทดลองใช้ฟรีมูลค่า$300
การตั้งค่า Google Cloud Shell
ใน Codelab นี้ เราจะใช้ Google Cloud Shell ซึ่งเป็นสภาพแวดล้อมบรรทัดคำสั่งที่ทำงานในระบบคลาวด์
เครื่องเสมือนที่ใช้ Debian นี้มาพร้อมเครื่องมือพัฒนาทั้งหมดที่คุณต้องการ โดยมีไดเรกทอรีหลักแบบถาวรขนาด 5 GB และทำงานใน Google Cloud ซึ่งช่วยเพิ่มประสิทธิภาพเครือข่ายและการตรวจสอบสิทธิ์ได้อย่างมาก ซึ่งหมายความว่าคุณจะต้องมีเพียงเบราว์เซอร์เท่านั้นสำหรับ Codelab นี้
หากต้องการเปิดใช้งาน Cloud Shell จาก Cloud Console เพียงคลิกเปิดใช้งาน Cloud Shell ![]() (ระบบจะจัดสรรและเชื่อมต่อกับสภาพแวดล้อมในเวลาไม่กี่นาที)
(ระบบจะจัดสรรและเชื่อมต่อกับสภาพแวดล้อมในเวลาไม่กี่นาที)

เมื่อเชื่อมต่อกับ Cloud Shell แล้ว คุณควรเห็นว่าระบบได้ตรวจสอบสิทธิ์คุณแล้ว และตั้งค่าโปรเจ็กต์เป็น PROJECT_ID แล้ว
gcloud auth list
ผลลัพธ์ที่คาดไว้
Credentialed Accounts

ACTIVE: *
ACCOUNT: <myaccount>@<mydomain>.com
gcloud config list project
ผลลัพธ์ที่คาดไว้
[core]
project = <PROJECT_ID>
หากไม่ได้ตั้งค่าโปรเจ็กต์เนื่องด้วยเหตุผลบางประการ ให้เรียกใช้คำสั่งต่อไปนี้
gcloud config set project <PROJECT_ID>
หากกำลังมองหา PROJECT_ID ตรวจสอบว่าคุณใช้รหัสใดในขั้นตอนการตั้งค่า หรือค้นหารหัสในแดชบอร์ด Cloud Console
นอกจากนี้ Cloud Shell ยังตั้งค่าตัวแปรสภาพแวดล้อมบางอย่างโดยค่าเริ่มต้น ซึ่งอาจมีประโยชน์เมื่อคุณเรียกใช้คำสั่งในอนาคต
echo $GOOGLE_CLOUD_PROJECT
ผลลัพธ์ที่คาดไว้
<PROJECT_ID>
เปิดใช้ API ที่จำเป็น
เปิดใช้ API ของ Spanner, Vertex AI และ BigQuery สำหรับโปรเจ็กต์ของคุณโดยทำดังนี้
gcloud services enable spanner.googleapis.com
gcloud services enable aiplatform.googleapis.com
gcloud services enable bigquery.googleapis.com
gcloud services enable bigqueryconnection.googleapis.com
สรุป
ในขั้นตอนนี้ คุณได้ตั้งค่าโปรเจ็กต์หากยังไม่มี เปิดใช้งาน Cloud Shell และเปิดใช้ API ที่จำเป็น
ถัดไป
จากนั้นคุณจะตั้งค่าอินสแตนซ์ Spanner
3. ตั้งค่าอินสแตนซ์ Spanner
สร้างอินสแตนซ์ Spanner
ในขั้นตอนนี้ คุณจะตั้งค่าอินสแตนซ์ Spanner สำหรับ Codelab โดยเปิด Cloud Shell แล้วเรียกใช้คำสั่งต่อไปนี้
export SPANNER_INSTANCE=cloudspanner-onlinebanking
gcloud spanner instances create $SPANNER_INSTANCE \
  --config=regional-us-central1 \
  --description="Spanner Online Banking" \
  --nodes=1 \
  --edition=ENTERPRISE \
  --default-backup-schedule-type=NONE
ผลลัพธ์ที่คาดไว้
Creating instance...done.
สรุป
ในขั้นตอนนี้ คุณได้สร้างอินสแตนซ์ Spanner แล้ว
ถัดไป
จากนั้นคุณจะเตรียมแอปพลิเคชันเริ่มต้นและสร้างฐานข้อมูลและสคีมา
4. สร้างฐานข้อมูลและสคีมา
เตรียมใบสมัครเริ่มต้น
ในขั้นตอนนี้ คุณจะสร้างฐานข้อมูลและสคีมาผ่านโค้ด
ก่อนอื่น ให้สร้างแอปพลิเคชัน Java ชื่อ onlinebanking โดยใช้ Maven ดังนี้
mvn -B archetype:generate \
  -DarchetypeGroupId=org.apache.maven.archetypes \
  -DgroupId=com.google.codelabs \
  -DartifactId=onlinebanking \
  -DjavaCompilerVersion=1.8 \
  -DjunitVersion=4.13.2 \
  -DarchetypeVersion=1.5
ชำระเงินและคัดลอกไฟล์ข้อมูลที่เราจะเพิ่มลงในฐานข้อมูล (ดูที่นี่สำหรับที่เก็บโค้ด)
git clone https://github.com/GoogleCloudPlatform/cloud-spanner-samples.git
cp -r ./cloud-spanner-samples/banking/data ./onlinebanking
ไปที่โฟลเดอร์แอปพลิเคชัน
cd onlinebanking
เปิดไฟล์ pom.xml Maven เพิ่มส่วนการจัดการทรัพยากร Dependency เพื่อใช้ Maven BOM ในการจัดการเวอร์ชันของไลบรารี Google Cloud
<dependencyManagement>
  <dependencies>
    <dependency>
      <groupId>com.google.cloud</groupId>
      <artifactId>libraries-bom</artifactId>
      <version>26.56.0</version>
      <type>pom</type>
      <scope>import</scope>
    </dependency>
  </dependencies>
</dependencyManagement>
โดยเครื่องมือแก้ไขและไฟล์จะมีลักษณะดังนี้ 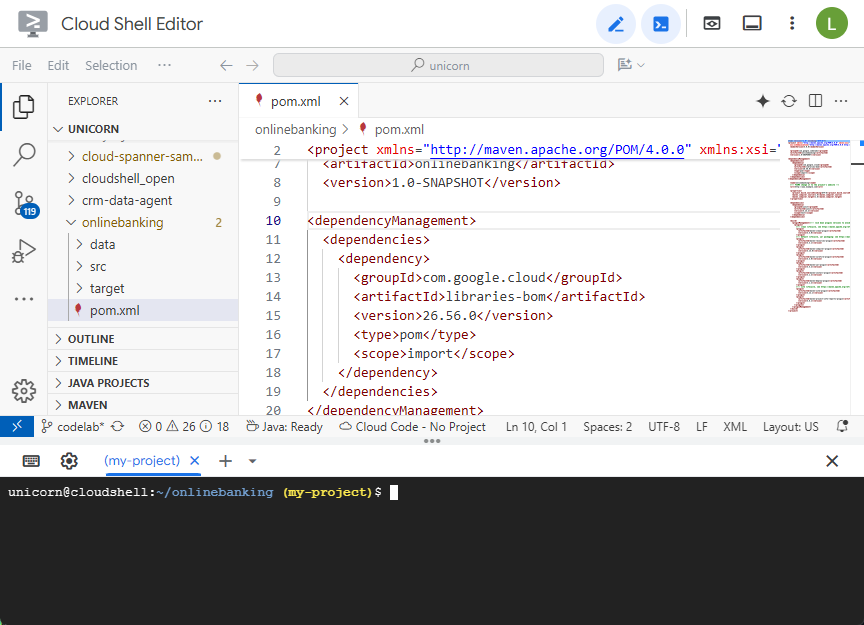
ตรวจสอบว่าส่วน dependencies มีไลบรารีที่แอปพลิเคชันจะใช้
<dependencies>
  <dependency>
    <groupId>junit</groupId>
    <artifactId>junit</artifactId>
    <version>4.13.2</version>
    <scope>test</scope>
  </dependency>
  <dependency>
    <groupId>org.slf4j</groupId>
    <artifactId>slf4j-nop</artifactId>
    <version>2.0.9</version>
  </dependency>
  <dependency>
    <groupId>com.opencsv</groupId>
    <artifactId>opencsv</artifactId>
    <version>5.10</version>
  </dependency>
  <dependency>
    <groupId>com.google.cloud</groupId>
    <artifactId>google-cloud-spanner</artifactId>
  </dependency>
  <dependency>
    <groupId>com.google.cloud</groupId>
    <artifactId>google-cloud-bigquery</artifactId>
  </dependency>
  <dependency>
    <groupId>com.google.cloud</groupId>
    <artifactId>google-cloud-bigqueryconnection</artifactId>
  </dependency>
</dependencies>
สุดท้าย ให้แทนที่ปลั๊กอินบิลด์เพื่อให้ระบบแพ็กเกจแอปพลิเคชันเป็น JAR ที่เรียกใช้ได้
<build>
  <plugins>
    <plugin>
      <artifactId>maven-resources-plugin</artifactId>
      <version>3.3.1</version>
      <executions>
        <execution>
          <id>copy-resources</id>
          <phase>process-resources</phase>
          <goals>
            <goal>copy-resources</goal>
          </goals>
          <configuration>
            <outputDirectory>${project.build.directory}/${project.artifactId}-resources</outputDirectory>
            <resources>
              <resource>
                <directory>resources</directory>
                <filtering>true</filtering>
              </resource>
            </resources>
          </configuration>
        </execution>
      </executions>
    </plugin>
    <plugin>
      <groupId>org.apache.maven.plugins</groupId>
      <artifactId>maven-dependency-plugin</artifactId>
      <version>3.8.1</version>
      <executions>
        <execution>
          <id>copy-dependencies</id>
          <phase>prepare-package</phase>
          <goals>
            <goal>copy-dependencies</goal>
          </goals>
          <configuration>
            <outputDirectory>${project.build.directory}/${project.artifactId}-resources/lib</outputDirectory>
            <overWriteReleases>false</overWriteReleases>
            <overWriteSnapshots>false</overWriteSnapshots>
            <overWriteIfNewer>true</overWriteIfNewer>
          </configuration>
        </execution>
      </executions>
    </plugin>
    <plugin>
      <groupId>org.apache.maven.plugins</groupId>
      <artifactId>maven-jar-plugin</artifactId>
      <version>3.4.2</version>
      <configuration>
        <finalName>${project.artifactId}</finalName>
        <outputDirectory>${project.build.directory}</outputDirectory>
        <archive>
          <index>false</index>
          <manifest>
            <mainClass>com.google.codelabs.App</mainClass>
            <addClasspath>true</addClasspath>
            <classpathPrefix>${project.artifactId}-resources/lib/</classpathPrefix>
          </manifest>
        </archive>
      </configuration>
    </plugin>
    <plugin>
      <groupId>org.apache.maven.plugins</groupId>
      <artifactId>maven-failsafe-plugin</artifactId>
      <version>3.2.5</version>
      <executions>
        <execution>
          <goals>
            <goal>integration-test</goal>
          </goals>
        </execution>
      </executions>
    </plugin>
    <plugin>
      <groupId>org.apache.maven.plugins</groupId>
      <artifactId>maven-surefire-plugin</artifactId>
      <version>3.2.5</version>
      <configuration>
        <useSystemClassLoader>false</useSystemClassLoader>
      </configuration>
    </plugin>
  </plugins>
</build>
บันทึกการเปลี่ยนแปลงที่คุณทำกับไฟล์ pom.xml โดยเลือก "บันทึก" ในเมนู "ไฟล์" ของ Cloud Shell Editor หรือกด Ctrl+S
เมื่อทรัพยากร Dependency พร้อมใช้งานแล้ว คุณจะเพิ่มโค้ดลงในแอปเพื่อสร้างสคีมา ดัชนีบางรายการ (รวมถึงการค้นหา) และโมเดล AI ที่เชื่อมต่อกับอุปกรณ์ปลายทางระยะไกล คุณจะสร้างอิงตามอาร์ติแฟกต์เหล่านี้และเพิ่มเมธอดอื่นๆ ลงในคลาสนี้ตาม Codelab นี้
เปิด App.java ในส่วน onlinebanking/src/main/java/com/google/codelabs แล้วแทนที่เนื้อหาด้วยโค้ดต่อไปนี้
package com.google.codelabs;

import java.util.Arrays;
import java.util.List;
import java.util.concurrent.ExecutionException;

import com.google.api.gax.longrunning.OperationFuture;
import com.google.cloud.bigquery.BigQuery;
import com.google.cloud.bigquery.BigQueryOptions;
import com.google.cloud.spanner.Database;
import com.google.cloud.spanner.DatabaseAdminClient;
import com.google.cloud.spanner.DatabaseClient;
import com.google.cloud.spanner.DatabaseId;
import com.google.cloud.spanner.Spanner;
import com.google.cloud.spanner.SpannerException;
import com.google.cloud.spanner.SpannerExceptionFactory;
import com.google.cloud.spanner.SpannerOptions;
import com.google.spanner.admin.database.v1.CreateDatabaseMetadata;

public class App {

  // Create the Spanner database and schema
  public static void create(DatabaseAdminClient dbAdminClient, DatabaseId db,
      String location, String model) {
    System.out.println("Creating Spanner database...");
    List<String> statements = Arrays.asList(
      "CREATE TABLE Customers (\n"
          + "  CustomerId INT64 NOT NULL,\n"
          + "  FirstName STRING(256) NOT NULL,\n"
          + "  LastName STRING(256) NOT NULL,\n"
          + "  FullName STRING(512) AS (FirstName || ' ' || LastName) STORED,\n"
          + "  Email STRING(512) NOT NULL,\n"
          + "  EmailTokens TOKENLIST AS\n"
          + "    (TOKENIZE_SUBSTRING(Email, ngram_size_min=>2, ngram_size_max=>3,\n"
          + "      relative_search_types=>[\"all\"])) HIDDEN,\n"
          + "  Address STRING(MAX)\n"
          + ") PRIMARY KEY (CustomerId)",

      "CREATE INDEX CustomersByEmail\n"
          + "ON Customers(Email)",

      "CREATE SEARCH INDEX CustomersFuzzyEmail\n"
          + "ON Customers(EmailTokens)",

      "CREATE TABLE Accounts (\n"
          + "  AccountId INT64 NOT NULL,\n"
          + "  CustomerId INT64 NOT NULL,\n"
          + "  AccountType STRING(256) NOT NULL,\n"
          + "  Balance NUMERIC NOT NULL,\n"
          + "  OpenDate TIMESTAMP NOT NULL\n"
          + ") PRIMARY KEY (AccountId)",

      "CREATE INDEX AccountsByCustomer\n"
          + "ON Accounts (CustomerId)",

      "CREATE TABLE TransactionLedger (\n"
          + "  TransactionId INT64 NOT NULL,\n"
          + "  AccountId INT64 NOT NULL,\n"
          + "  TransactionType STRING(256) NOT NULL,\n"
          + "  Amount NUMERIC NOT NULL,\n"
          + "  Timestamp TIMESTAMP NOT NULL"
          + "  OPTIONS(allow_commit_timestamp=true),\n"
          + "  Category STRING(256),\n"
          + "  Description STRING(MAX),\n"
          + "  CategoryTokens TOKENLIST AS (TOKENIZE_FULLTEXT(Category)) HIDDEN,\n"
          + "  DescriptionTokens TOKENLIST AS (TOKENIZE_FULLTEXT(Description)) HIDDEN\n"
          + ") PRIMARY KEY (AccountId, TransactionId),\n"
          + "INTERLEAVE IN PARENT Accounts ON DELETE CASCADE",

      "CREATE INDEX TransactionLedgerByAccountType\n"
          + "ON TransactionLedger(AccountId, TransactionType)",

      "CREATE INDEX TransactionLedgerByCategory\n"
          + "ON TransactionLedger(AccountId, Category)",

      "CREATE SEARCH INDEX TransactionLedgerTextSearch\n"
          + "ON TransactionLedger(CategoryTokens, DescriptionTokens)",

      "CREATE MODEL TransactionCategoryModel\n"
          + "INPUT (prompt STRING(MAX))\n"
          + "OUTPUT (content STRING(MAX))\n"
          + "REMOTE OPTIONS (\n"
          + "  endpoint = '//aiplatform.googleapis.com/projects/" + db.getInstanceId().getProject()
              + "/locations/" + location + "/publishers/google/models/" + model + "',\n"
          + "  default_batch_size = 1\n"
          + ")");
    OperationFuture<Database, CreateDatabaseMetadata> op = dbAdminClient.createDatabase(
        db.getInstanceId().getInstance(),
        db.getDatabase(),
        statements);
    try {
      Database dbOperation = op.get();
      System.out.println("Created Spanner database [" + dbOperation.getId() + "]");
    } catch (ExecutionException e) {
      throw (SpannerException) e.getCause();
    } catch (InterruptedException e) {
      throw SpannerExceptionFactory.propagateInterrupt(e);
    }
  }

  static void printUsageAndExit() {
    System.out.println("Online Online Banking Application 1.0.0");
    System.out.println("Usage:");
    System.out.println("  java -jar target/onlinebanking.jar <command> [command_option(s)]");
    System.out.println("");
    System.out.println("Examples:");
    System.out.println("  java -jar target/onlinebanking.jar create");
    System.out.println("      - Create a sample Spanner database and schema in your "
        + "project.\n");
    System.exit(1);
  }

  public static void main(String[] args) {
    if (args.length < 1) {
      printUsageAndExit();
    }

    String instanceId = System.getProperty("SPANNER_INSTANCE", System.getenv("SPANNER_INSTANCE"));
    String databaseId = System.getProperty("SPANNER_DATABASE", System.getenv("SPANNER_DATABASE"));
    String location = System.getenv().getOrDefault("SPANNER_LOCATION", "us-central1");
    String model = System.getenv().getOrDefault("SPANNER_MODEL", "gemini-2.0-flash-lite");
    if (instanceId == null || databaseId == null) {
      System.err.println("Missing one or more required environment variables: SPANNER_INSTANCE or "
          + "SPANNER_DATABASE");
      System.exit(1);
    }

    BigQueryOptions bigqueryOptions = BigQueryOptions.newBuilder().build();
    BigQuery bigquery = bigqueryOptions.getService();

    SpannerOptions spannerOptions = SpannerOptions.newBuilder().build();
    try (Spanner spanner = spannerOptions.getService()) {
      String command = args[0];
      DatabaseId db = DatabaseId.of(spannerOptions.getProjectId(), instanceId, databaseId);
      DatabaseClient dbClient = spanner.getDatabaseClient(db);
      DatabaseAdminClient dbAdminClient = spanner.getDatabaseAdminClient();

      switch (command) {
        case "create":
          create(dbAdminClient, db, location, model);
          break;
        default:
          printUsageAndExit();
      }
    }
  }
}
บันทึกการเปลี่ยนแปลงใน App.java
ดูเอนทิตีต่างๆ ที่โค้ดของคุณสร้างขึ้น แล้วสร้าง JAR ของแอปพลิเคชัน
mvn package
ผลลัพธ์ที่คาดไว้
[INFO] Building jar: /home/your_user/onlinebanking/target/onlinebanking.jar
[INFO] ------------------------------------------------------------------------
[INFO] BUILD SUCCESS
เรียกใช้แอปพลิเคชันเพื่อดูข้อมูลการใช้งาน
java -jar target/onlinebanking.jar
ผลลัพธ์ที่คาดไว้
Online Banking Application 1.0.0
Usage:
  java -jar target/onlinebanking.jar <command> [command_option(s)]

Examples:
  java -jar target/onlinebanking.jar create
      - Create a sample Spanner database and schema in your project.
สร้างฐานข้อมูลและสคีมา
ตั้งค่าตัวแปรสภาพแวดล้อมของแอปพลิเคชันที่จำเป็น
export SPANNER_INSTANCE=cloudspanner-onlinebanking
export SPANNER_DATABASE=onlinebanking
สร้างฐานข้อมูลและสคีมาโดยเรียกใช้คำสั่ง create
java -jar target/onlinebanking.jar create
ผลลัพธ์ที่คาดไว้
Creating Spanner database...
Created Spanner database [<DATABASE_RESOURCE_NAME>]
ตรวจสอบสคีมาใน Spanner
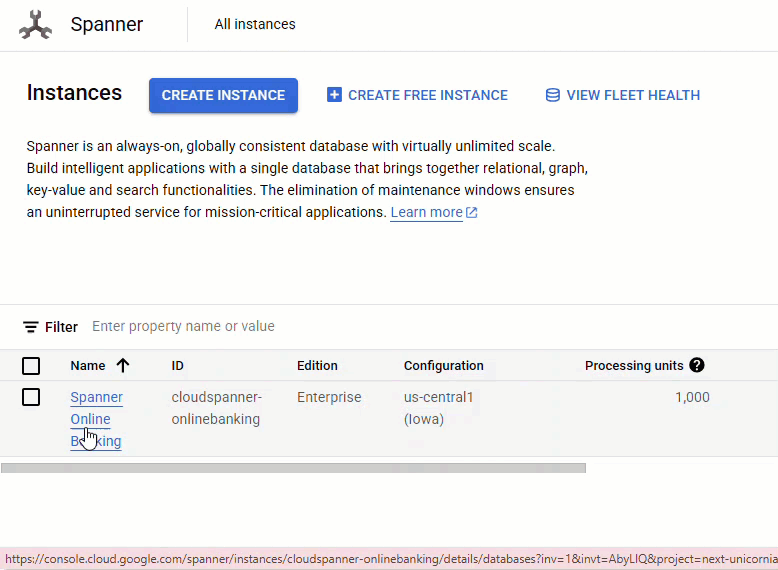
ในคอนโซล Spanner ให้ไปที่อินสแตนซ์และฐานข้อมูลที่เพิ่งสร้าง
คุณควรเห็นตารางทั้ง 3 ตาราง ได้แก่ Accounts, Customers และ TransactionLedger
การดำเนินการนี้จะสร้างสคีมาของฐานข้อมูล ซึ่งรวมถึงตาราง Accounts, Customers และ TransactionLedger พร้อมด้วยดัชนีรองสำหรับการดึงข้อมูลที่เพิ่มประสิทธิภาพ และการอ้างอิงโมเดล Vertex AI
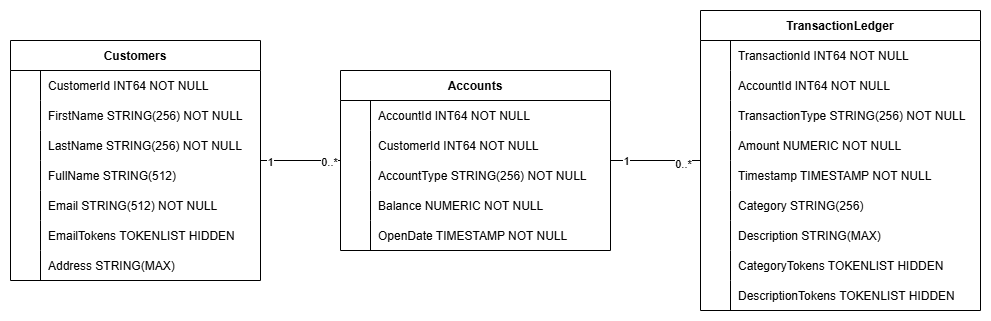
TransactionLedger ตารางจะสอดแทรกอยู่ในบัญชีเพื่อเพิ่มประสิทธิภาพการค้นหาธุรกรรมเฉพาะบัญชีผ่านการปรับปรุงการจัดเก็บข้อมูลในพื้นที่
เราได้ใช้ดัชนีรอง (CustomersByEmail, CustomersFuzzyEmail, AccountsByCustomer, TransactionLedgerByAccountType, TransactionLedgerByCategory, TransactionLedgerTextSearch) เพื่อเพิ่มประสิทธิภาพรูปแบบการเข้าถึงข้อมูลทั่วไปที่ใช้ใน Codelab นี้ เช่น การค้นหาลูกค้าตามอีเมลที่ตรงกันและอีเมลที่คล้ายกัน การดึงข้อมูลบัญชีตามลูกค้า รวมถึงการค้นหาและค้นหาข้อมูลธุรกรรมอย่างมีประสิทธิภาพ
TransactionCategoryModel ใช้ประโยชน์จาก Vertex AI เพื่อเปิดใช้การเรียก SQL โดยตรงไปยัง LLM ซึ่งใช้สำหรับการจัดหมวดหมู่ธุรกรรมแบบไดนามิกใน Codelab นี้
สรุป
ในขั้นตอนนี้ คุณได้สร้างฐานข้อมูลและสคีมา Spanner แล้ว
ถัดไป
จากนั้นคุณจะโหลดข้อมูลแอปพลิเคชันตัวอย่าง
5. โหลดข้อมูล
ตอนนี้คุณจะเพิ่มฟังก์ชันการทำงานเพื่อโหลดข้อมูลตัวอย่างจากไฟล์ CSV ลงในฐานข้อมูล
เปิด App.java แล้วเริ่มด้วยการแทนที่การนำเข้า
package com.google.codelabs;

import java.io.FileReader;
import java.math.BigDecimal;
import java.time.Duration;
import java.time.Instant;
import java.time.temporal.ChronoUnit;
import java.util.ArrayList;
import java.util.Arrays;
import java.util.HashMap;
import java.util.List;
import java.util.Map;
import java.util.Random;
import java.util.concurrent.ExecutionException;

import com.google.api.gax.longrunning.OperationFuture;
import com.google.cloud.Timestamp;
import com.google.cloud.bigquery.BigQuery;
import com.google.cloud.bigquery.BigQueryOptions;
import com.google.cloud.spanner.Database;
import com.google.cloud.spanner.DatabaseAdminClient;
import com.google.cloud.spanner.DatabaseClient;
import com.google.cloud.spanner.DatabaseId;
import com.google.cloud.spanner.Key;
import com.google.cloud.spanner.Spanner;
import com.google.cloud.spanner.SpannerException;
import com.google.cloud.spanner.SpannerExceptionFactory;
import com.google.cloud.spanner.SpannerOptions;
import com.google.cloud.spanner.Statement;
import com.google.cloud.spanner.Struct;
import com.google.spanner.admin.database.v1.CreateDatabaseMetadata;
import com.opencsv.CSVReader;
จากนั้นเพิ่มวิธีการแทรกลงในคลาส App ดังนี้
  // Insert customers from CSV
  public static void insertCustomers(DatabaseClient dbClient) {
    System.out.println("Inserting customers...");
    dbClient
        .readWriteTransaction()
        .run(transaction -> {
          int count = 0;
          List<Statement> statements = new ArrayList<>();
          try (CSVReader reader = new CSVReader(new FileReader("data/customers.csv"))) {
            reader.skip(1);
            String[] line;
            while ((line = reader.readNext()) != null) {
              Statement statement = Statement.newBuilder(
                  "INSERT INTO Customers (CustomerId, FirstName, LastName, Email, Address) "
                      + "VALUES (@customerId, @firstName, @lastName, @email, @address)")
                  .bind("customerId").to(Long.parseLong(line[0]))
                  .bind("firstName").to(line[1])
                  .bind("lastName").to(line[2])
                  .bind("email").to(line[3])
                  .bind("address").to(line[4])
                  .build();
              statements.add(statement);
              count++;
            }
            transaction.batchUpdate(statements);
            System.out.println("Inserted " + count + " customers");
            return null;
          }
        });
  }

  // Insert accounts from CSV
  public static void insertAccounts(DatabaseClient dbClient) {
    System.out.println("Inserting accounts...");
    dbClient
        .readWriteTransaction()
        .run(transaction -> {
          int count = 0;
          List<Statement> statements = new ArrayList<>();
          try (CSVReader reader = new CSVReader(new FileReader("data/accounts.csv"))) {
            reader.skip(1);
            String[] line;
            while ((line = reader.readNext()) != null) {
              Statement statement = Statement.newBuilder(
                "INSERT INTO Accounts (AccountId, CustomerId, AccountType, Balance, OpenDate) "
                    + "VALUES (@accountId, @customerId, @accountType, @balance, @openDate)")
                .bind("accountId").to(Long.parseLong(line[0]))
                .bind("customerId").to(Long.parseLong(line[1]))
                .bind("accountType").to(line[2])
                .bind("balance").to(new BigDecimal(line[3]))
                .bind("openDate").to(line[4])
                .build();
              statements.add(statement);
              count++;
            }
            transaction.batchUpdate(statements);
            System.out.println("Inserted " + count + " accounts");
            return null;
          }
        });
  }

  // Insert transactions from CSV
  public static void insertTransactions(DatabaseClient dbClient) {
    System.out.println("Inserting transactions...");
    dbClient
        .readWriteTransaction()
        .run(transaction -> {
          int count = 0;
          List<Statement> statements = new ArrayList<>();
          try (CSVReader reader = new CSVReader(new FileReader("data/transactions.csv"))) {
            reader.skip(1);
            String[] line;

            // Specify timestamps that are within last 30 days
            Random random = new Random();
            Instant startTime = Instant.now().minus(15, ChronoUnit.DAYS);
            Instant currentTimestamp = startTime;

            Map<Long, BigDecimal> balanceChanges = new HashMap<>();
            while ((line = reader.readNext()) != null) {
              long accountId = Long.parseLong(line[1]);
              String transactionType = line[2];
              BigDecimal amount = new BigDecimal(line[3]);
              int randomMinutes = random.nextInt(60) + 1;
              currentTimestamp = currentTimestamp.plus(Duration.ofMinutes(randomMinutes));
              Timestamp timestamp = Timestamp.ofTimeSecondsAndNanos(
                  currentTimestamp.getEpochSecond(), currentTimestamp.getNano());
              Statement statement = Statement.newBuilder(
                "INSERT INTO TransactionLedger (TransactionId, AccountId, TransactionType, Amount,"
                    + "Timestamp, Category, Description) "
                    + "VALUES (@transactionId, @accountId, @transactionType, @amount, @timestamp,"
                    + "@category, @description)")
                .bind("transactionId").to(Long.parseLong(line[0]))
                .bind("accountId").to(accountId)
                .bind("transactionType").to(transactionType)
                .bind("amount").to(amount)
                .bind("timestamp").to(timestamp)
                .bind("category").to(line[5])
                .bind("description").to(line[6])
                .build();
              statements.add(statement);

              // Track balance changes per account
              BigDecimal balanceChange = balanceChanges.getOrDefault(accountId,
                  BigDecimal.ZERO);
              if ("Credit".equalsIgnoreCase(transactionType)) {
                balanceChanges.put(accountId, balanceChange.add(amount));
              } else if ("Debit".equalsIgnoreCase(transactionType)) {
                balanceChanges.put(accountId, balanceChange.subtract(amount));
              } else {
                System.err.println("Unsupported transaction type: " + transactionType);
                continue;
              }

              count++;
            }

            // Apply final balance updates
            for (Map.Entry<Long, BigDecimal> entry : balanceChanges.entrySet()) {
              long accountId = entry.getKey();
              BigDecimal balanceChange = entry.getValue();

              Struct row = transaction.readRow(
                  "Accounts",
                  Key.of(accountId),
                  List.of("Balance"));
              if (row != null) {
                BigDecimal currentBalance = row.getBigDecimal("Balance");
                BigDecimal updatedBalance = currentBalance.add(balanceChange);
                Statement statement = Statement.newBuilder(
                  "UPDATE Accounts SET Balance = @balance WHERE AccountId = @accountId")
                  .bind("accountId").to(accountId)
                  .bind("balance").to(updatedBalance)
                  .build();
                statements.add(statement);
              }
            }

            transaction.batchUpdate(statements);
            System.out.println("Inserted " + count + " transactions");
          }
          return null;
        });
  }
เพิ่มคำสั่ง CASE อีกรายการในmainเมธอดสำหรับการแทรกภายในswitch (command)
        case "insert":
          String insertType = (args.length >= 2) ? args[1] : "";
          if (insertType.equals("customers")) {
            insertCustomers(dbClient);
          } else if (insertType.equals("accounts")) {
            insertAccounts(dbClient);
          } else if (insertType.equals("transactions")) {
            insertTransactions(dbClient);
          } else {
            insertCustomers(dbClient);
            insertAccounts(dbClient);
            insertTransactions(dbClient);
          }
          break;
สุดท้าย ให้เพิ่มวิธีใช้การแทรกไปยังเมธอด printUsageAndExit ดังนี้
    System.out.println("  java -jar target/onlinebanking.jar insert");
    System.out.println("      - Insert sample Customers, Accounts, and Transactions into the "
        + "database.\n");
บันทึกการเปลี่ยนแปลงที่คุณทำกับ App.java
สร้างแอปพลิเคชันอีกครั้ง
mvn package
แทรกข้อมูลตัวอย่างโดยเรียกใช้คำสั่ง insert ดังนี้
java -jar target/onlinebanking.jar insert
ผลลัพธ์ที่คาดไว้
Inserting customers...
Inserted 100 customers
Inserting accounts...
Inserted 125 accounts
Inserting transactions...
Inserted 200 transactions
ใน Spanner Console ให้กลับไปที่ Spanner Studio สำหรับอินสแตนซ์และฐานข้อมูล จากนั้นเลือกTransactionLedgerตาราง แล้วคลิก "ข้อมูล" ในแถบด้านข้างเพื่อยืนยันว่าโหลดข้อมูลแล้ว ตารางควรมี 200 แถว
สรุป
ในขั้นตอนนี้ คุณได้แทรกข้อมูลตัวอย่างลงในฐานข้อมูลแล้ว
ถัดไป
จากนั้นคุณจะใช้ประโยชน์จากการผสานรวม Vertex AI เพื่อจัดหมวดหมู่ธุรกรรมธนาคารโดยอัตโนมัติภายใน Spanner SQL โดยตรง
6. จัดหมวดหมู่ข้อมูลด้วย Vertex AI
ในขั้นตอนนี้ คุณจะใช้ประโยชน์จากความสามารถของ Vertex AI เพื่อจัดหมวดหมู่ธุรกรรมทางการเงินโดยอัตโนมัติภายใน Spanner SQL โดยตรง Vertex AI ช่วยให้คุณเลือกโมเดลที่ฝึกไว้ล่วงหน้าที่มีอยู่ หรือฝึกและติดตั้งใช้งานโมเดลของคุณเองได้ ดูโมเดลที่พร้อมใช้งานได้ใน Vertex AI Model Garden
สำหรับ Codelab นี้ เราจะใช้โมเดล Gemini อย่างใดอย่างหนึ่ง นั่นคือ Gemini Flash Lite Gemini เวอร์ชันนี้คุ้มค่า แต่ยังคงรองรับปริมาณงานส่วนใหญ่ในแต่ละวันได้
ปัจจุบันเรามีธุรกรรมทางการเงินจำนวนหนึ่งที่ต้องการจัดหมวดหมู่ (groceries, transportation ฯลฯ) ตามคำอธิบาย เราทำได้โดยการลงทะเบียนโมเดลใน Spanner แล้วใช้ ML.PREDICT เพื่อเรียกใช้โมเดล AI
ในแอปพลิเคชันธนาคาร เราอาจต้องการจัดหมวดหมู่ธุรกรรมเพื่อให้ได้ข้อมูลเชิงลึกเกี่ยวกับพฤติกรรมของลูกค้ามากขึ้น เพื่อให้เราปรับเปลี่ยนบริการในแบบของคุณ ตรวจจับความผิดปกติได้อย่างมีประสิทธิภาพมากขึ้น หรือให้ลูกค้าสามารถติดตามงบประมาณของตนเองได้ในแต่ละเดือน
ขั้นตอนแรกเสร็จสมบูรณ์แล้วเมื่อเราสร้างฐานข้อมูลและสคีมา ซึ่งสร้างโมเดลดังนี้
จากนั้นเราจะเพิ่มเมธอดลงในแอปพลิเคชันเพื่อเรียกใช้ ML.PREDICT
เปิด App.java แล้วเพิ่มวิธีการ categorize ดังนี้
  // Use Vertex AI to set the category of transactions
  public static void categorize(DatabaseClient dbClient) {
    System.out.println("Categorizing transactions...");
    try {
      // Create a prompt to instruct the LLM how to categorize the transactions
      String categories = String.join(", ", Arrays.asList("Entertainment", "Gifts", "Groceries",
          "Investment", "Medical", "Movies", "Online Shopping", "Other", "Purchases", "Refund",
          "Restaurants", "Salary", "Transfer", "Transportation", "Utilities"));
      String prompt = "Categorize the following financial activity into one of these "
          + "categories: " +  categories + ". Return Other if the description cannot be mapped to "
          + "one of these categories.  Only return the exact category string, no other text or "
          + "punctuation or reasoning. Description: ";
      String sql = "UPDATE TransactionLedger SET Category = (\n"
          + "  SELECT content FROM ML.PREDICT(MODEL `TransactionCategoryModel`, (\n"
          + "    SELECT CONCAT('" + prompt + "', CASE WHEN TRIM(Description) = ''\n"
          + "    THEN 'Other' ELSE Description END) AS prompt\n"
          + "  ))\n"
          + ") WHERE TRUE";

      // Use partitioned update to batch update a large number of rows
      dbClient.executePartitionedUpdate(Statement.of(sql));
      System.out.println("Completed categorizing transactions");
    } catch (SpannerException e) {
      throw e;
    }
  }
เพิ่มคำสั่ง CASE อีกรายการในmainเมธอดสำหรับจัดหมวดหมู่:
        case "categorize":
          categorize(dbClient);
          break;
สุดท้าย ให้เพิ่มวิธีใช้การจัดหมวดหมู่ลงในprintUsageAndExitวิธี:
    System.out.println("  java -jar target/onlinebanking.jar categorize");
    System.out.println("      - Use AI to categorize transactions in the database.\n");
บันทึกการเปลี่ยนแปลงที่คุณทำกับ App.java
สร้างแอปพลิเคชันอีกครั้ง
mvn package
จัดหมวดหมู่ธุรกรรมในฐานข้อมูลโดยเรียกใช้คำสั่ง categorize
java -jar target/onlinebanking.jar categorize
ผลลัพธ์ที่คาดไว้
Categorizing transactions...
Completed categorizing transactions
ใน Spanner Studio ให้เรียกใช้คำสั่งแสดงตัวอย่างข้อมูลสำหรับตาราง TransactionLedger ตอนนี้คอลัมน์ Category ควรมีข้อมูลสำหรับทุกแถวแล้ว
เมื่อจัดหมวดหมู่ธุรกรรมแล้ว เราจะใช้ข้อมูลนี้สำหรับการค้นหาภายในหรือการค้นหาที่ลูกค้ามองเห็นได้ ในขั้นตอนถัดไป เราจะดูวิธีค้นหาจำนวนเงินที่ลูกค้าใช้จ่ายในหมวดหมู่หนึ่งๆ ในช่วงเดือนที่ผ่านมา
สรุป
ในขั้นตอนนี้ คุณได้ใช้โมเดลที่ฝึกไว้ล่วงหน้าเพื่อทำการจัดหมวดหมู่ข้อมูลโดยใช้ AI
ถัดไป
จากนั้นคุณจะใช้การแปลงเป็นโทเค็นเพื่อทำการค้นหาแบบคร่าวๆ และแบบข้อความเต็ม
7. ค้นหาโดยใช้การค้นหาข้อความแบบเต็ม
เพิ่มรหัสคำค้นหา
Spanner มีการค้นหาข้อความแบบเต็มหลายรายการ ในขั้นตอนนี้ คุณจะทำการค้นหาที่ตรงกันทั้งหมด จากนั้นทำการค้นหาแบบคลุมเครือและการค้นหาข้อความแบบเต็ม
เปิด App.java แล้วเริ่มด้วยการแทนที่การนำเข้า
package com.google.codelabs;

import java.io.FileReader;
import java.math.BigDecimal;
import java.time.Duration;
import java.time.Instant;
import java.time.temporal.ChronoUnit;
import java.util.ArrayList;
import java.util.Arrays;
import java.util.HashMap;
import java.util.List;
import java.util.Map;
import java.util.Random;
import java.util.concurrent.ExecutionException;
import java.util.concurrent.TimeUnit;

import com.google.api.gax.longrunning.OperationFuture;
import com.google.cloud.Timestamp;
import com.google.cloud.bigquery.BigQuery;
import com.google.cloud.bigquery.BigQueryOptions;
import com.google.cloud.spanner.Database;
import com.google.cloud.spanner.DatabaseAdminClient;
import com.google.cloud.spanner.DatabaseClient;
import com.google.cloud.spanner.DatabaseId;
import com.google.cloud.spanner.Key;
import com.google.cloud.spanner.ReadOnlyTransaction;
import com.google.cloud.spanner.ResultSet;
import com.google.cloud.spanner.Spanner;
import com.google.cloud.spanner.SpannerException;
import com.google.cloud.spanner.SpannerExceptionFactory;
import com.google.cloud.spanner.SpannerOptions;
import com.google.cloud.spanner.Statement;
import com.google.cloud.spanner.Struct;
import com.google.cloud.spanner.TimestampBound;
import com.google.spanner.admin.database.v1.CreateDatabaseMetadata;
import com.opencsv.CSVReader;
จากนั้นเพิ่มวิธีการค้นหา
  // Get current account balance(s) by customer
  public static void getBalance(DatabaseClient dbClient, long customerId) {
    String query = "SELECT AccountId, Balance\n"
        + "FROM Accounts\n"
        + "WHERE CustomerId = @customerId";
    Statement statement = Statement.newBuilder(query)
        .bind("customerId").to(customerId)
        .build();

    // Ignore ongoing transactions, use stale reads as seconds-old data is sufficient
    TimestampBound stalenessBound = TimestampBound.ofMaxStaleness(5, TimeUnit.SECONDS);
    try (ReadOnlyTransaction transaction = dbClient.singleUseReadOnlyTransaction(stalenessBound);
        ResultSet resultSet = transaction.executeQuery(statement);) {
      System.out.println("Account balances for customer " + customerId + ":");
      while (resultSet.next()) {
        System.out.println("  Account " + resultSet.getLong("AccountId") + ": "
            + resultSet.getBigDecimal("Balance"));
      }
    }
  }

  // Find customers by email
  public static void findCustomers(DatabaseClient dbClient, String email) {
    // Query using fuzzy search (ngrams) to allow for spelling mistakes
    String query = "SELECT CustomerId, Email\n"
        + "FROM Customers\n"
        + "WHERE SEARCH_NGRAMS(EmailTokens, @email)\n"
        + "ORDER BY SCORE_NGRAMS(EmailTokens, @email) DESC\n"
        + "LIMIT 10";
    Statement statement = Statement.newBuilder(query)
        .bind("email").to(email)
        .build();

    try (ReadOnlyTransaction transaction = dbClient.singleUseReadOnlyTransaction();
        ResultSet resultSet = transaction.executeQuery(statement)) {
      System.out.println("Customer emails matching " + email + " (top 10 matches):");
      while (resultSet.next()) {
        System.out.println("  Customer " + resultSet.getLong("CustomerId") + ": "
            + resultSet.getString("Email"));
      }
    }
  }

  // Get total monthly spending for a customer by category
  public static void getSpending(DatabaseClient dbClient, long customerId, String category) {
    // Query category using full-text search
    String query = "SELECT SUM(Amount) as TotalSpending\n"
        + "FROM TransactionLedger t\n"
        + "JOIN Accounts a\n"
        + "  ON t.AccountId = a.AccountId\n"
        + "WHERE t.TransactionType = 'Debit'\n"
        + "  AND a.CustomerId = @customerId\n"
        + "  AND t.Timestamp >= TIMESTAMP_ADD(CURRENT_TIMESTAMP(), INTERVAL -30 DAY)\n"
        + "  AND (SEARCH(t.CategoryTokens, @category) OR SEARCH(t.DescriptionTokens, @category))";
    Statement statement = Statement.newBuilder(query)
        .bind("customerId").to(customerId)
        .bind("category").to(category)
        .build();

    try (ReadOnlyTransaction transaction = dbClient.singleUseReadOnlyTransaction();
        ResultSet resultSet = transaction.executeQuery(statement);) {
      System.out.println("Total spending for customer " + customerId + " under category "
          + category + ":");
      while (resultSet.next()) {
        BigDecimal totalSpending = BigDecimal.ZERO;
        if (!resultSet.isNull("TotalSpending")) {
          totalSpending = resultSet.getBigDecimal("TotalSpending");
        }
        System.out.println("  " + totalSpending);
      }
    }
  }
เพิ่มคำสั่ง case อีกรายการในเมธอด main สำหรับการค้นหา
        case "query":
          String queryType = (args.length >= 2) ? args[1] : "";
          if (queryType.equals("balance")) {
            long customerId = (args.length >= 3) ? Long.parseLong(args[2]) : 1L;
            getBalance(dbClient, customerId);
          } else if (queryType.equals("email")) {
            String email = (args.length >= 3) ? args[2] : "";
            findCustomers(dbClient, email);
          } else if (queryType.equals("spending")) {
            long customerId = (args.length >= 3) ? Long.parseLong(args[2]) : 1L;
            String category = (args.length >= 4) ? args[3] : "";
            getSpending(dbClient, customerId, category);
          } else {
            printUsageAndExit();
          }
          break;
สุดท้าย ให้แนบวิธีการใช้คำสั่งค้นหากับเมธอด printUsageAndExit ดังนี้
    System.out.println("  java -jar target/onlinebanking.jar query balance 1");
    System.out.println("      - Query customer account balance(s) by customer id.\n");
    System.out.println("  java -jar target/onlinebanking.jar query email madi");
    System.out.println("      - Find customers by email using fuzzy search.\n");
    System.out.println("  java -jar target/onlinebanking.jar query spending 1 groceries");
    System.out.println("      - Query customer spending by customer id and category using "
        + "full-text search.\n");
บันทึกการเปลี่ยนแปลงที่คุณทำกับ App.java
สร้างแอปพลิเคชันอีกครั้ง
mvn package
ค้นหายอดคงเหลือในบัญชีลูกค้าที่ตรงกันทุกประการ
การค้นหาที่ตรงกันทุกประการจะค้นหาแถวที่ตรงกันซึ่งตรงกับคำนั้นๆ ทุกประการ
ระบบได้เพิ่มดัชนีไว้แล้วเมื่อคุณสร้างฐานข้อมูลและสคีมาเพื่อปรับปรุงประสิทธิภาพ
  "CREATE INDEX AccountsByCustomer\n"
          + "ON Accounts (CustomerId)",
getBalance วิธีนี้จะใช้ดัชนีนี้โดยนัยเพื่อค้นหาลูกค้าที่ตรงกับ customerId ที่ระบุ และยังรวมบัญชีที่เป็นของลูกค้ารายนั้นด้วย
นี่คือลักษณะของคำค้นหาเมื่อดำเนินการใน Spanner Studio โดยตรง 
แสดงยอดคงเหลือในบัญชีของลูกค้า 1 โดยเรียกใช้คำสั่งต่อไปนี้
java -jar target/onlinebanking.jar query balance 1
ผลลัพธ์ที่คาดไว้
Account balances for customer 1:
  Account 1: 9875.25
  Account 7: 9900
  Account 110: 38200
มีลูกค้า 100 ราย ดังนั้นคุณจึงค้นหายอดคงเหลือในบัญชีลูกค้าอื่นๆ ได้ด้วยการระบุรหัสลูกค้าที่แตกต่างกัน
java -jar target/onlinebanking.jar query balance 5
java -jar target/onlinebanking.jar query balance 10
java -jar target/onlinebanking.jar query balance 99
ทำการค้นหาแบบคลุมเครือกับอีเมลของลูกค้า
การค้นหาแบบคร่าวๆ ช่วยให้ค้นหาคำที่ตรงกันโดยประมาณสำหรับข้อความค้นหา รวมถึงการสะกดที่แตกต่างกันและการพิมพ์ผิด
ระบบได้เพิ่มดัชนี n-gram ไว้แล้วเมื่อคุณสร้างฐานข้อมูลและสคีมา
CREATE TABLE Customers (
  ...
  EmailTokens TOKENLIST AS (TOKENIZE_SUBSTRING(Email,
    ngram_size_min=>2,
    ngram_size_max=>3,
    relative_search_types=>["all"])) HIDDEN,
) PRIMARY KEY(CustomerId);

CREATE SEARCH INDEX CustomersFuzzyEmail ON Customers(EmailTokens);
findCustomers วิธีนี้ใช้ SEARCH_NGRAMS และ SCORE_NGRAMS เพื่อค้นหาในดัชนีนี้เพื่อค้นหาลูกค้าตามอีเมล เนื่องจากคอลัมน์อีเมลได้รับการแปลงข้อมูลเป็นโทเค็นแบบ n-gram คำค้นหานี้จึงอาจมีการสะกดผิดและยังคงแสดงคำตอบที่ถูกต้องได้ ผลลัพธ์จะเรียงตามรายการที่ตรงกันมากที่สุด
ค้นหาอีเมลลูกค้าที่ตรงกันซึ่งมี madi โดยเรียกใช้คำสั่งต่อไปนี้
java -jar target/onlinebanking.jar query email madi
ผลลัพธ์ที่คาดไว้
Customer emails matching madi (top 10 matches):
  Customer 39: madison.perez@example.com
  Customer 64: mason.gray@example.com
  Customer 91: mabel.alexander@example.com
คำตอบนี้แสดงรายการที่ตรงกันมากที่สุดซึ่งมี madi หรือสตริงที่คล้ายกันตามลำดับการจัดอันดับ
คำค้นหาจะมีลักษณะดังนี้หากดำเนินการใน Spanner Studio โดยตรง 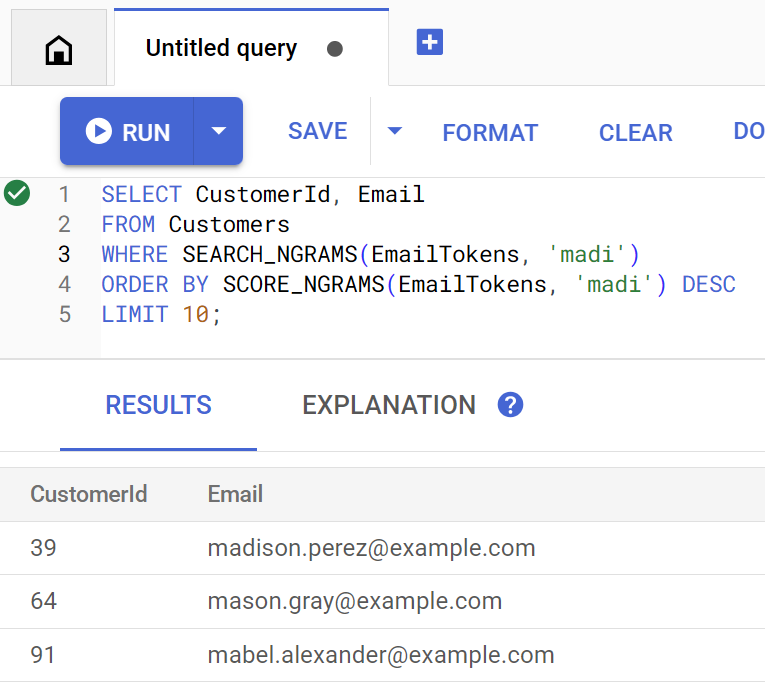
การค้นหาแบบคลุมเครือยังช่วยแก้ไขข้อผิดพลาดในการสะกด เช่น การสะกดคำว่า emily ผิด ได้ด้วย
java -jar target/onlinebanking.jar query email emily
java -jar target/onlinebanking.jar query email emliy
java -jar target/onlinebanking.jar query email emilee
ผลลัพธ์ที่คาดไว้
Customer emails matching emliy (top 10 matches):
  Customer 31: emily.lopez@example.com
ในแต่ละกรณี ระบบจะแสดงอีเมลของลูกค้าที่คาดไว้เป็นผลการค้นหาอันดับแรก
ค้นหาธุรกรรมด้วยการค้นหาข้อความแบบเต็ม
ฟีเจอร์การค้นหาข้อความแบบเต็มของ Spanner ใช้เพื่อดึงข้อมูลตามคีย์เวิร์ดหรือวลี โดยสามารถแก้ไขข้อผิดพลาดในการสะกดหรือค้นหาคำพ้องความหมายได้
ระบบได้เพิ่มดัชนีการค้นหาข้อความแบบเต็มแล้วเมื่อคุณสร้างฐานข้อมูลและสคีมา
CREATE TABLE TransactionLedger (
  ...
  CategoryTokens TOKENLIST AS (TOKENIZE_FULLTEXT(Category)) HIDDEN,
  DescriptionTokens TOKENLIST AS (TOKENIZE_FULLTEXT(Description)) HIDDEN,
) PRIMARY KEY(AccountId, TransactionId),
  INTERLEAVE IN PARENT Accounts ON DELETE CASCADE;

CREATE SEARCH INDEX TransactionLedgerTextSearch ON TransactionLedger(CategoryTokens, DescriptionTokens);
getSpending วิธีนี้ใช้ฟังก์ชันการค้นหาข้อความแบบเต็ม SEARCH เพื่อจับคู่กับดัชนีนั้น โดยจะค้นหาการใช้จ่ายทั้งหมด (การหักบัญชี) ในช่วง 30 วันที่ผ่านมาสำหรับรหัสลูกค้าที่ระบุ
ดูค่าใช้จ่ายทั้งหมดในช่วงเดือนที่ผ่านมาสำหรับลูกค้า 1 ในหมวดหมู่ groceries โดยเรียกใช้คำสั่งต่อไปนี้
java -jar target/onlinebanking.jar query spending 1 groceries
ผลลัพธ์ที่คาดไว้
Total spending for customer 1 under category groceries:
  50
นอกจากนี้ คุณยังดูการใช้จ่ายในหมวดหมู่อื่นๆ (ที่เราจัดหมวดหมู่ไว้ในขั้นตอนก่อนหน้า) หรือใช้รหัสลูกค้าอื่นได้ด้วย
java -jar target/onlinebanking.jar query spending 1 transportation
java -jar target/onlinebanking.jar query spending 1 restaurants
java -jar target/onlinebanking.jar query spending 12 entertainment
สรุป
ในขั้นตอนนี้ คุณได้ทำการค้นหาที่ตรงกันทุกประการ รวมถึงการค้นหาแบบคลุมเครือและการค้นหาแบบข้อความเต็ม
ถัดไป
จากนั้นคุณจะผสานรวม Spanner กับ Google BigQuery เพื่อทำการค้นหาแบบรวม ซึ่งจะช่วยให้คุณรวมข้อมูล Spanner แบบเรียลไทม์กับข้อมูล BigQuery ได้
8. เรียกใช้การค้นหาแบบรวมกับ BigQuery
สร้างชุดข้อมูล BigQuery
ในขั้นตอนนี้ คุณจะรวมข้อมูล BigQuery และ Spanner เข้าด้วยกันโดยใช้การค้นหาแบบรวม
โดยให้สร้างชุดข้อมูล MarketingCampaigns ในบรรทัดคำสั่ง Cloud Shell ก่อน
bq mk --location=us-central1 MarketingCampaigns
ผลลัพธ์ที่คาดไว้
Dataset '<PROJECT_ID>:MarketingCampaigns' successfully created.
และCustomerSegmentsตารางในชุดข้อมูล
bq mk --table MarketingCampaigns.CustomerSegments CampaignId:STRING,CampaignName:STRING,CustomerId:INT64
ผลลัพธ์ที่คาดไว้
Table '<PROJECT_ID>:MarketingCampaigns.CustomerSegments' successfully created.
จากนั้นสร้างการเชื่อมต่อจาก BigQuery ไปยัง Spanner โดยทำดังนี้
bq mk --connection \
  --connection_type=CLOUD_SPANNER \
  --properties="{\"database\": \"projects/$GOOGLE_CLOUD_PROJECT/instances/cloudspanner-onlinebanking/databases/onlinebanking\", \"useParallelism\": true, \"useDataBoost\": true}" \
  --location=us-central1 \
  spanner-connection
ผลลัพธ์ที่คาดไว้
Connection <PROJECT_NUMBER>.us-central1.spanner-connection successfully created
สุดท้าย ให้เพิ่มลูกค้าบางรายลงในตาราง BigQuery ที่รวมกับข้อมูล Spanner ได้
bq query --use_legacy_sql=false '
INSERT INTO MarketingCampaigns.CustomerSegments (CampaignId, CampaignName, CustomerId)
VALUES
  ("campaign1", "Spring Promotion", 1),
  ("campaign1", "Spring Promotion", 3),
  ("campaign1", "Spring Promotion", 5),
  ("campaign1", "Spring Promotion", 7),
  ("campaign1", "Spring Promotion", 9),
  ("campaign1", "Spring Promotion", 11)'
ผลลัพธ์ที่คาดไว้
Waiting on bqjob_r76a7ce76c5ec948f_0000019644bda052_1 ... (0s) Current status: DONE
Number of affected rows: 6
คุณตรวจสอบว่ามีข้อมูลหรือไม่โดยการค้นหา BigQuery ดังนี้
bq query --use_legacy_sql=false "SELECT * FROM MarketingCampaigns.CustomerSegments"
ผลลัพธ์ที่คาดไว้
+------------+------------------+------------+
| CampaignId |   CampaignName   | CustomerId |
+------------+------------------+------------+
| campaign1  | Spring Promotion |          1 |
| campaign1  | Spring Promotion |          5 |
| campaign1  | Spring Promotion |          7 |
| campaign1  | Spring Promotion |          9 |
| campaign1  | Spring Promotion |         11 |
| campaign1  | Spring Promotion |          3 |
+------------+------------------+------------+
ข้อมูลนี้ใน BigQuery แสดงถึงข้อมูลที่เพิ่มผ่านเวิร์กโฟลว์ของธนาคารต่างๆ เช่น รายชื่อลูกค้าที่เพิ่งเปิดบัญชีหรือลงชื่อสมัครรับโปรโมชันทางการตลาด หากต้องการระบุรายชื่อลูกค้าที่เราต้องการกำหนดเป้าหมายในแคมเปญการตลาด เราต้องค้นหาทั้งข้อมูลนี้ใน BigQuery และข้อมูลแบบเรียลไทม์ใน Spanner และการค้นหาแบบรวมจะช่วยให้เราทำสิ่งนี้ได้ในการค้นหาครั้งเดียว
เรียกใช้การค้นหาแบบรวมกับ BigQuery
จากนั้นเราจะเพิ่มเมธอดลงในแอปพลิเคชันเพื่อเรียกใช้ EXTERNAL_QUERY เพื่อทำการค้นหาแบบรวม ซึ่งจะช่วยให้สามารถรวมและวิเคราะห์ข้อมูลลูกค้าใน BigQuery และ Spanner ได้ เช่น การระบุลูกค้าที่ตรงตามเกณฑ์สําหรับแคมเปญการตลาดของเราโดยอิงตามการใช้จ่ายล่าสุด
เปิด App.java แล้วเริ่มด้วยการแทนที่การนำเข้า
package com.google.codelabs;

import java.io.FileReader;
import java.math.BigDecimal;
import java.time.Duration;
import java.time.Instant;
import java.time.temporal.ChronoUnit;
import java.util.ArrayList;
import java.util.Arrays;
import java.util.HashMap;
import java.util.List;
import java.util.Map;
import java.util.Random;
import java.util.concurrent.ExecutionException;
import java.util.concurrent.TimeUnit;

import com.google.api.gax.longrunning.OperationFuture;
import com.google.cloud.Timestamp;
import com.google.cloud.bigquery.BigQuery;
import com.google.cloud.bigquery.BigQueryException;
import com.google.cloud.bigquery.BigQueryOptions;
import com.google.cloud.bigquery.connection.v1.ConnectionName;
import com.google.cloud.bigquery.JobException;
import com.google.cloud.bigquery.QueryJobConfiguration;
import com.google.cloud.bigquery.TableResult;
import com.google.cloud.spanner.Database;
import com.google.cloud.spanner.DatabaseAdminClient;
import com.google.cloud.spanner.DatabaseClient;
import com.google.cloud.spanner.DatabaseId;
import com.google.cloud.spanner.Key;
import com.google.cloud.spanner.ReadOnlyTransaction;
import com.google.cloud.spanner.ResultSet;
import com.google.cloud.spanner.Spanner;
import com.google.cloud.spanner.SpannerException;
import com.google.cloud.spanner.SpannerExceptionFactory;
import com.google.cloud.spanner.SpannerOptions;
import com.google.cloud.spanner.Statement;
import com.google.cloud.spanner.Struct;
import com.google.cloud.spanner.TimestampBound;
import com.google.spanner.admin.database.v1.CreateDatabaseMetadata;
import com.opencsv.CSVReader;
จากนั้นเพิ่มเมธอด campaign ดังนี้
  // Get customers for quarterly marketing campaign in BigQuery using Spanner data
  public static void campaign(BigQuery bq, DatabaseId db, String location, String campaignId,
      int threshold) {
    // The BigQuery dataset, table, and Spanner connection must already exist for this to succeed
    ConnectionName connection = ConnectionName.of(db.getInstanceId().getProject(), location,
        "spanner-connection");

    // Use a federated query to bring Spanner data into BigQuery
    String bqQuery = "SELECT cs.CampaignName, c.CustomerId, c.FullName, t.TotalSpending\n"
        + "FROM MarketingCampaigns.CustomerSegments cs\n"
        + "JOIN EXTERNAL_QUERY('" + connection.toString() + "',\n"
        + "  \"SELECT t.AccountId, SUM(t.Amount) AS TotalSpending"
        + "   FROM TransactionLedger t"
        + "   WHERE t.Timestamp >= TIMESTAMP_ADD(CURRENT_TIMESTAMP(), INTERVAL -90 DAY)"
        + "   GROUP BY t.AccountId"
        + "   HAVING SUM(t.Amount) > " + threshold + "\"\n"
        + ") t ON cs.CustomerId = t.AccountId\n"
        + "JOIN EXTERNAL_QUERY('" + connection.toString() + "',\n"
        + "  \"SELECT CustomerId, FullName"
        + "   FROM Customers\"\n"
        + ") c ON c.CustomerId = cs.CustomerId\n"
        + "WHERE cs.CampaignId = '" + campaignId + "'";
    try {
      QueryJobConfiguration queryConfig = QueryJobConfiguration.newBuilder(bqQuery).build();
      TableResult results = bq.query(queryConfig);

      System.out.println("Customers for campaign (" + campaignId + "):");
      results.iterateAll().forEach(row -> {
        System.out.println("  " + row.get("FullName").getStringValue()
            + " (" + row.get("CustomerId").getStringValue() + ")");
      });
    } catch (JobException e) {
      throw (BigQueryException) e.getCause();
    } catch (InterruptedException e) {
      throw SpannerExceptionFactory.propagateInterrupt(e);
    }
  }
เพิ่มข้อความเคสอีกรายการในเมธอด main สำหรับแคมเปญ
        case "campaign":
          String campaignId = (args.length >= 2) ? args[1] : "";
          int threshold = (args.length >= 3) ? Integer.parseInt(args[2]) : 5000;
          campaign(bigquery, db, location, campaignId, threshold);
          break;
สุดท้าย ให้ระบุวิธีใช้แคมเปญกับเมธอด printUsageAndExit ดังนี้
    System.out.println("  java -jar target/onlinebanking.jar campaign campaign1 5000");
    System.out.println("      - Use Federated Queries (BigQuery) to find customers that match a "
        + "marketing campaign by name based on a recent spending threshold.\n");
บันทึกการเปลี่ยนแปลงที่คุณทำกับ App.java
สร้างแอปพลิเคชันอีกครั้ง
mvn package
เรียกใช้การค้นหาแบบรวมเพื่อระบุลูกค้าที่ควรอยู่ในแคมเปญการตลาด (campaign1) หากใช้จ่ายอย่างน้อย $5000 ในช่วง 3 เดือนที่ผ่านมาโดยเรียกใช้คำสั่ง campaign
java -jar target/onlinebanking.jar campaign campaign1 5000
ผลลัพธ์ที่คาดไว้
Customers for campaign (campaign1):
  Alice Smith (1)
  Eve Davis (5)
  Kelly Thomas (11)
ตอนนี้เราสามารถกำหนดเป้าหมายลูกค้าเหล่านี้ด้วยข้อเสนอหรือรางวัลสุดพิเศษได้แล้ว
หรือเราอาจมองหาลูกค้าจำนวนมากขึ้นที่มียอดใช้จ่ายถึงเกณฑ์ที่ต่ำกว่าในช่วง 3 เดือนที่ผ่านมา
java -jar target/onlinebanking.jar campaign campaign1 2500
ผลลัพธ์ที่คาดไว้
Customers for campaign (campaign1):
  Alice Smith (1)
  Charlie Williams (3)
  Eve Davis (5)
  Ivy Taylor (9)
  Kelly Thomas (11)
สรุป
ในขั้นตอนนี้ คุณได้ดำเนินการค้นหาแบบรวมจาก BigQuery ที่นำข้อมูล Spanner แบบเรียลไทม์เข้ามาเรียบร้อยแล้ว
ถัดไป
จากนั้นคุณสามารถล้างข้อมูลทรัพยากรที่สร้างขึ้นสำหรับโค้ดแล็บนี้เพื่อหลีกเลี่ยงค่าใช้จ่าย
9. การทำความสะอาดข้อมูล (ไม่บังคับ)
คุณจะทำขั้นตอนนี้หรือไม่ก็ได้ หากต้องการทดสอบอินสแตนซ์ Spanner ต่อไป คุณไม่จำเป็นต้องล้างข้อมูลในตอนนี้ อย่างไรก็ตาม โปรเจ็กต์ที่คุณใช้จะยังคงถูกเรียกเก็บเงินสำหรับอินสแตนซ์ต่อไป หากไม่จำเป็นต้องใช้อินสแตนซ์นี้อีกต่อไป คุณควรลบอินสแตนซ์นี้ในตอนนี้เพื่อหลีกเลี่ยงค่าใช้จ่ายดังกล่าว นอกจากอินสแตนซ์ Spanner แล้ว Codelab นี้ยังสร้างชุดข้อมูลและการเชื่อมต่อ BigQuery ซึ่งควรล้างเมื่อไม่จำเป็นต้องใช้แล้ว
ลบอินสแตนซ์ Spanner โดยทำดังนี้
gcloud spanner instances delete cloudspanner-onlinebanking
ยืนยันว่าต้องการดำเนินการต่อ (พิมพ์ Y):
Delete instance [cloudspanner-onlinebanking]. Are you sure?

Do you want to continue (Y/n)?
ลบการเชื่อมต่อและชุดข้อมูล BigQuery โดยทำดังนี้
bq rm --connection --location=us-central1 spanner-connection
bq rm -r MarketingCampaigns
ยืนยันการลบชุดข้อมูล BigQuery (พิมพ์ Y):
rm: remove dataset '<PROJECT_ID>:MarketingCampaigns'? (y/N)
10. ขอแสดงความยินดี
🚀 คุณได้สร้างอินสแตนซ์ Cloud Spanner ใหม่ สร้างฐานข้อมูลที่ว่างเปล่า โหลดข้อมูลตัวอย่าง ดำเนินการและค้นหาขั้นสูง และ (ไม่บังคับ) ลบอินสแตนซ์ Cloud Spanner
สิ่งที่เราได้พูดถึงไปแล้ว
- วิธีตั้งค่าอินสแตนซ์ Spanner
- วิธีสร้างฐานข้อมูลและตาราง
- วิธีโหลดข้อมูลลงในตารางฐานข้อมูล Spanner
- วิธีเรียกใช้โมเดล Vertex AI จาก Spanner
- วิธีค้นหาฐานข้อมูล Spanner โดยใช้การค้นหาแบบคลุมเครือและการค้นหาแบบข้อความเต็ม
- วิธีทำการค้นหาแบบรวมกับ Spanner จาก BigQuery
- วิธีลบอินสแตนซ์ Spanner
ขั้นตอนต่อไปคืออะไร
- ดูข้อมูลเพิ่มเติมเกี่ยวกับฟีเจอร์ขั้นสูงของ Spanner ซึ่งรวมถึง
- ดูไลบรารีของไคลเอ็นต์ Spanner ที่พร้อมใช้งาน