
1. Introduction
In this codelab, you will learn how to use GKE Dynamic Slicing to optimize the utilization of Cloud TPU resources. Dynamic slicing is a powerful capability that allows you to decouple raw TPU provisioning from workload scheduling.
Specifically, you will explore two key patterns:
- Sub-slicing: Splitting a large provisioned TPU block into smaller, isolated slices for smaller workloads.
- Super-slicing: Stitching multiple provisioned TPU blocks together to form a larger virtual slice for large-scale workloads.
You will apply these patterns to deploy a high-performance Disaggregated Serving (Prefill/Decode disaggregation) architecture for a large language model (Qwen 397B) using Kueue, LeaderWorkerSet (LWS), and the Gateway API.
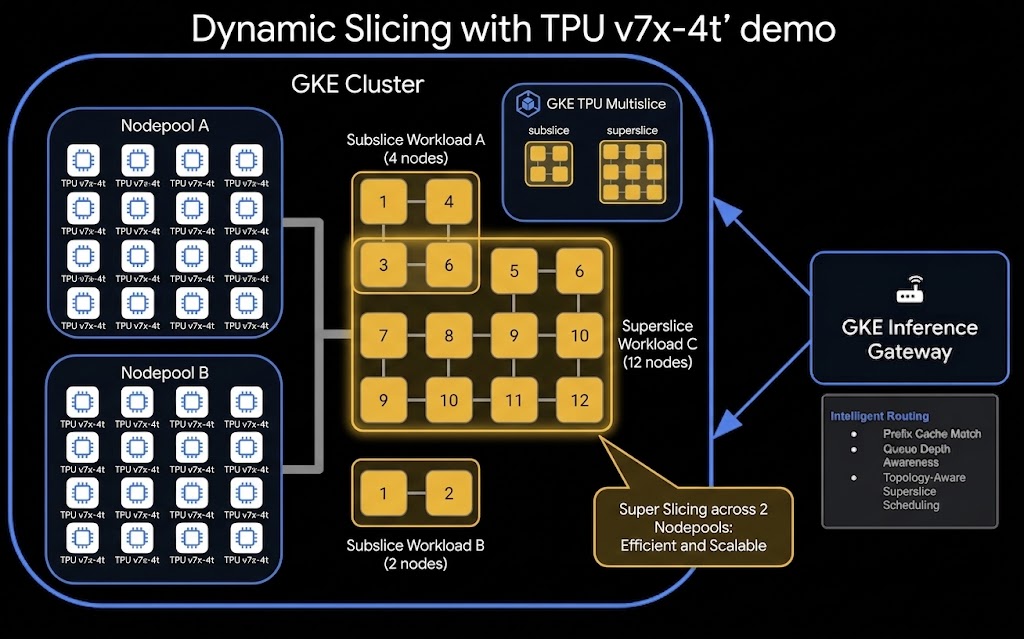
Architecture
Here is the high-level architecture of the TPU Dynamic Slicing and Disaggregated Serving setup:
What you'll do
- Provision a GKE cluster with the GKE Slice Controller enabled.
- Create GKE TPU node pools configured for incremental provisioning.
- Deploy Kueue and LeaderWorkerSet to manage TPU workloads.
- Run a subslicing workload to verify JAX TPU access on smaller slices.
- Run a superslicing workload to verify JAX TPU access across multiple combined node pools.
- Deploy a Disaggregated Serving setup where Prefill and Decode stages run on separate, dynamically allocated TPU slices, coordinated by an LLM router.
What you'll need
- A web browser such as Chrome.
- A Google Cloud project with billing enabled.
- IMPORTANT: Access to a Cloud TPU7x (Ironwood) All Capacity mode reservation.
2. Before you begin
Create or select a Google Cloud Project
Create a Google Cloud Project
- In the Google Cloud Console, on the project selector page, select or create a Google Cloud project.
- Make sure that billing is enabled for your Cloud project. Learn how to check if billing is enabled on a project.
Start Cloud Shell
Cloud Shell is a command-line environment running in Google Cloud that comes preloaded with necessary tools.
- Click Activate Cloud Shell at the top of the Google Cloud console.
- Once connected to Cloud Shell, verify your authentication:
gcloud auth list - Confirm your project is configured:
gcloud config get project - If your project is not set as expected, set it:
export PROJECT_ID=<YOUR_PROJECT_ID>
gcloud config set project $PROJECT_ID
Clone the Demo Repository
Clone the repository containing the manifests and helper scripts for this codelab:
git clone --depth 1 --sparse https://github.com/GoogleCloudPlatform/devrel-demos.git
cd devrel-demos
git sparse-checkout set ai-ml/dynamic-slicing
cd ai-ml/dynamic-slicing
3. Configure Environment
Before provisioning resources, you need to configure your environment variables. A helper script 01_setup_env.sh is provided to generate an env.sh file.
Run the setup script:
./01_setup_env.sh
You will be prompted for several values. Press [ENTER] to accept the defaults, but make sure to provide the correct Reservation Name and Reservation Block provided by your event instructor:
- GCP Project ID: Your current project ID.
- GCP Project Number: Your project number.
- GKE Cluster Name:
tpu-serving-cluster(default). - TPU Node Pool Zone:
us-central1-ai1a(default). - Kubernetes Namespace:
llm-d-pd-disaggregation(default). - Cloud TPU Reservation Name: [Enter the provided reservation name]
- Cloud TPU Reservation Block Name:
block-0(default). - GCS Bucket Name for Weights:
model-weights(default). - TPU Machine Type:
tpu7x-standard-4t(default). - Hugging Face Token: [Enter your HF token if required, or press ENTER if using pre-loaded weights]
After running the script, apply the variables to your current session:
source env.sh
4. Enable APIs and AI Zone Features
Now that your environment is configured, you need to enable the required Google Cloud APIs and the AI Zone visibility feature. A helper script 02_enable_apis_and_features.sh is provided.
Run the script:
./02_enable_apis_and_features.sh
This script:
- Enables the GKE, Compute, IAM, Resource Manager, Filestore, and Network Services APIs.
- Enables the
ai-zones-visibilitypreview feature for GKE Dynamic Slicing.
5. Provision GKE Cluster and TPU Node Pools
In this step, you will provision the underlying network infrastructure, GKE cluster, and TPU node pools.
The TPU node pools will be configured with Incremental Provisioning (using --placement-policy=superslice-policy and --reservation-affinity=specific), which maps each node pool to a 16-node "cube" (sub-block) of raw TPU capacity.
Run the provisioning script:
./03_create_cluster_and_nodes.sh
What this script does:
- Creates VPC Network & Subnets: Sets up a main VPC network with a large MTU (8896) optimized for TPU traffic, a TPU subnet, and a proxy-only subnet required by GKE Gateway.
- Creates GKE Cluster: Provisions a Standard GKE cluster with the Slice Controller enabled (
--enable-slice-controller). - Creates Workload Policy: Defines a resource policy named
superslice-policyof typeHIGH_THROUGHPUTwith a topology of4x4x4. - Creates GKE TPU Node Pools: Provisions two node pools (
tpu7-pool-1andtpu7-pool-2), each containing 16 nodes oftpu7x-standard-4t. These represent two separate 16-node cubes.
Verify the Nodes
Once the script completes, verify that all 32 TPU nodes are provisioned and registered:
kubectl get nodes -l google.com/tpu=present
You should see 32 nodes in the list.
6. Install Orchestration Tools
Dynamic slicing relies on several Kubernetes controllers to coordinate jobs and slice allocation. You will install:
- JobSet: For managing group of jobs (needed for superslicing).
- Kueue: For queueing, resource management, and Topology Aware Scheduling (TAS).
- LeaderWorkerSet (LWS): For managing replicated multi-node TPU deployments (needed for LLM serving).
- GKE Slice Controller (User Space): Connects Kueue with the TPU Cluster Director to dynamically manage the physical slices.
Run the installation script:
./04_install_kueue_lws_slice_controller.sh
Verify that the Slice Controller is running successfully:
kubectl rollout status deployment/slice-controller-controller-manager -n slice-controller-system
7. Configure Kueue Resources
Now you need to define the Kueue resources that represent your TPU hardware topology and configure the admission checks.
Run the deployment script:
./05_deploy_kueue_resources.sh
Key Resources Deployed:
- Topology (
slice-topology): Defines the hierarchical levels of TPU partitions (from block down to hostname) that Kueue should consider when scheduling. - ResourceFlavor (
slice-rf): Associates theslice-topologywith thetpu7xaccelerator. - AdmissionCheck (
ac): Configures Kueue to use the GKE Slice Controller (accelerator.gke.io/slice) to dynamically provision slices when a job is admitted. - ClusterQueue (
cq) & LocalQueue (lq): Sets up the queues that workloads will be submitted to. - WorkloadPriorityClass (
low-priority-1000,medium-priority-2000,high-priority-3000): Defines priority levels to enable preemption and priority-based scheduling.
Verify the resources:
kubectl get topology slice-topology
kubectl get resourceflavor slice-rf
kubectl get admissioncheck ac
kubectl get clusterqueue cq
kubectl get localqueue lq -n ${NAMESPACE}
8. Deploy and verify TPU Access with Subslicing
Sub-slicing allows you to run multiple smaller workloads within a single provisioned TPU block. In this step, you will submit a workload that requests a 2x2x2 topology (8 chips / 2 VMs) to a cluster made of 4x4x4 (64 chips / 16 VMs) blocks.
Deploy the subslicing workload:
./06_deploy_simple_subslicing.sh
This script applies kueue-jobset-simple-subslicing.yaml.
How it works:
- The JobSet spec includes the annotation
cloud.google.com/gke-tpu-slice-topology: 2x2x2. - It configures
replicas: 6andparallelism: 2(completions: 2). This means Kueue will schedule 6 independent jobs, each consisting of 2 pods. - Each pod requests
google.com/tpu: "4"(1 TPU VM). - Kueue and the GKE Slice Controller dynamically carve the 32-node cluster to allocate six
2x2x2slices.
Verify JAX execution
Monitor the pods until they are running:
kubectl get pods -n ${NAMESPACE} -l jobset.sigs.k8s.io/jobset-name=kueue-jobset-simple-subslicing
Check the logs of one of the pods to verify JAX successfully detected the 8 TPU devices (cores) on its sub-slice:
kubectl logs $(kubectl get pods -n ${NAMESPACE} -l jobset.sigs.k8s.io/jobset-name=kueue-jobset-simple-subslicing -o name | head -n 1) -n ${NAMESPACE}
You should see output indicating: Total TPU devices (cores): 8
9. Deploy and verify TPU Access with Superslicing
Super-slicing is a powerful GKE feature that allows a single workload to span multiple physical TPU blocks (often referred to as cubes or topologies like 4x4x4). By stitching these blocks together, you can form a larger virtual slice for large-scale training or serving workloads. In this step, you will deploy a JobSet that requests a 4x4x8 topology (128 chips / 32 VMs). Since a single 4x4x4 block only contains 64 chips, this workload exceeds the size of a single block and requires GKE to dynamically stitch the tpu7-pool-1 and tpu7-pool-2 node pools together to satisfy the request.
Deploy the superslicing workload:
./07_deploy_simple_superslicing.sh
This script applies kueue-jobset-simple-superslicing.yaml.
How it works:
- The JobSet template includes the annotation
cloud.google.com/gke-tpu-slice-topology: 4x4x8. - It configures
parallelism: 32andcompletions: 32. - Each pod requests
google.com/tpu: "4". - Since a
4x4x8topology requires all 32 nodes, the Slice Controller dynamically configures the OCS (Optical Circuit Switching) network to interconnect the two 16-node pools into a single 32-node ICI mesh.
Verify that the JobSet pods successfully run and that JAX detects all 128 devices:
kubectl get pods -n ${NAMESPACE} -l jobset.sigs.k8s.io/jobset-name=kueue-jobset-simple-superslicing
Check the logs of one of the pods:
kubectl logs $(kubectl get pods -n ${NAMESPACE} -l jobset.sigs.k8s.io/jobset-name=kueue-jobset-simple-superslicing -o name | head -n 1) -n ${NAMESPACE}
You should see JAX output showing the global device count: Global device count: 128
10. Deploy Disaggregated Serving (Prefill/Decode)
Now you will deploy the end-to-end LLM serving stack using Prefill/Decode Disaggregation.
In standard serving, prefill (processing the prompt) and decode (generating tokens) run on the same TPUs. Since prefill is compute-bound and decode is memory-bandwidth-bound, they conflict. Disaggregated serving runs them on separate TPU slices, transferring the KV Cache over the network.
Setup LLM-D and Gateway
Setup the namespaces, Hugging Face secrets, and GKE Gateway:
./08_setup_llm_d.sh
Deploy LLM-D Router
Deploy the router that will receive client requests and coordinate the routing between Prefill and Decode slices:
./09_deploy_llm_d_router.sh
Deploy Prefill and Decode Workloads
Deploy the vLLM model servers on dynamically allocated TPU slices:
./10_deploy_subslicing_pd_workload.sh
What this does:
- Deploys
kueue-vllm-prefill-model-streamer(LWS requesting a2x2x2TPU slice). - Deploys
kueue-vllm-decode-model-streamer(LWS requesting a2x2x2TPU slice). - The prefill slice loads the Qwen 397B model weights and acts as the
kv_producer. - The decode slice acts as the
kv_consumer. - They communicate using
TPUConnectorHMAto transfer KV caches.
Wait until both prefill and decode pods are running:
kubectl get pods -n ${NAMESPACE} -l llm-d.ai/role=prefill
kubectl get pods -n ${NAMESPACE} -l llm-d.ai/role=decode
11. Verify Serving
With the router, prefill, and decode workloads running, you can now verify the serving API.
Run the verification script:
./11_verify_serving.sh
How it works:
- The script retrieves the internal IP of the GKE Gateway.
- It spins up a temporary pod (
curl-debug-comp) to send a completion request tohttp://${GATEWAY_IP}/v1/completions. - It spins up another pod (
curl-debug-chat) to send a chat request tohttp://${GATEWAY_IP}/v1/chat/completions.
You should see a successful JSON response from the Qwen model:
{
  "choices": [
    {
      "text": "... [Model Response] ..."
    }
  ]
}
12. Clean up
To avoid ongoing charges to your Google Cloud account, delete the resources created during this codelab.
Run the teardown script:
./12_teardown_cleanup.sh
What this script does:
- Deletes GKE node pools (
tpu7-pool-1,tpu7-pool-2). - Deletes GKE Cluster (
tpu-serving-cluster). - Deletes resource policies (
superslice-policy). - Deletes VPC networks (
qwen-serving-main).
Alternatively, if you created a dedicated project for this codelab, you can delete the entire project:
gcloud projects delete ${PROJECT_ID}
13. Congratulations
Congratulations! You have successfully explored GKE Dynamic Slicing and deployed a Disaggregated LLM Serving architecture.
What you've learned
- How to enable the GKE Slice Controller and configure node pools for Incremental Provisioning.
- How to use Kueue to request specific TPU topologies.
- How Sub-slicing splits a large TPU block for smaller, independent JAX workloads.
- How Super-slicing stitches multiple node pools into a single larger virtual TPU slice.
- How to deploy Prefill/Decode disaggregated serving using LWS, Gateway API, and vLLM.