1. Overview
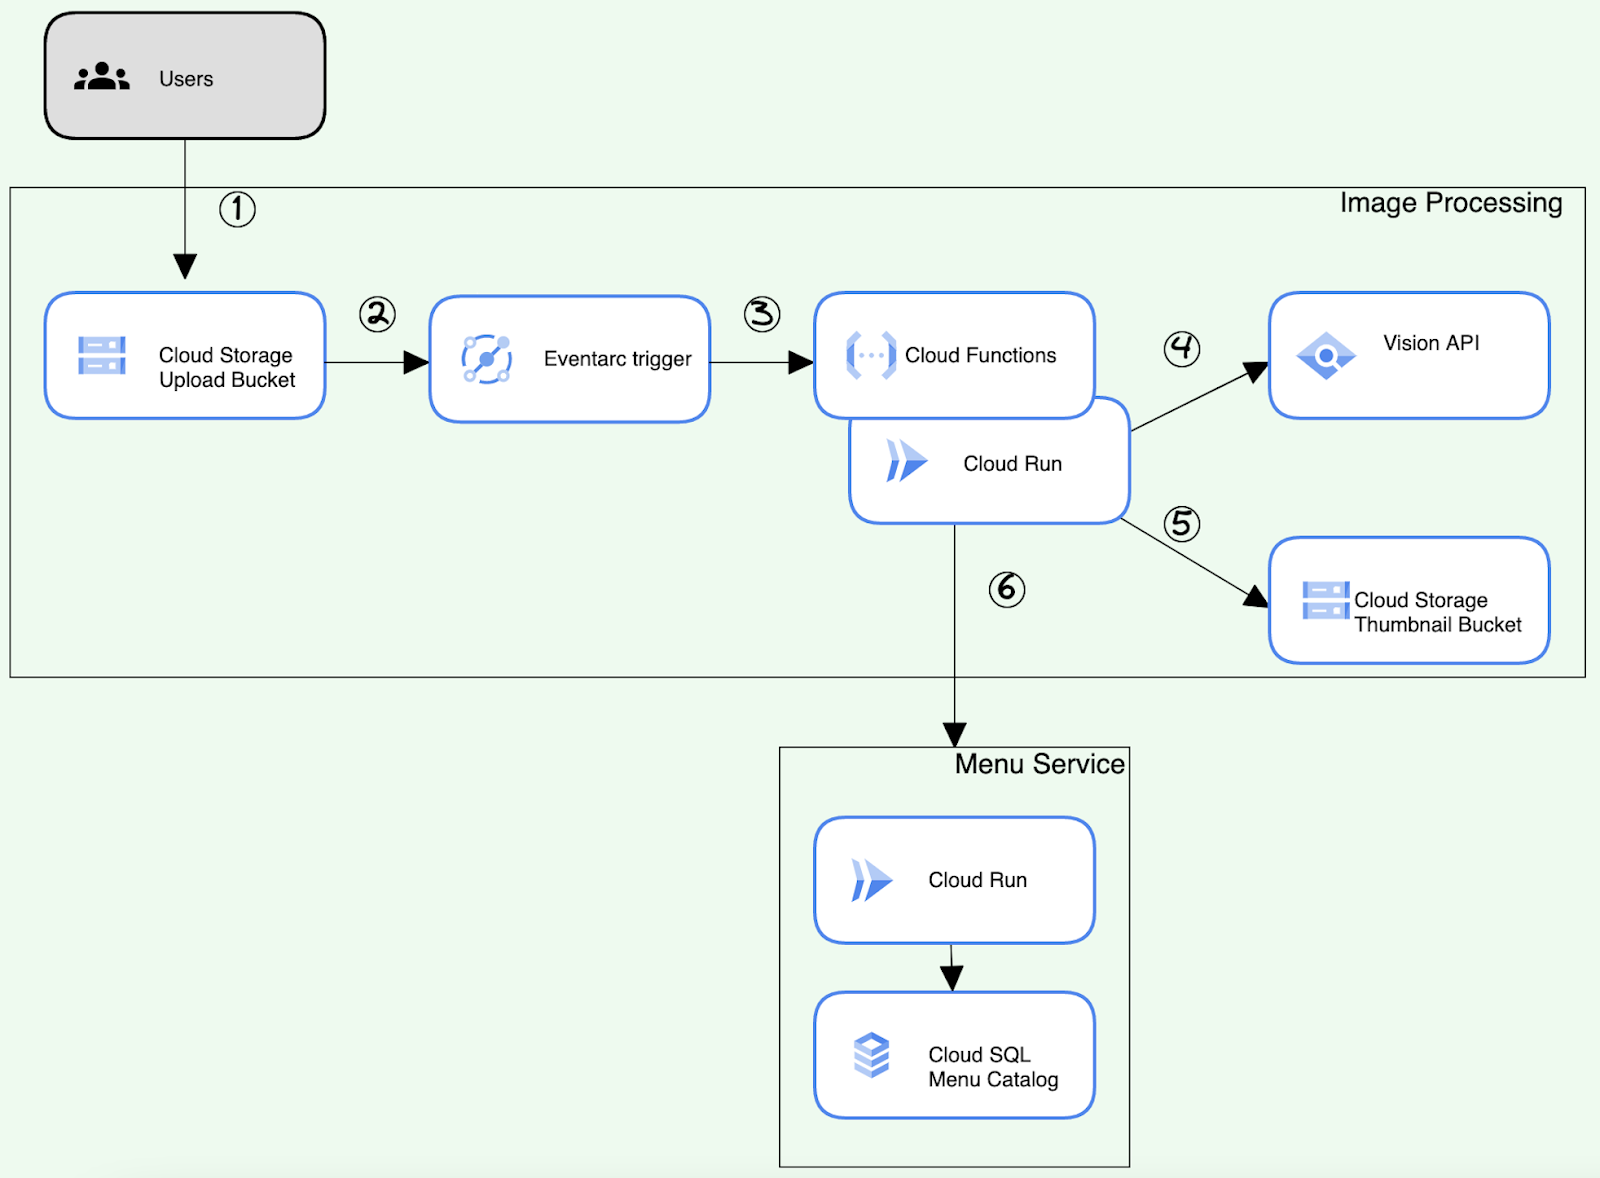
In this lab, you will learn how to use Cloud Storage bucket events and Eventarc to trigger event processing. You will use Cloud Run functions to analyze data and process images. The function will use Google's Vision API and save the resulting image back in the Cloud Storage bucket.
What you will learn
How to build an image processing pipeline.
- Configure Storage buckets
- Create a Cloud Run functions to read and write objects in Cloud Storage
- Deploy an Eventarc trigger
- Integrate Vision API to detect food images
- Test and validate the end-to-end solution
Prerequisites
- This lab assumes familiarity with the Cloud Console and shell environments.
- Prior Cloud Storage, Cloud Run functions, or Vision API experience is helpful but not required.
2. Setup and Requirements
Cloud Project setup
- Sign-in to the Google Cloud Console and create a new project or reuse an existing one. If you don't already have a Gmail or Google Workspace account, you must create one.


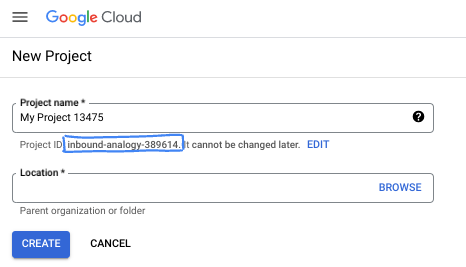
- The Project name is the display name for this project's participants. It is a character string not used by Google APIs. You can always update it.
- The Project ID is unique across all Google Cloud projects and is immutable (cannot be changed after it has been set). The Cloud Console auto-generates a unique string; usually you don't care what it is. In most codelabs, you'll need to reference your Project ID (typically identified as
PROJECT_ID). If you don't like the generated ID, you might generate another random one. Alternatively, you can try your own, and see if it's available. It can't be changed after this step and remains for the duration of the project. - For your information, there is a third value, a Project Number, which some APIs use. Learn more about all three of these values in the documentation.
- Next, you'll need to enable billing in the Cloud Console to use Cloud resources/APIs. Running through this codelab won't cost much, if anything at all. To shut down resources to avoid incurring billing beyond this tutorial, you can delete the resources you created or delete the project. New Google Cloud users are eligible for the $300 USD Free Trial program.
Activate Cloud Shell
Activate Cloud Shell by clicking on the icon to the right of the search bar.

Environment Setup
- Create a project and resource-related environment variables by running commands below in the Cloud Shell terminal.
export PROJECT_ID=$(gcloud config get-value project)
export PROJECT_NAME=$(gcloud config get-value project)
export PROJECT_NUMBER=$(gcloud projects describe $PROJECT_ID --format='value(projectNumber)')
export REGION=us-east1
export UPLOAD_BUCKET_NAME=menu-item-uploads-$PROJECT_ID
export UPLOAD_BUCKET=gs://menu-item-uploads-$PROJECT_ID
export BUCKET_THUMBNAILS=gs://menu-item-thumbnails-$PROJECT_ID
export MENU_SERVICE_NAME=menu-service
export USER_EMAIL=$(gcloud config list account --format "value(core.account)")
- Enable the APIs required for the lab
gcloud services enable \
    vision.googleapis.com \
    cloudfunctions.googleapis.com \
    pubsub.googleapis.com \
    cloudbuild.googleapis.com \
    logging.googleapis.com \
    eventarc.googleapis.com \
    artifactregistry.googleapis.com \
    run.googleapis.com \
    --quiet
- Clone the repository
git clone https://github.com/GoogleCloudPlatform/cymbal-eats.git && cd cymbal-eats/cloud-functions
3. Configure Cloud Storage buckets
Create Storage Buckets
Create upload and thumbnails Cloud Storage buckets for your image processing pipeline.
Use the gsutil mb command and a unique name to create two buckets:
- Upload bucket where images will be uploaded first
- Thumbnails bucket to store generated thumbnail images
Create a bucket to upload new images:
gsutil mb -p $PROJECT_ID -l $REGION $UPLOAD_BUCKET
Example output:
Creating gs://menu-item-uploads-cymbal-eats-8399-3119/...
Create a bucket to store generated thumbnails:
gsutil mb -p $PROJECT_ID -l $REGION $BUCKET_THUMBNAILS
Example output:
Creating gs://menu-item-thumbnails-cymbal-eats-8399-3119/...
Update Bucket permissions
Update the storage bucket permissions to allow read permissions to users.
Use the gsutil iam ch command to give permission to read and write objects in your bucket:
gsutil iam ch allUsers:objectViewer $UPLOAD_BUCKET
gsutil iam ch allUsers:objectViewer $BUCKET_THUMBNAILS
Example output
Updated IAM policy for project [cymbal-eats-8399-3119].
[...]
4. Configure service accounts
Create a custom service account for Cloud Function to process thumbnails:
export CF_SERVICE_ACCOUNT=thumbnail-service-sa
gcloud iam service-accounts create ${CF_SERVICE_ACCOUNT}
Grant the artifactregistry.reader role to allow read operations from Artifact Registry:
gcloud projects add-iam-policy-binding $PROJECT_ID \
  --member "serviceAccount:${CF_SERVICE_ACCOUNT}@${PROJECT_ID}.iam.gserviceaccount.com" \
  --role "roles/artifactregistry.reader"
Grant the storage.objectCreator role to allow storing generated images in thumbnail bucket:
gcloud projects add-iam-policy-binding $PROJECT_ID \
  --member "serviceAccount:${CF_SERVICE_ACCOUNT}@${PROJECT_ID}.iam.gserviceaccount.com" \
  --role "roles/storage.objectCreator"
Grant the run.invoker role to allow Cloud Run service invocation:
gcloud projects add-iam-policy-binding $PROJECT_ID \
  --member "serviceAccount:${CF_SERVICE_ACCOUNT}@${PROJECT_ID}.iam.gserviceaccount.com" \
  --role "roles/run.invoker"
Grant the eventarc.eventReceiver role to allow receive events from providers:
gcloud projects add-iam-policy-binding $PROJECT_ID \
  --member "serviceAccount:${CF_SERVICE_ACCOUNT}@${PROJECT_ID}.iam.gserviceaccount.com" \
  --role "roles/eventarc.eventReceiver"
Grant the pubsub.publisher role to the Cloud Storage service account. This will allow the service account to publish events when images are uploaded into the bucket.
GCS_SERVICE_ACCOUNT=$(gsutil kms serviceaccount -p $PROJECT_NUMBER)

gcloud projects add-iam-policy-binding $PROJECT_NUMBER \
    --member "serviceAccount:$GCS_SERVICE_ACCOUNT" \
    --role "roles/pubsub.publisher"
5. Image Processing Function Overview
Create a function to download an image from Cloud Storage, resize the image and upload the image back to Cloud Storage. The function will call the Vision API to assign a description label to the image. The function will check the description label. If the label identifies the image as "Food" an event will be sent to the menu service to update the menu item's image and thumbnail.

Triggering a Function
Cloud Storage functions are based on Pub/Sub notifications from Cloud Storage and support similar event types:
In this lab, you will deploy and trigger a function when an object is finalized in Cloud Storage.
Object Finalize
Object finalize events trigger when a "write" of a Cloud Storage Object is successfully finalized. In particular, this means that creating a new object or overwriting an existing object triggers this event. Archive and metadata update operations are ignored by this trigger.
6. Integrate Cloud Storage
Cloud Storage is a service for storing your objects in Google Cloud. An object is an immutable piece of data consisting of a file of any format. You store objects in containers called buckets. All buckets are associated with a project, and you can group your projects under an organization. Client libraries and APIs make integrating with Cloud Storage
In this lab, you will use the client library to read and write objects to Cloud Storage.
Installing the client library
Cloud client libraries are available in many popular programming languages. To begin using the libraries you must install the client library.
Using the client library
Implementation details in large depend on the programming language. To use the client library in your application, the first step is to import Cloud Storage dependencies. For example, in the Node.js project, imports are added in the package.json file. The snippet below shows this lab's package.json file notice.
package.json
{
    "name": "thumbnail-service",
    "version": "0.1.0",
    "dependencies": {
      "@google-cloud/functions-framework": "^3.0.0",
      "@google-cloud/storage": "^5.18.2",
      "@google-cloud/vision": "^2.4.2",
        ...
    }
  }
Register a CloudEvent callback
Register a CloudEvent callback with the Functions Framework that will be triggered by Cloud Storage when a new image is uploaded into the bucket.
index.js
functions.cloudEvent('process-thumbnails', async (cloudEvent) => {
    console.log(`Event ID: ${cloudEvent.id}`);
    console.log(`Event Type: ${cloudEvent.type}`);
    ...
Creating a storage reference object
After the client libraries are imported, you'll need to create a new storage client and buckets your application will interact with.
index.js
const storage = new Storage();
const bucket = storage.bucket(file.bucket);
const thumbBucket = storage.bucket(process.env.BUCKET_THUMBNAILS);
Download Cloud Storage objects
index.js
await bucket.file(file.name).download({
            destination: originalFile
        });
Upload objects to Cloud Storage
You can send upload requests to Cloud Storage in three ways: single-request, resumable or XML API multipart upload. For larger uploads or streaming uploads use resumable uploads. With XML API files are uploaded in parts and assembled as a single object. For smaller objects, use single-request uploads.
The code below uploads an image to cloud storage using a single-request upload.
index.js
const thumbnailImage = await thumbBucket.upload(thumbFile);
7. Integrate Vision API
Cloud Vision allows developers to easily integrate vision detection features within applications, including image labeling, face and landmark detection, optical character recognition (OCR), and tagging of explicit content.
Installing the client library
Cloud client libraries are available in many popular programming languages. To begin using the libraries you must install the client library.
Create an Image Annotator Client
To access Google APIs using the official client SDKs, you create a service object based on the API's discovery document, which describes the API to the SDK. You'll need to fetch it from the Vision API's discovery service, using your credentials.
index.js
const client = new vision.ImageAnnotatorClient();
Build a Vision API request
The Vision API can perform feature detection on an image file by sending the contents of the image file as a base64 encoded string in the body of your request.
To build a request using the images resource to annotate your image. A request to this API takes the form of an object with a requests list. Each item in this list contains two bits of information:
- The base64-encoded image data
- A list of features you'd like annotated about that image.
index.js
        const client = new vision.ImageAnnotatorClient();
        const visionRequest = {
            image: { source: { imageUri: `gs://${file.bucket}/${file.name}` } },
            features: [
                { type: 'LABEL_DETECTION' },
            ]
        };
        const visionPromise = client.annotateImage(visionRequest);
8. Deploy Cloud Run functions
This image resize service is part of the larger Cymbal Eats system. In this section, you will deploy just the components related to the image processing feature. The full installation incorporates a UI to upload the image and a downstream request to store the resulting metadata. Those capabilities are not installed as part of this lab.
The following components will be created during the function deployment:
- Cloud Run functions
- Eventarc trigger
- Pub/Sub Topic and Subscription
In the cloudshell terminal, run the command below to deploy Cloud Run functions with a trigger bucket on the menu-item-uploads-$PROJECT_ID:
To deploy a Cloud Run functions directly onto Cloud Run, you will first deploy the function and then create a trigger for it.
Deploy the cloud run functions:
gcloud beta run deploy process-thumbnails \
      --source=thumbnail \
      --function process-thumbnails \
      --region $REGION \
      --base-image google-22-full/nodejs20 \
      --no-allow-unauthenticated \
      --project=$PROJECT_ID \
--service-account="${CF_SERVICE_ACCOUNT}@${PROJECT_ID}.iam.gserviceaccount.com" \
--set-env-vars=BUCKET_THUMBNAILS=$BUCKET_THUMBNAILS,MENU_SERVICE_URL=$MENU_SERVICE_URL \
  --max-instances=1 \
  --quiet
Example output:
Done.
Service [process-thumbnails] revision [process-thumbnails-00001-abc] has been deployed and is serving 100 percent of traffic.
Service URL: https://process-thumbnails-000000000.us-east1.run.app
Create the trigger:
gcloud eventarc triggers create process-thumbnails-trigger \
     --location=$REGION \
     --destination-run-service=process-thumbnails \
    --destination-run-region=$REGION \
     --event-filters="type=google.cloud.storage.object.v1.finalized" \
     --event-filters="bucket=$UPLOAD_BUCKET_NAME" \
     --service-account="${CF_SERVICE_ACCOUNT}@${PROJECT_ID}.iam.gserviceaccount.com"
Example output:
Creating trigger [process-thumbnails-trigger] in project [qwiklabs-gcp-02-53f8532696e1], location [us-east1]...done.
WARNING: It may take up to 2 minutes for the new trigger to become active.
If the trigger deployment fails due to a permission issue - please wait for IAM changes from the previous step to propagate. Usually takes 1-2 minutes, and then retry deployment again.
Example error output:
...If you recently started to use Eventarc, it may take a few minutes before all necessary permissions are propagated to the Service Agent...
[...]
In the Cloud console, review Cloud Run service that was created for the function:

In the Cloud console, review Eventarc trigger that was created for the function:
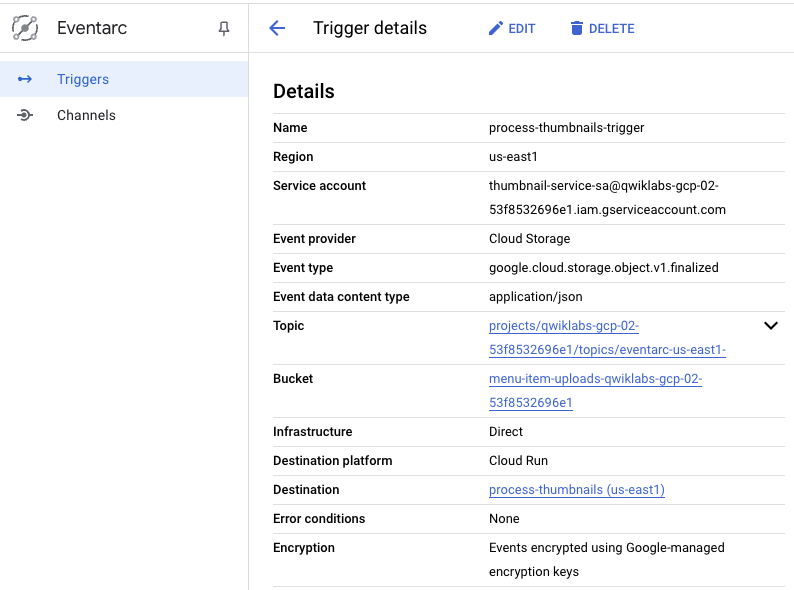
In the Cloud console, review Pub/Sub Topic and Subscription that were created for the Eventarc trigger:


9. Test and validate the end-to-end solution
Upload a new photo to Cloud Storage and monitor the progress of the pipeline as the images are analyzed. You will test the end-to-end solution by monitoring cloud functions logs.
Uploading an image

- Save this image to your local machine
- Rename the file 1.jpg
- Open the Cloud Storage console
- Click on the menu-item-uploads-... bucket
- Click UPLOAD FILES
- Upload 1.jpg to the storage bucket
- In Cloud Console, navigate to Cloud Run
- Click on process-thumbails
- Click on the LOGS tab
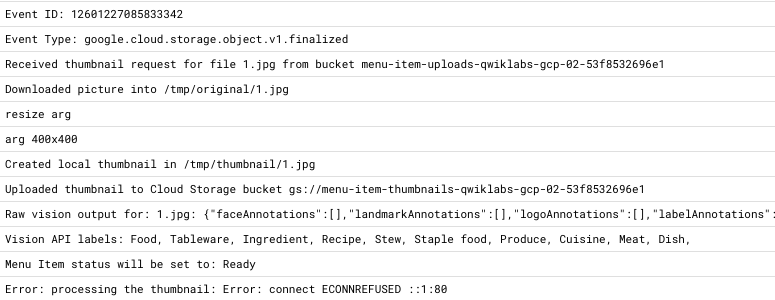
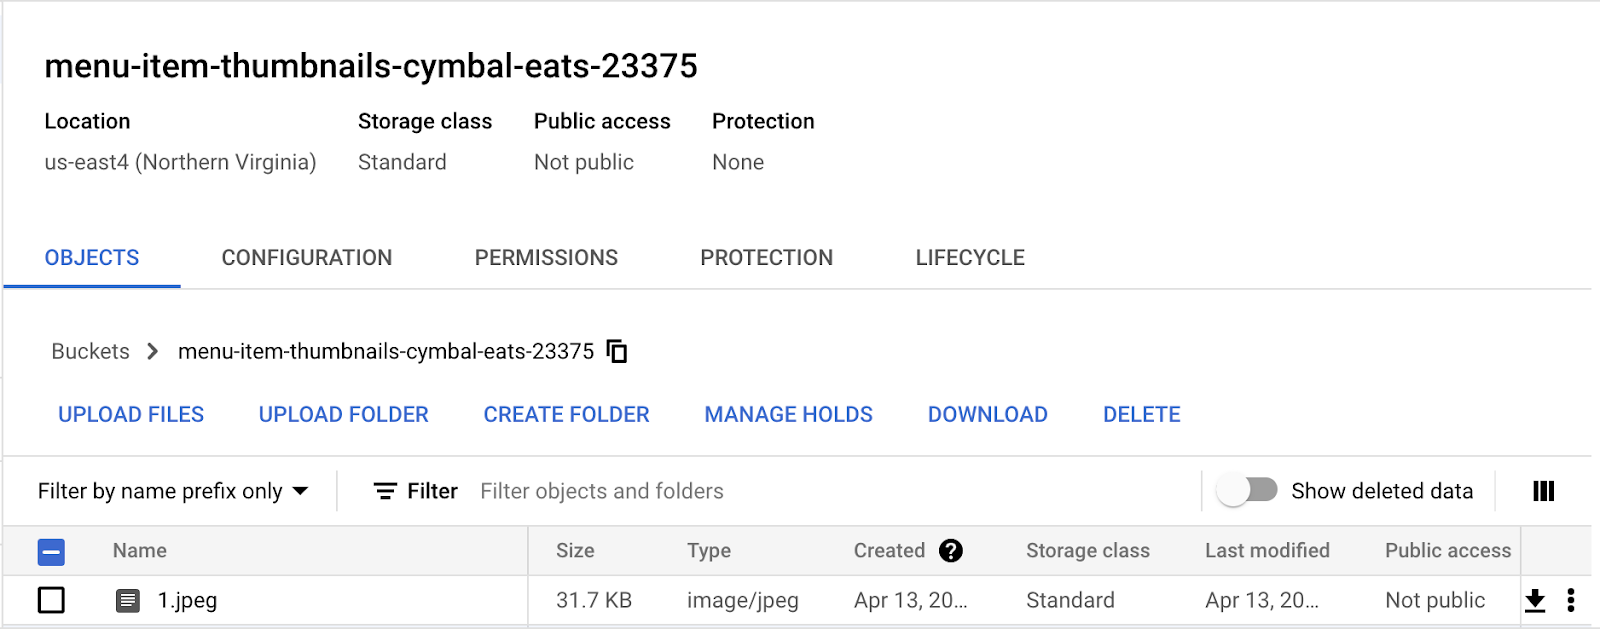
- Navigate into the menu-item-thumbnails-$PROJECT_ID Cloud Storage bucket
- Verify that the thumbnail image has been created in the thumbnails bucket
Uploading a non-food image
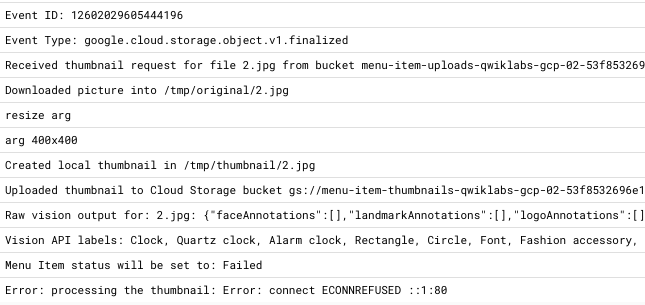
To verify the function works properly, you will upload an image that does not contain an object that would be classified as a "Food" item.

- Save this image to your local machine
- Rename the file 2.jpg
- Open the Cloud Storage console
- Click on the menu-item-uploads-... bucket
- Click UPLOAD FILES
- Upload 2.jpg to the storage bucket
- In Cloud Console, navigate to Cloud Run
- Click on process-thumbails
- Click on the LOGS tab
10. Congratulations!
Congratulations, you finished the lab!
What's next:
Explore other Cymbal Eats codelabs:
- Triggering Cloud Workflows with Eventarc
- Connecting to Private CloudSQL from Cloud Run
- Connecting to Fully Managed Databases from Cloud Run
- Secure Serverless Application with Identity Aware Proxy (IAP)
- Triggering Cloud Run Jobs with Cloud Scheduler
- Securely Deploying to Cloud Run
- Securing Cloud Run Ingress Traffic
- Connecting to private AlloyDB from GKE Autopilot
Clean up
To avoid incurring charges to your Google Cloud account for the resources used in this tutorial, either delete the project that contains the resources, or keep the project and delete the individual resources.
Deleting the project
The easiest way to eliminate billing is to delete the project that you created for the tutorial.
