1. 總覽
本實驗室將帶您瞭解如何透過 Vertex Pipelines 建立及執行機器學習 pipeline。
課程內容
內容如下:
- 使用 Kubeflow Pipelines SDK 建構可擴充的機器學習 pipeline
- 建立並執行接受文字輸入內容的 3 步驟簡易 pipeline
- 建立並執行 pipeline 來訓練、評估及部署 AutoML 分類模型
- 使用透過
google_cloud_pipeline_components程式庫的預先建構元件,與 Vertex AI 服務互動 - 使用 Cloud Scheduler 為 pipeline 工作安排時間
在 Google Cloud 上執行這個實驗室的總費用約為 $25 美元。
2. Vertex AI 簡介
本實驗室使用 Google Cloud 最新推出的 AI 產品服務。Vertex AI 整合了 Google Cloud 機器學習服務,提供流暢的開發體驗。以 AutoML 訓練的模型和自訂模型,先前需透過不同的服務存取。這項新服務將兩者併至單一 API,並加入其他新產品。您也可以將現有專案遷移至 Vertex AI。
除了模型訓練和部署服務,Vertex AI 也提供各種 MLOps 產品,包括 Vertex Pipelines (本實驗室的重點)、模型監控、特徵儲存庫等。下圖列出所有 Vertex AI 產品。

如有任何意見,請參閱支援頁面。
機器學習 pipeline 有什麼用途?
深入探索前,我們先介紹使用 pipeline 的原因。假設您在建構機器學習工作流程,流程中會處理資料、訓練模型、調整超參數、評估及開發模型。每個步驟可能有不同的依附元件,如果光看整個工作流程,可能難以掌握這些步驟。開始擴展機器學習流程時,您或許會想與團隊成員分享機器學習工作流程,方便他們執行流程及貢獻程式碼。這時如果沒有可靠且可重複使用的程序,可能會難以進行。Pipeline 可將機器學習流程的各步驟化為容器,讓您開發個別步驟,並用可重複使用的方法,追蹤各步驟的輸入和輸出內容。您也可以根據 Cloud 環境的其他事件 (例如:有新的訓練資料時),排定或觸發 pipeline 執行作業。
簡而言之:Pipeline 可助您自動執行及重複使用機器學習工作流程。
3. 設定雲端環境
您必須擁有已啟用計費功能的 Google Cloud Platform 專案,才能執行這項程式碼研究室。如要建立專案,請按照這裡的說明操作。
步驟 1:啟動 Cloud Shell
在本實驗室中,您將在 Cloud Shell 工作階段中操作,這是由 Google Cloud 中執行的虛擬機器代管的指令解譯器。您也可以在本機電腦上輕鬆執行本節內容,但使用 Cloud Shell 可讓所有人在一致的環境中,獲得可重現的體驗。完成實驗室後,歡迎在自己的電腦上重試這個部分。

啟用 Cloud Shell
在 Cloud 控制台的右上角,按一下下方的按鈕來啟用 Cloud Shell:

如果您是首次啟動 Cloud Shell,系統會顯示中繼畫面 (位於需捲動位置),說明這個指令列環境。點選「繼續」後,這則訊息日後就不會再出現。以下是這個初次畫面的樣子:

佈建並連至 Cloud Shell 預計只需要幾分鐘。

這部虛擬機器搭載您需要的所有開發工具,並提供永久的 5GB 主目錄,而且可在 Google Cloud 運作,大幅提升網路效能並強化驗證功能。本程式碼研究室幾乎所有工作都可在瀏覽器或 Chromebook 上完成。
連線至 Cloud Shell 後,您應會發現自己通過驗證,且專案已設為您的專案 ID。
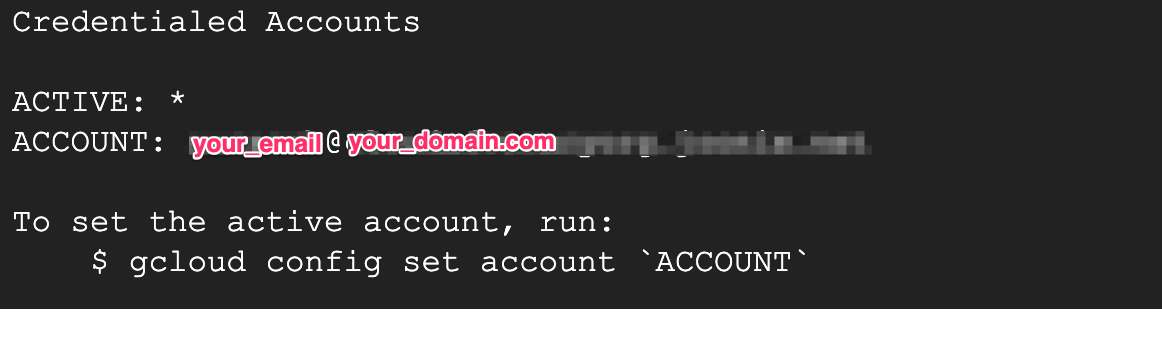
在 Cloud Shell 中執行下列指令,確認您已通過驗證:
gcloud auth list
指令輸出內容應如下所示:
在 Cloud Shell 中執行下列指令,確認 gcloud 指令知道您的專案:
gcloud config list project
指令輸出
[core]
project = <PROJECT_ID>
如未設定,請輸入下列指令手動設定專案:
gcloud config set project <PROJECT_ID>
指令輸出
Updated property [core/project].
Cloud Shell 有幾個環境變數,包括 GOOGLE_CLOUD_PROJECT,其中包含目前雲端專案的名稱。我們會在整個實驗室的各個地方使用這個檔案。您可以執行下列指令來查看:
echo $GOOGLE_CLOUD_PROJECT
步驟 2:啟用 API
在後續步驟中,您會瞭解需要這些服務的原因和位置,但現在請執行下列指令,授予專案 Compute Engine、Container Registry 和 Vertex AI 服務的存取權:
gcloud services enable compute.googleapis.com         \
                       containerregistry.googleapis.com  \
                       aiplatform.googleapis.com  \
                       cloudbuild.googleapis.com \
                       cloudfunctions.googleapis.com
這時應該會顯示類似以下的成功訊息:
Operation "operations/acf.cc11852d-40af-47ad-9d59-477a12847c9e" finished successfully.
步驟 3:建立 Cloud Storage 值區
如要在 Vertex AI 上執行訓練工作,我們需要儲存空間值區來儲存已儲存的模型資產。值區必須是區域值區。我們在這裡使用 us-central,但您也可以使用其他區域 (只要在本實驗室中替換即可)。如果已有 bucket,可以略過這個步驟。
在 Cloud Shell 終端機中執行下列指令,建立 bucket:
BUCKET_NAME=gs://$GOOGLE_CLOUD_PROJECT-bucket
gsutil mb -l us-central1 $BUCKET_NAME
接著,我們會授予運算服務帳戶這個值區的存取權。這樣可確保 Vertex Pipelines 具備將檔案寫入這個值區的必要權限。執行下列指令來新增這項權限:
gcloud projects describe $GOOGLE_CLOUD_PROJECT > project-info.txt
PROJECT_NUM=$(cat project-info.txt | sed -nre 's:.*projectNumber\: (.*):\1:p')
SVC_ACCOUNT="${PROJECT_NUM//\'/}-compute@developer.gserviceaccount.com"
gcloud projects add-iam-policy-binding $GOOGLE_CLOUD_PROJECT --member serviceAccount:$SVC_ACCOUNT --role roles/storage.objectAdmin
步驟 4:建立 Vertex AI Workbench 執行個體
在 Cloud 控制台的「Vertex AI」部分中,按一下「Workbench」:

然後在「使用者自行管理的 Notebooks」中,按一下「New Notebook」(新增 Notebook):

然後選取「TensorFlow 企業版 2.3 (含 LTS)」執行個體類型,且不加入任何 GPU:

使用預設選項,然後按一下「建立」。
步驟 5:開啟筆記本
建立執行個體後,請選取「Open JupyterLab」:

4. 設定 Vertex Pipelines
使用 Vertex Pipelines 前,需先安裝幾個額外的程式庫:
- Kubeflow Pipelines:這是用於建構 pipeline 的 SDK。Vertex Pipelines 可執行透過 Kubeflow Pipelines 和/或 TFX 建構的 pipeline。
- Google Cloud Pipeline Components 提供預先建立的元件,可讓您在建構 pipeline 時,輕鬆操作 Vertex AI 服務。
步驟 1:建立 Python 筆記本及安裝程式庫
首先,從筆記本執行個體的啟動器選單,選取「Python 3」建立筆記本:

點選筆記本執行個體左上方的「+」符號,即可打開啟動器選單。
如要安裝本實驗室使用的兩項服務,請先在筆記本儲存格設定使用者旗標:
USER_FLAG = "--user"
接著,從筆記本執行下列指令:
!pip3 install {USER_FLAG} google-cloud-aiplatform==1.7.0 --upgrade
!pip3 install {USER_FLAG} kfp==1.8.9 google-cloud-pipeline-components==0.2.0
安裝這些套件後,需重新啟動核心:
import os

if not os.getenv("IS_TESTING"):
    # Automatically restart kernel after installs
    import IPython

    app = IPython.Application.instance()
    app.kernel.do_shutdown(True)
最後,確認套件是否已正確安裝。KFP SDK 版本應為 1.8 以上:
!python3 -c "import kfp; print('KFP SDK version: {}'.format(kfp.__version__))"
!python3 -c "import google_cloud_pipeline_components; print('google_cloud_pipeline_components version: {}'.format(google_cloud_pipeline_components.__version__))"
步驟 2:設定專案 ID 和 bucket
您會在本實驗室用到自己的雲端專案 ID,以及先前建立的 bucket。接下來,請為 ID 和 bucket 建立變數。
如果不知道自己的專案 ID,執行以下指令或許就能取得:
import os
PROJECT_ID = ""

# Get your Google Cloud project ID from gcloud
if not os.getenv("IS_TESTING"):
    shell_output=!gcloud config list --format 'value(core.project)' 2>/dev/null
    PROJECT_ID = shell_output[0]
    print("Project ID: ", PROJECT_ID)
否則,請在這裡設定:
if PROJECT_ID == "" or PROJECT_ID is None:
    PROJECT_ID = "your-project-id"  # @param {type:"string"}
接著建立用來儲存 bucket 名稱的變數。如果您是在本實驗室中建立,下列做法就適用。否則,您必須手動設定:
BUCKET_NAME="gs://" + PROJECT_ID + "-bucket"
步驟 3:匯入程式庫
新增以下程式碼,匯入本程式碼研究室會用到的程式庫:
import kfp

from kfp.v2 import compiler, dsl
from kfp.v2.dsl import component, pipeline, Artifact, ClassificationMetrics, Input, Output, Model, Metrics

from google.cloud import aiplatform
from google_cloud_pipeline_components import aiplatform as gcc_aip
from typing import NamedTuple
步驟 4:定義常數
建構 pipeline 前,最後還需定義幾項常數變數。PIPELINE_ROOT 是 Cloud Storage 路徑,pipeline 建立的構件會寫入到這個位置。此程式碼使用 us-central1 做為區域,但如果您在建立 bucket 時使用不同的區域,請更新下方程式碼中的 REGION 變數:
PATH=%env PATH
%env PATH={PATH}:/home/jupyter/.local/bin
REGION="us-central1"

PIPELINE_ROOT = f"{BUCKET_NAME}/pipeline_root/"
PIPELINE_ROOT
執行上方的程式碼後,您應該會看到 pipeline 的根目錄。這是要寫入 pipeline 構件的 Cloud Storage 位置。格式為 gs://YOUR-BUCKET-NAME/pipeline_root/
5. 建立第一個管道
為熟悉 Vertex Pipelines 的運作方式,我們將先使用 KFP SDK 建立短 pipeline。這個 pipeline 不會進行任何與機器學習相關的作業 (請放心,日後還有機會學),我們將透過這個 pipeline 教導您:
- 如何在 KFP SDK 建立自訂元件
- 如何在 Vertex Pipelines 執行及監控 pipeline
接著建立輸出句子的 pipeline,句中有以下兩項元件:產品名稱和表情符號說明。這個 pipeline 將由三項元件組成:
product_name:這個元件會使用產品名稱 (或任何您想要的名稱) 做為輸入內容,並傳回該字串做為輸出內容emoji:這個元件會將表情符號的文字說明轉換為表情符號,像是把文字程式碼「sparkles」轉為 ✨。這個元件使用表情符號程式庫,顯示如何在 pipeline 管理外部依附元件build_sentence:這個最後的元件會使用前兩個元件的輸出內容,建構含有表情符號的句子。舉例來說,輸出結果可能會是「Vertex Pipelines 很 ✨」。
開始編寫程式碼吧!
步驟 1:建立以 Python 函式為基礎的元件
使用 KFP SDK,即可建立以 Python 函式為基礎的元件。我們會在第一個管道中使用這項功能。首先建構 product_name 元件,使用字串做為輸入內容,並傳回該字串。將下列程式碼新增至筆記本:
@component(base_image="python:3.9", output_component_file="first-component.yaml")
def product_name(text: str) -> str:
    return text
請進一步瞭解下列語法:
@component修飾符會在 pipeline 執行時,將此函式編譯至元件。編寫自訂元件時,可使用此修飾符。base_image參數會指定這個元件要用的容器映像檔。output_component_file為選用參數,可指定要寫入已編譯元件的 yaml 檔案。執行該儲存格後,應該會看到該檔案寫入筆記本執行個體。如果您想與其他人分享這個元件,可以傳送生成的 yaml 檔案,並請他們使用下列程式碼載入檔案:
product_name_component = kfp.components.load_component_from_file('./first-component.yaml')
- 函式定義後方的
-> str指定這個元件的輸出內容類型。
步驟 2:再建立兩個元件
為完成 pipeline,請再建立兩個元件。我們定義的第一個元件會將字串做為輸入內容,並轉換為對應的表情符號 (如有)。此元件會傳回元組 (內含傳遞的輸入文字),以及相應的表情符號:
@component(packages_to_install=["emoji"])
def emoji(
    text: str,
) -> NamedTuple(
    "Outputs",
    [
        ("emoji_text", str),  # Return parameters
        ("emoji", str),
    ],
):
    import emoji

    emoji_text = text
    emoji_str = emoji.emojize(':' + emoji_text + ':', language='alias')
    print("output one: {}; output_two: {}".format(emoji_text, emoji_str))
    return (emoji_text, emoji_str)
這個元件比前一個元件複雜,以下詳細說明各項新功能:
packages_to_install參數會告知元件這個容器所有的外部程式庫依附元件。在本例中,我們將使用「emoji」程式庫。- 這個元件會傳回稱為
Outputs的NamedTuple。您可看到這個元組的每個字串都有索引鍵:emoji_text和emoji。我們將在下一個元件使用這些索引鍵來存取輸出內容。
這個 pipeline 的最後一個元件會使用前兩個元件的輸出內容,並將其合併來傳回字串:
@component
def build_sentence(
    product: str,
    emoji: str,
    emojitext: str
) -> str:
    print("We completed the pipeline, hooray!")
    end_str = product + " is "
    if len(emoji) > 0:
        end_str += emoji
    else:
        end_str += emojitext
    return(end_str)
您可能會想瞭解:為何這個元件知道要使用先前步驟定義的輸出內容?好問題!我們會在下一個步驟將全部串聯在一起。
步驟 3:將元件組合成 pipeline
我們在上方定義的元件定義建立了工廠函式,您可在 pipeline 定義中使用這些函式建立步驟。如要設定管道,請使用 @pipeline 修飾符,為管道加入名稱和說明,然後提供要寫入管道構件的根路徑。構件是指所有由 pipeline 生成的輸出檔案。這個簡單的 pipeline 不會生成任何檔案,但下一個 pipeline 會。
我們會在下一個程式碼區塊定義 intro_pipeline 函式,指定初始 pipeline 步驟的輸入內容,以及步驟的銜接方式:
product_task會使用產品名稱做為輸入內容。在本實驗室,此元件會傳遞「Vertex Pipelines」,但您可以視需要變更。emoji_task會使用表情符號的文字程式碼做為輸入內容,您也可以視需要變更。舉例來說,「party_face」是 🥳 表情符號。請注意,由於沒有任何步驟會將輸入內容傳遞至這個元件和product_task元件,因此定義 pipeline 時,需要手動指定這些元件的輸入內容。- 在 pipeline 最後一個步驟,
consumer_task有三個輸入參數:product_task的輸出內容。由於這個步驟只會產生一項輸出內容,我們可以透過product_task.output參照。emoji_task步驟的emoji輸出內容。請查看您在上方定義的emoji元件,我們在其中命名了輸出參數。- 同樣地,
emoji元件中名為emoji_text的輸出內容。如果 pipeline 傳遞的文字沒有對應的表情符號,系統會使用該文字來建構句子。
@pipeline(
    name="hello-world",
    description="An intro pipeline",
    pipeline_root=PIPELINE_ROOT,
)

# You can change the `text` and `emoji_str` parameters here to update the pipeline output
def intro_pipeline(text: str = "Vertex Pipelines", emoji_str: str = "sparkles"):
    product_task = product_name(text)
    emoji_task = emoji(emoji_str)
    consumer_task = build_sentence(
        product_task.output,
        emoji_task.outputs["emoji"],
        emoji_task.outputs["emoji_text"],
    )
步驟 4:編譯及執行 pipeline
定義 pipeline 後,即可編譯 pipeline。以下程式碼會產生用於執行 pipeline 的 JSON 檔案:
compiler.Compiler().compile(
    pipeline_func=intro_pipeline, package_path="intro_pipeline_job.json"
)
接著,請建立 TIMESTAMP 變數。我們會在工作 ID 中使用這項資訊:
from datetime import datetime

TIMESTAMP = datetime.now().strftime("%Y%m%d%H%M%S")
接著定義管道工作:
job = aiplatform.PipelineJob(
    display_name="hello-world-pipeline",
    template_path="intro_pipeline_job.json",
    job_id="hello-world-pipeline-{0}".format(TIMESTAMP),
    enable_caching=True
)
最後,執行工作來建立新的管道執行作業:
job.submit()
執行這個儲存格後,您應該會看到記錄,其中包含在控制台中查看管道執行的連結:

前往該連結。完成後,您的管道應如下所示:
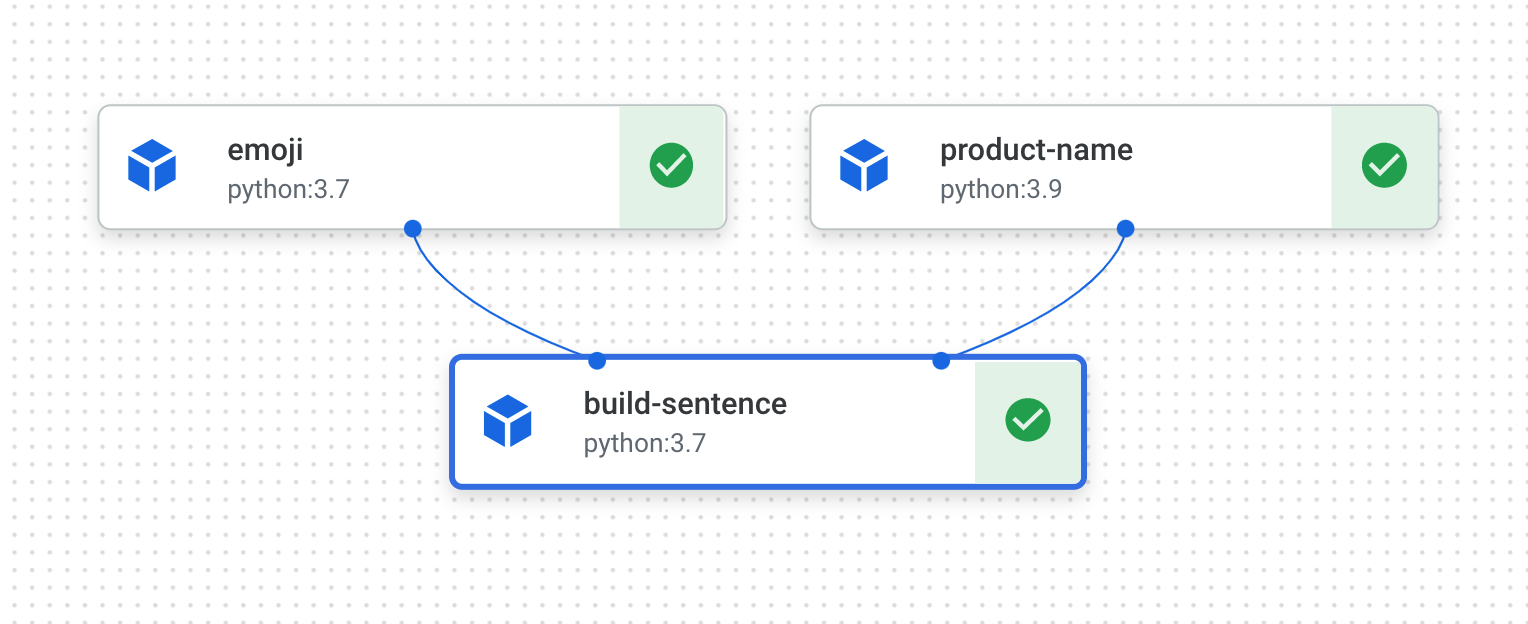
這個 pipeline 的執行時間為 5 至 6 分鐘。完成後,點選 build-sentence 元件即可查看最終輸出內容:

您已熟悉 KFP SDK 和 Vertex Pipelines 的運作方式,現在可以建構 pipeline,運用其他 Vertex AI 服務建立及部署機器學習模型。現在就開始吧!
6. 建立端對端機器學習管道
接著就來建構第一個機器學習 pipeline 吧!在這個 pipeline 中,我們將使用 UCI Machine Learning Dry beans 資料集 (來源:KOKLU, M. and OZKAN, I.A., (2020), "Multiclass Classification of Dry Beans Using Computer Vision and Machine Learning Techniques."In Computers and Electronics in Agriculture, 174, 105507. DOI。
此為表格資料集,我們將在 pipeline 使用此資料集訓練、評估及部署 AutoML 模型,並根據特徵將豆子分為 7 類。
這個 pipeline 將進行以下操作:
- 在 中建立資料集
- 使用 AutoML 訓練表格分類模型
- 取得這個模型的評估指標
- 根據評估指標,決定是否使用 Vertex Pipelines 中的條件邏輯來部署模型
- 使用 Vertex Prediction 將模型部署至端點
接下來的各個步驟都是一個元件。大部分的 pipeline 步驟會使用我們在本程式碼研究室中匯入的 google_cloud_pipeline_components 程式庫,透過預先建立的元件操作 Vertex AI 服務。在這裡,我們會先定義一個自訂元件,再用預先建立的元件,定義其餘的 pipeline 步驟。透過預先建立的元件,您將能輕鬆使用 Vertex AI 服務,例如訓練和部署模型的服務。
步驟 1:用於評估模型的自訂元件
接下來請定義自訂元件,在模型訓練完成後、pipeline 作業結尾時使用。此元件將進行以下操作:
- 從訓練後的 AutoML 分類模型取得評估指標
- 剖析指標,並在 Vertex Pipelines UI 轉譯
- 比較指標數據與門檻的差距,決定是否要部署模型
定義元件前,請先瞭解元件的輸入和輸出參數。這個管道會使用我們雲端專案的部分中繼資料、訓練後的模型 (之後會定義這個元件)、模型的評估指標,以及 thresholds_dict_str,做為輸入內容。我們會在執行管道時定義 thresholds_dict_str。在本例的分類模型中,此為應部署模型的 ROC 曲線下面積值。舉例來說,如果傳入 0.95,表示我們希望管道只在這項指標超過 95% 時部署模型。
評估元件會傳回字串,指出是否要部署模型。將以下程式碼加入筆記本儲存格,建立這個自訂元件:
@component(
    base_image="gcr.io/deeplearning-platform-release/tf2-cpu.2-3:latest",
    output_component_file="tabular_eval_component.yaml",
    packages_to_install=["google-cloud-aiplatform"],
)
def classification_model_eval_metrics(
    project: str,
    location: str,  # "us-central1",
    api_endpoint: str,  # "us-central1-aiplatform.googleapis.com",
    thresholds_dict_str: str,
    model: Input[Artifact],
    metrics: Output[Metrics],
    metricsc: Output[ClassificationMetrics],
) -> NamedTuple("Outputs", [("dep_decision", str)]):  # Return parameter.

    import json
    import logging

    from google.cloud import aiplatform as aip

    # Fetch model eval info
    def get_eval_info(client, model_name):
        from google.protobuf.json_format import MessageToDict

        response = client.list_model_evaluations(parent=model_name)
        metrics_list = []
        metrics_string_list = []
        for evaluation in response:
            print("model_evaluation")
            print(" name:", evaluation.name)
            print(" metrics_schema_uri:", evaluation.metrics_schema_uri)
            metrics = MessageToDict(evaluation._pb.metrics)
            for metric in metrics.keys():
                logging.info("metric: %s, value: %s", metric, metrics[metric])
            metrics_str = json.dumps(metrics)
            metrics_list.append(metrics)
            metrics_string_list.append(metrics_str)

        return (
            evaluation.name,
            metrics_list,
            metrics_string_list,
        )

    # Use the given metrics threshold(s) to determine whether the model is
    # accurate enough to deploy.
    def classification_thresholds_check(metrics_dict, thresholds_dict):
        for k, v in thresholds_dict.items():
            logging.info("k {}, v {}".format(k, v))
            if k in ["auRoc", "auPrc"]:  # higher is better
                if metrics_dict[k] < v:  # if under threshold, don't deploy
                    logging.info("{} < {}; returning False".format(metrics_dict[k], v))
                    return False
        logging.info("threshold checks passed.")
        return True

    def log_metrics(metrics_list, metricsc):
        test_confusion_matrix = metrics_list[0]["confusionMatrix"]
        logging.info("rows: %s", test_confusion_matrix["rows"])

        # log the ROC curve
        fpr = []
        tpr = []
        thresholds = []
        for item in metrics_list[0]["confidenceMetrics"]:
            fpr.append(item.get("falsePositiveRate", 0.0))
            tpr.append(item.get("recall", 0.0))
            thresholds.append(item.get("confidenceThreshold", 0.0))
        print(f"fpr: {fpr}")
        print(f"tpr: {tpr}")
        print(f"thresholds: {thresholds}")
        metricsc.log_roc_curve(fpr, tpr, thresholds)

        # log the confusion matrix
        annotations = []
        for item in test_confusion_matrix["annotationSpecs"]:
            annotations.append(item["displayName"])
        logging.info("confusion matrix annotations: %s", annotations)
        metricsc.log_confusion_matrix(
            annotations,
            test_confusion_matrix["rows"],
        )

        # log textual metrics info as well
        for metric in metrics_list[0].keys():
            if metric != "confidenceMetrics":
                val_string = json.dumps(metrics_list[0][metric])
                metrics.log_metric(metric, val_string)
        # metrics.metadata["model_type"] = "AutoML Tabular classification"

    logging.getLogger().setLevel(logging.INFO)
    aip.init(project=project)
    # extract the model resource name from the input Model Artifact
    model_resource_path = model.metadata["resourceName"]
    logging.info("model path: %s", model_resource_path)

    client_options = {"api_endpoint": api_endpoint}
    # Initialize client that will be used to create and send requests.
    client = aip.gapic.ModelServiceClient(client_options=client_options)
    eval_name, metrics_list, metrics_str_list = get_eval_info(
        client, model_resource_path
    )
    logging.info("got evaluation name: %s", eval_name)
    logging.info("got metrics list: %s", metrics_list)
    log_metrics(metrics_list, metricsc)

    thresholds_dict = json.loads(thresholds_dict_str)
    deploy = classification_thresholds_check(metrics_list[0], thresholds_dict)
    if deploy:
        dep_decision = "true"
    else:
        dep_decision = "false"
    logging.info("deployment decision is %s", dep_decision)

    return (dep_decision,)
步驟 2:新增 Google Cloud 預先建立元件
在本步驟中,我們將定義其餘的 pipeline 元件,並瞭解這些元件的搭配方式。首先,請使用時間戳記為 pipeline 執行作業定義顯示名稱:
import time
DISPLAY_NAME = 'automl-beans{}'.format(str(int(time.time())))
print(DISPLAY_NAME)
接著,將下列程式碼複製到新的筆記本儲存格:
@pipeline(name="automl-tab-beans-training-v2",
                  pipeline_root=PIPELINE_ROOT)
def pipeline(
    bq_source: str = "bq://aju-dev-demos.beans.beans1",
    display_name: str = DISPLAY_NAME,
    project: str = PROJECT_ID,
    gcp_region: str = "us-central1",
    api_endpoint: str = "us-central1-aiplatform.googleapis.com",
    thresholds_dict_str: str = '{"auRoc": 0.95}',
):
    dataset_create_op = gcc_aip.TabularDatasetCreateOp(
        project=project, display_name=display_name, bq_source=bq_source
    )

    training_op = gcc_aip.AutoMLTabularTrainingJobRunOp(
        project=project,
        display_name=display_name,
        optimization_prediction_type="classification",
        budget_milli_node_hours=1000,
        column_transformations=[
            {"numeric": {"column_name": "Area"}},
            {"numeric": {"column_name": "Perimeter"}},
            {"numeric": {"column_name": "MajorAxisLength"}},
            {"numeric": {"column_name": "MinorAxisLength"}},
            {"numeric": {"column_name": "AspectRation"}},
            {"numeric": {"column_name": "Eccentricity"}},
            {"numeric": {"column_name": "ConvexArea"}},
            {"numeric": {"column_name": "EquivDiameter"}},
            {"numeric": {"column_name": "Extent"}},
            {"numeric": {"column_name": "Solidity"}},
            {"numeric": {"column_name": "roundness"}},
            {"numeric": {"column_name": "Compactness"}},
            {"numeric": {"column_name": "ShapeFactor1"}},
            {"numeric": {"column_name": "ShapeFactor2"}},
            {"numeric": {"column_name": "ShapeFactor3"}},
            {"numeric": {"column_name": "ShapeFactor4"}},
            {"categorical": {"column_name": "Class"}},
        ],
        dataset=dataset_create_op.outputs["dataset"],
        target_column="Class",
    )
    model_eval_task = classification_model_eval_metrics(
        project,
        gcp_region,
        api_endpoint,
        thresholds_dict_str,
        training_op.outputs["model"],
    )

    with dsl.Condition(
        model_eval_task.outputs["dep_decision"] == "true",
        name="deploy_decision",
    ):

        endpoint_op = gcc_aip.EndpointCreateOp(
            project=project,
            location=gcp_region,
            display_name="train-automl-beans",
        )

        gcc_aip.ModelDeployOp(
            model=training_op.outputs["model"],
            endpoint=endpoint_op.outputs["endpoint"],
            dedicated_resources_min_replica_count=1,
            dedicated_resources_max_replica_count=1,
            dedicated_resources_machine_type="n1-standard-4",
        )
以下說明這段程式碼的運作方式:
- 首先,如同前一個 pipeline,這個 pipeline 要用的輸入參數由您定義。我們需要手動設定這些參數,因為這些參數不會採用 pipeline 中其他步驟的輸出內容。
- Pipeline 的其他步驟會使用預先建立的元件來操作 Vertex AI 服務:
TabularDatasetCreateOp會根據 Cloud Storage 或 BigQuery 的資料集來源,在 Vertex AI 建立表格資料集。在這個 pipeline,我們會透過 BigQuery 資料表網址傳遞資料AutoMLTabularTrainingJobRunOp會啟動表格資料集的 AutoML 訓練工作。請傳遞一些設定參數至這個元件,包括模型類型 (本例為分類)、資料欄的一些資料、訓練的執行時間,以及資料集的相關資訊。請注意,如要將資料集傳入此元件,需使用dataset_create_op.outputs["dataset"]提供前一個元件的輸出內容。EndpointCreateOp會在 Vertex AI 中建立端點。從這個步驟建立的端點會做為下一個元件的輸入內容傳遞ModelDeployOp會將指定模型部署到 Vertex AI 中的端點。在本例中,我們使用上一個步驟建立的端點。有其他設定選項,但在這裡,請提供端點機型及要部署的模型,再存取 pipeline 中訓練步驟的輸出內容,將資料傳入模型
- 這個 pipeline 也會使用 Vertex Pipelines 的條件邏輯功能,讓您定義條件,以及依據該條件結果產生的不同分支版本。請注意,定義 pipeline 時需傳遞
thresholds_dict_str參數。此為準確率門檻,用於決定是否要將模型部署至端點。如要實作這項功能,請使用 KFP SDK 的Condition類別。傳入的條件,是我們在本程式碼研究室稍早定義的自訂評估元件的輸出結果。如果此條件為「true」,pipeline 將繼續執行deploy_op元件。如果準確率未達預先定義的門檻,pipeline 會停止且不會部署模型。
步驟 3:編譯及執行端對端機器學習 pipeline
定義完整 pipeline 後,就能編譯 pipeline:
compiler.Compiler().compile(
    pipeline_func=pipeline, package_path="tab_classif_pipeline.json"
)
接著定義工作:
ml_pipeline_job = aiplatform.PipelineJob(
    display_name="automl-tab-beans-training",
    template_path="tab_classif_pipeline.json",
    pipeline_root=PIPELINE_ROOT,
    parameter_values={"project": PROJECT_ID, "display_name": DISPLAY_NAME},
    enable_caching=True
)
最後,執行工作:
ml_pipeline_job.submit()
執行上方儲存格後,前往記錄中顯示的連結,在控制台查看 pipeline。此 pipeline 的執行時間會稍微超過 1 小時。大部分的時間會用於 AutoML 訓練步驟。執行完畢的 pipeline 應如下所示:

切換頂端的「Expand artifacts」按鈕,就能深入瞭解以 pipeline 建立的各個構件。舉例來說,點選 dataset 構件,便會看到 Vertex AI 資料集的詳細資料。點選下方連結,即可前往該資料集的頁面:

同樣地,如要查看自訂評估元件產生的指標圖表,請點選「metricsc」構件。您可以在資訊主頁右側,看到這個模型的混淆矩陣:

如要查看執行這個 pipeline 時,系統建立的模型和端點,請前往模型區塊,然後按一下「automl-beans」模型。您應該會看到該模型部署至某個端點:

您也可以點選 pipeline 圖表的「endpoint」構件,前往該頁面。
除了在控制台查看 pipeline 圖表,您也可以使用 Vertex Pipelines 的歷程追蹤功能。歷程追蹤是指追蹤整個 pipeline 中建立的構件,可協助我們瞭解構件的建立位置,以及構件在整個機器學習工作流程的用途。舉例來說,此 pipeline 建立了一個資料集,如要查看資料集的歷程追蹤,請依序點選資料集構件和「查看歷程」:

下圖顯示所有使用此構件的位置:

步驟 4:比較不同 pipeline 執行作業的指標
如果您多次執行這個 pipeline,可能會想比較各執行作業的指標。您可以使用 aiplatform.get_pipeline_df() 方法存取執行作業中繼資料。我們會在此步驟,取得這個 pipeline 所有執行作業的中繼資料,並將這些資料載入 Pandas DataFrame:
pipeline_df = aiplatform.get_pipeline_df(pipeline="automl-tab-beans-training-v2")
small_pipeline_df = pipeline_df.head(2)
small_pipeline_df
這樣就完成了實驗室!
🎉 恭喜!🎉
您已瞭解如何使用 Vertex AI 執行下列作業:
- 使用 Kubeflow Pipelines SDK 建構含有自訂元件的端對端 pipeline
- 在 Vertex Pipelines 上執行管道,並使用 SDK 啟動管道執行作業
- 在控制台中查看及分析 Vertex Pipelines 圖表
- 使用預先建立的 pipeline 元件,將 Vertex AI 服務新增至 pipeline
- 排定週期性管道工作
如要進一步瞭解 Vertex 的其他部分,請參閱說明文件。
7. 清除
為避免產生費用,建議您刪除在本實驗室中建立的資源。
步驟 1:停止或刪除 Notebooks 執行個體
如要繼續使用在本實驗室中建立的筆記本,建議您在未使用時關閉筆記本。在 Cloud 控制台的 Notebooks 使用者介面中,選取筆記本,然後選取「停止」。如要完全刪除執行個體,請選取「刪除」:

步驟 2:刪除端點
如要刪除已部署的端點,請前往 Vertex AI 控制台的「端點」專區,然後按一下刪除圖示:

然後點選下列提示中的「取消部署」:

最後,請前往控制台的「模型」部分,找出該模型,然後按一下右側的三點選單,並選取「刪除模型」:

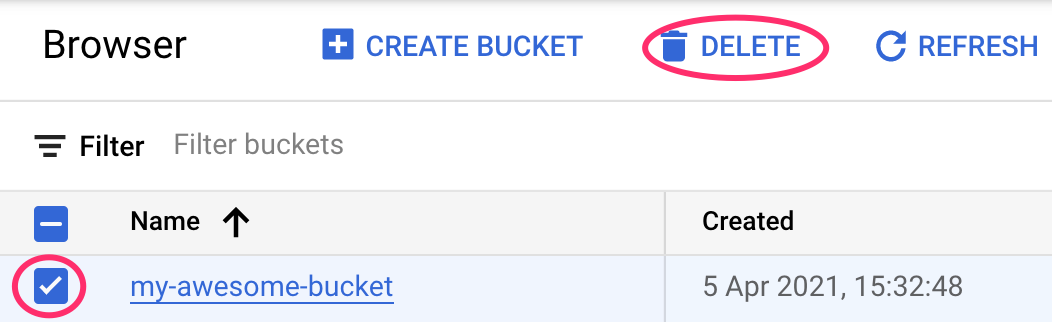
步驟 3:刪除 Cloud Storage bucket
如要刪除 Storage Bucket,請使用 Cloud 控制台中的導覽選單瀏覽至 Storage,選取 bucket,然後按一下「Delete」: