程式碼研究室簡介
2. Vertex AI 簡介
這個研究室使用 Google Cloud 最新的 AI 產品服務。Vertex AI 將 Google Cloud 中的機器學習產品整合到流暢的開發體驗中。先前使用 AutoML 訓練的模型和自訂模型,都能透過不同的服務存取。這項新產品會與其他新產品一起合併為一個 API。您也可以將現有專案遷移至 Vertex AI。如有任何意見,請參閱支援頁面。
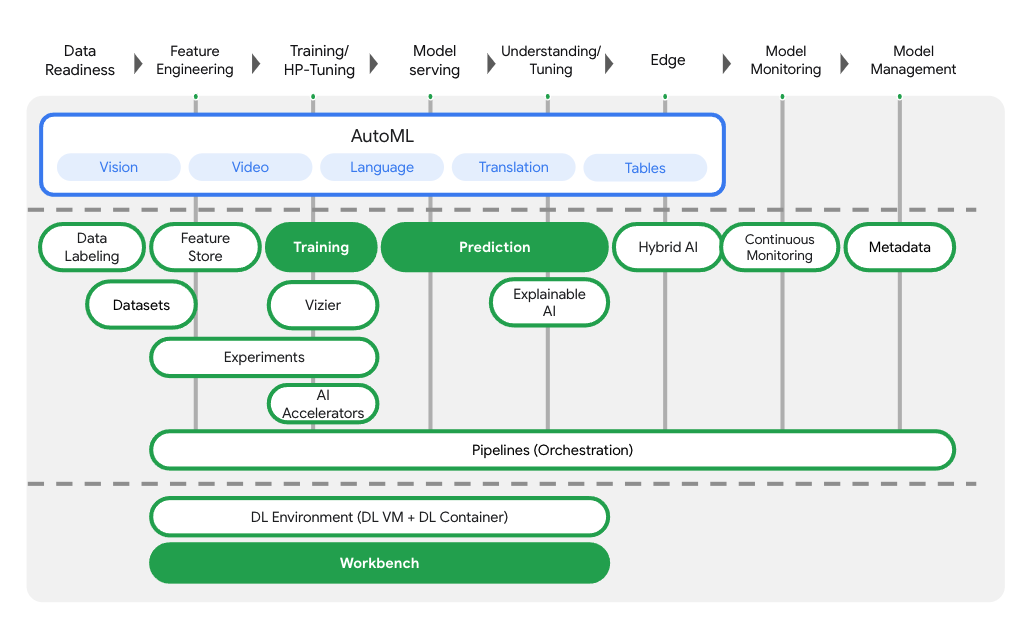
Vertex AI 提供許多不同的產品,可支援端對端機器學習工作流程。本研究室將著重於下列產品:訓練、預測和 Workbench。
3. 設定環境
您需要已啟用計費功能的 Google Cloud Platform 專案,才能執行這個程式碼研究室。如要建立專案,請按照這篇文章中的操作說明進行。
步驟 1:啟用 Compute Engine API
前往「Compute Engine」,並選取「啟用」 (如果尚未啟用)。建立筆記本執行個體時會用到。
步驟 2:啟用 Vertex AI API
前往 Cloud 控制台的 Vertex AI 專區,然後按一下「啟用 Vertex AI API」。
步驟 3:啟用 Container Registry API
前往「Container Registry」,然後選取「Enable」(啟用) (如果尚未啟用)。您將使用這個選項為自訂訓練工作建立容器。
步驟 4:建立 Vertex AI Workbench 執行個體
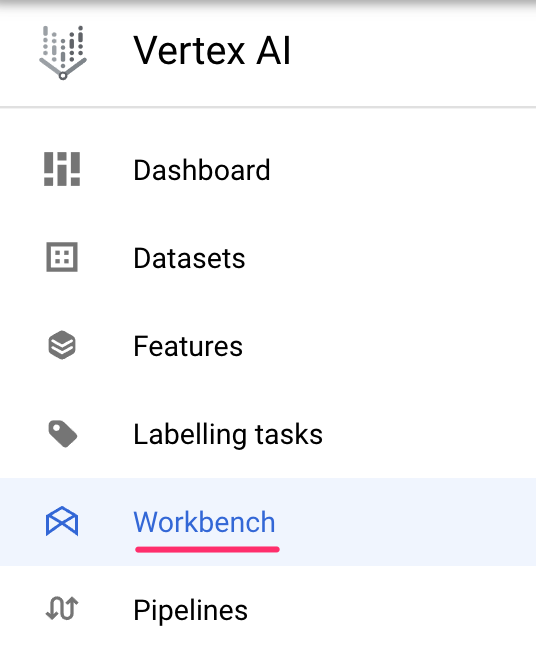
在 Cloud 控制台的 Vertex AI 專區中,按一下「Workbench」:
接著在「使用者自行管理的筆記本」中,按一下「新增筆記本」:

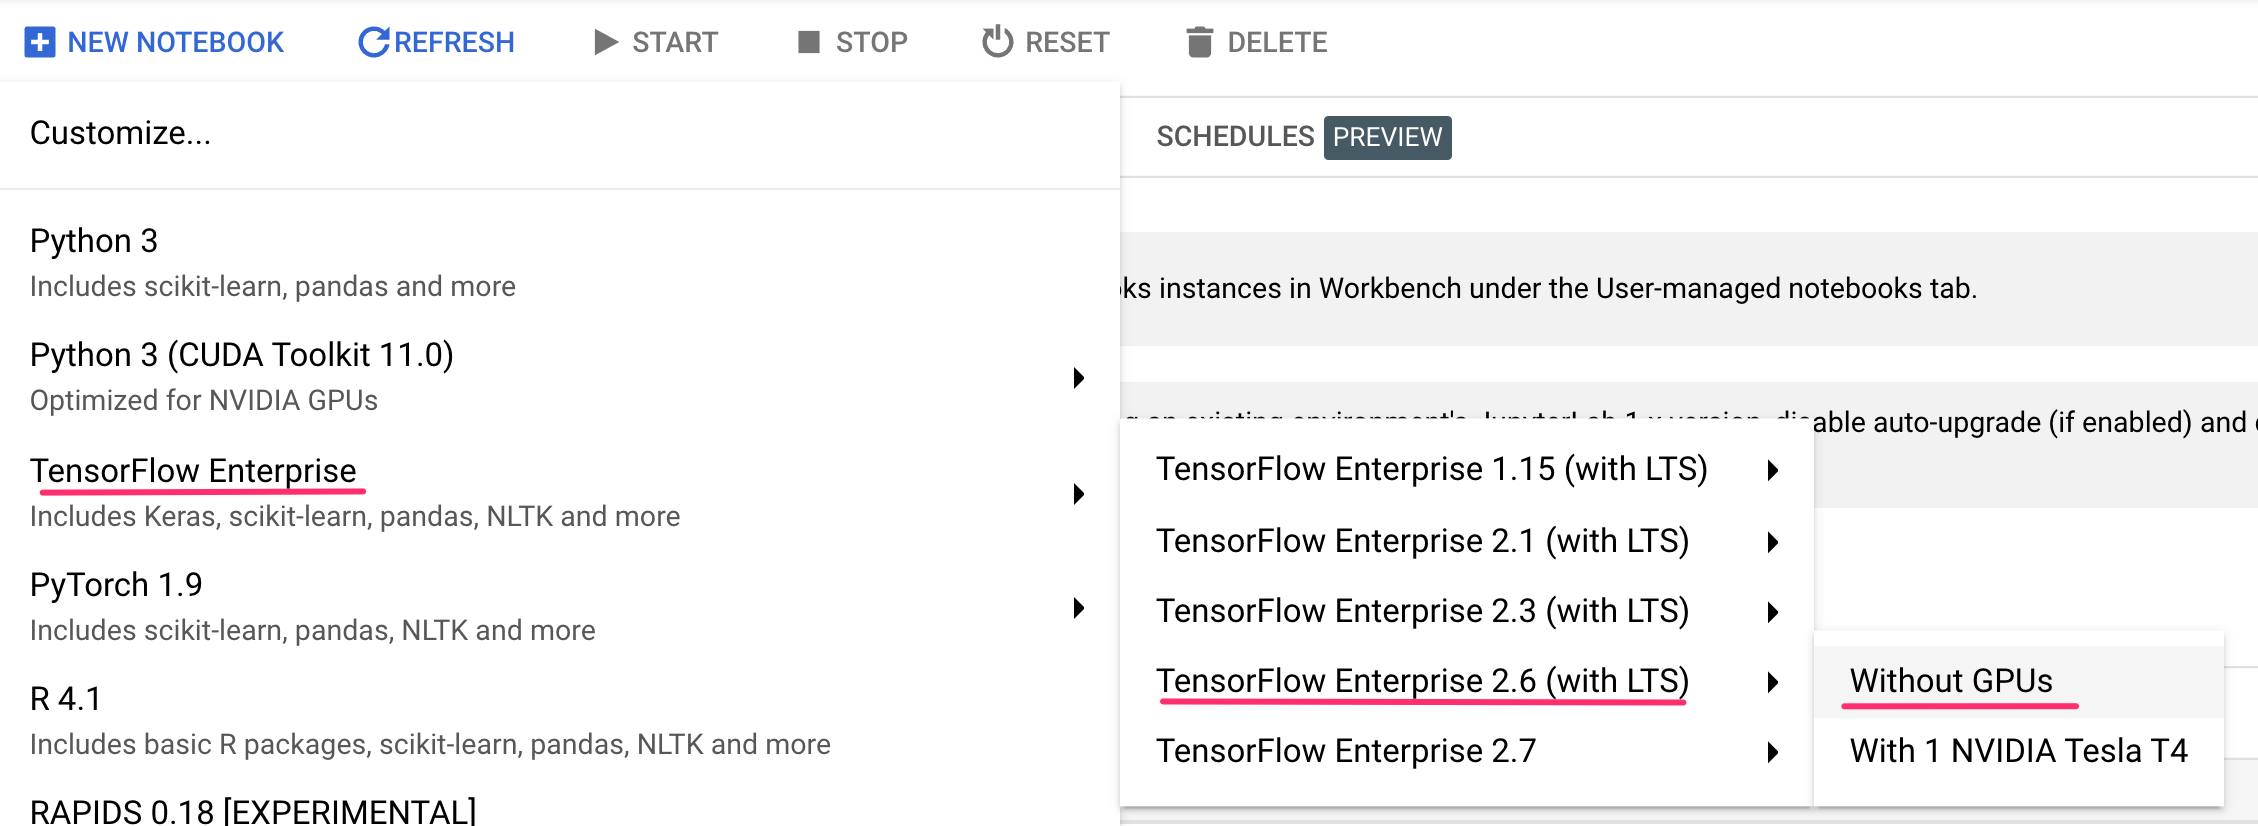
接著選取最新版的「TensorFlow (含 LTS)」執行個體類型,但「不含 GPU」:
使用預設選項,然後按一下「建立」。
本研究室將訓練及提供的模型是依據 TensorFlow 說明文件的本教學課程建構而成。本教學課程使用 Kaggle 的 Auto MPG 資料集,預測車輛的油耗效率。
4. 將訓練程式碼容器化
我們會將訓練程式碼放入 Docker 容器,並將這項容器推送至 Google Container Registry,然後將這項訓練工作提交至 Vertex。透過這種做法,我們可以訓練以任何架構建構的模型。
如要開始使用,請透過「啟動器」選單開啟筆記本執行個體中的「終端機」視窗:

建立名為 mpg 的新目錄,並使用 cd 加入該目錄:
mkdir mpg
cd mpg
步驟 1:建立 Dockerfile
將程式碼容器化的首要步驟,就是建立 Dockerfile。並在 Dockerfile 中加入執行映像檔所需的所有指令。此工具會安裝目前使用的所有程式庫,並設定訓練程式碼的進入點。在終端機中建立空白的 Dockerfile:
touch Dockerfile
開啟 Dockerfile,並將以下內容複製到檔案中:
FROM gcr.io/deeplearning-platform-release/tf2-cpu.2-6
WORKDIR /

# Copies the trainer code to the docker image.
COPY trainer /trainer

# Sets up the entry point to invoke the trainer.
ENTRYPOINT ["python", "-m", "trainer.train"]
這個 Dockerfile 會使用 深度學習容器 TensorFlow 企業版 2.3 Docker 映像檔。Google Cloud 的深度學習容器預先安裝許多常見的機器學習和數據資料學架構。我們使用的版本包含 TF Enterprise 2.3、Pandas、Scikit-learn 和其他版本。下載該映像檔後,這個 Dockerfile 會設定訓練程式碼的進入點。我們尚未建立這些檔案,在下一個步驟中,我們會新增用於訓練及匯出模型的程式碼。
步驟 2:建立 Cloud Storage 值區
在訓練工作中,我們會將訓練好的 TensorFlow 模型匯出至 Cloud Storage 值區。Vertex 會透過這些資料讀取匯出的模型資產,然後部署模型。在終端機執行下列指令,定義專案的環境變數;請務必將 your-cloud-project 替換為您的專案 ID:
PROJECT_ID='your-cloud-project'
接著,在終端機中執行下列指令,在專案中建立新值區。-l (位置) 旗標非常重要,因為這需要位於您稍後在教學課程中部署模型端點的區域:
BUCKET_NAME="gs://${PROJECT_ID}-bucket"
gsutil mb -l us-central1 $BUCKET_NAME
步驟 3:新增模型訓練程式碼
從終端機執行下列指令,為訓練程式碼和 Python 檔案建立目錄,並加入程式碼:
mkdir trainer
touch trainer/train.py
mpg/ 目錄中現在應該會顯示以下內容:
+ Dockerfile
+ trainer/
    + train.py
接著,開啟剛才建立的 train.py 檔案,然後複製下方程式碼 (這是 TensorFlow 文件中教學課程的改編版本)。
在檔案的開頭,將 BUCKET 變數更新為您在上一個步驟中建立的 Storage 值區名稱:
import numpy as np
import pandas as pd
import pathlib
import tensorflow as tf

from tensorflow import keras
from tensorflow.keras import layers

print(tf.__version__)

"""## The Auto MPG dataset

The dataset is available from the [UCI Machine Learning Repository](https://archive.ics.uci.edu/ml/).

### Get the data
First download the dataset.
"""

dataset_path = keras.utils.get_file("auto-mpg.data", "http://archive.ics.uci.edu/ml/machine-learning-databases/auto-mpg/auto-mpg.data")
dataset_path

"""Import it using pandas"""

column_names = ['MPG','Cylinders','Displacement','Horsepower','Weight',
                'Acceleration', 'Model Year', 'Origin']
dataset = pd.read_csv(dataset_path, names=column_names,
                      na_values = "?", comment='\t',
                      sep=" ", skipinitialspace=True)

dataset.tail()

# TODO: replace `your-gcs-bucket` with the name of the Storage bucket you created earlier
BUCKET = 'gs://your-gcs-bucket'

"""### Clean the data

The dataset contains a few unknown values.
"""

dataset.isna().sum()

"""To keep this initial tutorial simple drop those rows."""

dataset = dataset.dropna()

"""The `"Origin"` column is really categorical, not numeric. So convert that to a one-hot:"""

dataset['Origin'] = dataset['Origin'].map({1: 'USA', 2: 'Europe', 3: 'Japan'})

dataset = pd.get_dummies(dataset, prefix='', prefix_sep='')
dataset.tail()

"""### Split the data into train and test

Now split the dataset into a training set and a test set.

We will use the test set in the final evaluation of our model.
"""

train_dataset = dataset.sample(frac=0.8,random_state=0)
test_dataset = dataset.drop(train_dataset.index)

"""### Inspect the data

Have a quick look at the joint distribution of a few pairs of columns from the training set.

Also look at the overall statistics:
"""

train_stats = train_dataset.describe()
train_stats.pop("MPG")
train_stats = train_stats.transpose()
train_stats

"""### Split features from labels

Separate the target value, or "label", from the features. This label is the value that you will train the model to predict.
"""

train_labels = train_dataset.pop('MPG')
test_labels = test_dataset.pop('MPG')

"""### Normalize the data

Look again at the `train_stats` block above and note how different the ranges of each feature are.

It is good practice to normalize features that use different scales and ranges. Although the model *might* converge without feature normalization, it makes training more difficult, and it makes the resulting model dependent on the choice of units used in the input.

Note: Although we intentionally generate these statistics from only the training dataset, these statistics will also be used to normalize the test dataset. We need to do that to project the test dataset into the same distribution that the model has been trained on.
"""

def norm(x):
  return (x - train_stats['mean']) / train_stats['std']
normed_train_data = norm(train_dataset)
normed_test_data = norm(test_dataset)

"""This normalized data is what we will use to train the model.

Caution: The statistics used to normalize the inputs here (mean and standard deviation) need to be applied to any other data that is fed to the model, along with the one-hot encoding that we did earlier.  That includes the test set as well as live data when the model is used in production.

## The model

### Build the model

Let's build our model. Here, we'll use a `Sequential` model with two densely connected hidden layers, and an output layer that returns a single, continuous value. The model building steps are wrapped in a function, `build_model`, since we'll create a second model, later on.
"""

def build_model():
  model = keras.Sequential([
    layers.Dense(64, activation='relu', input_shape=[len(train_dataset.keys())]),
    layers.Dense(64, activation='relu'),
    layers.Dense(1)
  ])

  optimizer = tf.keras.optimizers.RMSprop(0.001)

  model.compile(loss='mse',
                optimizer=optimizer,
                metrics=['mae', 'mse'])
  return model

model = build_model()

"""### Inspect the model

Use the `.summary` method to print a simple description of the model
"""

model.summary()

"""Now try out the model. Take a batch of `10` examples from the training data and call `model.predict` on it.

It seems to be working, and it produces a result of the expected shape and type.

### Train the model

Train the model for 1000 epochs, and record the training and validation accuracy in the `history` object.

Visualize the model's training progress using the stats stored in the `history` object.

This graph shows little improvement, or even degradation in the validation error after about 100 epochs. Let's update the `model.fit` call to automatically stop training when the validation score doesn't improve. We'll use an *EarlyStopping callback* that tests a training condition for  every epoch. If a set amount of epochs elapses without showing improvement, then automatically stop the training.

You can learn more about this callback [here](https://www.tensorflow.org/api_docs/python/tf/keras/callbacks/EarlyStopping).
"""

model = build_model()

EPOCHS = 1000

# The patience parameter is the amount of epochs to check for improvement
early_stop = keras.callbacks.EarlyStopping(monitor='val_loss', patience=10)

early_history = model.fit(normed_train_data, train_labels,
                    epochs=EPOCHS, validation_split = 0.2,
                    callbacks=[early_stop])


# Export model and save to GCS
model.save(BUCKET + '/mpg/model')
步驟 4:在本機建構及測試容器
在終端機中,使用 Google Container Registry 中容器映像檔的 URI 定義變數:
IMAGE_URI="gcr.io/$PROJECT_ID/mpg:v1"
接著,從 mpg 目錄的根目錄執行下列指令,以建構容器:
docker build ./ -t $IMAGE_URI
在筆記本執行個體中執行容器,確保容器正常運作:
docker run $IMAGE_URI
模型應該會在 1 到 2 分鐘內完成訓練,驗證準確率約為 72% (精確的準確度可能有所不同)。在本機完成後執行容器後,請將其推送至 Google Container Registry:
docker push $IMAGE_URI
將容器推送至 Container Registry 後,您就可以開始自訂模型訓練工作。
5. 在 Vertex AI 中執行訓練工作
Vertex AI 提供兩種訓練模型的選項:
- AutoML:只需要最基本的機器學習專業知識,就能輕鬆訓練出高品質模型。
- 自訂訓練:使用 Google Cloud 其中一個預先建構的容器,或在雲端執行自訂訓練應用程式。
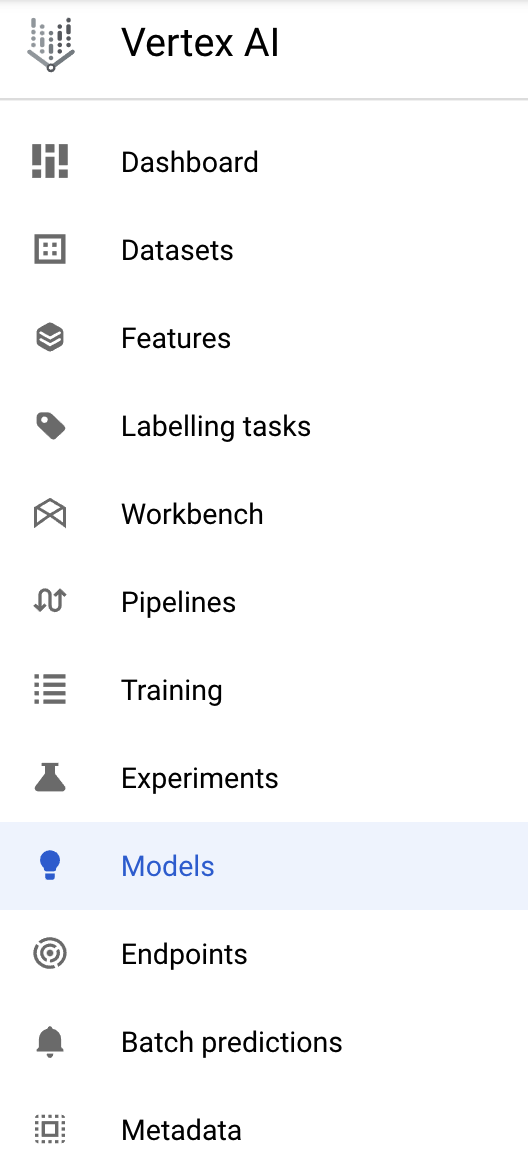
在本研究室中,我們會透過 Google Container Registry 中的自訂容器進行自訂訓練。首先,請前往 Cloud 控制台「Vertex」專區中的「模型」區段:
步驟 1:開始執行訓練工作
按一下「建立」,輸入訓練工作和已部署模型的參數:
- 在「資料集」下方,選取「沒有代管資料集」
- 接著選取「Custom training (advanced)」(自訂訓練 (進階))做為訓練方法,然後按一下「Continue」。
- 按一下 [Continue] (繼續)。
下一步是在「Model name」(模型名稱) 中輸入 mpg (或任何您想要呼叫模型的內容)。接著選取「自訂容器」:

在「Container image」(容器映像檔) 文字方塊中,按一下「Browse」,然後找出您剛才上傳至 Container Registry 的 Docker 映像檔。將其餘欄位留白,並按一下「繼續」。
我們不會在本教學課程中使用超參數調整,因此請取消勾選「Enable hyperparameter tuning」(啟用超參數微調) 方塊,然後按一下「Continue」(繼續)。
在「運算和定價」中,將所選區域保持不變,並選擇 n1-standard-4 做為機器類型:

將加速器欄位留白,然後選取「繼續」。由於本示範中的模型訓練速度很快,我們使用較小的機器類型。
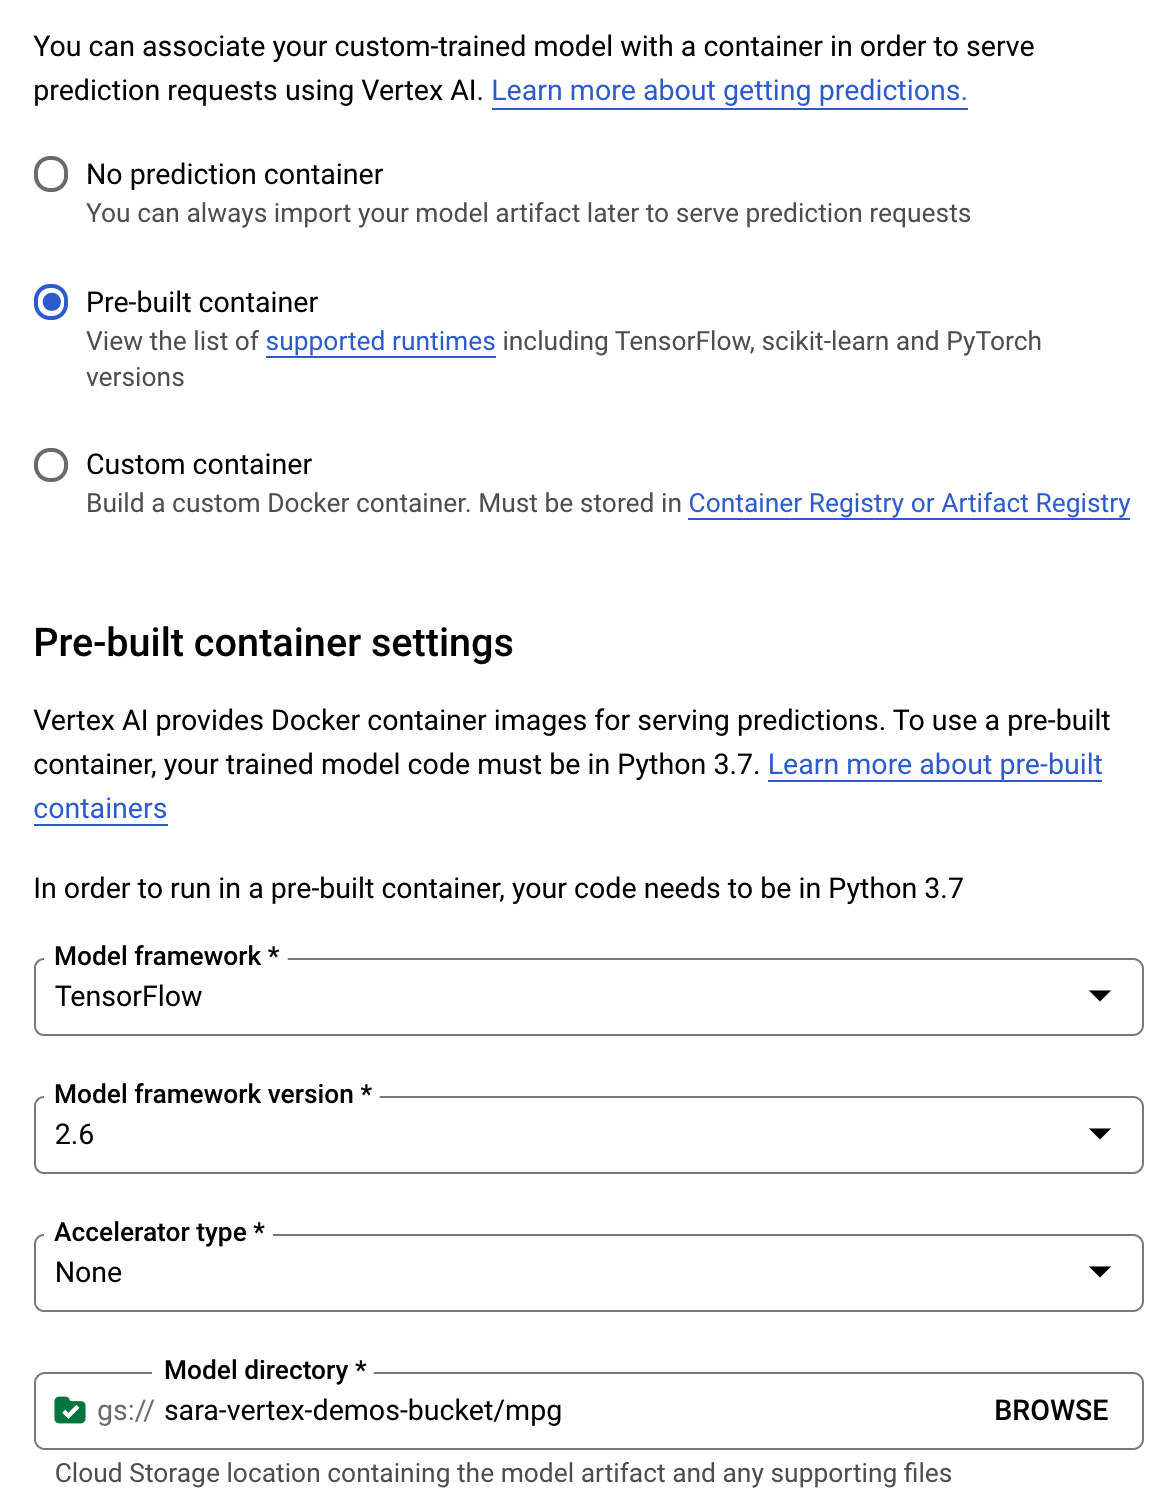
在「預測容器」步驟下方,依序選取「預先建構的容器」和「TensorFlow 2.6」。
請保留預先建構容器的預設設定。在「Model directory」下方,輸入包含 mpg 子目錄的 GCS 值區。這是模型訓練指令碼中匯出已訓練模型的路徑:
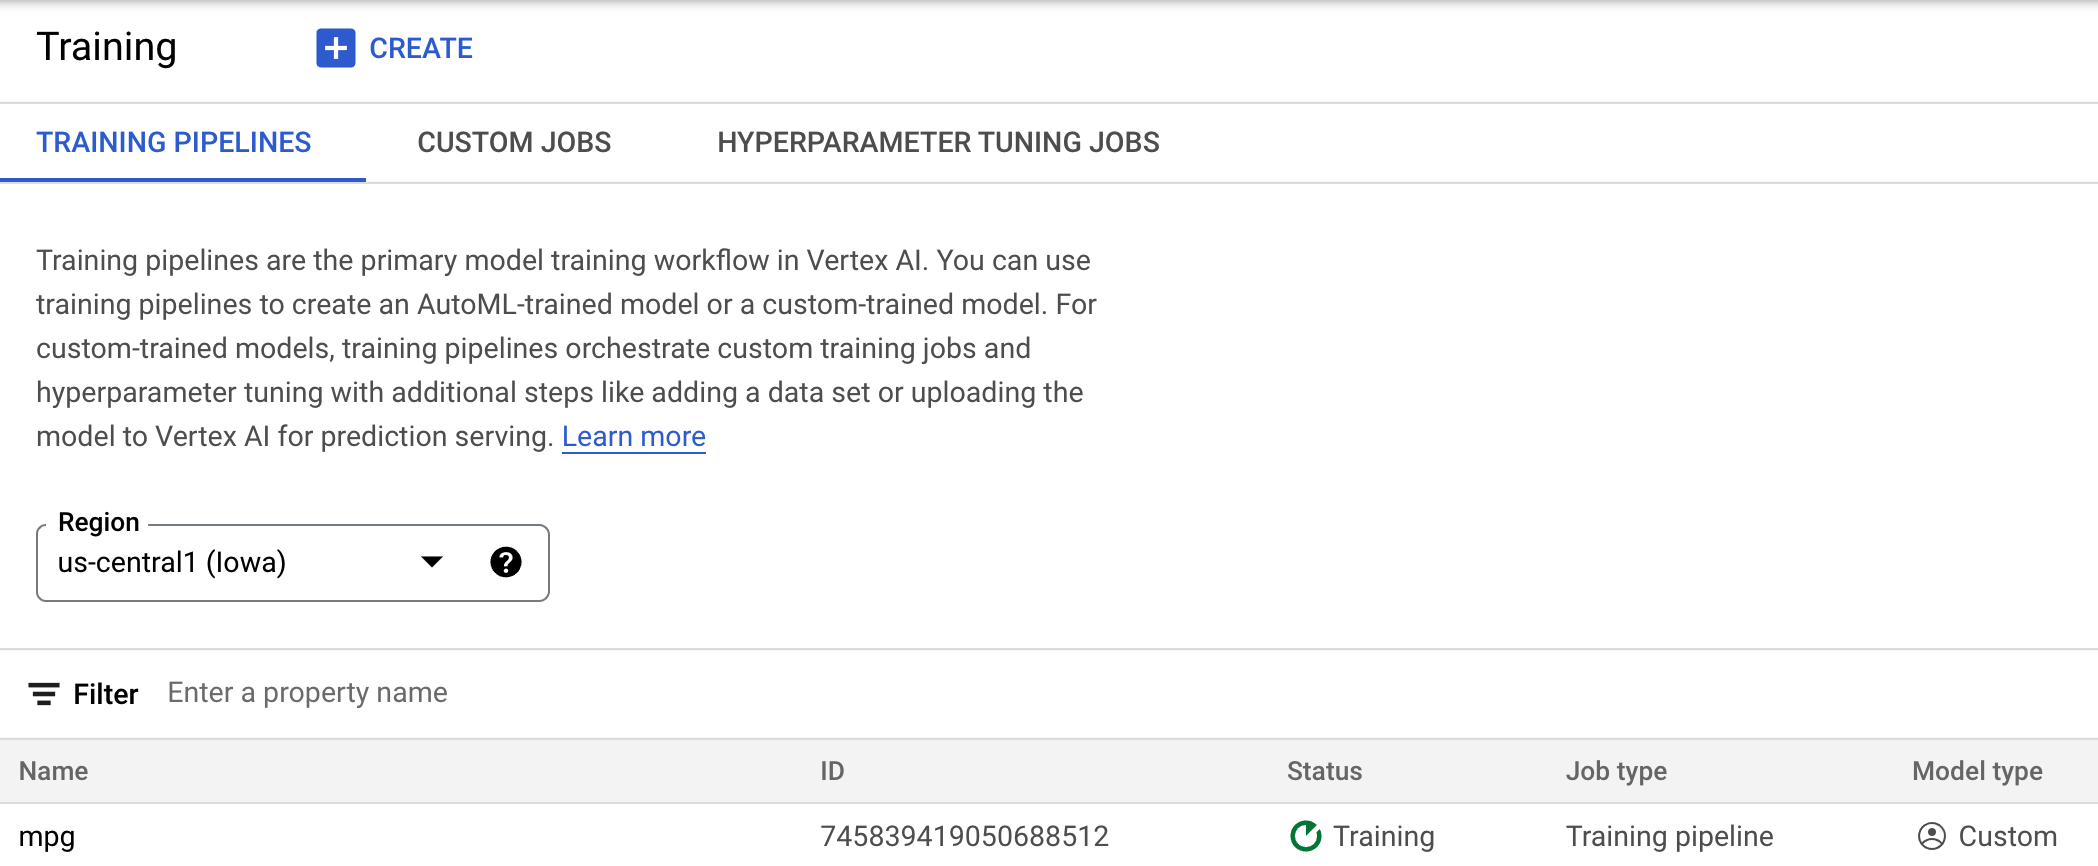
Vertex 部署模型時,會尋找這個位置。完成後,您就可以開始訓練了!點選「Start training」來開始訓練工作。在控制台的「訓練」專區,您會看到以下內容:
6. 部署模型端點
設定訓練工作時,我們已指定 Vertex AI 該在何處尋找匯出的模型資產。在訓練管道中,Vertex 會根據這個資產路徑建立模型資源。模型資源本身並非已部署的模型,不過一旦有模型,您就可以將模型部署至端點。如要進一步瞭解 Vertex AI 中的模型和端點,請參閱說明文件。
在這個步驟中,我們會為訓練過的模型建立端點。我們可以透過 Vertex AI API,透過模型取得模型預測結果。
步驟 1:部署端點
訓練工作完成後,您應該會在控制台的「Models」部分看到名為 mpg (或您指定的名稱) 的模型:
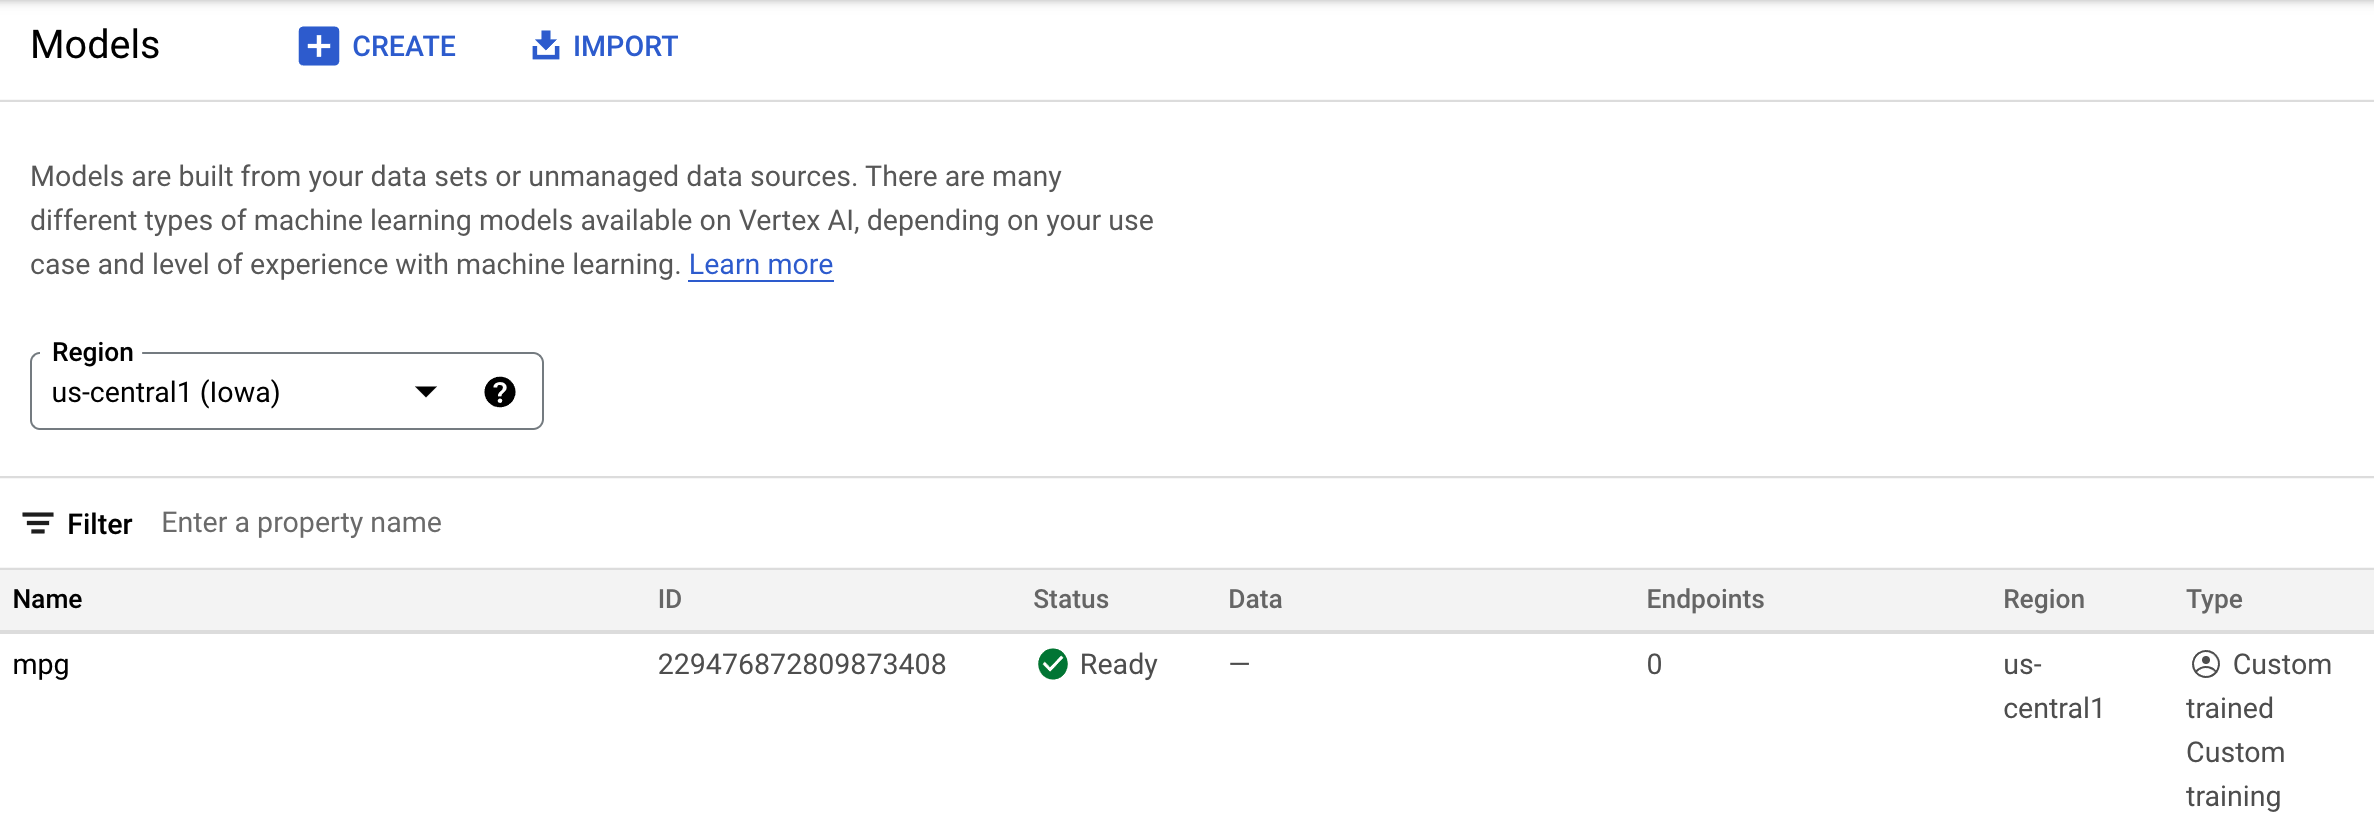
執行訓練工作時,Vertex 會為您建立模型資源。如要使用這個模型,您必須部署端點。每個模型可以有多個端點。按一下模型,然後點選「部署至端點」。
選取「Create new 端點」並輸入名稱 (例如 v1)。保留「存取權」的「標準」選項,然後按一下「繼續」。
將「流量分配」保持為 100,並在「運算節點數量下限」中輸入 1。在「機器類型」下方,選取「n1-standard-2」或您想要的任何機器類型。其餘設定均保留預設值,然後點選「繼續」。我們不會為這個模型啟用監控功能,因此請按一下「部署」啟動端點部署作業。
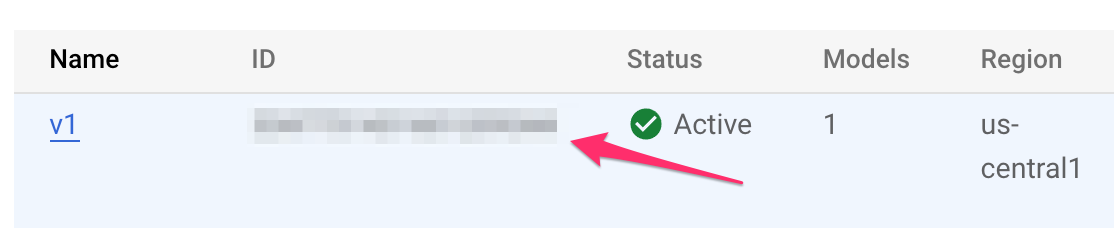
部署端點需要 10 到 15 分鐘,部署完成後,系統會傳送電子郵件通知您。端點完成部署後,您會看到以下內容,其中顯示部署在模型資源下的端點:

步驟 2:取得部署模型的預測結果
我們會透過 Vertex Python API,從 Python 筆記本取得訓練後的模型預測結果。返回筆記本執行個體,然後從啟動器建立 Python 3 筆記本:

在筆記本中,在儲存格中執行下列指令,安裝 Vertex AI SDK:
!pip3 install google-cloud-aiplatform --upgrade --user
然後在筆記本中新增儲存格來匯入 SDK,並為剛剛部署的端點建立參照:
from google.cloud import aiplatform

endpoint = aiplatform.Endpoint(
    endpoint_name="projects/YOUR-PROJECT-NUMBER/locations/us-central1/endpoints/YOUR-ENDPOINT-ID"
)
您需要將上述 endpoint_name 字串中的兩個值替換成您的專案編號和端點。如要找出專案編號,請前往專案資訊主頁,然後取得「專案編號」值。
如要查看端點 ID,請前往控制台的「端點」專區:
最後,請複製下列程式碼,並在新儲存格中執行,對端點進行預測:
test_mpg = [1.4838871833555929,
 1.8659883497083019,
 2.234620276849616,
 1.0187816540094903,
 -2.530890710602246,
 -1.6046416850441676,
 -0.4651483719733302,
 -0.4952254087173721,
 0.7746763768735953]

response = endpoint.predict([test_mpg])

print('API response: ', response)

print('Predicted MPG: ', response.predictions[0][0])
這個範例已有正規化的值,也就是模型預期的格式。
執行這個儲存格後,您應該會看到每加侖左右的預測結果輸出約 16 英里。
🎉 恭喜!🎉
您已瞭解如何使用 Vertex AI 執行下列作業:
- 在自訂容器中提供訓練程式碼來訓練模型。在這個範例中,您使用了 TensorFlow 模型,但可以透過自訂容器,以任何架構建構的模型。
- 使用預先建構的容器部署 TensorFlow 模型,做為您用於訓練的工作流程的一部分。
- 建立模型端點及產生預測。
如要進一步瞭解 Vertex 的其他部分,請參閱說明文件。
7. 清除所用資源
如果想繼續使用您在這個研究室中建立的筆記本,建議在不使用時將其關閉。在 Cloud Console 的 Workbench UI 中,選取筆記本,然後選取「Stop」。
如想完全刪除筆記本,請按一下右上方的「刪除」按鈕。
如要刪除您部署的端點,請前往 Vertex AI 控制台的「端點」部分,按一下您建立的端點,然後選取「取消部署端點中的模型」:

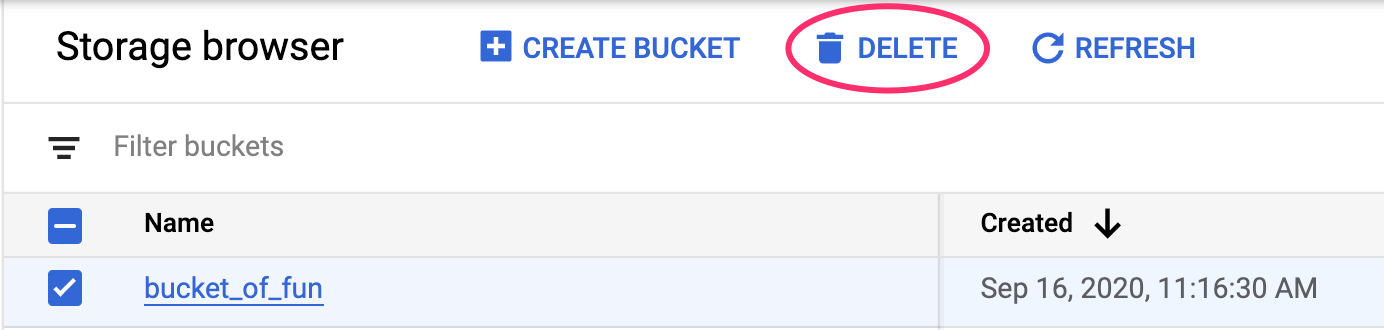
如要刪除 Storage 值區,請使用 Cloud 控制台中的導覽選單前往「Storage」(儲存空間)、選取值區,然後點選「Delete」(刪除):