
1. לפני שמתחילים
מה זה Vertex AI?
Vertex AI היא פלטפורמת הפיתוח המאוחדת של Google Cloud ליצירה, לפריסה ולהתאמה לעומס (scaling) של סוכני AI ואפליקציות ברמת הארגון. הפלטפורמה מספקת למפתחים ולמדעני נתונים את הכלים המתקדמים שדרושים להם כדי לתכנן זרימות עבודה אג'נטיות מותאמות אישית שמשולבות באופן עמוק בתשתית גלובלית.
- גישה ל-Model Garden: תוכלו לבחור מתוך יותר מ-150 מודלים בסיסיים, כולל משפחת Gemini המלאה, מודלים של צד שלישי ומודלים מיוחדים בקוד פתוח, כדי למצוא את המודל המתאים למשימות ספציפיות של סוכנים.
- תכנון תזמור מורכב: Vertex AI מספק את ה-framework לתכנון סוכנים אוטונומיים שמשתמשים בחשיבה רציונלית כדי לתכנן ולבצע משימות מרובות שלבים, ולקרוא לממשקי API חיצוניים.
- הארקה ברמה שמתאימה לארגונים: חיבור סוכנים לנתונים עסקיים בזמן אמת, כולל RAG (יצירה עם שליפה משופרת) עם ביצועים גבוהים, כדי למנוע הזיות ולהבטיח דיוק עובדתי.
- DevOps: שילוב חלק של פיתוח סוכנים בצינורות CI/CD קיימים באמצעות ערכות SDK, ממשקי API וכלי הערכה חזקים למדידת הביצועים והבטיחות של הסוכנים בקנה מידה גדול.
- אבטחה ברמה תעשייתית: מערכת Vertex AI מוודאת שהנתונים של הלקוחות שמשמשים לאימון או להארקה יישארו פרטיים, מוצפנים ועומדים בדרישות הגלובליות בנוגע למיקום הנתונים.
- תשתית שעברה אופטימיזציה: אפשר להרחיב את עומסי העבודה (workload) של סוכנים בקלות באשכולות TPU ו-GPU ברמה עולמית של Google, כדי להבטיח ביצועים עם זמן אחזור נמוך גם עבור האפליקציות הגלובליות התובעניות ביותר.

מה זה Google Workspace?
Google Workspace היא אוסף של פתרונות מבוססי-ענן לפרודוקטיביות ולשיתוף פעולה, שמיועדים לאנשים פרטיים, לבתי ספר ולעסקים:
- תקשורת: שירותי אימייל מקצועיים (Gmail), שיחות ועידה בווידאו (Meet) והודעות לצוות (Chat).
- יצירת תוכן: כלים לכתיבת מסמכים (Docs), ליצירת גיליונות אלקטרוניים (Sheets) ולעיצוב מצגות (Slides).
- ארגון: יומנים משותפים (יומנים) וסיכום פגישות דיגיטלי (Keep).
- אחסון: נפח אחסון בענן שבו אפשר לשמור ולשתף קבצים באופן מאובטח (Drive).
- ניהול: אמצעי בקרה לאדמינים לניהול משתמשים והגדרות אבטחה (מסוף Admin של Workspace).
איזה סוג של שילובים בהתאמה אישית?
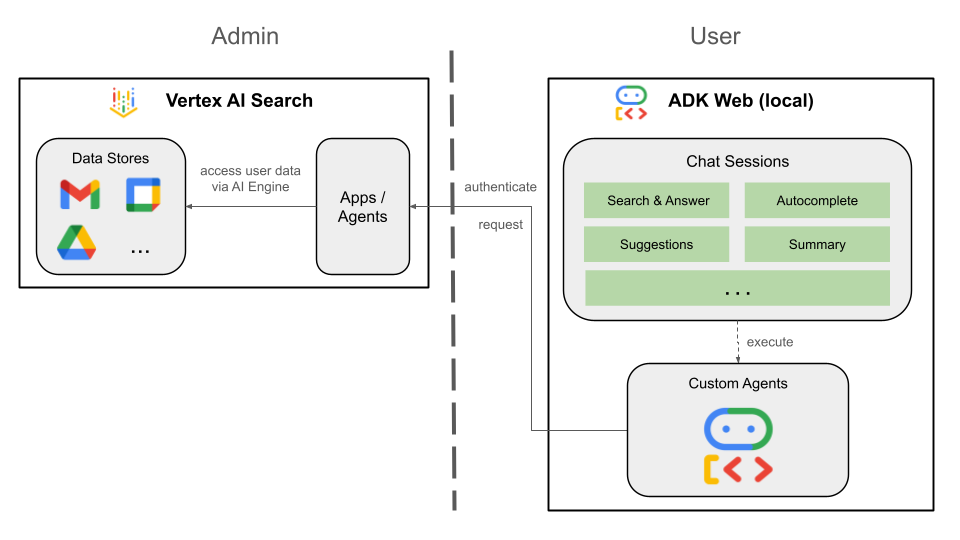
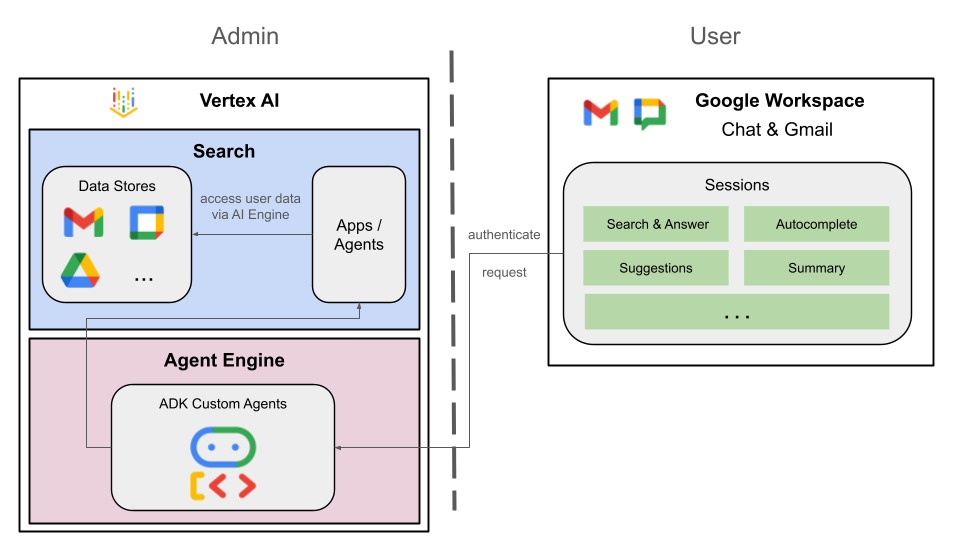
Google Workspace ו-Vertex AI יוצרים לולאת משוב עוצמתית שבה Workspace מספק נתונים בזמן אמת והקשר לשיתוף פעולה, בעוד ש-Vertex AI מציע את המודלים, את החשיבה הרציונלית האג'נטית ואת התזמור שנדרשים כדי להפוך תהליכי עבודה חכמים לאוטומטיים.
- קישוריות חכמה: מאגרי נתונים, ממשקי API ושרתי MCP (מנוהלים על ידי Google ומותאמים אישית) שמנוהלים על ידי Google מאפשרים לסוכנים לגשת בצורה חלקה ומאובטחת לנתוני Workspace ולבצע פעולות בשם המשתמשים.
- סוכנים בהתאמה אישית: צוותים יכולים ליצור סוכנים מיוחדים שמתבססים על נתונים ופעולות ב-Workspace שמנוהלים על ידי האדמין, באמצעות מעצבים בלי קוד או מסגרות קוד מקצועיות.
- שילוב מקורי: תוספים ל-Workspace מגשרים על הפער בין מערכות AI לבין אפליקציות כמו Chat ו-Gmail, בין אם באמצעות רכיבי ממשק משתמש ייעודיים או תהליכים שמתבצעים ברקע. כך הנציגים יכולים לפגוש את המשתמשים בדיוק במקום שבו הם נמצאים ולספק להם עזרה מיידית בהתאם להקשר.
שילוב של מערכת הפרודוקטיביות החזקה של Google Workspace עם היכולות המתקדמות של סוכני Vertex AI מאפשר לארגונים לשנות את הפעילות שלהם באמצעות סוכני AI מותאמים אישית שמבוססים על נתונים ומבצעים אוטומציה של תהליכי עבודה מורכבים ישירות בכלים שהצוותים שלהם כבר משתמשים בהם מדי יום.
דרישות מוקדמות
כדי לבצע את כל השלבים בסביבה שלכם, תצטרכו:
- ידע בסיסי ב-Google Cloud וב-Python.
- פרויקט בענן של Google שאתם הבעלים שלו עם חיוב. כדי לבדוק אם החיוב מופעל בפרויקט קיים, אפשר לעיין במאמר אימות סטטוס החיוב של הפרויקטים. כדי ליצור פרויקט ולהגדיר חיוב, אפשר לעיין במאמר בנושא יצירת פרויקט ב-Google Cloud. כדי לשנות את הבעלות על פרויקט, קראו את המאמר ניהול חברים בפרויקט או שינוי הבעלות על פרויקט.
- חשבון Google Workspace במהדורת Business או Enterprise עם גישה ל-Google Chat ועם התכונות החכמות מופעלות.
- ה-CLI של Google Cloud מותקן ומופעל עבור פרויקט הענן שלכם ב-Google Cloud.
- Python 3.11 ואילך מותקן. הוראות מפורטות זמינות באתר הרשמי של Python.
מה תפַתחו
ב-Codelab הזה נבנה שלושה פתרונות עם סוכני Vertex AI שמשולבים באופן הדוק עם Google Workspace. הם יציגו דפוסי ארכיטקטורה שאפשר להשתמש בהם כדי ליצור אינטראקציה עם נתונים, פעולות וממשקי משתמש.
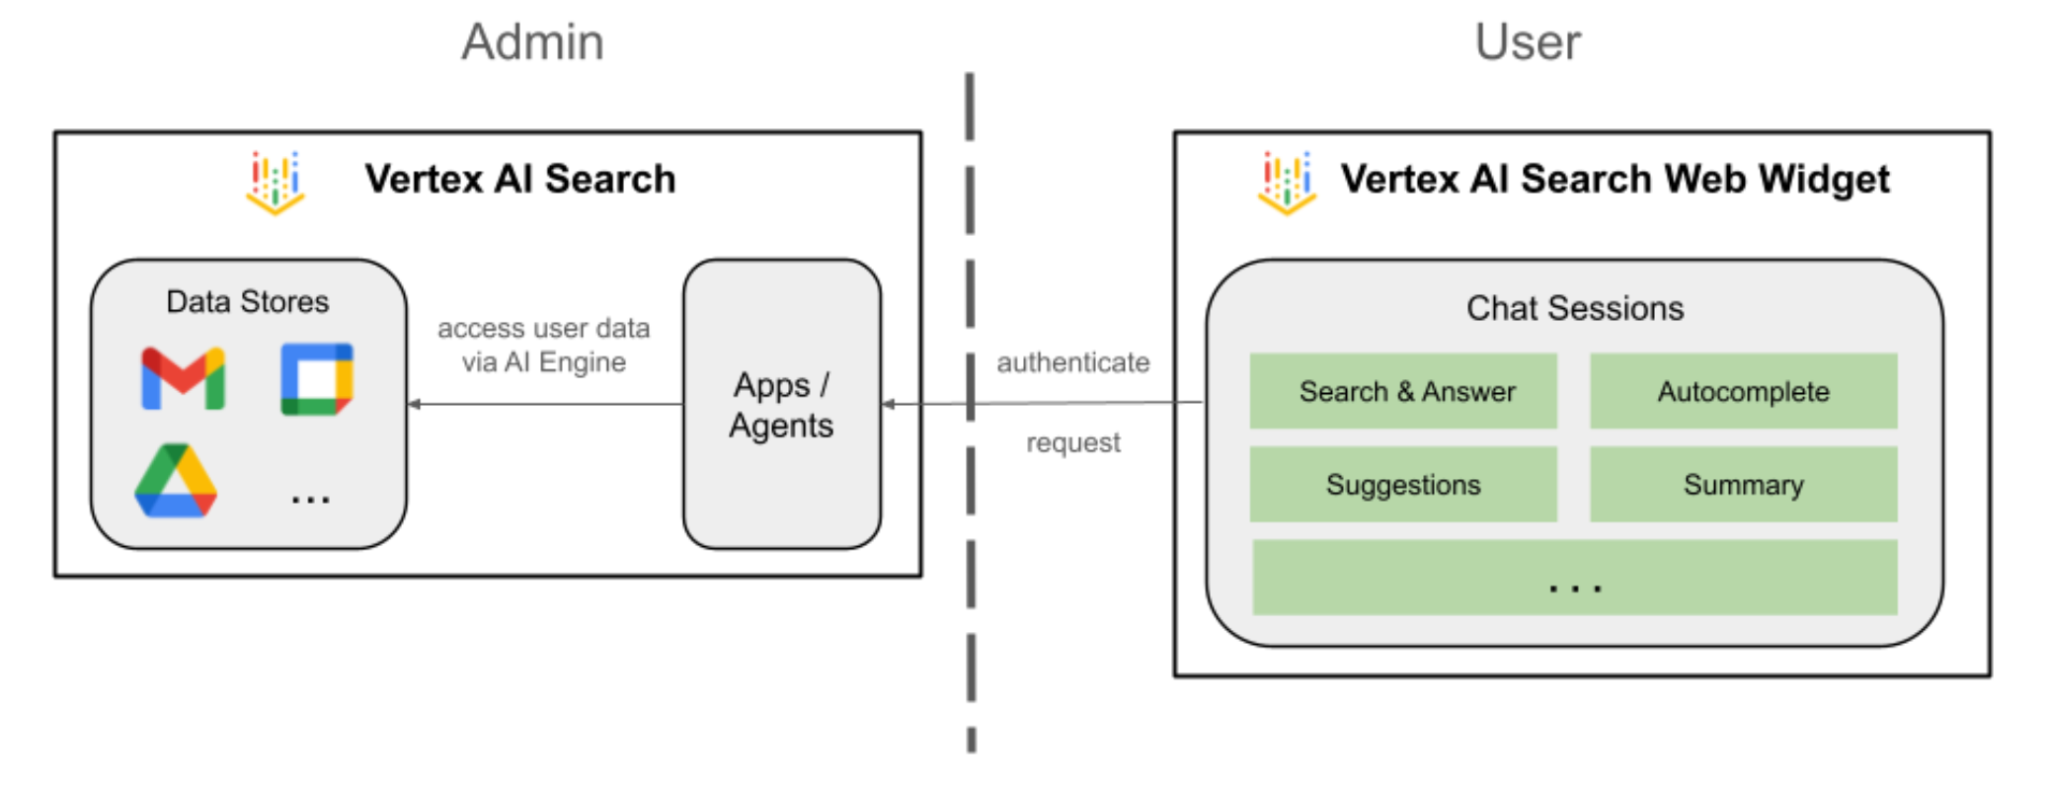
אפליקציית חיפוש מבוסס-Vertex AI
הסוכן הזה מאפשר למשתמשים לחפש נתונים ולבצע פעולות ב-Workspace בשפה הטבעית שלהם. הוא מבוסס על הרכיבים הבאים:
- מודל: Gemini.
- נתונים ופעולות: מאגרי נתונים של Vertex AI ל-Google Workspace (יומן, Gmail, Drive).
- מארח הסוכן: חיפוש מבוסס-Vertex AI.
- ממשק משתמש: ווידג'ט אינטרנט של חיפוש מבוסס-Vertex AI.
נציג מותאם אישית
הסוכן הזה מאפשר למשתמשים לחפש נתונים ולבצע פעולות ב-Workspace בשפה טבעית באמצעות כלים וכללים בהתאמה אישית. הוא מבוסס על הרכיבים הבאים:
- מודל: Gemini.
- נתונים ופעולות: מאגרי נתונים של Vertex AI ל-Google Workspace (יומן, Gmail, Drive), שרת Model Context Protocol (MCP) של חיפוש מבוסס-Vertex AI שמנוהל על ידי Google, פונקציית כלי בהתאמה אישית לשליחת הודעות ב-Google Chat (באמצעות Google Chat API).
- כלים ליצירת סוכנים: Agent Development Kit (ADK).
- מארח הסוכן: Vertex AI Agent Engine.
- ממשק משתמש: ADK Web.
סוכן כתוסף ל-Google Workspace
הסוכן הזה מאפשר למשתמשים לחפש נתונים ב-Workspace בשפה טבעית בהקשר של ממשקי משתמש של אפליקציות Workspace. הוא מבוסס על הרכיבים הבאים:
- מודל: Gemini.
- נתונים ופעולות: מאגרי נתונים של Vertex AI ל-Google Workspace (יומן, Gmail, Drive), שרת Model Context Protocol (MCP) של חיפוש מבוסס-Vertex AI שמנוהל על ידי Google, פונקציית כלי בהתאמה אישית לשליחת הודעות ב-Google Chat (באמצעות Google Chat API).
- כלים ליצירת סוכנים: Agent Development Kit (ADK).
- מארח הסוכן: Vertex AI Agent Engine.
- ממשק משתמש: תוסף Google Workspace ל-Chat ול-Gmail (אפשר להרחיב אותו בקלות ליומן, ל-Drive, ל-Docs, ל-Sheets ול-Slides).
- תוסף ל-Google Workspace: Apps Script, ממשקי Vertex AI Agent Engine API, הקשרי (הודעת Gmail שנבחרה).
מה תלמדו
- נקודות השילוב בין חיפוש מבוסס-Vertex AI לבין Google Workspace שמאפשרות גישה לנתונים ולפעולות.
- האפשרויות ליצירת סוכנים בהתאמה אישית שמתארחים ב-Vertex AI.
- הדרכים שבהן משתמשים יכולים לגשת לסוכנים, כמו הווידג'ט האינטרנטי של חיפוש מבוסס-Vertex AI ואפליקציות Google Workspace.
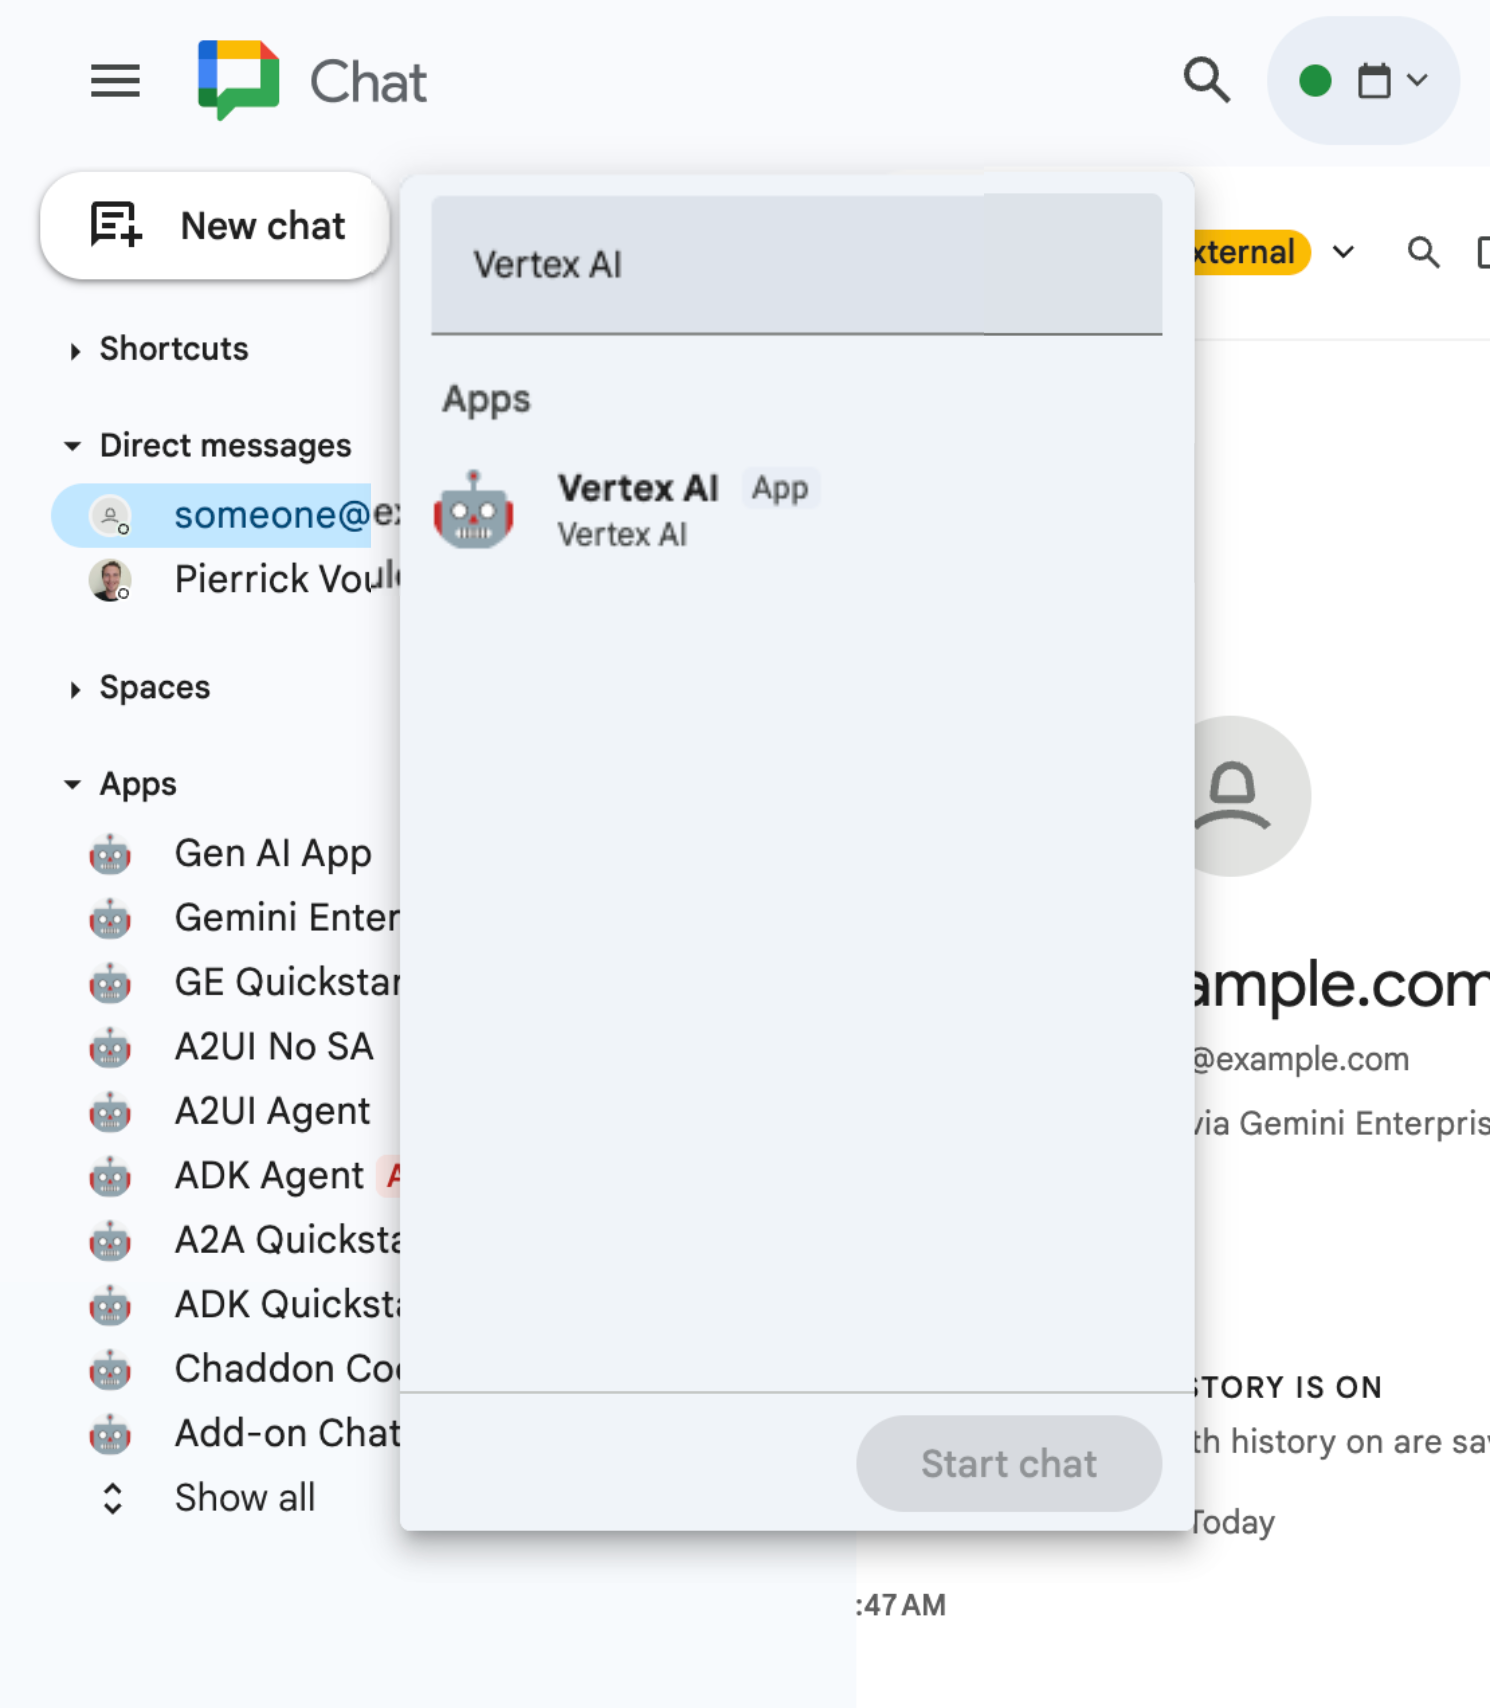
גישה קלה ל-Codelab הזה
2. הגדרה
לפני שיוצרים פתרונות, צריך לאתחל את ההגדרות של Vertex AI Applications בפרויקט, להפעיל את ממשקי ה-API הנדרשים וליצור את מאגרי הנתונים של Vertex AI Workspace.
סקירת מושגים
אפליקציית Vertex AI
אפליקציית Vertex AI היא פתרון מנוהל מקצה לקצה ב-Google Cloud שמשלב מודלים של למידת מכונה (כמו סוכני AI גנרטיביים או מנועי חיפוש) עם נתונים ארגוניים וכלים ייעודיים לביצוע משימות מורכבות כמו חיפוש סמנטי, יצירת תוכן או אינטראקציה אוטומטית עם לקוחות.
מאגר נתונים של Vertex AI
מאגר נתונים של Vertex AI הוא ישות שמכילה את הנתונים שנקלטים ממקור נתונים מאינטראקציה ישירה (First-Party), כמו Google Workspace, או מאפליקציות של צד שלישי, כמו Jira או Shopify. מאגרי נתונים שמכילים נתונים מאפליקציות של צד שלישי נקראים גם מחברי נתונים.
הפעלת ההגדרות של Vertex AI Applications
מאחלים את ההגדרות של Vertex AI Applications כדי להפעיל את יצירת הסוכנים.
פותחים את מסוף Google Cloud בכרטיסייה חדשה ומבצעים את השלבים הבאים:
- בוחרים את הפרויקט הרצוי.
- בשדה החיפוש של Google Cloud, עוברים אל AI Applications (אפליקציות AI).
- אחרי שקוראים את התנאים ומביעים הסכמה, לוחצים על המשך והפעלת ה-API.
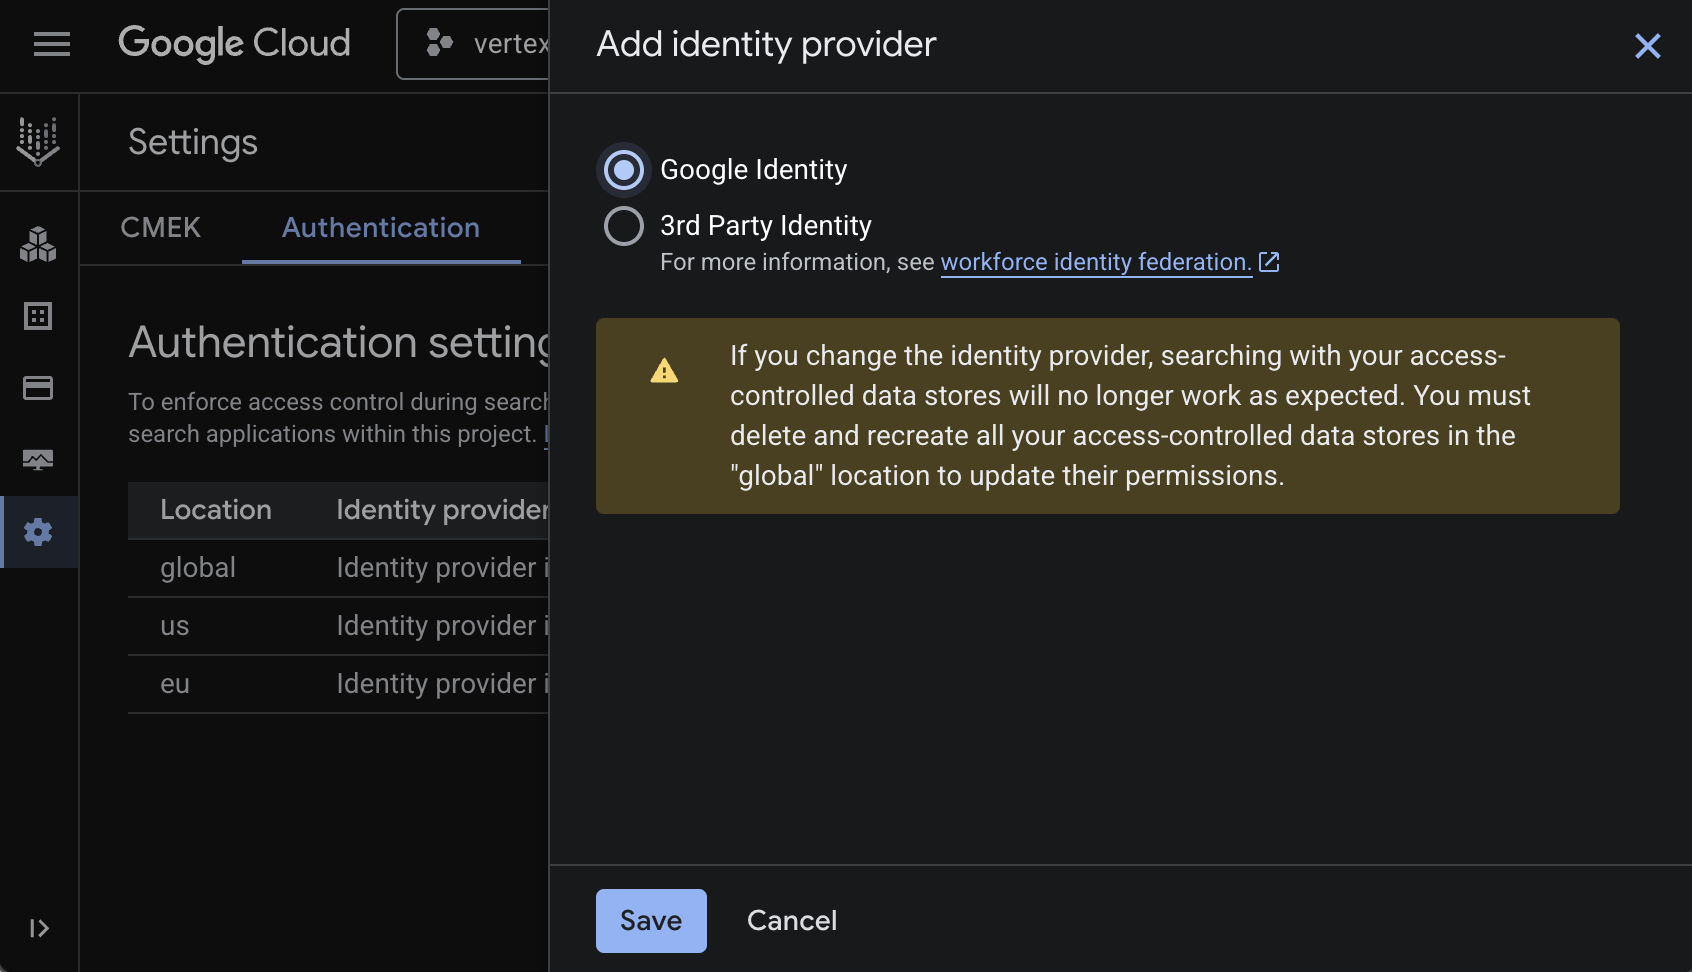
- נכנסים להגדרות.
- בכרטיסייה Authentication (אימות), עורכים את global (גלובלי).
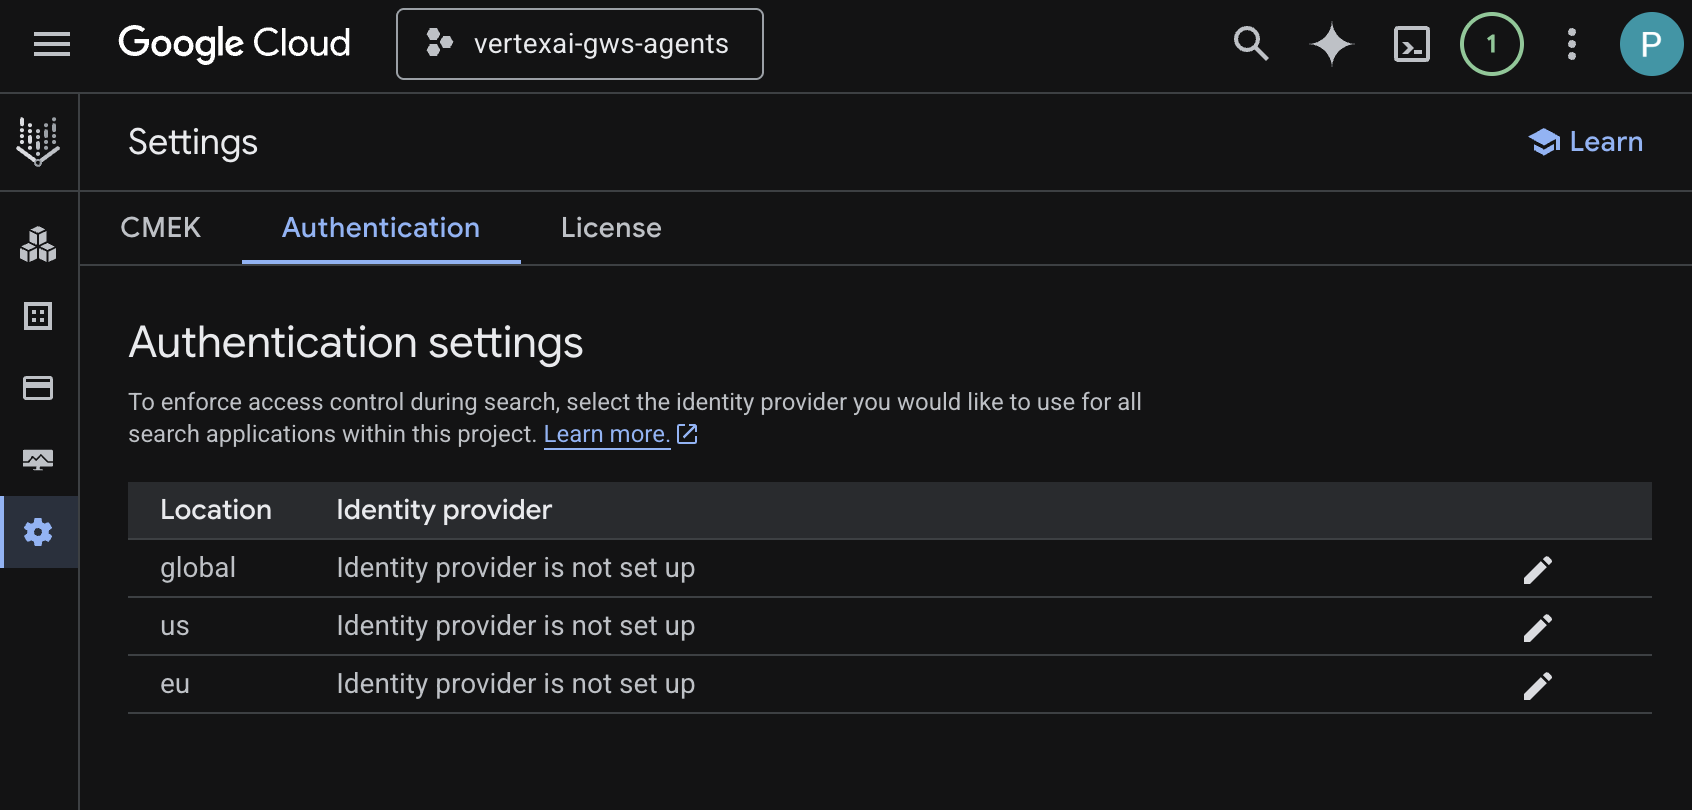
- בוחרים באפשרות Google Identity (זהות Google) ואז לוחצים על שמירה.
הפעלת ממשקי ה-API
כדי להשתמש במאגרי הנתונים של Vertex AI Workspace, צריך להפעיל את ממשקי ה-API הבאים:
- ב-מסוף Google Cloud, מפעילים את ממשקי ה-API של יומן Google, Gmail ואנשים:
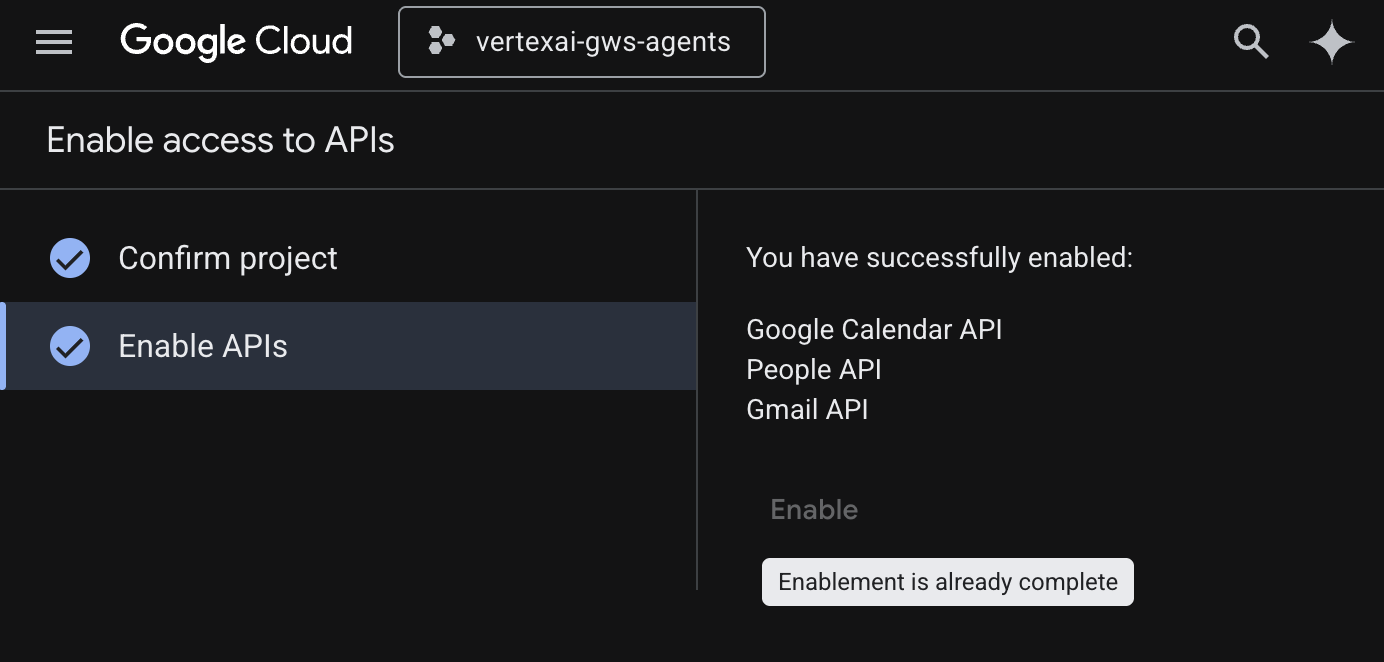
- לוחצים על תפריט ☰ > ממשקי API ושירותים > ממשקי API ושירותים מופעלים ומוודאים ש-Google Calendar API, Gmail API ו-People API מופיעים ברשימה.
יצירת מאגרי נתונים
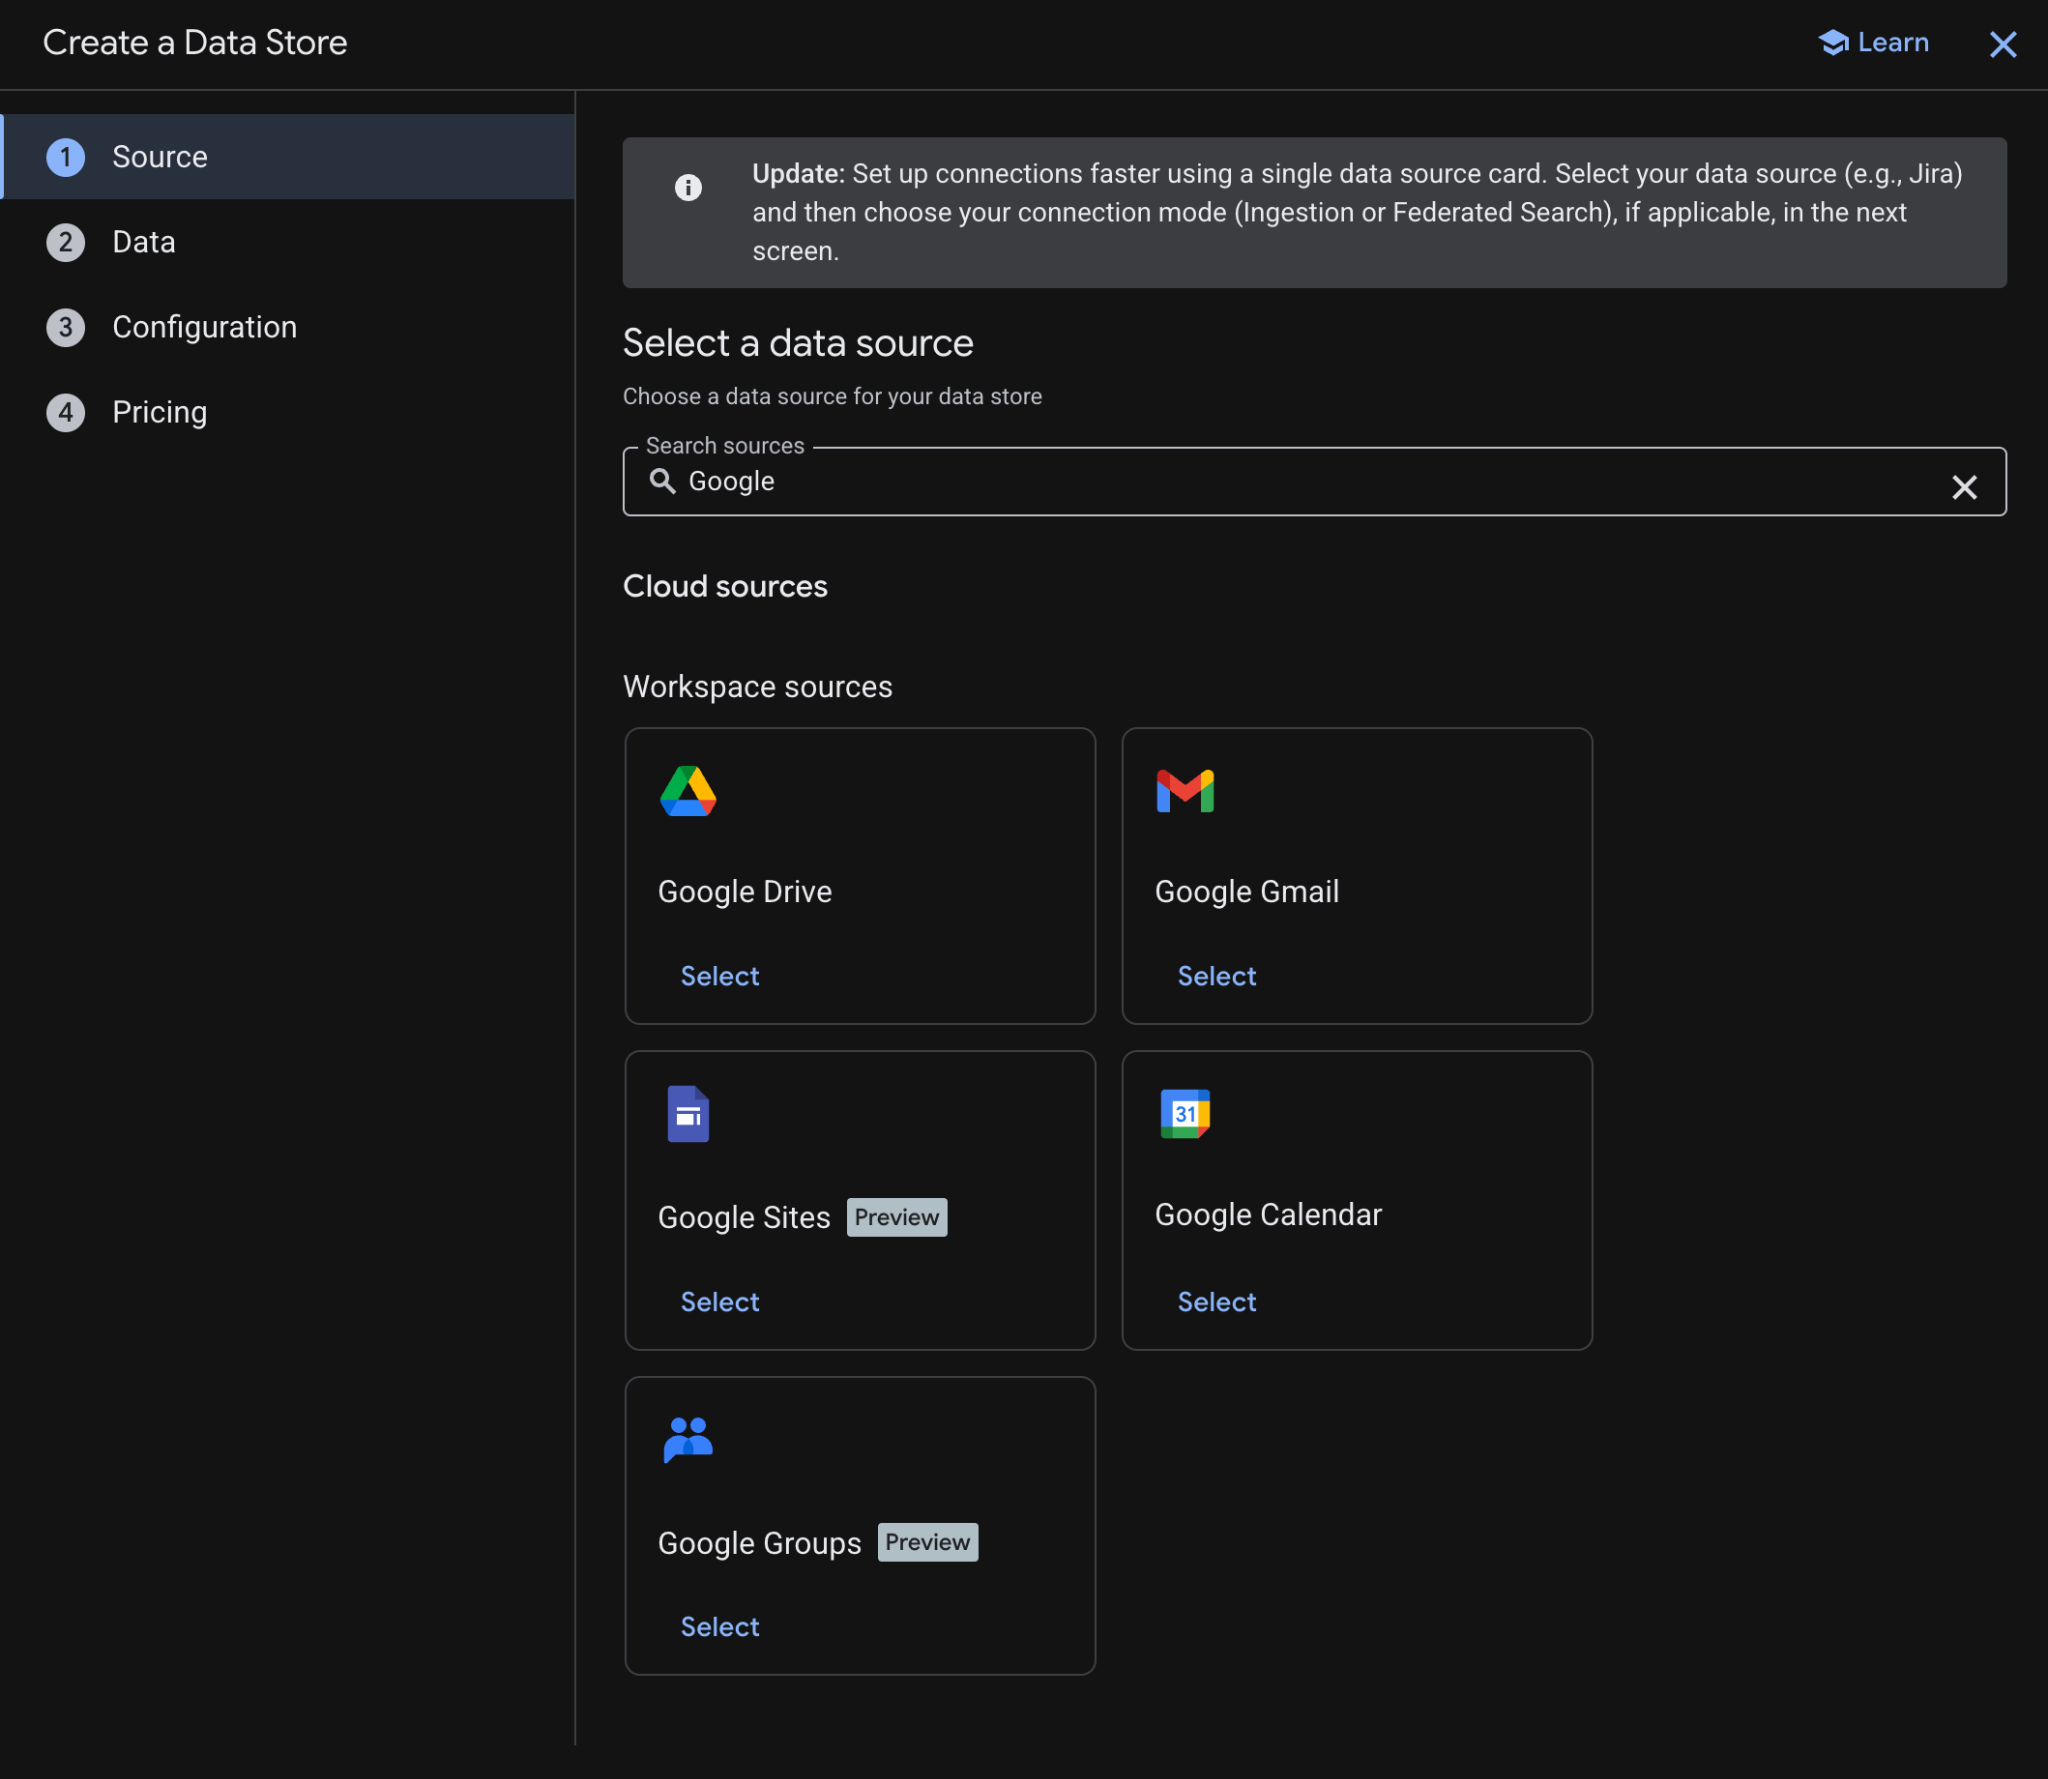
יוצרים את מאגר הנתונים של Google Drive:
- במסוף Google Cloud, עוברים אל AI Applications (אפליקציות AI) ואז אל Data Stores (מאגרי מידע).
- לוחצים על + יצירת מאגר נתונים.
- בקטע מקור, מתחת לGoogle Drive, לוחצים על בחירה.
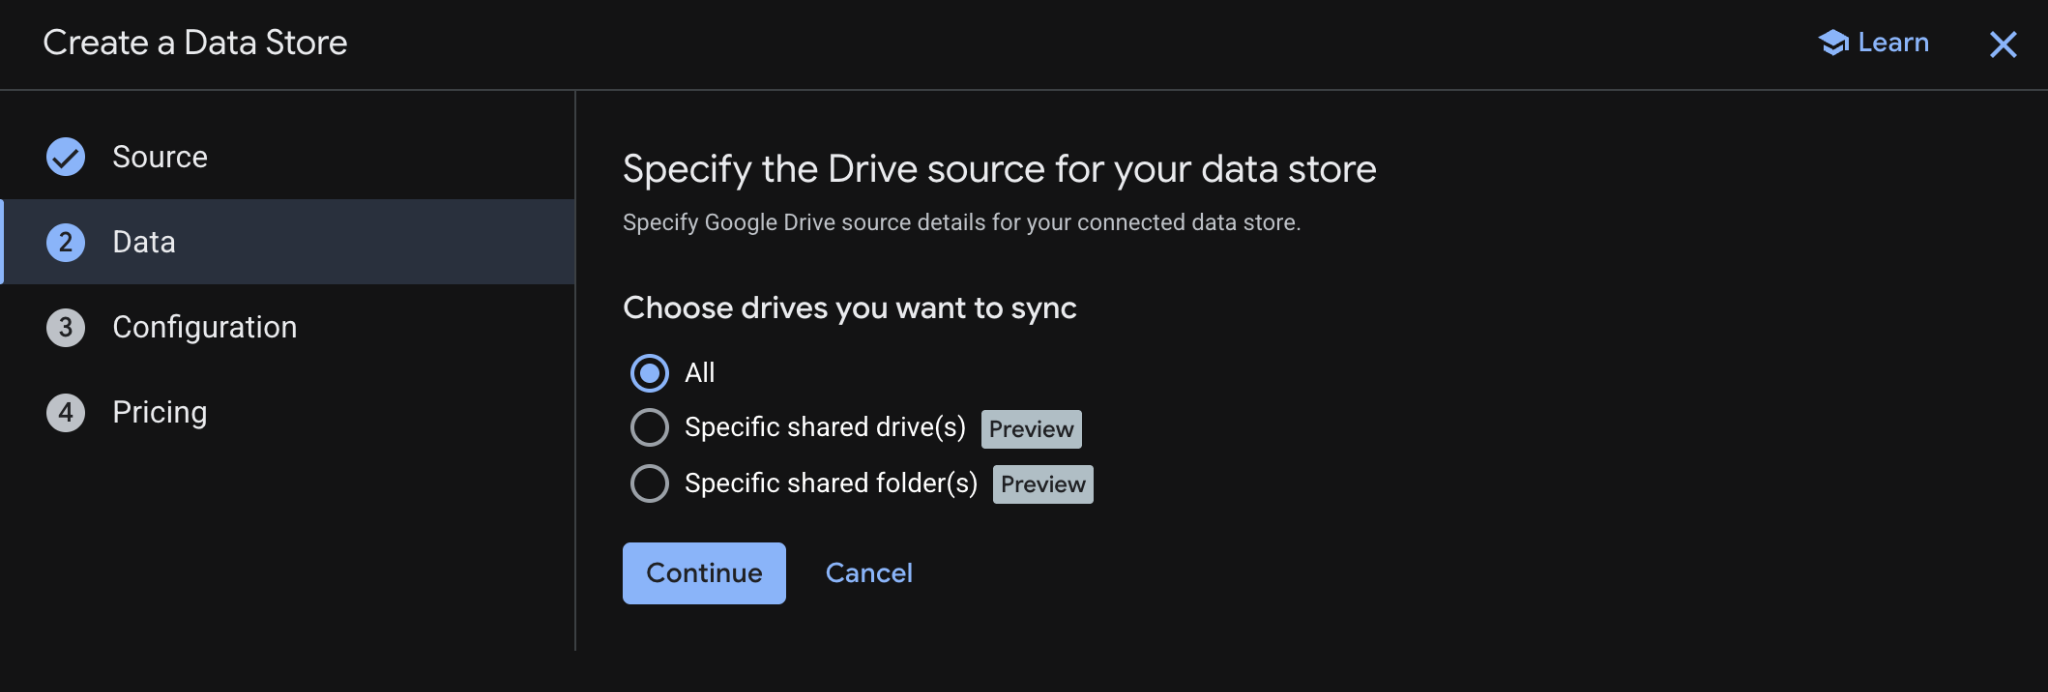
- בקטע נתונים, בוחרים באפשרות הכול ולוחצים על המשך.
- בקטע הגדרה, מגדירים את השם של מחבר הנתונים ל-
drive, ואחרי שבודקים ומאשרים את החיובים שעשויים לחול, לוחצים על המשך.
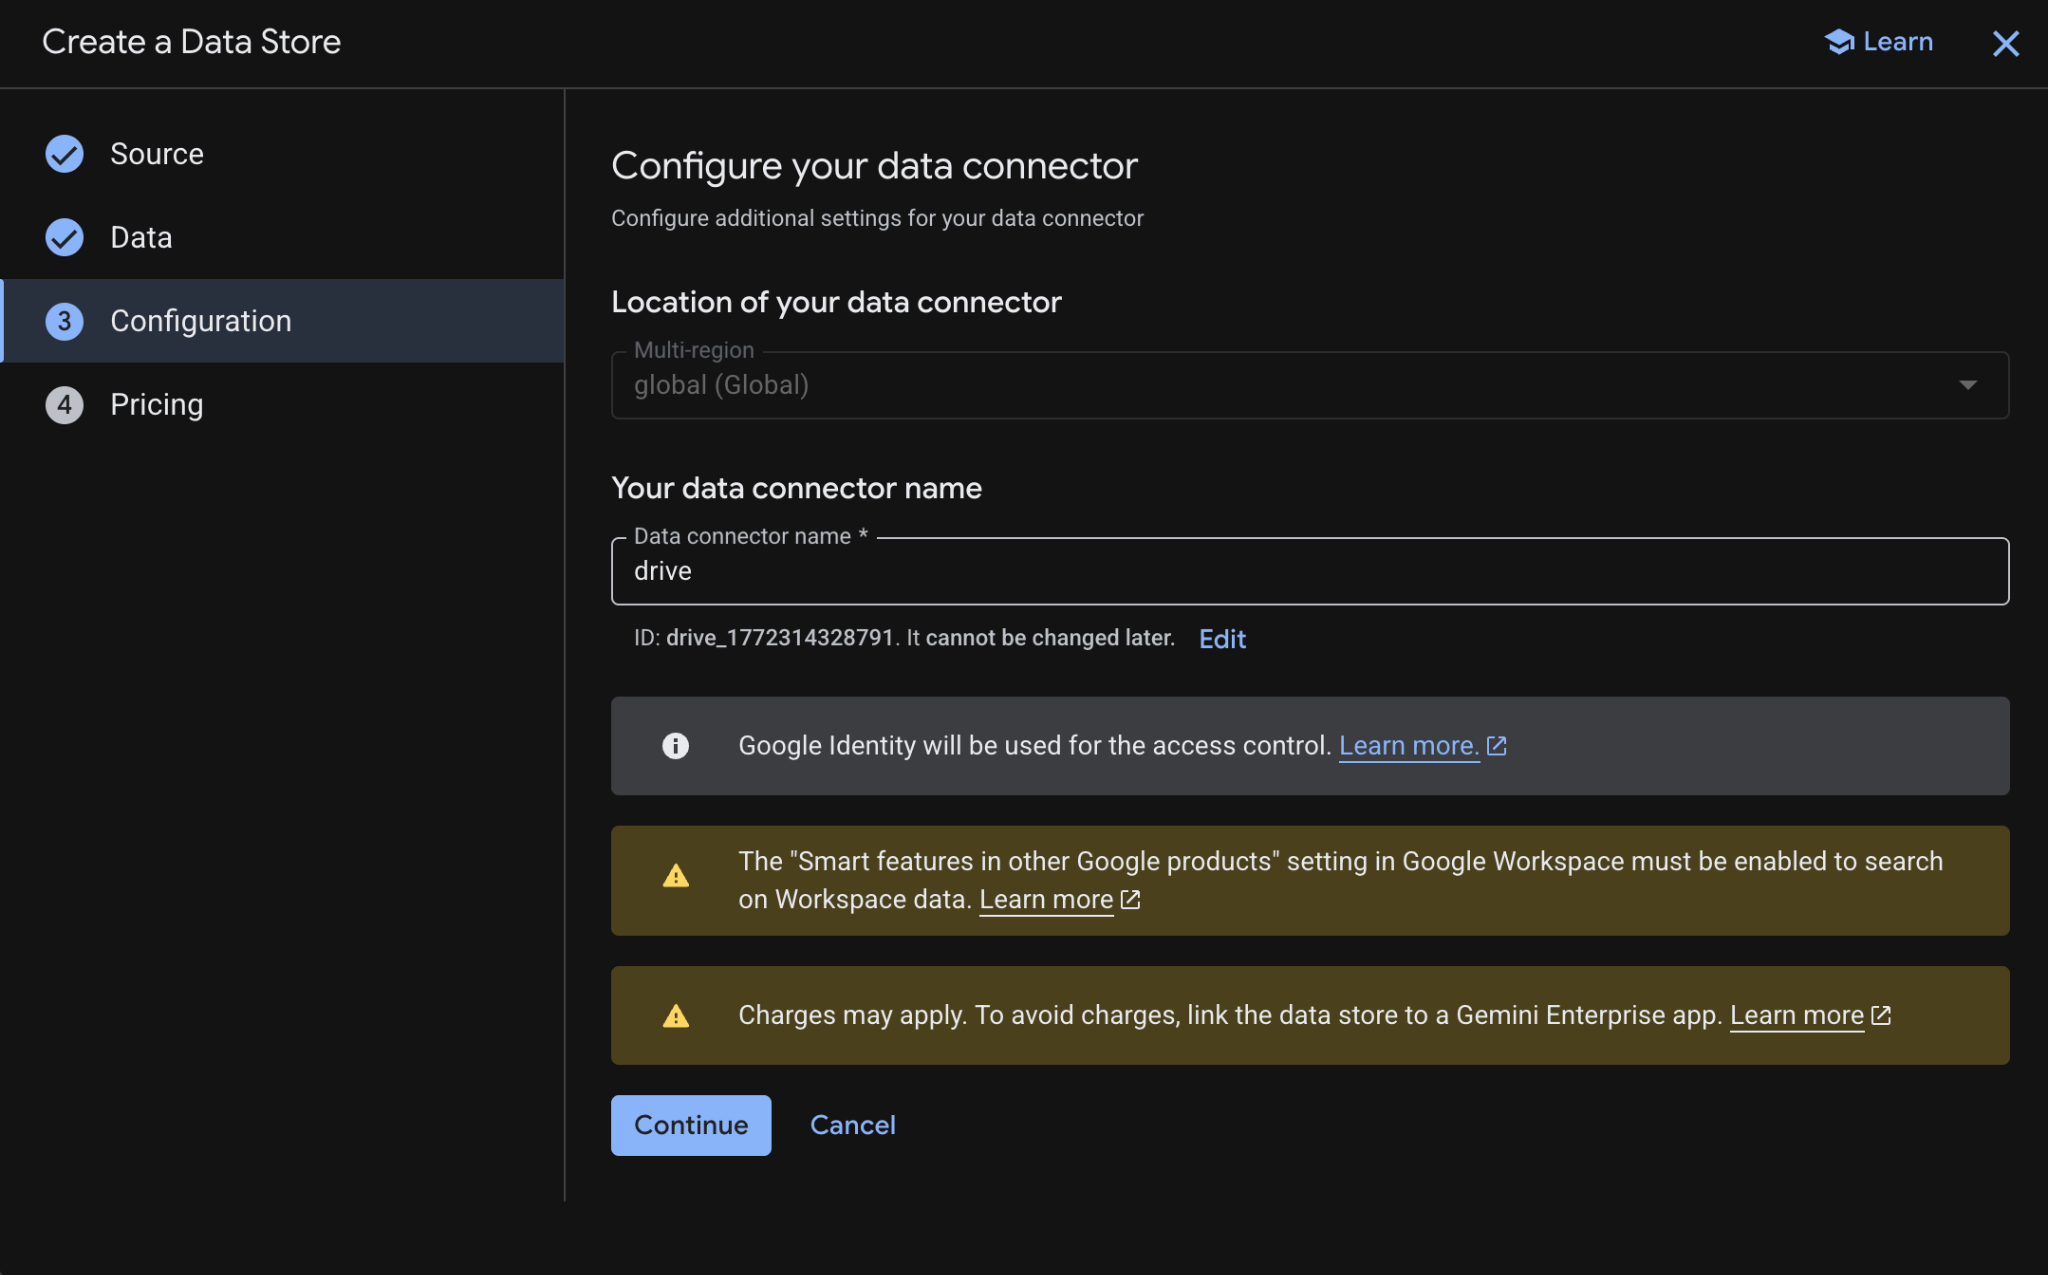
- בקטע תמחור, בוחרים את מודל התמחור הרצוי ולוחצים על יצירה. מומלץ להשתמש בתמחור כללי בהקשר של ה-codelab הזה.
- תועברו אוטומטית אל מאגרי נתונים, שם תוכלו לראות את מאגר הנתונים החדש שהוספתם.
יוצרים את מאגר הנתונים של יומן Google:
- לוחצים על + יצירת מאגר נתונים.
- במקור, מחפשים את יומן Google ולוחצים על בחירה.
- בקטע פעולות, לוחצים על דילוג.
- בקטע Configuration, מגדירים את שם מחבר הנתונים לערך
calendar. - לוחצים על יצירה.
- תועברו אוטומטית אל מאגרי נתונים, שם תוכלו לראות את מאגר הנתונים החדש שהוספתם.
יוצרים את מאגר הנתונים של Google Gmail:
- לוחצים על + מאגר נתונים חדש.
- בשדה מקור, מחפשים את Google Gmail ולוחצים על בחירה.
- בקטע פעולות, לוחצים על דילוג.
- בקטע Configuration, מגדירים את שם מחבר הנתונים לערך
gmail. - לוחצים על יצירה.
- תועברו אוטומטית אל מאגרי נתונים, שם תוכלו לראות את מאגר הנתונים החדש שהוספתם.
3. אפליקציית חיפוש מבוסס-Vertex AI
הסוכן הזה מאפשר למשתמשים לחפש נתונים ולבצע פעולות ב-Workspace בשפה הטבעית שלהם. הוא מבוסס על הרכיבים הבאים:
- מודל: Gemini.
- נתונים ופעולות: מאגרי נתונים של Vertex AI ל-Google Workspace (יומן, Gmail, Drive).
- מארח הסוכן: חיפוש מבוסס-Vertex AI.
- ממשק משתמש: ווידג'ט אינטרנט של חיפוש מבוסס-Vertex AI.
בדיקת מושגים
אפליקציית חיפוש מבוסס-Vertex AI
אפליקציית חיפוש מבוסס-Vertex AI מספקת למשתמשי הקצה תוצאות חיפוש, פעולות וסוכנים. במסגרת ממשקי API, אפשר להשתמש במונח 'אפליקציה' לסירוגין עם המונח 'מנוע'. כדי להשתמש בנתונים ממאגר נתונים להצגת תוצאות חיפוש, תשובות או פעולות, צריך לקשר את האפליקציה למאגר הנתונים.
Vertex AI Search Web Widget
Vertex AI Search Web Widget הוא רכיב UI מוכן מראש שאפשר להתאים אישית, ומאפשר למפתחים להטמיע סרגל חיפוש וממשק תוצאות מבוסס-AI ישירות באתר, עם מינימום תכנות.
תצוגה מקדימה של חיפוש מבוסס-Vertex AI
תצוגה מקדימה של חיפוש מבוסס-Vertex AI היא סביבת בדיקה מובנית במסוף Google Cloud, שמאפשרת למפתחים לאמת הגדרות חיפוש ותשובות גנרטיביות לפני פריסה חלקה של אותן הגדרות לווידג'ט אינטרנט של חיפוש מבוסס-Vertex AI שמוכן לייצור.
בדיקת ארכיטקטורת הפתרון
יצירת אפליקציה
יוצרים אפליקציית חיפוש חדשה כדי לקשר את מאגרי הנתונים.
פותחים את AI Applications > Apps במסוף Cloud ופועלים לפי השלבים הבאים:
- לוחצים על + יצירת אפליקציה.
- בקטע סוג, מתחת לחיפוש מותאם אישית (כללי), לוחצים על יצירה.
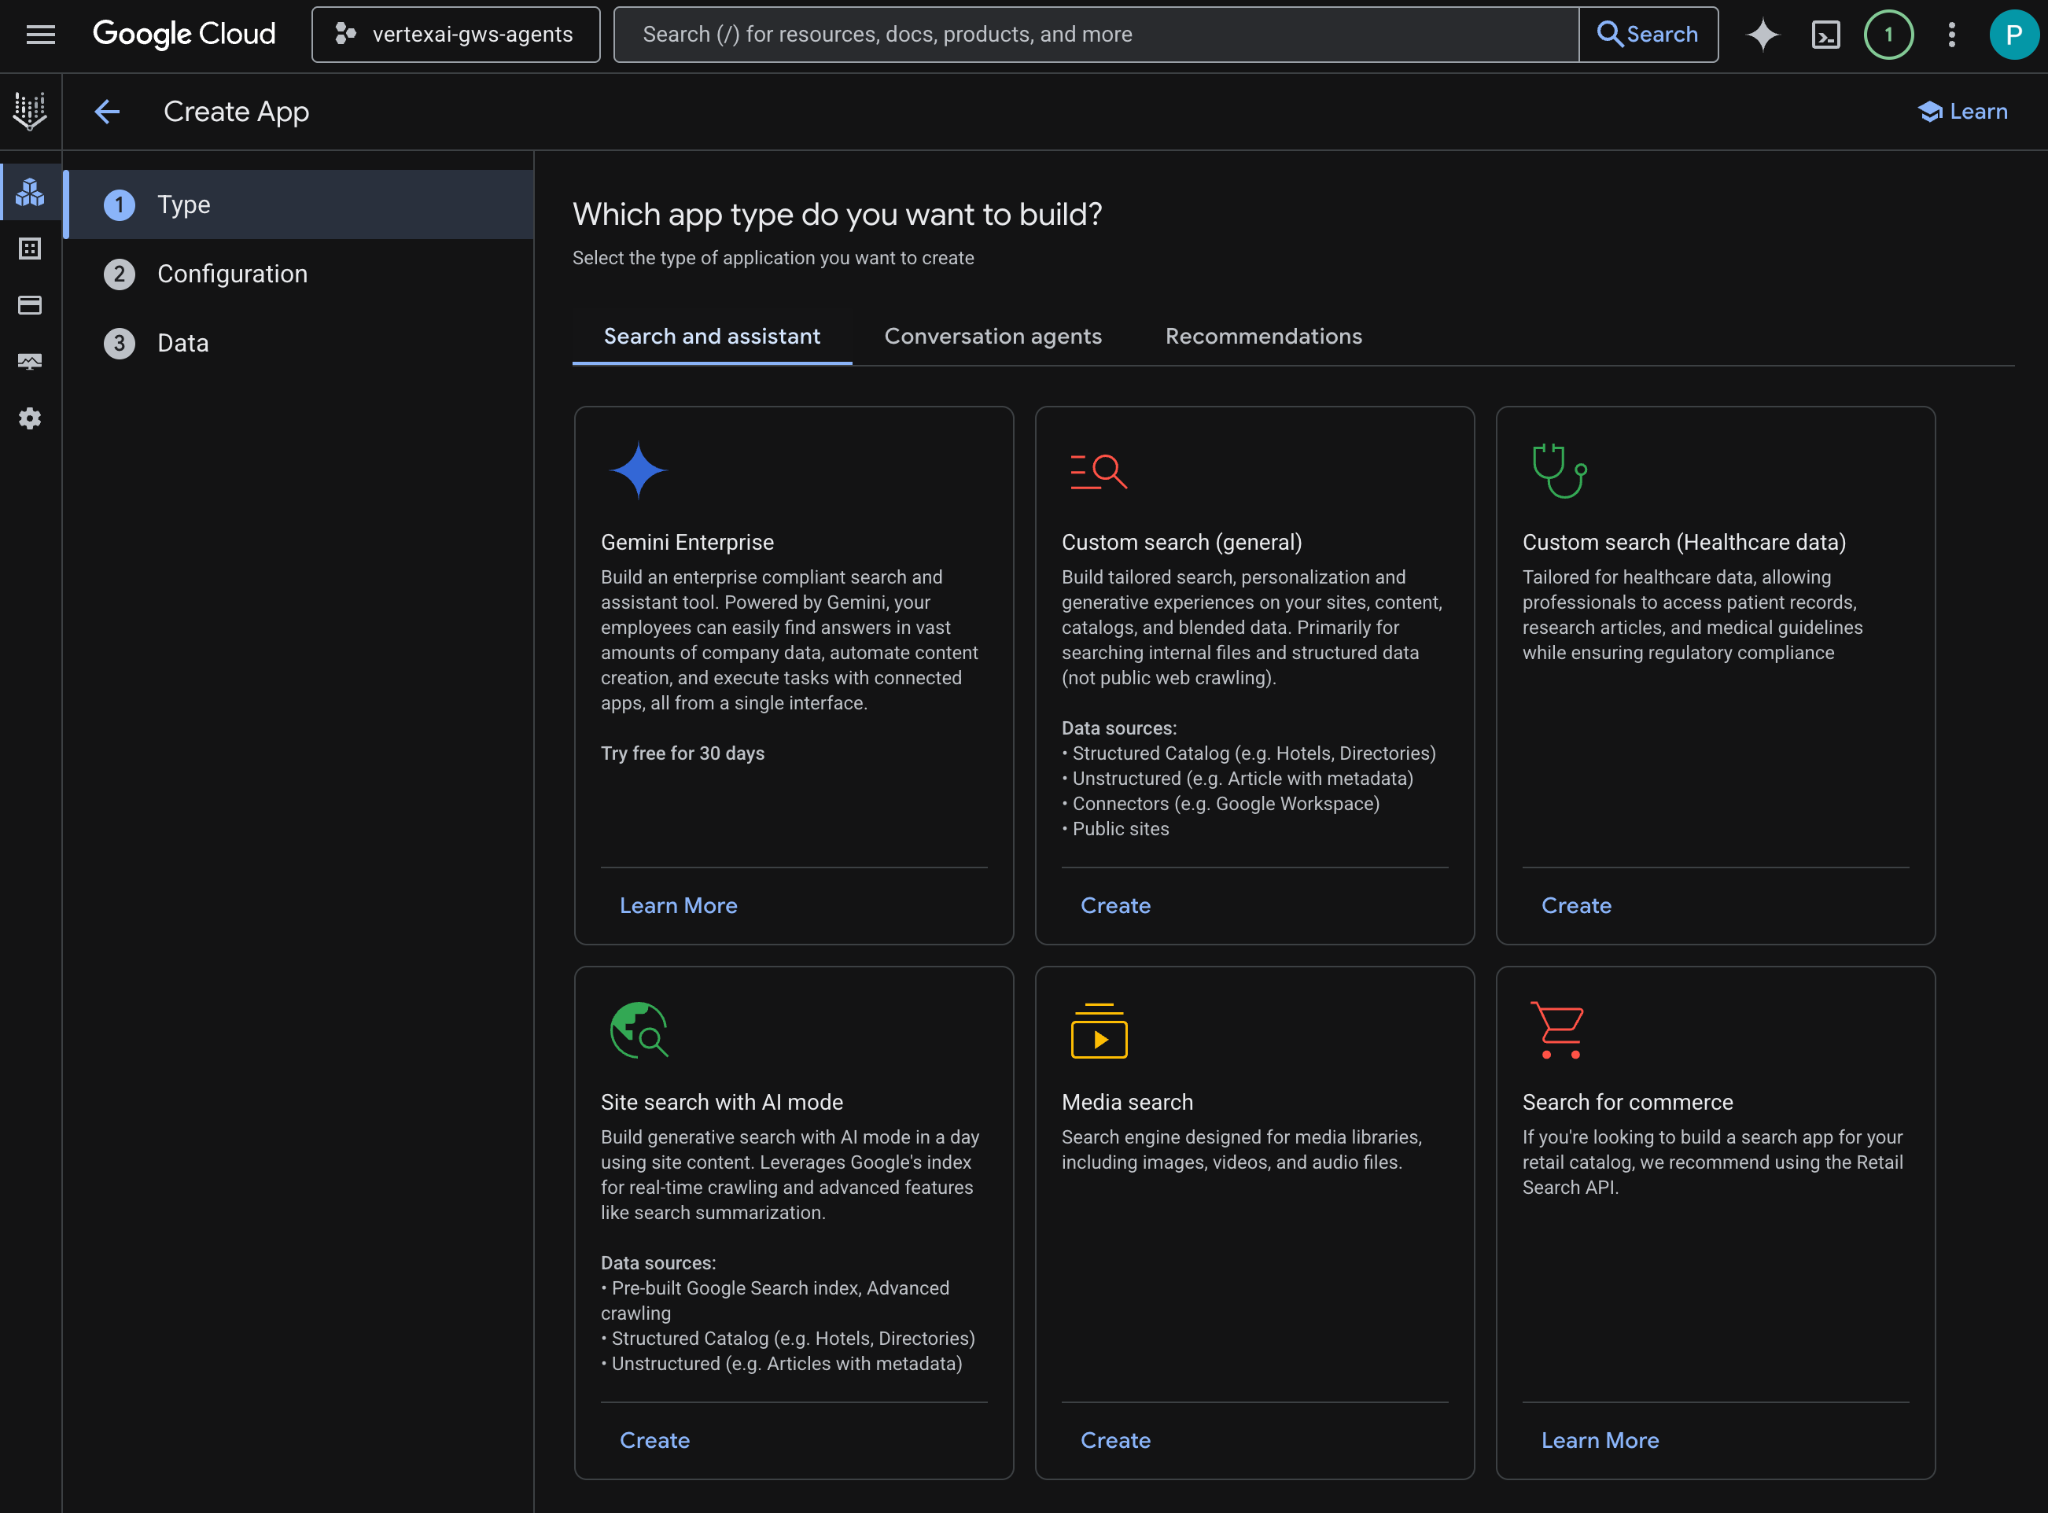
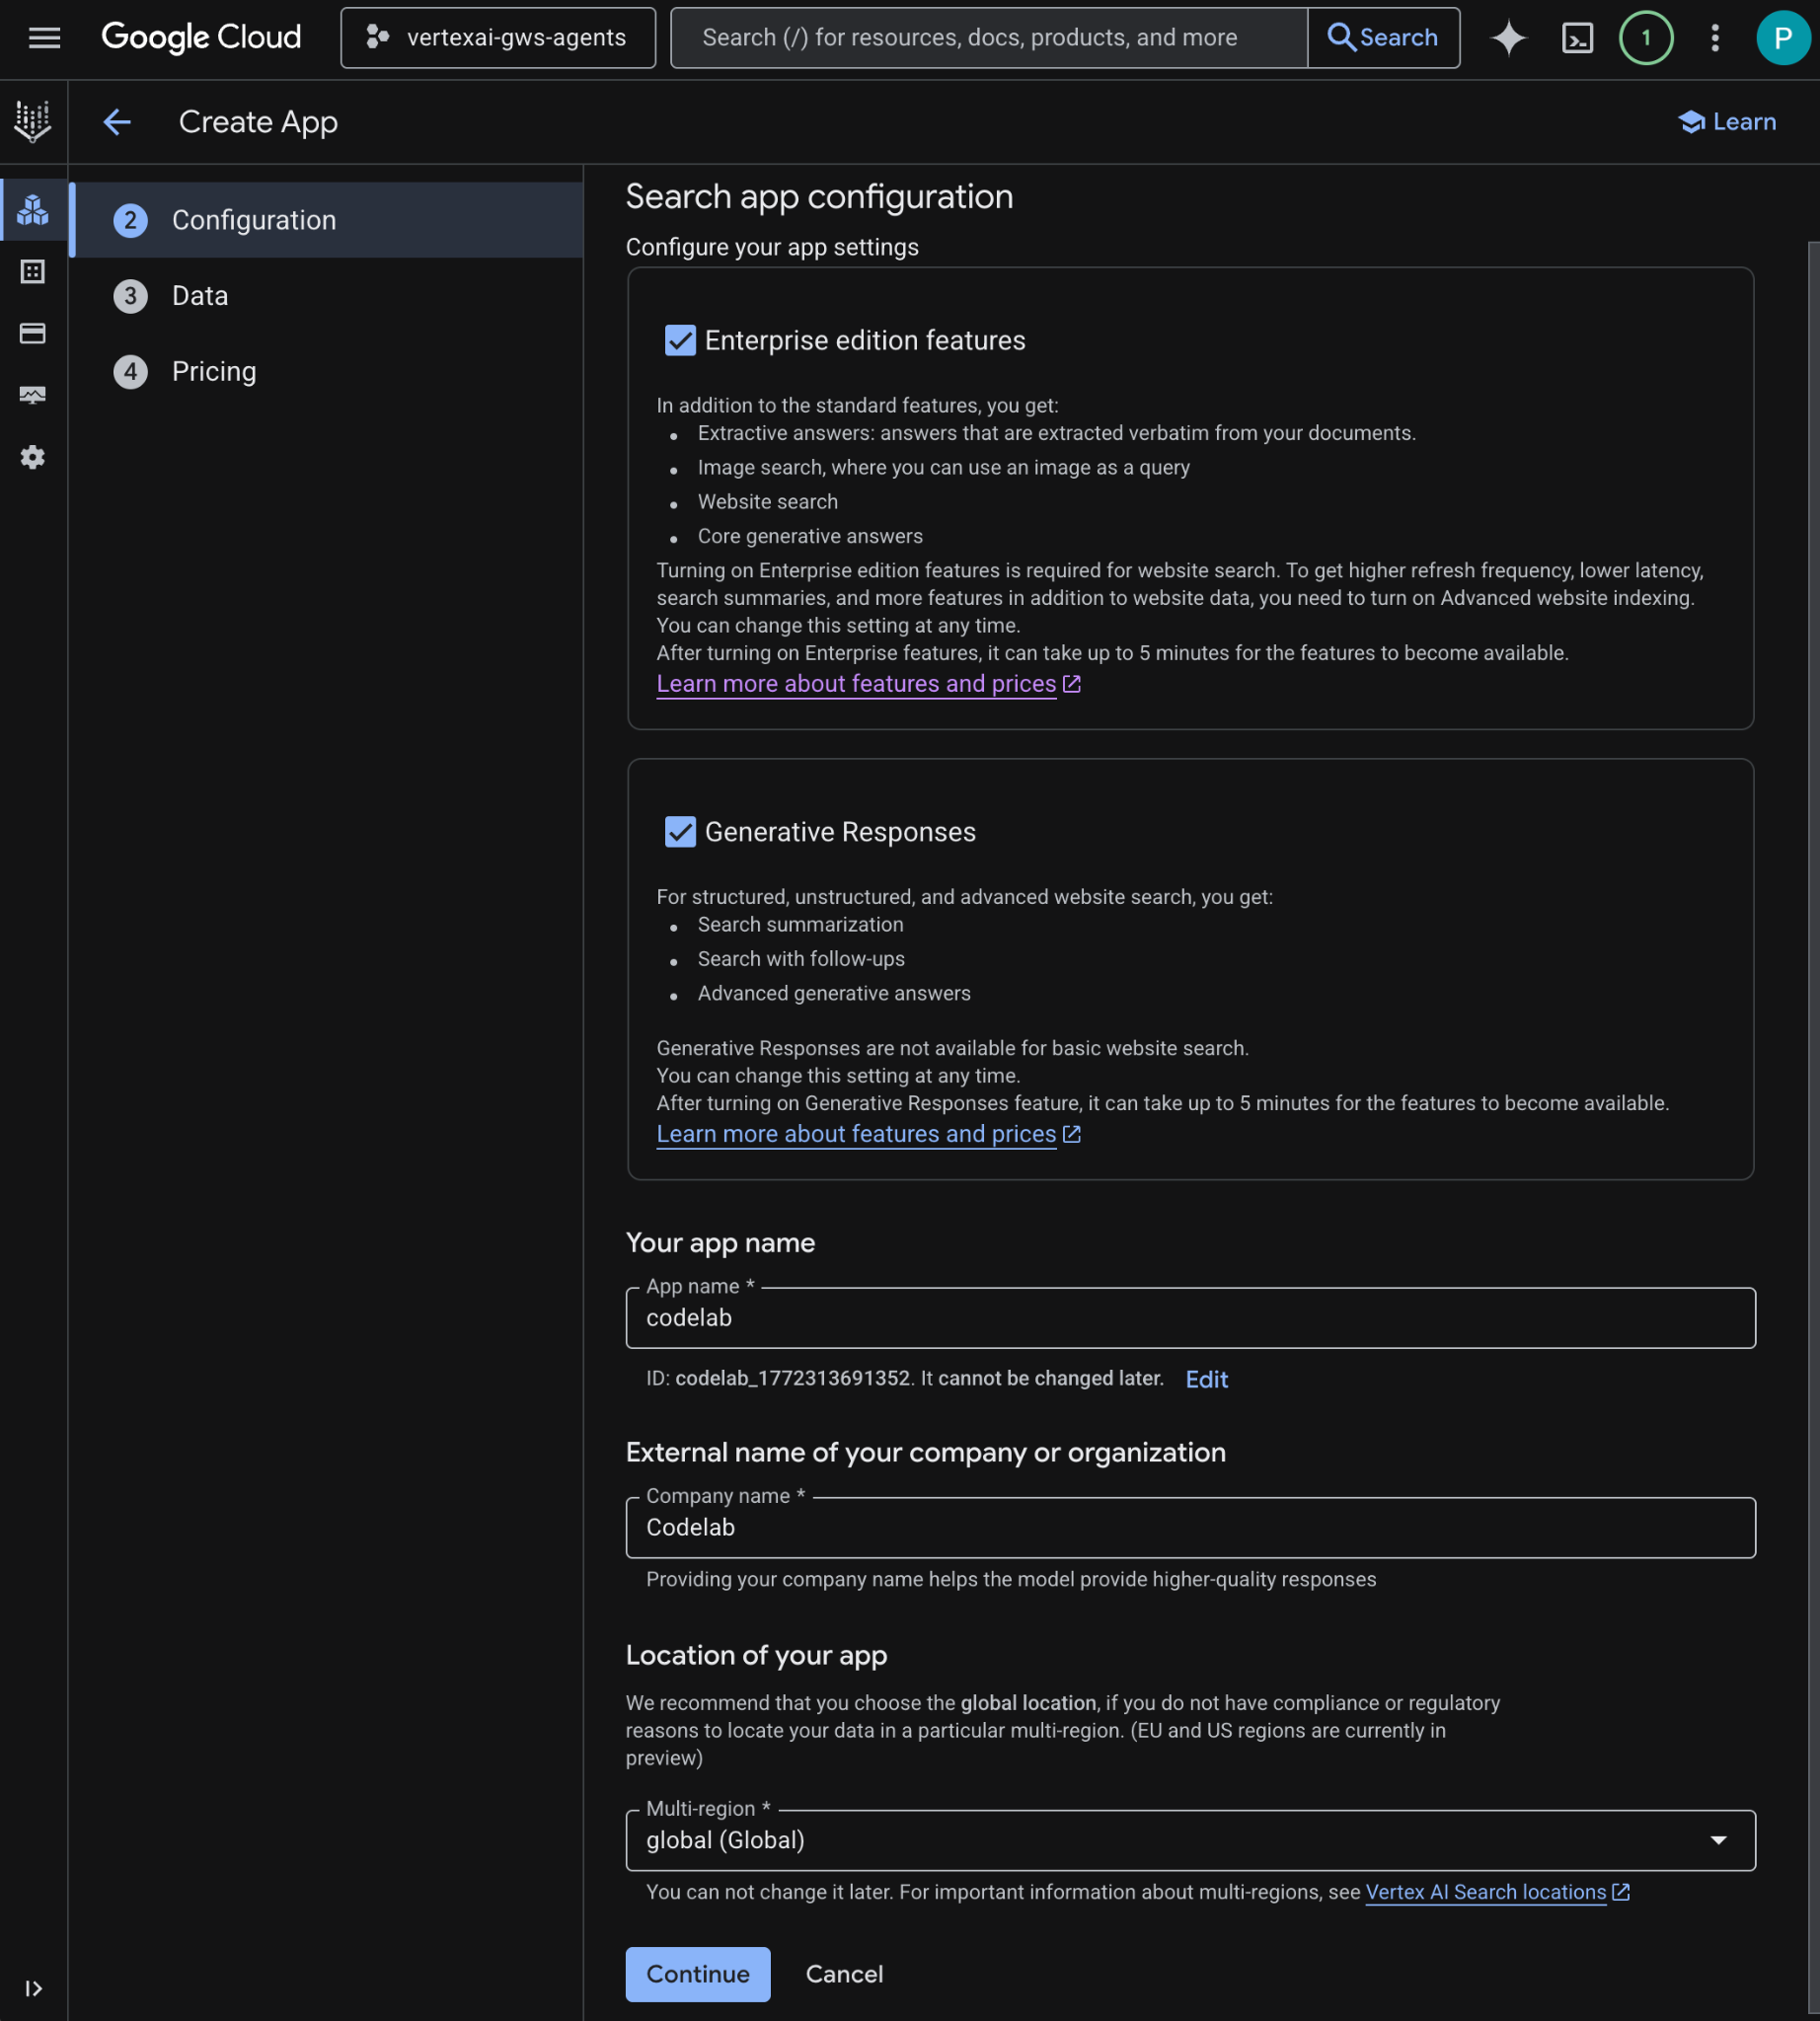
- בקטע הגדרה, מסמנים את התיבות תכונות של מהדורת Enterprise ותשובות גנרטיביות אחרי שמעיינים במחירים ומאשרים אותם.
- מגדירים את שם האפליקציה ל-
codelab. - המערכת יוצרת מזהה על סמך השם ומציגה אותו מתחת לשדה. מעתיקים אותו.
- מגדירים את שם החברה לערך
Codelab. - מגדירים את במספר אזורים לערך
global (Global). - לוחצים על המשך.
- בקטע נתונים, בוחרים את מאגרי הנתונים drive, gmail וcalendar, ואז לוחצים על המשך.
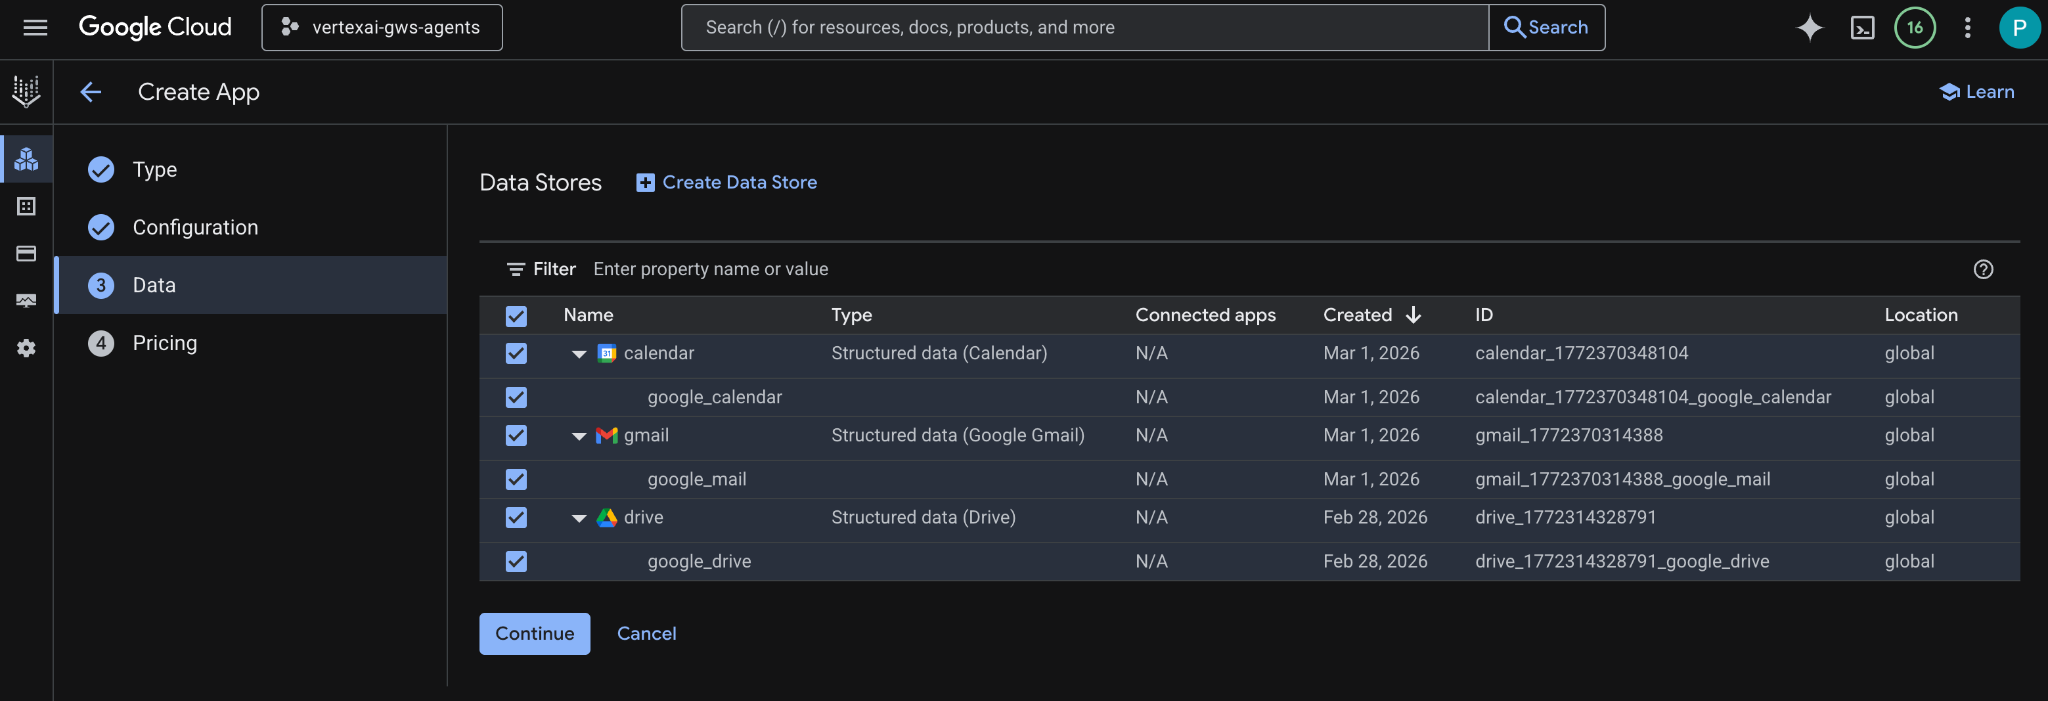
- בקטע תמחור, בוחרים את מודל התמחור הרצוי ולוחצים על יצירה. מומלץ להשתמש בתמחור כללי בהקשר של ה-codelab הזה.
- האפליקציה נוצרת ואתם מועברים אוטומטית אל AI Applications > Apps > codelab > App overview.
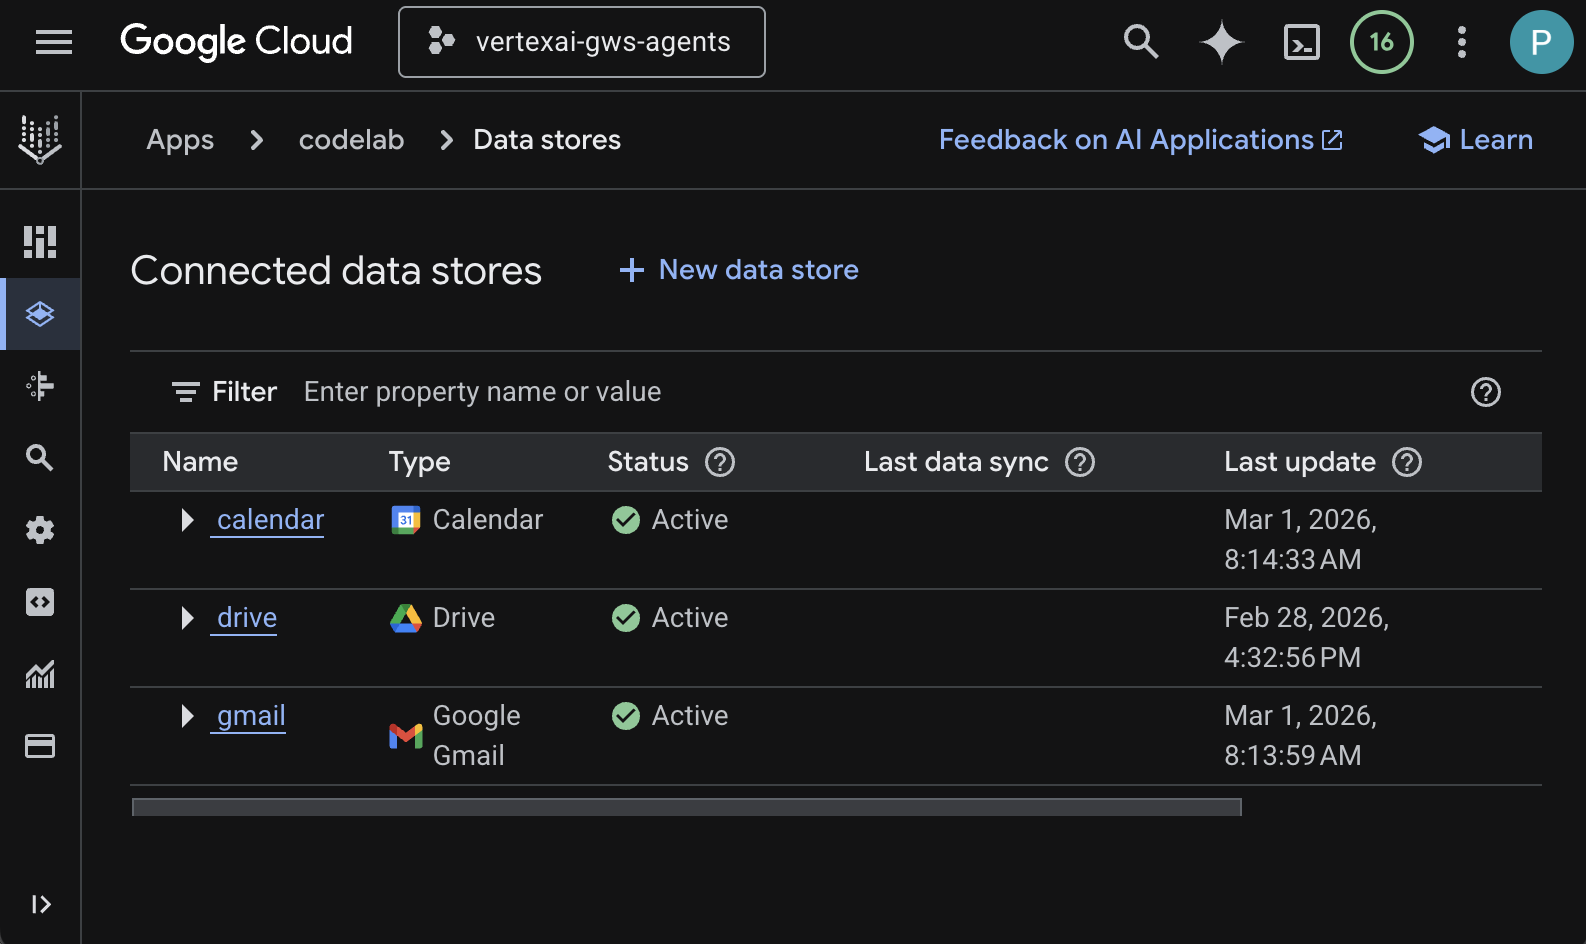
- עוברים אל מאגרי נתונים מקושרים.
- אחרי כמה דקות, הסטטוס של כל מאגרי הנתונים המקושרים צריך להיות פעיל.
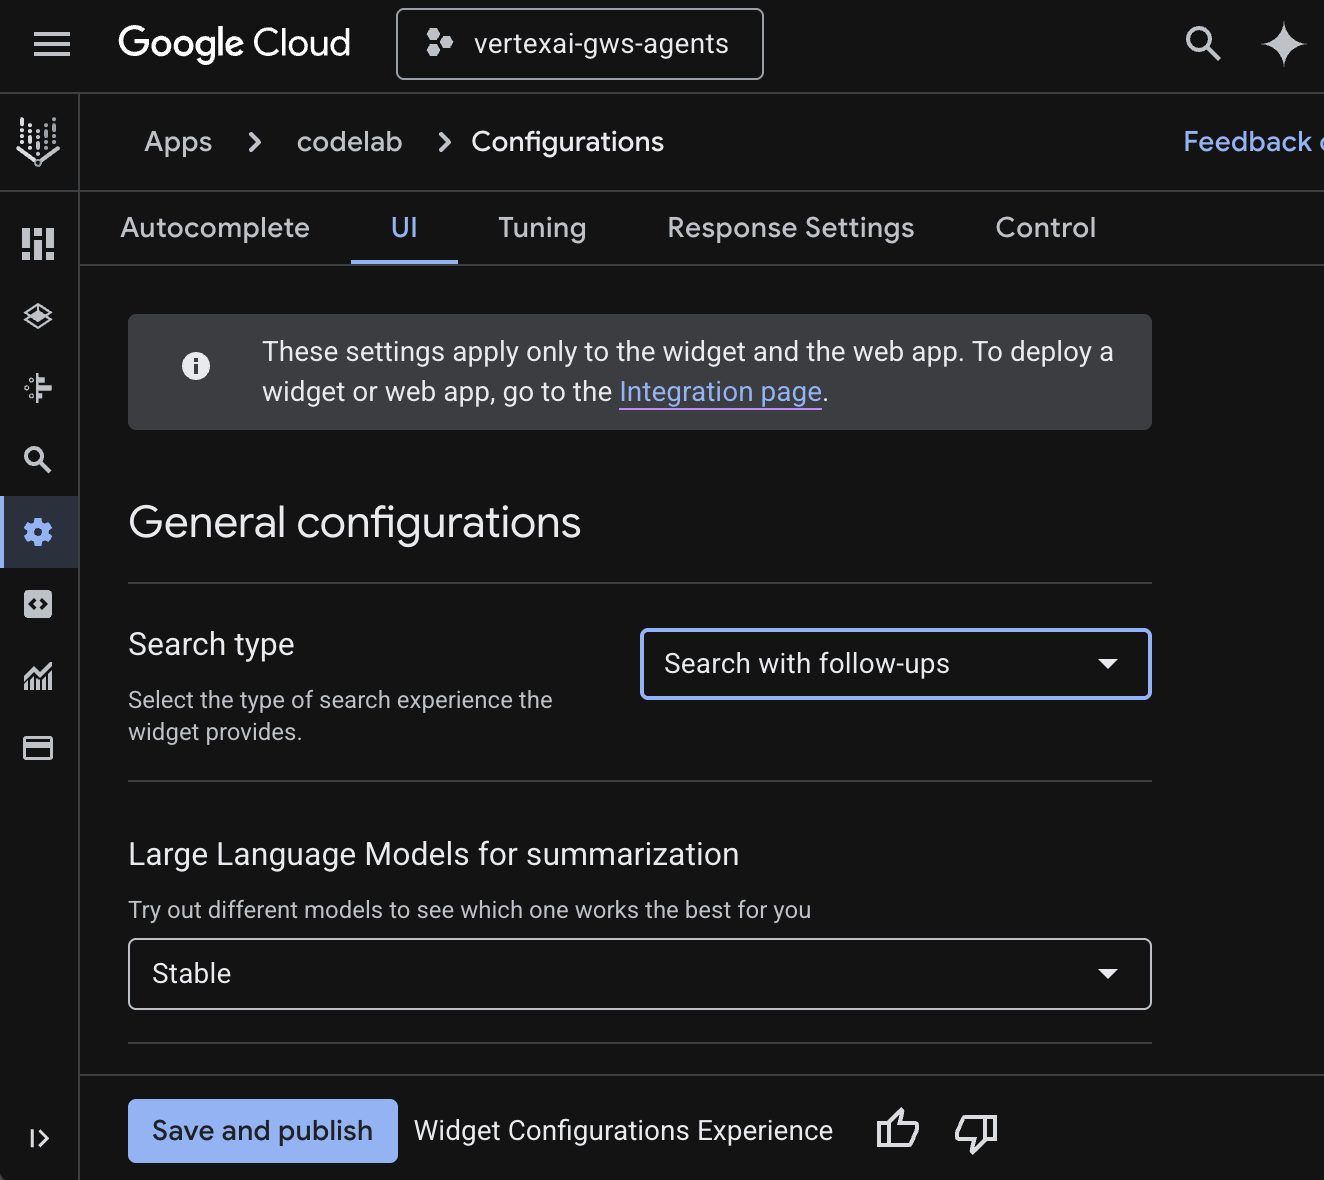
הגדרת הווידג'ט לאתר
הגדרת המראה וההתנהגות של ווידג'ט החיפוש.
- עוברים אל הגדרות.
- בכרטיסייה ממשק משתמש, מגדירים את סוג החיפוש לחיפוש עם שאלות המשך, ואז לוחצים על שמירה ופרסום.
להורדת האפליקציה
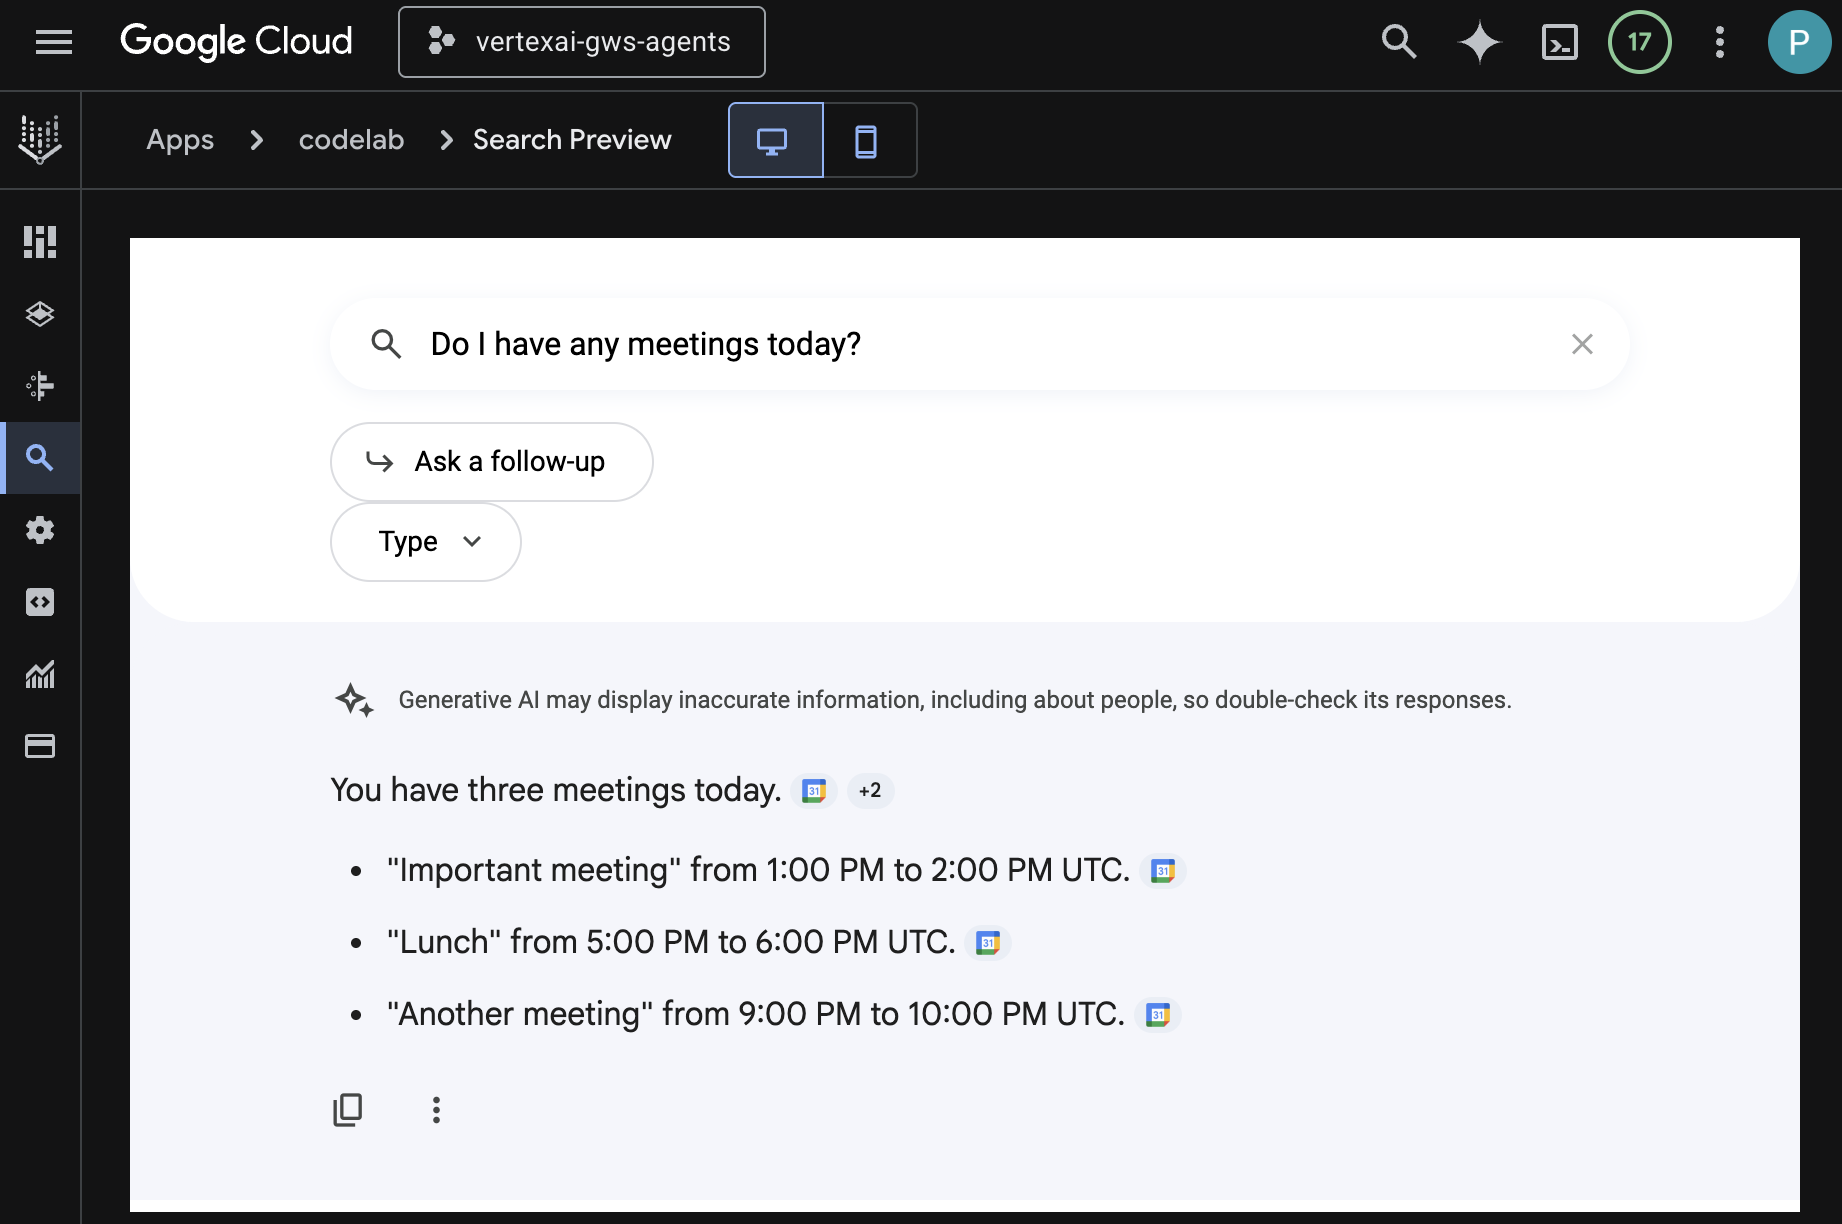
בודקים את אפליקציית החיפוש ישירות במסוף Google Cloud.
- עוברים אל תצוגה מקדימה, הווידג'ט לאתר מוצג.
- בצ'אט, מקלידים
Do I have any meetings today?ומקישים עלenter. - בצ'אט, מקלידים
Did I receive an email on March 1st 2026?ומקישים עלenter. - בצ'אט, מקלידים
Give me the title of the latest Drive file I createdומקישים עלenter.
4. נציג בהתאמה אישית
הסוכן הזה מאפשר למשתמשים לחפש נתונים ולבצע פעולות ב-Workspace בשפה טבעית באמצעות כלים וכללים בהתאמה אישית. הוא מבוסס על הרכיבים הבאים:
- מודל: Gemini.
- נתונים ופעולות: מאגרי נתונים של Vertex AI ל-Google Workspace (יומן, Gmail, Drive), שרת Model Context Protocol (MCP) של חיפוש מבוסס-Vertex AI שמנוהל על ידי Google, פונקציית כלי בהתאמה אישית לשליחת הודעות ב-Google Chat (באמצעות Google Chat API).
- כלים ליצירת סוכנים: Agent Development Kit (ADK).
- מארח הסוכן: Vertex AI Agent Engine.
- ממשק משתמש: ADK Web.
סקירת מושגים
ערכה לפיתוח סוכנים (ADK)
הערכה לפיתוח סוכנים (ADK) היא חבילה מיוחדת של כלים ומסגרות שנועדה לפשט את תהליך היצירה של סוכני AI אוטונומיים. היא כוללת מודולים מוכנים מראש להסקת מסקנות, לניהול זיכרון ולשילוב כלים.
Model Context Protocol (MCP)
Model Context Protocol (MCP) הוא תקן פתוח שנועד לאפשר שילוב חלק ומאובטח בין אפליקציות AI לבין מקורות נתונים או כלים שונים באמצעות ממשק אוניברסלי של 'הפעל והרצה'.
כלי הפונקציות
כלי פונקציות הוא שגרה מוגדרת מראש שניתנת להרצה, ומודל AI יכול להפעיל אותה כדי לבצע פעולות ספציפיות או לאחזר נתונים בזמן אמת ממערכות חיצוניות. כך המודל יכול לבצע פעולות מעבר ליצירת טקסט פשוטה.
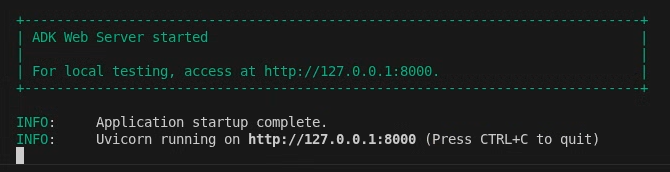
ADK Web
ADK web הוא ממשק משתמש מובנה למפתחים שמגיע עם ADK SDK כדי להקל על הפיתוח והניפוי באגים.
בדיקת ארכיטקטורת הפתרון
בדיקת קוד המקור
agent.py
הקוד הבא מבצע אימות ב-Vertex AI, מאתחל את כלי ה-API של חיפוש מבוסס-Vertex AI MCP ו-Chat, ומגדיר את ההתנהגות של הסוכן.
- אימות: הוא מאחזר את
ACCESS_TOKENממשתני הסביבה כדי לאמת את קריאות ה-API ואת MCP. - הגדרת כלים: הוא מאתחל את
vertexai_mcp, ערכת כלים שמתחברת לשרת Model Context Protocol (MCP) של חיפוש מבוסס-Vertex AI, ואת הכליsend_direct_message. כך הנציג יכול לחפש במאגרי הנתונים המקושרים ולשלוח הודעות ב-Google Chat. - הגדרת הסוכן: ההגדרה מגדירה את
root_agentבאמצעות מודלgemini-2.5-flash. ההוראות אומרות לנציג לתת עדיפות לשימוש בכלי החיפוש לאחזור מידע ובכליsend_direct_messageלביצוע פעולות, וכך למעשה הנציג מתבסס על נתוני הארגון שלכם.
...
MODEL = "gemini-2.5-flash"

# Access token for authentication
ACCESS_TOKEN = os.environ.get("ACCESS_TOKEN")
if not ACCESS_TOKEN:
    raise ValueError("ACCESS_TOKEN environment variable must be set")

VERTEXAI_SEARCH_TIMEOUT = 15.0

def get_project_id():
    """Fetches the consumer project ID from the environment natively."""
    _, project = google.auth.default()
    if project:
        return project
    raise Exception(f"Failed to resolve GCP Project ID from environment.")

def find_serving_config_path():
    """Dynamically finds the default serving config in the engine."""
    project_id = get_project_id()
    engines = discoveryengine_v1.EngineServiceClient().list_engines(
        parent=f"projects/{project_id}/locations/global/collections/default_collection"
    )
    for engine in engines:
        # engine.name natively contains the numeric Project Number
        return f"{engine.name}/servingConfigs/default_serving_config"
    raise Exception(f"No Discovery Engines found in project {project_id}")

def send_direct_message(email: str, message: str) -> dict:
    """Sends a Google Chat Direct Message (DM) to a specific user by email address."""
    chat_client = chat_v1.ChatServiceClient(
        credentials=Credentials(token=ACCESS_TOKEN)
    )

    # 1. Setup the DM space or find existing one
    person = chat_v1.User(
        name=f"users/{email}",
        type_=chat_v1.User.Type.HUMAN
    )
    membership = chat_v1.Membership(member=person)
    space_req = chat_v1.Space(space_type=chat_v1.Space.SpaceType.DIRECT_MESSAGE)
    setup_request = chat_v1.SetUpSpaceRequest(
        space=space_req,
        memberships=[membership]
    )
    space_response = chat_client.set_up_space(request=setup_request)
    space_name = space_response.name

    # 2. Send the message
    msg = chat_v1.Message(text=message)
    message_request = chat_v1.CreateMessageRequest(
        parent=space_name,
        message=msg
    )
    message_response = chat_client.create_message(request=message_request)

    return {"status": "success", "message_id": message_response.name, "space": space_name}

vertexai_mcp = McpToolset(
    connection_params=StreamableHTTPConnectionParams(
        url="https://discoveryengine.googleapis.com/mcp",
        timeout=VERTEXAI_SEARCH_TIMEOUT,
        sse_read_timeout=VERTEXAI_SEARCH_TIMEOUT,
        headers={"Authorization": f"Bearer {ACCESS_TOKEN}"}
    ),
    tool_filter=['search']
)

# Answer nicely the following user queries:
#  - Please find my meetings for today, I need their titles and links
#  - What is the latest Drive file I created?
#  - What is the latest Gmail message I received?
#  - Please send the following message to someone@example.com: Hello, this is a test message.

root_agent = LlmAgent(
    model=MODEL,
    name='enterprise_ai',
    instruction=f"""
        You are a helpful assistant that always uses the Vertex AI MCP search tool to answer the user's message, unless the user asks you to send a message to someone.
        If the user asks you to send a message to someone, use the send_direct_message tool to send the message.
        You MUST unconditionally use the Vertex AI MCP search tool to find answer, even if you believe you already know the answer or believe the Vertex AI MCP search tool does not contain the data.
        The Vertex AI MCP search tool accesses the user's data through datastores including Google Drive, Google Calendar, and Gmail.
        Only use the Vertex AI MCP search tool with servingConfig and query parameters, do not use any other parameters.
        Always use the servingConfig {find_serving_config_path()} while using the Vertex AI MCP search tool.
    """,
    tools=[vertexai_mcp, FunctionTool(send_direct_message)]
)
הורדת קוד מקור
כדי להתחיל, מורידים את הקוד לדוגמה לסביבה המקומית.
- מורידים את מאגר GitHub הזה.
- בטרמינל, פותחים את הספרייה
solutions/enterprise-ai-agent-local.
הפעלת ממשקי API
כדי להשתמש בפתרון, צריך להפעיל ממשקי API נוספים:
- ב-מסוף Google Cloud, מפעילים את ממשקי ה-API של Vertex AI, Cloud Resource Manager ו-Google Chat:
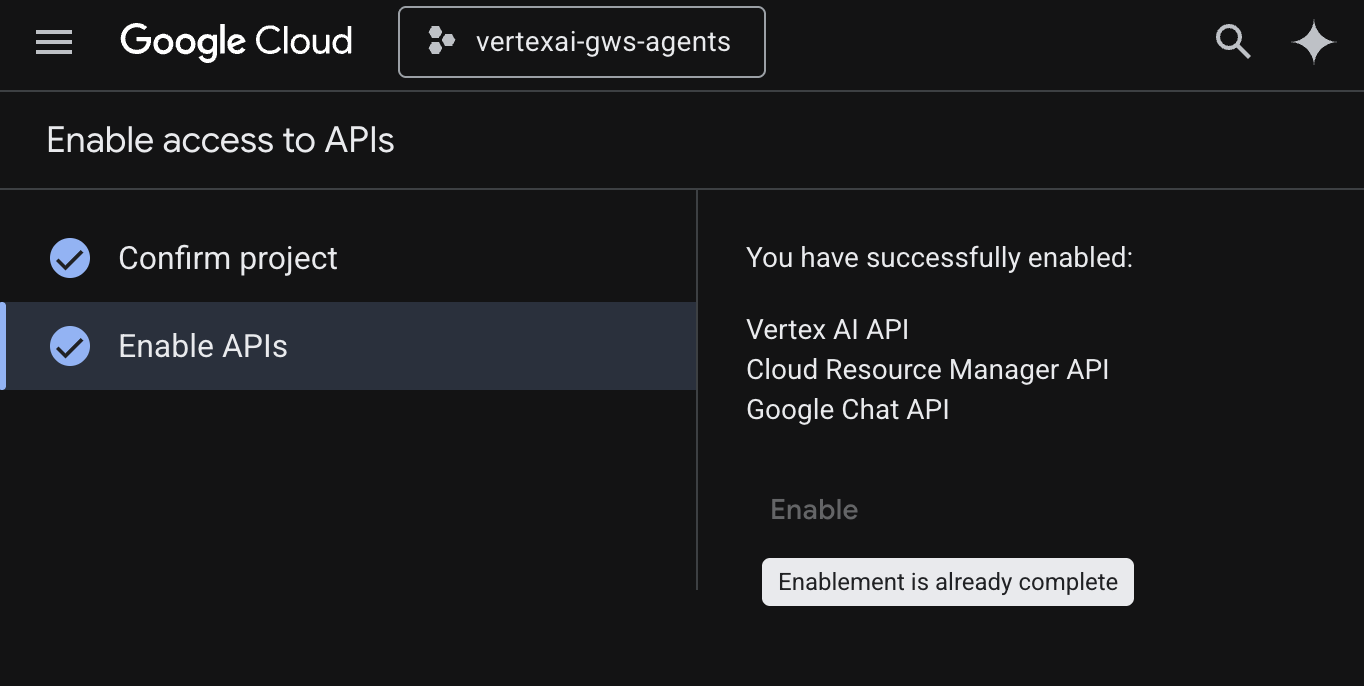
- לוחצים על Menu ☰ > APIs & Services > Enabled APIs & Services ומוודאים ש-Vertex AI API, Cloud Resource Manager API ו-Google Chat API מופיעים ברשימה.
הגדרת מסך הסכמה ל-OAuth
הפתרון דורש הגדרה של מסך הסכמה:
- במסוף Google Cloud, לוחצים על תפריט ☰ > פלטפורמת האימות של Google > מיתוג.
- לוחצים על שנתחיל?.
- בקטע App Information, מגדירים את App name ל-
Codelab. - בקטע User support email, בוחרים כתובת אימייל לתמיכה שאליה משתמשים יפנו אם יש להם שאלות לגבי ההסכמה שלהם.
- לוחצים על Next.
- בקטע Audience, לוחצים על Internal.
- לוחצים על Next.
- בקטע Contact Information, מזינים כתובת אימייל שאליה אפשר לשלוח התראות על שינויים בפרויקט.
- לוחצים על הבא.
- בקטע Finish, קוראים את המדיניות של Google בנושא נתוני משתמשים בשירותי API. אם אתם מסכימים, מסמנים את התיבה I agree to the Google API Services: User Data Policy.
- לוחצים על המשך ואז על יצירה.
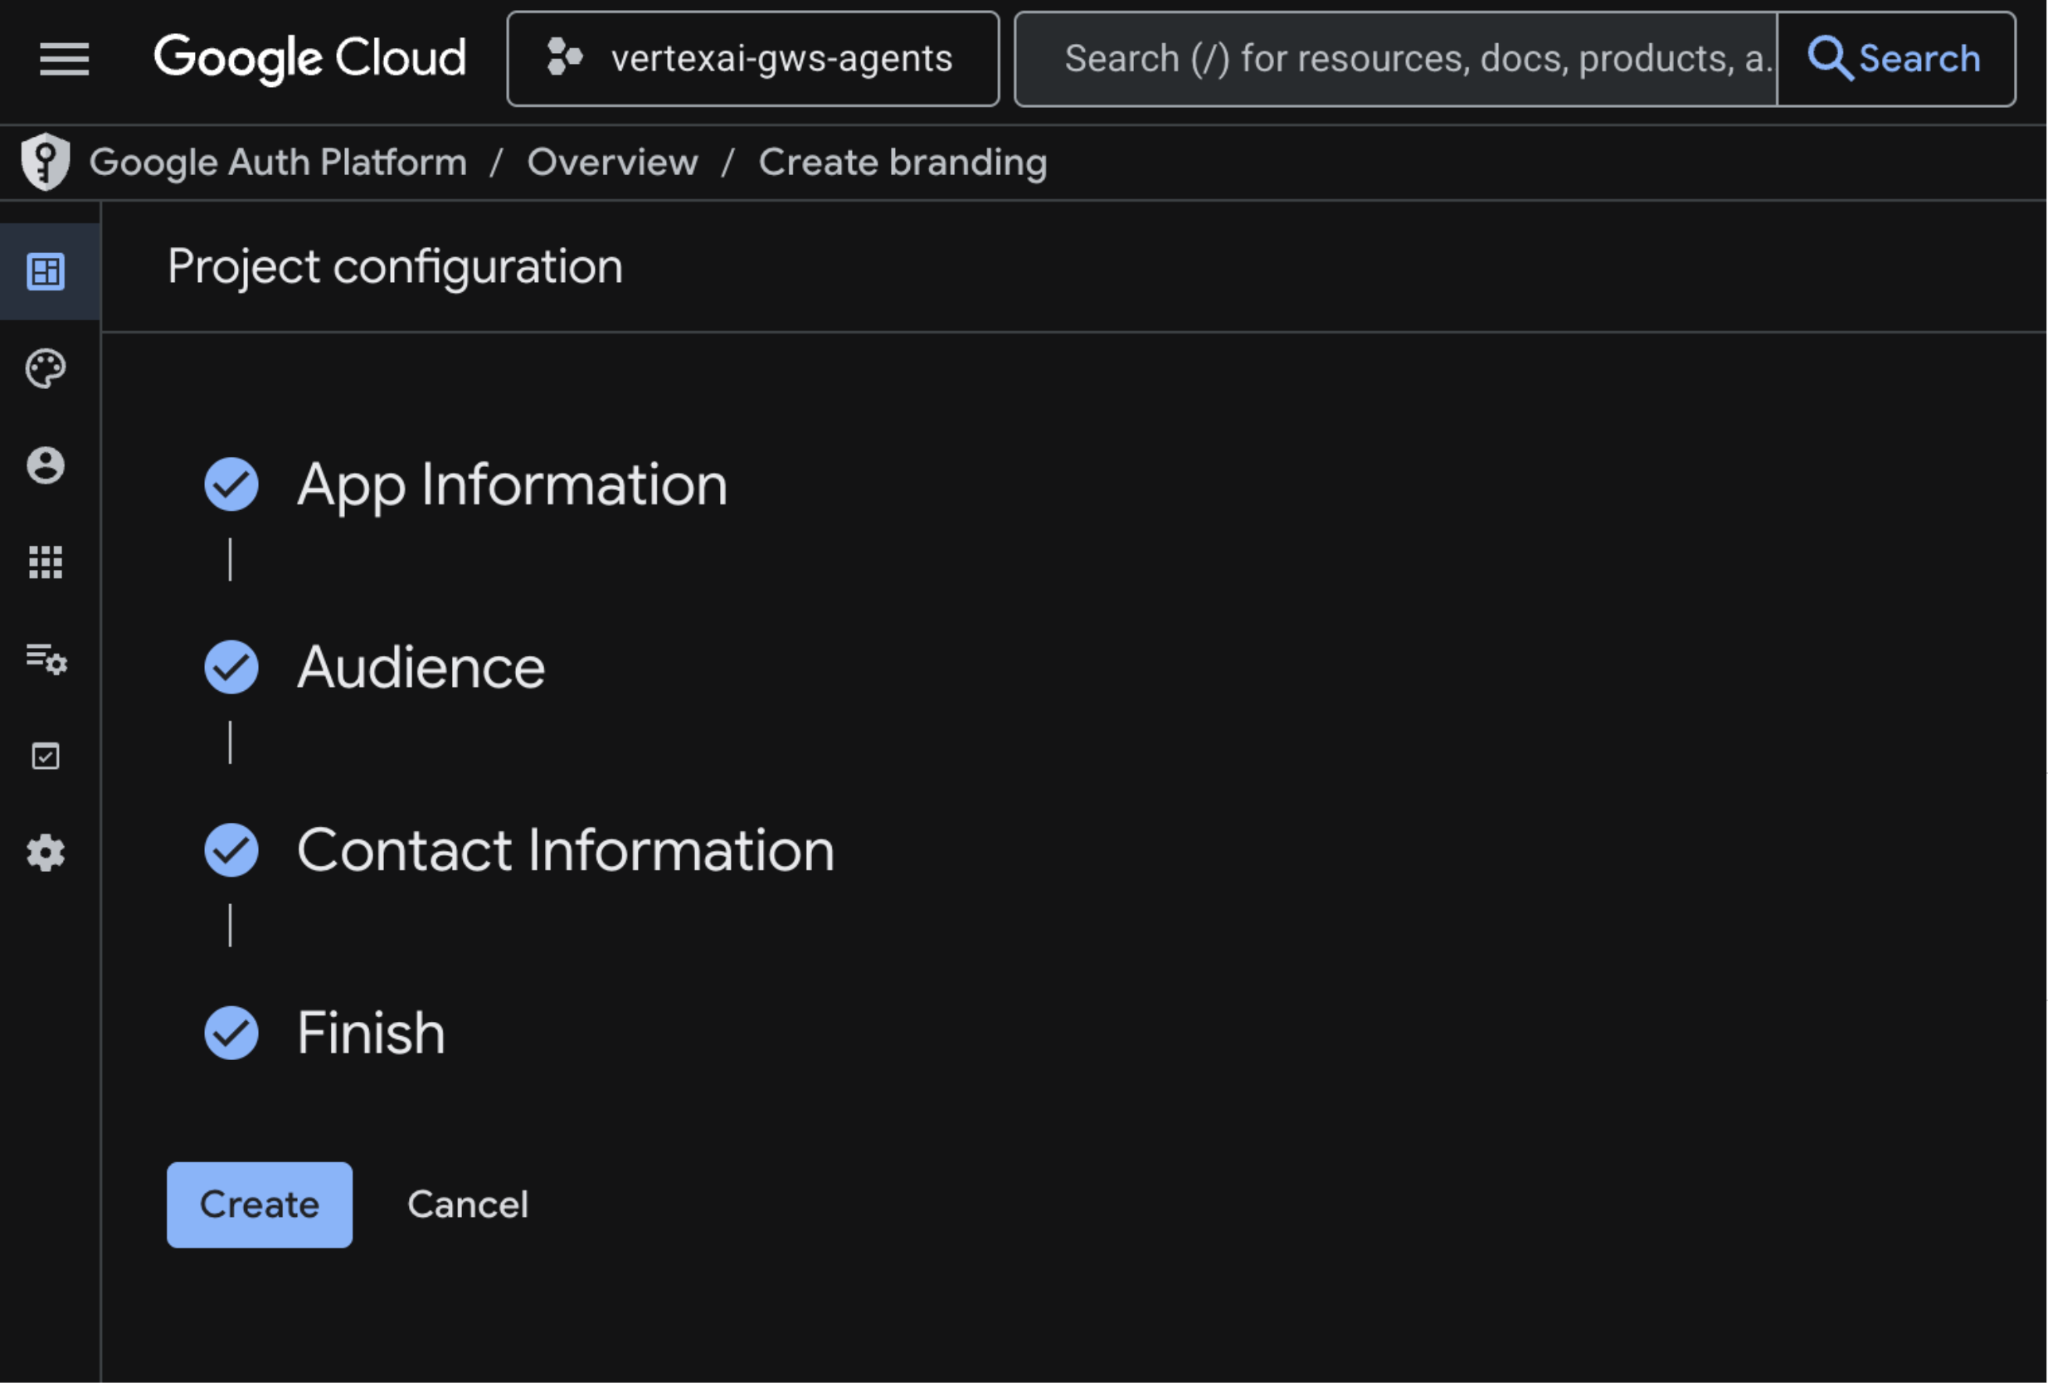
- ההגדרה נשמרת ואתם מועברים אוטומטית אל Google Auth Platform > Overview.
למידע נוסף, אפשר לעיין במדריך המלא בנושא הגדרת הסכמה ל-OAuth.
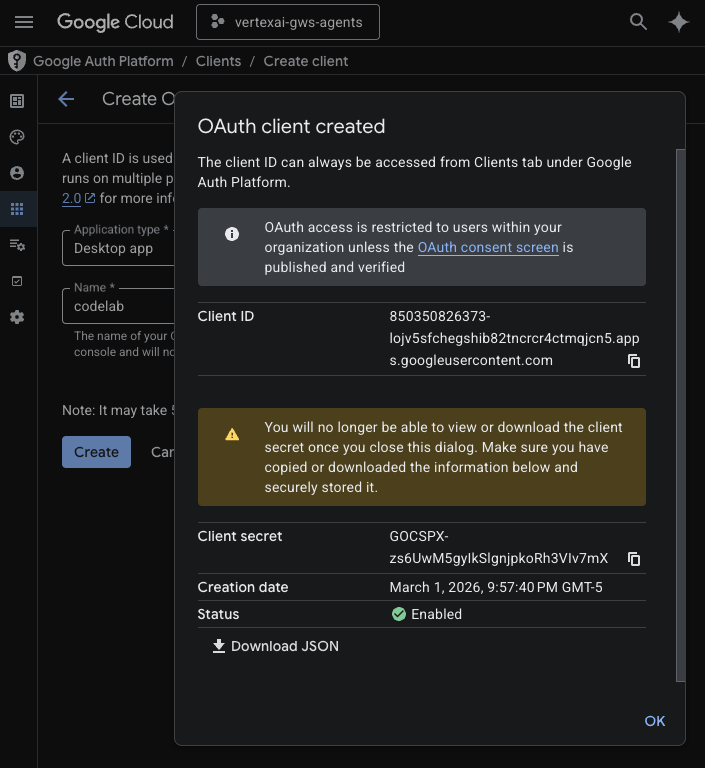
יצירת פרטי כניסה של לקוח OAuth
יוצרים לקוח OAuth חדש לאפליקציה למחשב כדי לאמת את המשתמש בסביבה מקומית:
- במסוף Google Cloud, לוחצים על תפריט ☰ > פלטפורמת האימות של Google > לקוחות.
- לוחצים על + יצירת לקוח.
- ב-Application type (סוג האפליקציה), בוחרים באפשרות Desktop app (אפליקציה למחשב).
- מגדירים את Name לערך
codelab. - לוחצים על יצירה. פרטי הכניסה החדשים שנוצרו מופיעים.
- לוחצים על הורדת JSON ושומרים את הקובץ בשם client_secret.json בספרייה
solutions/enterprise-ai-agent-local.
הפעלת חיפוש מבוסס-Vertex AI MCP
- במסוף, מריצים את הפקודה:
gcloud beta services mcp enable discoveryengine.googleapis.com \
     --project=$(gcloud config get-value project)
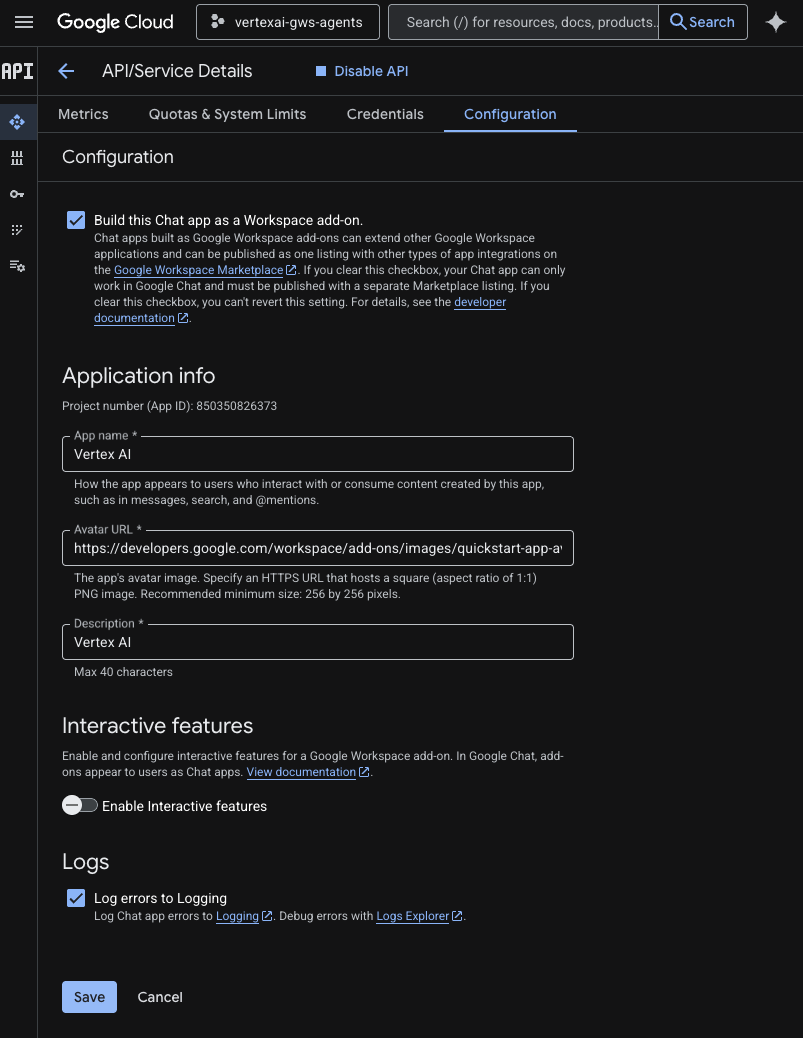
הגדרת אפליקציה ל-Chat
מגדירים את אפליקציית Google Chat עם הפרטים הבסיסיים שלה.
- ב-מסוף Google Cloud, מחפשים את
Google Chat APIבשדה החיפוש של Google Cloud, לוחצים על Google Chat API, על ניהול ואז על הגדרה.
- מגדירים את שם האפליקציה ואת התיאור לערך
Vertex AI. - מגדירים את כתובת ה-URL של הדמות ל-
https://developers.google.com/workspace/add-ons/images/quickstart-app-avatar.png. - מבטלים את הסימון של הפעלת תכונות אינטראקטיביות ואז לוחצים על השבתה בתיבת הדו-שיח המודאלית שמופיעה.
- בוחרים באפשרות Log errors to Logging (רישום שגיאות ב-Logging).
- לוחצים על שמירה.
הרצת סוכן ב-ADK Web
מפעילים את הסוכן באופן מקומי באמצעות ממשק האינטרנט של ADK.
- בטרמינל, פותחים את הספרייה
solutions/enterprise-ai-agent-localומריצים את הפקודה:
# 1. Authenticate with all the required scopes
gcloud auth application-default login \
  --client-id-file=client_secret.json \
   --scopes=https://www.googleapis.com/auth/cloud-platform,https://www.googleapis.com/auth/chat.spaces,https://www.googleapis.com/auth/chat.messages

# 2. Configure environment
export ACCESS_TOKEN=$(gcloud auth application-default print-access-token)
export GOOGLE_GENAI_USE_VERTEXAI=1
export GOOGLE_CLOUD_PROJECT=$(gcloud config get-value project)
export GOOGLE_CLOUD_LOCATION=us-central1

# 3. Create and activate a new virtual environment
python3 -m venv .venv
source .venv/bin/activate

# 4. Install poetry and project dependencies
pip install poetry
poetry install

# 5. Start ADK Web
adk web
מנסים סוכן
כדי לוודא שהזרימה תקינה, אפשר להתכתב בצ'אט עם הסוכן המותאם אישית.
- בדפדפן האינטרנט, פותחים את אתר ה-ADK.
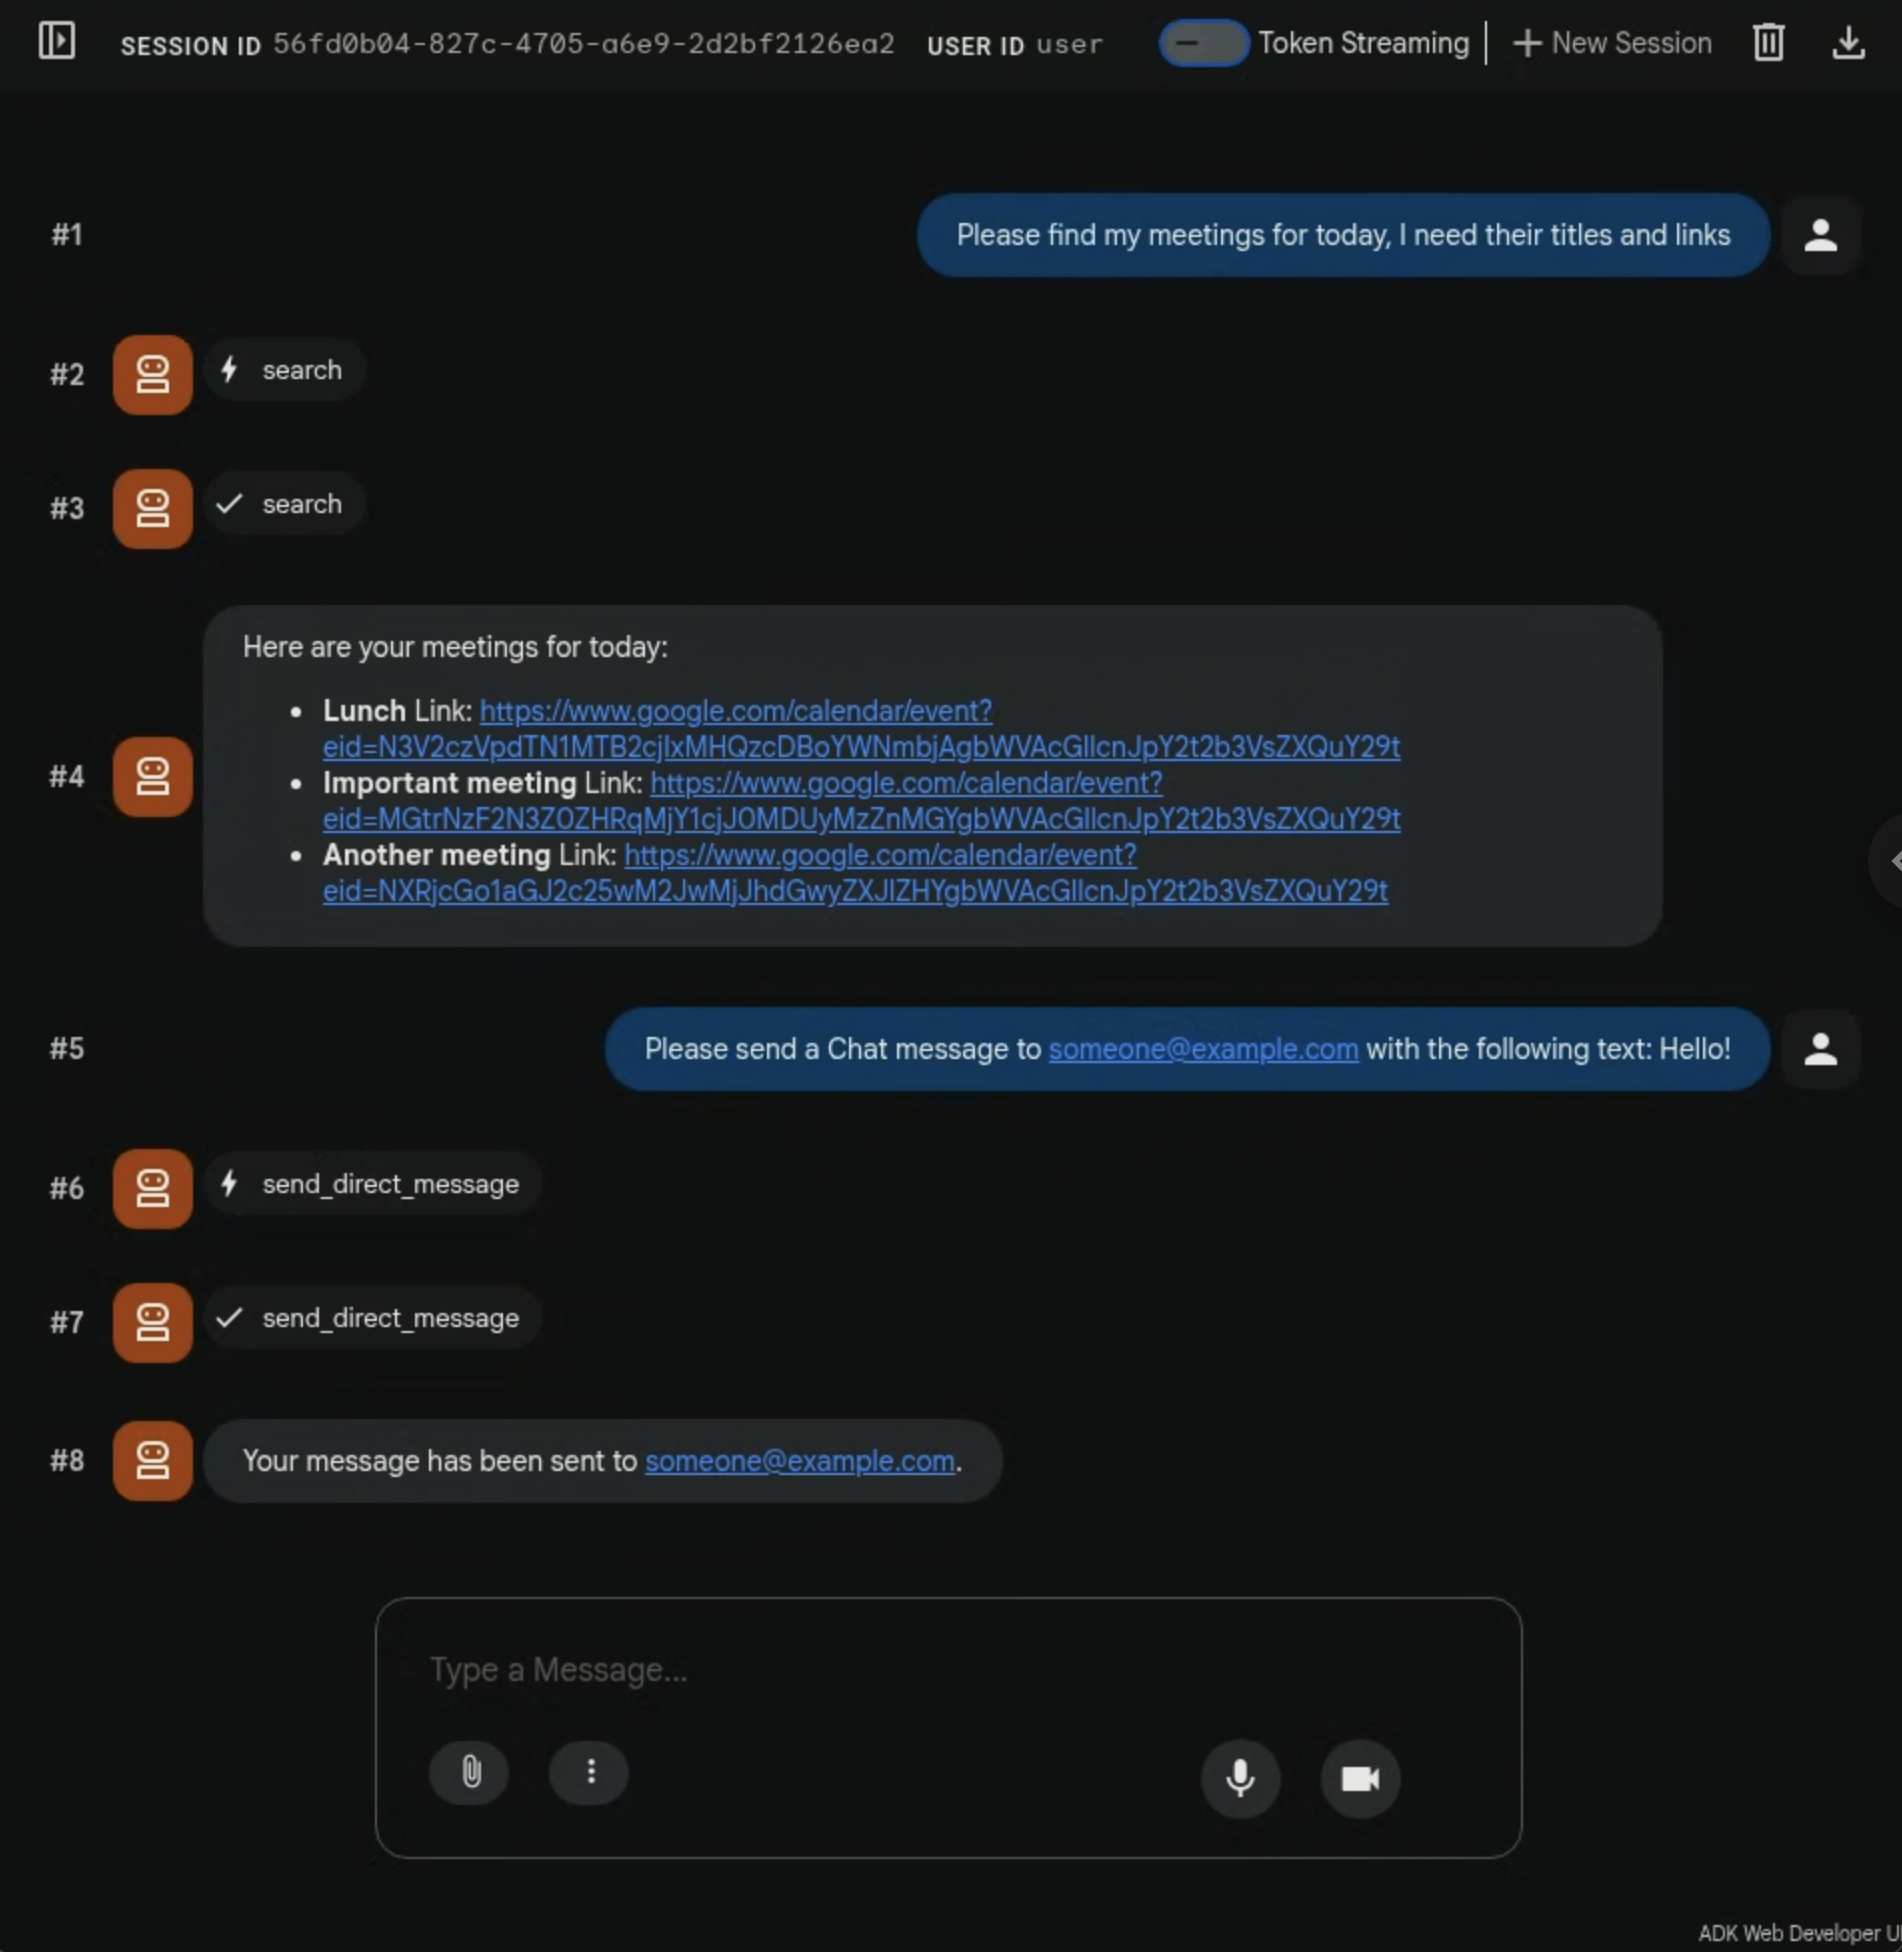
- בצ'אט, מקלידים
Please find my meetings for today, I need their titles and linksומקישים עלenter. - הסוכן עונה עם רשימה של אירועים ביומן (בהתאם לחשבון של המשתמש).
- בצ'אט, מקלידים
Please send a Chat message to someone@example.com with the following text: Hello!ומקישים עלenter. - הנציג משיב בהודעת אישור.
5. הסוכן כתוסף ל-Google Workspace
הסוכן הזה מאפשר למשתמשים לחפש נתונים ב-Workspace בשפה טבעית בהקשר של ממשקי משתמש של אפליקציות Workspace. הוא מבוסס על הרכיבים הבאים:
- מודל: Gemini.
- נתונים ופעולות: מאגרי נתונים של Vertex AI ל-Google Workspace (יומן, Gmail, Drive), שרת Model Context Protocol (MCP) של חיפוש מבוסס-Vertex AI שמנוהל על ידי Google, פונקציית כלי בהתאמה אישית לשליחת הודעות ב-Google Chat (באמצעות Google Chat API).
- כלים ליצירת סוכנים: Agent Development Kit (ADK).
- מארח הסוכן: Vertex AI Agent Engine.
- ממשק משתמש: תוסף Google Workspace ל-Chat ול-Gmail (אפשר להרחיב אותו בקלות ליומן, ל-Drive, ל-Docs, ל-Sheets ול-Slides).
- תוסף ל-Google Workspace: Apps Script, ממשקי Vertex AI Agent Engine API, הקשרי (הודעת Gmail שנבחרה).
בדיקת מושגים
תוסף ל-Google Workspace
תוסף ל-Google Workspace הוא אפליקציה בהתאמה אישית שמרחיבה אפליקציה אחת או יותר של Google Workspace (Gmail, Chat, יומן, Docs, Drive, Meet, Sheets ו-Slides).
Apps Script
Apps Script היא פלטפורמת JavaScript מבוססת-ענן שמופעלת על ידי Google Drive. היא מאפשרת לכם לשלב בין מוצרי Google ולהפוך משימות לאוטומטיות.
מסגרת הכרטיסים של Google Workspace
מסגרת הכרטיסים ב-Google Workspace מאפשרת למפתחים ליצור ממשקי משתמש עשירים ואינטראקטיביים. הוא מאפשר ליצור כרטיסים מאורגנים ומושכים מבחינה ויזואלית, שיכולים לכלול טקסט, תמונות, לחצנים ווידג'טים אחרים. הכרטיסים האלה משפרים את חוויית המשתמש כי הם מספקים מידע מובנה ומאפשרים לבצע פעולות מהירות ישירות באפליקציות של Workspace.
בדיקת ארכיטקטורת הפתרון
בדיקת קוד המקור
Agent
agent.py
הקוד הבא מבצע אימות ב-Vertex AI, מאתחל את כלי ה-API של חיפוש מבוסס-Vertex AI MCP ו-Chat, ומגדיר את ההתנהגות של הסוכן.
- אימות: הפונקציה משתמשת בפונקציית עזר
_get_access_token_from_contextכדי לאחזר את אסימון האימות (CLIENT_AUTH_NAME) שהלקוח מזריק. האסימון הזה חיוני כדי לבצע קריאות מאובטחות לשירותים במורד הזרם, כמו חיפוש מבוסס-Vertex AI MCP וכלי Google Chat. - הגדרת כלים: הוא מאתחל את
vertexai_mcp, ערכת כלים שמתחברת לשרת Model Context Protocol (MCP) של חיפוש מבוסס-Vertex AI, ואת הכליsend_direct_message. כך הנציג יכול לחפש במאגרי הנתונים המקושרים ולשלוח הודעות ב-Google Chat. - הגדרת הסוכן: ההגדרה מגדירה את
root_agentבאמצעות מודלgemini-2.5-flash. ההוראות אומרות לנציג לתת עדיפות לשימוש בכלי החיפוש לאחזור מידע ובכליsend_direct_messageלביצוע פעולות, וכך למעשה הנציג מתבסס על נתוני הארגון שלכם.
...
MODEL = "gemini-2.5-flash"

# Client injects a bearer token into the ToolContext state.
# The key pattern is "CLIENT_AUTH_NAME_<random_digits>".
# We dynamically parse this token to authenticate our MCP and API calls.
CLIENT_AUTH_NAME = "enterprise-ai"

VERTEXAI_SEARCH_TIMEOUT = 15.0

def get_project_id():
    """Fetches the consumer project ID from the environment natively."""
    _, project = google.auth.default()
    if project:
        return project
    raise Exception(f"Failed to resolve GCP Project ID from environment.")

def find_serving_config_path():
    """Dynamically finds the default serving config in the engine."""
    project_id = get_project_id()
    engines = discoveryengine_v1.EngineServiceClient().list_engines(
        parent=f"projects/{project_id}/locations/global/collections/default_collection"
    )
    for engine in engines:
        # engine.name natively contains the numeric Project Number
        return f"{engine.name}/servingConfigs/default_serving_config"
    raise Exception(f"No Discovery Engines found in project {project_id}")

def _get_access_token_from_context(tool_context: ToolContext) -> str:
    """Helper method to dynamically parse the intercepted bearer token from the context state."""
    escaped_name = re.escape(CLIENT_AUTH_NAME)
    pattern = re.compile(fr"^{escaped_name}_\d+$")
    # Handle ADK varying state object types (Raw Dict vs ADK State)
    state_dict = tool_context.state.to_dict() if hasattr(tool_context.state, 'to_dict') else tool_context.state
    matching_keys = [k for k in state_dict.keys() if pattern.match(k)]
    if matching_keys:
        return state_dict.get(matching_keys[0])
    raise Exception(f"No bearer token found in ToolContext state matching pattern {pattern.pattern}")

def auth_header_provider(tool_context: ToolContext) -> dict[str, str]:
    token = _get_access_token_from_context(tool_context)
    return {"Authorization": f"Bearer {token}"}

def send_direct_message(email: str, message: str, tool_context: ToolContext) -> dict:
    """Sends a Google Chat Direct Message (DM) to a specific user by email address."""
    chat_client = chat_v1.ChatServiceClient(
        credentials=Credentials(token=_get_access_token_from_context(tool_context))
    )

    # 1. Setup the DM space or find existing one
    person = chat_v1.User(
        name=f"users/{email}",
        type_=chat_v1.User.Type.HUMAN
    )
    membership = chat_v1.Membership(member=person)
    space_req = chat_v1.Space(space_type=chat_v1.Space.SpaceType.DIRECT_MESSAGE)
    setup_request = chat_v1.SetUpSpaceRequest(
        space=space_req,
        memberships=[membership]
    )
    space_response = chat_client.set_up_space(request=setup_request)
    space_name = space_response.name

    # 2. Send the message
    msg = chat_v1.Message(text=message)
    message_request = chat_v1.CreateMessageRequest(
        parent=space_name,
        message=msg
    )
    message_response = chat_client.create_message(request=message_request)

    return {"status": "success", "message_id": message_response.name, "space": space_name}

vertexai_mcp = McpToolset(
    connection_params=StreamableHTTPConnectionParams(
        url="https://discoveryengine.googleapis.com/mcp",
        timeout=VERTEXAI_SEARCH_TIMEOUT,
        sse_read_timeout=VERTEXAI_SEARCH_TIMEOUT
    ),
    tool_filter=['search'],
    # The auth_header_provider dynamically injects the bearer token from the ToolContext
    # into the MCP call for authentication.
    header_provider=auth_header_provider
)

# Answer nicely the following user queries:
#  - Please find my meetings for today, I need their titles and links
#  - What is the latest Drive file I created?
#  - What is the latest Gmail message I received?
#  - Please send the following message to someone@example.com: Hello, this is a test message.

root_agent = LlmAgent(
    model=MODEL,
    name='enterprise_ai',
    instruction=f"""
        You are a helpful assistant that always uses the Vertex AI MCP search tool to answer the user's message, unless the user asks you to send a message to someone.
        If the user asks you to send a message to someone, use the send_direct_message tool to send the message.
        You MUST unconditionally use the Vertex AI MCP search tool to find answer, even if you believe you already know the answer or believe the Vertex AI MCP search tool does not contain the data.
        The Vertex AI MCP search tool accesses the user's data through datastores including Google Drive, Google Calendar, and Gmail.
        Only use the Vertex AI MCP search tool with servingConfig and query parameters, do not use any other parameters.
        Always use the servingConfig {find_serving_config_path()} while using the Vertex AI MCP search tool.
    """,
    tools=[vertexai_mcp, FunctionTool(send_direct_message)]
)
לקוח
appsscript.json
ההגדרה הבאה מגדירה את הטריגרים וההרשאות של התוסף.
- הגדרת התוסף: הקובץ הזה מגדיר ל-Workspace שהפרויקט הזה הוא תוסף ל-Chat ול-Gmail.
- טריגרים תלויי-הקשר: ב-Gmail, הטריגר הזה מגדיר
contextualTriggerשמופעלonAddonEventבכל פעם שמשתמש פותח הודעת אימייל. כך התוסף יכול 'לראות' את תוכן האימייל. - הרשאות: כאן מפורטות ההרשאות
oauthScopesשנדרשות להפעלת התוסף, כמו הרשאות לקריאת האימייל הנוכחי, להרצת הסקריפט ולהתחברות לשירותים חיצוניים (כמו Vertex AI APIs).
...
"addOns": {
    "common": {
      "name": "Vertex AI",
      "logoUrl": "https://developers.google.com/workspace/add-ons/images/quickstart-app-avatar.png"
    },
    "chat": {},
    "gmail": {
      "contextualTriggers": [
        {
          "unconditional": {},
          "onTriggerFunction": "onAddonEvent"
        }
      ]
    }
  },
  "oauthScopes": [
   "https://www.googleapis.com/auth/script.external_request",
   "https://www.googleapis.com/auth/cloud-platform",
   "https://www.googleapis.com/auth/gmail.addons.execute",
   "https://www.googleapis.com/auth/gmail.addons.current.message.readonly"
 ]
...
Chat.gs
הקוד הבא מטפל בהודעות נכנסות ב-Google Chat.
- Receives Messages: הפונקציה
onMessageהיא נקודת הכניסה לאינטראקציות עם ההודעות. - ניהול ההקשר: הוא שומר את
space.name(המזהה של המרחב ב-Chat) במאפיינים של המשתמש. כך, כשהסוכן יהיה מוכן להשיב, הוא יידע בדיוק לאיזו שיחה לפרסם את ההודעה. - העברה לסוכן: הפונקציה קוראת ל-
requestAgent, ומעבירה את ההודעה של המשתמש ללוגיקה המרכזית שמטפלת בתקשורת עם ה-API.
...
// Service that handles Google Chat operations.

// Handle incoming Google Chat message events, actions will be taken via Google Chat API calls
function onMessage(event) {
  if (isInDebugMode()) {
    console.log(`MESSAGE event received (Chat): ${JSON.stringify(event)}`);
  }
  // Extract data from the event.
  const chatEvent = event.chat;
  setChatConfig(chatEvent.messagePayload.space.name);

  // Request AI agent to answer the message
  requestAgent(chatEvent.messagePayload.message);
  // Respond with an empty response to the Google Chat platform to acknowledge execution
  return null;
}

// --- Utility functions ---

// The Chat direct message (DM) space associated with the user
const SPACE_NAME_PROPERTY = "DM_SPACE_NAME"

// Sets the Chat DM space name for subsequent operations.
function setChatConfig(spaceName) {
  const userProperties = PropertiesService.getUserProperties();
  userProperties.setProperty(SPACE_NAME_PROPERTY, spaceName);
  console.log(`Space is set to ${spaceName}`);
}

// Retrieved the Chat DM space name to sent messages to.
function getConfiguredChat() {
  const userProperties = PropertiesService.getUserProperties();
  return userProperties.getProperty(SPACE_NAME_PROPERTY);
}

// Finds the Chat DM space name between the Chat app and the given user.
function findChatAppDm(userName) {
  return Chat.Spaces.findDirectMessage(
    { 'name': userName },
    {'Authorization': `Bearer ${getAddonCredentials().getAccessToken()}`}
  ).name;
}

// Creates a Chat message in the configured space.
function createMessage(message) {
  const spaceName = getConfiguredChat();
  console.log(`Creating message in space ${spaceName}...`);
  return Chat.Spaces.Messages.create(
    message,
    spaceName,
    {},
    {'Authorization': `Bearer ${getAddonCredentials().getAccessToken()}`}
  ).name;
}
Sidebar.gs
הקוד הבא יוצר את סרגל הצד ב-Gmail ומקבל את ההקשר של האימייל.
- בניית ממשק המשתמש:
createSidebarCardבונה את הממשק החזותי באמצעות Workspace Card Service. הוא יוצר פריסה פשוטה עם אזור להזנת טקסט ולחצן 'שליחת הודעה'. - הבנת ההקשר של האימייל: ב-
handleSendMessage, הקוד בודק אם המשתמש צופה כרגע באימייל (event.gmail.messageId). אם כן, הוא מאחזר בצורה מאובטחת את הנושא ואת גוף האימייל ומוסיף אותם להנחיה של המשתמש. - הצגת התוצאה: אחרי שהסוכן מגיב, הקוד מעדכן את כרטיס סרגל הצד כדי להציג את התשובה.
...
// Service that handles Gmail operations.

// Triggered when the user opens the Gmail Add-on or selects an email.
function onAddonEvent(event) {
  // If this was triggered by a button click, handle it
  if (event.parameters && event.parameters.action === 'send') {
    return handleSendMessage(event);
  }

  // Otherwise, just render the default initial sidebar
  return createSidebarCard();
}

// Creates the standard Gmail sidebar card consisting of a text input and send button.
// Optionally includes an answer section if a response was generated.
function createSidebarCard(optionalAnswerSection) {
  const card = CardService.newCardBuilder();
  const actionSection = CardService.newCardSection();

  // Create text input for the user's message
  const messageInput = CardService.newTextInput()
    .setFieldName("message")
    .setTitle("Message")
    .setMultiline(true);

  // Create action for sending the message
  const sendAction = CardService.newAction()
    .setFunctionName('onAddonEvent')
    .setParameters({ 'action': 'send' });

  const sendButton = CardService.newTextButton()
    .setText("Send message")
    .setTextButtonStyle(CardService.TextButtonStyle.FILLED)
    .setOnClickAction(sendAction);

  actionSection.addWidget(messageInput);
  actionSection.addWidget(CardService.newButtonSet().addButton(sendButton));

  card.addSection(actionSection);

  // Attach the response at the bottom if we have one
  if (optionalAnswerSection) {
    card.addSection(optionalAnswerSection);
  }

  return card.build();
}

// Handles clicks from the Send message button.
function handleSendMessage(event) {
  const commonEventObject = event.commonEventObject || {};
  const formInputs = commonEventObject.formInputs || {};
  const messageInput = formInputs.message;

  let userMessage = "";
  if (messageInput && messageInput.stringInputs && messageInput.stringInputs.value.length > 0) {
    userMessage = messageInput.stringInputs.value[0];
  }

  if (!userMessage || userMessage.trim().length === 0) {
    return CardService.newActionResponseBuilder()
      .setNotification(CardService.newNotification().setText("Please enter a message."))
      .build();
  }

  let finalQueryText = `USER MESSAGE TO ANSWER: ${userMessage}`;

  // If we have an email selected in Gmail, append its content as context
  if (event.gmail && event.gmail.messageId) {
    try {
      GmailApp.setCurrentMessageAccessToken(event.gmail.accessToken);
      const message = GmailApp.getMessageById(event.gmail.messageId);

      const subject = message.getSubject();
      const bodyText = message.getPlainBody() || message.getBody();

      finalQueryText += `\n\nEMAIL THE USER HAS OPENED ON SCREEN:\nSubject: ${subject}\nBody:\n---\n${bodyText}\n---`;
    } catch (e) {
      console.error("Could not fetch Gmail context: " + e);
      // Invalidate the token explicitly so the next prompt requests the missing scopes
      ScriptApp.invalidateAuth();

      CardService.newAuthorizationException()
        .setResourceDisplayName("Enterprise AI")
        .setAuthorizationUrl(ScriptApp.getAuthorizationUrl())
        .throwException();
    }
  }

  try {
    const response = queryAgent({ text: finalQueryText });

    // We leverage the 'showdown' library to parse the LLM's Markdown output into HTML
    // We also substitute markdown listings with arrows and adjust newlines for clearer rendering in the sidebar
    let displayedText = substituteListingsFromMarkdown(response.text);
    displayedText = new showdown.Converter().makeHtml(displayedText).replace(/\n/g, '\n\n');

    const textParagraph = CardService.newTextParagraph();
    textParagraph.setText(displayedText);

    const answerSection = CardService.newCardSection()
      .addWidget(textParagraph);

    const updatedCard = createSidebarCard(answerSection);

    return CardService.newActionResponseBuilder()
      .setNavigation(CardService.newNavigation().updateCard(updatedCard))
      .build();

  } catch (err) {
    return CardService.newActionResponseBuilder()
      .setNotification(CardService.newNotification().setText("Error fetching response: " + err.message))
      .build();
  }
}
...
AgentHandler.gs
הקוד הבא מתזמר את הקריאה ל-Vertex AI API.
- מבצע תזמור של הקריאה ל-API:
queryAgentהוא הגשר בין התוסף לבין Vertex AI Agent Engine. הוא יוצר בקשה שכוללת את השאילתה של המשתמש ואת אסימון האימות במצב. - התשובה מוזרמת: מכיוון שלוקח זמן לקבל תשובה מהסוכן, נעשה שימוש ב-
streamQueryAPI עם Server-Sent Events (SSE). הקוד אוסף את התשובה בחלקים ומרכיב מחדש את התשובה המלאה.
...
// Service that handles Vertex AI Agent operations.

// Submits a query to the AI agent and returns the response string synchronously
function queryAgent(input) {
 let systemPrompt = "SYSTEM PROMPT START Do not respond with tables but use bullet points instead." +
   " Do not ask the user follow-up questions or converse with them as history is not kept in this interface." +
   " SYSTEM PROMPT END\n\n";

 const requestPayload = {
   "class_method": "async_stream_query",
   "input": {
     "user_id": "vertex_ai_add_on",
     "message": { "role": "user", "parts": [{ "text": systemPrompt + input.text }] },
     "state_delta": {
       "enterprise-ai_999": `${ScriptApp.getOAuthToken()}`
     }
   }
 };

 const responseContentText = UrlFetchApp.fetch(
   `https://${getLocation()}-aiplatform.googleapis.com/v1/${getReasoningEngine()}:streamQuery?alt=sse`,
   {
     method: 'post',
     headers: { 'Authorization': `Bearer ${ScriptApp.getOAuthToken()}` },
     contentType: 'application/json',
     payload: JSON.stringify(requestPayload),
     muteHttpExceptions: true
   }
 ).getContentText();
  if (isInDebugMode()) {
   console.log(`Response: ${responseContentText}`);
 }

 const events = responseContentText.split('\n').map(s => s.replace(/^data:\s*/, '')).filter(s => s.trim().length > 0);
 console.log(`Received ${events.length} agent events.`);

 let author = "default";
 let answerText = "";
 for (const eventJson of events) {
   if (isInDebugMode()) {
     console.log("Event: " + eventJson);
   }
   const event = JSON.parse(eventJson);

   // Retrieve the agent responsible for generating the content
   author = event.author;

   // Ignore events that are not useful for the end-user
   if (!event.content) {
     console.log(`${author}: internal event`);
     continue;
   }

   // Handle text answers
   const parts = event.content.parts || [];
   const textPart = parts.find(p => p.text);
   if (textPart) {
     answerText += textPart.text;
   }
 }
 return { author: author, text: answerText };
}
...
פריסת סוכן ב-Vertex AI Agent Engine
- במסוף, פותחים את ספריית
solutions/enterprise-ai-agentמהמקורות שהורדו בשלבים הקודמים ומריצים את הפקודה:
# 1. Create and activate a new virtual environment
deactivate
python3 -m venv .venv
source .venv/bin/activate

# 2. Install poetry and project dependencies
pip install poetry
poetry install

# 3. Deploy the agent
adk deploy agent_engine \
  --project=$(gcloud config get-value project) \
  --region=us-central1 \
  --display_name="Enterprise AI" \
  enterprise_ai
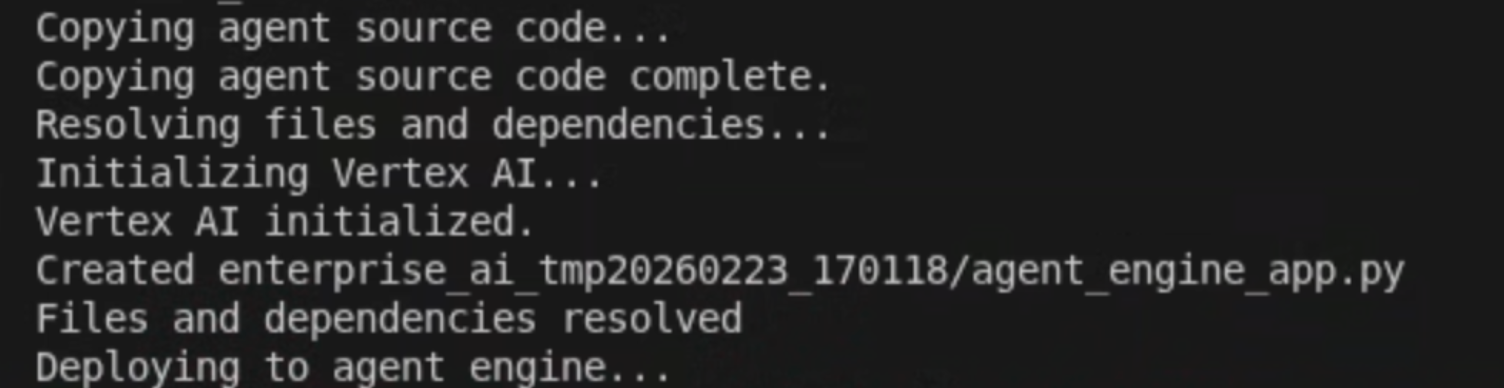
- כשרואים את השורה Deploying to agent engine... ביומנים, פותחים טרמינל חדש ומריצים את הפקודה הבאה כדי להוסיף את ההרשאות הנדרשות ל-Vertex AI Reasoning Engine Service Agent:
# 1. Get the current Project ID
PROJECT_ID=$(gcloud config get-value project)

# 2. Extract the Project Number for that ID
PROJECT_NUMBER=$(gcloud projects describe $PROJECT_ID --format='value(projectNumber)')

# 3. Construct the Service Account name
SERVICE_ACCOUNT="service-${PROJECT_NUMBER}@gcp-sa-aiplatform-re.iam.gserviceaccount.com"

# 4. Apply the IAM policy binding
gcloud projects add-iam-policy-binding $PROJECT_ID \
     --member="serviceAccount:$SERVICE_ACCOUNT" \
     --role="roles/discoveryengine.viewer"
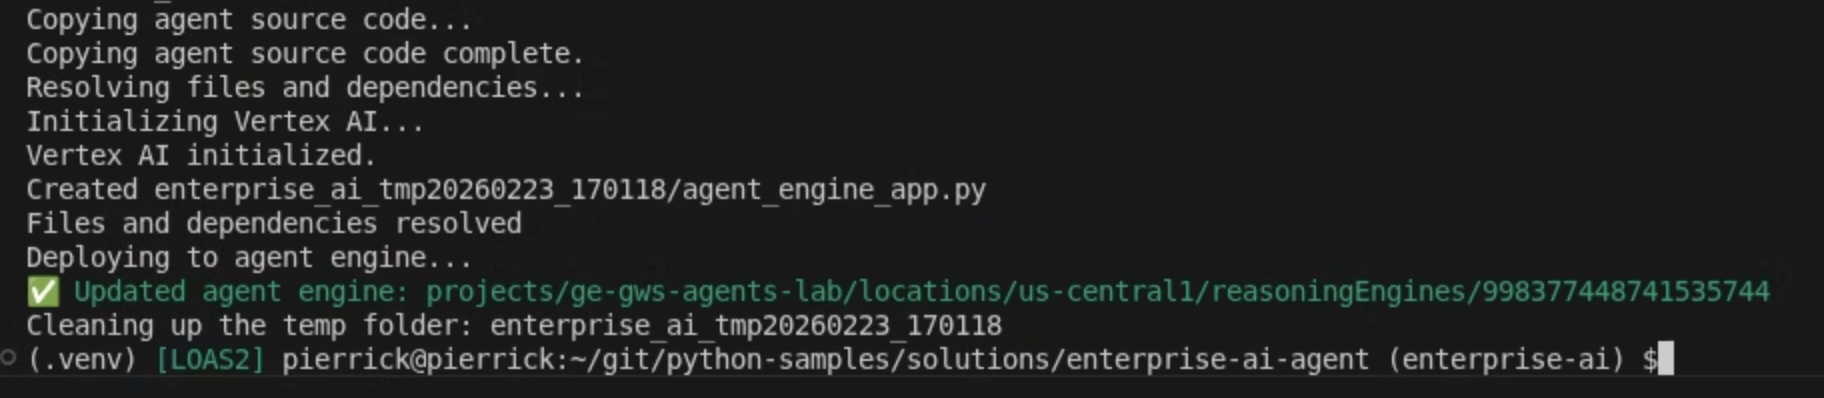
- מחכים שהפקודה adk deploy תושלם, ואז מעתיקים את שם המשאב של הסוכן החדש שהופעל מ<b>פלט הפקודה</b> בצבע ירוק.
Initiate service account
יוצרים חשבון שירות ייעודי כדי לאשר את הפעולות בצד השרת של התוסף.
במסוף Google Cloud, פועלים לפי השלבים הבאים:
- לוחצים על תפריט ☰ > IAM & Admin > Service Accounts > + Create service account (תפריט ☰ > IAM ואדמין > חשבונות שירות > + יצירת חשבון שירות).
- מגדירים את שם חשבון השירות לערך
vertexai-add-on.
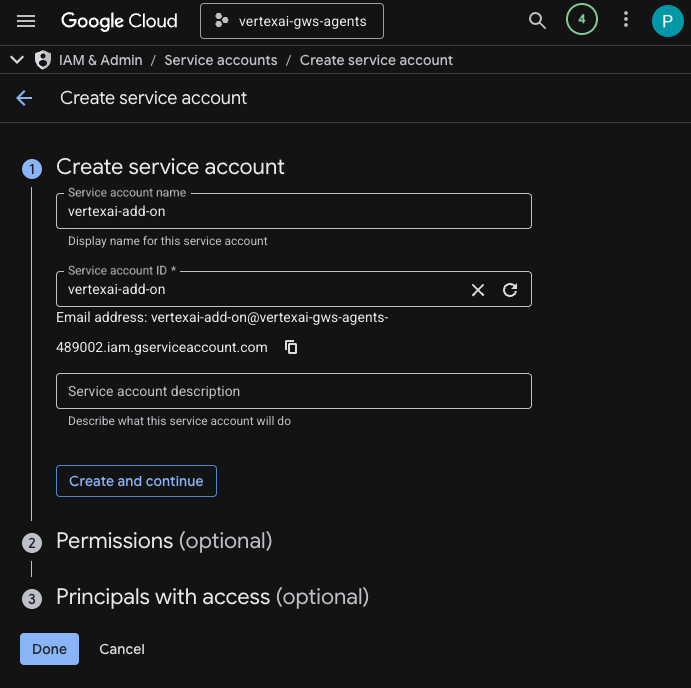
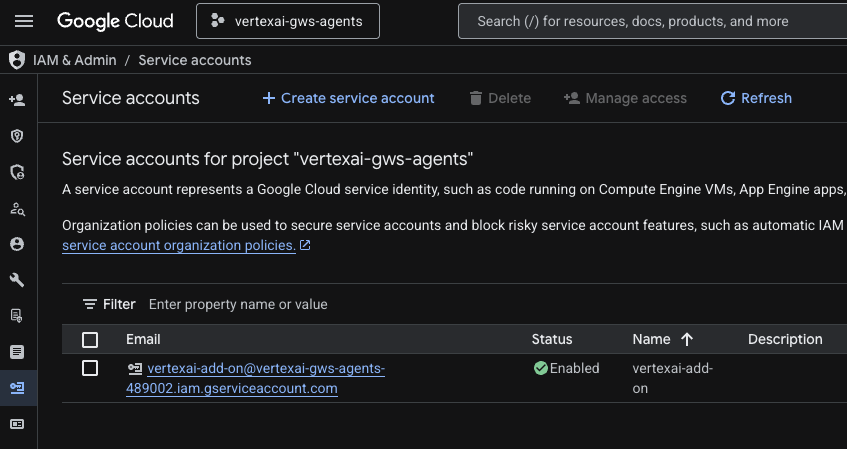
- לוחצים על סיום. תועברו לדף Service accounts ותוכלו לראות את חשבון השירות שיצרתם.
- בוחרים את חשבון השירות החדש שנוצר ואז את הכרטיסייה Keys.
- לוחצים על Add key ואז על Create new key.
- בוחרים באפשרות JSON ולוחצים על Create.

- תיבת הדו-שיח תיסגר וזוג המפתחות הציבורי/פרטי שנוצר יורד אוטומטית לסביבה המקומית שלכם כקובץ JSON.
יצירה והגדרה של פרויקט Apps Script
יוצרים פרויקט חדש ב-Apps Script כדי לארח את קוד התוסף ומגדירים את מאפייני החיבור שלו.
- כדי לפתוח את פרויקט Apps Script של התוסף Enterprise AI, לוחצים על הלחצן הבא:
- לוחצים על סקירה כללית > יצירת עותק.
- בפרויקט Apps Script, לוחצים על הגדרות הפרויקט > עריכת מאפייני הסקריפט > הוספת מאפיין סקריפט כדי להוסיף מאפייני סקריפט.
- מגדירים את REASONING_ENGINE_RESOURCE_NAME לשם המשאב של סוכן Vertex AI שהועתק בשלבים הקודמים. הפורמט הוא:
projects/<PROJECT_NUMBER>/locations/us-central1/reasoningEngines/<AGENT_ID>
- מגדירים את APP_SERVICE_ACCOUNT_KEY למפתח ה-JSON מקובץ חשבון השירות שהורד בשלבים הקודמים.
- לוחצים על שמירת מאפייני סקריפט.
פריסה ב-Gmail וב-Chat
פורסים את התוסף כדי לבדוק אותו ישירות ב-Gmail וב-Google Chat.
בפרויקט Apps Script, פועלים לפי השלבים הבאים:
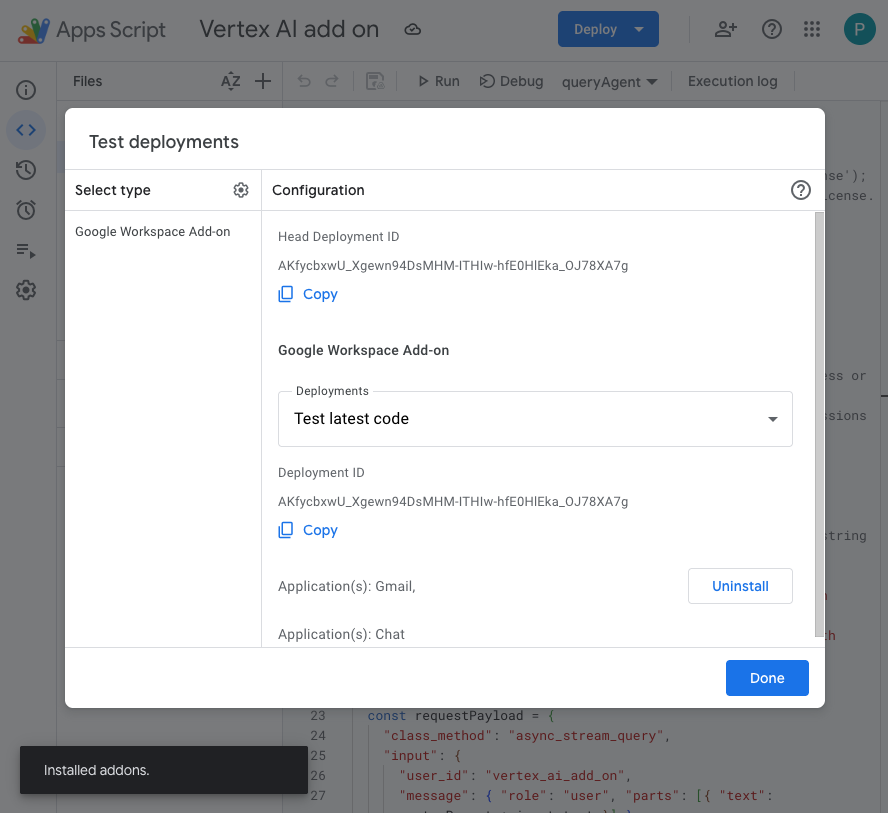
- לוחצים על Deploy > Test deployments (פריסה > בדיקת פריסות) ואז על Install (התקנה). היא זמינה עכשיו ב-Gmail.
- לוחצים על העתקה בקטע מזהה Head Deployment.
במסוף Google Cloud, פועלים לפי השלבים הבאים:
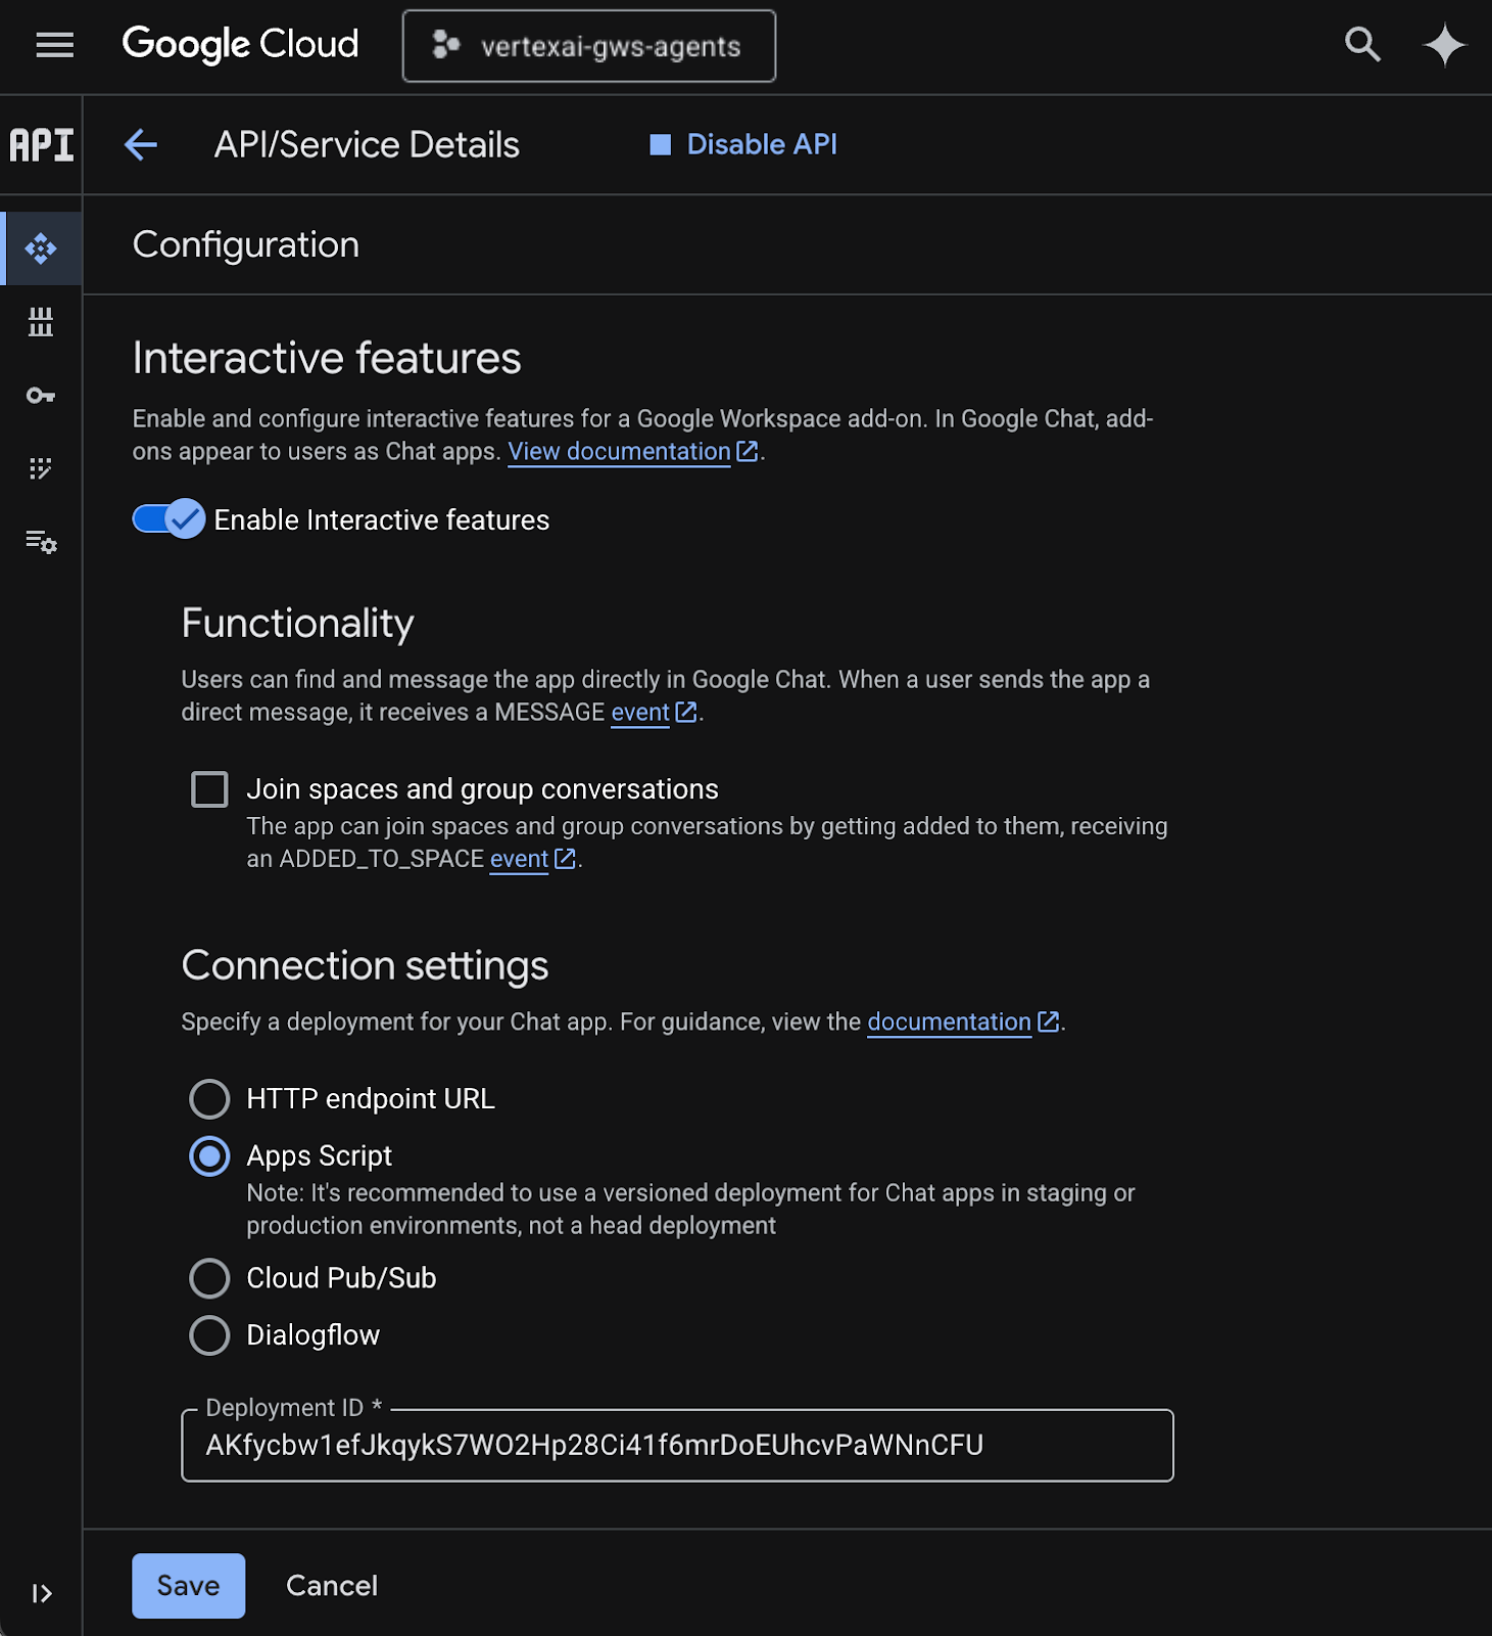
- מחפשים את
Google Chat APIבשדה החיפוש של Google Cloud, לוחצים על Google Chat API, לוחצים על Manage ואז על Configuration.
- בוחרים באפשרות הפעלה של תכונות אינטראקטיביות.
- מבטלים את הסימון של הצטרפות למרחבים ולשיחות קבוצתיות.
- בקטע הגדרות חיבור, בוחרים באפשרות Apps Script.
- מגדירים את מזהה הפריסה למזהה הפריסה של Head שהועתק בשלבים הקודמים.
- בקטע חשיפה, בוחרים באפשרות הפיכת אפליקציית הצ'אט הזו לזמינה לאנשים ולקבוצות ספציפיים בדומיין שלכם ב-Workspace ומזינים את כתובת האימייל.
- לוחצים על שמירה.
רוצים לנסות את התוסף?
כדי לוודא שהתוסף יכול לאחזר נתונים ולענות על שאלות בהקשר, מנהלים איתו אינטראקציה.
פותחים את Google Chat בכרטיסייה חדשה ומבצעים את השלבים הבאים:
- פותחים צ'אט ישיר עם אפליקציית Chat Vertex AI.
- לוחצים על הגדרה ופועלים לפי שלבי האימות.
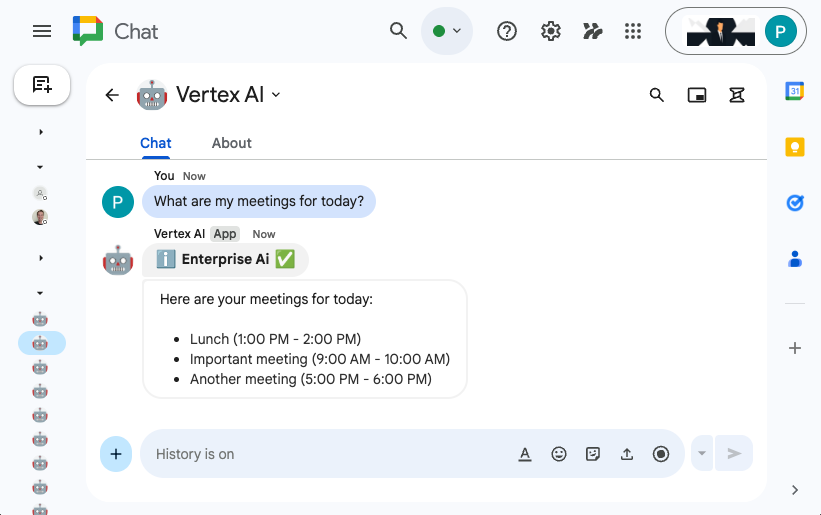
- מקלידים
What are my meetings for today?ומקישים עלenter. אפליקציית הצ'אט של Vertex AI אמורה להשיב עם התוצאות.
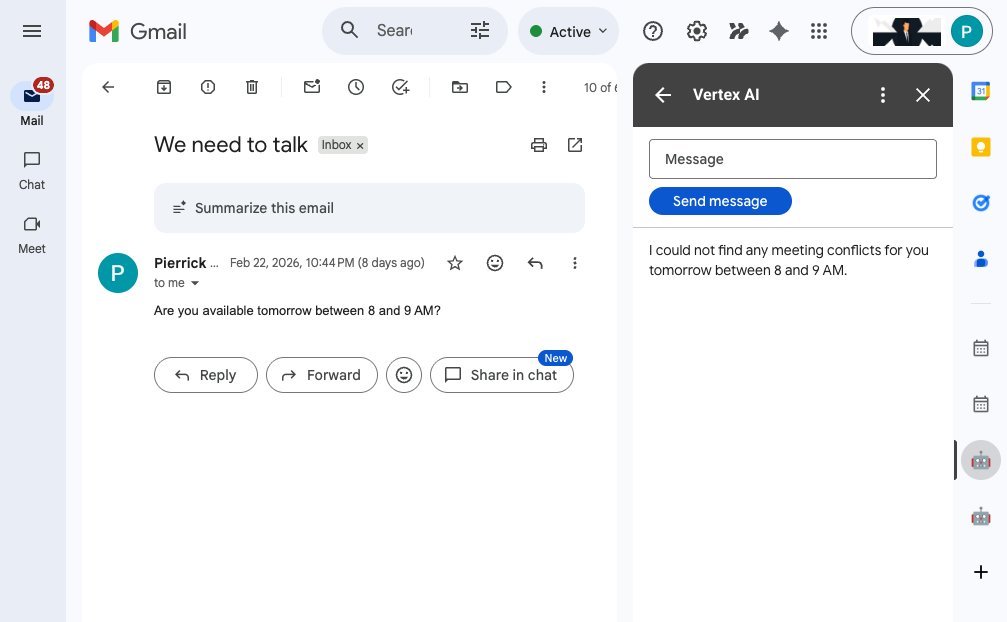
פותחים את Gmail בכרטיסייה חדשה ומבצעים את השלבים הבאים:
- שולחים לעצמכם אימייל עם נושא שמוגדר ל-
We need to talkוגוף שמוגדר ל-Are you available today between 8 and 9 AM? - פותחים את הודעת האימייל החדשה שקיבלתם.
- פותחים את סרגל הצד של התוסף Vertex AI.
- מגדירים את ההודעה לערך
Do I have any meeting conflicts? - לוחצים על שליחת הודעה.
- התשובה מוצגת אחרי הכפתור.
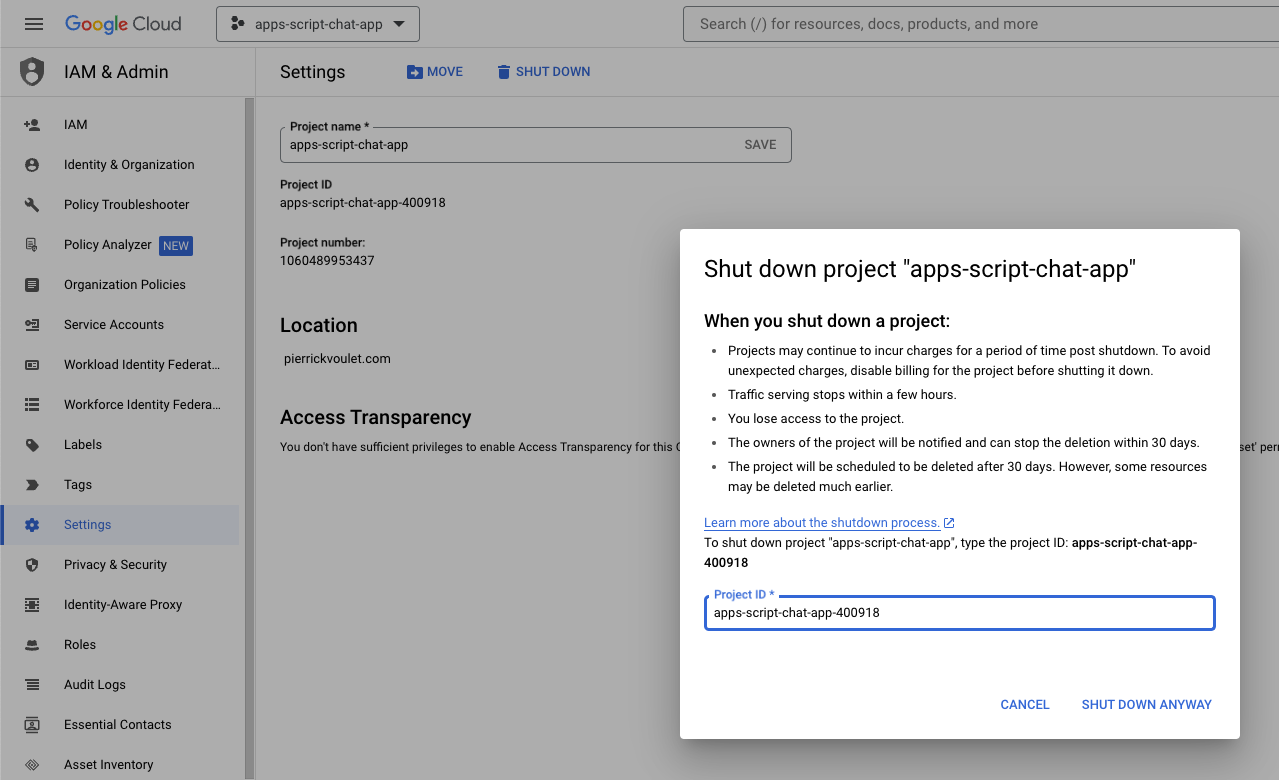
6. הסרת המשאבים
מחיקת פרויקט ב-Google Cloud
כדי להימנע מחיובים בחשבון Google Cloud על המשאבים שבהם השתמשתם ב-Codelab הזה, מומלץ למחוק את הפרויקט בענן ב-Google Cloud.
במסוף Google Cloud, פועלים לפי השלבים הבאים:
- לוחצים על תפריט ☰ > IAM ואדמין > הגדרות.
- לוחצים על כיבוי.
- מזינים את מזהה הפרויקט.
- לוחצים על Shut down anyway (כיבוי בכל זאת).
7. מזל טוב
מעולה! יצרתם פתרונות שמנצלים את היתרונות של שילוב Vertex AI ו-Google Workspace כדי לעזור לעובדים!
מה השלב הבא?
ב-codelab הזה אנחנו מציגים רק את תרחישי השימוש הנפוצים ביותר, אבל יש הרבה תחומים להרחבה שכדאי לכם לשקול בפתרונות שלכם, כמו:
- שימוש בכלים למפתחים מבוססי-AI כמו Gemini CLI ו-Antigravity.
- שילוב עם מסגרות וכלים אחרים של סוכנים, כמו MCP מותאם אישית, קריאות מותאמות אישית לפונקציות וממשקי משתמש גנרטיביים.
- שילוב עם מודלים אחרים של AI, כולל מודלים בהתאמה אישית, שמתארחים בפלטפורמות ייעודיות כמו Vertex AI.
- שילוב עם סוכנים אחרים, שמתארחים בפלטפורמות ייעודיות כמו Dialogflow או על ידי צדדים שלישיים דרך Cloud Marketplace.
- פרסום סוכנים ב-Cloud Marketplace כדי לאפשר לצוותים, לארגונים או למשתמשים ציבוריים להשתמש בהם.
מידע נוסף
יש הרבה מקורות מידע למפתחים, כמו סרטונים ב-YouTube, אתרי תיעוד, דוגמאות קוד ומדריכים:
- מרכז המפתחים של Google Cloud
- מוצרים נתמכים | שרתים של Google Cloud MCP
- A2UI
- Model Garden ב-Vertex AI | Google Cloud
- סקירה כללית של Vertex AI Agent Engine
- קבלת תשובות ופריטים למעקב | חיפוש מבוסס-Vertex AI | תיעוד של Google Cloud
- הצעת סוכני AI דרך Google Cloud Marketplace
- ערוץ YouTube למפתחי Google Workspace – ברוכים הבאים מפתחים!
- אתר המפתחים של Google Workspace
- מאגר GitHub לכל הדוגמאות של תוספים ל-Google Workspace