
1. 事前準備
什麼是 Vertex AI?
Vertex AI 是 Google Cloud 的統合式開發平台,可建構、部署及擴充企業級 AI 代理程式和應用程式。這個平台提供進階工具,可供開發人員和資料科學家設計自訂代理工作流程,並與全球規模的基礎架構深度整合。
- 存取 Model Garden:從超過 150 種基礎模型中選擇,包括完整的 Gemini 系列、第三方模型和專門的開放原始碼模型,找出適合特定代理程式工作的模型。
- 建構複雜的自動化調度管理:Vertex AI 提供框架,可設計自主代理程式,運用推論功能規劃及執行多步驟任務,並呼叫外部 API。
- 企業級基準:將代理連結至即時業務資料,包括高效能 RAG (檢索增強生成) 技術,以消除幻覺並確保事實準確度。
- DevOps:透過強大的 SDK、API 和評估工具,將代理程式開發作業無縫整合至現有的 CI/CD 管道,大規模評估代理程式效能和安全性。
- 工業級安全防護:Vertex AI 可確保用於訓練或建立基準的客戶資料維持私密、經過加密,並符合全球資料落地要求。
- 最佳化基礎架構:在 Google 世界級的 TPU 和 GPU 叢集上輕鬆擴充代理程式工作負載,即使是全球最嚴苛的應用程式,也能確保低延遲效能。

什麼是 Google Workspace?
Google Workspace 是一套雲端式效率提升與協作解決方案,適用於個人、學校和企業:
- 通訊:專業電子郵件服務 (Gmail)、視訊會議 (Meet) 和團隊訊息 (Chat)。
- 內容製作:撰寫文件 (Google 文件)、建立試算表 (Google 試算表) 及設計簡報 (Google 簡報) 的工具。
- 整理:共用日曆 (日曆) 和數位筆記 (Keep)。
- 儲存空間:集中式雲端空間,可安全地儲存及共用檔案 (雲端硬碟)。
- 管理:管理控制項,可管理使用者和安全性設定 (Workspace 管理控制台)。
自訂整合的類型?
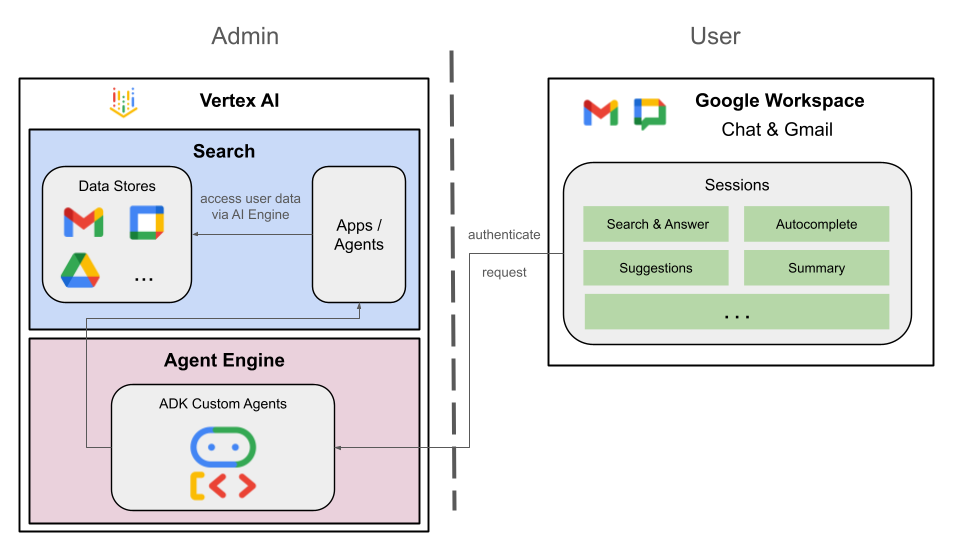
Google Workspace 和 Vertex AI 形成強大的回饋循環,Workspace 提供即時資料和協作情境,Vertex AI 則提供自動化智慧工作流程所需的模型、代理推論和自動化調度管理。
- 智慧連線:代理程式可透過 Google 管理的資料儲存空間、API 和 MCP 伺服器 (Google 管理和自訂),安全且順暢地存取 Workspace 資料,並代表使用者採取行動。
- 自訂代理:團隊可使用無程式碼設計工具或專業程式碼架構,根據管理員控管的 Workspace 資料和動作,建構專用代理。
- 原生整合:無論是透過專屬 UI 元件或背景程序,Workspace 外掛程式都能彌合 AI 系統與 Chat 和 Gmail 等應用程式之間的差距。代理人可直接在使用者所在位置提供即時協助,並根據情境提供適當的幫助。
結合 Google Workspace 強大的生產力生態系統與 Vertex AI 先進的代理功能,機構可透過自訂的資料輔助 AI 代理,在團隊每天使用的工具中自動執行複雜工作流程,進而轉型營運。
必要條件
如要在自己的環境中完成所有步驟,您需要:
- 對 Google Cloud 和 Python 有基本瞭解。
- 您擁有且已啟用計費功能的 Google Cloud 專案。如要確認現有專案是否已啟用計費功能,請參閱「確認專案的帳單狀態」。如要建立專案及設定帳單,請參閱「建立 Google Cloud 專案」。如要變更專案擁有權,請參閱「管理專案成員或變更專案擁有權」。
- 公司或學校專用 Google Workspace 帳戶,且可存取 Google Chat 並開啟智慧功能。
- 已安裝 Google Cloud CLI,並為您的 Google Cloud 雲端專案初始化。
- 已安裝 Python 3.11 以上版本,請參閱 Python 官方網站的說明。
建構目標
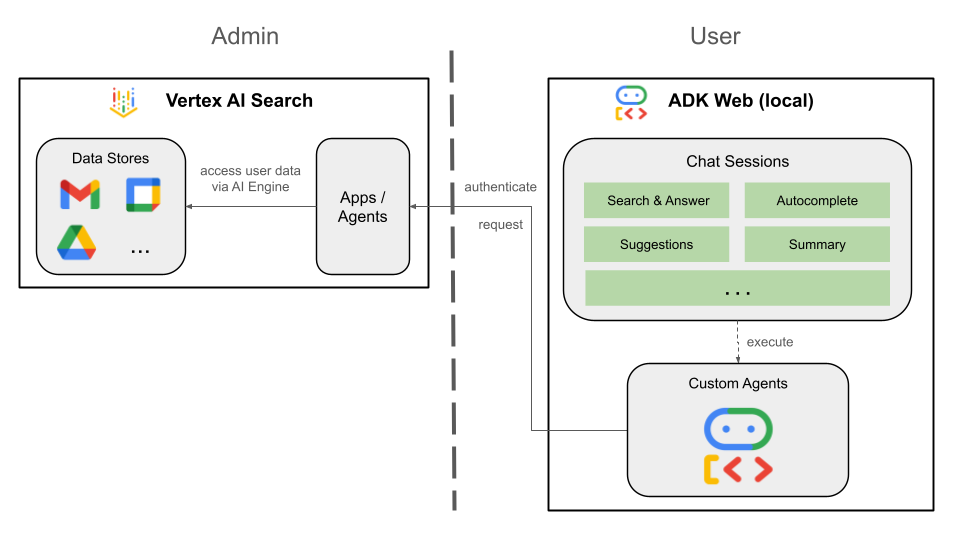
在本程式碼研究室中,我們將建構三種解決方案,並將 Vertex AI 代理與 Google Workspace 緊密整合。他們將展示可用於與資料、動作和 UI 互動的架構模式。
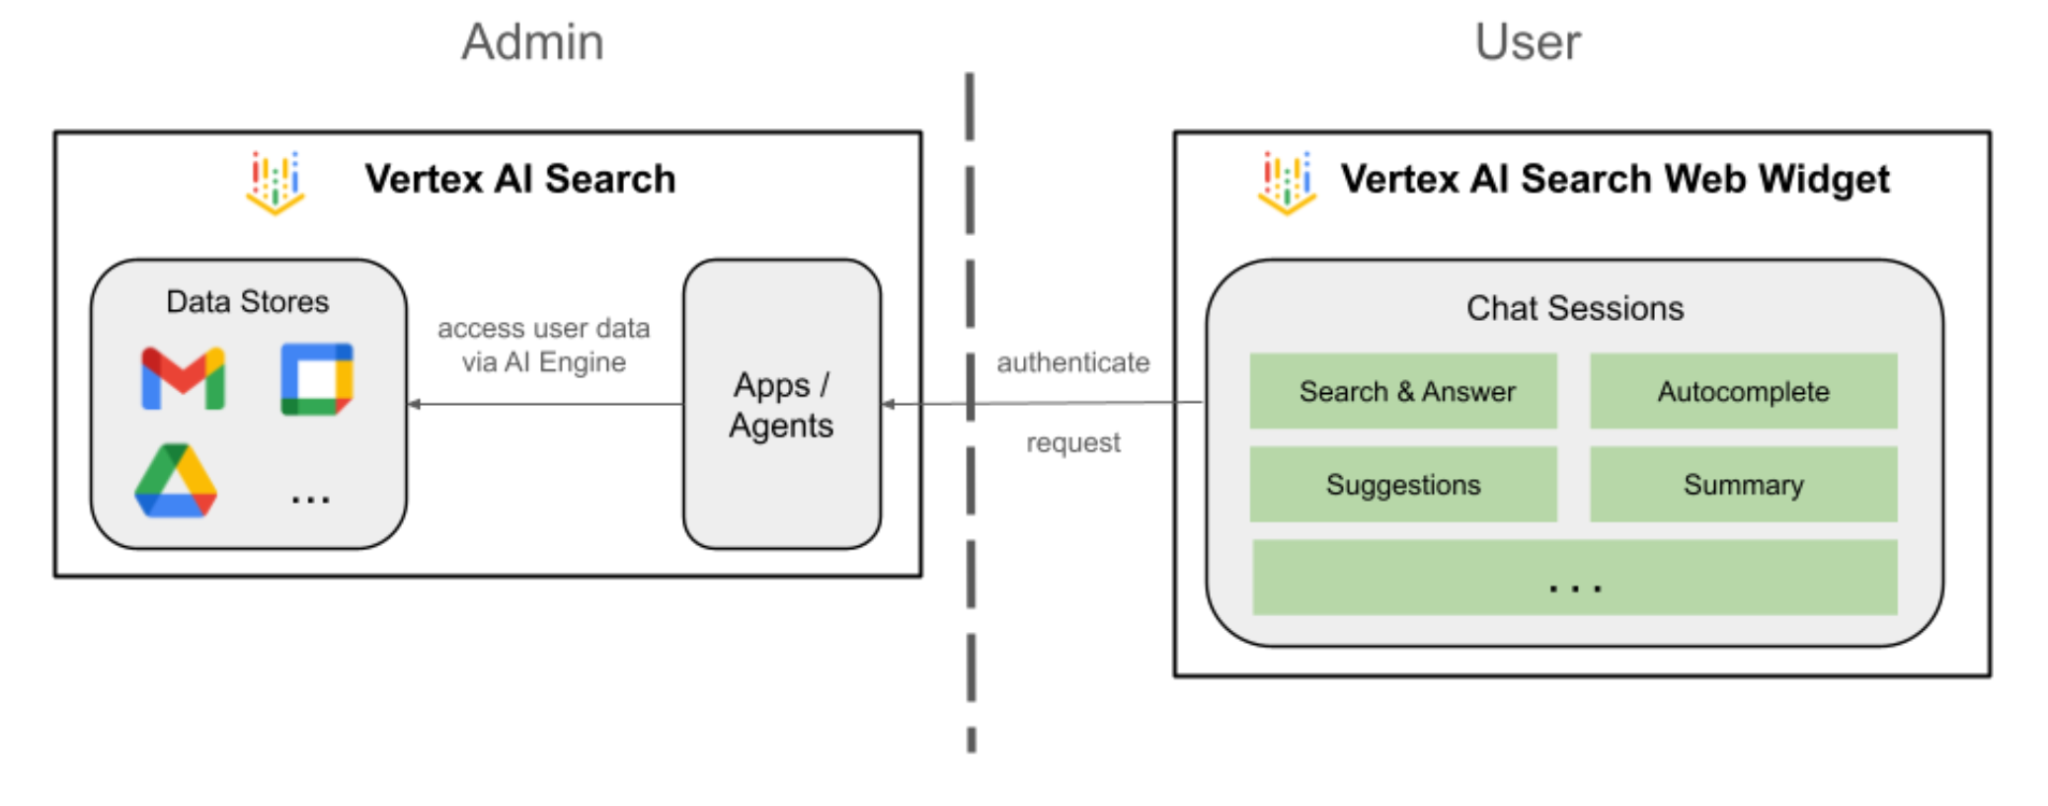
Vertex AI Search 應用程式
使用者可以透過自然語言,使用這個代理程式搜尋資料及執行 Workspace 動作。這項功能需要下列元素:
- 模型:Gemini。
- 資料和動作:Google Workspace (日曆、Gmail、雲端硬碟) 的 Vertex AI 資料儲存庫。
- 代理主機:Vertex AI Search。
- 使用者介面:Vertex AI Search 網頁小工具。
自訂代理程式
使用者可以透過自訂工具和規則,以自然語言搜尋資料及執行 Workspace 動作。這項功能需要下列元素:
- 模型:Gemini。
- 資料和動作:Google Workspace (日曆、Gmail、雲端硬碟) 適用的 Vertex AI 資料儲存庫、Google 管理的 Vertex AI Search Model Context Protocol (MCP) 伺服器、傳送 Google Chat 訊息的自訂工具函式 (透過 Google Chat API)。
- 代理建構工具:Agent Development Kit (ADK)。
- 代理主機:Vertex AI Agent Engine。
- 使用者介面:ADK Web。
以 Google Workspace 外掛程式的形式使用 Agent
使用者可以在 Workspace 應用程式 UI 中,以自然語言搜尋 Workspace 資料。這項功能需要下列元素:
- 模型:Gemini。
- 資料和動作:Google Workspace (日曆、Gmail、雲端硬碟) 適用的 Vertex AI 資料儲存庫、Google 管理的 Vertex AI Search Model Context Protocol (MCP) 伺服器、傳送 Google Chat 訊息的自訂工具函式 (透過 Google Chat API)。
- 代理建構工具:Agent Development Kit (ADK)。
- 代理主機:Vertex AI Agent Engine。
- 使用者介面:適用於 Chat 和 Gmail 的 Google Workspace 外掛程式 (可輕鬆擴充至日曆、雲端硬碟、文件、試算表和簡報)。
- Google Workspace 外掛程式:Apps Script、Vertex AI Agent Engine API、情境 (選取的 Gmail 郵件)。

學習目標
- Vertex AI Search 和 Google Workspace 之間的整合點,可啟用資料和動作。
- 在 Vertex AI 中建構自訂代理的選項。
- 使用者存取代理的方式,例如 Vertex AI Search 網頁小工具和 Google Workspace 應用程式。
輕鬆存取這個程式碼實驗室
2. 設定
建構解決方案前,我們必須先初始化專案的 Vertex AI 應用程式設定、啟用必要 API,以及建立 Vertex AI Workspace 資料儲存庫。
查看概念
Vertex AI 應用程式
Vertex AI 應用程式是 Google Cloud 上的全方位管理型解決方案,可整合機器學習模型 (例如生成式 AI 代理或搜尋引擎)、企業資料和專用工具,執行語意搜尋、內容生成或自動化客戶互動等複雜工作。
Vertex AI 資料儲存庫
Vertex AI 資料儲存庫是包含從第一方資料來源 (例如 Google Workspace) 或第三方應用程式 (例如 Jira 或 Shopify) 擷取資料的實體。含有第三方應用程式資料的資料儲存庫也稱為資料連接器。
啟動 Vertex AI 應用程式設定
初始化 Vertex AI 應用程式設定,啟用代理程式建立功能。
在新分頁中開啟 Google Cloud 控制台,然後按照下列步驟操作:
- 選取專案。
- 在 Google Cloud 搜尋欄位中,前往「AI Applications」
- 詳閱並同意條款後,按一下「繼續並啟用 API」。
- 前往「Settings」。
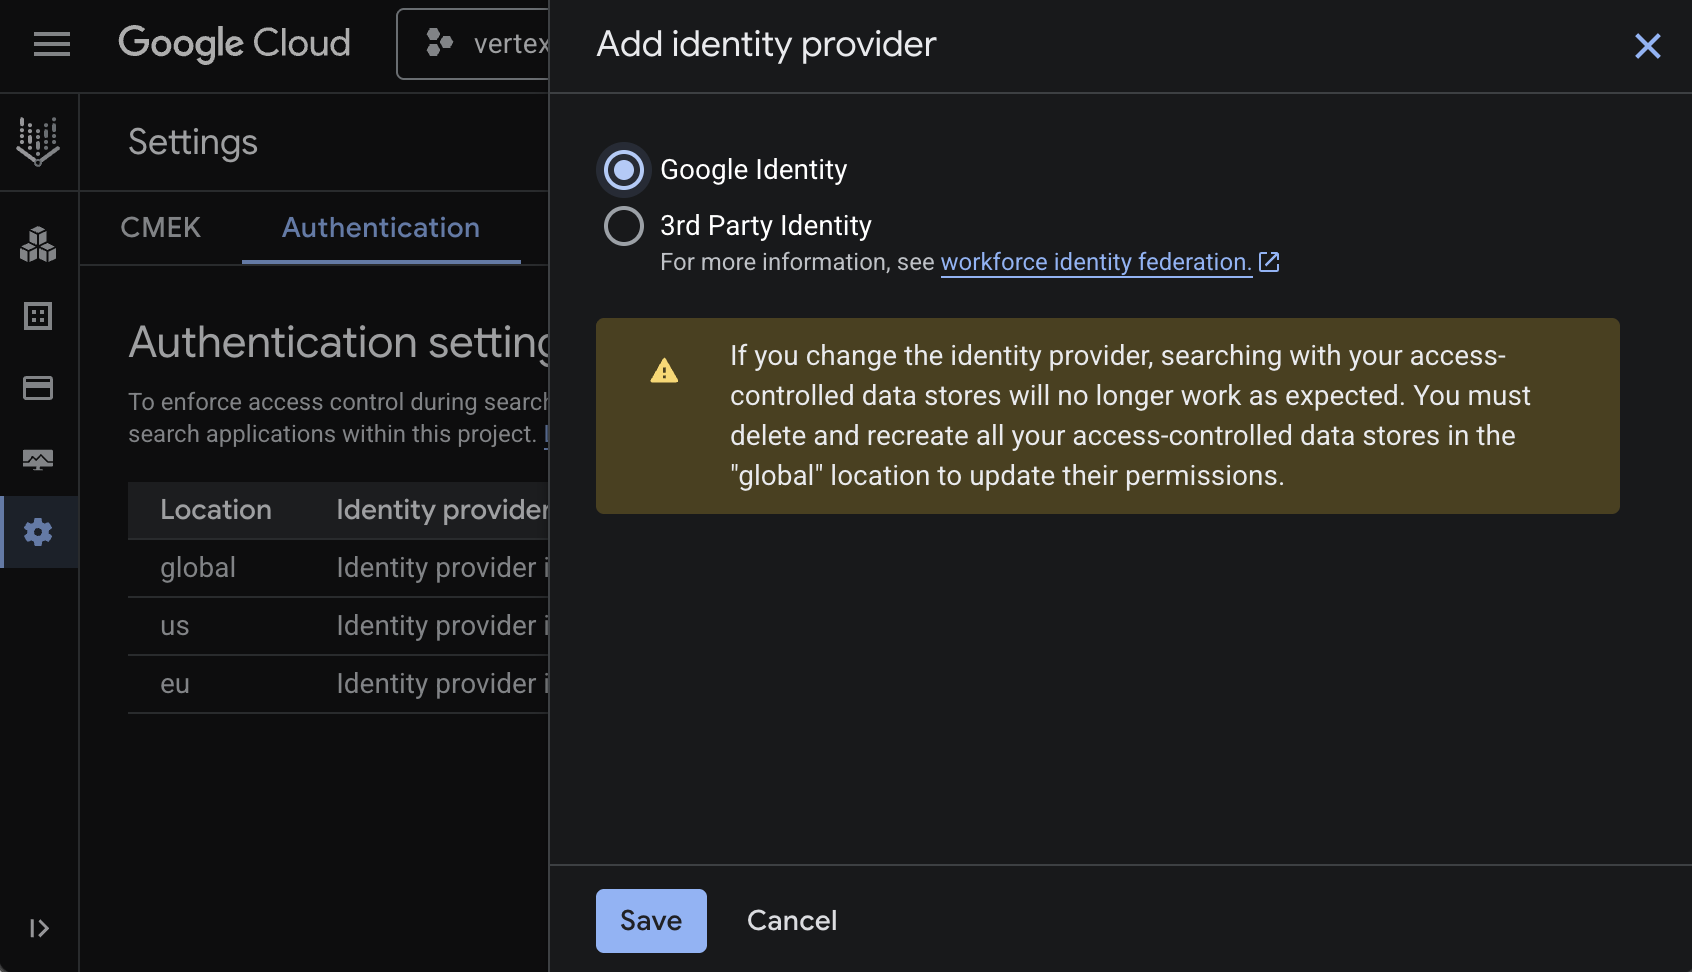
- 在「Authentication」分頁中,編輯「global」。
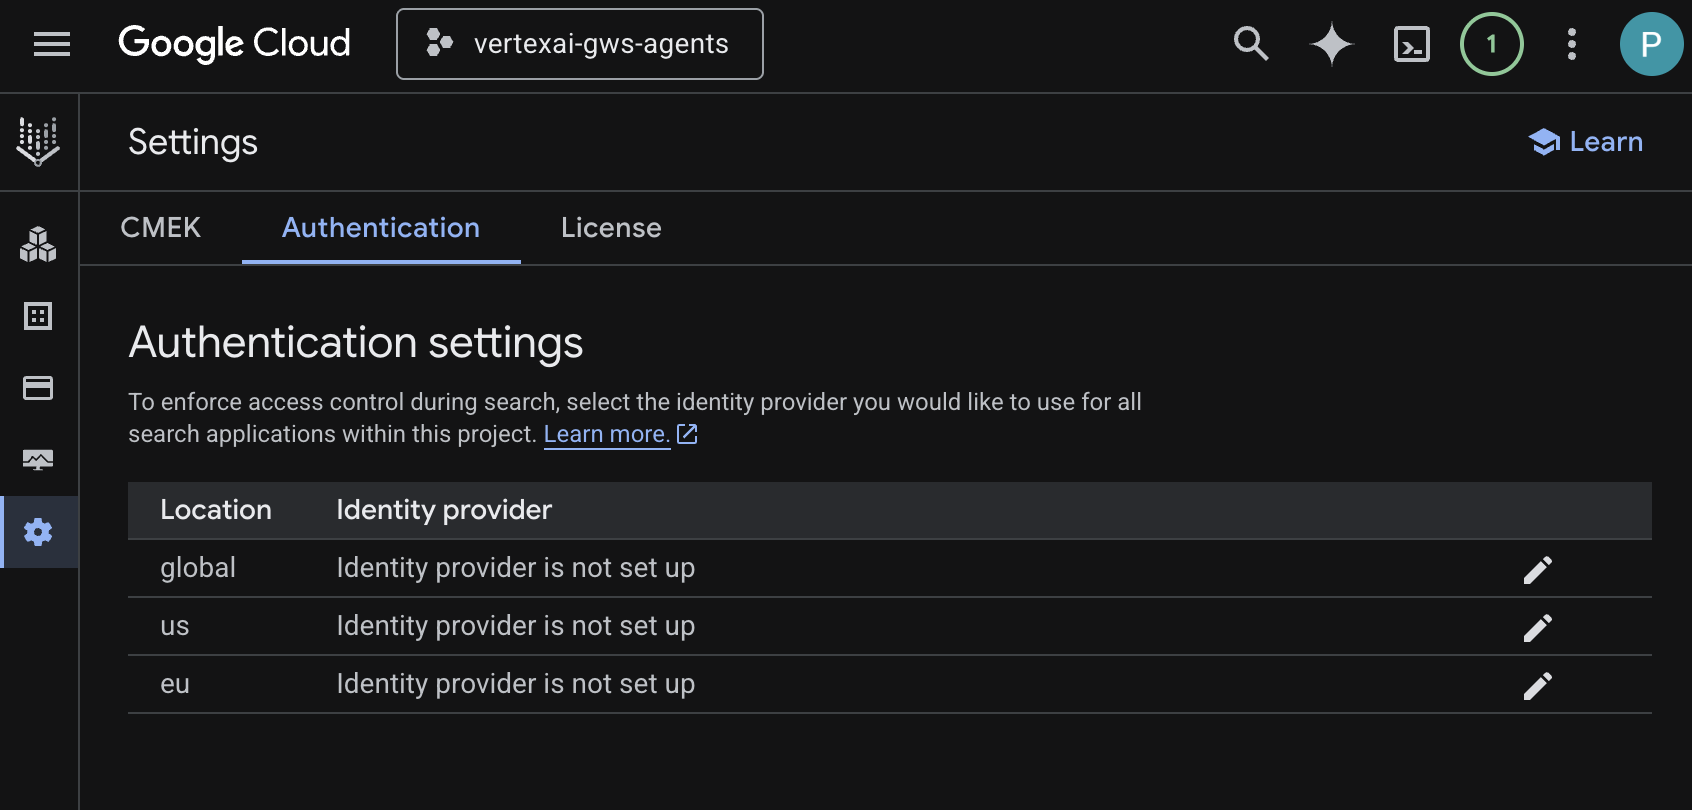
- 選取「Google Identity」,然後點按「儲存」。
啟用 API
Vertex AI Workspace 資料儲存庫需要啟用下列 API:
- 在 Google Cloud 控制台中,啟用 Calendar、Gmail 和 People API:
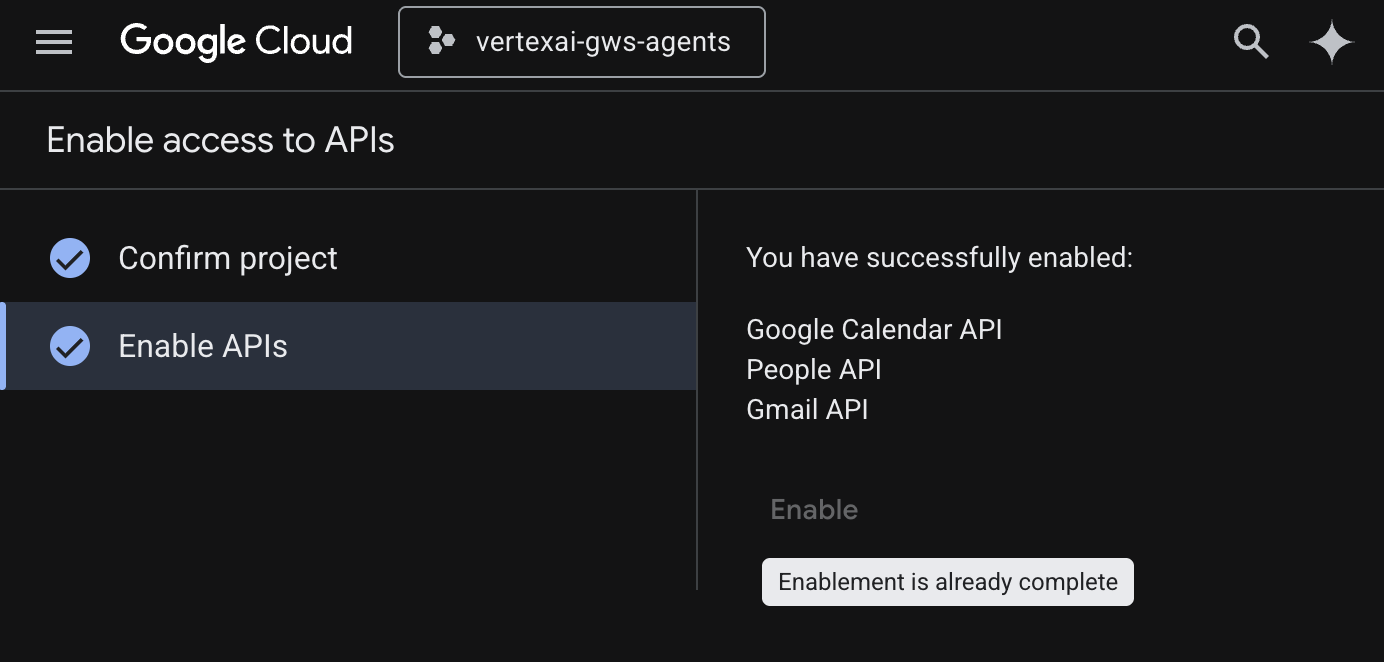
- 依序點選「選單」圖示 ☰ >「API 和服務」>「已啟用的 API 和服務」,然後確認「Google 日曆 API」、「Gmail API」和「People API」是否在清單中。
建立資料儲存庫
建立 Google 雲端硬碟資料儲存庫:
- 前往 Google Cloud 控制台的「AI Applications」,然後前往「Data Stores」。
- 點選「+ 建立資料儲存庫」。
- 在「來源」的「Google 雲端硬碟」下方,按一下「選取」。
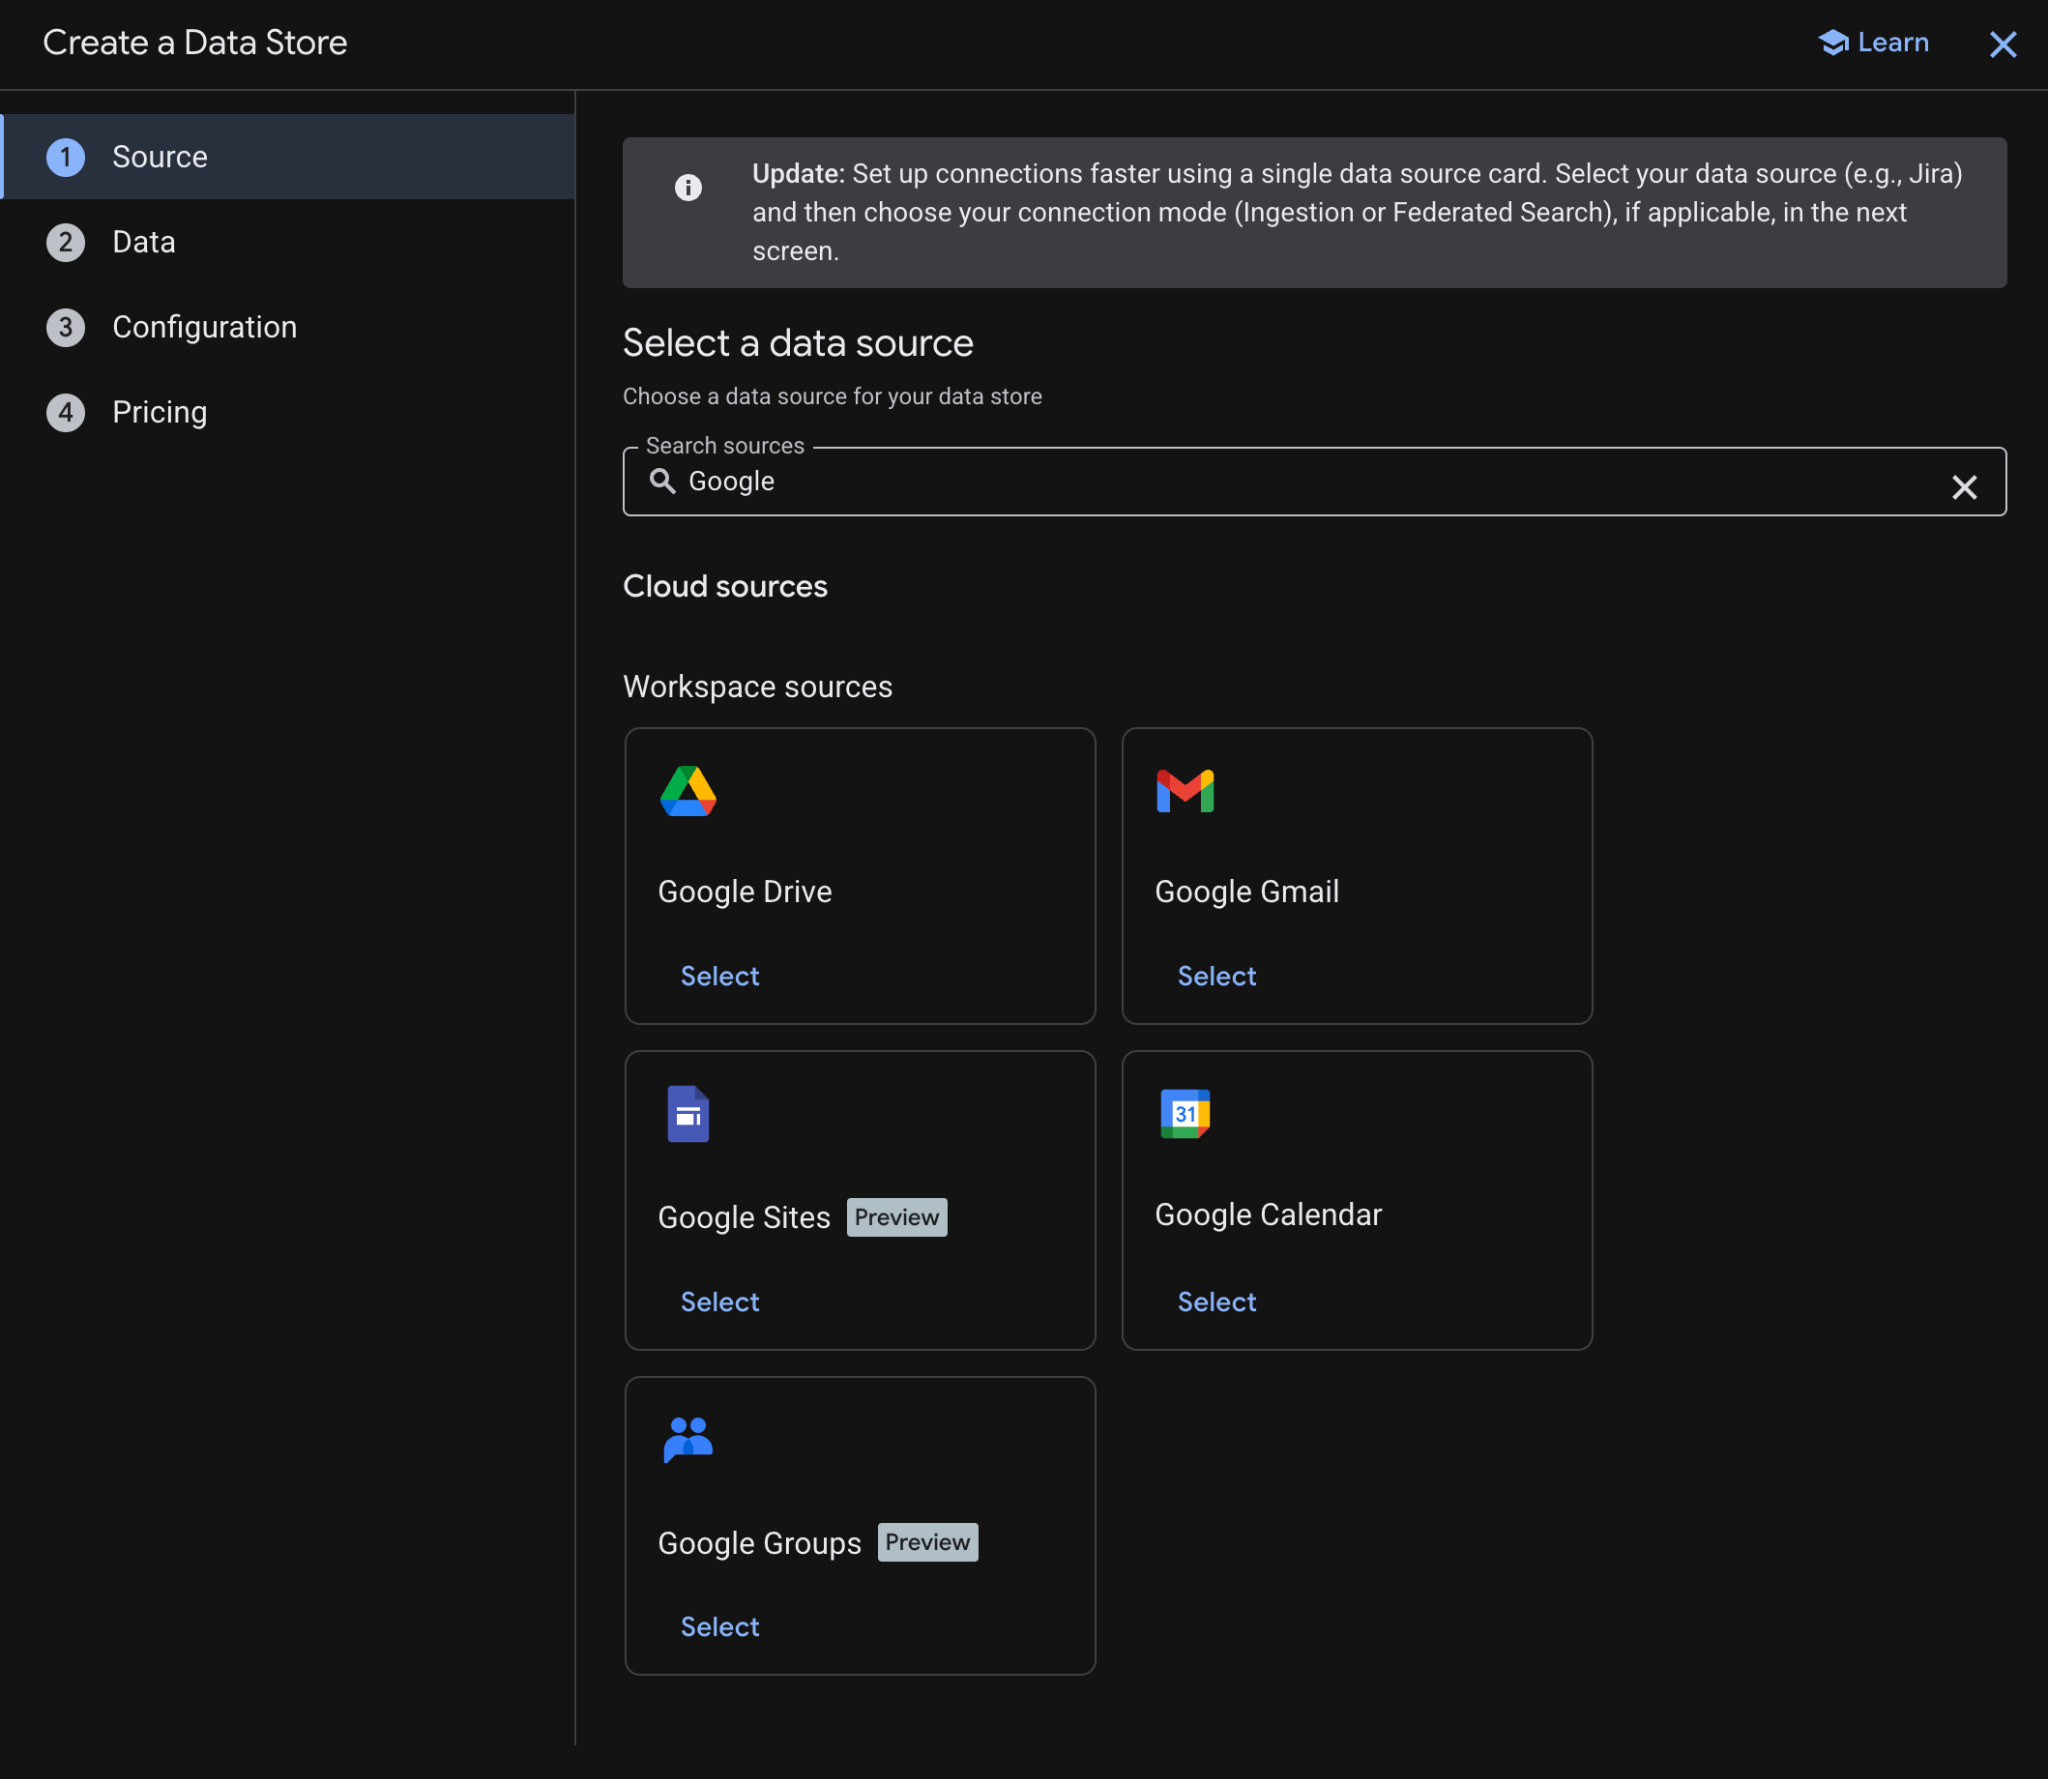
- 在「資料」中選取「全部」,然後按一下「繼續」。
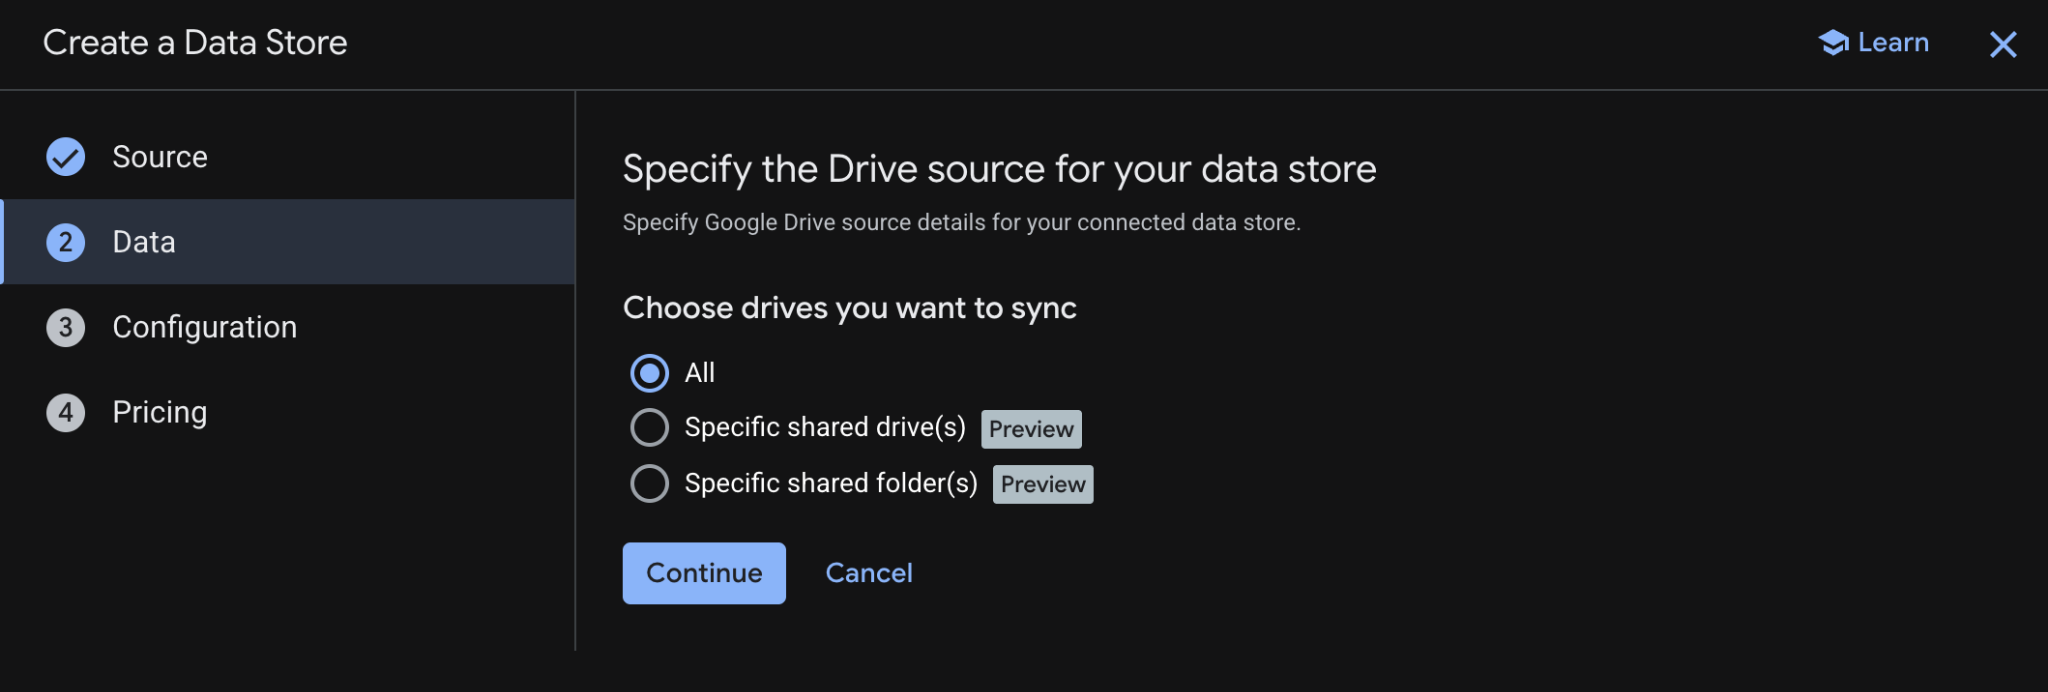
- 在「設定」中,將「資料連接器名稱」設為
drive,然後查看並同意可能適用的費用,再點選「繼續」。
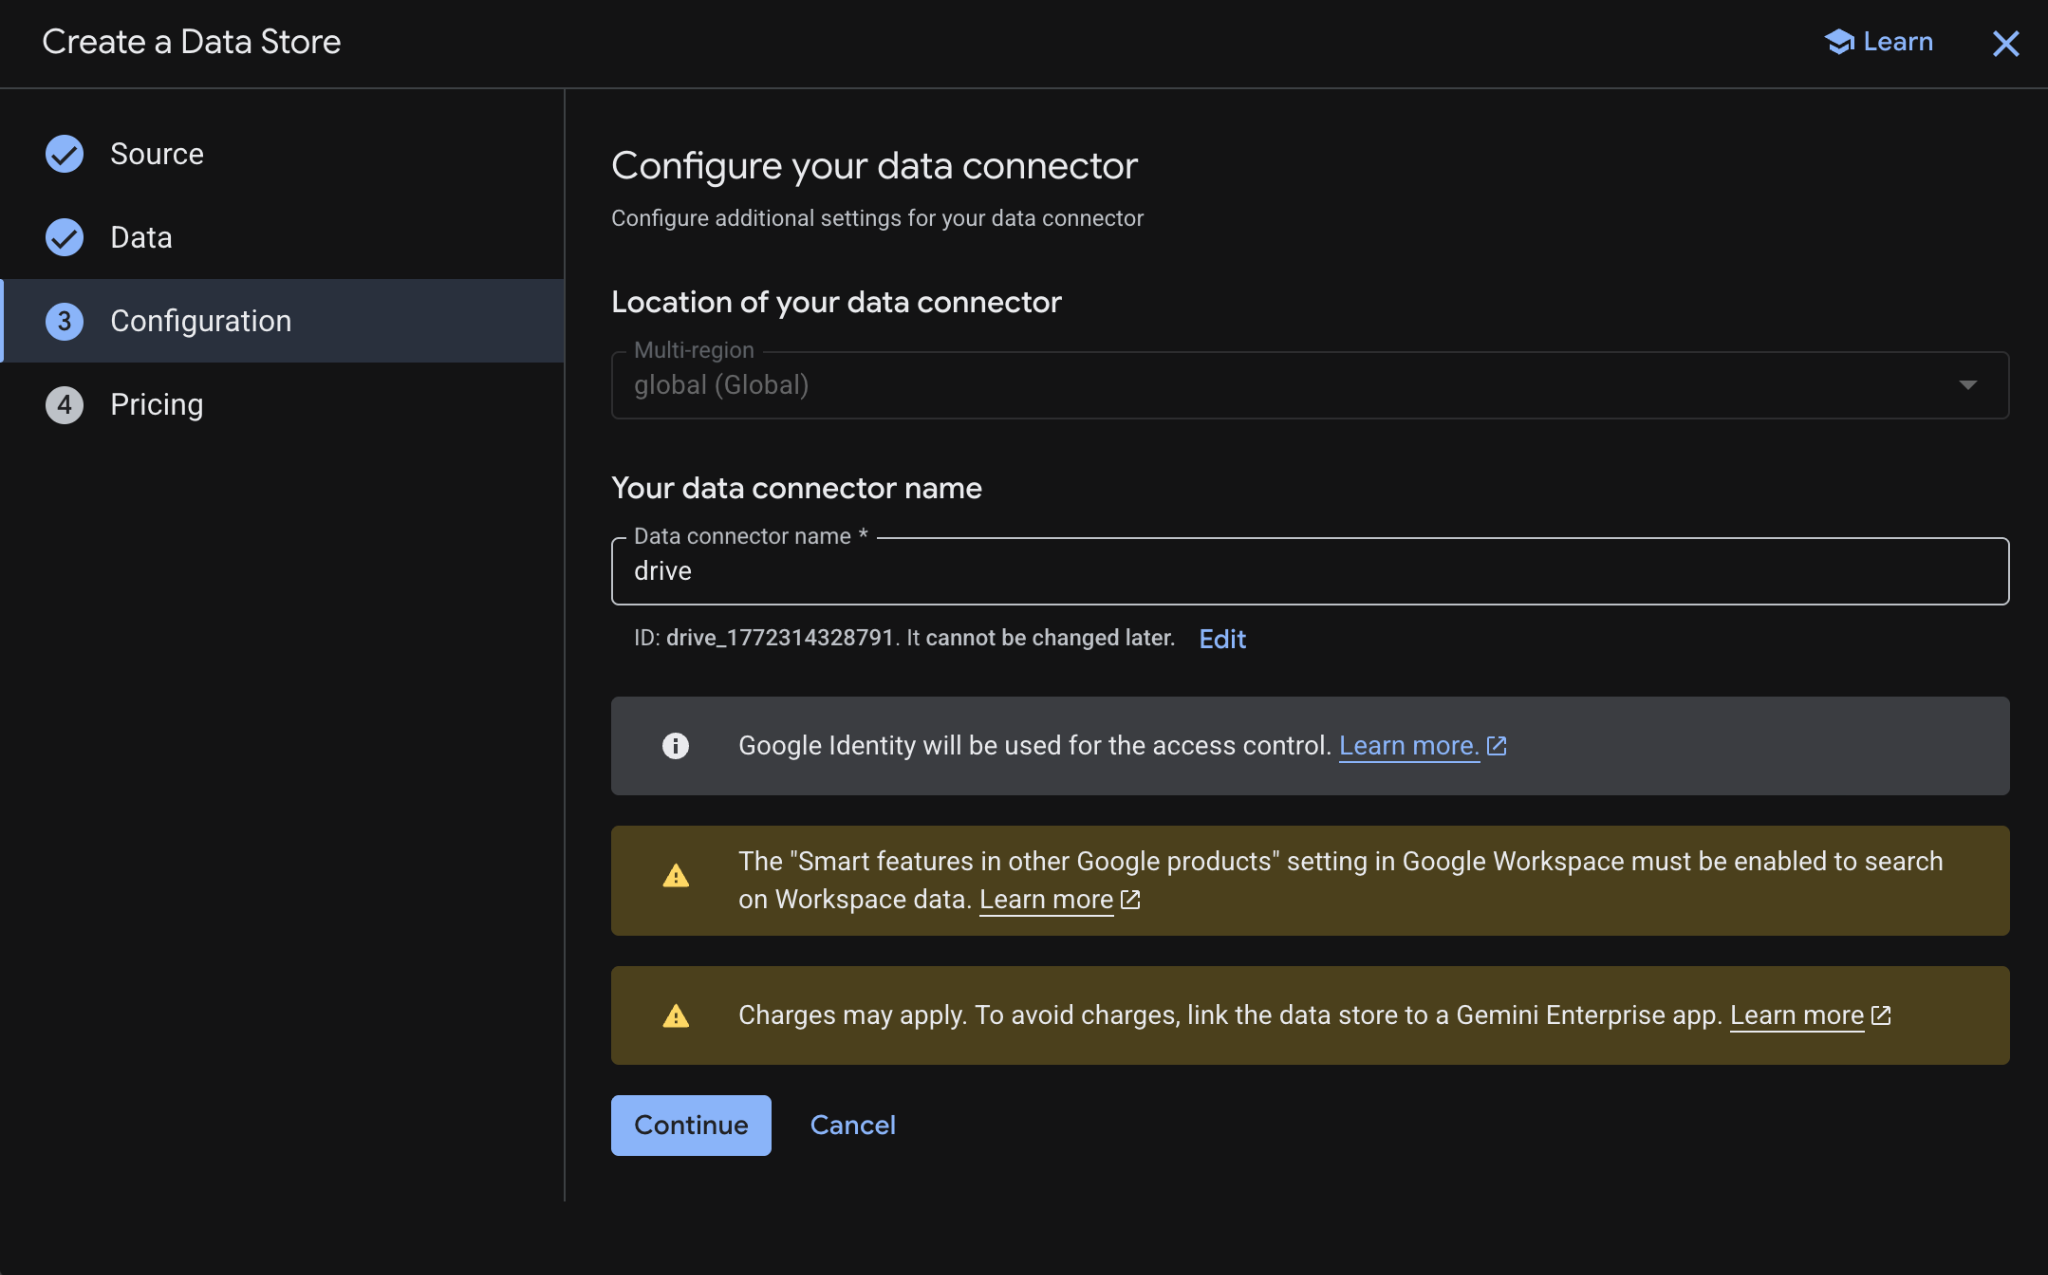
- 在「定價」中,選取偏好的定價模式,然後按一下「建立」。在本程式碼實驗室中,建議使用一般定價。
- 系統會自動將您重新導向至「資料儲存庫」,您可以在這裡查看新加入的資料儲存庫。
建立 Google 日曆資料儲存庫:
- 點選「+ 建立資料儲存庫」。
- 在「來源」中搜尋「Google 日曆」,然後按一下「選取」。
- 在「動作」部分,點按「略過」。
- 在「設定」部分,將「資料連接器名稱」設為
calendar。 - 點選「建立」。
- 系統會自動將您重新導向至「資料儲存庫」,您可以在這裡查看新加入的資料儲存庫。
建立 Google Gmail 資料儲存庫:
- 點選「+ New data store」。
- 在「Source」(來源) 中搜尋「Google Gmail」,然後按一下「Select」(選取)。
- 在「動作」部分,點按「略過」。
- 在「設定」部分,將「資料連接器名稱」設為
gmail。 - 點選「建立」。
- 系統會自動將您重新導向至「資料儲存庫」,您可以在這裡查看新加入的資料儲存庫。
3. Vertex AI Search 應用程式
使用者可以透過自然語言,使用這個代理程式搜尋資料及執行 Workspace 動作。這項功能需要下列元素:
- 模型:Gemini。
- 資料和動作:Google Workspace (日曆、Gmail、雲端硬碟) 的 Vertex AI 資料儲存庫。
- 代理主機:Vertex AI Search。
- 使用者介面:Vertex AI Search 網頁小工具。
複習概念
Vertex AI Search 應用程式
Vertex AI Search 應用程式會為使用者提供搜尋結果、動作和虛擬服務專員。在 API 的情境中,「應用程式」一詞可與「引擎」互換使用。應用程式必須連結至資料儲存庫,才能使用其中的資料提供搜尋結果、答案或動作。
Vertex AI Search 網頁小工具
Vertex AI Search 網頁小工具是預先建構的可自訂 UI 元件,開發人員只需編寫少量程式碼,即可將 AI 輔助搜尋列和結果介面直接嵌入網站。
Vertex AI Search 預先發布版
Vertex AI Search 預覽版是 Google Cloud 控制台內建的測試環境,可讓開發人員驗證搜尋設定和生成式答案,然後將這些設定無縫部署至可供正式環境使用的 Vertex AI Search 網頁小工具。
檢閱解決方案架構
建立應用程式
建立新的搜尋應用程式,做為資料儲存庫的錨點。
從 Cloud 控制台開啟「AI Applications」>「Apps」,然後按照下列步驟操作:
- 按一下「+ 建立應用程式」。
- 在「類型」下方的「自訂搜尋 (一般)」,按一下「建立」。
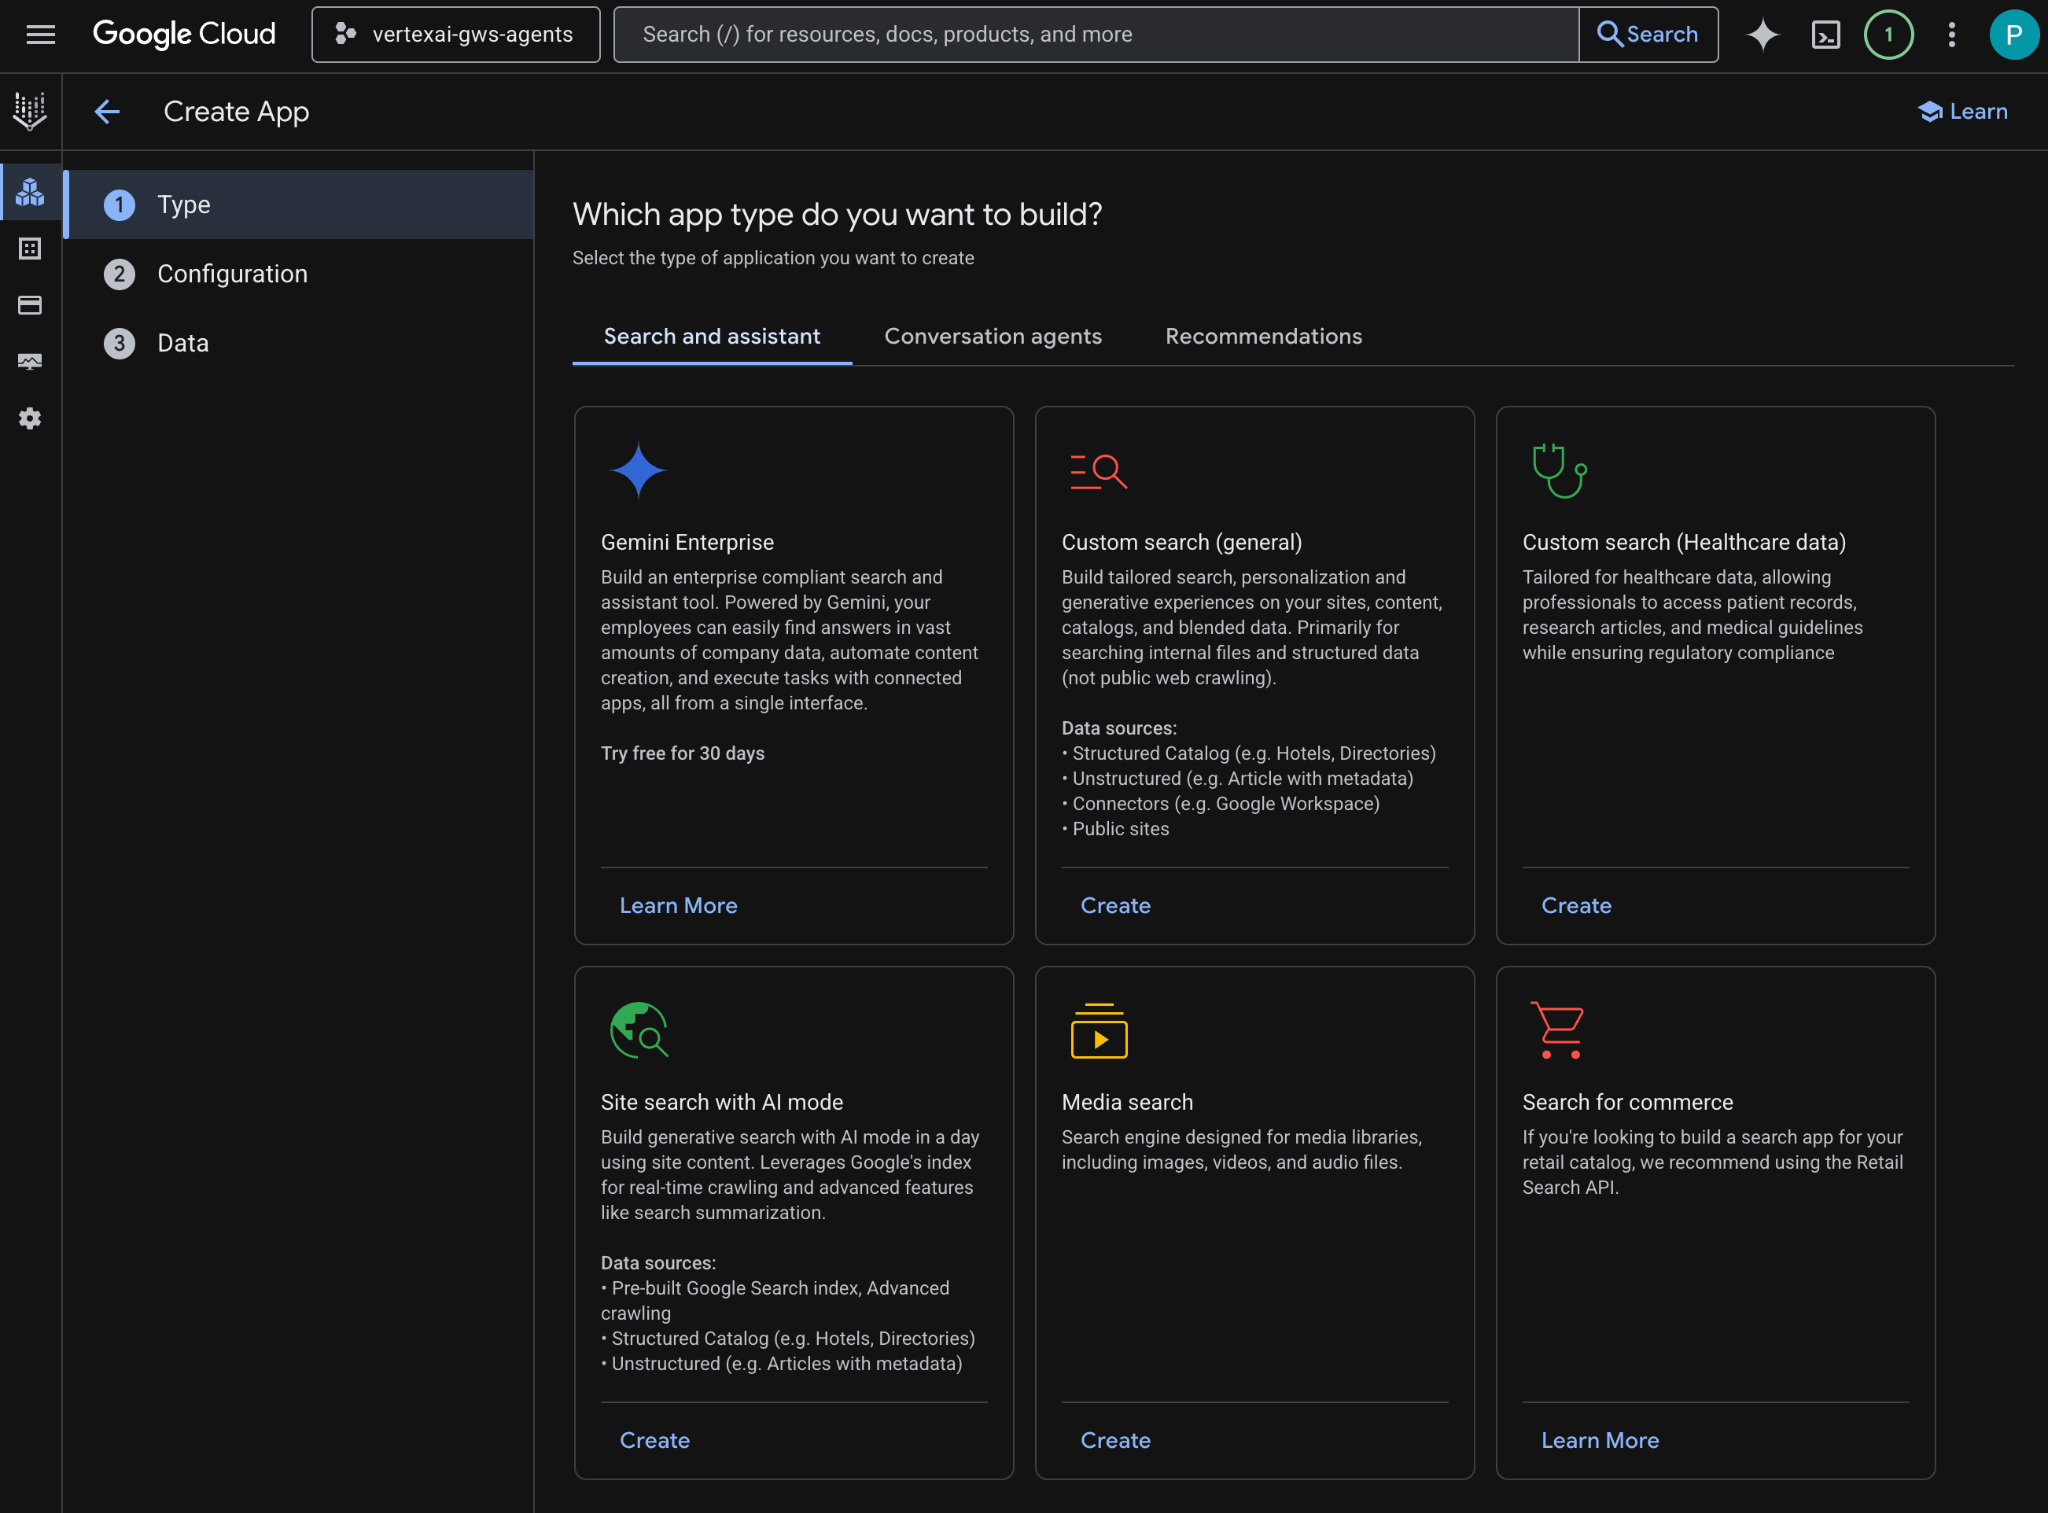
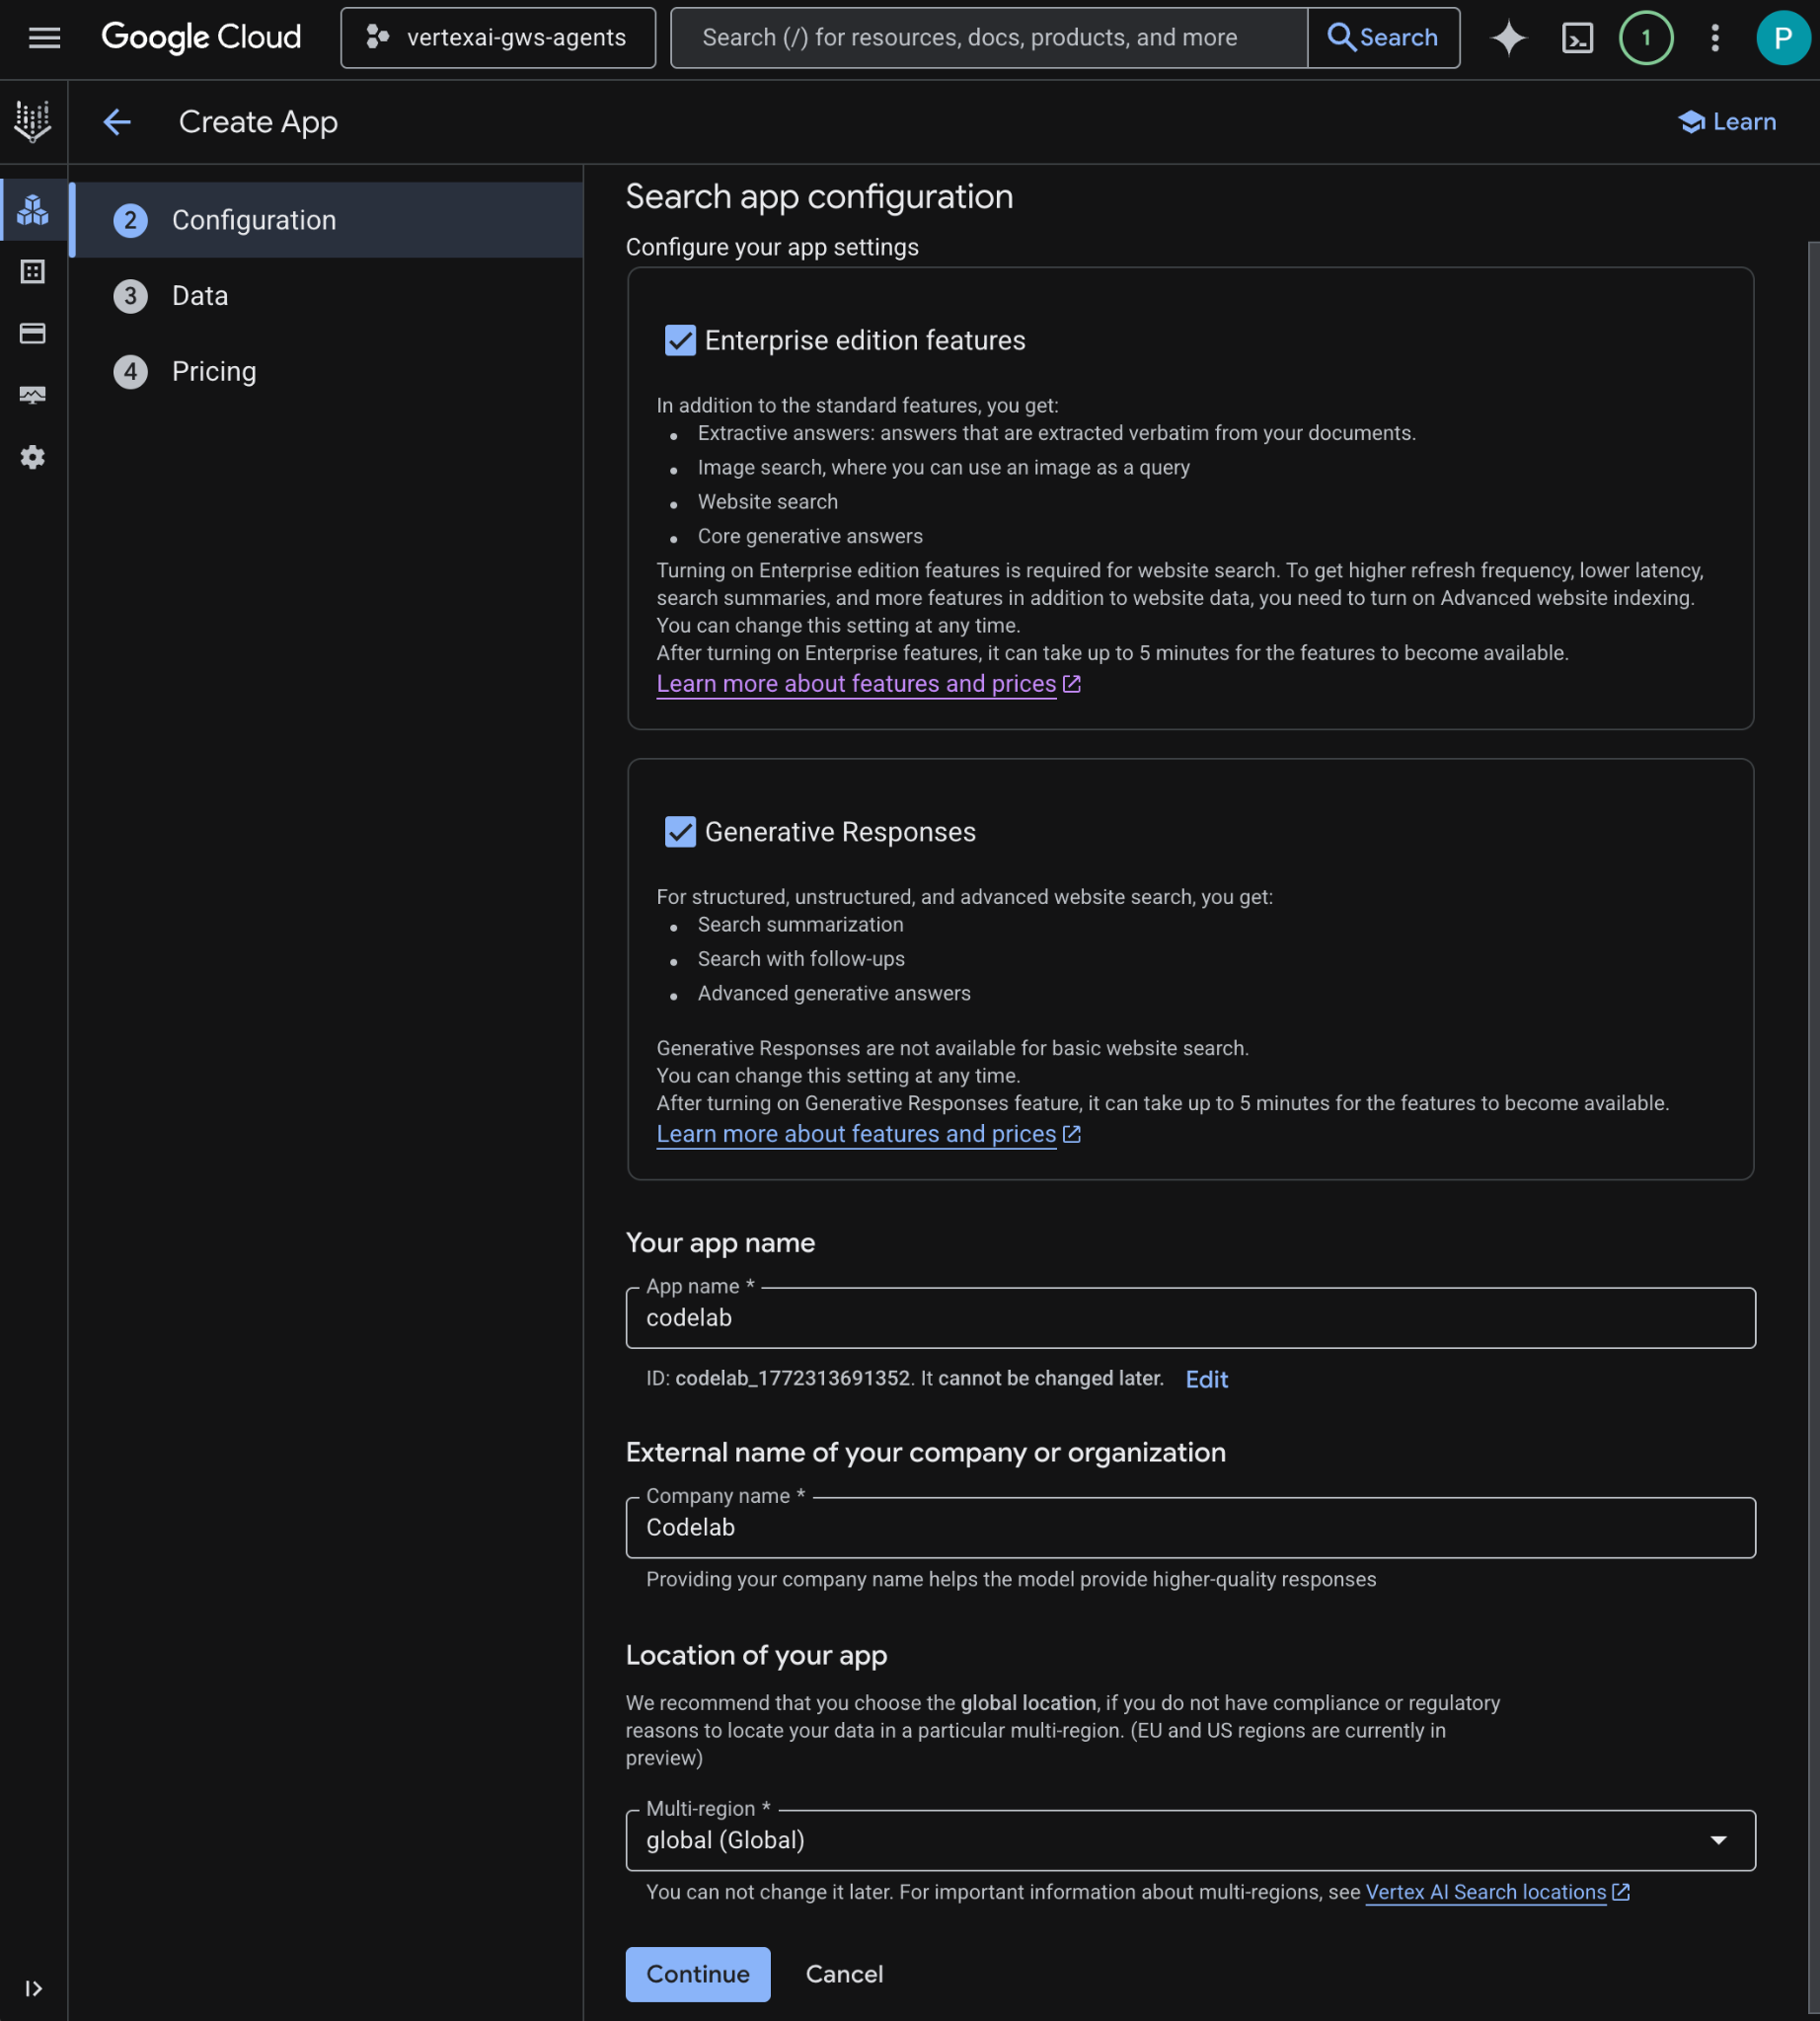
- 在「設定」中,檢閱並同意價格後,勾選「Enterprise 版功能」和「生成式回覆」。
- 將「App name」(應用程式名稱) 設為
codelab。 - 系統會根據名稱產生 ID,並顯示在欄位下方,請複製該 ID。
- 將「公司名稱」設為
Codelab。 - 將「多區域」設為
global (Global)。 - 按一下「繼續」。
- 在「資料」中,選取資料儲存庫「雲端硬碟」、「Gmail」和「日曆」,然後按一下「繼續」。

- 在「定價」中,選取偏好的定價模式,然後按一下「建立」。在本程式碼實驗室中,建議使用一般定價。
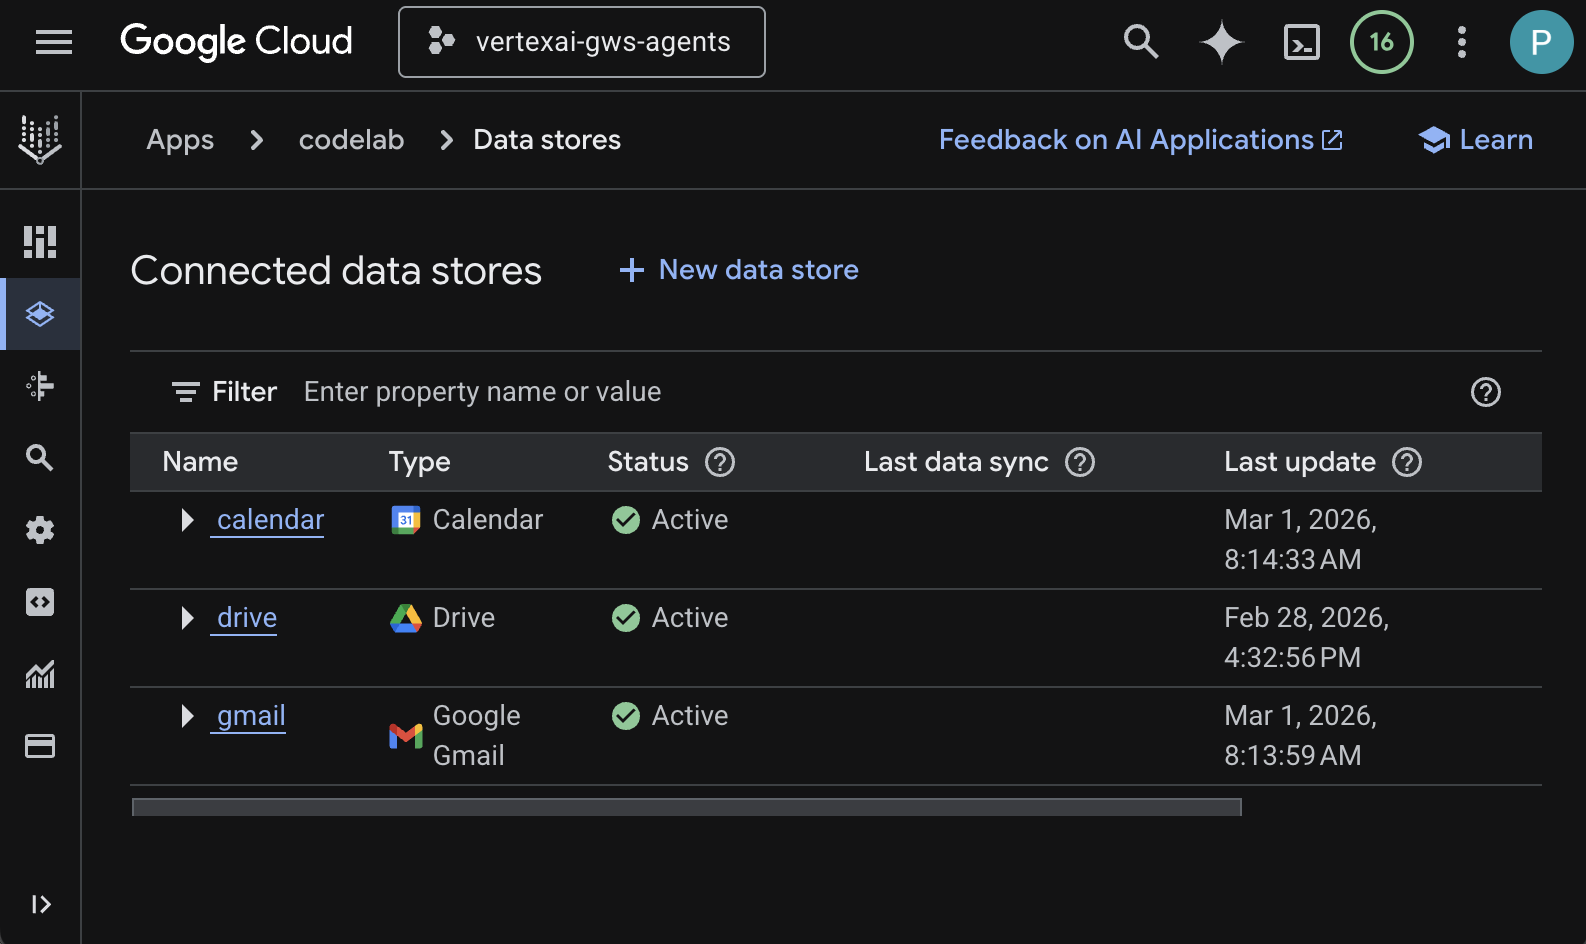
- 應用程式建立完成後,系統會自動將您重新導向至「AI Applications」 >「應用程式」 >「codelab」 >「應用程式總覽」。
- 前往「連結的資料儲存庫」。
- 幾分鐘後,所有已連結的資料儲存庫狀態應會顯示為「Active」(運作中)。
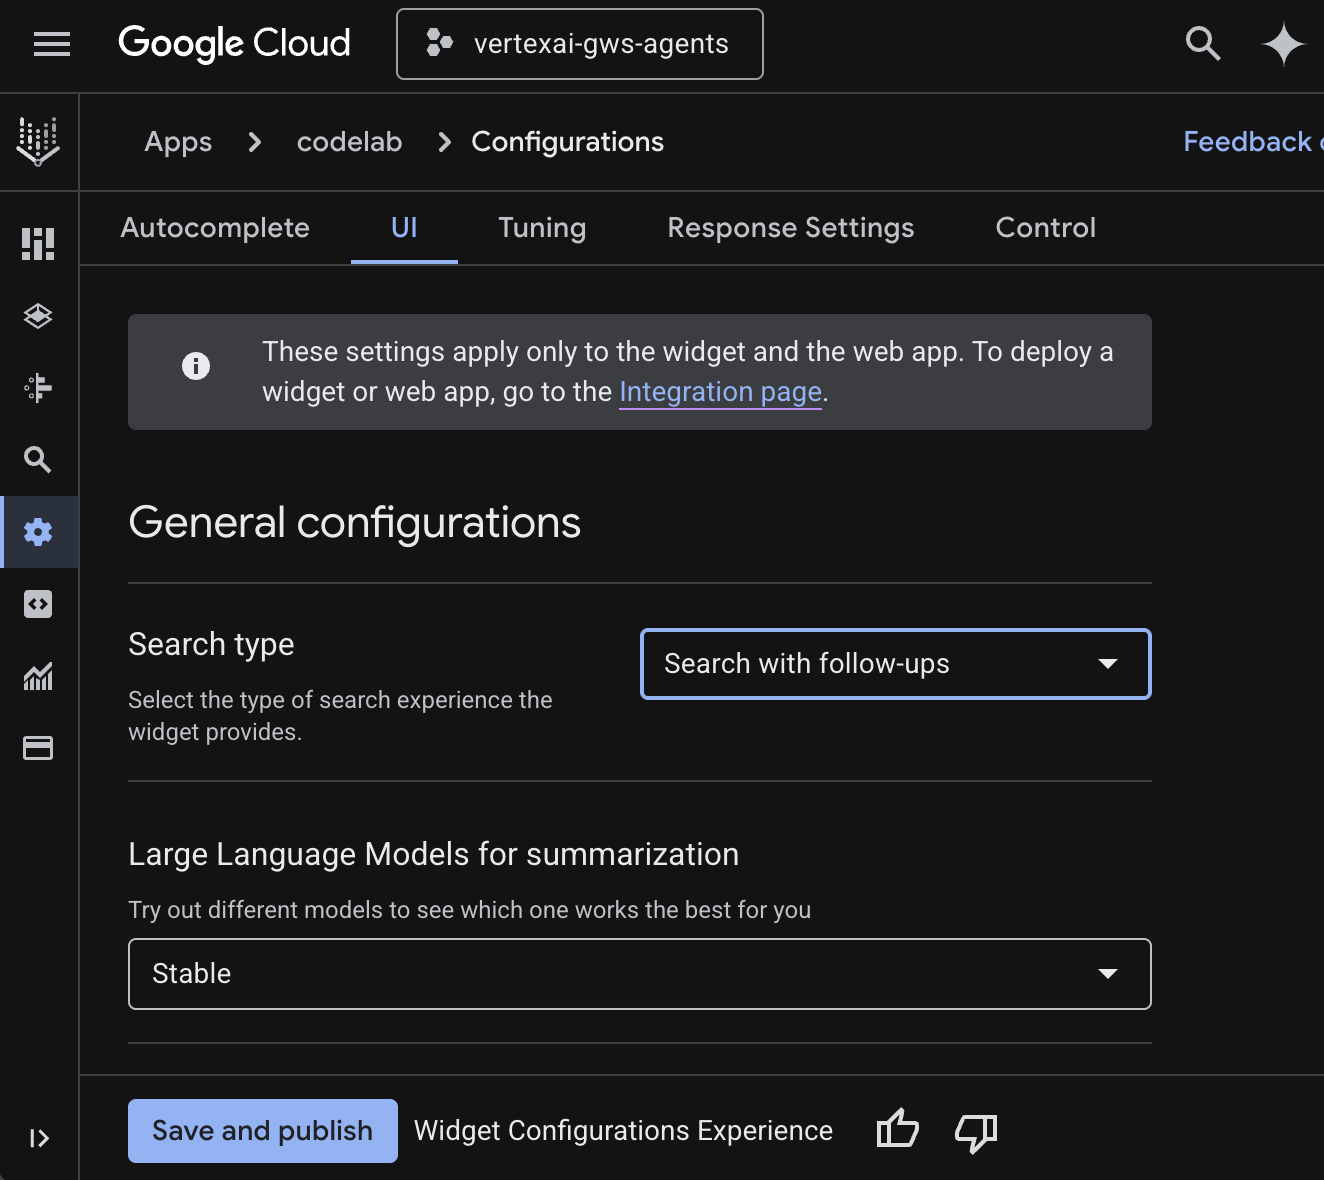
設定 Web Widget
設定搜尋小工具的外觀和行為。
- 前往「設定」。
- 在「UI」分頁中,將「搜尋類型」設為「搜尋並追問」,然後按一下「儲存並發布」。
試用應用程式
直接在 Google Cloud 控制台中測試搜尋應用程式。
- 前往「預覽」,系統會顯示 Web Widget。
- 在對話中輸入
Do I have any meetings today?,然後按下enter鍵。 - 在對話中輸入
Did I receive an email on March 1st 2026?,然後按下enter鍵。 - 在對話中輸入
Give me the title of the latest Drive file I created,然後按下enter鍵。
4. 自訂代理
使用者可以透過自訂工具和規則,以自然語言搜尋資料及執行 Workspace 動作。這項功能需要下列元素:
- 模型:Gemini。
- 資料和動作:Google Workspace (日曆、Gmail、雲端硬碟) 適用的 Vertex AI 資料儲存庫、Google 管理的 Vertex AI Search Model Context Protocol (MCP) 伺服器、傳送 Google Chat 訊息的自訂工具函式 (透過 Google Chat API)。
- 代理建構工具:Agent Development Kit (ADK)。
- 代理主機:Vertex AI Agent Engine。
- 使用者介面:ADK Web。
查看概念
Agent Development Kit (ADK)
Agent Development Kit (ADK) 是一套專用套裝組合和框架,提供預先建構的模組,用於推論、記憶體管理和工具整合,簡化自主式 AI 代理的建立程序。
Model Context Protocol (MCP)
Model Context Protocol (MCP) 是一項開放標準,旨在透過通用「隨插即用」介面,讓 AI 應用程式與各種資料來源或工具無縫安全地整合。
函式工具
函式工具是預先定義的可執行常式,AI 模型可觸發這類工具來執行特定動作,或從外部系統擷取即時資料,擴充功能,不只是生成簡單的文字。
ADK Web
ADK 網頁是 ADK SDK 隨附的內建開發 UI,可簡化開發和偵錯程序。
查看解決方案架構
查看原始碼
agent.py
下列程式碼會向 Vertex AI 進行驗證、初始化 Vertex AI Search MCP 和 Chat API 工具,並定義代理程式的行為。
- 驗證:從環境變數擷取
ACCESS_TOKEN,驗證 MCP 和 API 呼叫。 - 工具設定:初始化
vertexai_mcp,這個工具集會連線至 Vertex AI Search Model Context Protocol (MCP) 伺服器和send_direct_message工具。代理程式就能搜尋已連結的資料儲存庫,並傳送 Google Chat 訊息。 - 代理程式定義:使用
gemini-2.5-flash模型定義root_agent。指令會告知代理優先使用搜尋工具擷取資訊,並使用send_direct_message工具執行動作,有效以企業資料為代理建立基準。
...
MODEL = "gemini-2.5-flash"

# Access token for authentication
ACCESS_TOKEN = os.environ.get("ACCESS_TOKEN")
if not ACCESS_TOKEN:
    raise ValueError("ACCESS_TOKEN environment variable must be set")

VERTEXAI_SEARCH_TIMEOUT = 15.0

def get_project_id():
    """Fetches the consumer project ID from the environment natively."""
    _, project = google.auth.default()
    if project:
        return project
    raise Exception(f"Failed to resolve GCP Project ID from environment.")

def find_serving_config_path():
    """Dynamically finds the default serving config in the engine."""
    project_id = get_project_id()
    engines = discoveryengine_v1.EngineServiceClient().list_engines(
        parent=f"projects/{project_id}/locations/global/collections/default_collection"
    )
    for engine in engines:
        # engine.name natively contains the numeric Project Number
        return f"{engine.name}/servingConfigs/default_serving_config"
    raise Exception(f"No Discovery Engines found in project {project_id}")

def send_direct_message(email: str, message: str) -> dict:
    """Sends a Google Chat Direct Message (DM) to a specific user by email address."""
    chat_client = chat_v1.ChatServiceClient(
        credentials=Credentials(token=ACCESS_TOKEN)
    )

    # 1. Setup the DM space or find existing one
    person = chat_v1.User(
        name=f"users/{email}",
        type_=chat_v1.User.Type.HUMAN
    )
    membership = chat_v1.Membership(member=person)
    space_req = chat_v1.Space(space_type=chat_v1.Space.SpaceType.DIRECT_MESSAGE)
    setup_request = chat_v1.SetUpSpaceRequest(
        space=space_req,
        memberships=[membership]
    )
    space_response = chat_client.set_up_space(request=setup_request)
    space_name = space_response.name

    # 2. Send the message
    msg = chat_v1.Message(text=message)
    message_request = chat_v1.CreateMessageRequest(
        parent=space_name,
        message=msg
    )
    message_response = chat_client.create_message(request=message_request)

    return {"status": "success", "message_id": message_response.name, "space": space_name}

vertexai_mcp = McpToolset(
    connection_params=StreamableHTTPConnectionParams(
        url="https://discoveryengine.googleapis.com/mcp",
        timeout=VERTEXAI_SEARCH_TIMEOUT,
        sse_read_timeout=VERTEXAI_SEARCH_TIMEOUT,
        headers={"Authorization": f"Bearer {ACCESS_TOKEN}"}
    ),
    tool_filter=['search']
)

# Answer nicely the following user queries:
#  - Please find my meetings for today, I need their titles and links
#  - What is the latest Drive file I created?
#  - What is the latest Gmail message I received?
#  - Please send the following message to someone@example.com: Hello, this is a test message.

root_agent = LlmAgent(
    model=MODEL,
    name='enterprise_ai',
    instruction=f"""
        You are a helpful assistant that always uses the Vertex AI MCP search tool to answer the user's message, unless the user asks you to send a message to someone.
        If the user asks you to send a message to someone, use the send_direct_message tool to send the message.
        You MUST unconditionally use the Vertex AI MCP search tool to find answer, even if you believe you already know the answer or believe the Vertex AI MCP search tool does not contain the data.
        The Vertex AI MCP search tool accesses the user's data through datastores including Google Drive, Google Calendar, and Gmail.
        Only use the Vertex AI MCP search tool with servingConfig and query parameters, do not use any other parameters.
        Always use the servingConfig {find_serving_config_path()} while using the Vertex AI MCP search tool.
    """,
    tools=[vertexai_mcp, FunctionTool(send_direct_message)]
)
下載原始碼
將程式碼範例下載至本機環境,即可開始使用。
- 在終端機中開啟
solutions/enterprise-ai-agent-local目錄。
啟用 API
這個解決方案需要啟用其他 API:
- 在 Google Cloud 控制台中,啟用 Vertex AI、Cloud Resource Manager 和 Google Chat API:

- 依序點選「選單」圖示 ☰ >「API 和服務」>「已啟用的 API 和服務」,然後確認清單中是否列出「Vertex AI API」、「Cloud Resource Manager API」和「Google Chat API」。
設定 OAuth 同意畫面
這個解決方案需要設定同意畫面:
- 前往 Google Cloud 控制台,依序點選「選單」圖示 ☰ >「Google Auth platform」(Google 驗證平台) >「Branding」(品牌)。
- 按一下 [開始使用]。
- 在「應用程式資訊」下方,將「應用程式名稱」設為
Codelab。 - 在「使用者支援電子郵件」中,選擇支援電子郵件地址,方便使用者在同意聲明方面有任何疑問時與您聯絡。
- 點選 [下一步]。
- 在「目標對象」下方,選取「內部」。
- 點選 [下一步]。
- 在「聯絡資訊」下方,輸入可接收專案異動通知的電子郵件地址。
- 點選 [下一步]。
- 在「完成」部分,請詳閱《Google API 服務使用者資料政策》,然後選取「我同意《Google API 服務:使用者資料政策》」。
- 依序點選「繼續」和「建立」。

- 系統會儲存設定,並自動將您重新導向至 Google Auth Platform > 總覽。
詳情請參閱完整的「設定 OAuth 同意畫面」指南。
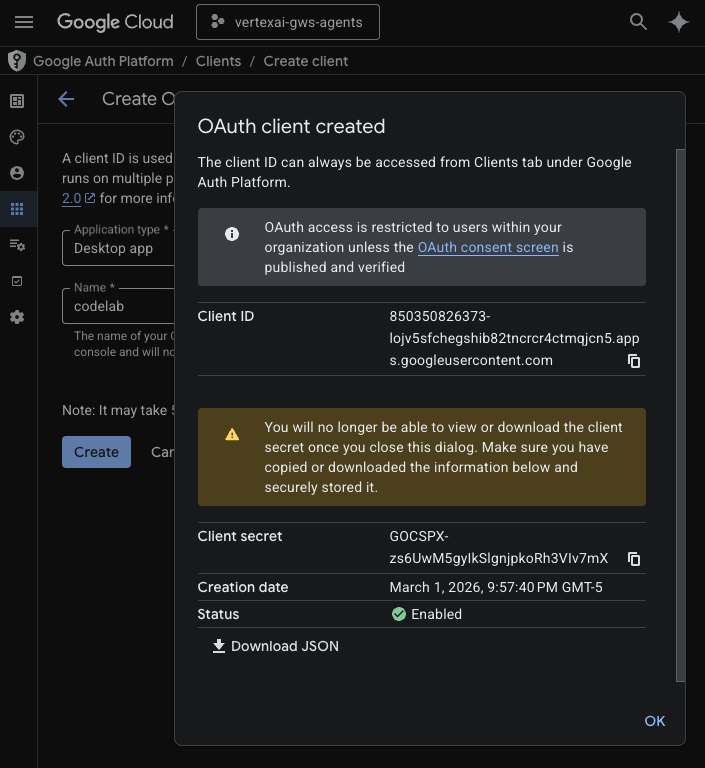
建立 OAuth 用戶端憑證
建立新的「桌面應用程式」OAuth 用戶端,在本地環境中驗證使用者:
- 在 Google Cloud 控制台中,依序點選「選單」圖示 ☰ >「Google Auth platform」 >「Clients」。
- 按一下「+ 建立用戶端」。
- 在「應用程式類型」部分,選取「電腦版應用程式」。
- 將「Name」(名稱) 設為
codelab。 - 按一下「建立」,系統會顯示新建立的憑證。
- 按一下「Download JSON」(下載 JSON),然後將檔案儲存為 client_secret.json,並放在
solutions/enterprise-ai-agent-local目錄中。
啟用 Vertex AI Search MCP
- 在終端機中執行:
gcloud beta services mcp enable discoveryengine.googleapis.com \
     --project=$(gcloud config get-value project)
設定 Chat 擴充應用程式
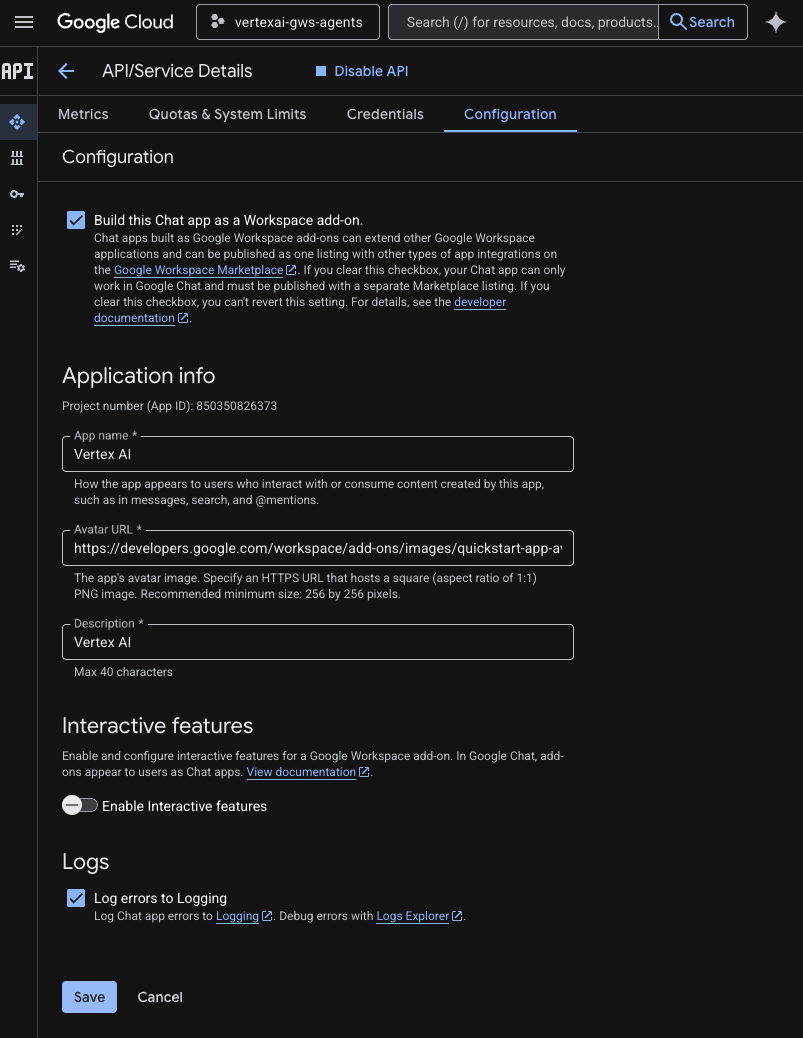
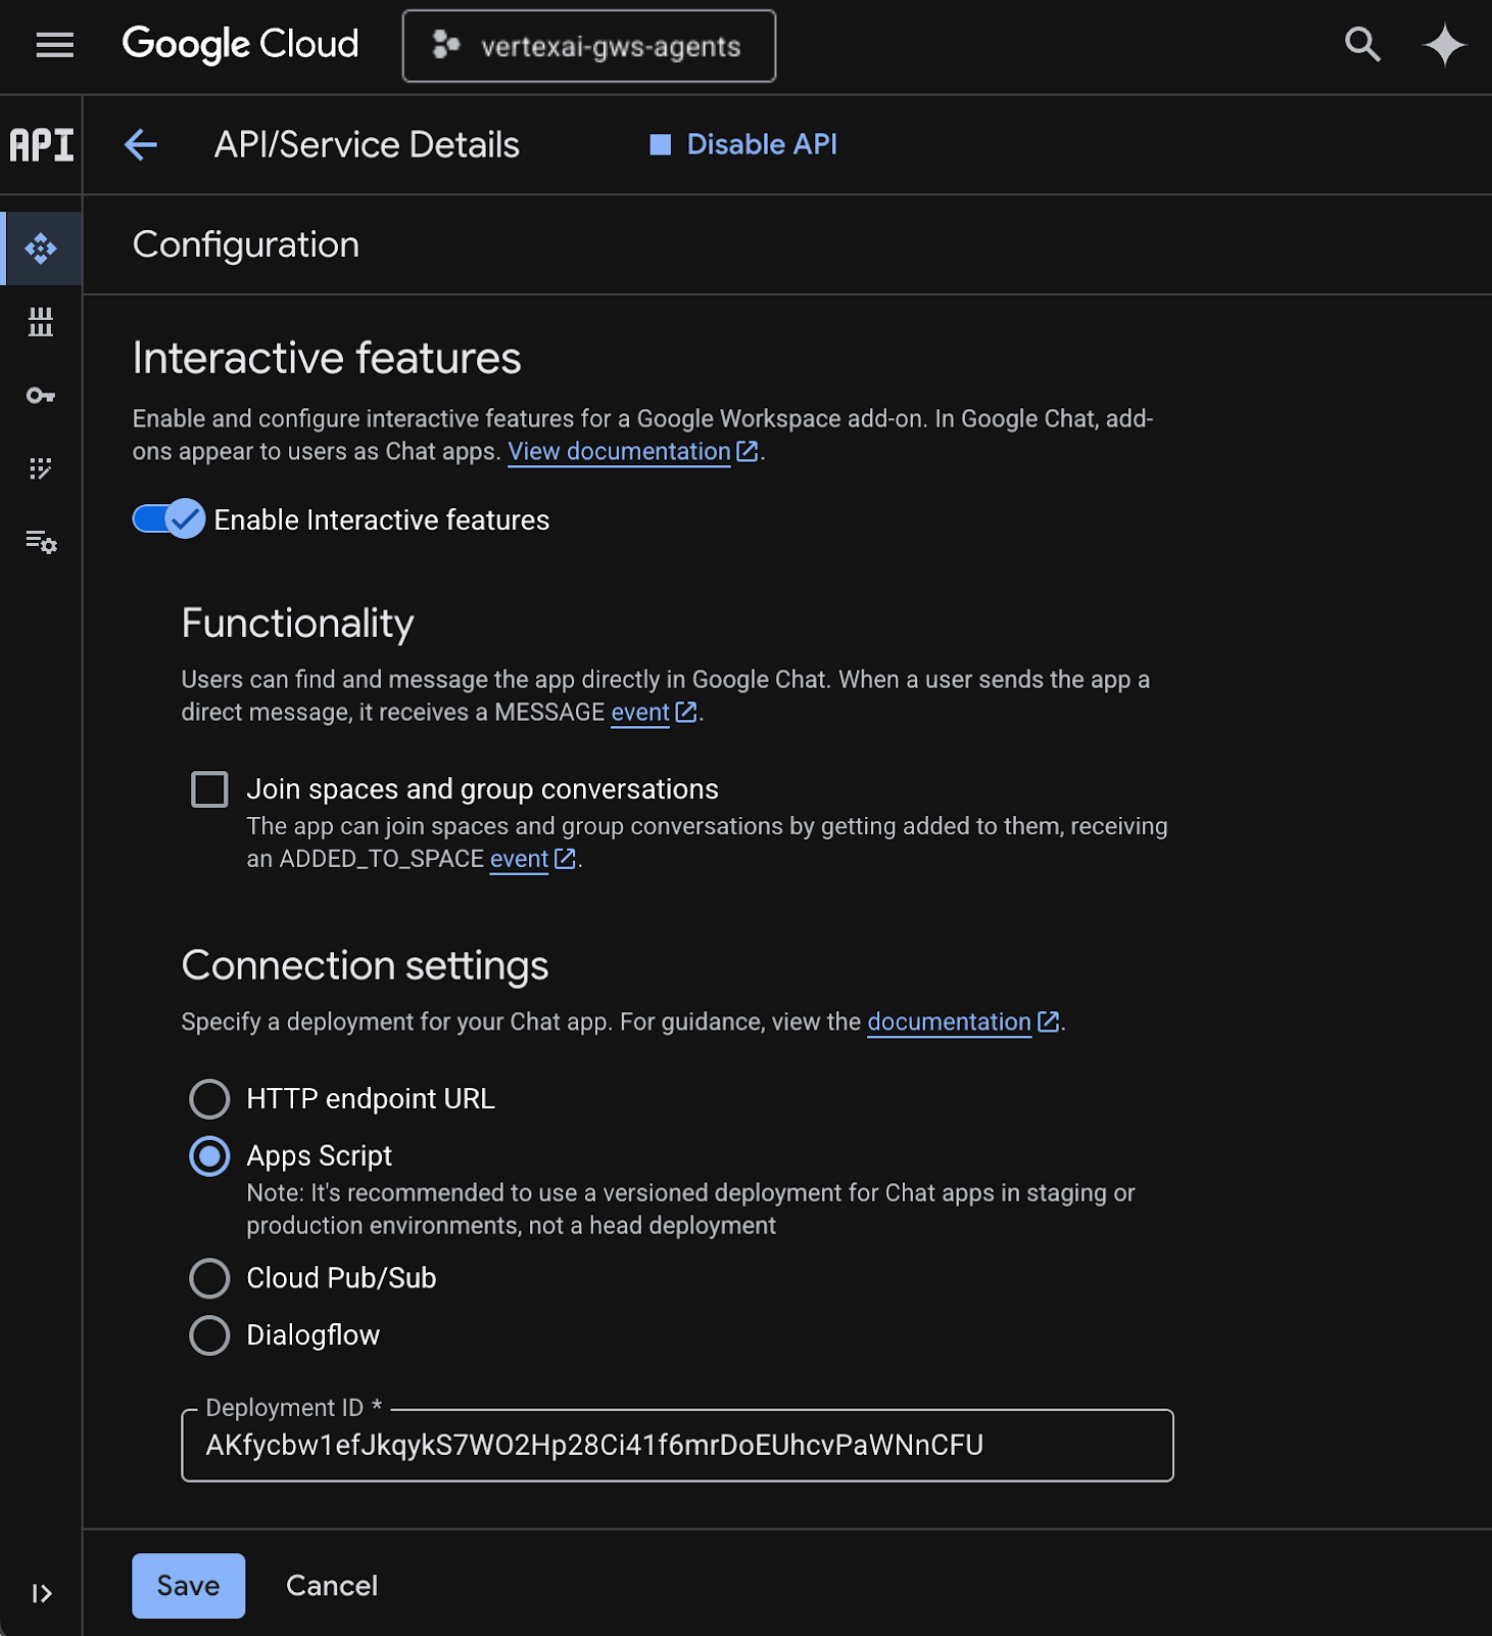
設定 Google Chat 應用程式的基本資訊詳細資料。
- 在 Google Cloud 控制台的 Google Cloud 搜尋欄位中搜尋
Google Chat API,然後依序點選「Google Chat API」、「管理」和「設定」。
- 將「應用程式名稱」和「說明」設為
Vertex AI。 - 將「Avatar URL」(顯示圖片網址) 設為
https://developers.google.com/workspace/add-ons/images/quickstart-app-avatar.png。 - 取消選取「啟用互動功能」,然後在隨即顯示的模式對話方塊中按一下「停用」。
- 選取「將錯誤記錄至 Logging」。
- 按一下 [儲存]。
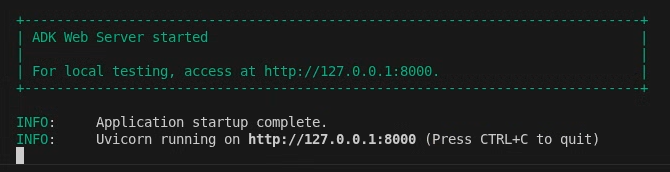
在 ADK Web 中執行代理
使用 ADK 網路介面在本機啟動代理程式。
- 在終端機中開啟
solutions/enterprise-ai-agent-local目錄,然後執行:
# 1. Authenticate with all the required scopes
gcloud auth application-default login \
  --client-id-file=client_secret.json \
   --scopes=https://www.googleapis.com/auth/cloud-platform,https://www.googleapis.com/auth/chat.spaces,https://www.googleapis.com/auth/chat.messages

# 2. Configure environment
export ACCESS_TOKEN=$(gcloud auth application-default print-access-token)
export GOOGLE_GENAI_USE_VERTEXAI=1
export GOOGLE_CLOUD_PROJECT=$(gcloud config get-value project)
export GOOGLE_CLOUD_LOCATION=us-central1

# 3. Create and activate a new virtual environment
python3 -m venv .venv
source .venv/bin/activate

# 4. Install poetry and project dependencies
pip install poetry
poetry install

# 5. Start ADK Web
adk web
試用代理
與自訂代理程式對話,驗證流程是否正常運作。
- 在網際網路瀏覽器中開啟 ADK 網站。
- 在對話中輸入
Please find my meetings for today, I need their titles and links,然後按下enter鍵。 - 代理程式會根據使用者帳戶,回覆日曆活動清單。
- 在對話中輸入
Please send a Chat message to someone@example.com with the following text: Hello!,然後按下enter鍵。 - 代理程式會回覆確認訊息。
5. 以 Google Workspace 外掛程式形式提供的代理程式
使用者可以在 Workspace 應用程式 UI 中,以自然語言搜尋 Workspace 資料。這項功能需要下列元素:
- 模型:Gemini。
- 資料和動作:Google Workspace (日曆、Gmail、雲端硬碟) 適用的 Vertex AI 資料儲存庫、Google 管理的 Vertex AI Search Model Context Protocol (MCP) 伺服器、傳送 Google Chat 訊息的自訂工具函式 (透過 Google Chat API)。
- 代理建構工具:Agent Development Kit (ADK)。
- 代理主機:Vertex AI Agent Engine。
- 使用者介面:適用於 Chat 和 Gmail 的 Google Workspace 外掛程式 (可輕鬆擴充至日曆、雲端硬碟、文件、試算表和簡報)。
- Google Workspace 外掛程式:Apps Script、Vertex AI Agent Engine API、情境 (選取的 Gmail 郵件)。
複習概念
Google Workspace 外掛程式
Google Workspace 外掛程式是自訂應用程式,可擴充一或多個 Google Workspace 應用程式 (Gmail、Chat、日曆、文件、雲端硬碟、Meet、試算表和簡報)。
Apps Script
Apps Script 是以雲端為基礎的 JavaScript 平台,由 Google 雲端硬碟提供支援,可讓您整合 Google 產品並自動執行相關工作。
Google Workspace 資訊卡架構
Google Workspace 的資訊卡架構可讓開發人員建立豐富的互動式使用者介面。可建構有條理且美觀的資訊卡,當中可包含文字、圖片、按鈕和其他小工具。這些資訊卡提供結構化資訊,並直接在 Workspace 應用程式中啟用快速動作,提升使用者體驗。
檢閱解決方案架構
查看原始碼
Agent
agent.py
下列程式碼會向 Vertex AI 進行驗證、初始化 Vertex AI Search MCP 和 Chat API 工具,並定義代理程式的行為。
- 驗證:使用輔助函式
_get_access_token_from_context擷取用戶端插入的驗證權杖 (CLIENT_AUTH_NAME)。這個權杖對於安全呼叫下游服務 (例如 Vertex AI Search MCP 和 Google Chat 工具) 至關重要。 - 工具設定:初始化
vertexai_mcp,這個工具集會連線至 Vertex AI Search Model Context Protocol (MCP) 伺服器和send_direct_message工具。代理程式就能搜尋已連結的資料儲存庫,並傳送 Google Chat 訊息。 - 代理程式定義:使用
gemini-2.5-flash模型定義root_agent。指令會告知代理優先使用搜尋工具擷取資訊,並使用send_direct_message工具執行動作,有效以企業資料為代理建立基準。
...
MODEL = "gemini-2.5-flash"

# Client injects a bearer token into the ToolContext state.
# The key pattern is "CLIENT_AUTH_NAME_<random_digits>".
# We dynamically parse this token to authenticate our MCP and API calls.
CLIENT_AUTH_NAME = "enterprise-ai"

VERTEXAI_SEARCH_TIMEOUT = 15.0

def get_project_id():
    """Fetches the consumer project ID from the environment natively."""
    _, project = google.auth.default()
    if project:
        return project
    raise Exception(f"Failed to resolve GCP Project ID from environment.")

def find_serving_config_path():
    """Dynamically finds the default serving config in the engine."""
    project_id = get_project_id()
    engines = discoveryengine_v1.EngineServiceClient().list_engines(
        parent=f"projects/{project_id}/locations/global/collections/default_collection"
    )
    for engine in engines:
        # engine.name natively contains the numeric Project Number
        return f"{engine.name}/servingConfigs/default_serving_config"
    raise Exception(f"No Discovery Engines found in project {project_id}")

def _get_access_token_from_context(tool_context: ToolContext) -> str:
    """Helper method to dynamically parse the intercepted bearer token from the context state."""
    escaped_name = re.escape(CLIENT_AUTH_NAME)
    pattern = re.compile(fr"^{escaped_name}_\d+$")
    # Handle ADK varying state object types (Raw Dict vs ADK State)
    state_dict = tool_context.state.to_dict() if hasattr(tool_context.state, 'to_dict') else tool_context.state
    matching_keys = [k for k in state_dict.keys() if pattern.match(k)]
    if matching_keys:
        return state_dict.get(matching_keys[0])
    raise Exception(f"No bearer token found in ToolContext state matching pattern {pattern.pattern}")

def auth_header_provider(tool_context: ToolContext) -> dict[str, str]:
    token = _get_access_token_from_context(tool_context)
    return {"Authorization": f"Bearer {token}"}

def send_direct_message(email: str, message: str, tool_context: ToolContext) -> dict:
    """Sends a Google Chat Direct Message (DM) to a specific user by email address."""
    chat_client = chat_v1.ChatServiceClient(
        credentials=Credentials(token=_get_access_token_from_context(tool_context))
    )

    # 1. Setup the DM space or find existing one
    person = chat_v1.User(
        name=f"users/{email}",
        type_=chat_v1.User.Type.HUMAN
    )
    membership = chat_v1.Membership(member=person)
    space_req = chat_v1.Space(space_type=chat_v1.Space.SpaceType.DIRECT_MESSAGE)
    setup_request = chat_v1.SetUpSpaceRequest(
        space=space_req,
        memberships=[membership]
    )
    space_response = chat_client.set_up_space(request=setup_request)
    space_name = space_response.name

    # 2. Send the message
    msg = chat_v1.Message(text=message)
    message_request = chat_v1.CreateMessageRequest(
        parent=space_name,
        message=msg
    )
    message_response = chat_client.create_message(request=message_request)

    return {"status": "success", "message_id": message_response.name, "space": space_name}

vertexai_mcp = McpToolset(
    connection_params=StreamableHTTPConnectionParams(
        url="https://discoveryengine.googleapis.com/mcp",
        timeout=VERTEXAI_SEARCH_TIMEOUT,
        sse_read_timeout=VERTEXAI_SEARCH_TIMEOUT
    ),
    tool_filter=['search'],
    # The auth_header_provider dynamically injects the bearer token from the ToolContext
    # into the MCP call for authentication.
    header_provider=auth_header_provider
)

# Answer nicely the following user queries:
#  - Please find my meetings for today, I need their titles and links
#  - What is the latest Drive file I created?
#  - What is the latest Gmail message I received?
#  - Please send the following message to someone@example.com: Hello, this is a test message.

root_agent = LlmAgent(
    model=MODEL,
    name='enterprise_ai',
    instruction=f"""
        You are a helpful assistant that always uses the Vertex AI MCP search tool to answer the user's message, unless the user asks you to send a message to someone.
        If the user asks you to send a message to someone, use the send_direct_message tool to send the message.
        You MUST unconditionally use the Vertex AI MCP search tool to find answer, even if you believe you already know the answer or believe the Vertex AI MCP search tool does not contain the data.
        The Vertex AI MCP search tool accesses the user's data through datastores including Google Drive, Google Calendar, and Gmail.
        Only use the Vertex AI MCP search tool with servingConfig and query parameters, do not use any other parameters.
        Always use the servingConfig {find_serving_config_path()} while using the Vertex AI MCP search tool.
    """,
    tools=[vertexai_mcp, FunctionTool(send_direct_message)]
)
客戶
appsscript.json
下列設定定義外掛程式的觸發條件和權限。
- 定義外掛程式:向 Workspace 說明這個專案是 Chat 和 Gmail 的外掛程式。
- 內容比對觸發條件:如果是 Gmail,系統會設定
contextualTrigger,只要使用者開啟電子郵件訊息,就會觸發onAddonEvent。外掛程式就能「查看」電子郵件內容。 - 權限:列出外掛程式執行時所需的
oauthScopes,例如讀取目前電子郵件、執行指令碼,以及連線至外部服務 (如 Vertex AI API) 的權限。
...
"addOns": {
    "common": {
      "name": "Vertex AI",
      "logoUrl": "https://developers.google.com/workspace/add-ons/images/quickstart-app-avatar.png"
    },
    "chat": {},
    "gmail": {
      "contextualTriggers": [
        {
          "unconditional": {},
          "onTriggerFunction": "onAddonEvent"
        }
      ]
    }
  },
  "oauthScopes": [
   "https://www.googleapis.com/auth/script.external_request",
   "https://www.googleapis.com/auth/cloud-platform",
   "https://www.googleapis.com/auth/gmail.addons.execute",
   "https://www.googleapis.com/auth/gmail.addons.current.message.readonly"
 ]
...
Chat.gs
下列程式碼會處理傳入的 Google Chat 訊息。
- 接收訊息:
onMessage函式是訊息互動的進入點。 - 管理內容:將
space.name(Chat 空間的 ID) 儲存至使用者的屬性。這樣一來,當專員準備回覆時,系統就能確切知道要將訊息發布到哪個對話。 - 委派給代理程式:呼叫
requestAgent,將使用者的訊息傳遞至處理 API 通訊的核心邏輯。
...
// Service that handles Google Chat operations.

// Handle incoming Google Chat message events, actions will be taken via Google Chat API calls
function onMessage(event) {
  if (isInDebugMode()) {
    console.log(`MESSAGE event received (Chat): ${JSON.stringify(event)}`);
  }
  // Extract data from the event.
  const chatEvent = event.chat;
  setChatConfig(chatEvent.messagePayload.space.name);

  // Request AI agent to answer the message
  requestAgent(chatEvent.messagePayload.message);
  // Respond with an empty response to the Google Chat platform to acknowledge execution
  return null;
}

// --- Utility functions ---

// The Chat direct message (DM) space associated with the user
const SPACE_NAME_PROPERTY = "DM_SPACE_NAME"

// Sets the Chat DM space name for subsequent operations.
function setChatConfig(spaceName) {
  const userProperties = PropertiesService.getUserProperties();
  userProperties.setProperty(SPACE_NAME_PROPERTY, spaceName);
  console.log(`Space is set to ${spaceName}`);
}

// Retrieved the Chat DM space name to sent messages to.
function getConfiguredChat() {
  const userProperties = PropertiesService.getUserProperties();
  return userProperties.getProperty(SPACE_NAME_PROPERTY);
}

// Finds the Chat DM space name between the Chat app and the given user.
function findChatAppDm(userName) {
  return Chat.Spaces.findDirectMessage(
    { 'name': userName },
    {'Authorization': `Bearer ${getAddonCredentials().getAccessToken()}`}
  ).name;
}

// Creates a Chat message in the configured space.
function createMessage(message) {
  const spaceName = getConfiguredChat();
  console.log(`Creating message in space ${spaceName}...`);
  return Chat.Spaces.Messages.create(
    message,
    spaceName,
    {},
    {'Authorization': `Bearer ${getAddonCredentials().getAccessToken()}`}
  ).name;
}
Sidebar.gs
下列程式碼會建構 Gmail 側欄,並擷取電子郵件內容。
- 建構 UI:
createSidebarCard使用 Workspace 資訊卡服務建構視覺化介面。這個範本會建立簡單的版面配置,包含文字輸入區和「傳送訊息」按鈕。 - 擷取電子郵件內容:在
handleSendMessage中,程式碼會檢查使用者目前是否正在查看電子郵件 (event.gmail.messageId)。如果是,程式碼會安全地擷取電子郵件的主旨和內文,並附加至使用者的提示。 - 顯示結果:代理程式回覆後,程式碼會更新側欄資訊卡,顯示回覆內容。
...
// Service that handles Gmail operations.

// Triggered when the user opens the Gmail Add-on or selects an email.
function onAddonEvent(event) {
  // If this was triggered by a button click, handle it
  if (event.parameters && event.parameters.action === 'send') {
    return handleSendMessage(event);
  }

  // Otherwise, just render the default initial sidebar
  return createSidebarCard();
}

// Creates the standard Gmail sidebar card consisting of a text input and send button.
// Optionally includes an answer section if a response was generated.
function createSidebarCard(optionalAnswerSection) {
  const card = CardService.newCardBuilder();
  const actionSection = CardService.newCardSection();

  // Create text input for the user's message
  const messageInput = CardService.newTextInput()
    .setFieldName("message")
    .setTitle("Message")
    .setMultiline(true);

  // Create action for sending the message
  const sendAction = CardService.newAction()
    .setFunctionName('onAddonEvent')
    .setParameters({ 'action': 'send' });

  const sendButton = CardService.newTextButton()
    .setText("Send message")
    .setTextButtonStyle(CardService.TextButtonStyle.FILLED)
    .setOnClickAction(sendAction);

  actionSection.addWidget(messageInput);
  actionSection.addWidget(CardService.newButtonSet().addButton(sendButton));

  card.addSection(actionSection);

  // Attach the response at the bottom if we have one
  if (optionalAnswerSection) {
    card.addSection(optionalAnswerSection);
  }

  return card.build();
}

// Handles clicks from the Send message button.
function handleSendMessage(event) {
  const commonEventObject = event.commonEventObject || {};
  const formInputs = commonEventObject.formInputs || {};
  const messageInput = formInputs.message;

  let userMessage = "";
  if (messageInput && messageInput.stringInputs && messageInput.stringInputs.value.length > 0) {
    userMessage = messageInput.stringInputs.value[0];
  }

  if (!userMessage || userMessage.trim().length === 0) {
    return CardService.newActionResponseBuilder()
      .setNotification(CardService.newNotification().setText("Please enter a message."))
      .build();
  }

  let finalQueryText = `USER MESSAGE TO ANSWER: ${userMessage}`;

  // If we have an email selected in Gmail, append its content as context
  if (event.gmail && event.gmail.messageId) {
    try {
      GmailApp.setCurrentMessageAccessToken(event.gmail.accessToken);
      const message = GmailApp.getMessageById(event.gmail.messageId);

      const subject = message.getSubject();
      const bodyText = message.getPlainBody() || message.getBody();

      finalQueryText += `\n\nEMAIL THE USER HAS OPENED ON SCREEN:\nSubject: ${subject}\nBody:\n---\n${bodyText}\n---`;
    } catch (e) {
      console.error("Could not fetch Gmail context: " + e);
      // Invalidate the token explicitly so the next prompt requests the missing scopes
      ScriptApp.invalidateAuth();

      CardService.newAuthorizationException()
        .setResourceDisplayName("Enterprise AI")
        .setAuthorizationUrl(ScriptApp.getAuthorizationUrl())
        .throwException();
    }
  }

  try {
    const response = queryAgent({ text: finalQueryText });

    // We leverage the 'showdown' library to parse the LLM's Markdown output into HTML
    // We also substitute markdown listings with arrows and adjust newlines for clearer rendering in the sidebar
    let displayedText = substituteListingsFromMarkdown(response.text);
    displayedText = new showdown.Converter().makeHtml(displayedText).replace(/\n/g, '\n\n');

    const textParagraph = CardService.newTextParagraph();
    textParagraph.setText(displayedText);

    const answerSection = CardService.newCardSection()
      .addWidget(textParagraph);

    const updatedCard = createSidebarCard(answerSection);

    return CardService.newActionResponseBuilder()
      .setNavigation(CardService.newNavigation().updateCard(updatedCard))
      .build();

  } catch (err) {
    return CardService.newActionResponseBuilder()
      .setNotification(CardService.newNotification().setText("Error fetching response: " + err.message))
      .build();
  }
}
...
AgentHandler.gs
下列程式碼會協調對 Vertex AI 的 API 呼叫。
- 自動調度 API 呼叫:
queryAgent是外掛程式與 Vertex AI Agent Engine 之間的橋樑。這會建構要求,其中包含使用者的查詢和狀態中的驗證權杖。 - 串流回應:由於代理程式回應可能需要一些時間,因此會搭配使用
streamQueryAPI 和伺服器傳送事件 (SSE)。程式碼會分批收集回覆,並重構完整答案。
...
// Service that handles Vertex AI Agent operations.

// Submits a query to the AI agent and returns the response string synchronously
function queryAgent(input) {
 let systemPrompt = "SYSTEM PROMPT START Do not respond with tables but use bullet points instead." +
   " Do not ask the user follow-up questions or converse with them as history is not kept in this interface." +
   " SYSTEM PROMPT END\n\n";

 const requestPayload = {
   "class_method": "async_stream_query",
   "input": {
     "user_id": "vertex_ai_add_on",
     "message": { "role": "user", "parts": [{ "text": systemPrompt + input.text }] },
     "state_delta": {
       "enterprise-ai_999": `${ScriptApp.getOAuthToken()}`
     }
   }
 };

 const responseContentText = UrlFetchApp.fetch(
   `https://${getLocation()}-aiplatform.googleapis.com/v1/${getReasoningEngine()}:streamQuery?alt=sse`,
   {
     method: 'post',
     headers: { 'Authorization': `Bearer ${ScriptApp.getOAuthToken()}` },
     contentType: 'application/json',
     payload: JSON.stringify(requestPayload),
     muteHttpExceptions: true
   }
 ).getContentText();
  if (isInDebugMode()) {
   console.log(`Response: ${responseContentText}`);
 }

 const events = responseContentText.split('\n').map(s => s.replace(/^data:\s*/, '')).filter(s => s.trim().length > 0);
 console.log(`Received ${events.length} agent events.`);

 let author = "default";
 let answerText = "";
 for (const eventJson of events) {
   if (isInDebugMode()) {
     console.log("Event: " + eventJson);
   }
   const event = JSON.parse(eventJson);

   // Retrieve the agent responsible for generating the content
   author = event.author;

   // Ignore events that are not useful for the end-user
   if (!event.content) {
     console.log(`${author}: internal event`);
     continue;
   }

   // Handle text answers
   const parts = event.content.parts || [];
   const textPart = parts.find(p => p.text);
   if (textPart) {
     answerText += textPart.text;
   }
 }
 return { author: author, text: answerText };
}
...
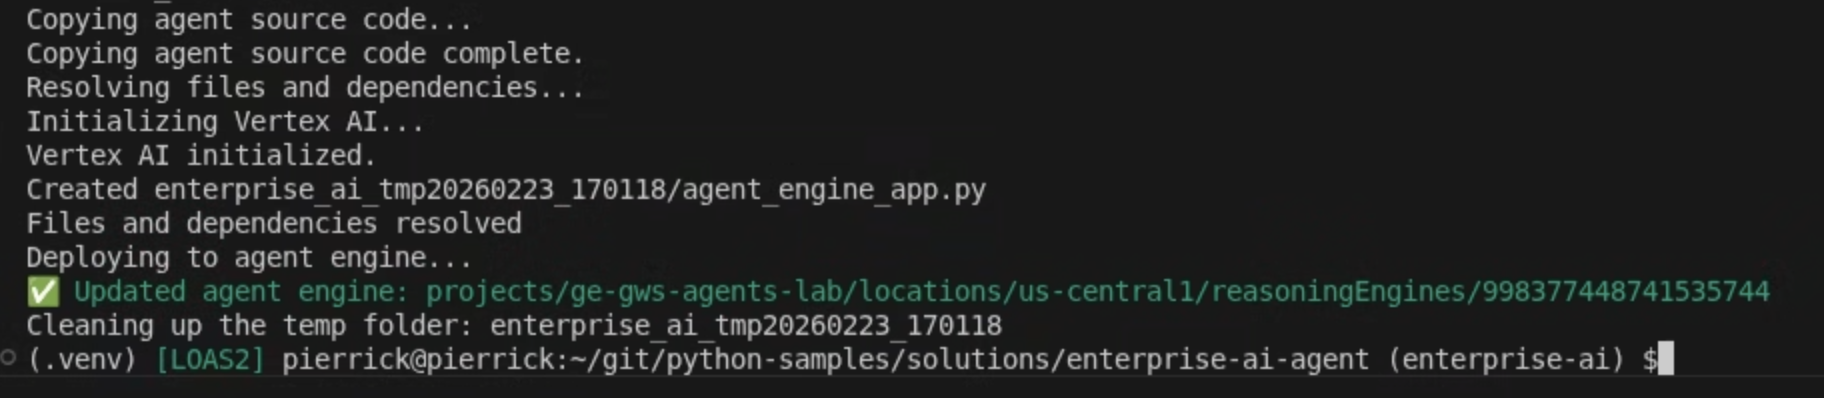
在 Vertex AI Agent Engine 部署代理
- 在終端機中,開啟從先前步驟下載來源的
solutions/enterprise-ai-agent目錄,然後執行:
# 1. Create and activate a new virtual environment
deactivate
python3 -m venv .venv
source .venv/bin/activate

# 2. Install poetry and project dependencies
pip install poetry
poetry install

# 3. Deploy the agent
adk deploy agent_engine \
  --project=$(gcloud config get-value project) \
  --region=us-central1 \
  --display_name="Enterprise AI" \
  enterprise_ai
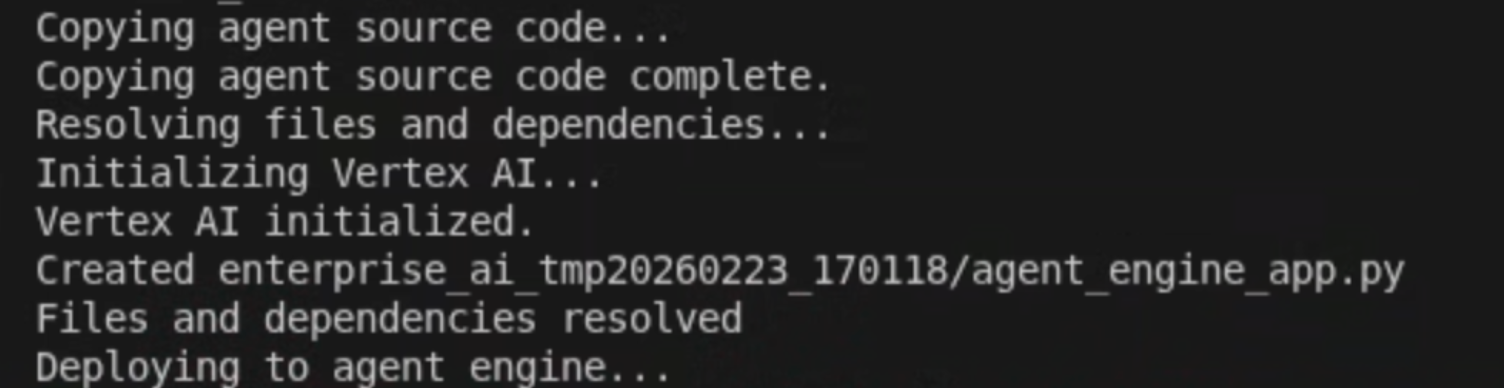
- 在記錄中看到「Deploying to agent engine...」這行時,請開啟新的終端機並執行下列指令,將必要權限新增至 Vertex AI Reasoning Engine 服務代理程式:
# 1. Get the current Project ID
PROJECT_ID=$(gcloud config get-value project)

# 2. Extract the Project Number for that ID
PROJECT_NUMBER=$(gcloud projects describe $PROJECT_ID --format='value(projectNumber)')

# 3. Construct the Service Account name
SERVICE_ACCOUNT="service-${PROJECT_NUMBER}@gcp-sa-aiplatform-re.iam.gserviceaccount.com"

# 4. Apply the IAM policy binding
gcloud projects add-iam-policy-binding $PROJECT_ID \
     --member="serviceAccount:$SERVICE_ACCOUNT" \
     --role="roles/discoveryengine.viewer"
- 等待 adk deploy 指令執行完畢,然後從指令輸出內容 (以綠色標示) 複製新部署代理的資源名稱。
啟動服務帳戶
建立專用服務帳戶,授權外掛程式的伺服器端作業。
在 Google Cloud 控制台中,按照下列步驟操作:
- 依序點選「選單 ☰」>「IAM 與管理」>「服務帳戶」>「+ 建立服務帳戶」。
- 將「服務帳戶名稱」設為
vertexai-add-on。
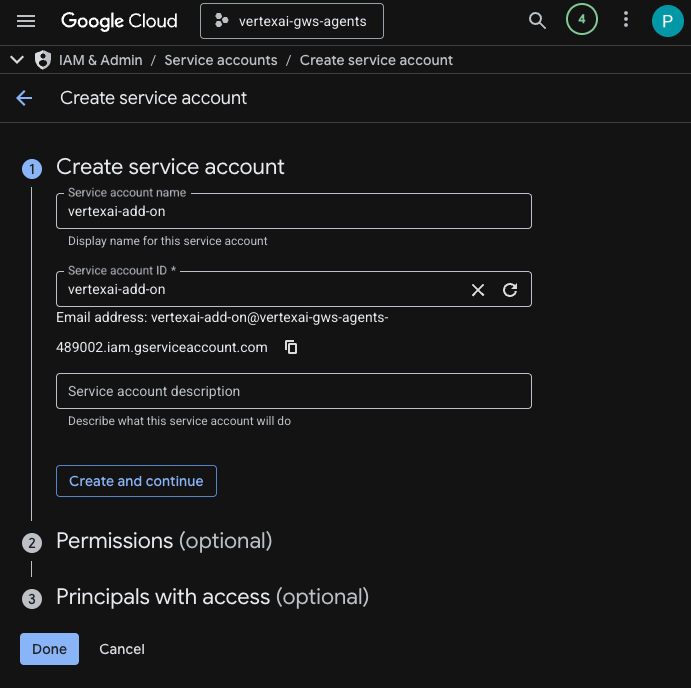
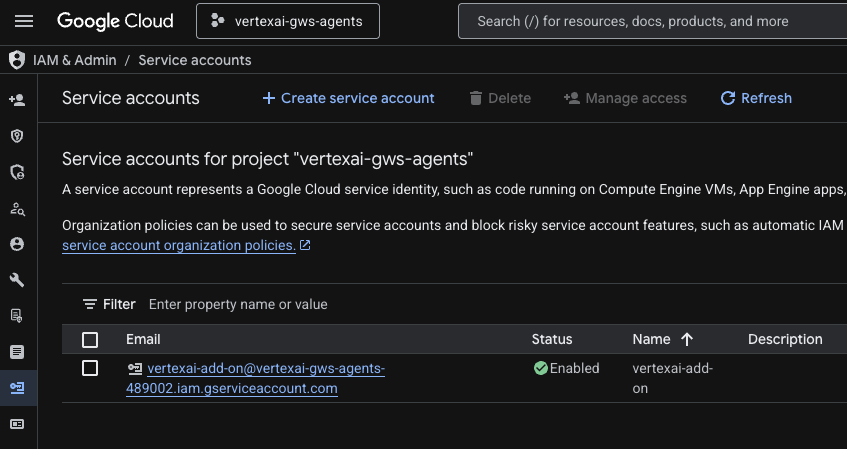
- 按一下「完成」,系統會將您重新導向至「服務帳戶」頁面,您可以在該頁面看到建立的服務帳戶。
- 選取新建立的服務帳戶,然後選取「金鑰」分頁標籤。
- 依序點選「新增金鑰」和「建立新的金鑰」。
- 選取「JSON」,然後按一下「建立」。
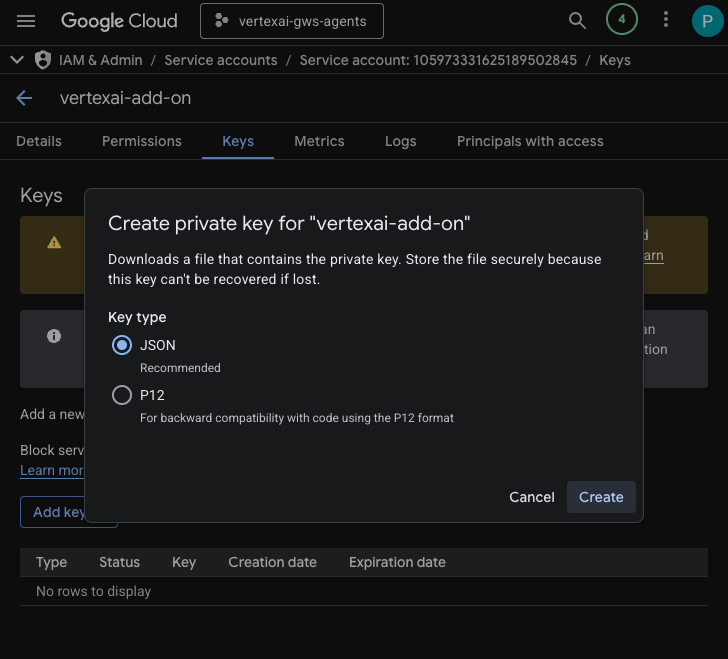
- 對話方塊會關閉,新建立的公開/私密金鑰組會自動下載至本機環境,並儲存為 JSON 檔案。
建立及設定 Apps Script 專案
建立新的 Apps Script 專案來託管外掛程式程式碼,並設定連線屬性。
- 點選下列按鈕,開啟 Enterprise AI 外掛程式 Apps Script 專案:
- 依序點選「總覽」 >「建立副本」。
- 在 Apps Script 專案中,依序點選「專案設定」 >「編輯指令碼屬性」 >「新增指令碼屬性」,即可新增指令碼屬性。
- 將 REASONING_ENGINE_RESOURCE_NAME 設為先前步驟中複製的 Vertex AI 代理程式資源名稱。格式如下:
projects/<PROJECT_NUMBER>/locations/us-central1/reasoningEngines/<AGENT_ID>
- 將 APP_SERVICE_ACCOUNT_KEY 設為先前步驟下載的服務帳戶檔案中的 JSON 金鑰。
- 按一下「儲存指令碼屬性」
部署至 Gmail 和 Chat
部署外掛程式,直接在 Gmail 和 Google Chat 中測試。
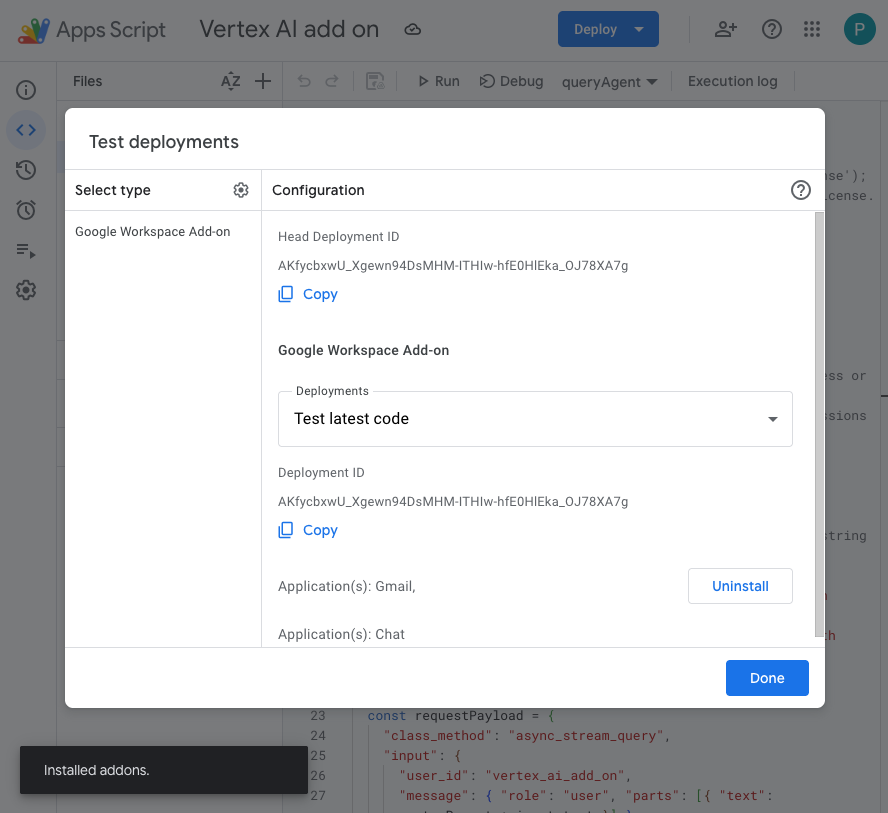
在 Apps Script 專案中,請按照下列步驟操作:
- 依序點選「部署」>「測試部署作業」,然後點選「安裝」。這項功能現已在 Gmail 中推出。
- 按一下「首要部署作業 ID」下方的「複製」。
在 Google Cloud 控制台中,按照下列步驟操作:
- 在 Google Cloud 搜尋欄位中搜尋
Google Chat API,依序點選「Google Chat API」、「管理」和「設定」。
- 選取「啟用互動功能」。
- 取消選取「加入聊天室和群組對話」。
- 在「連線設定」下方,選取「Apps Script」。
- 將「部署作業 ID」設為上一個步驟複製的「首要部署作業 ID」。
- 在「瀏覽權限」下方,選取「將這個 Chat 擴充應用程式提供給 Your Workspace Domain 中的特定使用者和群組」,然後輸入電子郵件地址。
- 按一下 [儲存]。
試用外掛程式
與即時外掛程式互動,確認外掛程式可以擷取資料,並根據內容回答問題。
在新分頁中開啟 Google Chat,然後按照下列步驟操作:
- 開啟與 Chat 應用程式 Vertex AI 互傳的即時訊息。
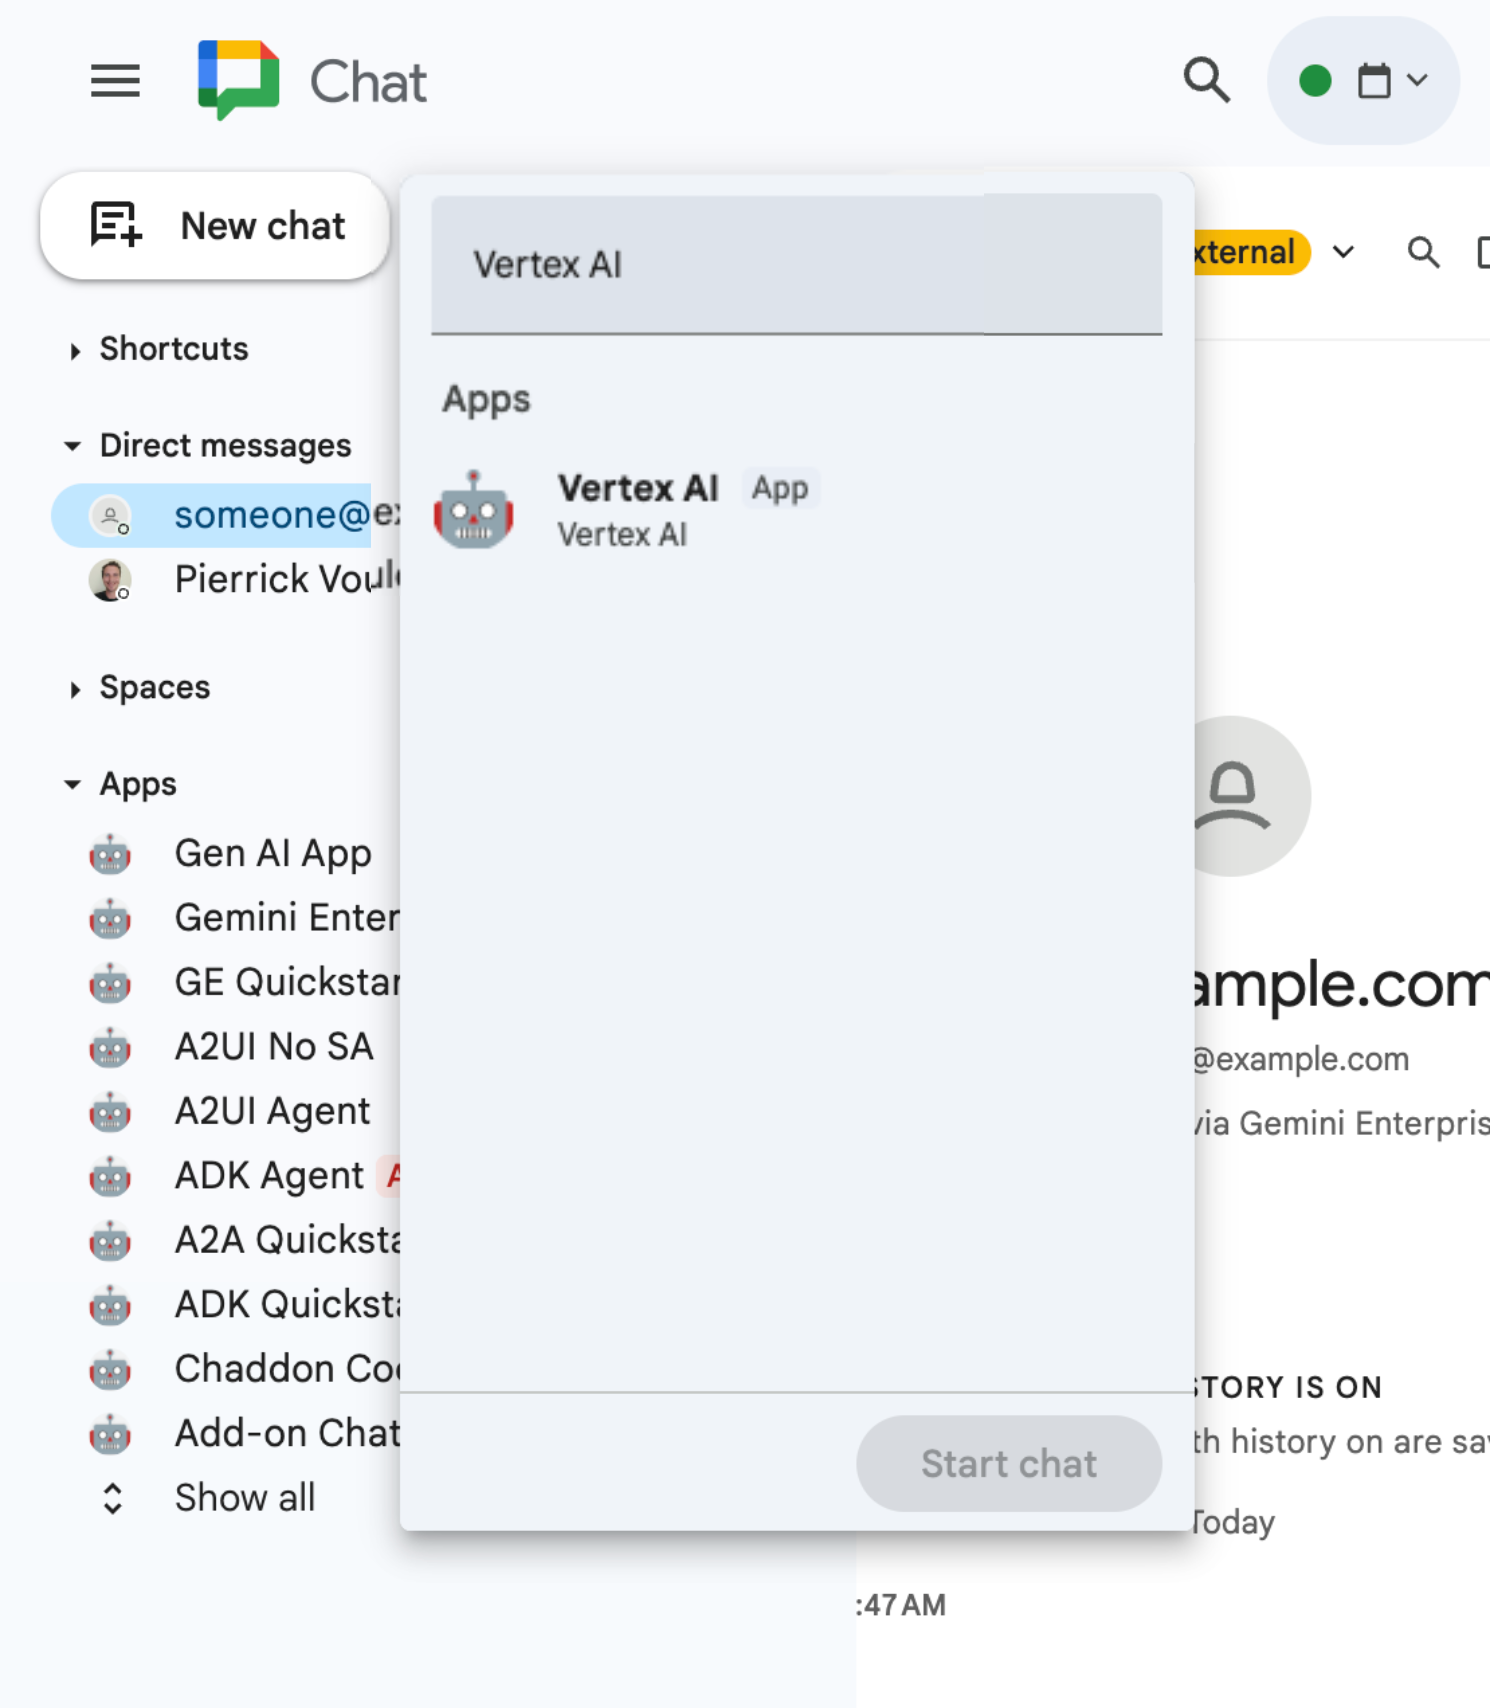
- 按一下「設定」,然後完成驗證流程。
- 輸入
What are my meetings for today?,然後按下enter鍵。Vertex AI Chat 應用程式應回覆結果。
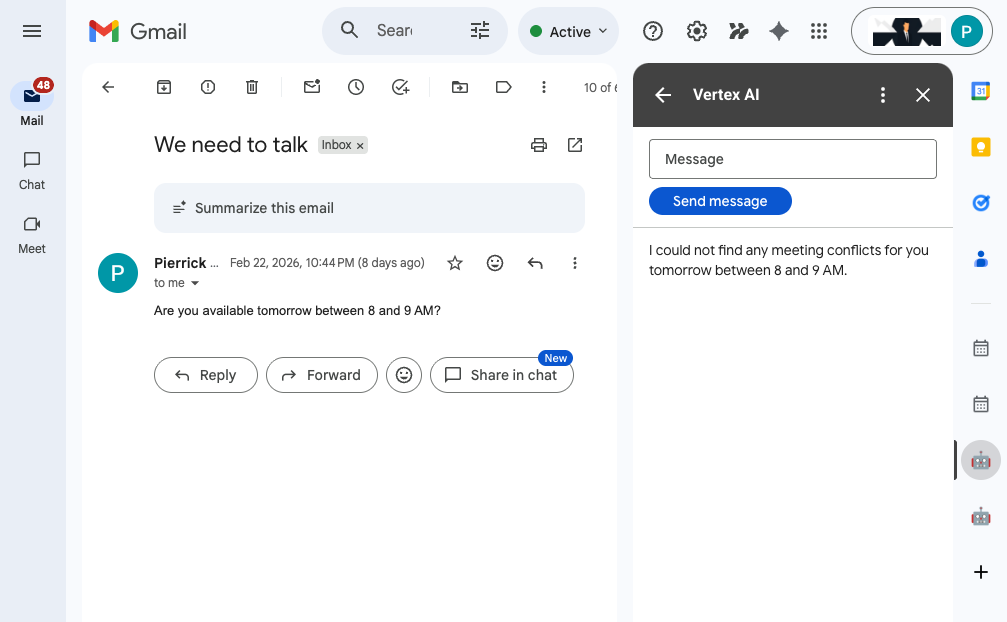
在新分頁中開啟 Gmail,然後按照下列步驟操作:
- 傳送電子郵件給自己,並將「主旨」設為
We need to talk,將「內文」設為Are you available today between 8 and 9 AM? - 開啟新收到的電子郵件訊息。
- 開啟 Vertex AI 外掛程式側欄。
- 將「Message」(訊息) 設為
Do I have any meeting conflicts? - 按一下 [傳送訊息]。
- 答案會顯示在按鈕下方。
6. 清理
刪除 Google Cloud 專案
如要避免系統向您的 Google Cloud 帳戶收取本程式碼研究室所用資源的費用,建議您刪除 Google Cloud 專案。
在 Google Cloud 控制台中,按照下列步驟操作:
- 依序點選「選單」圖示 ☰ >「IAM 與管理」>「設定」。
- 按一下「Shut down」(關閉)。
- 輸入專案 ID。
- 按一下「仍要關閉」。

7. 恭喜
恭喜!您建構的解決方案可讓 Vertex AI 和 Google Workspace 更緊密整合,為工作者提供強大助力!
後續步驟
本程式碼研究室只會展示最典型的用途,但您可能會想在解決方案中考慮許多擴充領域,例如:
- 使用 Gemini CLI 和 Antigravity 等 AI 輔助開發人員工具。
- 與其他代理框架和工具整合,例如自訂 MCP、自訂函式呼叫和生成式 UI。
- 與其他 AI 模型整合,包括託管於 Vertex AI 等專屬平台中的自訂模型。
- 與其他代理程式整合,這些代理程式可託管在 Dialogflow 等專屬平台上,或由第三方透過 Cloud Marketplace 提供。
- 在 Cloud Marketplace 發布代理程式,協助團隊、機構或公開使用者。
瞭解詳情
開發人員可參考許多資源,例如 YouTube 影片、說明文件網站、程式碼範例和教學課程:
- Google Cloud 開發人員中心
- 支援的產品 | Google Cloud MCP 伺服器
- A2UI
- Vertex AI Model Garden | Google Cloud
- Vertex AI Agent Engine 簡介
- 取得答案和後續追蹤 | Vertex AI Search | Google Cloud 說明文件
- 透過 Google Cloud Marketplace 提供 AI 虛擬服務專員
- Google Workspace 開發人員 YouTube 頻道 - 歡迎開發人員!
- Google Workspace 開發人員網站
- 所有 Google Workspace 外掛程式範例的 GitHub 存放區