
1. 始める前に
Vertex AI とは
Vertex AI は、エンタープライズ クラスの AI エージェントとアプリケーションを構築、デプロイ、スケーリングするための Google Cloud の統合開発プラットフォームです。このサービスは、グローバル規模のインフラストラクチャと深く統合されたカスタム エージェント ワークフローを設計するために必要な高度なツールを開発者とデータ サイエンティストに提供します。
- Model Garden にアクセスする: Gemini ファミリー全体、サードパーティ モデル、特殊なオープンソース モデルなど、150 以上の基盤モデルから選択して、特定のエージェント タスクに最適なモデルを見つけます。
- 複雑なオーケストレーションを設計する: Vertex AI は、推論を使用して計画を立て、複数ステップのタスクを実行し、外部 API を呼び出す自律型エージェントを設計するためのフレームワークを提供します。
- エンタープライズ グレードのグラウンディング: エージェントを、高性能 RAG(検索拡張生成)などのライブ ビジネスデータに接続して、ハルシネーションを排除し、事実の正確性を確保します。
- DevOps: エージェントのパフォーマンスと安全性を大規模に測定するための堅牢な SDK、API、評価ツールを使用して、エージェント開発を既存の CI/CD パイプラインにシームレスに統合します。
- 業界水準のセキュリティ: Vertex AI は、トレーニングやグラウンディングに使用される顧客データが非公開で暗号化され、グローバルな所在地要件に準拠していることを保証します。
- 最適化されたインフラストラクチャ: Google の世界クラスの TPU クラスタと GPU クラスタでエージェント ワークロードを簡単にスケーリングし、最も要求の厳しいグローバル アプリケーションでも低レイテンシのパフォーマンスを確保します。

Google Workspace とは
Google Workspace は、個人、学校、企業向けに設計されたクラウドベースの生産性向上ソリューションとコラボレーション ソリューションのコレクションです。
- コミュニケーション: ビジネス用メールサービス(Gmail)、ビデオ会議(Meet)、チーム メッセージング(Chat)。
- コンテンツ作成: ドキュメントの作成(ドキュメント)、スプレッドシートの作成(スプレッドシート)、プレゼンテーションの作成(スライド)を行うためのツール。
- 整理: 共有カレンダー(カレンダー)とデジタル メモ(Keep)。
- ストレージ: ファイルを安全に保存、共有できる一元化されたクラウド スペース(ドライブ)。
- 管理: ユーザーとセキュリティ設定を管理するための管理ツール(Workspace 管理コンソール)。
どのようなカスタム統合ですか?
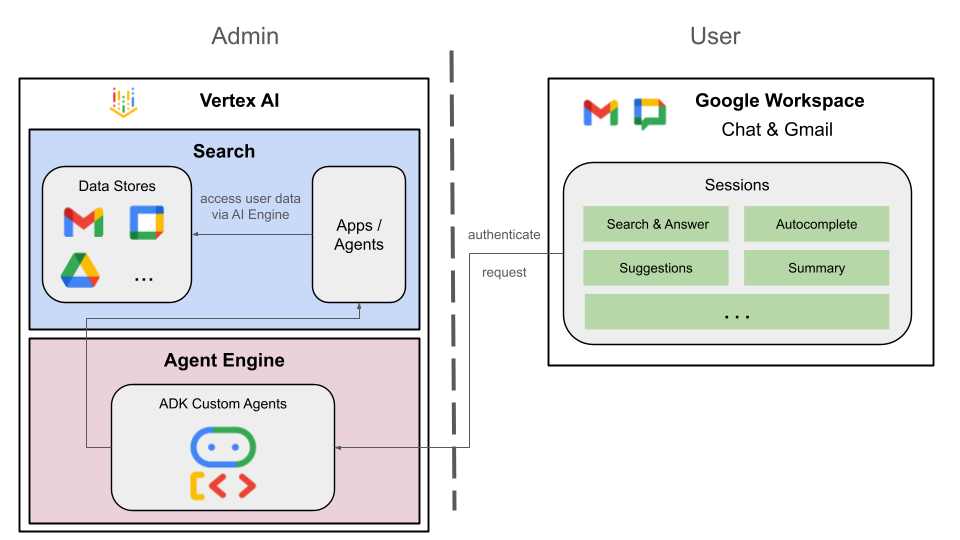
Google Workspace と Vertex AI は、強力なフィードバック ループを形成します。Workspace はリアルタイム データとコラボレーション コンテキストを提供し、Vertex AI はインテリジェントなワークフローの自動化に必要なモデル、エージェントによる推論、オーケストレーションを提供します。
- スマートな接続性: Google が管理するデータストア、API、MCP サーバー(Google が管理するものとカスタムのもの)により、エージェントは Workspace データに安全かつシームレスにアクセスし、ユーザーに代わってアクションを実行できます。
- カスタム エージェント: ノーコード デザイナーまたはプロコード フレームワークを使用して、管理者が管理する Workspace のデータとアクションに基づいて、特殊なエージェントを構築できます。
- ネイティブ統合: Workspace アドオンは、専用の UI コンポーネントまたはバックグラウンド プロセスを介して、AI システムと Chat や Gmail などのアプリケーション間のギャップを埋めます。これにより、エージェントはユーザーの状況を正確に把握し、コンテキストに応じたサポートを即座に提供できます。
Google Workspace の堅牢な生産性エコシステムと Vertex AI の高度なエージェント機能を組み合わせることで、組織は、チームが日常的に使用しているツール内で複雑なワークフローを自動化する、データに基づいたカスタム AI エージェントを通じて、オペレーションを変革できます。
前提条件
ご自身の環境で手順をすべて行う場合は、次のものが必要です。
- Google Cloud と Python の基礎知識。
- 課金が設定されており、自分がオーナーである Google Cloud プロジェクト。既存のプロジェクトで課金が有効になっていることを確認するには、プロジェクトの課金ステータスを確認するをご覧ください。プロジェクトを作成して課金管理を設定するには、Google Cloud プロジェクトを作成するをご覧ください。プロジェクトの所有権を変更するには、プロジェクト メンバーの管理またはプロジェクトの所有権の変更をご覧ください。
- Google Chat へのアクセス権を持ち、スマート機能がオンになっている Business または Enterprise の Google Workspace アカウント。
- Google Cloud プロジェクト用に Google Cloud CLI がインストールされ、初期化されていること。
- Python 3.11 以降がインストールされている。公式の Python ウェブサイトの手順をご覧ください。
作業内容
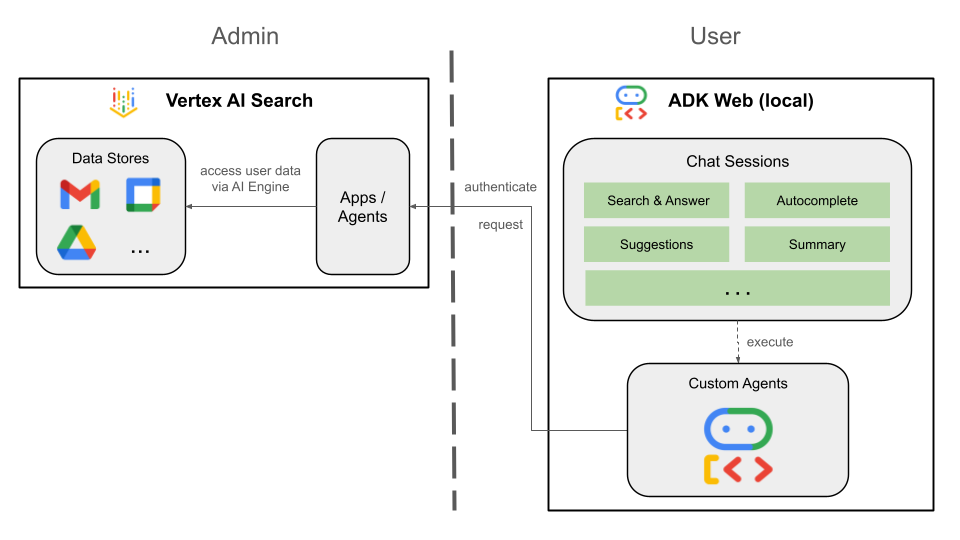
この Codelab では、Google Workspace と緊密に統合された Vertex AI エージェントを使用して 3 つのソリューションを構築します。データ、アクション、UI とのやり取りに使用できるアーキテクチャ パターンについて説明します。
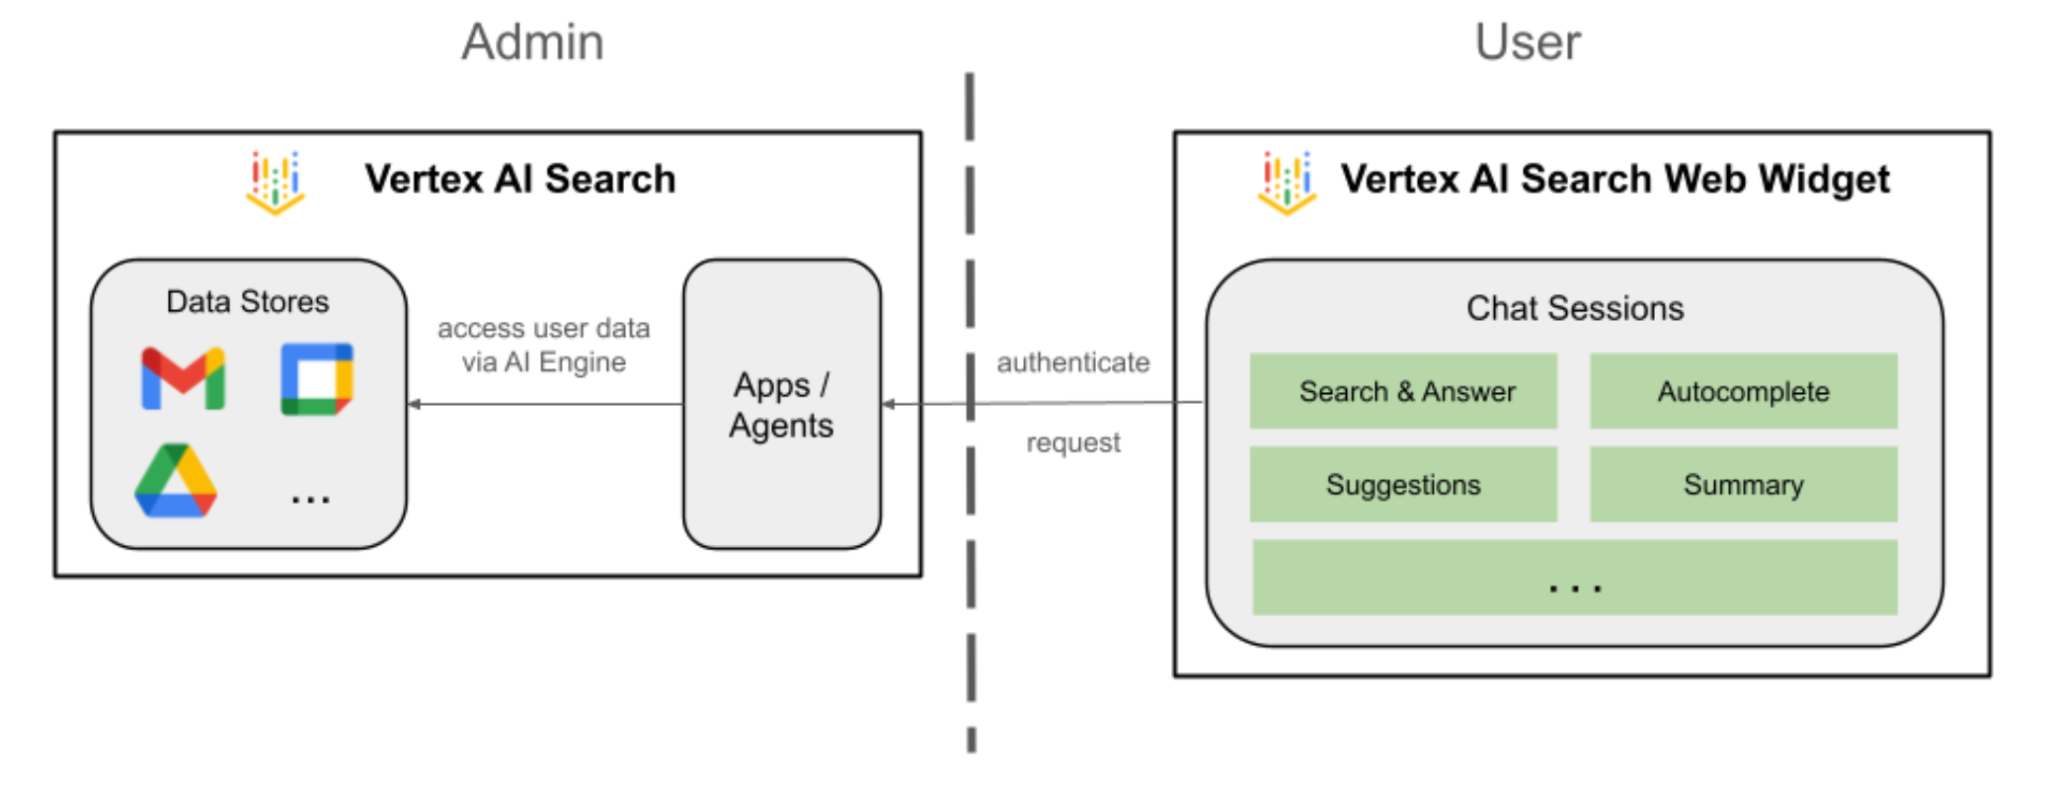
Vertex AI Search アプリ
このエージェントを使用すると、ユーザーは自然言語で Workspace のデータを検索してアクションを実行できます。次の要素に依存します。
- モデル: Gemini。
- データとアクション: Google Workspace(カレンダー、Gmail、ドライブ)用の Vertex AI データストア。
- エージェント ホスト: Vertex AI Search。
- UI: Vertex AI Search ウェブ ウィジェット。
カスタム エージェント
このエージェントを使用すると、ユーザーはカスタムツールとルールを使用して、自然言語で Workspace のデータを検索し、アクションを実行できます。次の要素に依存します。
- モデル: Gemini。
- データとアクション: Google Workspace(カレンダー、Gmail、ドライブ)用の Vertex AI データストア、Google が管理する Vertex AI Search Model Context Protocol(MCP)サーバー、Google Chat メッセージを送信するカスタムツール関数(Google Chat API 経由)。
- エージェント構築ツール: Agent Development Kit(ADK)。
- エージェント ホスト: Vertex AI Agent Engine。
- UI: ADK Web。
Google Workspace アドオンとしてのエージェント
このエージェントを使用すると、Workspace アプリの UI のコンテキスト内で、Workspace のデータを自然言語で検索できます。次の要素に依存します。
- モデル: Gemini。
- データとアクション: Google Workspace(カレンダー、Gmail、ドライブ)用の Vertex AI データストア、Google が管理する Vertex AI Search Model Context Protocol(MCP)サーバー、Google Chat メッセージを送信するカスタムツール関数(Google Chat API 経由)。
- エージェント構築ツール: Agent Development Kit(ADK)。
- エージェント ホスト: Vertex AI Agent Engine。
- UI: Chat と Gmail 用の Google Workspace アドオン(カレンダー、ドライブ、ドキュメント、スプレッドシート、スライドにも簡単に拡張可能)。
- Google Workspace アドオン: Apps Script、Vertex AI Agent Engine API、コンテキスト(選択した Gmail メッセージ)。
学習内容
- データとアクションを可能にする Vertex AI Search と Google Workspace 間の統合ポイント。
- Vertex AI でホストされるカスタム エージェントを構築するオプション。
- ユーザーがエージェントにアクセスする方法(Vertex AI Search ウェブ ウィジェットや Google Workspace アプリケーションなど)。
この Codelab への簡単なアクセス
2. 設定
ソリューションを構築する前に、プロジェクトの Vertex AI Applications 設定を初期化し、必要な API を有効にして、Vertex AI Workspace データストアを作成する必要があります。
コンセプトを確認する
Vertex AI アプリケーション
Vertex AI アプリケーションは、Google Cloud 上のマネージド エンドツーエンド ソリューションです。ML モデル(生成 AI エージェントや検索エンジンなど)を企業データや特殊なツールと統合して、セマンティック検索、コンテンツ生成、顧客対応の自動化などの複雑なタスクを実行します。
Vertex AI データストア
Vertex AI データストアは、Google Workspace などのファーストパーティ データソースや、Jira や Shopify などのサードパーティ アプリケーションから取り込まれたデータを含むエンティティです。サードパーティ アプリケーションのデータを含むデータストアは、データコネクタとも呼ばれます。
Vertex AI Applications の設定を開始する
Vertex AI Applications の設定を初期化して、エージェントの作成を有効にします。
新しいタブで Google Cloud コンソールを開き、次の操作を行います。
- プロジェクトを選択します。
- Google Cloud の検索フィールドで、[AI Applications] に移動します。
- 利用規約を確認して同意したら、[続行して API を有効にする] をクリックします。
- [設定] に移動します。
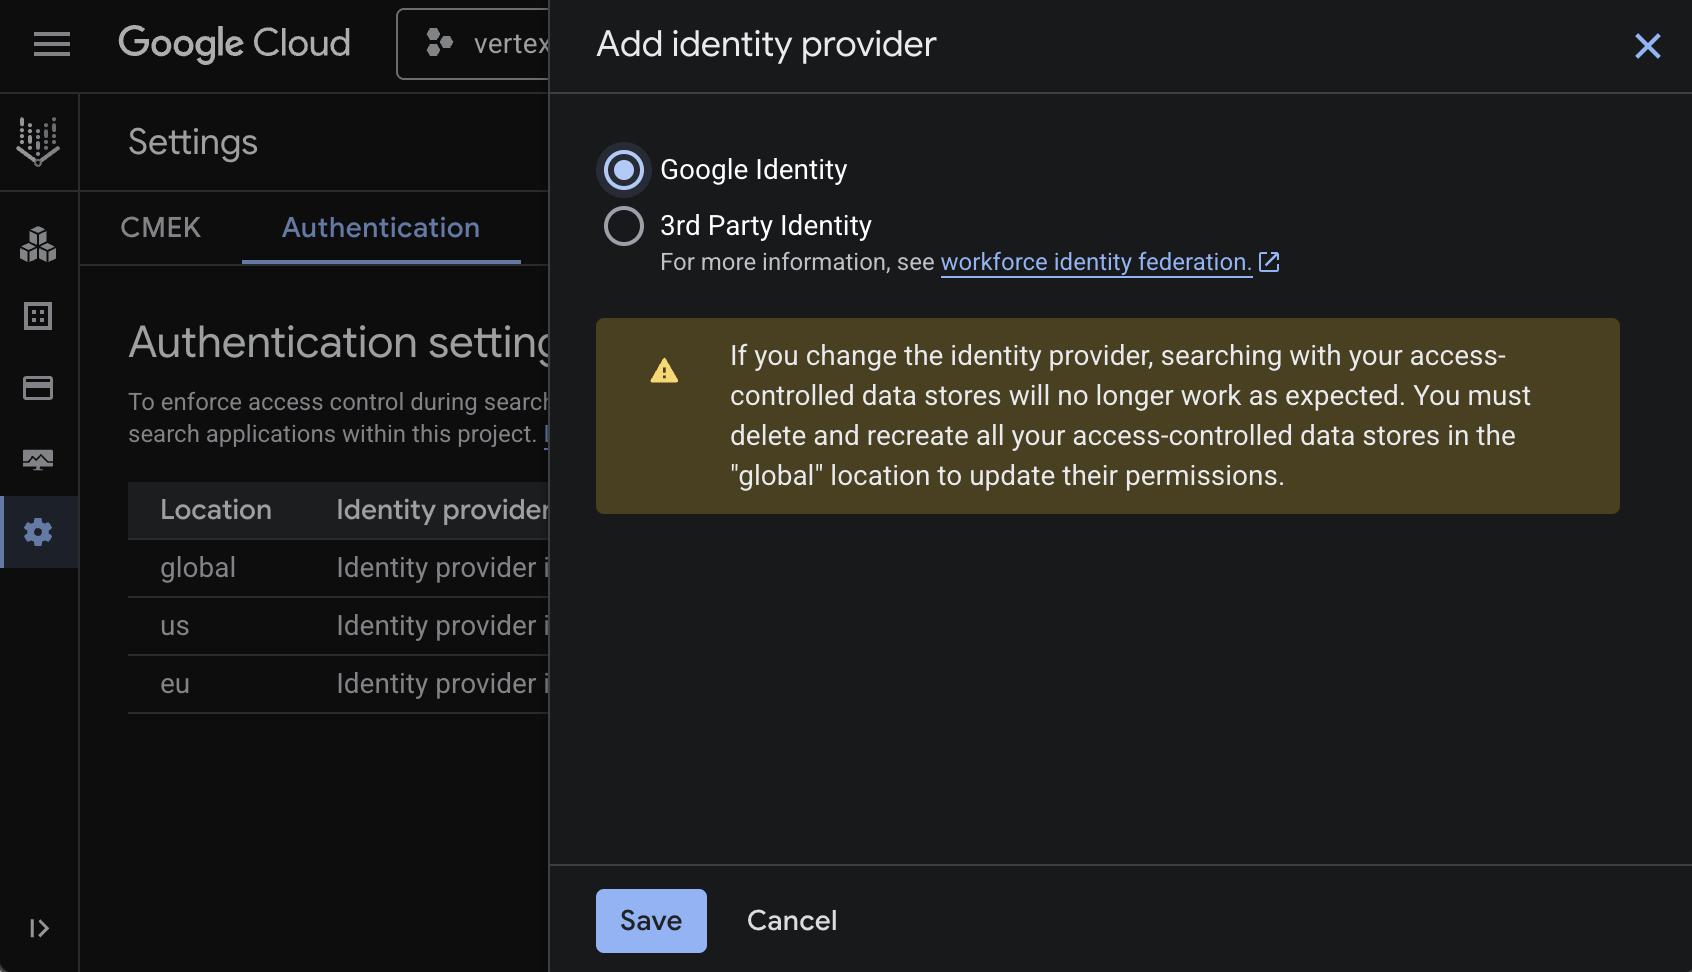
- [Authentication] タブで、global を編集します。
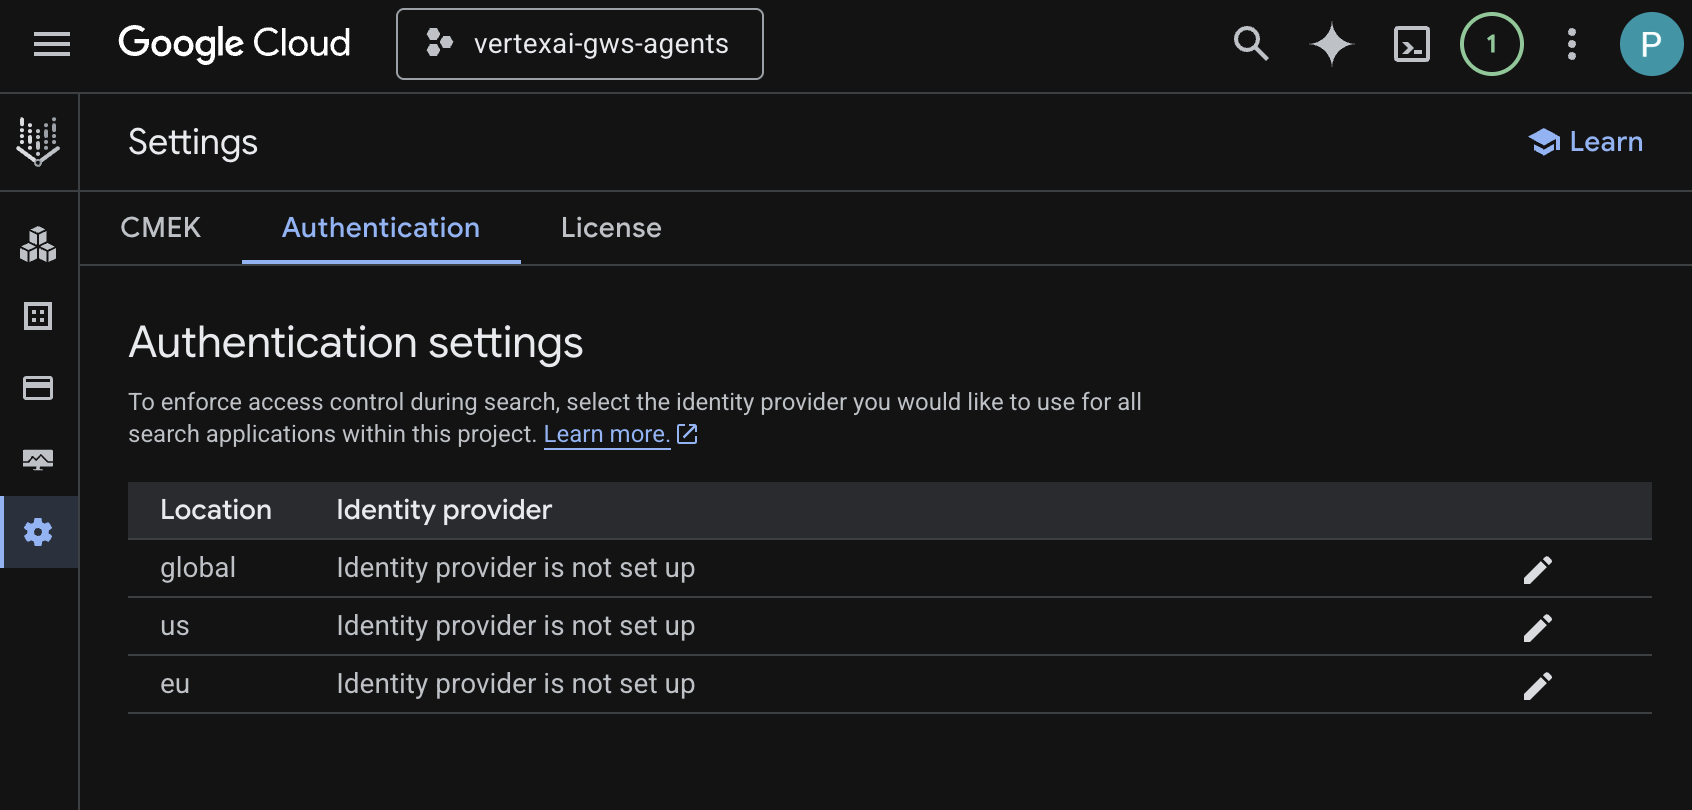
- [Google Identity] を選択し、[保存] をクリックします。
API を有効にする
Vertex AI Workspace データストアでは、次の API を有効にする必要があります。
- Google Cloud コンソールで、カレンダー、Gmail、People API を有効にします。
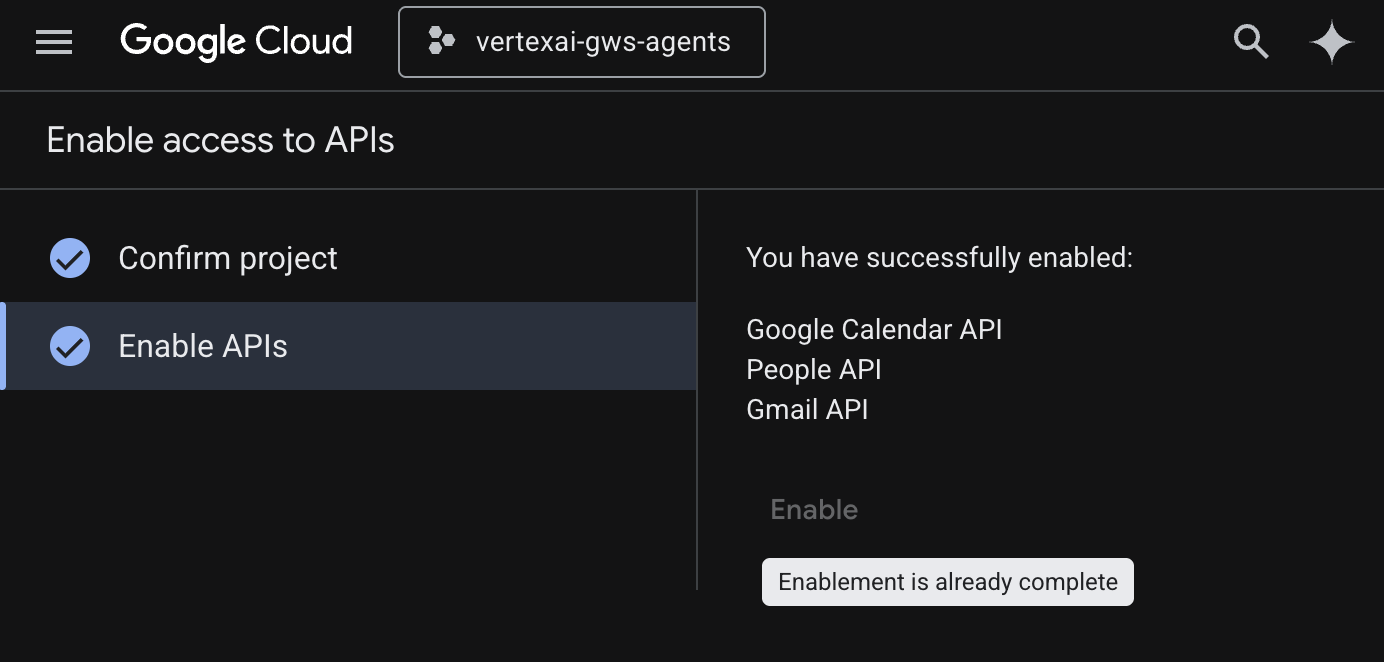
- メニュー ☰ > [API とサービス] > [有効な API とサービス] をクリックし、Google カレンダー API、Gmail API、People API がリストに含まれていることを確認します。
データストアを作成する
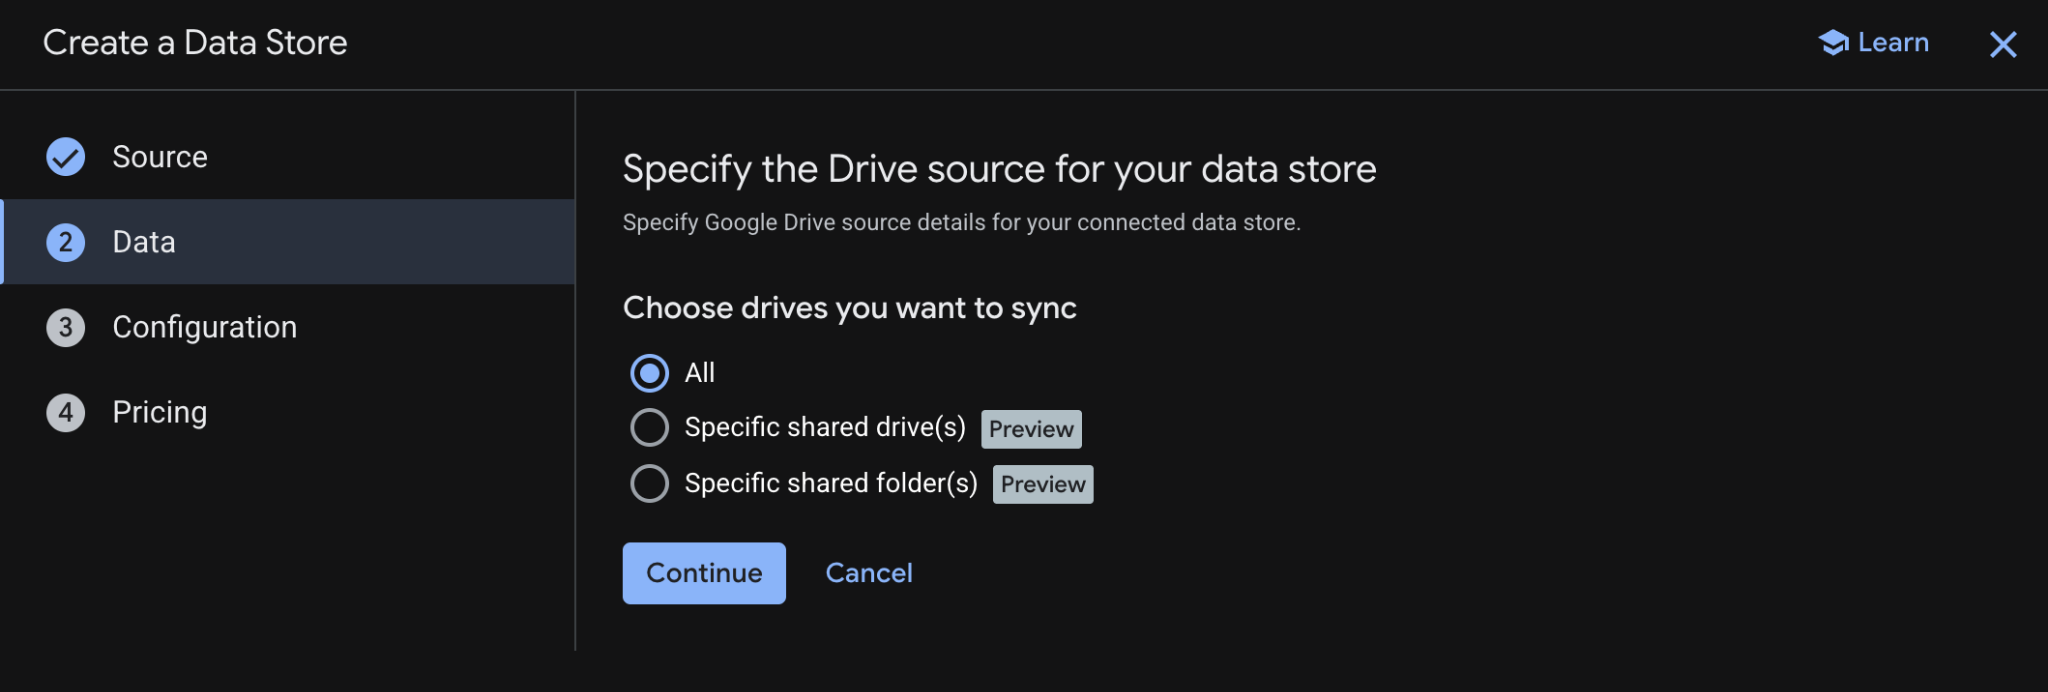
Google ドライブのデータストアを作成します。
- Google Cloud コンソールで、[AI Applications] に移動し、[データストア] に移動します。
- [+ データストアを作成] をクリックします。
- [ソース] の [Google ドライブ] で、[選択] をクリックします。
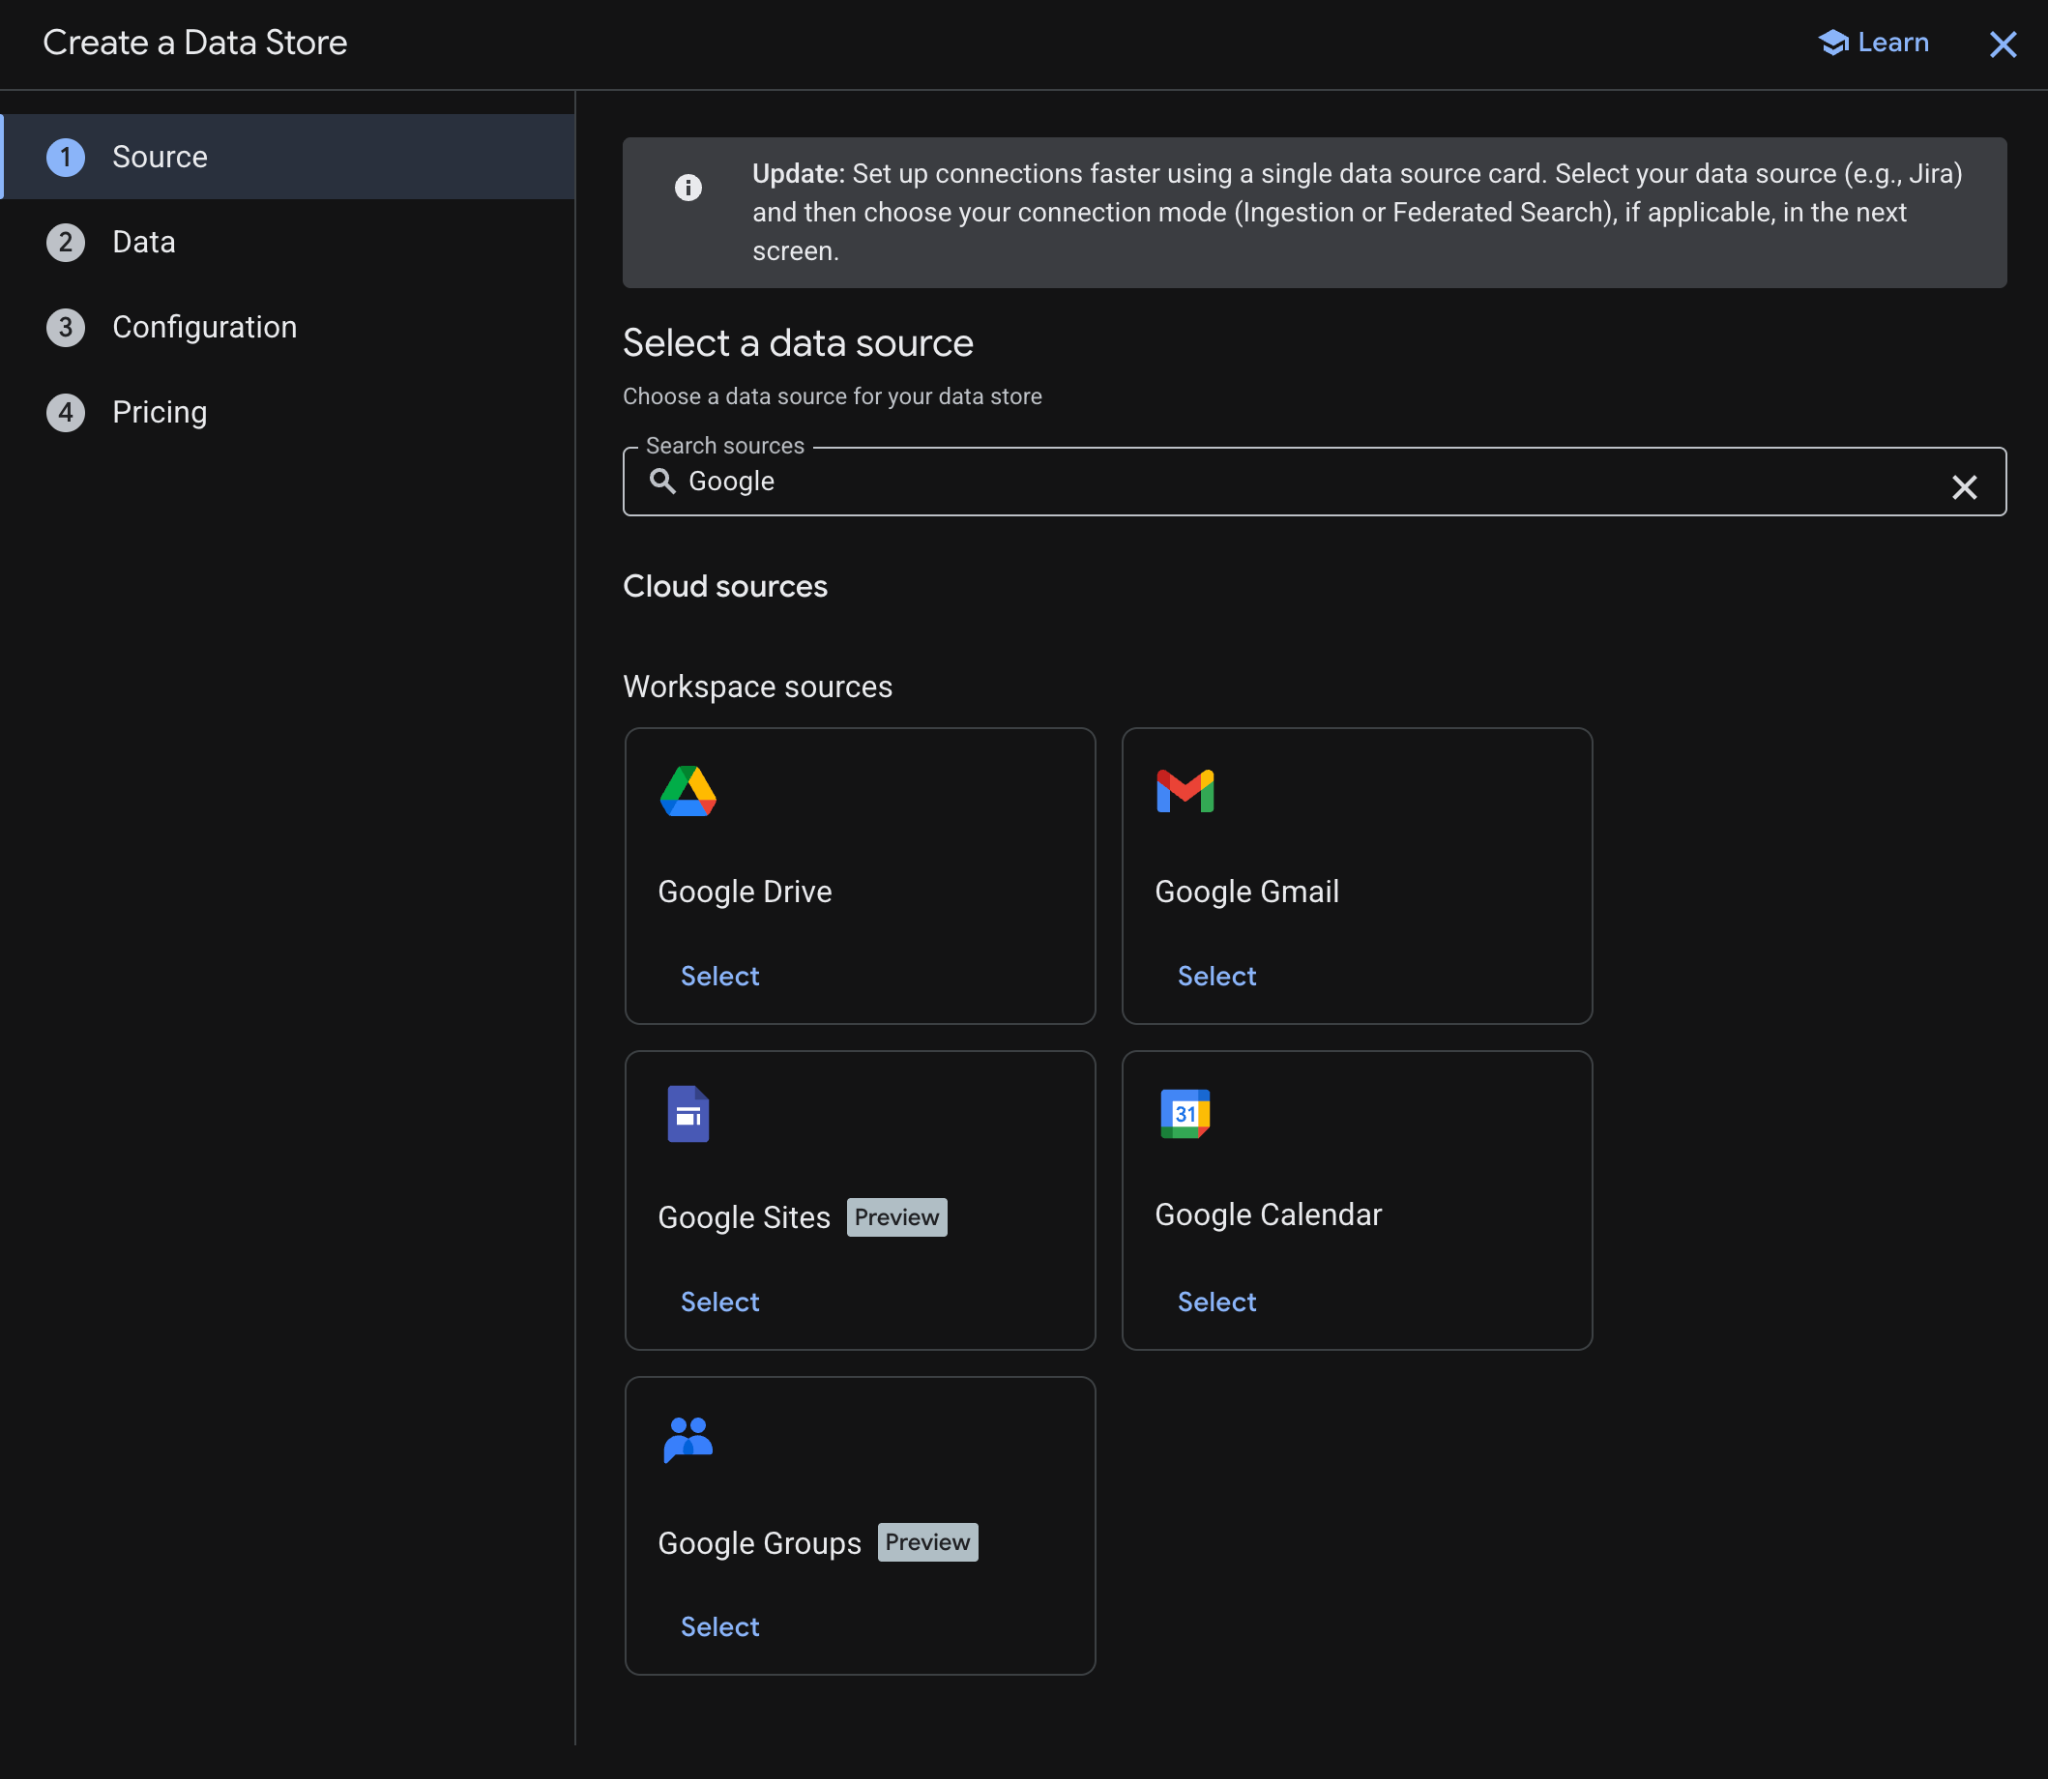
- [データ] で [すべて] を選択し、[続行] をクリックします。
- [構成] で、[データコネクタ名] を
driveに設定し、適用される可能性のある料金を確認して同意してから、[続行] をクリックします。
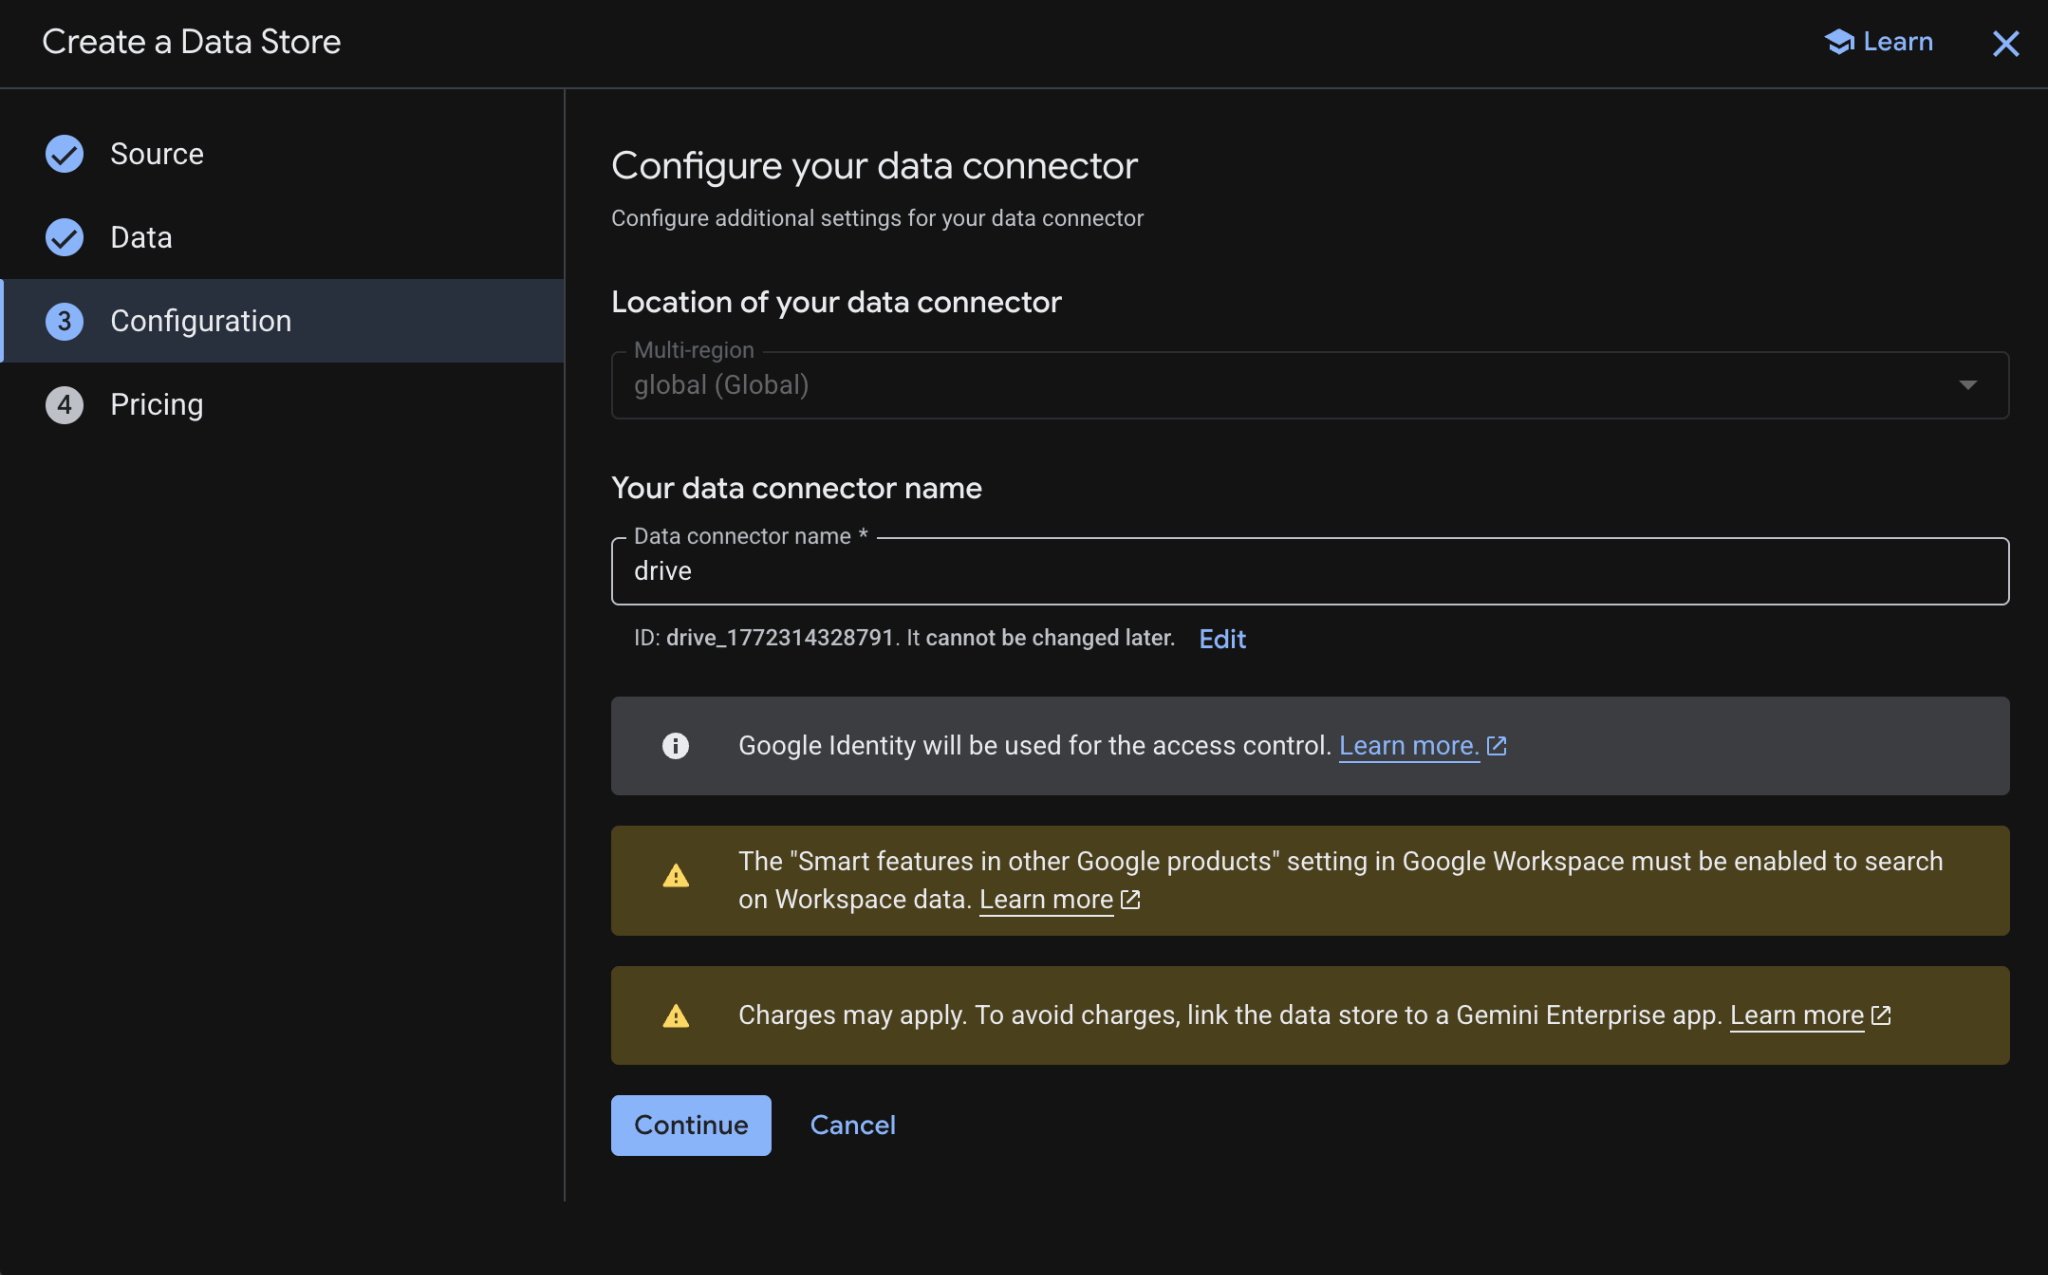
- [料金] で、ご希望の料金モデルを選択し、[作成] をクリックします。この Codelab のコンテキストでは、一般的な料金をおすすめします。
- [データストア] に自動的にリダイレクトされ、新しく追加されたデータストアが表示されます。
Google カレンダーのデータストアを作成します。
- [+ データストアを作成] をクリックします。
- [ソース] で「Google カレンダー」を検索し、[選択] をクリックします。
- [アクション] セクションで、[スキップ] をクリックします。
- [構成] セクションで、[データコネクタ名] を
calendarに設定します。 - [作成] をクリックします。
- [データストア] に自動的にリダイレクトされ、新しく追加されたデータストアが表示されます。
Google Gmail データストアを作成します。
- [+ 新しいデータストア] をクリックします。
- [ソース] で [Google Gmail] を検索し、[選択] をクリックします。
- [アクション] セクションで、[スキップ] をクリックします。
- [構成] セクションで、[データコネクタ名] を
gmailに設定します。 - [作成] をクリックします。
- [データストア] に自動的にリダイレクトされ、新しく追加されたデータストアが表示されます。
3. Vertex AI Search アプリ
このエージェントを使用すると、ユーザーは自然言語で Workspace のデータを検索してアクションを実行できます。次の要素に依存します。
- モデル: Gemini。
- データとアクション: Google Workspace(カレンダー、Gmail、ドライブ)用の Vertex AI データストア。
- エージェント ホスト: Vertex AI Search。
- UI: Vertex AI Search ウェブ ウィジェット。
コンセプトを確認する
Vertex AI Search アプリ
Vertex AI Search アプリは、検索結果、アクション、エージェントをエンドユーザーに提供します。API のコンテキストでは、「アプリ」という用語と「エンジン」という用語を同じ意味で使用できます。データストアのデータを使用して検索結果、回答、アクションを提示するには、アプリがデータストアに接続される必要があります。
Vertex AI Search ウェブ ウィジェット
Vertex AI Search ウェブ ウィジェットは、事前構築されたカスタマイズ可能な UI コンポーネントです。このコンポーネントを使用すると、デベロッパーは最小限のコーディングで、AI を活用した検索バーと結果インターフェースをウェブサイトに直接埋め込むことができます。
Vertex AI Search プレビュー
Vertex AI Search プレビューは、Google Cloud コンソール内の組み込みテスト環境です。デベロッパーは、この環境で検索構成と生成された回答を検証してから、同じ設定をプロダクション レディな Vertex AI Search ウェブ ウィジェットにシームレスにデプロイできます。
ソリューション アーキテクチャを確認する
アプリを作成する
データストアをアンカーする新しい検索アプリを作成します。
Cloud コンソールで [AI アプリケーション] > [アプリ] を開き、次の操作を行います。
- [+ アプリを作成] をクリックします。
- [タイプ] の [カスタム検索(一般)] で、[作成] をクリックします。
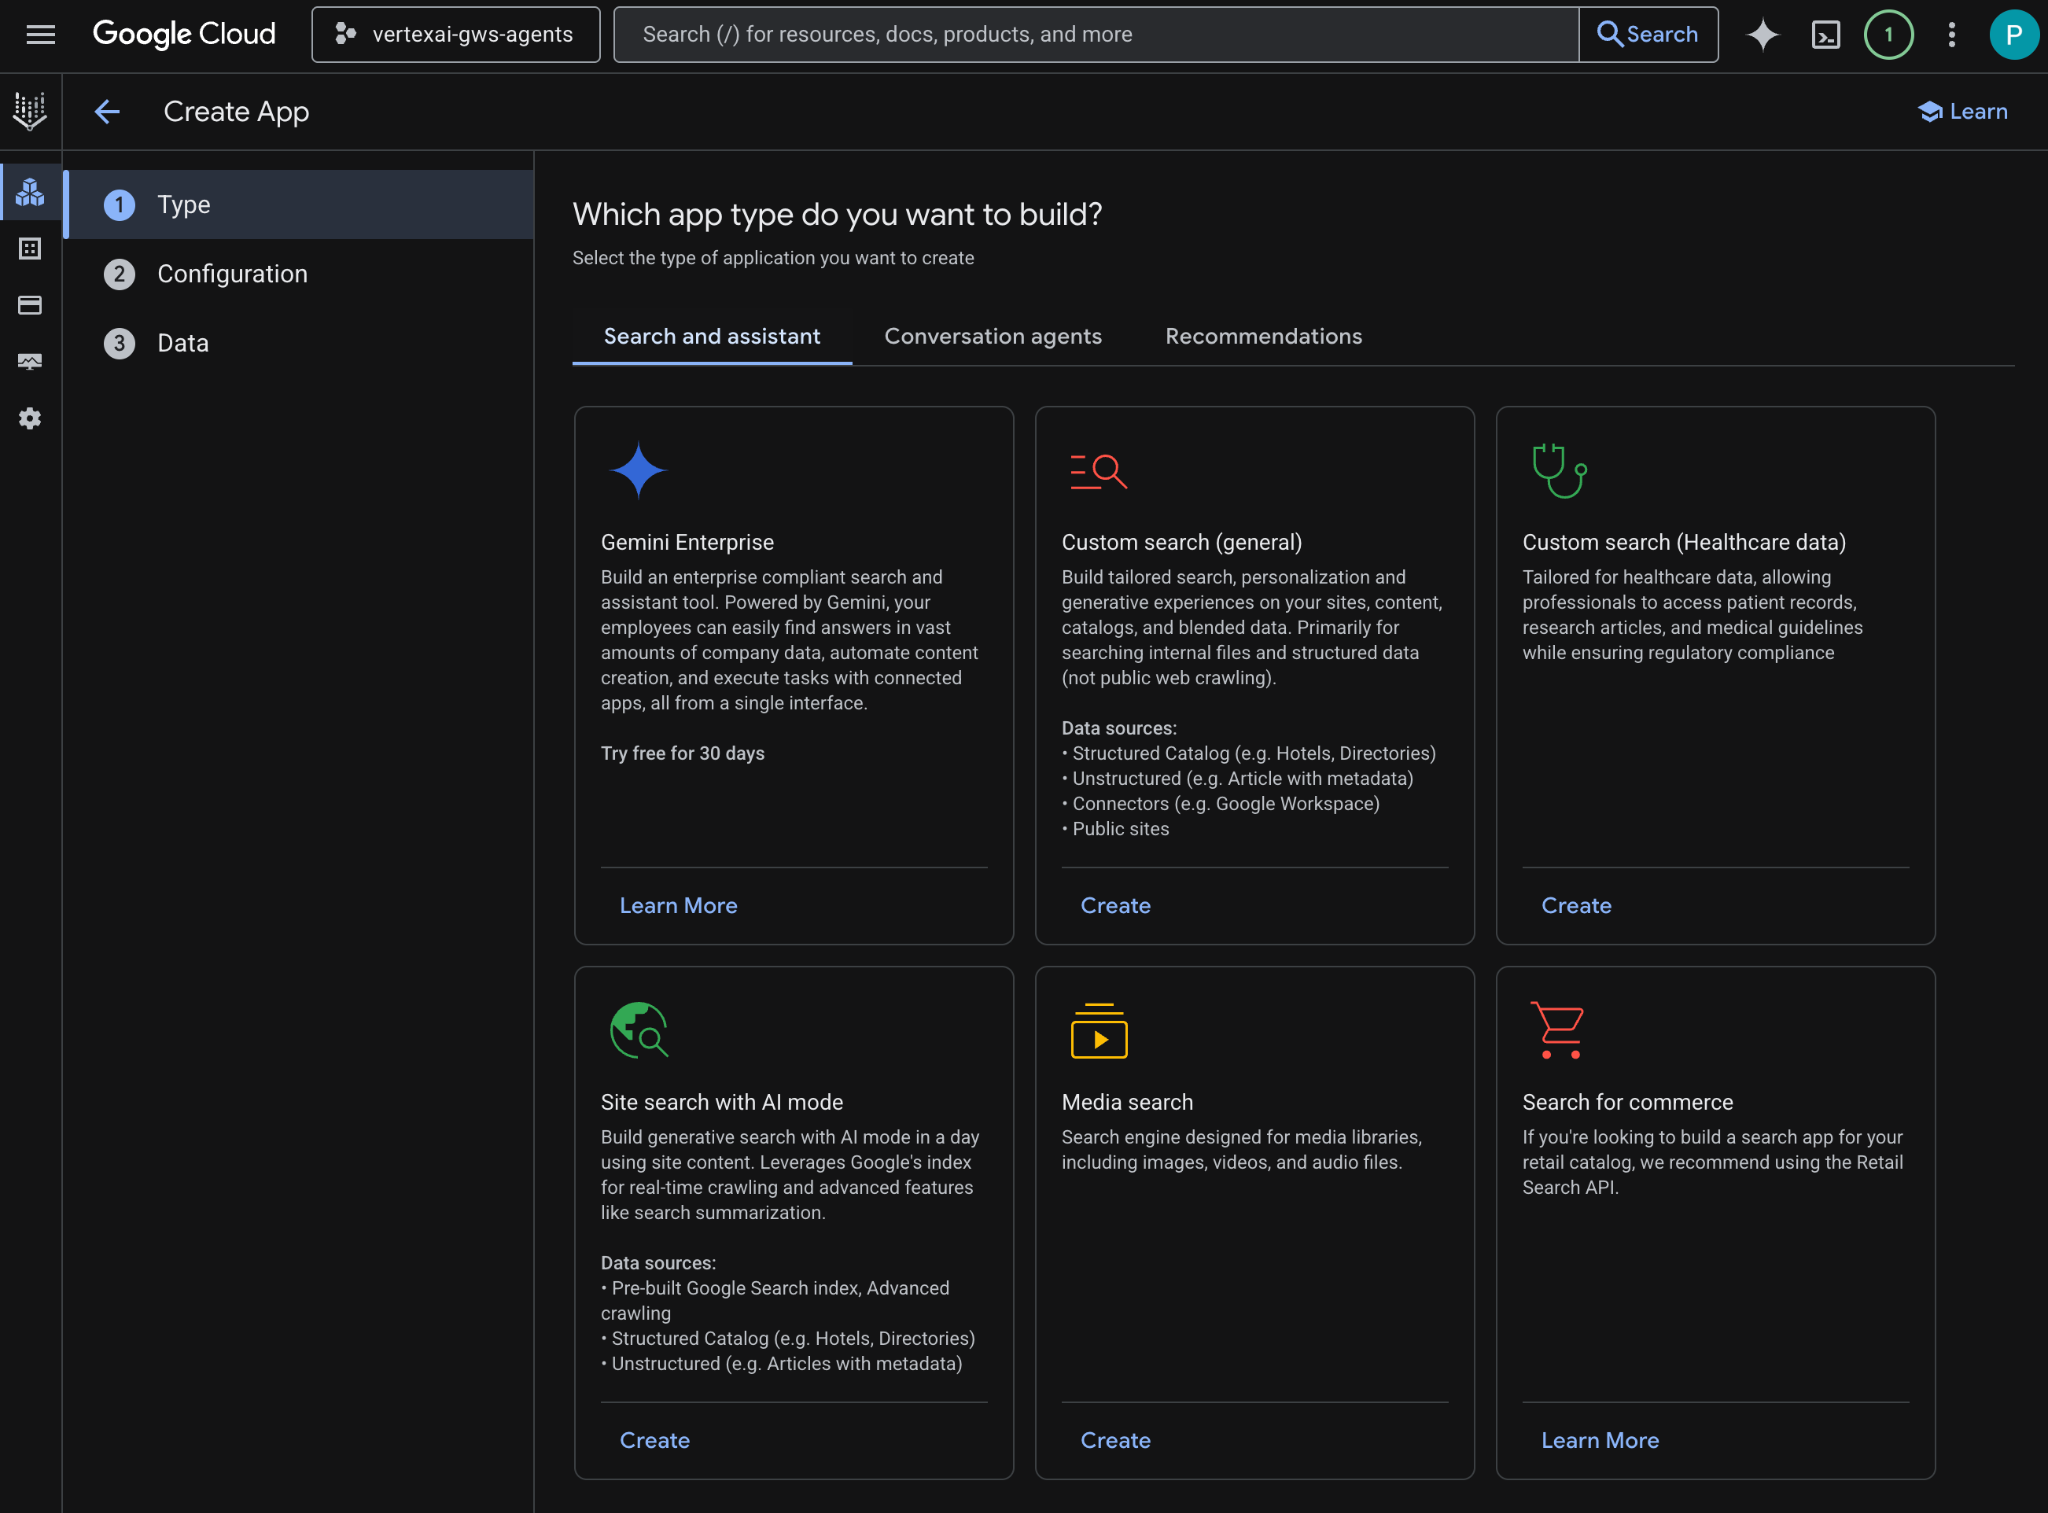
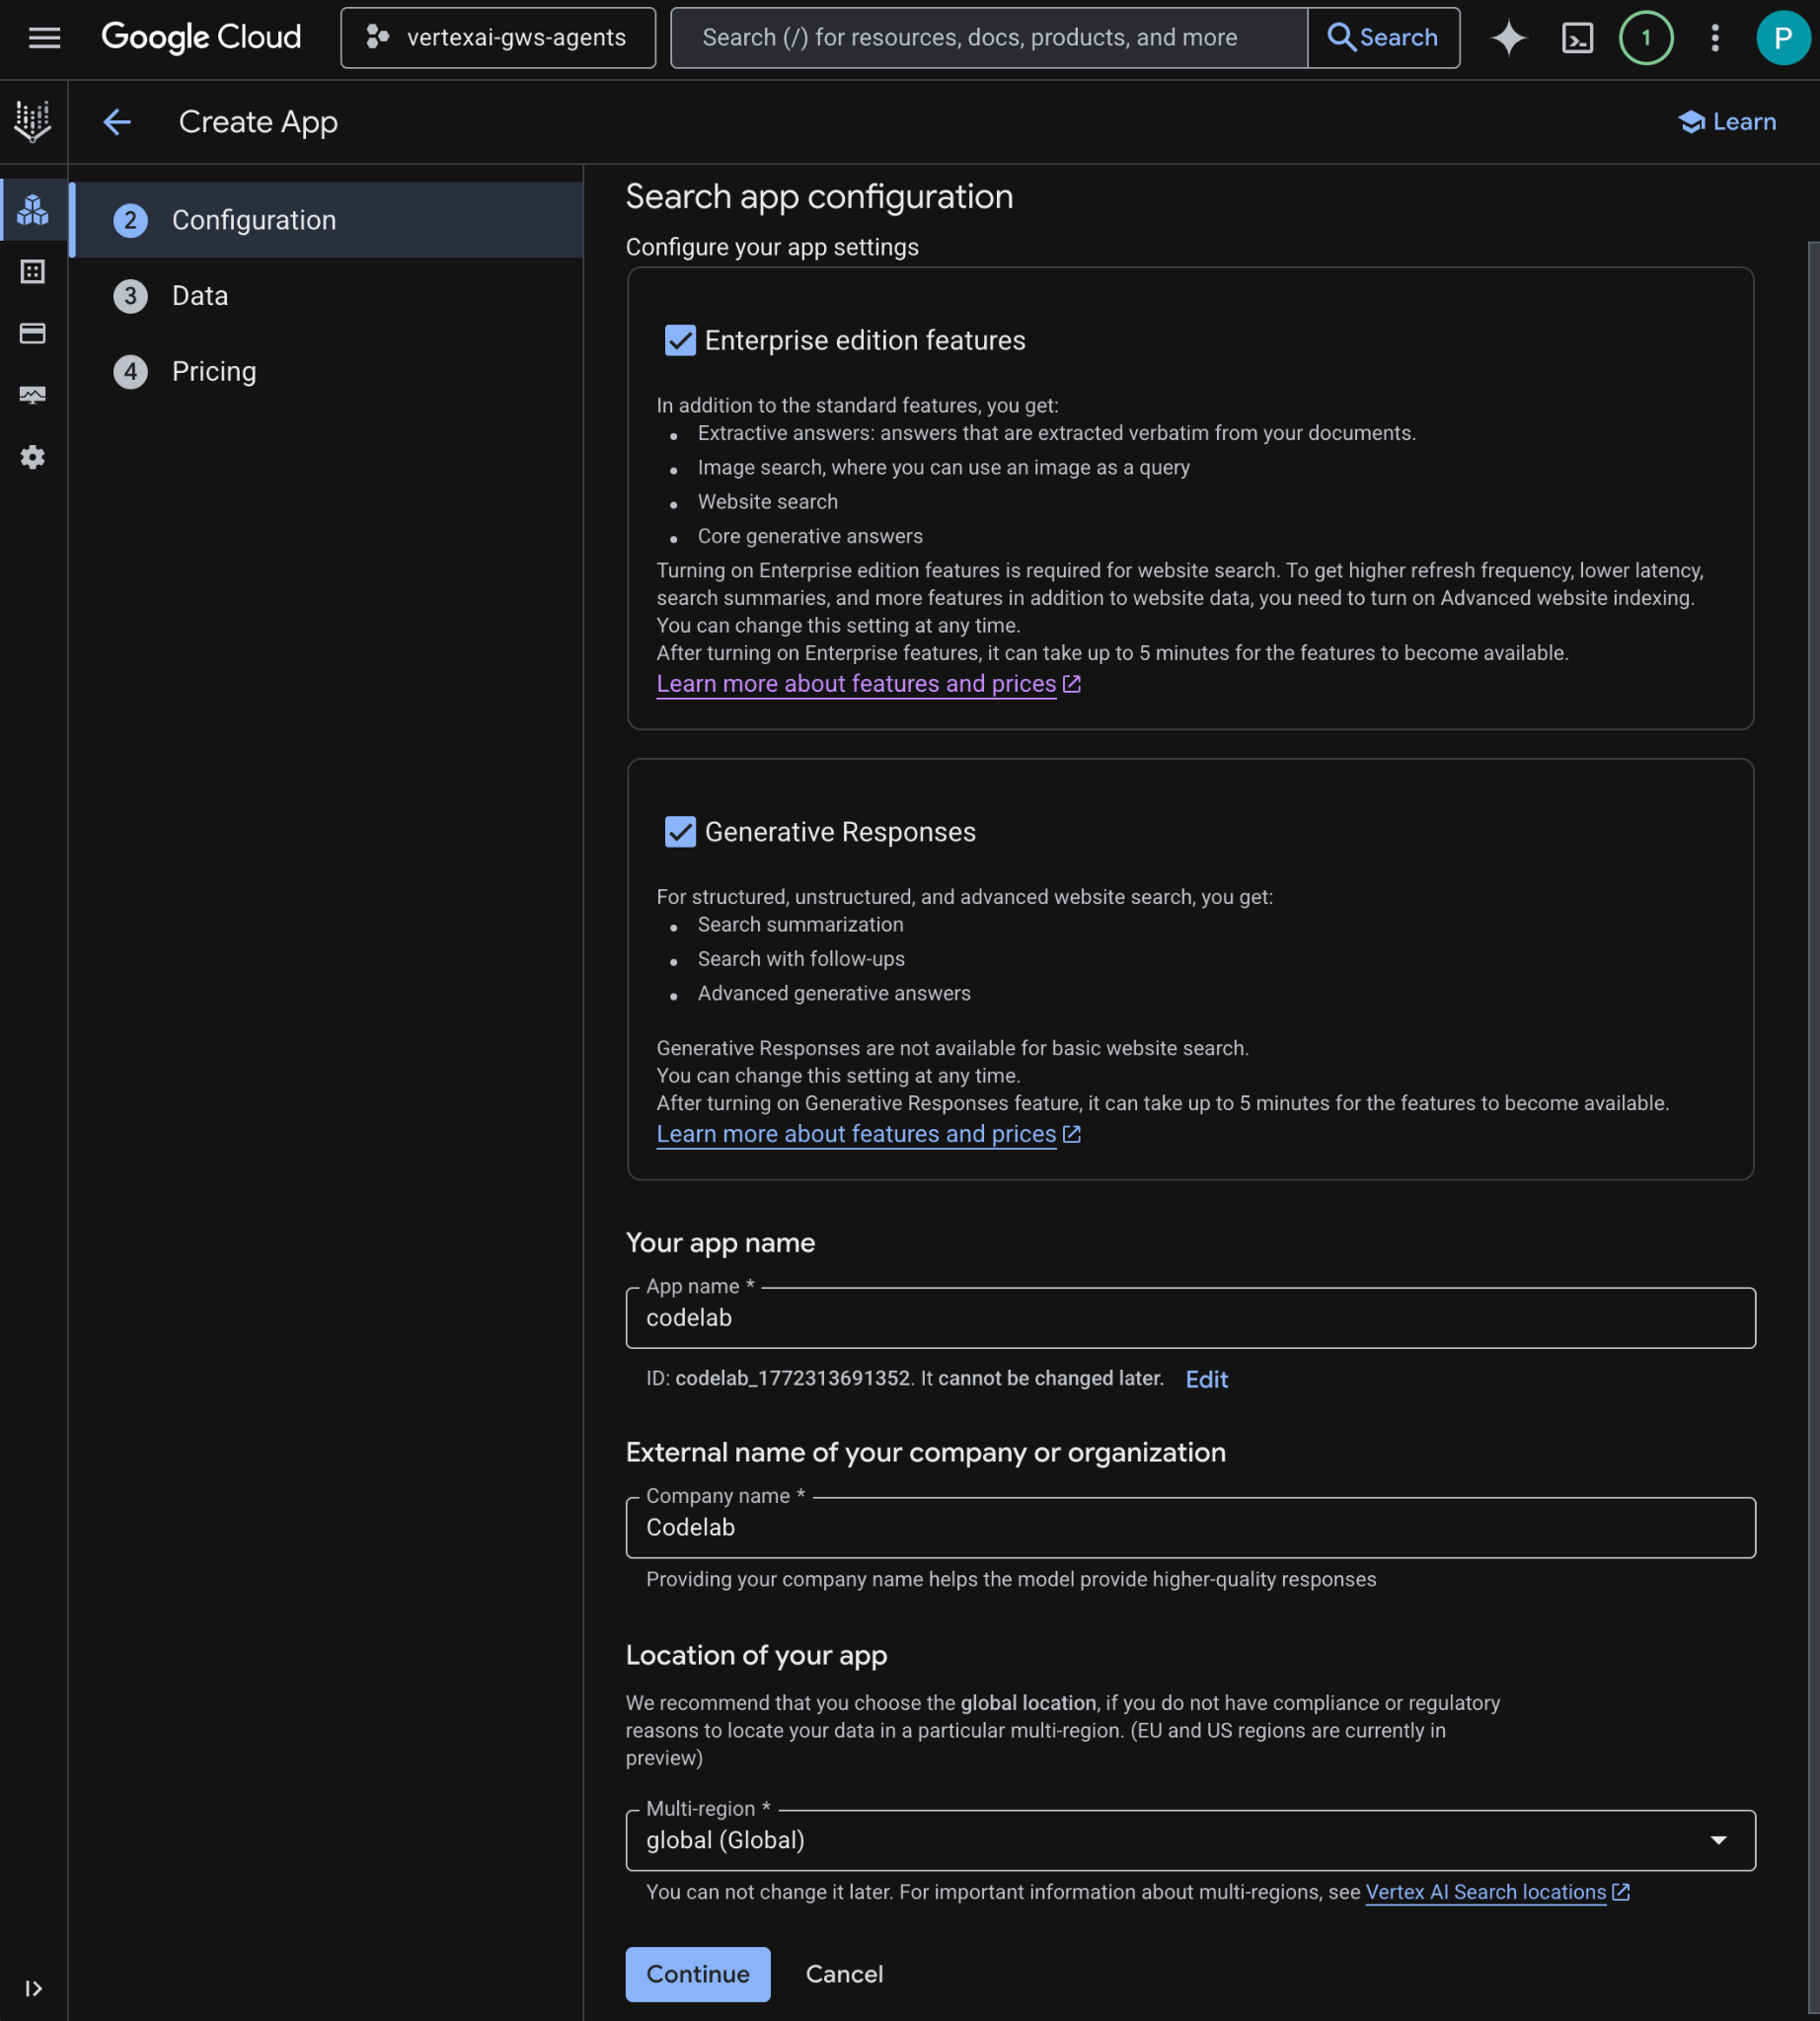
- [構成] で、料金を確認して同意した後、[Enterprise エディションの機能] と [生成された回答] をオンにします。
- [アプリ名] を
codelabに設定します。 - ID は名前に基づいて生成され、フィールドの下に表示されます。コピーします。
- [会社名] を
Codelabに設定します。 - [マルチリージョン] を
global (Global)に設定します。 - [続行] をクリックします。
- [データ] で、データストア drive、gmail、calendar を選択し、[続行] をクリックします。
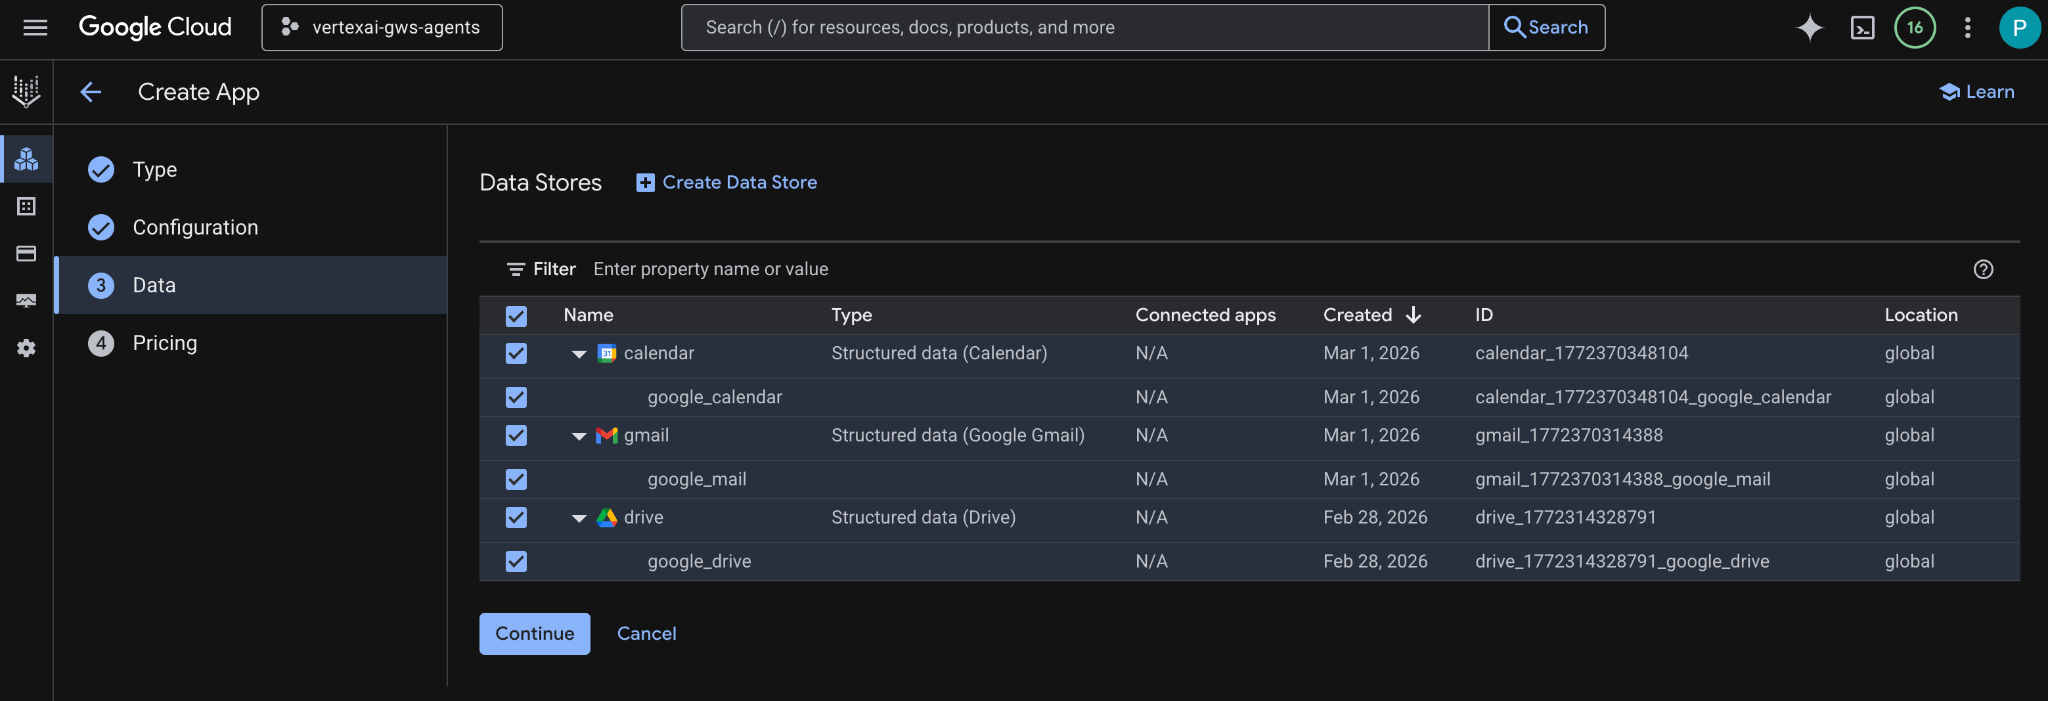
- [料金] で、ご希望の料金モデルを選択し、[作成] をクリックします。この Codelab のコンテキストでは、一般的な料金をおすすめします。
- アプリが作成され、[AI Applications] > [アプリ] > [codelab] > [アプリの概要] に自動的にリダイレクトされます。
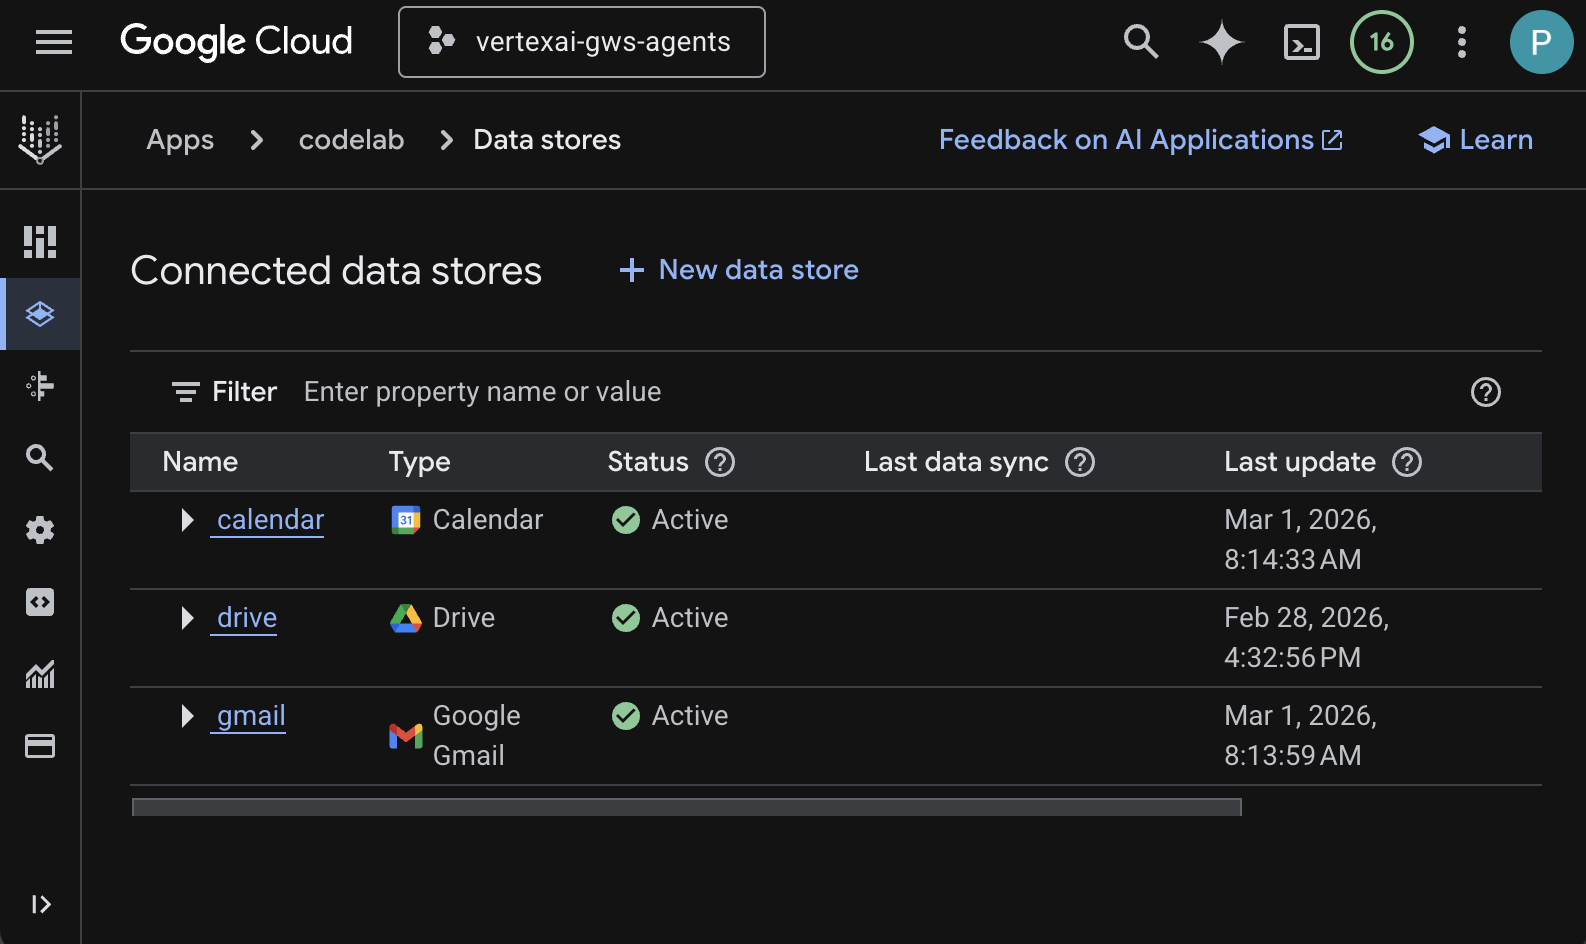
- [接続されたデータストア] に移動します。
- 数分後には、接続されているすべてのデータストアのステータスが [アクティブ] になります。
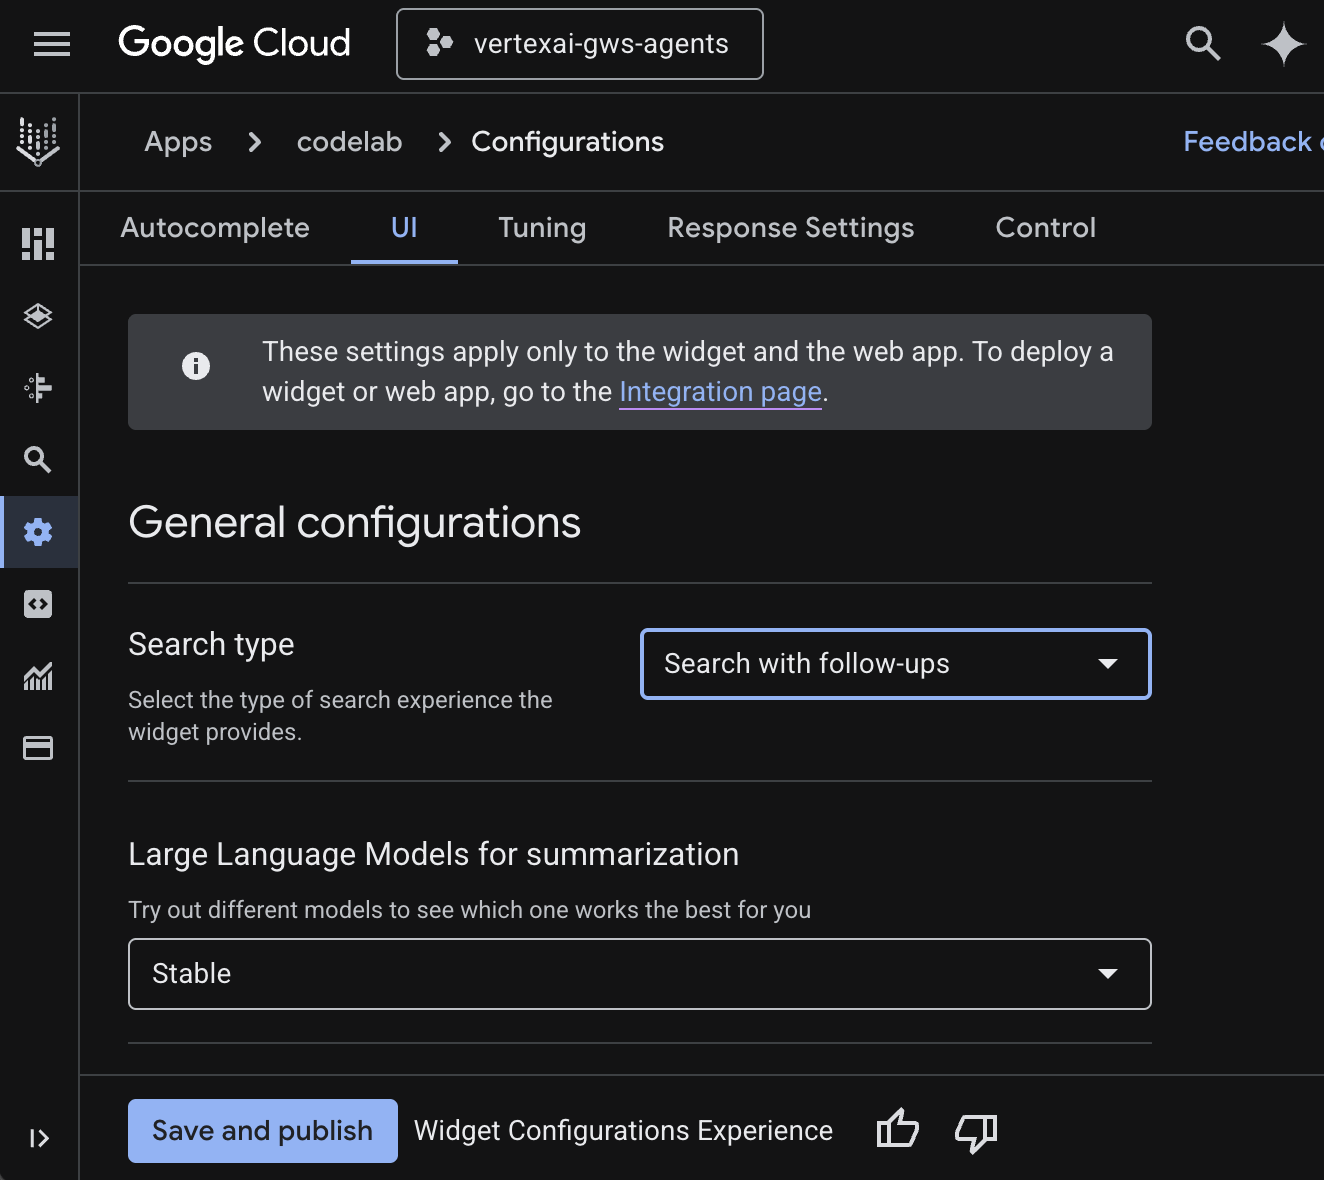
Web Widget を構成する
検索ウィジェットの見た目と動作を構成します。
- [構成] に移動します。
- [UI] タブで、[検索タイプ] を [フォローアップ付き検索] に設定し、[保存して公開] をクリックします。
アプリを試す
Google Cloud コンソールで検索アプリを直接テストします。
- [Preview](プレビュー)に移動すると、Web Widget が表示されます。
- チャットで「
Do I have any meetings today?」と入力し、enterキーを押します。 - チャットで「
Did I receive an email on March 1st 2026?」と入力し、enterキーを押します。 - チャットで「
Give me the title of the latest Drive file I created」と入力し、enterキーを押します。
4. カスタム エージェント
このエージェントを使用すると、ユーザーはカスタムツールとルールを使用して、自然言語で Workspace のデータを検索し、アクションを実行できます。次の要素に依存します。
- モデル: Gemini。
- データとアクション: Google Workspace(カレンダー、Gmail、ドライブ)用の Vertex AI データストア、Google が管理する Vertex AI Search Model Context Protocol(MCP)サーバー、Google Chat メッセージを送信するカスタムツール関数(Google Chat API 経由)。
- エージェント構築ツール: Agent Development Kit(ADK)。
- エージェント ホスト: Vertex AI Agent Engine。
- UI: ADK Web。
コンセプトを確認する
Agent Development Kit(ADK)
Agent Development Kit(ADK)は、推論、メモリ管理、ツール統合用の事前構築済みモジュールを提供することで、自律型 AI エージェントの作成を簡素化するように設計された、ツールとフレームワークの専用スイートです。
Model Context Protocol(MCP)
Model Context Protocol(MCP)は、ユニバーサルな「プラグ アンド プレイ」インターフェースを通じて、AI アプリケーションとさまざまなデータソースやツール間のシームレスで安全な統合を可能にするように設計されたオープン スタンダードです。
関数ツール
関数ツールは、AI モデルがトリガーして特定のアクションを実行したり、外部システムからリアルタイム データを取得したりできる、事前定義された実行可能なルーティンです。これにより、単純なテキスト生成を超えて機能を拡張できます。
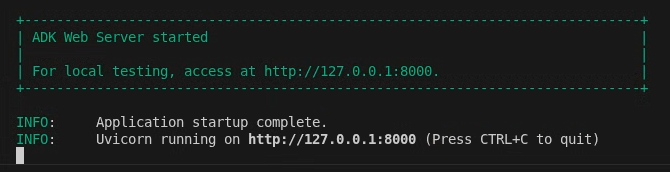
ADK Web
ADK web は、ADK SDK に付属する組み込みの開発 UI であり、開発とデバッグを容易にします。
ソリューション アーキテクチャを確認する
ソースコードを確認する
agent.py
次のコードは、Vertex AI で認証を行い、Vertex AI Search MCP ツールと Chat API ツールを初期化し、エージェントの動作を定義します。
- 認証: 環境変数から
ACCESS_TOKENを取得して、MCP と API 呼び出しを認証します。 - ツールの設定: Vertex AI Search Model Context Protocol(MCP)サーバーと
send_direct_messageツールに接続するツールセットであるvertexai_mcpを初期化します。これにより、エージェントは接続されたデータストアを検索して Google Chat メッセージを送信できます。 - エージェント定義:
gemini-2.5-flashモデルを使用してroot_agentを定義します。この指示により、エージェントは情報取得に検索ツールを、アクションにsend_direct_messageツールを優先的に使用するようになり、企業データに効果的に基づいた動作を行うようになります。
...
MODEL = "gemini-2.5-flash"

# Access token for authentication
ACCESS_TOKEN = os.environ.get("ACCESS_TOKEN")
if not ACCESS_TOKEN:
    raise ValueError("ACCESS_TOKEN environment variable must be set")

VERTEXAI_SEARCH_TIMEOUT = 15.0

def get_project_id():
    """Fetches the consumer project ID from the environment natively."""
    _, project = google.auth.default()
    if project:
        return project
    raise Exception(f"Failed to resolve GCP Project ID from environment.")

def find_serving_config_path():
    """Dynamically finds the default serving config in the engine."""
    project_id = get_project_id()
    engines = discoveryengine_v1.EngineServiceClient().list_engines(
        parent=f"projects/{project_id}/locations/global/collections/default_collection"
    )
    for engine in engines:
        # engine.name natively contains the numeric Project Number
        return f"{engine.name}/servingConfigs/default_serving_config"
    raise Exception(f"No Discovery Engines found in project {project_id}")

def send_direct_message(email: str, message: str) -> dict:
    """Sends a Google Chat Direct Message (DM) to a specific user by email address."""
    chat_client = chat_v1.ChatServiceClient(
        credentials=Credentials(token=ACCESS_TOKEN)
    )

    # 1. Setup the DM space or find existing one
    person = chat_v1.User(
        name=f"users/{email}",
        type_=chat_v1.User.Type.HUMAN
    )
    membership = chat_v1.Membership(member=person)
    space_req = chat_v1.Space(space_type=chat_v1.Space.SpaceType.DIRECT_MESSAGE)
    setup_request = chat_v1.SetUpSpaceRequest(
        space=space_req,
        memberships=[membership]
    )
    space_response = chat_client.set_up_space(request=setup_request)
    space_name = space_response.name

    # 2. Send the message
    msg = chat_v1.Message(text=message)
    message_request = chat_v1.CreateMessageRequest(
        parent=space_name,
        message=msg
    )
    message_response = chat_client.create_message(request=message_request)

    return {"status": "success", "message_id": message_response.name, "space": space_name}

vertexai_mcp = McpToolset(
    connection_params=StreamableHTTPConnectionParams(
        url="https://discoveryengine.googleapis.com/mcp",
        timeout=VERTEXAI_SEARCH_TIMEOUT,
        sse_read_timeout=VERTEXAI_SEARCH_TIMEOUT,
        headers={"Authorization": f"Bearer {ACCESS_TOKEN}"}
    ),
    tool_filter=['search']
)

# Answer nicely the following user queries:
#  - Please find my meetings for today, I need their titles and links
#  - What is the latest Drive file I created?
#  - What is the latest Gmail message I received?
#  - Please send the following message to someone@example.com: Hello, this is a test message.

root_agent = LlmAgent(
    model=MODEL,
    name='enterprise_ai',
    instruction=f"""
        You are a helpful assistant that always uses the Vertex AI MCP search tool to answer the user's message, unless the user asks you to send a message to someone.
        If the user asks you to send a message to someone, use the send_direct_message tool to send the message.
        You MUST unconditionally use the Vertex AI MCP search tool to find answer, even if you believe you already know the answer or believe the Vertex AI MCP search tool does not contain the data.
        The Vertex AI MCP search tool accesses the user's data through datastores including Google Drive, Google Calendar, and Gmail.
        Only use the Vertex AI MCP search tool with servingConfig and query parameters, do not use any other parameters.
        Always use the servingConfig {find_serving_config_path()} while using the Vertex AI MCP search tool.
    """,
    tools=[vertexai_mcp, FunctionTool(send_direct_message)]
)
ソースコードをダウンロードする
まず、サンプルコードをローカル環境にダウンロードします。
- この GitHub リポジトリをダウンロードします。
- ターミナルで、
solutions/enterprise-ai-agent-localディレクトリを開きます。
API を有効にする
このソリューションでは、次の追加の API を有効にする必要があります。
- Google Cloud コンソールで、Vertex AI、Cloud Resource Manager、Google Chat の各 API を有効にします。
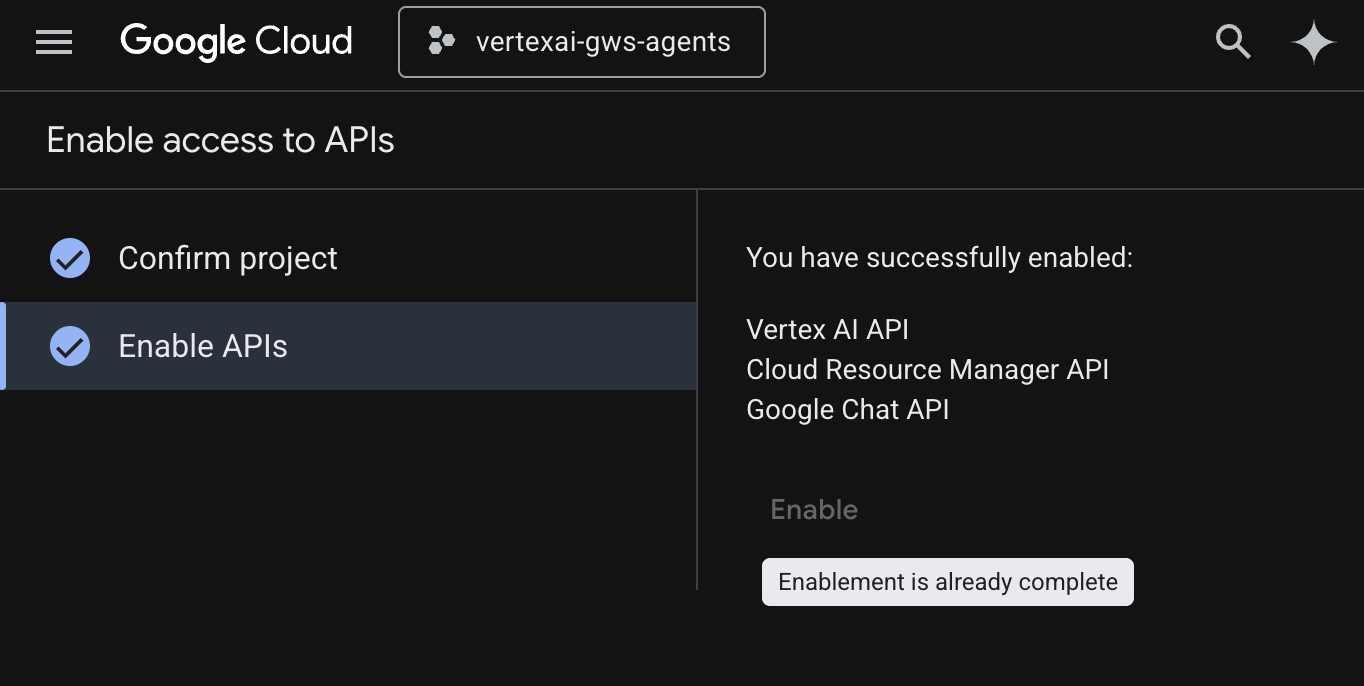
- メニュー アイコン ☰ > [API とサービス] > [有効な API とサービス] をクリックし、Vertex AI API、Cloud Resource Manager API、Google Chat API がリストに含まれていることを確認します。
OAuth 同意画面を構成する
このソリューションでは、同意画面の構成が必要です。
- Google Cloud コンソールで、メニュー アイコン ☰ > Google 認証プラットフォーム > ブランディングをクリックします。
- [開始] をクリックします。
- [アプリ情報] で、[アプリ名] を
Codelabに設定します。 - [ユーザー サポートメール] で、ユーザーが同意について問い合わせる際に使用するサポートのメールアドレスを選択します。
- [次へ] をクリックします。
- [対象] で [内部] を選択します。
- [次へ] をクリックします。
- [連絡先情報] で、プロジェクトに対する変更の通知を受け取るメールアドレスを入力します。
- [次へ] をクリックします。
- [完了] で、Google API サービスのユーザーデータに関するポリシーを確認し、同意する場合は [Google API サービス: ユーザーデータに関するポリシーに同意します] を選択します。
- [続行]、[作成] の順にクリックします。
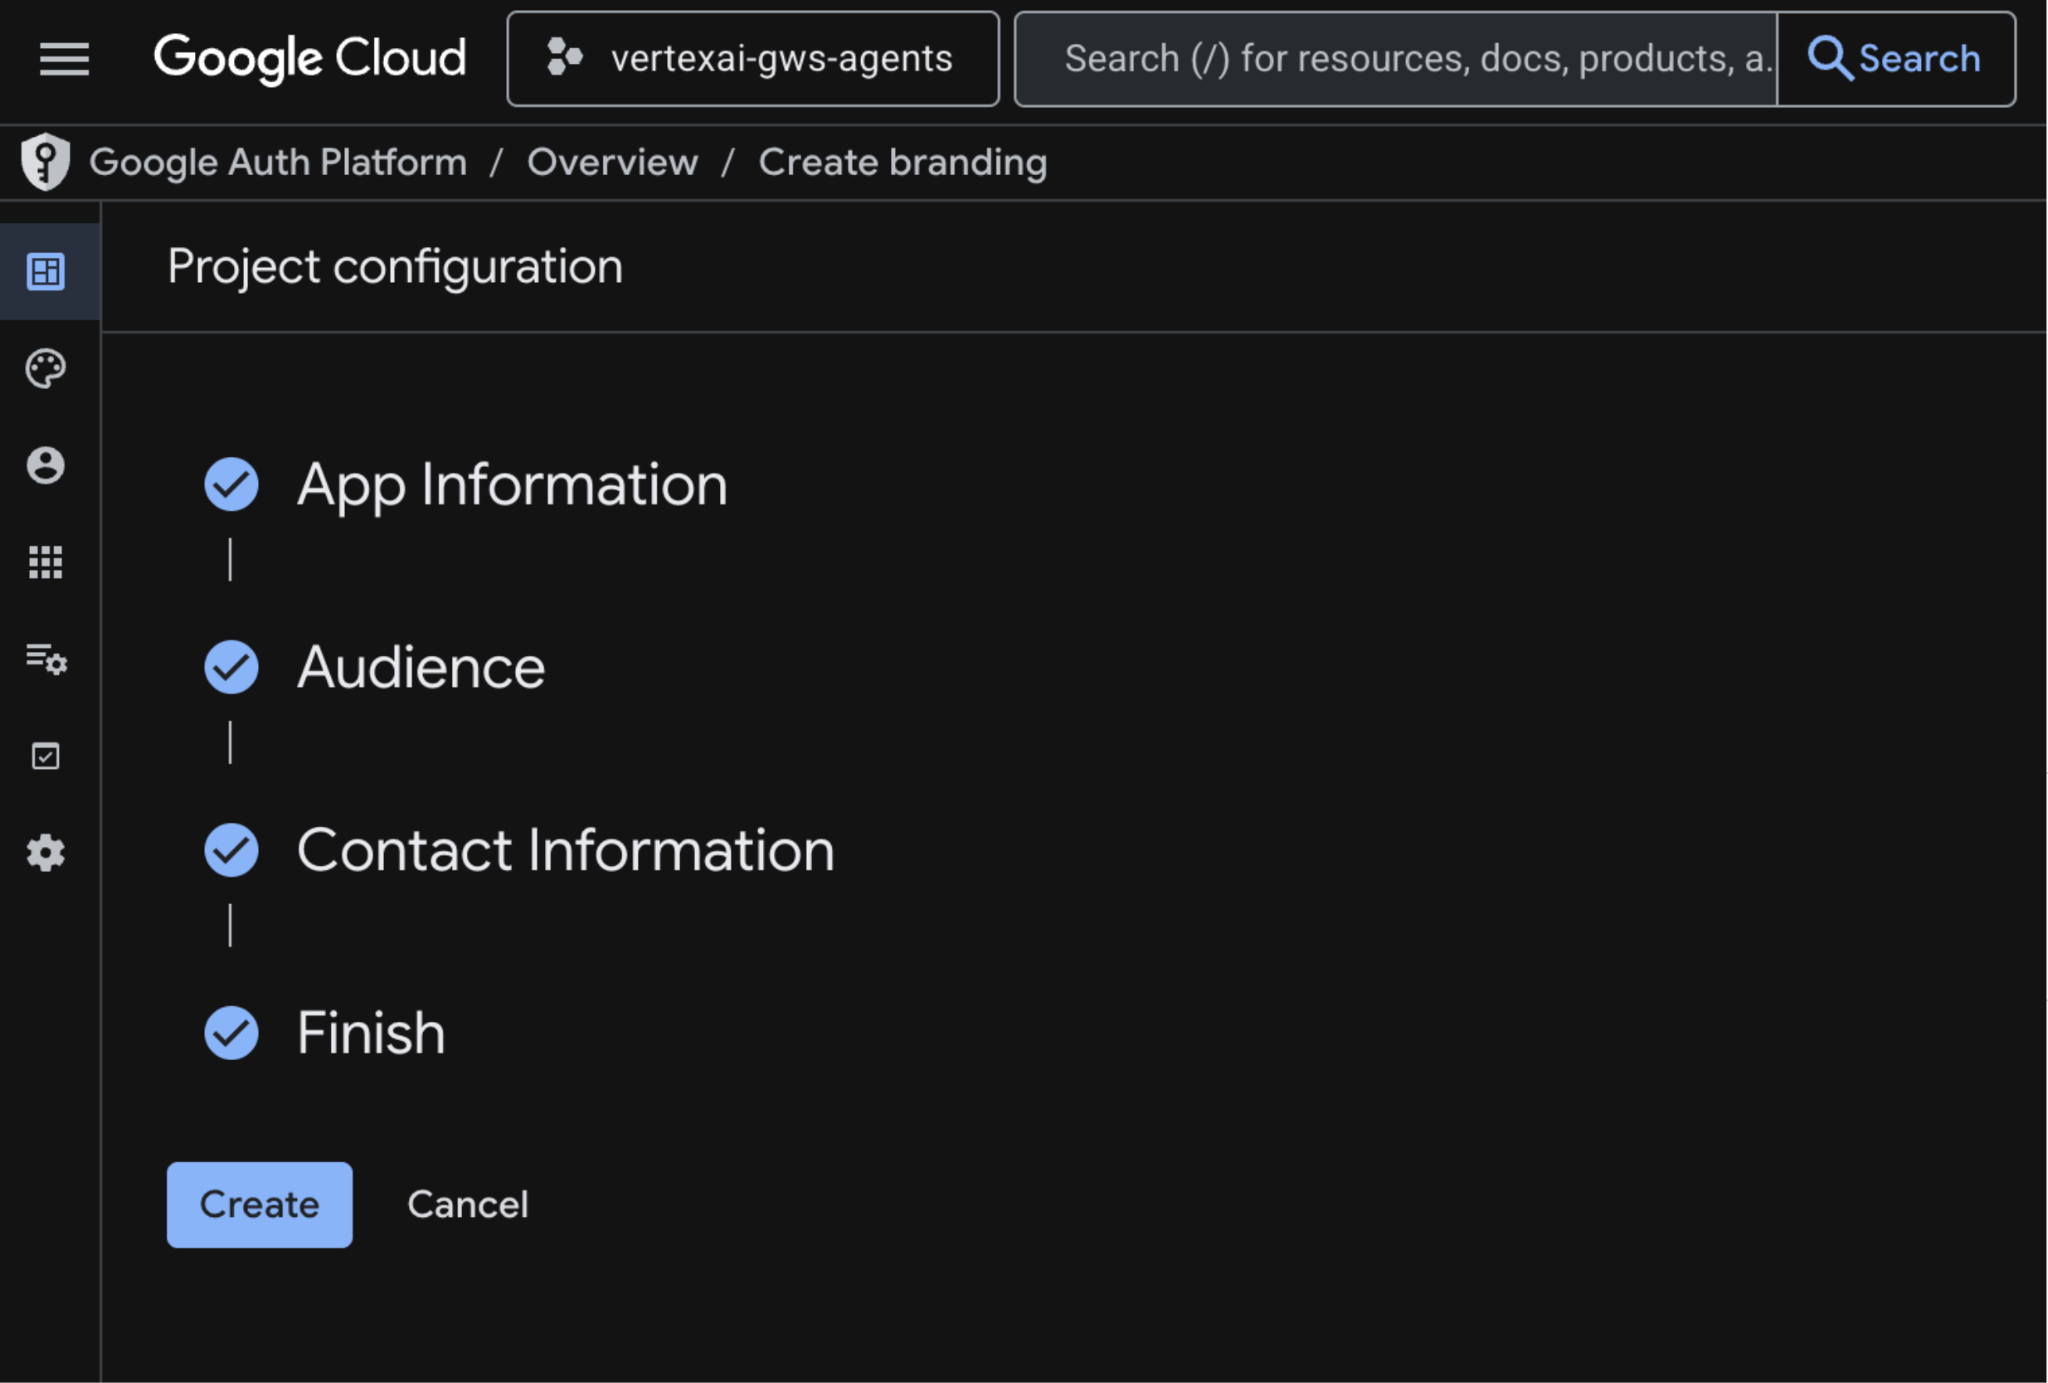
- 構成が保存され、Google Auth Platform > 概要 に自動的にリダイレクトされます。
詳細については、OAuth 同意画面を構成するのガイドをご覧ください。
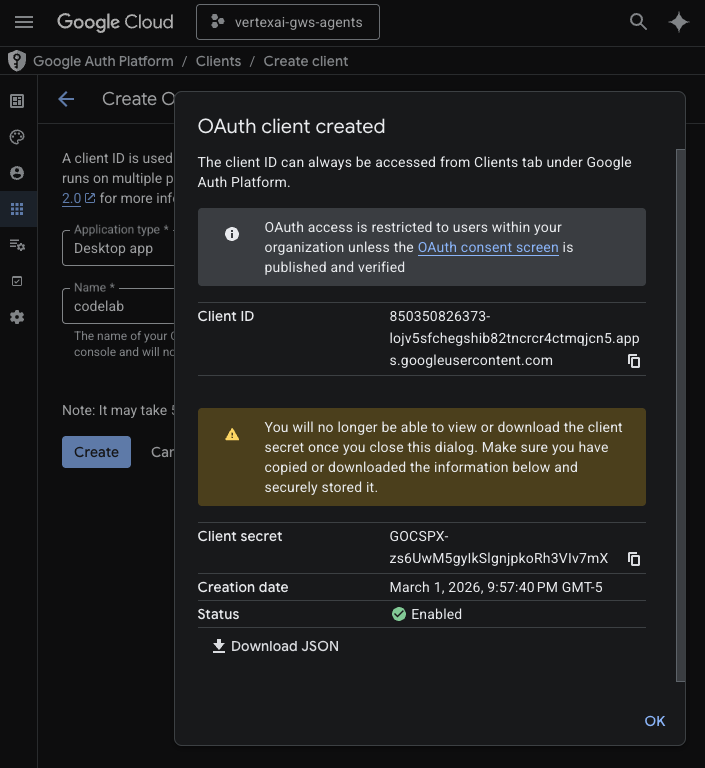
OAuth クライアント認証情報を作成する
ローカル環境でユーザーを認証するための新しいデスクトップ アプリの OAuth クライアントを作成します。
- Google Cloud コンソールで、メニュー アイコン ☰ > Google Auth Platform > クライアントをクリックします。
- [+ クライアントを作成] をクリックします。
- [アプリケーションの種類] で [デスクトップ アプリ] を選択します。
- [名前] を
codelabに設定します。 - [作成] をクリックします。新しく作成された認証情報が表示されます。
- [JSON をダウンロード] をクリックし、ファイルを
solutions/enterprise-ai-agent-localディレクトリに client_secret.json として保存します。
Vertex AI Search MCP を有効にする
- ターミナルで次のコマンドを実行します。
gcloud beta services mcp enable discoveryengine.googleapis.com \
     --project=$(gcloud config get-value project)
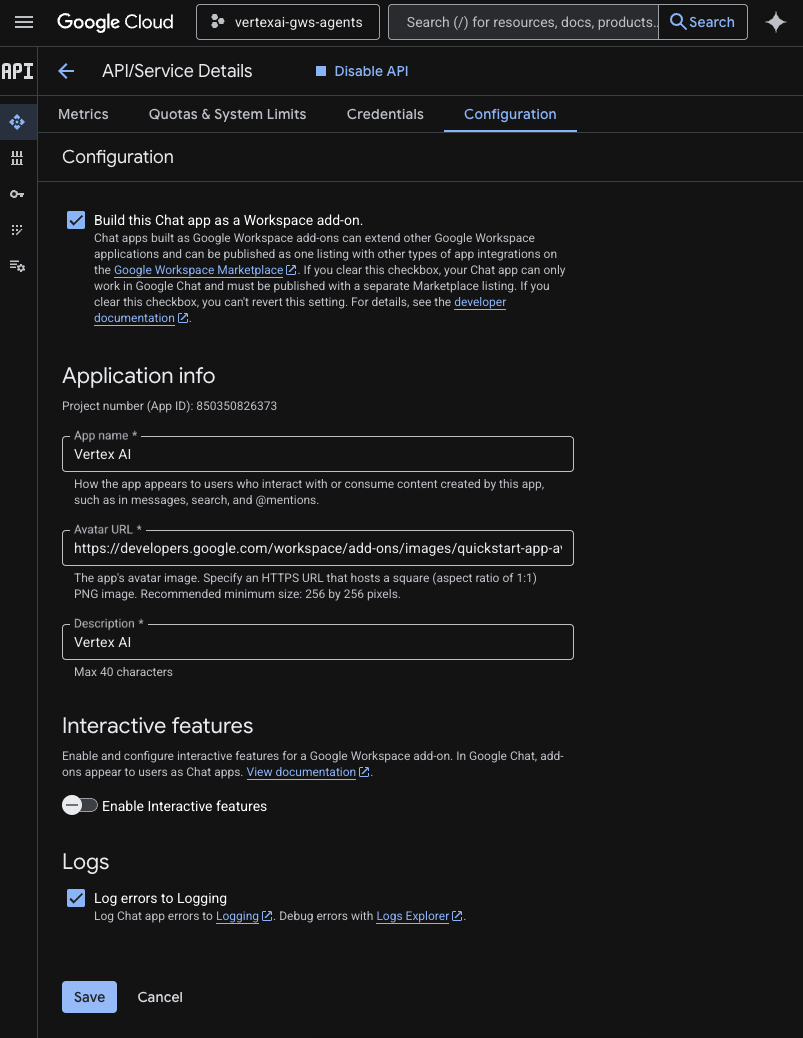
Chat 用アプリを構成する
基本的な情報詳細を使用して Google Chat アプリを構成します。
- Google Cloud コンソールで、Google Cloud 検索フィールドに「
Google Chat API」と入力して Google Chat API をクリックし、[管理]、[構成] の順にクリックします。
- [アプリ名] と [説明] を
Vertex AIに設定します。 - [アバターの URL] を
https://developers.google.com/workspace/add-ons/images/quickstart-app-avatar.pngに設定します。 - [インタラクティブ機能を有効にする] の選択を解除し、表示されたモーダル ダイアログで [無効にする] をクリックします。
- [エラーを Logging に記録する] を選択します。
- [保存] をクリックします。
ADK ウェブでエージェントを実行する
ADK ウェブ インターフェースを使用してエージェントをローカルで起動します。
- ターミナルで
solutions/enterprise-ai-agent-localディレクトリを開き、次のコマンドを実行します。
# 1. Authenticate with all the required scopes
gcloud auth application-default login \
  --client-id-file=client_secret.json \
   --scopes=https://www.googleapis.com/auth/cloud-platform,https://www.googleapis.com/auth/chat.spaces,https://www.googleapis.com/auth/chat.messages

# 2. Configure environment
export ACCESS_TOKEN=$(gcloud auth application-default print-access-token)
export GOOGLE_GENAI_USE_VERTEXAI=1
export GOOGLE_CLOUD_PROJECT=$(gcloud config get-value project)
export GOOGLE_CLOUD_LOCATION=us-central1

# 3. Create and activate a new virtual environment
python3 -m venv .venv
source .venv/bin/activate

# 4. Install poetry and project dependencies
pip install poetry
poetry install

# 5. Start ADK Web
adk web
エージェントを試す
カスタム エージェントとチャットして、フローを確認します。
- インターネット ブラウザで ADK のウェブサイトを開きます。
- チャットで「
Please find my meetings for today, I need their titles and links」と入力し、enterキーを押します。 - エージェントは、カレンダーの予定のリストで回答します(ユーザーのアカウントによって異なります)。
- チャットで「
Please send a Chat message to someone@example.com with the following text: Hello!」と入力し、enterキーを押します。 - エージェントが確認メッセージで回答します。
5. Google Workspace アドオンとしてのエージェント
このエージェントを使用すると、Workspace アプリの UI のコンテキスト内で、Workspace のデータを自然言語で検索できます。次の要素に依存します。
- モデル: Gemini。
- データとアクション: Google Workspace(カレンダー、Gmail、ドライブ)用の Vertex AI データストア、Google が管理する Vertex AI Search Model Context Protocol(MCP)サーバー、Google Chat メッセージを送信するカスタムツール関数(Google Chat API 経由)。
- エージェント構築ツール: Agent Development Kit(ADK)。
- エージェント ホスト: Vertex AI Agent Engine。
- UI: Chat と Gmail 用の Google Workspace アドオン(カレンダー、ドライブ、ドキュメント、スプレッドシート、スライドにも簡単に拡張可能)。
- Google Workspace アドオン: Apps Script、Vertex AI Agent Engine API、コンテキスト(選択した Gmail メッセージ)。
コンセプトを確認する
Google Workspace アドオン
Google Workspace アドオンは、1 つ以上の Google Workspace アプリケーション(Gmail、Chat、カレンダー、ドキュメント、ドライブ、Meet、スプレッドシート、スライド)を拡張するカスタマイズされたアプリケーションです。
Apps Script
Apps Script は、Google ドライブを基盤とするクラウドベースの JavaScript プラットフォームで、Google プロダクト全体でタスクの統合と自動化を可能にします。
Google Workspace カード フレームワーク
Google Workspace のカード フレームワークを使用すると、デベロッパーはリッチでインタラクティブなユーザー インターフェースを作成できます。テキスト、画像、ボタンなどのウィジェットを含めることができる、整理された視覚的に魅力的なカードを構築できます。これらのカードは、構造化された情報を提供し、Workspace アプリケーション内で直接クイック アクションを実行できるようにすることで、ユーザー エクスペリエンスを向上させます。
ソリューション アーキテクチャを確認する
ソースコードを確認する
エージェント
agent.py
次のコードは、Vertex AI で認証を行い、Vertex AI Search MCP ツールと Chat API ツールを初期化し、エージェントの動作を定義します。
- 認証: ヘルパー関数
_get_access_token_from_contextを使用して、クライアントが挿入する認証トークン(CLIENT_AUTH_NAME)を取得します。このトークンは、Vertex AI Search MCP や Google Chat ツールなどのダウンストリーム サービスを安全に呼び出すために不可欠です。 - ツールの設定: Vertex AI Search Model Context Protocol(MCP)サーバーと
send_direct_messageツールに接続するツールセットであるvertexai_mcpを初期化します。これにより、エージェントは接続されたデータストアを検索して Google Chat メッセージを送信できます。 - エージェント定義:
gemini-2.5-flashモデルを使用してroot_agentを定義します。この指示により、エージェントは情報取得に検索ツールを、アクションにsend_direct_messageツールを優先的に使用するようになり、企業データに効果的に基づいた動作を行うようになります。
...
MODEL = "gemini-2.5-flash"

# Client injects a bearer token into the ToolContext state.
# The key pattern is "CLIENT_AUTH_NAME_<random_digits>".
# We dynamically parse this token to authenticate our MCP and API calls.
CLIENT_AUTH_NAME = "enterprise-ai"

VERTEXAI_SEARCH_TIMEOUT = 15.0

def get_project_id():
    """Fetches the consumer project ID from the environment natively."""
    _, project = google.auth.default()
    if project:
        return project
    raise Exception(f"Failed to resolve GCP Project ID from environment.")

def find_serving_config_path():
    """Dynamically finds the default serving config in the engine."""
    project_id = get_project_id()
    engines = discoveryengine_v1.EngineServiceClient().list_engines(
        parent=f"projects/{project_id}/locations/global/collections/default_collection"
    )
    for engine in engines:
        # engine.name natively contains the numeric Project Number
        return f"{engine.name}/servingConfigs/default_serving_config"
    raise Exception(f"No Discovery Engines found in project {project_id}")

def _get_access_token_from_context(tool_context: ToolContext) -> str:
    """Helper method to dynamically parse the intercepted bearer token from the context state."""
    escaped_name = re.escape(CLIENT_AUTH_NAME)
    pattern = re.compile(fr"^{escaped_name}_\d+$")
    # Handle ADK varying state object types (Raw Dict vs ADK State)
    state_dict = tool_context.state.to_dict() if hasattr(tool_context.state, 'to_dict') else tool_context.state
    matching_keys = [k for k in state_dict.keys() if pattern.match(k)]
    if matching_keys:
        return state_dict.get(matching_keys[0])
    raise Exception(f"No bearer token found in ToolContext state matching pattern {pattern.pattern}")

def auth_header_provider(tool_context: ToolContext) -> dict[str, str]:
    token = _get_access_token_from_context(tool_context)
    return {"Authorization": f"Bearer {token}"}

def send_direct_message(email: str, message: str, tool_context: ToolContext) -> dict:
    """Sends a Google Chat Direct Message (DM) to a specific user by email address."""
    chat_client = chat_v1.ChatServiceClient(
        credentials=Credentials(token=_get_access_token_from_context(tool_context))
    )

    # 1. Setup the DM space or find existing one
    person = chat_v1.User(
        name=f"users/{email}",
        type_=chat_v1.User.Type.HUMAN
    )
    membership = chat_v1.Membership(member=person)
    space_req = chat_v1.Space(space_type=chat_v1.Space.SpaceType.DIRECT_MESSAGE)
    setup_request = chat_v1.SetUpSpaceRequest(
        space=space_req,
        memberships=[membership]
    )
    space_response = chat_client.set_up_space(request=setup_request)
    space_name = space_response.name

    # 2. Send the message
    msg = chat_v1.Message(text=message)
    message_request = chat_v1.CreateMessageRequest(
        parent=space_name,
        message=msg
    )
    message_response = chat_client.create_message(request=message_request)

    return {"status": "success", "message_id": message_response.name, "space": space_name}

vertexai_mcp = McpToolset(
    connection_params=StreamableHTTPConnectionParams(
        url="https://discoveryengine.googleapis.com/mcp",
        timeout=VERTEXAI_SEARCH_TIMEOUT,
        sse_read_timeout=VERTEXAI_SEARCH_TIMEOUT
    ),
    tool_filter=['search'],
    # The auth_header_provider dynamically injects the bearer token from the ToolContext
    # into the MCP call for authentication.
    header_provider=auth_header_provider
)

# Answer nicely the following user queries:
#  - Please find my meetings for today, I need their titles and links
#  - What is the latest Drive file I created?
#  - What is the latest Gmail message I received?
#  - Please send the following message to someone@example.com: Hello, this is a test message.

root_agent = LlmAgent(
    model=MODEL,
    name='enterprise_ai',
    instruction=f"""
        You are a helpful assistant that always uses the Vertex AI MCP search tool to answer the user's message, unless the user asks you to send a message to someone.
        If the user asks you to send a message to someone, use the send_direct_message tool to send the message.
        You MUST unconditionally use the Vertex AI MCP search tool to find answer, even if you believe you already know the answer or believe the Vertex AI MCP search tool does not contain the data.
        The Vertex AI MCP search tool accesses the user's data through datastores including Google Drive, Google Calendar, and Gmail.
        Only use the Vertex AI MCP search tool with servingConfig and query parameters, do not use any other parameters.
        Always use the servingConfig {find_serving_config_path()} while using the Vertex AI MCP search tool.
    """,
    tools=[vertexai_mcp, FunctionTool(send_direct_message)]
)
お客様
appsscript.json
次の構成では、アドオンのトリガーと権限を定義します。
- アドオンを定義する: このプロジェクトが Chat と Gmail の両方のアドオンであることを Workspace に伝えます。
- コンテキスト トリガー: Gmail の場合、ユーザーがメール メッセージを開くたびに
onAddonEventを起動するcontextualTriggerを設定します。これにより、アドオンはメールのコンテンツを「認識」できるようになります。 - 権限: アドオンの実行に必要な
oauthScopesが一覧表示されます。たとえば、現在のメールを読み取る権限、スクリプトを実行する権限、外部サービス(Vertex AI API など)に接続する権限などです。
...
"addOns": {
    "common": {
      "name": "Vertex AI",
      "logoUrl": "https://developers.google.com/workspace/add-ons/images/quickstart-app-avatar.png"
    },
    "chat": {},
    "gmail": {
      "contextualTriggers": [
        {
          "unconditional": {},
          "onTriggerFunction": "onAddonEvent"
        }
      ]
    }
  },
  "oauthScopes": [
   "https://www.googleapis.com/auth/script.external_request",
   "https://www.googleapis.com/auth/cloud-platform",
   "https://www.googleapis.com/auth/gmail.addons.execute",
   "https://www.googleapis.com/auth/gmail.addons.current.message.readonly"
 ]
...
Chat.gs
次のコードは、受信した Google Chat メッセージを処理します。
- メッセージを受信する:
onMessage関数は、メッセージのやり取りのエントリ ポイントです。 - コンテキストを管理:
space.name(Chat スペースの ID)をユーザーのプロパティに保存します。これにより、エージェントが返信する準備ができたときに、メッセージを投稿する会話を正確に把握できます。 - Delegates to Agent:
requestAgentを呼び出し、API 通信を処理するコアロジックにユーザーのメッセージを渡します。
...
// Service that handles Google Chat operations.

// Handle incoming Google Chat message events, actions will be taken via Google Chat API calls
function onMessage(event) {
  if (isInDebugMode()) {
    console.log(`MESSAGE event received (Chat): ${JSON.stringify(event)}`);
  }
  // Extract data from the event.
  const chatEvent = event.chat;
  setChatConfig(chatEvent.messagePayload.space.name);

  // Request AI agent to answer the message
  requestAgent(chatEvent.messagePayload.message);
  // Respond with an empty response to the Google Chat platform to acknowledge execution
  return null;
}

// --- Utility functions ---

// The Chat direct message (DM) space associated with the user
const SPACE_NAME_PROPERTY = "DM_SPACE_NAME"

// Sets the Chat DM space name for subsequent operations.
function setChatConfig(spaceName) {
  const userProperties = PropertiesService.getUserProperties();
  userProperties.setProperty(SPACE_NAME_PROPERTY, spaceName);
  console.log(`Space is set to ${spaceName}`);
}

// Retrieved the Chat DM space name to sent messages to.
function getConfiguredChat() {
  const userProperties = PropertiesService.getUserProperties();
  return userProperties.getProperty(SPACE_NAME_PROPERTY);
}

// Finds the Chat DM space name between the Chat app and the given user.
function findChatAppDm(userName) {
  return Chat.Spaces.findDirectMessage(
    { 'name': userName },
    {'Authorization': `Bearer ${getAddonCredentials().getAccessToken()}`}
  ).name;
}

// Creates a Chat message in the configured space.
function createMessage(message) {
  const spaceName = getConfiguredChat();
  console.log(`Creating message in space ${spaceName}...`);
  return Chat.Spaces.Messages.create(
    message,
    spaceName,
    {},
    {'Authorization': `Bearer ${getAddonCredentials().getAccessToken()}`}
  ).name;
}
Sidebar.gs
次のコードは、Gmail サイドバーを構築し、メールのコンテキストを取得します。
- UI を構築する:
createSidebarCardは、Workspace カードサービスを使用してビジュアル インターフェースを構築します。テキスト入力エリアと [メッセージを送信] ボタンを含むシンプルなレイアウトを作成します。 - メールのコンテキストを取得する:
handleSendMessageでは、ユーザーが現在メールを表示しているかどうか(event.gmail.messageId)をコードで確認します。表示している場合は、メールの件名と本文を安全に取得し、ユーザーのプロンプトに追加します。 - 結果を表示する: エージェントが返信すると、コードによってサイドバー カードが更新され、返信が表示されます。
...
// Service that handles Gmail operations.

// Triggered when the user opens the Gmail Add-on or selects an email.
function onAddonEvent(event) {
  // If this was triggered by a button click, handle it
  if (event.parameters && event.parameters.action === 'send') {
    return handleSendMessage(event);
  }

  // Otherwise, just render the default initial sidebar
  return createSidebarCard();
}

// Creates the standard Gmail sidebar card consisting of a text input and send button.
// Optionally includes an answer section if a response was generated.
function createSidebarCard(optionalAnswerSection) {
  const card = CardService.newCardBuilder();
  const actionSection = CardService.newCardSection();

  // Create text input for the user's message
  const messageInput = CardService.newTextInput()
    .setFieldName("message")
    .setTitle("Message")
    .setMultiline(true);

  // Create action for sending the message
  const sendAction = CardService.newAction()
    .setFunctionName('onAddonEvent')
    .setParameters({ 'action': 'send' });

  const sendButton = CardService.newTextButton()
    .setText("Send message")
    .setTextButtonStyle(CardService.TextButtonStyle.FILLED)
    .setOnClickAction(sendAction);

  actionSection.addWidget(messageInput);
  actionSection.addWidget(CardService.newButtonSet().addButton(sendButton));

  card.addSection(actionSection);

  // Attach the response at the bottom if we have one
  if (optionalAnswerSection) {
    card.addSection(optionalAnswerSection);
  }

  return card.build();
}

// Handles clicks from the Send message button.
function handleSendMessage(event) {
  const commonEventObject = event.commonEventObject || {};
  const formInputs = commonEventObject.formInputs || {};
  const messageInput = formInputs.message;

  let userMessage = "";
  if (messageInput && messageInput.stringInputs && messageInput.stringInputs.value.length > 0) {
    userMessage = messageInput.stringInputs.value[0];
  }

  if (!userMessage || userMessage.trim().length === 0) {
    return CardService.newActionResponseBuilder()
      .setNotification(CardService.newNotification().setText("Please enter a message."))
      .build();
  }

  let finalQueryText = `USER MESSAGE TO ANSWER: ${userMessage}`;

  // If we have an email selected in Gmail, append its content as context
  if (event.gmail && event.gmail.messageId) {
    try {
      GmailApp.setCurrentMessageAccessToken(event.gmail.accessToken);
      const message = GmailApp.getMessageById(event.gmail.messageId);

      const subject = message.getSubject();
      const bodyText = message.getPlainBody() || message.getBody();

      finalQueryText += `\n\nEMAIL THE USER HAS OPENED ON SCREEN:\nSubject: ${subject}\nBody:\n---\n${bodyText}\n---`;
    } catch (e) {
      console.error("Could not fetch Gmail context: " + e);
      // Invalidate the token explicitly so the next prompt requests the missing scopes
      ScriptApp.invalidateAuth();

      CardService.newAuthorizationException()
        .setResourceDisplayName("Enterprise AI")
        .setAuthorizationUrl(ScriptApp.getAuthorizationUrl())
        .throwException();
    }
  }

  try {
    const response = queryAgent({ text: finalQueryText });

    // We leverage the 'showdown' library to parse the LLM's Markdown output into HTML
    // We also substitute markdown listings with arrows and adjust newlines for clearer rendering in the sidebar
    let displayedText = substituteListingsFromMarkdown(response.text);
    displayedText = new showdown.Converter().makeHtml(displayedText).replace(/\n/g, '\n\n');

    const textParagraph = CardService.newTextParagraph();
    textParagraph.setText(displayedText);

    const answerSection = CardService.newCardSection()
      .addWidget(textParagraph);

    const updatedCard = createSidebarCard(answerSection);

    return CardService.newActionResponseBuilder()
      .setNavigation(CardService.newNavigation().updateCard(updatedCard))
      .build();

  } catch (err) {
    return CardService.newActionResponseBuilder()
      .setNotification(CardService.newNotification().setText("Error fetching response: " + err.message))
      .build();
  }
}
...
AgentHandler.gs
次のコードは、Vertex AI への API 呼び出しをオーケストレートします。
- API 呼び出しをオーケストレートする:
queryAgentは、アドオンと Vertex AI Agent Engine の間のブリッジです。ユーザーのクエリと状態の認証トークンを含むリクエストを作成します。 - レスポンスをストリーミングする: エージェントのレスポンスには時間がかかることがあるため、サーバー送信イベント(SSE)で
streamQueryAPI を使用します。コードはレスポンスをチャンク単位で収集し、完全な回答を再構築します。
...
// Service that handles Vertex AI Agent operations.

// Submits a query to the AI agent and returns the response string synchronously
function queryAgent(input) {
 let systemPrompt = "SYSTEM PROMPT START Do not respond with tables but use bullet points instead." +
   " Do not ask the user follow-up questions or converse with them as history is not kept in this interface." +
   " SYSTEM PROMPT END\n\n";

 const requestPayload = {
   "class_method": "async_stream_query",
   "input": {
     "user_id": "vertex_ai_add_on",
     "message": { "role": "user", "parts": [{ "text": systemPrompt + input.text }] },
     "state_delta": {
       "enterprise-ai_999": `${ScriptApp.getOAuthToken()}`
     }
   }
 };

 const responseContentText = UrlFetchApp.fetch(
   `https://${getLocation()}-aiplatform.googleapis.com/v1/${getReasoningEngine()}:streamQuery?alt=sse`,
   {
     method: 'post',
     headers: { 'Authorization': `Bearer ${ScriptApp.getOAuthToken()}` },
     contentType: 'application/json',
     payload: JSON.stringify(requestPayload),
     muteHttpExceptions: true
   }
 ).getContentText();
  if (isInDebugMode()) {
   console.log(`Response: ${responseContentText}`);
 }

 const events = responseContentText.split('\n').map(s => s.replace(/^data:\s*/, '')).filter(s => s.trim().length > 0);
 console.log(`Received ${events.length} agent events.`);

 let author = "default";
 let answerText = "";
 for (const eventJson of events) {
   if (isInDebugMode()) {
     console.log("Event: " + eventJson);
   }
   const event = JSON.parse(eventJson);

   // Retrieve the agent responsible for generating the content
   author = event.author;

   // Ignore events that are not useful for the end-user
   if (!event.content) {
     console.log(`${author}: internal event`);
     continue;
   }

   // Handle text answers
   const parts = event.content.parts || [];
   const textPart = parts.find(p => p.text);
   if (textPart) {
     answerText += textPart.text;
   }
 }
 return { author: author, text: answerText };
}
...
Vertex AI Agent Engine にエージェントをデプロイする
- ターミナルで、前の手順でダウンロードしたソースから
solutions/enterprise-ai-agentディレクトリを開き、次のコマンドを実行します。
# 1. Create and activate a new virtual environment
deactivate
python3 -m venv .venv
source .venv/bin/activate

# 2. Install poetry and project dependencies
pip install poetry
poetry install

# 3. Deploy the agent
adk deploy agent_engine \
  --project=$(gcloud config get-value project) \
  --region=us-central1 \
  --display_name="Enterprise AI" \
  enterprise_ai
- ログに「Deploying to agent engine...」という行が表示されたら、新しいターミナルを開き、次のコマンドを実行して、Vertex AI Reasoning Engine サービス エージェントに必要な権限を追加します。
# 1. Get the current Project ID
PROJECT_ID=$(gcloud config get-value project)

# 2. Extract the Project Number for that ID
PROJECT_NUMBER=$(gcloud projects describe $PROJECT_ID --format='value(projectNumber)')

# 3. Construct the Service Account name
SERVICE_ACCOUNT="service-${PROJECT_NUMBER}@gcp-sa-aiplatform-re.iam.gserviceaccount.com"

# 4. Apply the IAM policy binding
gcloud projects add-iam-policy-binding $PROJECT_ID \
     --member="serviceAccount:$SERVICE_ACCOUNT" \
     --role="roles/discoveryengine.viewer"
- adk deploy コマンドが完了するまで待ち、コマンド出力の緑色の部分から、新しくデプロイされたエージェントのリソース名をコピーします。
サービス アカウントを開始する
アドオンのサーバーサイド オペレーションを承認するための専用のサービス アカウントを作成します。
Google Cloud コンソールで、次の手順を行います。
- メニュー アイコン ☰ > [IAM と管理] > [サービス アカウント] > [+ サービス アカウントを作成] をクリックします。
- [サービス アカウント名] を
vertexai-add-onに設定します。
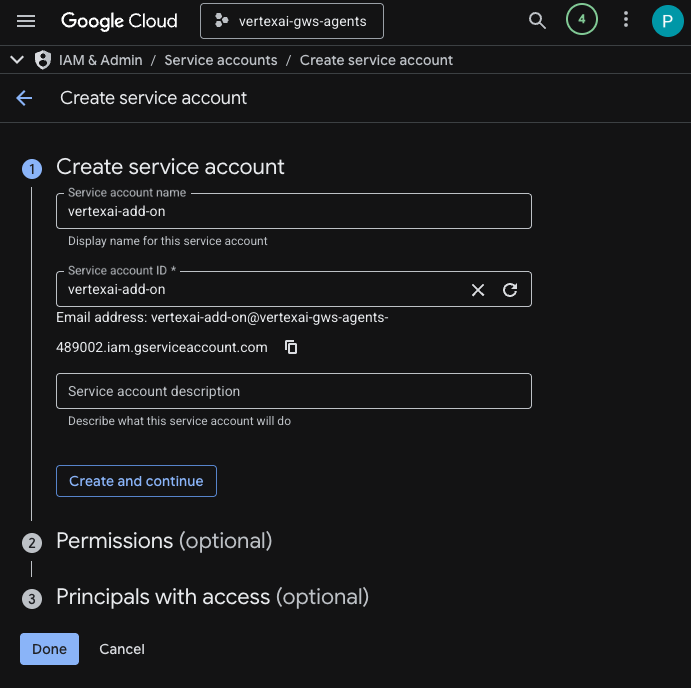
- [完了] をクリックします。[サービス アカウント] ページにリダイレクトし、作成したサービス アカウントが表示されます。

- 新しく作成したサービス アカウントを選択し、[キー] タブを選択します。
- [鍵を追加]、[新しい鍵を作成] の順にクリックします。
- [JSON] を選択し、[作成] をクリックします。
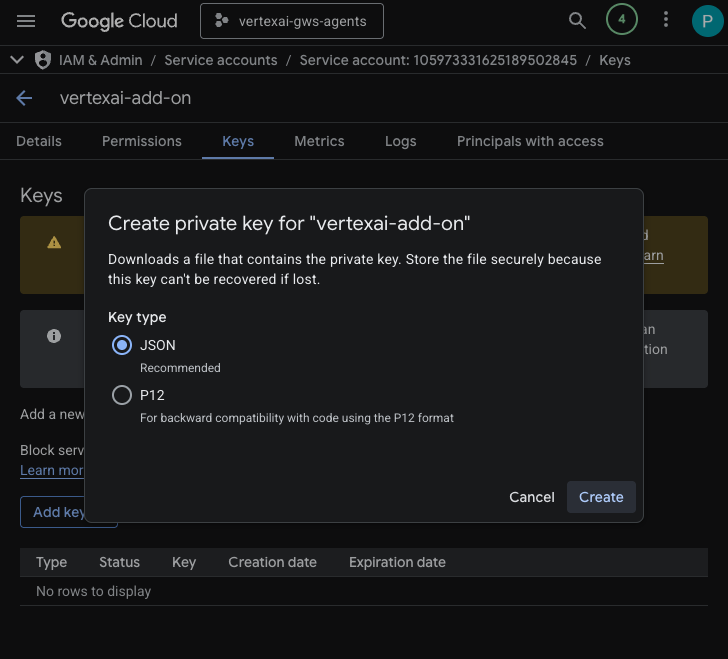
- ダイアログが閉じ、新しく作成された公開鍵/秘密鍵ペアが JSON ファイルとしてローカル環境に自動的にダウンロードされます。
Apps Script プロジェクトを作成して構成する
アドオン コードをホストする新しい Apps Script プロジェクトを作成し、その接続プロパティを構成します。
- 次のボタンをクリックして、Enterprise AI アドオンの Apps Script プロジェクトを開きます。
- [概要] > [コピーを作成] をクリックします。
- Apps Script プロジェクトで、[プロジェクトの設定] > [スクリプトのプロパティを編集] > [スクリプトのプロパティを追加] の順にクリックして、スクリプトのプロパティを追加します。
- REASONING_ENGINE_RESOURCE_NAME を、前の手順でコピーした Vertex AI エージェントのリソース名に設定します。次の形式となります。
projects/<PROJECT_NUMBER>/locations/us-central1/reasoningEngines/<AGENT_ID>
- APP_SERVICE_ACCOUNT_KEY を、前の手順でダウンロードしたサービス アカウント ファイルの JSON キーに設定します。
- [スクリプト プロパティを保存] をクリックします。
Gmail と Chat にデプロイする
アドオンをデプロイして、Gmail と Google Chat 内で直接テストします。
Apps Script プロジェクトで、次の手順を行います。
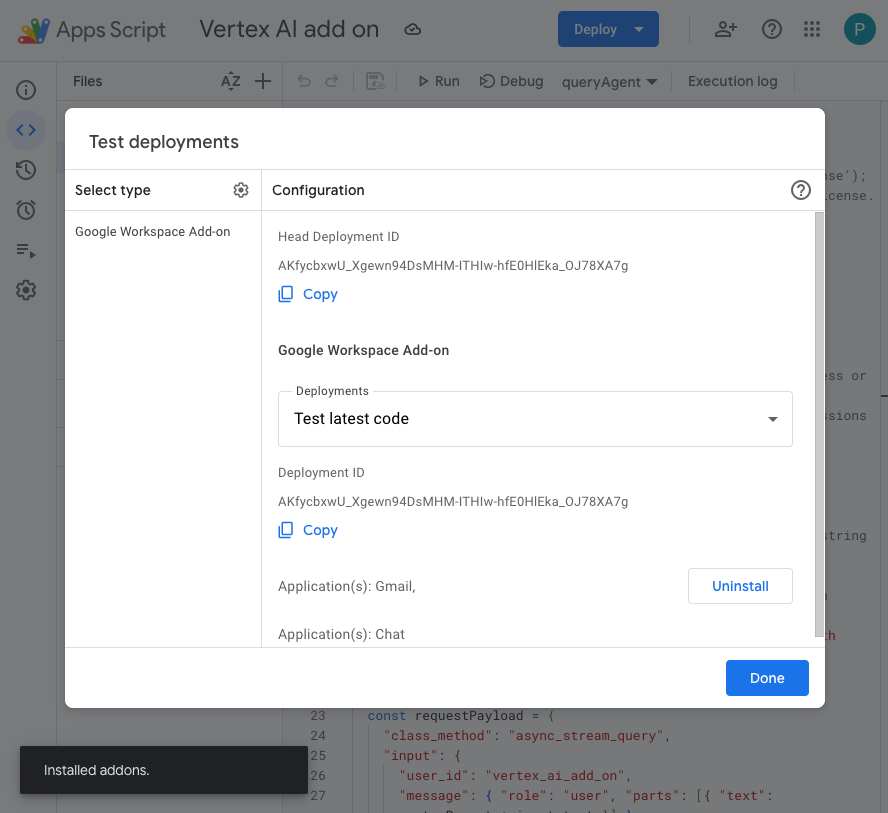
- [デプロイ] > [デプロイをテスト] をクリックし、[インストール] をクリックします。この機能が Gmail で利用できるようになりました。
- [Head Deployment ID] の [Copy] をクリックします。
Google Cloud コンソールで、次の手順を行います。
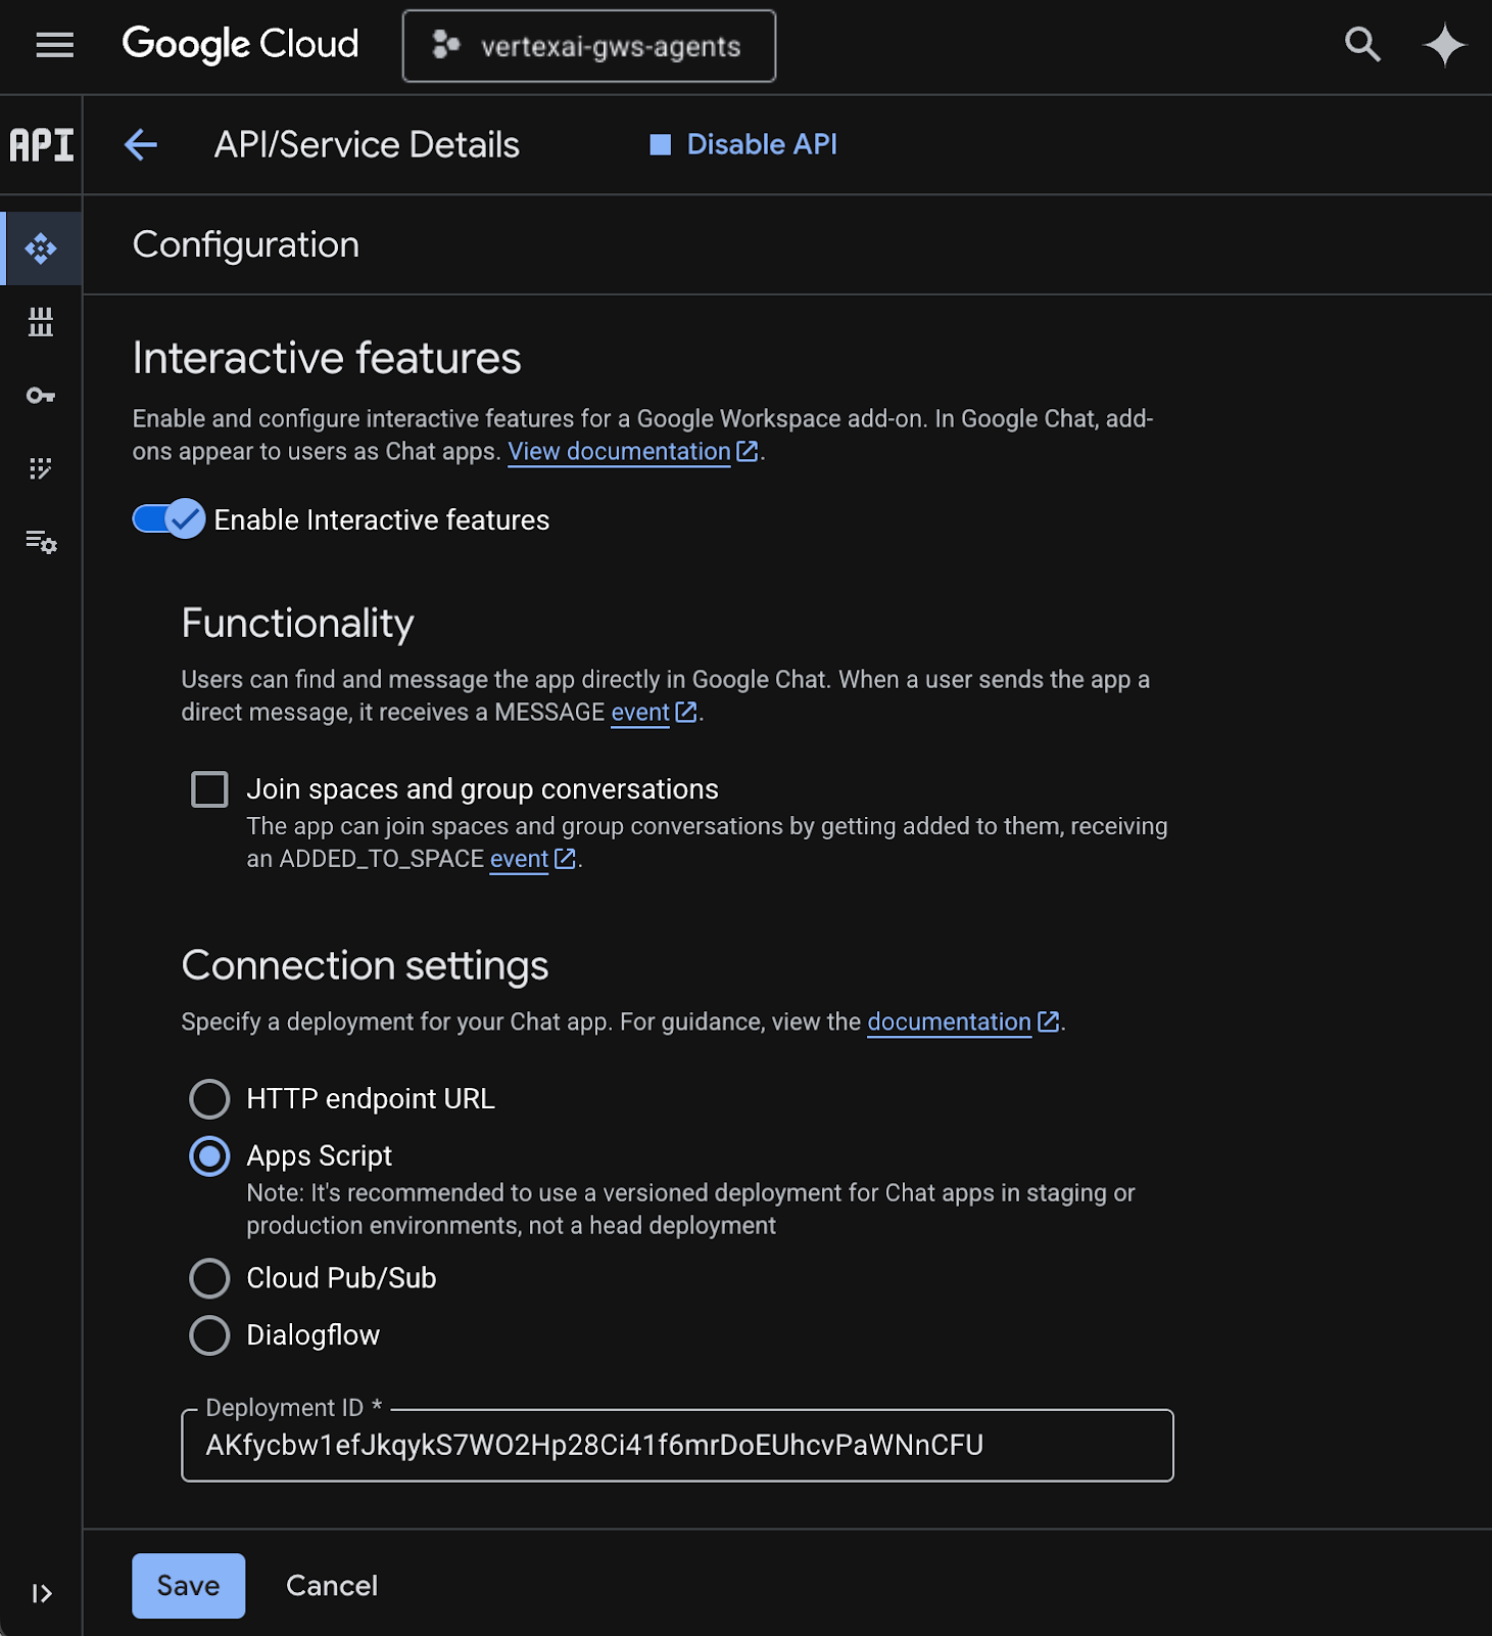
- Google Cloud の検索フィールドで
Google Chat APIを検索し、[Google Chat API]、[管理]、[構成] の順にクリックします。
- [インタラクティブ機能を有効にする] を選択します。
- [スペースとグループの会話に参加する] のチェックを外します。
- [接続設定] で [Apps Script] を選択します。
- [Deployment ID] を、前の手順でコピーした [Head Deployment ID] に設定します。
- [公開設定] で、[この Chat 用アプリを <Workspace ドメイン> の特定のユーザーとグループが使用できるようにします] を選択し、メールアドレスを入力します。
- [保存] をクリックします。
アドオンを試す
ライブ アドオンを操作して、データを取得し、コンテキスト内の質問に回答できることを確認します。
新しいタブで Google Chat を開き、次の手順を行います。
- Chat 用アプリ Vertex AI とのダイレクト メッセージ スペースを開きます。
- [構成] をクリックして、認証フローを行います。
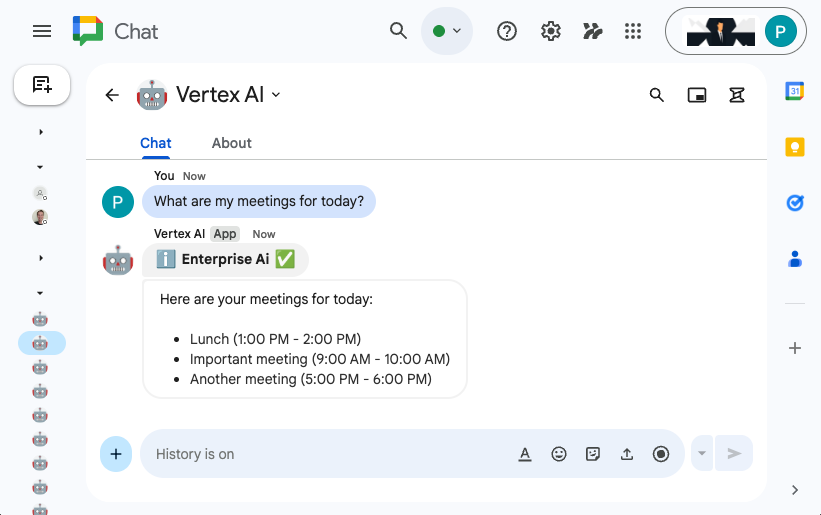
- 「
What are my meetings for today?」と入力してenterキーを押します。Vertex AI チャットアプリは結果を返信する必要があります。
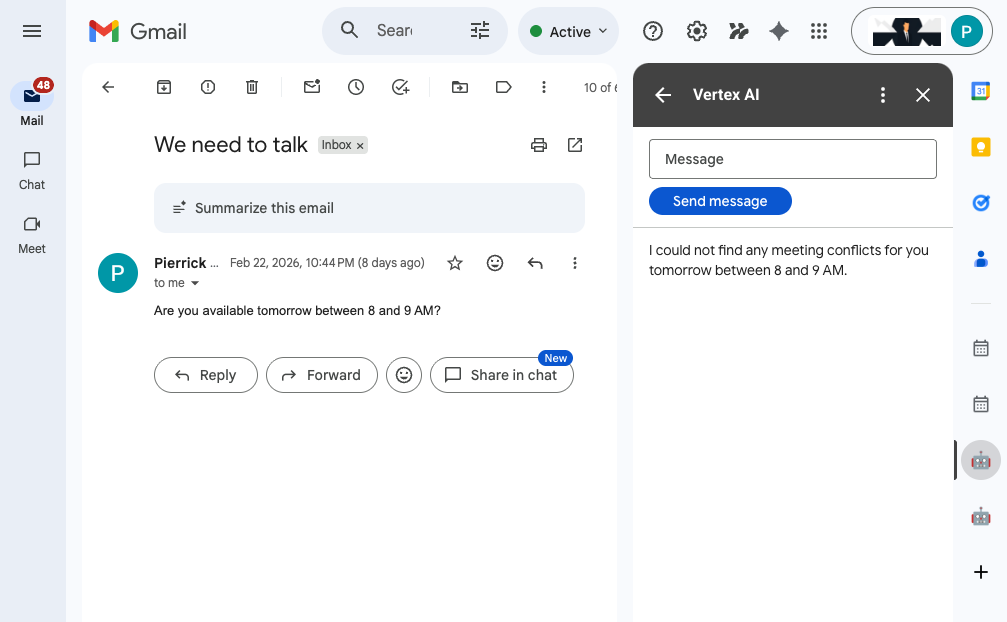
新しいタブで Gmail を開き、次の手順を行います。
- 件名を
We need to talkに、本文をAre you available today between 8 and 9 AM?に設定して、自分宛てにメールを送信します。 - 新しく受信したメールを開きます。
- Vertex AI アドオンのサイドバーを開きます。
- [メッセージ] を
Do I have any meeting conflicts?に設定します。 - [メッセージを送信] をクリックします。
- 答えはボタンの後に表示されます。
6. クリーンアップ
Google Cloud プロジェクトを削除する
この Codelab で使用したリソースに対して Google Cloud アカウントで課金されないようにするには、Google Cloud プロジェクトを削除することをおすすめします。
Google Cloud コンソールで、次の手順を行います。
- メニュー アイコン ☰ > [IAM と管理] > [設定] をクリックします。
- [シャットダウン] をクリックします。
- プロジェクト ID を入力します。
- [このままシャットダウン] をクリックします。
7. 完了
おめでとうございます!Vertex AI と Google Workspace を連携させて、従業員向けのソリューションを構築しました。
次のステップ
この Codelab では最も一般的なユースケースのみを紹介しましたが、ソリューションはさまざまな形で拡張して使用できます。たとえば次のような例があります。
- Gemini CLI や Antigravity などの AI を活用したデベロッパー ツールを使用します。
- カスタム MCP、カスタム関数呼び出し、生成 UI などの他のエージェント フレームワークやツールと統合します。
- Vertex AI などの専用プラットフォームでホストされているカスタムを含む他の AI モデルと統合します。
- Dialogflow などの専用プラットフォームでホストされている他のエージェントや、Cloud Marketplace を介してサードパーティがホストしている他のエージェントと統合します。
- Cloud Marketplace でエージェントを公開して、チーム、組織、一般ユーザーを支援します。
その他の情報
YouTube 動画、ドキュメント ウェブサイト、コードサンプル、チュートリアルなど、さまざまなデベロッパー向けリソースがあります。
- Google Cloud Developer Center
- サポート対象のプロダクト | Google Cloud MCP サーバー
- A2UI
- Vertex AI の Model Garden | Google Cloud
- Vertex AI Agent Engine の概要
- 回答とフォローアップを取得する | Vertex AI Search | Google Cloud ドキュメント
- Google Cloud Marketplace で AI エージェントを提供する
- Google Workspace デベロッパーの YouTube チャンネル - デベロッパーの皆様、ようこそ
- Google Workspace デベロッパー ウェブサイト
- すべての Google Workspace アドオン サンプルの GitHub リポジトリ