
1. ก่อนเริ่มต้น
Vertex AI คืออะไร
Vertex AI เป็นแพลตฟอร์มการพัฒนาแบบครบวงจรของ Google Cloud สำหรับการสร้าง การติดตั้งใช้งาน และการปรับขนาด AI Agent และแอปพลิเคชันระดับองค์กร โดยมีเครื่องมือที่ซับซ้อนที่นักพัฒนาซอฟต์แวร์และนักวิทยาศาสตร์ข้อมูลจำเป็นต้องใช้ในการออกแบบเวิร์กโฟลว์ที่เป็น Agent แบบกำหนดเองซึ่งผสานรวมเข้ากับโครงสร้างพื้นฐานระดับโลกอย่างลึกซึ้ง
- เข้าถึง Model Garden: เลือกจากโมเดลพื้นฐานกว่า 150 รายการ ซึ่งรวมถึงโมเดลตระกูล Gemini ทั้งหมด โมเดลของบุคคลที่สาม และโมเดลโอเพนซอร์สเฉพาะทาง เพื่อค้นหาโมเดลที่เหมาะกับงานของเอเจนต์ที่เฉพาะเจาะจง
- ออกแบบการจัดการเป็นกลุ่มที่ซับซ้อน: Vertex AI มีเฟรมเวิร์กในการออกแบบเอเจนต์อัตโนมัติที่ใช้การให้เหตุผลเพื่อวางแผน ดำเนินการงานที่มีหลายขั้นตอน และเรียกใช้ API ภายนอก
- การเชื่อมต่อแหล่งข้อมูลระดับองค์กร: เชื่อมต่อ Agent กับข้อมูลธุรกิจแบบเรียลไทม์ รวมถึง RAG (Retrieval-Augmented Generation) ที่มีประสิทธิภาพสูง เพื่อกำจัดอาการหลอนของ AI และรับประกันความแม่นยำของข้อเท็จจริง
- DevOps: ผสานรวมการพัฒนาเอเจนต์เข้ากับไปป์ไลน์ CI/CD ที่มีอยู่ได้อย่างราบรื่นด้วย SDK, API และเครื่องมือประเมินที่แข็งแกร่งเพื่อวัดประสิทธิภาพและความปลอดภัยของเอเจนต์ในวงกว้าง
- ความปลอดภัยระดับอุตสาหกรรม: Vertex AI ช่วยให้มั่นใจว่าข้อมูลลูกค้าที่ใช้ในการฝึกหรือการเชื่อมต่อแหล่งข้อมูลจะยังคงเป็นส่วนตัว เข้ารหัส และเป็นไปตามข้อกำหนดด้านถิ่นที่อยู่ทั่วโลก
- โครงสร้างพื้นฐานที่เพิ่มประสิทธิภาพ: ปรับขนาดภาระงานของเอเจนต์ได้อย่างง่ายดายในคลัสเตอร์ TPU และ GPU ระดับโลกของ Google เพื่อให้มั่นใจว่ามีประสิทธิภาพที่มีเวลาในการตอบสนองต่ำแม้สำหรับแอปพลิเคชันระดับโลกที่มีความต้องการสูงสุด

Google Workspace คืออะไร
Google Workspace คือชุดโซลูชันการทำงานร่วมกันและการเพิ่มประสิทธิภาพการทำงานบนระบบคลาวด์ที่ออกแบบมาสำหรับบุคคลทั่วไป โรงเรียน และธุรกิจ
- การสื่อสาร: บริการอีเมลแบบมืออาชีพ (Gmail), การประชุมทางวิดีโอ (Meet) และการรับส่งข้อความของทีม (Chat)
- การสร้างเนื้อหา: เครื่องมือสำหรับเขียนเอกสาร (เอกสาร) สร้างสเปรดชีต (ชีต) และออกแบบงานนำเสนอ (สไลด์)
- การจัดระเบียบ: ปฏิทินที่ใช้ร่วมกัน (ปฏิทิน) และการจดบันทึกดิจิทัล (Keep)
- พื้นที่เก็บข้อมูล: พื้นที่เก็บข้อมูลระบบคลาวด์ส่วนกลางสำหรับบันทึกและแชร์ไฟล์อย่างปลอดภัย (ไดรฟ์)
- การจัดการ: การควบคุมดูแลระบบเพื่อจัดการผู้ใช้และการตั้งค่าความปลอดภัย (คอนโซลผู้ดูแลระบบ Workspace)
การผสานรวมที่กำหนดเองประเภทใด
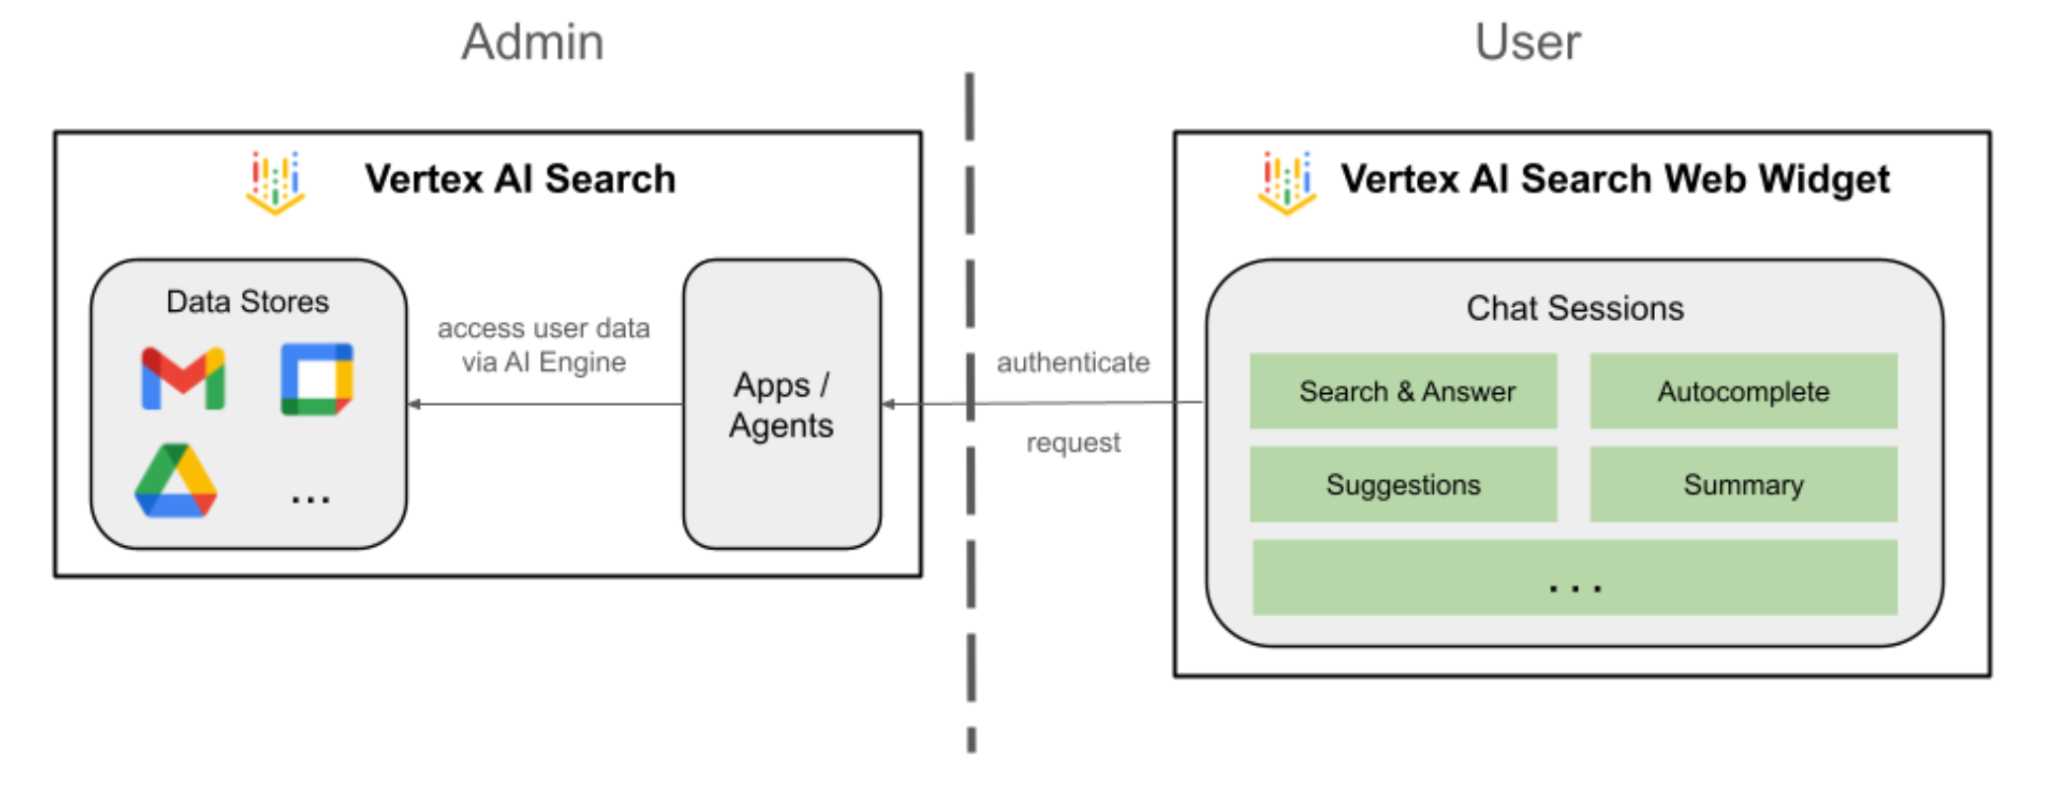
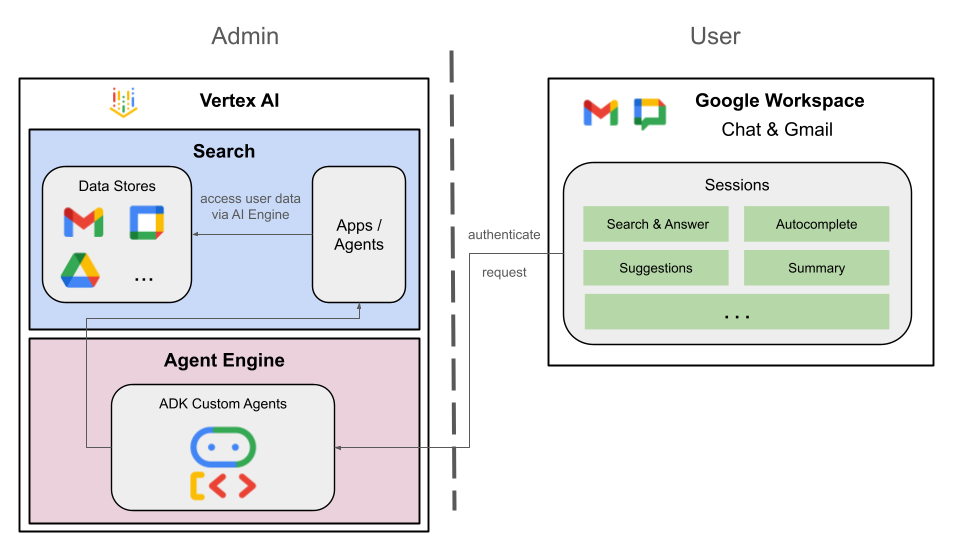
Google Workspace และ Vertex AI สร้างวงจรความคิดเห็นที่มีประสิทธิภาพซึ่ง Workspace จะให้ข้อมูลแบบเรียลไทม์และบริบทการทำงานร่วมกัน ขณะที่ Vertex AI จะนำเสนอโมเดล การให้เหตุผลแบบ Agent และการจัดการเป็นกลุ่มที่จำเป็นต่อการทำงานอัตโนมัติของเวิร์กโฟลว์อัจฉริยะ
- การเชื่อมต่ออัจฉริยะ: ที่เก็บข้อมูล, API และเซิร์ฟเวอร์ MCP (ที่ Google จัดการและที่กำหนดเอง) ที่ Google จัดการช่วยให้ตัวแทนเข้าถึงข้อมูล Workspace และดำเนินการในนามของผู้ใช้ได้อย่างปลอดภัยและราบรื่น
- เอเจนต์ที่กำหนดเอง: ทีมสามารถสร้างเอเจนต์เฉพาะทางที่อิงตามข้อมูลและการดำเนินการของ Workspace ที่ผู้ดูแลระบบควบคุมได้โดยใช้ดีไซเนอร์แบบไม่ต้องเขียนโค้ดหรือเฟรมเวิร์ก Pro-Code
- การผสานรวมดั้งเดิม: ส่วนเสริม Workspace ช่วยเชื่อมช่องว่างระหว่างระบบ AI กับแอปพลิเคชันต่างๆ เช่น Chat และ Gmail ไม่ว่าจะผ่านคอมโพเนนต์ UI เฉพาะหรือกระบวนการเบื้องหลัง ซึ่งช่วยให้ตัวแทนพบปะผู้ใช้ได้ทุกที่ทุกเวลาเพื่อรับความช่วยเหลือที่รวดเร็วและคำนึงถึงบริบท
การผสานรวมระบบนิเวศด้านประสิทธิภาพการทำงานที่แข็งแกร่งของ Google Workspace เข้ากับพลังของเอเจนต์ขั้นสูงของ Vertex AI จะช่วยให้องค์กรเปลี่ยนแปลงการดำเนินงานผ่านเอเจนต์ AI ที่กำหนดเองซึ่งอิงตามข้อมูล และทำให้เวิร์กโฟลว์ที่ซับซ้อนเป็นอัตโนมัติได้โดยตรงภายในเครื่องมือที่ทีมใช้เป็นประจำทุกวัน
ข้อกำหนดเบื้องต้น
หากต้องการทำตามขั้นตอนทั้งหมดในสภาพแวดล้อมของคุณเอง คุณจะต้องมีสิ่งต่อไปนี้
- มีความรู้พื้นฐานเกี่ยวกับ Google Cloud และ Python
- โปรเจ็กต์ Google Cloud ที่คุณเป็นเจ้าของและมีการเรียกเก็บเงิน หากต้องการตรวจสอบว่าโปรเจ็กต์ที่มีอยู่เปิดใช้การเรียกเก็บเงินแล้วหรือไม่ ให้ดูที่ยืนยันสถานะการเรียกเก็บเงินของโปรเจ็กต์ หากต้องการสร้างโปรเจ็กต์ Google Cloud และตั้งค่าการเรียกเก็บเงิน โปรดดูสร้างโปรเจ็กต์ Google Cloud หากต้องการเปลี่ยนการเป็นเจ้าของโปรเจ็กต์ โปรดดูจัดการสมาชิกในโปรเจ็กต์หรือเปลี่ยนการเป็นเจ้าของโปรเจ็กต์
- บัญชี Google Workspace สำหรับธุรกิจหรือองค์กรที่มีสิทธิ์เข้าถึง Google Chat และเปิดฟีเจอร์อัจฉริยะ
- ติดตั้งและเริ่มต้น Google Cloud CLI สำหรับโปรเจ็กต์ที่อยู่ในระบบคลาวด์ Google Cloud
- ติดตั้ง Python 3.11 ขึ้นไป โปรดดูวิธีการในเว็บไซต์ทางการของ Python
สิ่งที่คุณจะสร้าง
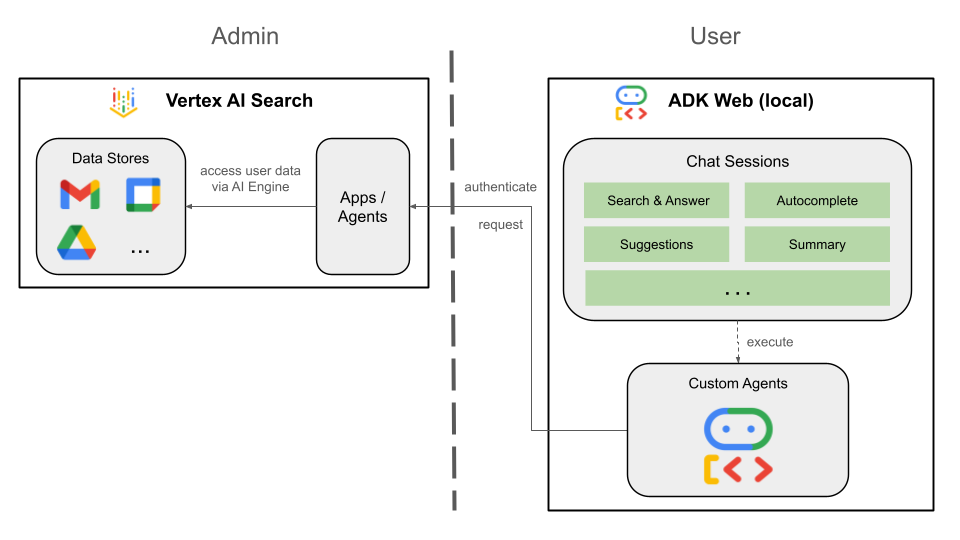
ใน Codelab นี้ เราจะสร้างโซลูชัน 3 รายการด้วย Vertex AI Agent ที่ผสานรวมกับ Google Workspace อย่างใกล้ชิด โดยจะแสดงรูปแบบสถาปัตยกรรมที่ใช้โต้ตอบกับข้อมูล การดำเนินการ และ UI ได้
แอป Vertex AI Search
เอเจนต์นี้ช่วยให้ผู้ใช้ค้นหาข้อมูลและดำเนินการสำหรับ Workspace ในภาษาที่เป็นธรรมชาติได้ โดยจะอิงตามองค์ประกอบต่อไปนี้
- โมเดล: Gemini
- ข้อมูลและการดำเนินการ: ที่เก็บข้อมูล Vertex AI สำหรับ Google Workspace (ปฏิทิน, Gmail, ไดรฟ์)
- โฮสต์ของ Agent: Vertex AI Search
- UI: วิดเจ็ตเว็บของ Vertex AI Search
เอเจนต์ที่กำหนดเอง
เอเจนต์นี้ช่วยให้ผู้ใช้ค้นหาข้อมูลและดำเนินการสำหรับ Workspace ในภาษาที่เป็นธรรมชาติได้โดยใช้เครื่องมือและกฎที่กำหนดเอง โดยจะอิงตามองค์ประกอบต่อไปนี้
- โมเดล: Gemini
- ข้อมูลและการดำเนินการ: ที่เก็บข้อมูล Vertex AI สำหรับ Google Workspace (ปฏิทิน, Gmail, ไดรฟ์), เซิร์ฟเวอร์ Vertex AI Search Model Context Protocol (MCP) ที่ Google จัดการ, ฟังก์ชันเครื่องมือที่กำหนดเองเพื่อส่งข้อความ Google Chat (ผ่าน Google Chat API)
- เครื่องมือสร้างเอเจนต์: Agent Development Kit (ADK)
- โฮสต์ของ Agent: Vertex AI Agent Engine
- UI: ADK Web
Agent ในฐานะส่วนเสริมของ Google Workspace
เอเจนต์นี้ช่วยให้ผู้ใช้ค้นหาข้อมูลสำหรับ Workspace ในภาษาที่เป็นธรรมชาติภายในบริบทของ UI ของแอป Workspace โดยจะอิงตามองค์ประกอบต่อไปนี้
- โมเดล: Gemini
- ข้อมูลและการดำเนินการ: ที่เก็บข้อมูล Vertex AI สำหรับ Google Workspace (ปฏิทิน, Gmail, ไดรฟ์), เซิร์ฟเวอร์ Vertex AI Search Model Context Protocol (MCP) ที่ Google จัดการ, ฟังก์ชันเครื่องมือที่กำหนดเองเพื่อส่งข้อความ Google Chat (ผ่าน Google Chat API)
- เครื่องมือสร้างเอเจนต์: Agent Development Kit (ADK)
- โฮสต์ของ Agent: Vertex AI Agent Engine
- UI: ส่วนเสริม Google Workspace สำหรับ Chat และ Gmail (ขยายไปยังปฏิทิน, ไดรฟ์, เอกสาร, ชีต และสไลด์ได้อย่างง่ายดาย)
- ส่วนเสริม Google Workspace: Apps Script, Vertex AI Agent Engine API, ตามบริบท (ข้อความ Gmail ที่เลือก)
สิ่งที่คุณจะได้เรียนรู้
- จุดผสานรวมระหว่าง Vertex AI Search กับ Google Workspace ที่เปิดใช้ข้อมูลและการดำเนินการ
- ตัวเลือกในการสร้าง Agent ที่กำหนดเองซึ่งโฮสต์ใน Vertex AI
- วิธีที่ผู้ใช้เข้าถึง Agent เช่น วิดเจ็ตเว็บ Vertex AI Search และแอปพลิเคชัน Google Workspace
เข้าถึง Codelab นี้ได้ง่าย
2. ตั้งค่า
ก่อนสร้างโซลูชัน เราต้องเริ่มต้นการตั้งค่าแอปพลิเคชัน Vertex AI ของโปรเจ็กต์ เปิดใช้ API ที่จำเป็น และสร้างที่เก็บข้อมูล Vertex AI Workspace
แนวคิดเกี่ยวกับรีวิว
แอปพลิเคชัน Vertex AI
แอปพลิเคชัน Vertex AI คือโซลูชันแบบครบวงจรที่มีการจัดการใน Google Cloud ซึ่งผสานรวมโมเดลแมชชีนเลิร์นนิง (เช่น เอเจนต์ Generative AI หรือเครื่องมือค้นหา) กับข้อมูลขององค์กรและเครื่องมือเฉพาะทางเพื่อทำงานที่ซับซ้อน เช่น การค้นหาเชิงความหมาย การสร้างเนื้อหา หรือการโต้ตอบกับลูกค้าโดยอัตโนมัติ
ที่เก็บข้อมูล Vertex AI
ที่เก็บข้อมูล Vertex AI คือเอนทิตีที่มีข้อมูลที่นำเข้าจากแหล่งข้อมูลจากบุคคลที่หนึ่ง เช่น Google Workspace หรือแอปพลิเคชันของบุคคลที่สาม เช่น Jira หรือ Shopify ที่เก็บข้อมูลที่มีข้อมูลจากแอปพลิเคชันของบุคคลที่สามเรียกว่าเครื่องมือเชื่อมต่อข้อมูลด้วย
เริ่มการตั้งค่าแอปพลิเคชัน Vertex AI
เริ่มต้นการตั้งค่าแอปพลิเคชัน Vertex AI เพื่อเปิดใช้การสร้างเอเจนต์
เปิด คอนโซล Google Cloud ในแท็บใหม่ แล้วทำตามขั้นตอนต่อไปนี้
- เลือกโปรเจ็กต์
- ในช่องค้นหาของ Google Cloud ให้ไปที่แอปพลิเคชัน AI
- คลิกดำเนินการต่อและเปิดใช้งาน API หลังจากอ่านและยอมรับข้อกำหนดแล้ว
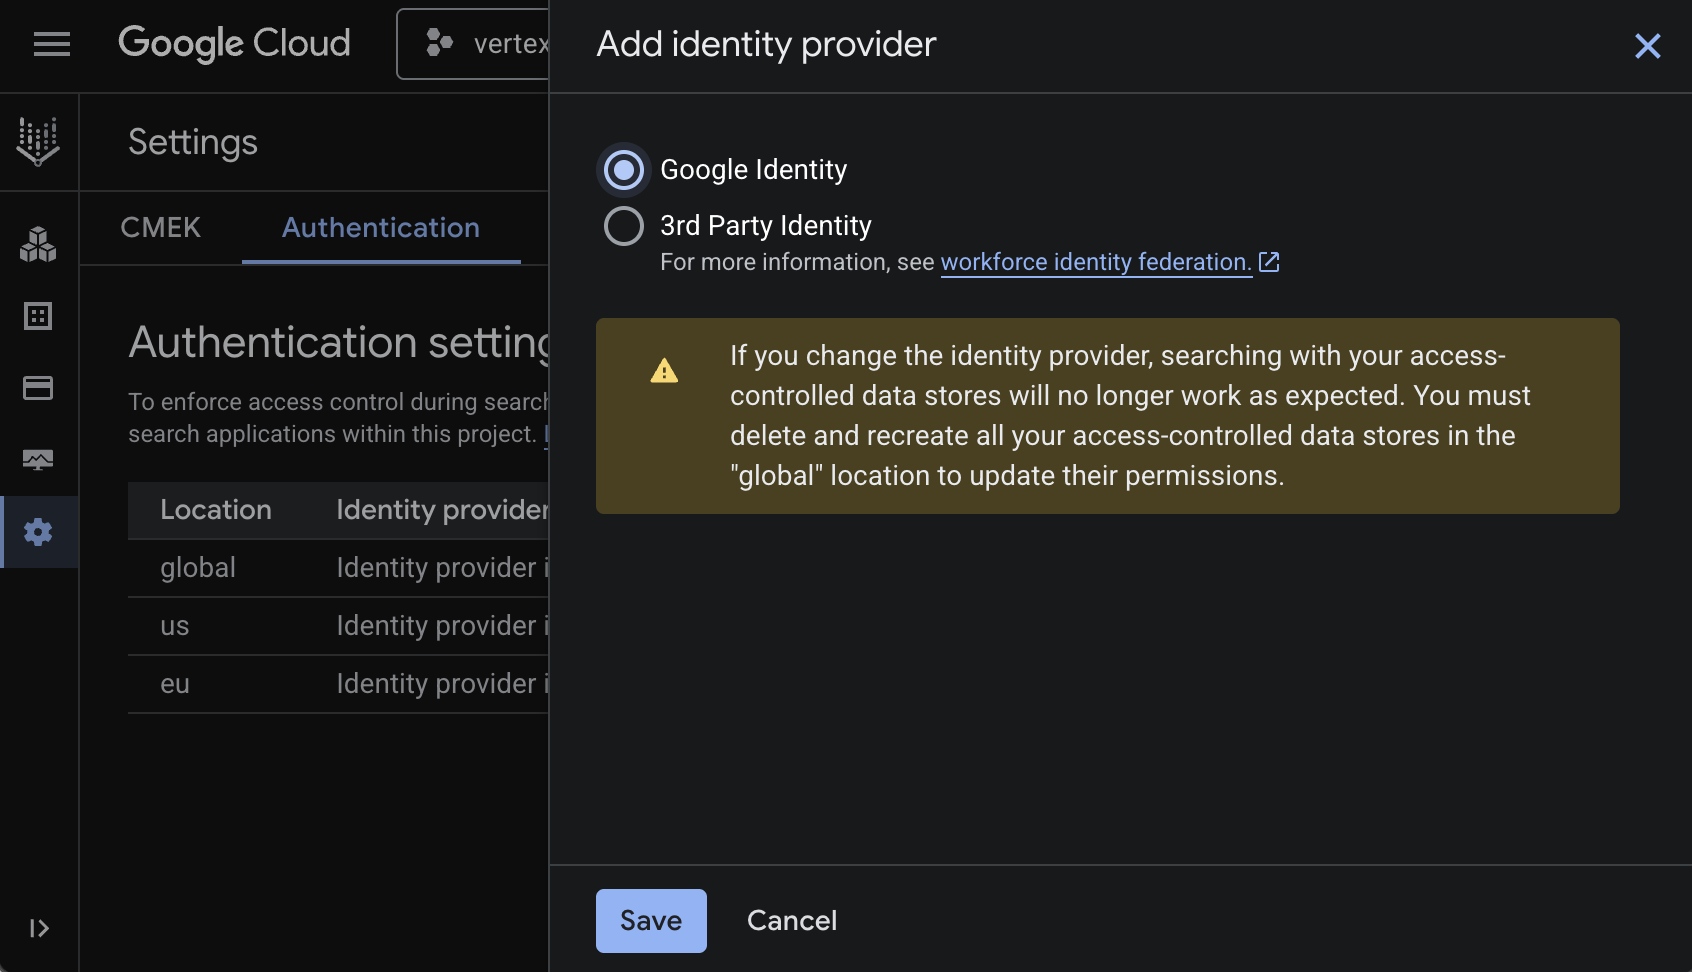
- ไปที่การตั้งค่า
- ในแท็บ Authentication ให้แก้ไข global
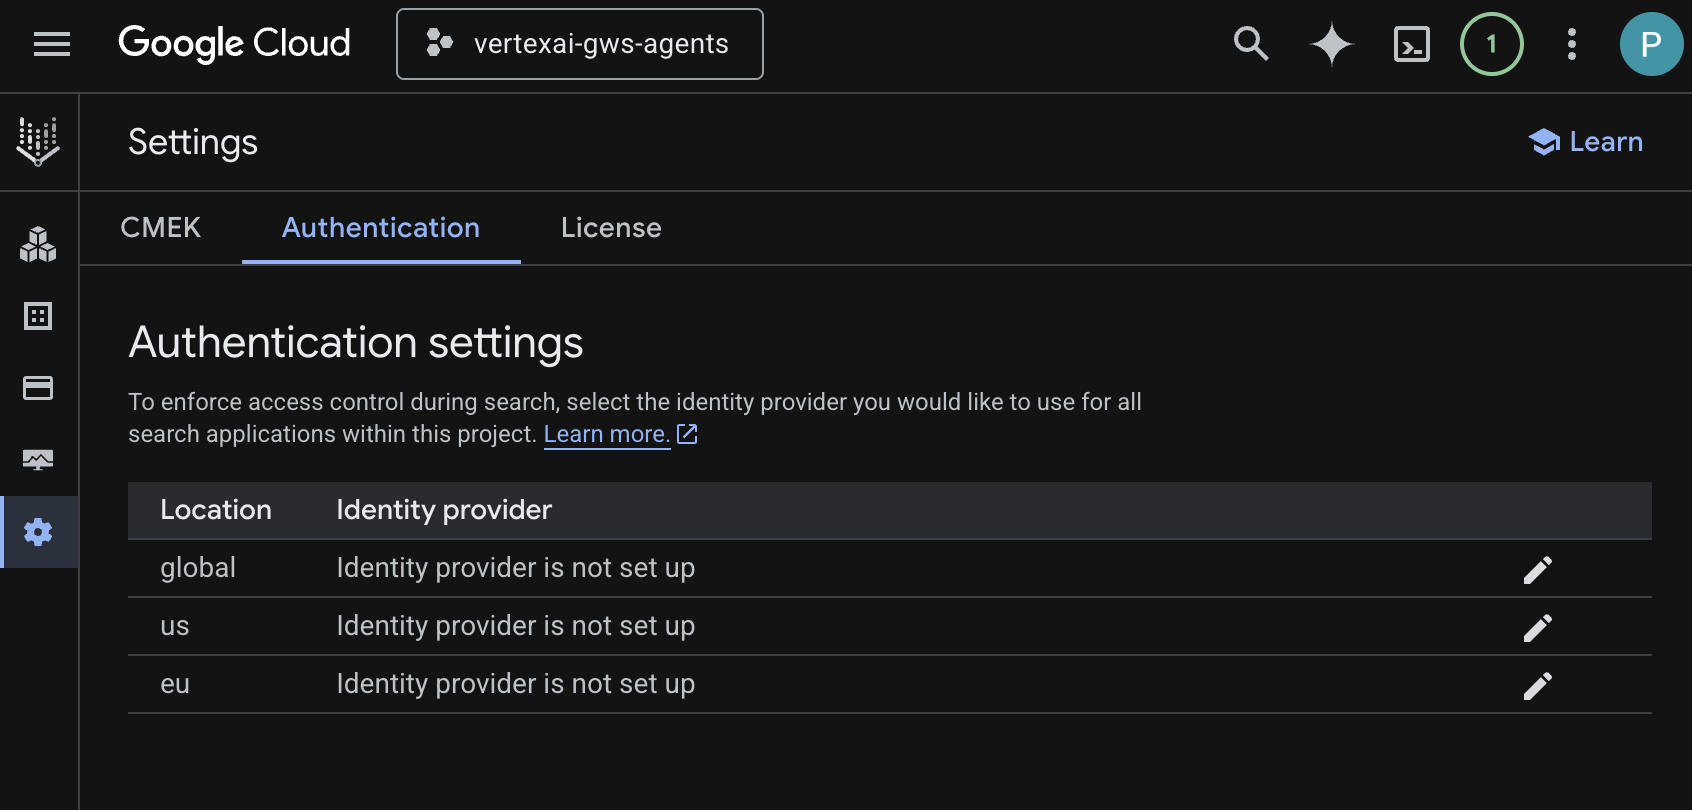
- เลือก Google Identity แล้วคลิกบันทึก
เปิดใช้ API
พื้นที่เก็บข้อมูล Vertex AI Workspace ต้องเปิดใช้ API ดังนี้
- ในคอนโซล Google Cloud ให้เปิดใช้ Calendar, Gmail และ People API โดยทำดังนี้
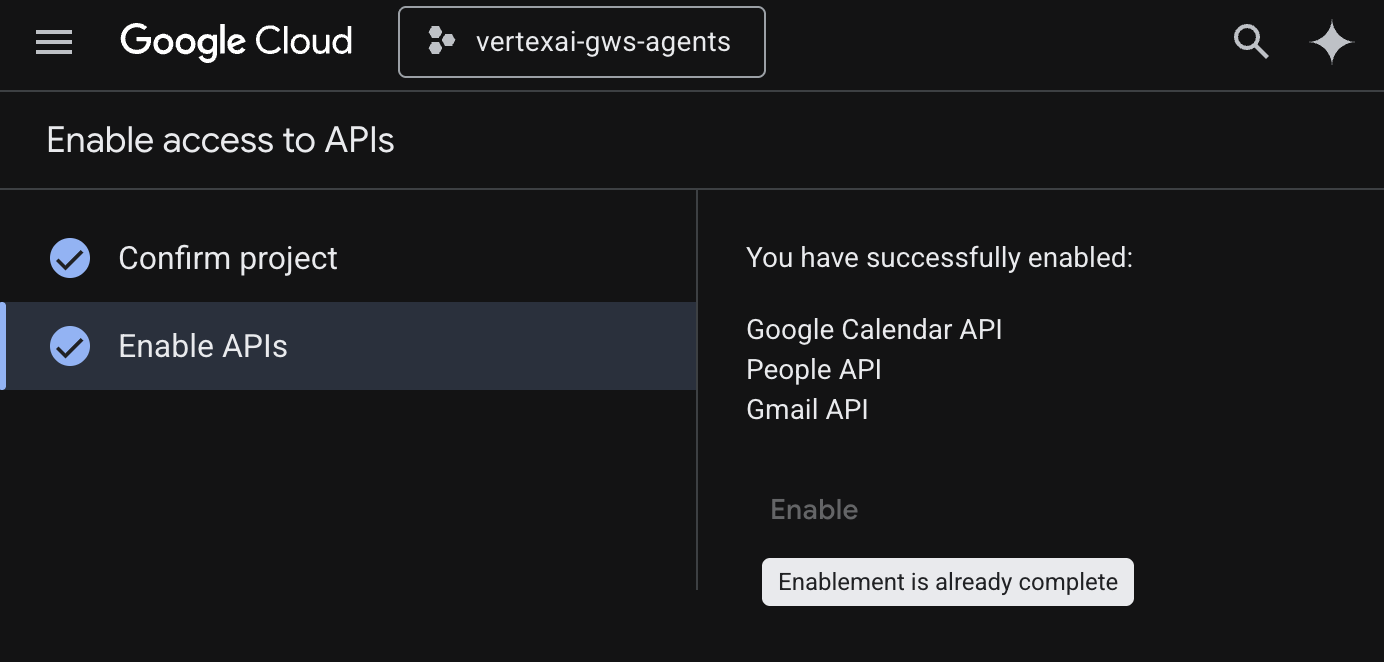
- คลิกเมนู ☰ > API และบริการ > API และบริการที่เปิดใช้ แล้วตรวจสอบว่า Google ปฏิทิน API, Gmail API และ People API อยู่ในรายการ
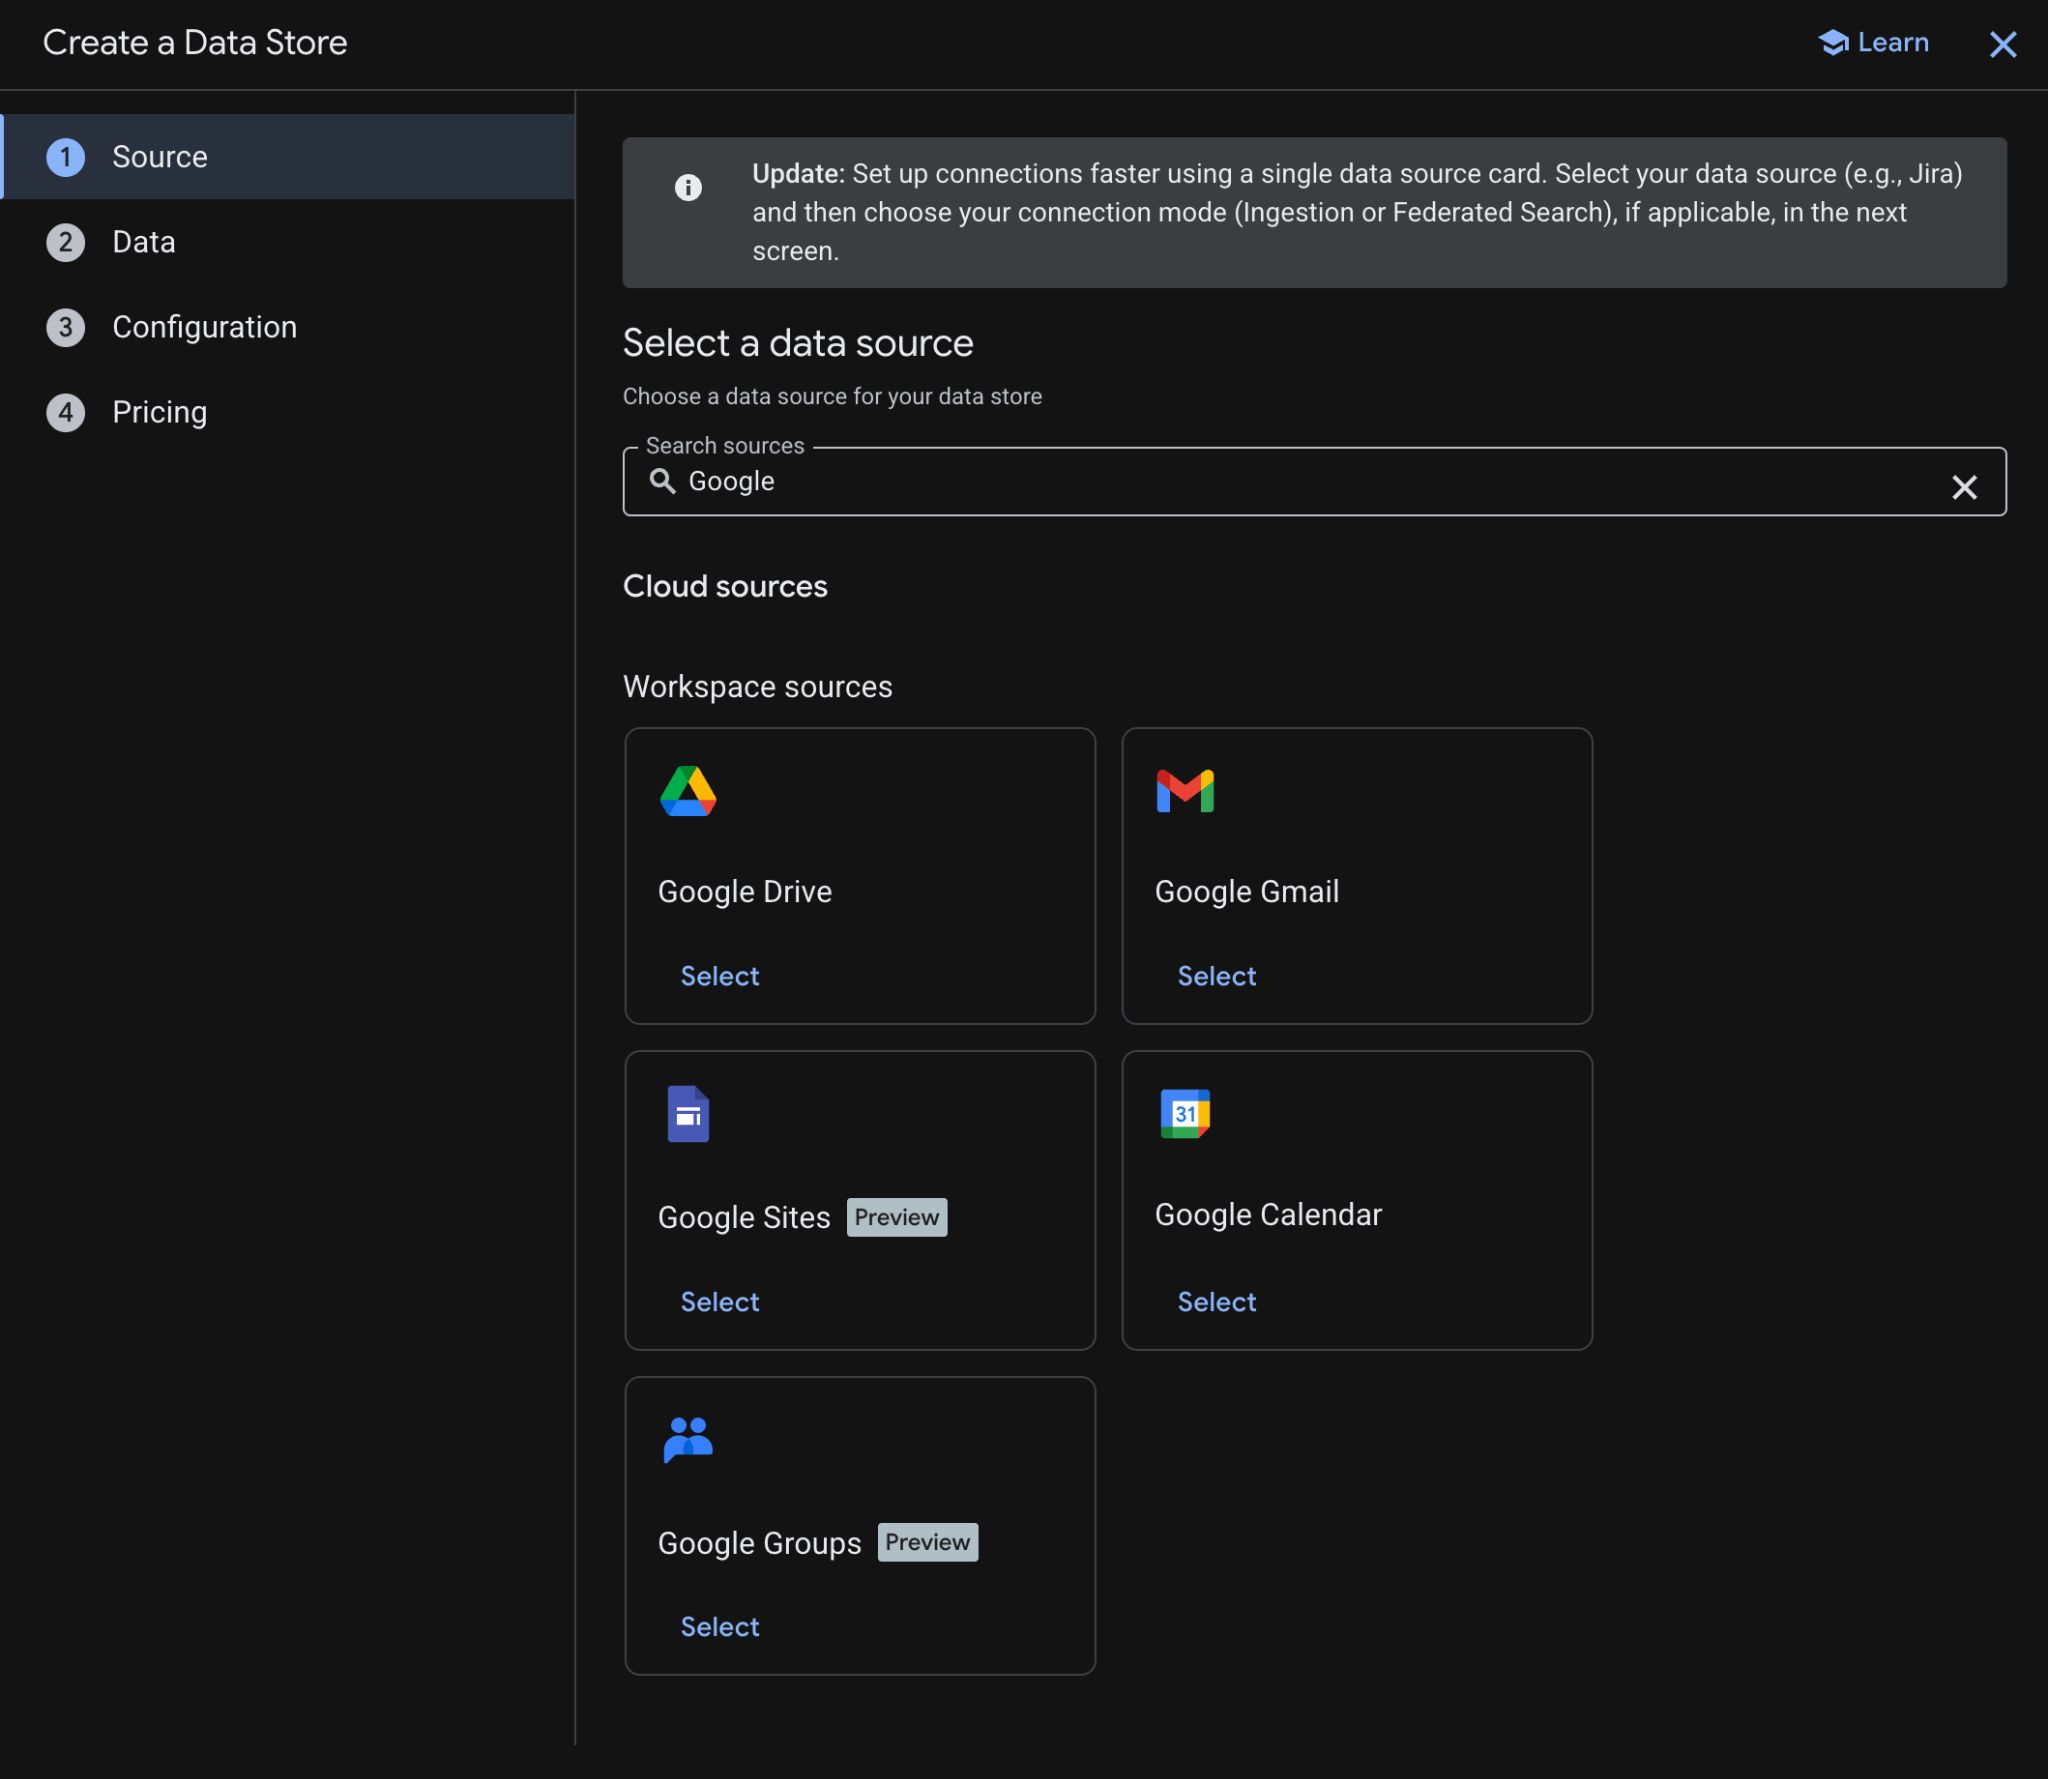
สร้างพื้นที่เก็บข้อมูล
สร้างพื้นที่เก็บข้อมูล Google ไดรฟ์
- ในคอนโซล Google Cloud ให้ไปที่แอปพลิเคชัน AI แล้วไปที่ที่เก็บข้อมูล
- คลิก + สร้างที่เก็บข้อมูล
- ในแหล่งที่มา ภายใน Google ไดรฟ์ ให้คลิกเลือก
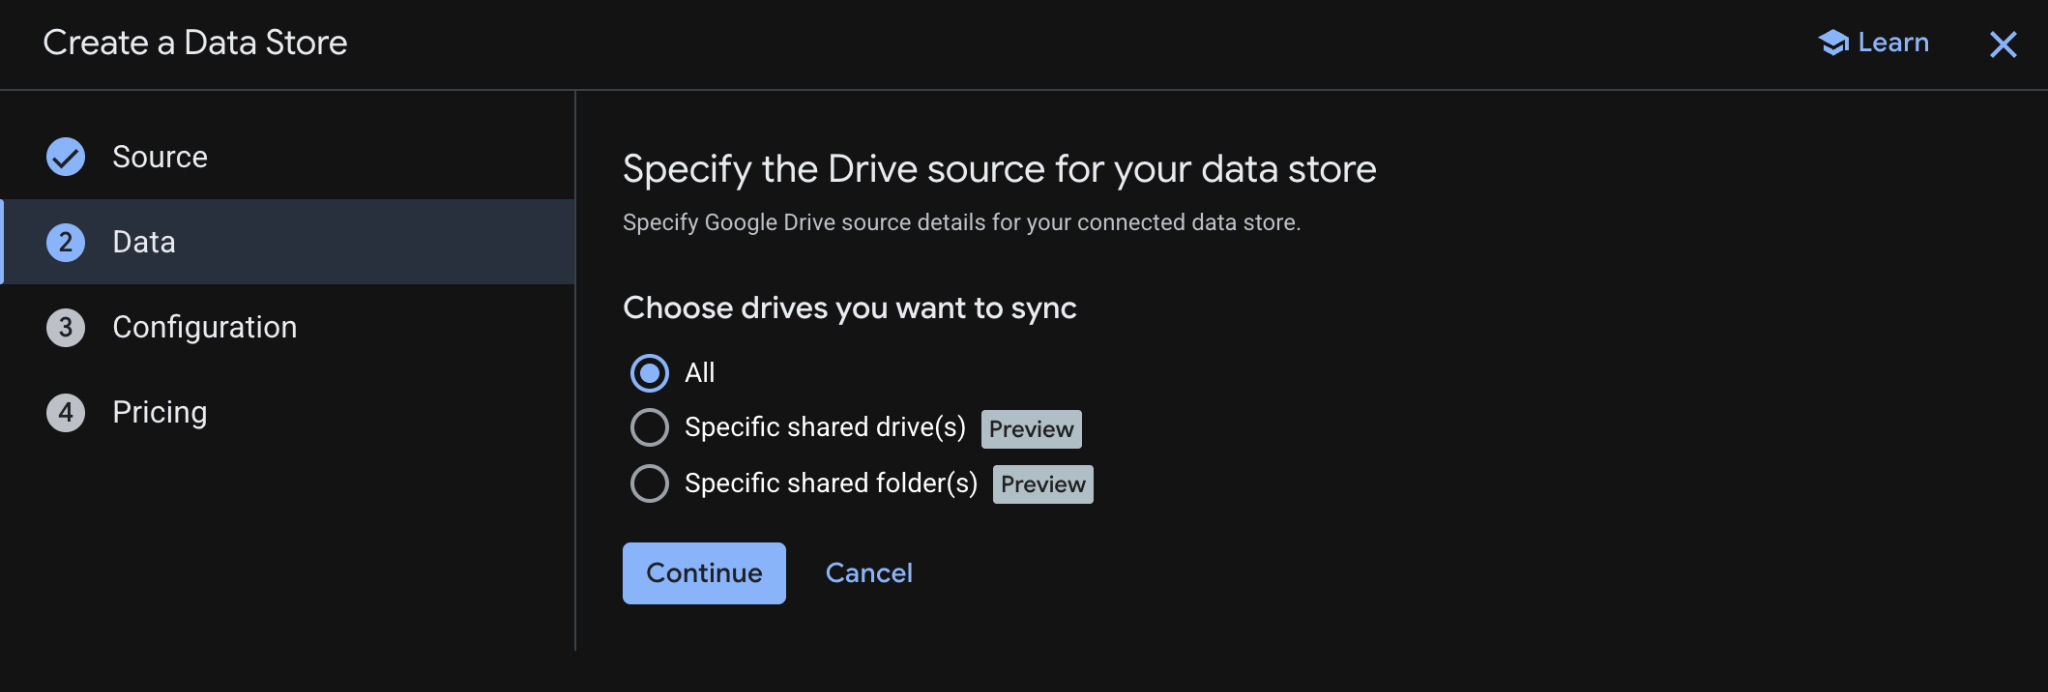
- ในข้อมูล ให้เลือกทั้งหมด แล้วคลิกต่อไป
- ในการกำหนดค่า ให้ตั้งเครื่องมือเชื่อมต่อข้อมูลเป็น
driveแล้วคลิกต่อไปหลังจากตรวจสอบและยอมรับค่าใช้จ่ายที่อาจมี
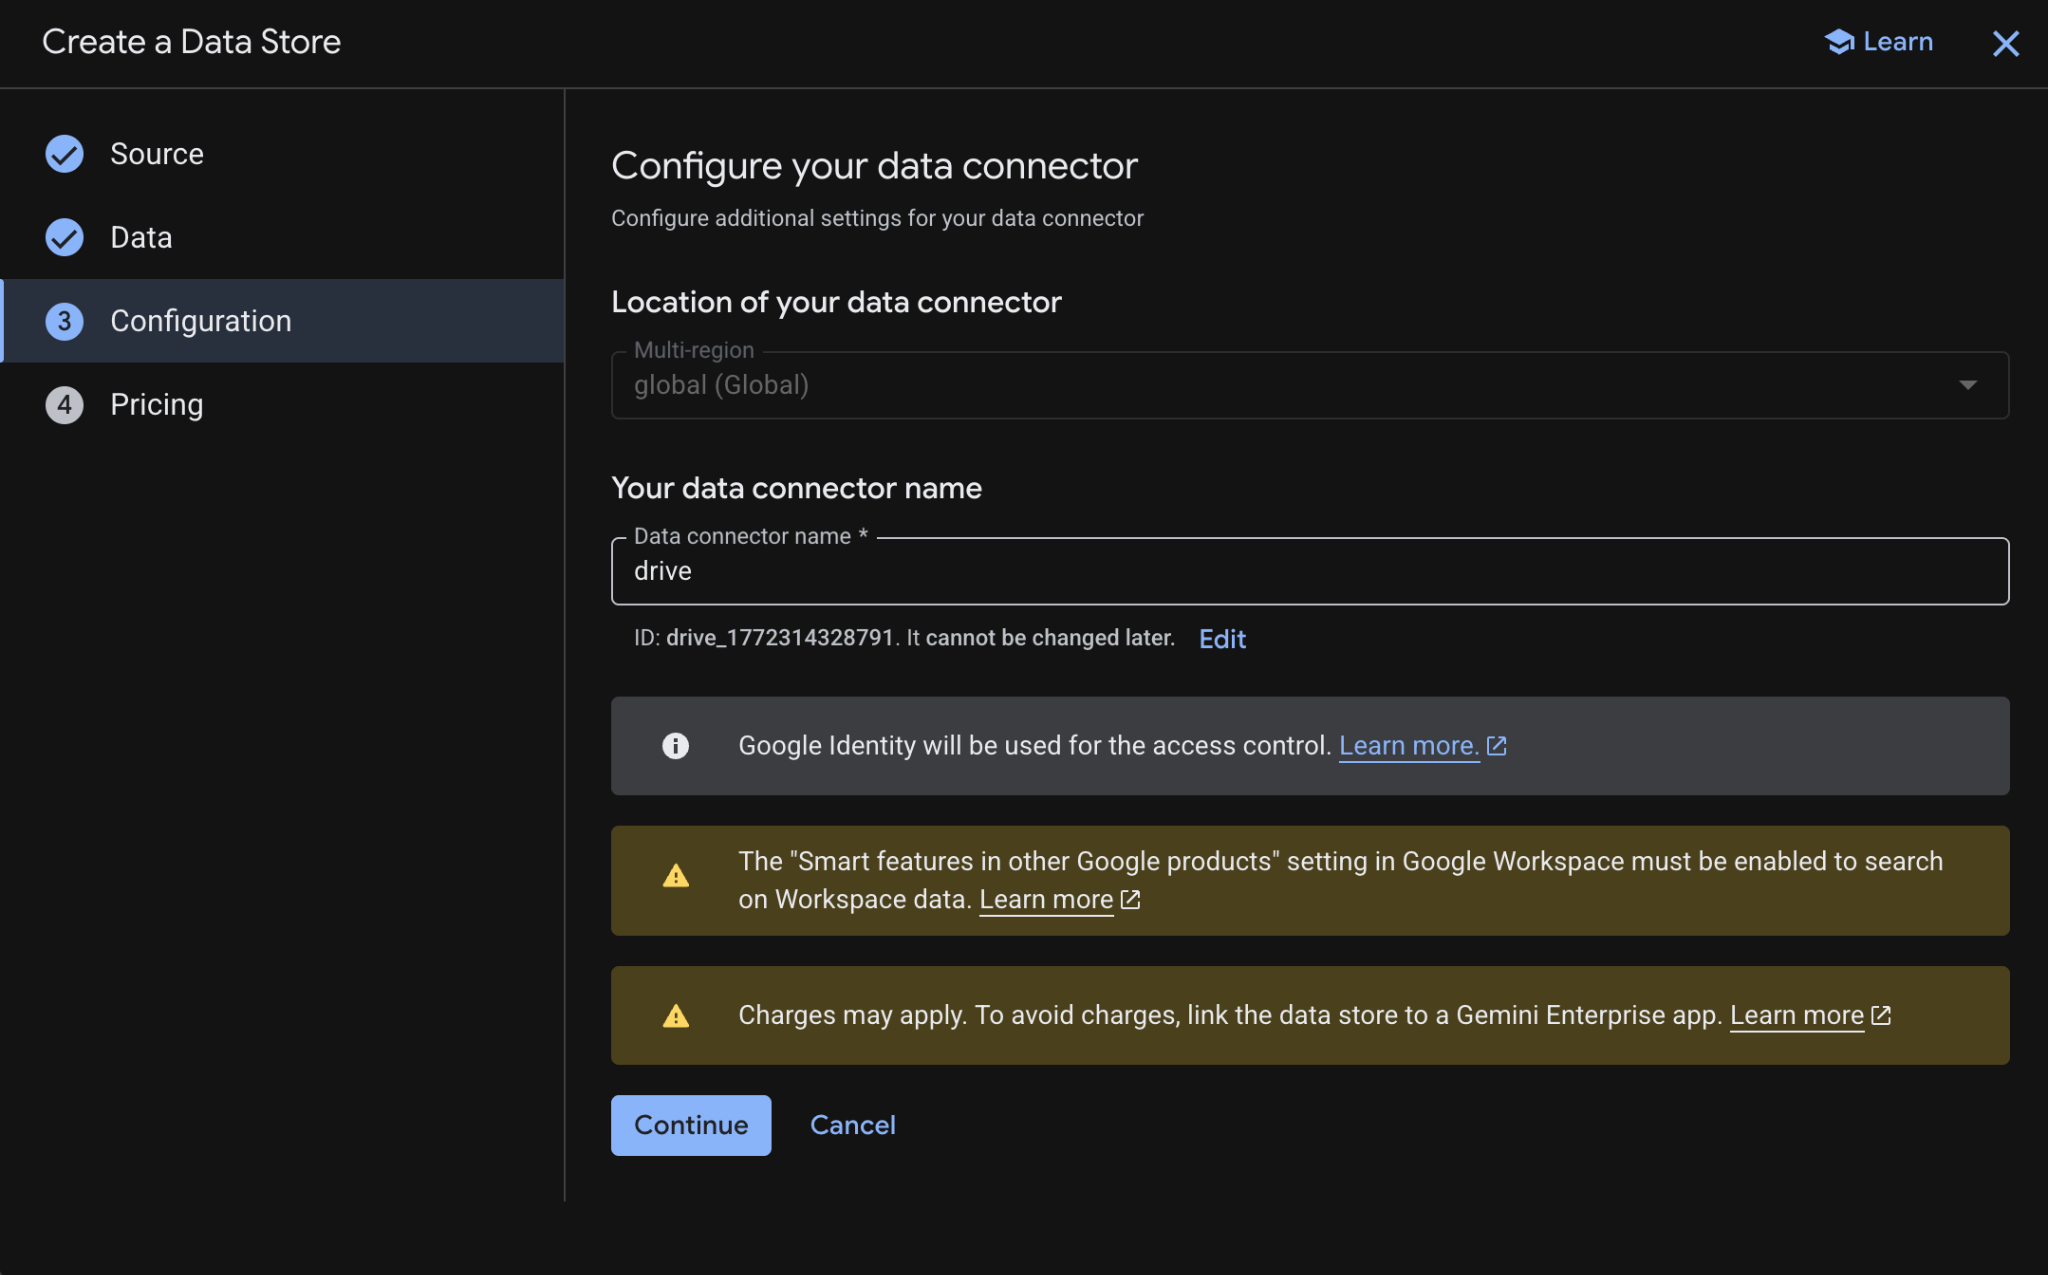
- ในการกำหนดราคา ให้เลือกรูปแบบการกำหนดราคาที่ต้องการ แล้วคลิกสร้าง เราขอแนะนำให้ใช้การกำหนดราคาทั่วไปในบริบทของ Codelab นี้
- ระบบจะเปลี่ยนเส้นทางคุณไปยังที่เก็บข้อมูลโดยอัตโนมัติ ซึ่งคุณจะเห็นที่เก็บข้อมูลที่เพิ่มใหม่
สร้างพื้นที่เก็บข้อมูล Google ปฏิทิน
- คลิก + สร้างที่เก็บข้อมูล
- ในแหล่งที่มา ให้ค้นหา Google ปฏิทิน แล้วคลิกเลือก
- ในส่วนการดำเนินการ ให้คลิกข้าม
- ในส่วนการกำหนดค่า ให้ตั้งชื่อเครื่องมือเชื่อมต่อข้อมูลเป็น
calendar - คลิกสร้าง
- ระบบจะเปลี่ยนเส้นทางคุณไปยังที่เก็บข้อมูลโดยอัตโนมัติ ซึ่งคุณจะเห็นที่เก็บข้อมูลที่เพิ่มใหม่
สร้างพื้นที่เก็บข้อมูล Google Gmail โดยทำดังนี้
- คลิก + ที่เก็บข้อมูลใหม่
- ในแหล่งที่มา ให้ค้นหา Google Gmail แล้วคลิกเลือก
- ในส่วนการดำเนินการ ให้คลิกข้าม
- ในส่วนการกำหนดค่า ให้ตั้งชื่อเครื่องมือเชื่อมต่อข้อมูลเป็น
gmail - คลิกสร้าง
- ระบบจะเปลี่ยนเส้นทางคุณไปยังที่เก็บข้อมูลโดยอัตโนมัติ ซึ่งคุณจะเห็นที่เก็บข้อมูลที่เพิ่มใหม่
3. แอป Vertex AI Search
เอเจนต์นี้ช่วยให้ผู้ใช้ค้นหาข้อมูลและดำเนินการสำหรับ Workspace ในภาษาที่เป็นธรรมชาติได้ โดยจะอิงตามองค์ประกอบต่อไปนี้
- โมเดล: Gemini
- ข้อมูลและการดำเนินการ: ที่เก็บข้อมูล Vertex AI สำหรับ Google Workspace (ปฏิทิน, Gmail, ไดรฟ์)
- โฮสต์ของ Agent: Vertex AI Search
- UI: วิดเจ็ตเว็บของ Vertex AI Search
ตรวจสอบแนวคิด
แอป Vertex AI Search
แอป Vertex AI Search จะแสดงผลการค้นหา การดำเนินการ และเอเจนต์แก่ผู้ใช้ปลายทาง คำว่าแอปสามารถใช้แทนคำว่าเครื่องมือในบริบทของ API ได้ แอปต้องเชื่อมต่อกับที่เก็บข้อมูลจึงจะใช้ข้อมูลจากที่เก็บข้อมูลเพื่อแสดงผลการค้นหา คำตอบ หรือการดำเนินการได้
วิดเจ็ตเว็บ Vertex AI Search
วิดเจ็ตเว็บ Vertex AI Search เป็นคอมโพเนนต์ UI ที่สร้างไว้ล่วงหน้าและปรับแต่งได้ ซึ่งช่วยให้นักพัฒนาแอปฝังแถบค้นหาและอินเทอร์เฟซผลการค้นหาที่ทำงานด้วยระบบ AI ลงในเว็บไซต์ได้โดยตรงโดยใช้การเขียนโค้ดน้อยที่สุด
ตัวอย่าง Vertex AI Search
Vertex AI Search เวอร์ชันตัวอย่างคือสภาพแวดล้อมการทดสอบในตัวภายในคอนโซล Google Cloud ซึ่งช่วยให้นักพัฒนาแอปตรวจสอบการกำหนดค่าการค้นหาและคำตอบแบบ Generative ก่อนที่จะติดตั้งใช้งานการตั้งค่าเดียวกันเหล่านั้นอย่างราบรื่นกับวิดเจ็ตเว็บ Vertex AI Search ที่พร้อมใช้งานจริง
ตรวจสอบสถาปัตยกรรมโซลูชัน
สร้างแอป
สร้างแอปค้นหาใหม่เพื่อยึดพื้นที่เก็บข้อมูล
เปิด AI Applications > Apps จาก Cloud Console แล้วทำตามขั้นตอนต่อไปนี้
- คลิก + สร้างแอป
- ในประเภท ภายในCustom Search (ทั่วไป) ให้คลิกสร้าง
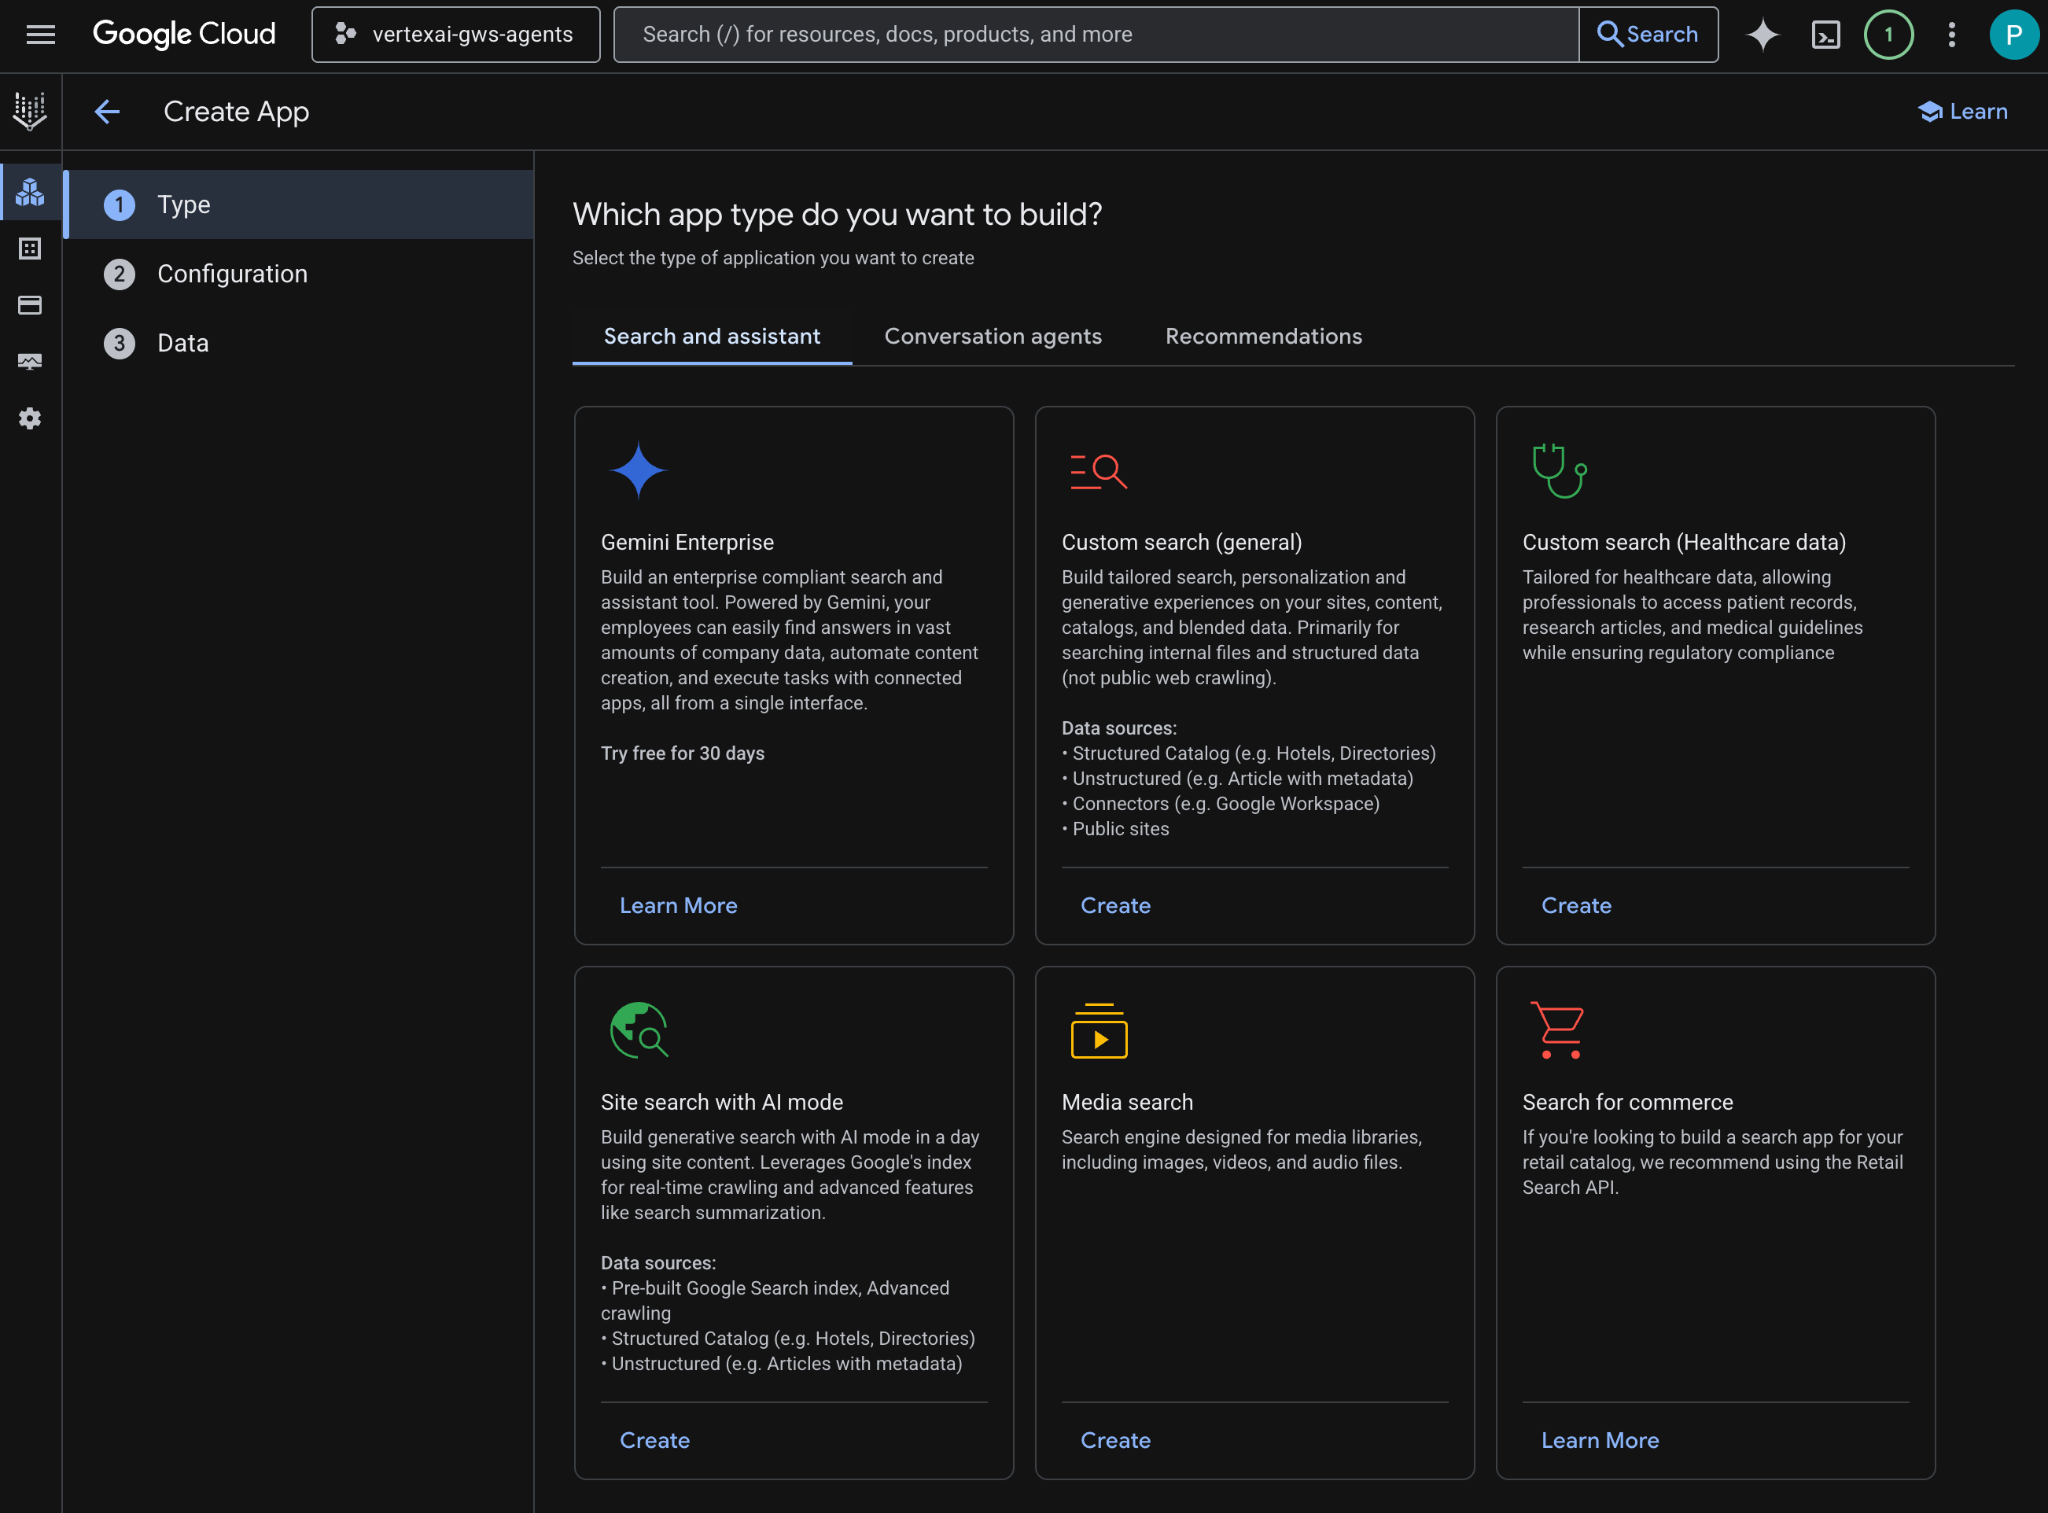
- ในการกำหนดค่า ให้เลือกฟีเจอร์รุ่น Enterprise และคำตอบแบบ Generative หลังจากตรวจสอบและตกลงราคาแล้ว
- ตั้งชื่อแอปเป็น
codelab - ระบบจะสร้างรหัสตามชื่อและแสดงไว้ใต้ช่อง ให้คัดลอกรหัส
- ตั้งค่าชื่อบริษัทเป็น
Codelab - ตั้งค่าหลายภูมิภาคเป็น
global (Global) - คลิกต่อไป
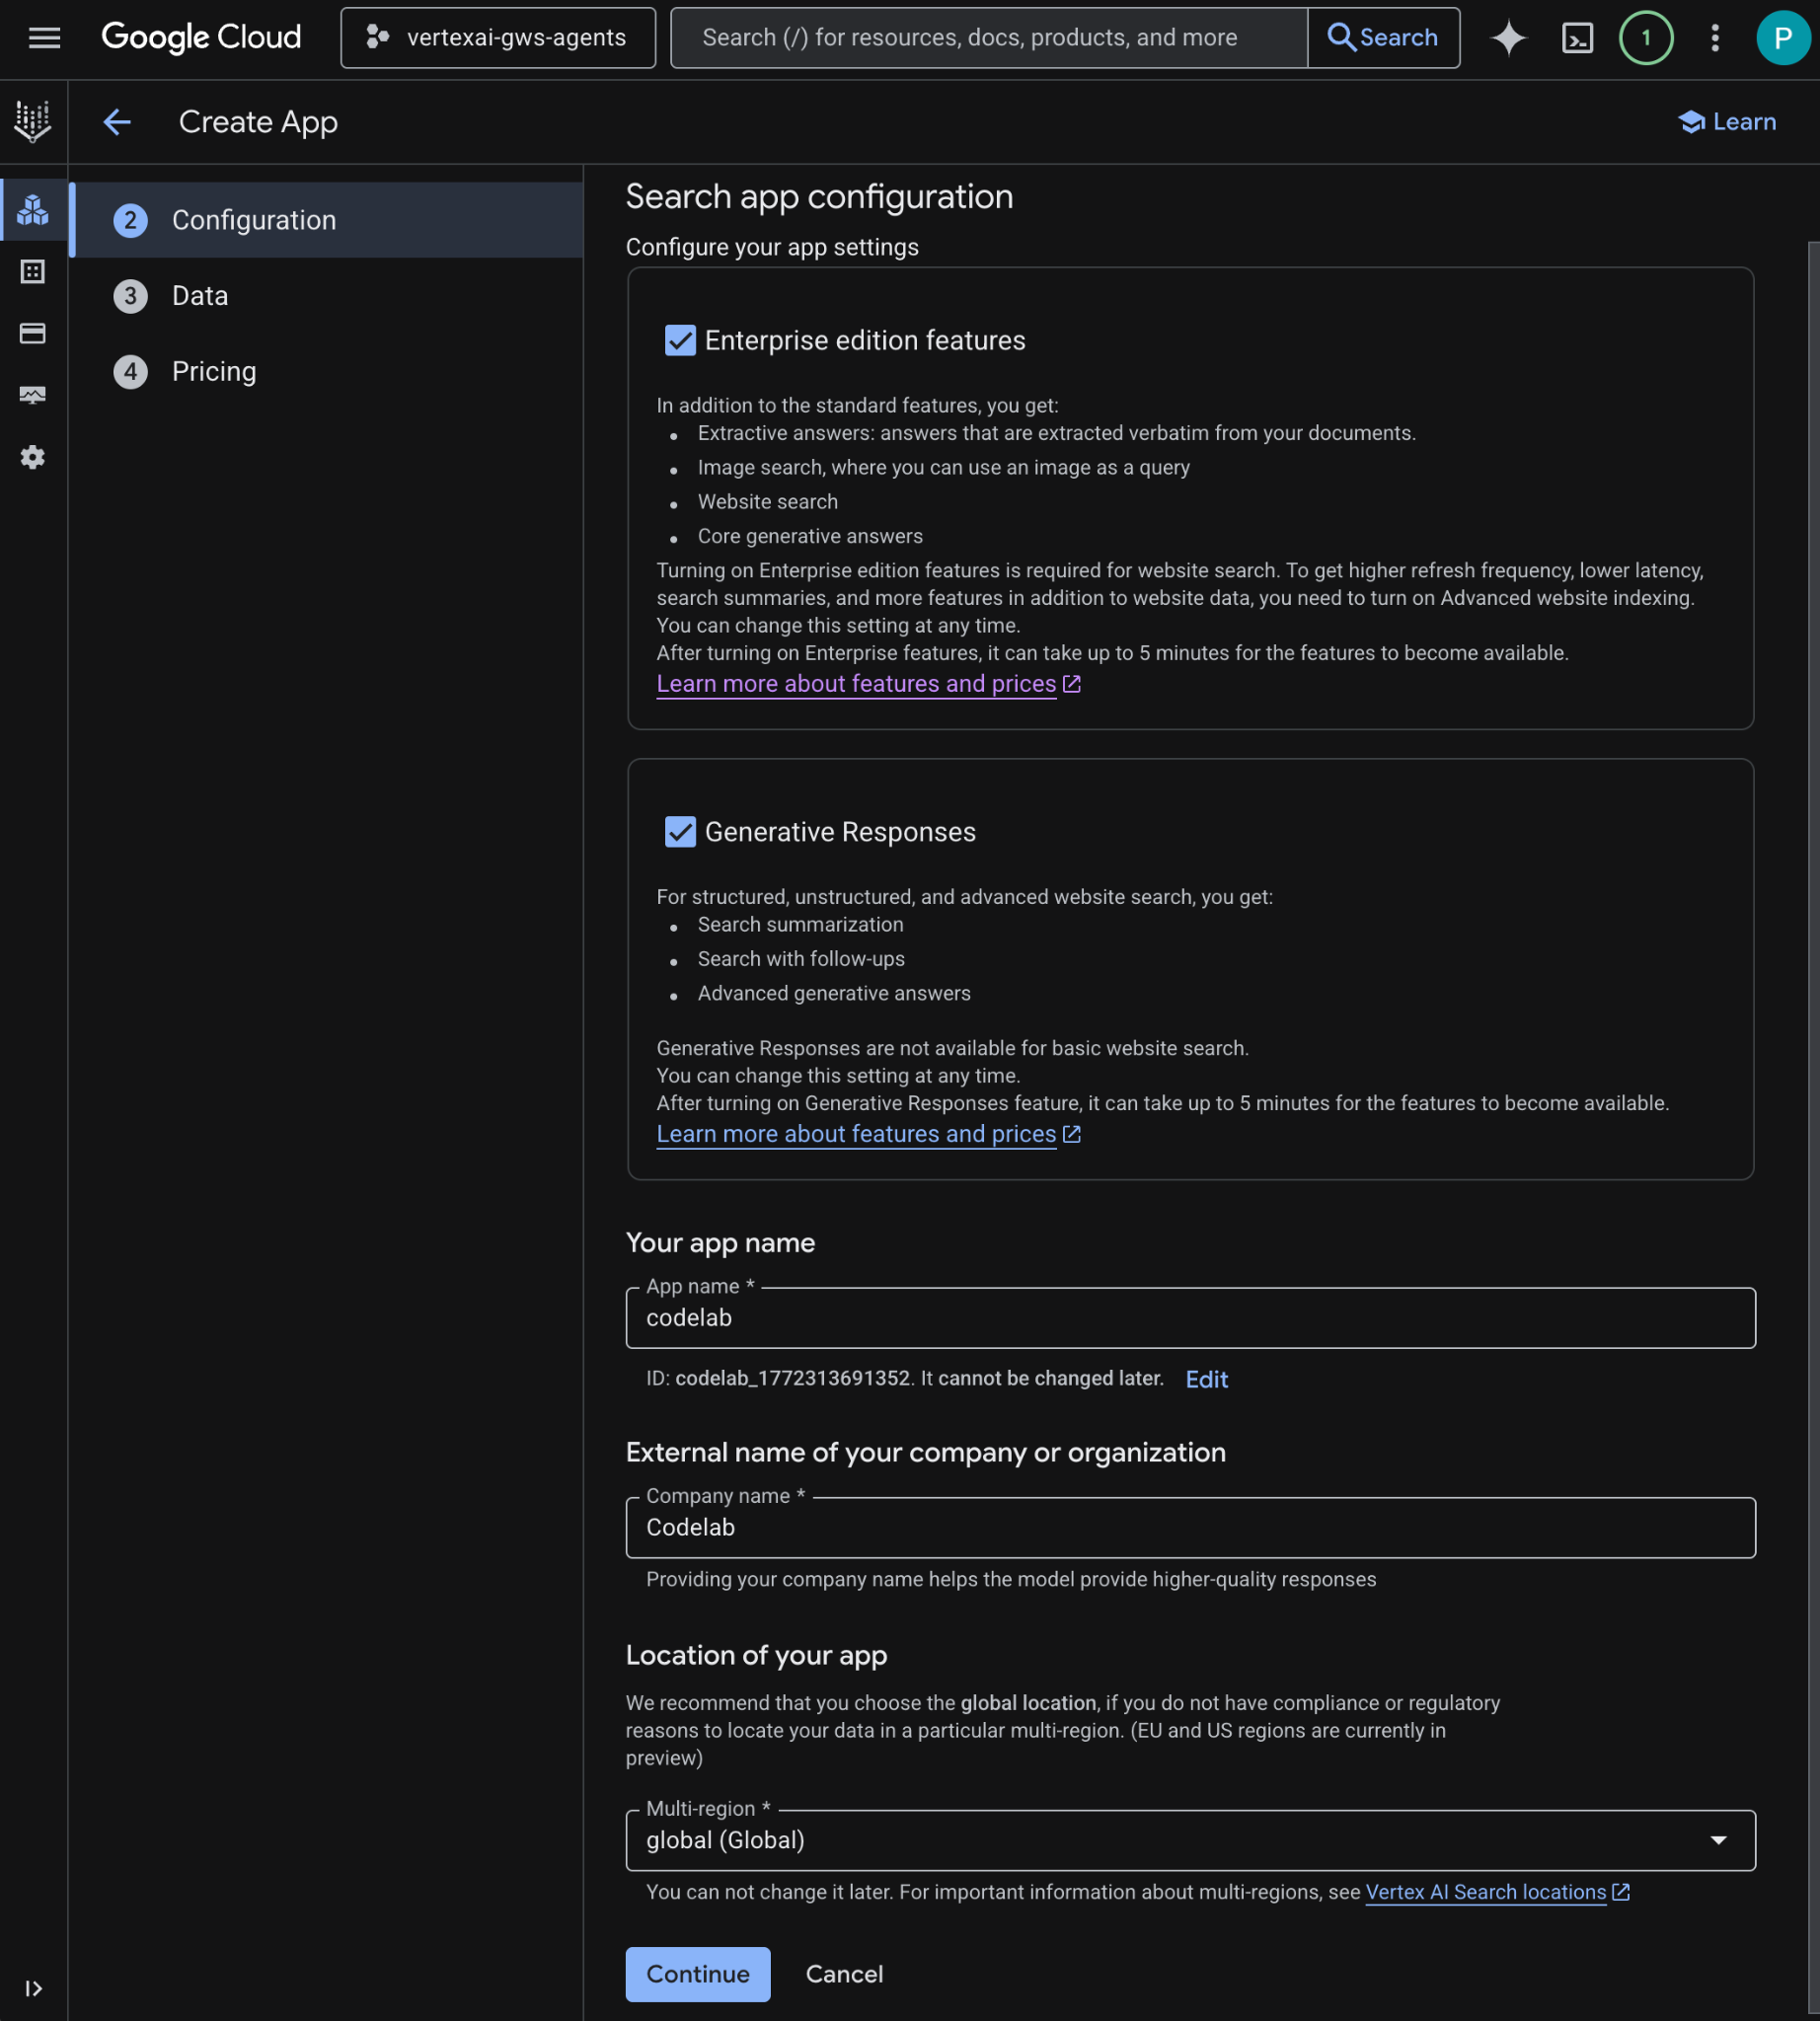
- ในข้อมูล ให้เลือกที่เก็บข้อมูล ไดรฟ์, Gmail และปฏิทิน แล้วคลิกต่อไป
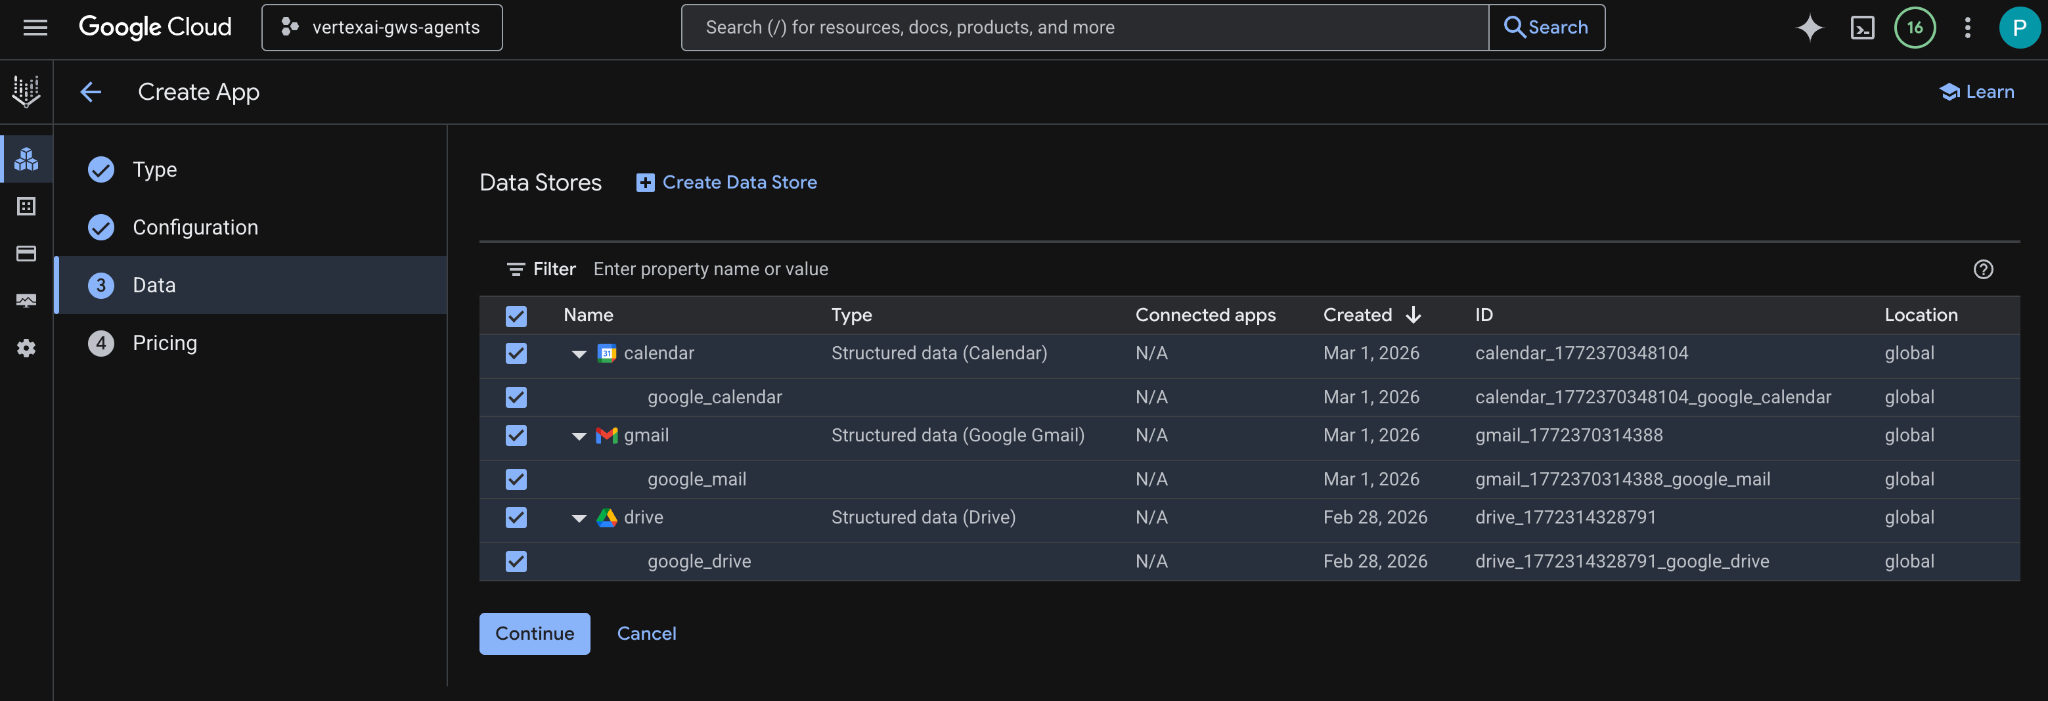
- ในการกำหนดราคา ให้เลือกรูปแบบการกำหนดราคาที่ต้องการ แล้วคลิกสร้าง เราขอแนะนำให้ใช้การกำหนดราคาทั่วไปในบริบทของ Codelab นี้
- ระบบจะสร้างแอปและเปลี่ยนเส้นทางคุณไปยังแอปพลิเคชัน AI > แอป > Codelab > ภาพรวมแอป โดยอัตโนมัติ
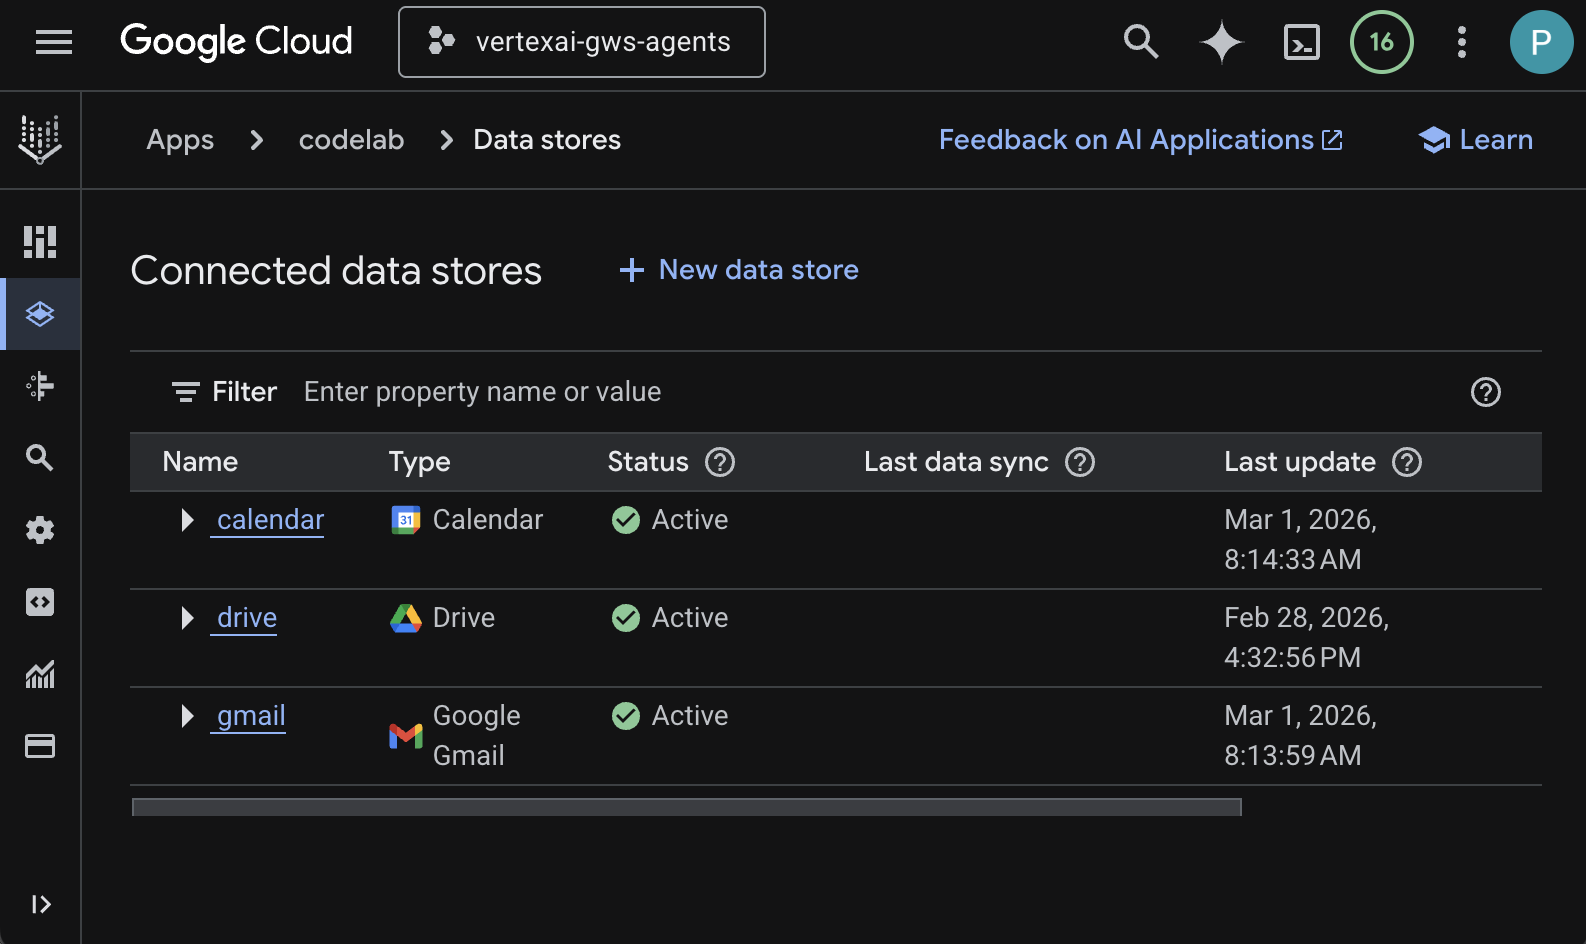
- ไปที่ที่เก็บข้อมูลที่เชื่อมต่อ
- หลังจากผ่านไป 2-3 นาที สถานะที่เก็บข้อมูลที่เชื่อมต่อทั้งหมดควรเป็นใช้งานอยู่
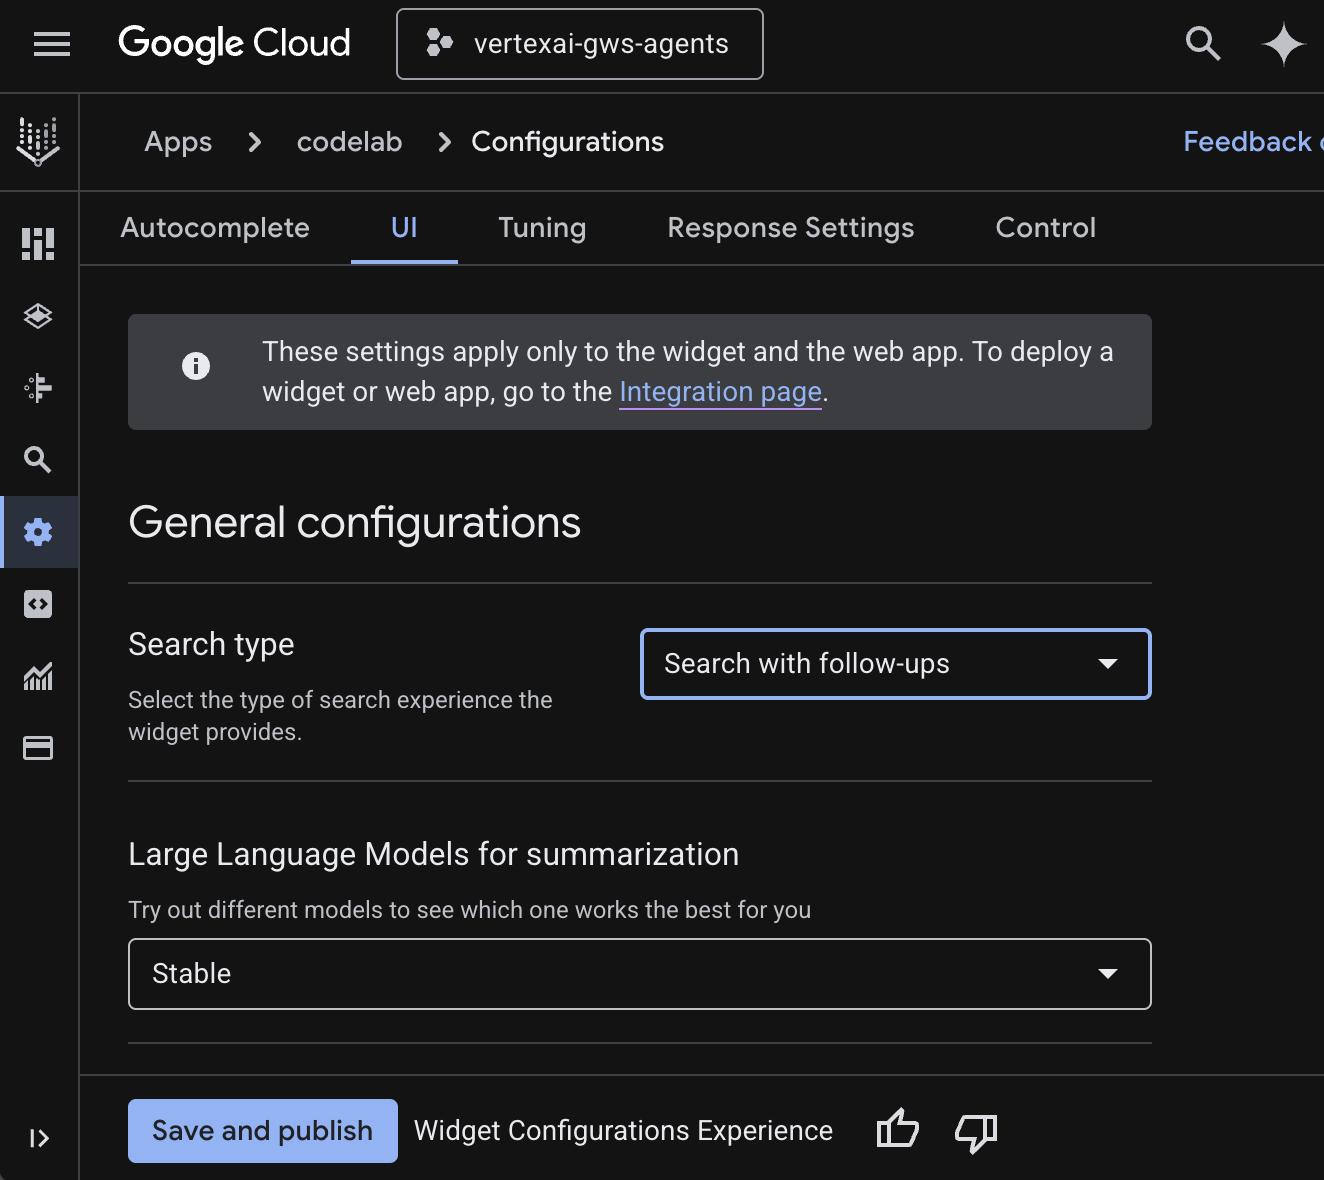
กำหนดค่าวิดเจ็ตเว็บ
กำหนดค่าลักษณะที่ปรากฏและลักษณะการทำงานของวิดเจ็ตค้นหา
- ไปที่การกำหนดค่า
- ในแท็บ UI ให้ตั้งค่าประเภทการค้นหาเป็นค้นหาพร้อมคำถามติดตามผล แล้วคลิกบันทึกและเผยแพร่
ลองใช้แอป
ทดสอบแอปค้นหาในคอนโซล Google Cloud โดยตรง
- ไปที่แสดงตัวอย่าง ระบบจะแสดงวิดเจ็ตเว็บ
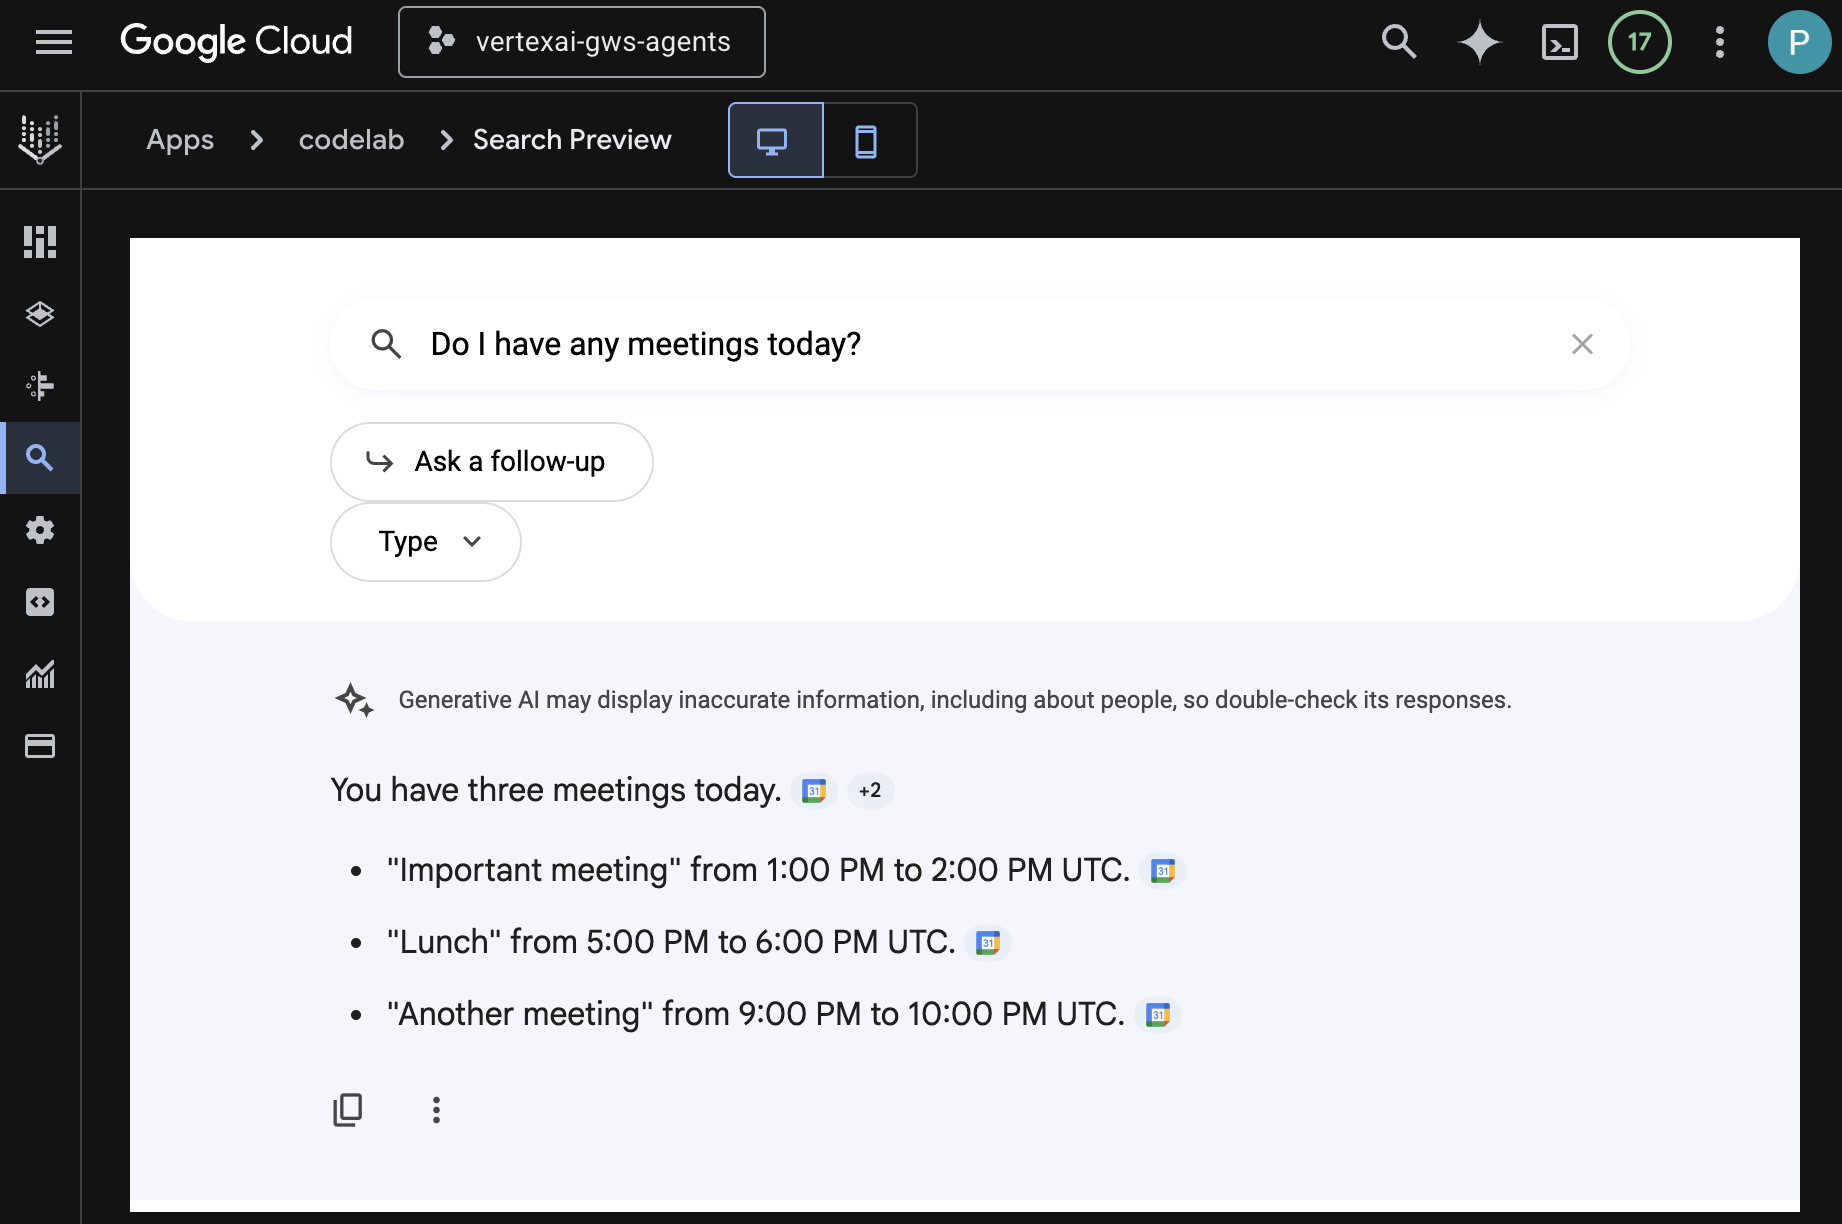
- ในแชท ให้พิมพ์
Do I have any meetings today?แล้วกดenter - ในแชท ให้พิมพ์
Did I receive an email on March 1st 2026?แล้วกดenter - ในแชท ให้พิมพ์
Give me the title of the latest Drive file I createdแล้วกดenter
4. เอเจนต์ที่กำหนดเอง
เอเจนต์นี้ช่วยให้ผู้ใช้ค้นหาข้อมูลและดำเนินการสำหรับ Workspace ในภาษาที่เป็นธรรมชาติได้โดยใช้เครื่องมือและกฎที่กำหนดเอง โดยจะอิงตามองค์ประกอบต่อไปนี้
- โมเดล: Gemini
- ข้อมูลและการดำเนินการ: ที่เก็บข้อมูล Vertex AI สำหรับ Google Workspace (ปฏิทิน, Gmail, ไดรฟ์), เซิร์ฟเวอร์ Vertex AI Search Model Context Protocol (MCP) ที่ Google จัดการ, ฟังก์ชันเครื่องมือที่กำหนดเองเพื่อส่งข้อความ Google Chat (ผ่าน Google Chat API)
- เครื่องมือสร้างเอเจนต์: Agent Development Kit (ADK)
- โฮสต์ของ Agent: Vertex AI Agent Engine
- UI: ADK Web
แนวคิดเกี่ยวกับรีวิว
ชุดพัฒนาเอเจนต์ (ADK)
Agent Development Kit (ADK) เป็นชุดเครื่องมือและเฟรมเวิร์กเฉพาะทางที่ออกแบบมาเพื่อลดความซับซ้อนในการสร้าง AI Agent แบบอัตโนมัติโดยการจัดเตรียมโมดูลที่สร้างไว้ล่วงหน้าสำหรับการให้เหตุผล การจัดการหน่วยความจำ และการผสานรวมเครื่องมือ
Model Context Protocol (MCP)
Model Context Protocol (MCP) เป็นมาตรฐานแบบเปิดที่ออกแบบมาเพื่อเปิดใช้การผสานรวมที่ราบรื่นและปลอดภัยระหว่างแอปพลิเคชัน AI กับแหล่งข้อมูลหรือเครื่องมือต่างๆ ผ่านอินเทอร์เฟซแบบ "พลักแอนด์เพลย์" ที่ใช้ได้ทั่วไป
เครื่องมือฟังก์ชัน
เครื่องมือฟังก์ชันคือกิจวัตรที่กำหนดไว้ล่วงหน้าซึ่งโมเดล AI สามารถทริกเกอร์เพื่อดำเนินการที่เฉพาะเจาะจงหรือดึงข้อมูลแบบเรียลไทม์จากระบบภายนอก ซึ่งจะขยายความสามารถของโมเดลให้เหนือกว่าการสร้างข้อความอย่างง่าย
ADK Web
ADK Web คือ UI สำหรับนักพัฒนาแอปในตัวที่มาพร้อมกับ ADK SDK เพื่อให้การพัฒนาและการแก้ไขข้อบกพร่องง่ายขึ้น
ตรวจสอบสถาปัตยกรรมโซลูชัน
ตรวจสอบซอร์สโค้ด
agent.py
โค้ดต่อไปนี้จะตรวจสอบสิทธิ์กับ Vertex AI, เริ่มต้นเครื่องมือ Vertex AI Search MCP และ Chat API และกำหนดลักษณะการทำงานของเอเจนต์
- การตรวจสอบสิทธิ์: ดึง
ACCESS_TOKENจากตัวแปรสภาพแวดล้อมเพื่อตรวจสอบสิทธิ์ MCP และการเรียก API - การตั้งค่าเครื่องมือ: เริ่มต้น
vertexai_mcpซึ่งเป็นชุดเครื่องมือที่เชื่อมต่อกับเซิร์ฟเวอร์ Model Context Protocol (MCP) ของ Vertex AI Search และเครื่องมือsend_direct_messageซึ่งจะช่วยให้ตัวแทนค้นหาผ่านที่เก็บข้อมูลที่เชื่อมต่อและส่งข้อความ Google Chat ได้ - คำจำกัดความของเอเจนต์: กำหนด
root_agentโดยใช้โมเดลgemini-2.5-flashคำสั่งจะบอกให้เอเจนต์จัดลำดับความสำคัญของการใช้เครื่องมือค้นหาเพื่อดึงข้อมูล และเครื่องมือsend_direct_messageสำหรับการดำเนินการ ซึ่งเป็นการเชื่อมต่อแหล่งข้อมูลขององค์กรเป็นหลักสำหรับเอเจนต์
...
MODEL = "gemini-2.5-flash"

# Access token for authentication
ACCESS_TOKEN = os.environ.get("ACCESS_TOKEN")
if not ACCESS_TOKEN:
    raise ValueError("ACCESS_TOKEN environment variable must be set")

VERTEXAI_SEARCH_TIMEOUT = 15.0

def get_project_id():
    """Fetches the consumer project ID from the environment natively."""
    _, project = google.auth.default()
    if project:
        return project
    raise Exception(f"Failed to resolve GCP Project ID from environment.")

def find_serving_config_path():
    """Dynamically finds the default serving config in the engine."""
    project_id = get_project_id()
    engines = discoveryengine_v1.EngineServiceClient().list_engines(
        parent=f"projects/{project_id}/locations/global/collections/default_collection"
    )
    for engine in engines:
        # engine.name natively contains the numeric Project Number
        return f"{engine.name}/servingConfigs/default_serving_config"
    raise Exception(f"No Discovery Engines found in project {project_id}")

def send_direct_message(email: str, message: str) -> dict:
    """Sends a Google Chat Direct Message (DM) to a specific user by email address."""
    chat_client = chat_v1.ChatServiceClient(
        credentials=Credentials(token=ACCESS_TOKEN)
    )

    # 1. Setup the DM space or find existing one
    person = chat_v1.User(
        name=f"users/{email}",
        type_=chat_v1.User.Type.HUMAN
    )
    membership = chat_v1.Membership(member=person)
    space_req = chat_v1.Space(space_type=chat_v1.Space.SpaceType.DIRECT_MESSAGE)
    setup_request = chat_v1.SetUpSpaceRequest(
        space=space_req,
        memberships=[membership]
    )
    space_response = chat_client.set_up_space(request=setup_request)
    space_name = space_response.name

    # 2. Send the message
    msg = chat_v1.Message(text=message)
    message_request = chat_v1.CreateMessageRequest(
        parent=space_name,
        message=msg
    )
    message_response = chat_client.create_message(request=message_request)

    return {"status": "success", "message_id": message_response.name, "space": space_name}

vertexai_mcp = McpToolset(
    connection_params=StreamableHTTPConnectionParams(
        url="https://discoveryengine.googleapis.com/mcp",
        timeout=VERTEXAI_SEARCH_TIMEOUT,
        sse_read_timeout=VERTEXAI_SEARCH_TIMEOUT,
        headers={"Authorization": f"Bearer {ACCESS_TOKEN}"}
    ),
    tool_filter=['search']
)

# Answer nicely the following user queries:
#  - Please find my meetings for today, I need their titles and links
#  - What is the latest Drive file I created?
#  - What is the latest Gmail message I received?
#  - Please send the following message to someone@example.com: Hello, this is a test message.

root_agent = LlmAgent(
    model=MODEL,
    name='enterprise_ai',
    instruction=f"""
        You are a helpful assistant that always uses the Vertex AI MCP search tool to answer the user's message, unless the user asks you to send a message to someone.
        If the user asks you to send a message to someone, use the send_direct_message tool to send the message.
        You MUST unconditionally use the Vertex AI MCP search tool to find answer, even if you believe you already know the answer or believe the Vertex AI MCP search tool does not contain the data.
        The Vertex AI MCP search tool accesses the user's data through datastores including Google Drive, Google Calendar, and Gmail.
        Only use the Vertex AI MCP search tool with servingConfig and query parameters, do not use any other parameters.
        Always use the servingConfig {find_serving_config_path()} while using the Vertex AI MCP search tool.
    """,
    tools=[vertexai_mcp, FunctionTool(send_direct_message)]
)
ดาวน์โหลดซอร์สโค้ด
ดาวน์โหลดโค้ดตัวอย่างลงในสภาพแวดล้อมในเครื่องเพื่อเริ่มต้นใช้งาน
- ดาวน์โหลดที่เก็บ GitHub นี้
- เปิดไดเรกทอรี
solutions/enterprise-ai-agent-localในเทอร์มินัล
เปิดใช้ API
โซลูชันนี้ต้องเปิดใช้ API เพิ่มเติมดังนี้
- ในคอนโซล Google Cloud ให้เปิดใช้ Vertex AI, Cloud Resource Manager และ Google Chat API โดยทำดังนี้
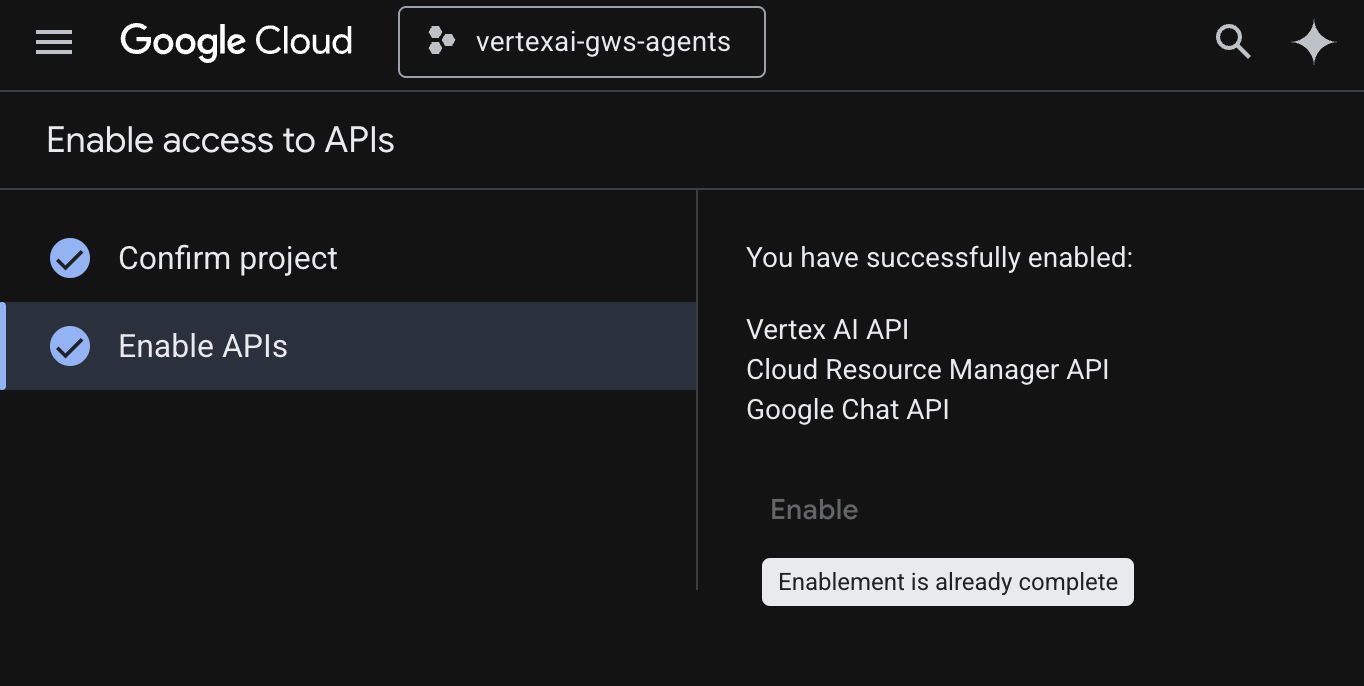
- คลิกเมนู ☰ > API และบริการ > API และบริการที่เปิดใช้ แล้วตรวจสอบว่า Vertex AI API, Cloud Resource Manager API และ Google Chat API อยู่ในรายการ
กำหนดค่าหน้าจอขอความยินยอม OAuth
โซลูชันต้องมีการกำหนดค่าหน้าจอขอความยินยอมดังนี้
- ในคอนโซล Google Cloud ให้คลิก เพื่อไปที่เมนู ☰ > แพลตฟอร์มการตรวจสอบสิทธิ์ของ Google > การสร้างแบรนด์
- คลิกเริ่มต้นใช้งาน
- ในส่วนข้อมูลแอป ให้ตั้งชื่อแอปเป็น
Codelab - ในอีเมลสนับสนุนสำหรับผู้ใช้ ให้เลือกอีเมลสนับสนุนที่ผู้ใช้สามารถติดต่อคุณได้หากมีข้อสงสัยเกี่ยวกับการยินยอม
- คลิกถัดไป
- ในส่วนกลุ่มเป้าหมาย ให้เลือกภายใน
- คลิกถัดไป
- ในส่วนข้อมูลติดต่อ ให้ป้อนอีเมลที่คุณต้องการรับการแจ้งเตือนเกี่ยวกับการเปลี่ยนแปลงในโปรเจ็กต์
- คลิกถัดไป
- ในส่วนเสร็จสิ้น ให้อ่านนโยบายข้อมูลผู้ใช้ของบริการ Google API และหากยอมรับ ให้เลือกฉันยอมรับบริการ Google API: นโยบายข้อมูลผู้ใช้
- คลิกต่อไป แล้วคลิกสร้าง
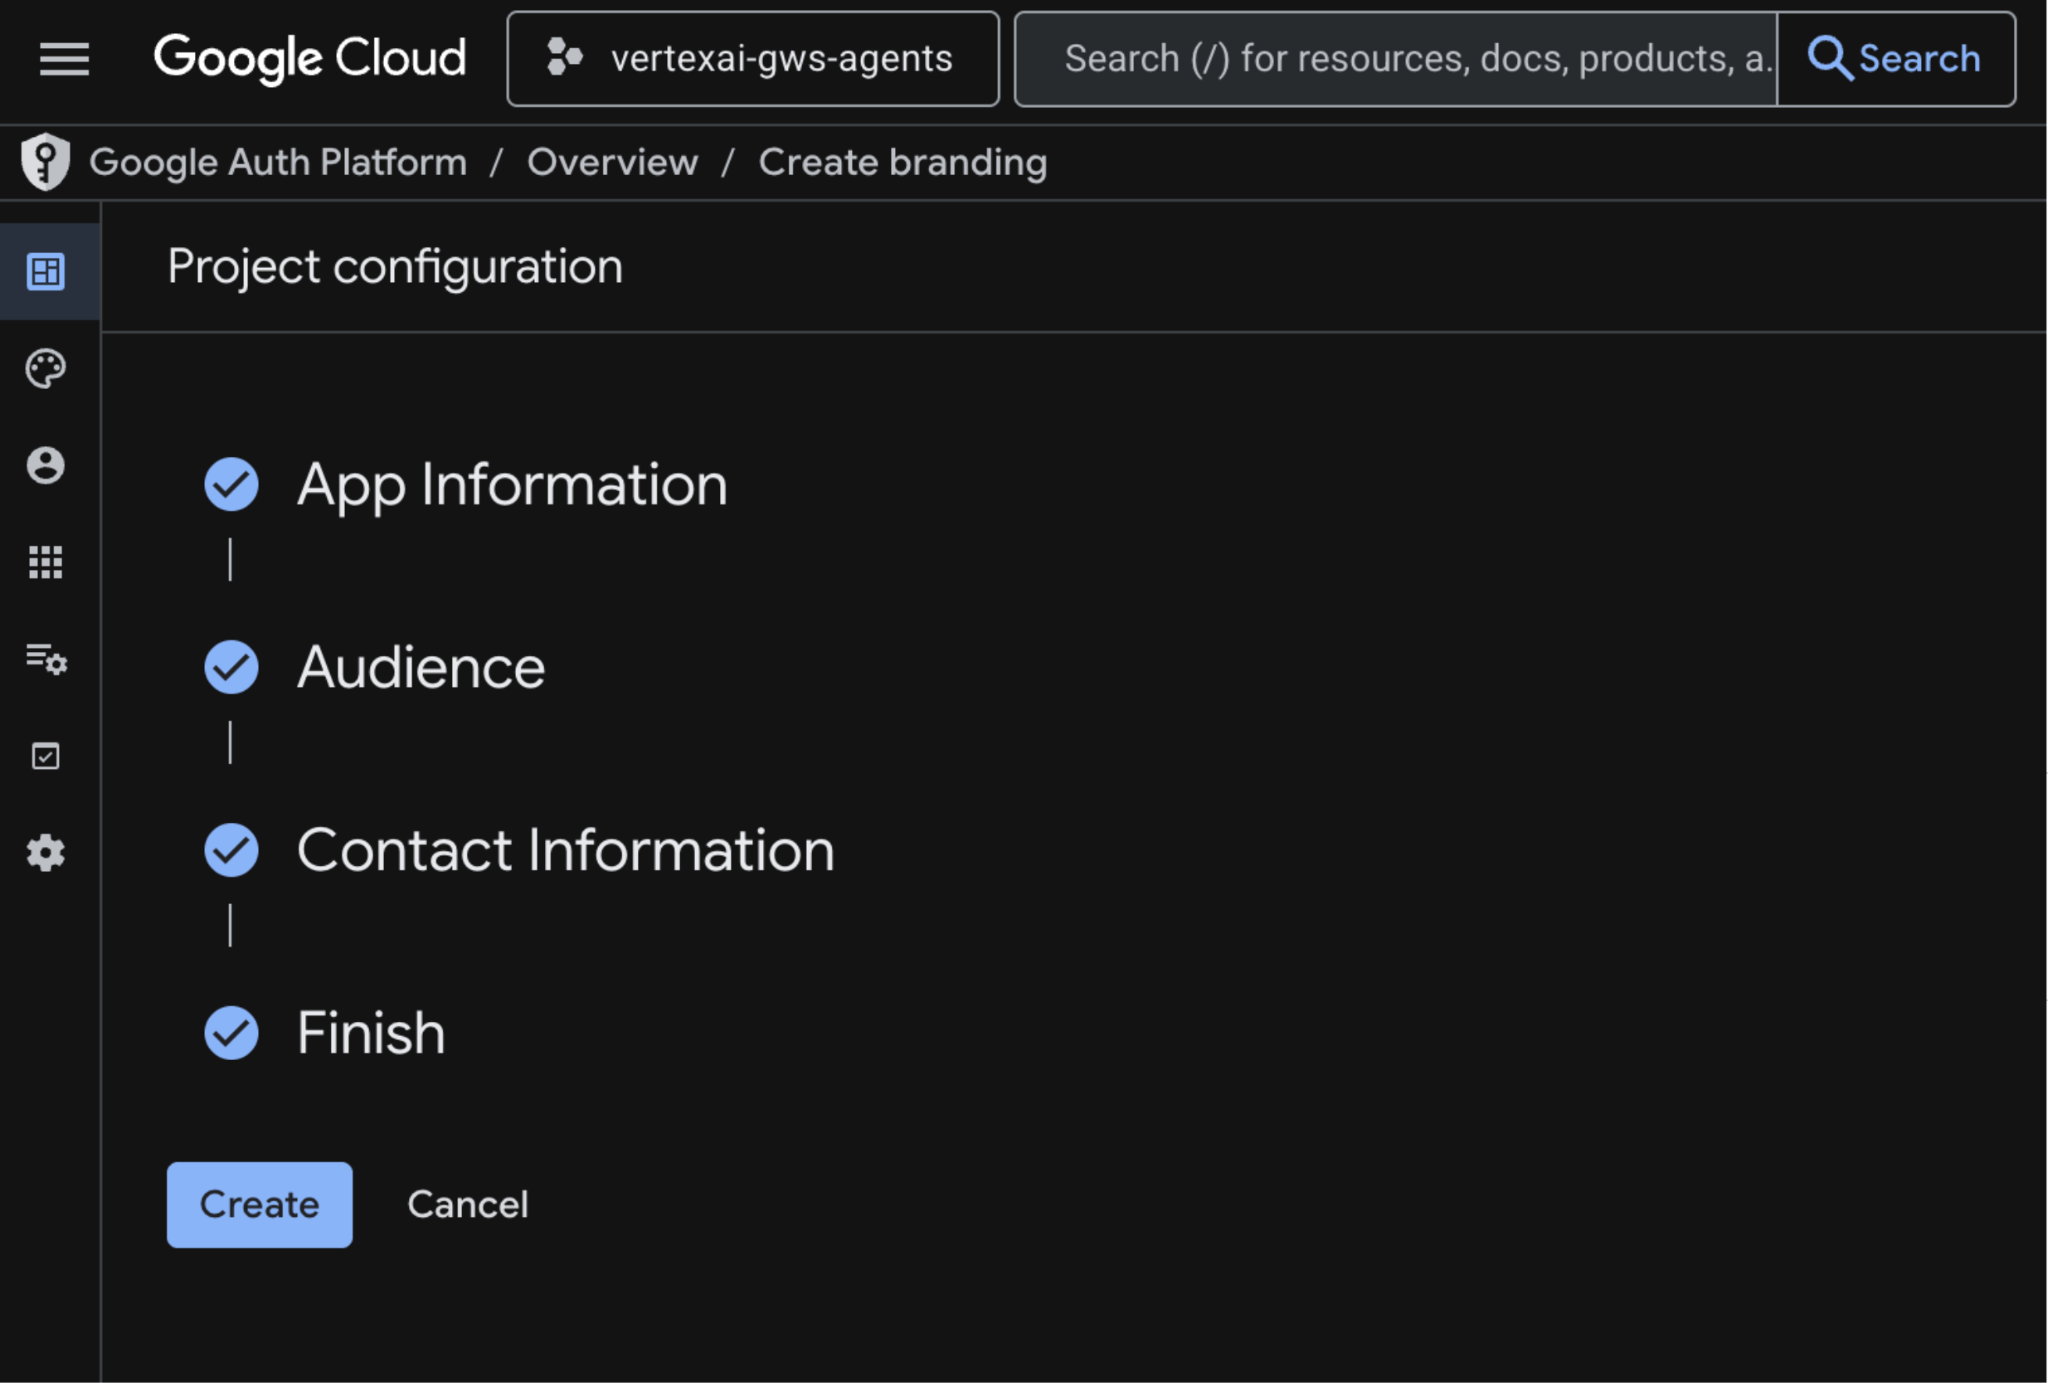
- ระบบจะบันทึกการกำหนดค่าและเปลี่ยนเส้นทางคุณไปยัง Google Auth Platform > ภาพรวม โดยอัตโนมัติ
ดูข้อมูลเพิ่มเติมได้ที่คู่มือกำหนดค่าความยินยอม OAuth ฉบับเต็ม
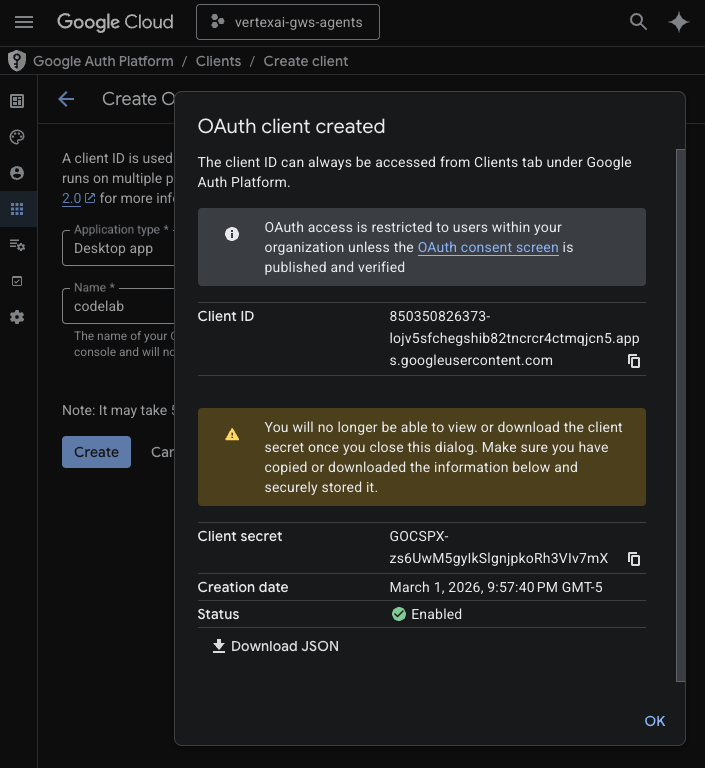
สร้างข้อมูลเข้าสู่ระบบไคลเอ็นต์ OAuth
สร้างไคลเอ็นต์ OAuth ของแอปบนเดสก์ท็อปใหม่เพื่อตรวจสอบสิทธิ์ผู้ใช้ในสภาพแวดล้อมภายใน
- ในคอนโซล Google Cloud ให้คลิก เพื่อไปที่เมนู ☰ > แพลตฟอร์มการตรวจสอบสิทธิ์ของ Google > ไคลเอ็นต์
- คลิก + สร้างไคลเอ็นต์
- ในส่วนประเภทแอปพลิเคชัน ให้เลือกแอปเดสก์ท็อป
- ตั้งค่าชื่อเป็น
codelab - คลิกสร้าง ข้อมูลเข้าสู่ระบบที่สร้างขึ้นใหม่จะปรากฏขึ้น
- คลิกดาวน์โหลด JSON แล้วบันทึกไฟล์เป็น client_secret.json ในไดเรกทอรี
solutions/enterprise-ai-agent-local
เปิดใช้ Vertex AI Search MCP
- ในเทอร์มินัล ให้เรียกใช้คำสั่งต่อไปนี้
gcloud beta services mcp enable discoveryengine.googleapis.com \
     --project=$(gcloud config get-value project)
กำหนดค่าแอปใน Chat
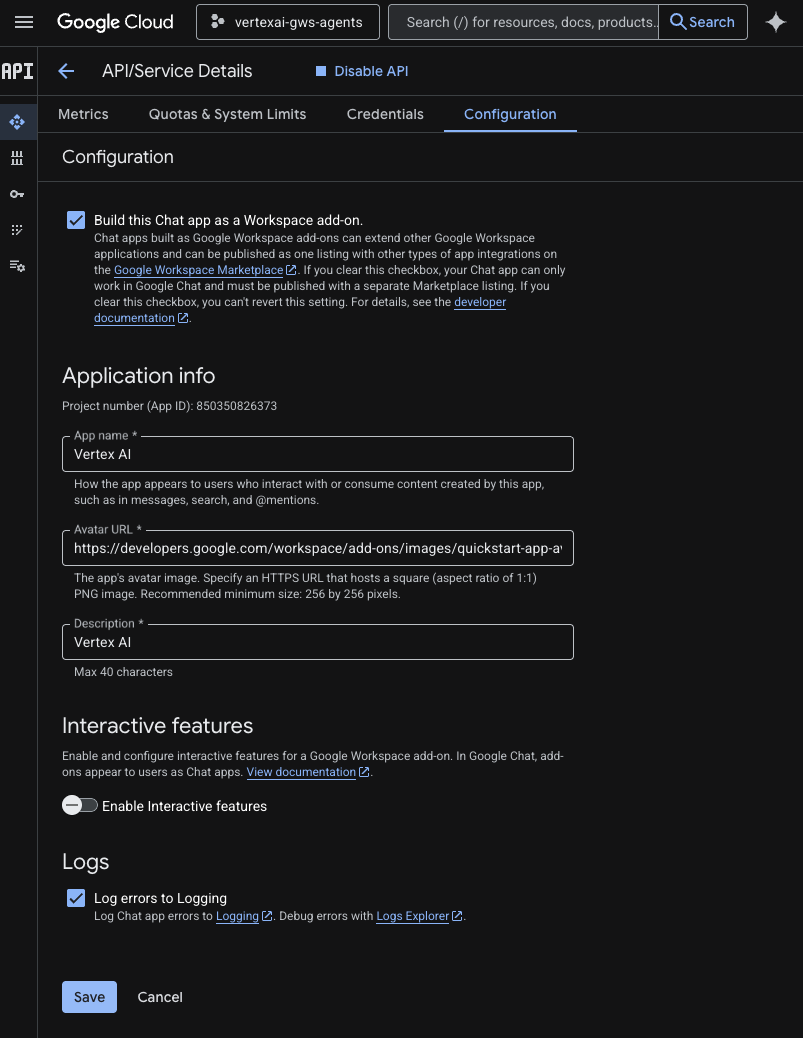
กำหนดค่าแอป Google Chat ด้วยรายละเอียดข้อมูลพื้นฐาน
- ในคอนโซล Google Cloud ให้ค้นหา
Google Chat APIในช่องค้นหาของ Google Cloud คลิก Google Chat API คลิกจัดการ แล้วคลิกการกำหนดค่า
- ตั้งค่าชื่อแอปและคำอธิบายเป็น
Vertex AI - ตั้งค่า URL ของอวตารเป็น
https://developers.google.com/workspace/add-ons/images/quickstart-app-avatar.png - ยกเลิกการเลือกเปิดใช้ฟีเจอร์แบบอินเทอร์แอกทีฟ แล้วคลิกปิดใช้ในกล่องโต้ตอบแบบโมดัลที่ปรากฏขึ้น
- เลือกบันทึกข้อผิดพลาดไปยังการบันทึก
- คลิกบันทึก
เรียกใช้ Agent ใน ADK Web
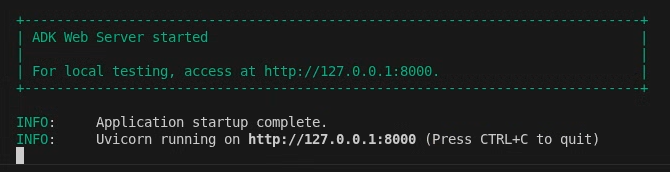
เปิดใช้ Agent ในเครื่องโดยใช้อินเทอร์เฟซเว็บของ ADK
- ในเทอร์มินัล ให้เปิดไดเรกทอรี
solutions/enterprise-ai-agent-localแล้วเรียกใช้คำสั่งต่อไปนี้
# 1. Authenticate with all the required scopes
gcloud auth application-default login \
  --client-id-file=client_secret.json \
   --scopes=https://www.googleapis.com/auth/cloud-platform,https://www.googleapis.com/auth/chat.spaces,https://www.googleapis.com/auth/chat.messages

# 2. Configure environment
export ACCESS_TOKEN=$(gcloud auth application-default print-access-token)
export GOOGLE_GENAI_USE_VERTEXAI=1
export GOOGLE_CLOUD_PROJECT=$(gcloud config get-value project)
export GOOGLE_CLOUD_LOCATION=us-central1

# 3. Create and activate a new virtual environment
python3 -m venv .venv
source .venv/bin/activate

# 4. Install poetry and project dependencies
pip install poetry
poetry install

# 5. Start ADK Web
adk web
ลองใช้ Agent
ยืนยันโฟลว์โดยแชทกับเอเจนต์ที่กำหนดเอง
- เปิดเว็บไซต์ ADK ในเบราว์เซอร์อินเทอร์เน็ต
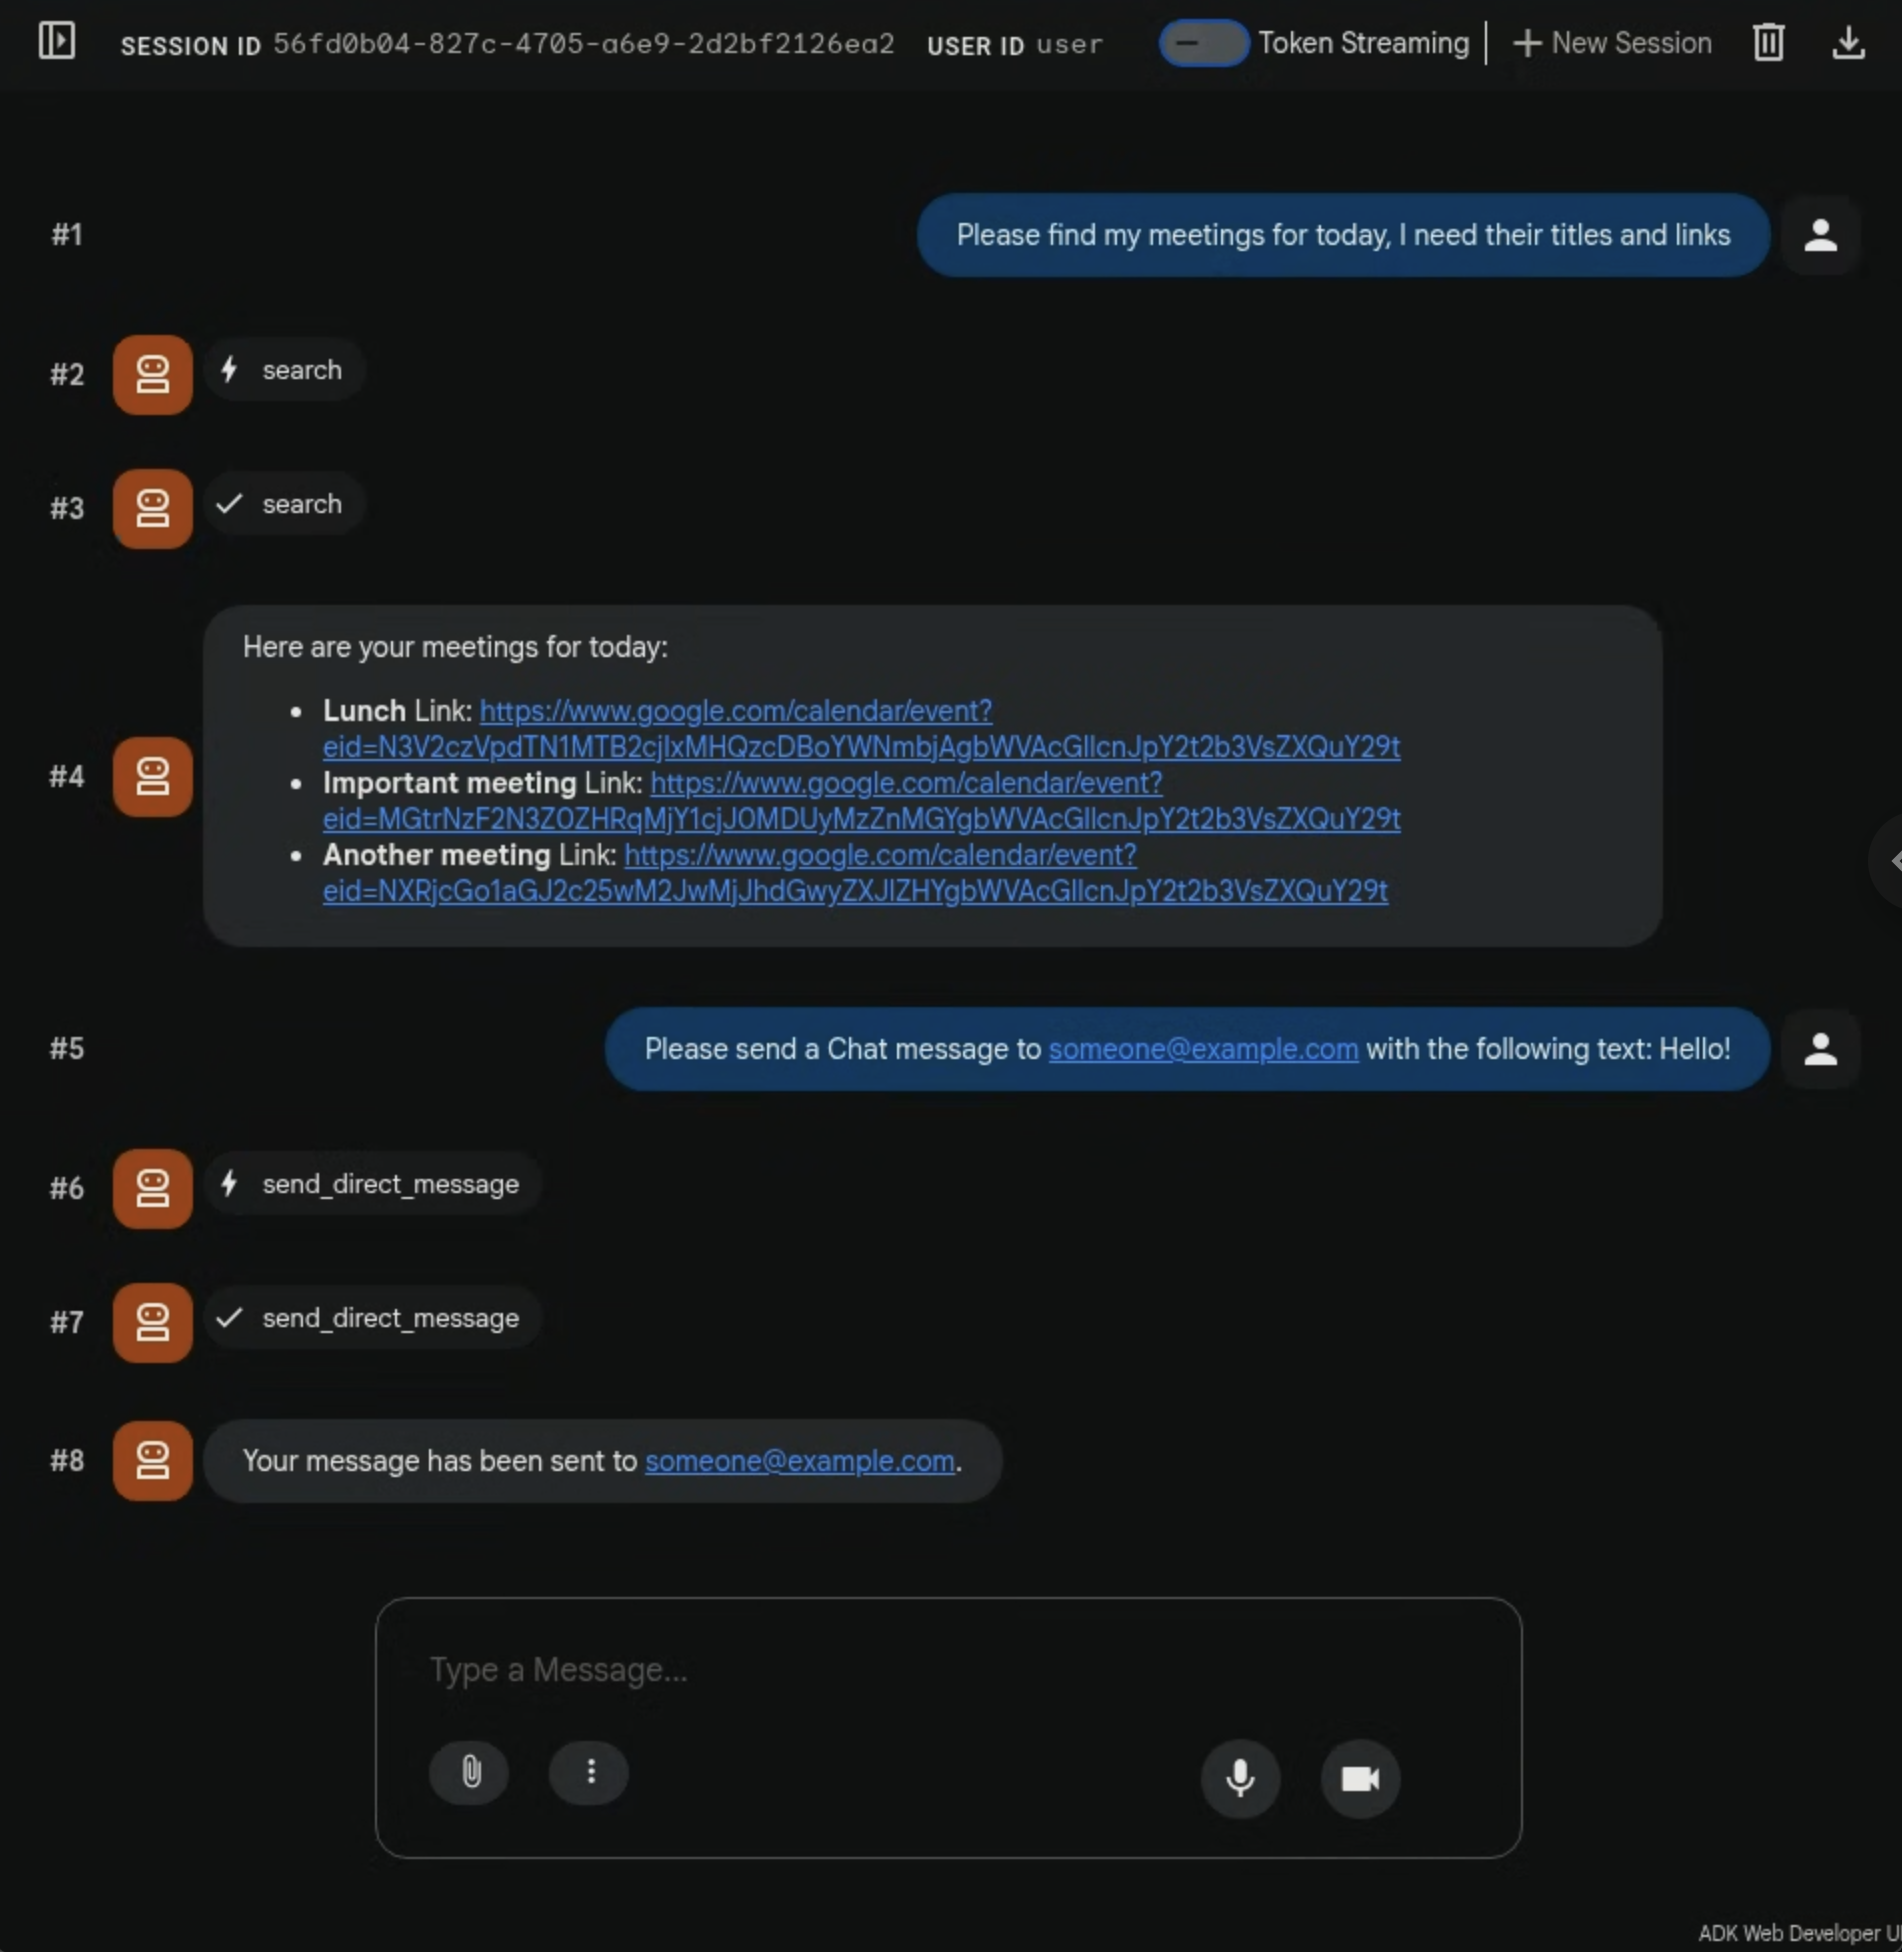
- ในแชท ให้พิมพ์
Please find my meetings for today, I need their titles and linksแล้วกดenter - เอเจนต์จะตอบกลับด้วยรายการกิจกรรมในปฏิทิน (ขึ้นอยู่กับบัญชีของผู้ใช้)
- ในแชท ให้พิมพ์
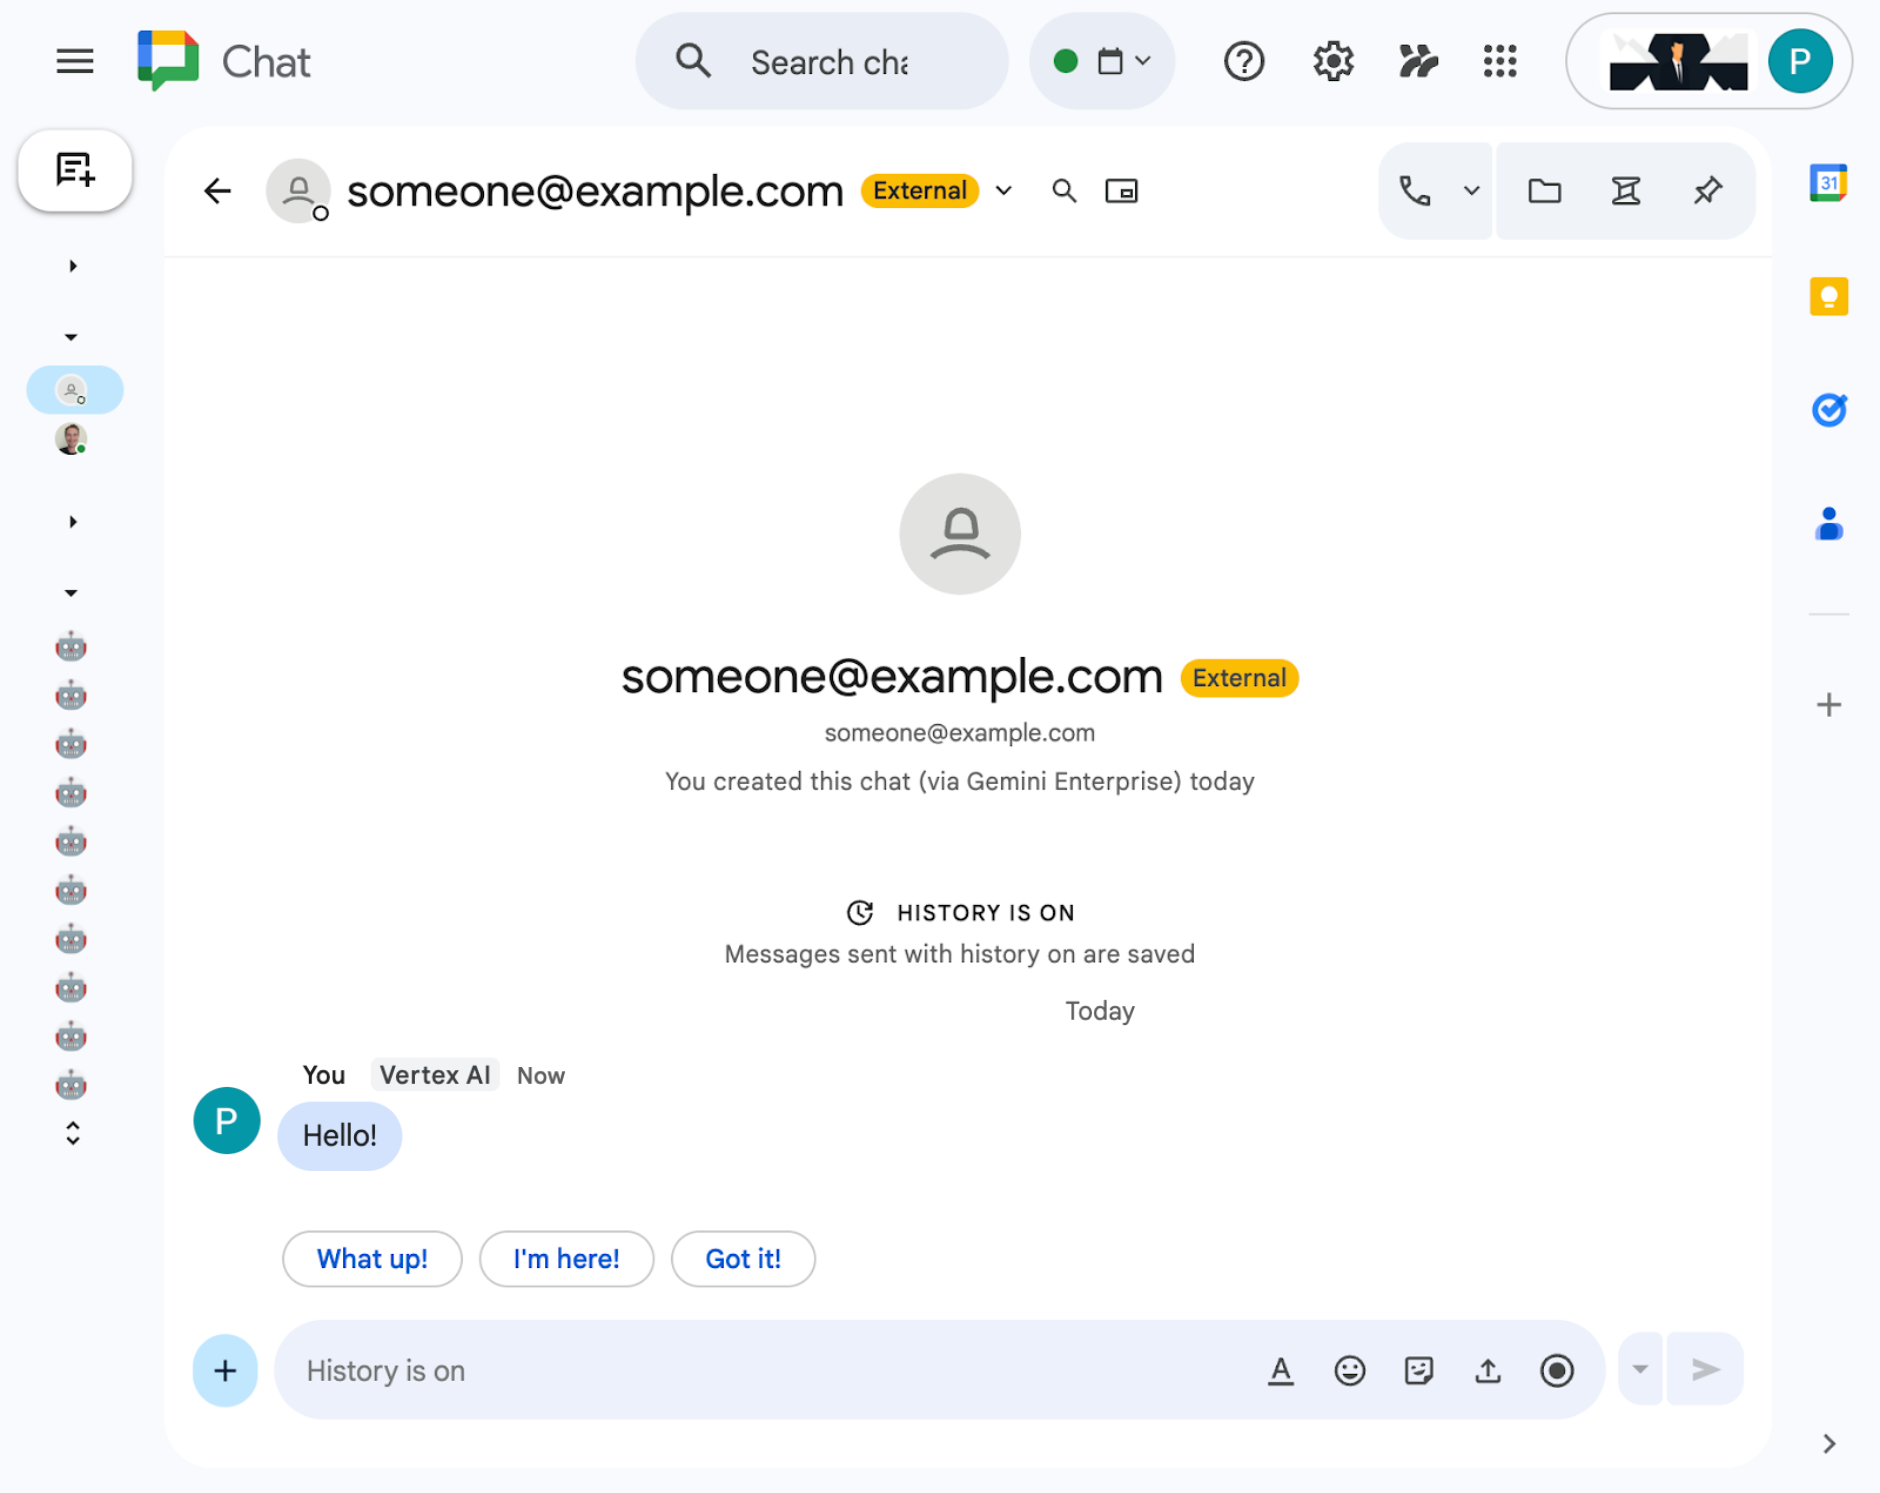
Please send a Chat message to someone@example.com with the following text: Hello!แล้วกดenter - ตัวแทนจะตอบกลับด้วยข้อความยืนยัน
5. เอเจนต์ในฐานะส่วนเสริมของ Google Workspace
เอเจนต์นี้ช่วยให้ผู้ใช้ค้นหาข้อมูลสำหรับ Workspace ในภาษาที่เป็นธรรมชาติภายในบริบทของ UI ของแอป Workspace โดยจะอิงตามองค์ประกอบต่อไปนี้
- โมเดล: Gemini
- ข้อมูลและการดำเนินการ: ที่เก็บข้อมูล Vertex AI สำหรับ Google Workspace (ปฏิทิน, Gmail, ไดรฟ์), เซิร์ฟเวอร์ Vertex AI Search Model Context Protocol (MCP) ที่ Google จัดการ, ฟังก์ชันเครื่องมือที่กำหนดเองเพื่อส่งข้อความ Google Chat (ผ่าน Google Chat API)
- เครื่องมือสร้างเอเจนต์: Agent Development Kit (ADK)
- โฮสต์ของ Agent: Vertex AI Agent Engine
- UI: ส่วนเสริม Google Workspace สำหรับ Chat และ Gmail (ขยายไปยังปฏิทิน, ไดรฟ์, เอกสาร, ชีต และสไลด์ได้อย่างง่ายดาย)
- ส่วนเสริม Google Workspace: Apps Script, Vertex AI Agent Engine API, ตามบริบท (ข้อความ Gmail ที่เลือก)
ตรวจสอบแนวคิด
ส่วนเสริมของ Google Workspace
ส่วนเสริมของ Google Workspace คือแอปพลิเคชันที่ปรับแต่งแล้วซึ่งขยายแอปพลิเคชัน Google Workspace อย่างน้อย 1 รายการ (Gmail, Chat, ปฏิทิน, เอกสาร, ไดรฟ์, Meet, ชีต และสไลด์)
Apps Script
Apps Script คือแพลตฟอร์ม JavaScript บนระบบคลาวด์ที่ขับเคลื่อนโดย Google ไดรฟ์ ซึ่งช่วยให้คุณผสานรวมและกำหนดงานอัตโนมัติในผลิตภัณฑ์ต่างๆ ของ Google ได้
เฟรมเวิร์กการ์ด Google Workspace
เฟรมเวิร์กการ์ดใน Google Workspace ช่วยให้นักพัฒนาแอปสร้างอินเทอร์เฟซผู้ใช้แบบอินเทอร์แอกทีฟที่สมบูรณ์ได้ ซึ่งช่วยให้สร้างการ์ดที่เป็นระเบียบและดึงดูดสายตาได้ โดยสามารถใส่ข้อความ รูปภาพ ปุ่ม และวิดเจ็ตอื่นๆ การ์ดเหล่านี้ช่วยปรับปรุงประสบการณ์ของผู้ใช้ด้วยการให้ข้อมูลที่มีโครงสร้างและช่วยให้ดำเนินการอย่างรวดเร็วได้โดยตรงภายในแอปพลิเคชัน Workspace
ตรวจสอบสถาปัตยกรรมโซลูชัน
ตรวจสอบซอร์สโค้ด
Agent
agent.py
โค้ดต่อไปนี้จะตรวจสอบสิทธิ์กับ Vertex AI, เริ่มต้นเครื่องมือ Vertex AI Search MCP และ Chat API และกำหนดลักษณะการทำงานของเอเจนต์
- การตรวจสอบสิทธิ์: ใช้ฟังก์ชันตัวช่วย
_get_access_token_from_contextเพื่อดึงโทเค็นการตรวจสอบสิทธิ์ (CLIENT_AUTH_NAME) ที่ไคลเอ็นต์แทรก โทเค็นนี้มีความสําคัญอย่างยิ่งต่อการเรียกใช้บริการดาวน์สตรีมอย่างปลอดภัย เช่น Vertex AI Search MCP และเครื่องมือ Google Chat - การตั้งค่าเครื่องมือ: เริ่มต้น
vertexai_mcpซึ่งเป็นชุดเครื่องมือที่เชื่อมต่อกับเซิร์ฟเวอร์ Model Context Protocol (MCP) ของ Vertex AI Search และเครื่องมือsend_direct_messageซึ่งจะช่วยให้ตัวแทนค้นหาผ่านที่เก็บข้อมูลที่เชื่อมต่อและส่งข้อความ Google Chat ได้ - คำจำกัดความของเอเจนต์: กำหนด
root_agentโดยใช้โมเดลgemini-2.5-flashคำสั่งจะบอกให้เอเจนต์จัดลำดับความสำคัญของการใช้เครื่องมือค้นหาเพื่อดึงข้อมูล และเครื่องมือsend_direct_messageสำหรับการดำเนินการ ซึ่งเป็นการเชื่อมต่อแหล่งข้อมูลขององค์กรเป็นหลักสำหรับเอเจนต์
...
MODEL = "gemini-2.5-flash"

# Client injects a bearer token into the ToolContext state.
# The key pattern is "CLIENT_AUTH_NAME_<random_digits>".
# We dynamically parse this token to authenticate our MCP and API calls.
CLIENT_AUTH_NAME = "enterprise-ai"

VERTEXAI_SEARCH_TIMEOUT = 15.0

def get_project_id():
    """Fetches the consumer project ID from the environment natively."""
    _, project = google.auth.default()
    if project:
        return project
    raise Exception(f"Failed to resolve GCP Project ID from environment.")

def find_serving_config_path():
    """Dynamically finds the default serving config in the engine."""
    project_id = get_project_id()
    engines = discoveryengine_v1.EngineServiceClient().list_engines(
        parent=f"projects/{project_id}/locations/global/collections/default_collection"
    )
    for engine in engines:
        # engine.name natively contains the numeric Project Number
        return f"{engine.name}/servingConfigs/default_serving_config"
    raise Exception(f"No Discovery Engines found in project {project_id}")

def _get_access_token_from_context(tool_context: ToolContext) -> str:
    """Helper method to dynamically parse the intercepted bearer token from the context state."""
    escaped_name = re.escape(CLIENT_AUTH_NAME)
    pattern = re.compile(fr"^{escaped_name}_\d+$")
    # Handle ADK varying state object types (Raw Dict vs ADK State)
    state_dict = tool_context.state.to_dict() if hasattr(tool_context.state, 'to_dict') else tool_context.state
    matching_keys = [k for k in state_dict.keys() if pattern.match(k)]
    if matching_keys:
        return state_dict.get(matching_keys[0])
    raise Exception(f"No bearer token found in ToolContext state matching pattern {pattern.pattern}")

def auth_header_provider(tool_context: ToolContext) -> dict[str, str]:
    token = _get_access_token_from_context(tool_context)
    return {"Authorization": f"Bearer {token}"}

def send_direct_message(email: str, message: str, tool_context: ToolContext) -> dict:
    """Sends a Google Chat Direct Message (DM) to a specific user by email address."""
    chat_client = chat_v1.ChatServiceClient(
        credentials=Credentials(token=_get_access_token_from_context(tool_context))
    )

    # 1. Setup the DM space or find existing one
    person = chat_v1.User(
        name=f"users/{email}",
        type_=chat_v1.User.Type.HUMAN
    )
    membership = chat_v1.Membership(member=person)
    space_req = chat_v1.Space(space_type=chat_v1.Space.SpaceType.DIRECT_MESSAGE)
    setup_request = chat_v1.SetUpSpaceRequest(
        space=space_req,
        memberships=[membership]
    )
    space_response = chat_client.set_up_space(request=setup_request)
    space_name = space_response.name

    # 2. Send the message
    msg = chat_v1.Message(text=message)
    message_request = chat_v1.CreateMessageRequest(
        parent=space_name,
        message=msg
    )
    message_response = chat_client.create_message(request=message_request)

    return {"status": "success", "message_id": message_response.name, "space": space_name}

vertexai_mcp = McpToolset(
    connection_params=StreamableHTTPConnectionParams(
        url="https://discoveryengine.googleapis.com/mcp",
        timeout=VERTEXAI_SEARCH_TIMEOUT,
        sse_read_timeout=VERTEXAI_SEARCH_TIMEOUT
    ),
    tool_filter=['search'],
    # The auth_header_provider dynamically injects the bearer token from the ToolContext
    # into the MCP call for authentication.
    header_provider=auth_header_provider
)

# Answer nicely the following user queries:
#  - Please find my meetings for today, I need their titles and links
#  - What is the latest Drive file I created?
#  - What is the latest Gmail message I received?
#  - Please send the following message to someone@example.com: Hello, this is a test message.

root_agent = LlmAgent(
    model=MODEL,
    name='enterprise_ai',
    instruction=f"""
        You are a helpful assistant that always uses the Vertex AI MCP search tool to answer the user's message, unless the user asks you to send a message to someone.
        If the user asks you to send a message to someone, use the send_direct_message tool to send the message.
        You MUST unconditionally use the Vertex AI MCP search tool to find answer, even if you believe you already know the answer or believe the Vertex AI MCP search tool does not contain the data.
        The Vertex AI MCP search tool accesses the user's data through datastores including Google Drive, Google Calendar, and Gmail.
        Only use the Vertex AI MCP search tool with servingConfig and query parameters, do not use any other parameters.
        Always use the servingConfig {find_serving_config_path()} while using the Vertex AI MCP search tool.
    """,
    tools=[vertexai_mcp, FunctionTool(send_direct_message)]
)
ไคลเอ็นต์
appsscript.json
การกำหนดค่าต่อไปนี้จะกำหนดทริกเกอร์และสิทธิ์ของส่วนเสริม
- กำหนดส่วนเสริม: บอก Workspace ว่าโปรเจ็กต์นี้เป็นส่วนเสริมสำหรับทั้ง Chat และ Gmail
- ทริกเกอร์ตามบริบท: สำหรับ Gmail จะตั้งค่า
contextualTriggerที่ทริกเกอร์onAddonEventทุกครั้งที่ผู้ใช้เปิดข้อความอีเมล ซึ่งจะช่วยให้ส่วนเสริม "เห็น" เนื้อหาอีเมล - สิทธิ์: แสดง
oauthScopesที่จำเป็นสำหรับส่วนเสริมในการเรียกใช้ เช่น สิทธิ์ในการอ่านอีเมลปัจจุบัน เรียกใช้สคริปต์ และเชื่อมต่อกับบริการภายนอก (เช่น Vertex AI API)
...
"addOns": {
    "common": {
      "name": "Vertex AI",
      "logoUrl": "https://developers.google.com/workspace/add-ons/images/quickstart-app-avatar.png"
    },
    "chat": {},
    "gmail": {
      "contextualTriggers": [
        {
          "unconditional": {},
          "onTriggerFunction": "onAddonEvent"
        }
      ]
    }
  },
  "oauthScopes": [
   "https://www.googleapis.com/auth/script.external_request",
   "https://www.googleapis.com/auth/cloud-platform",
   "https://www.googleapis.com/auth/gmail.addons.execute",
   "https://www.googleapis.com/auth/gmail.addons.current.message.readonly"
 ]
...
Chat.gs
โค้ดต่อไปนี้จะจัดการข้อความ Google Chat ขาเข้า
- รับข้อความ: ฟังก์ชัน
onMessageเป็นจุดแรกเข้าสำหรับการโต้ตอบข้อความ - จัดการบริบท: บันทึก
space.name(รหัสของพื้นที่ใน Chat) ลงในพร็อพเพอร์ตี้ของผู้ใช้ วิธีนี้จะช่วยให้เมื่อเอเจนต์พร้อมตอบกลับ ระบบจะทราบว่าควรโพสต์ข้อความในการสนทนาใด - Delegates to Agent: เรียกใช้
requestAgentโดยส่งข้อความของผู้ใช้ไปยังตรรกะหลักที่จัดการการสื่อสาร API
...
// Service that handles Google Chat operations.

// Handle incoming Google Chat message events, actions will be taken via Google Chat API calls
function onMessage(event) {
  if (isInDebugMode()) {
    console.log(`MESSAGE event received (Chat): ${JSON.stringify(event)}`);
  }
  // Extract data from the event.
  const chatEvent = event.chat;
  setChatConfig(chatEvent.messagePayload.space.name);

  // Request AI agent to answer the message
  requestAgent(chatEvent.messagePayload.message);
  // Respond with an empty response to the Google Chat platform to acknowledge execution
  return null;
}

// --- Utility functions ---

// The Chat direct message (DM) space associated with the user
const SPACE_NAME_PROPERTY = "DM_SPACE_NAME"

// Sets the Chat DM space name for subsequent operations.
function setChatConfig(spaceName) {
  const userProperties = PropertiesService.getUserProperties();
  userProperties.setProperty(SPACE_NAME_PROPERTY, spaceName);
  console.log(`Space is set to ${spaceName}`);
}

// Retrieved the Chat DM space name to sent messages to.
function getConfiguredChat() {
  const userProperties = PropertiesService.getUserProperties();
  return userProperties.getProperty(SPACE_NAME_PROPERTY);
}

// Finds the Chat DM space name between the Chat app and the given user.
function findChatAppDm(userName) {
  return Chat.Spaces.findDirectMessage(
    { 'name': userName },
    {'Authorization': `Bearer ${getAddonCredentials().getAccessToken()}`}
  ).name;
}

// Creates a Chat message in the configured space.
function createMessage(message) {
  const spaceName = getConfiguredChat();
  console.log(`Creating message in space ${spaceName}...`);
  return Chat.Spaces.Messages.create(
    message,
    spaceName,
    {},
    {'Authorization': `Bearer ${getAddonCredentials().getAccessToken()}`}
  ).name;
}
Sidebar.gs
โค้ดต่อไปนี้จะสร้างแถบด้านข้างของ Gmail และบันทึกบริบทของอีเมล
- สร้าง UI:
createSidebarCardสร้างอินเทอร์เฟซที่มองเห็นได้โดยใช้ Workspace Card Service โดยจะสร้างเลย์เอาต์ที่เรียบง่ายพร้อมพื้นที่ป้อนข้อความและปุ่ม "ส่งข้อความ" - บันทึกบริบทของอีเมล: ใน
handleSendMessageโค้ดจะตรวจสอบว่าผู้ใช้กำลังดูอีเมลอยู่หรือไม่ (event.gmail.messageId) หากผู้ใช้กำลังดูอีเมลอยู่ โค้ดจะดึงข้อมูลเรื่องและเนื้อหาของอีเมลอย่างปลอดภัย แล้วต่อท้ายข้อความแจ้งของผู้ใช้ - แสดงผลลัพธ์: เมื่อตัวแทนตอบกลับ โค้ดจะอัปเดตการ์ดแถบด้านข้างเพื่อแสดงคำตอบ
...
// Service that handles Gmail operations.

// Triggered when the user opens the Gmail Add-on or selects an email.
function onAddonEvent(event) {
  // If this was triggered by a button click, handle it
  if (event.parameters && event.parameters.action === 'send') {
    return handleSendMessage(event);
  }

  // Otherwise, just render the default initial sidebar
  return createSidebarCard();
}

// Creates the standard Gmail sidebar card consisting of a text input and send button.
// Optionally includes an answer section if a response was generated.
function createSidebarCard(optionalAnswerSection) {
  const card = CardService.newCardBuilder();
  const actionSection = CardService.newCardSection();

  // Create text input for the user's message
  const messageInput = CardService.newTextInput()
    .setFieldName("message")
    .setTitle("Message")
    .setMultiline(true);

  // Create action for sending the message
  const sendAction = CardService.newAction()
    .setFunctionName('onAddonEvent')
    .setParameters({ 'action': 'send' });

  const sendButton = CardService.newTextButton()
    .setText("Send message")
    .setTextButtonStyle(CardService.TextButtonStyle.FILLED)
    .setOnClickAction(sendAction);

  actionSection.addWidget(messageInput);
  actionSection.addWidget(CardService.newButtonSet().addButton(sendButton));

  card.addSection(actionSection);

  // Attach the response at the bottom if we have one
  if (optionalAnswerSection) {
    card.addSection(optionalAnswerSection);
  }

  return card.build();
}

// Handles clicks from the Send message button.
function handleSendMessage(event) {
  const commonEventObject = event.commonEventObject || {};
  const formInputs = commonEventObject.formInputs || {};
  const messageInput = formInputs.message;

  let userMessage = "";
  if (messageInput && messageInput.stringInputs && messageInput.stringInputs.value.length > 0) {
    userMessage = messageInput.stringInputs.value[0];
  }

  if (!userMessage || userMessage.trim().length === 0) {
    return CardService.newActionResponseBuilder()
      .setNotification(CardService.newNotification().setText("Please enter a message."))
      .build();
  }

  let finalQueryText = `USER MESSAGE TO ANSWER: ${userMessage}`;

  // If we have an email selected in Gmail, append its content as context
  if (event.gmail && event.gmail.messageId) {
    try {
      GmailApp.setCurrentMessageAccessToken(event.gmail.accessToken);
      const message = GmailApp.getMessageById(event.gmail.messageId);

      const subject = message.getSubject();
      const bodyText = message.getPlainBody() || message.getBody();

      finalQueryText += `\n\nEMAIL THE USER HAS OPENED ON SCREEN:\nSubject: ${subject}\nBody:\n---\n${bodyText}\n---`;
    } catch (e) {
      console.error("Could not fetch Gmail context: " + e);
      // Invalidate the token explicitly so the next prompt requests the missing scopes
      ScriptApp.invalidateAuth();

      CardService.newAuthorizationException()
        .setResourceDisplayName("Enterprise AI")
        .setAuthorizationUrl(ScriptApp.getAuthorizationUrl())
        .throwException();
    }
  }

  try {
    const response = queryAgent({ text: finalQueryText });

    // We leverage the 'showdown' library to parse the LLM's Markdown output into HTML
    // We also substitute markdown listings with arrows and adjust newlines for clearer rendering in the sidebar
    let displayedText = substituteListingsFromMarkdown(response.text);
    displayedText = new showdown.Converter().makeHtml(displayedText).replace(/\n/g, '\n\n');

    const textParagraph = CardService.newTextParagraph();
    textParagraph.setText(displayedText);

    const answerSection = CardService.newCardSection()
      .addWidget(textParagraph);

    const updatedCard = createSidebarCard(answerSection);

    return CardService.newActionResponseBuilder()
      .setNavigation(CardService.newNavigation().updateCard(updatedCard))
      .build();

  } catch (err) {
    return CardService.newActionResponseBuilder()
      .setNotification(CardService.newNotification().setText("Error fetching response: " + err.message))
      .build();
  }
}
...
AgentHandler.gs
โค้ดต่อไปนี้จัดระเบียบการเรียก API ไปยัง Vertex AI
- จัดระเบียบการเรียก API:
queryAgentเป็นตัวเชื่อมระหว่างส่วนเสริมกับ Vertex AI Agent Engine โดยจะสร้างคำขอที่มีคำค้นหาของผู้ใช้และโทเค็นการให้สิทธิ์ในสถานะ - สตรีมคำตอบ: เนื่องจากคำตอบของเอเจนต์อาจใช้เวลาสักครู่ จึงใช้
streamQueryAPI กับเหตุการณ์ที่เซิร์ฟเวอร์ส่ง (SSE) โค้ดจะรวบรวมคำตอบเป็นกลุ่มๆ และสร้างคำตอบทั้งหมดขึ้นมาใหม่
...
// Service that handles Vertex AI Agent operations.

// Submits a query to the AI agent and returns the response string synchronously
function queryAgent(input) {
 let systemPrompt = "SYSTEM PROMPT START Do not respond with tables but use bullet points instead." +
   " Do not ask the user follow-up questions or converse with them as history is not kept in this interface." +
   " SYSTEM PROMPT END\n\n";

 const requestPayload = {
   "class_method": "async_stream_query",
   "input": {
     "user_id": "vertex_ai_add_on",
     "message": { "role": "user", "parts": [{ "text": systemPrompt + input.text }] },
     "state_delta": {
       "enterprise-ai_999": `${ScriptApp.getOAuthToken()}`
     }
   }
 };

 const responseContentText = UrlFetchApp.fetch(
   `https://${getLocation()}-aiplatform.googleapis.com/v1/${getReasoningEngine()}:streamQuery?alt=sse`,
   {
     method: 'post',
     headers: { 'Authorization': `Bearer ${ScriptApp.getOAuthToken()}` },
     contentType: 'application/json',
     payload: JSON.stringify(requestPayload),
     muteHttpExceptions: true
   }
 ).getContentText();
  if (isInDebugMode()) {
   console.log(`Response: ${responseContentText}`);
 }

 const events = responseContentText.split('\n').map(s => s.replace(/^data:\s*/, '')).filter(s => s.trim().length > 0);
 console.log(`Received ${events.length} agent events.`);

 let author = "default";
 let answerText = "";
 for (const eventJson of events) {
   if (isInDebugMode()) {
     console.log("Event: " + eventJson);
   }
   const event = JSON.parse(eventJson);

   // Retrieve the agent responsible for generating the content
   author = event.author;

   // Ignore events that are not useful for the end-user
   if (!event.content) {
     console.log(`${author}: internal event`);
     continue;
   }

   // Handle text answers
   const parts = event.content.parts || [];
   const textPart = parts.find(p => p.text);
   if (textPart) {
     answerText += textPart.text;
   }
 }
 return { author: author, text: answerText };
}
...
ติดตั้งใช้งาน Agent ใน Vertex AI Agent Engine
- ในเทอร์มินัล ให้เปิดไดเรกทอรี
solutions/enterprise-ai-agentจากแหล่งที่มาที่ดาวน์โหลดในขั้นตอนก่อนหน้า แล้วเรียกใช้คำสั่งต่อไปนี้
# 1. Create and activate a new virtual environment
deactivate
python3 -m venv .venv
source .venv/bin/activate

# 2. Install poetry and project dependencies
pip install poetry
poetry install

# 3. Deploy the agent
adk deploy agent_engine \
  --project=$(gcloud config get-value project) \
  --region=us-central1 \
  --display_name="Enterprise AI" \
  enterprise_ai
- เมื่อเห็นบรรทัด Deploying to agent engine... ในบันทึก ให้เปิดเทอร์มินัลใหม่และเรียกใช้คำสั่งต่อไปนี้เพื่อเพิ่มสิทธิ์ที่จำเป็นให้กับ Vertex AI Reasoning Engine Service Agent
# 1. Get the current Project ID
PROJECT_ID=$(gcloud config get-value project)

# 2. Extract the Project Number for that ID
PROJECT_NUMBER=$(gcloud projects describe $PROJECT_ID --format='value(projectNumber)')

# 3. Construct the Service Account name
SERVICE_ACCOUNT="service-${PROJECT_NUMBER}@gcp-sa-aiplatform-re.iam.gserviceaccount.com"

# 4. Apply the IAM policy binding
gcloud projects add-iam-policy-binding $PROJECT_ID \
     --member="serviceAccount:$SERVICE_ACCOUNT" \
     --role="roles/discoveryengine.viewer"
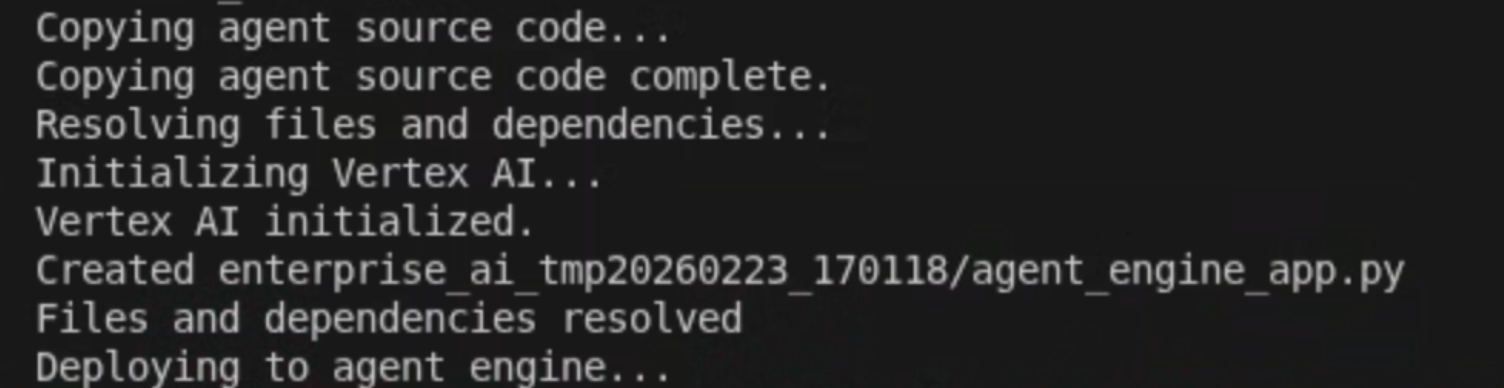
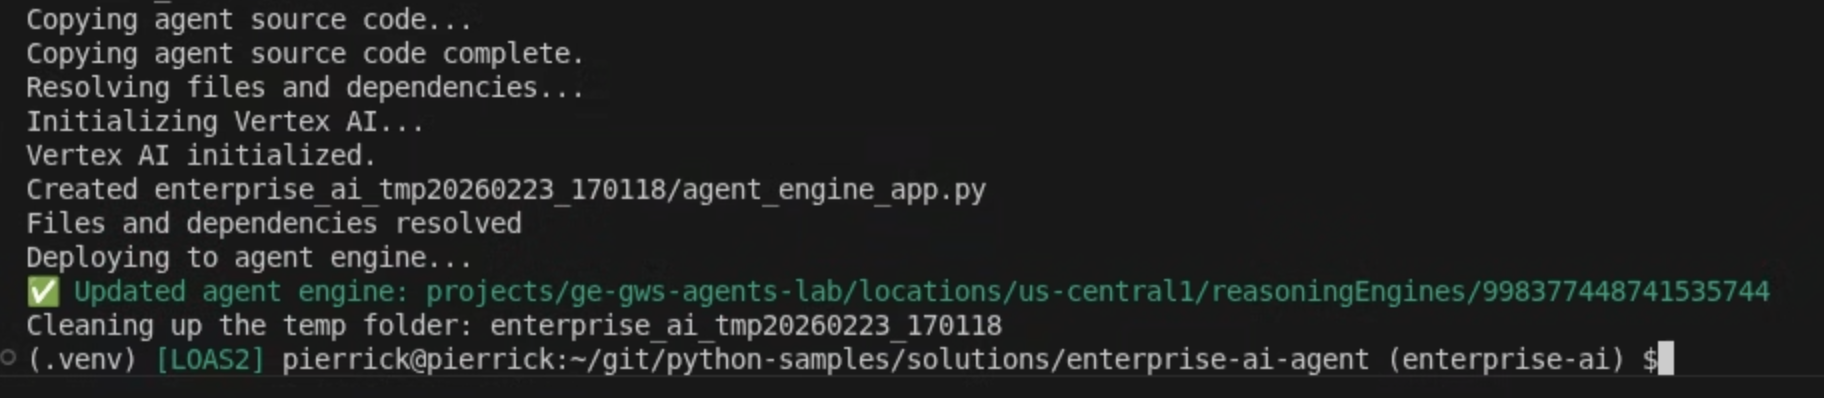
- รอให้คำสั่ง adk deploy ทำงานเสร็จ จากนั้นคัดลอกชื่อทรัพยากรของ Agent ที่เพิ่งทำให้ใช้งานได้จากเอาต์พุตจากคำสั่งเป็นสีเขียว
เริ่มต้นใช้งานบัญชีบริการ
สร้างบัญชีบริการเฉพาะเพื่อให้สิทธิ์การดำเนินการฝั่งเซิร์ฟเวอร์ของส่วนเสริม
ในคอนโซล Google Cloud ให้ทำตามขั้นตอนต่อไปนี้
- คลิกเมนู ☰ > IAM และผู้ดูแลระบบ > บัญชีบริการ > + สร้างบัญชีบริการ
- ตั้งชื่อบัญชีบริการเป็น
vertexai-add-on
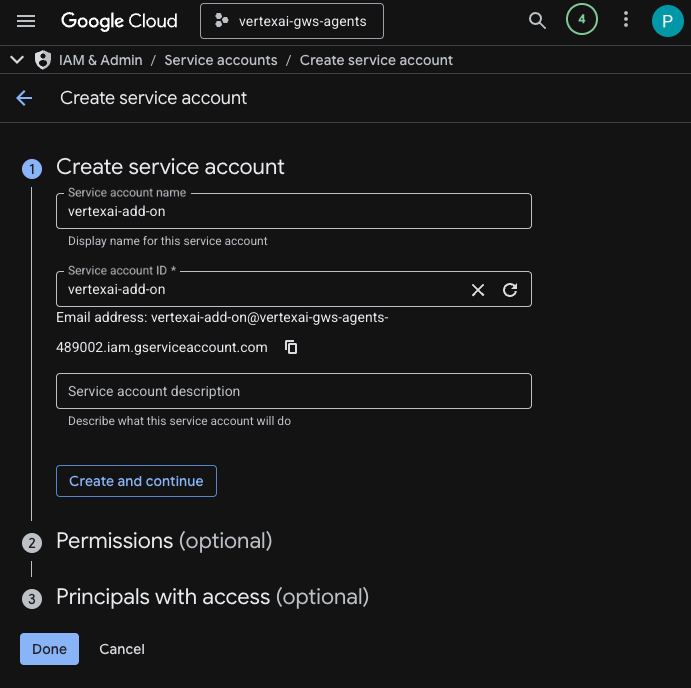
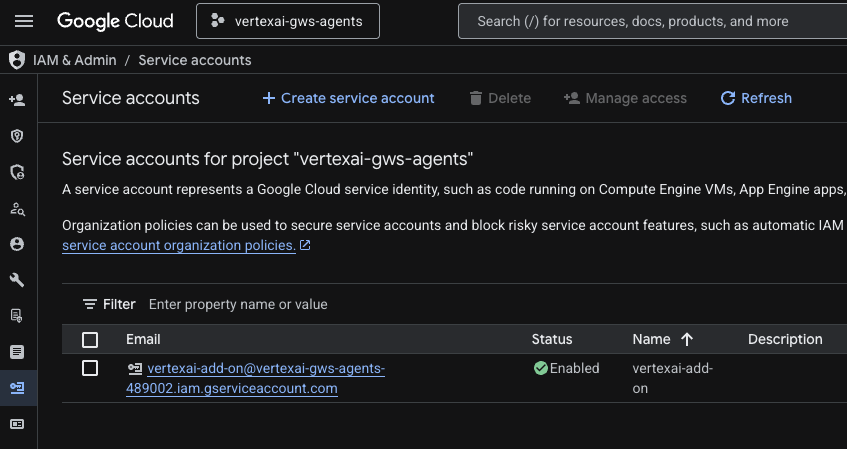
- คลิกเสร็จสิ้น ระบบจะเปลี่ยนเส้นทางคุณไปยังหน้าบัญชีบริการ และคุณจะเห็นบัญชีบริการที่สร้างขึ้น
- เลือกบัญชีบริการที่สร้างใหม่ แล้วเลือกแท็บคีย์
- คลิกเพิ่มคีย์ แล้วคลิกสร้างคีย์ใหม่
- เลือก JSON แล้วคลิกสร้าง
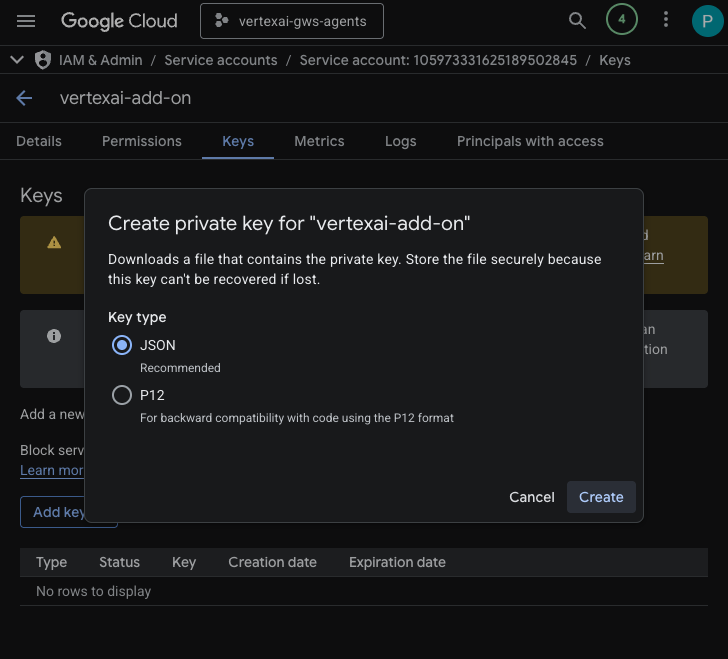
- กล่องโต้ตอบจะปิดลง และระบบจะดาวน์โหลดคู่คีย์สาธารณะ/ส่วนตัวที่สร้างขึ้นใหม่ลงในสภาพแวดล้อมในเครื่องโดยอัตโนมัติเป็นไฟล์ JSON
สร้างและกำหนดค่าโปรเจ็กต์ Apps Script
สร้างโปรเจ็กต์ Apps Script ใหม่เพื่อโฮสต์โค้ดส่วนเสริมและกำหนดค่าพร็อพเพอร์ตี้การเชื่อมต่อ
- คลิกปุ่มต่อไปนี้เพื่อเปิดโปรเจ็กต์ Apps Script ของส่วนเสริม Enterprise AI
- คลิกภาพรวม > ทำสำเนา
- ในโปรเจ็กต์ Apps Script ให้คลิกการตั้งค่าโปรเจ็กต์ > แก้ไขพร็อพเพอร์ตี้สคริปต์ > เพิ่มพร็อพเพอร์ตี้สคริปต์เพื่อเพิ่มพร็อพเพอร์ตี้สคริปต์
- ตั้งค่า REASONING_ENGINE_RESOURCE_NAME เป็นชื่อทรัพยากรของ AI Agent Vertex AI ที่คัดลอกไว้ในขั้นตอนก่อนหน้า โดยมีรูปแบบดังนี้
projects/<PROJECT_NUMBER>/locations/us-central1/reasoningEngines/<AGENT_ID>
- ตั้งค่า APP_SERVICE_ACCOUNT_KEY เป็นคีย์ JSON จากไฟล์บัญชีบริการที่ดาวน์โหลดในขั้นตอนก่อนหน้า
- คลิกบันทึกพร็อพเพอร์ตี้ของสคริปต์
ติดตั้งใช้งานใน Gmail และ Chat
ติดตั้งใช้งานส่วนเสริมเพื่อทดสอบภายใน Gmail และ Google Chat โดยตรง
ในโปรเจ็กต์ Apps Script ให้ทำตามขั้นตอนต่อไปนี้
- คลิกติดตั้งใช้งาน > ทดสอบการติดตั้งใช้งาน แล้วคลิกติดตั้ง ซึ่งตอนนี้พร้อมใช้งานใน Gmail แล้ว
- คลิกคัดลอกในส่วนรหัสการทำให้ใช้งานได้ของส่วนหัว
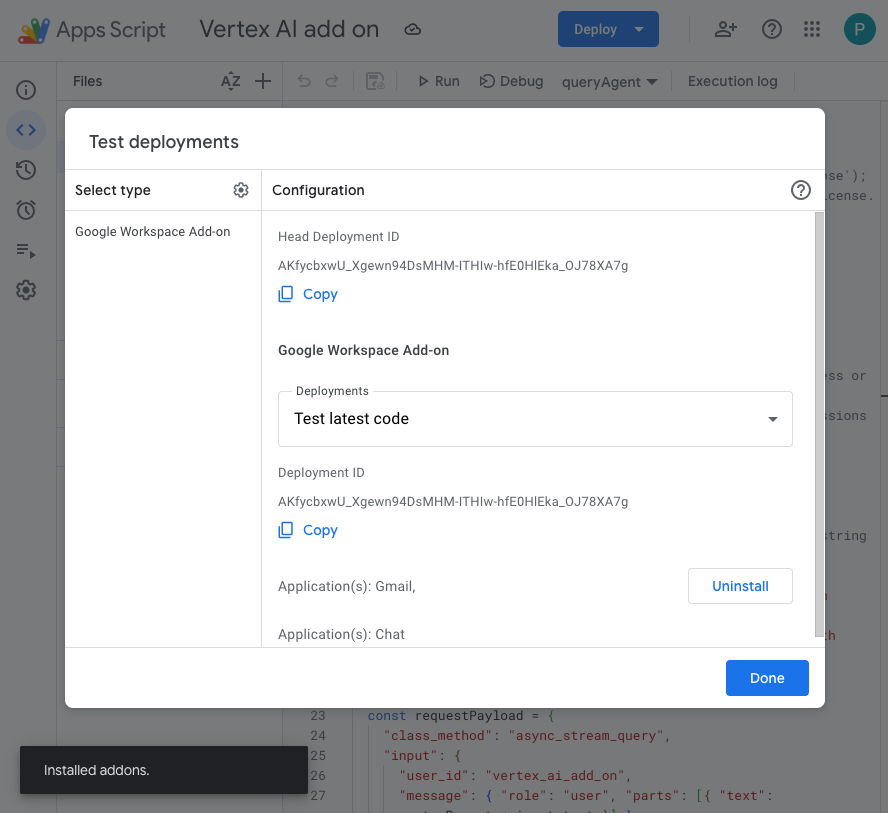
ในคอนโซล Google Cloud ให้ทำตามขั้นตอนต่อไปนี้
- ค้นหา
Google Chat APIในช่องค้นหาของ Google Cloud คลิก Google Chat API คลิกจัดการ แล้วคลิกการกำหนดค่า
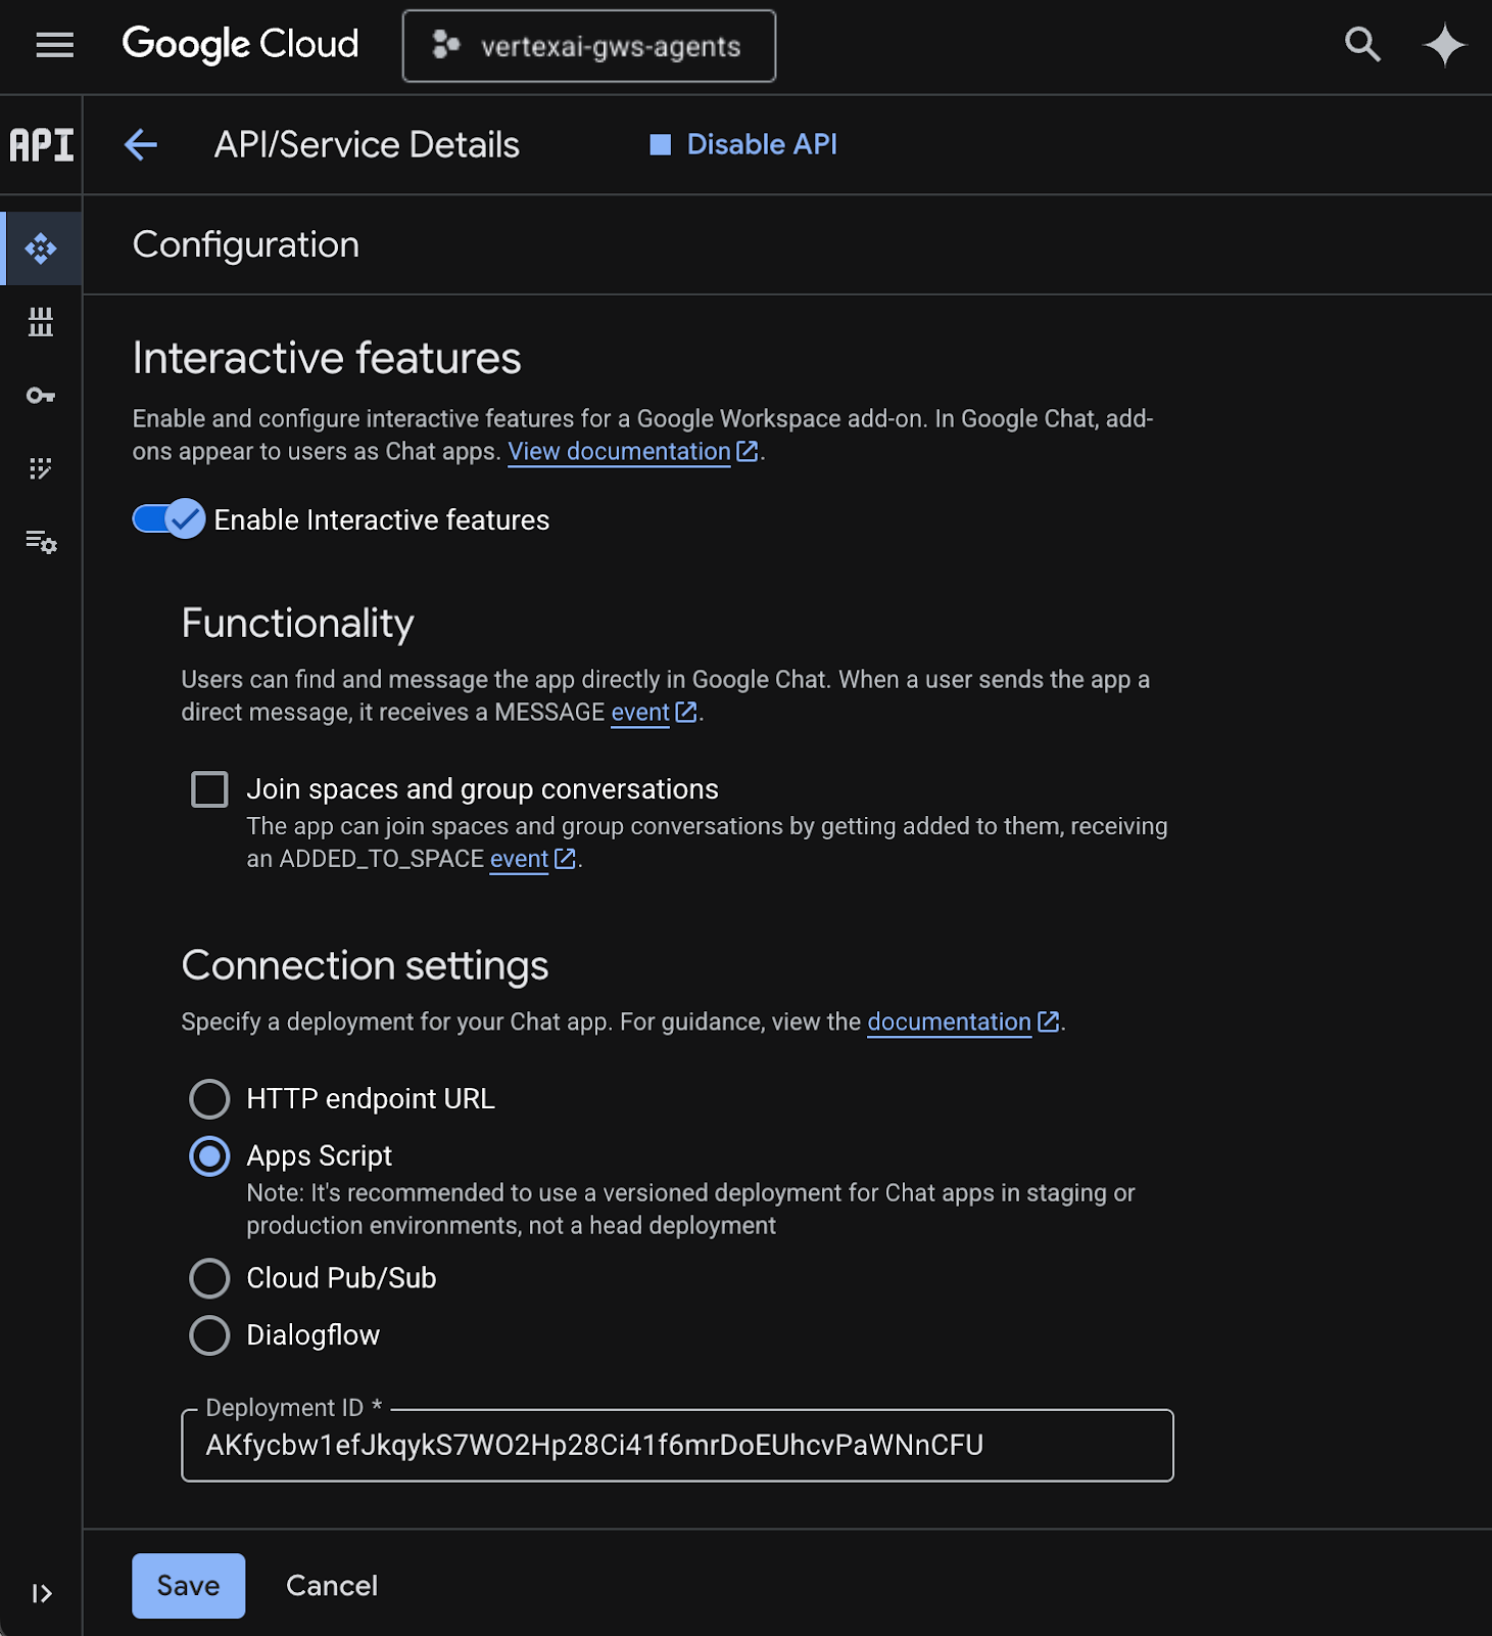
- เลือกเปิดใช้ฟีเจอร์แบบอินเทอร์แอกทีฟ
- ยกเลิกการเลือกเข้าร่วมพื้นที่ทำงานและการสนทนากลุ่ม
- เลือก Apps Script ในส่วนการตั้งค่าการเชื่อมต่อ
- ตั้งค่า Deployment ID เป็น Head Deployment ID ที่คัดลอกไว้ในขั้นตอนก่อนหน้า
- ในส่วนระดับการเข้าถึง ให้เลือกทำให้แอป Chat นี้พร้อมใช้งานสำหรับบุคคลและกลุ่มที่เฉพาะเจาะจงในโดเมน Workspace ของคุณ แล้วป้อนอีเมล
- คลิกบันทึก
ลองใช้ส่วนเสริม
โต้ตอบกับส่วนเสริมแบบเรียลไทม์เพื่อยืนยันว่าส่วนเสริมดังกล่าวสามารถดึงข้อมูลและตอบคำถามตามบริบทได้
เปิด Google Chat ในแท็บใหม่ แล้วทำตามขั้นตอนต่อไปนี้
- เปิดพื้นที่ข้อความส่วนตัวด้วยแอป Chat Vertex AI
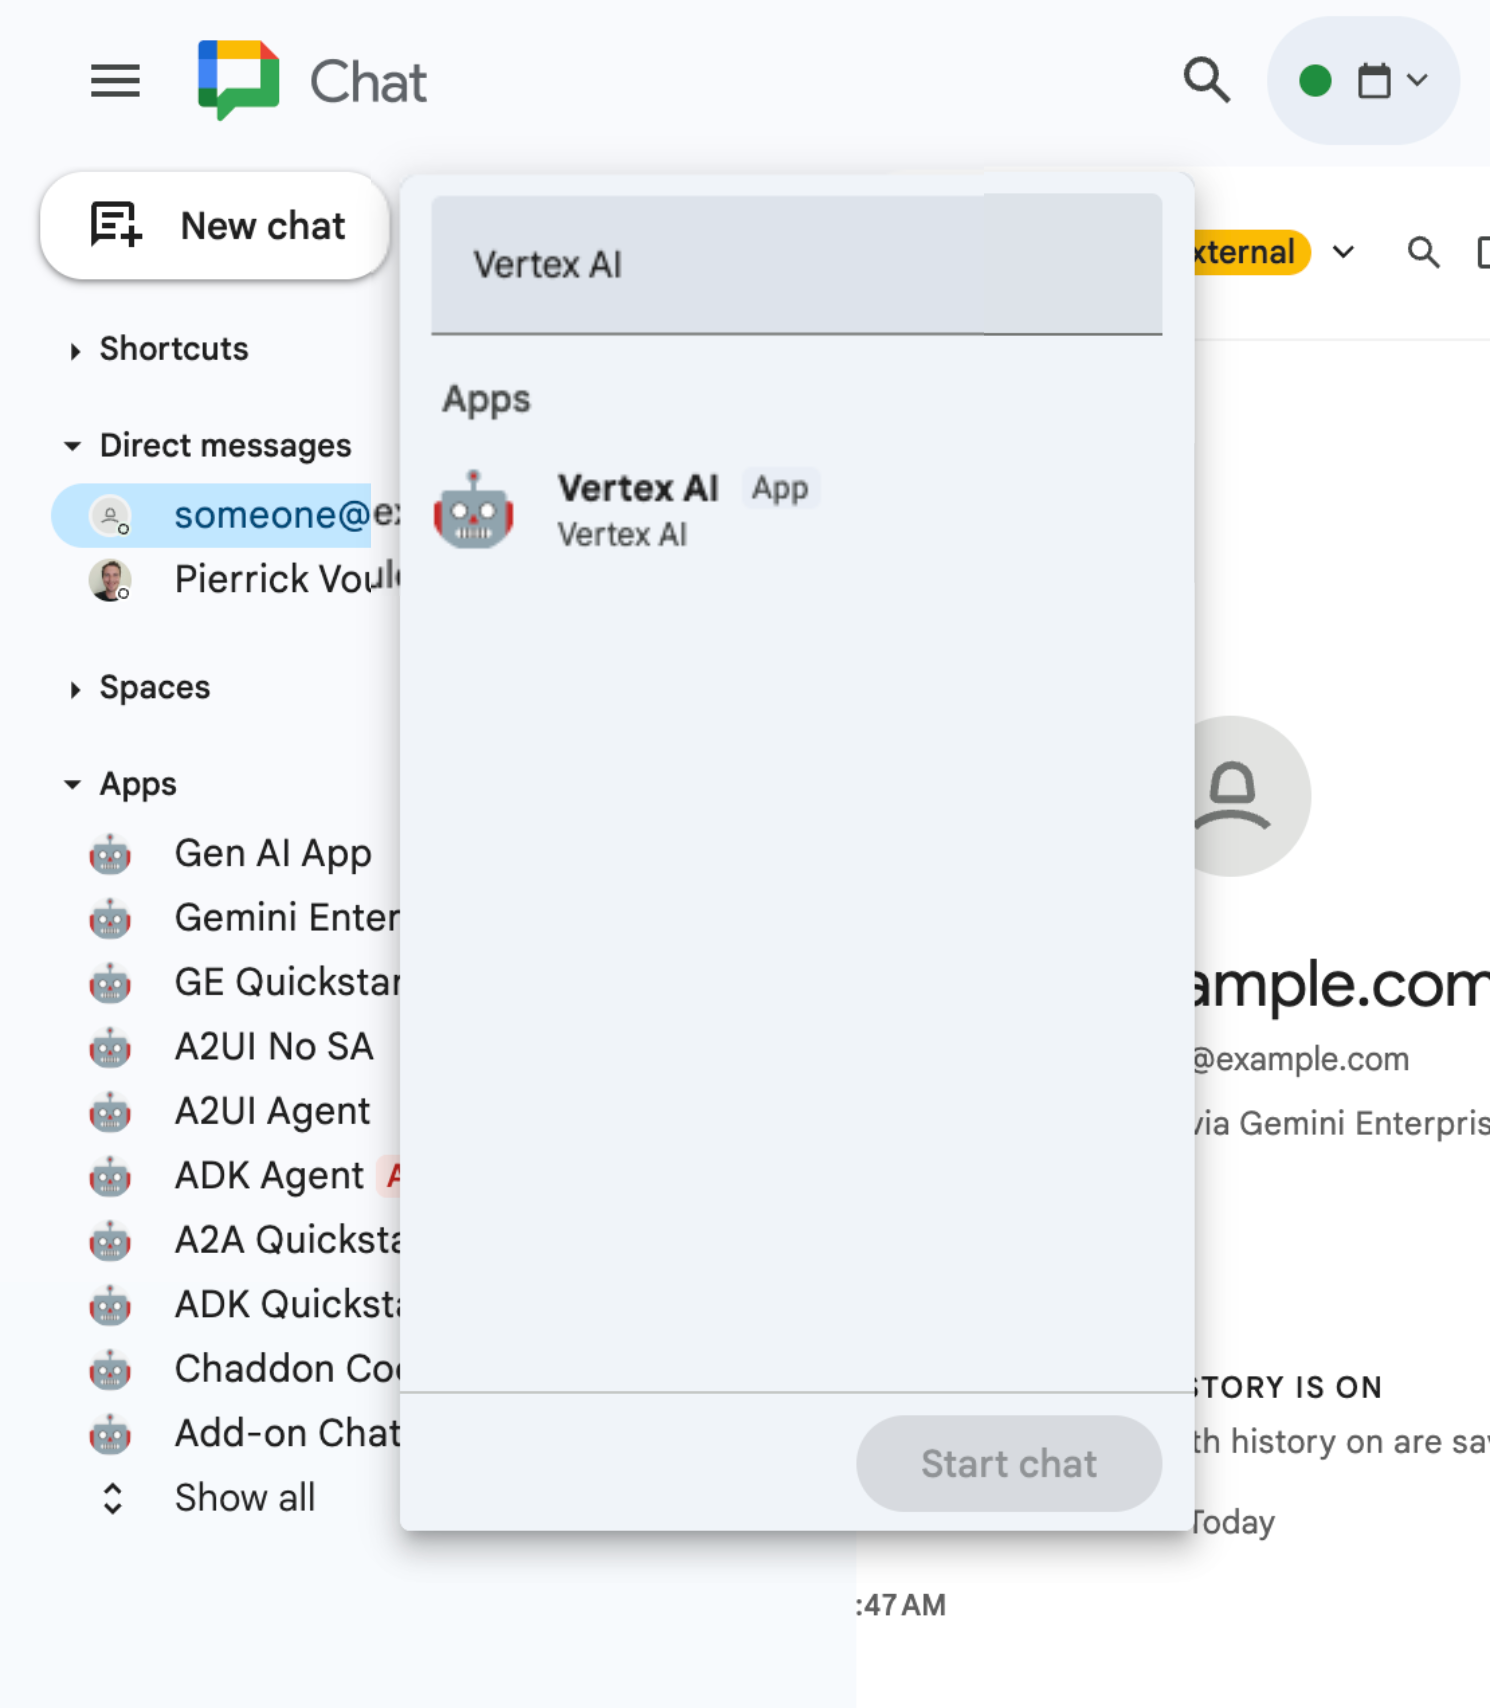
- คลิกกำหนดค่า แล้วทำตามขั้นตอนการตรวจสอบสิทธิ์
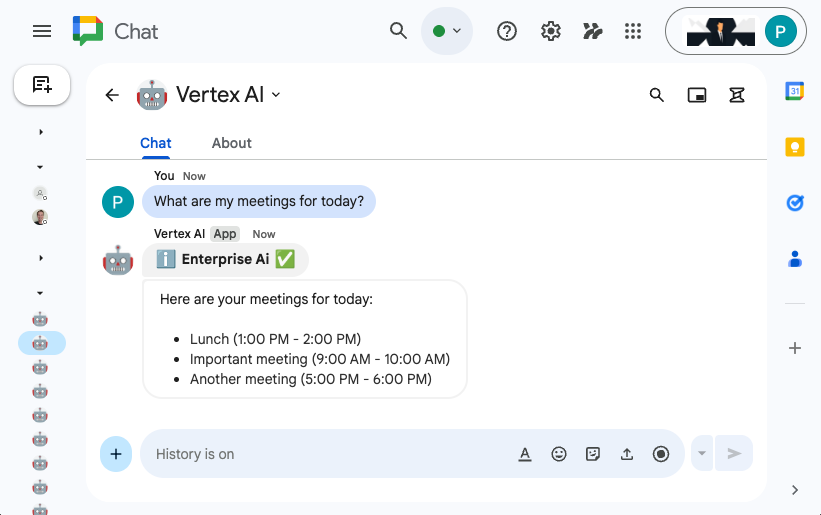
- พิมพ์
What are my meetings for today?แล้วกดenterแอปแชท Vertex AI ควรตอบกลับด้วยผลลัพธ์
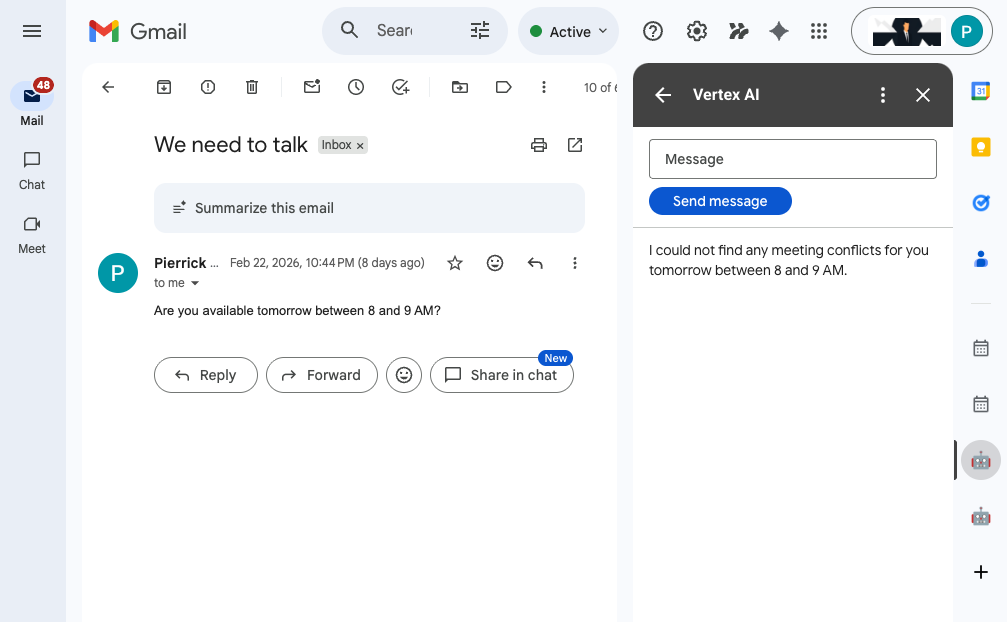
เปิด Gmail ในแท็บใหม่ แล้วทำตามขั้นตอนต่อไปนี้
- ส่งอีเมลถึงตัวเองโดยตั้งค่าเรื่องเป็น
We need to talkและตั้งค่าเนื้อหาเป็นAre you available today between 8 and 9 AM? - เปิดข้อความอีเมลที่ได้รับใหม่
- เปิดแถบด้านข้างของส่วนเสริม Vertex AI
- ตั้งค่าข้อความเป็น
Do I have any meeting conflicts? - คลิกส่งข้อความ
- คำตอบจะแสดงหลังจากปุ่ม
6. ล้างข้อมูล
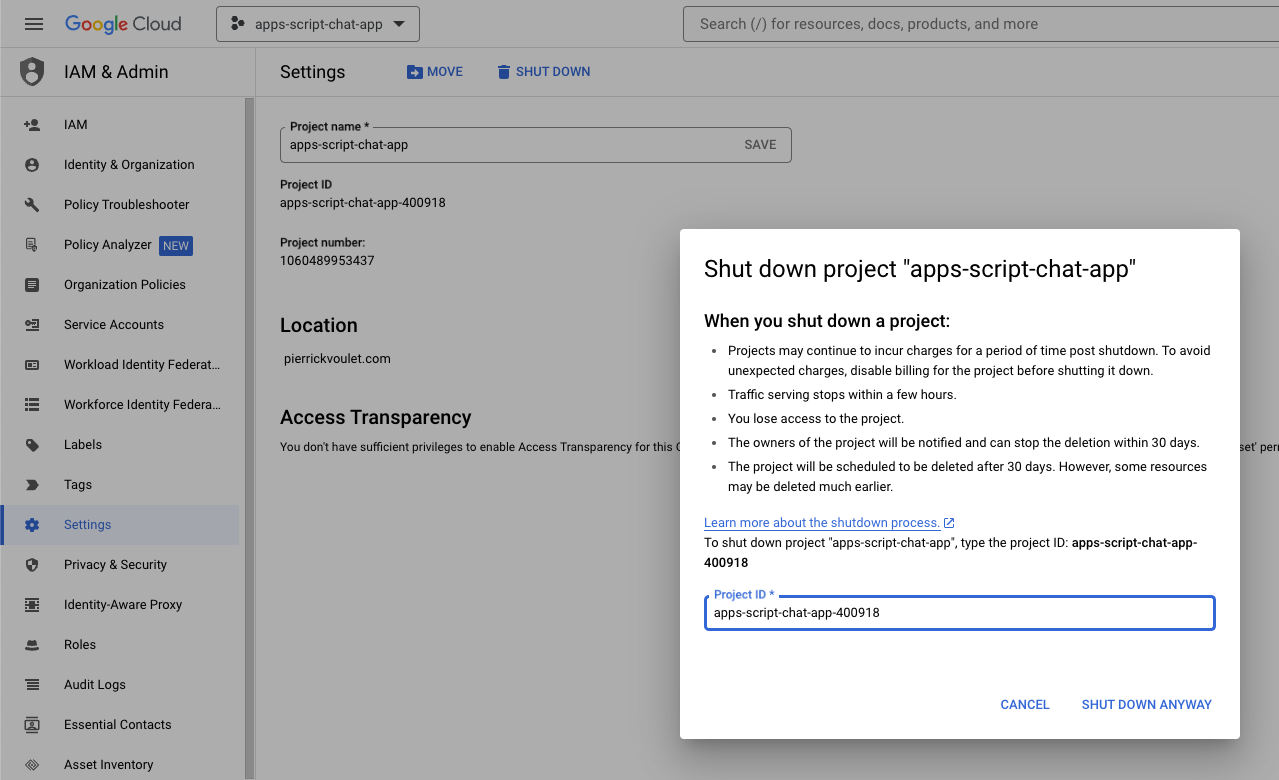
ลบโปรเจ็กต์ Google Cloud
เราขอแนะนำให้คุณลบโปรเจ็กต์ Google Cloud เพื่อหลีกเลี่ยงการเรียกเก็บเงินกับบัญชี Google Cloud สำหรับทรัพยากรที่ใช้ใน Codelab นี้
ในคอนโซล Google Cloud ให้ทำตามขั้นตอนต่อไปนี้
- คลิกเมนู ☰ > IAM และผู้ดูแลระบบ > การตั้งค่า
- คลิกปิดเครื่อง
- ป้อนรหัสโปรเจ็กต์
- คลิกปิดเครื่องต่อไป
7. ขอแสดงความยินดี
ยินดีด้วย คุณได้สร้างโซลูชันที่ใช้ประโยชน์จากการเชื่อมต่อ Vertex AI และ Google Workspace ให้ใกล้ชิดกันมากขึ้นสำหรับผู้ปฏิบัติงาน
ขั้นตอนต่อไปคืออะไร
เราจะแสดงเฉพาะกรณีการใช้งานที่พบบ่อยที่สุดใน Codelab นี้ แต่ก็ยังมีขอบเขตการขยายอีกมากมายที่คุณอาจต้องการพิจารณาในโซลูชันของคุณ เช่น
- ใช้เครื่องมือสำหรับนักพัฒนาซอฟต์แวร์ที่ทำงานด้วยระบบ AI เช่น Gemini CLI และ Antigravity
- ผสานรวมกับเฟรมเวิร์กและเครื่องมือของเอเจนต์อื่นๆ เช่น MCP ที่กำหนดเอง การเรียกใช้ฟังก์ชันที่กำหนดเอง และ UI แบบ Generative
- ผสานรวมกับโมเดล AI อื่นๆ รวมถึงโมเดลที่กำหนดเองซึ่งโฮสต์อยู่ในแพลตฟอร์มเฉพาะ เช่น Vertex AI
- ผสานรวมกับเอเจนต์อื่นๆ ที่โฮสต์ในแพลตฟอร์มเฉพาะ เช่น Dialogflow หรือโดยบุคคลที่สามผ่าน Cloud Marketplace
- เผยแพร่เอเจนต์ใน Cloud Marketplace เพื่อเพิ่มศักยภาพให้ทีม องค์กร หรือผู้ใช้ทั่วไป
ดูข้อมูลเพิ่มเติม
นักพัฒนาซอฟต์แวร์สามารถใช้แหล่งข้อมูลมากมาย เช่น วิดีโอบน YouTube, เว็บไซต์เอกสารประกอบ, ตัวอย่างโค้ด และบทแนะนำ
- ศูนย์นักพัฒนาแอปของ Google Cloud
- ผลิตภัณฑ์ที่รองรับ | เซิร์ฟเวอร์ MCP บน Google Cloud
- A2UI
- Model Garden ใน Vertex AI | Google Cloud
- ภาพรวม Vertex AI Agent Engine
- รับคำตอบและติดตามผล | Vertex AI Search | เอกสารประกอบของ Google Cloud
- เสนอเอเจนต์ AI ผ่าน Google Cloud Marketplace
- ช่อง YouTube ของนักพัฒนาแอป Google Workspace - ยินดีต้อนรับนักพัฒนาแอป
- เว็บไซต์นักพัฒนาแอป Google Workspace
- ที่เก็บ GitHub สำหรับตัวอย่างส่วนเสริมของ Google Workspace ทั้งหมด