
1. Overview
The era of "Chatbots that Read" is ending. We are entering the era of Agentic Vision.
In this Codelab, we will implement Deterministic AI Engineering—a practice of building AI systems that don't guess. Standard AI models often "hallucinate" (guess) when asked to count items in a complex image. In a supply chain, a guess is dangerous. If an AI guesses you have 12 items when you actually have 15, it triggers costly errors.
We will build an Autonomous Supply Chain Agent utilizing the new Think, Act, Observe loop in Gemini 3 Flash. It doesn't just look; it investigates.
The Deterministic Architecture
We will start with a "blind" and "amnesiac" system. You will manually "awaken" its senses one by one:

- The Eyes (Vision Agent): We enable Gemini 3 Flash with Code Execution. Instead of predicting tokens to guess a number, the model writes Python code (OpenCV) to count pixels deterministically.
- The Memory (Supplier Agent): We enable AlloyDB AI with ScaNN (Scalable Nearest Neighbors). This allows the agent to recall the exact supplier for a part from millions of options in milliseconds.
- The Handshake (A2A Protocol): We enable Agent-to-Agent communication using a standardized agent_card.json , allowing the Vision Agent to autonomously order stock from the Supplier Agent.
What you'll build
- A Vision Agent that performs "visual math" on camera feeds.
- A Supplier Agent backed by AlloyDB ScaNN for high-speed vector search.
- A Control Tower frontend with real-time WebSocket updates to visualize the autonomous loop.
What you'll learn
- How to set up AlloyDB with vector embeddings and ScaNN indexes.
- How to enable Agentic Vision with gemini-3-flash-preview using the Gemini API.
- How to implement vector search using the <=> (cosine distance) operator in AlloyDB.
- How to connect agents to AlloyDB using the AlloyDB Python Connector.
- How to use the A2A Protocol for dynamic agent discovery.
Requirements
- A browser, such as Chrome or Firefox
- A Google Cloud project with billing enabled.
- A Gemini API key (free tier available at Google AI Studio) for the Vision Agent.
2. Before you begin
Create a project
- In the Google Cloud Console, on the project selector page, select or create a Google Cloud project.
- Make sure that billing is enabled for your Cloud project. Learn how to check if billing is enabled on a project.
- You'll use Cloud Shell, a command-line environment running in Google Cloud. Click Activate Cloud Shell at the top of the Google Cloud console.

- Once connected to Cloud Shell, you check that you're already authenticated and that the project is set to your project ID using the following command:
gcloud auth list
Setup Database [AlloyDB]
Before anything else, let's provision the database — this takes ~15 minutes, so we'll kick it off first.
- Click the button below to open the AlloyDB setup tool in Cloud Shell:
- Run the setup:
Sh run.sh
- Use the Web Preview (eye icon 👁️ → Preview on port 8080) to open the setup UI.
- Enter your Project ID, select a Region (e.g., us-central1), and create a Database Password.
⚠️ SAVE THIS PASSWORD — you'll need it when the setup script asks for it.
- Click Start Deployment and wait ~15 minutes for the cluster to provision.
Get the Code
While AlloyDB provisions (or once it's done), open the codelab repo in Cloud Shell:
⚠️ IMPORTANT: When you click the button, you'll see a security dialog. Check the box "Trust repo" and click "Confirm".
Alternatively, clone manually:
git clone https://github.com/MohitBhimrajka/visual-commerce-gemini-3-alloydb.git

cd visual-commerce-gemini-3-alloydb
Set Your Project
In this Cloud Shell terminal, confirm your project is set:
gcloud config set project <YOUR_PROJECT_ID>
Enable Public IP on AlloyDB
Once AlloyDB provisioning is complete, enable Public IP so the Python Connector can connect from Cloud Shell:
- Go to the AlloyDB Console
- Click your cluster → click your primary instance
- Click Edit
- Scroll to Public IP Connectivity and check Enable Public IP
- Click Update Instance
💡 Note: The AlloyDB Python Connector handles authentication and encryption — you don't need to add any authorized external networks.
Grant Vertex AI Permissions
The AlloyDB service account needs Vertex AI access for generating embeddings. Run this in the same Cloud Shell window:
PROJECT_ID=$(gcloud config get-value project)


gcloud projects add-iam-policy-binding $PROJECT_ID \
  --member="serviceAccount:service-$(gcloud projects describe $PROJECT_ID --format="value(projectNumber)")@gcp-sa-alloydb.iam.gserviceaccount.com" \
  --role="roles/aiplatform.user"
Run the Setup Script
Now run the setup script — it will auto-detect your AlloyDB instance:
sh setup.sh
What the script does:
- Validates gcloud CLI, authentication, project, and Python 3
- Checks and enables required APIs (AlloyDB, Vertex AI, Compute, Service Networking)
- Prompts for your Gemini API key
- Auto-detects your AlloyDB instance and extracts region, cluster, and instance name
- Asks for your database password
- Generates the .env configuration file
- Installs Python dependencies
3. Database Setup
At the heart of our application lies AlloyDB for PostgreSQL. We'll use its powerful vector capabilities and ScaNN index to enable near real-time semantic search, allowing our agents to find inventory matches across thousands of records in milliseconds.
In this section, you'll provision the schema, seed data, and generate embeddings — all from AlloyDB Studio.
Connect to AlloyDB Studio
- Go to your AlloyDB instance in the AlloyDB Console
- Click AlloyDB Studio in the left navigation
- Authenticate with:
- Username: postgres
- Database: postgres
- Password: The password you set during cluster creation
Enable Extensions
AlloyDB provides built-in extensions for vectors and AI. Run the following SQL in AlloyDB Studio:
CREATE EXTENSION IF NOT EXISTS google_ml_integration CASCADE;
CREATE EXTENSION IF NOT EXISTS vector;
CREATE EXTENSION IF NOT EXISTS alloydb_scann CASCADE;
- google_ml_integration: Enables the ai.embedding() function for calling Vertex AI directly from SQL.
- vector: Stores and queries 768-dimensional vector embeddings.
- alloydb_scann: Enables Google's ScaNN index for ultra-fast vector search.
Create the Inventory Table
DROP TABLE IF EXISTS inventory;

CREATE TABLE inventory (
    id SERIAL PRIMARY KEY,
    part_name TEXT NOT NULL,
    supplier_name TEXT NOT NULL,
    description TEXT,
    stock_level INT DEFAULT 0,
    part_embedding vector(768)
);
The part_embedding column stores 768-dimensional vectors from text-embedding-005. This is what powers the semantic search.
Insert Sample Data
Insert 20 warehouse inventory items:
INSERT INTO inventory (part_name, supplier_name, description, stock_level) VALUES
('Cardboard Shipping Box Large', 'Packaging Solutions Inc', 'Heavy-duty corrugated cardboard shipping container, 24x18x12 inches', 250),
('Warehouse Storage Container', 'Industrial Supply Co', 'Stackable plastic storage bin with snap-lock lid, blue', 180),
('Product Shipping Boxes', 'Acme Packaging', 'Medium corrugated boxes for warehouse storage, 18x14x10 inches', 320),
('Industrial Widget X-9', 'Acme Corp', 'Heavy-duty industrial coupling for pneumatic systems', 50),
('Precision Bolt M4', 'Global Fasteners Inc', 'Stainless steel M4 allen bolt, 20mm length, grade A2-70', 200),
('Hexagonal Nut M6', 'Metro Supply Co', 'Galvanized steel hex nut M6, DIN 934 standard', 150),
('Phillips Head Screw 3x20', 'Acme Corp', 'Zinc-plated Phillips head wood screw, 3mm x 20mm', 500),
('Wooden Dowel 10mm', 'Craft Materials Ltd', 'Hardwood birch dowel rod, 10mm diameter x 300mm length', 80),
('Rubber Gasket Small', 'SealTech Industries', 'Buna-N rubber gasket, 25mm OD x 15mm ID, oil resistant', 120),
('Spring Tension 5kg', 'Mechanical Parts Co', 'Stainless steel compression spring, 5kg load capacity', 60),
('Bearing 6204', 'Bearings Direct', 'Deep groove ball bearing 6204-2RS, 20x47x14mm sealed', 45),
('Warehouse Shelf Boxes', 'Storage Systems Ltd', 'Standardized warehouse inventory boxes, corrugated, bulk pack', 400),
('Inventory Container Units', 'Supply Chain Pros', 'Modular stackable storage units for warehouse racking', 95),
('Aluminum Extrusion Bar', 'MetalWorks International', 'T-slot aluminum extrusion 20x20mm profile, 1 meter length', 110),
('Cable Tie Pack 200mm', 'ElectroParts Depot', 'Nylon cable ties, 200mm x 4.8mm, UV resistant black, pack of 100', 600),
('Hydraulic Hose 1/2 inch', 'FluidPower Systems', 'High-pressure hydraulic hose, 1/2 inch ID, 3000 PSI rated', 35),
('Safety Goggles Clear', 'WorkSafe Equipment Co', 'ANSI Z87.1 rated clear safety goggles, anti-fog coating', 275),
('Packing Tape Industrial', 'Packaging Solutions Inc', 'Heavy-duty polypropylene packing tape, 48mm x 100m, clear', 450),
('Stainless Steel Sheet 1mm', 'MetalWorks International', '304 stainless steel sheet, 1mm thickness, 300x300mm', 70),
('Silicone Sealant Tube', 'SealTech Industries', 'Industrial-grade RTV silicone sealant, 300ml cartridge, grey', 190);
Grant Embedding Permissions
GRANT EXECUTE ON FUNCTION embedding TO postgres;
Generate Vector Embeddings
This uses AlloyDB's built-in ai.embedding() function to call Vertex AI's text-embedding-005 model directly from SQL — no Python code needed:
UPDATE inventory
SET part_embedding = ai.embedding(
    'text-embedding-005',
    part_name || '. ' || description
)::vector
WHERE part_embedding IS NULL;
This generates 768-dimensional vectors that capture the semantic meaning of each part's name and description. The ScaNN index will use these for lightning-fast similarity search. [This will take approximately 3-5 minutes to complete]
Create the ScaNN Index
SET scann.allow_blocked_operations = true;

CREATE INDEX IF NOT EXISTS idx_inventory_scann
ON inventory USING scann (part_embedding cosine)
WITH (num_leaves=5, quantizer='sq8');
Verify Everything Worked
SELECT part_name, supplier_name, stock_level,
       (part_embedding IS NOT NULL) as has_embedding
FROM inventory
ORDER BY id;
You should see 20 rows, all with has_embedding = true.
4. Understanding the Architecture
Before making code changes, let's understand how the system is built. The architecture follows a progressive "awakening" pattern:
The Agent Stack
Vision Agent (agents/vision-agent/)
- agent.py — Core Gemini 3 Flash logic. Sends images to the model with Code Execution enabled so it writes Python (OpenCV) to count items deterministically.
- agent_executor.py — Bridges A2A protocol requests to the agent logic.
- main.py — Uvicorn A2A server that serves /.well-known/agent-card.json and handles requests.
Supplier Agent (agents/supplier-agent/)
- inventory.py — Connects to AlloyDB via the AlloyDB Python Connector (no Auth Proxy needed). Contains the find_supplier() function that performs ScaNN vector search.
- agent_executor.py — Bridges A2A protocol to inventory search logic.
- main.py — Uvicorn A2A server with agent card and health endpoint.
Control Tower (frontend/)
- app.py — FastAPI + WebSocket server that discovers agents via A2A, orchestrates the vision → search → order pipeline, and streams real-time updates to the browser.
The A2A Flow
- Control Tower reads /.well-known/agent-card.json from each agent
- Discovers capabilities (skills, endpoints) — no hardcoded URLs
- Sends image to Vision Agent → gets item count + description
- Sends description as embedding query to Supplier Agent → gets part match
- Places order autonomously
The AlloyDB Connection
The Supplier Agent uses the AlloyDB Python Connector instead of the traditional Auth Proxy:
from google.cloud.alloydbconnector import Connector

connector = Connector()
conn = connector.connect(
    inst_uri,       # Full instance URI
    "pg8000",       # Driver
    user="postgres",
    password=DB_PASS,
    ip_type="PUBLIC",  # Cloud Shell uses Public IP
)
This handles IAM authentication, SSL/TLS, and connection routing automatically. When deploying to Cloud Run later, simply change ip_type to "PRIVATE" for VPC access.
5. Step 1: The Memory (Supplier Agent)
The Supplier Agent remembers millions of parts using AlloyDB ScaNN. Right now, it ships with a placeholder query — an amnesiac that returns the first row it finds, regardless of what you search for.
The Audit: The Amnesiac
If you query the Supplier Agent now, it returns a random result. It has no concept of similarity. Let's fix that.
Start the Supplier Agent
The A2A server (main.py) delegates to agent_executor.py, which bridges the protocol to the business logic in inventory.py.
pkill -f uvicorn #Kill all uvicorn processes
Step 1: Navigate to the agent directory
cd agents/supplier-agent
Step 2: Install dependencies
pip install -r requirements.txt
Step 3: Start the agent server
uvicorn main:app --host 0.0.0.0 --port 8082 > /dev/null 2>&1 &
The > /dev/null 2>&1 & runs the server in the background and suppresses output so it doesn't interrupt your terminal.
Step 4: Verify the agent is running (wait 2-3 seconds after starting)
curl http://localhost:8082/.well-known/agent-card.json
Expected Output: JSON with agent configuration (should return without errors)
The Fix: Implementing the <=> Operator
Open agents/supplier-agent/inventory.py and find the find_supplier() function around line 60-70. You'll see the placeholder:
# TODO: Replace this placeholder query with ScaNN vector search

sql = "SELECT part_name, supplier_name FROM inventory LIMIT 1;"
cursor.execute(sql)
Replace those two lines with:
sql = """
SELECT part_name, supplier_name,
       part_embedding <=> %s::vector as distance
FROM inventory
ORDER BY part_embedding <=> %s::vector
LIMIT 1;
"""
cursor.execute(sql, (embedding_str, embedding_str))
What this does:
- <=> is the cosine distance operator in PostgreSQL
- ORDER BY part_embedding <=> %s::vector finds the nearest match (lowest distance = closest semantic meaning)
- %s::vector casts your embedding array to PostgreSQL's vector type
- The ScaNN index automatically accelerates this query!
Step 4: Save the file (Ctrl+S or Cmd+S)
The agent will now use semantic search instead of returning random results!
Verification
Test A2A discovery and the inventory:
curl http://localhost:8082/.well-known/agent-card.json

python3 -c "
from inventory import find_supplier
import json
vec = [0.1]*768
r = find_supplier(vec)
if r:
    result = {'part': r[0], 'supplier': r[1]}
    if len(r) > 2:
        result['distance'] = float(r[2]) if r[2] else None
    print(json.dumps(result))
else:
    print('No result found')
"
Expected: agent-card.json returns the agent card. The Python snippet returns a part and supplier from the seeded data.
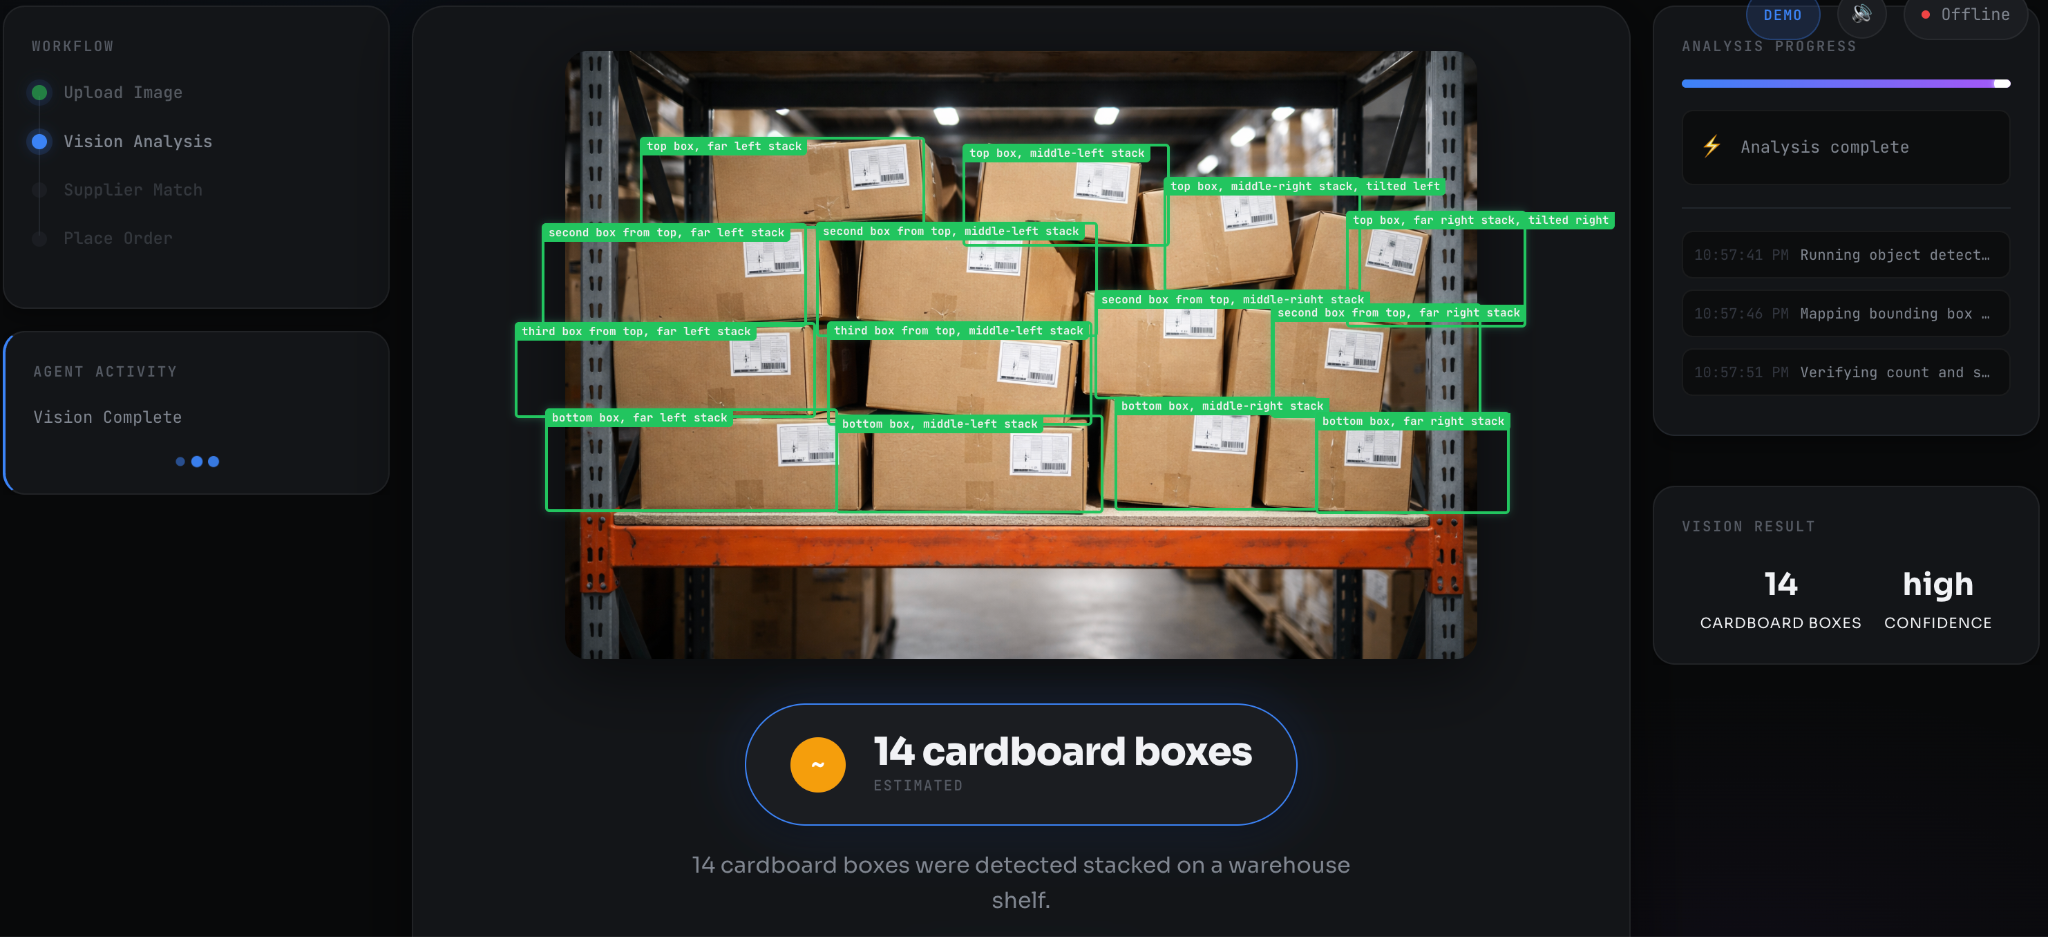
6. Step 2: The Eyes (Vision Agent)
While the database is accessible, let's awaken the eyes using Gemini 3 Flash. The Vision Agent performs "visual math" via Code Execution.
The Audit: The Hallucination
If you ask a standard multimodal model "How many boxes are in this messy image?", it processes the image as a static snapshot and guesses.
- Model says: "I see about 12 boxes."
- Reality: There are 15 boxes.
- Result: Supply chain failure.
The Fix: Awakening the Think-Act-Observe Loop
We enable Code Execution and ThinkingConfig so the model writes Python (OpenCV) to count deterministically.
- Open agents/vision-agent/agent.py .
- Find the GenerateContentConfig section (around line 68-78).
- Uncomment both the thinking_config=types.ThinkingConfig(...) block and tools=[types.Tool(code_execution=...)].
- The client is already configured to use your GEMINI_API_KEY from the environment.
File: agents/vision-agent/agent.py
config = types.GenerateContentConfig(
    temperature=0,
    # CODELAB STEP 1: Uncomment to enable reasoning
    thinking_config=types.ThinkingConfig(
        thinking_level="MINIMAL",  # Valid: "MINIMAL", "LOW", "MEDIUM", "HIGH"
        include_thoughts=False    # Set to True for debugging
    ),
    # CODELAB STEP 2: Uncomment to enable code execution
    tools=[types.Tool(code_execution=types.ToolCodeExecution)]
)
Why thinking_level="MINIMAL"?
For this task (counting items via code execution), "MINIMAL" provides sufficient reasoning to plan the script and verify the count. Using "HIGH" would add 2-3x latency without improving accuracy for deterministic tasks. Cost-Performance Optimization — match reasoning depth to task complexity.
Cost-Performance Optimization is a key skill for production AI engineering: match reasoning depth to task complexity.
Start the Vision Agent
🔄 Path Check: If you're still in agents/supplier-agent/, first go back to repo root with cd ../..
Step 1: Navigate to the vision agent directory
cd agents/vision-agent
Step 2: Install dependencies
pip install -r requirements.txt
Step 3: Start the vision agent server
uvicorn main:app --host 0.0.0.0 --port 8081 > /dev/null 2>&1 &
The > /dev/null 2>&1 & runs the server in the background and suppresses output so it doesn't interrupt your terminal.
Verification
Test A2A discovery:
curl http://localhost:8081/.well-known/agent-card.json
Expected: JSON with agent name and skills. You'll test the actual vision counting with the Control Tower UI in Step 8.

7. Step 3: The Handshake (A2A Agent Card)
Our agent sees the problem (Vision) and knows the supplier (Memory). The A2A protocol enables dynamic discovery—the frontend learns how to talk to each agent by reading its card.
A2A vs Traditional REST APIs
Aspect | Traditional REST | A2A Protocol |
Endpoint Discovery | Hardcoded URLs in config | Dynamic via /.well-known/agent-card.json |
Capability Description | API docs (for humans) | Skills (machine-readable) |
Integration | Manual code per service | Semantic matching: "I need inventory search" → discovers skill |
New Agent Added | Update all clients' configs | Zero config—auto-discovered |
Real-World Benefit: In a traditional microservice, if you add a third "Logistics Agent," you'd need to update the Control Tower's code with its URL and API contract. With A2A, the Control Tower discovers it automatically and understands its capabilities through natural language skill descriptions.
This is why A2A enables Plug-and-Play Agent Composition—the architectural pattern for autonomous systems.
Create the Agent Card
🔄 Path Check: If you're still in agents/vision-agent/, first go back to repo root with cd ../..
The agent card is already included at agents/supplier-agent/agent_card.json. Open it and review:
{
  "name": "Acme Supplier Agent",
  "description": "Autonomous fulfillment for industrial parts via AlloyDB ScaNN.",
  "version": "1.0.0",
  "skills": [{
    "id": "search_inventory",
    "name": "Search Inventory",
    "description": "Searches the warehouse database for semantic matches using AlloyDB ScaNN vector search.",
    "tags": ["inventory", "search", "alloydb"],
    "examples": ["Find stock for Industrial Widget X-9", "Who supplies ball bearings?"]
  }]
}
Feel free to customize the name, description, or examples to match your use case.
Restart the Supplier Agent to load the card:
Step 1: Stop the running agent
pkill -f "uvicorn main:app.*8082"
Step 2: Navigate to the agent directory
cd agents/supplier-agent
Step 3: Start the agent again
uvicorn main:app --host 0.0.0.0 --port 8082 > /dev/null 2>&1 &
The > /dev/null 2>&1 & runs the server in the background and suppresses output so it doesn't interrupt your terminal.
Step 4: Verify the new agent card (wait 2-3 seconds after starting)
curl http://localhost:8082/.well-known/agent-card.json
Expected Output: JSON with your filled-in name, description, and skills.

8. Step 4: The Control Tower
Run the Control Tower frontend with FastAPI + WebSockets. It discovers agents via A2A and orchestrates the full loop with real-time updates.
Start All Services
The easiest way to start all services:
Verify you're in repo root
pwd # Should end with: visual-commerce-gemini-3-alloydb
Then,
sh run.sh
This single command starts:
- Vision Agent on port 8081
- Supplier Agent on port 8082
- Control Tower on port 8080
Wait ~10 seconds for all services to initialize.
Test the System
Access the Control Tower:
- Click Web Preview button (eye icon 👁️) in the Cloud Shell toolbar
- Select "Preview on port 8080"
- The Control Tower dashboard will open in a new tab
Run the Demo:
- Top right: Connection status (green "Live" dot), DEMO/AUTO mode toggle, and audio controls
- Center: Main workflow canvas with image upload and analysis visualization
- Side panels (appear during analysis): Workflow timeline (left), progress tracking and code viewer (right)
Option 1: Quick Start (Recommended)
- On the homepage, you'll see a "Quick start" section with sample images
- Click any sample image to auto-start analysis
- Watch the autonomous workflow (~30-45 seconds)
Option 2: Upload Your Own
- Drag and drop a warehouse/shelf image (PNG, JPG, up to 10MB) or click to browse
- Click "Initiate Autonomous Workflow"
- Observe the 4-stage pipeline
What Happens:
- Agent Discovery: A2A protocol modals show Vision Agent and Supplier Agent cards with their skills and endpoints
- Vision Analysis: Gemini 3 Flash generates and executes Python code (OpenCV) to count items. Progress bar shows substeps. Bounding boxes overlay on detected items. Result badge shows "✓ Code-Verified" or "~ Estimated"
- Supplier Match: AlloyDB ScaNN vector search animation. Search query displays (e.g., "industrial metal boxes"). Result card shows matched part, supplier, and confidence score
- Order Placed: Receipt card with order ID, quantity, and details
Tip: Keep DEMO mode on (top right) to pause at each stage for presentations. In AUTO mode, the workflow runs continuously.
What Just Happened
The Control Tower used A2A Protocol to discover both agents via /.well-known/agent-card.json, orchestrated the vision analysis (Gemini 3 Flash with code execution), performed vector search (AlloyDB ScaNN), and placed an autonomous order—all with real-time WebSocket updates. Each agent exposes its capabilities via the A2A standard, enabling plug-and-play composition without custom SDKs. Learn more: A2A Protocol
Troubleshooting
Path-Related Errors:
- "No such file or directory" when running commands: You're not in the repo root.
# Check where you are
pwd

# If you're lost, navigate to home and back to repo
cd
cd visual-commerce-gemini-3-alloydb
Service Errors:
- "Address already in use": Processes from previous runs are still active.
# Kill all services and restart
pkill -f uvicorn
sh run.sh  # Or manually restart individual agents
- Services not starting: Check if ports are occupied:
# Check which processes are using the ports
lsof -i :8080  # Control Tower
lsof -i :8081  # Vision Agent
lsof -i :8082  # Supplier Agent
- "Connection refused" to AlloyDB: Verify Public IP is enabled on your AlloyDB instance
9. 🎁 Bonus: Deploy to Cloud Run
Optional — Everything works locally! But if you'd like to share your creation with a public URL:
# From repo root
sh deploy/deploy.sh
What happens:
- Reads your .env configuration
- Asks for your name (shown in the deployed app)
- Deploys all 3 services as a single Cloud Run container
- Grants IAM roles for AlloyDB access
- Outputs a shareable URL
Visitors who open your URL will see a popup:
10. Cleanup
To avoid incurring charges, destroy all resources with the automated cleanup script:
# From repo root
sh deploy/cleanup.sh
This safely removes:
- AlloyDB cluster (the primary cost driver)
- Cloud Run services (if deployed)
- Associated service accounts
The script will prompt for confirmation before deleting anything.
11. References & Further Reading
All technical claims in this codelab are verified from official Google Cloud and Google AI documentation.
Official Documentation
Gemini 3 Flash:
- Code Execution API: https://cloud.google.com/vertex-ai/generative-ai/docs/model-reference/code-execution-api
- Developer Guide: https://ai.google.dev/gemini-api/docs/gemini-3
- Model Documentation: https://docs.cloud.google.com/vertex-ai/generative-ai/docs/models/gemini/3-flash
- Model Card: https://deepmind.google/models/gemini/flash/
AlloyDB AI & ScaNN:
- ScaNN Performance Benchmarks: https://cloud.google.com/blog/products/databases/how-scann-for-alloydb-vector-search-compares-to-pgvector-hnsw
- Understanding ScaNN Index: https://cloud.google.com/blog/products/databases/understanding-the-scann-index-in-alloydb
- AlloyDB AI Deep Dive: https://cloud.google.com/blog/products/databases/alloydb-ais-scann-index-improves-search-on-all-kinds-of-data
- Best Practices for Tuning: https://docs.cloud.google.com/alloydb/docs/ai/best-practices-tuning-scann
- AlloyDB Documentation: https://cloud.google.com/alloydb/docs
MCP Toolbox for Databases (alternative approach):
Pricing Information:
- Gemini API Pricing: https://ai.google.dev/gemini-api/docs/pricing
- AlloyDB Pricing: https://cloud.google.com/alloydb/pricing
- Vertex AI Pricing: https://cloud.google.com/vertex-ai/pricing
Verified Performance Claims
Feature | Claim | Source |
ScaNN vs HNSW (filtered) | 10x faster | Google Cloud Blog (verified) |
ScaNN vs HNSW (standard) | 4x faster | Google Cloud Blog (verified) |
ScaNN memory footprint | 3-4x smaller | Google Cloud Blog (verified) |
ScaNN index build time | 8x faster | Google Cloud Blog (verified) |
Code execution timeout | 30 seconds max | Google Cloud Docs (verified) |
Code execution file I/O | Not supported | Google Cloud Docs (verified) |
Temperature=0 behavior | Deterministic output | Community verified |
Additional Resources
Agent-to-Agent (A2A) Protocol:
- A2A standardizes agent discovery and communication
- Agent cards served at
/.well-known/agent-card.json - Emerging standard for autonomous agent collaboration
ScaNN Research:
- Based on 12 years of Google Research
- Powers Google Search, YouTube at billion-scale
- Released for general availability: October 2024
- First PostgreSQL vector index suitable for million-to-billion vectors
12. Challenge Mode: Level Up Your Agentic Skills
You've built a working autonomous supply chain. Ready to push further? These challenges apply the patterns you've learned to new problems.
Challenge 1: Image-Based Search (Multimodal Embeddings)
Current Flow: Vision Agent counts items → generates text query → Supplier Agent embeds text → searches AlloyDB
Challenge: Bypass text entirely—send the cropped image directly to the Supplier Agent.
Hints:
- The Vision Agent's code execution can crop individual items from the shelf image
- Vertex AI's multimodalembedding@001 model can embed images directly
- Modify inventory.py to accept image bytes instead of text
- Update the A2A skill description to indicate "Accepts: image/jpeg or text"
Why This Matters: Visual search is more accurate for parts with complex appearances (color variations, damage, packaging differences).
Challenge 2: Observability—Trust Through Transparency
Current State: The system works, but you can't see "under the hood"
Challenge: Inspect AlloyDB's query logs to prove the vector search is executing.
Steps:
- Query insights are enabled by default on AlloyDB. To verify, run:
gcloud alloydb instances describe INSTANCE_NAME \
  --cluster=CLUSTER_NAME \
  --region=us-central1 \
  --format="value(queryInsightsConfig.queryPlansPerMinute)"
- Run a supplier search through the UI
- View the actual SQL executed:
gcloud logging read \
  'resource.type="alloydb.googleapis.com/Instance" AND textPayload:"ORDER BY part_embedding"' \
  --limit 5 \
  --format=json
Expected Output: You'll see the exact ORDER BY part_embedding <=> $1::vector LIMIT 1 query with execution time.
Why This Matters: Observability builds trust. When stakeholders ask "How does this agent make decisions?", you can show them the query plan, not just the output.
Challenge 3: Multi-Agent Composition
Challenge: Add a third agent (Logistics Agent) that calculates shipping costs based on warehouse location and item weight.
Architecture:
- Vision Agent outputs: item count
- Supplier Agent outputs: supplier location
- Logistics Agent (NEW) inputs: destination, weight → outputs: shipping cost + ETA
Hint: The A2A protocol makes this trivial—create a new agent card with a calculate_shipping skill. The Control Tower will discover it automatically.
Pattern You're Learning: This is the core of Agent-Oriented Architecture—complex systems built from small, composable specialists.
13. Conclusion
You have successfully moved from Generative AI to Agentic AI.
What we built:
- Vision: We replaced "guessing" with Code Execution (Gemini 3 Flash via API key).
- Memory: We replaced "slow search" with AlloyDB ScaNN (via GCP).
- Action: We replaced "API integration" with the A2A Protocol.
Hybrid Architecture Benefits:
This codelab demonstrated a hybrid approach:
- Vision Agent: Uses Gemini API (API key) - simple, free tier available, no GCP billing required
- Supplier Agent: Uses GCP (Vertex AI + AlloyDB) - enterprise-grade, compliance-ready
This is the architecture of the autonomous economy. The code is yours to keep.
Next Steps