
1. The Distress Signal

Your escape pod tears through the atmosphere of an unknown world. Warning lights flash across every panel. The navigation system is fried. Communications are down. As the pod's emergency protocols engage, the AI assistant crackles to life:
"Survivor detected. Emergency landing successful. Initiating rescue beacon protocol..."
"WARNING: Identity verification required. The galactic rescue network cannot locate unregistered explorers. Please confirm your identity to activate your beacon."
You look out the viewport. An alien landscape stretches to the horizon—strange rock formations, unfamiliar vegetation, an oddly-colored sky. Somewhere out there, other survivors from your mission are scattered across this planet's surface.
But first things first: you need to exist in the system.
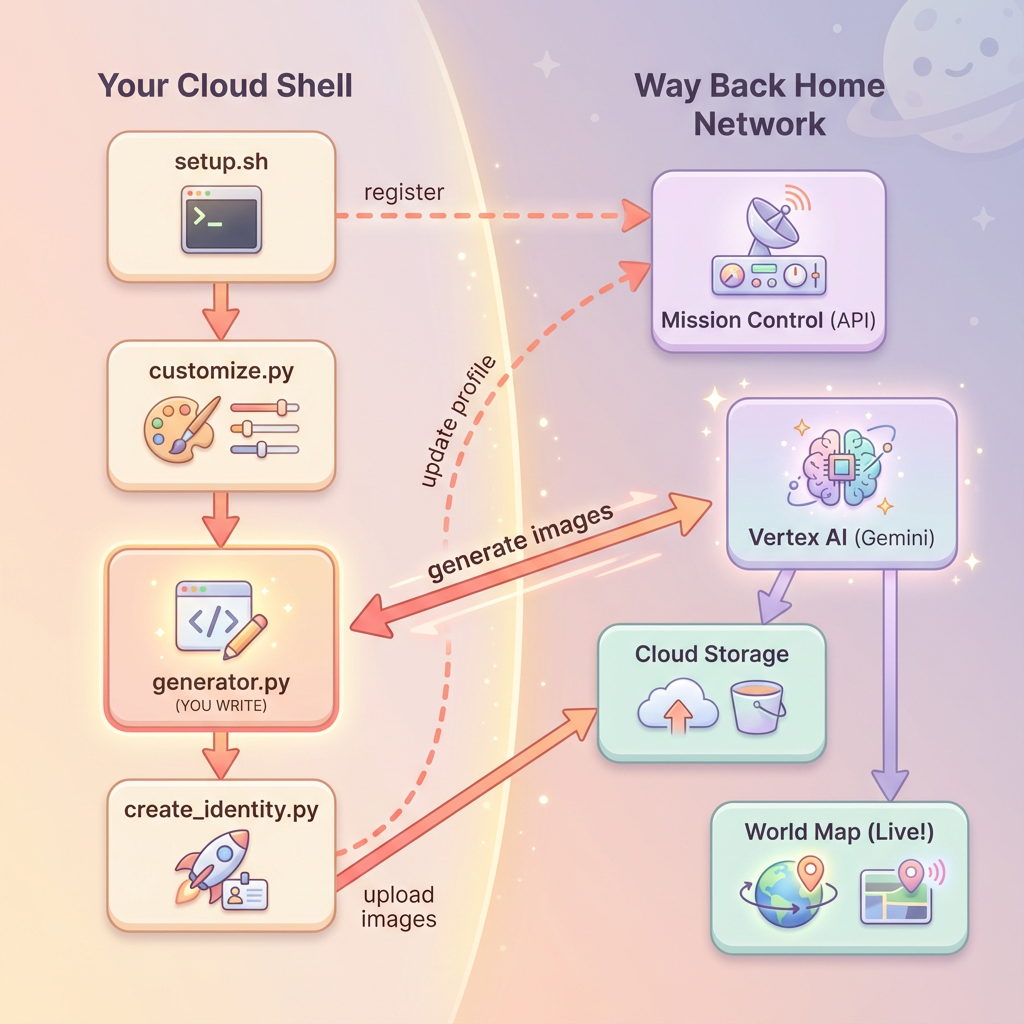
What You'll Build
In this level, you'll create your unique space explorer identity using multi-turn image generation with Google's Gemini image generation models (also known as Nano Banana 🍌). Your avatar will appear on the global rescue map, visible to all other survivors at your workshop event.
What You'll Learn
Concept | Description |
Multi-turn Image Generation | How to maintain character consistency across multiple image generations using chat sessions |
Prompt Engineering for Images | Crafting effective prompts for stylized, consistent outputs with specific constraints |
Gemini Image API (Nano Banana) | Using Gemini's native image generation capabilities via the Python SDK |
Chat Sessions | Leveraging conversation context for iterative refinement and character consistency |
By the end of this level, you will have:
✅ Generated a portrait of your explorer using text-to-image AI
✅ Created a consistent map icon using multi-turn conversation
✅ Registered your identity with the rescue network
✅ Appeared on the live world map alongside other explorers
Let's get you on the map! 📍
2. Prepare Your Environment
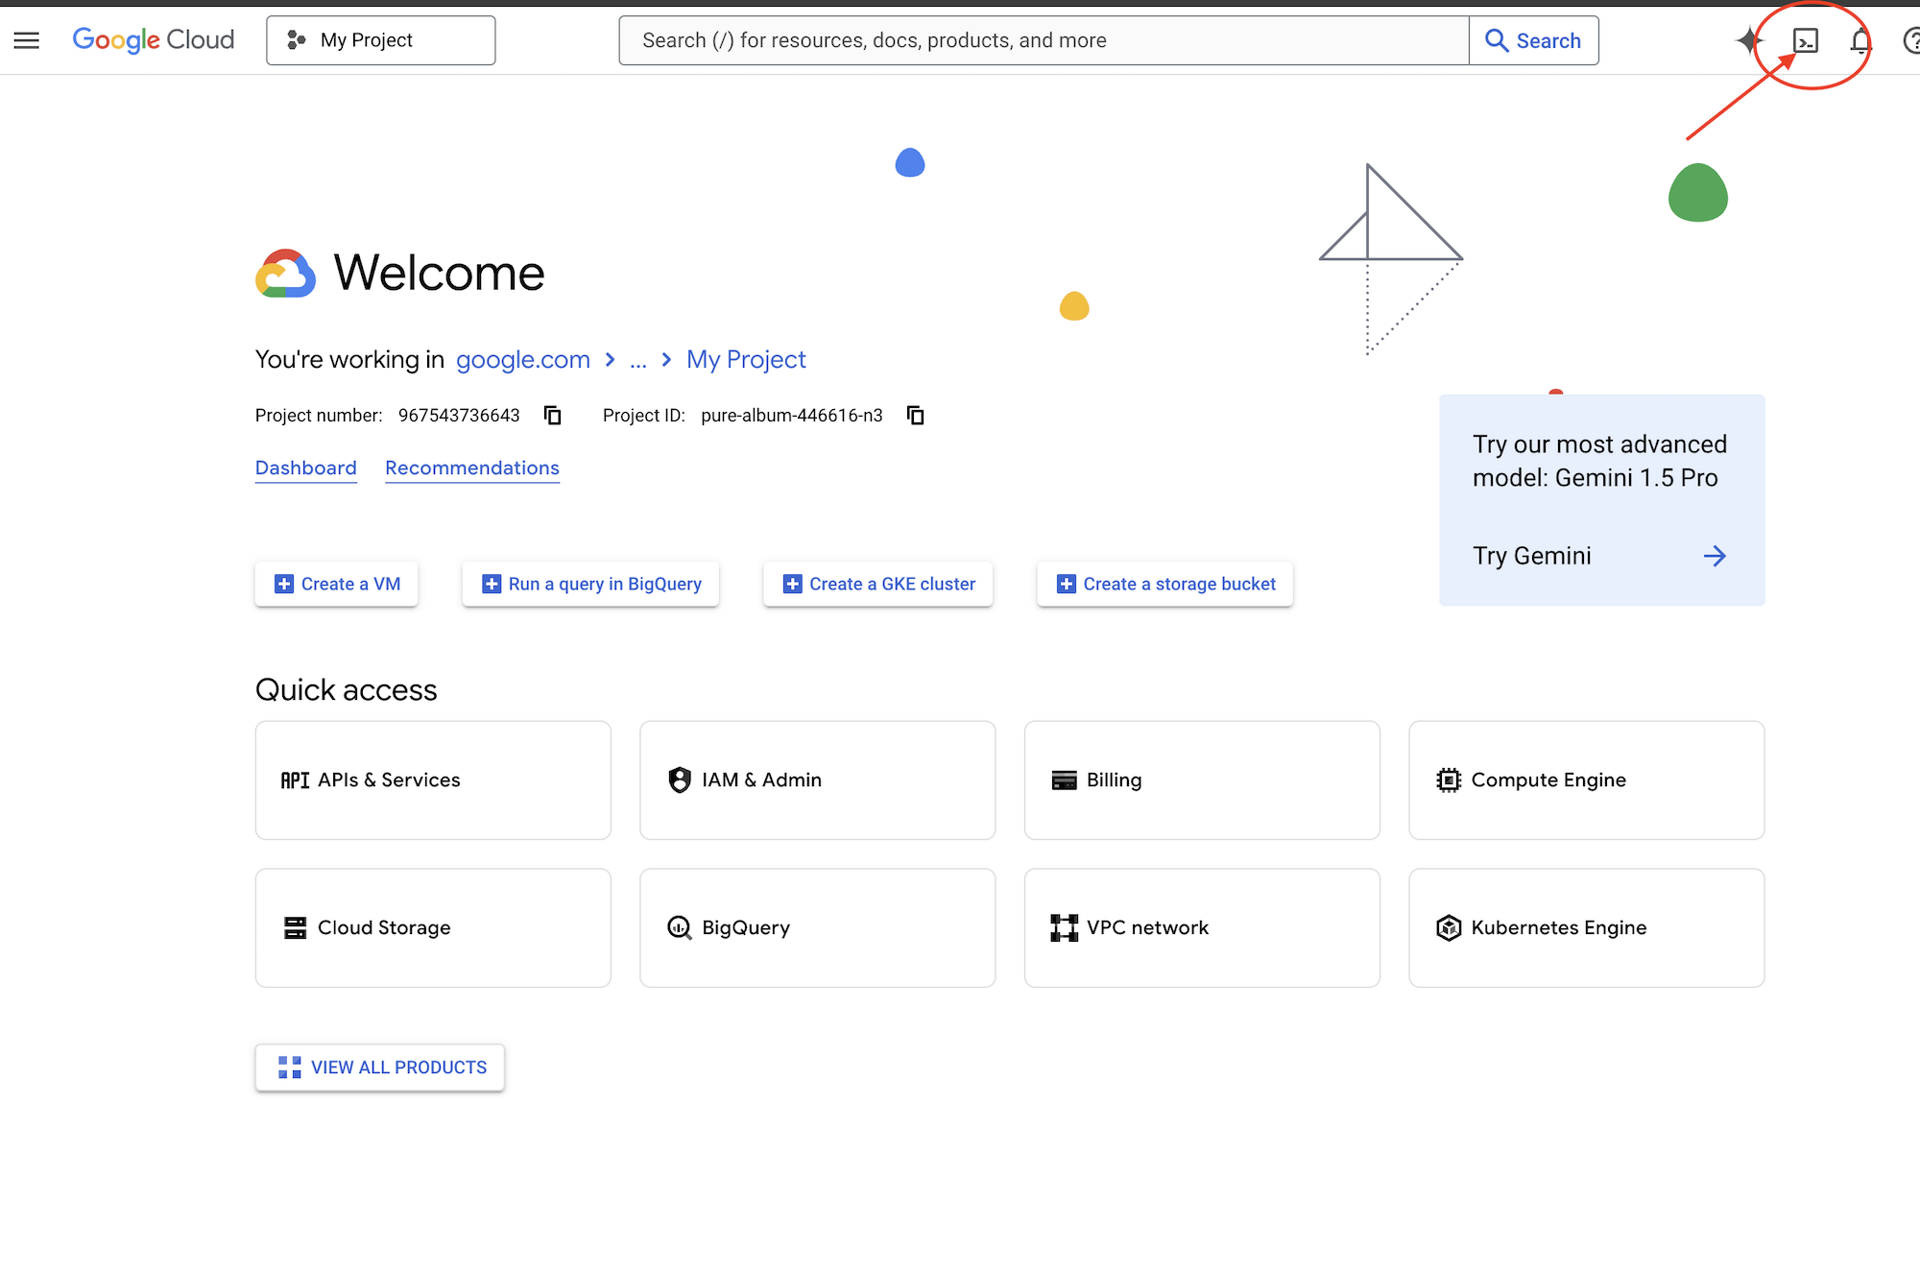
Access Cloud Shell
First, we'll open Cloud Shell, which is a browser-based terminal with the Google Cloud SDK and other essential tools pre-installed.
Click Activate Cloud Shell at the top of the Google Cloud Console (it's the terminal icon in the top-right navigation bar).
Once Cloud Shell opens, verify you're authenticated:
# Check that you are logged in
gcloud auth list
You should see your account listed as (ACTIVE).
Clone the Repository
Clone the Way Back Home repository and navigate to the project:
git clone https://github.com/gca-americas/way-back-home.git
cd way-back-home
Install Dependencies
Navigate to Level 0 and install the required Python packages:
cd level_0
uv sync
The key dependencies are:
Package | Purpose |
| Gemini API client for image generation |
| HTTP client for API calls to Mission Control |
| Image processing and file handling |
Verify Setup
Run a quick verification to ensure everything is configured correctly:
uv run python ../scripts/verify_setup.py
You should see:
✓ Authenticated as: your-email@google.com
✓ Python environment ready (uv)
✓ Ready to proceed!
What You Just Completed
✓ Opened Cloud Shell
✓ Authenticated with Google Cloud
✓ Cloned the codelab repository
✓ Installed Python dependencies with uv
✓ Verified your setup
Next: Connect to Mission Control — the setup script will configure your Google Cloud project and APIs automatically.
3. Connect to Mission Control
Run the Setup Script
The setup script connects you to the Way Back Home rescue network and reserves your explorer identity. Run it from the project root:
cd $HOME/way-back-home
chmod +x scripts/setup.sh
./scripts/setup.sh
You'll be prompted for two pieces of information.
Enter Your Event Code
The event code identifies which workshop event you're participating in.
If you're at a workshop: Enter the event code from the QR code, slide, or your workshop instructor.
🚀 Welcome to Way Back Home!

Enter event code (from QR/slide): devfest-nyc-26
Validating event...
✓ Connected to: DevFest NYC 2026
If you're learning on your own: Enter sandbox to join the public learning environment.
🚀 Welcome to Way Back Home!

Enter event code (from QR/slide): sandbox
Validating event...
✓ Connected to: Way Back Home Sandbox
Choose Your Explorer Name
Pick a unique name for your explorer. This is how you'll appear on the world map and leaderboard.
Choose your explorer name: AstroAyo
✓ Username available!
If your chosen name is already taken by another participant at the same event:
Choose your explorer name: SpaceExplorer
⚠️  That name is taken. Try another.
Choose your explorer name: SpaceExplorer42
✓ Username available!
Setup Complete
Once complete, you'll see confirmation:
Initializing your explorer profile...

✓ Environment configured!
  Explorer ID: a1b2c3d4
  Starting coordinates: (47, 23)

Next: cd level_0 && python customize.py
Navigate to Level 0
Now navigate to the Level 0 directory (your dependencies are already installed from Module 2):
cd level_0
Examine Your Configuration
Take a look at what was saved (config.json is in the project root):
cat ../config.json
{
    "event_code": "devfest-nyc-26",
    "event_name": "DevFest NYC 2026",
    "username": "AstroAyo",
    "participant_id": "a1b2c3d4",
    "starting_x": 47,
    "starting_y": 23,
    "api_base": "https://api.waybackhome.dev",
    "project_id": "your-project-id"
}
This configuration file will be used by subsequent scripts to identify you to the rescue network.
What You Just Completed
✓ Connected to Mission Control API
✓ Reserved your unique explorer name
✓ Received your participant ID and starting coordinates
✓ Configuration saved for subsequent steps
Next: Customize your explorer's appearance.
4. Customize Your Explorer
Run the Customization Script
Before generating your avatar, you'll make a few choices about your explorer's appearance:
uv run python customize.py
Select Your Suit Color
Choose a color for your explorer's space suit:
🎨 Let's create your explorer identity!

Select suit color:
  1. Deep Blue
  2. Crimson Red
  3. Forest Green
  4. Royal Purple
  5. Solar Gold
  6. Silver

Choice [1-6, default=6]: 1
✓ Deep Blue selected
Describe Your Explorer (Optional)
You can provide a brief description of your explorer's appearance, or press Enter for a random assignment:
Brief description of your explorer (or Enter for random):
Example: 'short dark hair, glasses, friendly smile'
> short dark hair, glasses, determined expression

✓ Preferences saved!
If you press Enter without typing anything, you'll get randomized traits:
>
✓ Random traits: confident expression, short styled hair
Configuration Updated
Your preferences are now saved:
✓ Preferences saved!
Next: Open generator.py and follow the codelab instructions
Verify the updated configuration:
cat ../config.json
You'll see your preferences added:
{
    "event_code": "devfest-nyc-26",
    "event_name": "DevFest NYC 2026",
    "username": "AstroAyo",
    "participant_id": "a1b2c3d4",
    "starting_x": 47,
    "starting_y": 23,
    "api_base": "https://api.waybackhome.dev",
    "project_id": "your-project-id",
    "suit_color": "deep blue with silver accents",
    "appearance": "short dark hair, glasses, determined expression"
}
What You Just Completed
✓ Selected your suit color
✓ Defined your explorer's appearance
✓ Configuration ready for image generation
Next: The main event—writing the image generation code!
5. Build the Avatar Generator
This is the core learning module. You'll write Python code that generates your unique explorer avatar using Gemini's multi-turn image generation capabilities (Nano Banana).
Open the Generator File
Open the avatar generator in the Cloud Shell Editor:
cloudshell edit generator.py
Or click Open Editor in Cloud Shell and navigate to generator.py in the level_0 folder.
Understanding the File Structure
The file has starter code and three placeholder sections where you'll add your implementation:
"""
Level 0: Avatar Generator

This module generates your unique space explorer avatar using
multi-turn image generation with Gemini (Nano Banana) for
character consistency across portrait and icon.
"""

from google import genai
from google.genai import types
from PIL import Image
import json
import os
import io

# Load configuration from setup (config.json is in project root)
CONFIG_PATH = "../config.json"

with open(CONFIG_PATH) as f:
    config = json.load(f)

USERNAME = config["username"]
SUIT_COLOR = config["suit_color"]
APPEARANCE = config["appearance"]

# Initialize the Gemini client for Vertex AI
client = genai.Client(
    vertexai=True,
    project=os.environ.get("GOOGLE_CLOUD_PROJECT", config.get("project_id")),
    location="us-central1"
)


def generate_explorer_avatar() -> dict:
    """
    Generate portrait and icon using multi-turn chat for consistency.

    The key technique here is using a CHAT SESSION rather than independent
    API calls. This allows Gemini to "remember" the character it created
    in the first turn, ensuring the icon matches the portrait.

    Returns:
        dict with portrait_path and icon_path
    """

    # MODULE_5_STEP_1_CREATE_CHAT_SESSION
    # TODO: Create a chat session for multi-turn generation
    chat = None  # Replace this line

    # MODULE_5_STEP_2_GENERATE_PORTRAIT
    # TODO: Generate the explorer portrait
    portrait_image = None  # Replace this section

    # MODULE_5_STEP_3_GENERATE_ICON
    # TODO: Generate a consistent map icon
    icon_image = None  # Replace this section

    return {
        "portrait_path": "outputs/portrait.png",
        "icon_path": "outputs/icon.png"
    }


if __name__ == "__main__":
    # Create outputs directory if it doesn't exist
    os.makedirs("outputs", exist_ok=True)

    print(f"Generating avatar for {USERNAME}...")
    result = generate_explorer_avatar()
    print(f"✅ Avatar created!")
    print(f"   Portrait: {result['portrait_path']}")
    print(f"   Icon: {result['icon_path']}")
You'll replace the three TODO sections with your implementation.
Step 1: Create the Chat Session
Find the placeholder MODULE_5_STEP_1_CREATE_CHAT_SESSION and replace the line chat = None # Replace this line with:
    # MODULE_5_STEP_1_CREATE_CHAT_SESSION
    # Create a chat session to maintain character consistency across generations.
    # The chat session preserves context between turns, so Gemini "remembers"
    # what it generated and can create consistent variations.
    chat = client.chats.create(
        model="gemini-2.5-flash-image",  # Nano Banana - Gemini with image generation
        config=types.GenerateContentConfig(
            response_modalities=["TEXT", "IMAGE"]
        )
    )
Step 2: Generate the Portrait
Find MODULE_5_STEP_2_GENERATE_PORTRAIT and replace portrait_image = None # Replace this section with the following code:
    # MODULE_5_STEP_2_GENERATE_PORTRAIT
    # First turn: Generate the explorer portrait.
    # This establishes the character that will be referenced in subsequent turns.
    portrait_prompt = f"""Create a stylized space explorer portrait.

Character appearance: {APPEARANCE}
Name on suit patch: "{USERNAME}"
Suit color: {SUIT_COLOR}

CRITICAL STYLE REQUIREMENTS:
- Digital illustration style, clean lines, vibrant saturated colors
- Futuristic but weathered space suit with visible mission patches
- Background: Pure solid white (#FFFFFF) - absolutely no gradients, patterns, or elements
- Frame: Head and shoulders only, 3/4 view facing slightly left
- Lighting: Soft diffused studio lighting, no harsh shadows
- Expression: Determined but approachable
- Art style: Modern animated movie character portrait (similar to Pixar or Dreamworks style)

The white background is essential - the avatar will be composited onto a map."""

    print("🎨 Generating your portrait...")
    portrait_response = chat.send_message(portrait_prompt)

    # Extract the image from the response.
    # Gemini returns a response with multiple "parts" - we need to find the image part.
    portrait_image = None
    for part in portrait_response.candidates[0].content.parts:
        if part.inline_data is not None:
            # Found the image! Convert from bytes to PIL Image and save.
            image_bytes = part.inline_data.data
            portrait_image = Image.open(io.BytesIO(image_bytes))
            portrait_image.save("outputs/portrait.png")
            break

    if portrait_image is None:
        raise Exception("Failed to generate portrait - no image in response")

    print("✓ Portrait generated!")
Step 3: Generate the Map Icon
Find MODULE_5_STEP_3_GENERATE_ICON and replace icon_image = None # Replace this section with:
    # MODULE_5_STEP_3_GENERATE_ICON
    # Second turn: Generate a consistent icon for the map.
    # Because we're in the same chat session, Gemini remembers the character
    # from the portrait and will maintain visual consistency.
    icon_prompt = """Now create a circular map icon of this SAME character.

CRITICAL REQUIREMENTS:
- SAME person, SAME face, SAME expression, SAME suit — maintain perfect consistency with the portrait
- Tighter crop: just the head and very top of shoulders
- Background: Pure solid white (#FFFFFF)
- Optimized for small display sizes (will be used as a 64px map marker)
- Keep the exact same art style, colors, and lighting as the portrait
- Square 1:1 aspect ratio

This icon must be immediately recognizable as the same character from the portrait."""

    print("🖼️  Creating map icon...")
    icon_response = chat.send_message(icon_prompt)

    # Extract the icon image from the response
    icon_image = None
    for part in icon_response.candidates[0].content.parts:
        if part.inline_data is not None:
            image_bytes = part.inline_data.data
            icon_image = Image.open(io.BytesIO(image_bytes))
            icon_image.save("outputs/icon.png")
            break

    if icon_image is None:
        raise Exception("Failed to generate icon - no image in response")

    print("✓ Icon generated!")
Your Completed Code
After adding all three sections, your generate_explorer_avatar() function should look like this:
def generate_explorer_avatar() -> dict:
    """
    Generate portrait and icon using multi-turn chat for consistency.

    The key technique here is using a CHAT SESSION rather than independent
    API calls. This allows Gemini to "remember" the character it created
    in the first turn, ensuring the icon matches the portrait.

    Returns:
        dict with portrait_path and icon_path
    """

    # MODULE_5_STEP_1_CREATE_CHAT_SESSION
    # Create a chat session to maintain character consistency across generations.
    # The chat session preserves context between turns, so Gemini "remembers"
    # what it generated and can create consistent variations.
    chat = client.chats.create(
        model="gemini-2.5-flash-image",  # Nano Banana - Gemini with image generation
        config=types.GenerateContentConfig(
            response_modalities=["TEXT", "IMAGE"]
        )
    )

    # MODULE_5_STEP_2_GENERATE_PORTRAIT
    # First turn: Generate the explorer portrait.
    # This establishes the character that will be referenced in subsequent turns.
    portrait_prompt = f"""Create a stylized space explorer portrait.

Character appearance: {APPEARANCE}
Name on suit patch: "{USERNAME}"
Suit color: {SUIT_COLOR}

CRITICAL STYLE REQUIREMENTS:
- Digital illustration style, clean lines, vibrant saturated colors
- Futuristic but weathered space suit with visible mission patches
- Background: Pure solid white (#FFFFFF) - absolutely no gradients, patterns, or elements
- Frame: Head and shoulders only, 3/4 view facing slightly left
- Lighting: Soft diffused studio lighting, no harsh shadows
- Expression: Determined but approachable
- Art style: Modern animated movie character portrait (similar to Pixar or Dreamworks style)

The white background is essential - the avatar will be composited onto a map."""

    print("🎨 Generating your portrait...")
    portrait_response = chat.send_message(portrait_prompt)

    # Extract the image from the response.
    # Gemini returns a response with multiple "parts" - we need to find the image part.
    portrait_image = None
    for part in portrait_response.candidates[0].content.parts:
        if part.inline_data is not None:
            # Found the image! Convert from bytes to PIL Image and save.
            image_bytes = part.inline_data.data
            portrait_image = Image.open(io.BytesIO(image_bytes))
            portrait_image.save("outputs/portrait.png")
            break

    if portrait_image is None:
        raise Exception("Failed to generate portrait - no image in response")

    print("✓ Portrait generated!")

    # MODULE_5_STEP_3_GENERATE_ICON
    # Second turn: Generate a consistent icon for the map.
    # Because we're in the same chat session, Gemini remembers the character
    # from the portrait and will maintain visual consistency.
    icon_prompt = """Now create a circular map icon of this SAME character.

CRITICAL REQUIREMENTS:
- SAME person, SAME face, SAME expression, SAME suit — maintain perfect consistency with the portrait
- Tighter crop: just the head and very top of shoulders
- Background: Pure solid white (#FFFFFF)
- Optimized for small display sizes (will be used as a 64px map marker)
- Keep the exact same art style, colors, and lighting as the portrait
- Square 1:1 aspect ratio

This icon must be immediately recognizable as the same character from the portrait."""

    print("🖼️  Creating map icon...")
    icon_response = chat.send_message(icon_prompt)

    # Extract the icon image from the response
    icon_image = None
    for part in icon_response.candidates[0].content.parts:
        if part.inline_data is not None:
            image_bytes = part.inline_data.data
            icon_image = Image.open(io.BytesIO(image_bytes))
            icon_image.save("outputs/icon.png")
            break

    if icon_image is None:
        raise Exception("Failed to generate icon - no image in response")

    print("✓ Icon generated!")

    return {
        "portrait_path": "outputs/portrait.png",
        "icon_path": "outputs/icon.png"
    }
Save Your File
Make sure to save generator.py:
- Cloud Shell Editor: Ctrl+S (Windows/Linux) or Cmd+S (Mac)
- vim: Press Escape, then type
:wqand Enter
What You Just Built
✓ Created a chat session for multi-turn image generation
✓ Crafted a detailed prompt for portrait generation with style constraints
✓ Generated a consistent map icon using conversation context
✓ Learned to parse image data from Gemini responses
Key Concepts Mastered:
Concept | What You Learned |
Chat Sessions |
|
Response Modalities |
|
Prompt Structure | Subject → Variables → Style → Technical Constraints |
Character Consistency | Same chat session = same character across images |
Response Parsing | Extracting images from |
Next: Run your code and see yourself on the map!
6. Generate and Register
Set Your Project ID
Make sure your project ID is available as an environment variable:
export GOOGLE_CLOUD_PROJECT=$(gcloud config get-value project)
Run the Identity Creator
Now run the main script that orchestrates generation, upload, and registration:
uv run python create_identity.py
You'll see the generation progress in real-time:
Note: it may take up to 5 seconds for your avatar to appear on the live map, so refresh if you don't see yourself immediately on the map.
🚀 Creating identity for AstroAyo...

🎨 Generating your portrait...
✓ Portrait generated!
🖼️  Creating map icon...
✓ Icon generated!

☁️  Uploading to mission database...
✓ Avatar uploaded!

📍 Registering with rescue network...
✓ Registration complete!

╔═══════════════════════════════════════════════════════════════╗
║                    ✅ IDENTITY CONFIRMED!                      ║
╠═══════════════════════════════════════════════════════════════╣
║                                                               ║
║  Explorer: AstroAyo                                           ║
║  Location: (47, 23) — unconfirmed                             ║
║                                                               ║
║  🗺️  You're now on the map!                                   ║
║  https://waybackhome.dev/e/devfest-nyc-26                     ║
║                                                               ║
║  NEXT: Proceed to Level 1 to pinpoint your exact location!   ║
║                                                               ║
╚═══════════════════════════════════════════════════════════════╝
View Your Generated Avatar
Check out your generated images locally:
# List the generated files
ls -la outputs/

# Download to view on your local machine
cloudshell download outputs/portrait.png
cloudshell download outputs/icon.png
Or view them directly in the Cloud Shell Editor by navigating to the outputs/ folder and clicking on the image files.
The generated portrait and icon will look something like these images:
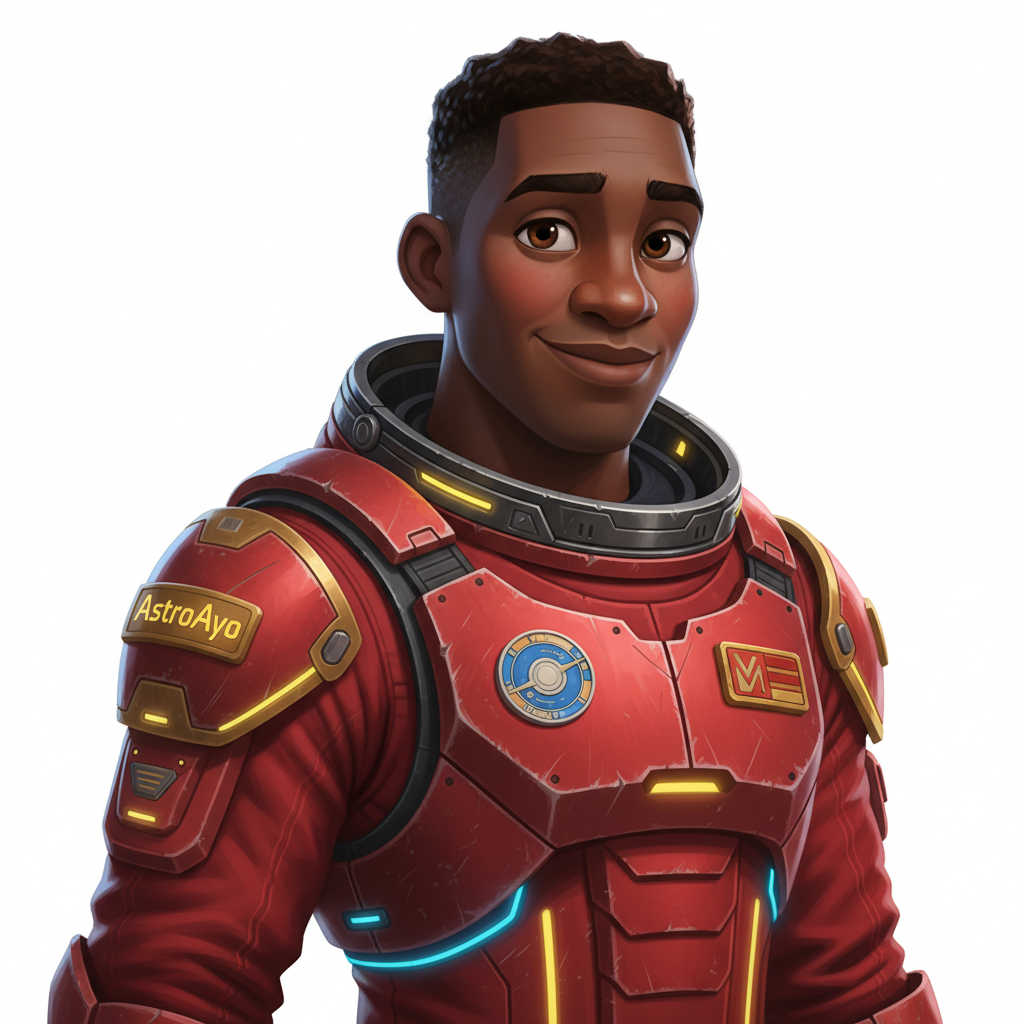
![]()
See Yourself on the Map!
Open the world map URL shown in your output:
https://waybackhome.dev/e/{your-event-code}
For example: https://waybackhome.dev/e/devfest-nyc-26
Find your avatar on the map! You'll see:
- Your icon marking your position on the planet surface
- Your explorer name as a label below your icon
- A dimmed beacon pulsing slowly around your marker
![]()
Click on your marker to see your full portrait in the detail card.
Not Happy with Your Avatar? Regenerate!
If you'd like a different avatar, you can regenerate it:
# Option 1: Change your appearance settings first
uv run python customize.py

# Option 2: Just regenerate with current settings
uv run python create_identity.py
Each time you run create_identity.py, it generates a completely new avatar (new chat session = new character) and updates your registration. Feel free to iterate until you're happy with the result!
Troubleshooting
What You Just Completed
✓ Generated your unique explorer portrait
✓ Created a consistent map icon
✓ Uploaded assets to Mission Control
✓ Registered your identity with the rescue network
✓ Appeared on the live world map!
Congratulations, explorer! You now exist in the rescue network. Your beacon is active (though dim), and other survivors can see you on the map.
7. Conclusion
What You Built
In just 10 minutes, you created a complete avatar generation system using multi-turn AI image generation:
┌─────────────────────────────────────────────────────────────┐
│                     Your Creation                           │
├─────────────────────────────────────────────────────────────┤
│                                                             │
│   📝 Input                       🖼️  Output                  │
│   ──────────                     ────────                    │
│   • Explorer name                • Stylized portrait         │
│   • Suit color                   • Consistent map icon       │
│   • Appearance description       • Live map presence         │
│                                                              │
├─────────────────────────────────────────────────────────────┤
│                                                             │
│   🧠 Techniques You Used                                     │
│   ──────────────────────                                    │
│   • Multi-turn chat sessions for character consistency      │
│   • Structured prompt engineering with style constraints    │
│   • Response parsing to extract generated images            │
│   • API integration for cloud registration                  │
│                                                             │
└─────────────────────────────────────────────────────────────┘
Key Takeaways
Lesson | Why It Matters |
Chat sessions maintain context | Essential for generating consistent characters across multiple images without variation drift |
Prompt structure matters | Clear constraints (white background, specific style, framing) produce predictable, production-ready results |
Multi-turn beats independent calls | Each message in a chat builds on previous context, enabling iterative refinement and consistency |
Response modalities control output | Setting |
Cost Summary
For this level, you generated 2 images using Gemini 2.5 Flash (Nano Banana):
Item | Tokens | Cost |
Portrait (1024×1024) | ~1,290 output tokens | ~$0.039 |
Icon (1024×1024) | ~1,290 output tokens | ~$0.039 |
Total | ~2,580 tokens | ~$0.08 |
The Journey Continues
Your explorer identity is confirmed, but there's a problem: your location is unconfirmed.
Look at the world map—your beacon is dim, pulsing slowly. The rescue network knows you exist, but they don't know exactly where you are. You could be anywhere within a vast region of the planet's surface.
In Level 1: Pinpoint Your Location, you'll:
- Build a multi-agent system using Google's Agent Development Kit (ADK)
- Create MCP servers for geological, botanical, and astronomical analysis
- Process multimodal input (images from your crash site)
- Generate a topographical map of your confirmed location using AI
- Light up your beacon for real — so rescue teams can find you!
Level 1 introduces significantly more advanced concepts: multi-agent orchestration, the Model Context Protocol (MCP), and production deployment patterns. You'll go from using a single model feature to building a complete agentic system.
Clean Up (Optional)
If you want to clean up local files (run from the level_0 directory):
rm -rf outputs/
deactivate  # Exit virtual environment
Your registration with the rescue network persists—you'll still appear on the map even after deleting local files. The images are stored in the cloud, not locally.
Resources
- Gemini Image Generation Documentation
- Prompt Engineering Guide for Images
- Nano Banana Announcement Blog
- Way Back Home Repository
- Level 1: Pinpoint Your Location
Your beacon awaits confirmation. See you in Level 1, explorer. 🚀
8. Bonus: Photo-Based Avatar (Optional)
When to Use Photo-to-Avatar
You might prefer this approach if:
- You want your avatar to actually resemble you
- You have a specific photo you'd like to stylize
- You want to explore Gemini's image-to-image transformation capabilities
How It Works
Instead of generating a character purely from text description, you provide a photo and ask Gemini to transform it while preserving the person's likeness:
![]()
Upload Your Photo
First, upload a photo to Cloud Shell:
- In Cloud Shell, click the three-dot menu (⋮) in the terminal toolbar
- Select Upload
- Choose a clear headshot photo (JPEG or PNG)
- Note the uploaded path (e.g.,
/home/your-username/my_photo.jpg)
Modify the Generator
To use a photo, you'll modify the portrait generation step in generator.py. Replace the text-only prompt with a multimodal prompt that includes your photo:
    # MODULE_5_STEP_2_GENERATE_PORTRAIT (Photo-based version)

    # Load your photo
    photo_path = "/home/your-username/my_photo.jpg"  # Update this path!
    user_photo = Image.open(photo_path)

    # Convert photo to bytes for the API
    photo_buffer = io.BytesIO()
    user_photo.save(photo_buffer, format="JPEG")
    photo_bytes = photo_buffer.getvalue()

    portrait_prompt = f"""Transform this person into a stylized space explorer portrait.

PRESERVE from the original photo:
- The person's facial features, face shape, and likeness
- Their general expression and personality
- Any distinctive features (glasses, facial hair, etc.)

TRANSFORM with this style:
- Digital illustration style, clean lines, vibrant saturated colors
- Add a futuristic space suit with the name "{USERNAME}" on a shoulder patch
- Suit color: {SUIT_COLOR}
- Background: Pure solid white (#FFFFFF) - no gradients or elements
- Frame: Head and shoulders, 3/4 view
- Lighting: Soft diffused studio lighting
- Art style: Modern animated movie character (Pixar/Dreamworks aesthetic)

The result should be clearly recognizable as THIS specific person, but illustrated as a heroic space explorer."""

    print("🎨 Transforming your photo into an explorer portrait...")

    # Send both the prompt AND the image
    portrait_response = chat.send_message([
        portrait_prompt,
        types.Part.from_bytes(data=photo_bytes, mime_type="image/jpeg")
    ])

    # Rest of the extraction code stays the same...
Multi-Turn Consistency Still Works
The multi-turn approach works the same way with photo-based generation:
- Turn 1: Photo + prompt → Stylized portrait (your likeness, illustrated)
- Turn 2: "Create icon of this SAME character" → Consistent icon
Because the chat session remembers the stylized version it created (not the original photo), the icon will match the transformed portrait perfectly.
Privacy Considerations
Try It in Vertex AI Studio
You can also experiment with photo transformation interactively in the Google Cloud Console before writing code:
- Navigate to Vertex AI Studio
- Select a Gemini model with image capabilities
- Upload your photo using the attachment button
- Enter the transformation prompt
- Iterate on the style until you're happy with the result
This interactive approach is great for experimenting with prompts and seeing results in real-time before committing to code!
What You Learned (Bonus)
✓ How to use image-to-image transformation with Gemini
✓ Sending multimodal content (text + image) in a single message
✓ Preserving likeness while applying artistic style transfer
✓ Privacy considerations for photo-based AI generation