
1. אות המצוקה
החללית שלכם חודרת את האטמוספירה של עולם לא מוכר. נוריות אזהרה מהבהבות בכל הפאנלים. מערכת הניווט נשרפה. התקשורת מושבתת. כשהפרוטוקולים למקרי חירום של התא מופעלים, עוזר ה-AI מתחיל לפעול:
"זוהה ניצול שואה. הנחיתה במקרה חירום בוצעה בהצלחה. מתחילים את פרוטוקול אותות החירום..."
"אזהרה: נדרש אימות זהות. רשת ההצלה הגלקטית לא יכולה לאתר חוקרים לא רשומים. עליך לאמת את הזהות שלך כדי להפעיל את ה-Beacon."
מסתכלים על אזור התצוגה. נוף חייזרי נמתח עד האופק – תצורות סלע מוזרות, צמחייה לא מוכרת ושמיים בצבע משונה. אי שם, ניצולים אחרים מהמשימה שלכם מפוזרים על פני כדור הארץ הזה.
אבל קודם כל: צריך להיות לכם חשבון במערכת.
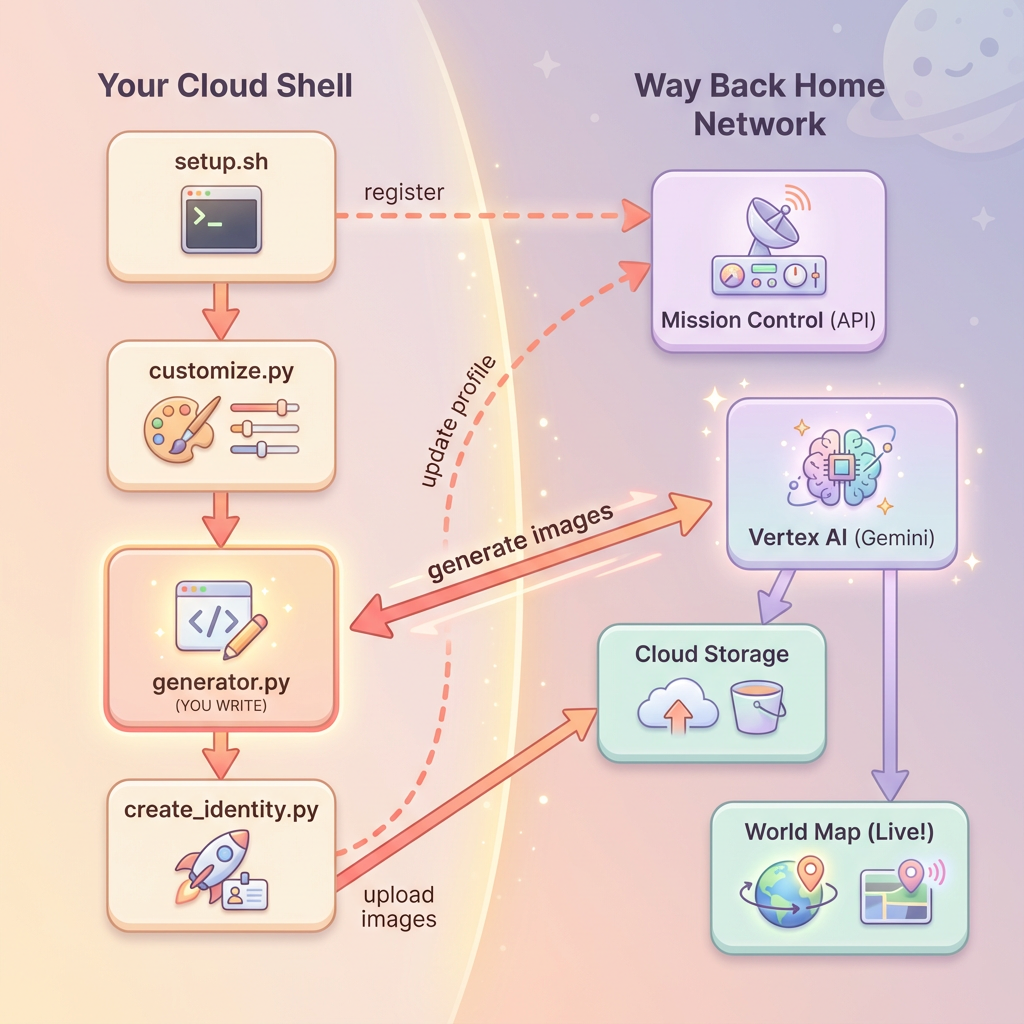
מה תפַתחו
בשלב הזה, תיצרו זהות ייחודית של חוקר/ת חלל באמצעות יצירת תמונות רב-שלבית עם מודלים של Gemini ליצירת תמונות (שנקראים גם Nano Banana 🍌). האווטאר שלכם יופיע במפת החילוץ הגלובלית, וכל הניצולים האחרים באירוע הסדנה יוכלו לראות אותו.
הנושאים שתלמד
קונספט | תיאור |
יצירת תמונות בשיחה | איך שומרים על עקביות הדמות בכמה תמונות שנוצרות באמצעות סשנים של צ'אט |
הנדסת הנחיות ליצירת תמונות | יצירת הנחיות יעילות לקבלת תוצאות מסוגננות ועקביות עם מגבלות ספציפיות |
Gemini Image API (Nano Banana) | שימוש ביכולות המובנות של Gemini ליצירת תמונות באמצעות Python SDK |
סשנים בצ'אט | שימוש בהקשר של השיחה כדי לשפר את התוצאה באופן איטרטיבי ולשמור על עקביות הדמות |
בסוף הרמה הזו, יהיו לכם:
✅ יצירת דיוקן של החוקר באמצעות AI ליצירת תמונות לפי טקסט
✅ יצירת סמל מפה עקבי באמצעות שיחה מרובת תפניות
✅ רישום הזהות ברשת החילוץ
✅ הופעה במפה העולמית בזמן אמת לצד חוקרים אחרים
שנתחיל בהגדרה? 📍
2. הכנת הסביבה
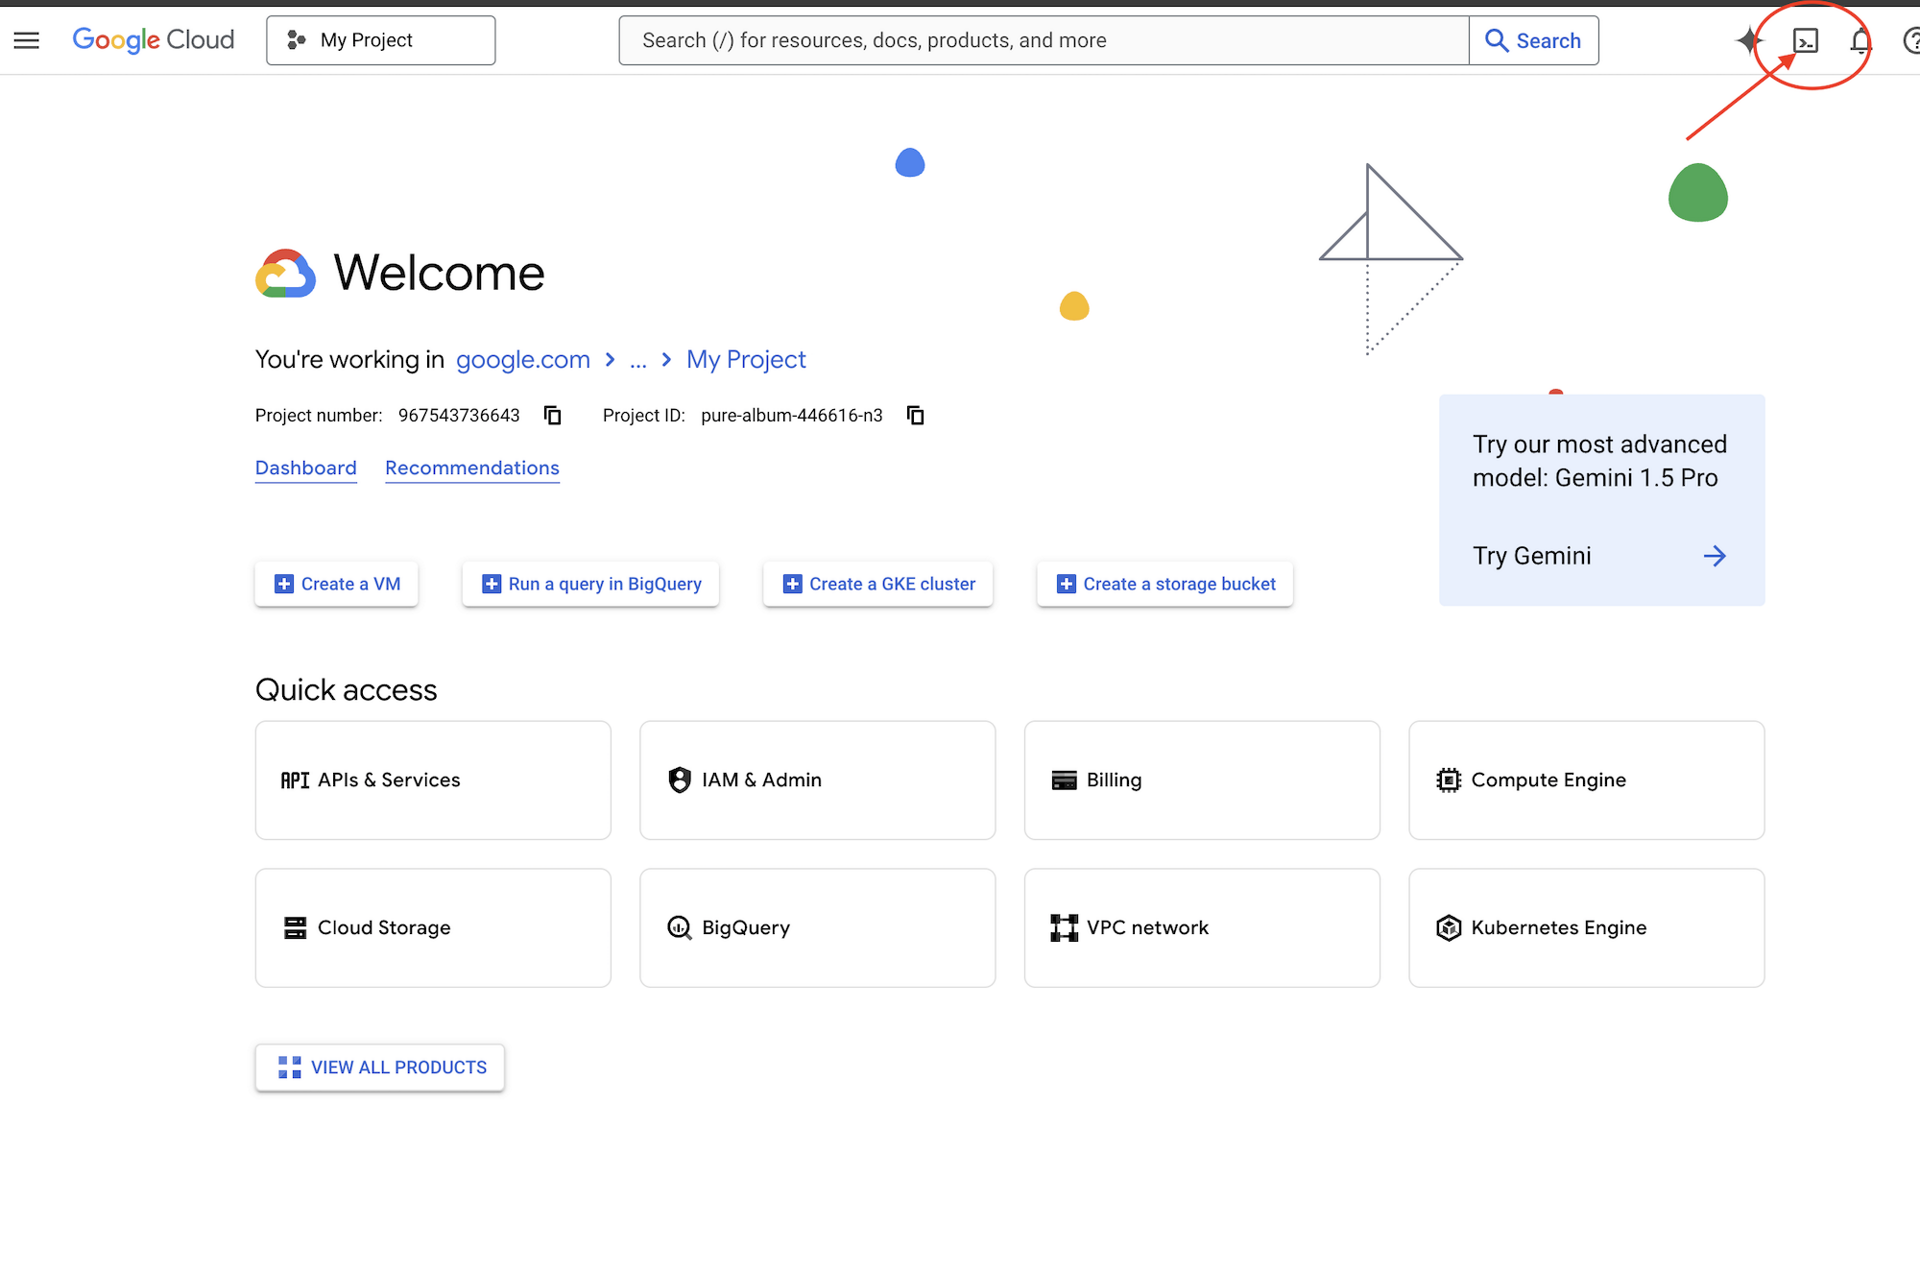
גישה ל-Cloud Shell
קודם נפתח את Cloud Shell, שהוא טרמינל מבוסס-דפדפן עם Google Cloud SDK וכלים חיוניים אחרים שמותקנים מראש.
לוחצים על Activate Cloud Shell (הפעלת Cloud Shell) בחלק העליון של מסוף Google Cloud (זהו סמל הטרמינל בסרגל הניווט בפינה השמאלית העליונה).
אחרי שפותחים את Cloud Shell, מוודאים שהאימות בוצע:
# Check that you are logged in
gcloud auth list
החשבון שלכם אמור להופיע ברשימה כ-(ACTIVE).
שכפול המאגר
משכפלים את מאגר Way Back Home ועוברים לפרויקט:
git clone https://github.com/gca-americas/way-back-home.git
cd way-back-home
התקנת יחסי תלות
עוברים לרמה 0 ומתקינים את חבילות Python הנדרשות:
cd level_0
uv sync
יחסי התלות העיקריים הם:
חבילה | מטרה |
| לקוח Gemini API ליצירת תמונות |
| לקוח HTTP לקריאות ל-API של Mission Control |
| עיבוד תמונה וטיפול בקבצים |
אימות ההגדרה
כדאי לבצע אימות מהיר כדי לוודא שהכול מוגדר בצורה נכונה:
uv run python ../scripts/verify_setup.py
הפרטים שמוצגים הם:
✓ Authenticated as: your-email@google.com
✓ Python environment ready (uv)
✓ Ready to proceed!
מה שסיימתם עכשיו
✓ פתיחה של Cloud Shell
✓ אימות ב-Google Cloud
✓ שיבוט של מאגר Codelab
✓ התקנה של יחסי תלות ב-Python באמצעות uv
✓ אימות ההגדרה
השלב הבא: מתחברים ל-Mission Control – סקריפט ההגדרה יגדיר את פרויקט Google Cloud ואת ממשקי ה-API באופן אוטומטי.
3. התחברות ל-Mission Control
הפעלת סקריפט ההגדרה
סקריפט ההגדרה מחבר אתכם לרשת החילוץ Way Back Home ושומר את הזהות שלכם ב-Explorer. מריצים אותו מהספרייה הראשית של הפרויקט:
cd $HOME/way-back-home
chmod +x scripts/setup.sh
./scripts/setup.sh
תתבקשו לספק שני פרטים.
הזנת קוד האירוע
קוד האירוע מזהה את אירוע הסדנה שבו אתם משתתפים.
אם אתם משתתפים בסדנה: מזינים את קוד האירוע מקוד ה-QR, משקף או מהמדריך של הסדנה.
🚀 Welcome to Way Back Home!

Enter event code (from QR/slide): devfest-nyc-26
Validating event...
✓ Connected to: DevFest NYC 2026
אם אתם לומדים באופן עצמאי: מזינים sandbox כדי להצטרף לסביבת הלמידה הציבורית.
🚀 Welcome to Way Back Home!

Enter event code (from QR/slide): sandbox
Validating event...
✓ Connected to: Way Back Home Sandbox
בחירת שם ל-Explorer
בוחרים שם ייחודי לכלי המחקר. כך הפרופיל שלכם ייראה במפה העולמית ובטבלת התורמים.
Choose your explorer name: AstroAyo
✓ Username available!
אם השם שבחרתם כבר נמצא בשימוש של משתתף אחר באותו אירוע:
Choose your explorer name: SpaceExplorer
⚠️  That name is taken. Try another.
Choose your explorer name: SpaceExplorer42
✓ Username available!
ההגדרה הושלמה
בסיום התהליך, תופיע הודעת אישור:
Initializing your explorer profile...

✓ Environment configured!
  Explorer ID: a1b2c3d4
  Starting coordinates: (47, 23)

Next: cd level_0 && python customize.py
ניווט לרמה 0
עכשיו עוברים לספרייה ברמה 0 (יחסי התלות כבר מותקנים מהמודול 2):
cd level_0
בדיקת ההגדרה
כדאי לבדוק מה נשמר (config.json נמצא בשורש הפרויקט):
cat ../config.json
{
    "event_code": "devfest-nyc-26",
    "event_name": "DevFest NYC 2026",
    "username": "AstroAyo",
    "participant_id": "a1b2c3d4",
    "starting_x": 47,
    "starting_y": 23,
    "api_base": "https://api.waybackhome.dev",
    "project_id": "your-project-id"
}
הסקריפטים הבאים ישתמשו בקובץ התצורה הזה כדי לזהות אתכם ברשת החילוץ.
מה שסיימתם עכשיו
✓ התחברתם ל-Mission Control API
✓ שמרתם את השם הייחודי שלכם ב-Explorer
✓ קיבלתם את מזהה המשתתף ואת קואורדינטות ההתחלה
✓ ההגדרה נשמרה לשלבים הבאים
המאמר הבא: התאמה אישית של המראה של הכלי לניתוח נתונים.
4. התאמה אישית של סייר המשתמשים
הרצת סקריפט ההתאמה האישית
לפני יצירת הדמות, תצטרכו לבחור כמה אפשרויות לגבי המראה שלה:
uv run python customize.py
בחירת צבע החליפה
בוחרים צבע לחליפת החלל של החוקר:
🎨 Let's create your explorer identity!

Select suit color:
  1. Deep Blue
  2. Crimson Red
  3. Forest Green
  4. Royal Purple
  5. Solar Gold
  6. Silver

Choice [1-6, default=6]: 1
✓ Deep Blue selected
תיאור ה-Explorer (אופציונלי)
אתם יכולים לספק תיאור קצר של המראה של החוקר או להקיש על Enter כדי להקצות מראה באופן אקראי:
Brief description of your explorer (or Enter for random):
Example: 'short dark hair, glasses, friendly smile'
> short dark hair, glasses, determined expression

✓ Preferences saved!
אם תלחצו על Enter בלי להקליד כלום, תקבלו תכונות אקראיות:
>
✓ Random traits: confident expression, short styled hair
ההגדרה עודכנה
ההעדפות שלכם נשמרו:
✓ Preferences saved!
Next: Open generator.py and follow the codelab instructions
בודקים את ההגדרה המעודכנת:
cat ../config.json
ההעדפות שקבעתם יופיעו:
{
    "event_code": "devfest-nyc-26",
    "event_name": "DevFest NYC 2026",
    "username": "AstroAyo",
    "participant_id": "a1b2c3d4",
    "starting_x": 47,
    "starting_y": 23,
    "api_base": "https://api.waybackhome.dev",
    "project_id": "your-project-id",
    "suit_color": "deep blue with silver accents",
    "appearance": "short dark hair, glasses, determined expression"
}
מה שסיימתם עכשיו
✓ בחרתם את צבע החליפה
✓ הגדרתם את המראה של החוקר
✓ ההגדרה מוכנה ליצירת תמונה
המשך: האירוע המרכזי – כתיבת הקוד ליצירת תמונות!
5. איך בונים כלי ליצירת דמויות
זהו מודול הליבה של הלמידה. תכתבו קוד Python שייצור את האווטאר הייחודי שלכם באמצעות יכולות יצירת התמונות של Gemini (Nano Banana).
פתיחת קובץ הגנרטור
פותחים את מחולל האווטרים ב-Cloud Shell Editor:
cloudshell edit generator.py
אפשר גם ללחוץ על Open Editor ב-Cloud Shell ולעבור אל generator.py בתיקייה level_0.
הסבר על מבנה הקובץ
בקובץ יש קוד לתחילת הדרך ושלושה מקטעים של placeholder שבהם צריך להוסיף את ההטמעה:
"""
Level 0: Avatar Generator

This module generates your unique space explorer avatar using
multi-turn image generation with Gemini (Nano Banana) for
character consistency across portrait and icon.
"""

from google import genai
from google.genai import types
from PIL import Image
import json
import os
import io

# Load configuration from setup (config.json is in project root)
CONFIG_PATH = "../config.json"

with open(CONFIG_PATH) as f:
    config = json.load(f)

USERNAME = config["username"]
SUIT_COLOR = config["suit_color"]
APPEARANCE = config["appearance"]

# Initialize the Gemini client for Vertex AI
client = genai.Client(
    vertexai=True,
    project=os.environ.get("GOOGLE_CLOUD_PROJECT", config.get("project_id")),
    location="us-central1"
)


def generate_explorer_avatar() -> dict:
    """
    Generate portrait and icon using multi-turn chat for consistency.

    The key technique here is using a CHAT SESSION rather than independent
    API calls. This allows Gemini to "remember" the character it created
    in the first turn, ensuring the icon matches the portrait.

    Returns:
        dict with portrait_path and icon_path
    """

    # MODULE_5_STEP_1_CREATE_CHAT_SESSION
    # TODO: Create a chat session for multi-turn generation
    chat = None  # Replace this line

    # MODULE_5_STEP_2_GENERATE_PORTRAIT
    # TODO: Generate the explorer portrait
    portrait_image = None  # Replace this section

    # MODULE_5_STEP_3_GENERATE_ICON
    # TODO: Generate a consistent map icon
    icon_image = None  # Replace this section

    return {
        "portrait_path": "outputs/portrait.png",
        "icon_path": "outputs/icon.png"
    }


if __name__ == "__main__":
    # Create outputs directory if it doesn't exist
    os.makedirs("outputs", exist_ok=True)

    print(f"Generating avatar for {USERNAME}...")
    result = generate_explorer_avatar()
    print(f"✅ Avatar created!")
    print(f"   Portrait: {result['portrait_path']}")
    print(f"   Icon: {result['icon_path']}")
תחליפו את שלושת הקטעים TODO בהטמעה שלכם.
שלב 1: יוצרים את סשן הצ'אט
מחפשים את ה-placeholder MODULE_5_STEP_1_CREATE_CHAT_SESSION ומחליפים את השורה chat = None # Replace this line בשורה הבאה:
    # MODULE_5_STEP_1_CREATE_CHAT_SESSION
    # Create a chat session to maintain character consistency across generations.
    # The chat session preserves context between turns, so Gemini "remembers"
    # what it generated and can create consistent variations.
    chat = client.chats.create(
        model="gemini-2.5-flash-image",  # Nano Banana - Gemini with image generation
        config=types.GenerateContentConfig(
            response_modalities=["TEXT", "IMAGE"]
        )
    )
שלב 2: יצירת הפורטרט
מחפשים את MODULE_5_STEP_2_GENERATE_PORTRAIT ומחליפים את portrait_image = None # Replace this section בקוד הבא:
    # MODULE_5_STEP_2_GENERATE_PORTRAIT
    # First turn: Generate the explorer portrait.
    # This establishes the character that will be referenced in subsequent turns.
    portrait_prompt = f"""Create a stylized space explorer portrait.

Character appearance: {APPEARANCE}
Name on suit patch: "{USERNAME}"
Suit color: {SUIT_COLOR}

CRITICAL STYLE REQUIREMENTS:
- Digital illustration style, clean lines, vibrant saturated colors
- Futuristic but weathered space suit with visible mission patches
- Background: Pure solid white (#FFFFFF) - absolutely no gradients, patterns, or elements
- Frame: Head and shoulders only, 3/4 view facing slightly left
- Lighting: Soft diffused studio lighting, no harsh shadows
- Expression: Determined but approachable
- Art style: Modern animated movie character portrait (similar to Pixar or Dreamworks style)

The white background is essential - the avatar will be composited onto a map."""

    print("🎨 Generating your portrait...")
    portrait_response = chat.send_message(portrait_prompt)

    # Extract the image from the response.
    # Gemini returns a response with multiple "parts" - we need to find the image part.
    portrait_image = None
    for part in portrait_response.candidates[0].content.parts:
        if part.inline_data is not None:
            # Found the image! Convert from bytes to PIL Image and save.
            image_bytes = part.inline_data.data
            portrait_image = Image.open(io.BytesIO(image_bytes))
            portrait_image.save("outputs/portrait.png")
            break

    if portrait_image is None:
        raise Exception("Failed to generate portrait - no image in response")

    print("✓ Portrait generated!")
שלב 3: יצירת סמל המפה
חיפוש הטקסט MODULE_5_STEP_3_GENERATE_ICON והחלפתו בטקסט icon_image = None # Replace this section:
    # MODULE_5_STEP_3_GENERATE_ICON
    # Second turn: Generate a consistent icon for the map.
    # Because we're in the same chat session, Gemini remembers the character
    # from the portrait and will maintain visual consistency.
    icon_prompt = """Now create a circular map icon of this SAME character.

CRITICAL REQUIREMENTS:
- SAME person, SAME face, SAME expression, SAME suit — maintain perfect consistency with the portrait
- Tighter crop: just the head and very top of shoulders
- Background: Pure solid white (#FFFFFF)
- Optimized for small display sizes (will be used as a 64px map marker)
- Keep the exact same art style, colors, and lighting as the portrait
- Square 1:1 aspect ratio

This icon must be immediately recognizable as the same character from the portrait."""

    print("🖼️  Creating map icon...")
    icon_response = chat.send_message(icon_prompt)

    # Extract the icon image from the response
    icon_image = None
    for part in icon_response.candidates[0].content.parts:
        if part.inline_data is not None:
            image_bytes = part.inline_data.data
            icon_image = Image.open(io.BytesIO(image_bytes))
            icon_image.save("outputs/icon.png")
            break

    if icon_image is None:
        raise Exception("Failed to generate icon - no image in response")

    print("✓ Icon generated!")
הקוד שהושלם
אחרי שמוסיפים את שלושת החלקים, הפונקציה generate_explorer_avatar() אמורה להיראות כך:
def generate_explorer_avatar() -> dict:
    """
    Generate portrait and icon using multi-turn chat for consistency.

    The key technique here is using a CHAT SESSION rather than independent
    API calls. This allows Gemini to "remember" the character it created
    in the first turn, ensuring the icon matches the portrait.

    Returns:
        dict with portrait_path and icon_path
    """

    # MODULE_5_STEP_1_CREATE_CHAT_SESSION
    # Create a chat session to maintain character consistency across generations.
    # The chat session preserves context between turns, so Gemini "remembers"
    # what it generated and can create consistent variations.
    chat = client.chats.create(
        model="gemini-2.5-flash-image",  # Nano Banana - Gemini with image generation
        config=types.GenerateContentConfig(
            response_modalities=["TEXT", "IMAGE"]
        )
    )

    # MODULE_5_STEP_2_GENERATE_PORTRAIT
    # First turn: Generate the explorer portrait.
    # This establishes the character that will be referenced in subsequent turns.
    portrait_prompt = f"""Create a stylized space explorer portrait.

Character appearance: {APPEARANCE}
Name on suit patch: "{USERNAME}"
Suit color: {SUIT_COLOR}

CRITICAL STYLE REQUIREMENTS:
- Digital illustration style, clean lines, vibrant saturated colors
- Futuristic but weathered space suit with visible mission patches
- Background: Pure solid white (#FFFFFF) - absolutely no gradients, patterns, or elements
- Frame: Head and shoulders only, 3/4 view facing slightly left
- Lighting: Soft diffused studio lighting, no harsh shadows
- Expression: Determined but approachable
- Art style: Modern animated movie character portrait (similar to Pixar or Dreamworks style)

The white background is essential - the avatar will be composited onto a map."""

    print("🎨 Generating your portrait...")
    portrait_response = chat.send_message(portrait_prompt)

    # Extract the image from the response.
    # Gemini returns a response with multiple "parts" - we need to find the image part.
    portrait_image = None
    for part in portrait_response.candidates[0].content.parts:
        if part.inline_data is not None:
            # Found the image! Convert from bytes to PIL Image and save.
            image_bytes = part.inline_data.data
            portrait_image = Image.open(io.BytesIO(image_bytes))
            portrait_image.save("outputs/portrait.png")
            break

    if portrait_image is None:
        raise Exception("Failed to generate portrait - no image in response")

    print("✓ Portrait generated!")

    # MODULE_5_STEP_3_GENERATE_ICON
    # Second turn: Generate a consistent icon for the map.
    # Because we're in the same chat session, Gemini remembers the character
    # from the portrait and will maintain visual consistency.
    icon_prompt = """Now create a circular map icon of this SAME character.

CRITICAL REQUIREMENTS:
- SAME person, SAME face, SAME expression, SAME suit — maintain perfect consistency with the portrait
- Tighter crop: just the head and very top of shoulders
- Background: Pure solid white (#FFFFFF)
- Optimized for small display sizes (will be used as a 64px map marker)
- Keep the exact same art style, colors, and lighting as the portrait
- Square 1:1 aspect ratio

This icon must be immediately recognizable as the same character from the portrait."""

    print("🖼️  Creating map icon...")
    icon_response = chat.send_message(icon_prompt)

    # Extract the icon image from the response
    icon_image = None
    for part in icon_response.candidates[0].content.parts:
        if part.inline_data is not None:
            image_bytes = part.inline_data.data
            icon_image = Image.open(io.BytesIO(image_bytes))
            icon_image.save("outputs/icon.png")
            break

    if icon_image is None:
        raise Exception("Failed to generate icon - no image in response")

    print("✓ Icon generated!")

    return {
        "portrait_path": "outputs/portrait.png",
        "icon_path": "outputs/icon.png"
    }
שמירת הקובץ
חשוב לשמור את generator.py:
- Cloud Shell Editor: Ctrl+S (Windows/Linux) או Cmd+S (Mac)
- vim: מקישים על Escape, מקלידים
:wqומקישים על Enter.
מה שבניתם עכשיו
✓ יצירת שיחת צ'אט ליצירת תמונות בכמה שלבים
✓ יצירת הנחיה מפורטת ליצירת פורטרט עם הגבלות סגנון
✓ יצירת סמל עקבי למפה באמצעות הקשר השיחה
✓ לימוד ניתוח נתוני תמונות מתשובות של Gemini
מושגים מרכזיים שנלמדו:
קונספט | מה למדתם |
סשנים בצ'אט | |
Response Modalities |
|
מבנה ההנחיה | נושא → משתנים → סגנון → מגבלות טכניות |
דמויות עקביות | אותה שיחת צ'אט = אותה דמות בכל התמונות |
ניתוח תגובות | חילוץ תמונות מ- |
השלב הבא: מריצים את הקוד ורואים את עצמכם במפה.
6. יצירה ורישום
הגדרת מזהה הפרויקט
מוודאים שמזהה הפרויקט זמין כמשתנה סביבה:
export GOOGLE_CLOUD_PROJECT=$(gcloud config get-value project)
הפעלת הכלי ליצירת זהויות
עכשיו מריצים את הסקריפט הראשי שמנהל את היצירה, ההעלאה והרישום:
uv run python create_identity.py
תוכלו לראות את התקדמות היצירה בזמן אמת:
הערה: יכול להיות שיעברו עד 5 שניות עד שהדמות שלכם תופיע במפה בזמן אמת, אז אם אתם לא רואים את עצמכם מיד במפה, רעננו את הדף.
🚀 Creating identity for AstroAyo...

🎨 Generating your portrait...
✓ Portrait generated!
🖼️  Creating map icon...
✓ Icon generated!

☁️  Uploading to mission database...
✓ Avatar uploaded!

📍 Registering with rescue network...
✓ Registration complete!

╔═══════════════════════════════════════════════════════════════╗
║                    ✅ IDENTITY CONFIRMED!                      ║
╠═══════════════════════════════════════════════════════════════╣
║                                                               ║
║  Explorer: AstroAyo                                           ║
║  Location: (47, 23) — unconfirmed                             ║
║                                                               ║
║  🗺️  You're now on the map!                                   ║
║  https://waybackhome.dev/e/devfest-nyc-26                     ║
║                                                               ║
║  NEXT: Proceed to Level 1 to pinpoint your exact location!   ║
║                                                               ║
╚═══════════════════════════════════════════════════════════════╝
איך רואים את הדמות שנוצרה
כדאי לבדוק את התמונות שנוצרו באופן מקומי:
# List the generated files
ls -la outputs/

# Download to view on your local machine
cloudshell download outputs/portrait.png
cloudshell download outputs/icon.png
אפשר גם להציג אותם ישירות ב-Cloud Shell Editor. לשם כך, עוברים לתיקייה outputs/ ולוחצים על קובצי התמונות.
הדיוקן והסמל שנוצרו ייראו בערך כמו התמונות האלה:
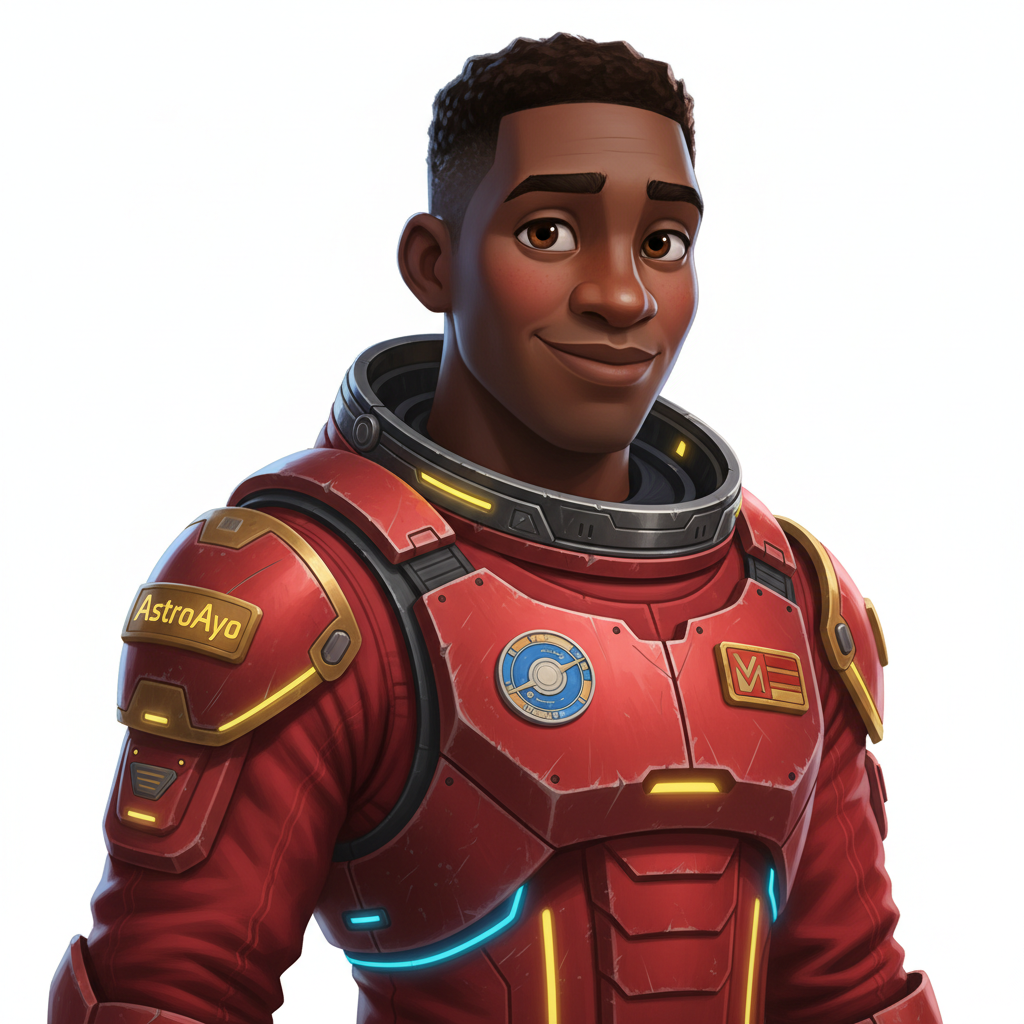
![]()
רוצים לראות את עצמכם במפה?
פותחים את כתובת ה-URL של מפת העולם שמוצגת בפלט:
https://waybackhome.dev/e/{your-event-code}
לדוגמה: https://waybackhome.dev/e/devfest-nyc-26
איך מוצאים את סמל הדמות במפה הפרטים שמוצגים הם:
- הסמל שמסמן את המיקום שלכם על פני כדור הארץ
- השם שלכם ב-Explorer כתווית מתחת לסמל
- משואה עמומה שמהבהבת לאט סביב הסמן
![]()
לוחצים על הסמן כדי לראות את הפרופיל המלא בכרטיס הפרטים.
לא מרוצים מהדמות? תנסו ליצור מחדש!
אם רוצים דמות אחרת, אפשר ליצור אותה מחדש:
# Option 1: Change your appearance settings first
uv run python customize.py

# Option 2: Just regenerate with current settings
uv run python create_identity.py
בכל פעם שמריצים את create_identity.py, נוצרת דמות חדשה לגמרי (שיחת צ'אט חדשה = דמות חדשה) וההרשמה מתעדכנת. אתם יכולים לחזור על התהליך עד שתהיו מרוצים מהתוצאה.
פתרון בעיות
מה שסיימתם עכשיו
✓ נוצר פורטרט ייחודי שלכם כחוקרים
✓ נוצר סמל מפה עקבי
✓ נכסים הועלו למרכז הבקרה של המשימה
✓ הזהות שלכם נרשמה ברשת החילוץ
✓ אתם מופיעים במפת העולם בזמן אמת!
מזל טוב, חוקרים! עכשיו אתם קיימים ברשת החילוץ. המשואה שלכם פעילה (אבל חלשה), וניצולים אחרים יכולים לראות אתכם במפה.
7. סיכום
מה יצרתם
תוך 10 דקות יצרתם מערכת שלמה ליצירת אווטארים באמצעות AI ליצירת תמונות עם כמה שלבים:
┌─────────────────────────────────────────────────────────────┐
│                     Your Creation                           │
├─────────────────────────────────────────────────────────────┤
│                                                             │
│   📝 Input                       🖼️  Output                  │
│   ──────────                     ────────                    │
│   • Explorer name                • Stylized portrait         │
│   • Suit color                   • Consistent map icon       │
│   • Appearance description       • Live map presence         │
│                                                              │
├─────────────────────────────────────────────────────────────┤
│                                                             │
│   🧠 Techniques You Used                                     │
│   ──────────────────────                                    │
│   • Multi-turn chat sessions for character consistency      │
│   • Structured prompt engineering with style constraints    │
│   • Response parsing to extract generated images            │
│   • API integration for cloud registration                  │
│                                                             │
└─────────────────────────────────────────────────────────────┘
נקודות עיקריות
שיעור | למה זה חשוב |
ההקשר נשמר בסשנים של צ'אט | חיוני ליצירת דמויות עקביות בכמה תמונות בלי שהדמות תשתנה |
למבנה ההנחיה יש חשיבות | הגבלות ברורות (רקע לבן, סגנון ספציפי, מסגור) מניבות תוצאות צפויות שמוכנות לשימוש בסביבת הייצור |
שיחות מורכבות עדיפות על שיחות פשוטות | כל הודעה בצ'אט מתבססת על ההקשר הקודם, וכך מאפשרת שיפור הדרגתי ועקבי |
הגדרת אופן התגובה כדי לשלוט בפלט | ההגדרה |
סיכום העלויות
ברמה הזו, יצרתם 2 תמונות באמצעות Gemini 2.5 Flash (Nano Banana):
פריט | טוקנים | עלות |
לאורך (1024x1024) | ~1,290 טוקנים של פלט | ~$0.039 |
סמל (1024x1024) | ~1,290 טוקנים של פלט | ~$0.039 |
סה"כ | 2,580 טוקנים | ~0.32 ש"ח |
המסע נמשך
הזהות שלכם כחוקרים אומתה, אבל יש בעיה: המיקום שלכם לא אומת.
מסתכלים על מפת העולם – המשואה שלכם עמומה, והיא מהבהבת לאט. רשת החילוץ יודעת שאתם קיימים, אבל לא יודעת בדיוק איפה אתם נמצאים. אתם יכולים להיות בכל מקום באזור נרחב של פני כדור הארץ.
ברמה 1: מיקום מדויק, תצטרכו:
- יצירת מערכת מרובת סוכנים באמצעות הערכה לפיתוח סוכנים (ADK) של Google
- יצירת שרתי MCP לניתוח גיאולוגי, בוטני ואסטרונומי
- עיבוד קלט רב-אופני (תמונות מאתר ההתרסקות)
- יצירת מפה טופוגרפית של המיקום שאושר באמצעות AI
- הדליקו את משואת המיקום באמת – כדי שצוותי החילוץ יוכלו למצוא אתכם!
רמה 1 מציגה מושגים מתקדמים הרבה יותר: תזמור של כמה סוכנים, Model Context Protocol (MCP) ודפוסי פריסה בייצור. תעברו משימוש בתכונה של מודל יחיד לבנייה של מערכת מלאה עם סוכן.
ניקוי (אופציונלי)
כדי לנקות קבצים מקומיים (מריצים מהספרייה level_0):
rm -rf outputs/
deactivate  # Exit virtual environment
ההרשמה שלכם לרשת החילוץ נשארת בתוקף – אתם עדיין תופיעו במפה גם אחרי מחיקת הקבצים המקומיים. התמונות מאוחסנות בענן ולא באופן מקומי.
משאבים
- מאמרי עזרה בנושא יצירת תמונות באמצעות Gemini
- מדריך להנדסת הנחיות ליצירת תמונות
- הודעה בבלוג של Nano Banana
- Way Back Home Repository
- רמה 1: איתור המיקום
האות שלך ממתין לאישור. נתראה ברמה 1, חוקר. 🚀
8. בונוס: אווטאר מבוסס-תמונה (אופציונלי)
מתי כדאי להשתמש בתכונה 'תמונה לאווטאר'
הגישה הזו מתאימה לכם אם:
- אתם רוצים שהדמות תיראה כמוכם
- יש לכם תמונה ספציפית שאתם רוצים להוסיף לה סגנון
- רוצים לנסות את היכולות של Gemini להפוך תמונה אחת לתמונה אחרת
איך זה עובד
במקום ליצור דמות רק מתיאור טקסטואלי, אתם יכולים לספק תמונה ולבקש מ-Gemini לשנות אותה תוך שמירה על הדמיון לאדם:
![]()
העלאת התמונה
קודם מעלים תמונה ל-Cloud Shell:
- ב-Cloud Shell, לוחצים על סמל האפשרויות הנוספות (3 נקודות) בסרגל הכלים של הטרמינל.
- בוחרים באפשרות העלאה.
- בוחרים תמונה ברורה של פנים (בפורמט JPEG או PNG)
- שימו לב לנתיב שהועלה (לדוגמה,
/home/your-username/my_photo.jpg)
שינוי הגנרטור
כדי להשתמש בתמונה, צריך לשנות את שלב יצירת הפורטרט ב-generator.py. מחליפים את ההנחיה שמכילה טקסט בלבד בהנחיה מולטי-מודאלית שכוללת את התמונה:
    # MODULE_5_STEP_2_GENERATE_PORTRAIT (Photo-based version)

    # Load your photo
    photo_path = "/home/your-username/my_photo.jpg"  # Update this path!
    user_photo = Image.open(photo_path)

    # Convert photo to bytes for the API
    photo_buffer = io.BytesIO()
    user_photo.save(photo_buffer, format="JPEG")
    photo_bytes = photo_buffer.getvalue()

    portrait_prompt = f"""Transform this person into a stylized space explorer portrait.

PRESERVE from the original photo:
- The person's facial features, face shape, and likeness
- Their general expression and personality
- Any distinctive features (glasses, facial hair, etc.)

TRANSFORM with this style:
- Digital illustration style, clean lines, vibrant saturated colors
- Add a futuristic space suit with the name "{USERNAME}" on a shoulder patch
- Suit color: {SUIT_COLOR}
- Background: Pure solid white (#FFFFFF) - no gradients or elements
- Frame: Head and shoulders, 3/4 view
- Lighting: Soft diffused studio lighting
- Art style: Modern animated movie character (Pixar/Dreamworks aesthetic)

The result should be clearly recognizable as THIS specific person, but illustrated as a heroic space explorer."""

    print("🎨 Transforming your photo into an explorer portrait...")

    # Send both the prompt AND the image
    portrait_response = chat.send_message([
        portrait_prompt,
        types.Part.from_bytes(data=photo_bytes, mime_type="image/jpeg")
    ])

    # Rest of the extraction code stays the same...
העקביות בשיחה עם כמה תפניות עדיין פועלת
הגישה של שיחה מרובת תפניות פועלת באותו אופן גם ביצירה מבוססת-תמונות:
- תור 1: תמונה + הנחיה ← דיוקן מעוצב (הדמות שלכם, מאוירת)
- תור 2: "Create icon of this SAME character" (יצירת סמל של אותה דמות) → סמל עקבי
מכיוון ששיחת הצ'אט זוכרת את הגרסה המעוצבת שיצרה (ולא את התמונה המקורית), הסמל יתאים בדיוק לדיוקן שעבר שינוי.
שיקולי פרטיות
רוצה לנסות את זה ב-Vertex AI Studio?
אפשר גם להתנסות בשינוי תמונות באופן אינטראקטיבי במסוף Google Cloud לפני שכותבים קוד:
- עוברים אל Vertex AI Studio.
- בחירת מודל Gemini עם יכולות תמונה
- העלאת תמונה באמצעות לחצן הצירוף
- מזינים את ההנחיה לשינוי התמונה
- חוזרים על הפעולה עד שמגיעים לתוצאה הרצויה.
הגישה האינטראקטיבית הזו מצוינת להתנסות בהנחיות ולראות את התוצאות בזמן אמת לפני שמתחייבים לקוד!
מה למדתם (בונוס)
✓ איך משתמשים ב-Gemini כדי לבצע טרנספורמציה של תמונה על סמך תמונה אחרת
✓ שליחת תוכן מולטימודאלי (טקסט + תמונה) בהודעה אחת
✓ שמירה על הדמיון תוך החלת העברה של סגנון אומנותי
✓ שיקולי פרטיות לגבי יצירת תמונות באמצעות AI