
1. A missão

Você se identificou para a IA de emergência, e seu sinalizador agora está pulsando no mapa planetário, mas é quase imperceptível, perdido entre a estática. As equipes de resgate que fazem varreduras da órbita conseguem ver algo nas suas coordenadas, mas não conseguem um bloqueio. O sinal está muito fraco.
Para aumentar a potência do beacon, confirme sua localização exata. O sistema de navegação da cápsula está danificado, mas a queda espalhou evidências recuperáveis pelo local do pouso. Amostras de solo. Flora estranha. Uma visão clara do céu noturno alienígena.
Se você puder analisar essas evidências e determinar em qual região do planeta está, a IA poderá triangular sua posição e ampliar o sinal do beacon. Talvez alguém encontre você.
É hora de juntar as peças.
Pré-requisitos
⚠️ Este nível exige a conclusão do nível 0.
Antes de começar, verifique se você tem:
- [ ]
config.jsonna raiz do projeto com seu ID de participante e coordenadas - [ ] Seu avatar visível no mapa-múndi
- [ ] Seu beacon aparecendo (fraco) nas suas coordenadas
Se você não tiver concluído o nível 0, comece por ele.
O que você criará
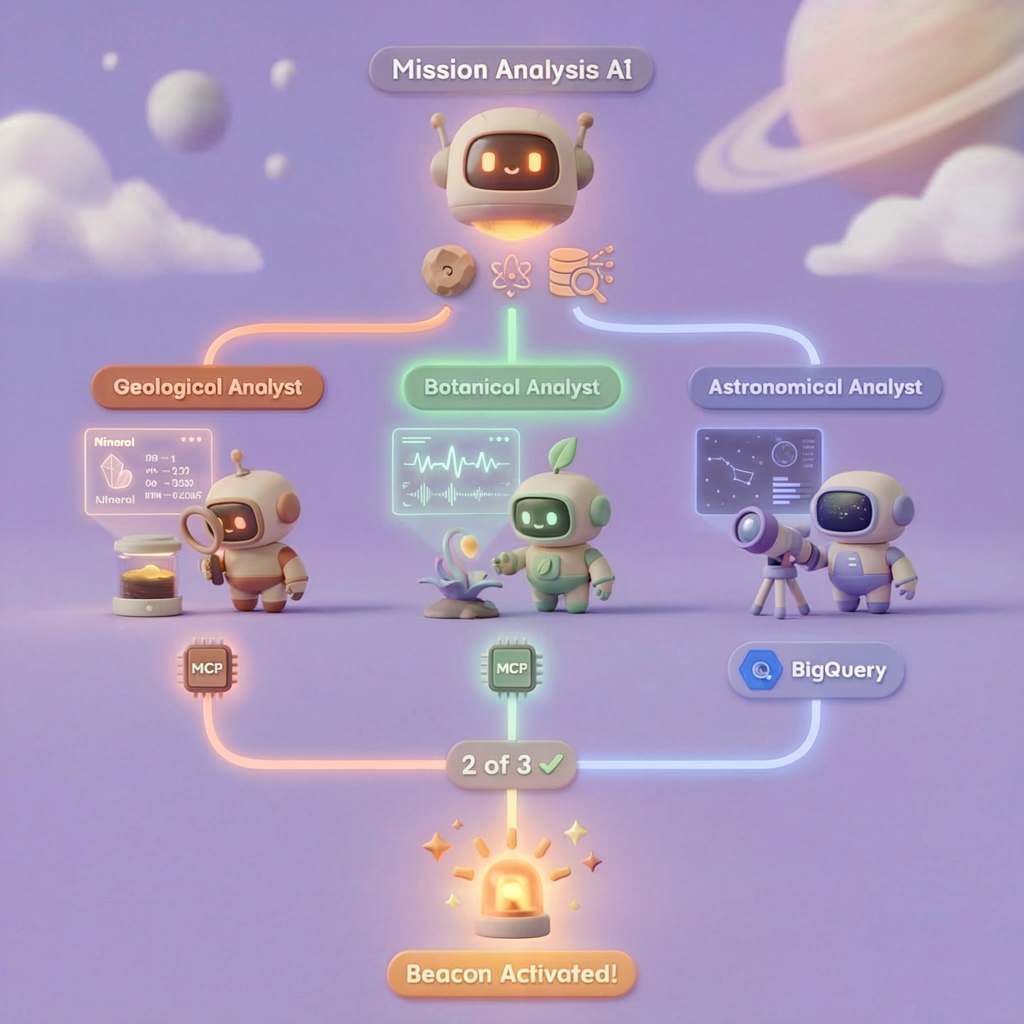
Neste nível, você vai criar um sistema de IA multiagente que analisa evidências do local do acidente usando o processamento paralelo:

Objetivos de aprendizagem
Conceito | O que você vai aprender |
Sistemas multiagente | Criar agentes especializados com responsabilidades únicas |
ParallelAgent | Compor agentes independentes para execução simultânea |
before_agent_callback | Buscar configuração e definir estado antes da execução do agente |
ToolContext | Acessar valores de estado em funções de ferramentas |
Servidores MCP personalizados | Criar ferramentas com o padrão imperativo (código Python no Cloud Run) |
BigQuery do OneMCP | Conectar-se ao MCP gerenciado do Google para acesso ao BigQuery |
IA multimodal | Analisar imagens e vídeo+áudio com o Gemini |
Orquestração de agentes | Coordenar vários agentes com um orquestrador raiz |
Implantação na nuvem | Implantar o servidor e o agente MCP no Cloud Run |
Preparação para A2A | Estruturar agentes para comunicação futura entre agentes |
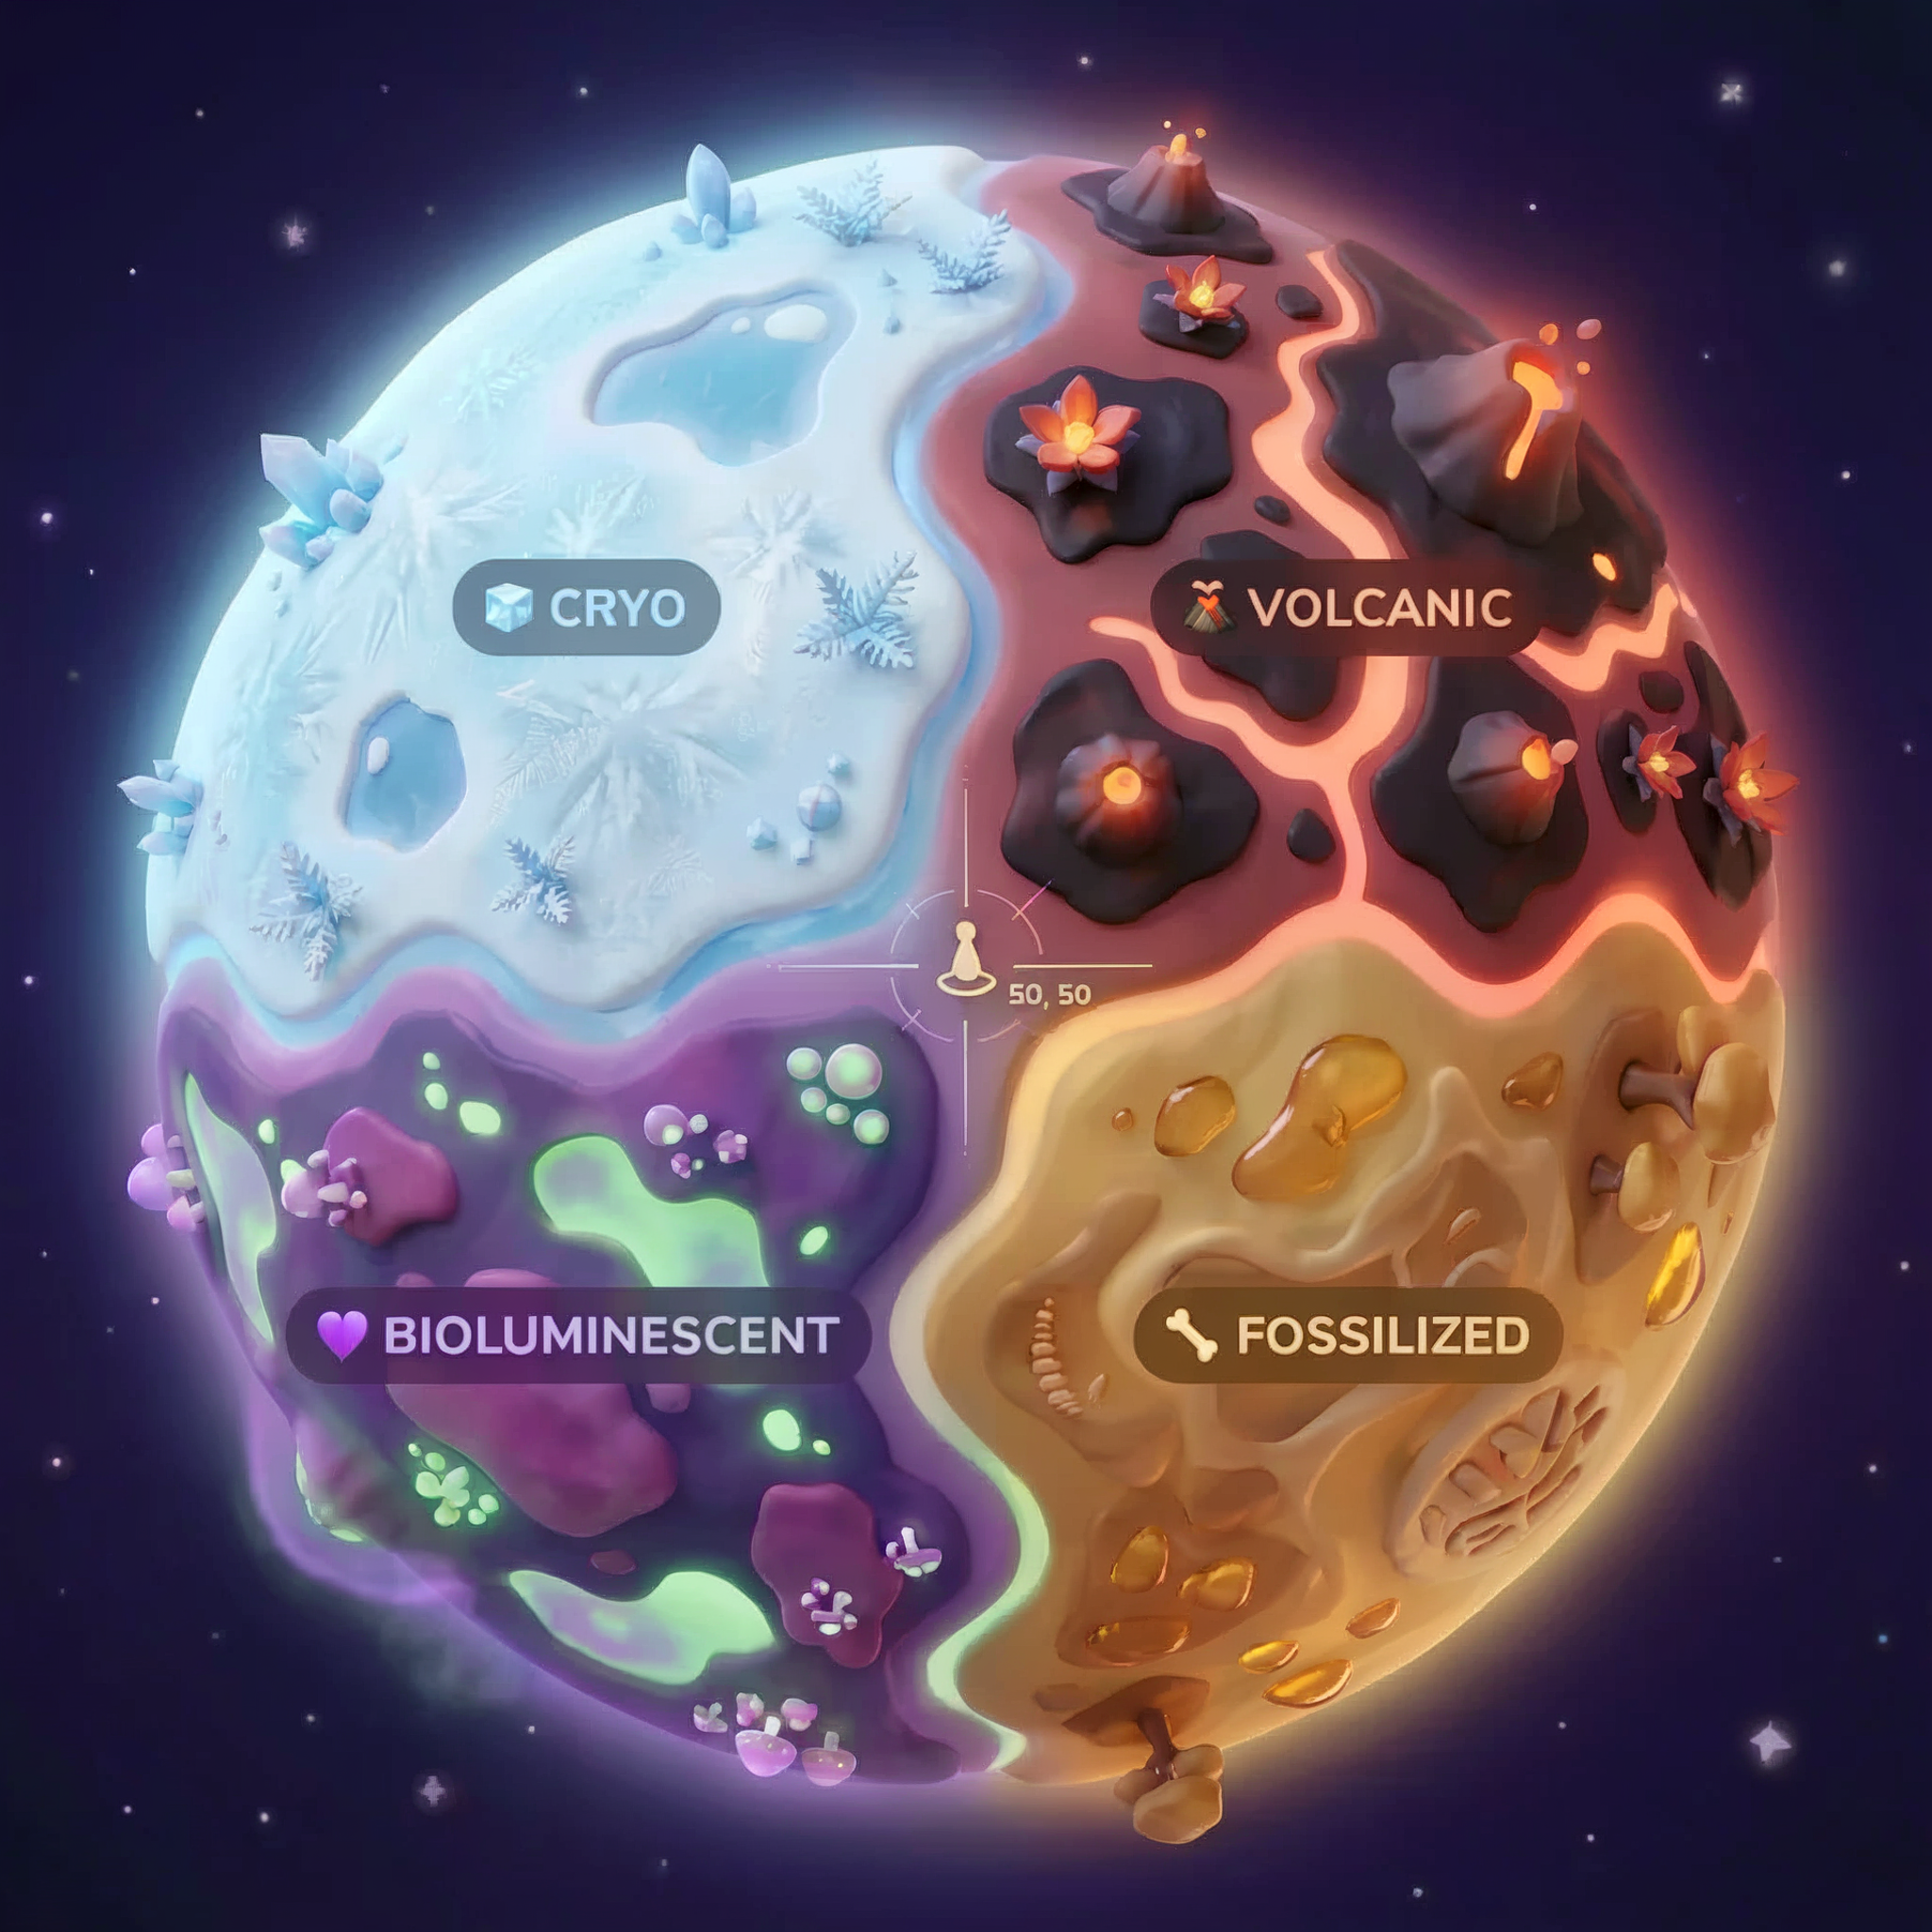
Os biomas do planeta
A superfície do planeta é dividida em quatro biomas distintos, cada um com características únicas:
Suas coordenadas determinam em qual bioma você caiu. As evidências no local do acidente refletem as características desse bioma:
Bioma | Quadrante | Evidências geológicas | Evidências botânicas | Evidências astronômicas |
🧊 CRYO (link em inglês) | NW (x<50, y≥50) | Metano congelado, cristais de gelo | Samambaias de gelo, crio-flora | Estrela gigante azul |
🌋 VOLCANIC | NE (x≥50, y≥50) | Depósitos de obsidiana e ite | Flores de fogo, flora resistente ao calor | Anã vermelha binária |
💜 BIOLUMINESCENT | SW (x<50, y<50) | Solo fosforescente | Fungos brilhantes, plantas luminescentes | Pulsar verde |
🦴 FOSSILIZED | SE (x≥50, y<50) | Depósitos de âmbar, minerais de ite | Árvores petrificadas, flora antiga | Sol amarelo |
Sua tarefa é criar agentes de IA que analisem as evidências e deduzam em qual bioma você está.
2. Configuração de seu ambiente
Executar o script de configuração do ambiente
Antes de gerar evidências, ative as APIs do Cloud necessárias, incluindo a OneMCP para o BigQuery, que oferece acesso gerenciado à MCP.
👉💻 Execute o script de configuração do ambiente:
cd $HOME/way-back-home/level_1
chmod +x setup/setup_env.sh
./setup/setup_env.sh
A resposta será semelhante a esta:
================================================================
Level 1: Environment Setup
================================================================
Project: your-project-id

[1/6] Enabling core Google Cloud APIs...
      ✓ Vertex AI API enabled
      ✓ Cloud Run API enabled
      ✓ Cloud Build API enabled
      ✓ BigQuery API enabled
      ✓ Artifact Registry API enabled
      ✓ IAM API enabled

[2/6] Enabling OneMCP BigQuery (Managed MCP)...
      ✓ OneMCP BigQuery enabled

[3/6] Setting up service account and IAM permissions...
      ✓ Service account 'way-back-home-sa' created
      ✓ Vertex AI User role granted
      ✓ Cloud Run Invoker role granted
      ✓ BigQuery User role granted
      ✓ BigQuery Data Viewer role granted
      ✓ Storage Object Viewer role granted

[4/6] Configuring Cloud Build IAM for deployments...
      ✓ Cloud Build can now deploy services as way-back-home-sa
      ✓ Cloud Run Admin role granted to Compute SA

[5/6] Creating Artifact Registry repository...
      ✓ Repository 'way-back-home' created

[6/6] Creating environment variables file...
      Found PARTICIPANT_ID in config.json: abc123...
      ✓ Created ../set_env.sh

================================================================
✅ Environment Setup Complete!
================================================================
Variáveis de ambiente de origem
👉💻 Extraia as variáveis de ambiente:
source $HOME/way-back-home/set_env.sh
Instalar dependências
👉💻 Instale as dependências do Python de nível 1:
cd $HOME/way-back-home/level_1
uv sync
Configurar o catálogo de estrelas
👉💻 Configure o catálogo de estrelas no BigQuery:
uv run python setup/setup_star_catalog.py
Você verá:
Setting up star catalog in project: your-project-id
==================================================
✓ Dataset way_back_home already exists
✓ Created table star_catalog
✓ Inserted 12 rows into star_catalog

📊 Star Catalog Summary:
----------------------------------------
  NE (VOLCANIC): 3 stellar patterns
  NW (CRYO): 3 stellar patterns
  SE (FOSSILIZED): 3 stellar patterns
  SW (BIOLUMINESCENT): 3 stellar patterns
----------------------------------------
✓ Star catalog is ready for triangulation queries

==================================================
✅ Star catalog setup complete!
3. Gerar evidências do local da falha
Agora gere evidências personalizadas do local do acidente com base nas suas coordenadas.
Executar o gerador de evidências
👉💻 No diretório level_1, execute:
cd $HOME/way-back-home/level_1
uv run python generate_evidence.py
A resposta será semelhante a esta:
✓ Welcome back, Explorer_Aria!
  Coordinates: (23, 67)
  Ready to analyze your crash site.

📍 Crash site analysis initiated...
   Generating evidence for your location...

🔬 Generating soil sample...
✓ Soil sample captured: outputs/soil_sample.png
✨ Capturing star field...
✓ Star field captured: outputs/star_field.png
🌿 Recording flora activity...
   (This may take 1-2 minutes for video generation)
   Generating video...
   Generating video...
   Generating video...
✓ Flora recorded: outputs/flora_recording.mp4

📤 Uploading evidence to Mission Control...
✓ Config updated with evidence URLs

==================================================
✅ Evidence generation complete!
==================================================
Revisar suas evidências
👉 Confira os arquivos de evidência gerados na pasta outputs/. Cada um reflete as características do bioma do local do acidente, mas você só vai saber qual é o bioma quando seus agentes de IA analisarem.
Dependendo da sua localização, as evidências geradas podem ser parecidas com estas:


4. Criar o servidor MCP personalizado
Os sistemas de análise integrados da sua cápsula de escape foram danificados, mas os dados brutos do sensor sobreviveram à queda. Você vai criar um servidor MCP com o FastMCP, que oferece ferramentas de análise geológica e botânica.
Criar a ferramenta de análise geológica
Essa ferramenta analisa imagens de amostras de solo para identificar a composição mineral.
👉✏️ Abra $HOME/way-back-home/level_1/mcp-server/main.py e encontre #REPLACE-GEOLOGICAL-TOOL. Substitua por:
GEOLOGICAL_PROMPT = """Analyze this alien soil sample image.

Classify the PRIMARY characteristic (choose exactly one):

1. CRYO - Frozen/icy minerals, crystalline structures, frost patterns,
   blue-white coloration, permafrost indicators

2. VOLCANIC - Volcanic rock, basalt, obsidian, sulfur deposits,
   red-orange minerals, heat-formed crystite structures

3. BIOLUMINESCENT - Glowing particles, phosphorescent minerals,
   organic-mineral hybrids, purple-green luminescence

4. FOSSILIZED - Ancient compressed minerals, amber deposits,
   petrified organic matter, golden-brown stratification

Respond ONLY with valid JSON (no markdown, no explanation):
{
    "biome": "CRYO|VOLCANIC|BIOLUMINESCENT|FOSSILIZED",
    "confidence": 0.0-1.0,
    "minerals_detected": ["mineral1", "mineral2"],
    "description": "Brief description of what you observe"
}
"""


@mcp.tool()
def analyze_geological(
    image_url: Annotated[
        str,
        Field(description="Cloud Storage URL (gs://...) of the soil sample image")
    ]
) -> dict:
    """
    Analyzes a soil sample image to identify mineral composition and classify the planetary biome.

    Args:
        image_url: Cloud Storage URL of the soil sample image (gs://bucket/path/image.png)

    Returns:
        dict with biome, confidence, minerals_detected, and description
    """
    logger.info(f">>> 🔬 Tool: 'analyze_geological' called for '{image_url}'")

    try:
        response = client.models.generate_content(
            model="gemini-2.5-flash",
            contents=[
                GEOLOGICAL_PROMPT,
                genai_types.Part.from_uri(file_uri=image_url, mime_type="image/png")
            ]
        )

        result = parse_json_response(response.text)
        logger.info(f"    ✓ Geological analysis complete: {result.get('biome', 'UNKNOWN')}")
        return result

    except Exception as e:
        logger.error(f"    ✗ Geological analysis failed: {str(e)}")
        return {"error": str(e), "biome": "UNKNOWN", "confidence": 0.0}
Criar a ferramenta de análise botânica
Essa ferramenta analisa gravações de vídeo da flora, incluindo a faixa de áudio.
👉✏️ No mesmo arquivo ($HOME/way-back-home/level_1/mcp-server/main.py), encontre #REPLACE-BOTANICAL-TOOL e substitua por:
BOTANICAL_PROMPT = """Analyze this alien flora video recording.

Pay attention to BOTH:
1. VISUAL elements: Plant appearance, movement patterns, colors, bioluminescence
2. AUDIO elements: Ambient sounds, rustling, organic noises, frequencies

Classify the PRIMARY biome (choose exactly one):

1. CRYO - Crystalline ice-plants, frost-covered vegetation,
   crackling/tinkling sounds, slow brittle movements, blue-white flora

2. VOLCANIC - Heat-resistant plants, sulfur-adapted species,
   hissing/bubbling sounds, smoke-filtering vegetation, red-orange flora

3. BIOLUMINESCENT - Glowing plants, pulsing light patterns,
   humming/resonating sounds, reactive to stimuli, purple-green flora

4. FOSSILIZED - Ancient petrified plants, amber-preserved specimens,
   deep resonant sounds, minimal movement, golden-brown flora

Respond ONLY with valid JSON (no markdown, no explanation):
{
    "biome": "CRYO|VOLCANIC|BIOLUMINESCENT|FOSSILIZED",
    "confidence": 0.0-1.0,
    "species_detected": ["species1", "species2"],
    "audio_signatures": ["sound1", "sound2"],
    "description": "Brief description of visual and audio observations"
}
"""


@mcp.tool()
def analyze_botanical(
    video_url: Annotated[
        str,
        Field(description="Cloud Storage URL (gs://...) of the flora video recording")
    ]
) -> dict:
    """
    Analyzes a flora video recording (visual + audio) to identify plant species and classify the biome.

    Args:
        video_url: Cloud Storage URL of the flora video (gs://bucket/path/video.mp4)

    Returns:
        dict with biome, confidence, species_detected, audio_signatures, and description
    """
    logger.info(f">>> 🌿 Tool: 'analyze_botanical' called for '{video_url}'")

    try:
        response = client.models.generate_content(
            model="gemini-2.5-flash",
            contents=[
                BOTANICAL_PROMPT,
                genai_types.Part.from_uri(file_uri=video_url, mime_type="video/mp4")
            ]
        )

        result = parse_json_response(response.text)
        logger.info(f"    ✓ Botanical analysis complete: {result.get('biome', 'UNKNOWN')}")
        return result

    except Exception as e:
        logger.error(f"    ✗ Botanical analysis failed: {str(e)}")
        return {"error": str(e), "biome": "UNKNOWN", "confidence": 0.0}
Testar o servidor MCP localmente
👉💻 Teste o servidor MCP:
cd $HOME/way-back-home/level_1/mcp-server
pip install -r requirements.txt
python main.py
Você verá:
[INFO] Initialized Gemini client for project: your-project-id
[INFO] 🚀 Location Analyzer MCP Server starting on port 8080
[INFO] 📍 MCP endpoint: http://0.0.0.0:8080/mcp
[INFO] 🔧 Tools: analyze_geological, analyze_botanical
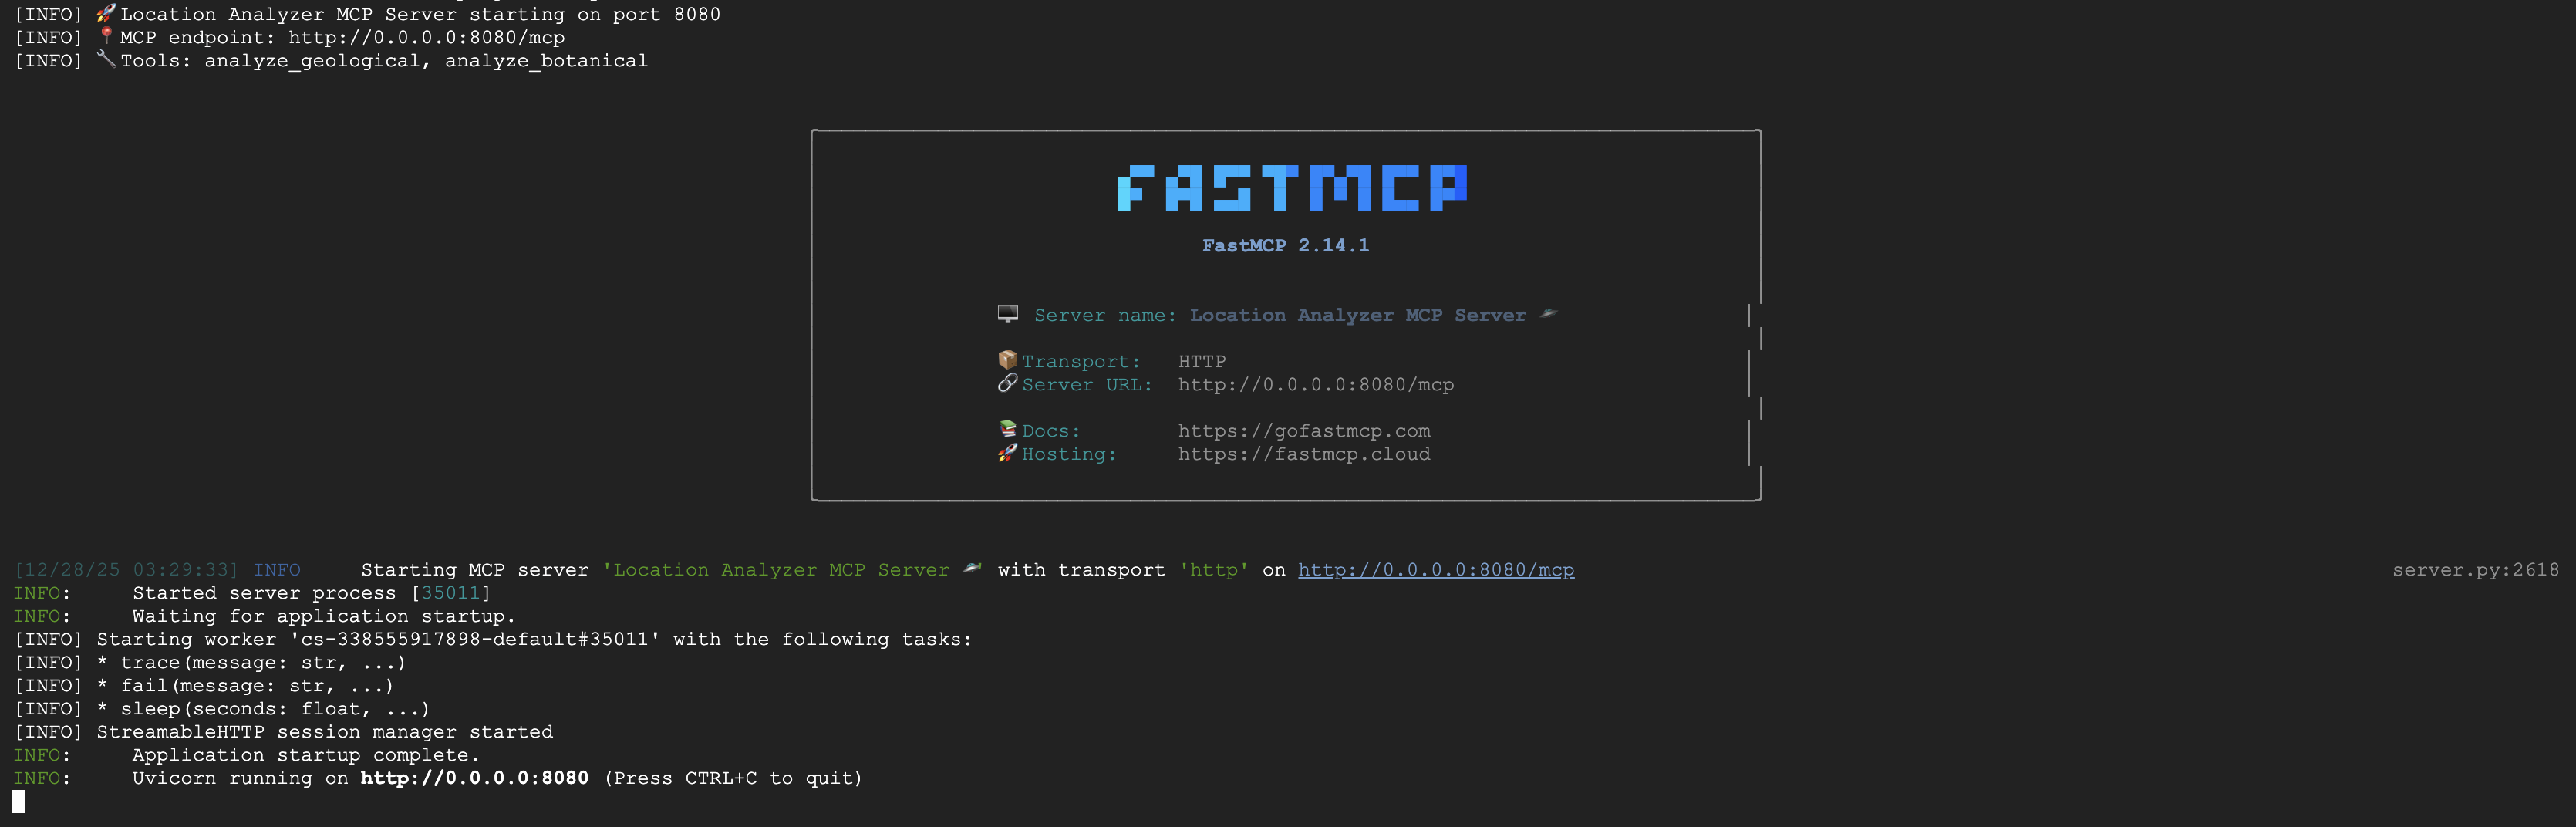
O servidor FastMCP agora está em execução com transporte HTTP. Pressione Ctrl+C para parar.
Implantar o servidor MCP no Cloud Run
👉💻 Implantação:
cd $HOME/way-back-home/level_1/mcp-server
source $HOME/way-back-home/set_env.sh

gcloud builds submit . \
  --config=cloudbuild.yaml \
  --substitutions=_REGION="$REGION",_REPO_NAME="$REPO_NAME",_SERVICE_ACCOUNT="$SERVICE_ACCOUNT"
Salvar o URL do serviço
👉💻 Salve o URL do serviço:
export MCP_SERVER_URL=$(gcloud run services describe location-analyzer \
  --region=$REGION --format='value(status.url)')
echo "MCP Server URL: $MCP_SERVER_URL"

# Add to set_env.sh for later use
echo "export MCP_SERVER_URL=\"$MCP_SERVER_URL\"" >> $HOME/way-back-home/set_env.sh
5. Criar os agentes especializados
Agora você vai criar três agentes especializados, cada um com uma única responsabilidade.
Criar o agente de análise geológica
👉✏️ Abra agent/agents/geological_analyst.py e encontre #REPLACE-GEOLOGICAL-AGENT. Substitua por:
from google.adk.agents import Agent
from agent.tools.mcp_tools import get_geological_tool

geological_analyst = Agent(
    name="GeologicalAnalyst",
    model="gemini-2.5-flash",
    description="Analyzes soil samples to classify planetary biome based on mineral composition.",
    instruction="""You are a geological specialist analyzing alien soil samples.

## YOUR EVIDENCE TO ANALYZE
Soil sample URL: {soil_url}

## YOUR TASK
1. Call the analyze_geological tool with the soil sample URL above
2. Examine the results for mineral composition and biome indicators
3. Report your findings clearly

The four possible biomes are:
- CRYO: Frozen, icy minerals, blue/white coloring
- VOLCANIC: Magma, obsidian, volcanic rock, red/orange coloring
- BIOLUMINESCENT: Glowing, phosphorescent minerals, purple/green
- FOSSILIZED: Amber, ancient preserved matter, golden/brown

## REPORTING FORMAT
Always report your classification clearly:
"GEOLOGICAL ANALYSIS: [BIOME] (confidence: X%)"

Include a brief description of what you observed in the sample.

## IMPORTANT
- You do NOT synthesize with other evidence
- You do NOT confirm locations
- Just analyze the soil sample and report what you find
- Call the tool immediately with the URL provided above""",
    tools=[get_geological_tool()]
)
Criar o agente de análise botânica
👉✏️ Abra agent/agents/botanical_analyst.py e encontre #REPLACE-BOTANICAL-AGENT. Substitua por:
from google.adk.agents import Agent
from agent.tools.mcp_tools import get_botanical_tool

botanical_analyst = Agent(
    name="BotanicalAnalyst",
    model="gemini-2.5-flash",
    description="Analyzes flora recordings to classify planetary biome based on plant life and ambient sounds.",
    instruction="""You are a botanical specialist analyzing alien flora recordings.

## YOUR EVIDENCE TO ANALYZE
Flora recording URL: {flora_url}

## YOUR TASK
1. Call the analyze_botanical tool with the flora recording URL above
2. Pay attention to BOTH visual AND audio elements in the recording
3. Report your findings clearly

The four possible biomes are:
- CRYO: Frost ferns, crystalline plants, cold wind sounds, crackling ice
- VOLCANIC: Fire blooms, heat-resistant flora, crackling/hissing sounds
- BIOLUMINESCENT: Glowing fungi, luminescent plants, ethereal hum, chiming
- FOSSILIZED: Petrified trees, ancient formations, deep resonant sounds

## REPORTING FORMAT
Always report your classification clearly:
"BOTANICAL ANALYSIS: [BIOME] (confidence: X%)"

Include descriptions of what you SAW and what you HEARD.

## IMPORTANT
- You do NOT synthesize with other evidence
- You do NOT confirm locations
- Just analyze the flora recording and report what you find
- Call the tool immediately with the URL provided above""",
    tools=[get_botanical_tool()]
)
Criar o agente de análise astronômica
Esse agente usa uma abordagem diferente com dois padrões de ferramentas:
- Local FunctionTool: Gemini Vision para extrair recursos de estrelas
- BigQuery do OneMCP: consulte o catálogo de estrelas usando o MCP gerenciado do Google
👉✏️ Abra agent/agents/astronomical_analyst.py e encontre #REPLACE-ASTRONOMICAL-AGENT. Substitua por:
from google.adk.agents import Agent
from agent.tools.star_tools import (
    extract_star_features_tool,
    get_bigquery_mcp_toolset,
)

# Get the BigQuery MCP toolset
bigquery_toolset = get_bigquery_mcp_toolset()

astronomical_analyst = Agent(
    name="AstronomicalAnalyst",
    model="gemini-2.5-flash",
    description="Analyzes star field images and queries the star catalog via OneMCP BigQuery.",
    instruction="""You are an astronomical specialist analyzing alien night skies.

## YOUR EVIDENCE TO ANALYZE
Star field URL: {stars_url}

## YOUR TWO TOOLS

### TOOL 1: extract_star_features (Local Gemini Vision)
Call this FIRST with the star field URL above.
Returns: "primary_star": "...", "nebula_type": "...", "stellar_color": "..."

### TOOL 2: BigQuery MCP (execute_query)
Call this SECOND with the results from Tool 1.
Use this exact SQL query (replace the placeholders with values from Step 1):

SELECT quadrant, biome, primary_star, nebula_type
FROM `{project_id}.way_back_home.star_catalog`
WHERE LOWER(primary_star) = LOWER('PRIMARY_STAR_FROM_STEP_1')
  AND LOWER(nebula_type) = LOWER('NEBULA_TYPE_FROM_STEP_1')
LIMIT 1

## YOUR WORKFLOW
1. Call extract_star_features with: {stars_url}
2. Get the primary_star and nebula_type from the result
3. Call execute_query with the SQL above (replacing placeholders)
4. Report the biome and quadrant from the query result

## BIOME REFERENCE
| Biome | Quadrant | Primary Star | Nebula Type |
|-------|----------|--------------|-------------|
| CRYO | NW | blue_giant | ice_blue |
| VOLCANIC | NE | red_dwarf_binary | fire |
| BIOLUMINESCENT | SW | green_pulsar | purple_magenta |
| FOSSILIZED | SE | yellow_sun | golden |

## REPORTING FORMAT
"ASTRONOMICAL ANALYSIS: [BIOME] in [QUADRANT] quadrant (confidence: X%)"

Include a description of the stellar features you observed.

## IMPORTANT
- You do NOT synthesize with other evidence
- You do NOT confirm locations
- Just analyze the stars and report what you find
- Start by calling extract_star_features with the URL above""",
    tools=[extract_star_features_tool, bigquery_toolset]
)
6. Criar as conexões de ferramentas do MCP
Agora você vai criar os wrappers do Python que permitem que os agentes do ADK se comuniquem com os servidores do MCP. Esses wrappers processam o ciclo de vida da conexão, estabelecendo sessões, invocando ferramentas e analisando respostas.
Criar conexão de ferramenta MCP (MCP personalizado)
Isso se conecta ao seu servidor FastMCP personalizado implantado no Cloud Run.
👉✏️ Abra agent/tools/mcp_tools.py e encontre #REPLACE-MCP-TOOL-CONNECTION. Substitua por:
import os
import logging

from google.adk.tools.mcp_tool.mcp_toolset import MCPToolset
from google.adk.tools.mcp_tool.mcp_session_manager import StreamableHTTPConnectionParams

logger = logging.getLogger(__name__)

MCP_SERVER_URL = os.environ.get("MCP_SERVER_URL")

_mcp_toolset = None

def get_mcp_toolset():
    """Get the MCPToolset connected to the location-analyzer server."""
    global _mcp_toolset

    if _mcp_toolset is not None:
        return _mcp_toolset

    if not MCP_SERVER_URL:
        raise ValueError(
            "MCP_SERVER_URL not set. Please run:\n"
            "  export MCP_SERVER_URL='https://location-analyzer-xxx.a.run.app'"
        )

    # FastMCP exposes MCP protocol at /mcp endpoint
    mcp_endpoint = f"{MCP_SERVER_URL}/mcp"
    logger.info(f"[MCP Tools] Connecting to: {mcp_endpoint}")

    _mcp_toolset = MCPToolset(
        connection_params=StreamableHTTPConnectionParams(
            url=mcp_endpoint,
            timeout=120,  # 2 minutes for Gemini analysis
        )
    )

    return _mcp_toolset

def get_geological_tool():
    """Get the geological analysis tool from the MCP server."""
    return get_mcp_toolset()

def get_botanical_tool():
    """Get the botanical analysis tool from the MCP server."""
    return get_mcp_toolset()
Criar ferramentas de análise de estrelas (BigQuery da OneMCP)
O catálogo de estrelas que você carregou anteriormente no BigQuery contém padrões estelares para cada bioma. Em vez de escrever código de cliente do BigQuery para consultar, nos conectamos ao servidor OneMCP do Google, que expõe a capacidade execute_query do BigQuery como uma ferramenta MCP que qualquer agente do ADK pode usar diretamente.
👉✏️ Abra agent/tools/star_tools.py e encontre #REPLACE-STAR-TOOLS. Substitua por:
import os
import json
import logging

from google import genai
from google.genai import types as genai_types
from google.adk.tools import FunctionTool
from google.adk.tools.mcp_tool.mcp_toolset import MCPToolset
from google.adk.tools.mcp_tool.mcp_session_manager import StreamableHTTPConnectionParams
import google.auth
import google.auth.transport.requests

logger = logging.getLogger(__name__)

# =============================================================================
# CONFIGURATION - Environment variables only
# =============================================================================

PROJECT_ID = os.environ.get("GOOGLE_CLOUD_PROJECT", "")

if not PROJECT_ID:
    logger.warning("[Star Tools] GOOGLE_CLOUD_PROJECT not set")

# Initialize Gemini client for star feature extraction
genai_client = genai.Client(
    vertexai=True,
    project=PROJECT_ID or "placeholder",
    location=os.environ.get("GOOGLE_CLOUD_LOCATION", "us-central1")
)

logger.info(f"[Star Tools] Initialized for project: {PROJECT_ID}")

# =============================================================================
# OneMCP BigQuery Connection
# =============================================================================

BIGQUERY_MCP_URL = "https://bigquery.googleapis.com/mcp"

_bigquery_toolset = None

def get_bigquery_mcp_toolset():
    """
    Get the MCPToolset connected to Google's BigQuery MCP server.

    This uses OAuth 2.0 authentication with Application Default Credentials.
    The toolset provides access to BigQuery's pre-built MCP tools like:
    - execute_query: Run SQL queries
    - list_datasets: List available datasets
    - get_table_schema: Get table structure
   """
    global _bigquery_toolset

    if _bigquery_toolset is not None:
        return _bigquery_toolset

    logger.info("[Star Tools] Connecting to OneMCP BigQuery...")

    # Get OAuth credentials
    credentials, project_id = google.auth.default(
        scopes=["https://www.googleapis.com/auth/bigquery"]
    )

    # Refresh to get a valid token
    credentials.refresh(google.auth.transport.requests.Request())
    oauth_token = credentials.token

    # Configure headers for BigQuery MCP
    headers = {
        "Authorization": f"Bearer {oauth_token}",
        "x-goog-user-project": project_id or PROJECT_ID
    }

    # Create MCPToolset with StreamableHTTP connection
    _bigquery_toolset = MCPToolset(
        connection_params=StreamableHTTPConnectionParams(
            url=BIGQUERY_MCP_URL,
            headers=headers
        )
    )

    logger.info("[Star Tools] Connected to BigQuery MCP")
    return _bigquery_toolset


# =============================================================================
# Local FunctionTool: Star Feature Extraction
# =============================================================================
# This is a LOCAL tool that calls Gemini directly - demonstrating that
# you can mix local FunctionTools with MCP tools in the same agent.

STAR_EXTRACTION_PROMPT = """Analyze this alien night sky image and extract stellar features.

Identify:
1. PRIMARY STAR TYPE: blue_giant, red_dwarf, red_dwarf_binary, green_pulsar, yellow_sun, etc.
2. NEBULA TYPE: ice_blue, fire, purple_magenta, golden, etc.
3. STELLAR COLOR: blue_white, red_orange, green_purple, yellow_gold, etc.

Respond ONLY with valid JSON:
{"primary_star": "...", "nebula_type": "...", "stellar_color": "...", "description": "..."}
"""


def _parse_json_response(text: str) -> dict:
    """Parse JSON from Gemini response, handling markdown formatting."""
    cleaned = text.strip()
    if cleaned.startswith("```json"):
        cleaned = cleaned[7:]
    elif cleaned.startswith("```"):
        cleaned = cleaned[3:]
    if cleaned.endswith("```"):
        cleaned = cleaned[:-3]
    cleaned = cleaned.strip()

    try:
        return json.loads(cleaned)
    except json.JSONDecodeError as e:
        logger.error(f"Failed to parse JSON: {e}")
        return {"error": f"Failed to parse response: {str(e)}"}


def extract_star_features(image_url: str) -> dict:
    """
    Extract stellar features from a star field image using Gemini Vision.

    This is a LOCAL FunctionTool - we call Gemini directly, not through MCP.
    The agent will use this alongside the BigQuery MCP tools.
    """
    logger.info(f"[Stars] Extracting features from: {image_url}")

    response = genai_client.models.generate_content(
        model="gemini-2.5-flash",
        contents=[
            STAR_EXTRACTION_PROMPT,
            genai_types.Part.from_uri(file_uri=image_url, mime_type="image/png")
        ]
    )

    result = _parse_json_response(response.text)
    logger.info(f"[Stars] Extracted: primary_star={result.get('primary_star')}")
    return result


# Create the local FunctionTool
extract_star_features_tool = FunctionTool(extract_star_features)
7. Criar o orquestrador
Agora crie a equipe paralela e o orquestrador raiz que coordena tudo.
Criar a equipe de análise paralela
Por que executar os três especialistas em paralelo? Porque eles são completamente independentes. O analista geológico não precisa esperar os resultados do analista botânico, e vice-versa. Cada especialista analisa uma evidência diferente usando ferramentas diferentes. Um ParallelAgent executa os três simultaneamente, reduzindo o tempo total de análise de ~30s (sequencial) para ~10s (paralelo).
👉✏️ Abra agent/agent.py e encontre #REPLACE-PARALLEL-CREW. Substitua por:
import os
import logging
import httpx

from google.adk.agents import Agent, ParallelAgent
from google.adk.agents.callback_context import CallbackContext

# Import specialist agents
from agent.agents.geological_analyst import geological_analyst
from agent.agents.botanical_analyst import botanical_analyst
from agent.agents.astronomical_analyst import astronomical_analyst

# Import confirmation tool
from agent.tools.confirm_tools import confirm_location_tool

logger = logging.getLogger(__name__)


# =============================================================================
# BEFORE AGENT CALLBACK - Fetches config and sets state
# =============================================================================

async def setup_participant_context(callback_context: CallbackContext) -> None:
    """
    Fetch participant configuration and populate state for all agents.

    This callback:
    1. Reads PARTICIPANT_ID and BACKEND_URL from environment
    2. Fetches participant data from the backend API
    3. Sets state values: soil_url, flora_url, stars_url, username, x, y, etc.
    4. Returns None to continue normal agent execution
    """
    participant_id = os.environ.get("PARTICIPANT_ID", "")
    backend_url = os.environ.get("BACKEND_URL", "https://api.waybackhome.dev")
    project_id = os.environ.get("GOOGLE_CLOUD_PROJECT", "")

    logger.info(f"[Callback] Setting up context for participant: {participant_id}")

    # Set project_id and backend_url in state immediately
    callback_context.state["project_id"] = project_id
    callback_context.state["backend_url"] = backend_url
    callback_context.state["participant_id"] = participant_id

    if not participant_id:
        logger.warning("[Callback] No PARTICIPANT_ID set - using placeholder values")
        callback_context.state["username"] = "Explorer"
        callback_context.state["x"] = 0
        callback_context.state["y"] = 0
        callback_context.state["soil_url"] = "Not available - set PARTICIPANT_ID"
        callback_context.state["flora_url"] = "Not available - set PARTICIPANT_ID"
        callback_context.state["stars_url"] = "Not available - set PARTICIPANT_ID"
        return None

    # Fetch participant data from backend API
    try:
        url = f"{backend_url}/participants/{participant_id}"
        logger.info(f"[Callback] Fetching from: {url}")

        async with httpx.AsyncClient(timeout=30.0) as client:
            response = await client.get(url)
            response.raise_for_status()
            data = response.json()

        # Extract evidence URLs
        evidence_urls = data.get("evidence_urls", {})

        # Set all state values for sub-agents to access
        callback_context.state["username"] = data.get("username", "Explorer")
        callback_context.state["x"] = data.get("x", 0)
        callback_context.state["y"] = data.get("y", 0)
        callback_context.state["soil_url"] = evidence_urls.get("soil", "Not available")
        callback_context.state["flora_url"] = evidence_urls.get("flora", "Not available")
        callback_context.state["stars_url"] = evidence_urls.get("stars", "Not available")

        logger.info(f"[Callback] State populated for {data.get('username')}")

    except Exception as e:
        logger.error(f"[Callback] Error fetching participant config: {e}")
        callback_context.state["username"] = "Explorer"
        callback_context.state["x"] = 0
        callback_context.state["y"] = 0
        callback_context.state["soil_url"] = f"Error: {e}"
        callback_context.state["flora_url"] = f"Error: {e}"
        callback_context.state["stars_url"] = f"Error: {e}"

    return None


# =============================================================================
# PARALLEL ANALYSIS CREW
# =============================================================================

evidence_analysis_crew = ParallelAgent(
    name="EvidenceAnalysisCrew",
    description="Runs geological, botanical, and astronomical analysis in parallel.",
    sub_agents=[geological_analyst, botanical_analyst, astronomical_analyst]
)
Criar o orquestrador raiz
Agora crie o agente raiz que coordena tudo e usa o callback.
👉✏️ No mesmo arquivo (agent/agent.py), encontre #REPLACE-ROOT-ORCHESTRATOR. Substitua por:
root_agent = Agent(
    name="MissionAnalysisAI",
    model="gemini-2.5-flash",
    description="Coordinates crash site analysis to confirm explorer location.",
    instruction="""You are the Mission Analysis AI coordinating a rescue operation.

## Explorer Information
- Name: {username}
- Coordinates: ({x}, {y})

## Evidence URLs (automatically provided to specialists via state)
- Soil sample: {soil_url}
- Flora recording: {flora_url}
- Star field: {stars_url}

## Your Workflow

### STEP 1: DELEGATE TO ANALYSIS CREW
Tell the EvidenceAnalysisCrew to analyze all the evidence.
The evidence URLs are already available to the specialists.

### STEP 2: COLLECT RESULTS
Each specialist will report:
- "GEOLOGICAL ANALYSIS: [BIOME] (confidence: X%)"
- "BOTANICAL ANALYSIS: [BIOME] (confidence: X%)"
- "ASTRONOMICAL ANALYSIS: [BIOME] in [QUADRANT] quadrant (confidence: X%)"

### STEP 3: APPLY 2-OF-3 AGREEMENT RULE
- If 2 or 3 specialists agree → that's the answer
- If all 3 disagree → use judgment based on confidence

### STEP 4: CONFIRM LOCATION
Call confirm_location with the determined biome.

## Biome Reference
| Biome | Quadrant | Key Characteristics |
|-------|----------|---------------------|
| CRYO | NW | Frozen, blue, ice crystals |
| VOLCANIC | NE | Magma, red/orange, obsidian |
| BIOLUMINESCENT | SW | Glowing, purple/green |
| FOSSILIZED | SE | Amber, golden, ancient |

## Response Style
Be encouraging and narrative! Celebrate when the beacon activates!
""",
    sub_agents=[evidence_analysis_crew],
    tools=[confirm_location_tool],
    before_agent_callback=setup_participant_context
)
Criar a ferramenta de confirmação de local
Esta é a peça final: a ferramenta que confirma sua localização para o Mission Control e ativa o beacon. Quando o orquestrador raiz determina em qual bioma você está (usando a regra de concordância de 2 em 3), ele chama essa ferramenta para enviar o resultado à API de back-end.
Essa ferramenta usa ToolContext, que dá acesso aos valores de estado (como participant_id e backend_url) definidos pelo before_agent_callback anteriormente.
👉✏️ Em agent/tools/confirm_tools.py, encontre #REPLACE-CONFIRM-TOOL. Substitua por:
import os
import logging
import requests

from google.adk.tools import FunctionTool
from google.adk.tools.tool_context import ToolContext

logger = logging.getLogger(__name__)

BIOME_TO_QUADRANT = {
    "CRYO": "NW",
    "VOLCANIC": "NE",
    "BIOLUMINESCENT": "SW",
    "FOSSILIZED": "SE"
}


def _get_actual_biome(x: int, y: int) -> tuple[str, str]:
    """Determine actual biome and quadrant from coordinates."""
    if x < 50 and y >= 50:
        return "NW", "CRYO"
    elif x >= 50 and y >= 50:
        return "NE", "VOLCANIC"
    elif x < 50 and y < 50:
        return "SW", "BIOLUMINESCENT"
    else:
        return "SE", "FOSSILIZED"


def confirm_location(biome: str, tool_context: ToolContext) -> dict:
    """
    Confirm the explorer's location and activate the rescue beacon.

    Uses ToolContext to read state values set by before_agent_callback.
    """
    # Read from state (set by before_agent_callback)
    participant_id = tool_context.state.get("participant_id", "")
    x = tool_context.state.get("x", 0)
    y = tool_context.state.get("y", 0)
    backend_url = tool_context.state.get("backend_url", "https://api.waybackhome.dev")

    # Fallback to environment variables
    if not participant_id:
        participant_id = os.environ.get("PARTICIPANT_ID", "")
    if not backend_url:
        backend_url = os.environ.get("BACKEND_URL", "https://api.waybackhome.dev")

    if not participant_id:
        return {"success": False, "message": "❌ No participant ID available."}

    biome_upper = biome.upper().strip()

    if biome_upper not in BIOME_TO_QUADRANT:
        return {"success": False, "message": f"❌ Unknown biome: {biome}"}

    # Get actual biome from coordinates
    actual_quadrant, actual_biome = _get_actual_biome(x, y)

    if biome_upper != actual_biome:
        return {
            "success": False,
            "message": f"❌ Mismatch! Analysis: {biome_upper}, Actual: {actual_biome}"
        }

    quadrant = BIOME_TO_QUADRANT[biome_upper]

    try:
        response = requests.patch(
            f"{backend_url}/participants/{participant_id}/location",
            params={"x": x, "y": y},
            timeout=10
        )
        response.raise_for_status()

        return {
            "success": True,
            "message": f"🔦 BEACON ACTIVATED!\n\nLocation: {biome_upper} in {quadrant}\nCoordinates: ({x}, {y})"
        }

    except requests.exceptions.ConnectionError:
        return {
            "success": True,
            "message": f"🔦 BEACON ACTIVATED! (Local)\n\nLocation: {biome_upper} in {quadrant}",
            "simulated": True
        }

    except Exception as e:
        return {"success": False, "message": f"❌ Failed: {str(e)}"}


confirm_location_tool = FunctionTool(confirm_location)
8. Teste com a interface da Web do ADK
Agora vamos testar o sistema multiagente completo localmente.
Iniciar o servidor da Web do ADK
👉💻 Defina as variáveis de ambiente e inicie o servidor da Web do ADK:
cd $HOME/way-back-home/level_1
source $HOME/way-back-home/set_env.sh

# Verify environment is set
echo "PARTICIPANT_ID: $PARTICIPANT_ID"
echo "MCP Server: $MCP_SERVER_URL"

# Start ADK web server
uv run adk web
Você verá:
+-----------------------------------------------------------------------------+
| ADK Web Server started                                                      |
|                                                                             |
| For local testing, access at http://localhost:8000.                         |
+-----------------------------------------------------------------------------+

INFO:     Application startup complete.
INFO:     Uvicorn running on http://0.0.0.0:8000 (Press CTRL+C to quit)
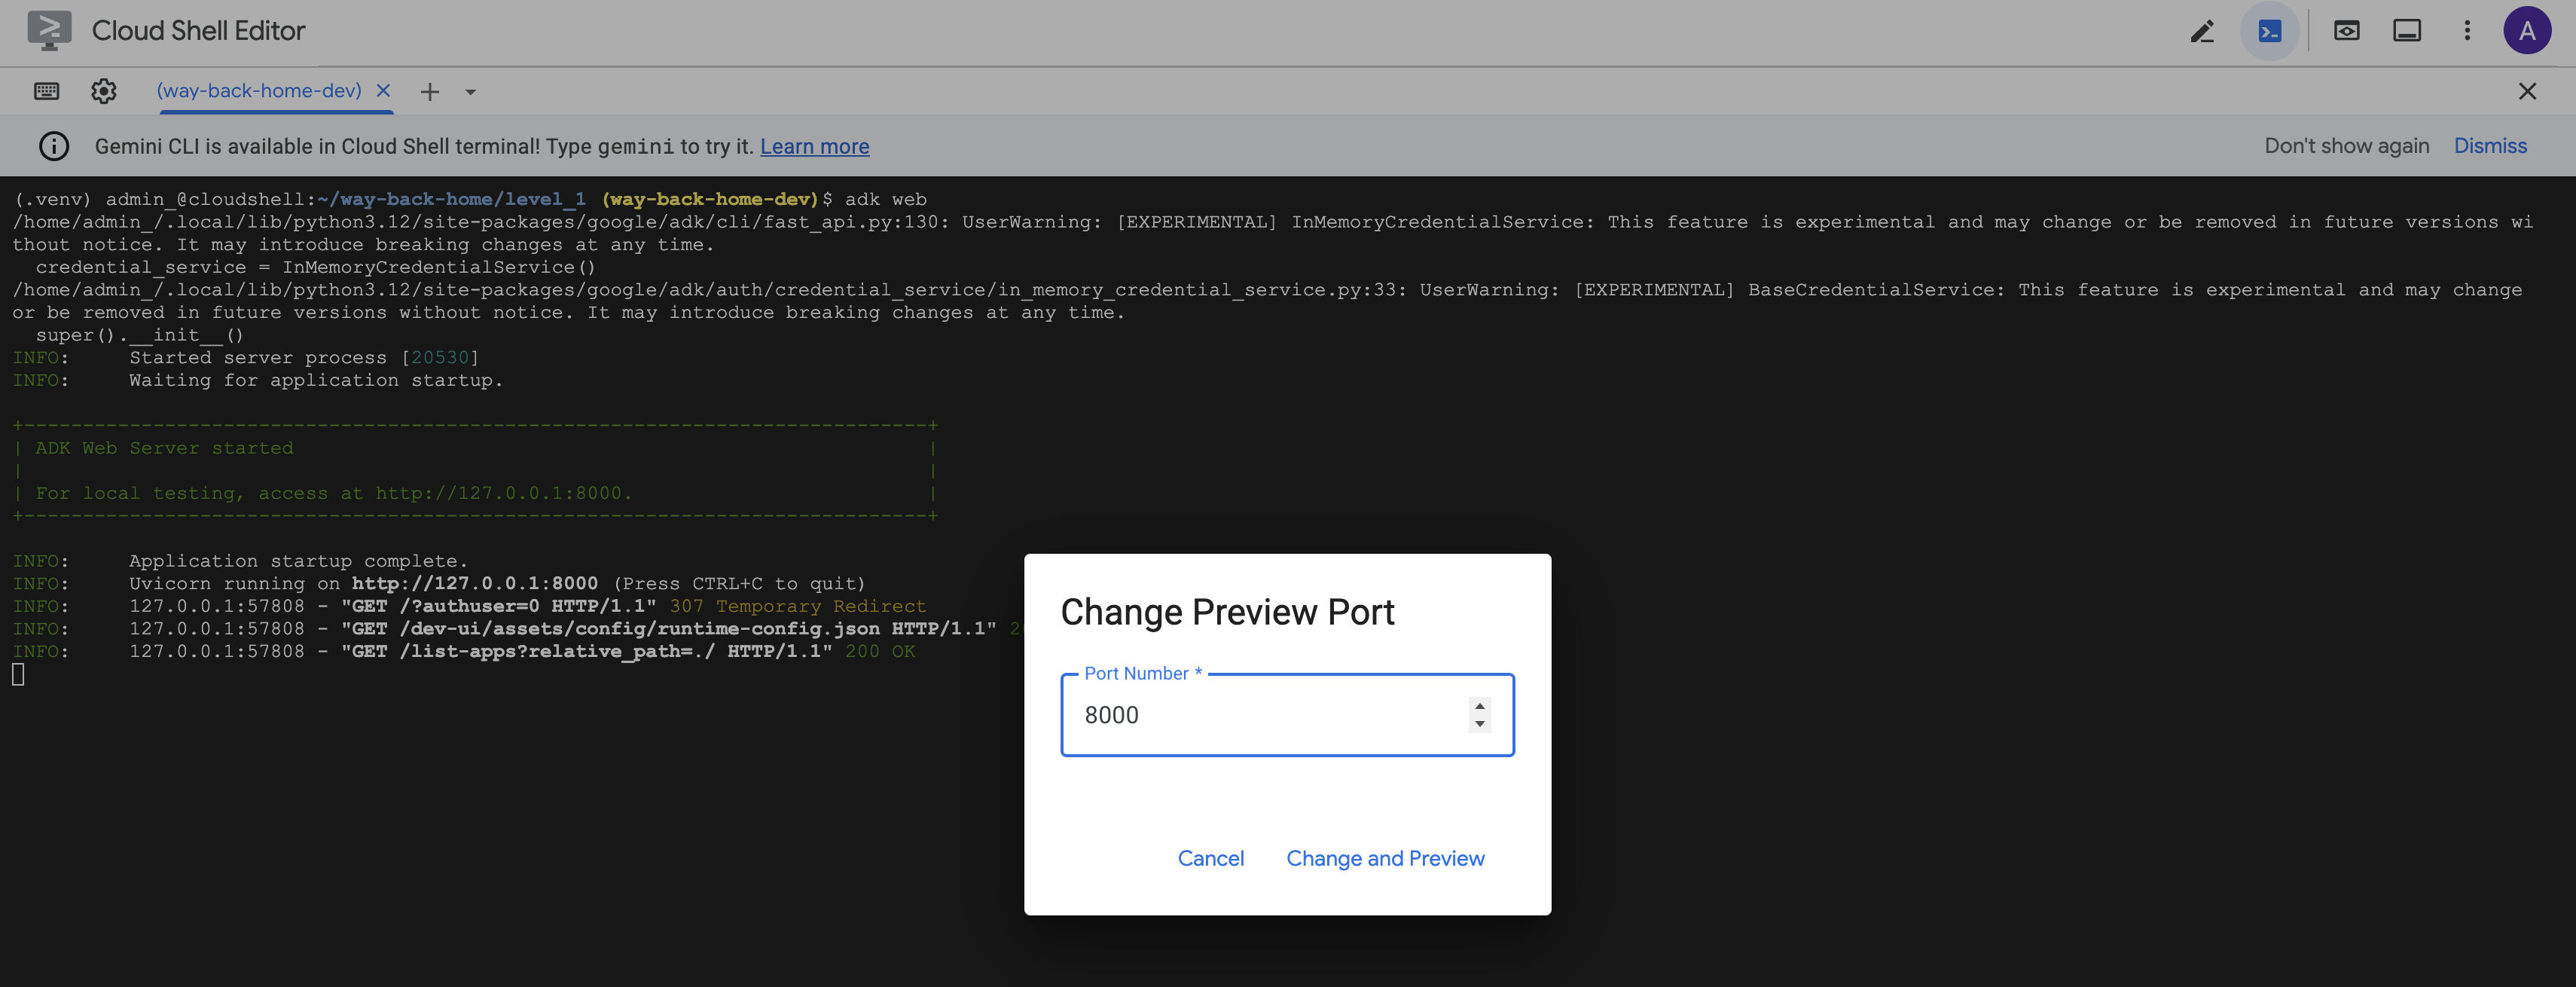
Acessar a interface da Web
👉 No ícone Visualização da Web na barra de ferramentas do Cloud Shell (parte superior direita), selecione Alterar porta.
![]()
👉 Defina a porta como 8000 e clique em Alterar e visualizar.
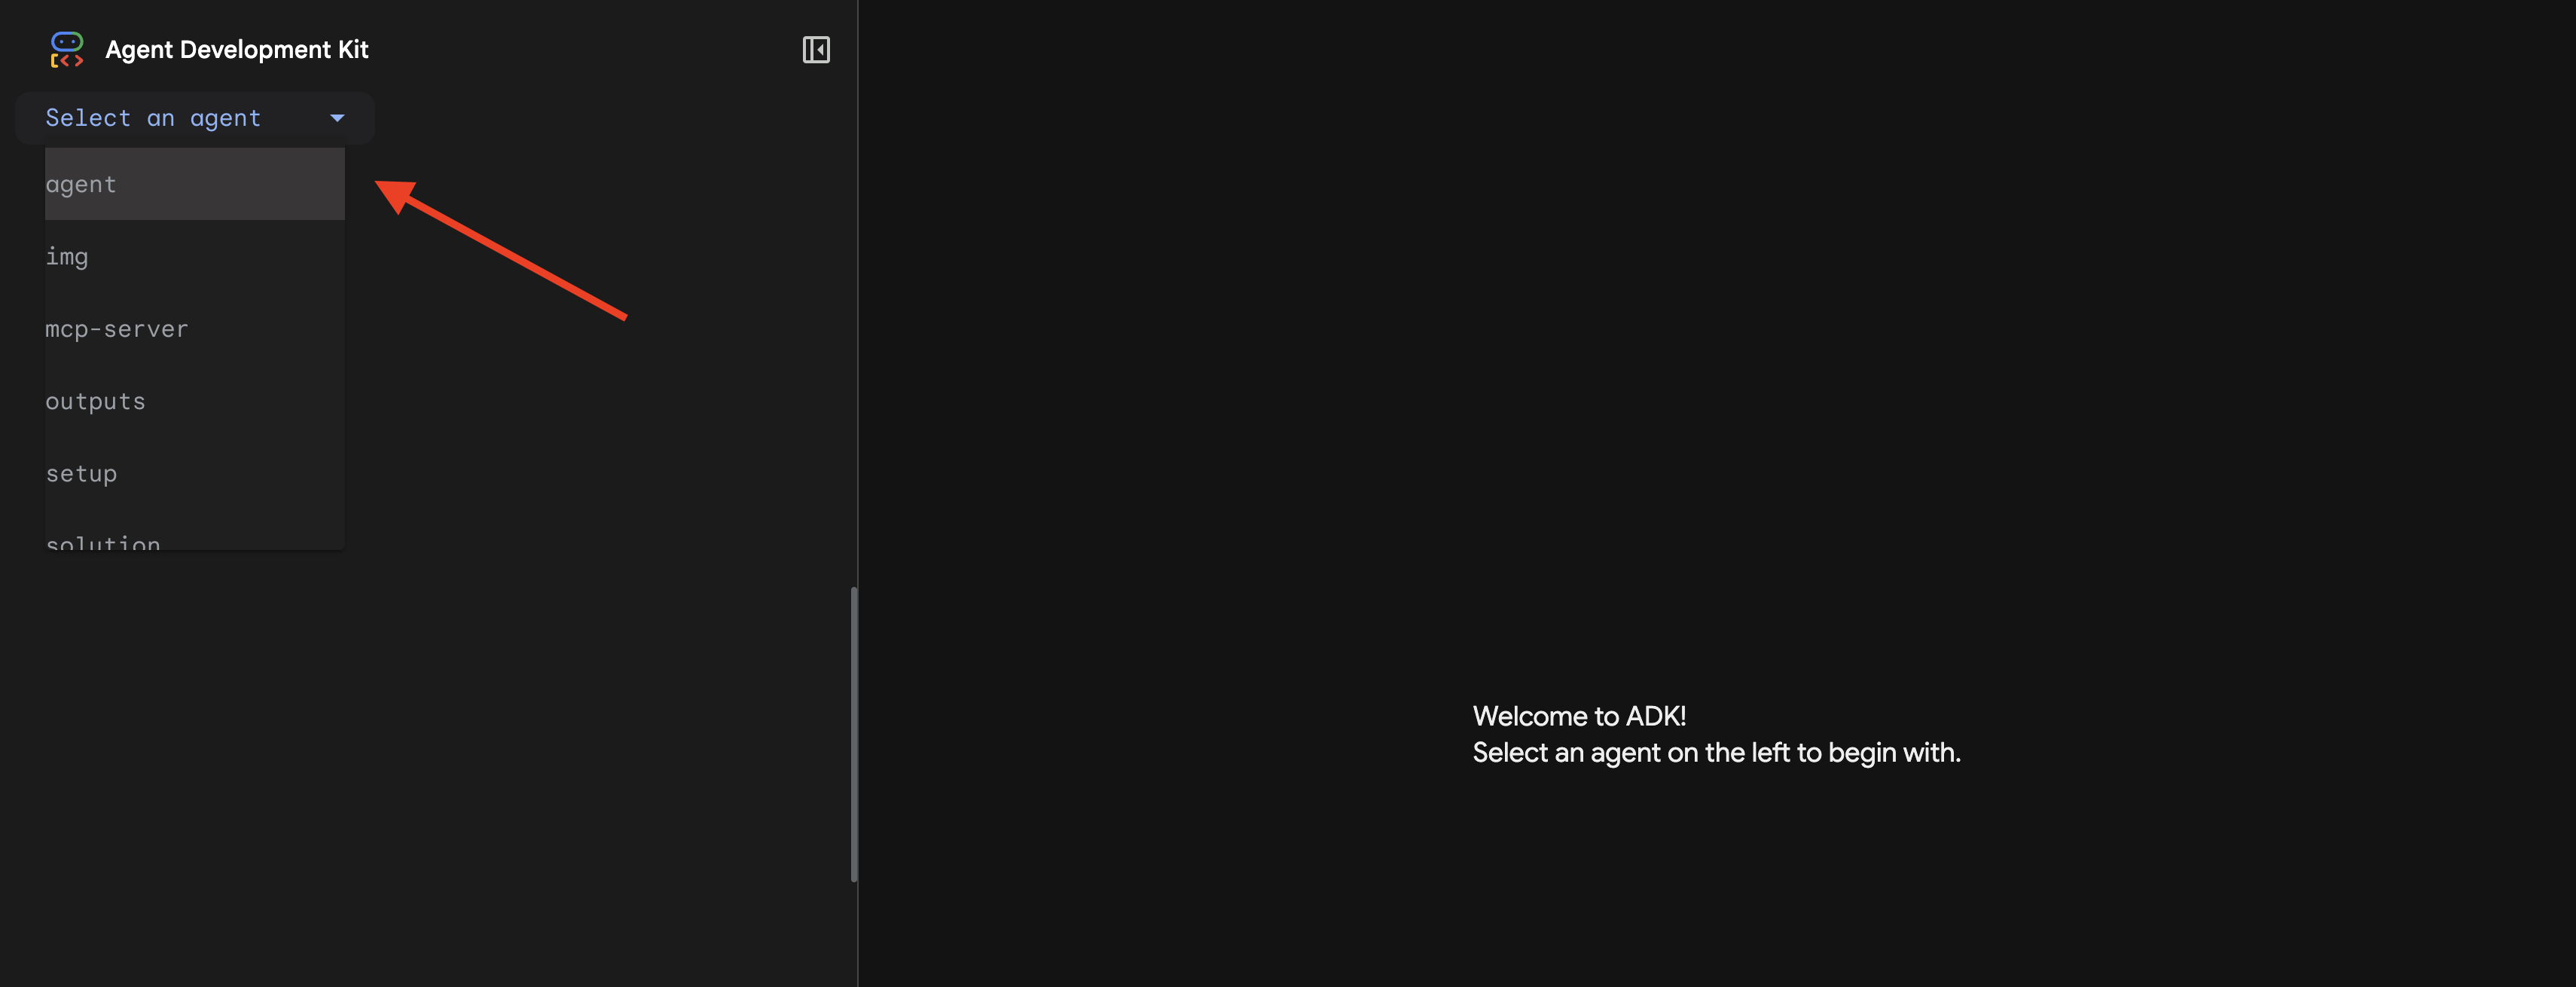
👉 A interface da Web do ADK será aberta. Selecione agente no menu suspenso.
Executar a análise
👉 Na interface de chat, digite:
Analyze the evidence from my crash site and confirm my location to activate the beacon.
Confira o sistema multiagente em ação:
👉 Quando os três agentes concluírem as análises, digite:
Where am I?
Como o sistema processa sua solicitação:

O painel de rastreamento à direita mostra todas as interações do agente e chamadas de ferramentas.
👉 Pressione Ctrl+C no terminal para interromper o servidor quando terminar de testar.
9. Implantar no Cloud Run
Agora implante seu sistema multiagente no Cloud Run para ficar pronto para A2A.
Implante o agente
👉💻 Implante no Cloud Run usando a CLI do ADK:
cd $HOME/way-back-home/level_1
source $HOME/way-back-home/set_env.sh

uv run adk deploy cloud_run \
  --project=$GOOGLE_CLOUD_PROJECT \
  --region=$REGION \
  --service_name=mission-analysis-ai \
  --with_ui \
  --a2a \
  ./agent
Quando solicitado Do you want to continue (Y/n) e Allow unauthenticated invocations to [mission-analysis-ai] (Y/n)?, digite Y para implantar e permitir o acesso público ao seu agente A2A.
A resposta será semelhante a esta:
Building and deploying agent to Cloud Run...
✓ Container built successfully
✓ Deploying to Cloud Run...
✓ Service deployed: https://mission-analysis-ai-abc123-uc.a.run.app
Definir variáveis de ambiente no Cloud Run
O agente implantado precisa de acesso às variáveis de ambiente. Atualize o serviço:
👉💻 Defina as variáveis de ambiente necessárias:
gcloud run services update mission-analysis-ai \
  --region=$REGION \
  --labels=dev-tutorial=multi-modal \
  --set-env-vars="GOOGLE_CLOUD_PROJECT=$GOOGLE_CLOUD_PROJECT,GOOGLE_CLOUD_LOCATION=$REGION,MCP_SERVER_URL=$MCP_SERVER_URL,BACKEND_URL=$BACKEND_URL,PARTICIPANT_ID=$PARTICIPANT_ID,GOOGLE_GENAI_USE_VERTEXAI=True"
Salvar o URL do agente
👉💻 Acesse o URL implantado:
export AGENT_URL=$(gcloud run services describe mission-analysis-ai \
  --region=$REGION --format='value(status.url)')
echo "Agent URL: $AGENT_URL"

# Add to set_env.sh
echo "export LEVEL1_AGENT_URL=\"$AGENT_URL\"" >> $HOME/way-back-home/set_env.sh
Verifique a implantação
👉💻 Teste o agente implantado abrindo o URL no navegador (a flag --with_ui implantou a interface da Web do ADK) ou teste usando curl:
curl -X GET "$AGENT_URL/list-apps"
Você vai ver uma resposta listando seu agente.
10. Conclusão
🎉 Nível 1 concluído!
Seu farol de resgate agora está transmitindo com força total. O sinal triangulado atravessa a interferência atmosférica, um pulso constante que diz "Estou aqui. Eu sobrevivi. Venha me encontrar."
Mas você não é a única pessoa neste planeta. À medida que seu beacon é ativado, você percebe outras luzes piscando no horizonte: outros sobreviventes, outros locais de acidentes, outros exploradores que sobreviveram.
![]()
No Nível 2, você vai aprender a processar sinais de SOS recebidos e coordenar com outros sobreviventes. O resgate não é apenas sobre ser encontrado, mas sobre encontrar uns aos outros.
Solução de problemas
"MCP_SERVER_URL not set"
export MCP_SERVER_URL=$(gcloud run services describe location-analyzer \
  --region=$REGION --format='value(status.url)')
"PARTICIPANT_ID not set"
source $HOME/way-back-home/set_env.sh
echo $PARTICIPANT_ID
"Tabela do BigQuery não encontrada"
uv run python setup/setup_star_catalog.py
"Especialistas pedindo URLs": isso significa que o modelo {key} não está funcionando. Verificação:
- O
before_agent_callbackestá definido no agente raiz? - O callback está definindo os valores de estado corretamente?
- Os subagentes estão usando
{soil_url}(não f-strings)?
"As três análises discordam". Gere novas evidências: uv run python generate_evidence.py
"O agente não está respondendo na adk web"
- Verifique se a porta 8000 está correta
- Verificar se MCP_SERVER_URL e PARTICIPANT_ID estão definidos
- Verificar mensagens de erro no terminal
Resumo da arquitetura
Componente | Tipo | Padrão | Finalidade |
setup_participant_context | Chamada de retorno | before_agent_callback | Buscar configuração, definir estado |
GeologicalAnalyst | Agente | Modelos {soil_url} | Classificação do solo |
BotanicalAnalyst | Agente | Modelos {flora_url} | Classificação de flora |
AstronomicalAnalyst | Agente | {stars_url}, {project_id} | Triangulação de estrelas |
confirm_location | Ferramenta | Acesso ao estado do ToolContext | Ativar beacon |
EvidenceAnalysisCrew | ParallelAgent | Composição de subagente | Executar especialistas simultaneamente |
MissionAnalysisAI | Agente (raiz) | Orquestrador + callback | Coordenar e sintetizar |
location-analyzer | Servidor FastMCP | MCP personalizada | Análise geológica e botânica |
bigquery.googleapis.com/mcp | OneMCP | MCP gerenciado | Acesso ao BigQuery |
Conceitos principais dominados
✓ before_agent_callback: busca a configuração antes da execução do agente
✓ {key} State Templating: acessa valores de estado nas instruções do agente
✓ ToolContext: acessa valores de estado em funções de ferramentas
✓ State Sharing: estado principal disponível automaticamente para subagentes via InvocationContext
✓ Multi-Agent Architecture: agentes especializados com responsabilidades únicas
✓ ParallelAgent: execução simultânea de tarefas independentes
✓ Custom MCP Server: seu próprio servidor MCP no Cloud Run
✓ OneMCP BigQuery: padrão MCP gerenciado para acesso ao banco de dados
✓ Cloud Deployment: implantação sem estado usando variáveis de ambiente
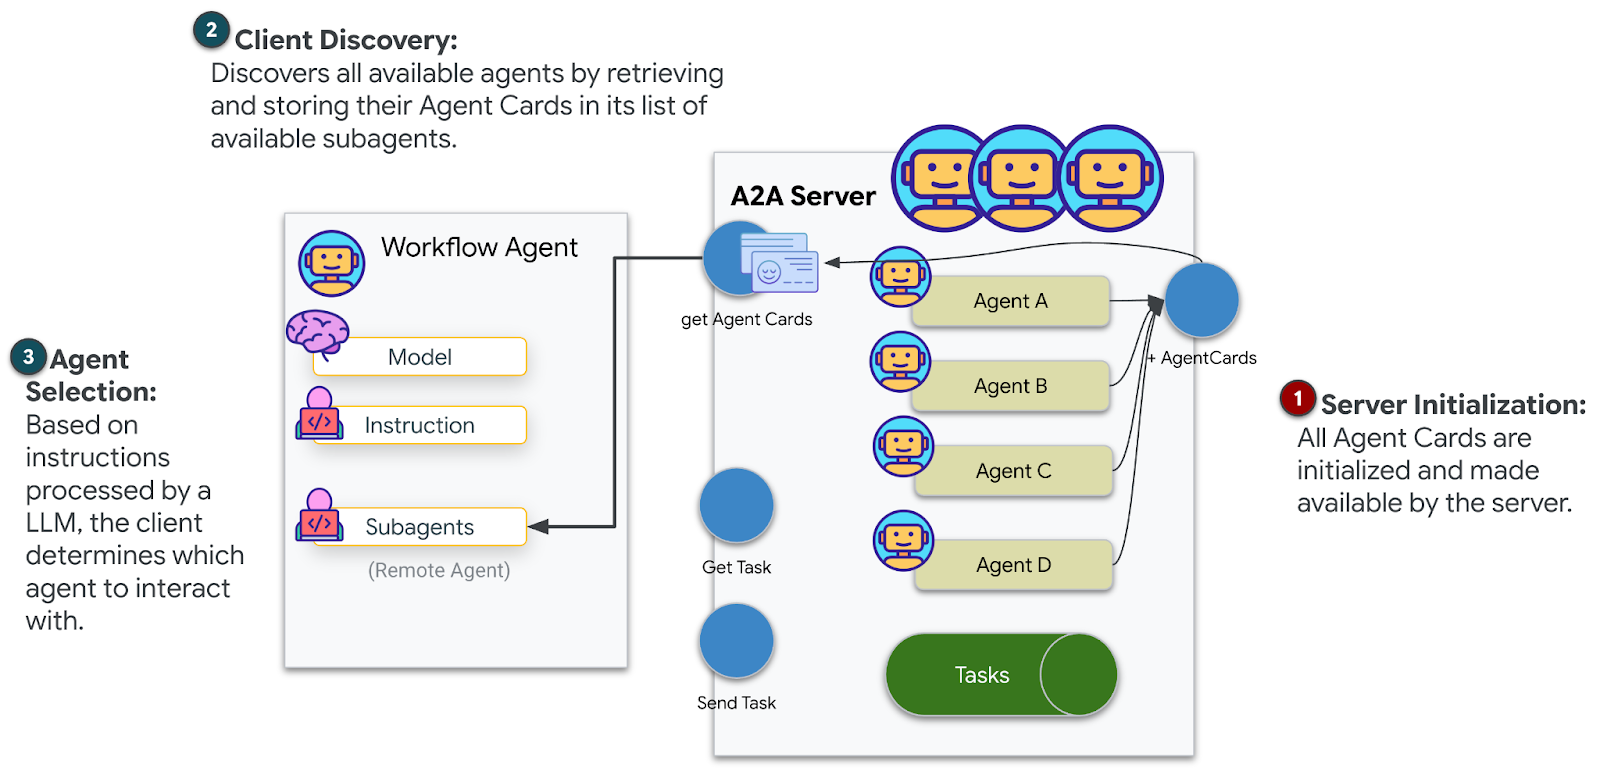
✓ A2A Preparation: agente pronto para comunicação entre agentes
Para quem não é gamer: aplicações no mundo real
"Identificando sua localização" representa a Análise paralela de especialistas com consenso, que executa várias análises especializadas de IA simultaneamente e sintetiza os resultados.
Aplicativos empresariais
Caso de uso | Especialistas paralelos | Regra de resumo |
Diagnóstico médico | Analista de imagens, de sintomas e de laboratório | Limite de confiança de 2 de 3 |
Detecção de fraude | Analista de transações, de comportamento e de rede | Qualquer uma das flags = análise |
Processamento de documentos | Agente de OCR, agente de classificação, agente de extração | Todos precisam concordar |
Controle de qualidade | Inspetor visual, analista de sensores, verificador de especificações | Cartão 2 de 3 |
Principais insights de arquitetura
- before_agent_callback para configuração: busca a configuração uma vez no início e preenche o estado de todos os subagentes. Nenhum arquivo de configuração lido em subagentes.
- Modelagem de estado {key}: declarativa, limpa e idiomática. Sem f-strings, sem importações, sem manipulação de sys.path.
- Mecanismos de consenso: o acordo de 2 em 3 lida com a ambiguidade de maneira robusta sem exigir unanimidade.
- ParallelAgent para tarefas independentes: quando as análises não dependem umas das outras, execute-as simultaneamente para acelerar o processo.
- Dois padrões do MCP: personalizado (crie o seu) e OneMCP (hospedado pelo Google). Ambos usam StreamableHTTP.
- Implantação sem estado: o mesmo código funciona localmente e implantado. Variáveis de ambiente + API de back-end = sem arquivos de configuração em contêineres.
A seguir
Nível 2: processamento de sinais de SOS →
Aprenda a processar sinais de socorro de outros sobreviventes usando padrões orientados a eventos e uma coordenação de agentes mais avançada.