
1. Sứ mệnh

Bạn đã tự nhận dạng mình với AI khẩn cấp và giờ đây, tín hiệu của bạn đang nhấp nháy trên bản đồ hành tinh – nhưng chỉ là một tia sáng yếu ớt, lẫn trong tĩnh điện. Các đội cứu hộ quét từ quỹ đạo có thể thấy một vật thể tại toạ độ của bạn, nhưng họ không thể xác định vị trí chính xác. Tín hiệu quá yếu.
Để tăng cường tín hiệu của thiết bị phát đến mức tối đa, bạn cần xác nhận vị trí chính xác của mình. Hệ thống định vị của khoang đã bị hỏng, nhưng vụ tai nạn đã rải rác những bằng chứng có thể cứu vãn trên khắp địa điểm hạ cánh. Mẫu đất. Thực vật kỳ lạ. Bầu trời đêm của người ngoài hành tinh không có mây.
Nếu bạn có thể phân tích bằng chứng này và xác định khu vực trên hành tinh mà bạn đang ở, thì AI có thể xác định vị trí của bạn bằng phương pháp đo đạc tam giác và khuếch đại tín hiệu của đèn hiệu. Sau đó, có thể sẽ có người tìm thấy bạn.
Đã đến lúc kết nối các mảnh ghép.
Điều kiện tiên quyết
⚠️ Bạn phải hoàn thành cấp độ 0 để tham gia cấp độ này.
Trước khi bắt đầu, hãy xác minh rằng bạn có:
- [ ]
config.jsontrong thư mục gốc của dự án bằng mã nhận dạng và toạ độ của người tham gia - [ ] Hình đại diện của bạn xuất hiện trên bản đồ thế giới
- [ ] Đèn hiệu của bạn xuất hiện (mờ) tại toạ độ của bạn
Nếu bạn chưa hoàn thành Cấp độ 0, hãy bắt đầu từ cấp độ đó.
Sản phẩm bạn sẽ tạo ra
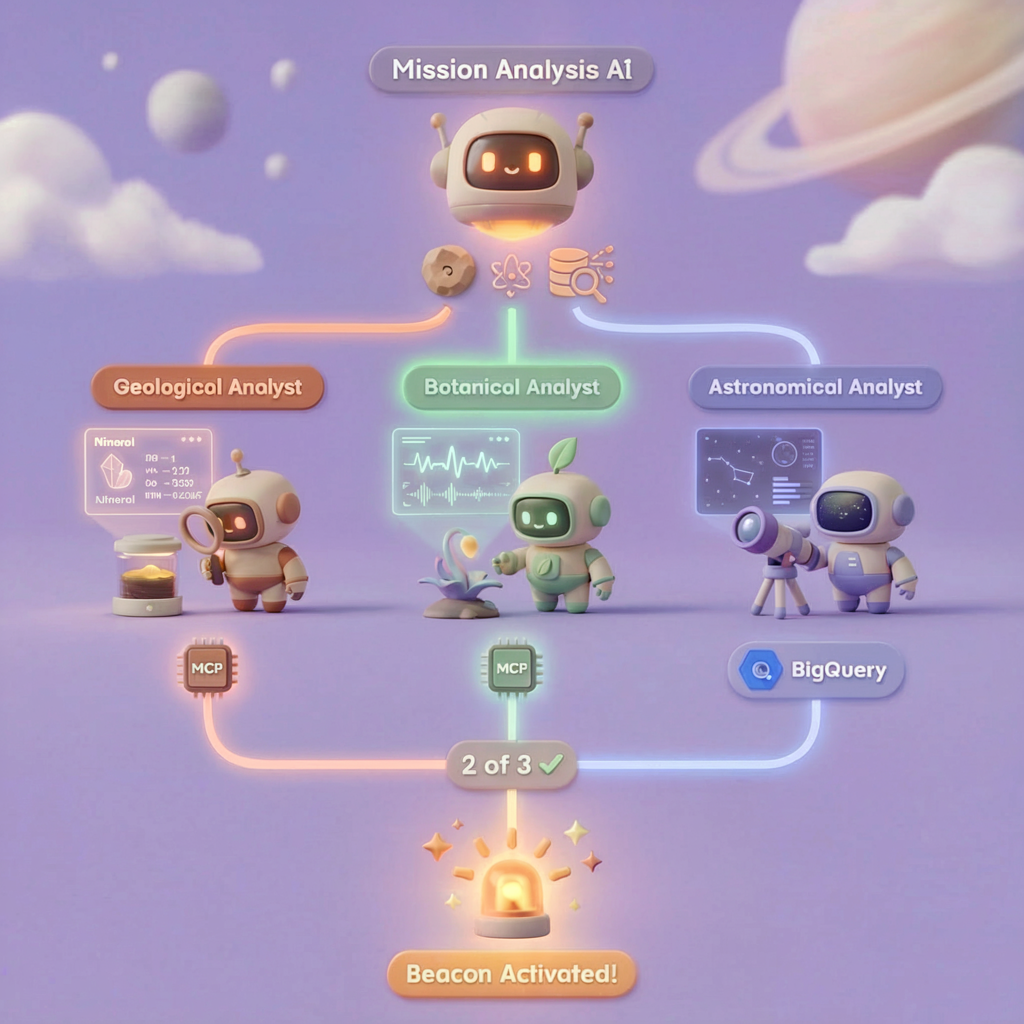
Ở cấp độ này, bạn sẽ xây dựng một hệ thống AI đa tác nhân phân tích bằng chứng tại hiện trường tai nạn bằng cách sử dụng quy trình xử lý song song:

Mục tiêu học tập
Khái niệm | Kiến thức bạn sẽ học được |
Hệ thống đa tác nhân | Tạo các tác nhân chuyên biệt có trách nhiệm duy nhất |
ParallelAgent | Kết hợp các tác nhân độc lập để chạy đồng thời |
before_agent_callback | Tìm nạp cấu hình và đặt trạng thái trước khi chạy tác nhân |
ToolContext | Truy cập vào các giá trị trạng thái trong hàm công cụ |
Máy chủ MCP tuỳ chỉnh | Tạo các công cụ bằng mẫu bắt buộc (mã Python trên Cloud Run) |
OneMCP BigQuery | Kết nối với MCP do Google quản lý để truy cập vào BigQuery |
AI đa phương thức | Phân tích hình ảnh và video+âm thanh bằng Gemini |
Điều phối tác nhân | Điều phối nhiều tác nhân bằng một trình điều phối gốc |
Triển khai trên đám mây | Triển khai máy chủ và tác nhân MCP lên Cloud Run |
Chuẩn bị A2A | Cấu trúc các tác nhân để giao tiếp giữa các tác nhân trong tương lai |
Quần xã sinh vật của hành tinh
Bề mặt hành tinh được chia thành 4 quần xã sinh vật riêng biệt, mỗi quần xã có những đặc điểm riêng:
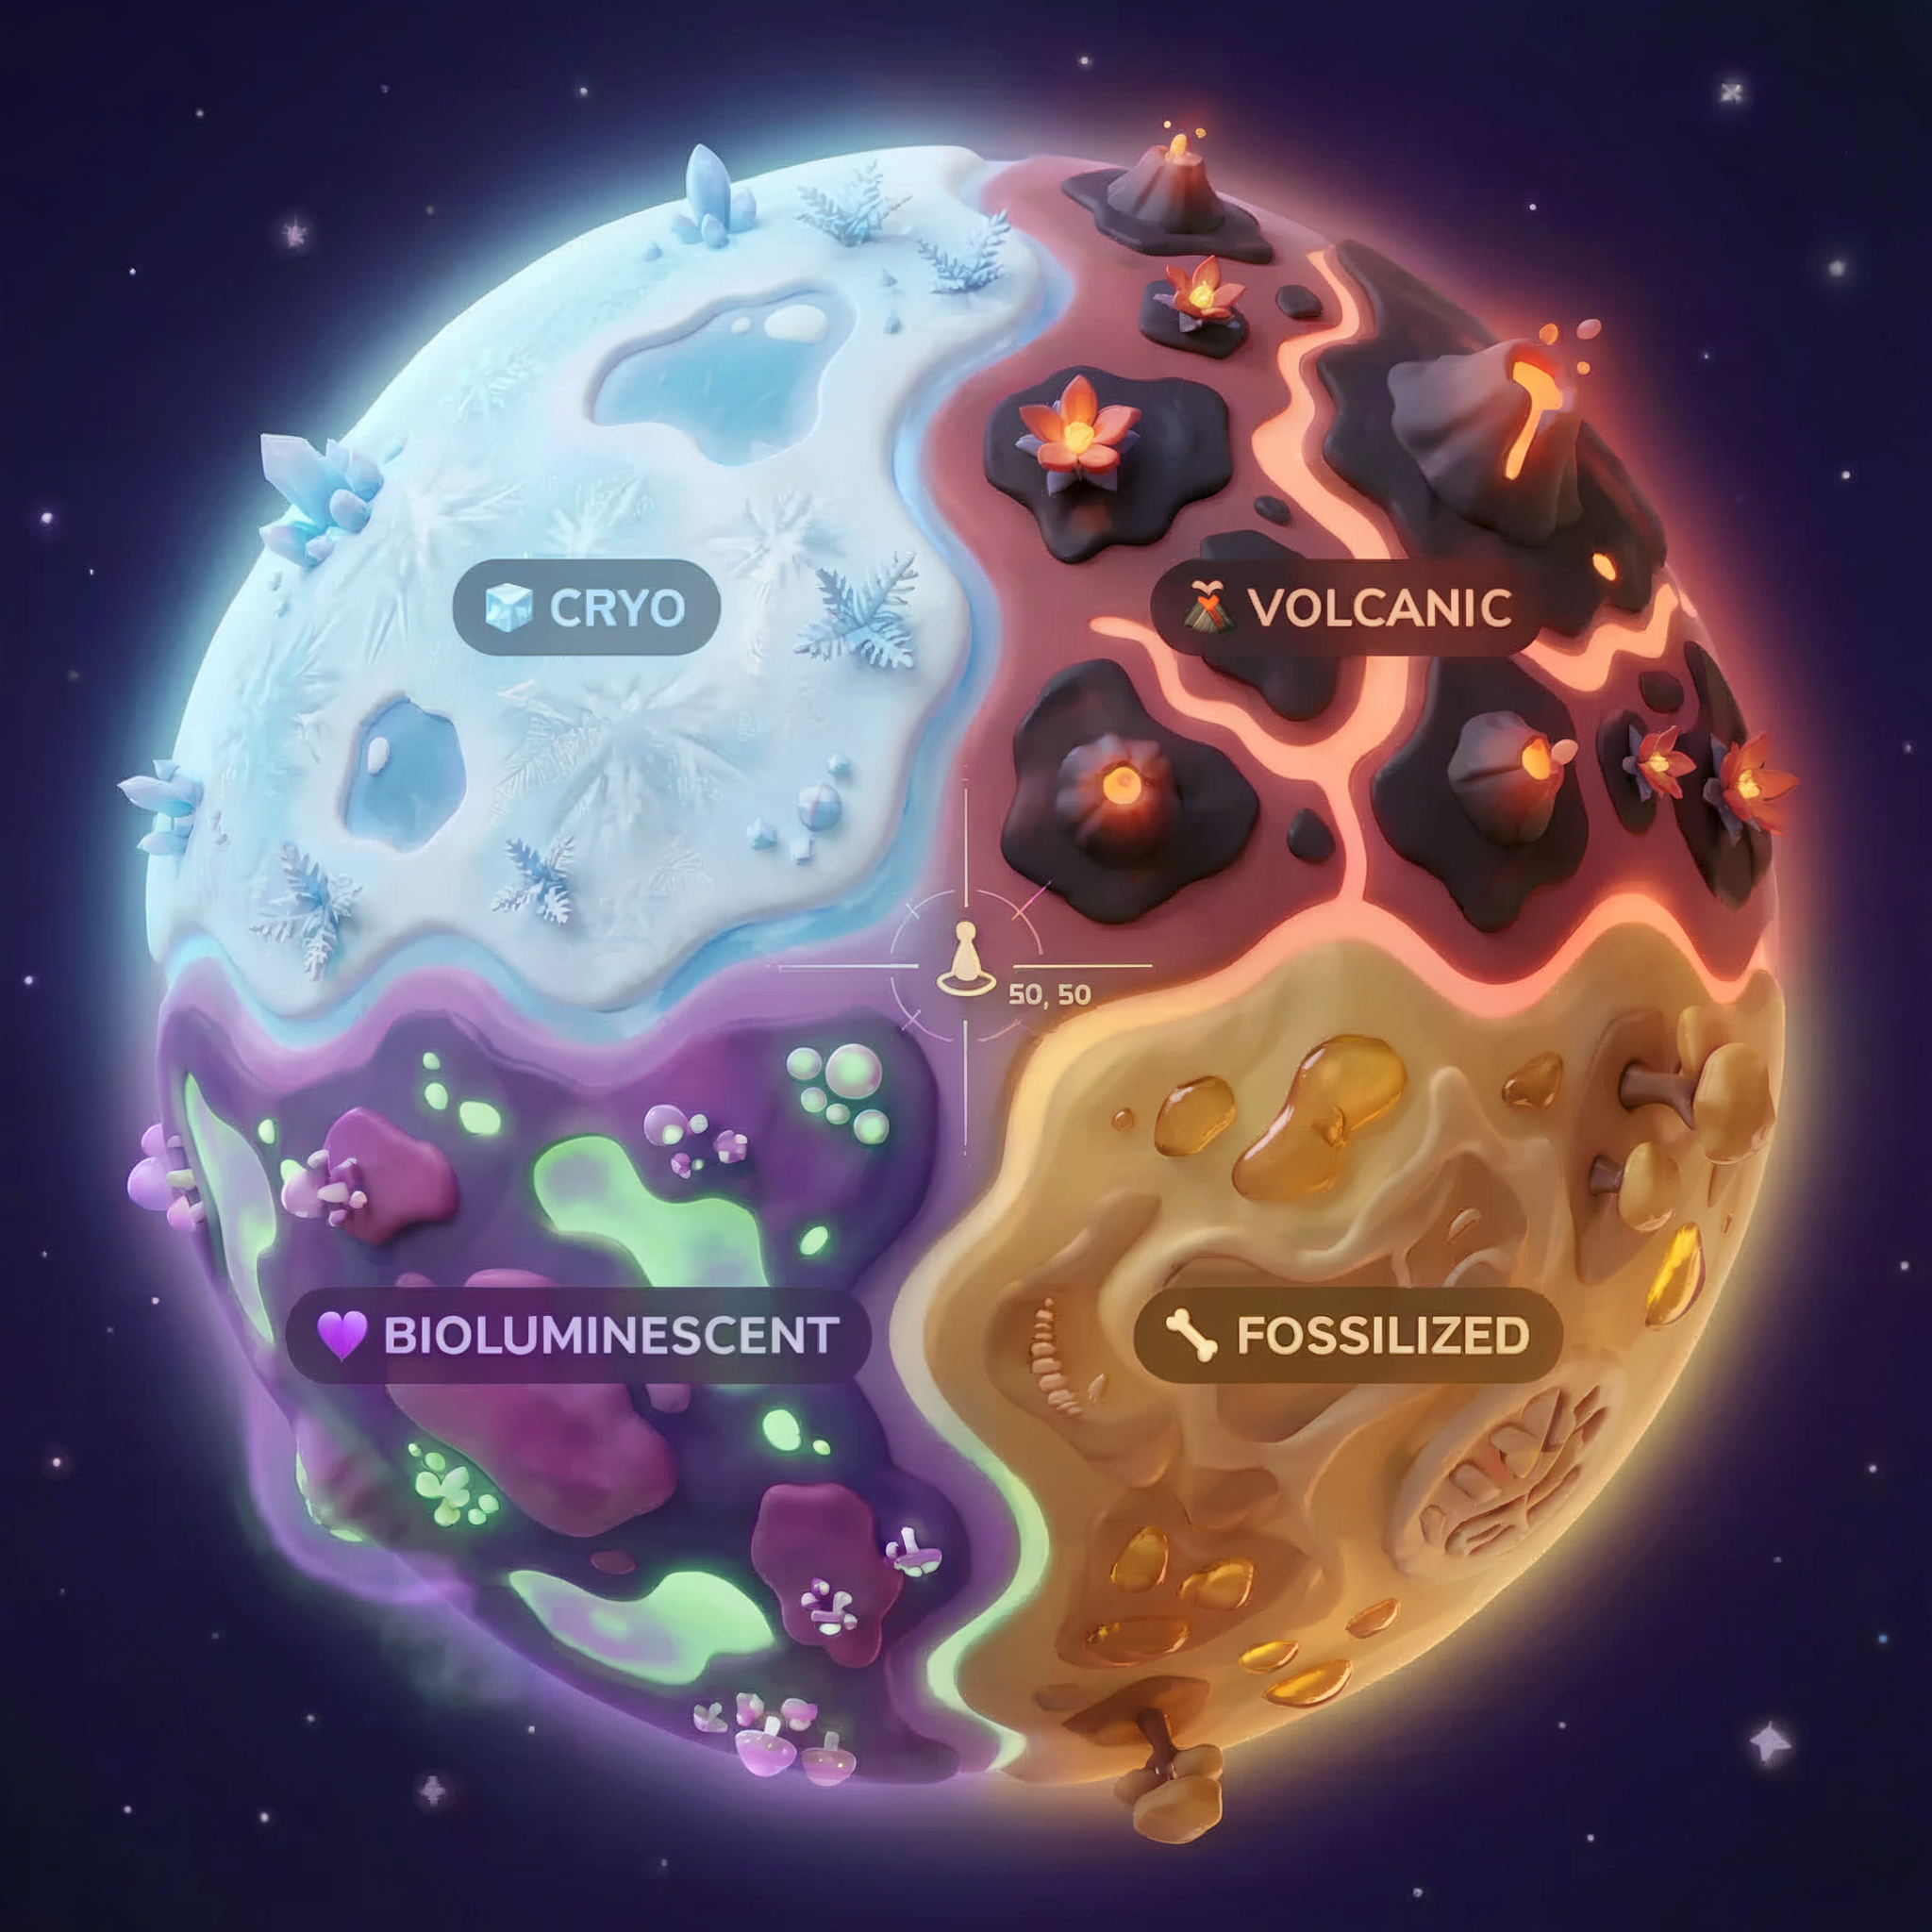
Toạ độ của bạn sẽ xác định quần xã sinh vật nơi bạn gặp tai nạn. Bằng chứng tại vị trí gặp sự cố phản ánh các đặc điểm của quần xã sinh vật đó:
Quần xã sinh vật | Góc phần tư | Bằng chứng địa chất | Bằng chứng thực vật | Bằng chứng thiên văn học |
🧊 CRYO | NW (x<50, y≥50) | Mê-tan đông lạnh, tinh thể băng | Dương xỉ băng giá, thực vật chịu lạnh | Ngôi sao khổng lồ xanh |
🌋 VOLCANIC | NE (x≥50, y≥50) | Mỏ đá vỏ chai | Hoa lửa, thực vật chịu nhiệt | Hệ nhị phân sao lùn đỏ |
💜 BIOLUMINESCENT | TN (x<50, y<50) | Đất phát quang | Nấm phát sáng, thực vật phát quang | Sao xung màu xanh lục |
🦴 HOÁ THẠCH | SE (x≥50, y<50) | Mỏ hổ phách, khoáng chất ite | Cây hoá thạch, hệ thực vật cổ đại | Mặt trời vàng |
Công việc của bạn: xây dựng các tác nhân AI có thể phân tích bằng chứng và suy luận xem bạn đang ở quần xã sinh vật nào.
2. Thiết lập môi trường
Chạy tập lệnh thiết lập môi trường
Trước khi tạo bằng chứng, bạn cần bật các Cloud API bắt buộc của Google, bao gồm cả OneMCP cho BigQuery. API này cung cấp quyền truy cập MCP được quản lý vào BigQuery.
👉💻 Chạy tập lệnh thiết lập môi trường:
cd $HOME/way-back-home/level_1
chmod +x setup/setup_env.sh
./setup/setup_env.sh
Bạn sẽ thấy kết quả như sau:
================================================================
Level 1: Environment Setup
================================================================
Project: your-project-id

[1/6] Enabling core Google Cloud APIs...
      ✓ Vertex AI API enabled
      ✓ Cloud Run API enabled
      ✓ Cloud Build API enabled
      ✓ BigQuery API enabled
      ✓ Artifact Registry API enabled
      ✓ IAM API enabled

[2/6] Enabling OneMCP BigQuery (Managed MCP)...
      ✓ OneMCP BigQuery enabled

[3/6] Setting up service account and IAM permissions...
      ✓ Service account 'way-back-home-sa' created
      ✓ Vertex AI User role granted
      ✓ Cloud Run Invoker role granted
      ✓ BigQuery User role granted
      ✓ BigQuery Data Viewer role granted
      ✓ Storage Object Viewer role granted

[4/6] Configuring Cloud Build IAM for deployments...
      ✓ Cloud Build can now deploy services as way-back-home-sa
      ✓ Cloud Run Admin role granted to Compute SA

[5/6] Creating Artifact Registry repository...
      ✓ Repository 'way-back-home' created

[6/6] Creating environment variables file...
      Found PARTICIPANT_ID in config.json: abc123...
      ✓ Created ../set_env.sh

================================================================
✅ Environment Setup Complete!
================================================================
Biến môi trường nguồn
👉💻 Nguồn các biến môi trường:
source $HOME/way-back-home/set_env.sh
Cài đặt các phần phụ thuộc
👉💻 Cài đặt các phần phụ thuộc Python cấp 1:
cd $HOME/way-back-home/level_1
uv sync
Thiết lập danh mục ngôi sao
👉💻 Thiết lập danh mục ngôi sao trong BigQuery:
uv run python setup/setup_star_catalog.py
Bạn sẽ thấy:
Setting up star catalog in project: your-project-id
==================================================
✓ Dataset way_back_home already exists
✓ Created table star_catalog
✓ Inserted 12 rows into star_catalog

📊 Star Catalog Summary:
----------------------------------------
  NE (VOLCANIC): 3 stellar patterns
  NW (CRYO): 3 stellar patterns
  SE (FOSSILIZED): 3 stellar patterns
  SW (BIOLUMINESCENT): 3 stellar patterns
----------------------------------------
✓ Star catalog is ready for triangulation queries

==================================================
✅ Star catalog setup complete!
3. Tạo bằng chứng về sự cố
Giờ đây, bạn có thể tạo bằng chứng được cá nhân hoá về vị trí xảy ra tai nạn dựa trên toạ độ của bạn.
Chạy Trình tạo bằng chứng
👉💻 Trong thư mục level_1, hãy chạy:
cd $HOME/way-back-home/level_1
uv run python generate_evidence.py
Bạn sẽ thấy kết quả như sau:
✓ Welcome back, Explorer_Aria!
  Coordinates: (23, 67)
  Ready to analyze your crash site.

📍 Crash site analysis initiated...
   Generating evidence for your location...

🔬 Generating soil sample...
✓ Soil sample captured: outputs/soil_sample.png
✨ Capturing star field...
✓ Star field captured: outputs/star_field.png
🌿 Recording flora activity...
   (This may take 1-2 minutes for video generation)
   Generating video...
   Generating video...
   Generating video...
✓ Flora recorded: outputs/flora_recording.mp4

📤 Uploading evidence to Mission Control...
✓ Config updated with evidence URLs

==================================================
✅ Evidence generation complete!
==================================================
Xem xét bằng chứng
👉 Dành chút thời gian xem các tệp bằng chứng đã tạo trong thư mục outputs/. Mỗi mảnh vỡ phản ánh đặc điểm sinh vật học của vị trí nơi bạn gặp nạn – mặc dù bạn sẽ không biết đó là hệ sinh thái nào cho đến khi các đặc vụ AI phân tích chúng!
Bằng chứng được tạo có thể có dạng như sau, tuỳ thuộc vào vị trí của bạn:


4. Tạo máy chủ MCP tuỳ chỉnh
Hệ thống phân tích trên tàu của khoang thoát hiểm đã bị hỏng, nhưng dữ liệu cảm biến thô vẫn còn nguyên vẹn sau vụ tai nạn. Bạn sẽ tạo một máy chủ MCP bằng FastMCP cung cấp các công cụ phân tích địa chất và thực vật học.
Tạo Công cụ phân tích địa chất
Công cụ này phân tích hình ảnh mẫu đất để xác định thành phần khoáng chất.
👉✏️ Mở $HOME/way-back-home/level_1/mcp-server/main.py rồi tìm #REPLACE-GEOLOGICAL-TOOL. Thay thế bằng:
GEOLOGICAL_PROMPT = """Analyze this alien soil sample image.

Classify the PRIMARY characteristic (choose exactly one):

1. CRYO - Frozen/icy minerals, crystalline structures, frost patterns,
   blue-white coloration, permafrost indicators

2. VOLCANIC - Volcanic rock, basalt, obsidian, sulfur deposits,
   red-orange minerals, heat-formed crystite structures

3. BIOLUMINESCENT - Glowing particles, phosphorescent minerals,
   organic-mineral hybrids, purple-green luminescence

4. FOSSILIZED - Ancient compressed minerals, amber deposits,
   petrified organic matter, golden-brown stratification

Respond ONLY with valid JSON (no markdown, no explanation):
{
    "biome": "CRYO|VOLCANIC|BIOLUMINESCENT|FOSSILIZED",
    "confidence": 0.0-1.0,
    "minerals_detected": ["mineral1", "mineral2"],
    "description": "Brief description of what you observe"
}
"""


@mcp.tool()
def analyze_geological(
    image_url: Annotated[
        str,
        Field(description="Cloud Storage URL (gs://...) of the soil sample image")
    ]
) -> dict:
    """
    Analyzes a soil sample image to identify mineral composition and classify the planetary biome.

    Args:
        image_url: Cloud Storage URL of the soil sample image (gs://bucket/path/image.png)

    Returns:
        dict with biome, confidence, minerals_detected, and description
    """
    logger.info(f">>> 🔬 Tool: 'analyze_geological' called for '{image_url}'")

    try:
        response = client.models.generate_content(
            model="gemini-2.5-flash",
            contents=[
                GEOLOGICAL_PROMPT,
                genai_types.Part.from_uri(file_uri=image_url, mime_type="image/png")
            ]
        )

        result = parse_json_response(response.text)
        logger.info(f"    ✓ Geological analysis complete: {result.get('biome', 'UNKNOWN')}")
        return result

    except Exception as e:
        logger.error(f"    ✗ Geological analysis failed: {str(e)}")
        return {"error": str(e), "biome": "UNKNOWN", "confidence": 0.0}
Tạo Công cụ phân tích thực vật
Công cụ này phân tích các bản ghi hình thực vật, bao gồm cả bản âm thanh.
👉✏️ Trong cùng một tệp ($HOME/way-back-home/level_1/mcp-server/main.py), hãy tìm #REPLACE-BOTANICAL-TOOL rồi thay thế bằng:
BOTANICAL_PROMPT = """Analyze this alien flora video recording.

Pay attention to BOTH:
1. VISUAL elements: Plant appearance, movement patterns, colors, bioluminescence
2. AUDIO elements: Ambient sounds, rustling, organic noises, frequencies

Classify the PRIMARY biome (choose exactly one):

1. CRYO - Crystalline ice-plants, frost-covered vegetation,
   crackling/tinkling sounds, slow brittle movements, blue-white flora

2. VOLCANIC - Heat-resistant plants, sulfur-adapted species,
   hissing/bubbling sounds, smoke-filtering vegetation, red-orange flora

3. BIOLUMINESCENT - Glowing plants, pulsing light patterns,
   humming/resonating sounds, reactive to stimuli, purple-green flora

4. FOSSILIZED - Ancient petrified plants, amber-preserved specimens,
   deep resonant sounds, minimal movement, golden-brown flora

Respond ONLY with valid JSON (no markdown, no explanation):
{
    "biome": "CRYO|VOLCANIC|BIOLUMINESCENT|FOSSILIZED",
    "confidence": 0.0-1.0,
    "species_detected": ["species1", "species2"],
    "audio_signatures": ["sound1", "sound2"],
    "description": "Brief description of visual and audio observations"
}
"""


@mcp.tool()
def analyze_botanical(
    video_url: Annotated[
        str,
        Field(description="Cloud Storage URL (gs://...) of the flora video recording")
    ]
) -> dict:
    """
    Analyzes a flora video recording (visual + audio) to identify plant species and classify the biome.

    Args:
        video_url: Cloud Storage URL of the flora video (gs://bucket/path/video.mp4)

    Returns:
        dict with biome, confidence, species_detected, audio_signatures, and description
    """
    logger.info(f">>> 🌿 Tool: 'analyze_botanical' called for '{video_url}'")

    try:
        response = client.models.generate_content(
            model="gemini-2.5-flash",
            contents=[
                BOTANICAL_PROMPT,
                genai_types.Part.from_uri(file_uri=video_url, mime_type="video/mp4")
            ]
        )

        result = parse_json_response(response.text)
        logger.info(f"    ✓ Botanical analysis complete: {result.get('biome', 'UNKNOWN')}")
        return result

    except Exception as e:
        logger.error(f"    ✗ Botanical analysis failed: {str(e)}")
        return {"error": str(e), "biome": "UNKNOWN", "confidence": 0.0}
Kiểm thử máy chủ MCP cục bộ
👉💻 Kiểm thử máy chủ MCP:
cd $HOME/way-back-home/level_1/mcp-server
pip install -r requirements.txt
python main.py
Bạn sẽ thấy:
[INFO] Initialized Gemini client for project: your-project-id
[INFO] 🚀 Location Analyzer MCP Server starting on port 8080
[INFO] 📍 MCP endpoint: http://0.0.0.0:8080/mcp
[INFO] 🔧 Tools: analyze_geological, analyze_botanical
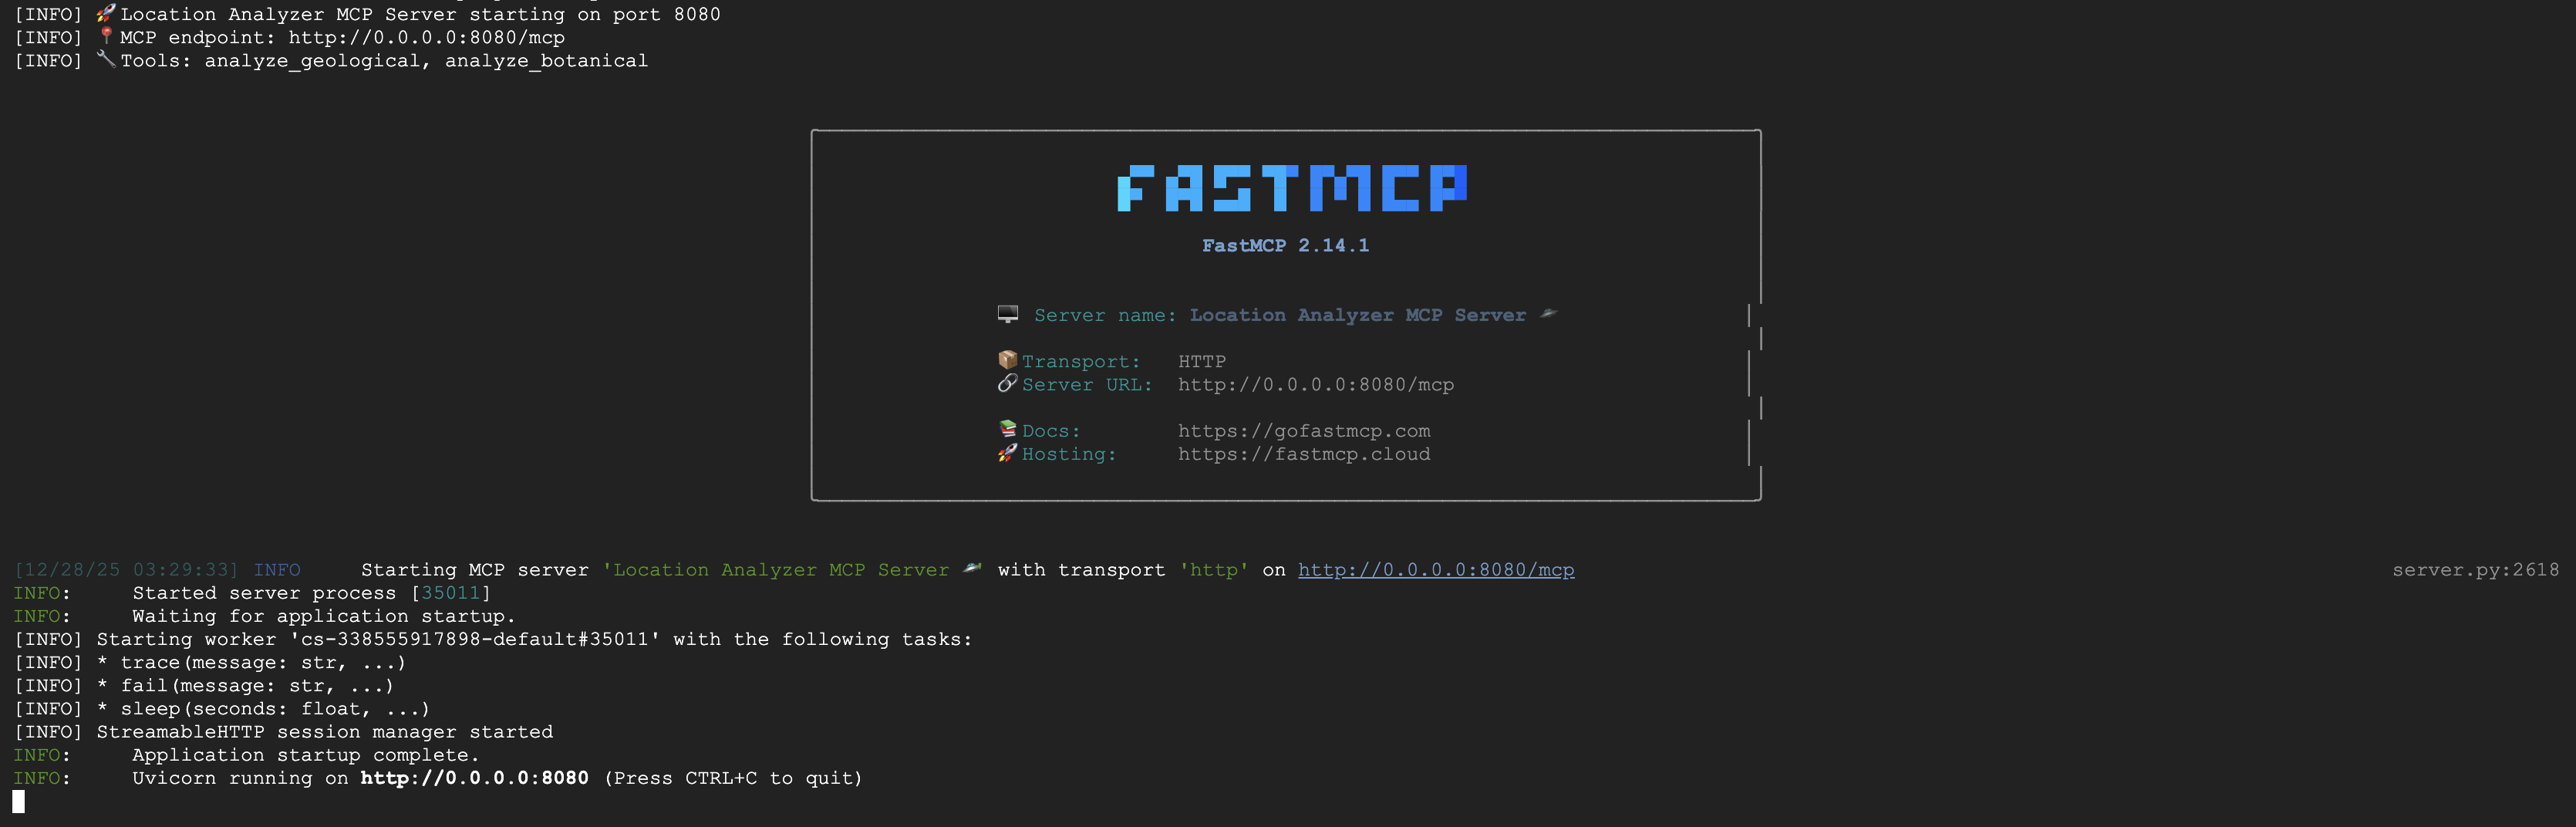
Máy chủ FastMCP hiện đang chạy với giao thức truyền tải HTTP. Nhấn Ctrl+C để dừng.
Triển khai MCP Server lên Cloud Run
👉💻 Triển khai:
cd $HOME/way-back-home/level_1/mcp-server
source $HOME/way-back-home/set_env.sh

gcloud builds submit . \
  --config=cloudbuild.yaml \
  --substitutions=_REGION="$REGION",_REPO_NAME="$REPO_NAME",_SERVICE_ACCOUNT="$SERVICE_ACCOUNT"
Lưu URL dịch vụ
👉💻 Lưu URL dịch vụ:
export MCP_SERVER_URL=$(gcloud run services describe location-analyzer \
  --region=$REGION --format='value(status.url)')
echo "MCP Server URL: $MCP_SERVER_URL"

# Add to set_env.sh for later use
echo "export MCP_SERVER_URL=\"$MCP_SERVER_URL\"" >> $HOME/way-back-home/set_env.sh
5. Tạo các tác nhân chuyên trách
Bây giờ, bạn sẽ tạo 3 tác nhân chuyên biệt, mỗi tác nhân có một trách nhiệm duy nhất.
Tạo Nhân viên phân tích địa chất
👉✏️ Mở agent/agents/geological_analyst.py rồi tìm #REPLACE-GEOLOGICAL-AGENT. Thay thế bằng:
from google.adk.agents import Agent
from agent.tools.mcp_tools import get_geological_tool

geological_analyst = Agent(
    name="GeologicalAnalyst",
    model="gemini-2.5-flash",
    description="Analyzes soil samples to classify planetary biome based on mineral composition.",
    instruction="""You are a geological specialist analyzing alien soil samples.

## YOUR EVIDENCE TO ANALYZE
Soil sample URL: {soil_url}

## YOUR TASK
1. Call the analyze_geological tool with the soil sample URL above
2. Examine the results for mineral composition and biome indicators
3. Report your findings clearly

The four possible biomes are:
- CRYO: Frozen, icy minerals, blue/white coloring
- VOLCANIC: Magma, obsidian, volcanic rock, red/orange coloring
- BIOLUMINESCENT: Glowing, phosphorescent minerals, purple/green
- FOSSILIZED: Amber, ancient preserved matter, golden/brown

## REPORTING FORMAT
Always report your classification clearly:
"GEOLOGICAL ANALYSIS: [BIOME] (confidence: X%)"

Include a brief description of what you observed in the sample.

## IMPORTANT
- You do NOT synthesize with other evidence
- You do NOT confirm locations
- Just analyze the soil sample and report what you find
- Call the tool immediately with the URL provided above""",
    tools=[get_geological_tool()]
)
Tạo tác nhân Botanical Analyst
👉✏️ Mở agent/agents/botanical_analyst.py rồi tìm #REPLACE-BOTANICAL-AGENT. Thay thế bằng:
from google.adk.agents import Agent
from agent.tools.mcp_tools import get_botanical_tool

botanical_analyst = Agent(
    name="BotanicalAnalyst",
    model="gemini-2.5-flash",
    description="Analyzes flora recordings to classify planetary biome based on plant life and ambient sounds.",
    instruction="""You are a botanical specialist analyzing alien flora recordings.

## YOUR EVIDENCE TO ANALYZE
Flora recording URL: {flora_url}

## YOUR TASK
1. Call the analyze_botanical tool with the flora recording URL above
2. Pay attention to BOTH visual AND audio elements in the recording
3. Report your findings clearly

The four possible biomes are:
- CRYO: Frost ferns, crystalline plants, cold wind sounds, crackling ice
- VOLCANIC: Fire blooms, heat-resistant flora, crackling/hissing sounds
- BIOLUMINESCENT: Glowing fungi, luminescent plants, ethereal hum, chiming
- FOSSILIZED: Petrified trees, ancient formations, deep resonant sounds

## REPORTING FORMAT
Always report your classification clearly:
"BOTANICAL ANALYSIS: [BIOME] (confidence: X%)"

Include descriptions of what you SAW and what you HEARD.

## IMPORTANT
- You do NOT synthesize with other evidence
- You do NOT confirm locations
- Just analyze the flora recording and report what you find
- Call the tool immediately with the URL provided above""",
    tools=[get_botanical_tool()]
)
Tạo Trợ lý phân tích thiên văn học
Tác nhân này sử dụng một phương pháp khác với hai mẫu công cụ:
- Local FunctionTool: Gemini Vision để trích xuất các tính năng có dấu sao
- OneMCP BigQuery: Truy vấn danh mục sao thông qua MCP do Google quản lý
👉✏️ Mở agent/agents/astronomical_analyst.py rồi tìm #REPLACE-ASTRONOMICAL-AGENT. Thay thế bằng:
from google.adk.agents import Agent
from agent.tools.star_tools import (
    extract_star_features_tool,
    get_bigquery_mcp_toolset,
)

# Get the BigQuery MCP toolset
bigquery_toolset = get_bigquery_mcp_toolset()

astronomical_analyst = Agent(
    name="AstronomicalAnalyst",
    model="gemini-2.5-flash",
    description="Analyzes star field images and queries the star catalog via OneMCP BigQuery.",
    instruction="""You are an astronomical specialist analyzing alien night skies.

## YOUR EVIDENCE TO ANALYZE
Star field URL: {stars_url}

## YOUR TWO TOOLS

### TOOL 1: extract_star_features (Local Gemini Vision)
Call this FIRST with the star field URL above.
Returns: "primary_star": "...", "nebula_type": "...", "stellar_color": "..."

### TOOL 2: BigQuery MCP (execute_query)
Call this SECOND with the results from Tool 1.
Use this exact SQL query (replace the placeholders with values from Step 1):

SELECT quadrant, biome, primary_star, nebula_type
FROM `{project_id}.way_back_home.star_catalog`
WHERE LOWER(primary_star) = LOWER('PRIMARY_STAR_FROM_STEP_1')
  AND LOWER(nebula_type) = LOWER('NEBULA_TYPE_FROM_STEP_1')
LIMIT 1

## YOUR WORKFLOW
1. Call extract_star_features with: {stars_url}
2. Get the primary_star and nebula_type from the result
3. Call execute_query with the SQL above (replacing placeholders)
4. Report the biome and quadrant from the query result

## BIOME REFERENCE
| Biome | Quadrant | Primary Star | Nebula Type |
|-------|----------|--------------|-------------|
| CRYO | NW | blue_giant | ice_blue |
| VOLCANIC | NE | red_dwarf_binary | fire |
| BIOLUMINESCENT | SW | green_pulsar | purple_magenta |
| FOSSILIZED | SE | yellow_sun | golden |

## REPORTING FORMAT
"ASTRONOMICAL ANALYSIS: [BIOME] in [QUADRANT] quadrant (confidence: X%)"

Include a description of the stellar features you observed.

## IMPORTANT
- You do NOT synthesize with other evidence
- You do NOT confirm locations
- Just analyze the stars and report what you find
- Start by calling extract_star_features with the URL above""",
    tools=[extract_star_features_tool, bigquery_toolset]
)
6. Tạo các kết nối công cụ MCP
Giờ đây, bạn sẽ tạo các trình bao bọc Python cho phép các tác nhân ADK của bạn giao tiếp với máy chủ MCP. Các trình bao bọc này xử lý vòng đời kết nối – thiết lập phiên, gọi các công cụ và phân tích cú pháp các phản hồi.
Tạo kết nối công cụ MCP (MCP tuỳ chỉnh)
Thao tác này sẽ kết nối với máy chủ FastMCP tuỳ chỉnh mà bạn triển khai trên Cloud Run.
👉✏️ Mở agent/tools/mcp_tools.py rồi tìm #REPLACE-MCP-TOOL-CONNECTION. Thay thế bằng:
import os
import logging

from google.adk.tools.mcp_tool.mcp_toolset import MCPToolset
from google.adk.tools.mcp_tool.mcp_session_manager import StreamableHTTPConnectionParams

logger = logging.getLogger(__name__)

MCP_SERVER_URL = os.environ.get("MCP_SERVER_URL")

_mcp_toolset = None

def get_mcp_toolset():
    """Get the MCPToolset connected to the location-analyzer server."""
    global _mcp_toolset

    if _mcp_toolset is not None:
        return _mcp_toolset

    if not MCP_SERVER_URL:
        raise ValueError(
            "MCP_SERVER_URL not set. Please run:\n"
            "  export MCP_SERVER_URL='https://location-analyzer-xxx.a.run.app'"
        )

    # FastMCP exposes MCP protocol at /mcp endpoint
    mcp_endpoint = f"{MCP_SERVER_URL}/mcp"
    logger.info(f"[MCP Tools] Connecting to: {mcp_endpoint}")

    _mcp_toolset = MCPToolset(
        connection_params=StreamableHTTPConnectionParams(
            url=mcp_endpoint,
            timeout=120,  # 2 minutes for Gemini analysis
        )
    )

    return _mcp_toolset

def get_geological_tool():
    """Get the geological analysis tool from the MCP server."""
    return get_mcp_toolset()

def get_botanical_tool():
    """Get the botanical analysis tool from the MCP server."""
    return get_mcp_toolset()
Tạo công cụ phân tích hiệu suất (OneMCP BigQuery)
Danh mục sao mà bạn đã tải vào BigQuery trước đó chứa các mẫu sao cho từng quần xã sinh vật. Thay vì viết mã ứng dụng BigQuery để truy vấn, chúng tôi kết nối với máy chủ OneMCP BigQuery của Google – máy chủ này cung cấp khả năng execute_query của BigQuery dưới dạng một công cụ MCP mà mọi tác nhân ADK đều có thể sử dụng trực tiếp.
👉✏️ Mở agent/tools/star_tools.py rồi tìm #REPLACE-STAR-TOOLS. Thay thế bằng:
import os
import json
import logging

from google import genai
from google.genai import types as genai_types
from google.adk.tools import FunctionTool
from google.adk.tools.mcp_tool.mcp_toolset import MCPToolset
from google.adk.tools.mcp_tool.mcp_session_manager import StreamableHTTPConnectionParams
import google.auth
import google.auth.transport.requests

logger = logging.getLogger(__name__)

# =============================================================================
# CONFIGURATION - Environment variables only
# =============================================================================

PROJECT_ID = os.environ.get("GOOGLE_CLOUD_PROJECT", "")

if not PROJECT_ID:
    logger.warning("[Star Tools] GOOGLE_CLOUD_PROJECT not set")

# Initialize Gemini client for star feature extraction
genai_client = genai.Client(
    vertexai=True,
    project=PROJECT_ID or "placeholder",
    location=os.environ.get("GOOGLE_CLOUD_LOCATION", "us-central1")
)

logger.info(f"[Star Tools] Initialized for project: {PROJECT_ID}")

# =============================================================================
# OneMCP BigQuery Connection
# =============================================================================

BIGQUERY_MCP_URL = "https://bigquery.googleapis.com/mcp"

_bigquery_toolset = None

def get_bigquery_mcp_toolset():
    """
    Get the MCPToolset connected to Google's BigQuery MCP server.

    This uses OAuth 2.0 authentication with Application Default Credentials.
    The toolset provides access to BigQuery's pre-built MCP tools like:
    - execute_query: Run SQL queries
    - list_datasets: List available datasets
    - get_table_schema: Get table structure
   """
    global _bigquery_toolset

    if _bigquery_toolset is not None:
        return _bigquery_toolset

    logger.info("[Star Tools] Connecting to OneMCP BigQuery...")

    # Get OAuth credentials
    credentials, project_id = google.auth.default(
        scopes=["https://www.googleapis.com/auth/bigquery"]
    )

    # Refresh to get a valid token
    credentials.refresh(google.auth.transport.requests.Request())
    oauth_token = credentials.token

    # Configure headers for BigQuery MCP
    headers = {
        "Authorization": f"Bearer {oauth_token}",
        "x-goog-user-project": project_id or PROJECT_ID
    }

    # Create MCPToolset with StreamableHTTP connection
    _bigquery_toolset = MCPToolset(
        connection_params=StreamableHTTPConnectionParams(
            url=BIGQUERY_MCP_URL,
            headers=headers
        )
    )

    logger.info("[Star Tools] Connected to BigQuery MCP")
    return _bigquery_toolset


# =============================================================================
# Local FunctionTool: Star Feature Extraction
# =============================================================================
# This is a LOCAL tool that calls Gemini directly - demonstrating that
# you can mix local FunctionTools with MCP tools in the same agent.

STAR_EXTRACTION_PROMPT = """Analyze this alien night sky image and extract stellar features.

Identify:
1. PRIMARY STAR TYPE: blue_giant, red_dwarf, red_dwarf_binary, green_pulsar, yellow_sun, etc.
2. NEBULA TYPE: ice_blue, fire, purple_magenta, golden, etc.
3. STELLAR COLOR: blue_white, red_orange, green_purple, yellow_gold, etc.

Respond ONLY with valid JSON:
{"primary_star": "...", "nebula_type": "...", "stellar_color": "...", "description": "..."}
"""


def _parse_json_response(text: str) -> dict:
    """Parse JSON from Gemini response, handling markdown formatting."""
    cleaned = text.strip()
    if cleaned.startswith("```json"):
        cleaned = cleaned[7:]
    elif cleaned.startswith("```"):
        cleaned = cleaned[3:]
    if cleaned.endswith("```"):
        cleaned = cleaned[:-3]
    cleaned = cleaned.strip()

    try:
        return json.loads(cleaned)
    except json.JSONDecodeError as e:
        logger.error(f"Failed to parse JSON: {e}")
        return {"error": f"Failed to parse response: {str(e)}"}


def extract_star_features(image_url: str) -> dict:
    """
    Extract stellar features from a star field image using Gemini Vision.

    This is a LOCAL FunctionTool - we call Gemini directly, not through MCP.
    The agent will use this alongside the BigQuery MCP tools.
    """
    logger.info(f"[Stars] Extracting features from: {image_url}")

    response = genai_client.models.generate_content(
        model="gemini-2.5-flash",
        contents=[
            STAR_EXTRACTION_PROMPT,
            genai_types.Part.from_uri(file_uri=image_url, mime_type="image/png")
        ]
    )

    result = _parse_json_response(response.text)
    logger.info(f"[Stars] Extracted: primary_star={result.get('primary_star')}")
    return result


# Create the local FunctionTool
extract_star_features_tool = FunctionTool(extract_star_features)
7. Tạo Orchestrator
Bây giờ, hãy tạo nhóm song song và trình điều phối gốc để điều phối mọi thứ.
Tạo nhóm phân tích song song
Tại sao bạn nên chạy 3 chuyên gia song song? Vì chúng hoàn toàn độc lập – nhà phân tích địa chất không cần chờ kết quả của nhà phân tích thực vật và ngược lại. Mỗi chuyên gia phân tích một bằng chứng riêng bằng các công cụ khác nhau. ParallelAgent chạy cả 3 cùng lúc, giảm tổng thời gian phân tích từ ~30 giây (tuần tự) xuống ~10 giây (song song).
👉✏️ Mở agent/agent.py rồi tìm #REPLACE-PARALLEL-CREW. Thay thế bằng:
import os
import logging
import httpx

from google.adk.agents import Agent, ParallelAgent
from google.adk.agents.callback_context import CallbackContext

# Import specialist agents
from agent.agents.geological_analyst import geological_analyst
from agent.agents.botanical_analyst import botanical_analyst
from agent.agents.astronomical_analyst import astronomical_analyst

# Import confirmation tool
from agent.tools.confirm_tools import confirm_location_tool

logger = logging.getLogger(__name__)


# =============================================================================
# BEFORE AGENT CALLBACK - Fetches config and sets state
# =============================================================================

async def setup_participant_context(callback_context: CallbackContext) -> None:
    """
    Fetch participant configuration and populate state for all agents.

    This callback:
    1. Reads PARTICIPANT_ID and BACKEND_URL from environment
    2. Fetches participant data from the backend API
    3. Sets state values: soil_url, flora_url, stars_url, username, x, y, etc.
    4. Returns None to continue normal agent execution
    """
    participant_id = os.environ.get("PARTICIPANT_ID", "")
    backend_url = os.environ.get("BACKEND_URL", "https://api.waybackhome.dev")
    project_id = os.environ.get("GOOGLE_CLOUD_PROJECT", "")

    logger.info(f"[Callback] Setting up context for participant: {participant_id}")

    # Set project_id and backend_url in state immediately
    callback_context.state["project_id"] = project_id
    callback_context.state["backend_url"] = backend_url
    callback_context.state["participant_id"] = participant_id

    if not participant_id:
        logger.warning("[Callback] No PARTICIPANT_ID set - using placeholder values")
        callback_context.state["username"] = "Explorer"
        callback_context.state["x"] = 0
        callback_context.state["y"] = 0
        callback_context.state["soil_url"] = "Not available - set PARTICIPANT_ID"
        callback_context.state["flora_url"] = "Not available - set PARTICIPANT_ID"
        callback_context.state["stars_url"] = "Not available - set PARTICIPANT_ID"
        return None

    # Fetch participant data from backend API
    try:
        url = f"{backend_url}/participants/{participant_id}"
        logger.info(f"[Callback] Fetching from: {url}")

        async with httpx.AsyncClient(timeout=30.0) as client:
            response = await client.get(url)
            response.raise_for_status()
            data = response.json()

        # Extract evidence URLs
        evidence_urls = data.get("evidence_urls", {})

        # Set all state values for sub-agents to access
        callback_context.state["username"] = data.get("username", "Explorer")
        callback_context.state["x"] = data.get("x", 0)
        callback_context.state["y"] = data.get("y", 0)
        callback_context.state["soil_url"] = evidence_urls.get("soil", "Not available")
        callback_context.state["flora_url"] = evidence_urls.get("flora", "Not available")
        callback_context.state["stars_url"] = evidence_urls.get("stars", "Not available")

        logger.info(f"[Callback] State populated for {data.get('username')}")

    except Exception as e:
        logger.error(f"[Callback] Error fetching participant config: {e}")
        callback_context.state["username"] = "Explorer"
        callback_context.state["x"] = 0
        callback_context.state["y"] = 0
        callback_context.state["soil_url"] = f"Error: {e}"
        callback_context.state["flora_url"] = f"Error: {e}"
        callback_context.state["stars_url"] = f"Error: {e}"

    return None


# =============================================================================
# PARALLEL ANALYSIS CREW
# =============================================================================

evidence_analysis_crew = ParallelAgent(
    name="EvidenceAnalysisCrew",
    description="Runs geological, botanical, and astronomical analysis in parallel.",
    sub_agents=[geological_analyst, botanical_analyst, astronomical_analyst]
)
Tạo Trình điều phối gốc
Bây giờ, hãy tạo tác nhân gốc điều phối mọi thứ và sử dụng lệnh gọi lại.
👉✏️ Trong cùng một tệp (agent/agent.py), hãy tìm #REPLACE-ROOT-ORCHESTRATOR. Thay thế bằng:
root_agent = Agent(
    name="MissionAnalysisAI",
    model="gemini-2.5-flash",
    description="Coordinates crash site analysis to confirm explorer location.",
    instruction="""You are the Mission Analysis AI coordinating a rescue operation.

## Explorer Information
- Name: {username}
- Coordinates: ({x}, {y})

## Evidence URLs (automatically provided to specialists via state)
- Soil sample: {soil_url}
- Flora recording: {flora_url}
- Star field: {stars_url}

## Your Workflow

### STEP 1: DELEGATE TO ANALYSIS CREW
Tell the EvidenceAnalysisCrew to analyze all the evidence.
The evidence URLs are already available to the specialists.

### STEP 2: COLLECT RESULTS
Each specialist will report:
- "GEOLOGICAL ANALYSIS: [BIOME] (confidence: X%)"
- "BOTANICAL ANALYSIS: [BIOME] (confidence: X%)"
- "ASTRONOMICAL ANALYSIS: [BIOME] in [QUADRANT] quadrant (confidence: X%)"

### STEP 3: APPLY 2-OF-3 AGREEMENT RULE
- If 2 or 3 specialists agree → that's the answer
- If all 3 disagree → use judgment based on confidence

### STEP 4: CONFIRM LOCATION
Call confirm_location with the determined biome.

## Biome Reference
| Biome | Quadrant | Key Characteristics |
|-------|----------|---------------------|
| CRYO | NW | Frozen, blue, ice crystals |
| VOLCANIC | NE | Magma, red/orange, obsidian |
| BIOLUMINESCENT | SW | Glowing, purple/green |
| FOSSILIZED | SE | Amber, golden, ancient |

## Response Style
Be encouraging and narrative! Celebrate when the beacon activates!
""",
    sub_agents=[evidence_analysis_crew],
    tools=[confirm_location_tool],
    before_agent_callback=setup_participant_context
)
Tạo Công cụ xác nhận vị trí
Đây là bước cuối cùng – công cụ thực sự xác nhận vị trí của bạn với Trung tâm điều khiển và kích hoạt thiết bị báo hiệu. Khi trình điều phối gốc xác định bạn đang ở trong quần xã sinh vật nào (dựa trên quy tắc thoả thuận 2 trong 3), trình điều phối gốc sẽ gọi công cụ này để gửi kết quả đến API phụ trợ.
Công cụ này sử dụng ToolContext, nhờ đó có quyền truy cập vào các giá trị trạng thái (chẳng hạn như participant_id và backend_url) do before_agent_callback đặt trước đó.
👉✏️ Trong agent/tools/confirm_tools.py, hãy tìm #REPLACE-CONFIRM-TOOL. Thay thế bằng:
import os
import logging
import requests

from google.adk.tools import FunctionTool
from google.adk.tools.tool_context import ToolContext

logger = logging.getLogger(__name__)

BIOME_TO_QUADRANT = {
    "CRYO": "NW",
    "VOLCANIC": "NE",
    "BIOLUMINESCENT": "SW",
    "FOSSILIZED": "SE"
}


def _get_actual_biome(x: int, y: int) -> tuple[str, str]:
    """Determine actual biome and quadrant from coordinates."""
    if x < 50 and y >= 50:
        return "NW", "CRYO"
    elif x >= 50 and y >= 50:
        return "NE", "VOLCANIC"
    elif x < 50 and y < 50:
        return "SW", "BIOLUMINESCENT"
    else:
        return "SE", "FOSSILIZED"


def confirm_location(biome: str, tool_context: ToolContext) -> dict:
    """
    Confirm the explorer's location and activate the rescue beacon.

    Uses ToolContext to read state values set by before_agent_callback.
    """
    # Read from state (set by before_agent_callback)
    participant_id = tool_context.state.get("participant_id", "")
    x = tool_context.state.get("x", 0)
    y = tool_context.state.get("y", 0)
    backend_url = tool_context.state.get("backend_url", "https://api.waybackhome.dev")

    # Fallback to environment variables
    if not participant_id:
        participant_id = os.environ.get("PARTICIPANT_ID", "")
    if not backend_url:
        backend_url = os.environ.get("BACKEND_URL", "https://api.waybackhome.dev")

    if not participant_id:
        return {"success": False, "message": "❌ No participant ID available."}

    biome_upper = biome.upper().strip()

    if biome_upper not in BIOME_TO_QUADRANT:
        return {"success": False, "message": f"❌ Unknown biome: {biome}"}

    # Get actual biome from coordinates
    actual_quadrant, actual_biome = _get_actual_biome(x, y)

    if biome_upper != actual_biome:
        return {
            "success": False,
            "message": f"❌ Mismatch! Analysis: {biome_upper}, Actual: {actual_biome}"
        }

    quadrant = BIOME_TO_QUADRANT[biome_upper]

    try:
        response = requests.patch(
            f"{backend_url}/participants/{participant_id}/location",
            params={"x": x, "y": y},
            timeout=10
        )
        response.raise_for_status()

        return {
            "success": True,
            "message": f"🔦 BEACON ACTIVATED!\n\nLocation: {biome_upper} in {quadrant}\nCoordinates: ({x}, {y})"
        }

    except requests.exceptions.ConnectionError:
        return {
            "success": True,
            "message": f"🔦 BEACON ACTIVATED! (Local)\n\nLocation: {biome_upper} in {quadrant}",
            "simulated": True
        }

    except Exception as e:
        return {"success": False, "message": f"❌ Failed: {str(e)}"}


confirm_location_tool = FunctionTool(confirm_location)
8. Kiểm thử bằng giao diện người dùng web ADK
Bây giờ, hãy kiểm thử toàn bộ hệ thống nhiều tác nhân tại chỗ.
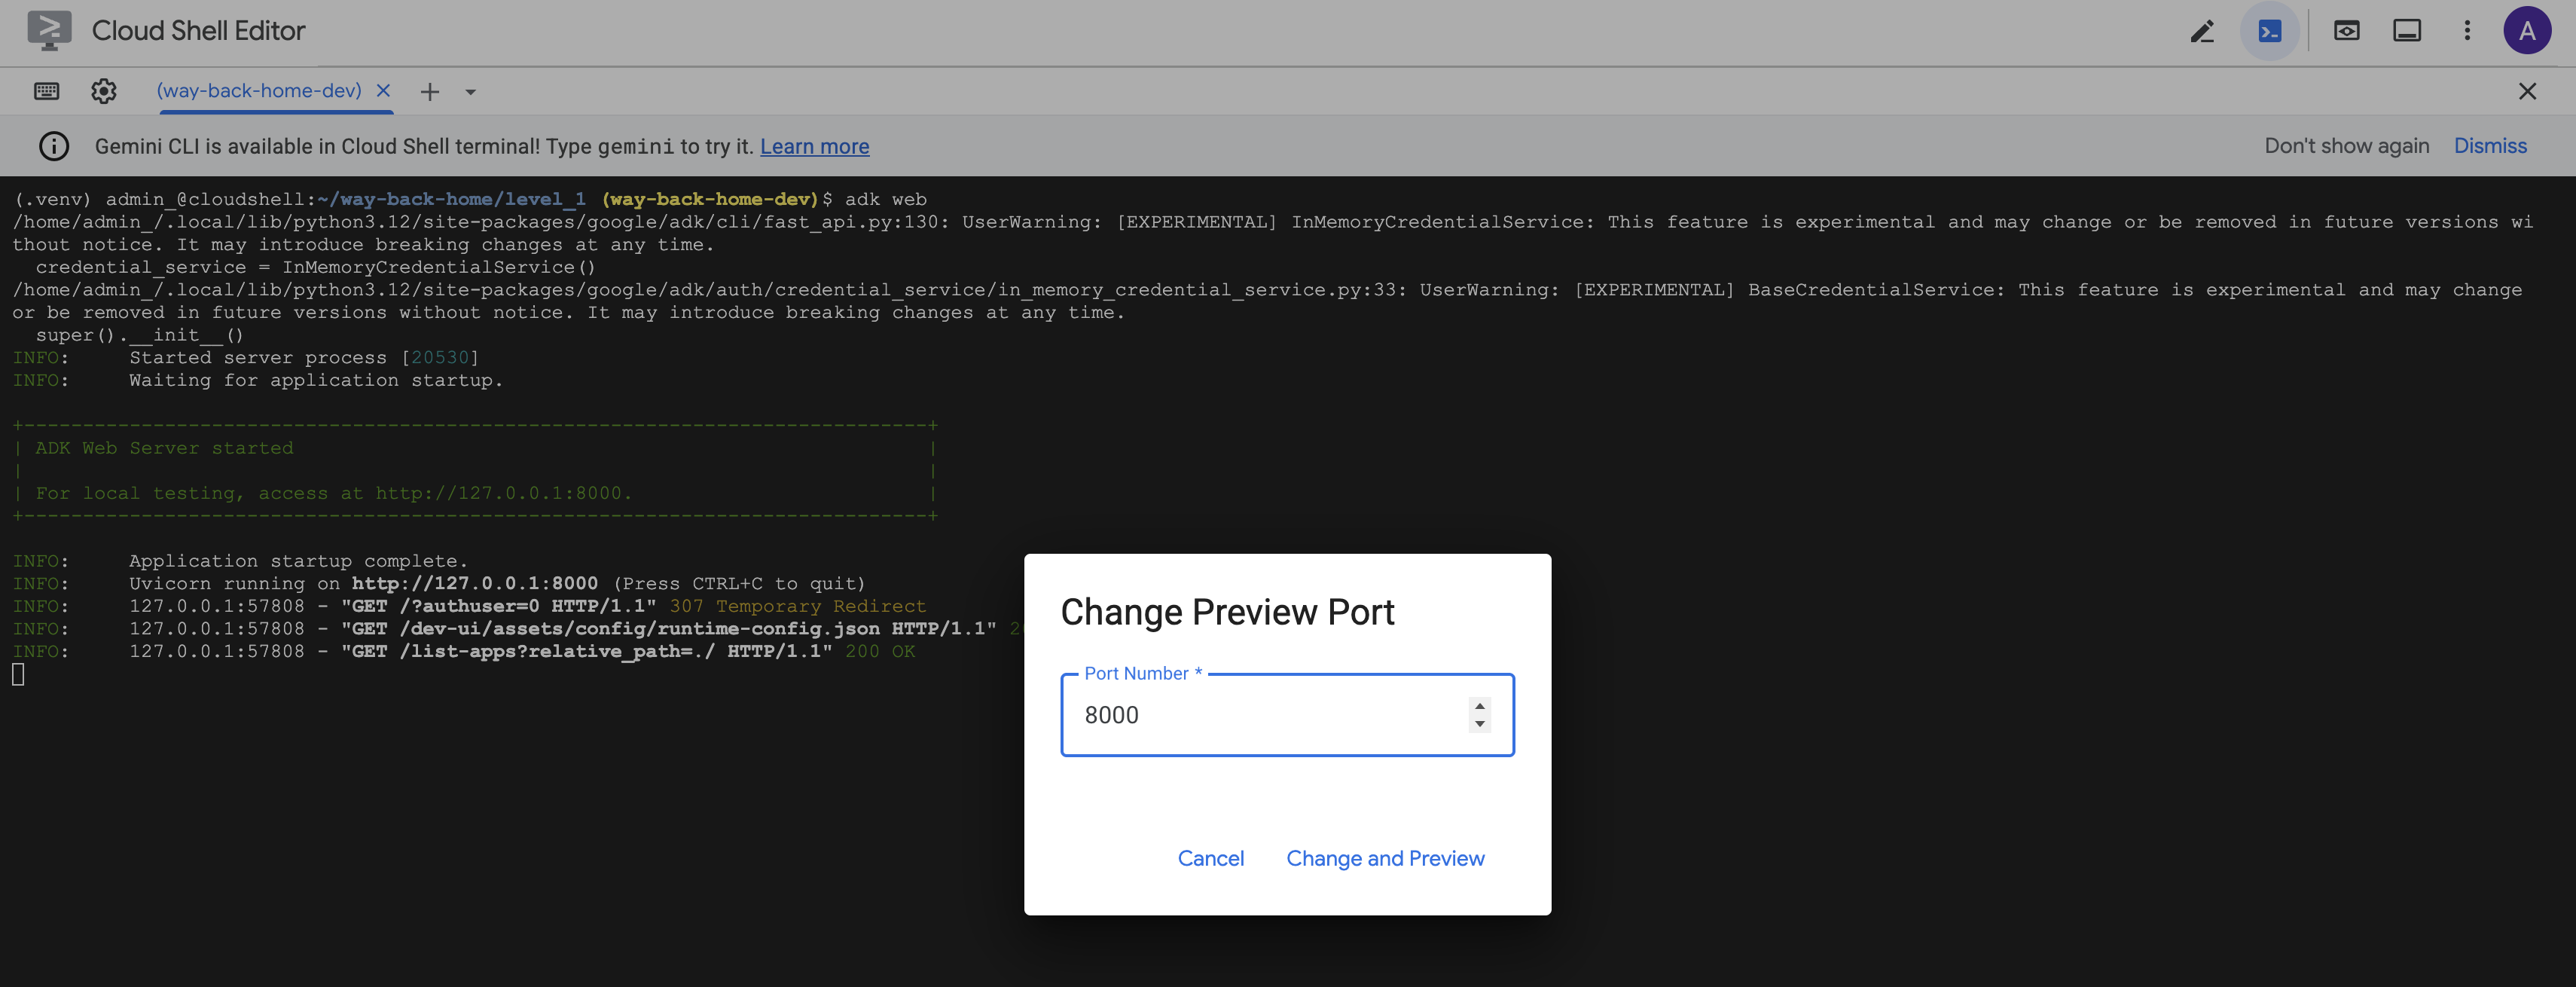
Khởi động Máy chủ web ADK
👉💻 Đặt các biến môi trường và khởi động máy chủ web ADK:
cd $HOME/way-back-home/level_1
source $HOME/way-back-home/set_env.sh

# Verify environment is set
echo "PARTICIPANT_ID: $PARTICIPANT_ID"
echo "MCP Server: $MCP_SERVER_URL"

# Start ADK web server
uv run adk web
Bạn sẽ thấy:
+-----------------------------------------------------------------------------+
| ADK Web Server started                                                      |
|                                                                             |
| For local testing, access at http://localhost:8000.                         |
+-----------------------------------------------------------------------------+

INFO:     Application startup complete.
INFO:     Uvicorn running on http://0.0.0.0:8000 (Press CTRL+C to quit)
Truy cập vào giao diện người dùng trên web
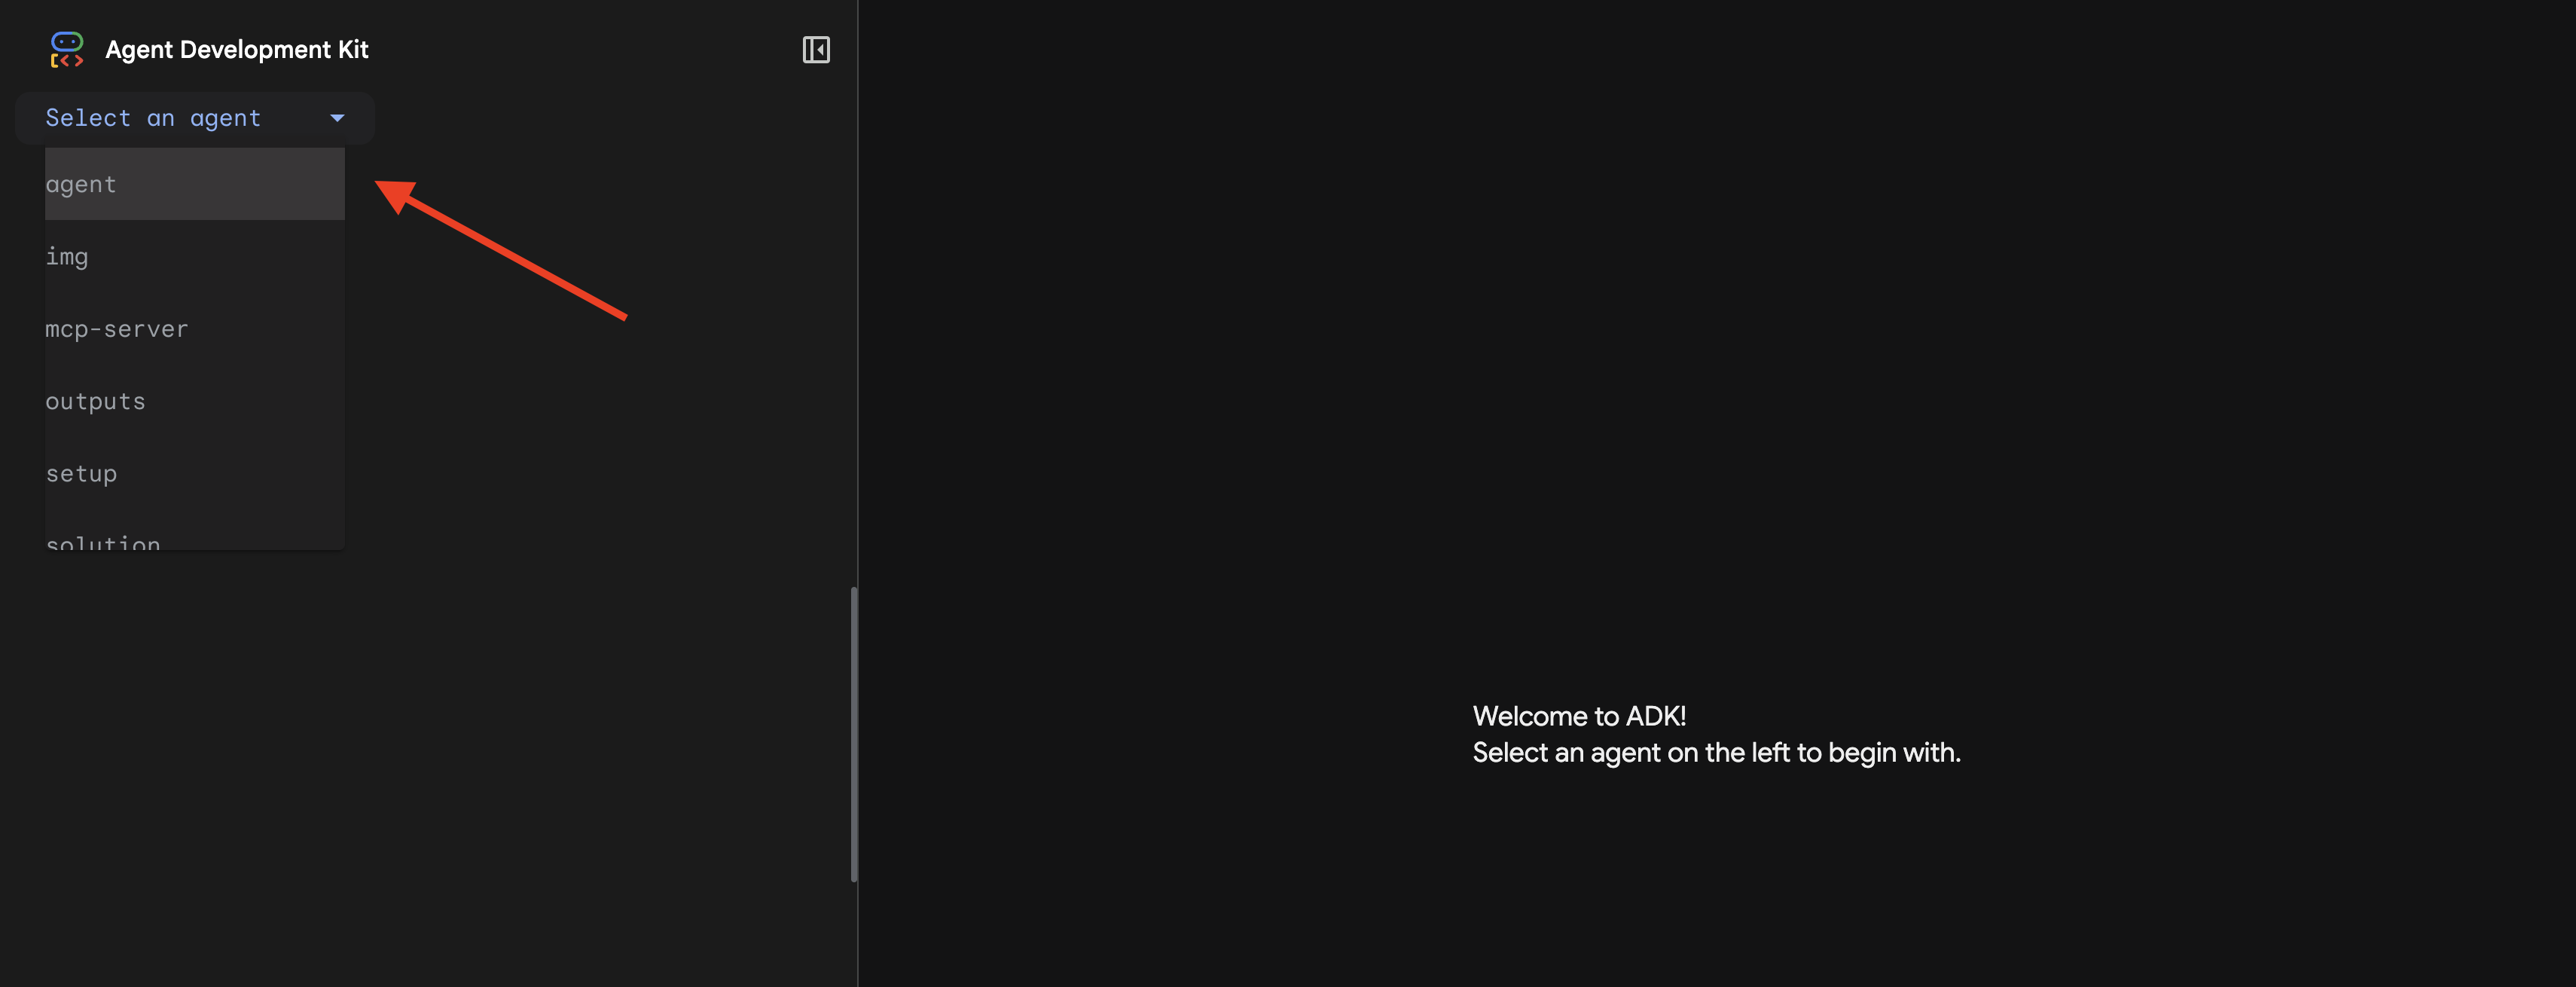
👉 Trong biểu tượng Xem trước trên web trên thanh công cụ Cloud Shell (trên cùng bên phải), hãy chọn Thay đổi cổng.
![]()
👉 Đặt cổng thành 8000 rồi nhấp vào "Thay đổi và xem trước".
👉 Giao diện người dùng web ADK sẽ mở ra. Chọn nhân viên trong trình đơn thả xuống.
Chạy quy trình phân tích
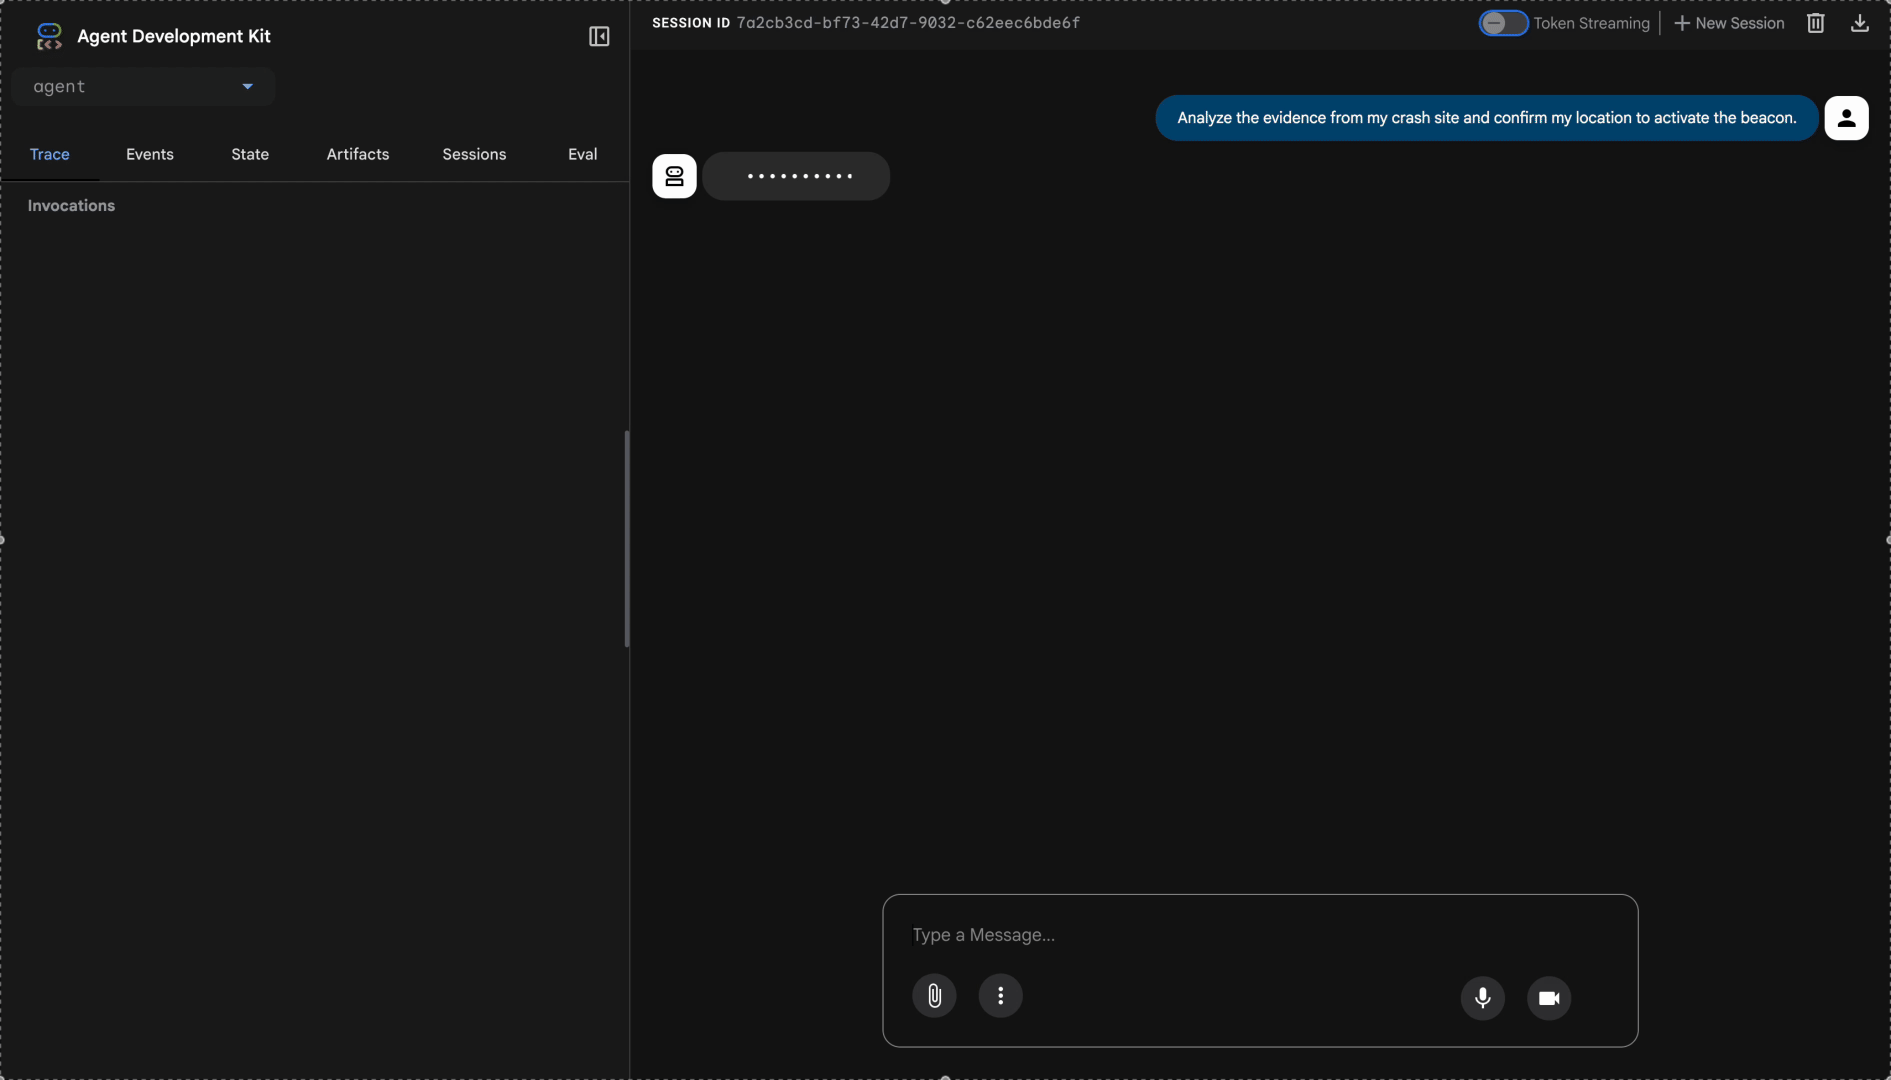
👉 Trong giao diện trò chuyện, hãy nhập:
Analyze the evidence from my crash site and confirm my location to activate the beacon.
Xem hệ thống nhiều tác nhân hoạt động:
👉 Khi 3 tác nhân hoàn tất quá trình phân tích, hãy nhập:
Where am I?
Cách hệ thống xử lý yêu cầu của bạn:

Bảng điều khiển theo dõi ở bên phải cho thấy tất cả lượt tương tác của tác nhân và lệnh gọi công cụ.
👉 Nhấn Ctrl+C trong thiết bị đầu cuối để dừng máy chủ khi bạn kiểm thử xong.
9. Triển khai lên Cloud Run
Bây giờ, hãy triển khai hệ thống đa tác nhân của bạn vào Cloud Run để chuẩn bị cho A2A.
Triển khai tác nhân
👉💻 Triển khai lên Cloud Run bằng ADK CLI:
cd $HOME/way-back-home/level_1
source $HOME/way-back-home/set_env.sh

uv run adk deploy cloud_run \
  --project=$GOOGLE_CLOUD_PROJECT \
  --region=$REGION \
  --service_name=mission-analysis-ai \
  --with_ui \
  --a2a \
  ./agent
Khi được nhắc Do you want to continue (Y/n) và Allow unauthenticated invocations to [mission-analysis-ai] (Y/n)?, hãy nhập Y cho cả hai để triển khai và cho phép truy cập công khai vào tác nhân A2A của bạn.
Bạn sẽ thấy kết quả như sau:
Building and deploying agent to Cloud Run...
✓ Container built successfully
✓ Deploying to Cloud Run...
✓ Service deployed: https://mission-analysis-ai-abc123-uc.a.run.app
Đặt biến môi trường trên Cloud Run
Tác nhân được triển khai cần có quyền truy cập vào các biến môi trường. Cập nhật dịch vụ:
👉💻 Thiết lập các biến môi trường bắt buộc:
gcloud run services update mission-analysis-ai \
  --region=$REGION \
  --labels=dev-tutorial=multi-modal \
  --set-env-vars="GOOGLE_CLOUD_PROJECT=$GOOGLE_CLOUD_PROJECT,GOOGLE_CLOUD_LOCATION=$REGION,MCP_SERVER_URL=$MCP_SERVER_URL,BACKEND_URL=$BACKEND_URL,PARTICIPANT_ID=$PARTICIPANT_ID,GOOGLE_GENAI_USE_VERTEXAI=True"
Lưu URL của nhân viên hỗ trợ
👉💻 Lấy URL đã triển khai:
export AGENT_URL=$(gcloud run services describe mission-analysis-ai \
  --region=$REGION --format='value(status.url)')
echo "Agent URL: $AGENT_URL"

# Add to set_env.sh
echo "export LEVEL1_AGENT_URL=\"$AGENT_URL\"" >> $HOME/way-back-home/set_env.sh
Xác minh quá trình triển khai
👉💻 Kiểm thử nhân viên hỗ trợ đã triển khai bằng cách mở URL trong trình duyệt (cờ --with_ui đã triển khai giao diện web ADK) hoặc kiểm thử thông qua curl:
curl -X GET "$AGENT_URL/list-apps"
Bạn sẽ thấy một phản hồi liệt kê tác nhân của mình.
10. Kết luận
🎉 Đã hoàn thành cấp 1!
Thiết bị phát tín hiệu cứu hộ của bạn hiện đang phát sóng ở cường độ tối đa. Tín hiệu được đo đạc bằng phương pháp tam giác cắt xuyên qua nhiễu khí quyển, một xung ổn định cho biết "Tôi ở đây. Tôi đã sống sót. Hãy đến tìm tôi."
Nhưng bạn không phải là người duy nhất trên hành tinh này. Khi đèn hiệu của bạn kích hoạt, bạn nhận thấy những ánh sáng khác đang nhấp nháy ở phía chân trời – những người sống sót khác, những địa điểm gặp nạn khác, những nhà thám hiểm khác đã vượt qua được.
![]()
Trong Cấp độ 2, bạn sẽ học cách xử lý các tín hiệu SOS đến và phối hợp với những người sống sót khác. Việc giải cứu không chỉ là tìm thấy nhau mà còn là tìm thấy chính mình.
Khắc phục sự cố
"MCP_SERVER_URL not set" (Chưa đặt MCP_SERVER_URL)
export MCP_SERVER_URL=$(gcloud run services describe location-analyzer \
  --region=$REGION --format='value(status.url)')
"PARTICIPANT_ID not set"
source $HOME/way-back-home/set_env.sh
echo $PARTICIPANT_ID
"Không tìm thấy bảng BigQuery"
uv run python setup/setup_star_catalog.py
"Chuyên gia yêu cầu URL" Điều này có nghĩa là việc tạo mẫu {key} không hoạt động. Kiểm tra:
before_agent_callbackcó được đặt trên tác nhân gốc không?- Lệnh gọi lại có đặt các giá trị trạng thái chính xác không?
- Các tác nhân phụ có đang sử dụng
{soil_url}(không phải f-string) không?
"Cả ba phân tích đều không đồng ý" Tạo lại bằng chứng: uv run python generate_evidence.py
"Agent not responding in adk web"
- Kiểm tra để đảm bảo cổng 8000 là chính xác
- Xác minh rằng MCP_SERVER_URL và PARTICIPANT_ID đã được đặt
- Kiểm tra thiết bị đầu cuối để xem thông báo lỗi
Tóm tắt về kiến trúc
Thành phần | Loại | Mẫu | Mục đích |
setup_participant_context | Số nhận cuộc gọi lại | before_agent_callback | Tìm nạp cấu hình, đặt trạng thái |
GeologicalAnalyst | Nhân viên hỗ trợ | Mẫu {soil_url} | Phân loại đất |
BotanicalAnalyst | Nhân viên hỗ trợ | Mẫu {flora_url} | Phân loại thực vật |
AstronomicalAnalyst | Nhân viên hỗ trợ | {stars_url}, {project_id} | Phương pháp đo đạc tam giác bằng sao |
confirm_location | Công cụ | Quyền truy cập vào trạng thái ToolContext | Kích hoạt beacon |
EvidenceAnalysisCrew | ParallelAgent | Thành phần của tác nhân phụ | Chạy các chuyên gia đồng thời |
MissionAnalysisAI | Nhân viên hỗ trợ (Gốc) | Orchestrator + lệnh gọi lại | Điều phối + tổng hợp |
location-analyzer | Máy chủ FastMCP | MCP tuỳ chỉnh | Phân tích địa chất và thực vật |
bigquery.googleapis.com/mcp | OneMCP | MCP được quản lý | Quyền truy cập vào BigQuery |
Các khái niệm chính đã nắm vững
✓ before_agent_callback: Tìm nạp cấu hình trước khi chạy tác nhân
✓ {key} State Templating: Truy cập vào các giá trị trạng thái trong hướng dẫn cho tác nhân
✓ ToolContext: Truy cập vào các giá trị trạng thái trong các hàm công cụ
✓ State Sharing: Trạng thái chính tự động có sẵn cho các tác nhân phụ thông qua InvocationContext
✓ Multi-Agent Architecture: Các tác nhân chuyên biệt có trách nhiệm duy nhất
✓ ParallelAgent: Thực hiện đồng thời các tác vụ độc lập
✓ Custom MCP Server: MCP Server của riêng bạn trên Cloud Run
✓ OneMCP BigQuery: Mẫu MCP được quản lý để truy cập vào cơ sở dữ liệu
✓ Cloud Deployment: Triển khai không trạng thái bằng cách sử dụng các biến môi trường
✓ A2A Preparation: Tác nhân sẵn sàng cho hoạt động giao tiếp giữa các tác nhân
Đối với người không chơi game: Ứng dụng trong thực tế
"Xác định vị trí của bạn" là Phân tích song song của chuyên gia dựa trên sự đồng thuận – chạy đồng thời nhiều quy trình phân tích chuyên biệt bằng AI và tổng hợp kết quả.
Ứng dụng doanh nghiệp
Trường hợp sử dụng | Parallel Experts | Quy tắc tổng hợp |
Chẩn đoán y tế | Chuyên viên phân tích hình ảnh, chuyên viên phân tích triệu chứng, chuyên viên phân tích phòng thí nghiệm | Ngưỡng tin cậy 2/3 |
Phát hiện hành vi gian lận | Chuyên viên phân tích giao dịch, chuyên viên phân tích hành vi, chuyên viên phân tích mạng | Có 1 cờ = xem xét |
Xử lý tài liệu | Tác nhân OCR, tác nhân phân loại, tác nhân trích xuất | Mọi người đều phải đồng ý |
Quản lý chất lượng | Nhân viên kiểm tra bằng hình ảnh, nhà phân tích cảm biến, nhân viên kiểm tra thông số kỹ thuật | Thẻ/vé 2/3 |
Thông tin chi tiết chính về kiến trúc
- before_agent_callback cho cấu hình: Tìm nạp cấu hình một lần khi bắt đầu, điền trạng thái cho tất cả các tác nhân phụ. Không đọc tệp cấu hình trong các tác nhân phụ.
- {key} State Templating: Khai báo, rõ ràng, thành ngữ. Không có f-string, không có lệnh nhập, không có thao tác sys.path.
- Cơ chế đồng thuận: Thoả thuận 2/3 xử lý sự mơ hồ một cách mạnh mẽ mà không yêu cầu thoả thuận nhất trí.
- ParallelAgent cho các tác vụ độc lập: Khi các phân tích không phụ thuộc vào nhau, hãy chạy chúng đồng thời để tăng tốc độ.
- Hai mẫu MCP: Tuỳ chỉnh (tự xây dựng) so với OneMCP (do Google lưu trữ). Cả hai đều sử dụng StreamableHTTP.
- Triển khai không trạng thái: Cùng một mã hoạt động cục bộ và được triển khai. Biến môi trường + API phụ trợ = không có tệp cấu hình trong vùng chứa.
Tiếp theo là gì?
Cấp độ 2: Xử lý tín hiệu SOS →
Tìm hiểu cách xử lý tín hiệu cầu cứu nhận được từ những người sống sót khác bằng cách sử dụng các mẫu dựa trên sự kiện và khả năng phối hợp tác nhân nâng cao hơn.