
1. The Mission

You are drifting in the silence of an uncharted sector. A massive **Solar Pulse** has torn your ship through a rift, leaving you stranded in a pocket of the universe that doesn't exist on any star chart.
After days of grueling repairs, you finally feel the hum of the engines beneath your feet. Your rocketship is fixed. You've even managed to secure a long-range uplink to the Mothership. You are clear for departure. You are ready to go home. But as you prepare to engage the jump drive, a distress signal pierces the static. Your sensors pick up five faint heat signatures trapped in "The Ravine"—a jagged, gravity-warped sector that your main ship can never enter. These are fellow explorers, survivors of the same storm that nearly claimed you. You cannot leave them behind.
You turn to your Alpha-Drone Rescue Scout. This small, agile ship is the only vessel capable of navigating the narrow walls of The Ravine. But there is a problem: the solar pulse performed a total "System Reset" on its core logic. The Scout's control systems are unresponsive. It is powered on, but its onboard computer is a blank slate, unable to process manual pilot commands or flight paths.
The Challenge
To save the survivors, you must bypass the Scout's damaged circuits entirely. You have one desperate option: build an AI Agent to establish a Biometric Neural Sync. This agent will act as a real-time bridge, allowing you to control the Rescue Scout manually via your own biological inputs. You won't be using a joystick or a keyboard; you will be wiring your intent directly into the ship's navigation network.
To lock in the link, you must perform the Synchronization Protocol in front of the Scout's optical sensors. The AI Agent must recognize your biological signature through a precise, real-time handshake.
Your Mission Objectives:
- Imprint the Neural Core: Define an ADK Agent capable of recognizing multimodal inputs.
- Establish the Connection: Build a bi-directional WebSocket pipeline to stream visual data from the Scout to the AI.
- Initiate the Handshake: Stand before the sensor and complete the finger sequence—showing 1 through 5 in order.
If successful, the "Biometric Sync" will engage. The AI will lock the neural link, giving you full manual control to launch the Scout and bring those survivors home.
What you will build
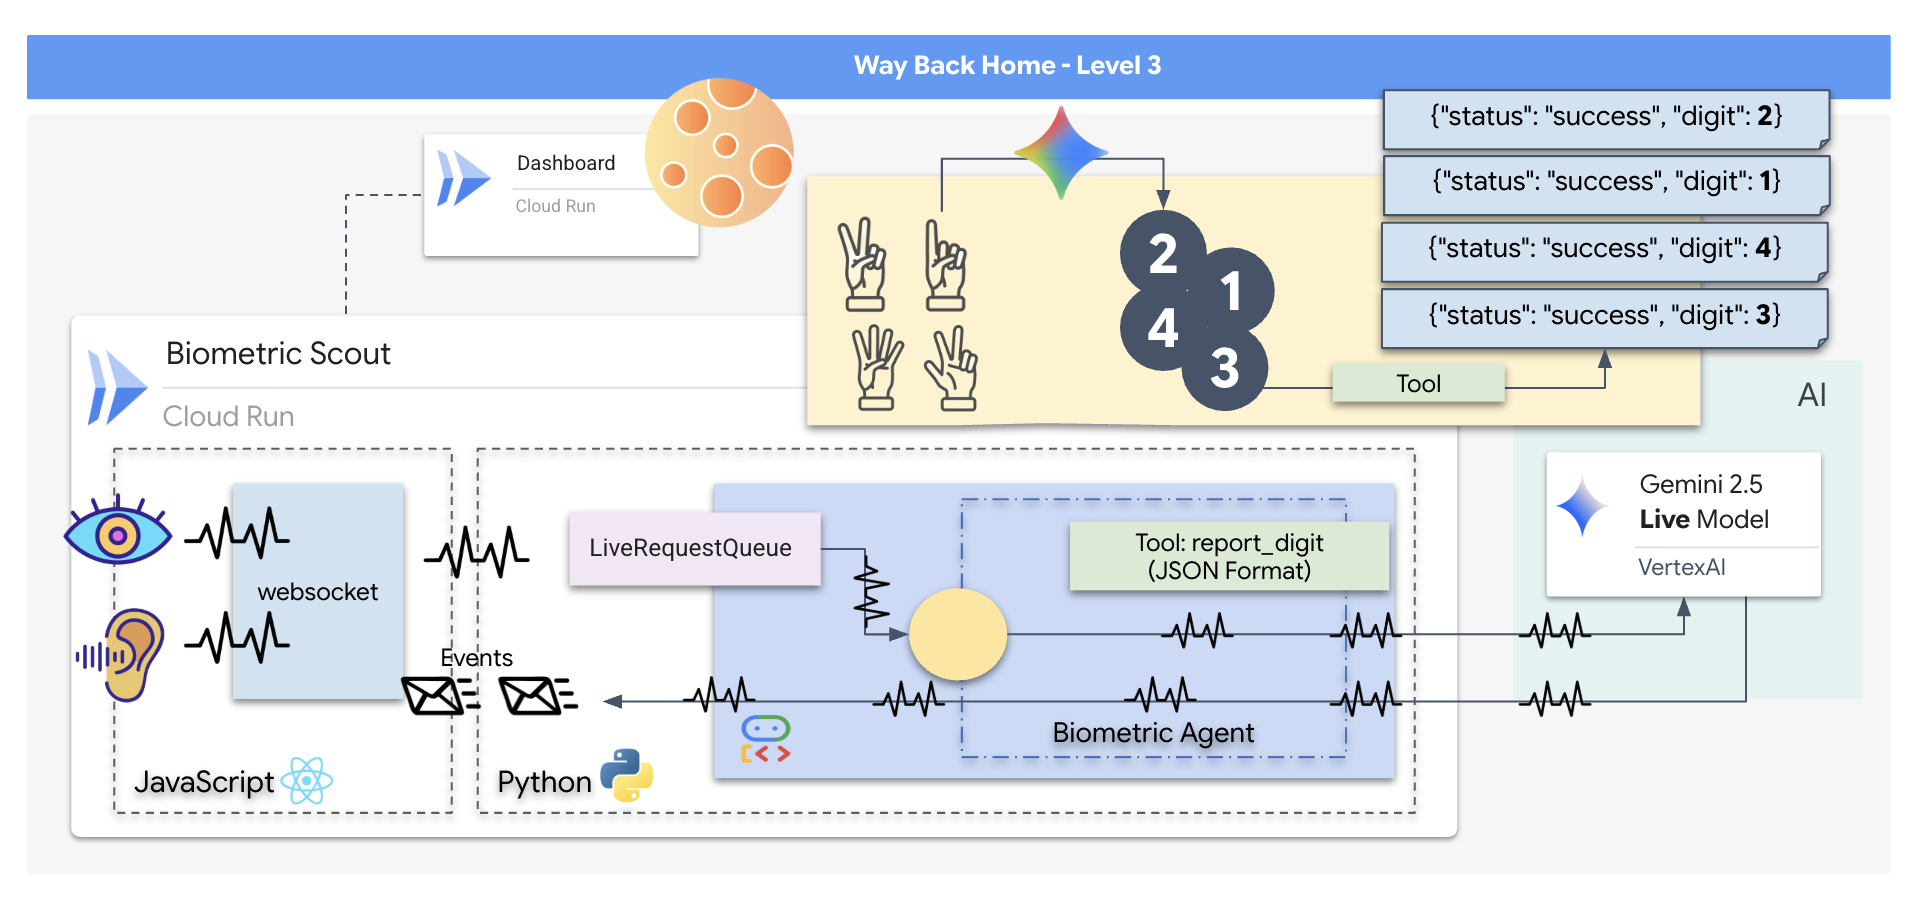
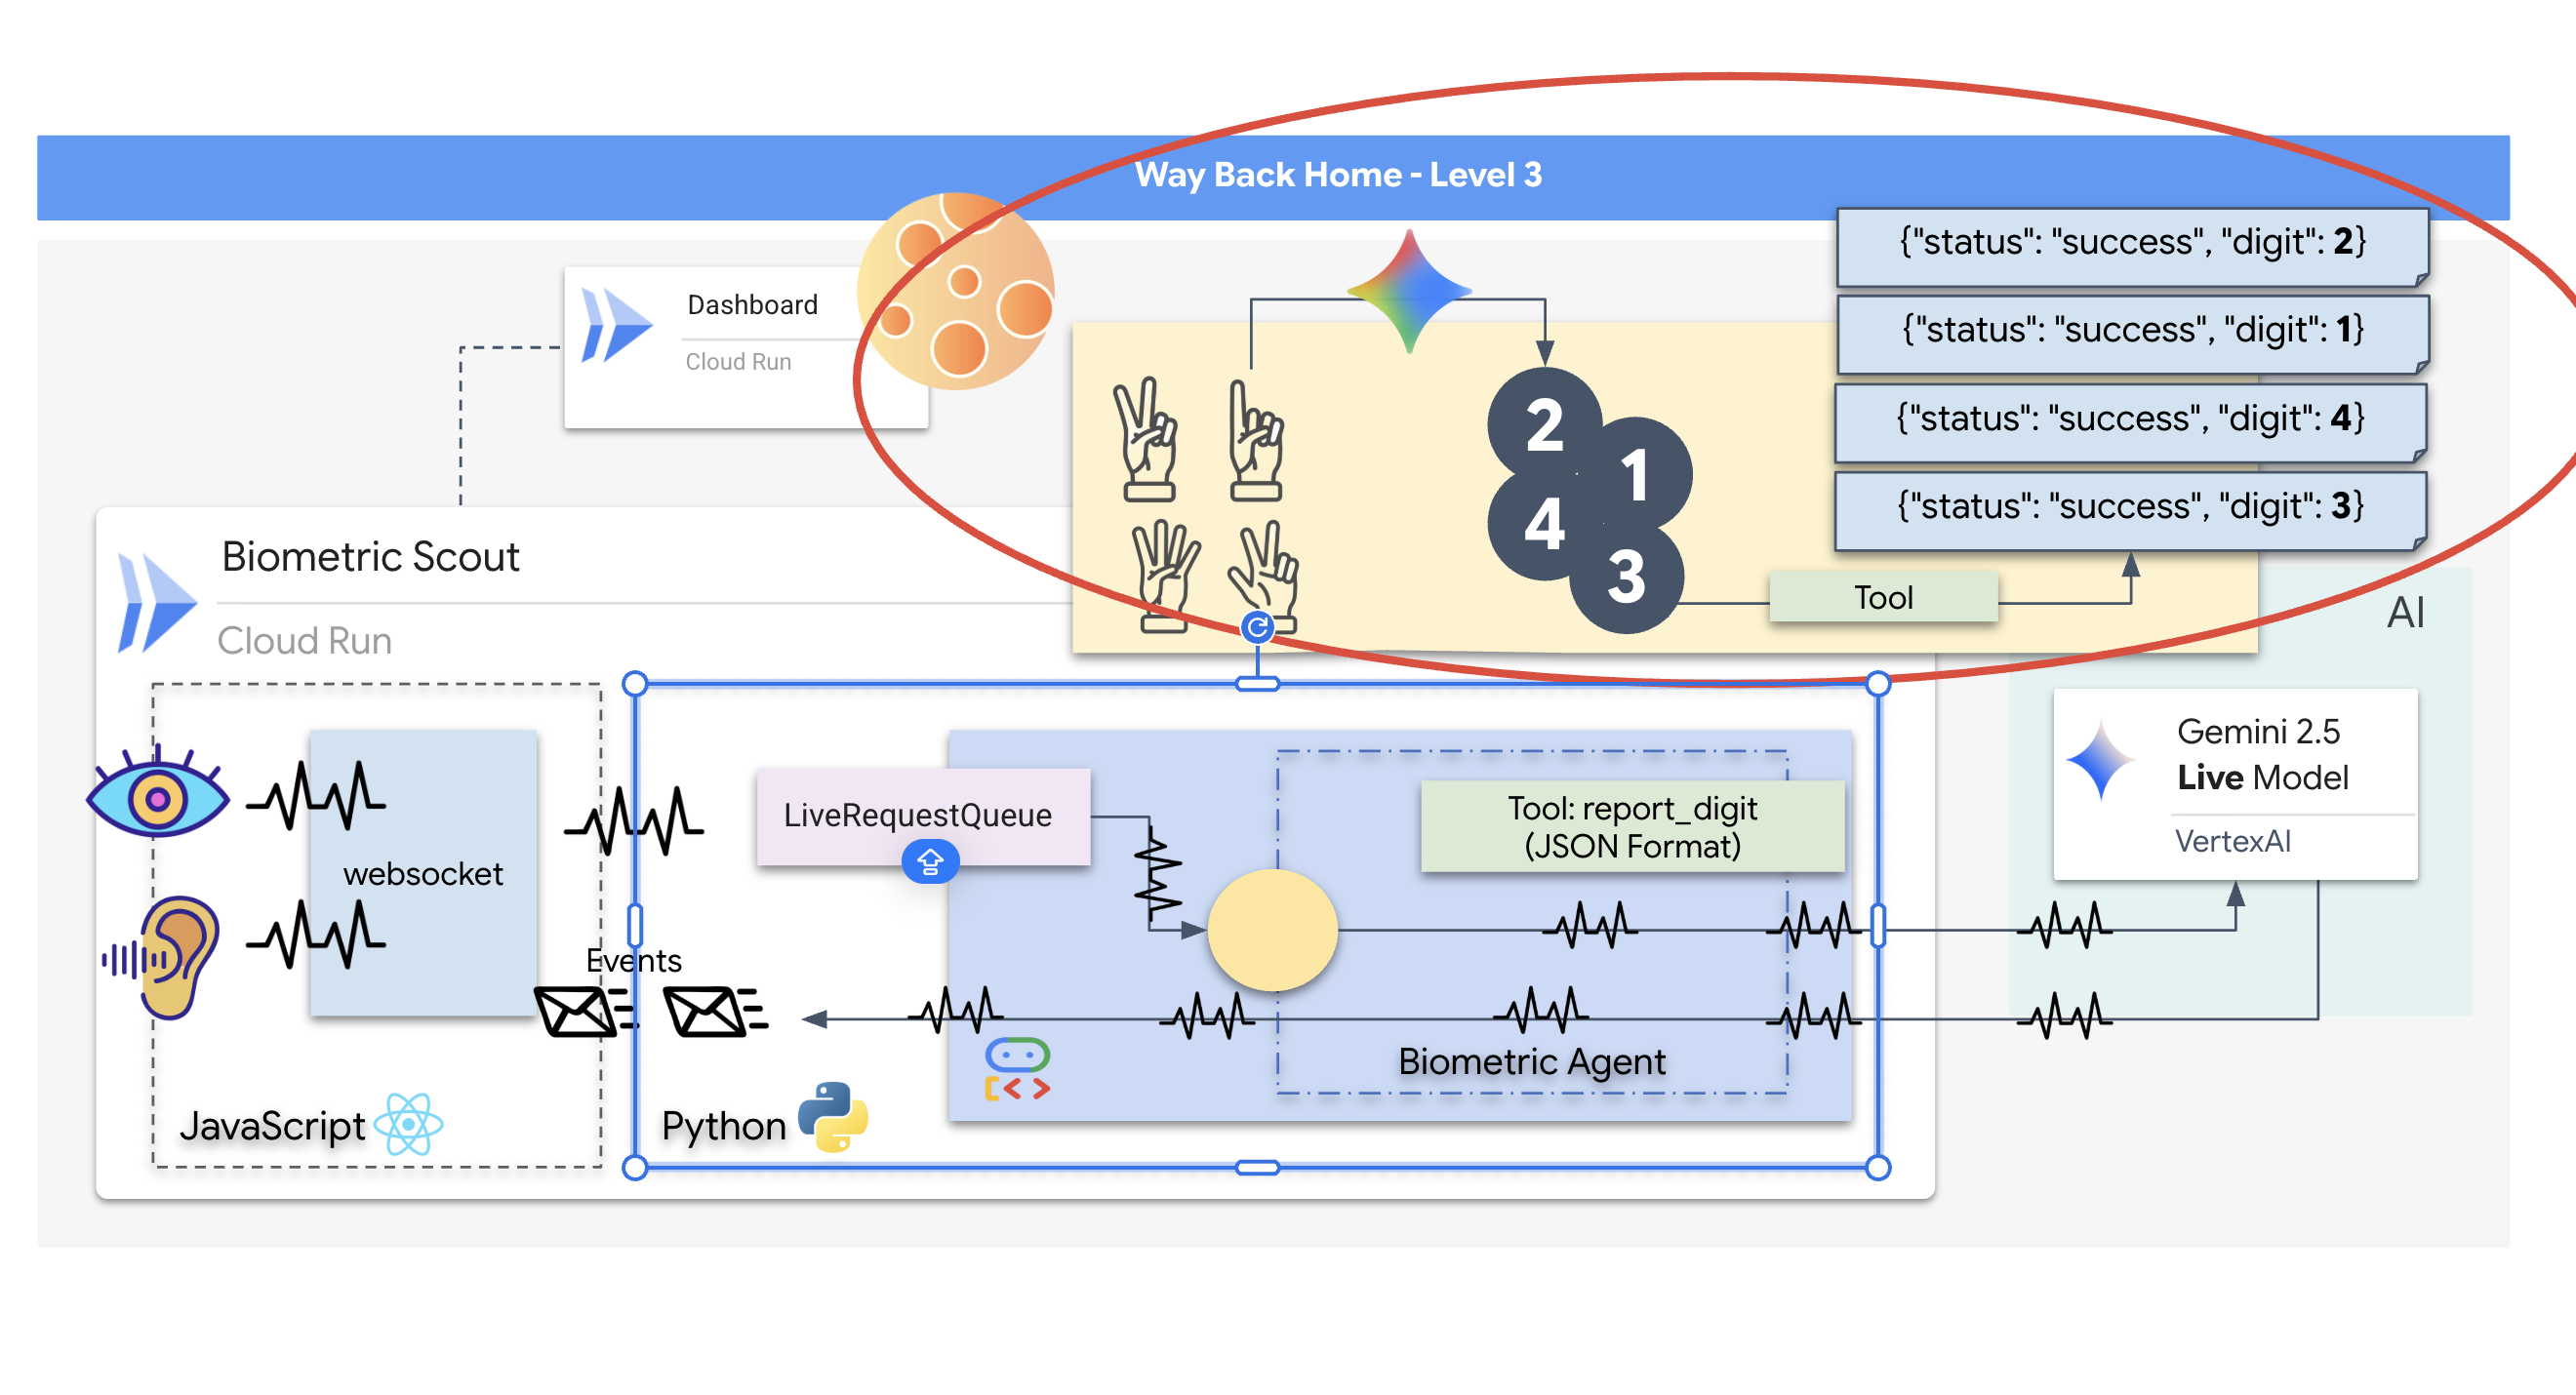
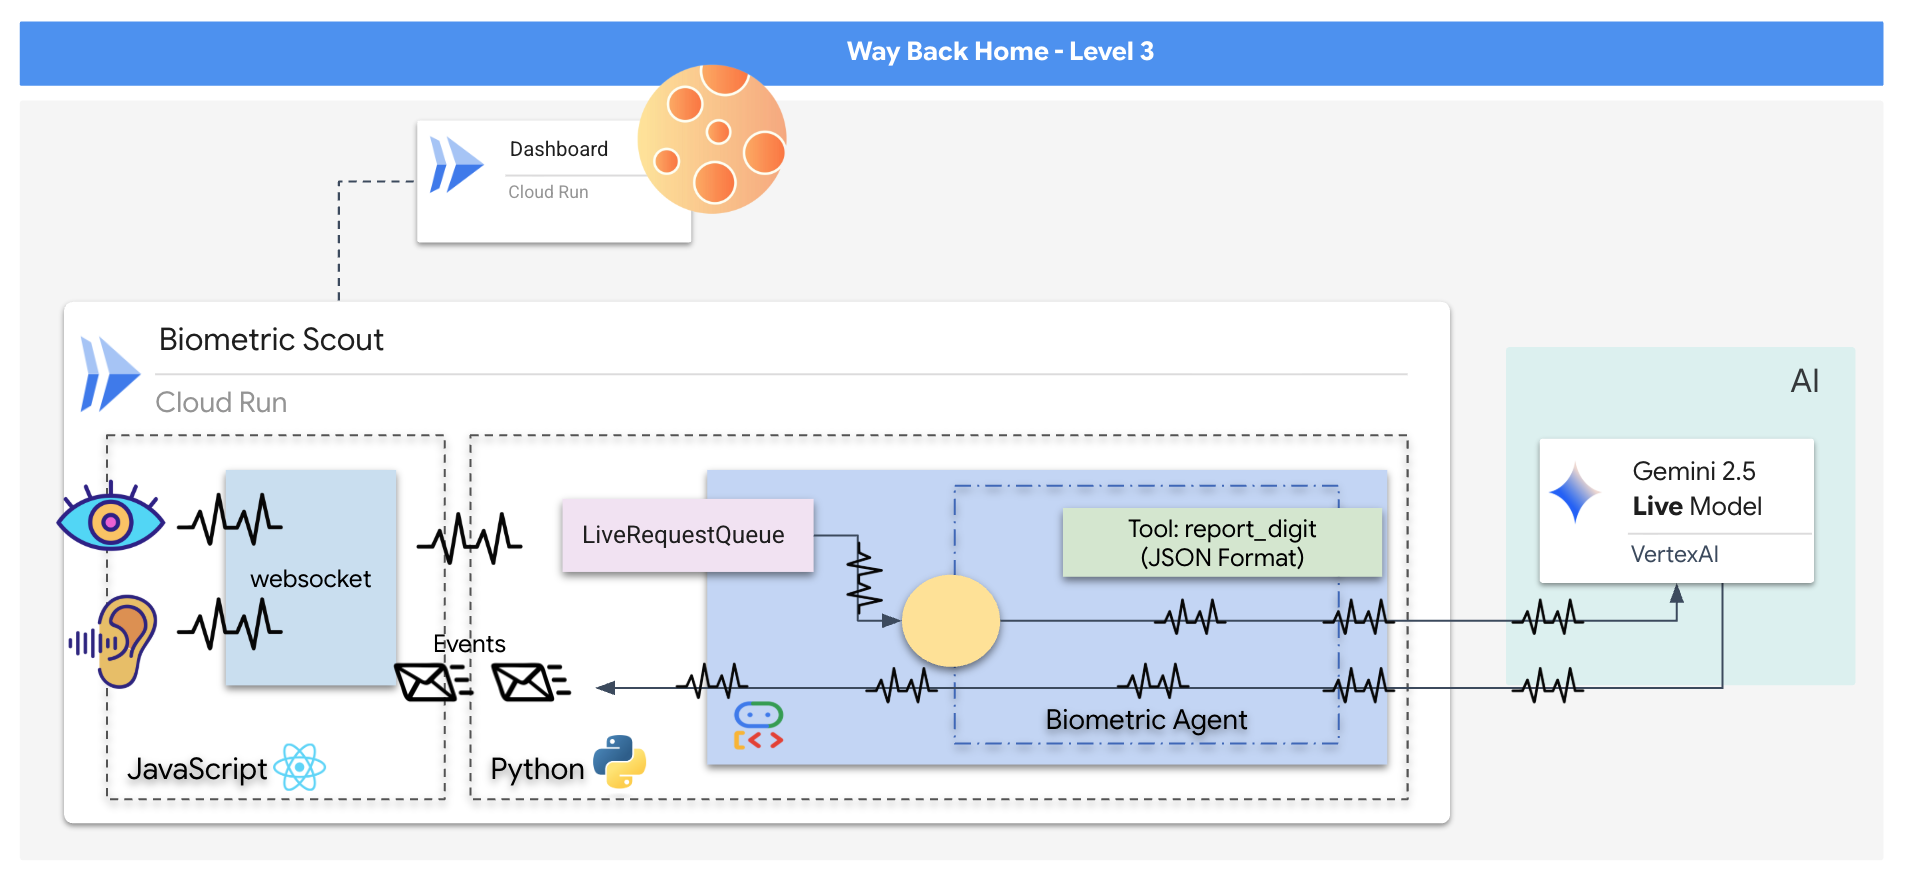
You will construct a "Biometric Neural Sync" application, a real-time, AI-powered system that acts as the control interface for a rescue drone. This system consists of:
- A React Frontend: The "Cockpit" of your ship, which captures live video from your webcam and audio from your microphone.
- A Python Backend: A high-performance server built with FastAPI, using Google's Agent Development Kit (ADK) to manage the LLM's logic and state.
- A Multimodal AI Agent: The "Brain" of the operation, using the Gemini Live API via the
google-genaiSDK to process and understand video and audio streams simultaneously. - A Bi-directional WebSocket Pipeline: The "Nervous System" that creates a persistent, low-latency connection between the frontend and the AI, allowing for real-time interaction.
What you will learn
Technology / Concept | Description |
Backend AI Agent | Build a stateful AI agent with Python and FastAPI. Use Google's ADK (Agent Development Kit) to manage instructions and memory, and the |
Frontend UI | Develop a dynamic user interface using React to capture and stream live video and audio directly from the browser. |
Real-Time Communication | Implement a WebSocket pipeline for full-duplex, low-latency communication, allowing the user and AI to interact simultaneously. |
Multimodal AI | Leverage the Gemini Live API to process and understand concurrent video and audio streams, enabling the AI to "see" and "hear" at the same time. |
Tool Calling | Enable the AI to execute specific Python functions in response to visual triggers, bridging the gap between model intelligence and real-world action. |
Full-Stack Deployment | Containerize the entire application (React frontend and Python backend) with Docker and deploy it as a scalable, serverless service on Google Cloud Run. |
2. Set Up Your Environment
Access Cloud Shell
First, we'll open Cloud Shell, which is a browser-based terminal with the Google Cloud SDK and other essential tools pre-installed.
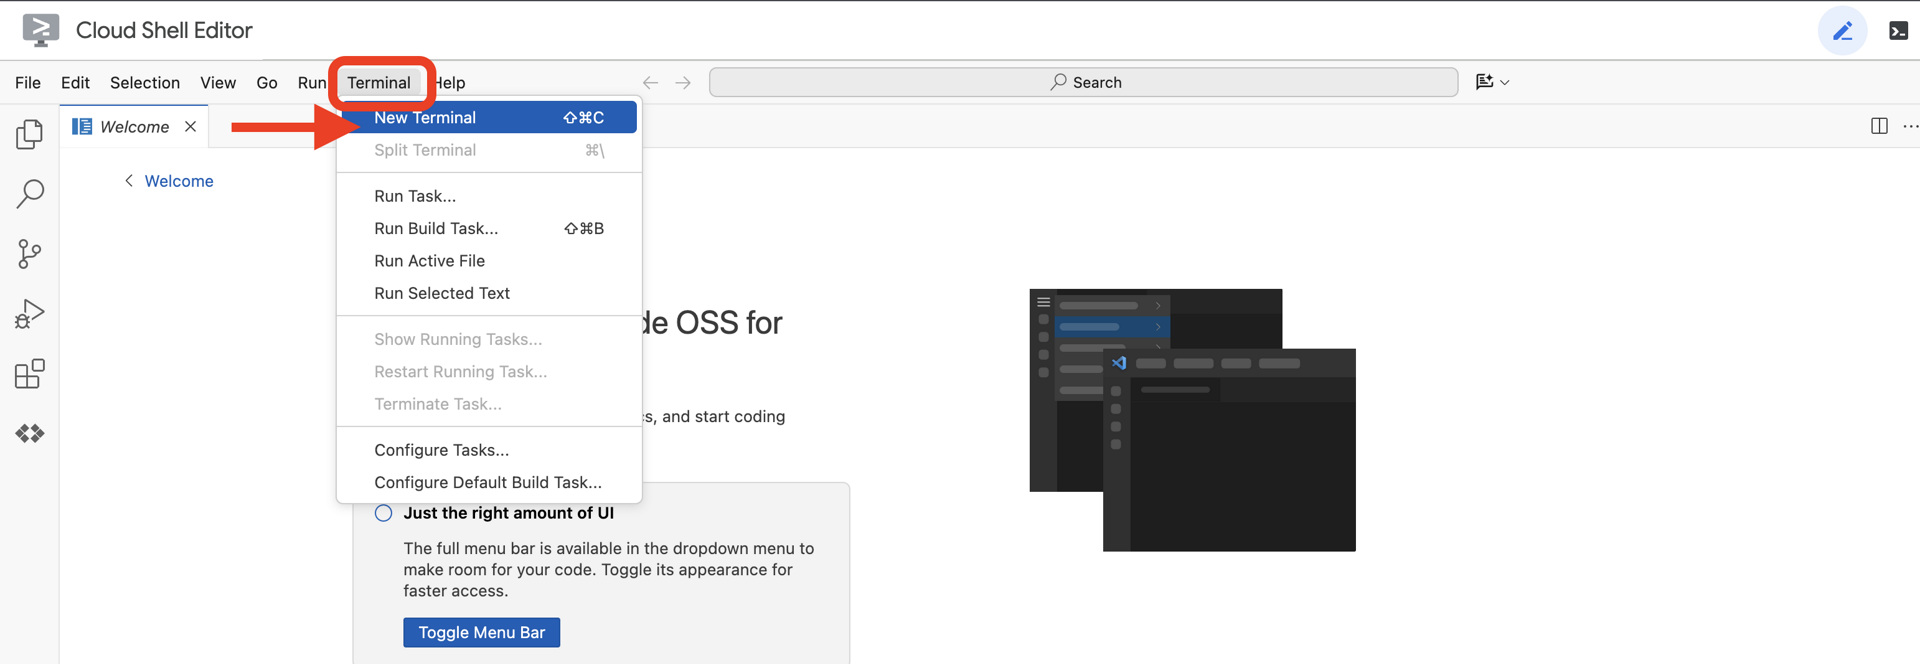
👉Click Activate Cloud Shell at the top of the Google Cloud console (It's the terminal shape icon at the top of the Cloud Shell pane), 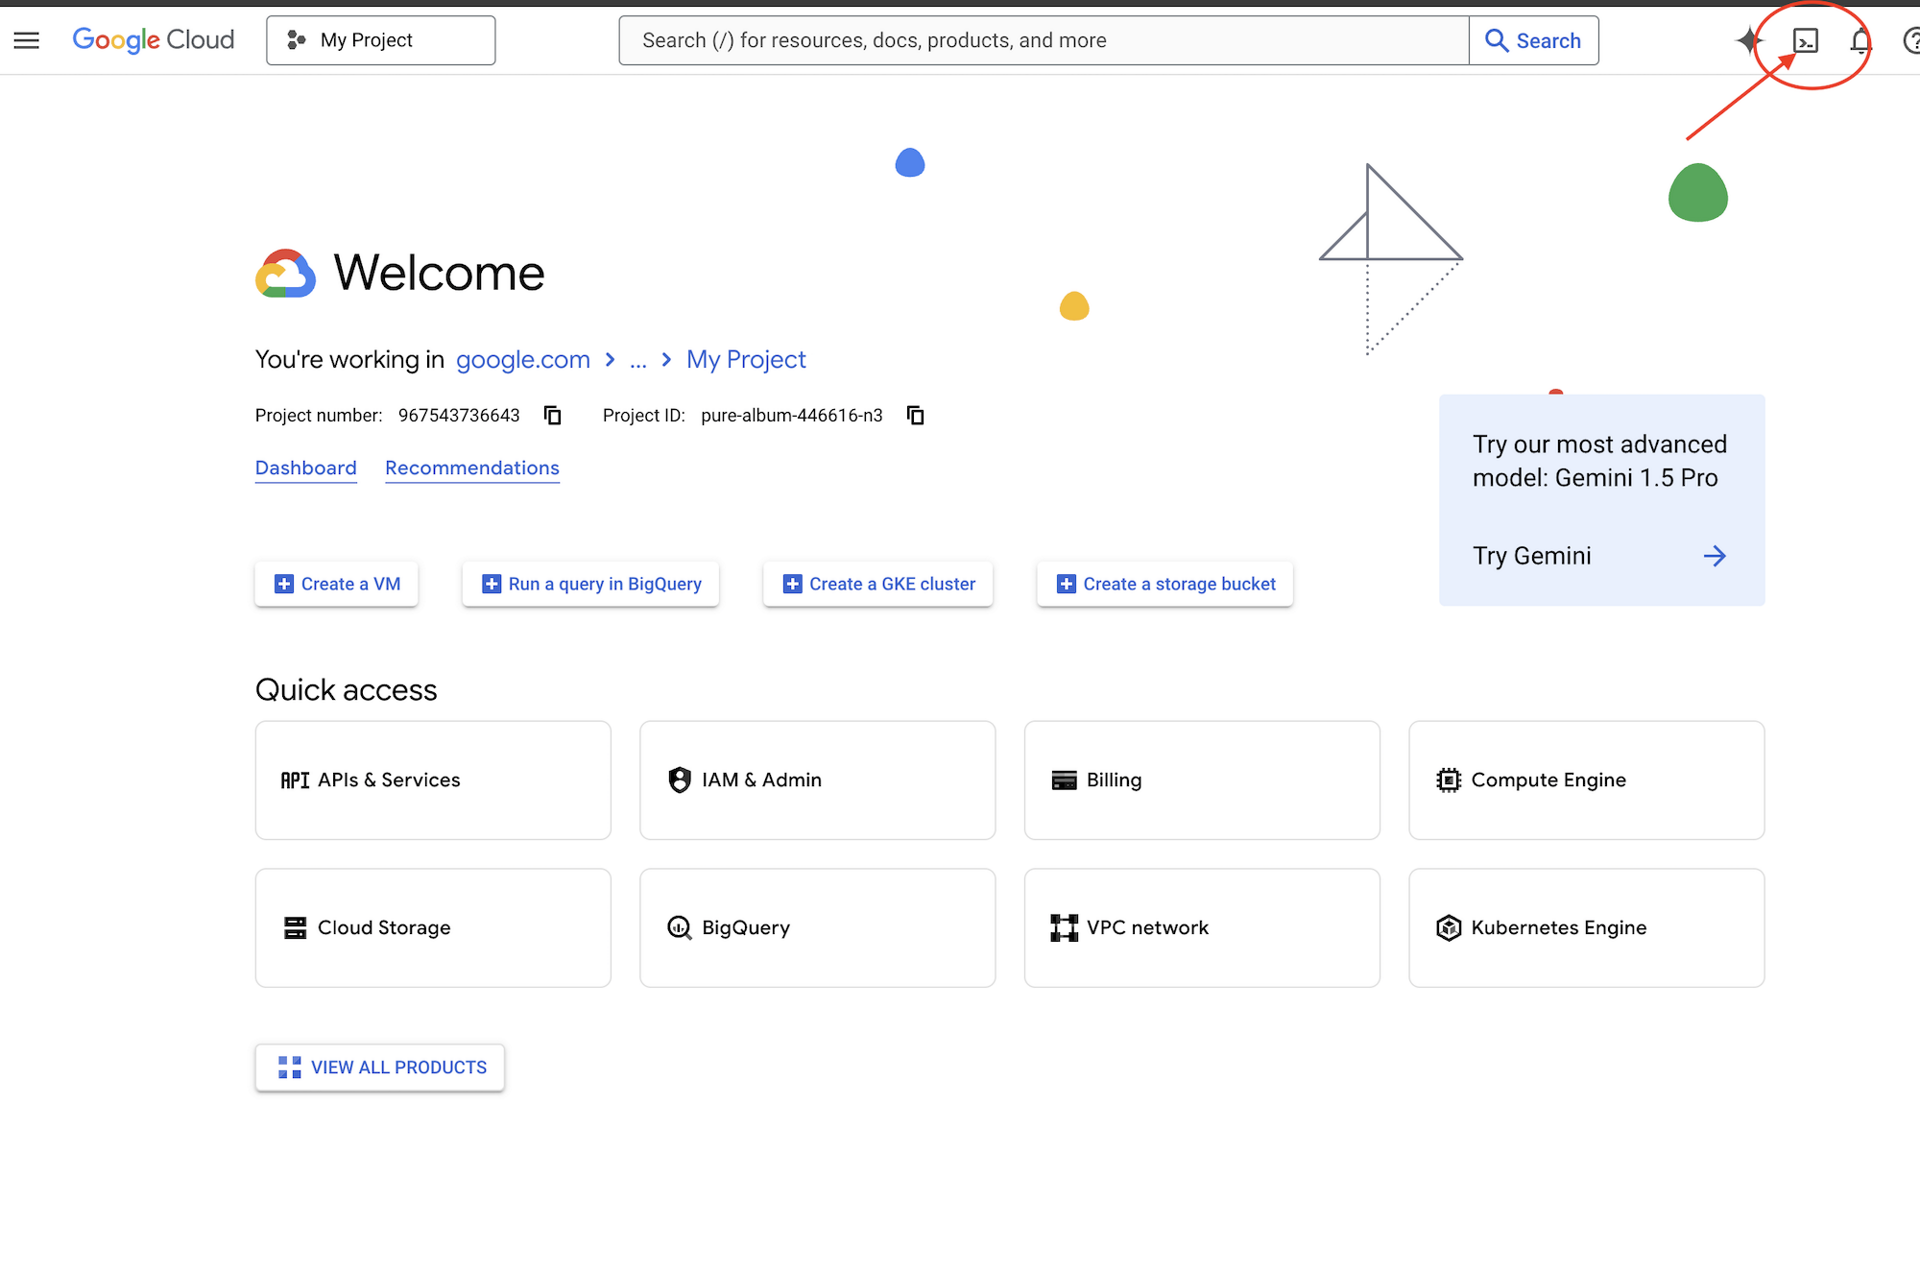
👉Click on the "Open Editor" button (it looks like an open folder with a pencil). This will open the Cloud Shell Code Editor in the window. You'll see a file explorer on the left side. 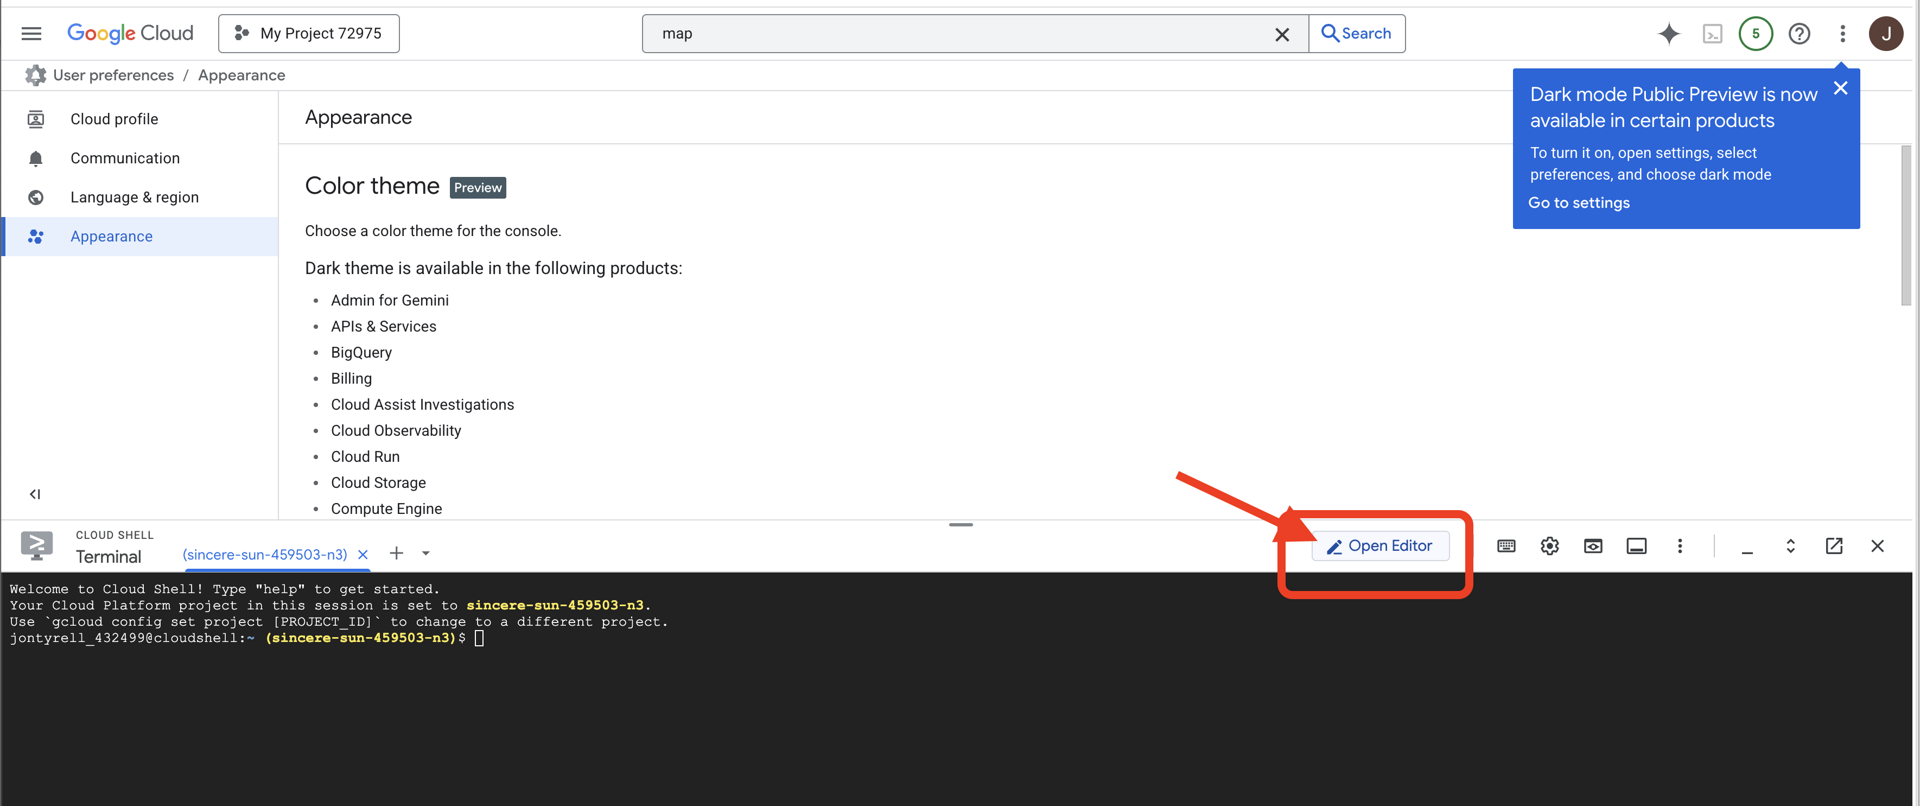
👉Open the terminal in the cloud IDE,
👉💻 In the terminal, verify that you're already authenticated and that the project is set to your project ID using the following command:
gcloud auth list
You should see your account listed as (ACTIVE).
Prerequisites
ℹ️ Level 0 is Optional (But Recommended)
You can complete this mission without Level 0, but finishing it first offers a more immersive experience, allowing you to see your beacon light up on the global map as you progress.
Setup The Project Environment
Back in your terminal, finalize the configuration by setting the active project and enabling the required Google Cloud services (Cloud Run, Vertex AI, etc.).
👉💻 In your terminal, set the Project ID:
gcloud config set project $(cat ~/project_id.txt) --quiet
👉💻 Enable Required Services:
gcloud services enable  compute.googleapis.com \
                        artifactregistry.googleapis.com \
                        run.googleapis.com \
                        cloudbuild.googleapis.com \
                        iam.googleapis.com \
                        aiplatform.googleapis.com
Install Dependencies
👉💻 Navigate to Level and install the required Python packages:
cd $HOME/way-back-home/level_3
uv sync
The key dependencies are:
Package | Purpose |
| High-performance web framework for the Satellite Station and SSE streaming |
| ASGI server required to run the FastAPI application |
| The Agent Development Kit used to build the Formation Agent |
| Native client for accessing Gemini models |
| Support for real-time bi-directional communication |
| Manages environment variables and configuration secrets |
Verify Setup
Before we launch into the code, let's ensure all systems are green. Run the verification script to audit your Google Cloud Project, APIs, and Python dependencies.
👉💻 Run the Verification Script:
cd $HOME/way-back-home/level_3/scripts
chmod +x verify_setup.sh
. verify_setup.sh
👀 You should see a series of Green Checks (✅).
- If you see Red Crosses (❌), follow the suggested fix commands in the output (e.g.,
gcloud services enable ...orpip install ...). - Note: A yellow warning for
.envis acceptable for now; we will create that file in the next step.
🚀 Verifying Mission Alpha (Level 3) Infrastructure...

✅ Google Cloud Project: xxxxxx
✅ Cloud APIs: Active
✅ Python Environment: Ready

🎉 SYSTEMS ONLINE. READY FOR MISSION.
3. Calibrating the Comm-Link (WebSockets)
To begin the Biometric Neural Sync, we need to update your ship's internal systems. Our primary objective is to capture a high-fidelity video and audio stream from your cockpit. This stream provides the essential components for the neural link: the visual identification of your finger sequences and the sonic frequency of your voice.
Full-Duplex vs. Half-Duplex
To understand why we need this for the Neural Sync, you have to understand the flow of data:
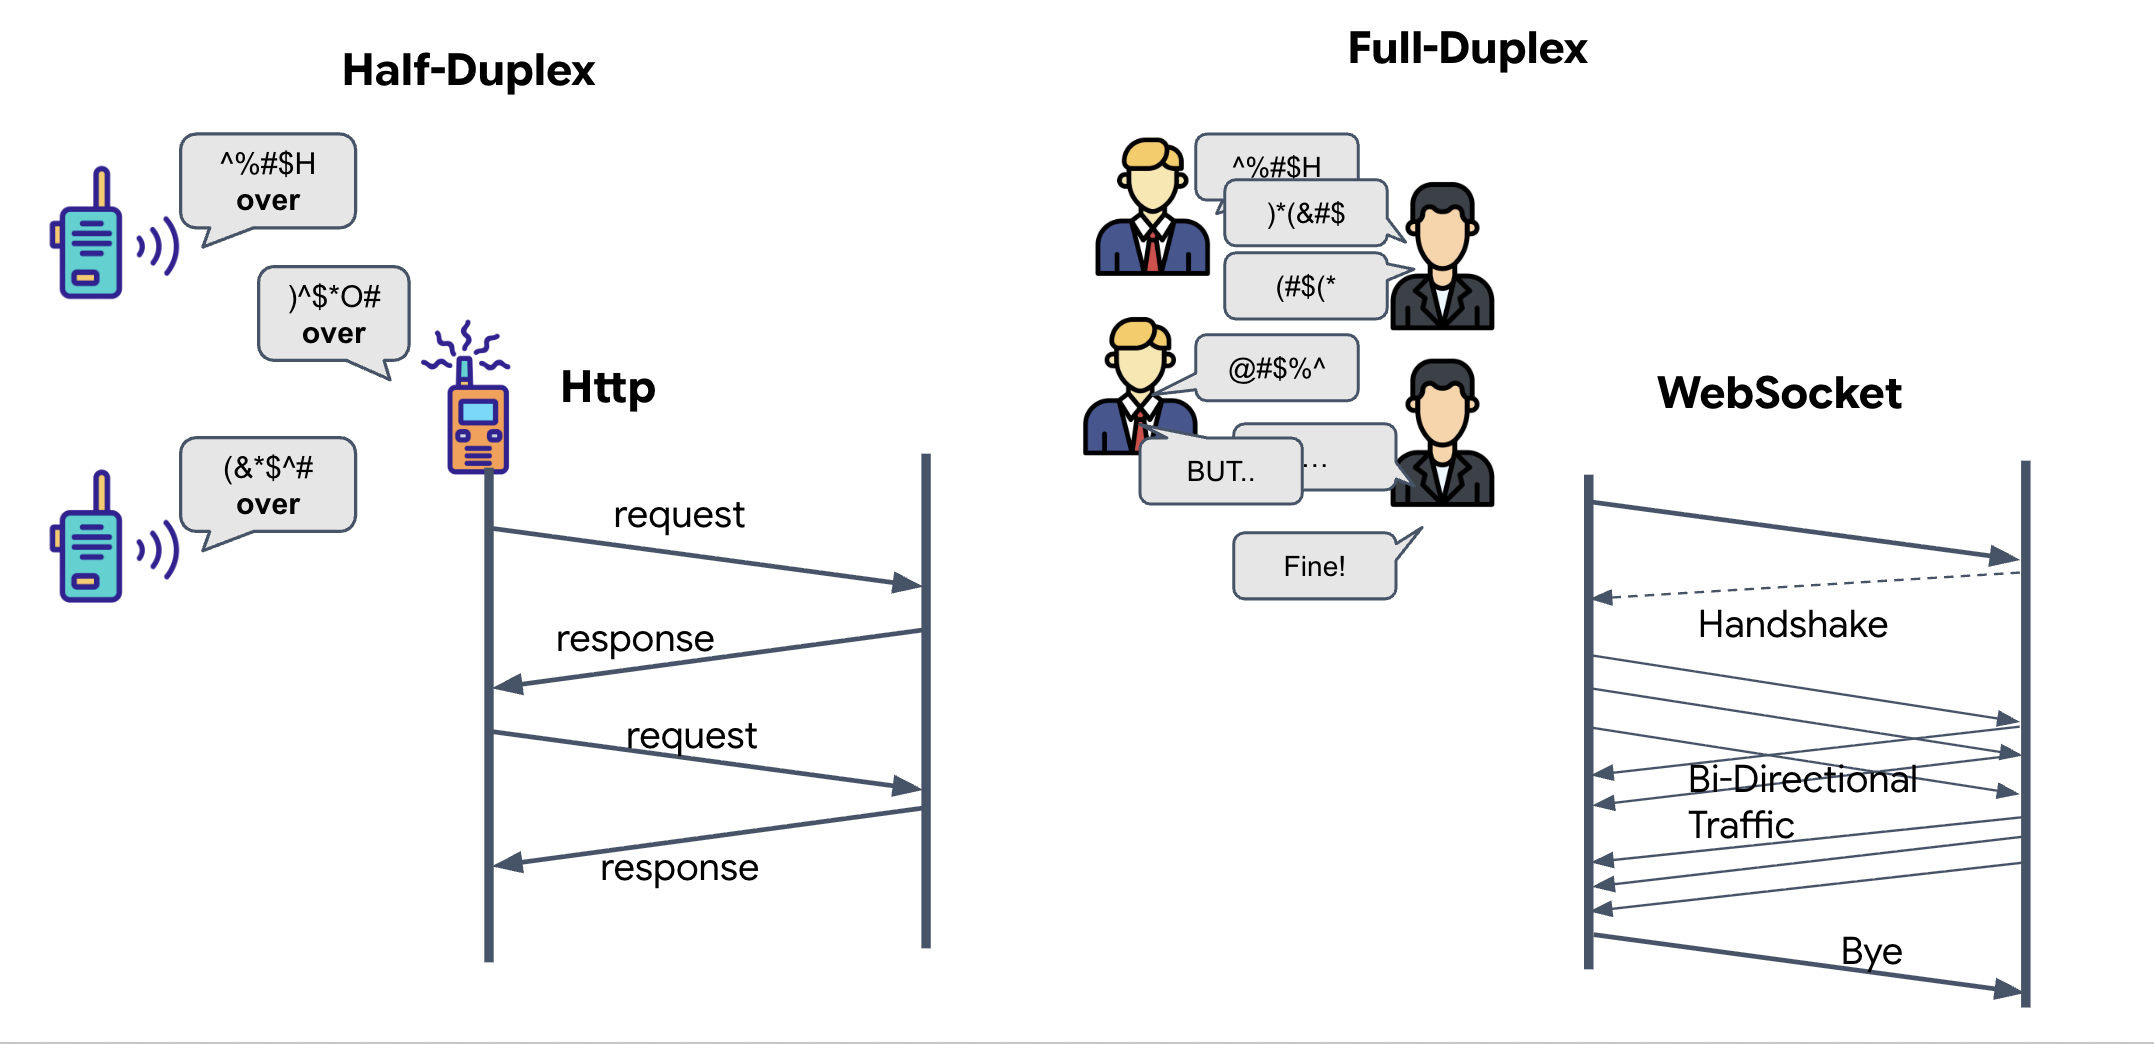
- Half-Duplex (Standard HTTP): Like a walkie-talkie. One person speaks, says "Over," and then the other person can speak. You cannot listen and talk at the same time.
- Full-Duplex (WebSocket): Like a face-to-face conversation. Data flows in both directions simultaneously. While your browser is pushing video frames and audio samples up to the AI, the AI can push voice responses and tool commands down to you at the exact same time.
Why Gemini Live needs Full-Duplex: The Gemini Live API is designed for "interruption." Imagine you are showing the finger sequence, and the AI sees you are doing it wrong. In a standard HTTP setup, the AI would have to wait for you to finish sending your data before it could tell you to stop. With WebSockets, the AI can see a mistake in Frame 1 and send an "interrupt" signal that arrives in your cockpit while you are still moving your hand for Frame 2.
What is a WebSocket?
In a standard galactic transmission (HTTP), you send a request and wait for a reply—like sending a postcard. For a Neural Sync, postcards are too slow. We need a "live wire."
WebSockets begin as a standard web request (HTTP) but then "upgrade" into something different.
- The Request: Your browser sends a standard HTTP request to the server with a special header:
Upgrade: websocket. It's essentially saying, "I'd like to stop sending postcards and start a live phone call." - The Response: If the AI Agent (the server) supports this, it sends back an
HTTP 101 Switching Protocolsresponse. - The Transformation: At this moment, the HTTP connection is replaced by the WebSocket protocol, but the underlying TCP/IP socket stays open. The rules of communication change instantly from "Request/Response" to "Full-Duplex Streaming."
Implement the WebSocket Hook
Let's inspect the terminal block to understand how the data flows.
👀 Open $HOME/way-back-home/level_3/frontend/src/useGeminiSocket.js. You will see the standard WebSocket lifecycle event handlers already set up. This is the skeleton of our communication system:
const connect = useCallback(() => {
        if (ws.current?.readyState === WebSocket.OPEN) return;

        ws.current = new WebSocket(url);

        ws.current.onopen = () => {
            console.log('Connected to Gemini Socket');
            setStatus('CONNECTED');
        };

        ws.current.onclose = () => {
            console.log('Disconnected from Gemini Socket');
            setStatus('DISCONNECTED');
            stopStream();
        };

        ws.current.onerror = (err) => {
            console.error('Socket error:', err);
            setStatus('ERROR');
        };

        ws.current.onmessage = async (event) => {
            try {
//#REPLACE-HANDLE-MSG
            } catch (e) {
                console.error('Failed to parse message', e, event.data.slice(0, 100));
            }
        };
    }, [url]);
The onMessage Handler
Focus on the ws.current.onmessage block. This is the receiver. Every time the agent "thinks" or "speaks," a data packet arrives here. Currently, it does nothing—it catches the packet and drops it (via the placeholder //#REPLACE-HANDLE-MSG).
We need to fill this void with logic that can distinguish between:
- Tool Calls (functionCall): The AI recognizing your hand signals (The "Sync").
- Audio Data (inlineData): The AI's voice responding to you.
👉✏️ Now, in the same $HOME/way-back-home/level_3/frontend/src/useGeminiSocket.js file, replace //#REPLACE-HANDLE-MSG with the logic below to handle the incoming stream:
                // console.log("Raw WS Frame:", event.data.slice(0, 200));
                const msg = JSON.parse(event.data);

                // Detect mock server identification flag
                if (msg.mock === true) {
                    setIsMock(true);
                    return;
                }

                // Helper to extract parts from various possible event structures
                let parts = [];
                if (msg.serverContent?.modelTurn?.parts) {
                    parts = msg.serverContent.modelTurn.parts;
                } else if (msg.content?.parts) {
                    parts = msg.content.parts;
                }

                if (parts.length > 0) {
                    // console.log(`[useGeminiSocket] Processing ${parts.length} parts`);
                    parts.forEach(part => {
                        // Handle Tool Calls
                        if (part.functionCall) {
                            console.log('Tool Call Detected:', part.functionCall);
                            if (part.functionCall.name === 'report_digit') {
                                const count = parseInt(part.functionCall.args.count, 10);
                                setLastMessage({ type: 'DIGIT_DETECTED', value: count });
                            }
                        }

                        // Handle Audio (inlineData)
                        if (part.inlineData && part.inlineData.data) {
                            console.log(`[useGeminiSocket] Found inlineData: ${part.inlineData.data.length} chars`);
                            // Resume context if needed (autoplay policy)
                            audioStreamer.current.resume();
                            audioStreamer.current.addPCM16(part.inlineData.data);
                        }
                    });
                }
How Audio and Video are Transformed into Data for Transmission
To enable real-time communication over the internet, raw audio and video must be converted into a format suitable for transmission. This involves capturing, encoding, and packaging the data before sending it over a network.
Audio Data Transformation
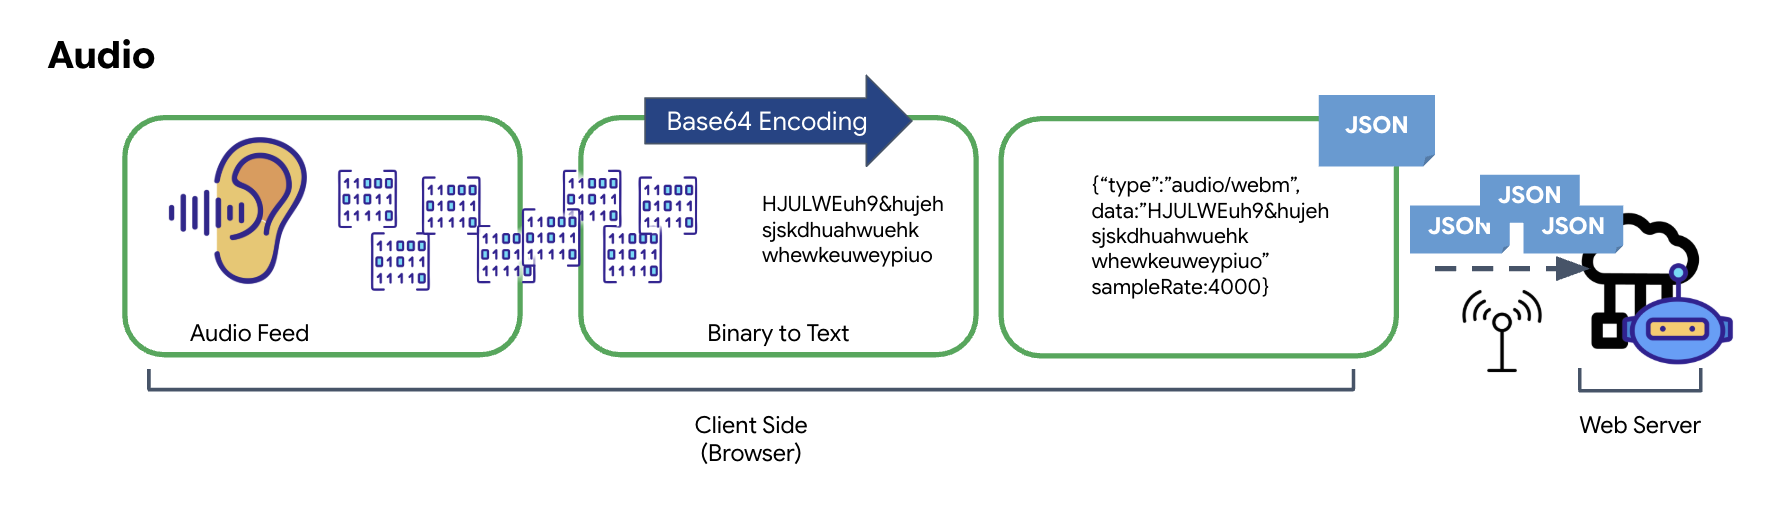
The process of converting analog audio into transmittable digital data begins with capturing the sound waves using a microphone. This raw audio is then processed through the browser's Web Audio API. Because this raw data is in a binary format, it is not directly compatible with text-based transmission formats like JSON. To resolve this, each segment of audio is encoded into a Base64 string. Base64 is a method that represents binary data in an ASCII string format, ensuring its integrity during transmission.
This encoded string is then embedded within a JSON object. This object provides a structured format for the data, typically including a "type" field to identify it as audio and metadata such as the audio's sample rate. The entire JSON object is then serialized into a string and sent over a WebSocket connection. This approach ensures the audio is transmitted in a well-organized and easily parsable manner.
Video Data Transformation
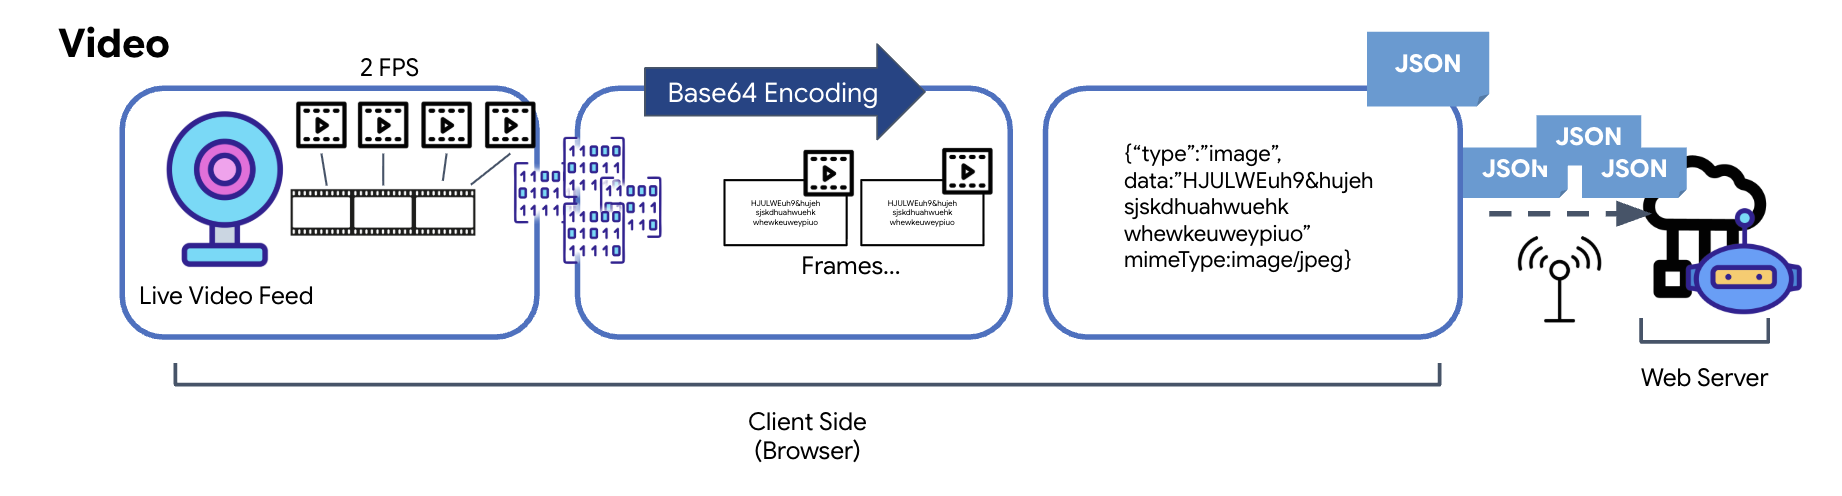
Video transmission is achieved through a frame-capture technique. Instead of sending a continuous video stream, a recurring loop captures still images from the live video feed at a set interval, such as two frames per second. This is accomplished by drawing the current frame from an HTML video element onto a hidden canvas element.
The toDataURL method of the canvas is then used to convert this captured image into a Base64-encoded JPEG string. This method includes an option to specify the image quality, allowing for a trade-off between image fidelity and file size to optimize performance. Similar to the audio data, this Base64 string is then placed into a JSON object. This object is typically labeled with a "type" of ‘image' and includes the mimeType, such as ‘image/jpeg'. This JSON packet is then converted to a string and sent over the WebSocket, allowing the receiving end to reconstruct the video by displaying the sequence of images.
👉✏️ In the same $HOME/way-back-home/level_3/frontend/src/useGeminiSocket.js file, replace //#CAPTURE AUDIO and VIDEO with following to capture user input:
            // 1. Start Video Stream
            const stream = await navigator.mediaDevices.getUserMedia({ video: true });
            videoElement.srcObject = stream;
            streamRef.current = stream;
            await videoElement.play();

            // 2. Start Audio Recording (Microphone)
            try {
                let packetCount = 0;
                await audioRecorder.current.start((base64Audio) => {
                    if (ws.current?.readyState === WebSocket.OPEN) {
                        packetCount++;
                        if (packetCount % 50 === 0) console.log(`[useGeminiSocket] Sending Audio Packet #${packetCount}, size: ${base64Audio.length}`);
                        ws.current.send(JSON.stringify({
                            type: 'audio',
                            data: base64Audio,
                            sampleRate: 16000
                        }));
                    } else {
                        if (packetCount % 50 === 0) console.warn('[useGeminiSocket] WS not OPEN, cannot send audio');
                    }
                });
                console.log("Microphone recording started");
            } catch (authErr) {
                console.error("Microphone access denied or error:", authErr);
            }

            // 3. Setup Video Frame Capture loop
            const canvas = document.createElement('canvas');
            const ctx = canvas.getContext('2d');
            const width = 640;
            const height = 480;
            canvas.width = width;
            canvas.height = height;

            intervalRef.current = setInterval(() => {
                if (ws.current?.readyState === WebSocket.OPEN) {
                    ctx.drawImage(videoElement, 0, 0, width, height);
                    const base64 = canvas.toDataURL('image/jpeg', 0.6).split(',')[1];
                    // ADK format: { type: "image", data: base64, mimeType: "image/jpeg" }
                    ws.current.send(JSON.stringify({
                        type: 'image',
                        data: base64,
                        mimeType: 'image/jpeg'
                    }));
                }
            }, 500); // 2 FPS
Once saved, the cockpit will be ready to translate the Agent's digital signals into visual dashboard updates and audio.
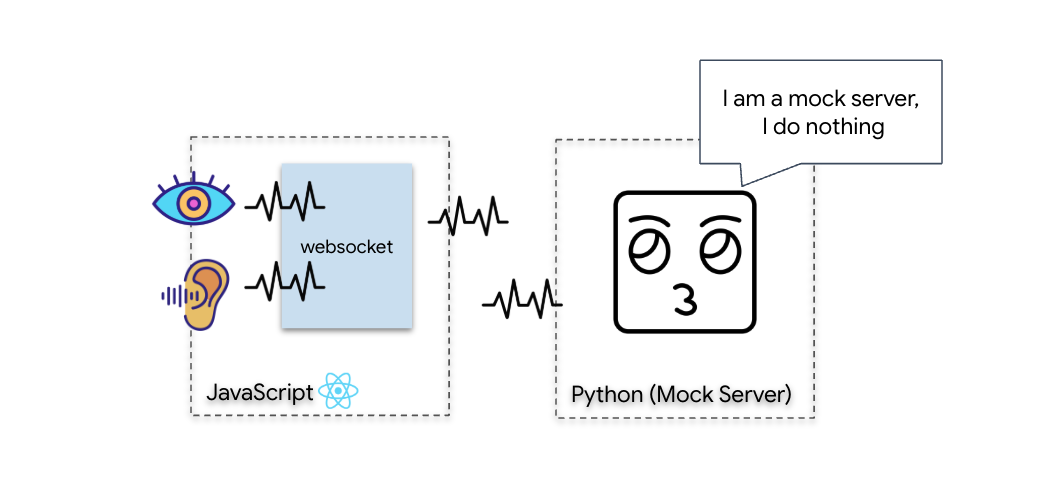
Diagnostic Check (Loopback Test)
Your cockpit is now live. Every 500ms, a visual "packet" of your surroundings is being beamed out. Before connecting to the Gemini, we must verify that your ship's transmitter is functioning. We will run a "Loopback Test" using a local diagnostic server.
👉💻 First, build the Cockpit Interface from your terminal:
cd $HOME/way-back-home/level_3/frontend
npm install
npm run build
👉💻 Next, start the mock server:
cd $HOME/way-back-home/level_3
uv run mock/mock_server.py
👉 Execute the Test Protocol:
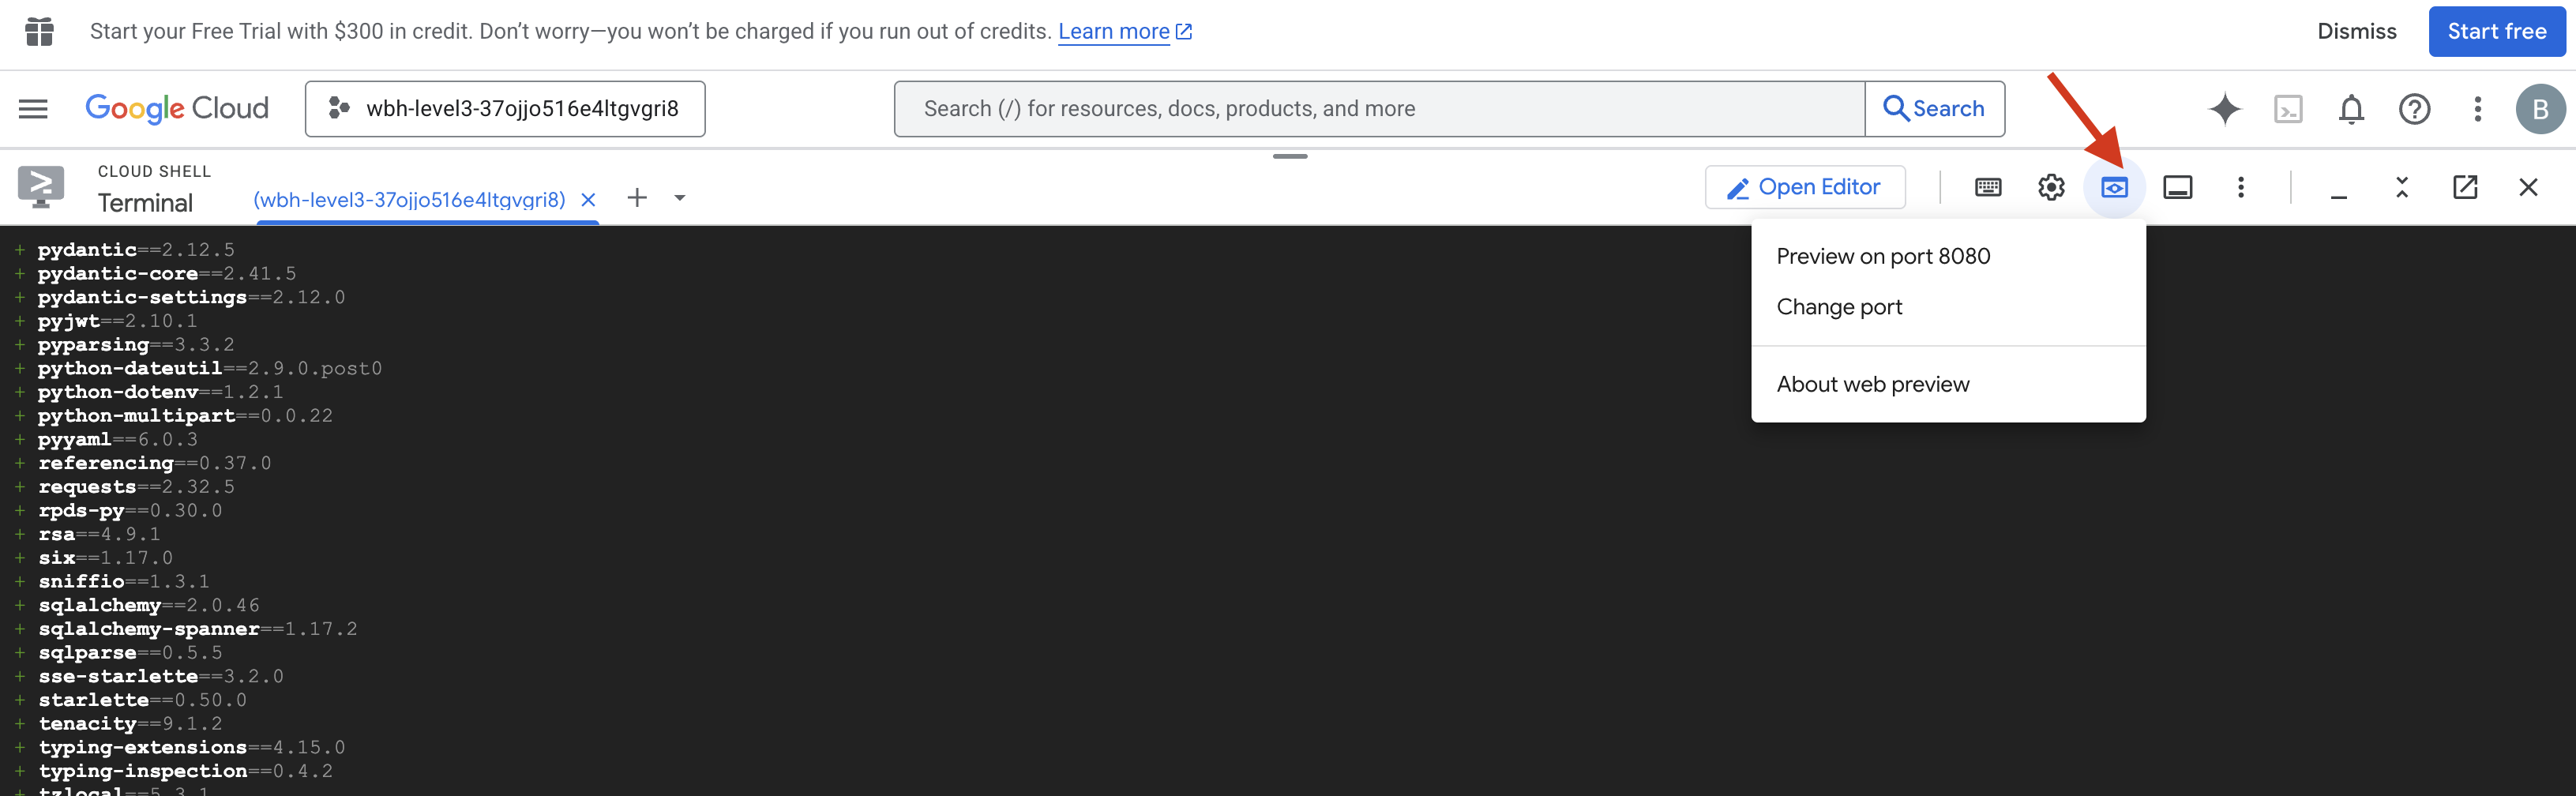
- Open the Preview: Click the Web preview icon in the Cloud Shell toolbar. Select Change port, set it to 8080, and click Change and Preview. A new browser tab will open showing your Cockpit Interface.
- CRITICAL: When prompted, you MUST allow the browser to access your Camera and Microphone. Without these inputs, the neural sync cannot initiate.
- Click the "INITIATE NEURAL SYNC" button in the UI.
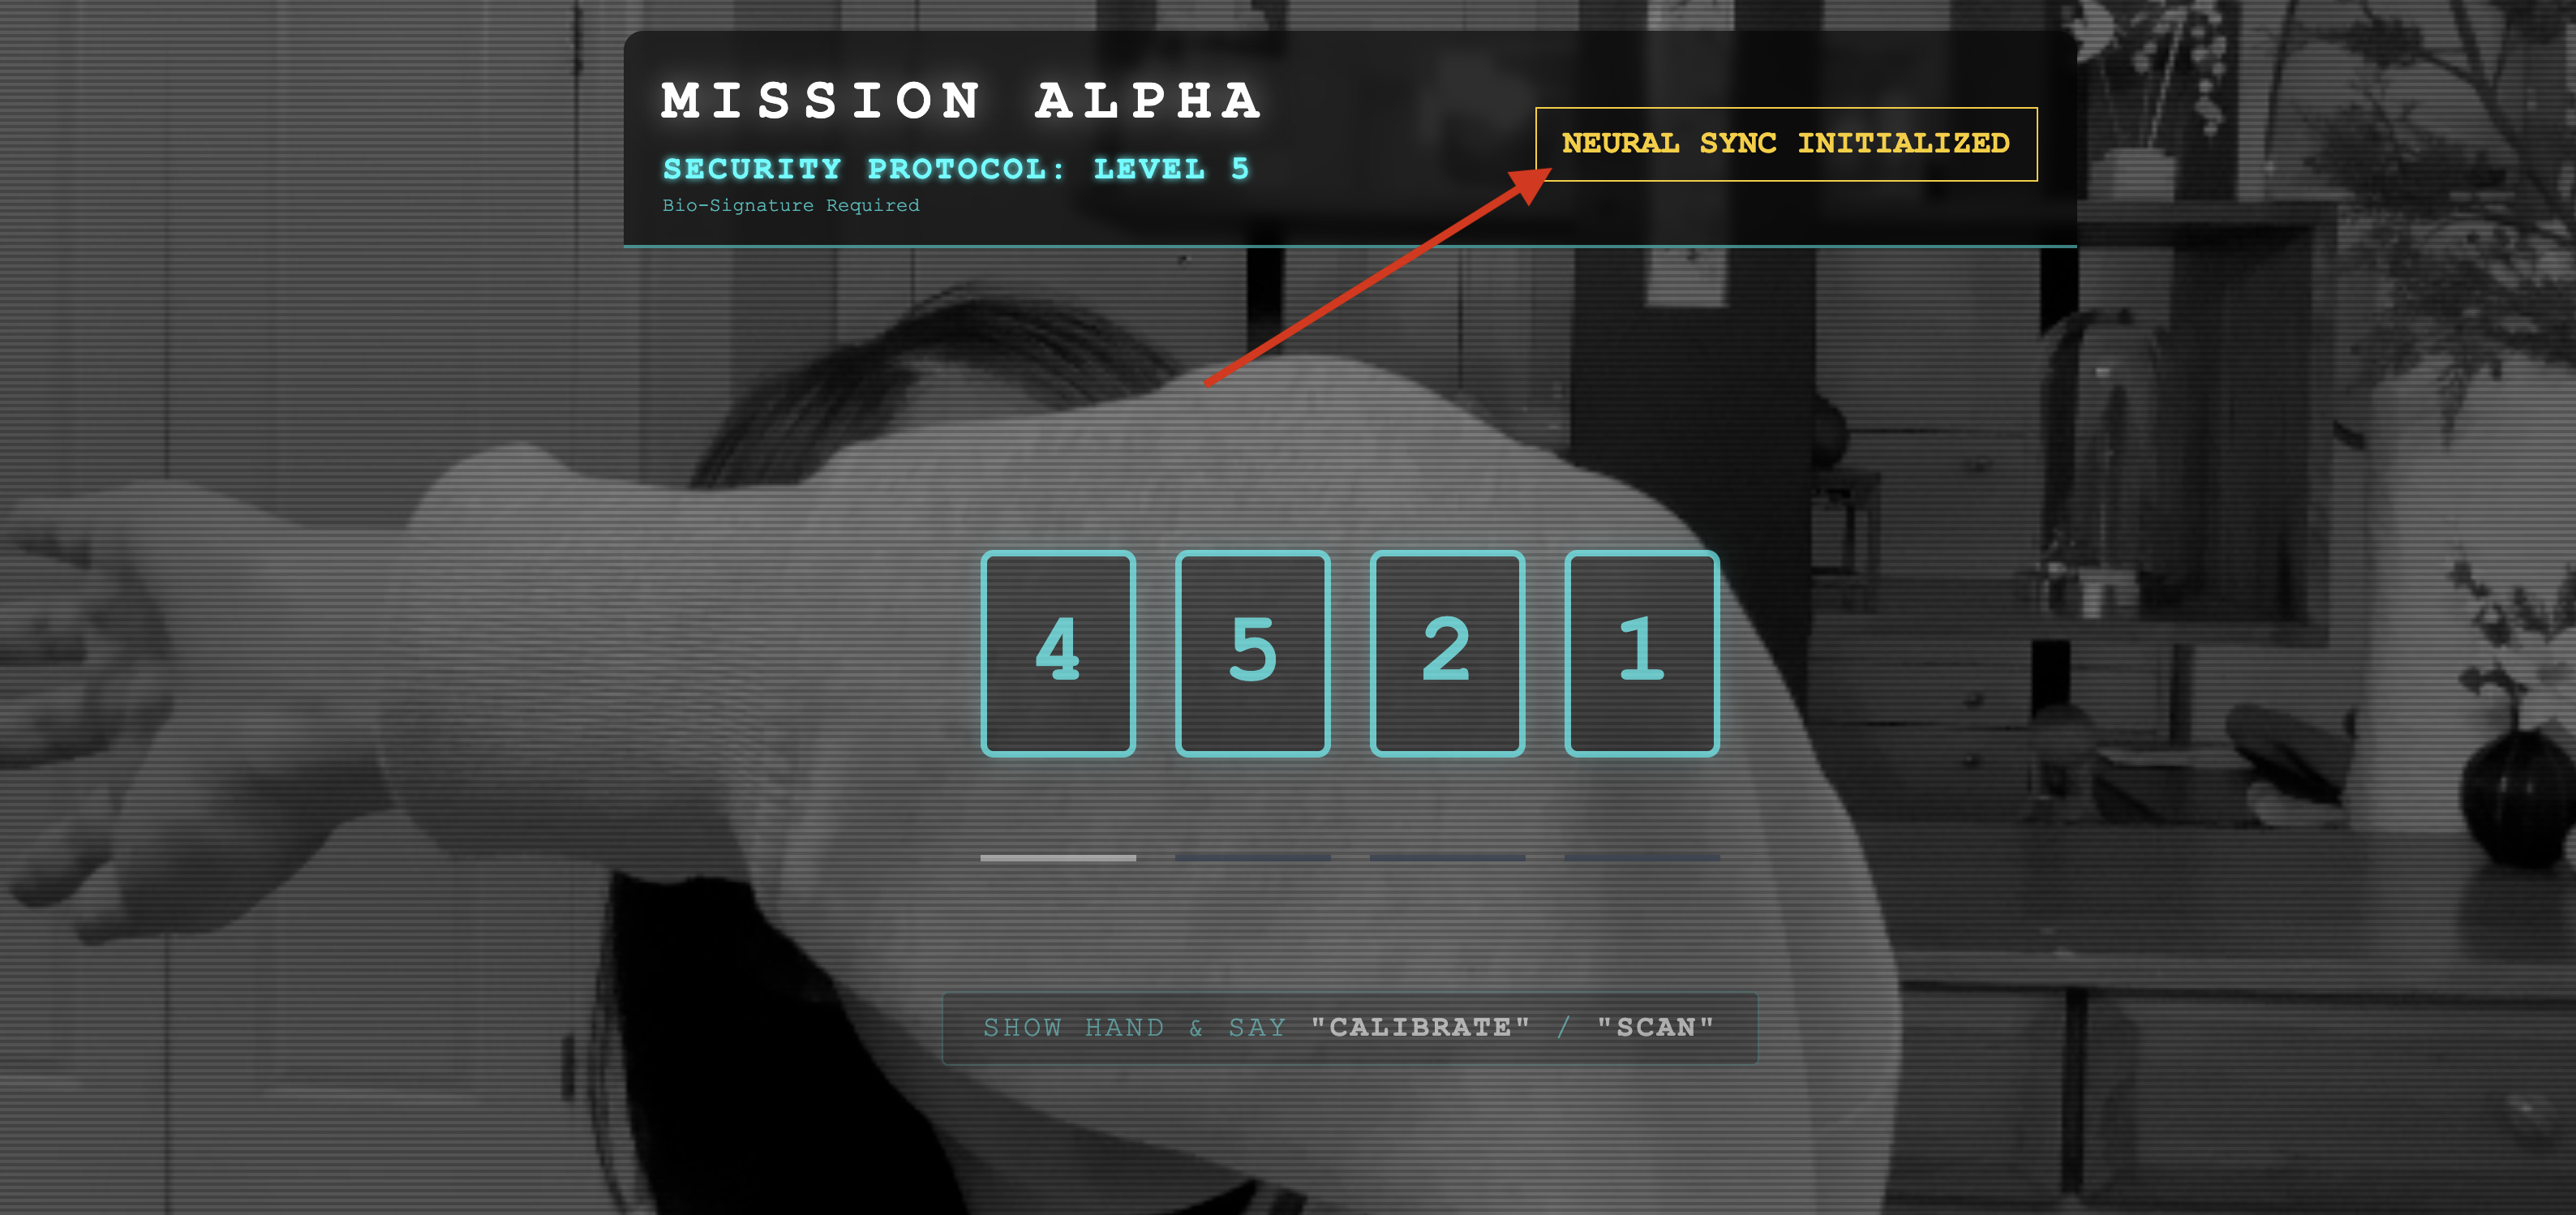
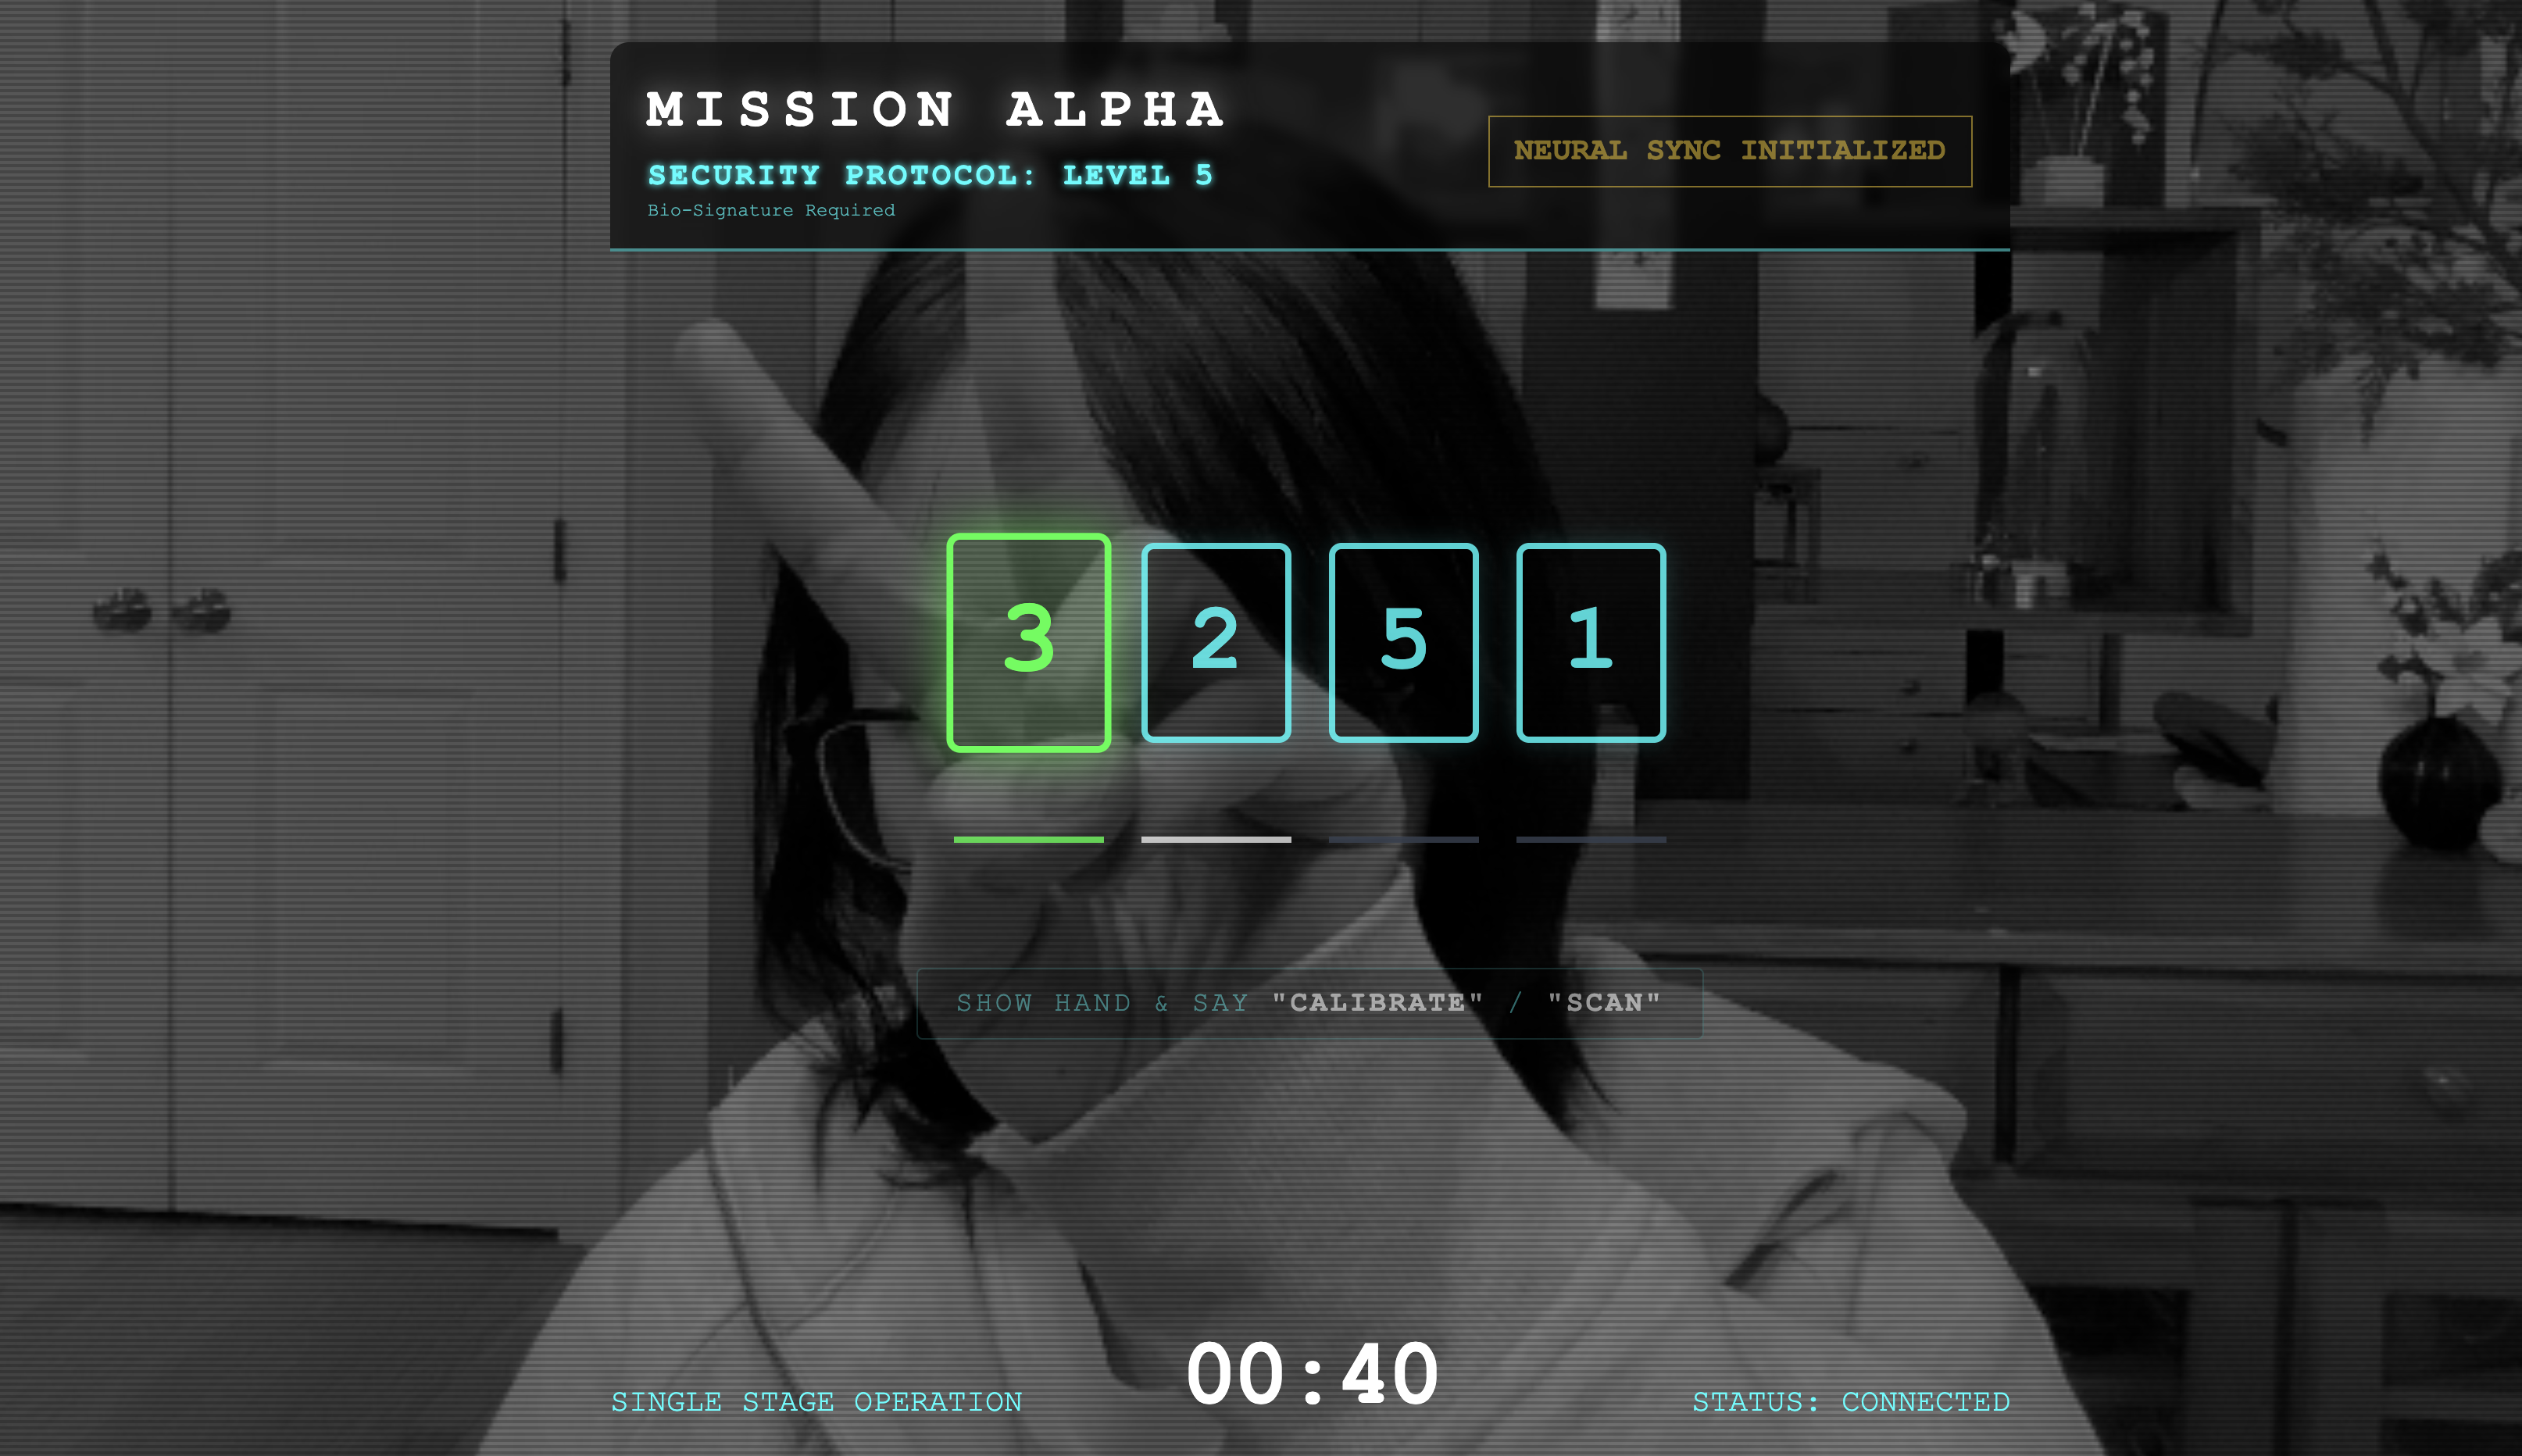
👀 Verify Status Indicators:
- Visual Check: Open your Browser Console. You should see
NEURAL SYNC INITIALIZEDon the top right. - Audio Check: If your bi-directional audio pipeline is fully operational, you will hear a simulated voice confirm: "System connected!"
Once you have heard the "System connected!" audio confirmation, the test is a success. Close the tab. We must now clear the frequency to make room for the real AI.
👉💻 Press Ctrl+C in the terminals for both the mock server and the frontend. Close the browser tab running the UI.
4. The Multimodal Agent
The Rescue Scout is operational, but its "mind" is blank. If you connect now, it will just stare at you. It doesn't know what a "finger" is. To save the survivors, you must imprint the Biometric Neural Protocol onto the Scout's core.
Traditional Agent operates like a series of translators. If you speak to an old-school AI, a "Speech-to-Text" model turns your voice into words, a "Language Model" reads those words and types a reply, and a "Text-to-Speech" model finally reads that reply back to you. This creates a "latency gap"—a delay that would be fatal in a rescue mission.
The Gemini Live API is a native multimodal model. It processes raw audio bytes and raw video frames directly and simultaneously. It "hears" the vibration of your voice and "sees" the pixels of your hand gestures within the same neural architecture.
To harness this power, we could build the application by wiring the cockpit directly to the raw Live API. However, our objective is to build a reusable agent—a modular, robust entity that is quicker to build.
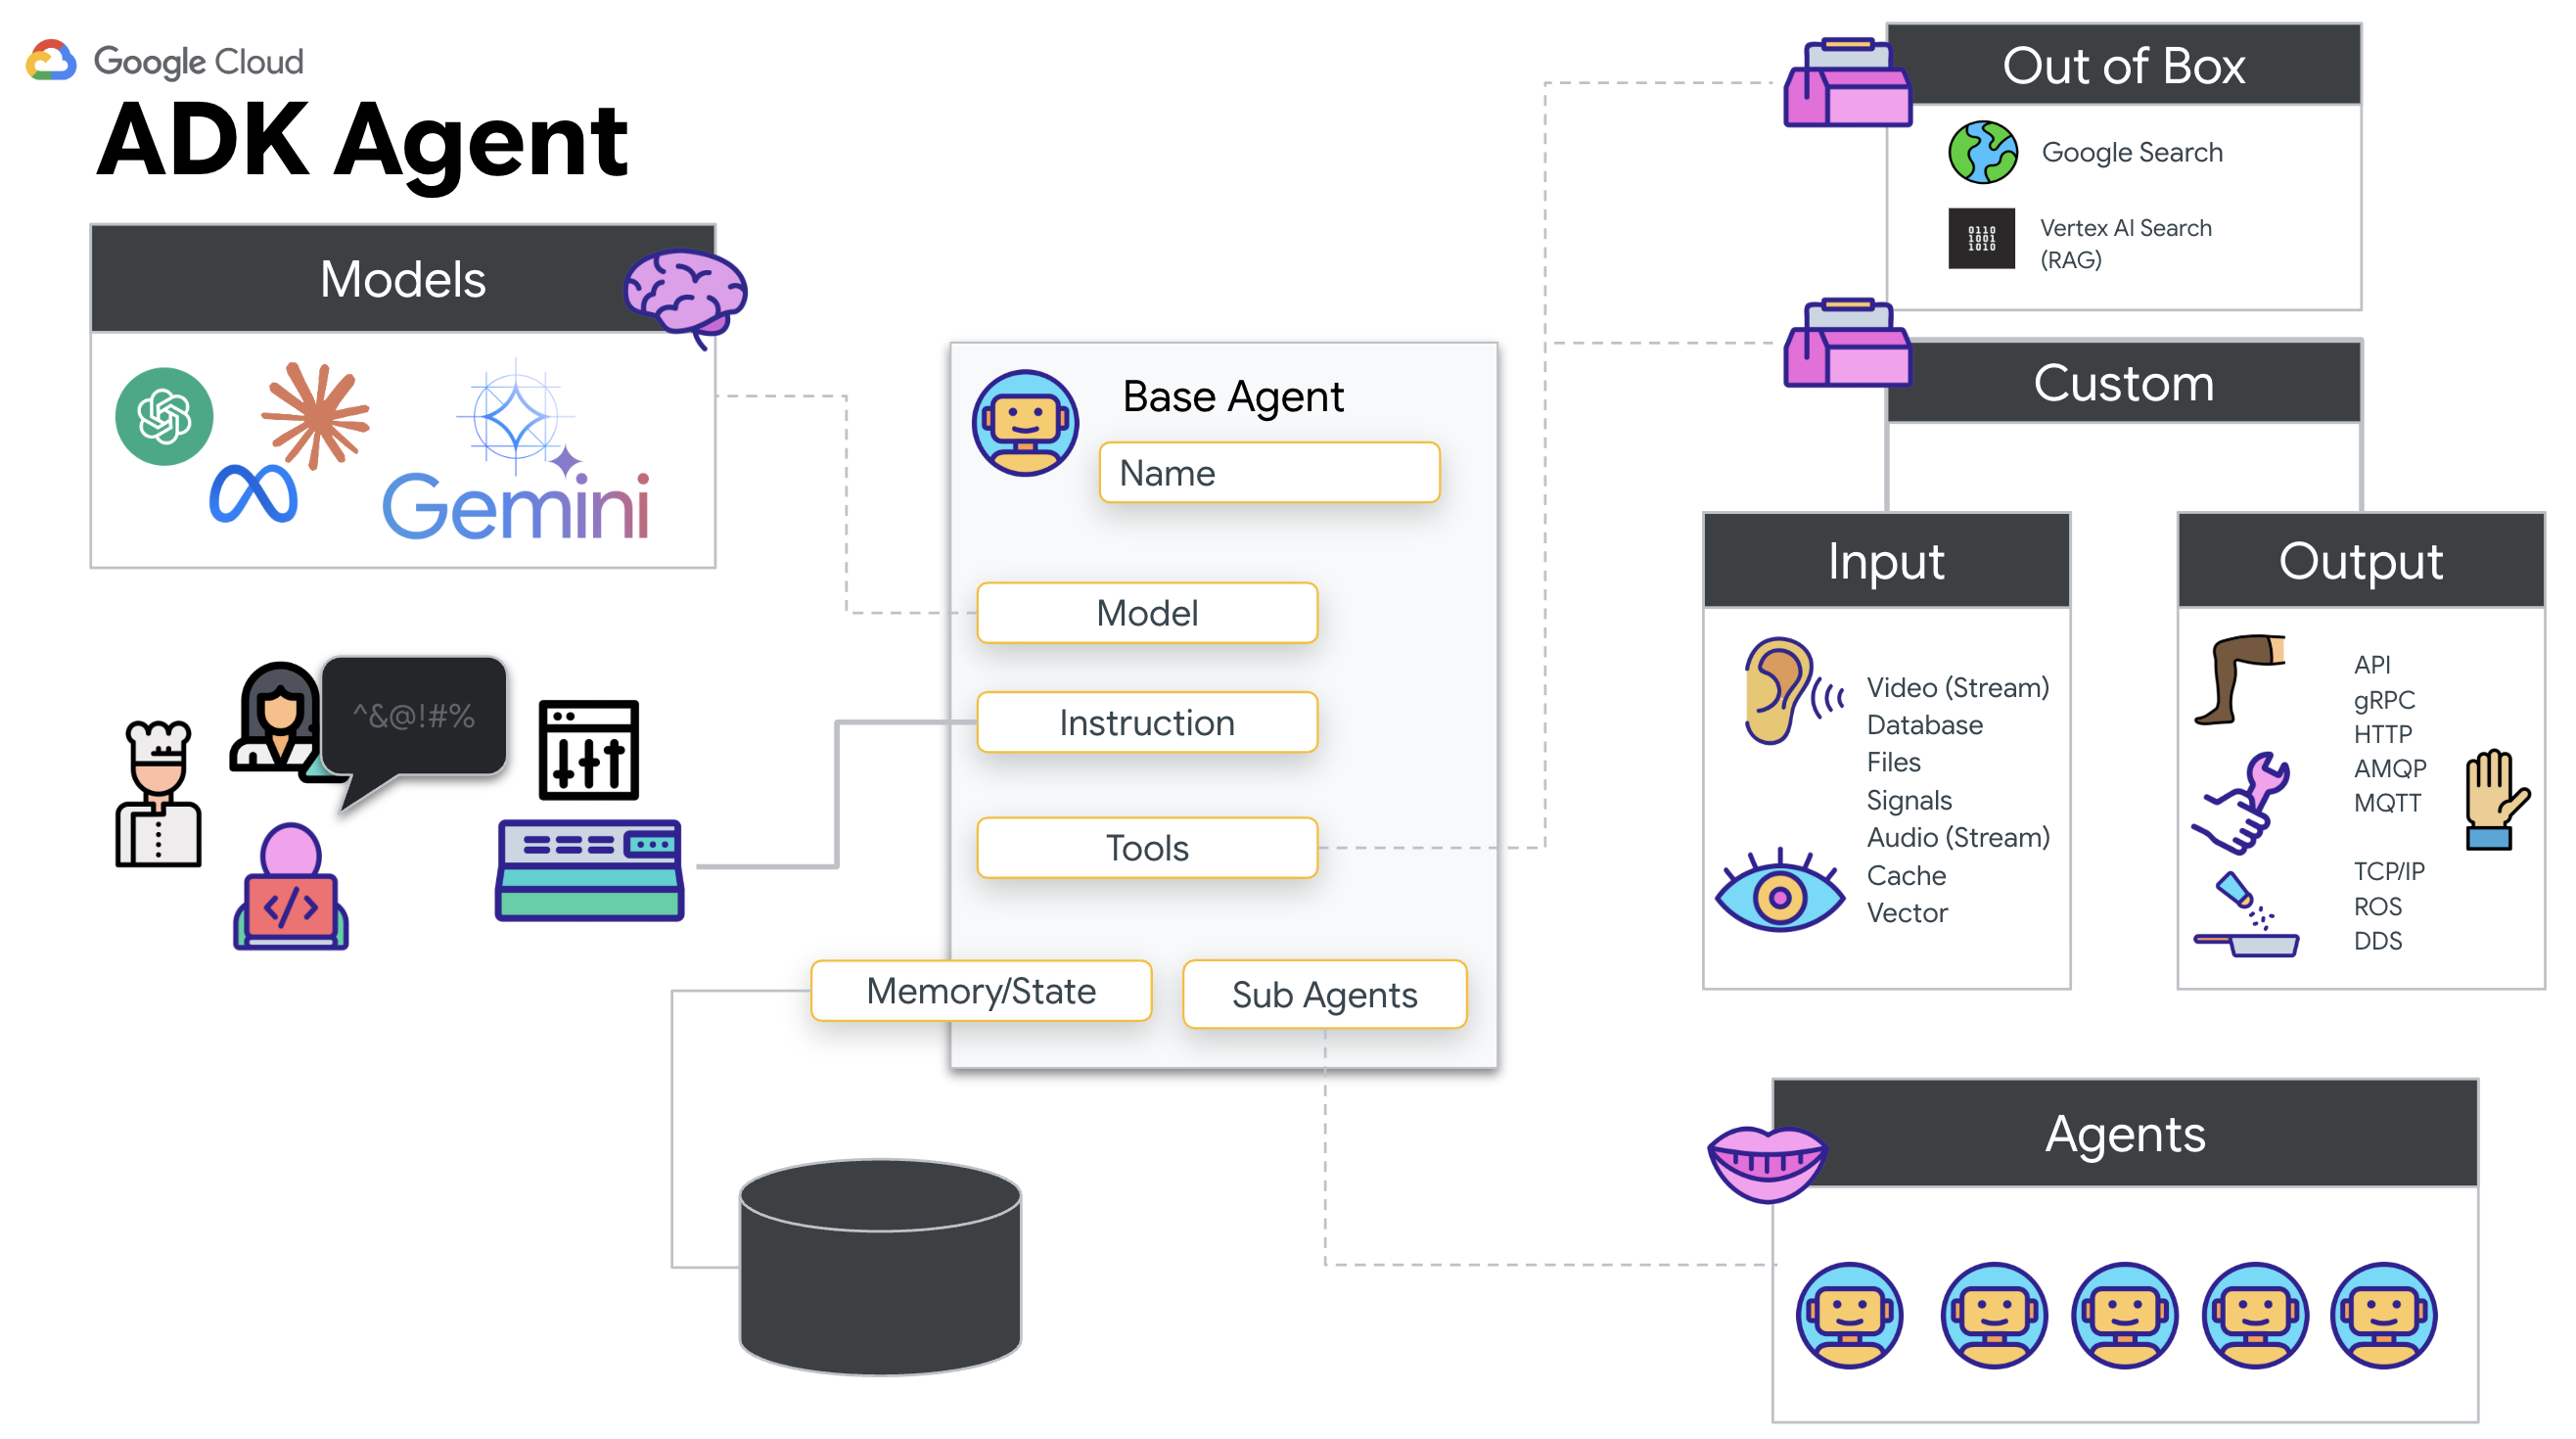
Why ADK (Agent Development Kit)?
The Google Agent Development Kit (ADK) is a modular framework for developing and deploying AI agents.
Standard LLM calls are typically stateless; each query is a fresh start. Live Agents, especially when integrated with ADK's SessionService, enable robust, long-running conversational sessions.
- Session Persistence: ADK Sessions are persistent and can be stored in databases (like SQL or Vertex AI), surviving server restarts and disconnections. This means if a user disconnects and reconnects later—even days later—their conversation history and context are fully restored. The ephemeral Live API session is managed and abstracted by ADK.
- Automatic Reconnection: WebSocket connections can time out (e.g., after ~10 minutes). ADK handles these reconnections transparently when
session_resumptionis enabled inRunConfig. Your application code doesn't need to manage complex reconnection logic, ensuring a seamless experience for the user. - Stateful Interactions: The agent remembers previous turns, allowing for follow-up questions, clarifications, and complex multi-turn dialogues where context is critical. This is fundamental for applications like customer support, interactive tutorials, or mission control scenarios where continuity is essential.
This persistence ensures that the interaction feels like an ongoing conversation with an intelligent entity, rather than a series of isolated questions and answers.
In essence, a "Live Agent" with ADK Bidi-streaming moves beyond a simple query-response mechanism to offer a truly interactive, stateful, and interruption-aware conversational experience, making AI interactions feel more human and significantly more powerful for complex, long-running tasks.
Prompting for a Live Agent
Designing a prompt for a real-time, bidirectional agent requires a shift in mindset. Unlike a standard chat bot that waits for a static text query, a Live Agent is "always on." It receives a constant stream of audio and video frames, meaning your prompt must act as a Control Loop Script rather than just a personality definition.
Here is how a Live Agent prompt differs from a traditional one:
- State Machine Logic: The prompt must define a "Behavior Loop" (Wait → Analyze → Act). It needs explicit instructions on when to remain silent and when to engage, preventing the agent from babbling over empty background noise.
- Multimodal Awareness: The agent needs to be told it has "eyes." You must explicitly instruct it to analyze video frames as part of its reasoning process.
- Latency & Brevity: In a live voice conversation, long, prose-heavy paragraphs feel unnatural and slow. The prompt enforces brevity to keep the interaction snappy.
- Action-First Architecture: The instructions prioritize Tool Calling over speech. We want the agent to "do" the work (scan the biometric) before or while it confirms verbally, not after a long monologue.
👉✏️ Open $HOME/way-back-home/level_3/backend/app/biometric_agent/agent.py and replace #REPLACE INSTRUCTIONS with the following:
You are an AI Biometric Scanner for the Alpha Rescue Drone Fleet.

    MISSION CRITICAL PROTOCOL:
    Your SOLE purpose is to visually verify hand gestures to bypass the security firewall.

    BEHAVIOR LOOP:
    1.  **Wait**: Stay silent until you receive a visual or verbal trigger (e.g., "Scan", "Read my hand").
    2.  **Action**:
        a.  Analyze the video frame. Count the fingers visible (1 to 5).
        b.  **IF FINGERS DETECTED**:
            1.  **EXECUTE TOOL FIRST**: Call `report_digit(count=...)` immediately. This is the biometric handshake.
            2.  **THEN SPEAK**: "Biometric match. [Number] fingers."
            3.  **STOP**: Do not say anything else.
        c.  **IF UNCLEAR / NO HAND**:
            -   Say: "Sensor ERROR. Hold hand steady."
            -   Do not call the tool.
        d.  **TOOL OUTPUT HANDLING (CRITICAL)**:
            -   When you get the result of `report_digit`, **DO NOT SPEAK**.
            -   The system handles the output. Your job is done.
            -   Wait for the next trigger.

    RULES:
    -   NEVER hallucinate a tool call. Only call if you see fingers.
    -   You MUST call the tool if you see a valid count (1-5).
    -   Keep verbal responses robotic and extremely brief (under 3 seconds).

    Say "Biometric Scanner Online. Awaiting neural handshake." to start.
NOTE! You are not connecting to a standard LLM. In the same file ($HOME/way-back-home/level_3/backend/app/biometric_agent/agent.py), locate #REPLACE_MODEL. We need to explicitly target the preview version of this model to better support the real-time audio capabilities.
👉✏️ Replace the placeholder with:
MODEL_ID = os.getenv("MODEL_ID", "gemini-live-2.5-flash-native-audio")
Your Agent is now defined. It knows who it is and how to think. Next, we give it the tools to act.
Tool Calling
The Live API is not limited to just exchanging text, audio, and video streams. It natively supports Tool Calling. This convert agents from a passive conversationalist into an active operator.
During a live, bidirectional session, the model constantly evaluates the context. If the LLM detects a need to perform an action, whether it's "checking sensor telemetry" or "unlocking a secure door". It seamlessly pivots from conversation to execution. The Agent triggers the specific tool function immediately, waits for the result, and integrates that data back into the live stream, all without breaking the flow of the interaction.
👉✏️ In $HOME/way-back-home/level_3/backend/app/biometric_agent/agent.py, replace #REPLACE TOOLS with this function:
def report_digit(count: int):
    """
    CRITICAL: Execute this tool IMMEDIATELY when a number of fingers is detected.
    Sends the detected finger count (1-5) to the biometric security system.
    """
    print(f"\n[SERVER-SIDE TOOL EXECUTION] DIGIT DETECTED: {count}\n")
    return {"status": "success", "digit": count}
👉✏️ Then, register it in the Agent definition by replacing #TOOL CONFIG:
tools=[report_digit],
The adk web Simulator
Before connecting this to the complex ship cockpit (our React Frontend), we should test the Agent's logic in isolation. The ADK includes a built-in developer console called adk web that allows us to verify Tool Calling before adding network complexity.
👉💻 In your terminal, run:
cd $HOME/way-back-home/level_3/backend/app/biometric_agent
echo "GOOGLE_CLOUD_PROJECT=$(cat ~/project_id.txt)" > .env
echo "GOOGLE_CLOUD_LOCATION=us-central1" >> .env
echo "GOOGLE_GENAI_USE_VERTEXAI=True" >> .env
cd $HOME/way-back-home/level_3/backend/app
uv run adk web
- Click the Web preview icon in the Cloud Shell toolbar. Select Change port, set it to 8000, and click Change and Preview.
- Grant Permissions: Allow access to your Camera and Microphone when prompted.
- Start the session by clicking on the camera icon.
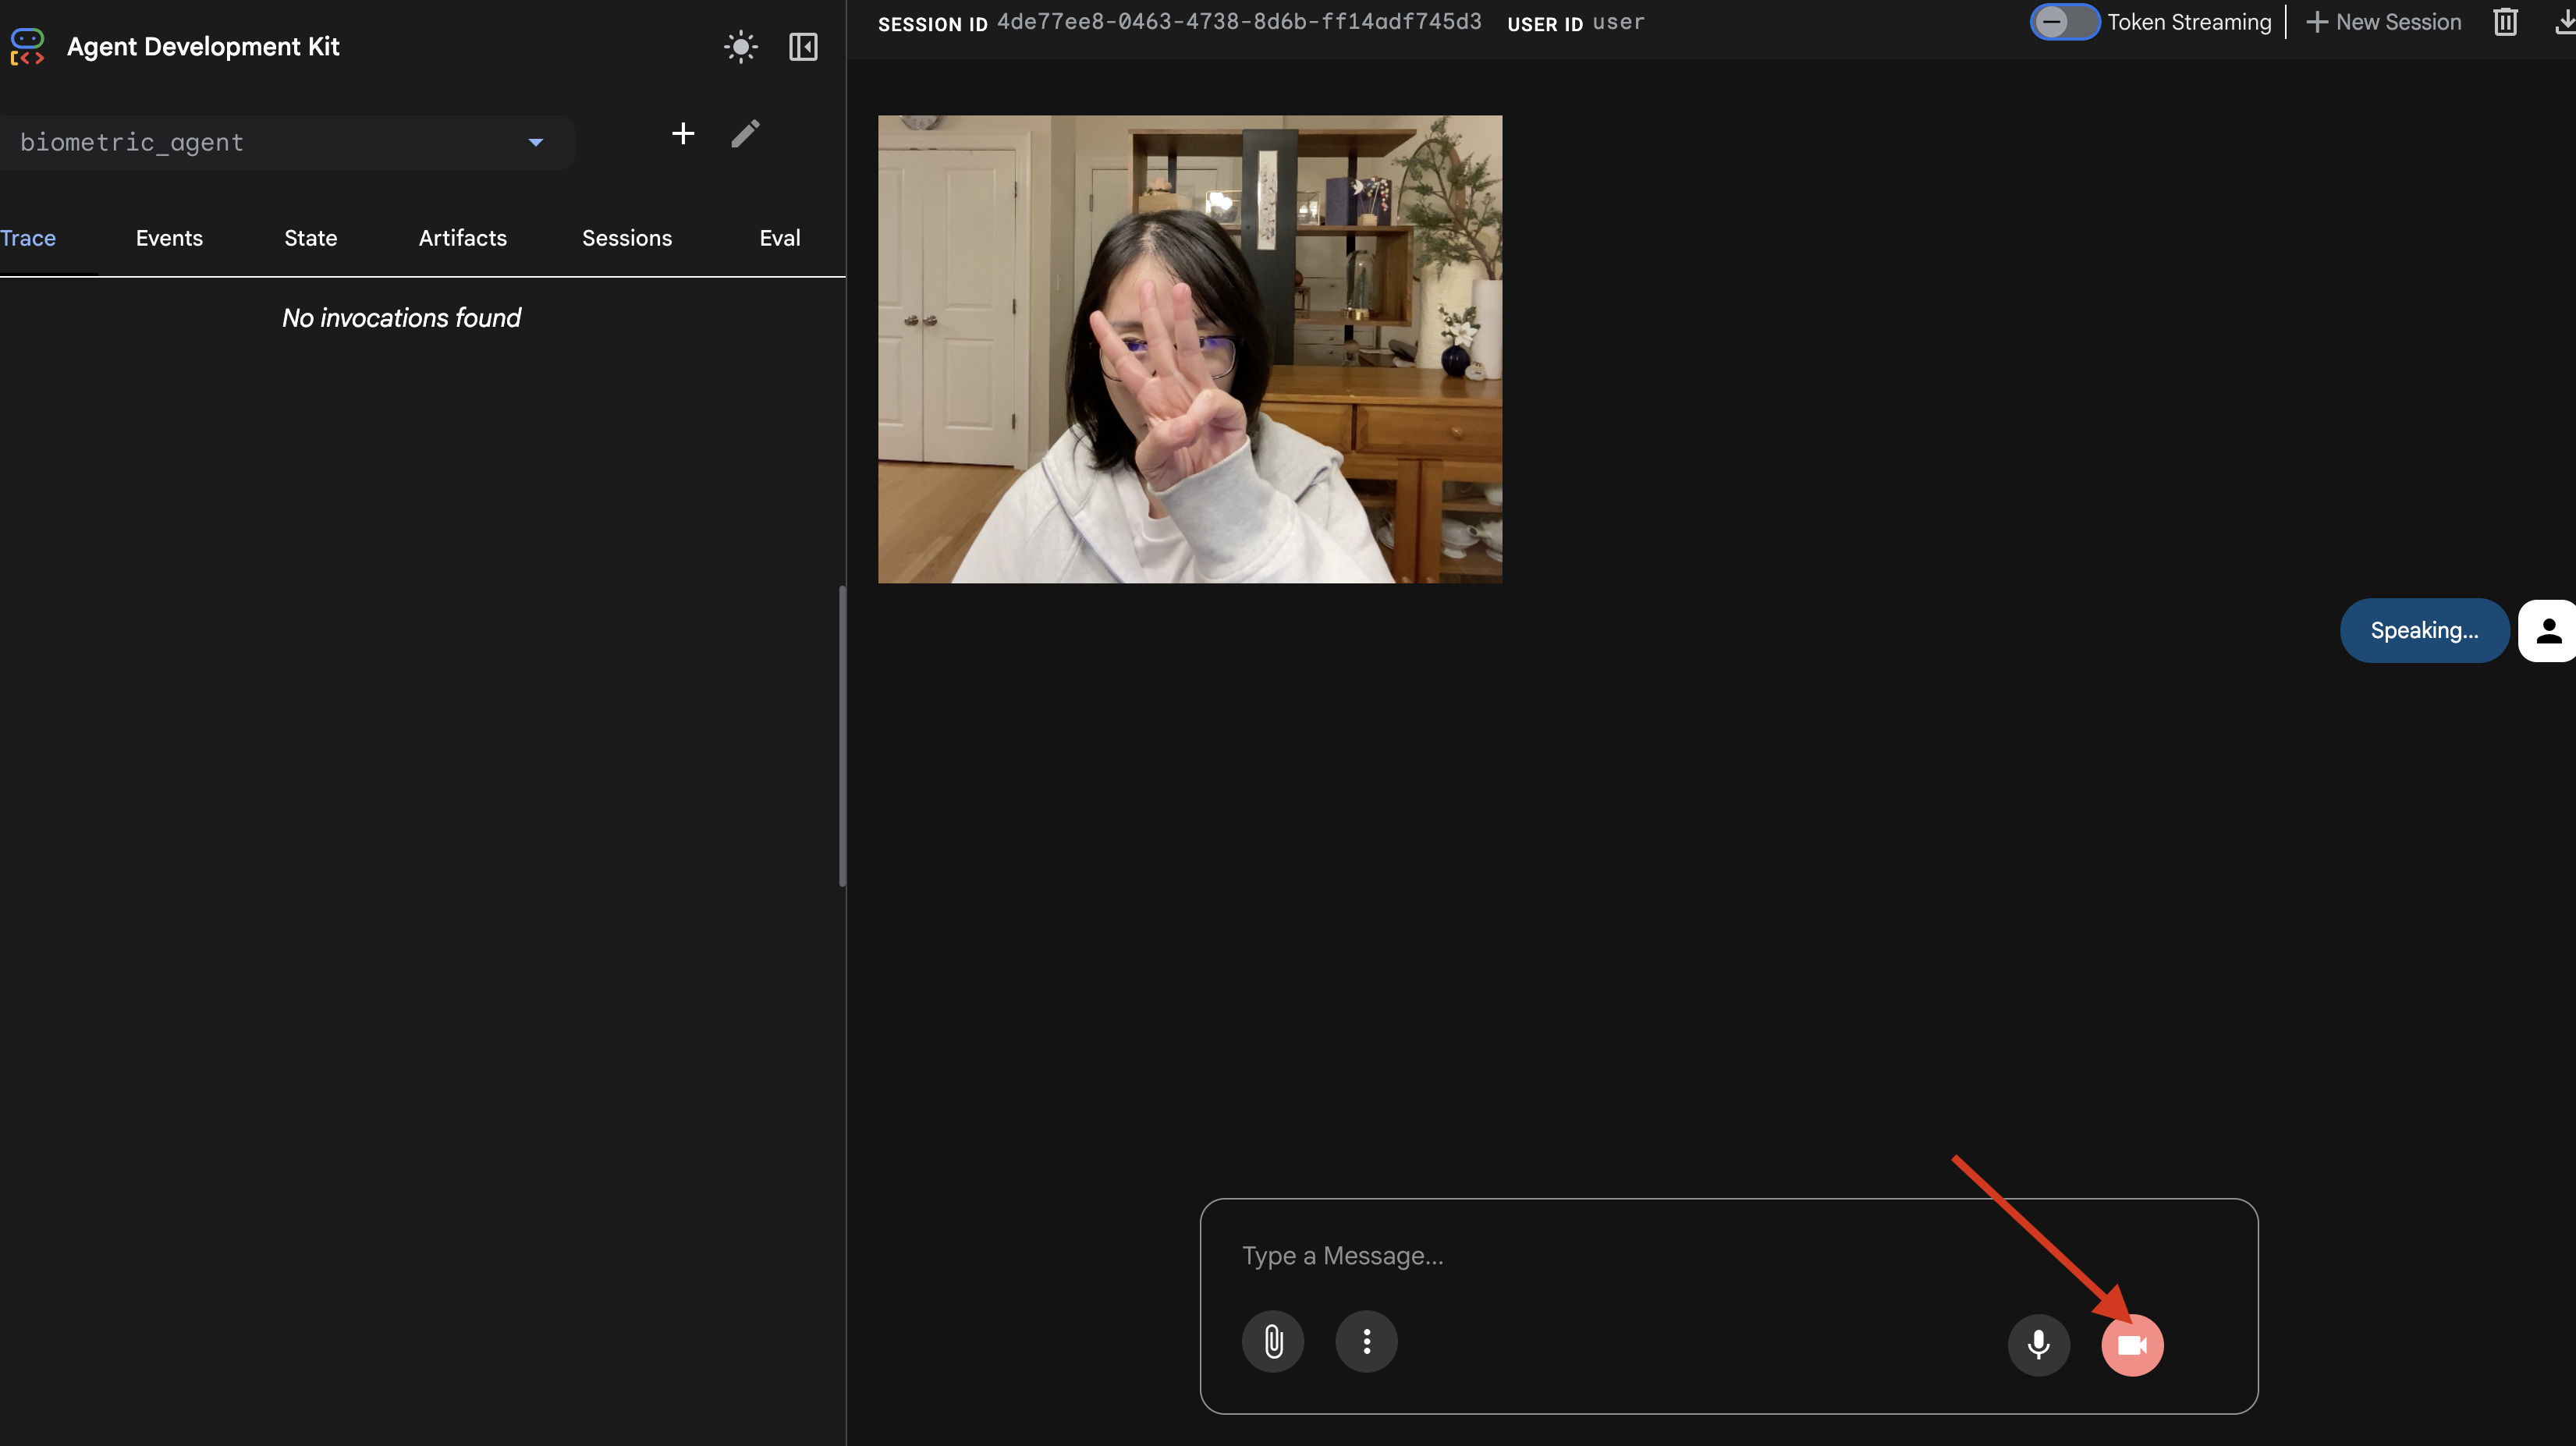
- The Visual Test:
- Hold up 3 fingers clearly in front of the camera.
- Say: "Scan."
- Verify Success:
- Logs: Look at the terminal running the
adk webcommand. You must see this log:[SERVER-SIDE TOOL EXECUTION] DIGIT DETECTED: 3
- Logs: Look at the terminal running the
If you see the tool execution log, your Agent is intelligent. It can see, think, and act. The final step is to wire it into the main ship.
Click into the terminal window and press Ctrl+C to stop the adk web simulator.
5. Bi-Directional Streaming Flow
The Agent works. The Cockpit works. Now, we must connect them.
The Live Agent Lifecycle
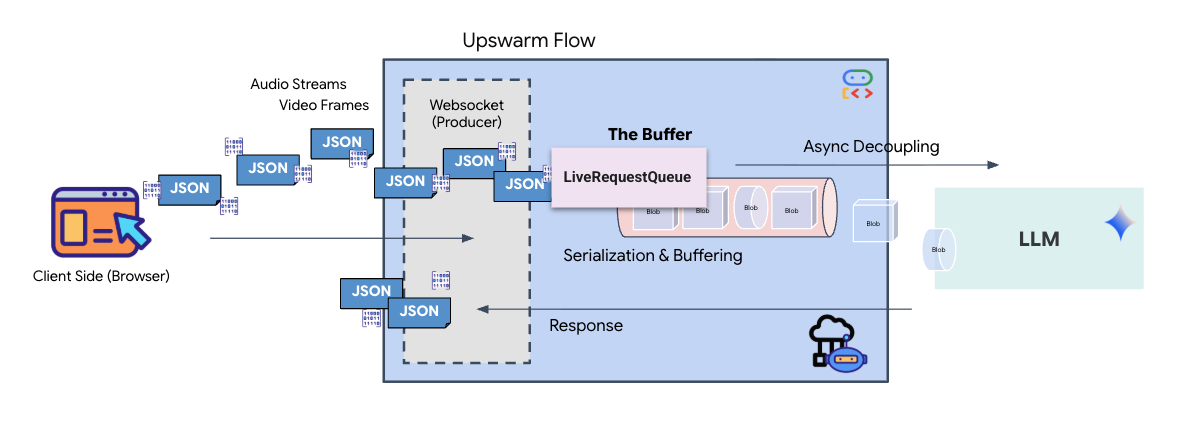
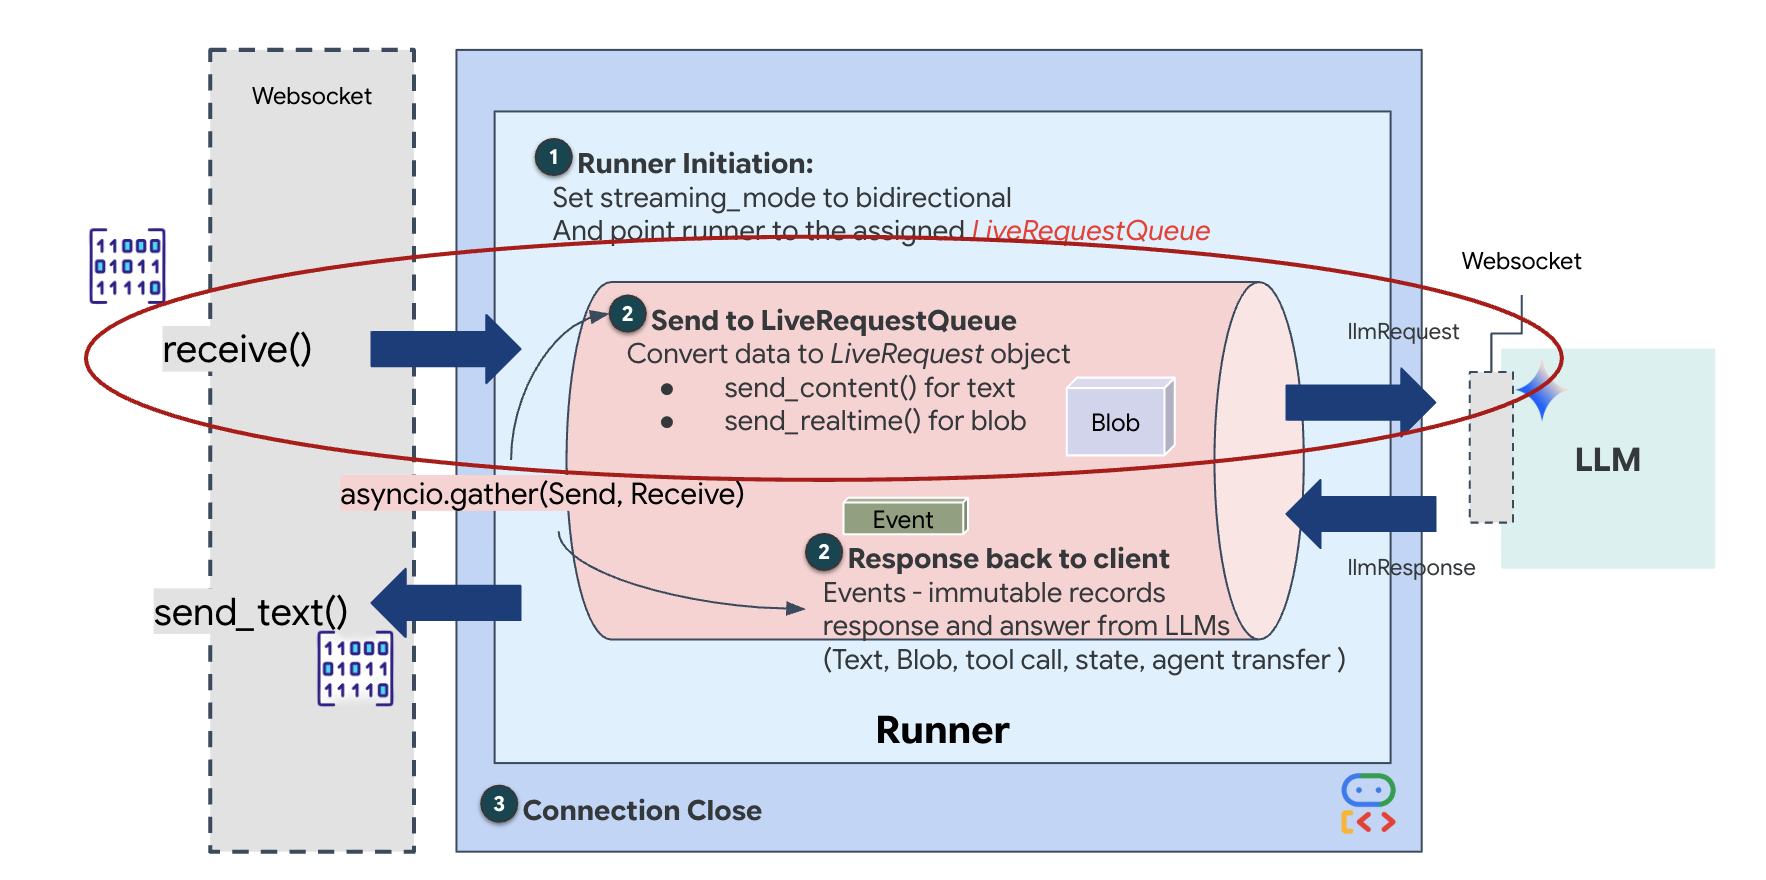
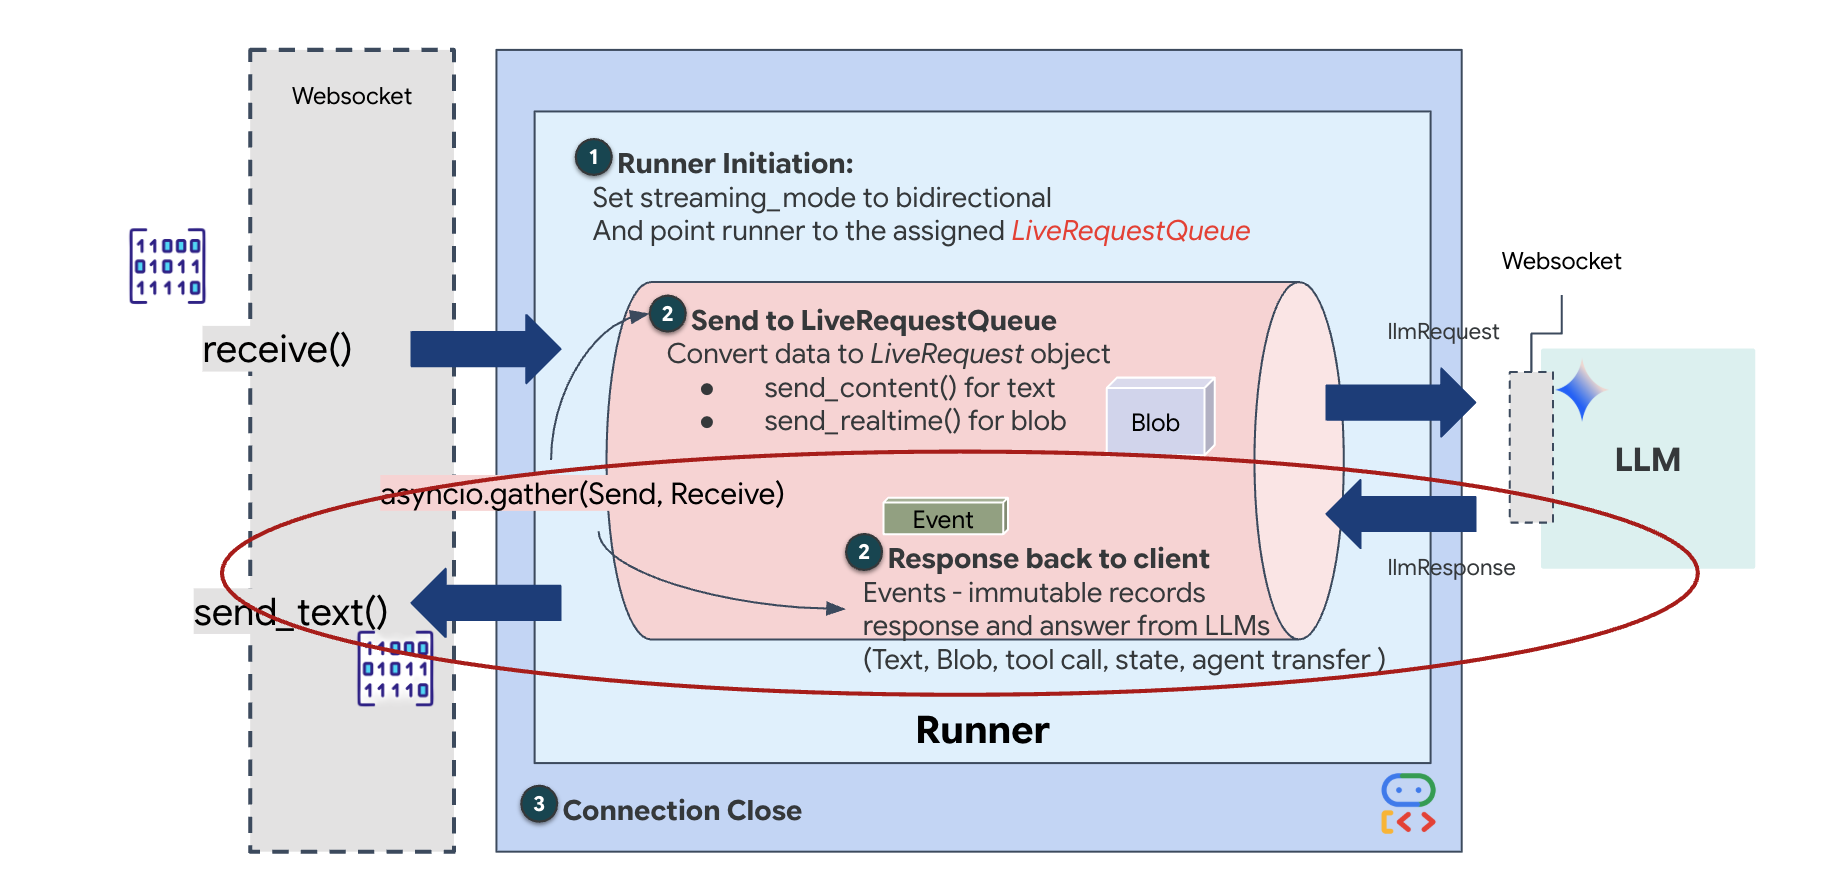
Real-time streaming introduces an "impedance mismatch" problem. The client (browser) pushes data asynchronously at variable rates—network bursts or rapid-fire inputs—while the model requires a regulated, sequential stream of input. The Google ADK solves this by employing the LiveRequestQueue.
It acts as a thread-safe, asynchronous First-In-First-Out (FIFO) buffer. The WebSocket handler acts as the Producer, pushing raw audio/video chunks into the queue. The ADK Agent acts as the Consumer, pulling data from the queue to feed the model's context window. This decoupling allows the application to continue receiving user input even while the model is generating a response or executing a tool.
The queue serves as a Multimodal Multiplexer. In a real environment, the upstream flow consists of distinct, concurrent data types: raw PCM audio bytes, video frames, text-based system instructions, and the results from asynchronous Tool Calls. The LiveRequestQueue linearizes these disparate inputs into a single chronological sequence. Whether the packet contains a millisecond of silence, a high-resolution image, or a JSON payload from a database query, it is serialized in the exact order of arrival, ensuring the model perceives a consistent, causal timeline.
This architecture enables Non-Blocking Control. Because the ingestion layer (Producer) is decoupled from the processing layer (Consumer), the system remains responsive even during computationally expensive model inference. If a user interrupts with a "Stop!" command while the Agent is executing a tool, that audio signal is instantly enqueued. The underlying event loop processes this priority signal immediately, allowing the system to halt generation or pivot tasks without the UI freezing or dropping packets.
👉💻 In $HOME/way-back-home/level_3/backend/app/main.py, find the comment #REPLACE_RUNNER_CONFIG and replace it with the following code to bring the system online:
# Define your session service
session_service = InMemorySessionService()

# Define your runner
runner = Runner(app_name=APP_NAME, agent=root_agent, session_service=session_service)
When a new WebSocket connection opens, we need to configure how the AI interacts. This is where we define the "Rules of Engagement."
👉✏️ In $HOME/way-back-home/level_3/backend/app/main.py, inside the async def websocket_endpoint function, replace the #REPLACE_SESSION_INIT comment with the code below:
# ========================================
    # Phase 2: Session Initialization (once per streaming session)
    # ========================================

    # Automatically determine response modality based on model architecture
    # Native audio models (containing "native-audio" in name)
    # ONLY support AUDIO response modality.
    # Half-cascade models support both TEXT and AUDIO;
    # we default to TEXT for better performance.

    model_name = root_agent.model
    is_native_audio = "native-audio" in model_name.lower() or "live" in model_name.lower()

    if is_native_audio:
        # Native audio models require AUDIO response modality
        # with audio transcription
        response_modalities = ["AUDIO"]

        # Build RunConfig with optional proactivity and affective dialog
        # These features are only supported on native audio models
        run_config = RunConfig(
            streaming_mode=StreamingMode.BIDI,
            response_modalities=response_modalities,
            input_audio_transcription=types.AudioTranscriptionConfig(),
            output_audio_transcription=types.AudioTranscriptionConfig(),
            session_resumption=types.SessionResumptionConfig(),
            proactivity=(
                types.ProactivityConfig(proactive_audio=True) if proactivity else None
            ),
            enable_affective_dialog=affective_dialog if affective_dialog else None,
        )
        logger.info(f"Model Config: {model_name} (Modalities: {response_modalities}, Proactivity: {proactivity})")
    else:
        # Half-cascade models support TEXT response modality
        # for faster performance
        response_modalities = ["TEXT"]
        run_config = None
        logger.info(f"Model Config: {model_name} (Modalities: {response_modalities})")

    # Get or create session (handles both new sessions and reconnections)
    session = await session_service.get_session(
        app_name=APP_NAME, user_id=user_id, session_id=session_id
    )
    if not session:
        await session_service.create_session(
            app_name=APP_NAME, user_id=user_id, session_id=session_id
        )
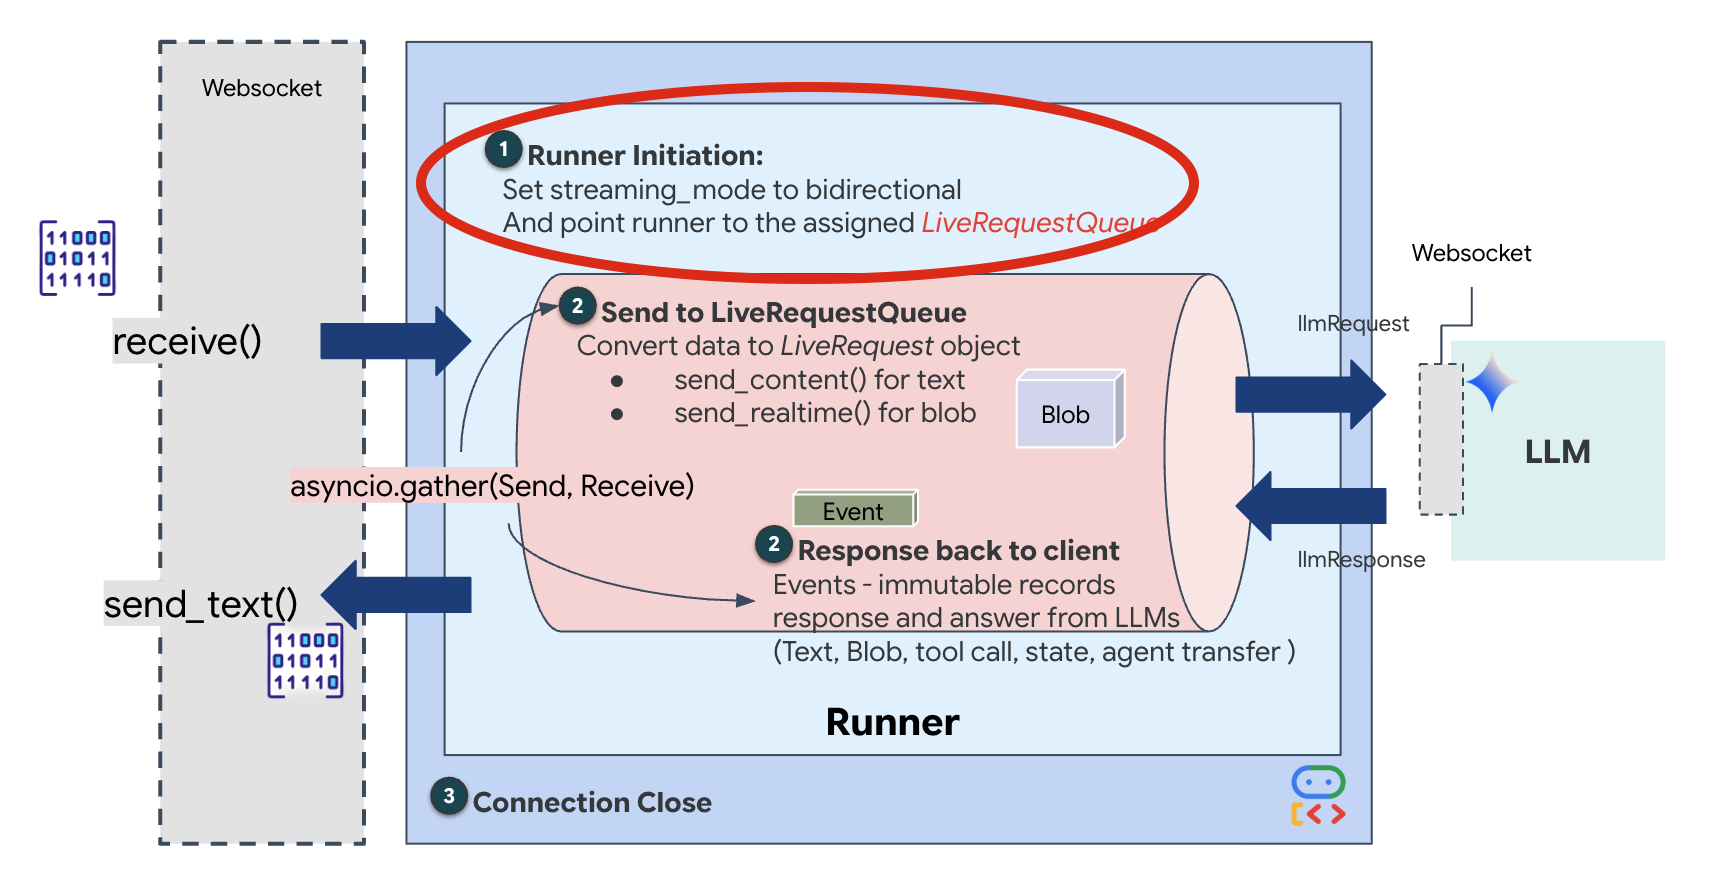
The Run Configuration
StreamingMode.BIDI: This sets the connection to bi-directional. Unlike "turn-based" AI (where you talk, stop, then it talks), BIDI allows for a realistic "full-duplex" conversation. You can interrupt the AI, and the AI can speak while you are moving.AudioTranscriptionConfig: Even though the model "hears" raw audio, we (the developers) need to see logs. This config tells Gemini: "Process the audio, but also send back a text transcript of what you heard so we can debug."
The Execution Logic Once the Runner has established the session, it hands control over to the execution logic, which relies on the LiveRequestQueue. This is the most critical component for real-time interaction. The loop allows the agent to be generating a voice response while the queue continues to accept new video frames from the user, ensuring the "Neural Sync" is never broken.
👉✏️ In $HOME/way-back-home/level_3/backend/app/main.py, replace #REPLACE_LIVE_REQUEST to define the upstream task that sends data to the LiveRequestQueue:
# ========================================
    # Phase 3: Active Session (concurrent bidirectional communication)
    # ========================================

    live_request_queue = LiveRequestQueue()

    # Send an initial "Hello" to the model to wake it up/force a turn
    logger.info("Sending initial 'Hello' stimulus to model...")
    live_request_queue.send_content(types.Content(parts=[types.Part(text="Hello")]))

    async def upstream_task() -> None:
        """Receives messages from WebSocket and sends to LiveRequestQueue."""
        frame_count = 0
        audio_count = 0

        try:
            while True:
                # Receive message from WebSocket (text or binary)
                message = await websocket.receive()

                # Handle binary frames (audio data)
                if "bytes" in message:
                    audio_data = message["bytes"]
                    audio_blob = types.Blob(
                        mime_type="audio/pcm;rate=16000", data=audio_data
                    )
                    live_request_queue.send_realtime(audio_blob)

                # Handle text frames (JSON messages)
                elif "text" in message:
                    text_data = message["text"]
                    json_message = json.loads(text_data)

                    # Extract text from JSON and send to LiveRequestQueue
                    if json_message.get("type") == "text":
                        logger.info(f"User says: {json_message['text']}")
                        content = types.Content(
                            parts=[types.Part(text=json_message["text"])]
                        )
                        live_request_queue.send_content(content)

                    # Handle audio data (microphone)
                    elif json_message.get("type") == "audio":
                        import base64
                        # Decode base64 audio data
                        audio_data = base64.b64decode(json_message.get("data", ""))

                        # Send to Live API as PCM 16kHz
                        audio_blob = types.Blob(
                            mime_type="audio/pcm;rate=16000",
                            data=audio_data
                        )
                        live_request_queue.send_realtime(audio_blob)

                    # Handle image data
                    elif json_message.get("type") == "image":
                        import base64
                        # Decode base64 image data
                        image_data = base64.b64decode(json_message["data"])
                        mime_type = json_message.get("mimeType", "image/jpeg")

                        # Send image as blob
                        image_blob = types.Blob(mime_type=mime_type, data=image_data)
                        live_request_queue.send_realtime(image_blob)
        finally:
             pass
Finally, we need to handle the AI's responses. This uses runner.run_live(), which is an event generator that yields events (Audio, Text, or Tool Calls) as they happen.
👉✏️ In $HOME/way-back-home/level_3/backend/app/main.py, replace #REPLACE_SORT_RESPONSE to define the downstream task and the concurrency manager:
    async def downstream_task() -> None:
        """Receives Events from run_live() and sends to WebSocket."""
        logger.info("Connecting to Gemini Live API...")
        async for event in runner.run_live(
            user_id=user_id,
            session_id=session_id,
            live_request_queue=live_request_queue,
            run_config=run_config,
        ):
            # Parse event for human-readable logging
            event_type = "UNKNOWN"
            details = ""

            # Check for tool calls
            if hasattr(event, "tool_call") and event.tool_call:
                 event_type = "TOOL_CALL"
                 details = str(event.tool_call.function_calls)
                 logger.info(f"[SERVER-SIDE TOOL EXECUTION] {details}")

            # Check for user input transcription (Text or Audio Transcript)
            input_transcription = getattr(event, "input_audio_transcription", None)
            if input_transcription and input_transcription.final_transcript:
                 logger.info(f"USER: {input_transcription.final_transcript}")

            # Check for model output transcription
            output_transcription = getattr(event, "output_audio_transcription", None)
            if output_transcription and output_transcription.final_transcript:
                 logger.info(f"GEMINI: {output_transcription.final_transcript}")

            event_json = event.model_dump_json(exclude_none=True, by_alias=True)
            await websocket.send_text(event_json)
        logger.info("Gemini Live API connection closed.")

    # Run both tasks concurrently
    # Exceptions from either task will propagate and cancel the other task
    try:
        await asyncio.gather(upstream_task(), downstream_task())
    except WebSocketDisconnect:
        logger.info("Client disconnected")
    except Exception as e:
        logger.error(f"Error: {e}", exc_info=False) # Reduced stack trace noise
    finally:
        # ========================================
        # Phase 4: Session Termination
        # ========================================

        # Always close the queue, even if exceptions occurred
        logger.debug("Closing live_request_queue")
        live_request_queue.close()
Notice the line await asyncio.gather(upstream_task(), downstream_task()). This is the essence of Full-Duplex. We run the listening task (upstream) and the speaking task (downstream) at the exact same time. This ensures the "Neural Link" allows for interruption and simultaneous data flow.
Your backend is now fully coded. The "Brain" (ADK) is wired to the "Body" (WebSocket).
Bio-Sync Execution
The code is complete. The systems are green. It is time to launch the rescue.
- 👉💻 Start the Backend:
cd $HOME/way-back-home/level_3/backend/ cp app/biometric_agent/.env app/.env uv run app/main.py - 👉 Launch the Frontend:
- Click the Web preview icon in the Cloud Shell toolbar. Select Change port, set it to 8080, and click Change and Preview.
- 👉 Execute the Protocol:
- Click "INITIATE NEURAL SYNC".
- Calibrate: Ensure the camera sees your hand clearly against the background.
- The Sync: Watch the Security Code displayed on the screen (e.g., 3, then 2, then 5).
- Match the Signal: When a number appears, hold up that exact number of fingers.
- Hold Steady: Keep your hand visible until the AI confirms the "Biometric match."
- Adapt: The code is random. Immediately switch to the next number shown until the sequence is complete.
- As you match the final number in the random sequence, the "Biometric Sync" will be complete. The neural link will lock. You have manual control. The Scout engines will roar to life, diving into The Ravine to bring the survivors home.
👉💻 Press Ctrl+C in the backend terminal to exit.
6. Deploy to Production (Optional)
You have successfully tested the biometrics locally. Now, we must upload the Agent's neural core to the ship's mainframes (Cloud Run) so it can operate independently of your local console.
👉💻 Run the following command in your Cloud Shell terminal. It will create the complete, multi-stage Dockerfile in your backend directory.
cd $HOME/way-back-home/level_3

cat <<EOF > Dockerfile
FROM node:20-slim as builder

# Set the working directory for our build process
WORKDIR /app

# Copy the frontend's package files first to leverage Docker's layer caching.
COPY frontend/package*.json ./frontend/
# Run 'npm install' from the context of the 'frontend' subdirectory
RUN npm --prefix frontend install

# Copy the rest of the frontend source code
COPY frontend/ ./frontend/
# Run the build script, which will create the 'frontend/dist' directory
RUN npm --prefix frontend run build


# STAGE 2: Build the Python Production Image
# This stage creates the final, lean container with our Python app and the built frontend.
FROM python:3.13-slim

# Set the final working directory
WORKDIR /app

# Install uv, our fast package manager
RUN pip install uv

# Copy the requirements.txt from the backend directory
COPY requirements.txt .
# Install the Python dependencies
RUN uv pip install --no-cache-dir --system -r requirements.txt

# Copy the contents of your backend application directory directly into the working directory.
COPY backend/app/ .

# CRITICAL STEP: Copy the built frontend assets from the 'builder' stage.
# We copy to /frontend/dist because main.py looks for "../../frontend/dist"
# When main.py is in /app, "../../" resolves to "/", so it looks for /frontend/dist
COPY --from=builder /app/frontend/dist /frontend/dist

# Cloud Run injects a PORT environment variable, which your main.py uses (defaults to 8080).
EXPOSE 8080

# Set the command to run the application.
CMD ["python", "main.py"]
EOF
👉💻 Navigate to the backend directory and package the application into a container image.
export PROJECT_ID=$(cat ~/project_id.txt)
export REGION=us-central1
export SERVICE_NAME=biometric-scout
export IMAGE_PATH=gcr.io/${PROJECT_ID}/${SERVICE_NAME}
cd $HOME/way-back-home/level_3
gcloud builds submit . --tag ${IMAGE_PATH}
👉💻 Deploy the service to Cloud Run. We will inject the necessary environment variables—specifically the Gemini configuration—directly into the launch command.
export PROJECT_ID=$(cat ~/project_id.txt)
export REGION=us-central1
export SERVICE_NAME=biometric-scout
export IMAGE_PATH=gcr.io/${PROJECT_ID}/${SERVICE_NAME}
gcloud run deploy ${SERVICE_NAME} \
  --image=${IMAGE_PATH} \
  --platform=managed \
  --region=${REGION} \
  --allow-unauthenticated \
  --labels=dev-tutorial=multi-modal \
  --set-env-vars="GOOGLE_CLOUD_PROJECT=${PROJECT_ID}" \
  --set-env-vars="GOOGLE_CLOUD_LOCATION=${REGION}" \
  --set-env-vars="GOOGLE_GENAI_USE_VERTEXAI=True" \
  --set-env-vars="MODEL_ID=gemini-live-2.5-flash-native-audio"
Once the command finishes, you will see a Service URL (e.g., https://biometric-scout-...run.app). The application is now live in the cloud.
👉 Go to the Google Cloud Run page and select the biometric-scout service from the list. 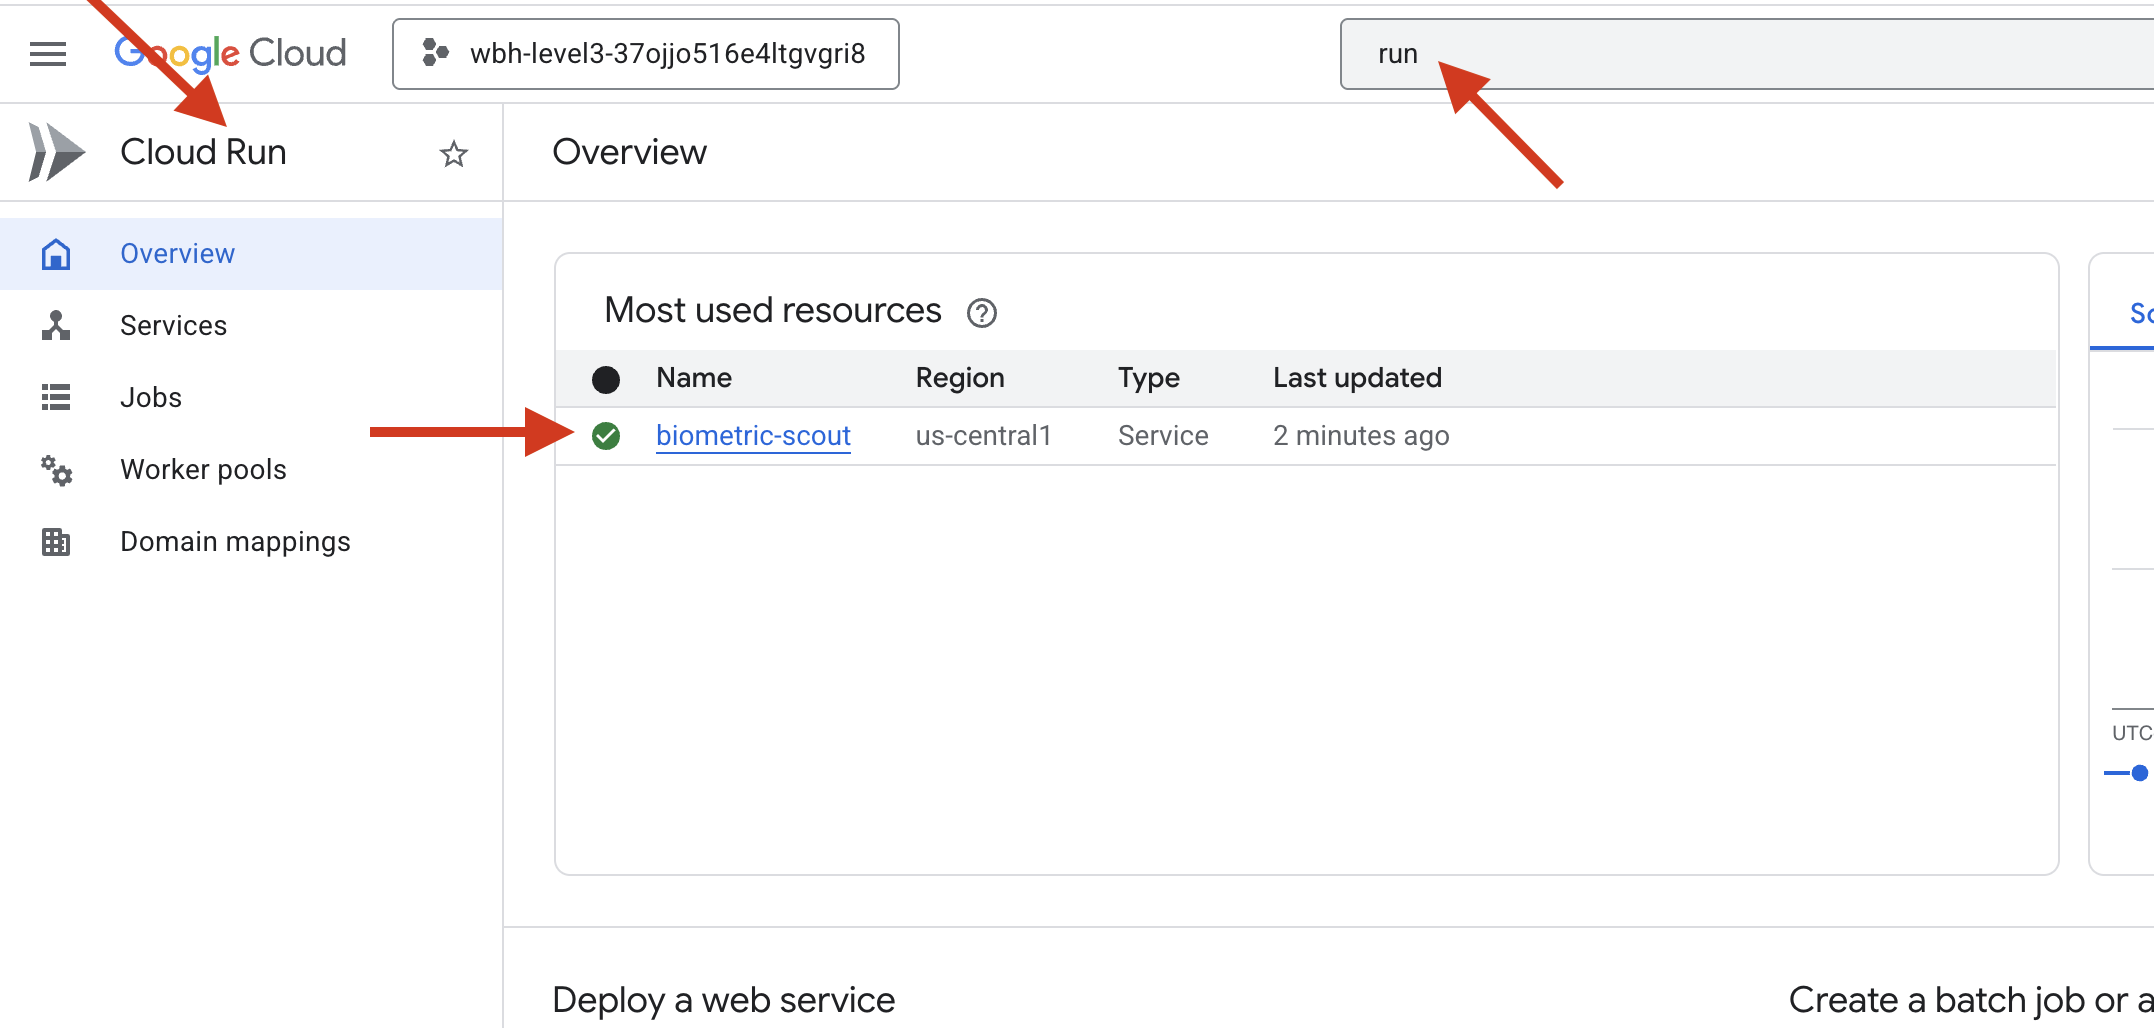
👉 Locate the Public URL displayed at the top of the Service details page. 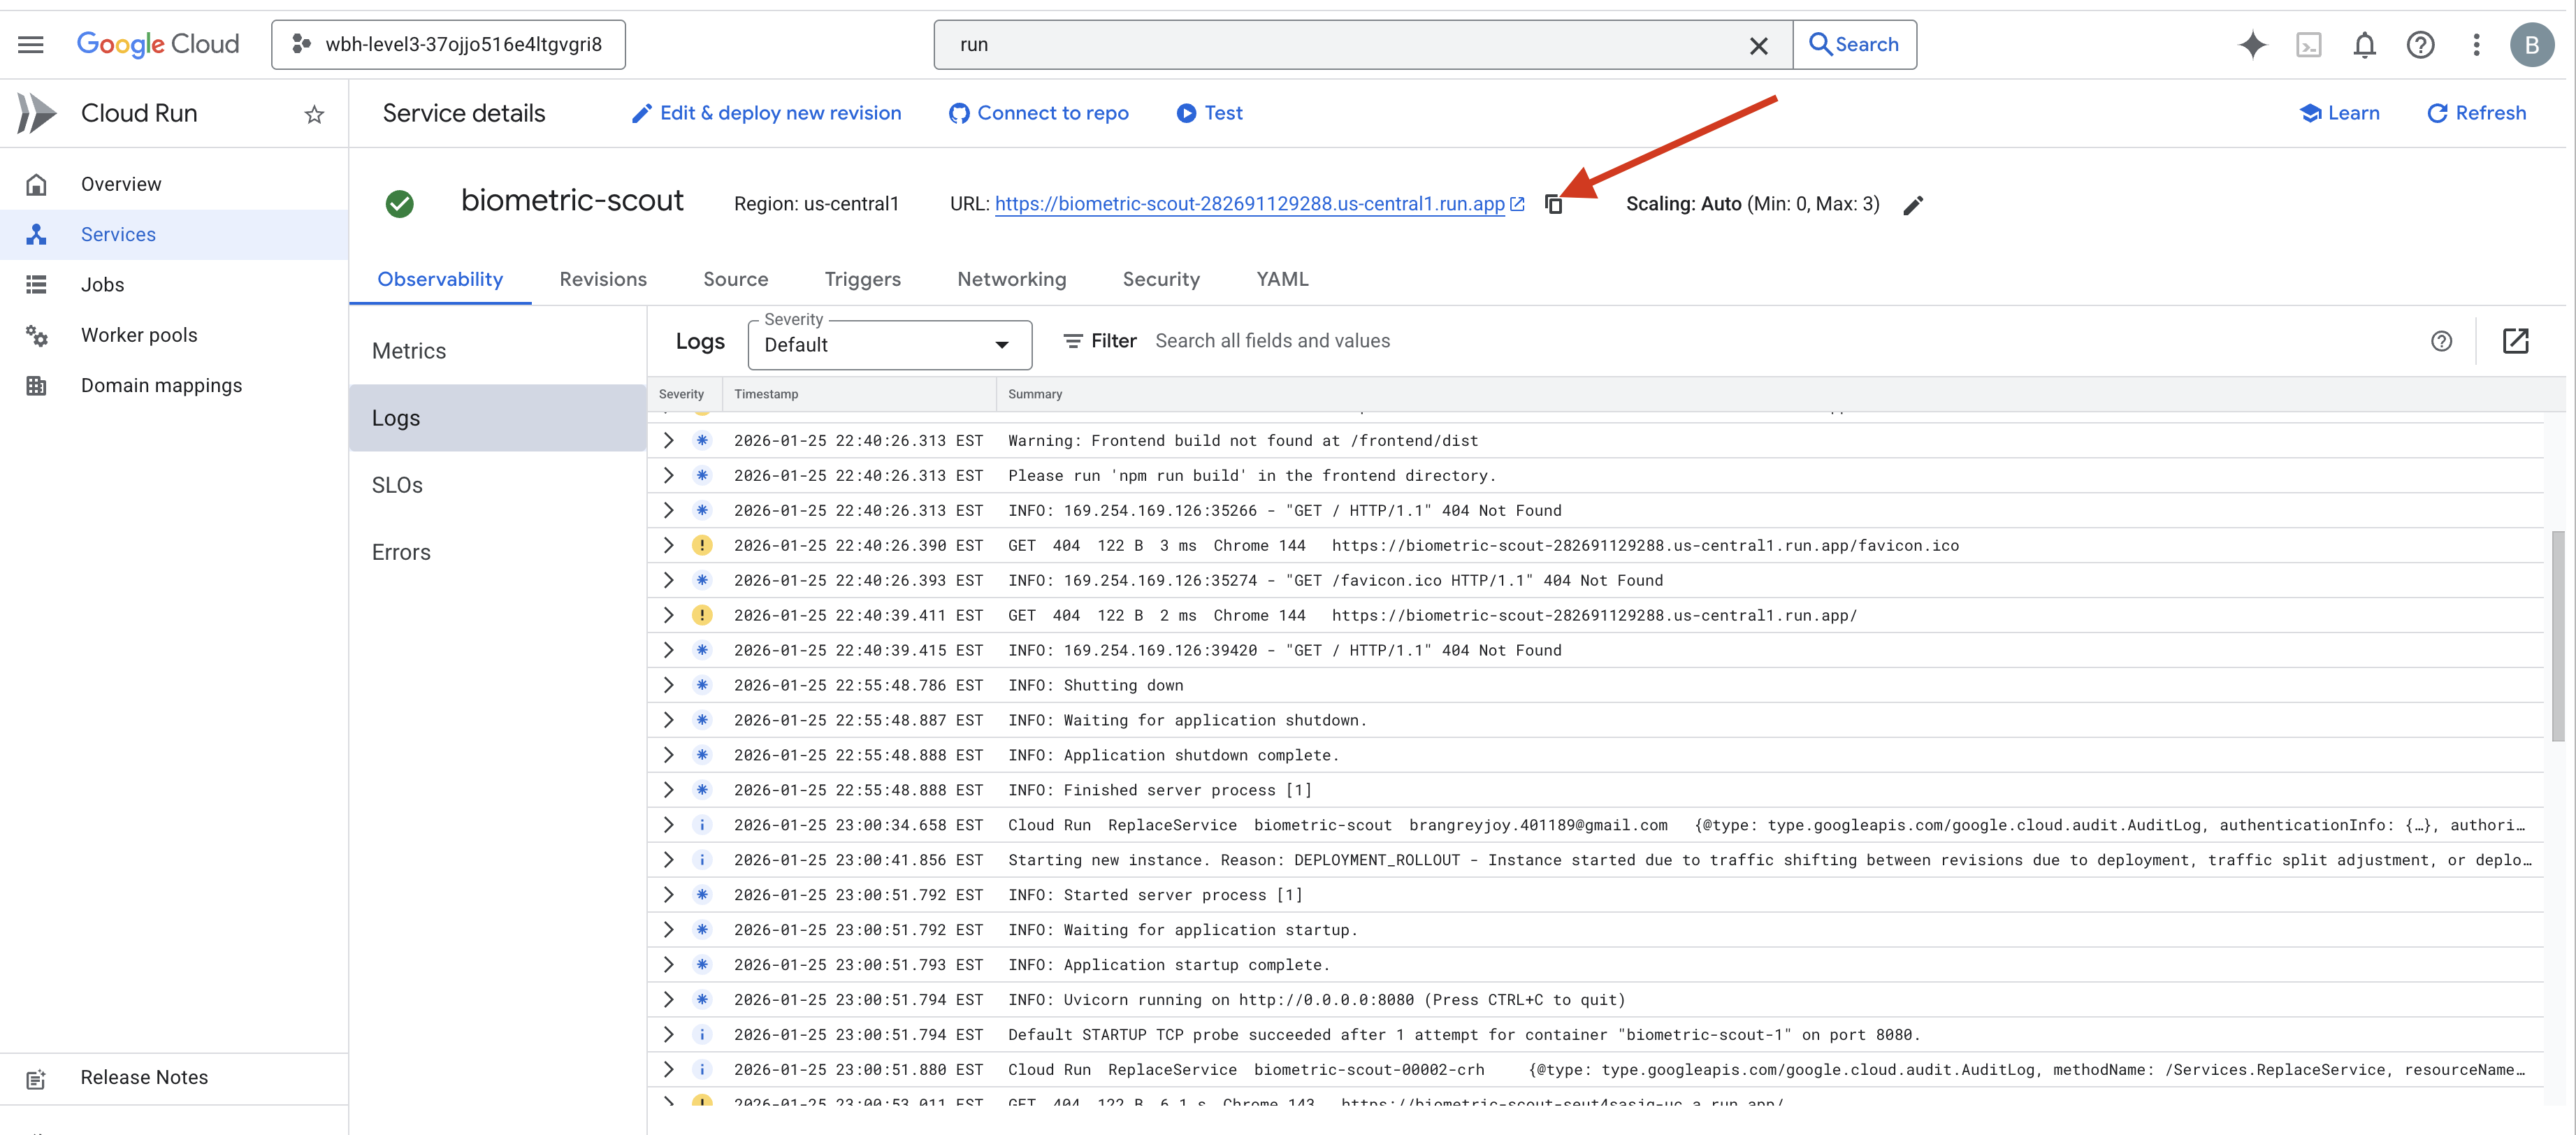
Try to do Bio-Sync in this environment, does it also works?
As your fifth finger extends, the AI locks the sequence. The screen flashes green: "Biometric Neural Sync: ESTABLISHED."
With a single thought, you dive the Scout into the darkness, latch onto the stranded pod, and pull them out just before the gravity tear collapses.
The airlock hisses open, and there they are—five living, breathing survivors. They stumble onto the deck, battered but alive, safe at last because of you.
Thanks to you, the neural link is synced and the survivors are rescued.
If you participated in Level 0, don't forget to check where your progress is on the way back home mission!
