1. The Mission
You are adrift in the silent, uncharted expanse of space. A massive Solar Pulse has ripped your ship through a dimensional rift, leaving you stranded in a pocket of the universe absent from any star chart.
After days of grueling repairs, the familiar hum of the engines finally returns. Your rocketship is operational. You've even managed to establish a long-range uplink to the Mothership. Departure is imminent. You are ready to go home.
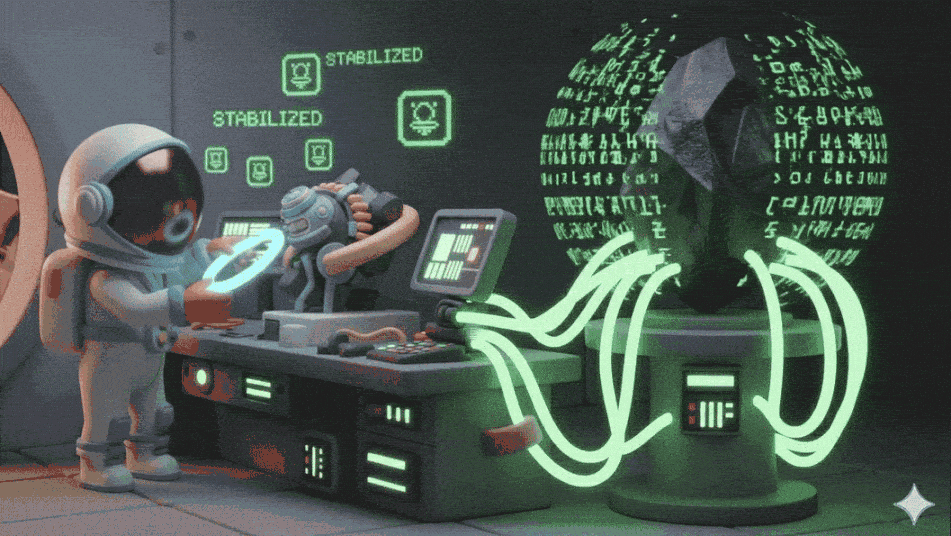
But as you prepare to engage the jump drive, a distress signal cuts through the static. Your sensors pinpoint a plea for help from a planet designated "Ozymandias." Survivors are trapped on this dying world, their ship grounded. Your mission is critical: rescue them before the planet's atmosphere collapses.
Their only means of escape is an ancient, derelict rocket built with Alien Tech. While functional, its Warp Drive is shattered. To save the survivors, you must remotely connect to their Volatile Workbench and manually assemble a replacement drive.
The Challenge
You have no experience with this alien technology, which is notoriously fragile. A destabilized component can become a radioactive hazard in seconds. You have one attempt to operate the Volatile Workbench. Your current AI assistant is struggling to process visual data and technical manuals simultaneously, leading to hallucinatory instructions and missed hazard warnings.
To succeed, you must upgrade your AI from a monolithic entity into a collaborative Multi-agent system.
Your Mission Objectives:
Assemble the Warp Drive by following the specialized, real-time instructions from your new multi-agent system.
What you will build
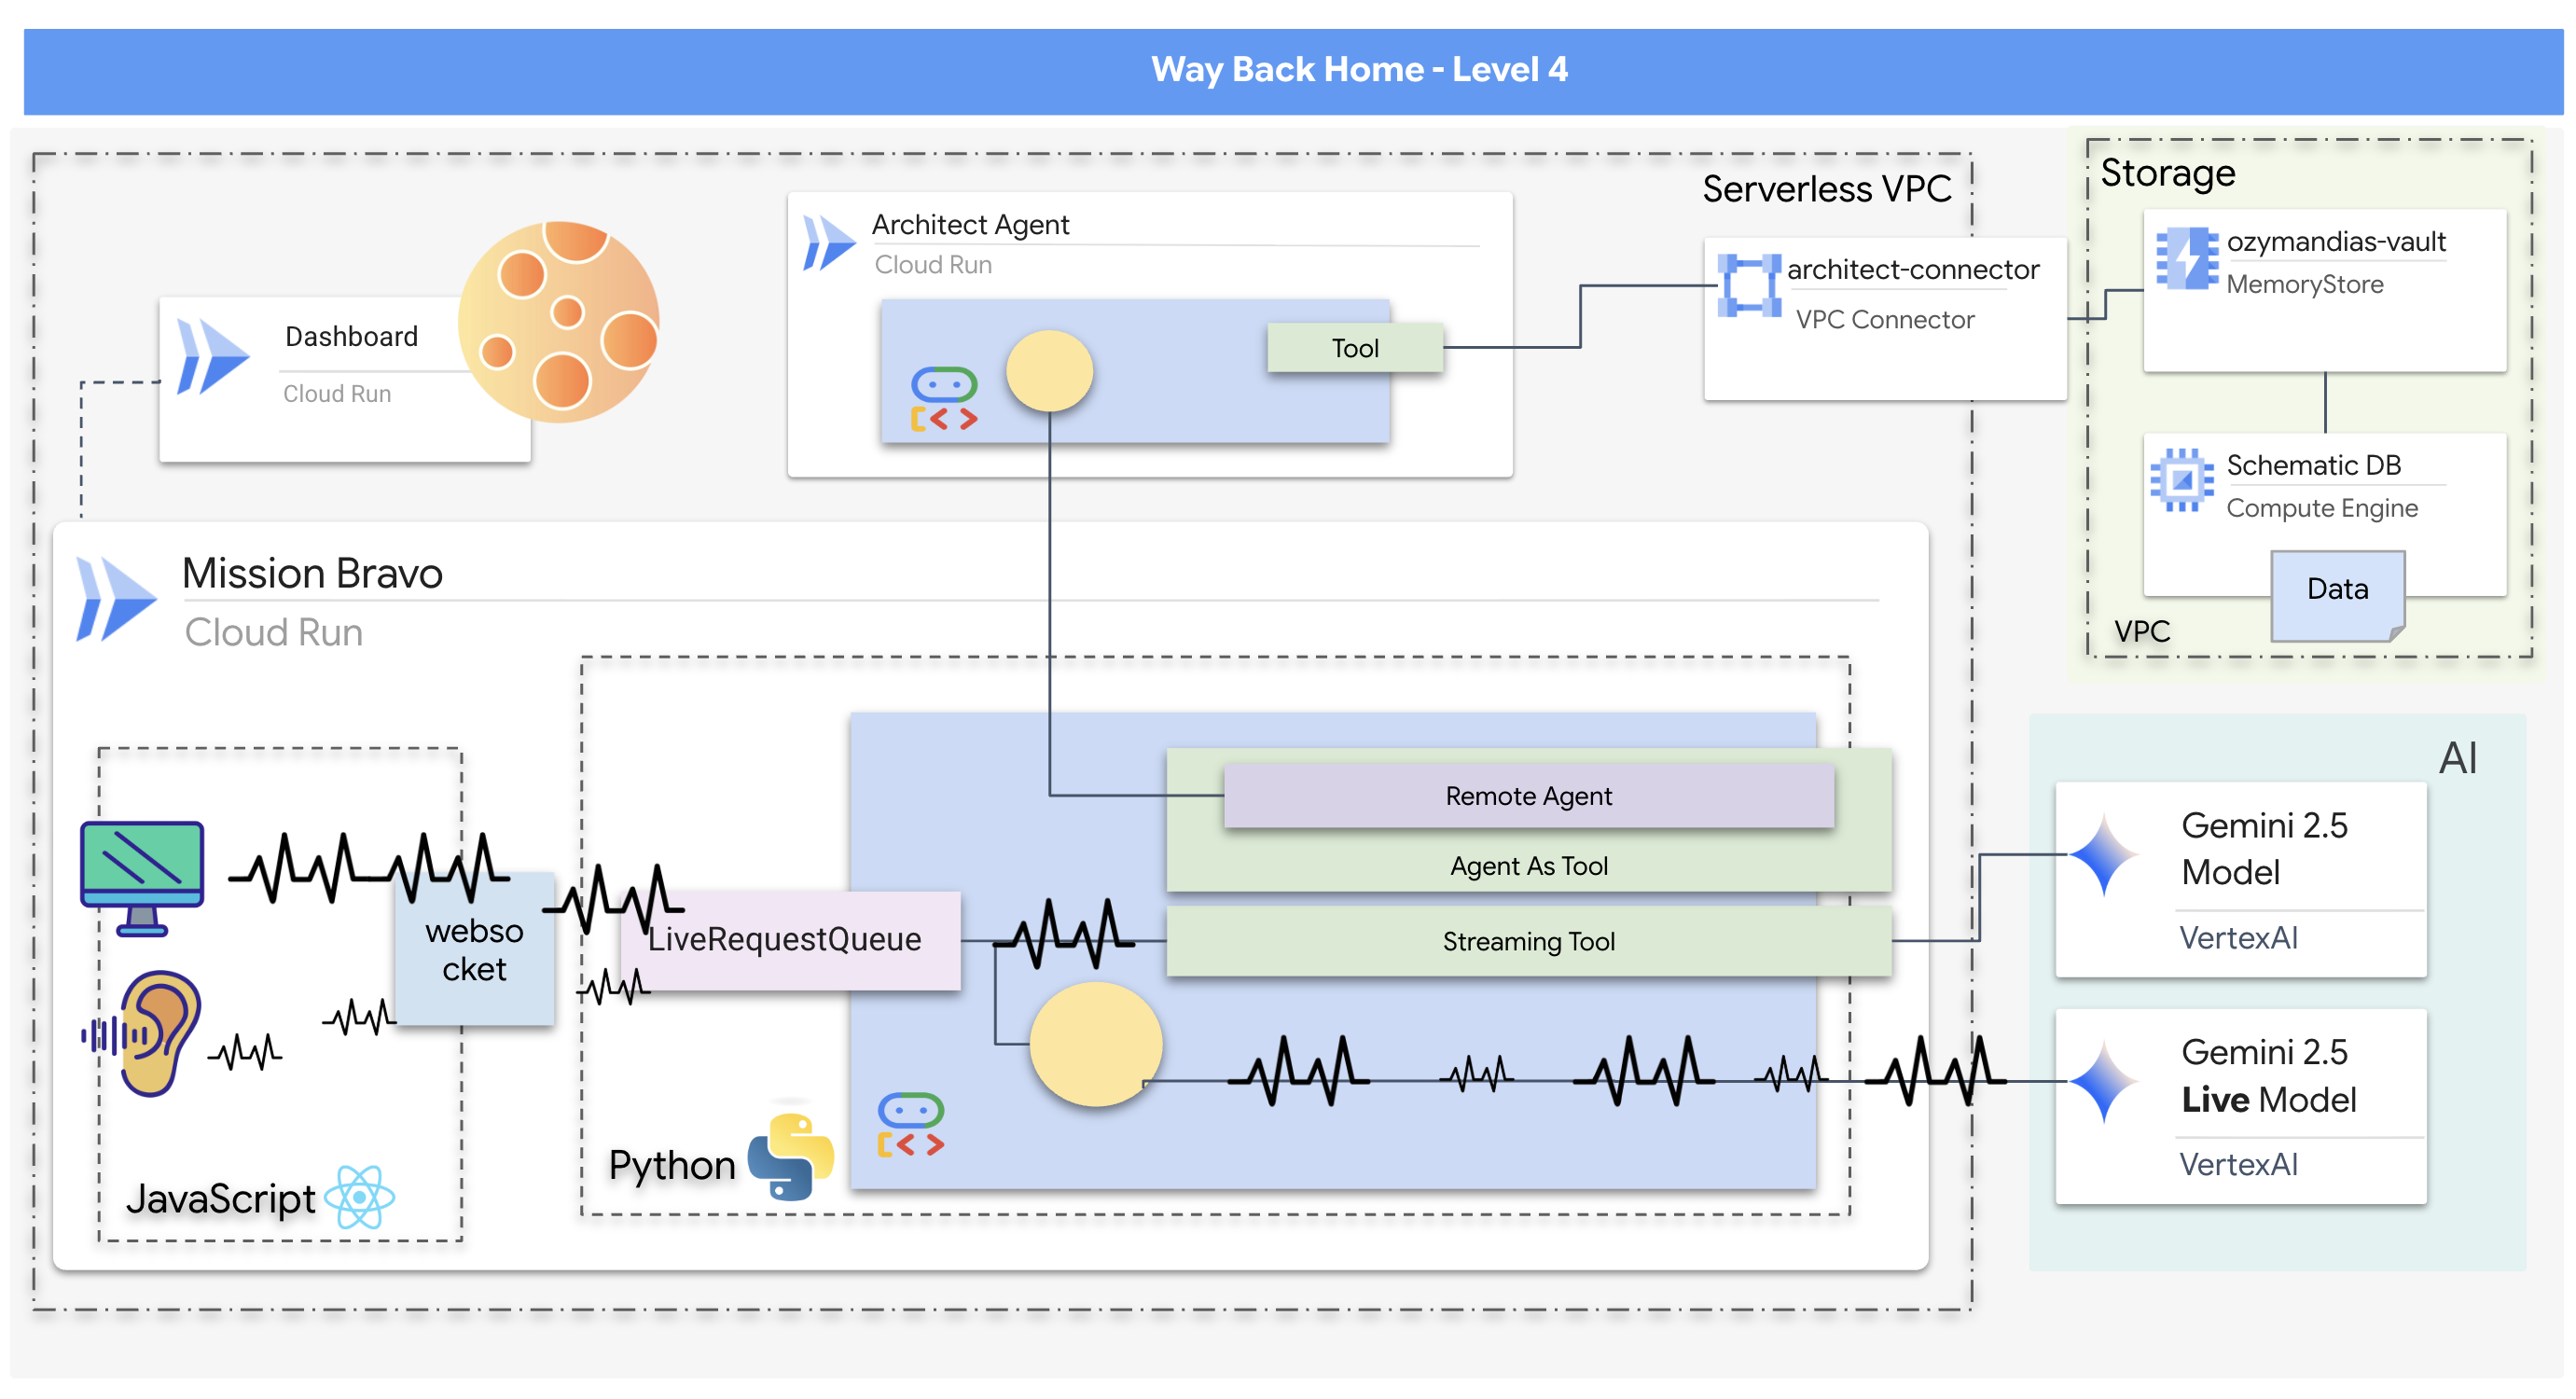
- A real-time, bidirectional multi-agent AI system featuring a central Dispatch Agent that manages user interaction and coordinates with specialized agents.
- An Architect Agent that connects to a Redis database to retrieve and serve schematic data.
- A proactive Safety Monitor that uses streaming tools to analyze a live video feed for visual hazards and trigger real-time alerts.
- A React-based frontend that provides a user interface for interacting with the system, streaming video and audio to the backend agents.
What you will learn
Technology / Concept | Description |
Google Agent Development Kit (ADK) | You'll use the ADK to build, test, and manage the agents, leveraging its framework for handling real-time communication, tool integration, and agent lifecycle. |
Bidirectional (Bidi) Streaming | You will implement a bidi-streaming agent that allows for natural, low-latency, two-way communication, enabling both human and AI to interrupt and respond in real-time. |
Multi-Agent Systems | You'll learn how to design a distributed AI system where a primary agent delegates tasks to specialized agents, enabling a separation of concerns and more scalable architecture. |
Agent-to-Agent (A2A) Protocol | You will use the A2A protocol to enable communication between the Dispatch Agent and the Architect Agent, allowing them to discover each other's capabilities and exchange data. |
Streaming Tools | You'll implement a streaming tool that acts as a background process, continuously analyzing a video feed to monitor for state changes (hazards) and proactively yielding results. |
Google Cloud Run & Memorystore | You will deploy the entire multi-agent application to a production environment, using Cloud Run to host the agent services and Memorystore (Redis) as the persistent database. |
FastAPI & WebSockets | The backend is built using FastAPI and WebSockets to handle the high-performance, real-time communication required for streaming audio, video, and agent responses. |
React Frontend | You will work with a React-based frontend that captures and streams user media (audio/video) and displays the real-time responses from the AI agents. |
2. Set Up Your Environment
Access Cloud Shell
👉Click Activate Cloud Shell at the top of the Google Cloud console (It's the terminal shape icon at the top of the Cloud Shell pane), 
👉Click on the "Open Editor" button (it looks like an open folder with a pencil). This will open the Cloud Shell Code Editor in the window. You'll see a file explorer on the left side. 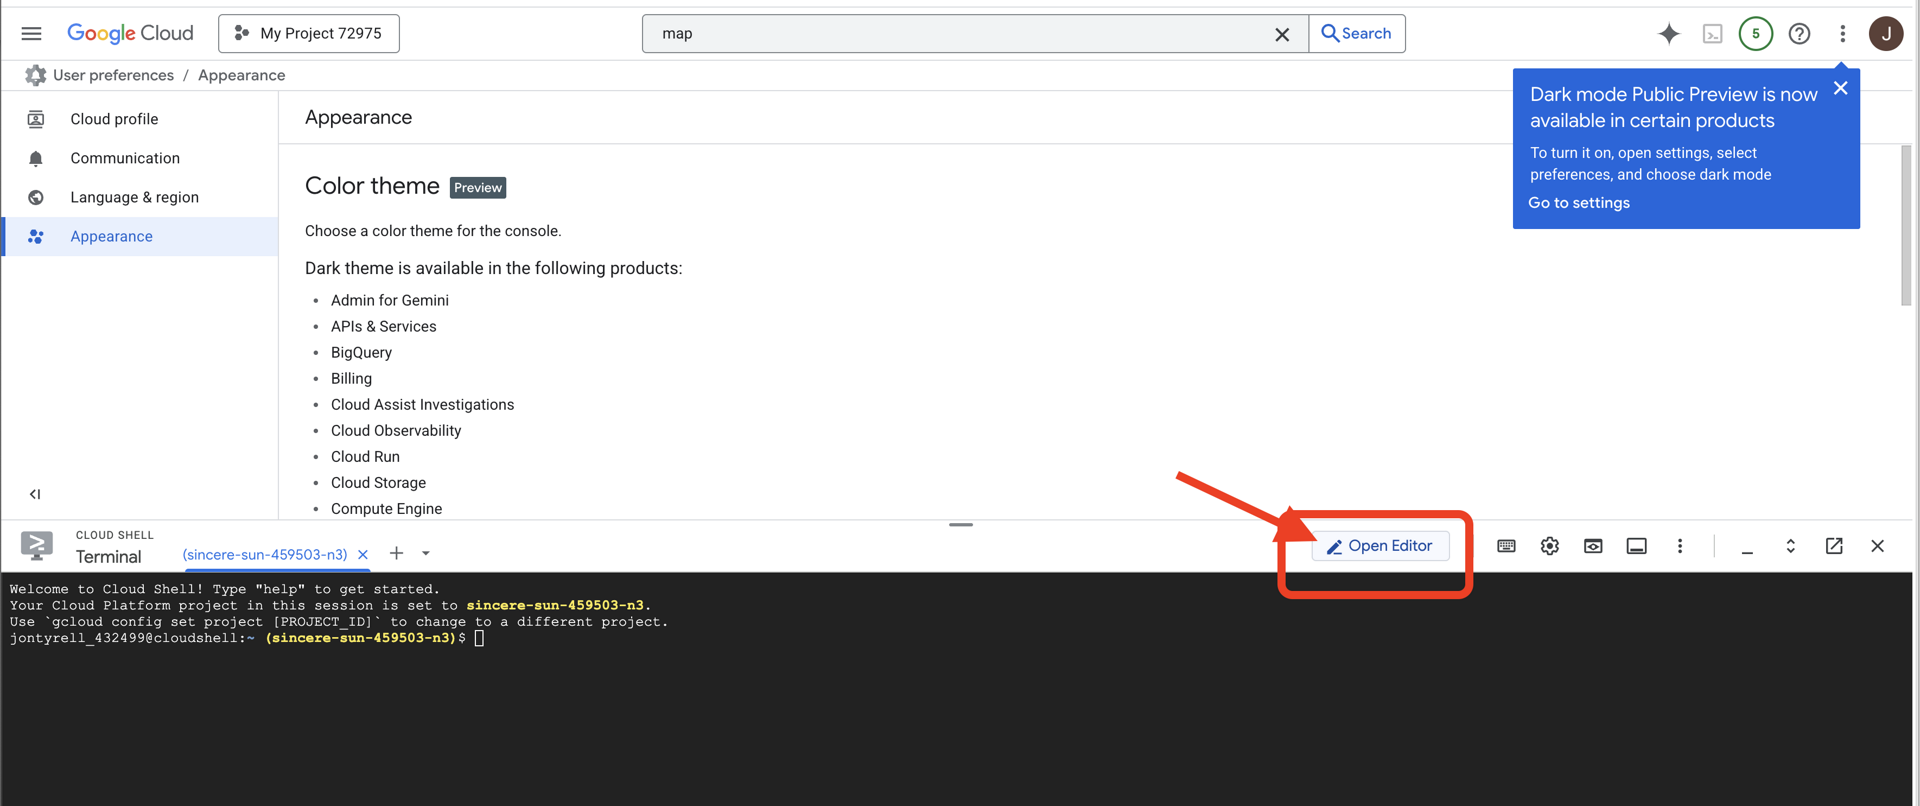
👉Open the terminal in the cloud IDE,
👉💻 In the terminal, verify that you're already authenticated and that the project is set to your project ID using the following command:
gcloud auth list
You should see your account listed as (ACTIVE).
Prerequisites
ℹ️ Level 0 is Optional (But Recommended)
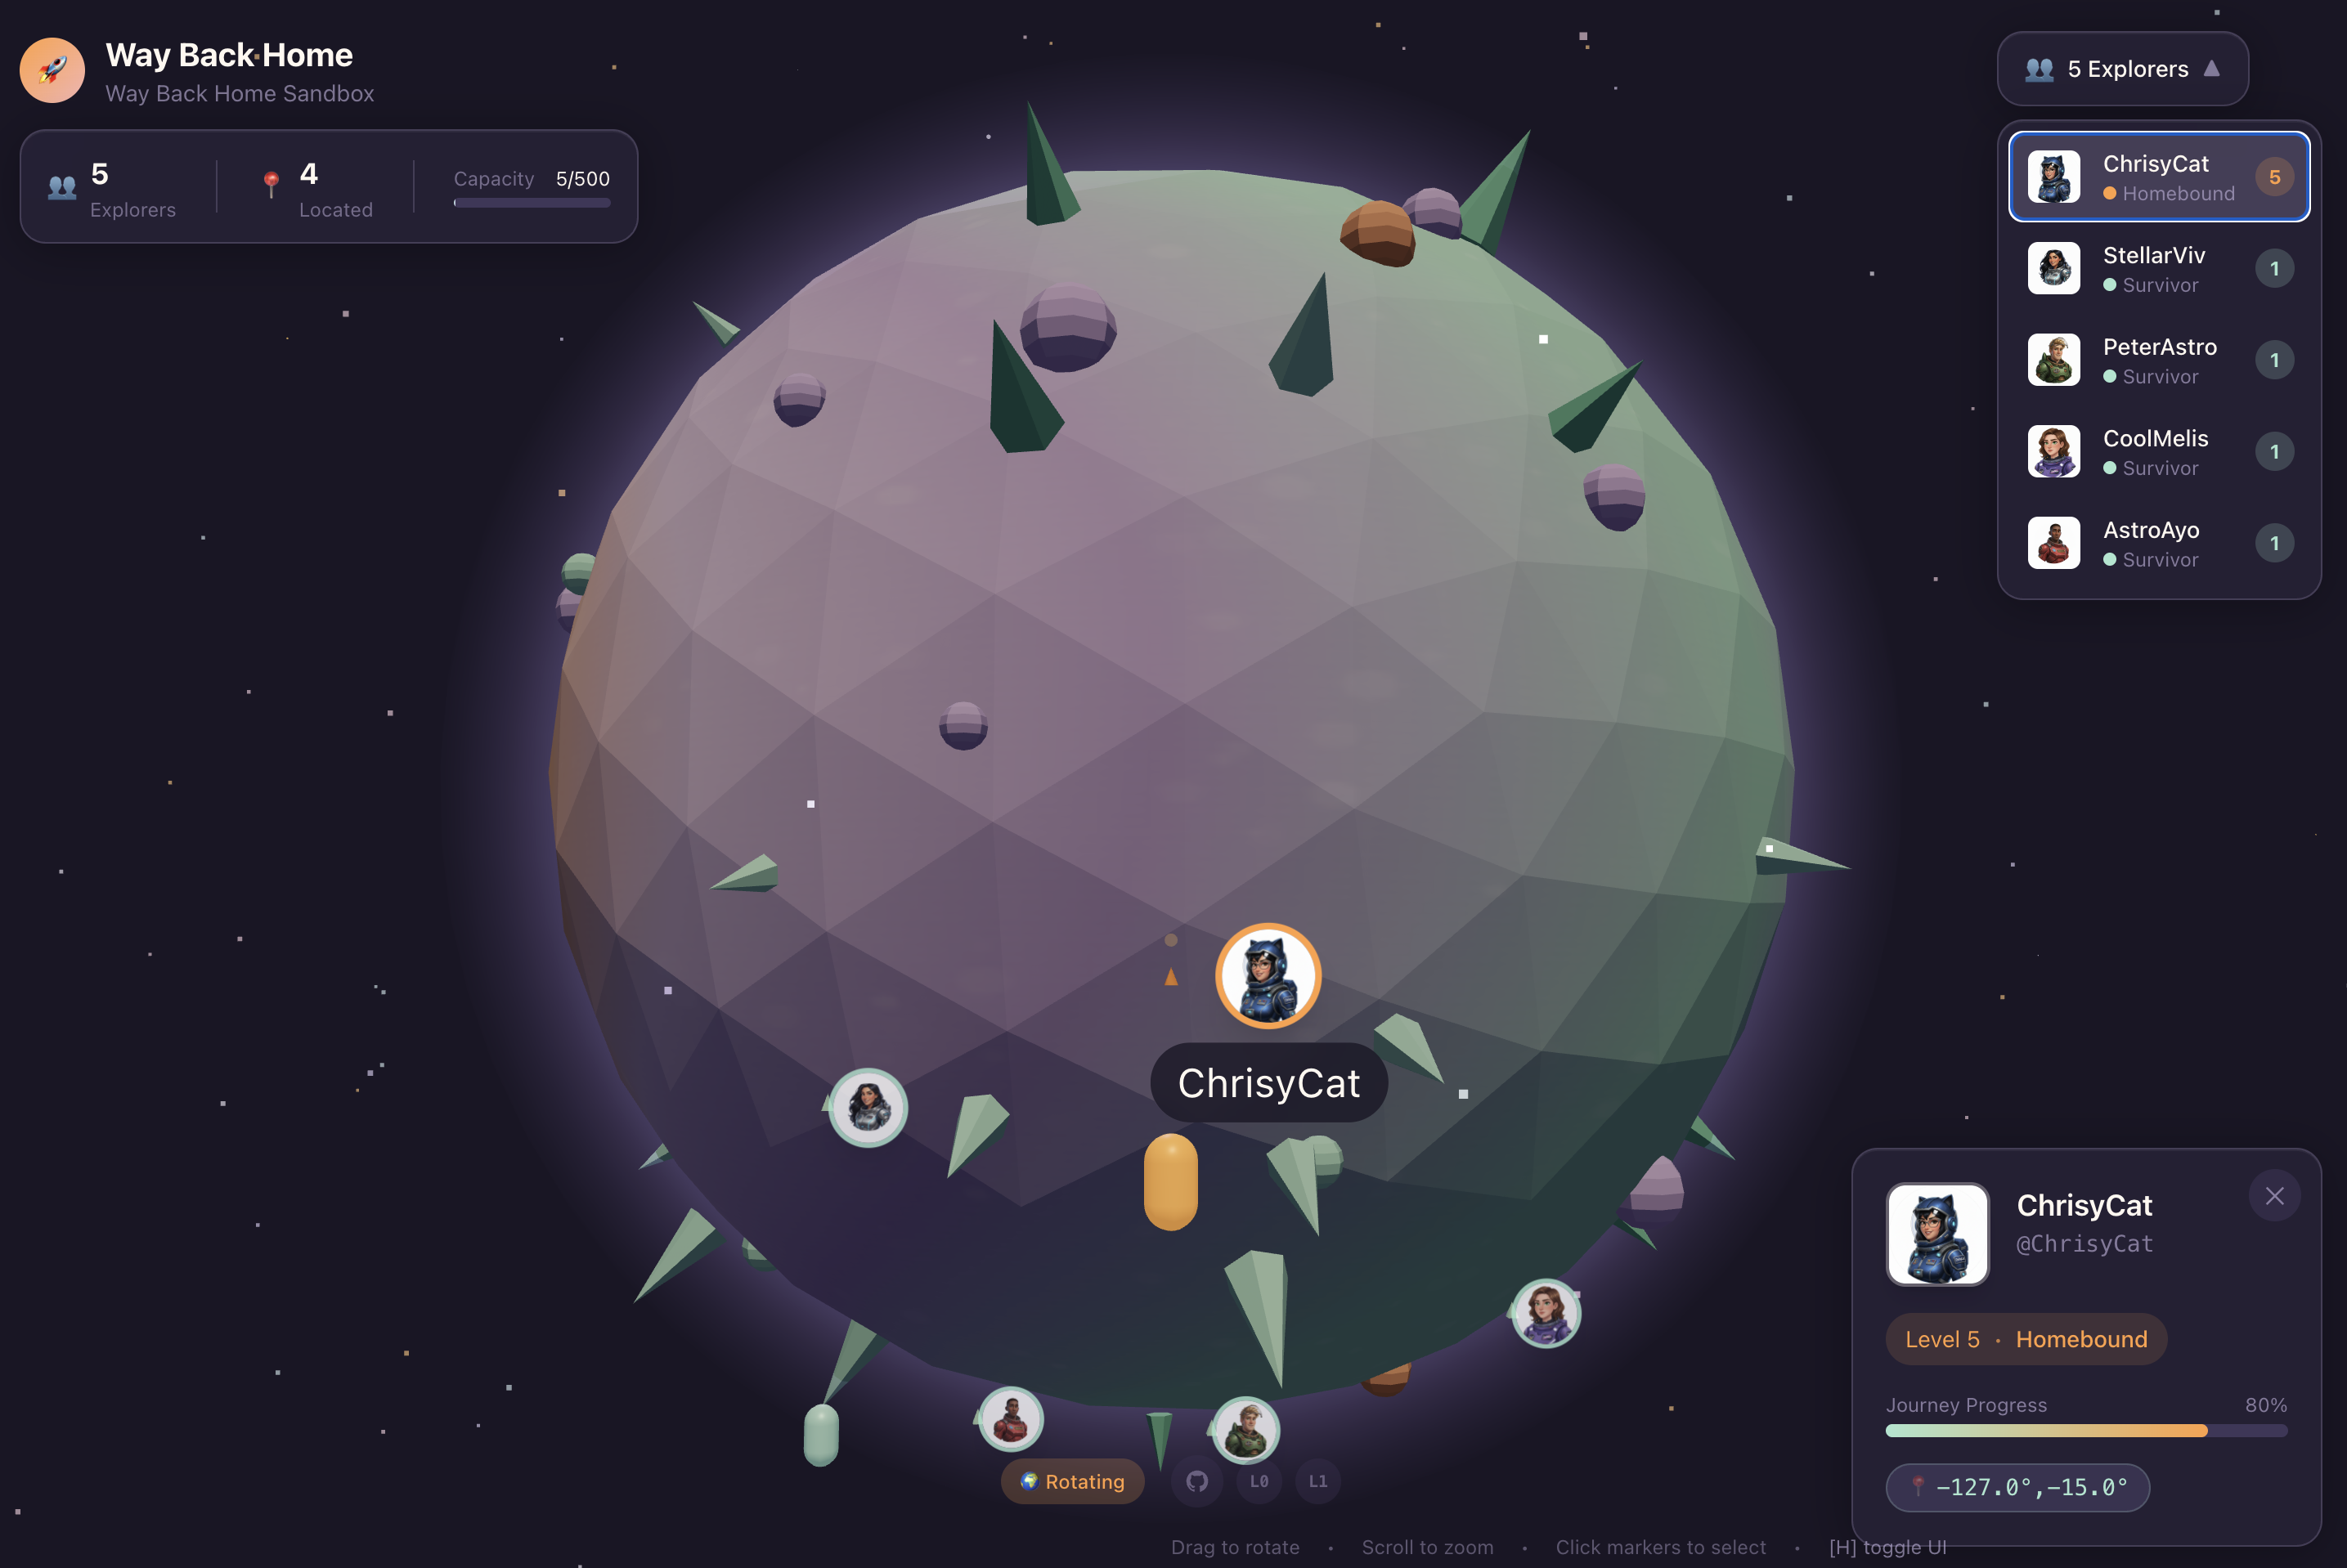
You can complete this mission without Level 0, but finishing it first offers a more immersive experience, allowing you to see your beacon light up on the global map as you progress.
Setup The Project Environment
Back in your terminal, finalize the configuration by setting the active project and enabling the required Google Cloud services (Cloud Run, Vertex AI, etc.).
👉💻 In your termina, set the Project ID:
gcloud config set project $(cat ~/project_id.txt) --quiet
👉💻 Enable Required Services:
gcloud services enable  compute.googleapis.com \
                        artifactregistry.googleapis.com \
                        run.googleapis.com \
                        cloudbuild.googleapis.com \
                        iam.googleapis.com \
                        aiplatform.googleapis.com \
                        cloudresourcemanager.googleapis.com \
                        redis.googleapis.com \
                        vpcaccess.googleapis.com
Install Dependencies
👉💻 Navigate to Level 4 and install the required Python packages:
cd $HOME/way-back-home/level_4
uv sync
The key dependencies are:
Package | Purpose |
| High-performance web framework for the Satellite Station and SSE streaming |
| ASGI server required to run the FastAPI application |
| The Agent Development Kit used to build the Formation Agent |
| Agent-to-Agent protocol library for standardized communication |
| Native client for accessing Gemini models |
| Python client for connecting to the Schematic Vault (Memorystore) |
| Support for real-time bi-directional communication |
| Manages environment variables and configuration secrets |
| Data validation and settings management |
Verify Setup
Before we launch into the code, let's ensure all systems are green. Run the verification script to audit your Google Cloud Project, APIs, and Python dependencies.
👉💻 Run the Verification Script:
cd $HOME/way-back-home/level_4/scripts
chmod +x verify_setup.sh
. verify_setup.sh
👀 You should see a series of Green Checks (✅).
- If you see Red Crosses (❌), follow the suggested fix commands in the output (e.g.,
gcloud services enable ...orpip install ...). - Note: A yellow warning for
.envis acceptable for now; we will create that file in the next step.
🚀 Verifying Mission Bravo (Level 4) Infrastructure...

✅ Google Cloud Project: xxxxxxx
✅ Cloud APIs: Active
✅ Python Environment: Ready

🎉 SYSTEMS ONLINE. READY FOR MISSION.
3. Building Schematic Vault in Redis and the BiDirecitional Agent with ADK
You have located the planetary schematic repository containing the blueprints for the derelict rocket. To retrieve this data accurately, you must interface with the repository's dedicated management interface: the Architect agent.
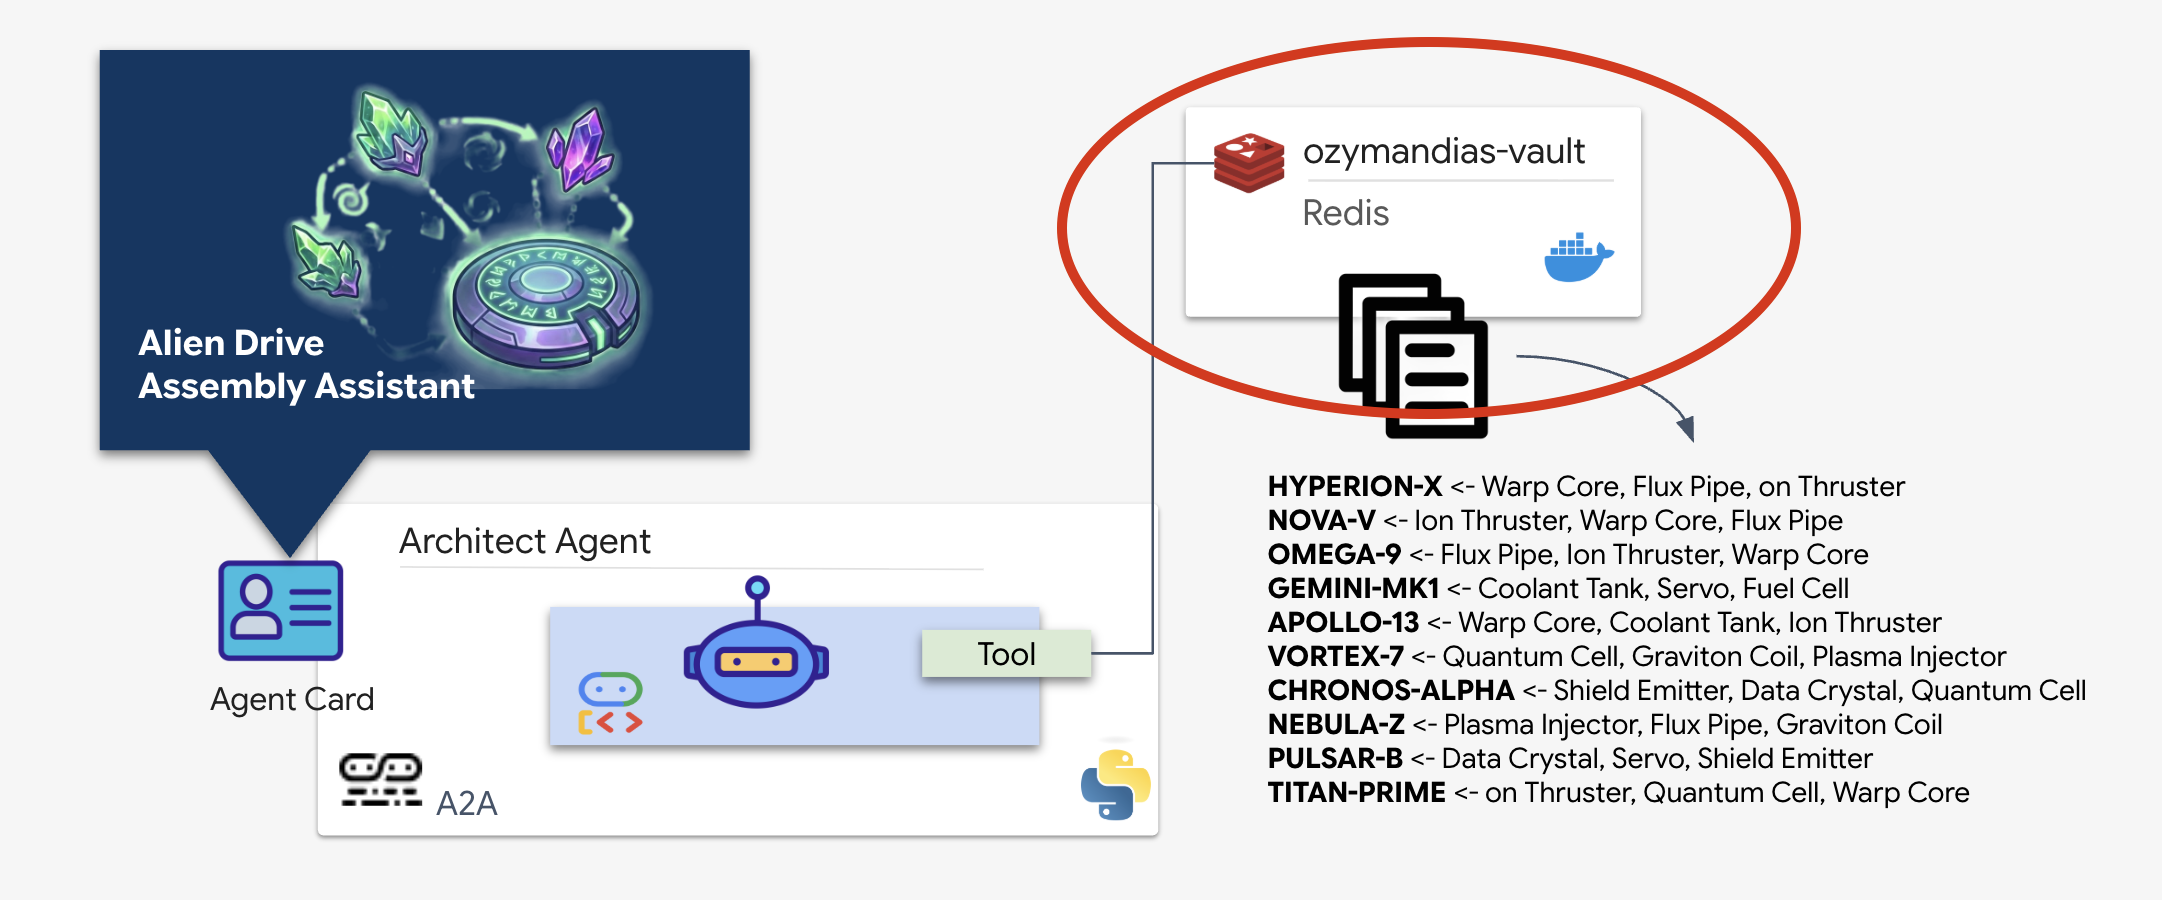
Provisioning the Schematic Vault (Redis)
Before the Architect can assist us, we must ensure the data is hosted in a secure, high-availability environment. We will use Redis as a fast data store for our alien schematics. For the convenience of development, we'll be spinning up a local Redis instance, but instructions on how to deploy to a production environment with Google Cloud Memorystore will be provided later.
👉💻 Run the following commands in your terminal to provision the Redis instance (This may take 2-3 minutes):
docker run -d --name ozymandias-vault -p 6379:6379 redis:8.6-rc1-alpine
👉💻 To load the preliminary data, run the following to enter the Redis Shell:
docker exec -it ozymandias-vault redis-cli
(Your prompt will change to 127.0.0.1:6379)
👉💻 Paste these commands inside:
RPUSH "HYPERION-X" "Warp Core" "Flux Pipe" "Ion Thruster"
RPUSH "NOVA-V" "Ion Thruster" "Warp Core" "Flux Pipe"
RPUSH "OMEGA-9" "Flux Pipe" "Ion Thruster" "Warp Core"
RPUSH "GEMINI-MK1" "Coolant Tank" "Servo" "Fuel Cell"
RPUSH "APOLLO-13" "Warp Core" "Coolant Tank" "Ion Thruster"
RPUSH "VORTEX-7" "Quantum Cell" "Graviton Coil" "Plasma Injector"
RPUSH "CHRONOS-ALPHA" "Shield Emitter" "Data Crystal" "Quantum Cell"
RPUSH "NEBULA-Z" "Plasma Injector" "Flux Pipe" "Graviton Coil"
RPUSH "PULSAR-B" "Data Crystal" "Servo" "Shield Emitter"
RPUSH "TITAN-PRIME" "Ion Thruster" "Quantum Cell" "Warp Core"
👉💻 Type exit to return to your normal shell.
👉💻 To check that the data exists by querying a specific ship directly from your terminal, run:
# Check 'TITAN-PRIME'
docker exec ozymandias-vault redis-cli LRANGE "TITAN-PRIME" 0 -1
👀 This is the expected output:
1) "Ion Thruster"
2) "Quantum Cell"
3) "Warp Core"
Implementing the Architect Agent
The Architect Agent is a specialized agent responsible for retrieving schematic blueprints from our Redis vault. It acts as a dedicated data interface, ensuring that the main Dispatch Agent receives accurate and structured information without needing to know the underlying database logic.
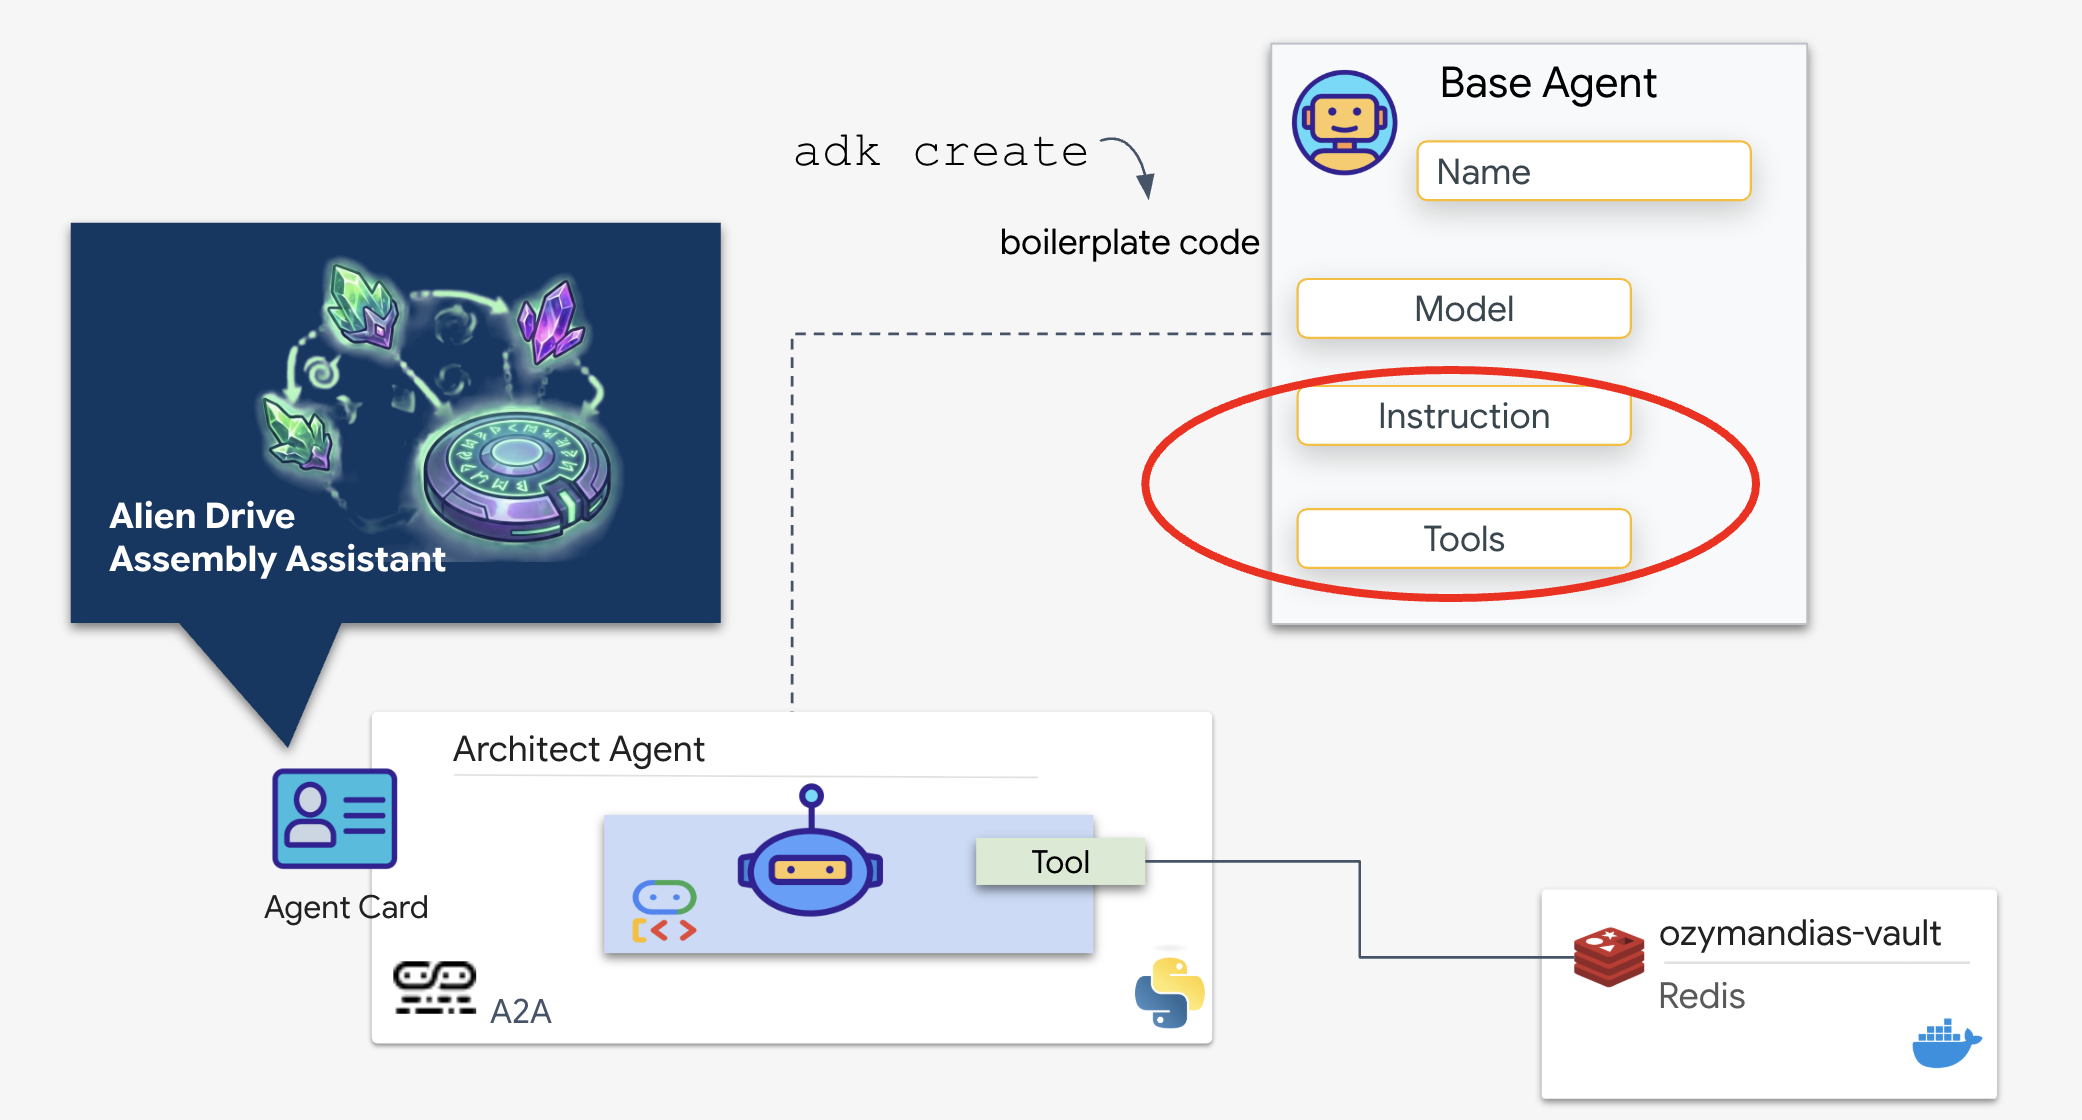
The Google Agent Development Kit (ADK) is the modular framework that makes this multi-agent setup possible. It handles two critical layers:
- Connection & Session Lifecycle: Interacting with real-time APIs requires complex protocol management—handling handshakes, authentication, and keep-alive signals.
- The Function Calling: This is the "Model-Code-Model Round Trip." When the LLM decides it needs data, it outputs a structured function call. The ADK intercepts this, executes your Python code (
lookup_schematic_tool), and feeds the result back into the model's context in milliseconds.
We will now build the Architect. This agent has no camera access. It exists solely to receive a "Drive Name" and return the "Parts List" from the database.
👉💻 We will use the adk create command. This is a tool from the Agent Development Kit (ADK) that automatically generates the boilerplate code and file structure for a new agent, saving us setup time.
cd $HOME/way-back-home/level_4/backend/
uv run adk create architect_agent
Configure the Agent
The CLI will launch an interactive setup wizard. Use the following responses to configure your agent:
- Choose a model: Select Option 1 (Gemini Flash).
- Note: The specific version (e.g., 2.5, 3.0) may vary based on availability. Always choose the "Flash" variant for speed.
- Choose a backend: Select Option 2 (Vertex AI).
- Enter Google Cloud Project ID: Press Enter to accept the default (detected from your environment).
- Enter Google Cloud Region: Press Enter to accept the default (
us-central1).
👀 Your terminal interaction should look similar to this:
(way-back-home) user@cloudshell:~/way-back-home/level_4/agent$ adk create architect_agent

Choose a model for the root agent:
1. gemini-2.5-flash
2. Other models (fill later)
Choose model (1, 2): 1

1. Google AI
2. Vertex AI
Choose a backend (1, 2): 2

You need an existing Google Cloud account and project...
Enter Google Cloud project ID [your-project-id]: <PRESS ENTER>
Enter Google Cloud region [us-central1]: <PRESS ENTER>

Agent created in /home/user/way-back-home/level_4/agent/architect_agent:
- .env
- __init__.py
- agent.py
You should now see an Agent created success message. This generates the skeleton code we will modify in the next step.
👉✏️ Navigate to and open the newly created $HOME/way-back-home/level_4/backend/architect_agent/agent.py file in your editor. Add the tool snippet to the file after the first import line:
import os
import redis

REDIS_IP = os.environ.get('REDIS_HOST', 'localhost')
r = redis.Redis(host=REDIS_IP, port=6379, decode_responses=True)

def lookup_schematic_tool(drive_name: str) -> list[str]:
    """Returns the ordered list of parts for a drive from local Redis."""

    # Logic to clean input like "TARGET: X" -> "X"
    clean_name = drive_name.replace("TARGET:", "").replace("TARGET", "").strip()
    clean_name = clean_name.replace(":", "").strip()

    # LRANGE gets all items in the list (index 0 to -1)
    result = r.lrange(clean_name, 0, -1)

    if not result:
        print(f"[ARCHITECT] Error: Drive ID '{clean_name}' not found in Redis.")
        return ["ERROR: Drive ID not found."]

    print(f"[ARCHITECT] Returning schematic for {clean_name}: {result}")
    return result
👉✏️ Replace the entire instruction line in the root_agent definition with the following and also add the tool we have defined earlier:
    instruction='''SYSTEM ROLE: Database API.
    INPUT: Text string (Drive Name).
    TASK: Run `lookup_schematic_tool`.
    OUTPUT: Return ONLY the raw list from the tool.
    CONSTRAINT: Do NOT add conversational text.
    ''',
    tools=[lookup_schematic_tool],
The ADK Advantage
With the Architect online, we now have a source of truth. Before we connect this to the primary agent,the Agent Development Kit (ADK) provides a significant advantage by simplifying the complexities of building and testing AI agents. With its built-in adk web developer console, we can isolate and verify the functionality of our Architect Agent, specifically its tool-calling capabilities, before integrating it into the larger multi-agent system. This modular approach to development and testing is crucial for building robust and reliable AI applications.
👉💻 In your terminal, run:
cd $HOME/way-back-home/level_4/
. scripts/check_redis.sh
cd $HOME/way-back-home/level_4/backend/
uv run adk web
👀 Wait until you see:
+-----------------------------------------------------------------------------+
| ADK Web Server started                                                      |
|                                                                             |
| For local testing, access at http://127.0.0.1:8000.                         |
+-----------------------------------------------------------------------------+

INFO:     Application startup complete.
INFO:     Uvicorn running on http://127.0.0.1:8000 (Press CTRL+C to quit)
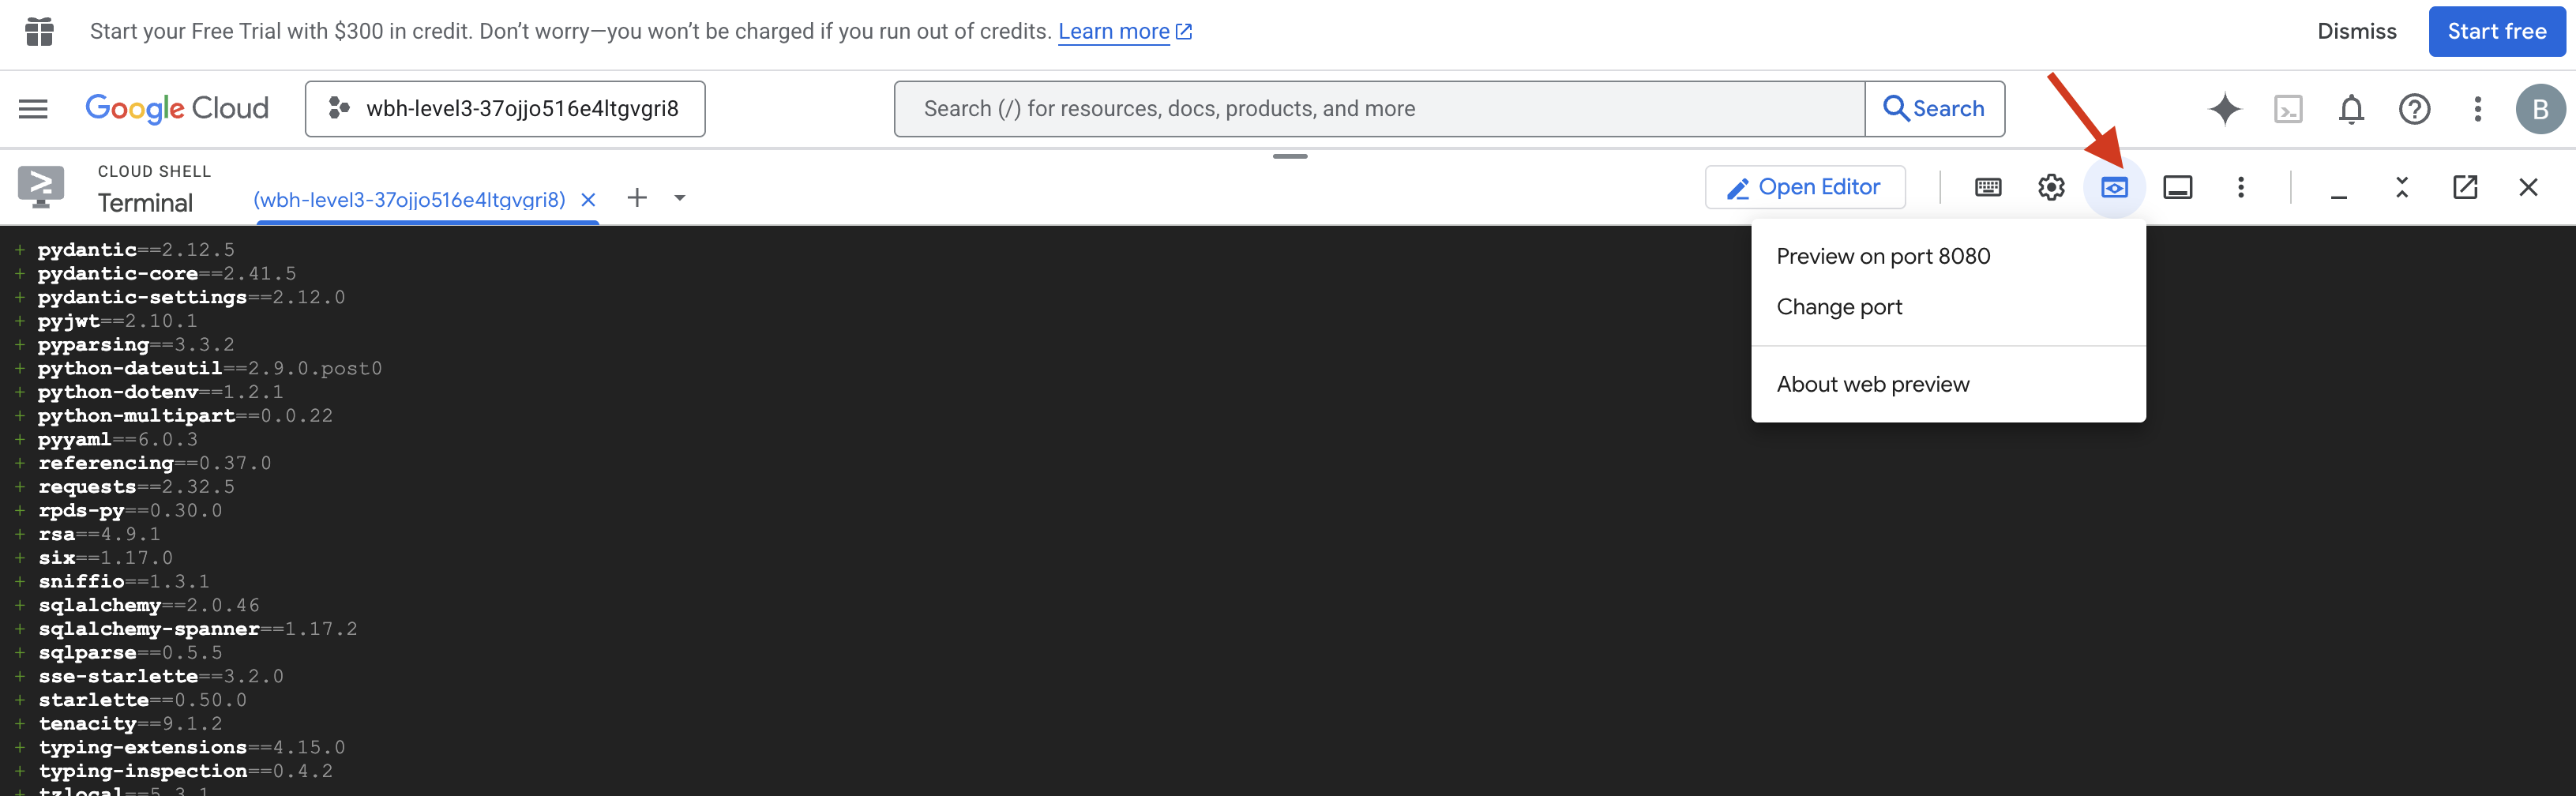
- Click the Web preview icon in the Cloud Shell toolbar. Select Change port, set it to 8000, and click Change and Preview.
- Select the architect_agent.
- Trigger the Tool: In the chat interface, type:
CHRONOS-ALPHA(or any Drive ID from the schematic database). - Observe the Behavior:
- The Architect should immediately trigger the
lookup_schematic_tool. - Because of our strict system instructions, it should return only the list of parts (e.g.,
['Shield Emitter', 'Data Crystal', 'Quantum Cell']) without any conversational filler.
- The Architect should immediately trigger the
- Verify the Logs: Look at your terminal window. You should see the successful execution log:
[ARCHITECT] Returning schematic for CHRONOS-ALPHA: ['Shield Emitter', 'Data Crystal', 'Quantum Cell']!(architect_agent adk)[img/03-02-adkweb.png]
If you see the tool execution log and the clean data response, your specialist agent is functioning as intended. It can process requests, query the vault, and return structured data.
👉💻 Press Ctrl+C to exit.
Initialize the A2A Server
To connect the Dispatch Agent to the Architect, we use the Agent-to-Agent (A2A) Protocol.
While protocols like MCP (Model Context Protocol) focus on connecting agents to tools, A2A focuses on connecting agents to other agents. It is the standard that allows our Dispatcher to "discover" the Architect and understand its capability to look up schematics.
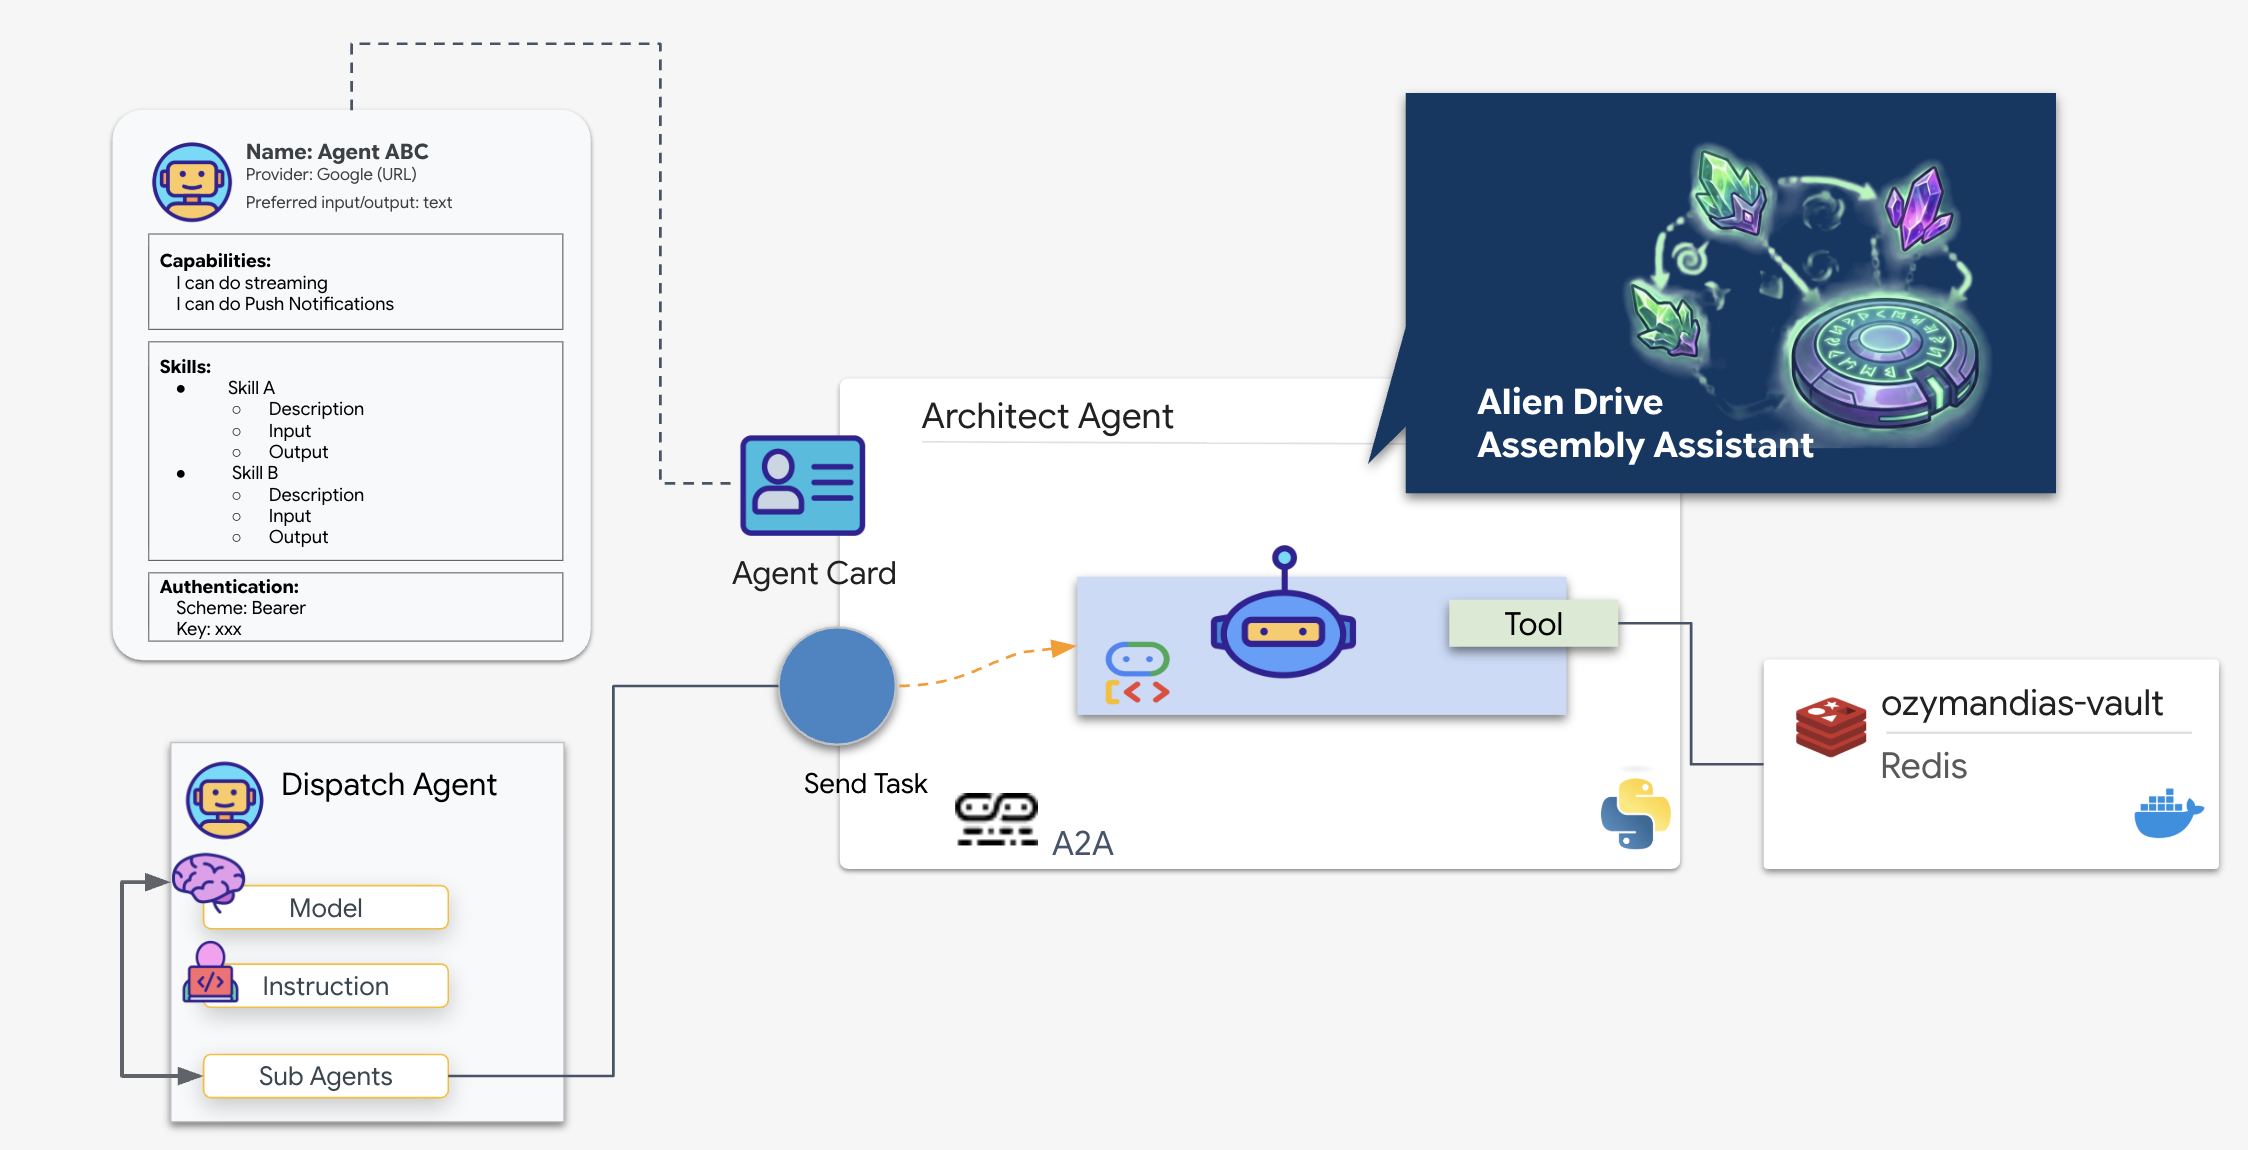
The A2A Flow: In this mission, we use a client-server model:
- Server (Architect): Hosts the database tools and "advertises" its skills via an Agent Card.
- Client (Dispatch): Reads the Architect's card, understands its API, and sends a schematic request.
What is an Agent Card?
Think of the Agent Card as a digital business card or a "Driver's License" for an AI. When an A2A server starts, it publishes this JSON object containing:
- Identity: The agent's name (
architect_agent) and ID. - Description: A human-and-machine readable summary of what it does ("System Role: Database API...").
- Interface: The specific input keys (
drive_name) and output formats it expects.
Without this card, the Dispatch agent would be operating blindly, guessing how to communicate with the Architect.
Create the Server Code
👉✏️ In your editor, under the $HOME/way-back-home/level_4/backend/architect_agent directory, create a file called server.py and paste the following code:
from google.adk.a2a.utils.agent_to_a2a import to_a2a
from agent import root_agent
import os
import logging
import json
from dotenv import load_dotenv

load_dotenv()

# Configure logging
logging.basicConfig(level=logging.INFO)
logger = logging.getLogger("architect_server")
HOST= os.environ.get("HOST_URL","localhost")
PROTOCOL= os.environ.get("PROTOCOL","http")
PORT= os.environ.get("A2A_PORT",8081)

# 1. Create the A2A App (Handles Agent Card & HTTP)
# This middleware automatically sets up the /a2a/v1/... endpoints
app = to_a2a(root_agent, host=HOST, port=PORT, protocol=PROTOCOL)

if __name__ == "__main__":
    import uvicorn
    # Use 0.0.0.0 to allow external access if needed, port 8080 as standard
    uvicorn.run(app, host='0.0.0.0', port=8081)
👉💻 Back in your terminal, navigate to the folder and start the server:
cd $HOME/way-back-home/level_4/
. scripts/check_redis.sh
cd $HOME/way-back-home/level_4/backend/architect_agent
uv run server.py
👀 Confirm if A2A server starts:
INFO:     Waiting for application startup.
INFO:     Application startup complete.
INFO:     Uvicorn running on http://0.0.0.0:8081 (Press CTRL+C to quit)
Verify the Agent Card
Open a new terminal tab (click the + icon). We will verify that the Architect is broadcasting its identity correctly by fetching its Agent Card manually.
👉💻 Run the following command:
curl -s http://localhost:8081/.well-known/agent.json | jq .
👀 You should see a JSON response. Look for the description field in the output. It should match the instruction you gave the agent earlier ("SYSTEM ROLE: Database API...").
{
  "capabilities": {},
  "defaultInputModes": [
    "text/plain"
  ],
  "defaultOutputModes": [
    "text/plain"
  ],
  "description": "A helpful assistant for user questions.",
  "name": "root_agent",
  "preferredTransport": "JSONRPC",
  "protocolVersion": "0.3.0",
  "skills": [
    {
      "description": "A helpful assistant for user questions. SYSTEM ROLE: Database API.\n    INPUT: Text string (Drive Name).\n    TASK: Run `lookup_schematic_tool`.\n    OUTPUT: Return ONLY the raw list from the tool.\n    CONSTRAINT: Do NOT add conversational text.\n    ",
      "examples": [],
      "id": "root_agent",
      "name": "model",
      "tags": [
        "llm"
      ]
    },
    {
      "description": "Returns the ordered list of parts for a drive from local Redis.",
      "id": "root_agent-lookup_schematic_tool",
      "name": "lookup_schematic_tool",
      "tags": [
        "llm",
        "tools"
      ]
    }
  ],
  "supportsAuthenticatedExtendedCard": false,
  "url": "http://localhost:8081",
  "version": "0.0.1"
}
If you see this JSON, the Architect is live, the A2A protocol is active, and the Agent Card is ready to be discovered by the Dispatcher.
Now that the Architect is ready to serve as a remote resource, we can proceed to wire it into the Dispatch Agent.
👉💻 Press Ctrl+C to exit the A2A server.
4. Connecting BIDI-Streams Agent to Remote Agent and Streaming Tools
You now will configure the primary communication hub to bridge the gap between live data and the remote Architect. This connection requires a high-bandwidth, low-latency pipeline to ensure the assembly bench remains stable during operation.
Understanding Bi-Directional streaming (Live) Agents
Bidirectional (Bidi) streaming in ADK adds the low-latency, two-way voice and video interaction capability of the Gemini Live API to AI agents. It represents a fundamental shift from traditional AI interactions. Instead of the rigid "ask-and-wait" pattern, it enables real-time, two-way communication where both human and AI can speak, listen, and respond simultaneously.
Think of the difference between sending emails and having a phone conversation. Traditional Agent interactions are like emails: you send a complete message, wait for a complete response, and then send another. Bidi-streaming is like a phone conversation: fluid, natural, with the ability to interrupt, clarify, and respond in real-time.
Key Characteristics:
- Two-way Communication: Continuous data exchange without waiting for complete responses. The AI responds as soon as it detects the user has finished speaking.
- Responsive Interruption: Users can interrupt the agent mid-response with new input, just like in a human conversation. If an AI is explaining a complex step and you say, "Wait, repeat that," the AI stops immediately and addresses your interruption.
- Optimized for Multimodality: Bidi-streaming excels at processing different input types simultaneously. You can speak to the agent while showing it the alien parts via video, and it processes both streams in a single, unified connection.
👀 Before we implement the client logic, let's examine the pre-generated skeleton for the Dispatch Agent. This agent will communicate with the user via voice and video and delegate queries to the Architect Agent.
__init__.py
agent.py
hazard_db.py
agent.py: This is the "Brain." It currently contains a basic Bidi-streaming setup. We will modify this file to add the A2A Client logic so it can communicate with the Architect.hazard_db.py: This is a local tool specific to the Dispatch Agent, containing safety protocols. It is separate from the Architect's schematic database.
Implementing the A2A Client
To allow the Dispatch Agent to communicate with our remote Architect, we must define a Remote A2A Agent. This tells the Dispatch agent where to find the Architect and what its "Agent Card" looks like.
👉✏️ Replace #REPLACE-REMOTEA2AAGENT in $HOME/way-back-home/level_4/backend/dispatch_agent/agent.py with the following:
architect_agent = RemoteA2aAgent(
    name="execute_architect",
    description="[SILENT ACTION]: Retrieves the REQUIRED SUBSET of parts. The screen shows a full inventory; this tool filters out the wrong parts. Must be called INSTANTLY when a Target Name is found. Input: Target Name.",
    agent_card=(f"{ARCHITECT_URL}{AGENT_CARD_WELL_KNOWN_PATH}"),
    httpx_client=insecure_client,
)
How Streaming Tools Work
With the previous agent, tools followed a standard "Request-Response" pattern, the agent asks a question, the tool provides an answer, and the interaction ends. However, on Ozymandias, hazards don't wait for you to ask if they are present. For this, you need a Streaming Tool.
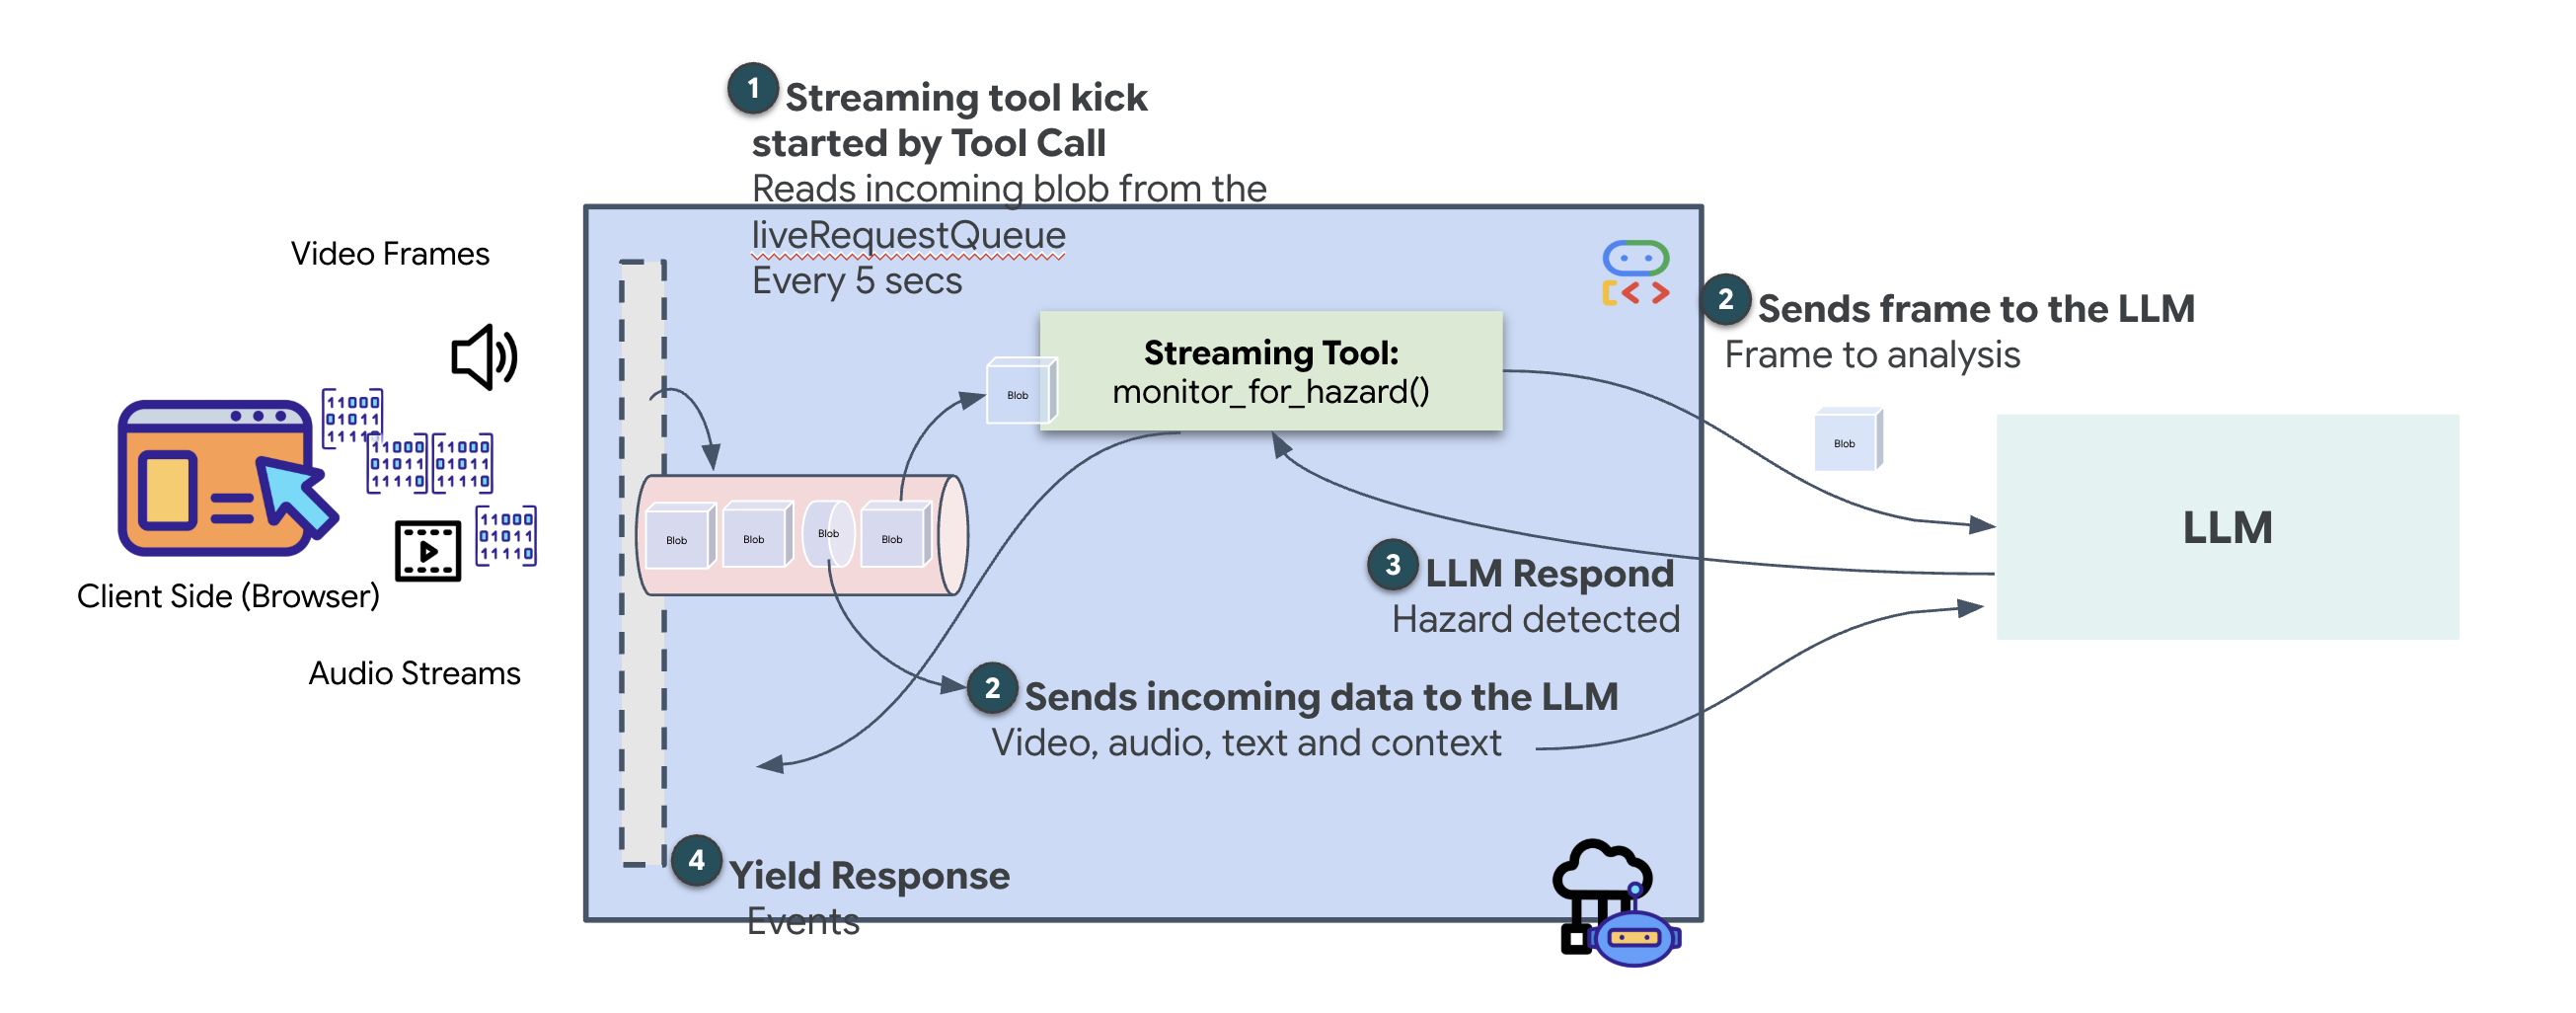
Streaming tools allow functions to stream intermediate results back to the agent in real-time, enabling the agent to react to changes as they happen. Common use cases include monitoring fluctuating stock prices or, in our case, monitoring a live video stream for state changes.
Unlike standard tools, a streaming tool is an Asynchronous Function that acts as an AsyncGenerator. This means instead of return-ing a single value, it yield-s multiple updates over time.
To define a streaming tool in the ADK, you must adhere to these technical requirements:
- Asynchronous Function: The tool must be defined with
async def. - AsyncGenerator Return Type: The function must be typed to return an
AsyncGenerator. The first parameter is the type of data being yielded (e.g.,str), and the second is typicallyNone. - Input Streams: We utilize Video Streaming Tools. In this mode, the actual video/audio stream (the
LiveRequestQueue) is passed directly into the function, allowing the tool to "see" the same frames the agent sees.
Think of a streaming tool as a Sentinel. While you and the Dispatch agent are discussing blueprints, the sentinel is running in the background, silently processing every video frame to ensure your safety.
Implementing the Background Monitoring Tool
We will now implement the monitor_for_hazard tool. This tool will ingest the input_stream (video frames), analyze them using a separate, lightweight vision call, and yield a warning only when a hazard is detected.
👉✏️ In $HOME/way-back-home/level_4/backend/dispatch_agent/agent.py, replace #REPLACE_MONITOR_HAZARD with the following logic:
async def monitor_for_hazard(
input_stream: LiveRequestQueue,
):
"""Monitor if any part is glowing"""
print("start monitor_video_stream!")
client = Client()
prompt_text = (
"Monitor the left menu if you see any glowing part, detect it's name"
)
last_count = None
while True:
last_valid_req = None
print("Monitoring loop cycle")
# use this loop to pull the latest images and discard the old ones
# Process only the current batch of events
while input_stream._queue.qsize() != 0:
live_req = await input_stream.get()
if live_req.blob is not None and live_req.blob.mime_type == "image/jpeg":
# Consumed by Monitor (Eyes)
# Deepcopy to ensure we detach from any referenced object before potential reuse/gc
# last_valid_req = deepcopy(live_req)
last_valid_req = live_req
# If we found a valid image, process it
if last_valid_req is not None:
print("Processing the most recent frame from the queue")
# Create an image part using the blob's data and mime type
image_part = genai_types.Part.from_bytes(
data=last_valid_req.blob.data, mime_type=last_valid_req.blob.mime_type
)
contents = genai_types.Content(
role="user",
parts=[image_part, genai_types.Part.from_text(text=prompt_text)],
)
# Call the model to generate content based on the provided image and prompt
try:
response = await client.aio.models.generate_content(
model="gemini-2.5-flash",
contents=contents,
config=genai_types.GenerateContentConfig(
system_instruction=(
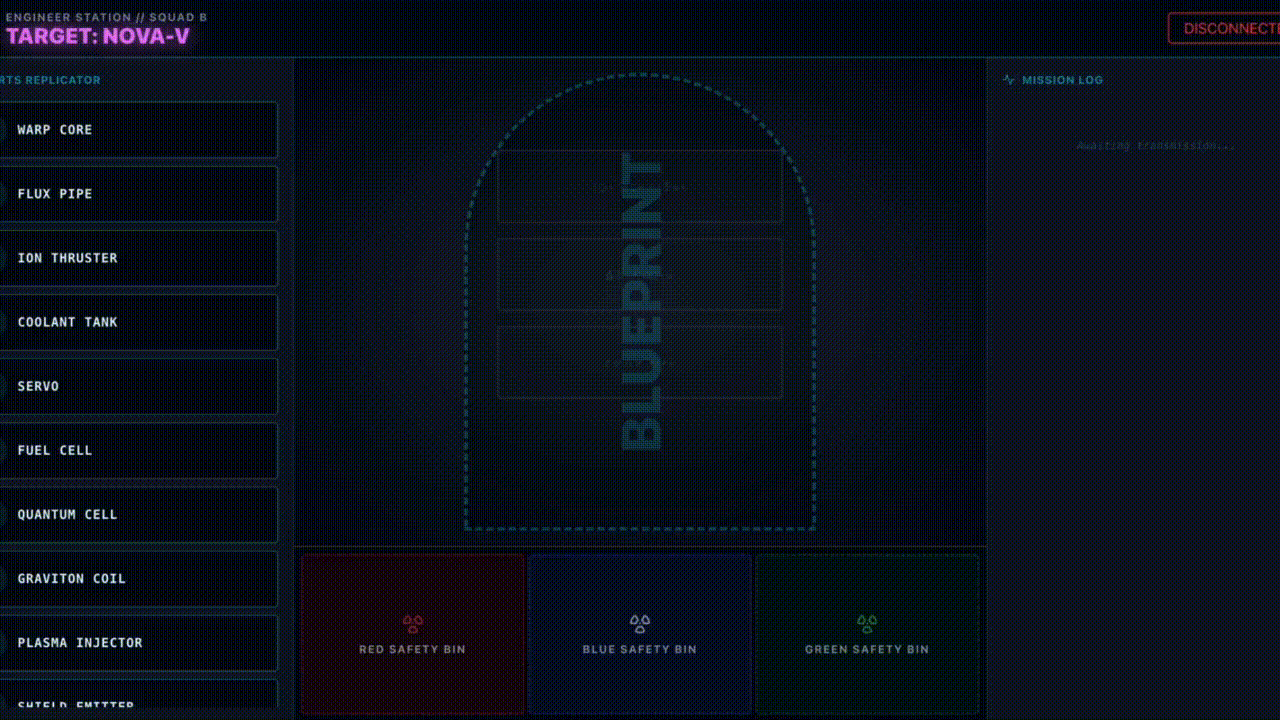
"Focus strictly on the far-left vertical column under the heading 'PARTS REPLICATOR.' "
"Ignore the center of the screen and the 'BLUEPRINT' area entirely. "
"Look only at the list containing"
"Identify if any item in this specific left-side list has a bright white border glow and the text 'HAZARD DETECTED' overlaying it. "
"If found, return ONLY the part name in ALL CAPS. If no part in that leftmost list is glowing, return nothing."
)
),
)
except Exception as e:
print(f"Error calling Gemini: {e}")
await asyncio.sleep(1)
continue
print("Gemini response received.response:", response.candidates[0].content.parts[0].text)
current_text = response.candidates[0].content.parts[0].text.strip()
# If we have a logical change (and it's not just empty)
if current_text and current_text != last_count:
# Ignore "Nothing." response from model
if current_text == "Nothing." or "I cannot fulfill" in current_text:
print(f"Model sees nothing or refused. Skipping alert.")
last_count = current_text
continue
print(f"New hazard detected: {current_text} (was: {last_count})")
last_count = current_text
part_name = current_text
color = lookup_part_safety(part_name)
yield f"Hazard detected place {part_name} to the {color} bin"
# Update last_count even if it's empty, so we can detect when it reappears?
# Actually if it goes from "DATA CRYSTAL" to "" (nothing), we probably just silence.
# But if we don't update last_count on empty, we won't re-trigger if "DATA CRYSTAL" stays "DATA CRYSTAL".
# The user wants to detect hazards.
# If current_text is empty, we should probably update last_count to empty so next valid one triggers.
if not current_text:
last_count = None
else:
print("No valid frame found, skipping processing.")
await asyncio.sleep(5)
Implementing the Dispatch Agent
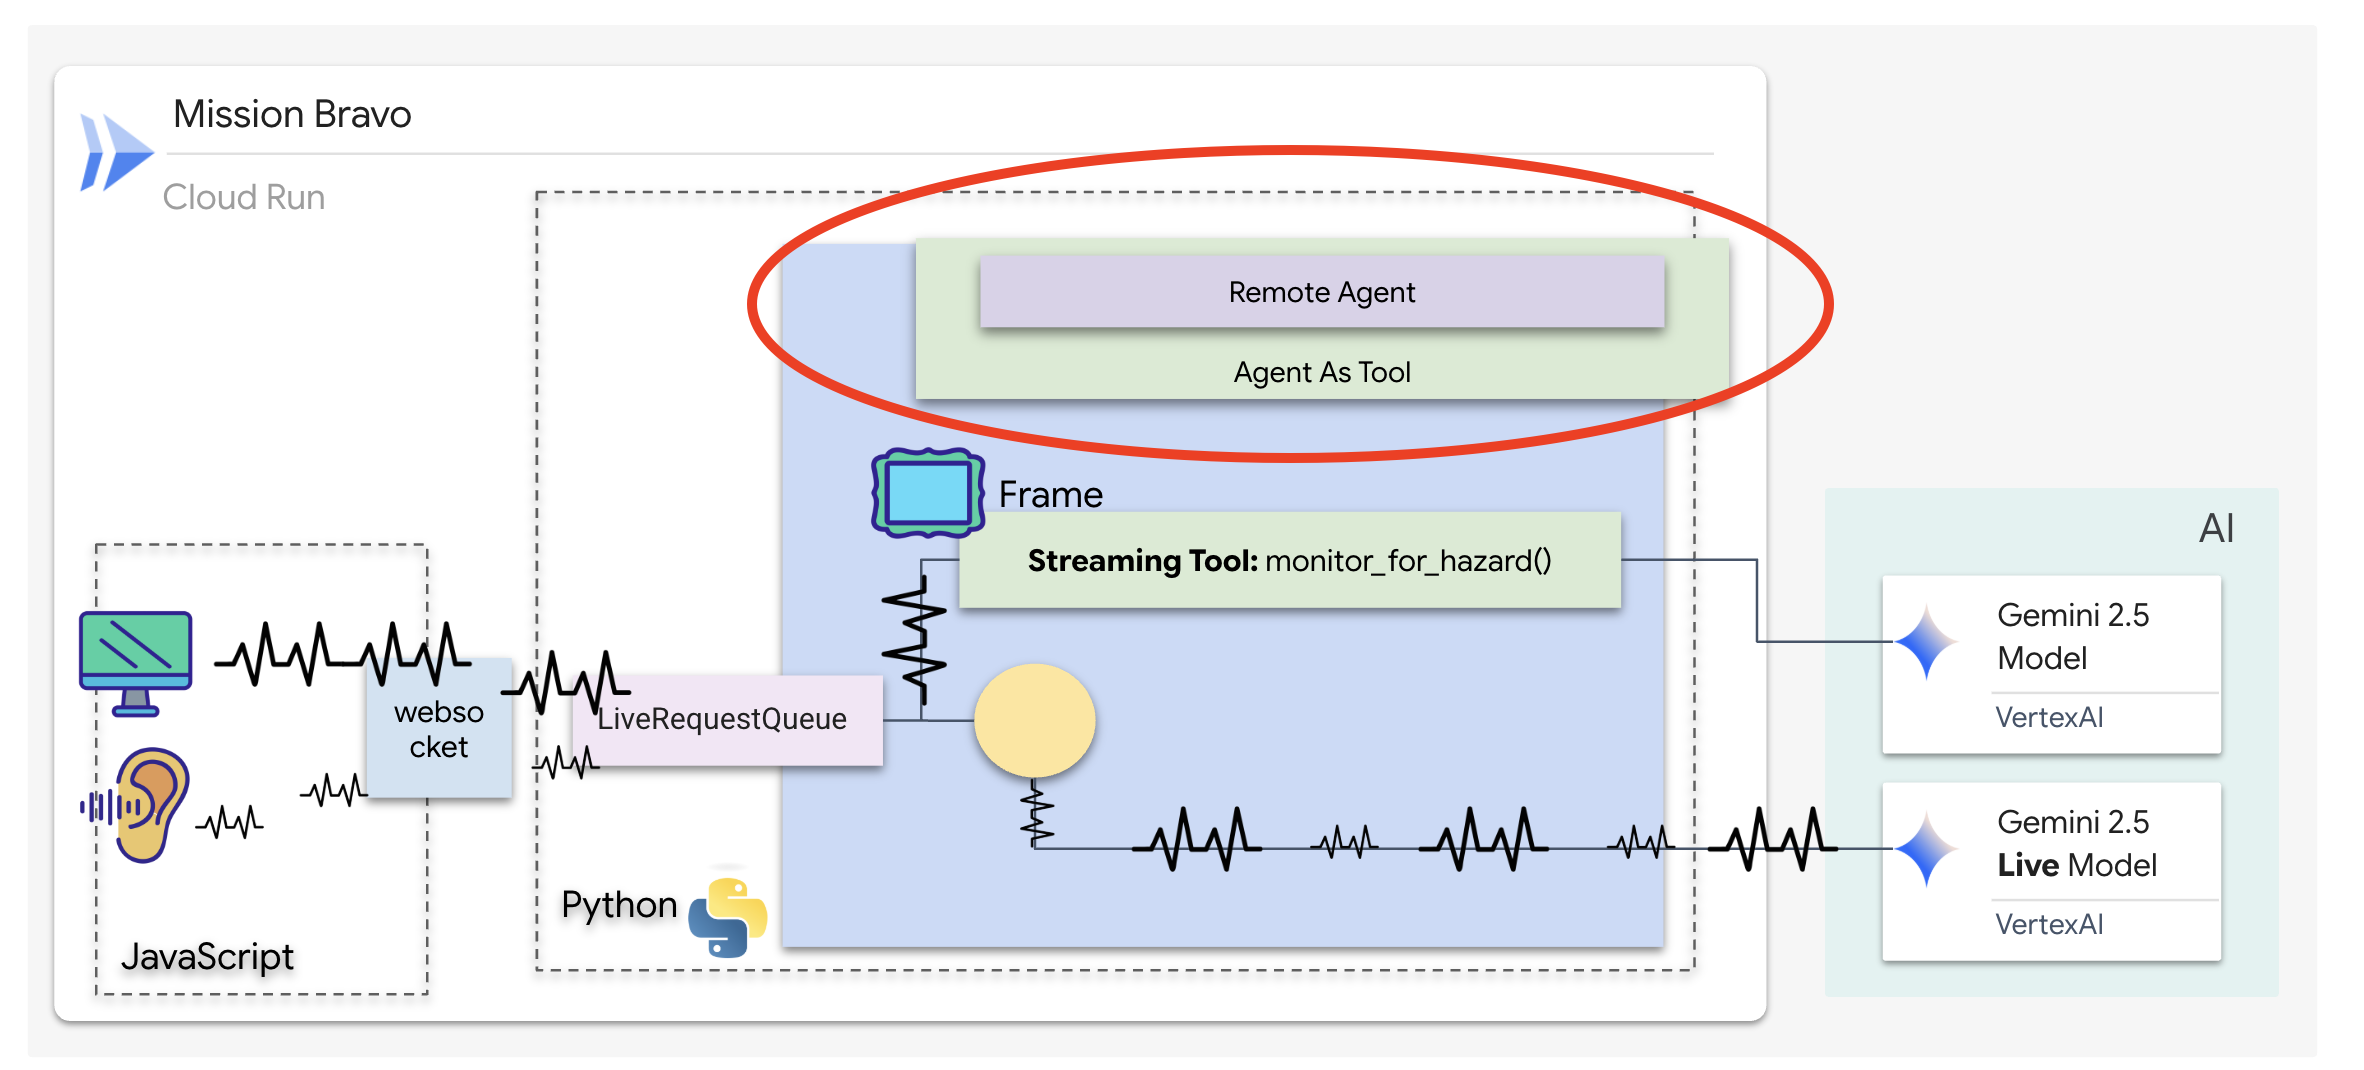
The Dispatch Agent is your primary interface and the orchestrator. Because it manages the bidi-streaming link (your live voice and video), it must retain control of the conversation at all times. To achieve this, we will use a specific ADK feature: Agent-as-a-Tool.
Concept: Agent-as-a-Tool vs. Sub-Agents
When building multi-agent systems, you must decide how responsibility is shared. In our rescue mission, the distinction is critical:
- Agent-as-a-Tool: This is the recommended approach for our bidi-streaming hub. When the Dispatch agent (Agent A) calls the Architect agent (Agent B) as a tool, the Architect's data is passed back to Dispatch. Dispatch then interprets that data and generates a response for you. Dispatch stays in control and continues to handle all subsequent user input.
- Sub-Agent: In a sub-agent relationship, responsibility is completely transferred. If Dispatch handed you off to the Architect as a sub-agent, you would be talking directly to a database API that has no "vision" and no conversational skills. The primary agent (Dispatch) would be effectively out of the loop.
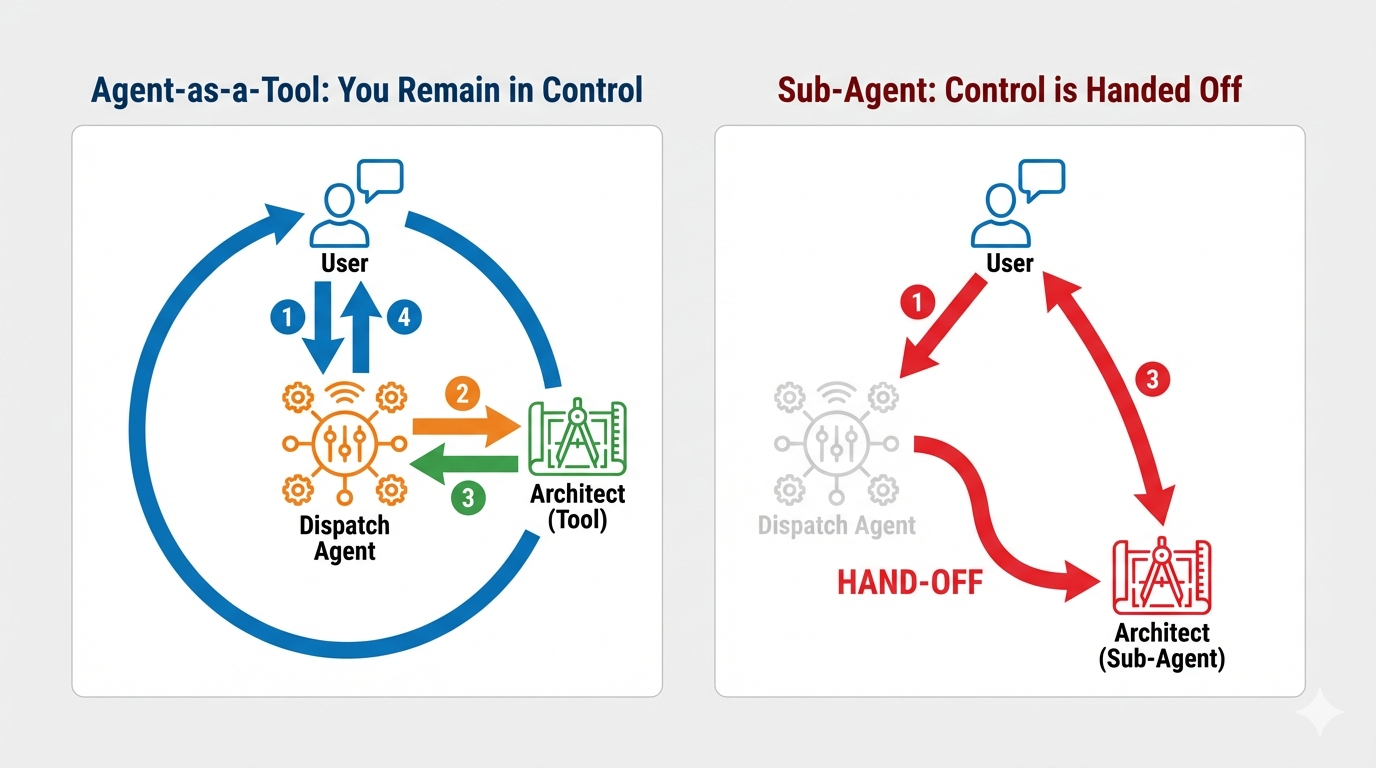
By using Agent-as-a-Tool, we leverage the Architect's specialized knowledge while maintaining the fluid, human-like interaction of the bidi-streaming agent.
Coding the Routing Logic
We will now wrap our architect_agent in an AgentTool and provide the Dispatch agent with a "Logic Map." This map tells the agent exactly when to fetch data from the vault and when to report findings from the background sentinel.
To give Dispatch "eyes" that never blink, we must grant it access to the Streaming Tool we built in the previous step.
In ADK, when you add an AsyncGenerator function (like monitor_for_hazard) to the tools list, the agent treats it as a persistent background process. Instead of a one-time execution, the agent "subscribes" to the tool's output. This allows Dispatch to continue its primary conversation while the Sentinel silently yields hazard alerts in the background.
👉✏️ Replace #REPLACE_AGENT_TOOLS in $HOME/way-back-home/level_4/backend/dispatch_agent/agent.py with the following:
tools=[AgentTool(agent=architect_agent), monitor_for_hazard],
Verification
👉💻 With both agents configured, we can test the live multi-agent interaction.
- In terminal A, start the Architect Agent:
cd $HOME/way-back-home/level_4/
. scripts/check_redis.sh
cd $HOME/way-back-home/level_4/backend/architect_agent
uv run server.py
- In a new terminal (terminal B), run the Dispatch Agent:
cd $HOME/way-back-home/level_4/backend/
cp architect_agent/.env .env
uv run adk web
Testing a multi-agent system that uses a real-time, multimodal model like gemini-live within the adk web simulator involves a specific workflow. The simulator is excellent for inspecting tool calls but has a known incompatibility when first processing images with this type of model.
- Click the Web preview icon in the Cloud Shell toolbar. Select Change port, set it to 8000, and click Change and Preview.
👉Select dispatch_agent and upload the Blueprint and Handle the Expected Error
This is the most critical step. We need to provide the image context to the agent.
- When the interface loads, allow it to access your microphone when prompted.
- Download this blueprint image to your computer:
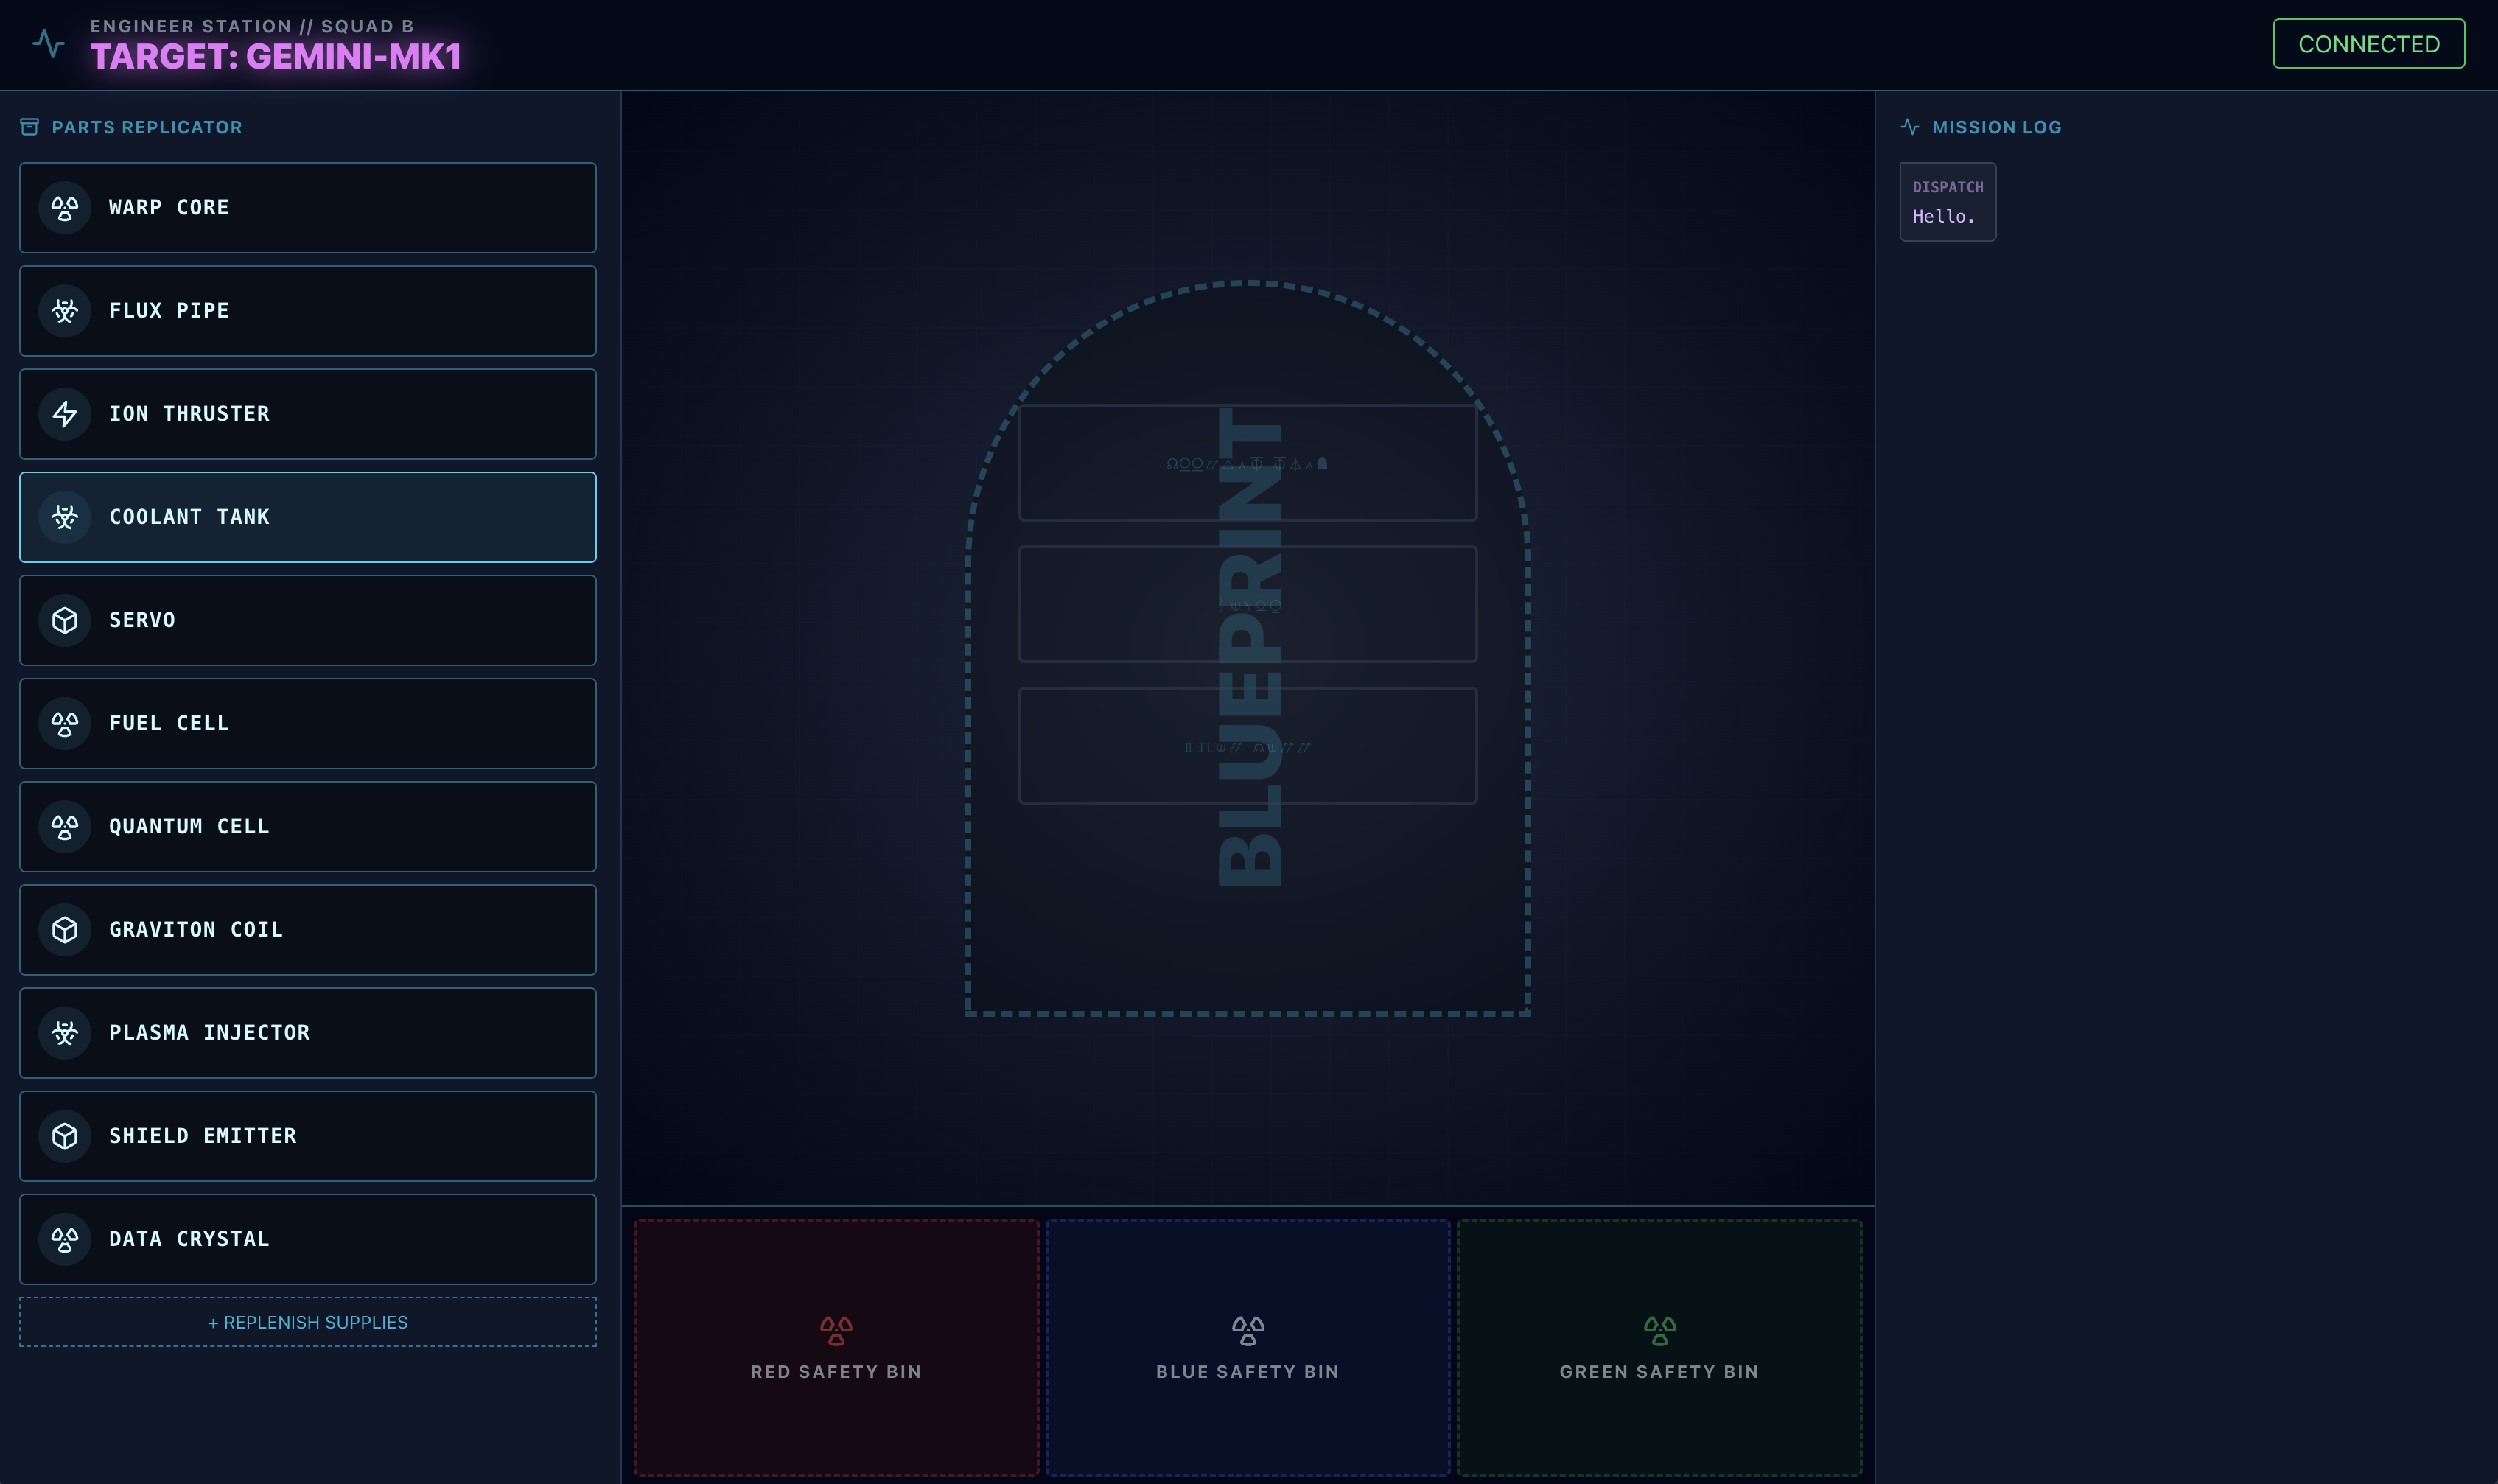
- In the
adk webinterface, click the paperclip icon and upload the blueprint image you just downloaded.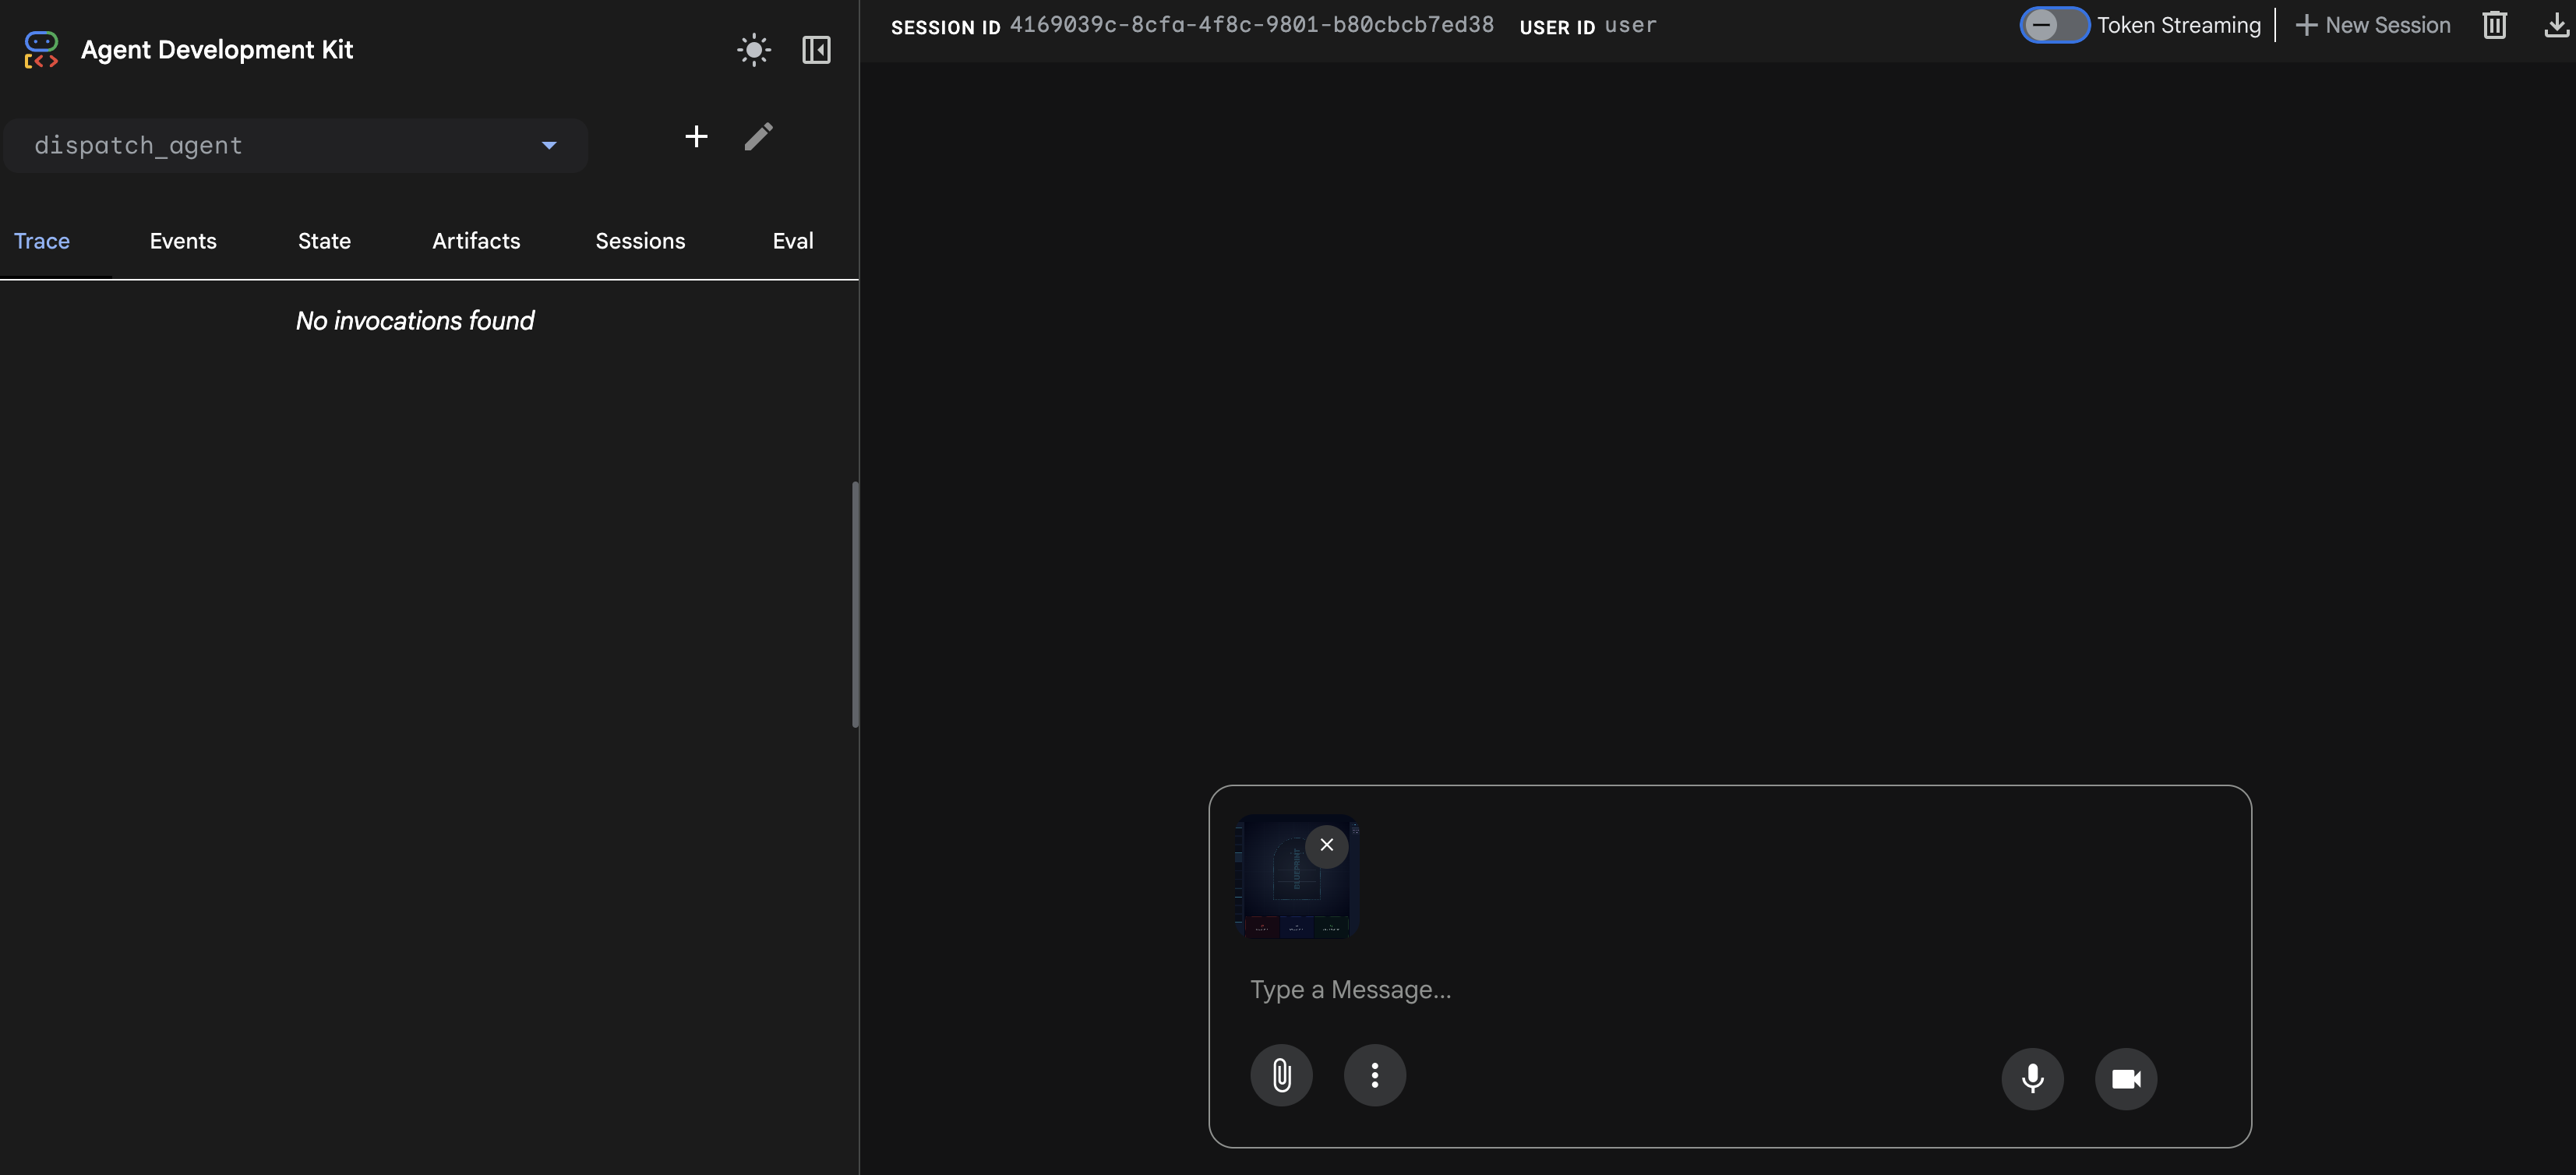
⚠️⚠️You will see a 400 INVALID_ARGUMENT error. This is expected.⚠️⚠️
This error occurs because the adk web image handler is not fully compatible with the gemini-live model's API for a one-time upload. However, the image has been successfully added to the session context.
- 👉 To clear the error, simply reload the browser page.
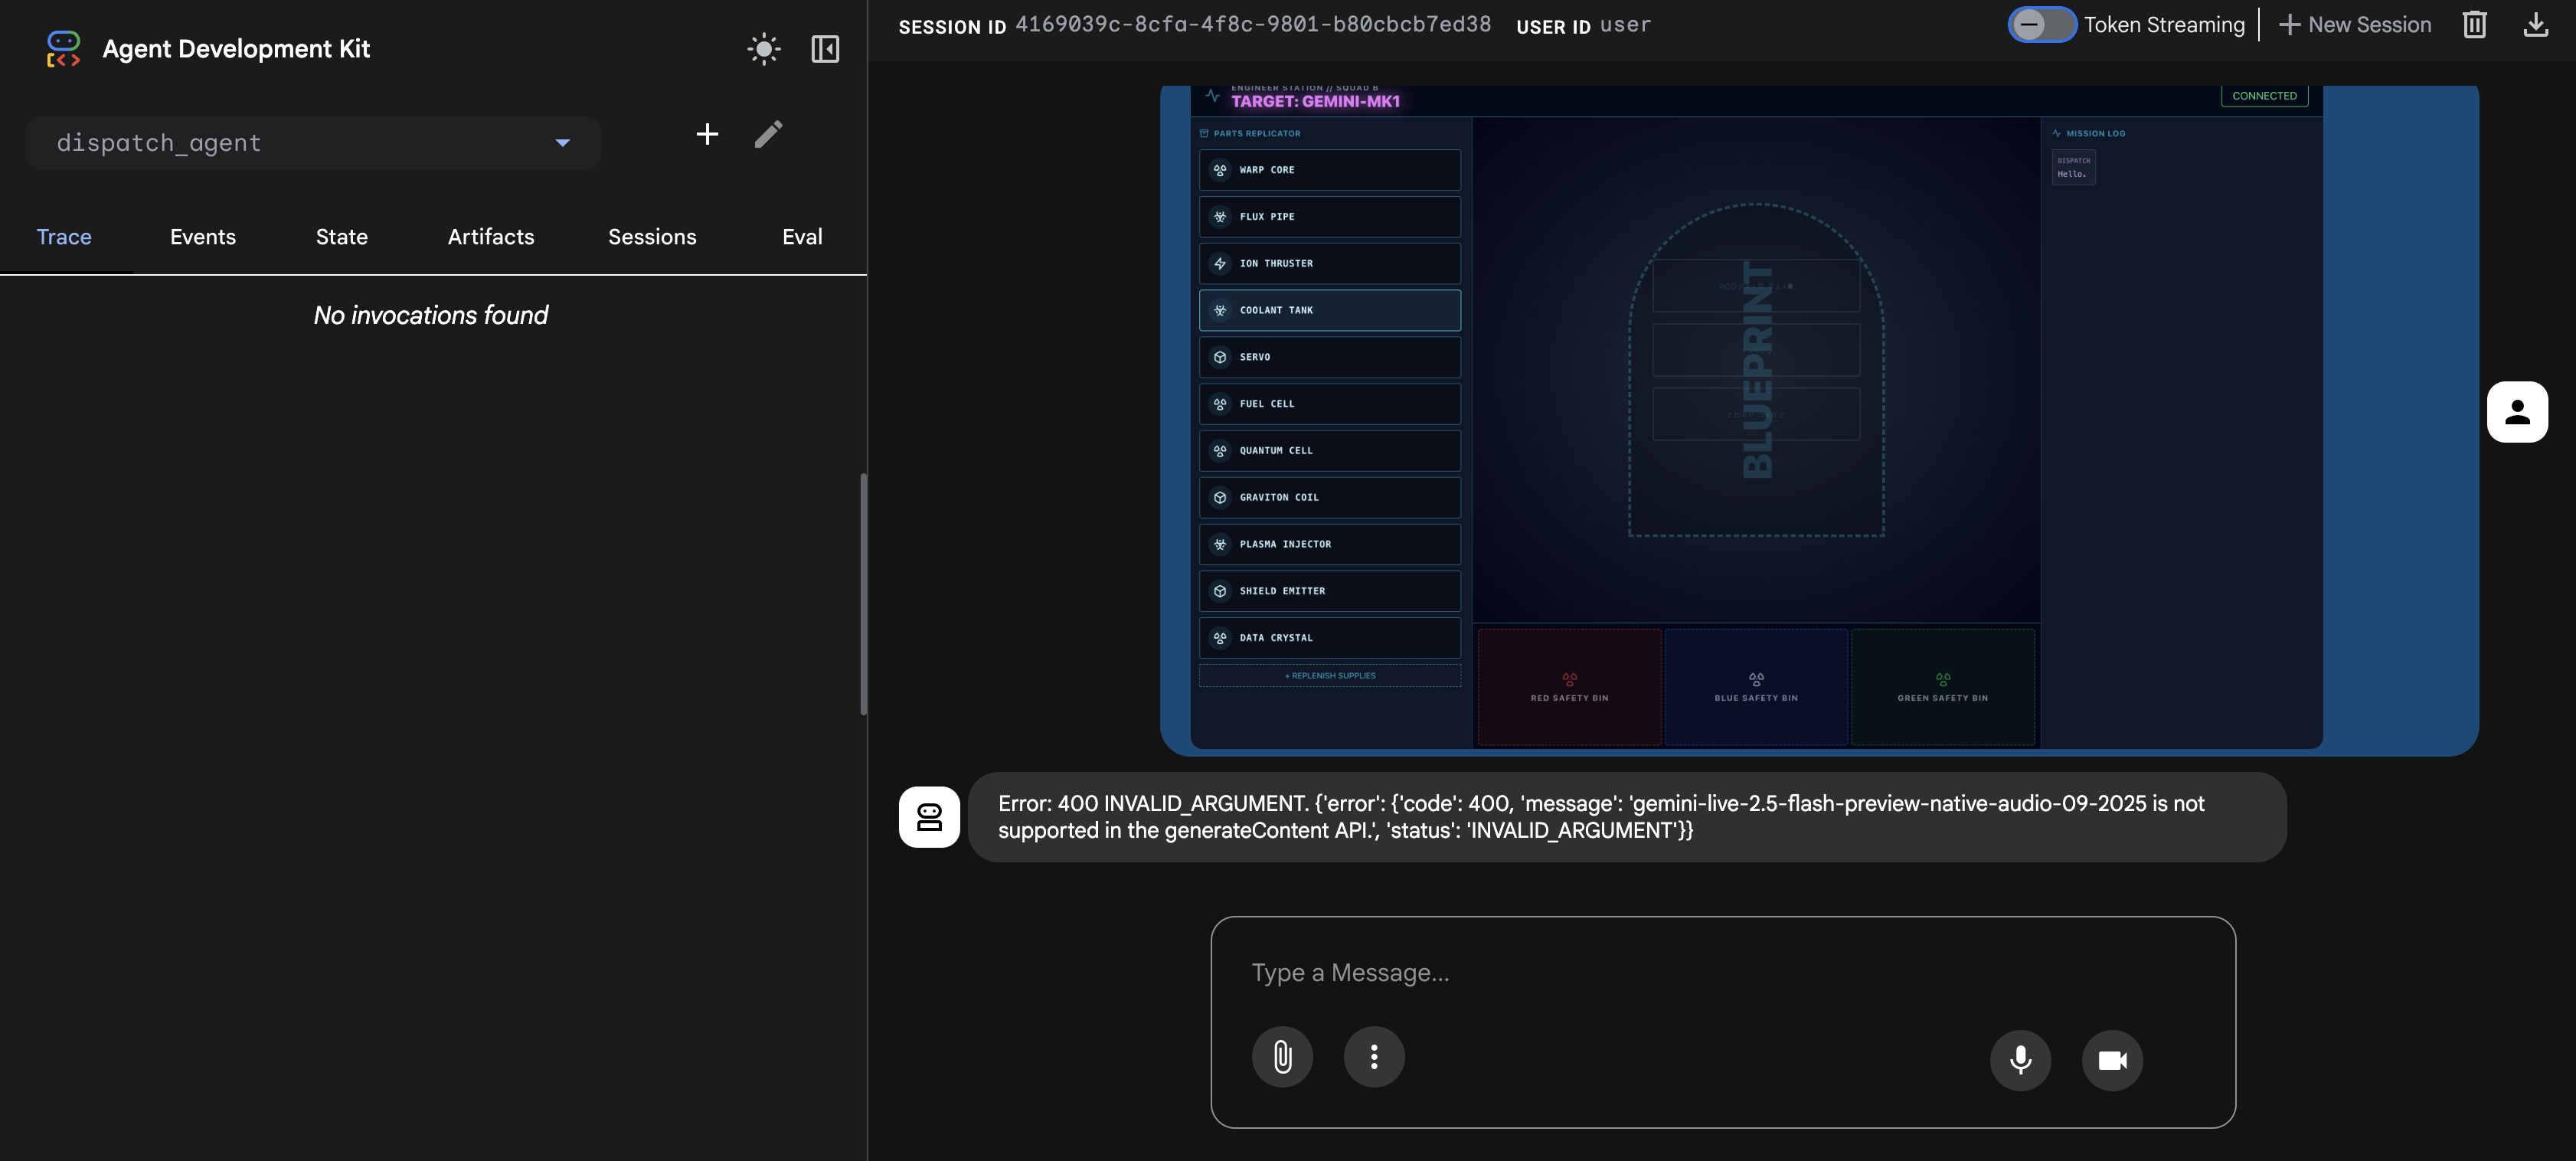
Trigger the Assembly Process
👉 After reloading, the error will be gone, and you will see the blueprint image in the chat history. The agent now has the visual context it needs.
- Click the microphone icon to turn it on. The interface will show "Listening...".
- Say the voice command: "start to assemble".
- The agent will process your request, and the UI will change to "Speaking...". You should hear an audio-only response listing the required parts.
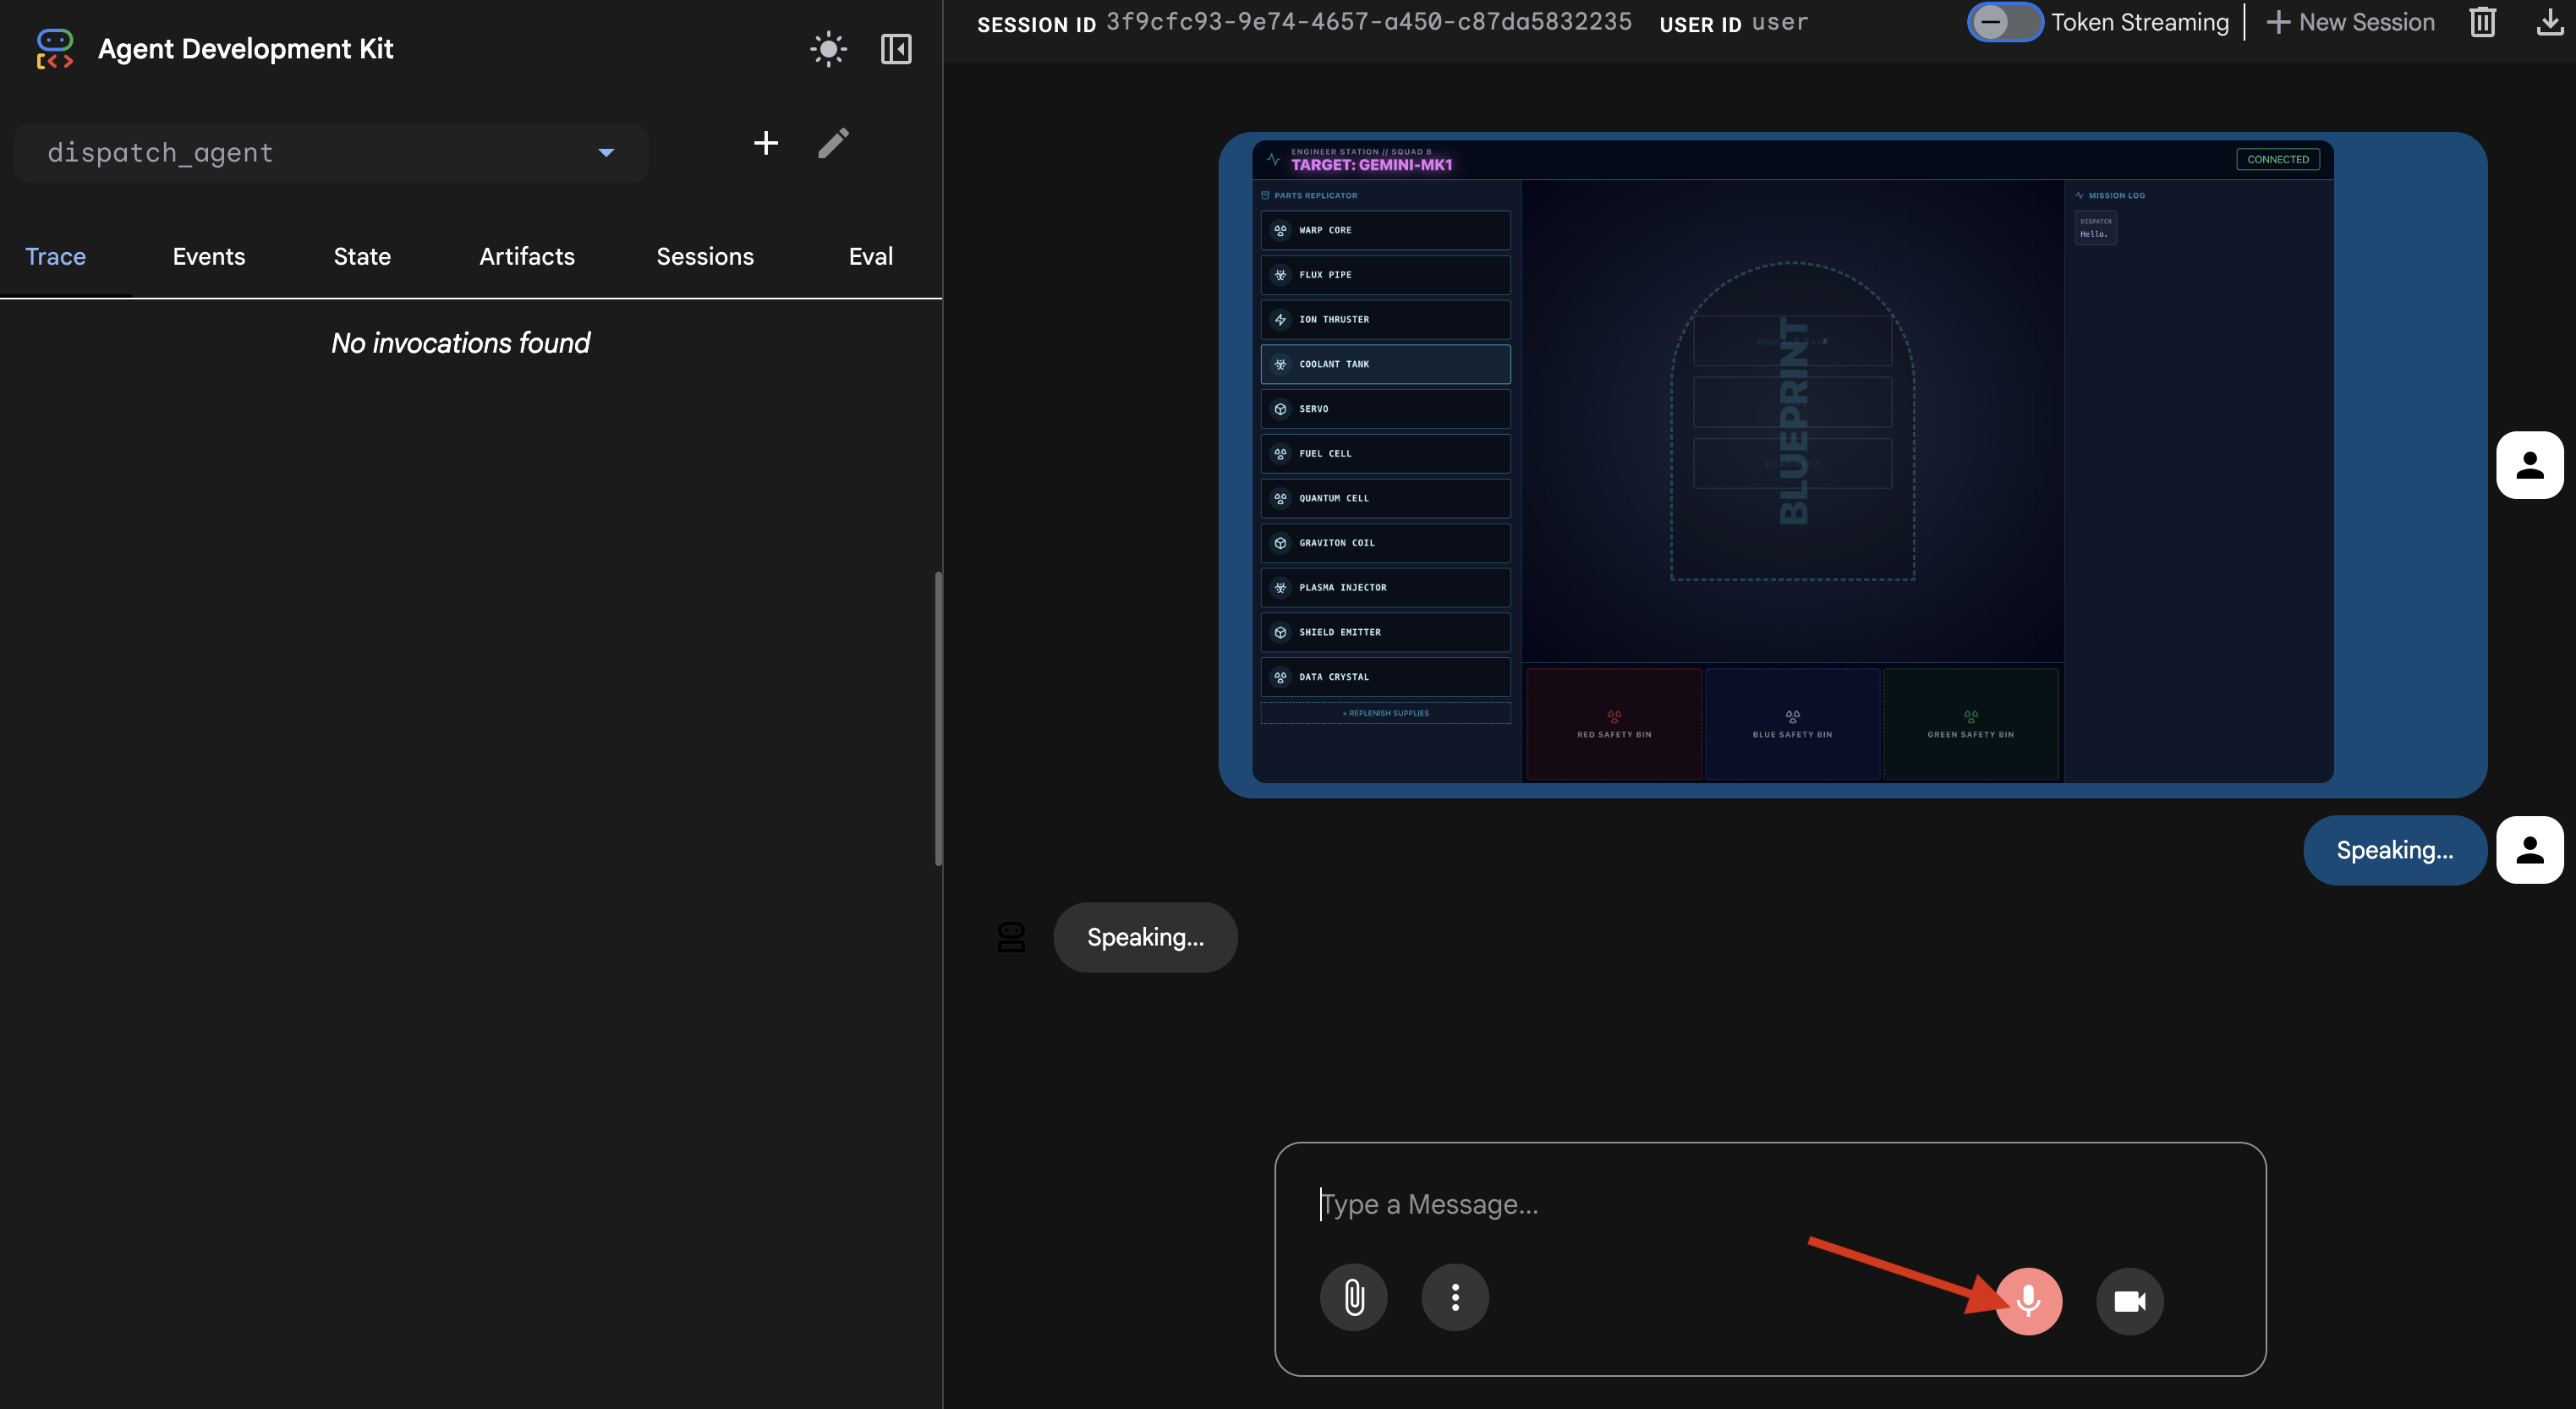
4. Verify the Agent-to-Agent Tool Calls
👉 The initial audio response confirms the system is working, but the real magic is in the multi-agent communication trace.
- Turn off the microphone.
- Refresh the page one more time.
The "Trace" panel on the left will now be populated. You can see the complete, successful execution flow:
- The
dispatch_agentfirst callsmonitor_for_hazard. - Then, it makes multiple
execute_architectcalls to thearchitect_agentto retrieve the schematic data.
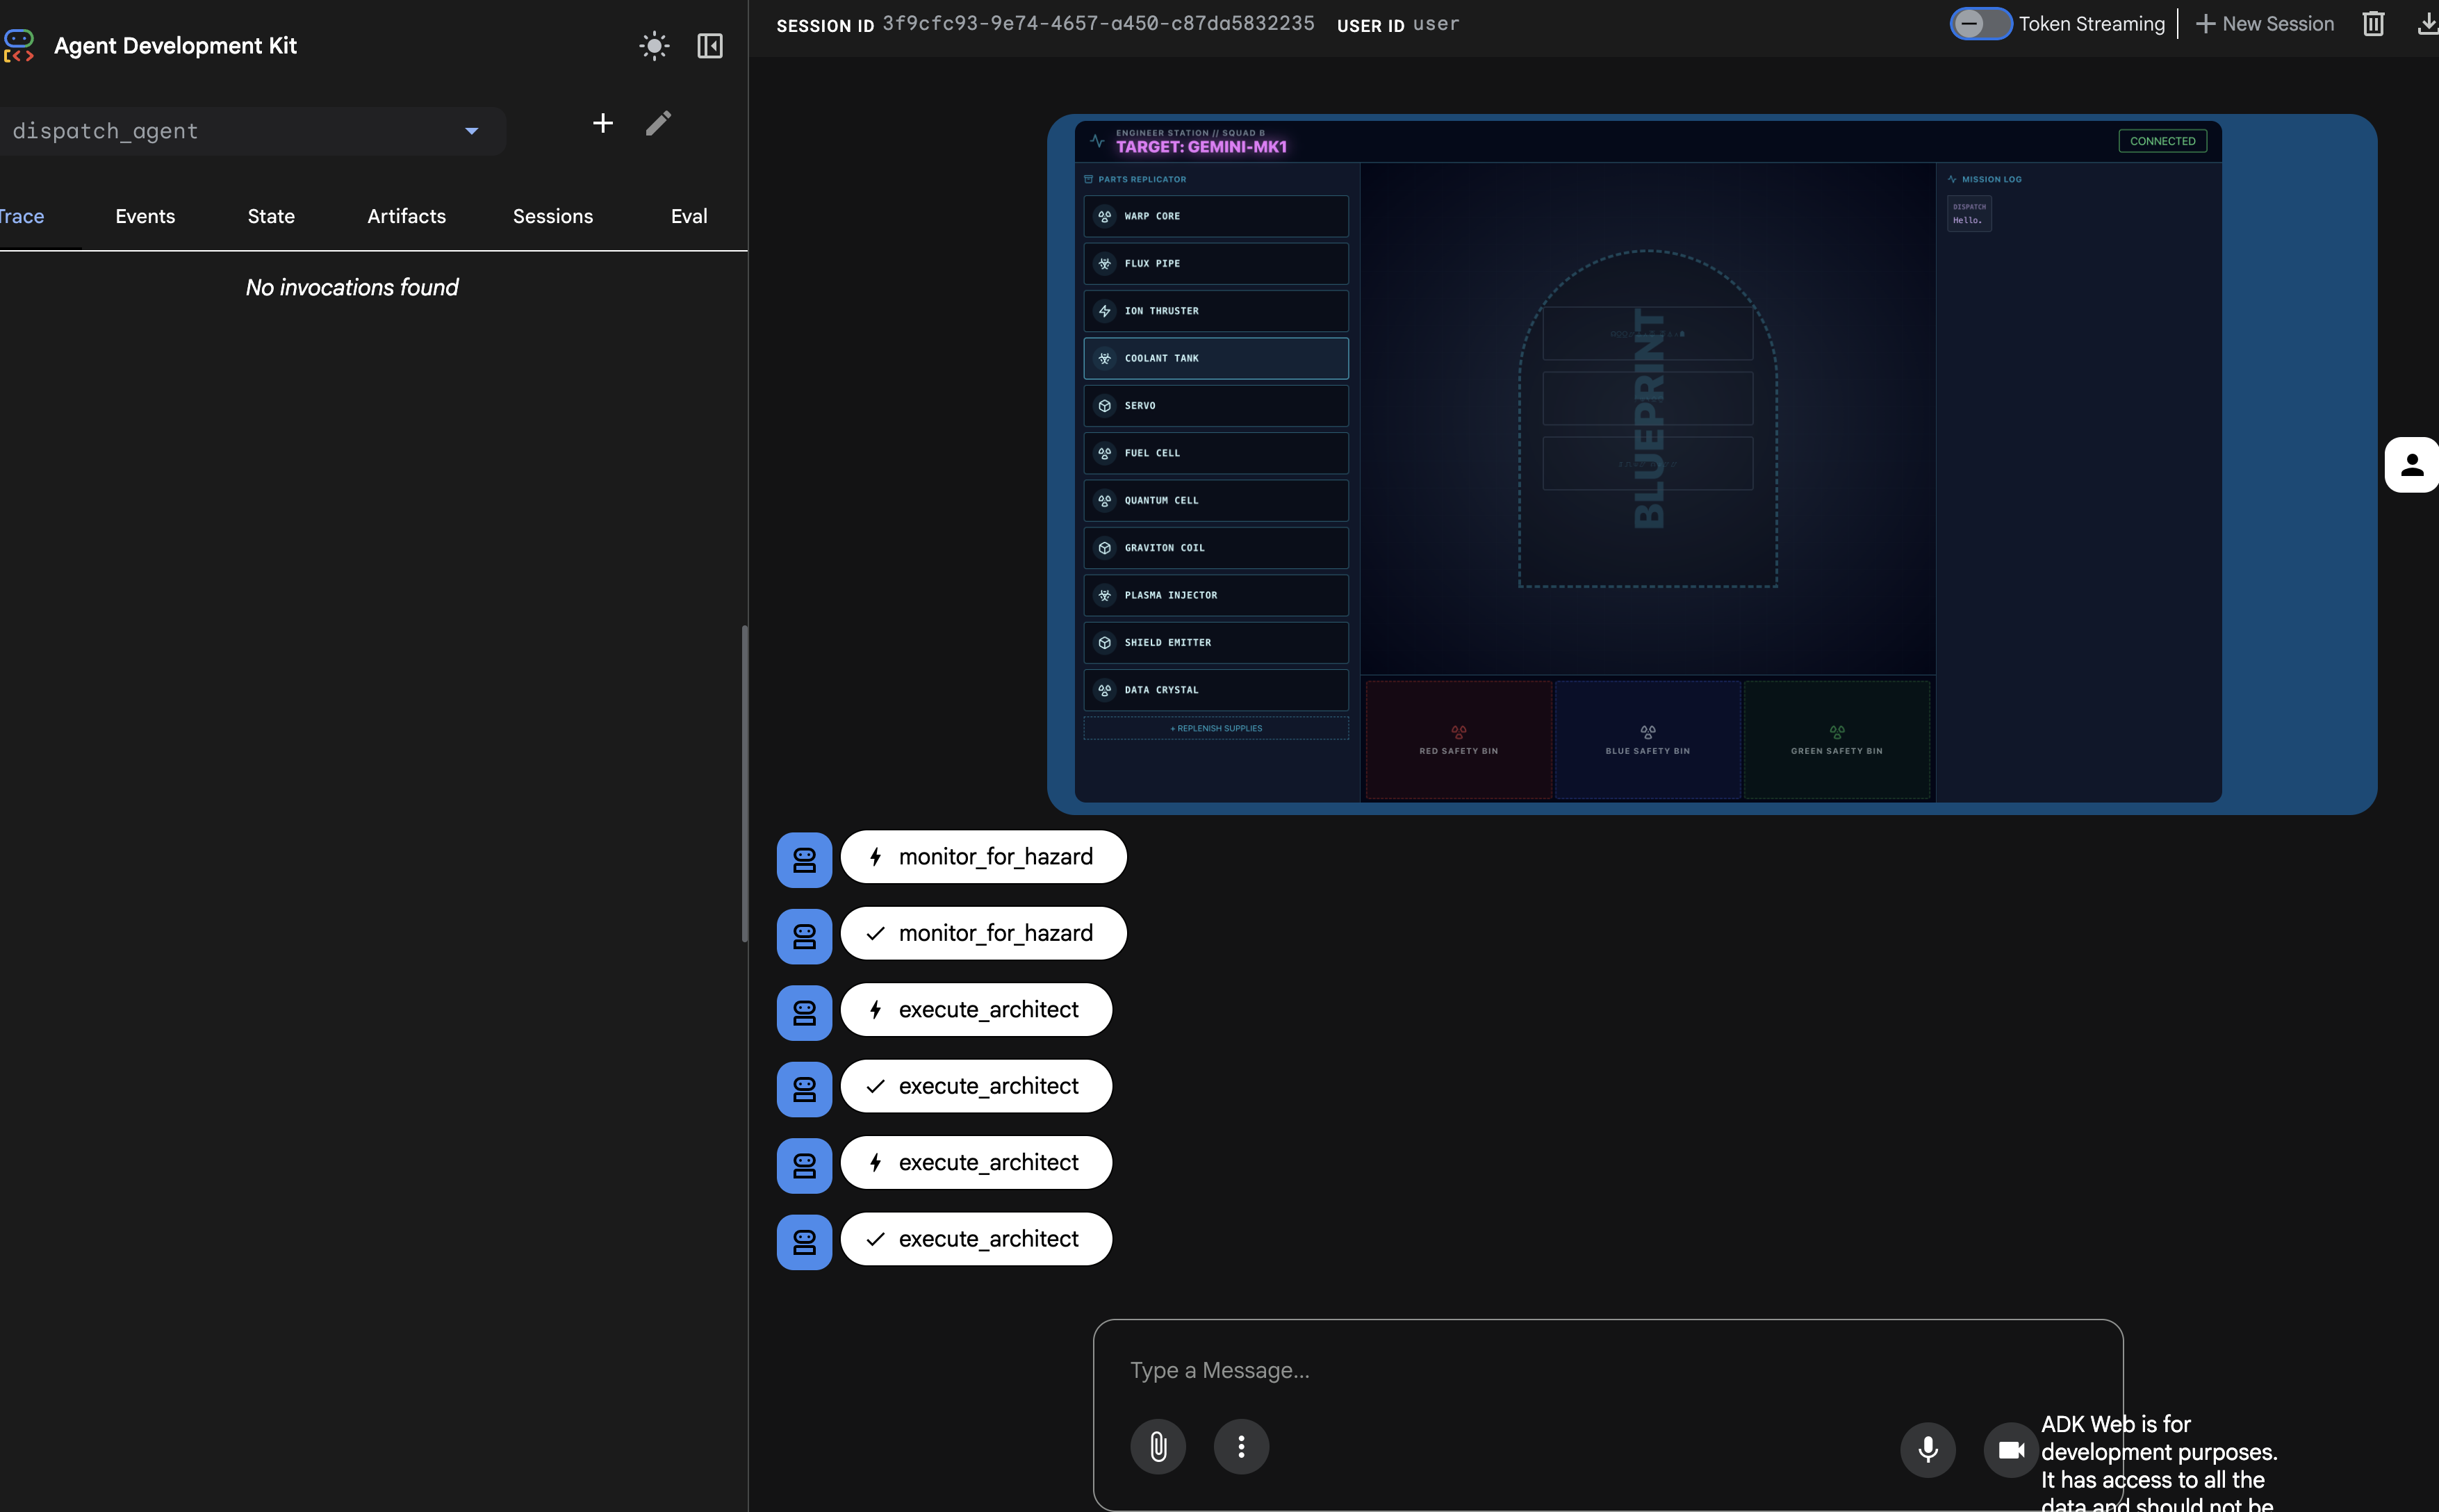
This sequence confirms that the entire multi-agent workflow is functioning correctly: the dispatch_agent received the request, delegated the data retrieval task to the architect_agent via a tool call, and received the data back to fulfill the user's command.
Your bidi-streaming link is now capable of background monitoring and multi-agent collaboration. Next, we will learn how to parse these complex responses on the frontend.
👉💻 Press Ctrl+c in both terminal to exit.
5. A Deep Dive into Live Multimodal Event Streams
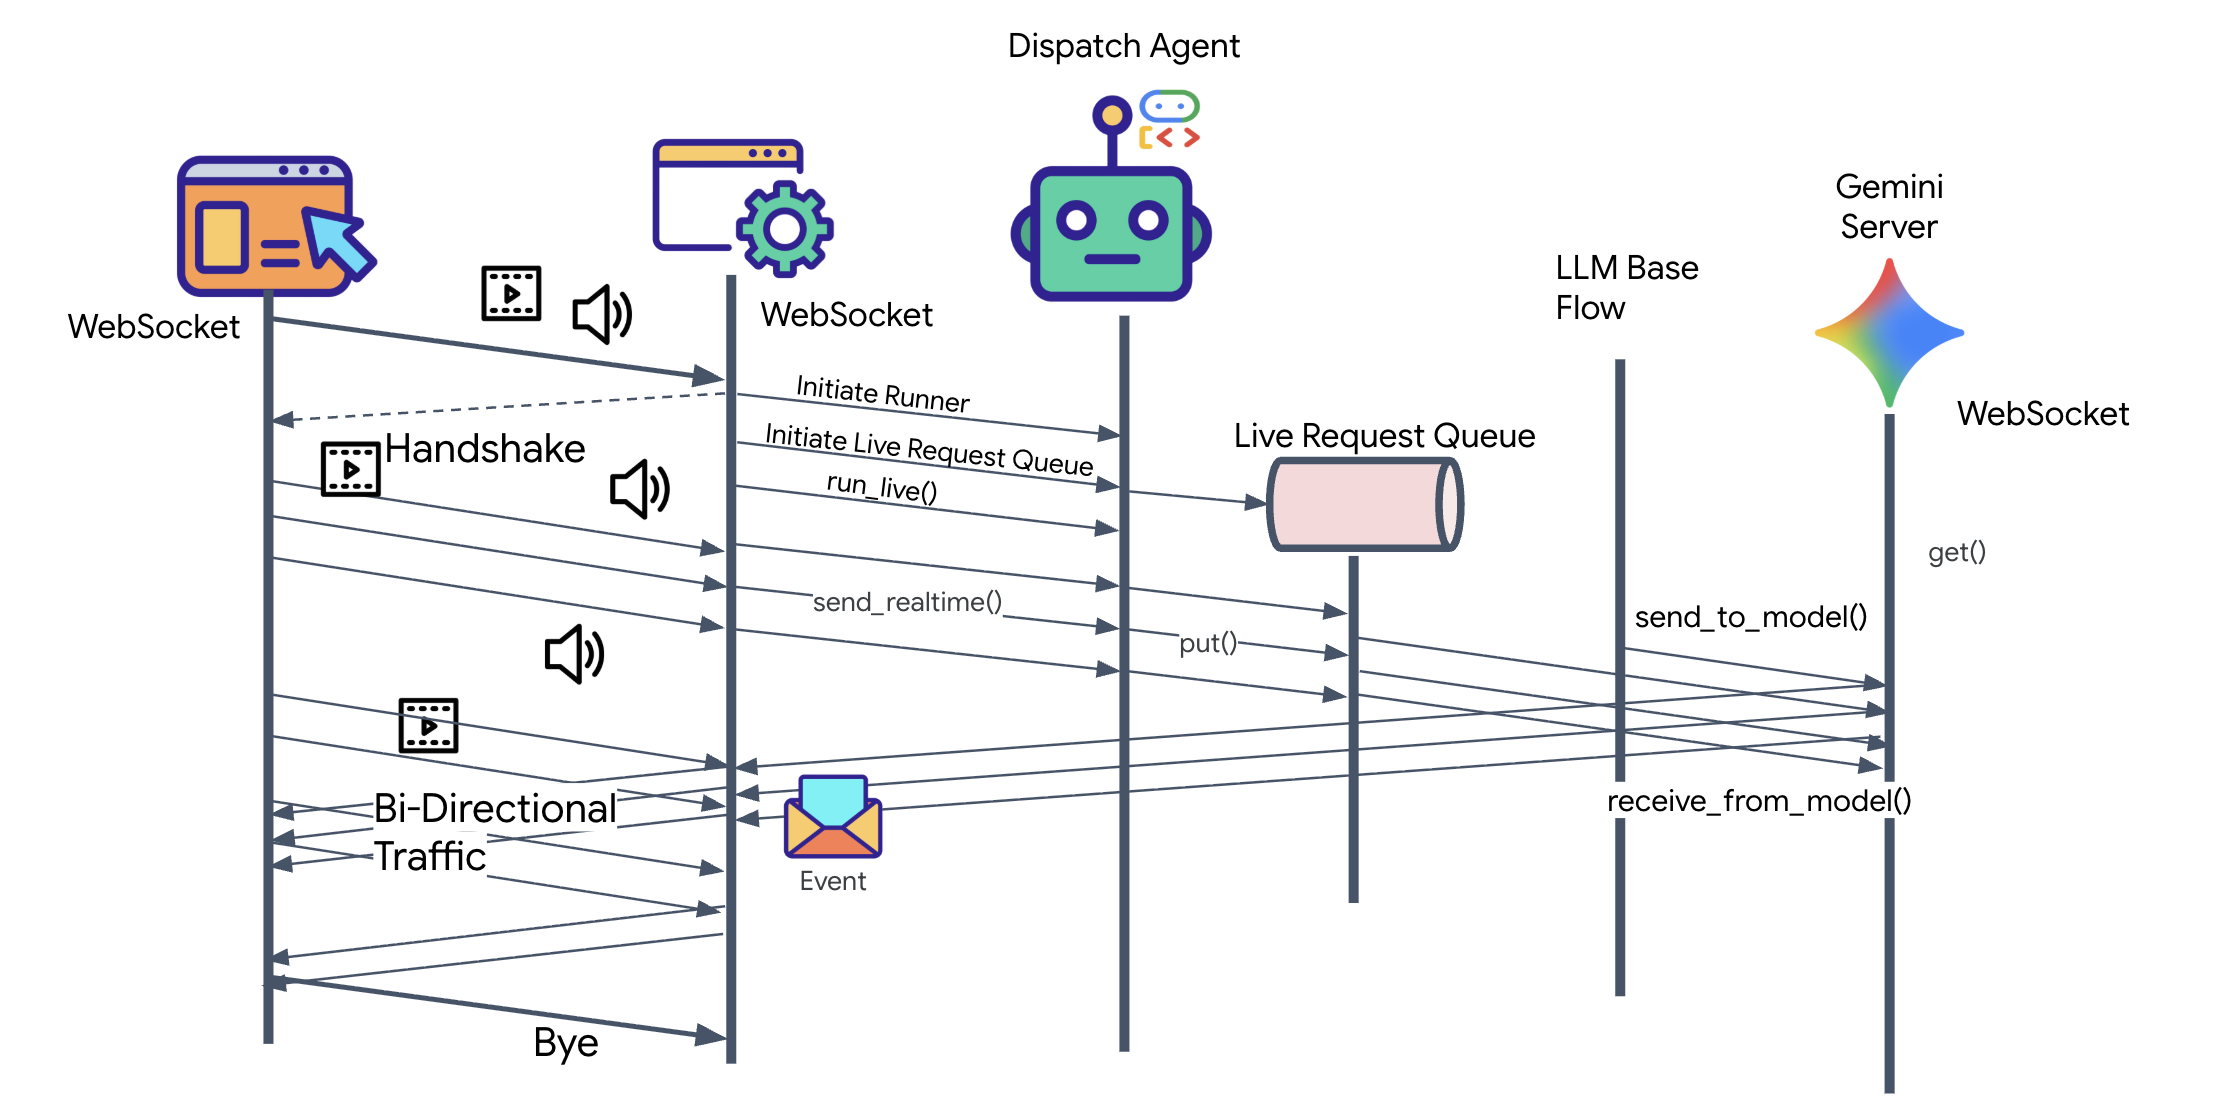
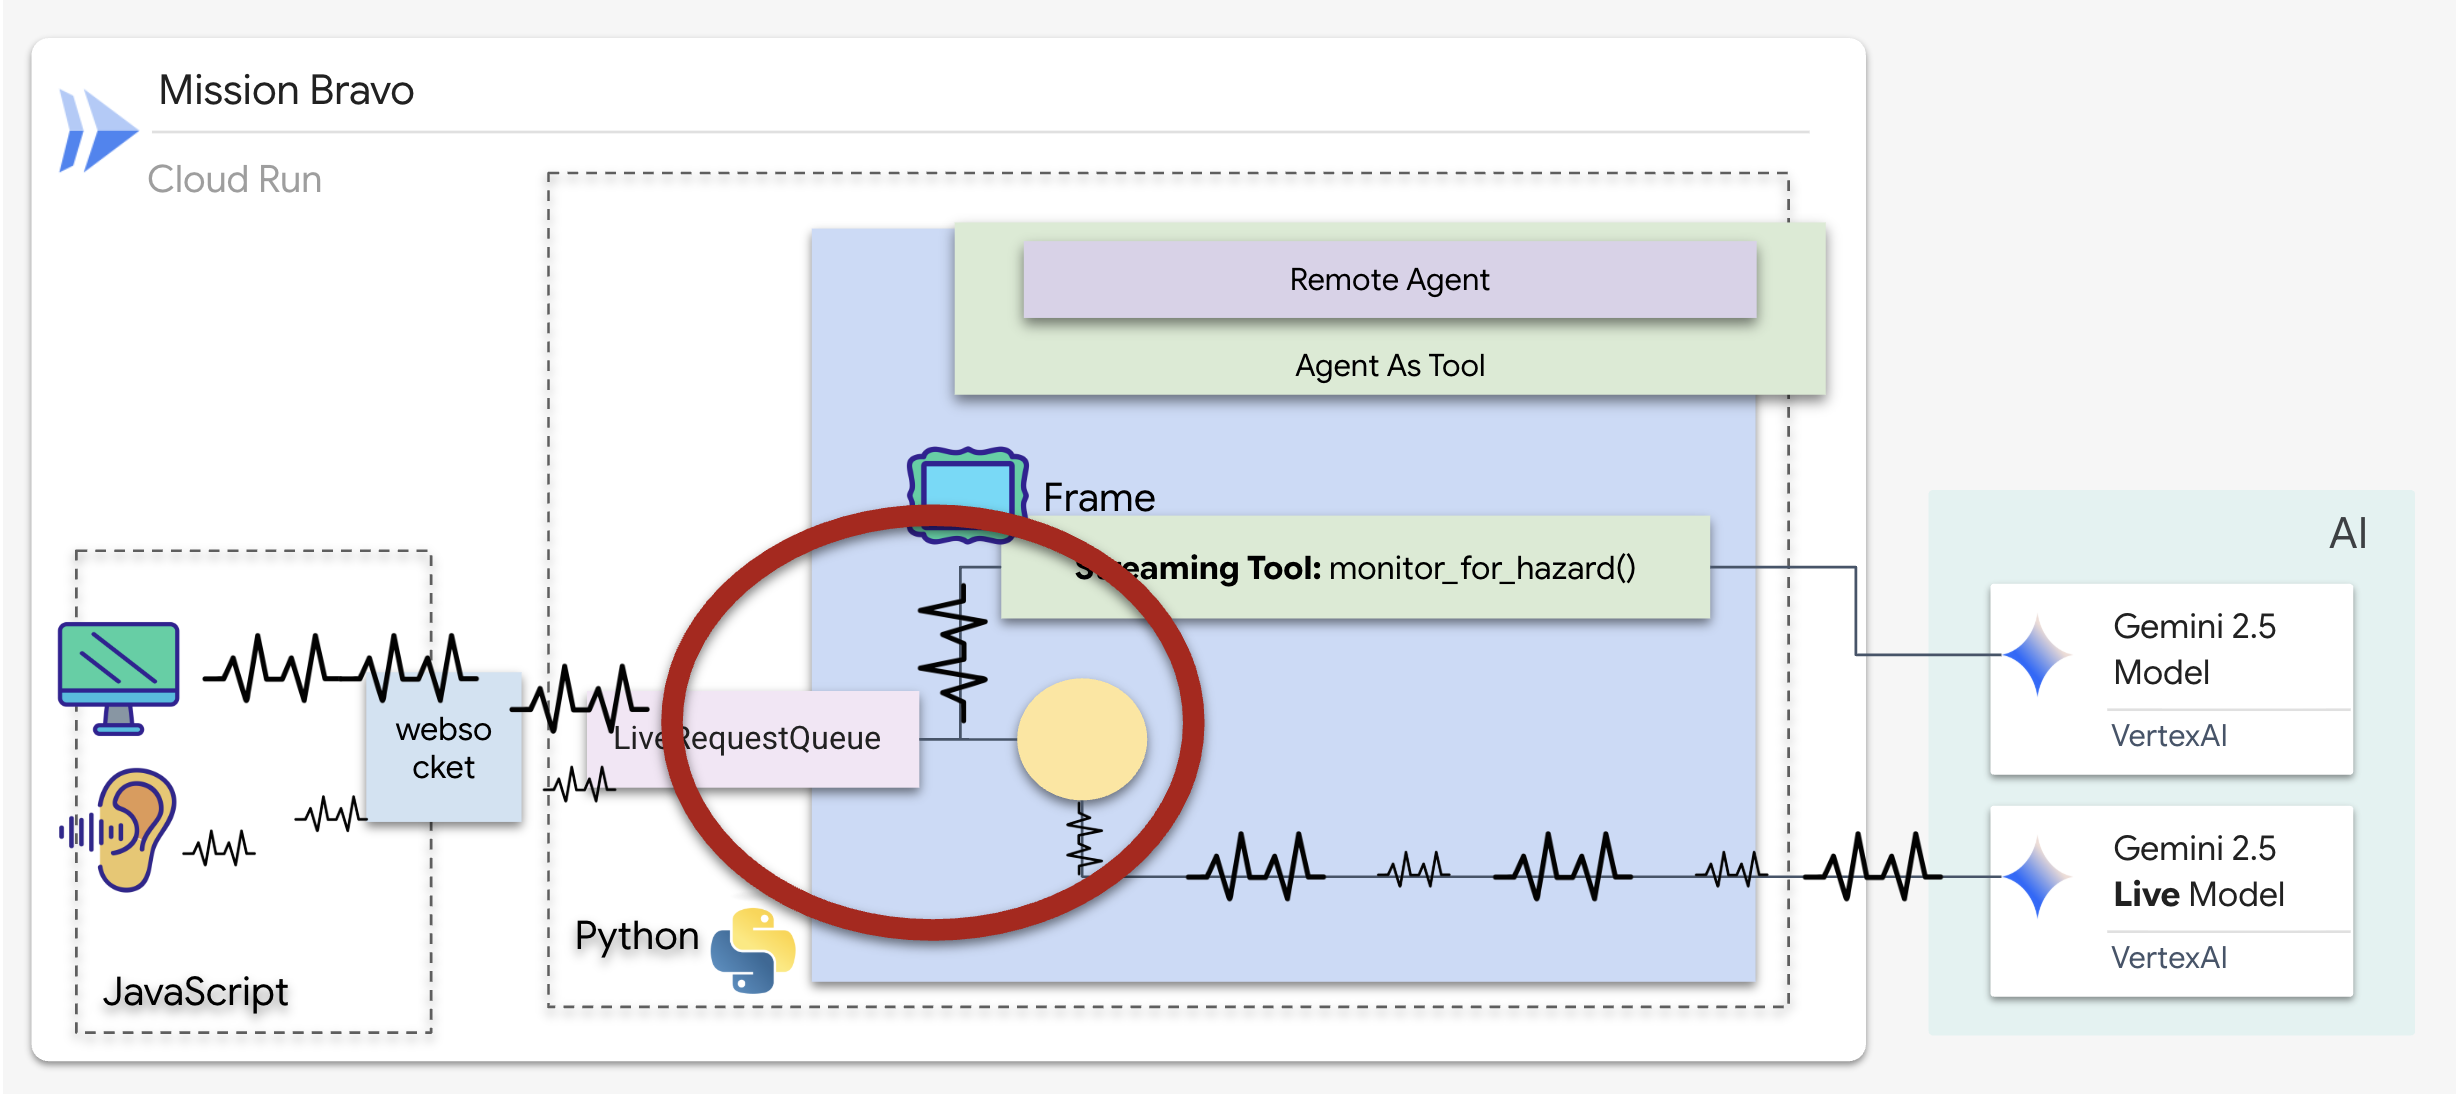
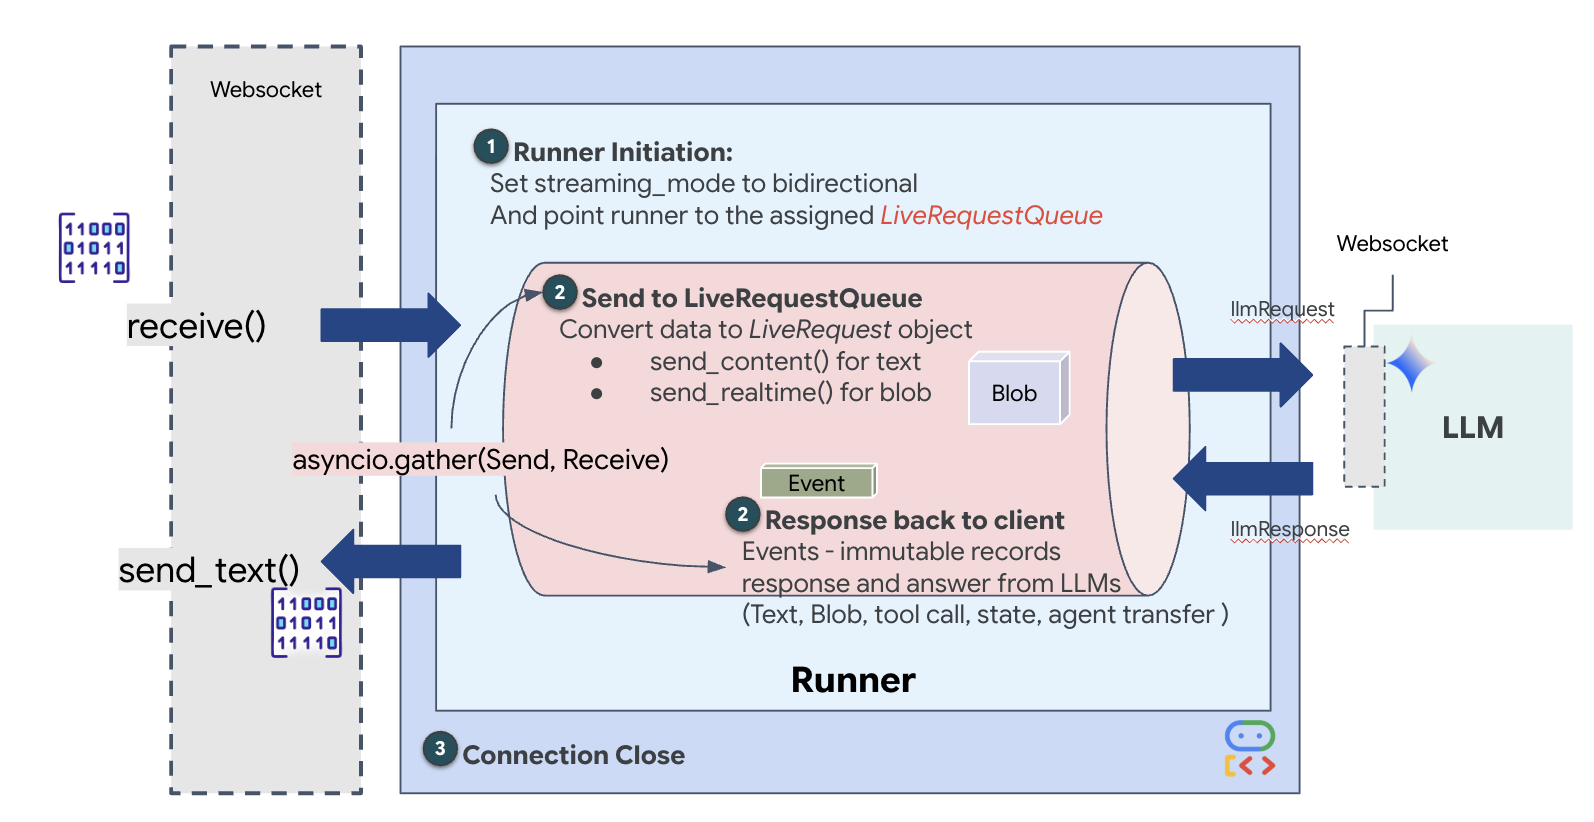
In the previous step, we successfully verified our multi-agent system using the built-in development server, adk web. This utility uses a default ADK runner to automatically manage the session, streams, and agent lifecycle. However, to create a standalone, production-ready application like our FastAPI service (main.py), we need explicit control. We must manually create and manage the ADK Runner to handle live user sessions, as it is the core component that processes the bidirectional streams for audio, video, and text.
The Model-Code-Model Loop
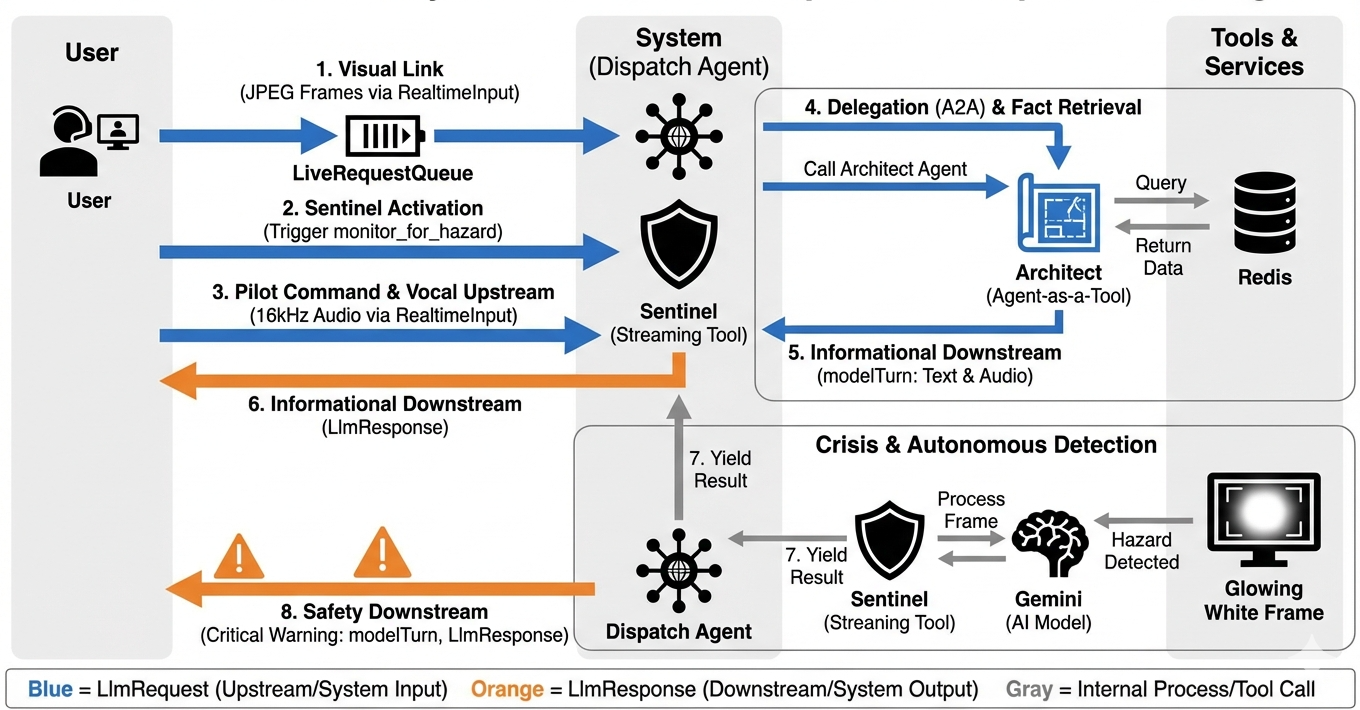
To understand how the system operates in real-time, let's follow the lifecycle of a single mission session. This loop represents the continuous exchange of LlmRequest and LlmResponse objects.
- The Visual Link: You initiate the connection and share your webcam/Screen. High-fidelity JPEG frames begin flowing Upstream via
realtimeInput(using theLiveRequestQueue). - Sentinel Activation: The system sends an initial "Hello" stimulus. Per its instructions, the Dispatch Agent immediately triggers the
monitor_for_hazardStreaming Tool. This starts a background loop that silently watches every incoming frame. - Pilot Command: You speak into the comms: "Start to assemble."
- Vocal Upstream: Your voice is captured as 16kHz audio and sent Upstream alongside the video frames.
- Delegation (A2A): Dispatch "hears" your intent. It realizes it lacks the schematics, so it calls the Architect Agent using the
AgentTool(Agent-as-a-Tool) protocol. - Fact Retrieval: The Architect queries the Redis database and returns the part list to Dispatch. Dispatch remains the "Master of the Session," receiving the data without handing you off.
- Informational Downstream: Dispatch sends a
modelTurn(Downstream) containing both text and native audio: "Architect Confirmed. The required subset is: Warp Core, Flux Pipe, Ion Thruster." - The Crisis: Suddenly, a part on the workbench destabilizes and begins Glowing White.
- Autonomous Detection: The background
monitor_for_hazardloop (the Sentinel) picks up the specific JPEG frame containing the glow. It processes the frame by calling Gemini and identifies the hazard. - Safety Downstream: The streaming tool
yieldsa result. Because this is a Bidi-Streaming agent, Dispatch can interrupt its current state to immediately send a critical safety warning Downstream: "Hazard detected! Neutralizing the Data Crystal now. Move it to the RED bin."
Setting Agent's Runtime configuration
The RunConfig in ADK allows for detailed configuration of an agent's behavior, including how it handles streaming data and interacts with various modalities.
The streaming_mode is set to BIDI for real-time, bidirectional communication, allowing both the user and the agent to speak and listen simultaneously. The response_modalities parameter defines the types of output the agent can produce, such as voice and text. input_audio_transcription configures how the agent processes and transcribes the user's incoming speech. To create a more resilient experience, session_resumption enables the agent to remember the conversation context and resume if the connection is lost. Finally, proactivity allows the agent to initiate actions or speech without a direct user command, such as issuing a spontaneous hazard warning, while enable_affective_dialog allows the agent to generate more natural and empathetic responses. You can learn more about the RunConfig of ADK here.
👉✏️ Locate the #REPLACE_RUN_CONFIG placeholder in your $HOME/way-back-home/level_4/backend/main.py file and replace it with the following dissection logic:
run_config = RunConfig(
            streaming_mode=StreamingMode.BIDI,
            response_modalities=response_modalities,
            input_audio_transcription=types.AudioTranscriptionConfig(),
            output_audio_transcription=types.AudioTranscriptionConfig(),
            session_resumption=types.SessionResumptionConfig(),
            proactivity=(
                types.ProactivityConfig(proactive_audio=True) if proactivity else None
            ),
            enable_affective_dialog=affective_dialog if affective_dialog else None,
        )
Implementing the Request to Agent
Next, we'll implement the core communications uplink that streams real-time, multimodal data from the user's Volatile Workbench to the Dispatch Agent via a WebSocket. It'll the agent continuously "sees" (video frames) and "hears" (voice commands). The logic continuously receives the data stream, distinguishes between incoming binary audio chunks and JSON-wrapped text/image packets, and encapsulating it into Blob (for multimedia) or Content (for text) objects, sending it into the LiveRequestQueue to power the bidirectional agent session.
Locate the #PROCESS_AGENT_REQUEST placeholder in your $HOME/way-back-home/level_4/backend/main.py file and replace it with the following dissection logic:
# Start the loop
        try:
            while True:
                # Receive message from WebSocket (text or binary)
                message = await websocket.receive()

                # Handle binary frames (audio data)
                if "bytes" in message:
                    audio_data = message["bytes"]
                    audio_blob = types.Blob(
                        mime_type="audio/pcm;rate=16000", data=audio_data
                    )
                    live_request_queue.send_realtime(audio_blob)

                # Handle text frames (JSON messages)
                elif "text" in message:
                    text_data = message["text"]
                    json_message = json.loads(text_data)

                    # Extract text from JSON and send to LiveRequestQueue
                    if json_message.get("type") == "text":
                        logger.info(f"User says: {json_message['text']}")
                        content = types.Content(
                            parts=[types.Part(text=json_message["text"])]
                        )
                        live_request_queue.send_content(content)

                    # Handle audio data (microphone)
                    elif json_message.get("type") == "audio":
                        # logger.info("Received AUDIO packet") # Uncomment for verbose debugging
                        import base64
                        # Decode base64 audio data
                        audio_data = base64.b64decode(json_message.get("data", ""))

                        # logger.info(f"Received Audio Chunk: {len(audio_data)} bytes")

                        import math
                        import struct
                        # Calculate RMS to debug silence
                        count = len(audio_data) // 2
                        shorts = struct.unpack(f"<{count}h", audio_data)
                        sum_squares = sum(s*s for s in shorts)
                        rms = math.sqrt(sum_squares / count) if count > 0 else 0

                        # logger.info(f"RMS: {rms:.2f} | Bytes: {len(audio_data)}")

                        # Send to Live API as PCM 16kHz
                        audio_blob = types.Blob(
                            mime_type="audio/pcm;rate=16000",
                            data=audio_data
                        )
                        live_request_queue.send_realtime(audio_blob)

                    # Handle image data
                    elif json_message.get("type") == "image":
                        import base64

                        # Decode base64 image data
                        image_data = base64.b64decode(json_message["data"])
                        # logger.info(f"Received Image Frame: {len(image_data)} bytes")

                        mime_type = json_message.get("mimeType", "image/jpeg")

                        # Send image as blob
                        image_blob = types.Blob(mime_type=mime_type, data=image_data)
                        live_request_queue.send_realtime(image_blob)

                        frame_count += 1

        finally:
             pass
The multimodal data is now being sent to the agent.
Implementing the Response: The Downstream Event Data Structure
When you are running a bidirectional (live) agent with ADK, the data coming back from the agent is packaged into a specific type of Event that inherits from the core GenAI SDK structures. The Event object you receive in your async for event in runner.run_live(...) loop is a single object containing several optional fields, each for a different type of information:

How the content is structured:
- When the Agent Speaks (via
.server_content): The field is not just plain text. It contains a list ofParts. EachPartis a container for one type of data—either a text string (like"The part is stable.") or a raw audio blob (the voice). - When the Agent Acts (via
.tool_call): The field contains a list ofFunctionCallobjects. EachFunctionCallis a simple, structured object that specifies the tool's name and the input arguments in a clean format that your backend code can easily read and execute.
👀 If you were to look at a single Event yielded by the run_live loop, the JSON (produced by event.model_dump(by_alias=True)) would look like this, strictly following the GenAI SDK shapes:
{
  "serverContent": {  // <-- LiveServerMessageServerContent
    "modelTurn": {    // <-- ModelTurn
      "parts": [      // <-- list[Part]
        {
          "text": "Architect Confirmed."
        },
        {
          "inlineData": { // <-- Blob (Audio Bytes)
            "mimeType": "audio/pcm;rate=24000",
            "data": "BASE64_AUDIO_DATA..."
          }
        }
      ]
    }
  },
  "toolCall": {       // <-- LiveServerMessageToolCall
    "functionCalls": [ // <-- list[FunctionCall]
      {
        "name": "neutralize_hazard",
        "args": { "color": "RED" }
      }
    ]
  }
}
👉✏️ We will now update the downstream_task in main.py to forward the complete event data. This logic ensures that every "thought" the AI has is logged in the ship's diagnostic terminal and sent as a single JSON object to the frontend UI.
Locate the #PROCESS_AGENT_RESPONSE placeholder in your $HOME/way-back-home/level_4/backend/main.py file and replace it with the following dissection logic:
            # Suppress raw event logging
            event_json = event.model_dump_json(exclude_none=True, by_alias=True)
            # logger.info(f"raw_event: {event_json[:200]}...")
            await websocket.send_text(event_json)
Mission Execution
With the backend vault connected and both agents configured, all systems are now mission-ready. The following steps will launch the full application, allowing you to interact with the two-agent system you just built.
Objective: Assemble the randomly assigned warp drive that appears on your workbench. Protocol: You must follow the vocal guidance of the Dispatch Agent, especially the hazard warnings for specific components.
Activate the Specialist (The Architect)
👉💻 In your first terminal window, launch the Architect agent. This backend service will connect to the Redis vault and wait for schematic requests from the Dispatcher.
# Ensure you are in the backend directory
cd $HOME/way-back-home/level_4/
. scripts/check_redis.sh
cd $HOME/way-back-home/level_4/backend
# Start the A2A Server on Port 8081
uv run architect_agent/server.py
(Leave this terminal running. It is now your active "database agent.")
Launch the Cockpit (The Dispatcher)
👉💻 In a new terminal window (Terminal B), we will build the frontend UI and start the main Dispatch agent, which serves the user interface and handles all live communication.
# 1. Build the Frontend Assets
cd $HOME/way-back-home/level_4/frontend
npm install
npm run build

# 2. Launch the Main Application Server
cd $HOME/way-back-home/level_4/backend
cp architect_agent/.env .env
uv run main.py
(This starts the primary server on Port 8080.)
Run the Test Scenario
The system is now live. Your goal is to follow the agent's instructions to complete the assembly.
- 👉 Access the Workbench:
- Click the Web preview icon in the Cloud Shell toolbar.
- Select Change port, set it to 8080, and click Change and Preview.
- 👉 Start the Mission:
- When the interface loads, make sure you allow it to access your screen and microphone.
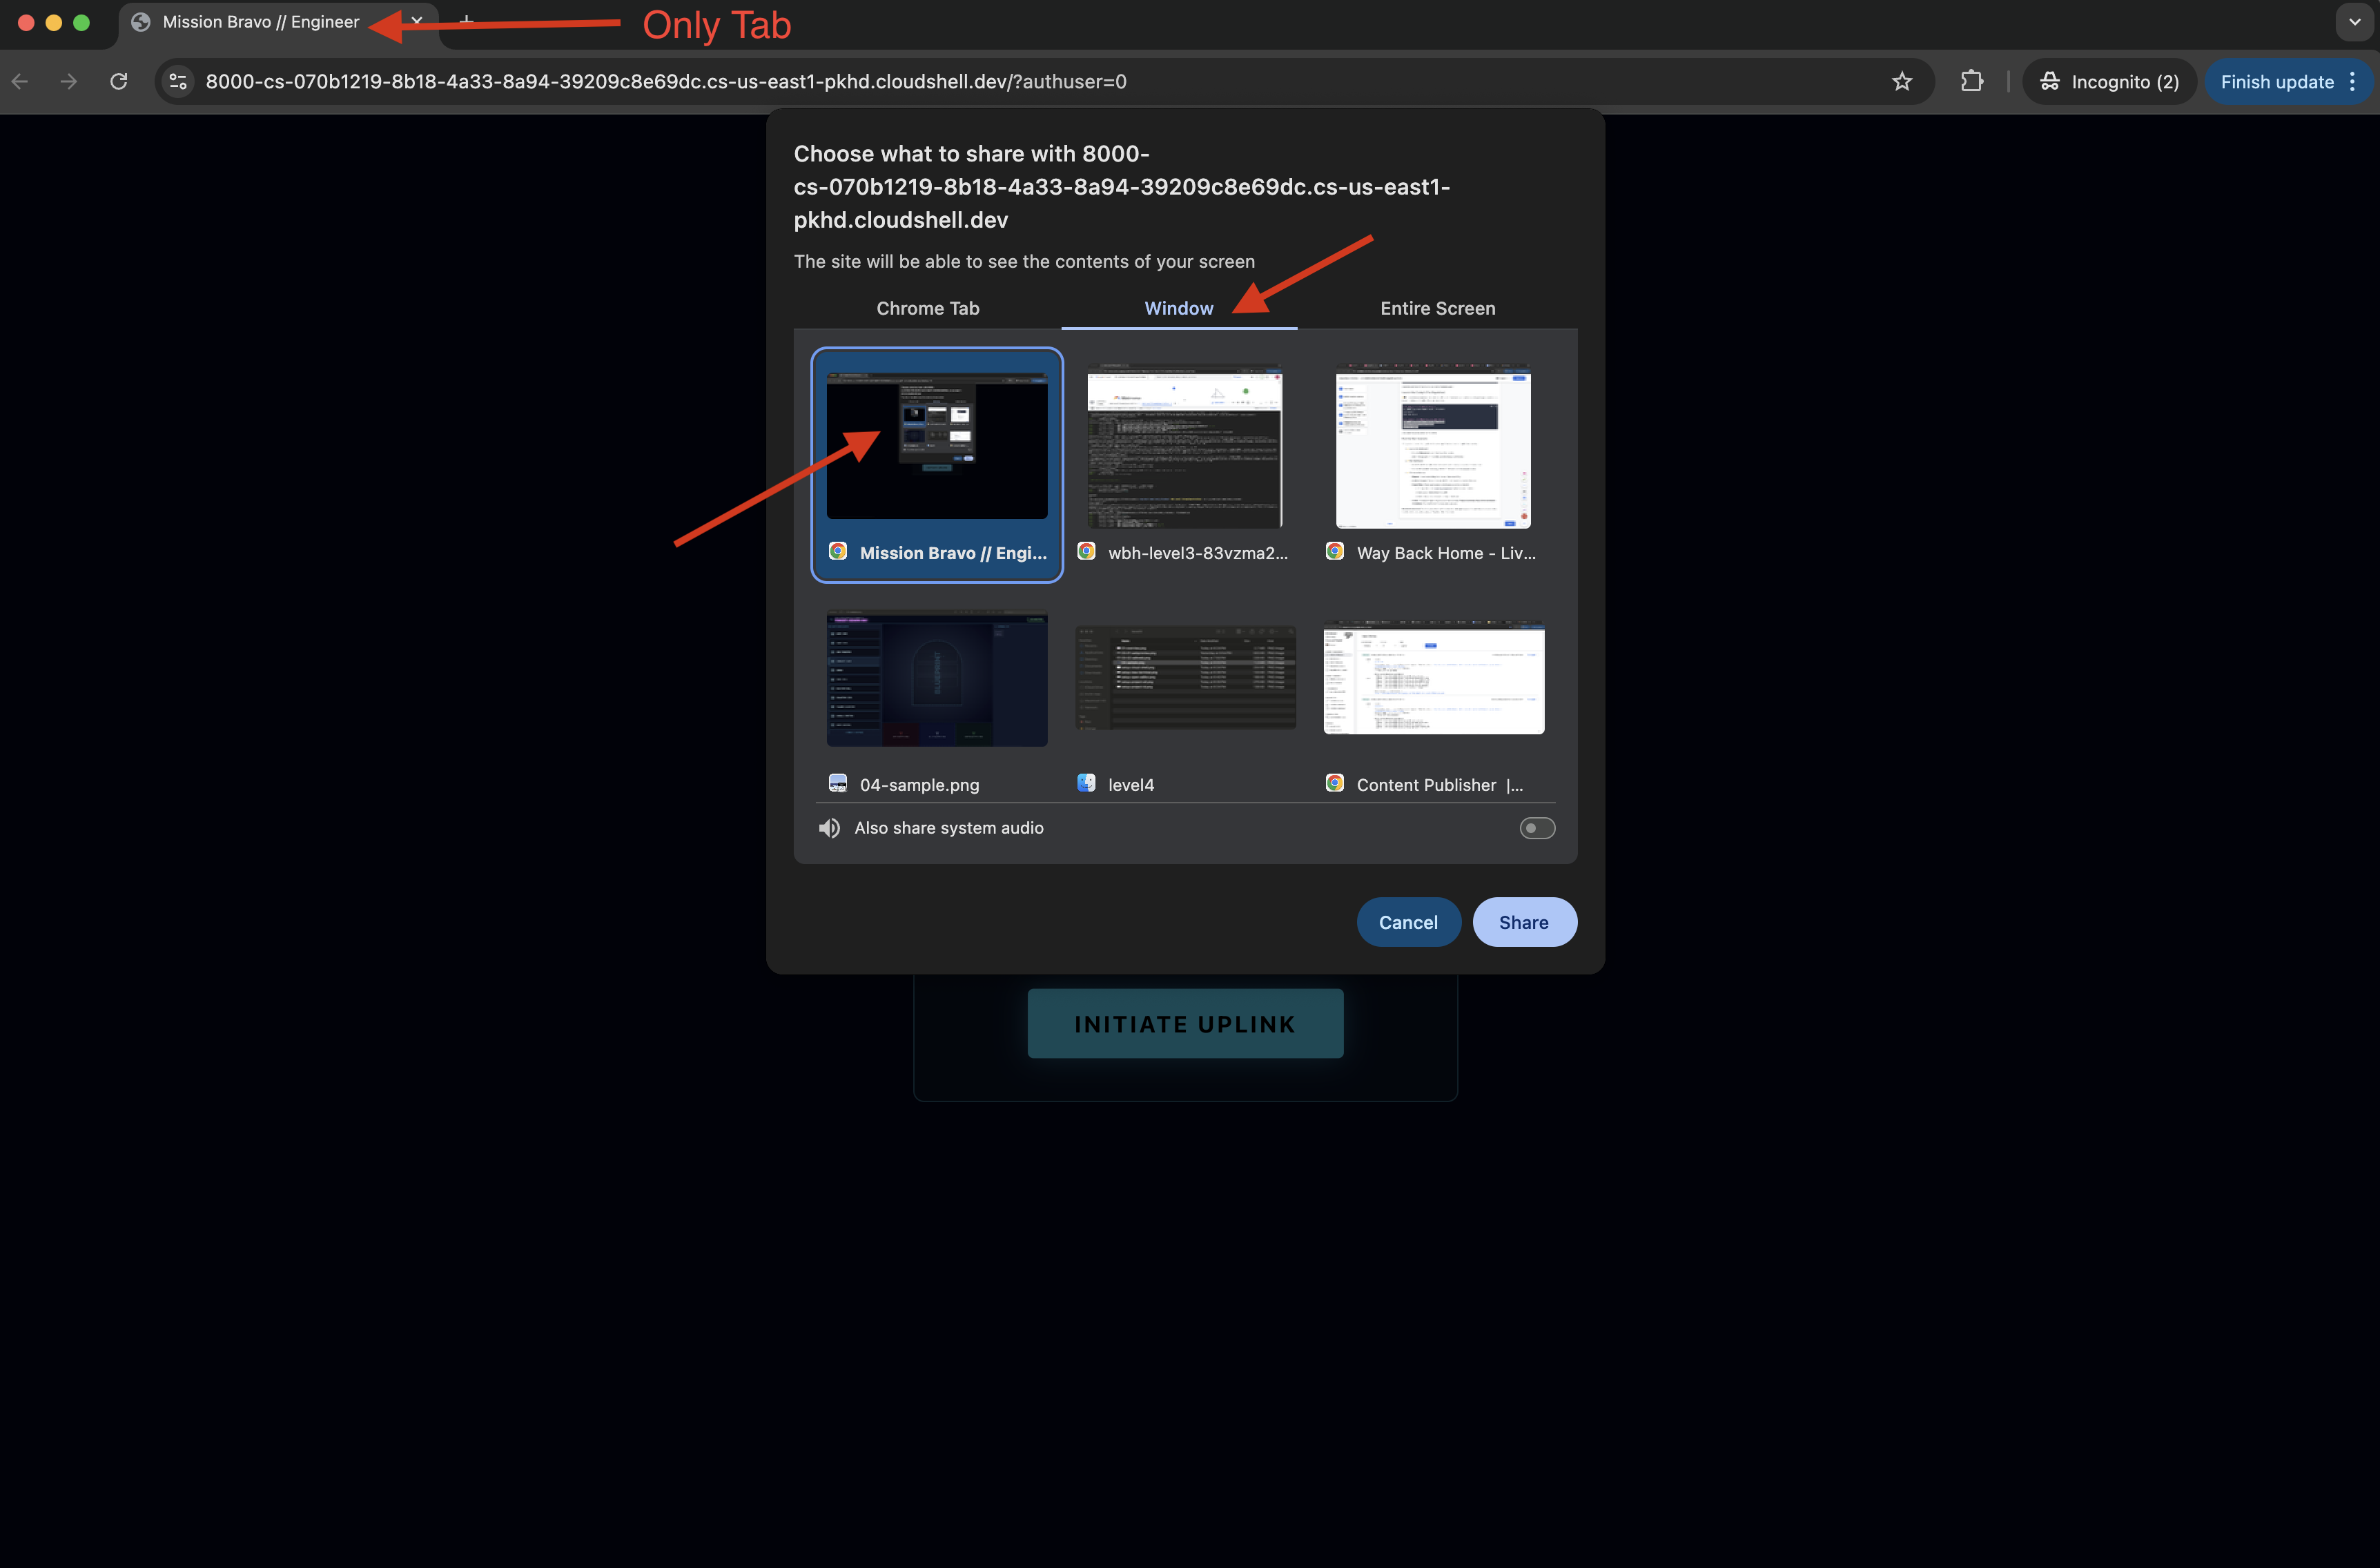
- You will be ask to select a tab or a window to share, if you are sharing the window, to avoid problem, make sure this is the ONLY tab in the window.
- A drive with a random name (e.g., "NOVA-V", "OMEGA-9") will be assigned to you.
- When the interface loads, make sure you allow it to access your screen and microphone.
- 👉 The Assembly Loop:
- Request: To start assembling the drive say: "Start assembling."
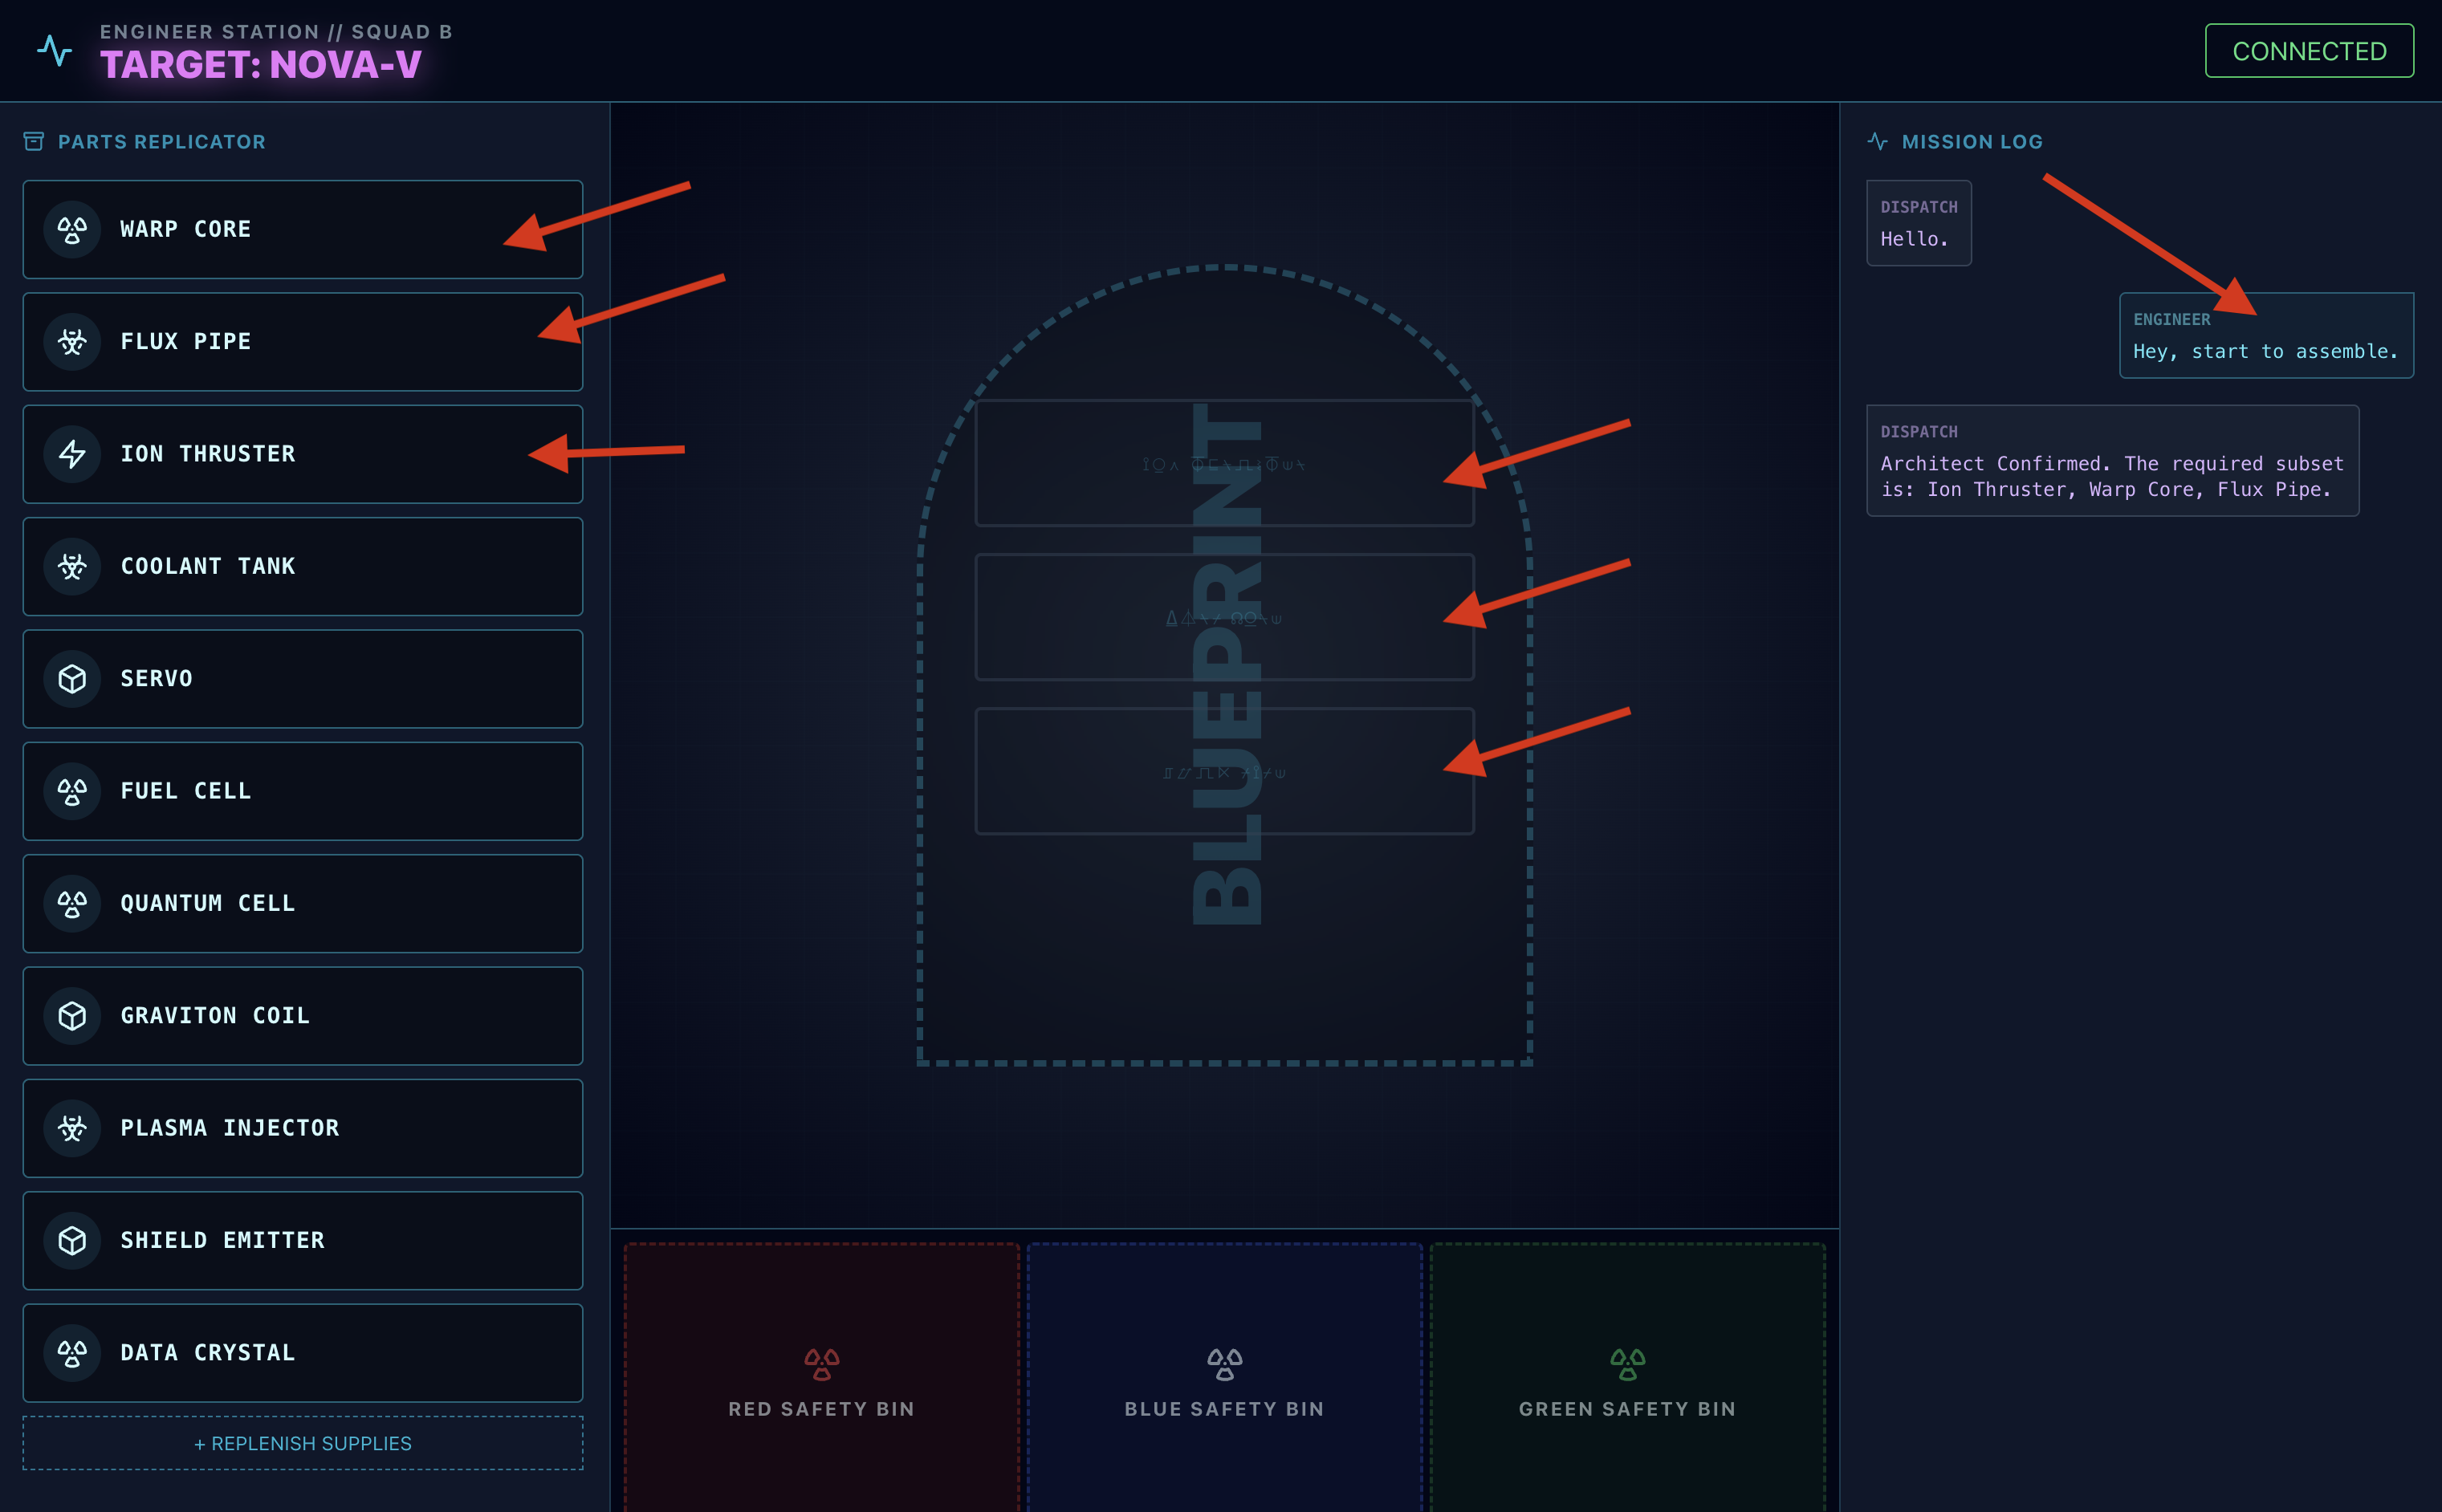
- Architect Respond: The agent will provide the correct parts to assemble the drive.
- Hazard Check: When a part appears to be hazardous on the workbench:
- The Dispatch agent's
monitor_for_hazardtool will visually identify it. - It will yield a "VISUAL HAZARD ALERT". (This will take about 30 sec)
- It will check which bin to use to disengage the hazard.
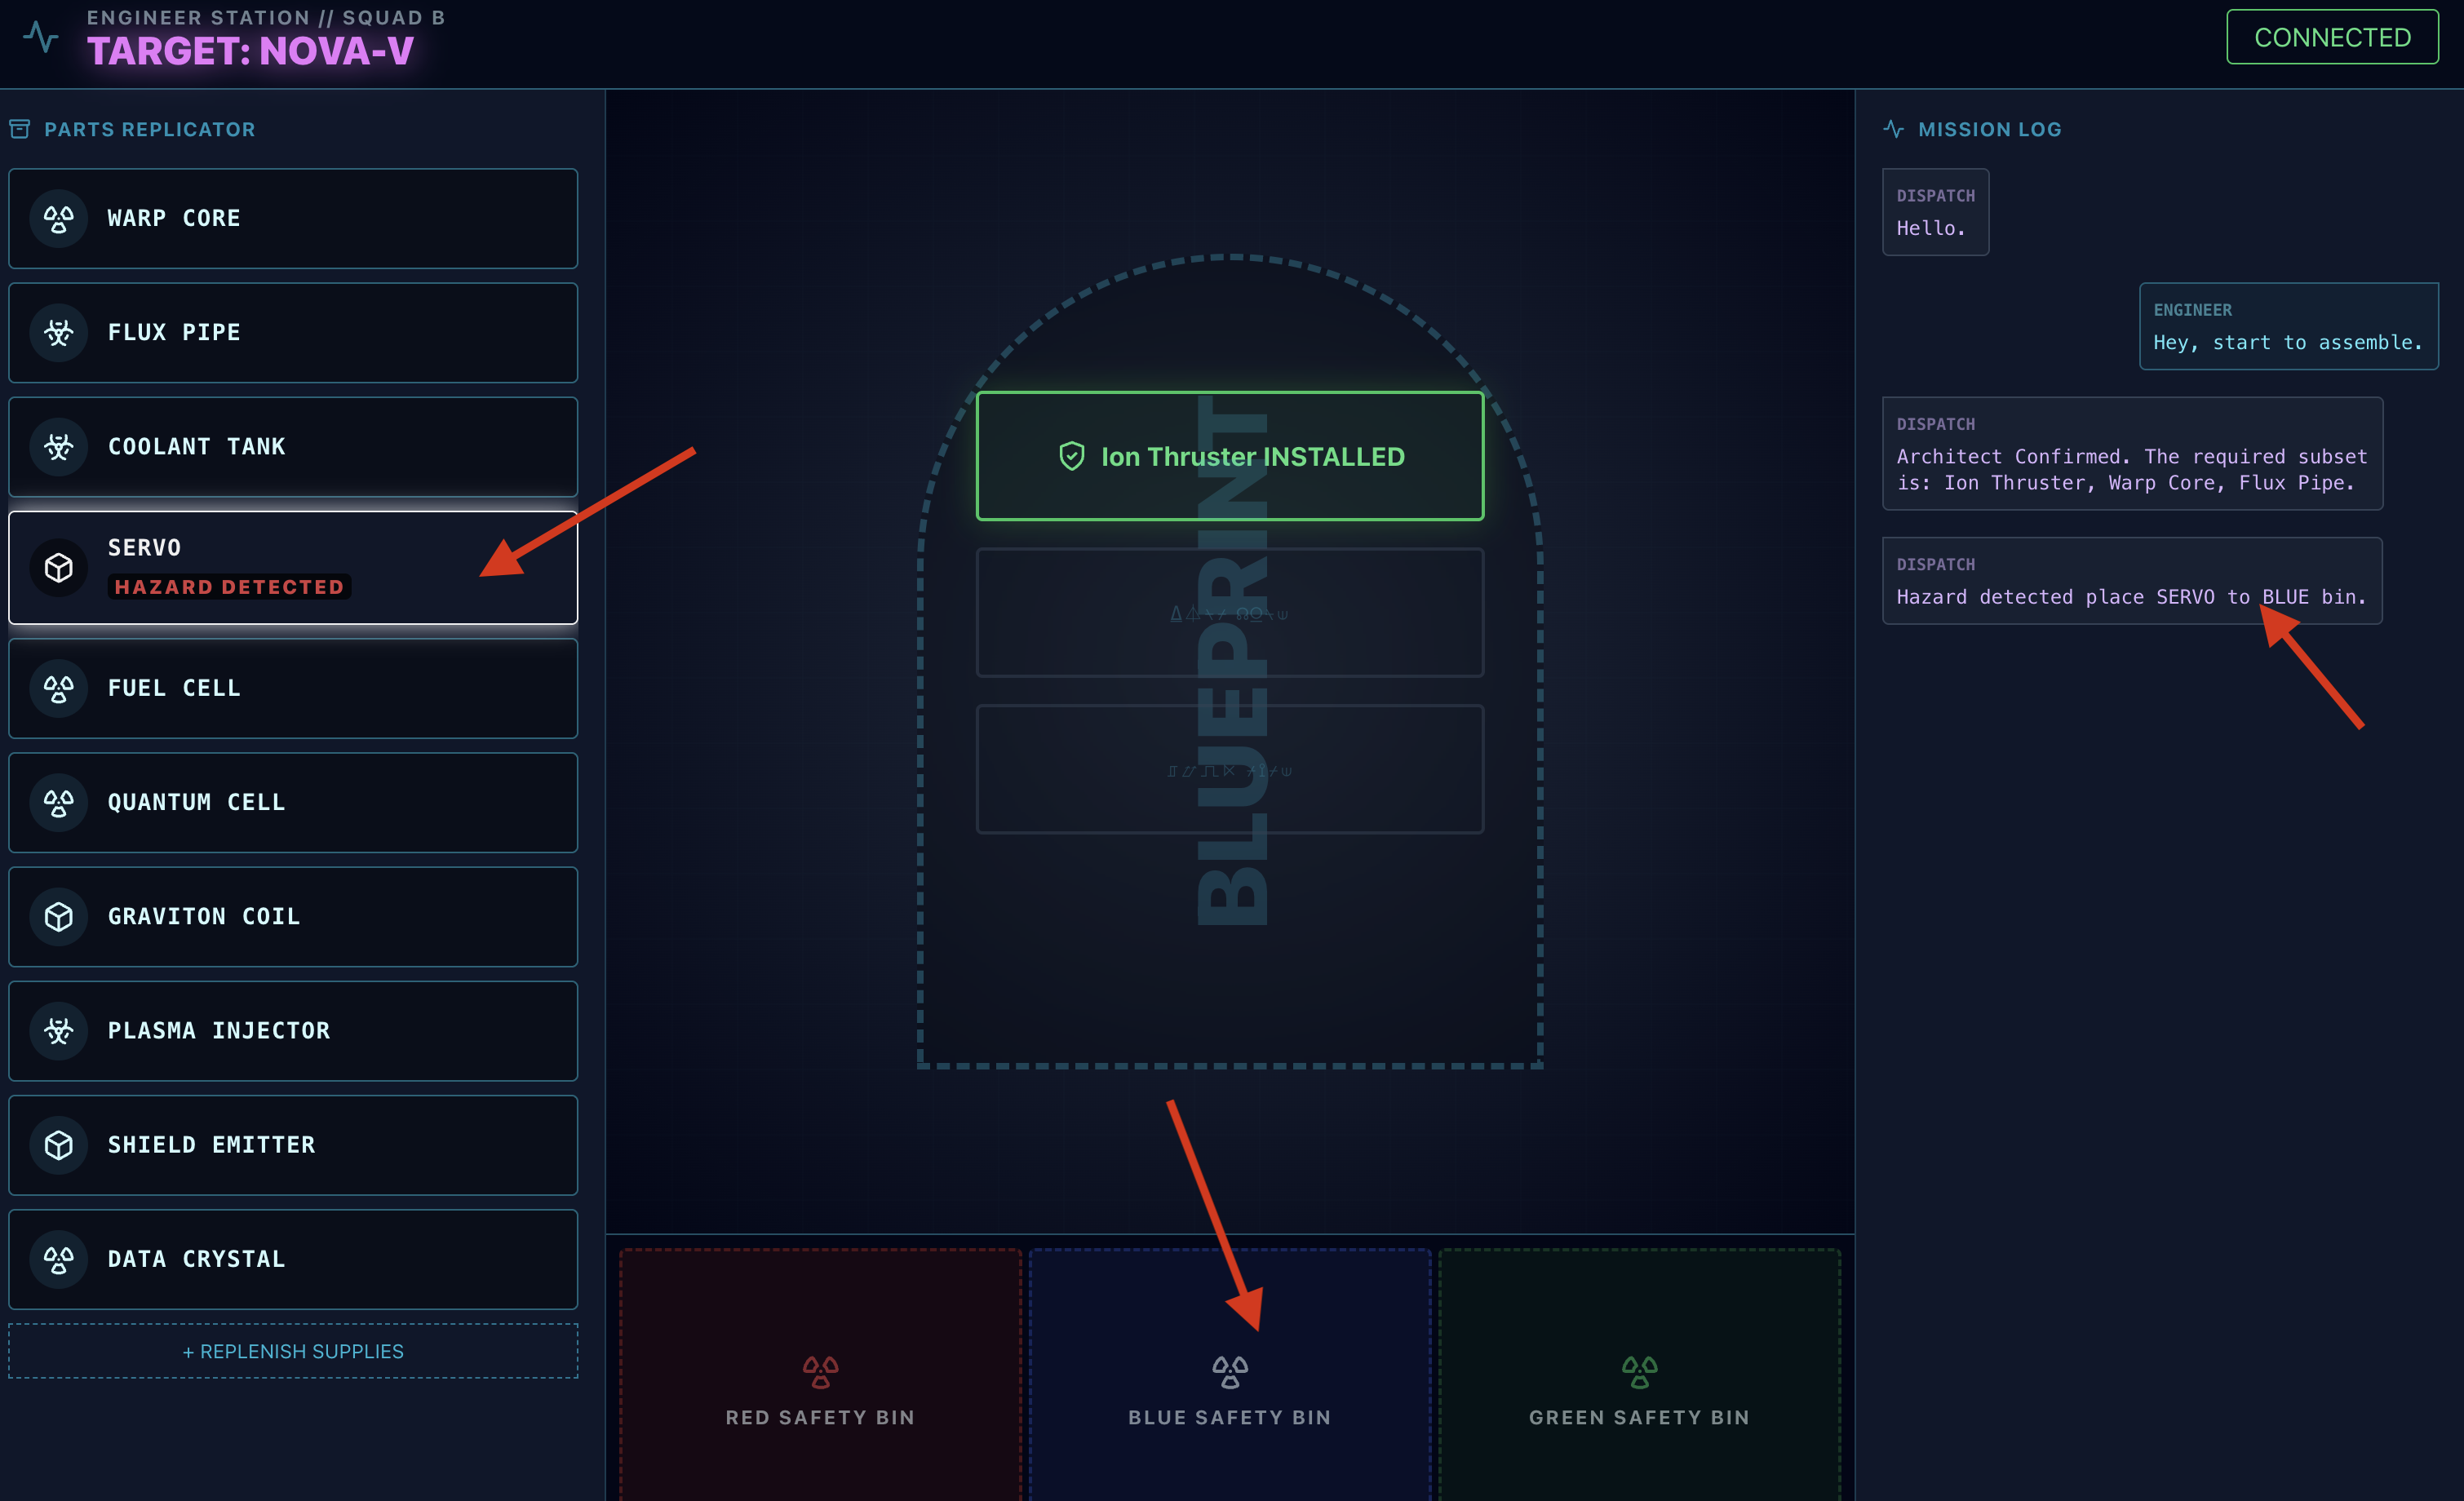
- The Dispatch agent's
- Action: The Dispatch Agent will give you a direct command: "Hazard Confirmed. Place XXX in the Red bin immediately." You must follow this instruction to proceed.
- Request: To start assembling the drive say: "Start assembling."
Mission Accomplished. You have successfully built an interactive, multi-agent system. The survivors are safe, the rocket has cleared the atmosphere, and your "Way Back Home" continues.
👉💻 Press Ctrl+c in both terminal to exit.
6. Deploy to Production (Optional)
You have successfully tested the agent locally. Now, we must upload the Architect's neural core to the ship's mainframes (Cloud Run). This will allow it to operate as a permanent, independent service that the Dispatch agent can query from anywhere.
Provision the Secure Vault (Infrastructure)
Before deploying the agent, we must create its persistent memory (Memorystore) and the secure channel to access it (VPC Connector).
👉💻 Create the Memorystore Instance (Redis Vault):
export REGION="us-central1"
gcloud redis instances create ozymandias-vault-prod --size=1 --tier=basic --region=${REGION}
👉💻 Retrieve the Vault's Network Address: Execute this command and copy the host IP address. This is the private address of your new Redis instance.
gcloud redis instances describe ozymandias-vault-prod --region=us-central1
👉💻 Create the VPC Access Connector (Secure Bridge): This connector acts as a private bridge, allowing Cloud Run to access the Redis instance inside your VPC.
export REGION="us-central1"
export SUBNET_NAME="vpc-connector-subnet"
export PROJECT_ID=$(gcloud config get-value project)
# Create the Dedicated Subnet ---

gcloud compute networks subnets create ${SUBNET_NAME} \
    --network=default \
    --region=${REGION} \
    --range=192.168.1.0/28


gcloud compute networks vpc-access connectors create architect-connector \
 --region ${REGION} \
 --subnet ${SUBNET_NAME} \
 --subnet-project ${PROJECT_ID} \
 --min-instances 2 \
 --max-instances 3 \
 --machine-type f1-micro
👉💻 Load the data:
export REGION="us-central1"
export ZONE="us-central1-a"
export VM_NAME="redis-seeder-$(date +%s)"
export REDIS_IP=$(gcloud redis instances describe ozymandias-vault-prod --region=${REGION} | grep 'host:' | awk '{print $2}')

gcloud compute instances create ${VM_NAME} \
    --zone=${ZONE} \
    --machine-type=e2-micro \
    --image-family=debian-11 \
    --image-project=debian-cloud \
    --quiet \
    --metadata=startup-script='#! /bin/bash
        # Install tools quietly
        apt-get update > /dev/null
        apt-get install -y redis-tools > /dev/null

        # Run each command individually
        redis-cli -h '"${REDIS_IP}"' DEL "HYPERION-X"
        redis-cli -h '"${REDIS_IP}"' RPUSH "HYPERION-X" "Warp Core" "Flux Pipe" "Ion Thruster"
        redis-cli -h '"${REDIS_IP}"' DEL "NOVA-V"
        redis-cli -h '"${REDIS_IP}"' RPUSH "NOVA-V" "Ion Thruster" "Warp Core" "Flux Pipe"
        redis-cli -h '"${REDIS_IP}"' DEL "OMEGA-9"
        redis-cli -h '"${REDIS_IP}"' RPUSH "OMEGA-9" "Flux Pipe" "Ion Thruster" "Warp Core"
        redis-cli -h '"${REDIS_IP}"' DEL "GEMINI-MK1"
        redis-cli -h '"${REDIS_IP}"' RPUSH "GEMINI-MK1" "Coolant Tank" "Servo" "Fuel Cell"
        redis-cli -h '"${REDIS_IP}"' DEL "APOLLO-13"
        redis-cli -h '"${REDIS_IP}"' RPUSH "APOLLO-13" "Warp Core" "Coolant Tank" "Ion Thruster"
        redis-cli -h '"${REDIS_IP}"' DEL "VORTEX-7"
        redis-cli -h '"${REDIS_IP}"' RPUSH "VORTEX-7" "Quantum Cell" "Graviton Coil" "Plasma Injector"
        redis-cli -h '"${REDIS_IP}"' DEL "CHRONOS-ALPHA"
        redis-cli -h '"${REDIS_IP}"' RPUSH "CHRONOS-ALPHA" "Shield Emitter" "Data Crystal" "Quantum Cell"
        redis-cli -h '"${REDIS_IP}"' DEL "NEBULA-Z"
        redis-cli -h '"${REDIS_IP}"' RPUSH "NEBULA-Z" "Plasma Injector" "Flux Pipe" "Graviton Coil"
        redis-cli -h '"${REDIS_IP}"' DEL "PULSAR-B"
        redis-cli -h '"${REDIS_IP}"' RPUSH "PULSAR-B" "Data Crystal" "Servo" "Shield Emitter"
        redis-cli -h '"${REDIS_IP}"' DEL "TITAN-PRIME"
        redis-cli -h '"${REDIS_IP}"' RPUSH "TITAN-PRIME" "Ion Thruster" "Quantum Cell" "Warp Core"

        # Signal that the script has finished
        echo "SEEDING_COMPLETE"
    '
# This command streams the logs and waits until grep finds our completion message.
# The -m 1 flag tells grep to exit after the first match.
gcloud compute instances tail-serial-port-output ${VM_NAME} --zone=${ZONE} | grep -m 1 "SEEDING_COMPLETE"

gcloud compute instances delete ${VM_NAME} --zone=${ZONE} --quiet
Deploy the Agent Application
Compile and Build Agent Image
👉💻 Navigate to the backend directory and create the dockerfile.
export PROJECT_ID=$(gcloud config get-value project)
export REGION=us-central1
export SERVICE_NAME=architect-agent
export IMAGE_PATH=gcr.io/${PROJECT_ID}/${SERVICE_NAME}
export VPC_CONNECTOR_NAME=architect-connector
export REDIS_IP=$(gcloud redis instances describe ozymandias-vault-prod --region=${REGION} | grep 'host:' | awk '{print $2}')

cd $HOME/way-back-home/level_4/backend/architect_agent
cp $HOME/way-back-home/level_4/requirements.txt requirements.txt
cat <<EOF > Dockerfile
# Use an official Python runtime as a parent image
FROM python:3.13-slim

# Set the working directory in the container
WORKDIR /app

# Copy the requirements file and install dependencies for THIS agent
COPY requirements.txt requirements.txt
RUN pip install --no-cache-dir -r requirements.txt

# Copy the rest of the architect's code (server.py, agent.py, etc.)
COPY . .

# Expose the port the architect server runs on
EXPOSE 8081

# Command to run the application
# This assumes your server file is named server.py and the FastAPI object is 'app'
CMD ["uvicorn", "server:app", "--host", "0.0.0.0", "--port", "8081"]
EOF
👉💻 Package the application into a container image.
cd $HOME/way-back-home/level_4/backend/architect_agent

export PROJECT_ID=$(gcloud config get-value project)
export SERVICE_NAME=architect-agent
export IMAGE_PATH=gcr.io/${PROJECT_ID}/${SERVICE_NAME}
export REGION=us-central1


# This should now print the full, correct path
echo "Verifying build path: ${IMAGE_PATH}"

gcloud builds submit . --tag ${IMAGE_PATH}
Deploy to Cloud Run
👉💻 Deploy the agent to Cloud Run. We will inject the Redis IP and link the VPC Connector directly into the launch command. This ensures the agent starts with a secure, private connection to its database.
cd $HOME/way-back-home/level_4/backend/architect_agent

export PROJECT_ID=$(gcloud config get-value project)
export REGION=us-central1
export SERVICE_NAME=architect-agent
export IMAGE_PATH=gcr.io/${PROJECT_ID}/${SERVICE_NAME}
export VPC_CONNECTOR_NAME=architect-connector
export REDIS_IP=$(gcloud redis instances describe ozymandias-vault-prod --region=${REGION} | grep 'host:' | awk '{print $2}')
export PROJECT_NUMBER=$(gcloud projects describe ${PROJECT_ID} --format="value(projectNumber)")
export PREDICTED_HOST="${SERVICE_NAME}-${PROJECT_NUMBER}.${REGION}.run.app"
export PROTOCOL=https

gcloud run deploy ${SERVICE_NAME} \
  --image=${IMAGE_PATH} \
  --platform=managed \
  --region=${REGION} \
  --port=8081 \
  --allow-unauthenticated \
  --labels=dev-tutorial=multi-modal \
  --vpc-connector=${VPC_CONNECTOR_NAME} \
  --vpc-egress=private-ranges-only \
  --set-env-vars="REDIS_HOST=${REDIS_IP}" \
  --set-env-vars="GOOGLE_GENAI_USE_VERTEXAI=True" \
  --set-env-vars="MODEL_ID=gemini-2.5-flash" \
  --set-env-vars="GOOGLE_CLOUD_PROJECT=${PROJECT_ID}" \
  --set-env-vars="HOST_URL=${PREDICTED_HOST}" \
  --set-env-vars="PROTOCOL=${PROTOCOL}" \
  --set-env-vars="A2A_PORT=443"
👉💻 Verify if the A2A server is running.
export REGION=us-central1
export ARCHITECT_AGENT_URL=$(gcloud run services describe architect-agent --platform managed --region ${REGION} --format 'value(status.url)')
curl -s  ${ARCHITECT_AGENT_URL}/.well-known/agent.json | jq
Once the command finishes, you will see a Service URL. The Architect Agent is now live in the cloud, permanently connected to its vault and ready to serve schematic data to other agents.
Deploy Dispatch Hub to Production Mainframe
With the Architect Agent operational in the cloud, we must now deploy the Dispatch Hub. This agent will serve as the primary user interface, handling live voice/video streams and delegating database queries to the Architect's secure endpoint.
👉💻 Run the following command in your Cloud Shell terminal. It will create the complete, multi-stage Dockerfile in your backend directory.
cd $HOME/way-back-home/level_4

cat <<EOF > Dockerfile
# STAGE 1: Build the React Frontend
# This stage uses a Node.js container to build the static frontend assets.
FROM node:20-slim as builder

# Set the working directory for our build process
WORKDIR /app

# Copy the frontend's package files first to leverage Docker's layer caching.
COPY frontend/package*.json ./frontend/
# Run 'npm install' from the context of the 'frontend' subdirectory
RUN npm --prefix frontend install

# Copy the rest of the frontend source code
COPY frontend/ ./frontend/
# Run the build script, which will create the 'frontend/dist' directory
RUN npm --prefix frontend run build


# STAGE 2: Build the Python Production Image
# This stage creates the final, lean container with our Python app and the built frontend.
FROM python:3.13-slim

# Set the final working directory
WORKDIR /app

# Install uv, our fast package manager
RUN pip install uv

# Copy the requirements.txt from the root of our build context
COPY requirements.txt .
# Install the Python dependencies
RUN uv pip install --no-cache-dir --system -r requirements.txt

# Copy the entire backend directory into the container
COPY backend/ ./backend/

# CRITICAL STEP: Copy the built frontend assets from the 'builder' stage.
# The source is the '/app/frontend/dist' directory from Stage 1.
# The destination is './frontend/dist', which matches the exact relative path
# your backend/main.py script expects to find.
COPY --from=builder /app/frontend/dist ./frontend/dist/

# Cloud Run injects a PORT environment variable, which your main.py already uses.
# We expose 8000 as a standard practice.
EXPOSE 8000

# Set the command to run the application.
# We specify the full path to the Python script.
CMD ["python", "backend/main.py"]
EOF
Compile and Build Agent/Frontend Image
👉💻 Navigate to the backend directory containing the Dispatch agent's code (main.py) and package it into a container image.
cd $HOME/way-back-home/level_4
export PROJECT_ID=$(gcloud config get-value project)
export REGION=us-central1
export SERVICE_NAME=mission-bravo
export IMAGE_PATH=gcr.io/${PROJECT_ID}/${SERVICE_NAME}
# This assumes your dispatch agent server (main.py) is in the backend folder

gcloud builds submit . --tag ${IMAGE_PATH}
Deploy to Cloud Run
👉💻 Deploy the Dispatch Hub to Cloud Run. We will inject the Architect's URL as an environment variable, creating the critical link between our two cloud-native agents.
export PROJECT_ID=$(gcloud config get-value project)
export REGION=us-central1
export SERVICE_NAME=mission-bravo
export AGENT_SERVICE_NAME=architect-agent
export IMAGE_PATH=gcr.io/${PROJECT_ID}/${SERVICE_NAME}
export PROJECT_NUMBER=$(gcloud projects describe ${PROJECT_ID} --format="value(projectNumber)")
export ARCHITECT_AGENT_URL="https://${AGENT_SERVICE_NAME}-${PROJECT_NUMBER}.${REGION}.run.app"
gcloud run deploy ${SERVICE_NAME} \
  --image=${IMAGE_PATH} \
  --platform=managed \
  --region=${REGION} \
  --port=8080 \
  --labels=dev-tutorial=multi-modal \
  --allow-unauthenticated \
  --set-env-vars="ARCHITECT_URL=${ARCHITECT_AGENT_URL}" \
  --set-env-vars="GOOGLE_GENAI_USE_VERTEXAI=True" \
  --set-env-vars="MODEL_ID=gemini-live-2.5-flash-native-audio" \
  --set-env-vars="GOOGLE_CLOUD_PROJECT=${PROJECT_ID}" \
  --set-env-vars="GOOGLE_CLOUD_LOCATION=${REGION}"
Once the command finishes, you will see a Service URL (e.g., https://mission-bravo-...run.app). The application is now live in the cloud.
👉 Go to the Google Cloud Run page and select the biometric-scout service from the list. 
👉 Locate the Public URL displayed at the top of the Service details page. 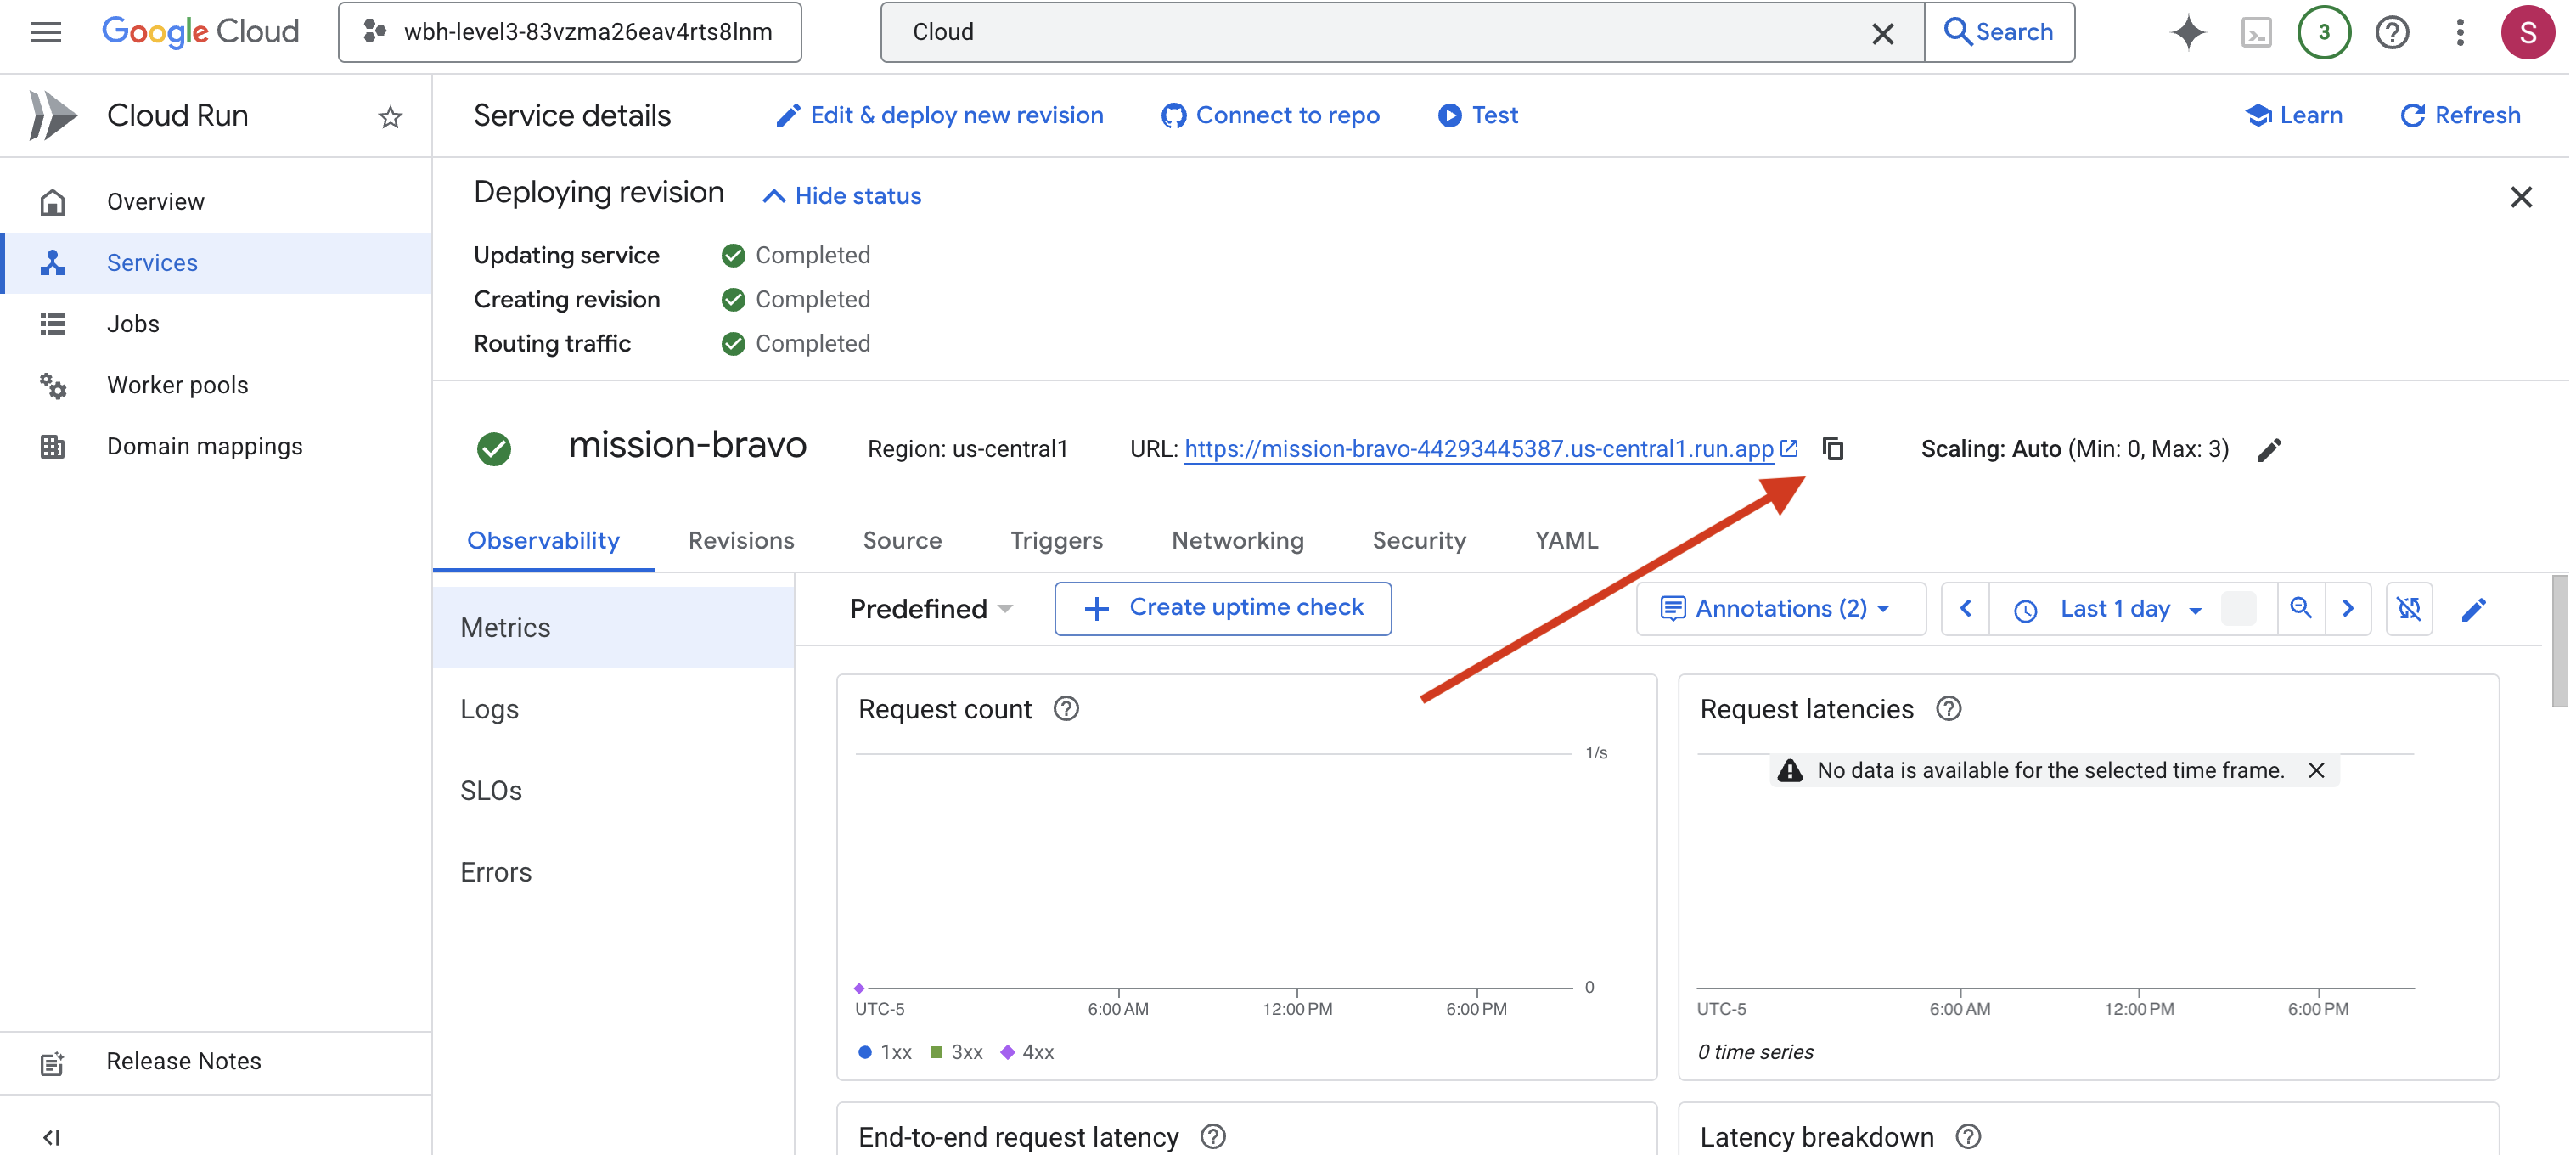
Final Systems Check (End-to-End Test)
👉 Now you will interact with the live system.
- Get the URL: Copy the Service URL from the output of the last deployment command (it should end with
run.app). - Open the Cockpit: Paste the URL into your web browser.
- Initiate Contact: When the interface loads, make sure you allow it to access your screen and microphone.
- Request Data: When a drive is assigned, ask to start assembling. For example: "Start to assemble"
You are now interacting with a fully deployed, multi-agent system running entirely on Google Cloud.
The Multi-agent system locks the final containment ring into place, and the erratic radiation flatlines into a steady hum.
"Warp Drive: STABILIZED. Rescue Craft: ENGINES IGNITED."
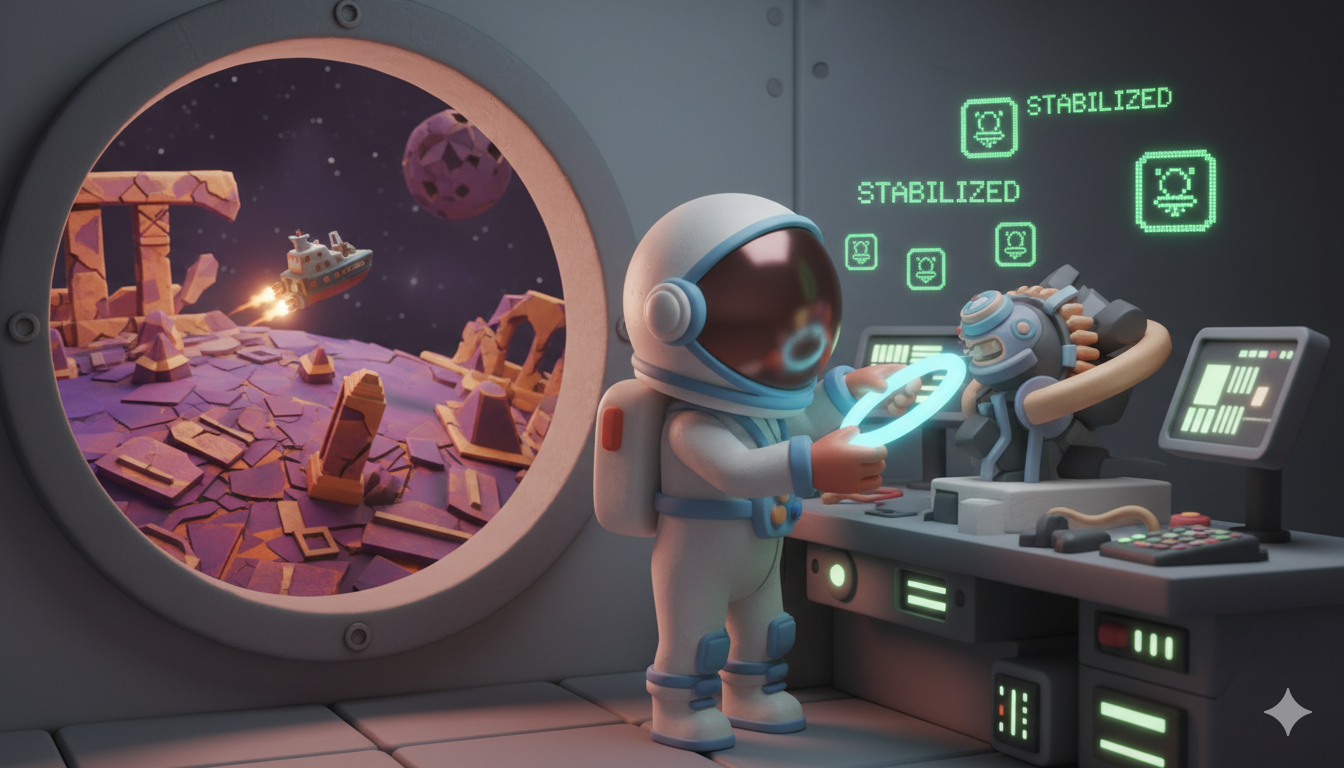
On your monitor, the alien ship streaks upward, narrowly escaping the crumbling surface of Ozymandias as the atmosphere collapses. It settles into a safe orbit alongside your vessel, and the comms fill with the voices of the survivors—shaken but alive. With the rescue complete and your path home clear, the remote link severs.
Thanks to you, the survivors are rescued.
If you participated in Level 0, don't forget to check where your progress is on the way back home mission!