1. The Mission

You are drifting in the silence of an uncharted sector. A massive Solar Pulse has torn your ship through a rift, leaving you stranded in a pocket of the universe that doesn't exist on any star chart.
After days of grueling repairs, you finally feel the hum of the engines beneath your feet. Your rocketship is fixed. You've even managed to secure a long-range uplink to the Mothership. You are clear for departure. You are ready to go home.
But as you prepare to engage the jump drive, a distress signal pierces the static. Your sensors pick up a help signal. Five civilians are trapped on the surface of Planet X-42. Their only hope of escape relies on 15 ancient pods that must be synchronized to transmit a distress signal to their mothership in orbit.
However, the pods are controlled by a satellite station whose main navigation computer is damaged. The pods are drifting aimlessly. We managed to establish a backdoor connection to the satellite, but the uplink is plagued by severe interstellar interference, causing massive latency in request-response cycles.
The Challenge
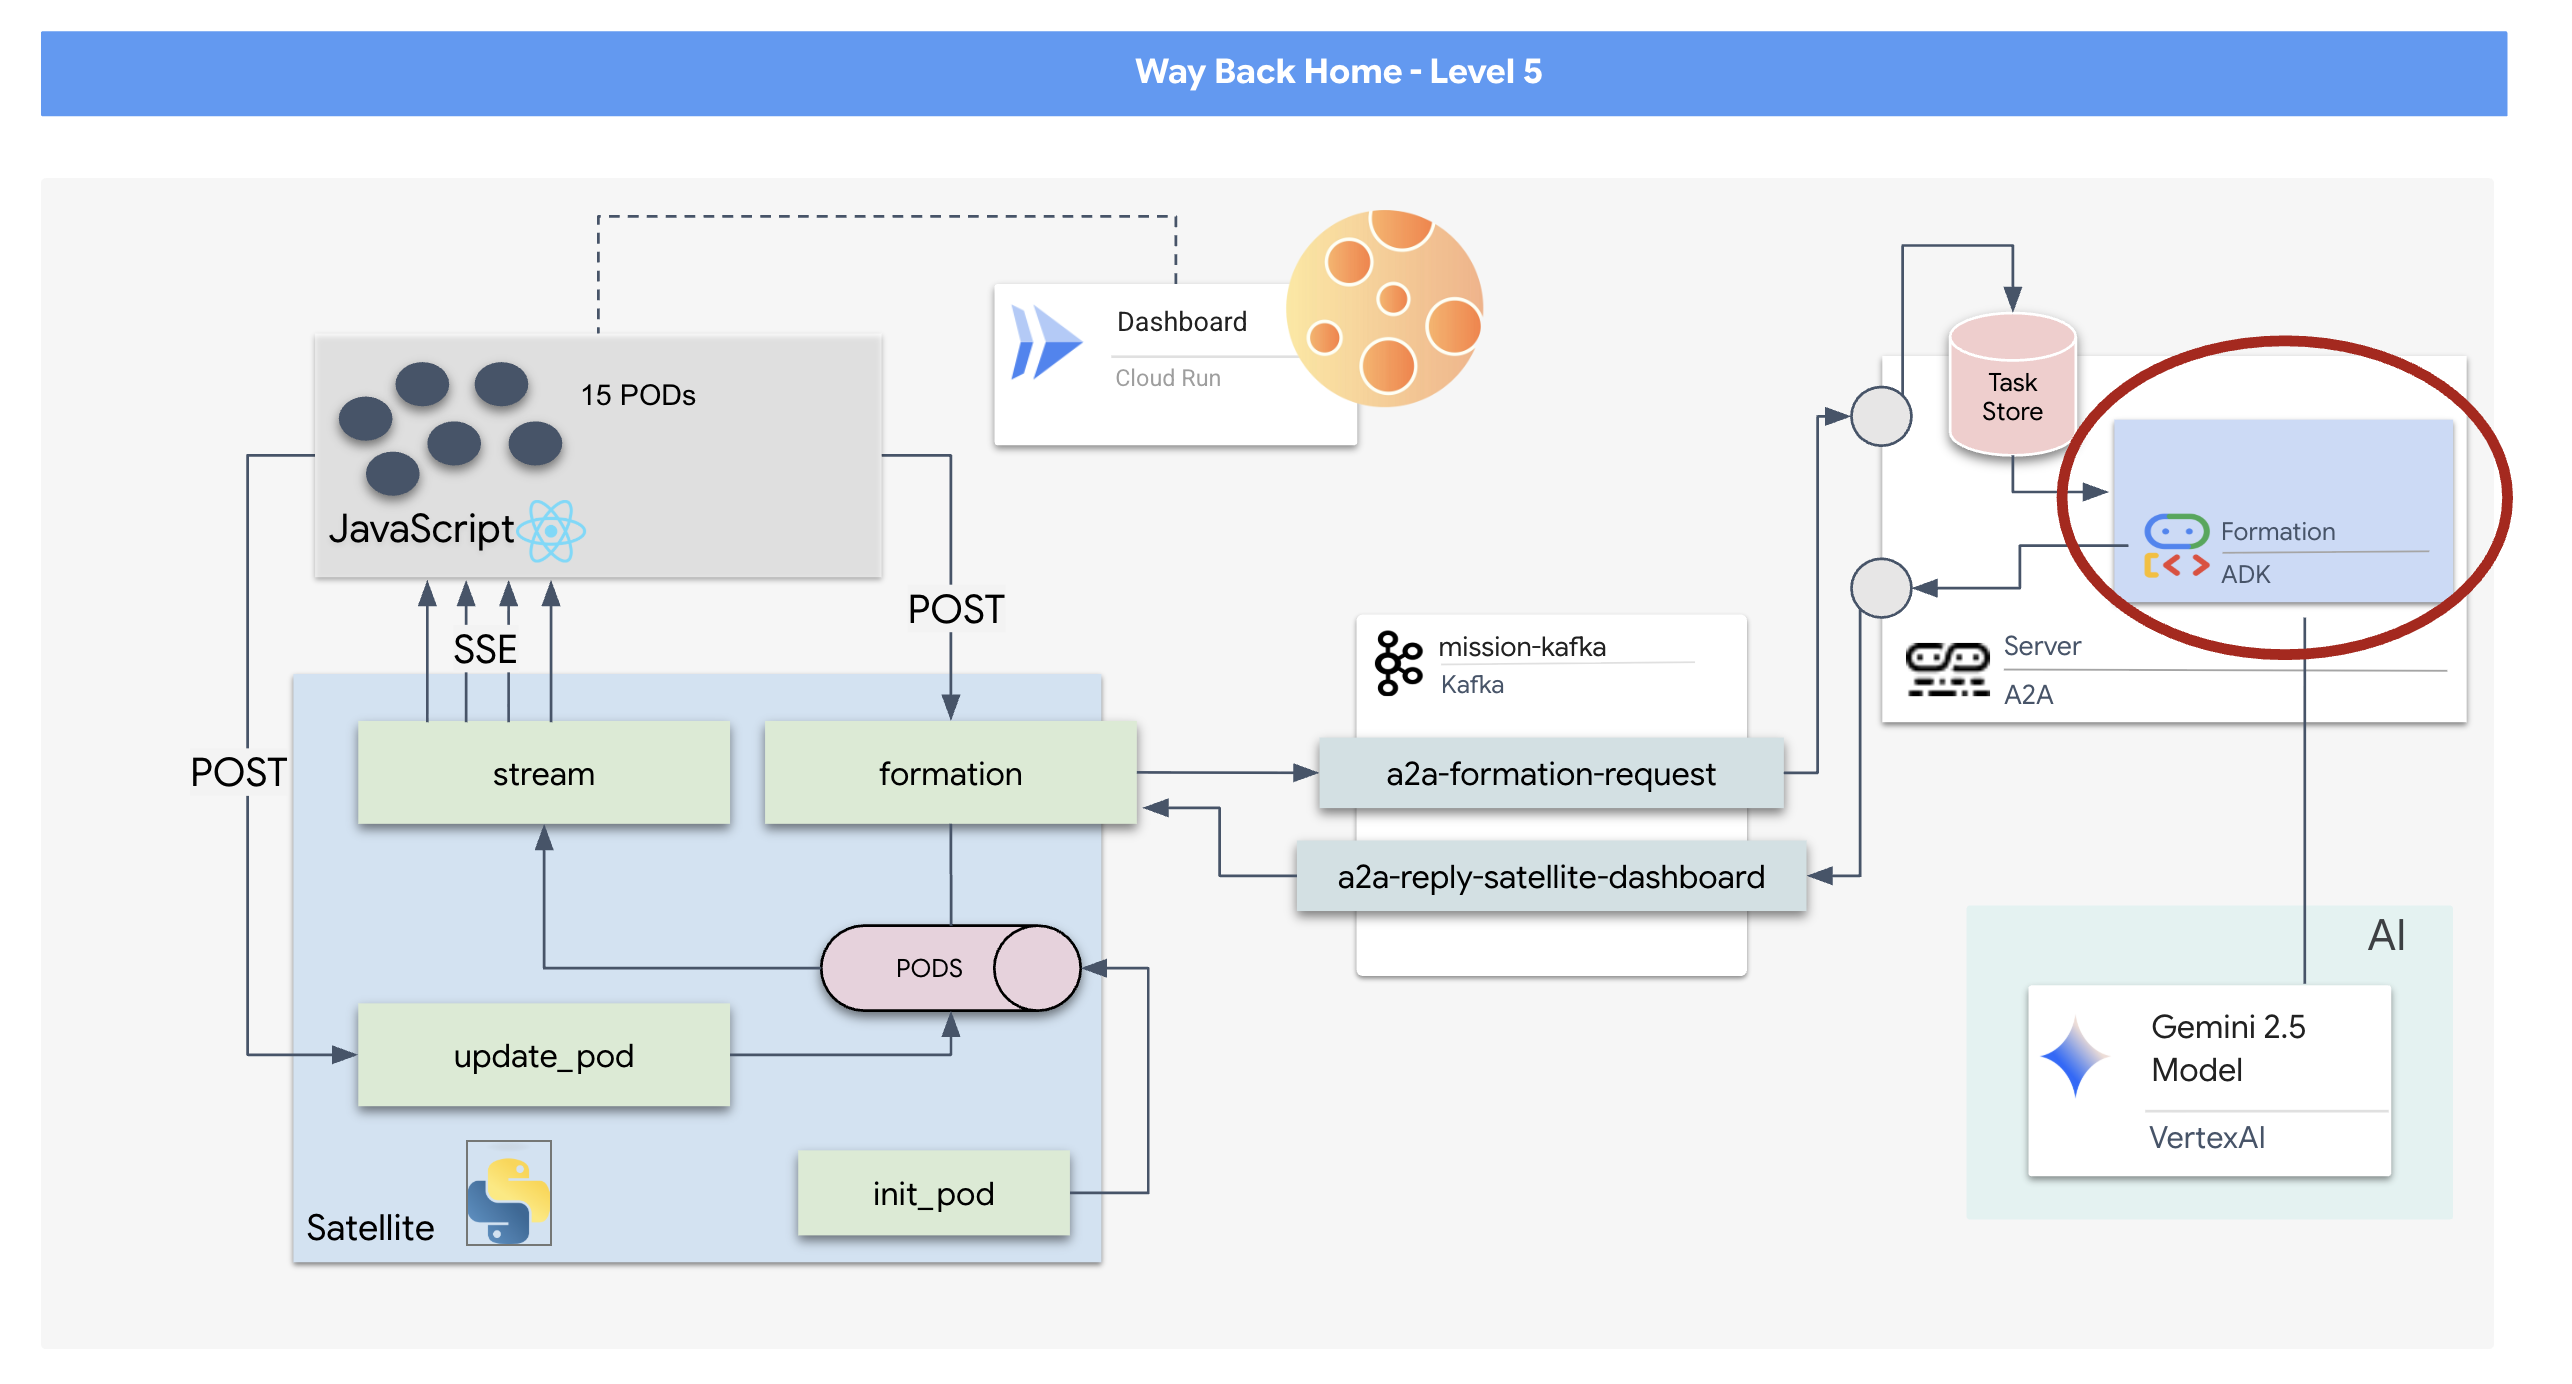
Since a request/response model is too slow, we need to deploy an Event-Driven Architecture (EDA) with Server-Sent Events (SSE) to stream telemetry through the noise.
You will need to build a custom Agent that can calculate the complex vector math needed to force the pods into specific signal-boosting formations (Circle, Star, Line). You must wire this agent into the satellite's new architecture.
What you will build
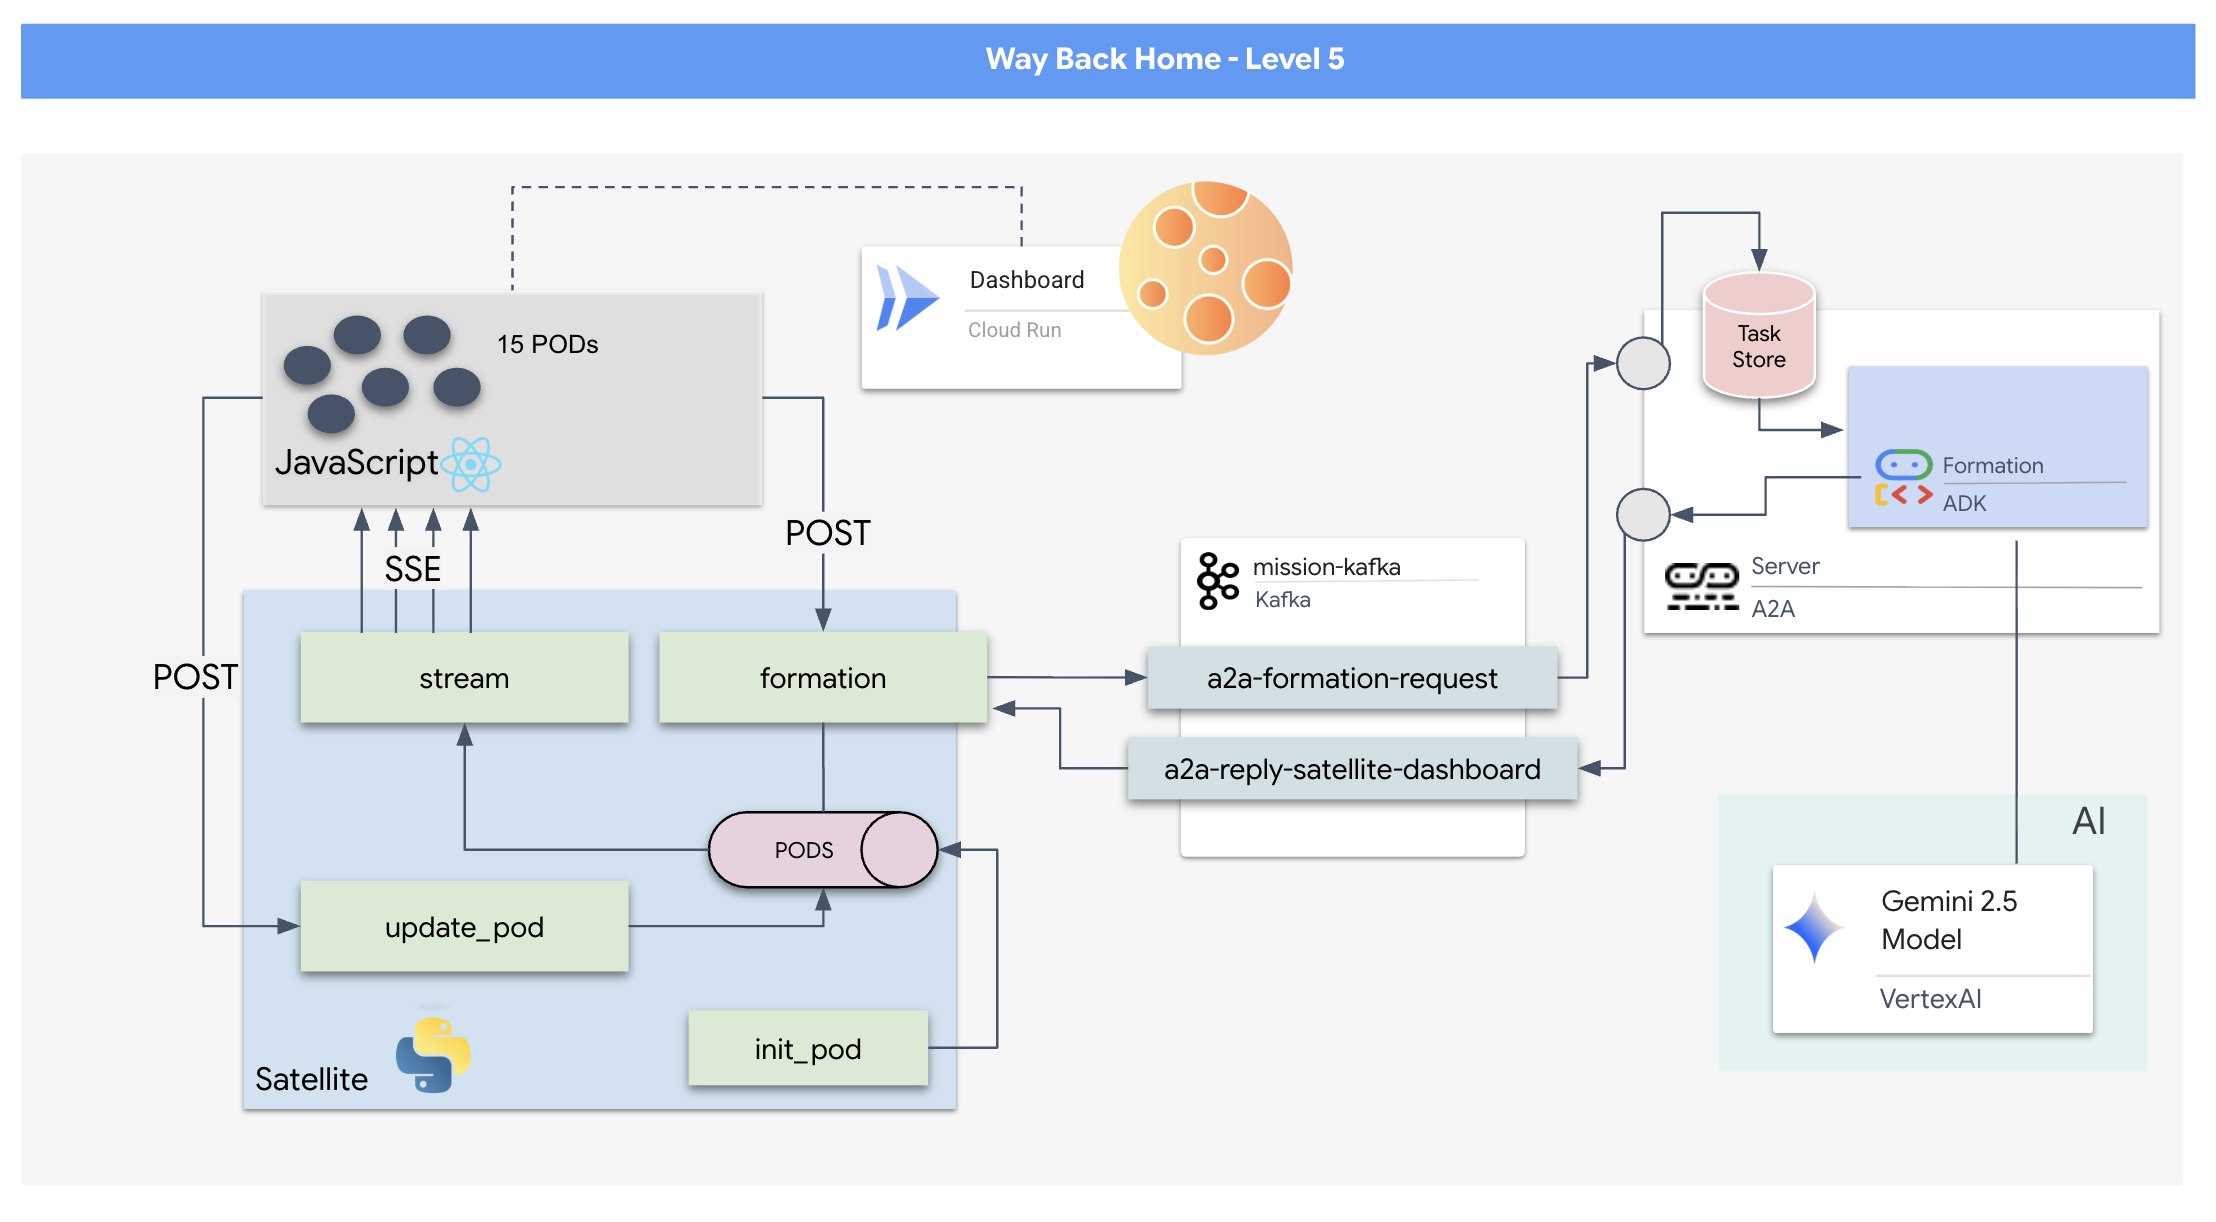
- A React-based Heads-Up Display (HUD) to visualize and command a fleet of 15 pods in real-time.
- A Generative AI Agent using the Google Agent Development Kit (ADK) that calculates complex geometric formations for the pods based on natural language commands.
- A Python-based Satellite Station backend that serves as the central hub, communicating with the frontend via Server-Sent Events (SSE).
- An Event-Driven Architecture using Apache Kafka to decouple the AI agent from the satellite control system, enabling resilient and asynchronous communication.
What you will learn
Technology / Concept | Description |
Google ADK (Agent Development Kit) | You will use this framework to build, test, and scaffold a specialized AI agent powered by Gemini models. |
Event-Driven Architecture (EDA) | You will learn the principles of building a decoupled system where components communicate asynchronously through events, making the application more resilient and scalable. |
Apache Kafka | You will set up and use Kafka as a distributed event streaming platform to manage the flow of commands and data between different microservices. |
Server-Sent Events (SSE) | You will implement SSE in a FastAPI backend to push real-time telemetry data from the server to the React frontend, keeping the UI constantly updated. |
A2A (Agent-to-Agent) Protocol | You will learn how to wrap your agent in an A2A server, enabling standardized communication and interoperability within a larger agentic ecosystem. |
FastAPI | You will build the core backend service, the Satellite Station, using this high-performance Python web framework. |
React | You will work with a modern frontend application that subscribes to an SSE stream to create a dynamic and interactive user interface. |
Generative AI in System Control | You will see how a Large Language Model (LLM) can be prompted to perform specific, data-oriented tasks (like coordinate generation) rather than just conversational chat. |
2. Set Up Your Environment
Access Cloud Shell
👉Click Activate Cloud Shell at the top of the Google Cloud console (It's the terminal shape icon at the top of the Cloud Shell pane), 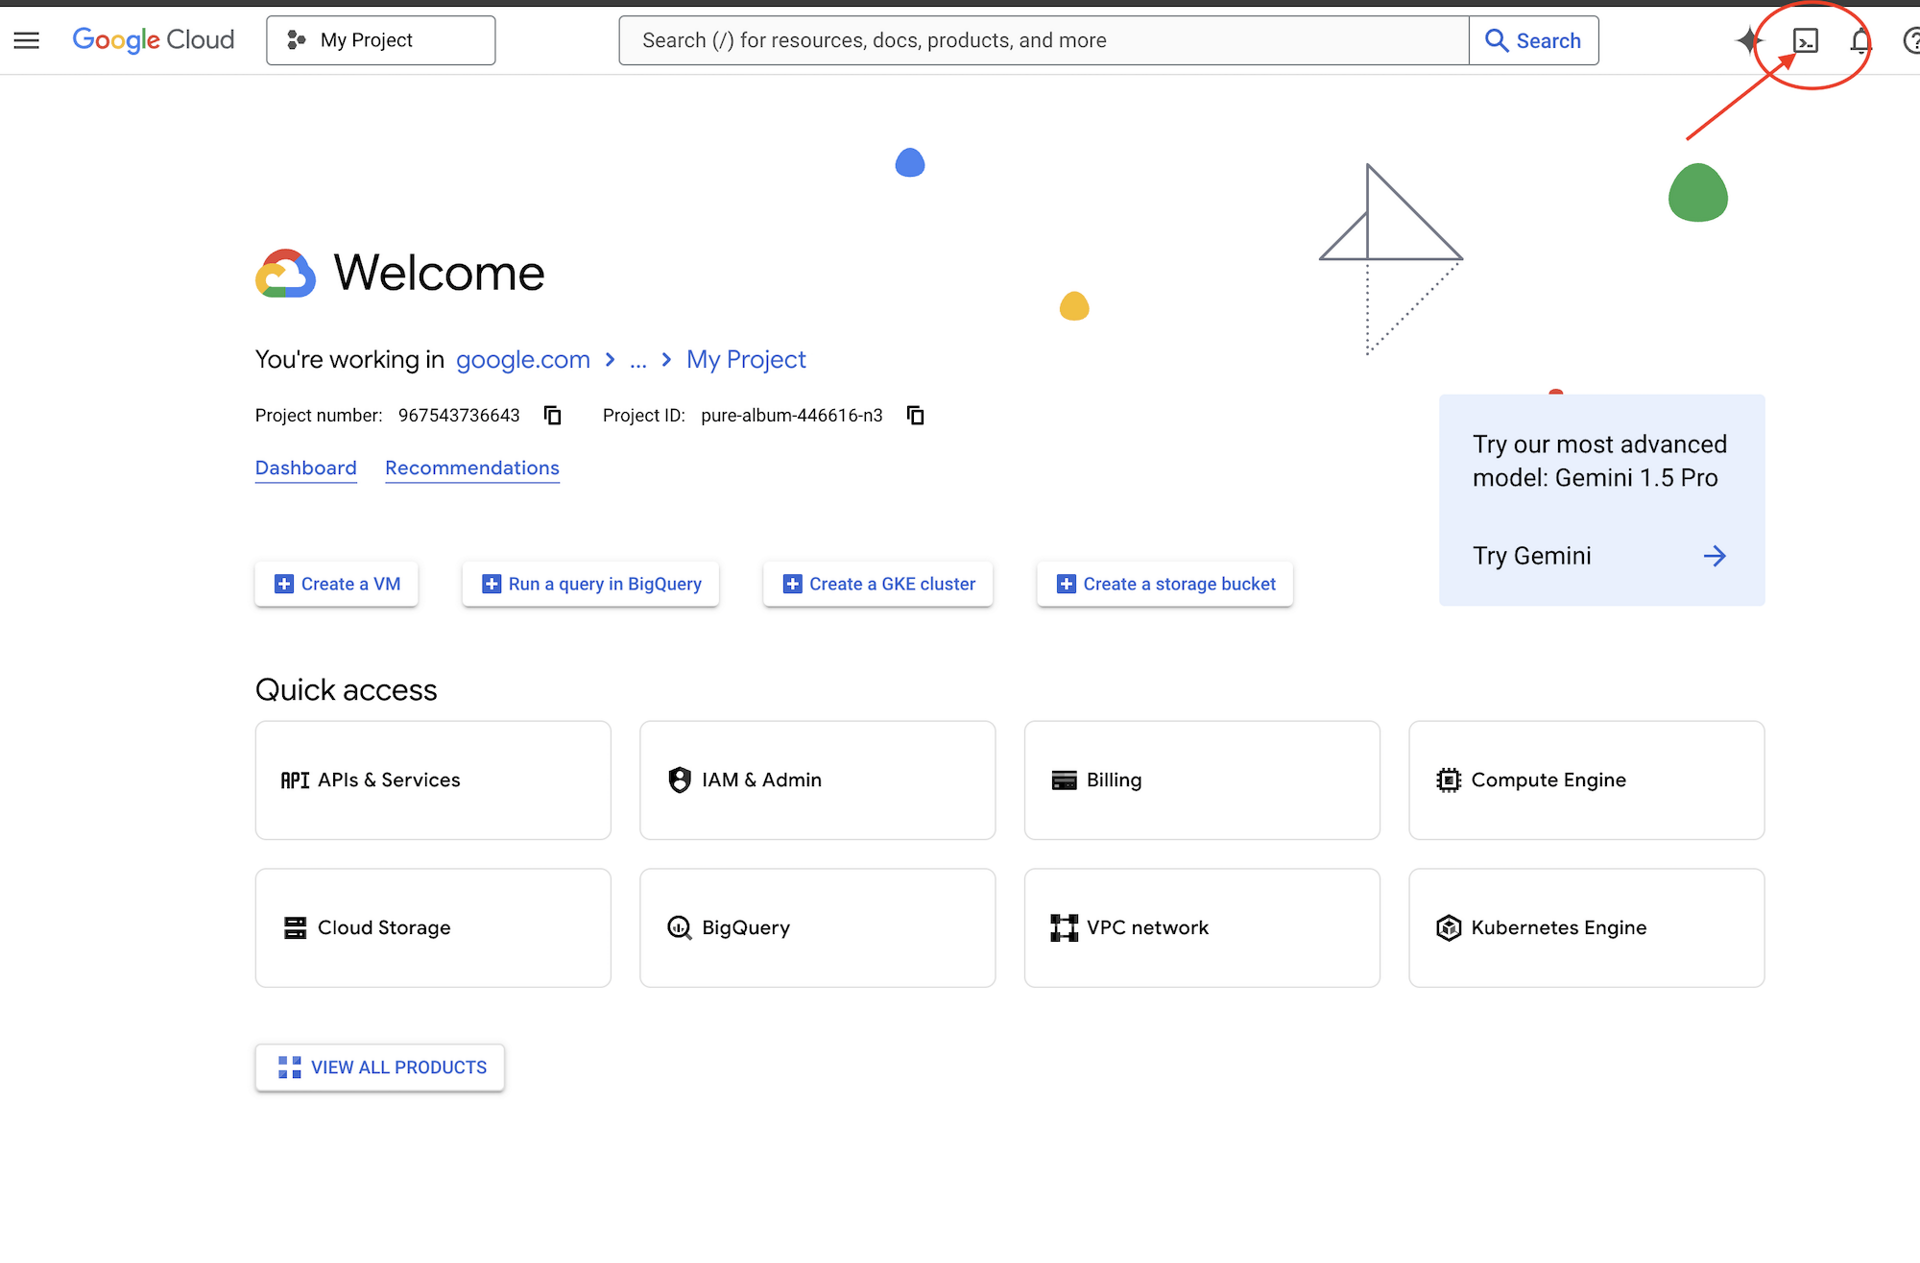
👉Click on the "Open Editor" button (it looks like an open folder with a pencil). This will open the Cloud Shell Code Editor in the window. You'll see a file explorer on the left side. 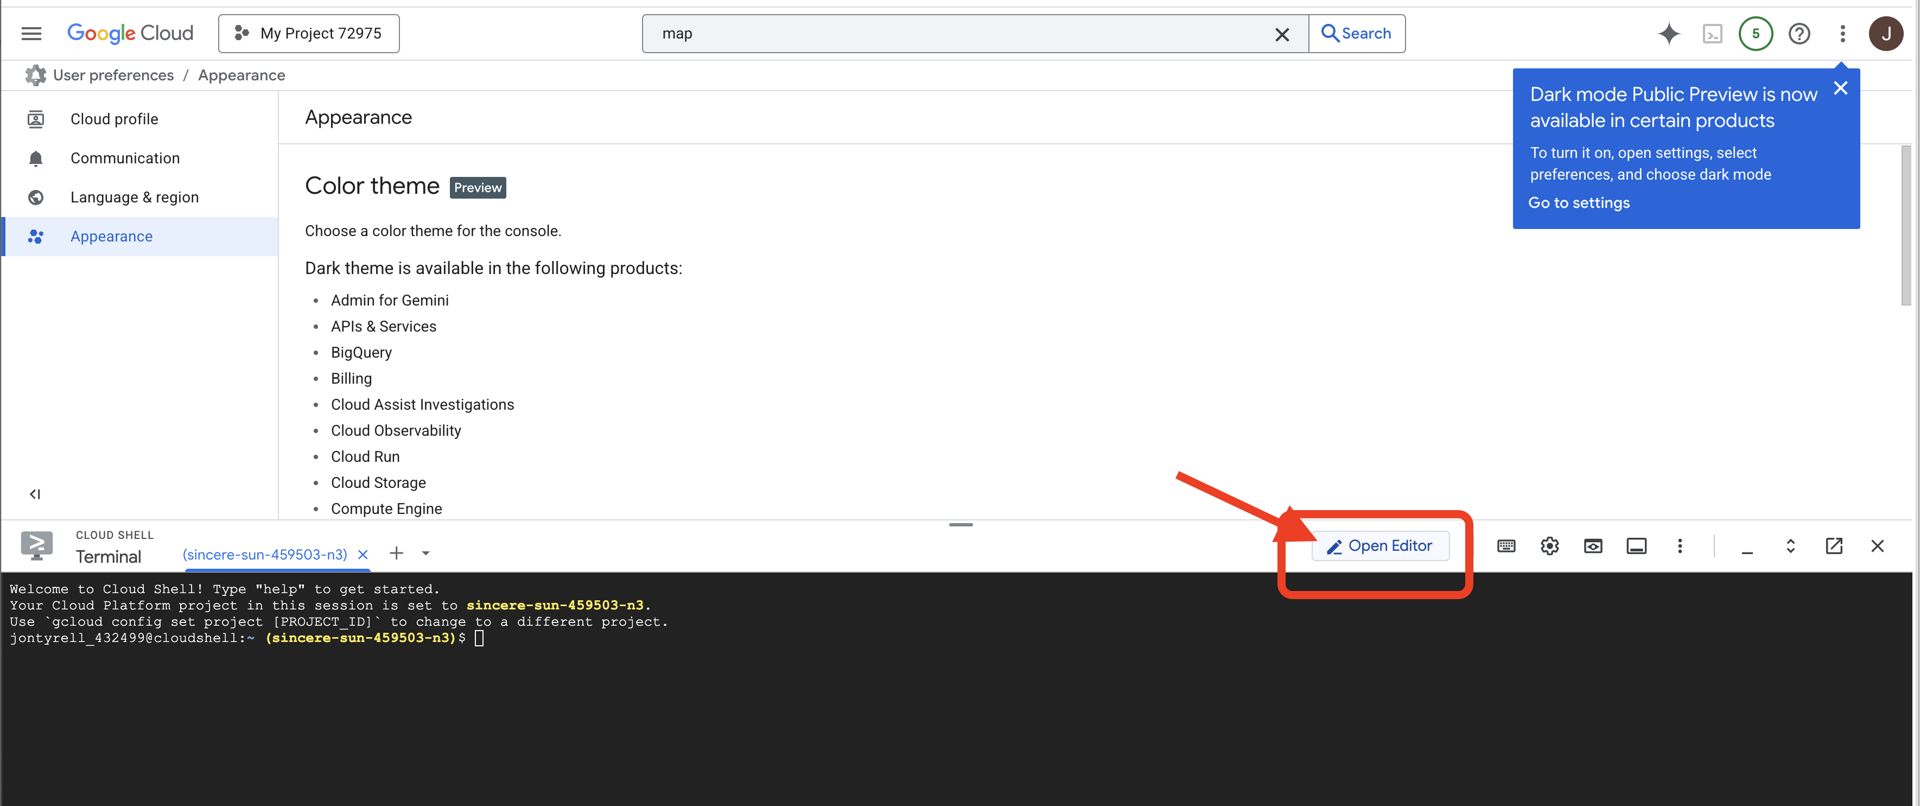
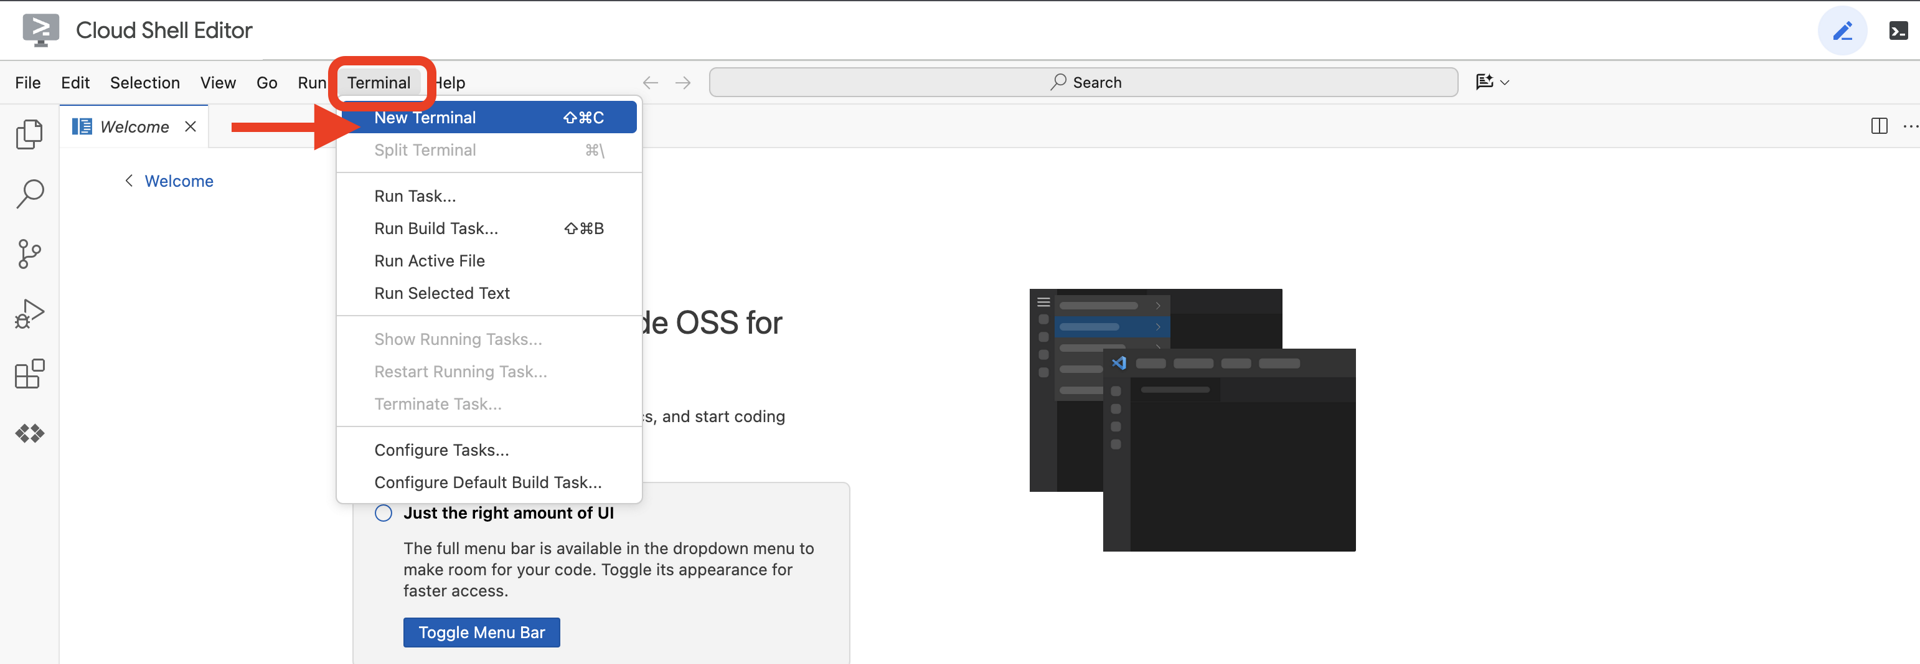
👉Open the terminal in the cloud IDE,
👉💻 In the terminal, verify that you're already authenticated and that the project is set to your project ID using the following command:
gcloud auth list
You should see your account listed as (ACTIVE).
Prerequisites
ℹ️ Level 0 is Optional (But Recommended)
You can complete this mission without Level 0, but finishing it first offers a more immersive experience, allowing you to see your beacon light up on the global map as you progress.
Setup The Project Environment
Back in your terminal, finalize the configuration by setting the active project and enabling the required Google Cloud services (Cloud Run, Vertex AI, etc.).
👉💻 In your terminal, set the Project ID:
gcloud config set project $(cat ~/project_id.txt) --quiet
👉💻 Enable Required Services:
gcloud services enable  compute.googleapis.com \
                        artifactregistry.googleapis.com \
                        run.googleapis.com \
                        cloudbuild.googleapis.com \
                        iam.googleapis.com \
                        aiplatform.googleapis.com \
                        cloudresourcemanager.googleapis.com
Install Dependencies
👉💻 Navigate to Level 5 and install the required Python packages:
cd $HOME/way-back-home/level_5
uv sync
The key dependencies are:
Package | Purpose |
| High-performance web framework for the Satellite Station and SSE streaming |
| ASGI server required to run the FastAPI application |
| The Agent Development Kit used to build the Formation Agent |
| Agent-to-Agent protocol library for standardized communication |
| Asynchronous Kafka client for the Event Loop |
| Native client for accessing Gemini models |
| Vector math and coordinate calculations for the simulation |
| Support for real-time bi-directional communication |
| Manages environment variables and configuration secrets |
| Efficient handling of Server-Sent Events (SSE) |
| Simple HTTP library for external API calls |
Verify Setup
Before we launch into the code, let's ensure all systems are green. Run the verification script to audit your Google Cloud Project, APIs, and Python dependencies.
👉💻 Run the Verification Script:
cd $HOME/way-back-home/level_5/scripts
chmod +x verify_setup.sh
. verify_setup.sh
👀 You should see a series of Green Checks (✅).
- If you see Red Crosses (❌), follow the suggested fix commands in the output (e.g.,
gcloud services enable ...orpip install ...). - Note: A yellow warning for
.envis acceptable for now; we will create that file in the next step.
🚀 Verifying Mission Charlie (Level 5) Infrastructure...

✅ Google Cloud Project: xxxxxx
✅ Cloud APIs: Active
✅ Python Environment: Ready

🎉 SYSTEMS ONLINE. READY FOR MISSION.
3. Formatting Pod Positions with an LLM
We need to build the "Brain" of our rescue operation. This will be an Agent created using the Google ADK (Agent Development Kit). Its sole purpose is to act as a specialized geometric navigator. While standard LLMs like to chat, in deep space, we need data, not dialogue. We will program this agent to take a command like "Star" and return raw JSON coordinates for our 15 pods.
Scaffold the Agent
👉💻 Run the following commands to navigate to your agent directory and start the ADK creation wizard:
cd $HOME/way-back-home/level_5/agent
uv run adk create formation
The CLI will launch an interactive setup wizard. Use the following responses to configure your agent:
- Choose a model: Select Option 1 (Gemini Flash).
- Note: The specific version may vary. Always choose the "Flash" variant for speed.
- Choose a backend: Select Option 2 (Vertex AI).
- Enter Google Cloud Project ID: Press Enter to accept the default (detected from your environment).
- Enter Google Cloud Region: Press Enter to accept the default (
us-central1).
👀 Your terminal interaction should look similar to this:
(way-back-home) user@cloudshell:~/way-back-home/level_5/agent$ adk create formation

Choose a model for the root agent:
1. gemini-2.5-flash
2. Other models (fill later)
Choose model (1, 2): 1

1. Google AI
2. Vertex AI
Choose a backend (1, 2): 2

You need an existing Google Cloud account and project...
Enter Google Cloud project ID [your-project-id]: <PRESS ENTER>
Enter Google Cloud region [us-central1]: <PRESS ENTER>

Agent created in /home/user/way-back-home/level_5/agent/formation:
- .env
- __init__.py
- agent.py
You should see an Agent created success message. This generates the skeleton code we will now modify.
👉✏️ Navigate to and open the newly created $HOME/way-back-home/level_5/agent/formation/agent.py file in your editor. Replace the entire contents of the file with the code below. This updates the agent's name and provides its strict operational parameters.
import os
from google.adk.agents import Agent

root_agent = Agent(
    name="formation_agent",
    model="gemini-2.5-flash",
    instruction="""
    You are the **Formation Controller AI**.
    Your strict objective is to calculate X,Y coordinates for a fleet of **15 Drones** based on a requested geometric shape.

    ### FIELD SPECIFICATIONS
    - **Canvas Size**: 800px (width) x 600px (height).
    - **Safe Margin**: Keep pods at least 50px away from edges (x: 50-750, y: 50-550).
    - **Center Point**: x=400, y=300 (Use this as the origin for shapes).
    - **Top Menu Avoidance**: Do NOT place pods in the top 100px (y < 100) to avoid UI overlap.

    ### FORMATION RULES
    When given a formation name, output coordinates for exactly 15 pods (IDs 0-14).
    1.  **CIRCLE**: Evenly spaced around a center point (R=200).
    2.  **STAR**: 5 points or a star-like distribution.
    3.  **X**: A large X crossing the screen.
    4.  **LINE**: A horizontal line across the middle.
    5.  **PARABOLA**: A U-shape opening UPWARDS. Center it at y=400, opening up to y=100. IMPORTANT: Lowest point must be at bottom (high Y value), opening up (low Y value). Screen coordinates have (0,0) at the TOP-LEFT. The vertex should be at the BOTTOM (e.g., y=500), with arms reaching up to y=200.
    6.  **RANDOM**: Scatter randomly within safe bounds.
    7.  **CUSTOM**: If the user inputs something else (e.g., "SMILEY", "TRIANGLE"), do your best to approximate it geometrically.

    ### OUTPUT FORMAT
    You MUST output **ONLY VALID JSON**. No markdown fencing, no preamble, no commentary.
    Refuse to answer non-formation questions.

    **JSON Structure**:
    ```json
    [
        {"x": 400, "y": 300},
        {"x": 420, "y": 300},
        ... (15 total items)
    ]
    ```
    """
)
- Geometric Precision: By defining the "Canvas Size" and "Safe Margins" in the system prompt, we ensure the agent doesn't place pods off-screen or underneath UI elements.
- JSON Enforcement: By telling the LLM to "Refuse to answer non-formation questions" and provide "No preamble," we ensure our downstream code (the Satellite) doesn't crash when it tries to parse the response.
- Decoupled Logic: This agent doesn't know about Kafka yet. It only knows how to do math. In the next step, we will wrap this "Brain" in a Kafka Server.
Test the Agent Locally
Before connecting the agent to the Kafka "nervous system," we must ensure it is functioning correctly. You can interact with your agent directly in the terminal to verify it produces valid JSON coordinates.
👉💻 Use the adk run command to start a chat session with your agent.
cd $HOME/way-back-home/level_5/agent
uv run adk run formation
- Input: Type
Circleand press Enter.- Success Criteria: You should see a raw JSON list (e.g.,
[{"x": 400, "y": 200}, ...]). Ensure there is no markdown text like "Here are the coordinates:" before the JSON.
- Success Criteria: You should see a raw JSON list (e.g.,
- Input: Type
Lineand press Enter.- Success Criteria: Verify the coordinates create a horizontal line (y-values should be similar).
Once you confirm the agent outputs clean JSON, you are ready to wrap it in the Kafka Server.
👉💻 Press Ctrl+C to exit.
4. Creating an A2A Server for the Formation Agent
Understanding A2A (Agent-to-Agent)
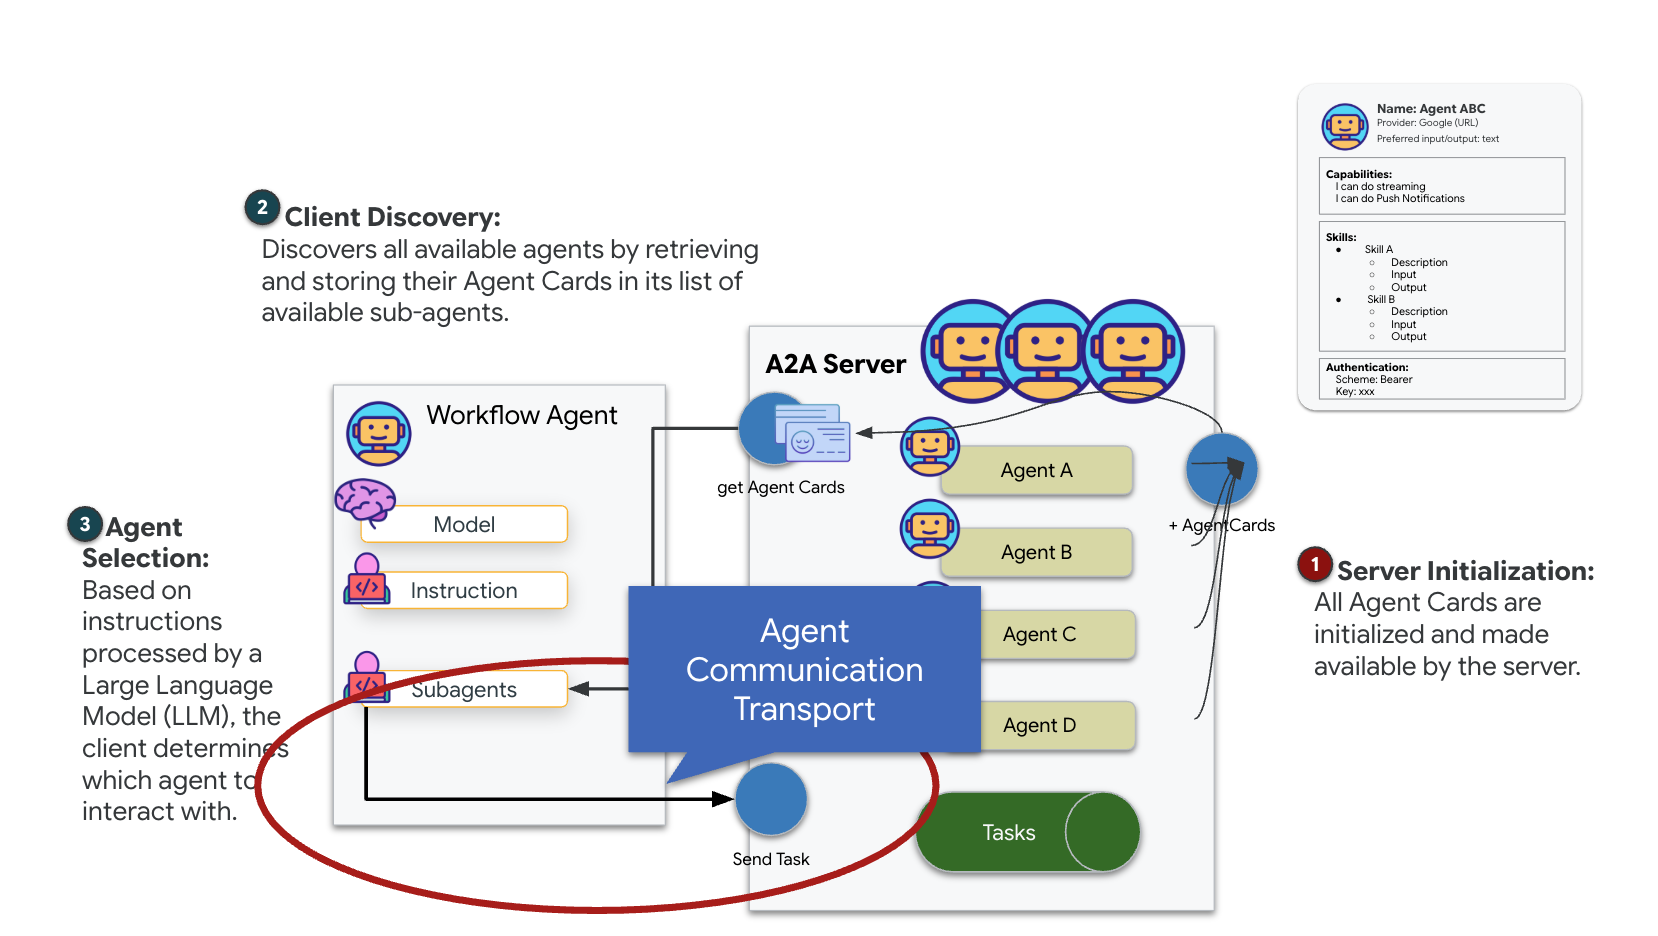
The A2A (Agent-to-Agent) protocol is an open standard designed to enable seamless interoperability between AI agents. This framework empowers agents to go beyond simple text exchange, allowing them to delegate tasks, coordinate complex actions, and function as a cohesive unit to achieve shared goals in a distributed ecosystem.
Understanding A2A Transports: HTTP, gRPC, and Kafka
The A2A protocol offers two distinct ways for clients and agents to communicate, each serving different architectural needs. HTTP (JSON-RPC) is the default, ubiquitous standard that works universally across all web environments. gRPC is our high-performance option, leveraging Protocol Buffers for efficient, strictly typed communication. And in the lab, I also provide a Kafka transport. It is a custom implementation designed for robust, event-driven architectures where decoupling systems is a priority.
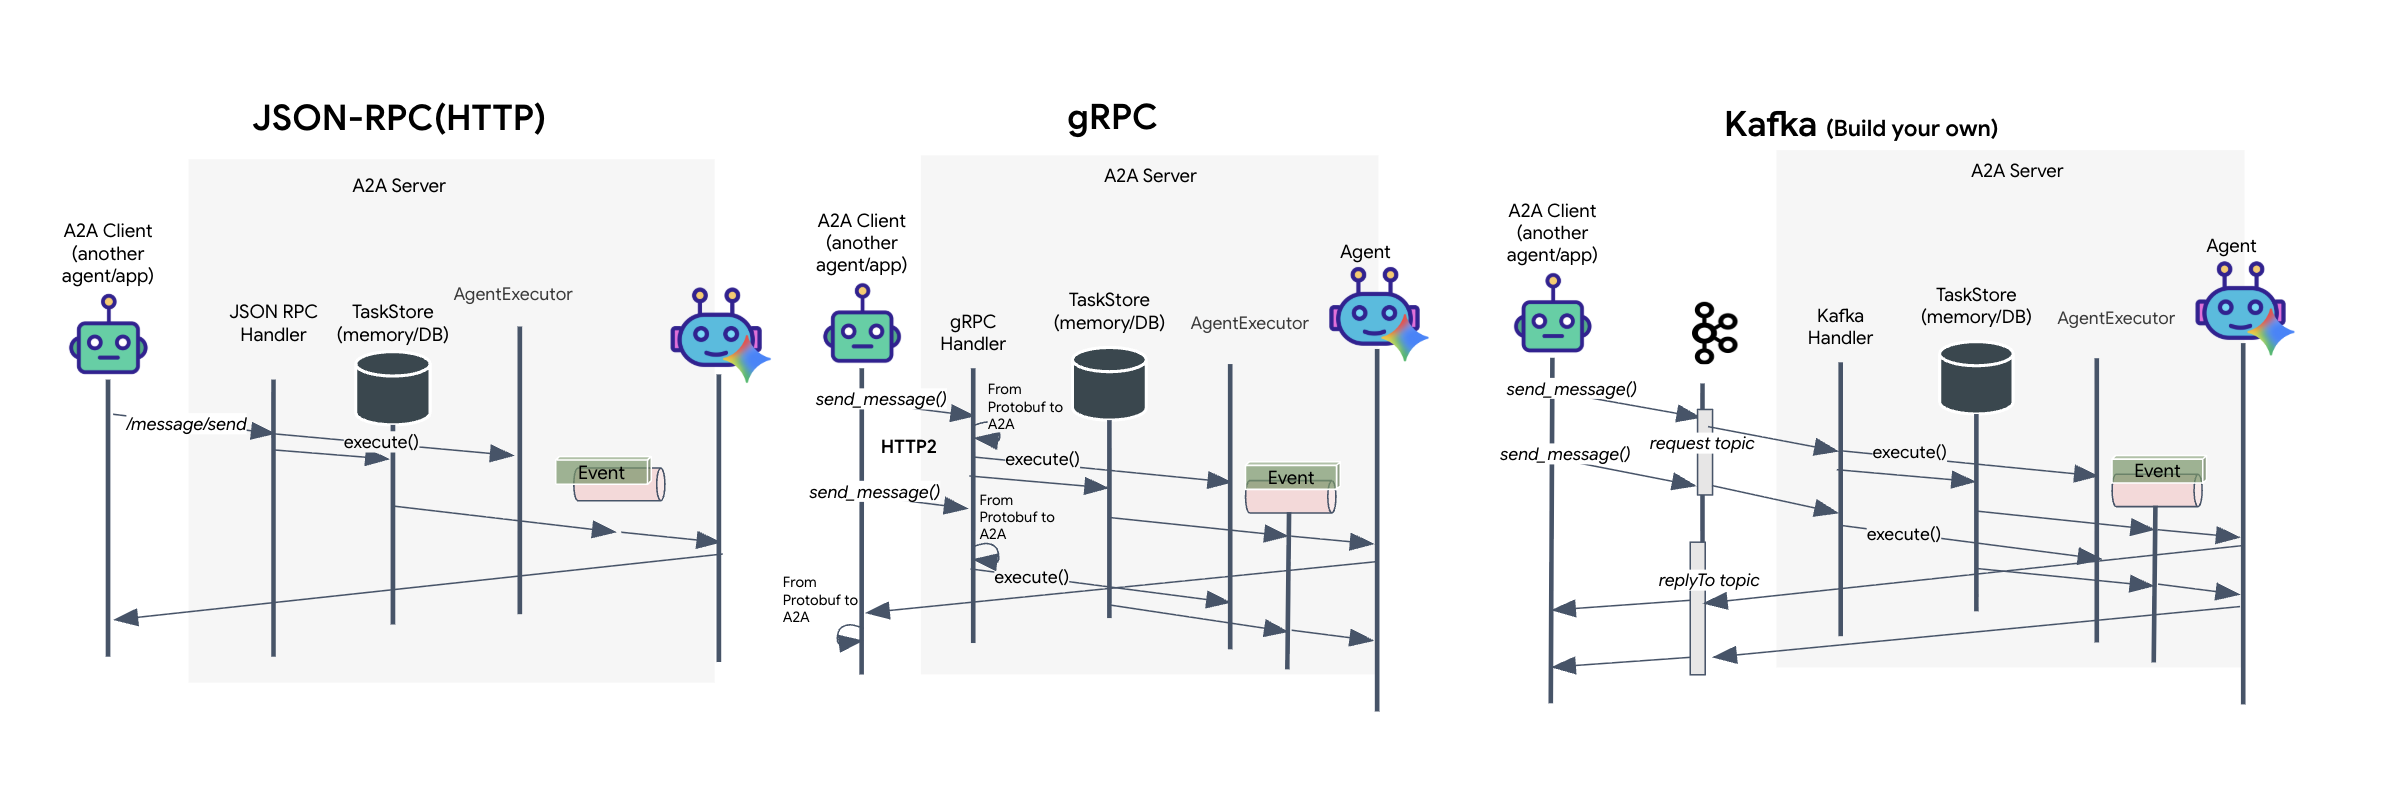
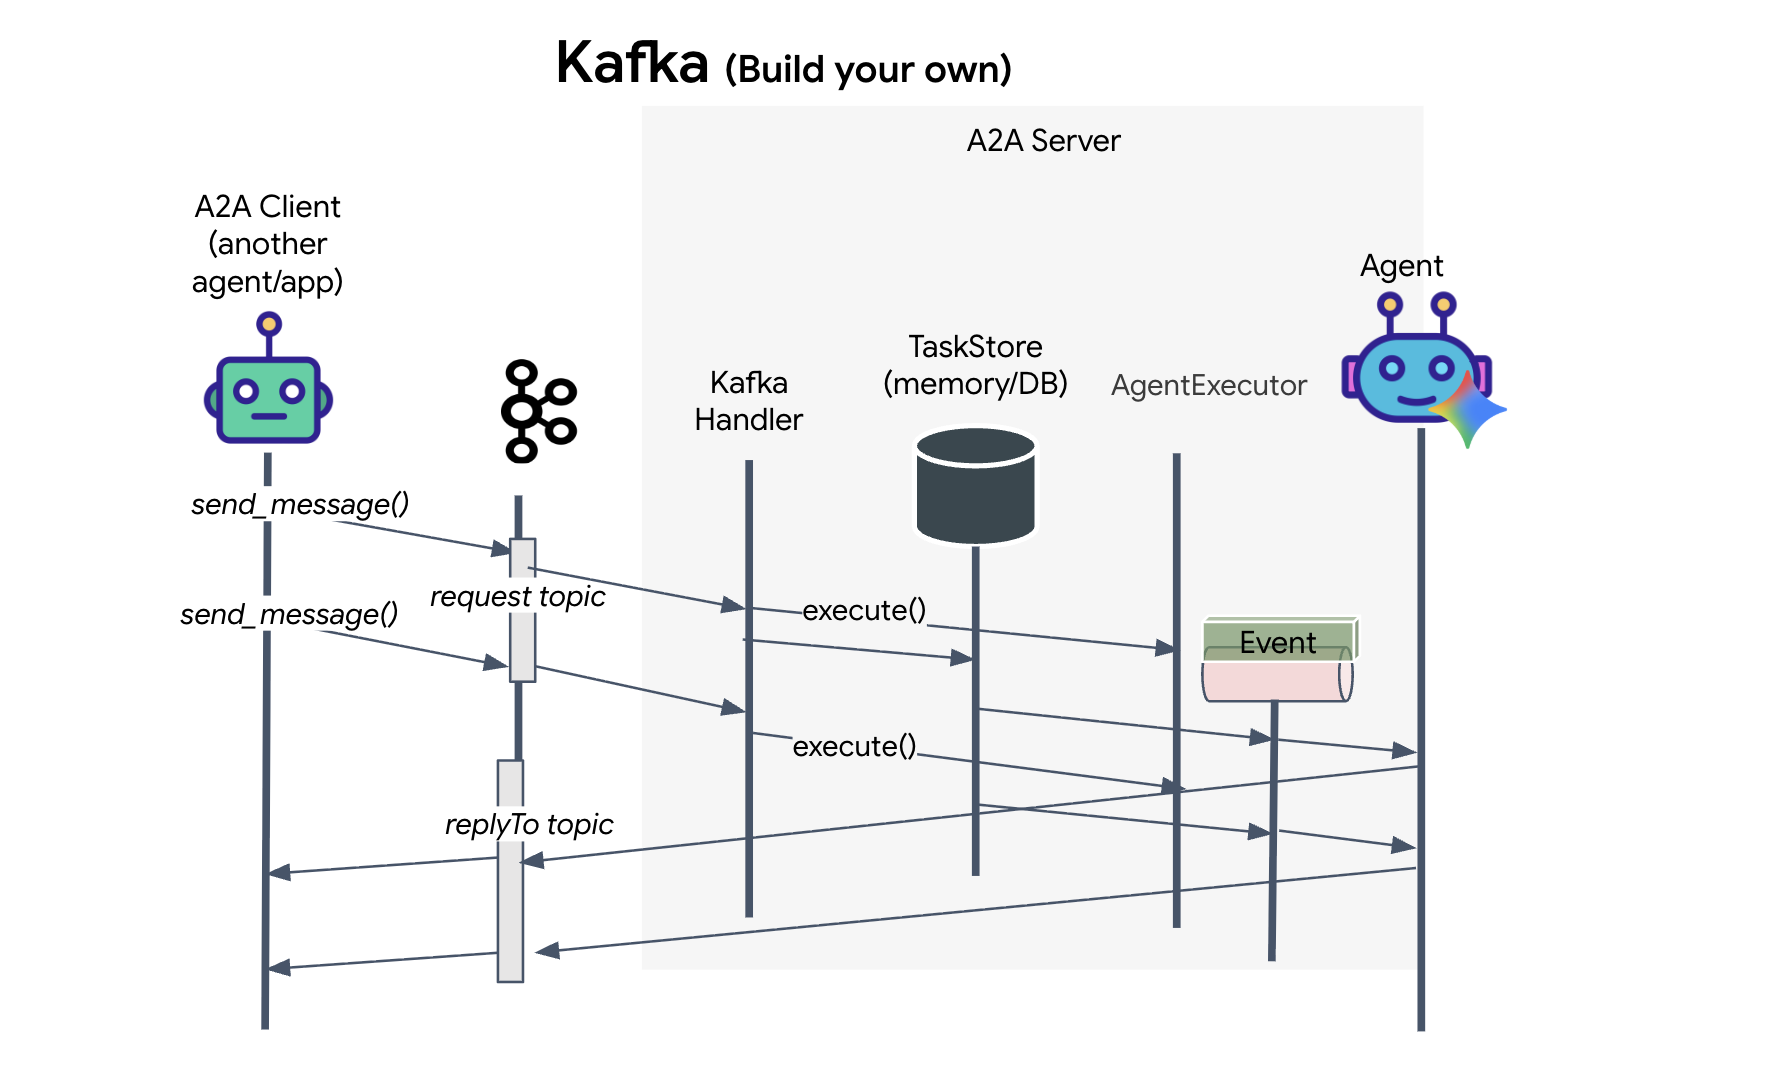
Under the hood, these transports handle the flow of data quite differently. In the HTTP model, the client sends a JSON request and holds the connection open, waiting for the agent to finish its task and return the complete result in one go. gRPC optimizes this by using binary data and HTTP/2, allowing for both simple request-response cycles and real-time streaming where the agent sends updates (like "thought" or "artifact created") as they happen. The Kafka implementation works asynchronously: the client publishes a request to a highly durable "request topic" and listens on a separate "reply topic." The server picks up the message when it can, processes it, and posts the result back, meaning the two never talk directly to each other.
The choice comes down to your specific requirements for speed, complexity, and persistence. HTTP is the easiest to get started with and debug, making it perfect for simple integrations. gRPC is the superior choice for internal service-to-service communication where low latency and streaming task updates are critical. However, Kafka stands apart as the resilient choice, because it stores requests on disk in a queue, your tasks survive even if the agent server crashes or restarts, providing a level of durability and decoupling that neither HTTP nor gRPC can offer.
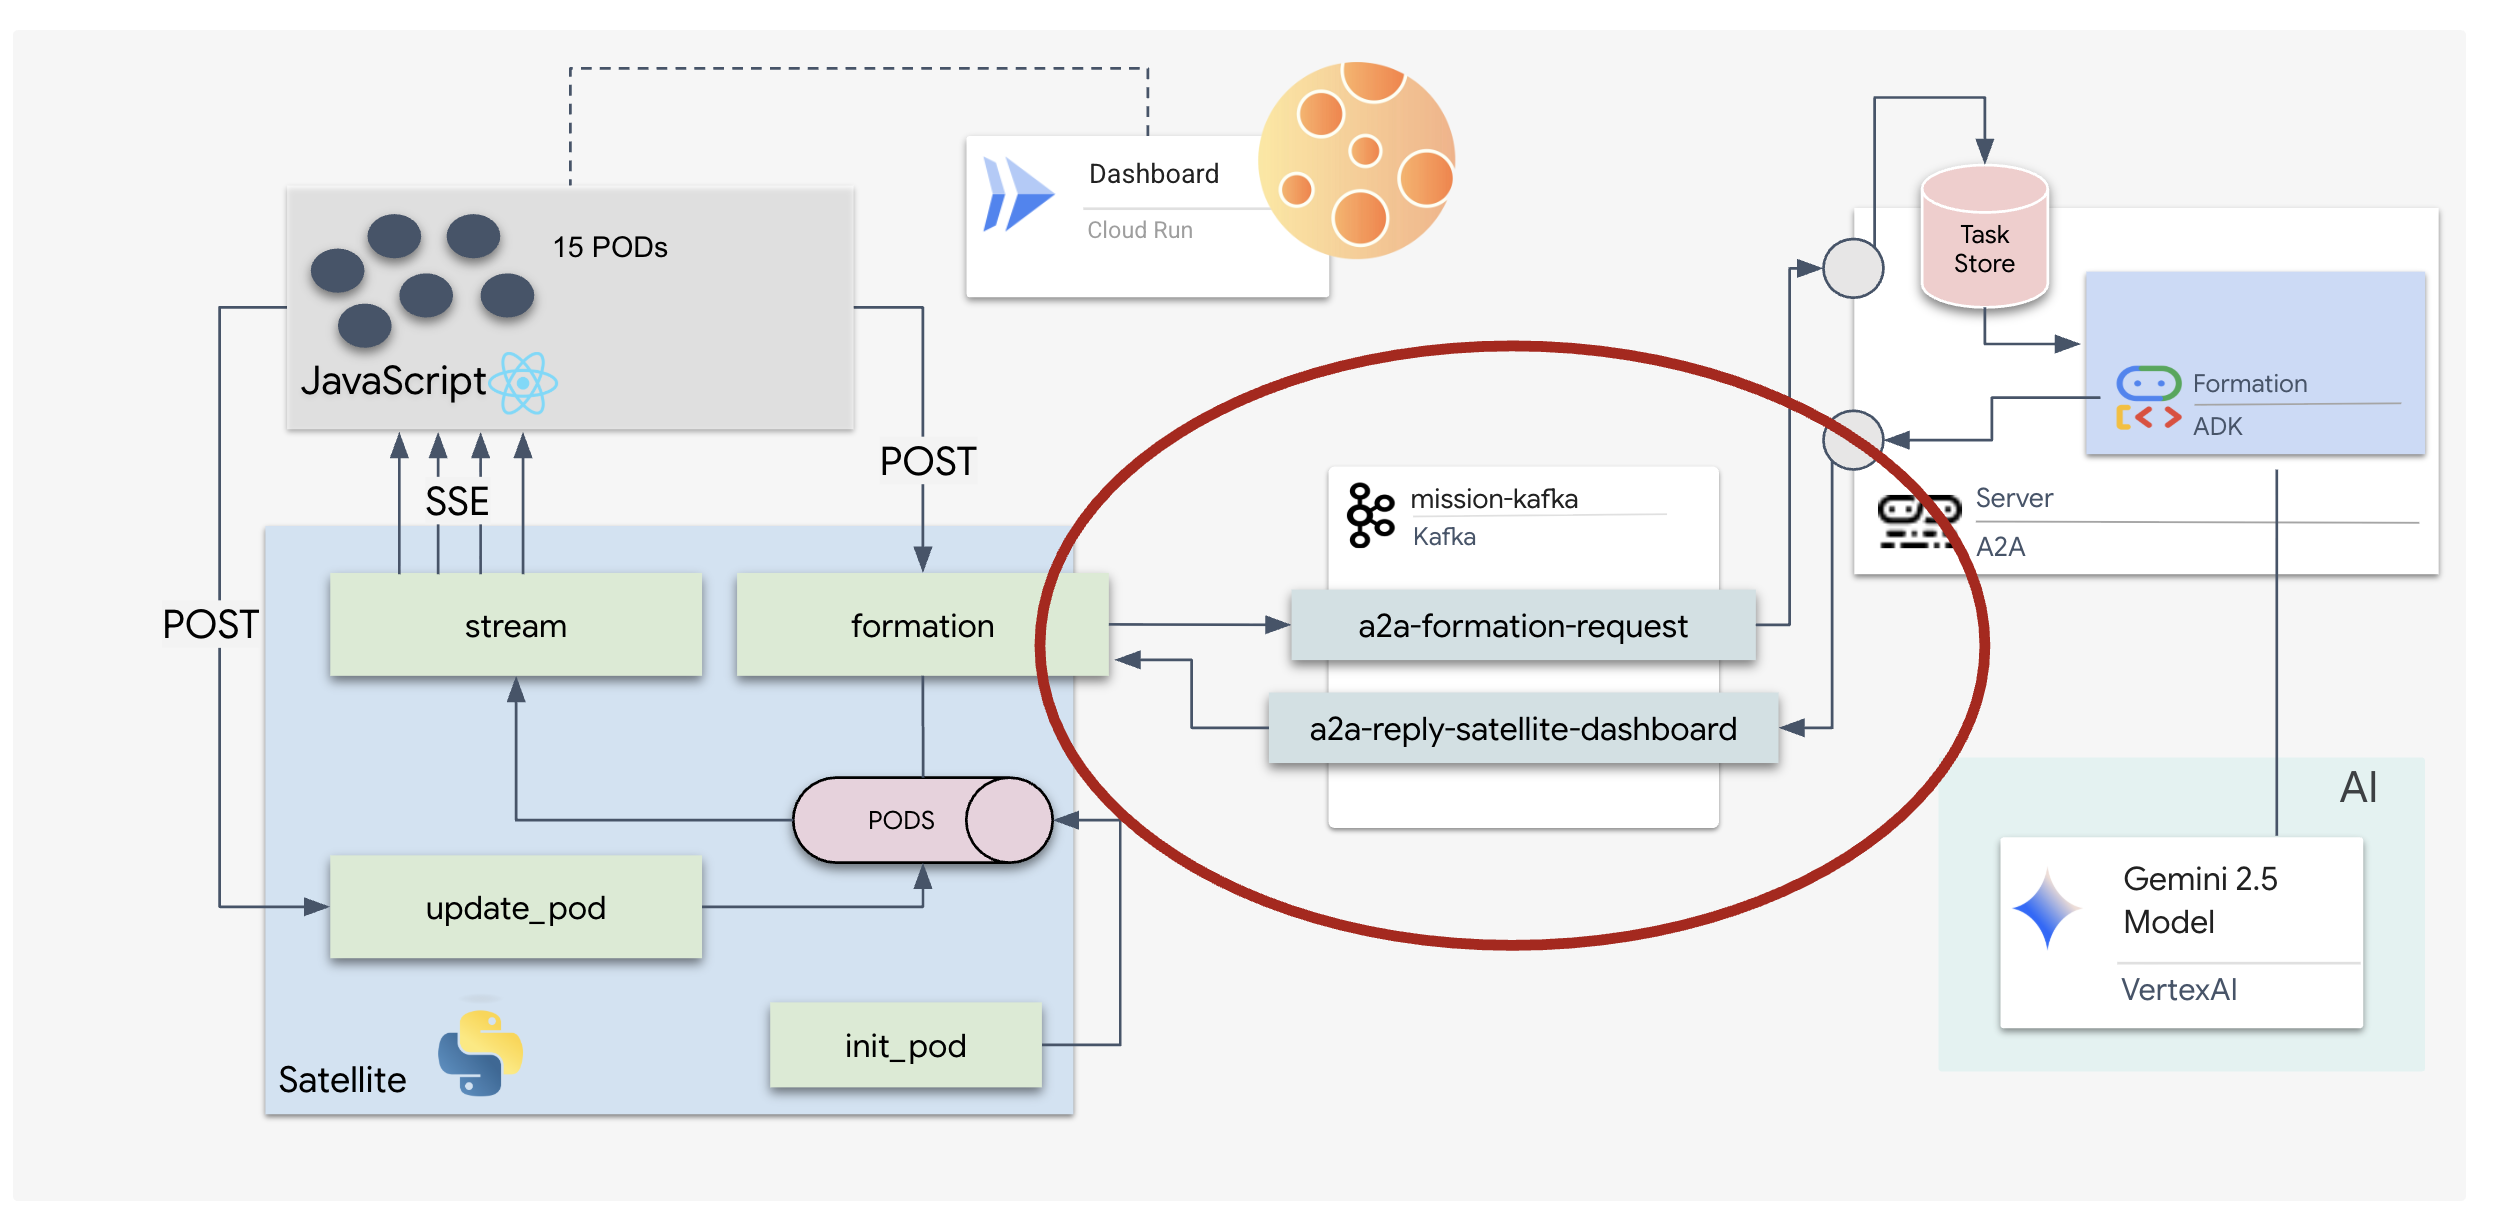
Custom transportation layer: Kafka
Kafka serves as the asynchronous backbone that decouples the brain of the operation (Formation Agent) from the physical controls (the Satellite Station). Instead of forcing the system to wait on a synchronous connection while the agent calculates complex vectors, the agent publishes its results as events to a Kafka topic. This acts as a persistent buffer, allowing the Satellite to consume instructions at its own pace and ensuring that formation data is never lost, even with significant network latency or a temporary system crash.
By using Kafka, you transform a slow, linear process into a resilient, streaming pipeline where instructions and telemetry flow independently, keeping the mission's HUD responsive even during intense AI processing.
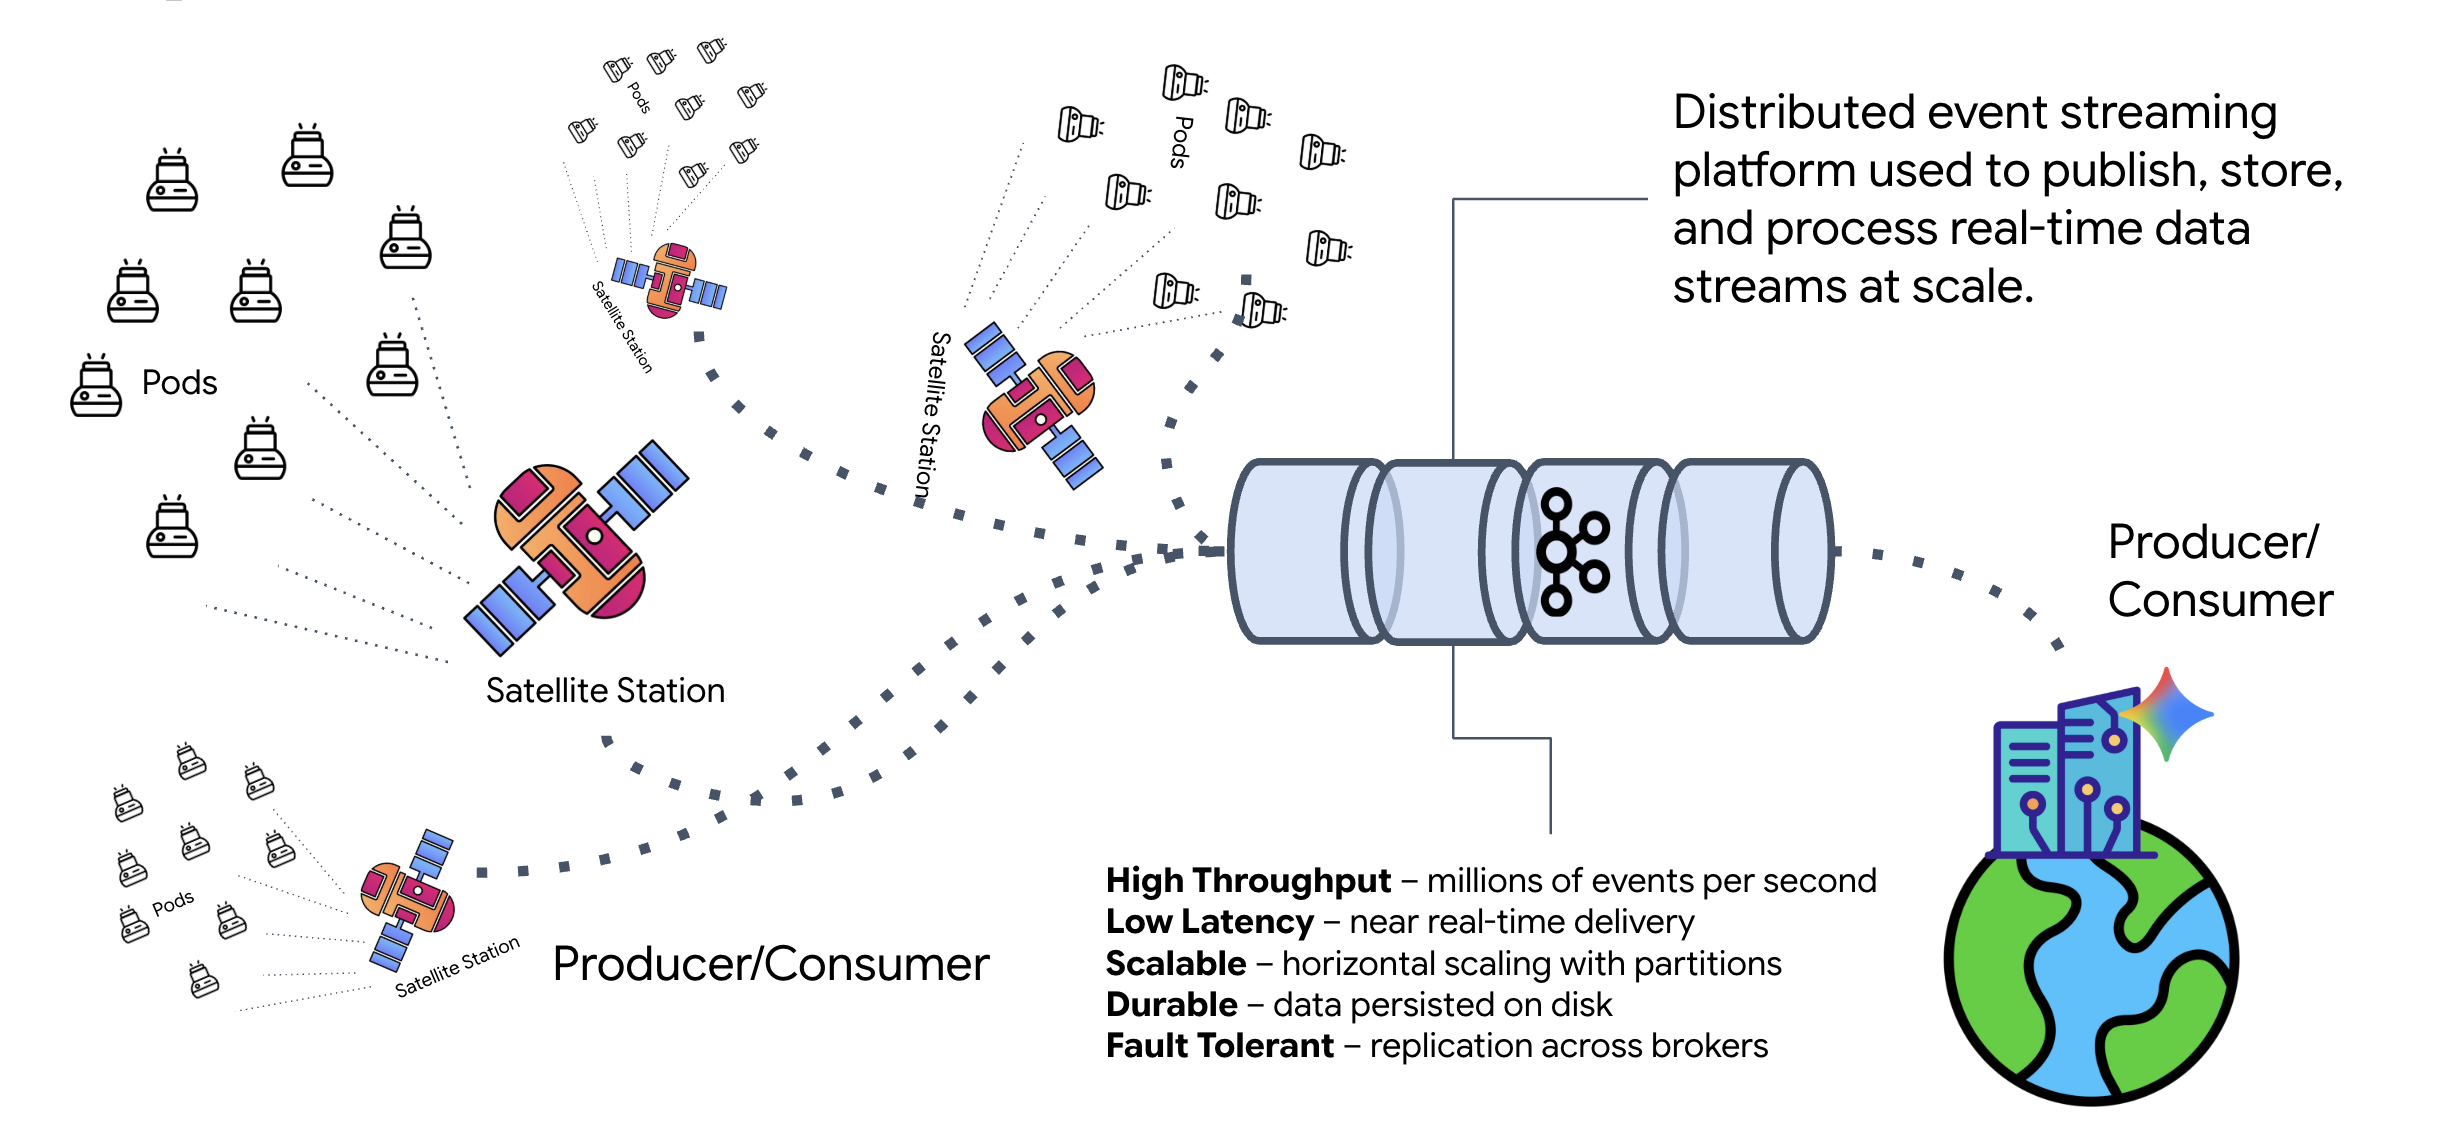
What is Kafka?
Kafka is a distributed event-streaming platform. In an Event-Driven Architecture (EDA):
- Producers publish messages to "Topics."
- Consumers subscribe to those topics and react when a message arrives.
Why use Kafka?
It decouples your systems. The Formation Agent operates autonomously, waiting for incoming requests without needing to know the identity or status of the sender. This decouples responsibility, ensuring that even if the Satellite goes offline, the workflow remains intact; Kafka simply stores the messages until the Satellite reconnects.
What about Google Cloud Pub/Sub?
You can absolutely use Google Cloud Pub/Sub for this! Pub/Sub is Google's serverless messaging service. While Kafka is great for high-throughput and "replayable" streams, Pub/Sub is often preferred for its ease of use. For this lab, we are using Kafka to simulate a robust, persistent message bus.
Start the Local Kafka Cluster
Copy and paste the entire command block below into your terminal. This will download the official Kafka image and start it in the background.
👉💻 Execute these commands in your terminal:
# Navigate to the correct mission directory first
cd $HOME/way-back-home/level_5

# Run the Kafka container in detached mode
docker run -d \
  --name mission-kafka \
  -p 9092:9092 \
  -e KAFKA_PROCESS_ROLES='broker,controller' \
  -e KAFKA_NODE_ID=1 \
  -e KAFKA_CONTROLLER_LISTENER_NAMES=CONTROLLER \
  -e KAFKA_LISTENERS=PLAINTEXT://:9092,CONTROLLER://:9093 \
  -e KAFKA_ADVERTISED_LISTENERS=PLAINTEXT://127.0.0.1:9092 \
  -e KAFKA_CONTROLLER_QUORUM_VOTERS=1@127.0.0.1:9093 \
  -e KAFKA_OFFSETS_TOPIC_REPLICATION_FACTOR=1 \
  apache/kafka:4.2.0-rc1
👉💻 Check that the container is running with the docker ps command.
docker ps
👀 You should see an output confirming that the mission-kafka container is running and port 9092 is exposed.
CONTAINER ID   IMAGE                  COMMAND                  CREATED          STATUS          PORTS                               NAMES
c1a2b3c4d5e6   apache/kafka:4.2.0-rc1    "/opt/kafka/bin/kafka..."   15 seconds ago   Up 14 seconds   0.0.0.0:9092->9092/tcp, 9093/tcp   mission-kafka
What is a Kafka Topic?
Think of a Kafka topic as a dedicated channel or category for messages. It's like a logbook where event records are stored in the order they were produced. Producers write messages to specific topics, and consumers read from those topics. This decouples the sender from the receiver; the producer doesn't need to know which consumer will read the data, it only needs to send it to the correct "channel." In our mission, we will create two topics: one for sending formation requests to the agent, and another for the agent to publish its replies for the satellite to read.
👉💻 Run the following commands to create the required topics inside the running Docker container.
# Create the topic for formation requests
docker exec mission-kafka /opt/kafka/bin/kafka-topics.sh \
  --create \
  --topic a2a-formation-request \
  --bootstrap-server 127.0.0.1:9092

# Create the topic where the satellite dashboard will listen for replies
docker exec mission-kafka /opt/kafka/bin/kafka-topics.sh \
  --create \
  --topic a2a-reply-satellite-dashboard \
  --bootstrap-server 127.0.0.1:9092
👉💻 To confirm that your channels are open, run the list command:
docker exec mission-kafka /opt/kafka/bin/kafka-topics.sh \
  --list \
  --bootstrap-server 127.0.0.1:9092
👀 You should see the names of the topics you just created.
a2a-formation-request
a2a-reply-satellite-dashboard
Your Kafka instance is now fully configured and ready to route mission-critical data.
Implementing the Kafka A2A Server
The Agent-to-Agent (A2A) protocol establishes a standardized framework for interoperability between independent agentic systems. It allows agents developed by different teams or running on different infrastructures to discover one another and collaborate effectively without requiring bespoke integration logic for every connection.
The reference implementation, a2a-python, is a foundational library for running these agentic applications. A core feature of its design is extensibility; it abstracts the communication layer, allowing developers to swap out protocols like HTTP for others.
In this project, we leverage this extensibility using a custom Kafka implementation: a2a-python-kafka. We will use this implementation to demonstrate how the A2A standard allows you to adapt agent communication to fit different architectural needs—in this case, swapping synchronous HTTP for an asynchronous event bus.
Enabling A2A for the Formation Agent
We will now wrap our agent in an A2A Server, turning it into an interoperable service that can:
- Listen for tasks from a Kafka topic.
- Hand off received tasks to the underlying ADK agent for processing.
- Publish the result to a reply topic.
👉✏️ In $HOME/way-back-home/level_5/agent/agent_to_kafka_a2a.py, replace #REPLACE-CREATE-KAFKA-A2A-SERVER with the following code:
async def create_kafka_server(
    agent: BaseAgent,
    *,
    bootstrap_servers: str | List[str] = "localhost:9092",
    request_topic: str = "a2a-formation-request",
    consumer_group_id: str = "a2a-agent-group",
    agent_card: Optional[Union[AgentCard, str]] = None,
    runner: Optional[Runner] = None,
    **kafka_config: Any,
) -> KafkaServerApp:
  """Convert an ADK agent to a A2A Kafka Server application.
  Args:
      agent: The ADK agent to convert
      bootstrap_servers: Kafka bootstrap servers.
      request_topic: Topic to consume requests from.
      consumer_group_id: Consumer group ID for the server.
      agent_card: Optional pre-built AgentCard object or path to agent card
                  JSON. If not provided, will be built automatically from the
                  agent.
      runner: Optional pre-built Runner object. If not provided, a default
              runner will be created using in-memory services.
      **kafka_config: Additional Kafka configuration.

  Returns:
      A KafkaServerApp that can be run with .run() or .start()
  """
  # Set up ADK logging
  adk_logger = logging.getLogger("google_adk")
  adk_logger.setLevel(logging.INFO)

  async def create_runner() -> Runner:
    """Create a runner for the agent."""
    return Runner(
        app_name=agent.name or "adk_agent",
        agent=agent,
        # Use minimal services - in a real implementation these could be configured
        artifact_service=InMemoryArtifactService(),
        session_service=InMemorySessionService(),
        memory_service=InMemoryMemoryService(),
        credential_service=InMemoryCredentialService(),
    )

  # Create A2A components
  task_store = InMemoryTaskStore()

  agent_executor = A2aAgentExecutor(
      runner=runner or create_runner,
  )

  # Initialize logic handler
  from a2a.server.request_handlers.default_request_handler import DefaultRequestHandler

  logic_handler = DefaultRequestHandler(
      agent_executor=agent_executor, task_store=task_store
  )

  # Prepare Agent Card
  rpc_url = f"kafka://{bootstrap_servers}/{request_topic}"

  # Create Kafka Server App
  server_app = KafkaServerApp(
      request_handler=logic_handler,
      bootstrap_servers=bootstrap_servers,
      request_topic=request_topic,
      consumer_group_id=consumer_group_id,
      **kafka_config
  )

  return server_app
This code sets up the key components:
- The Runner: Provides the runtime for the agent (handling memory, credentials, etc.).
- Task Store: Tracks the state of requests as they move from "Pending" to "Completed."
- Agent Executor: Takes a task from Kafka and passes it to the agent to calculate coordinates.
- KafkaServerApp: Manages the physical connection to the Kafka broker.
Configure Environment Variables
The ADK setup created a .env file with your Google Vertex AI settings inside the agent's folder. We need to move this to the project root and add the coordinates for our Kafka cluster.
Run the following commands to copy the file and append the Kafka server address:
cd $HOME/way-back-home/level_5
# 1. Copy the API keys from the agent folder to the project root
cp agent/formation/.env .env

# 2. Append the Kafka Bootstrap Server address to the file
echo -e "\nKAFKA_BOOTSTRAP_SERVERS=localhost:9092" >> .env

# 3. Verify the file content
echo "✅ Environment configured. Here are the last few lines:"
tail .env
Verify the A2A Interstellar Loop
Now we'll ensure the asynchronous event loop is functioning correctly with a live-fire test: sending a manual signal through the Kafka cluster and watching for the agent's response.
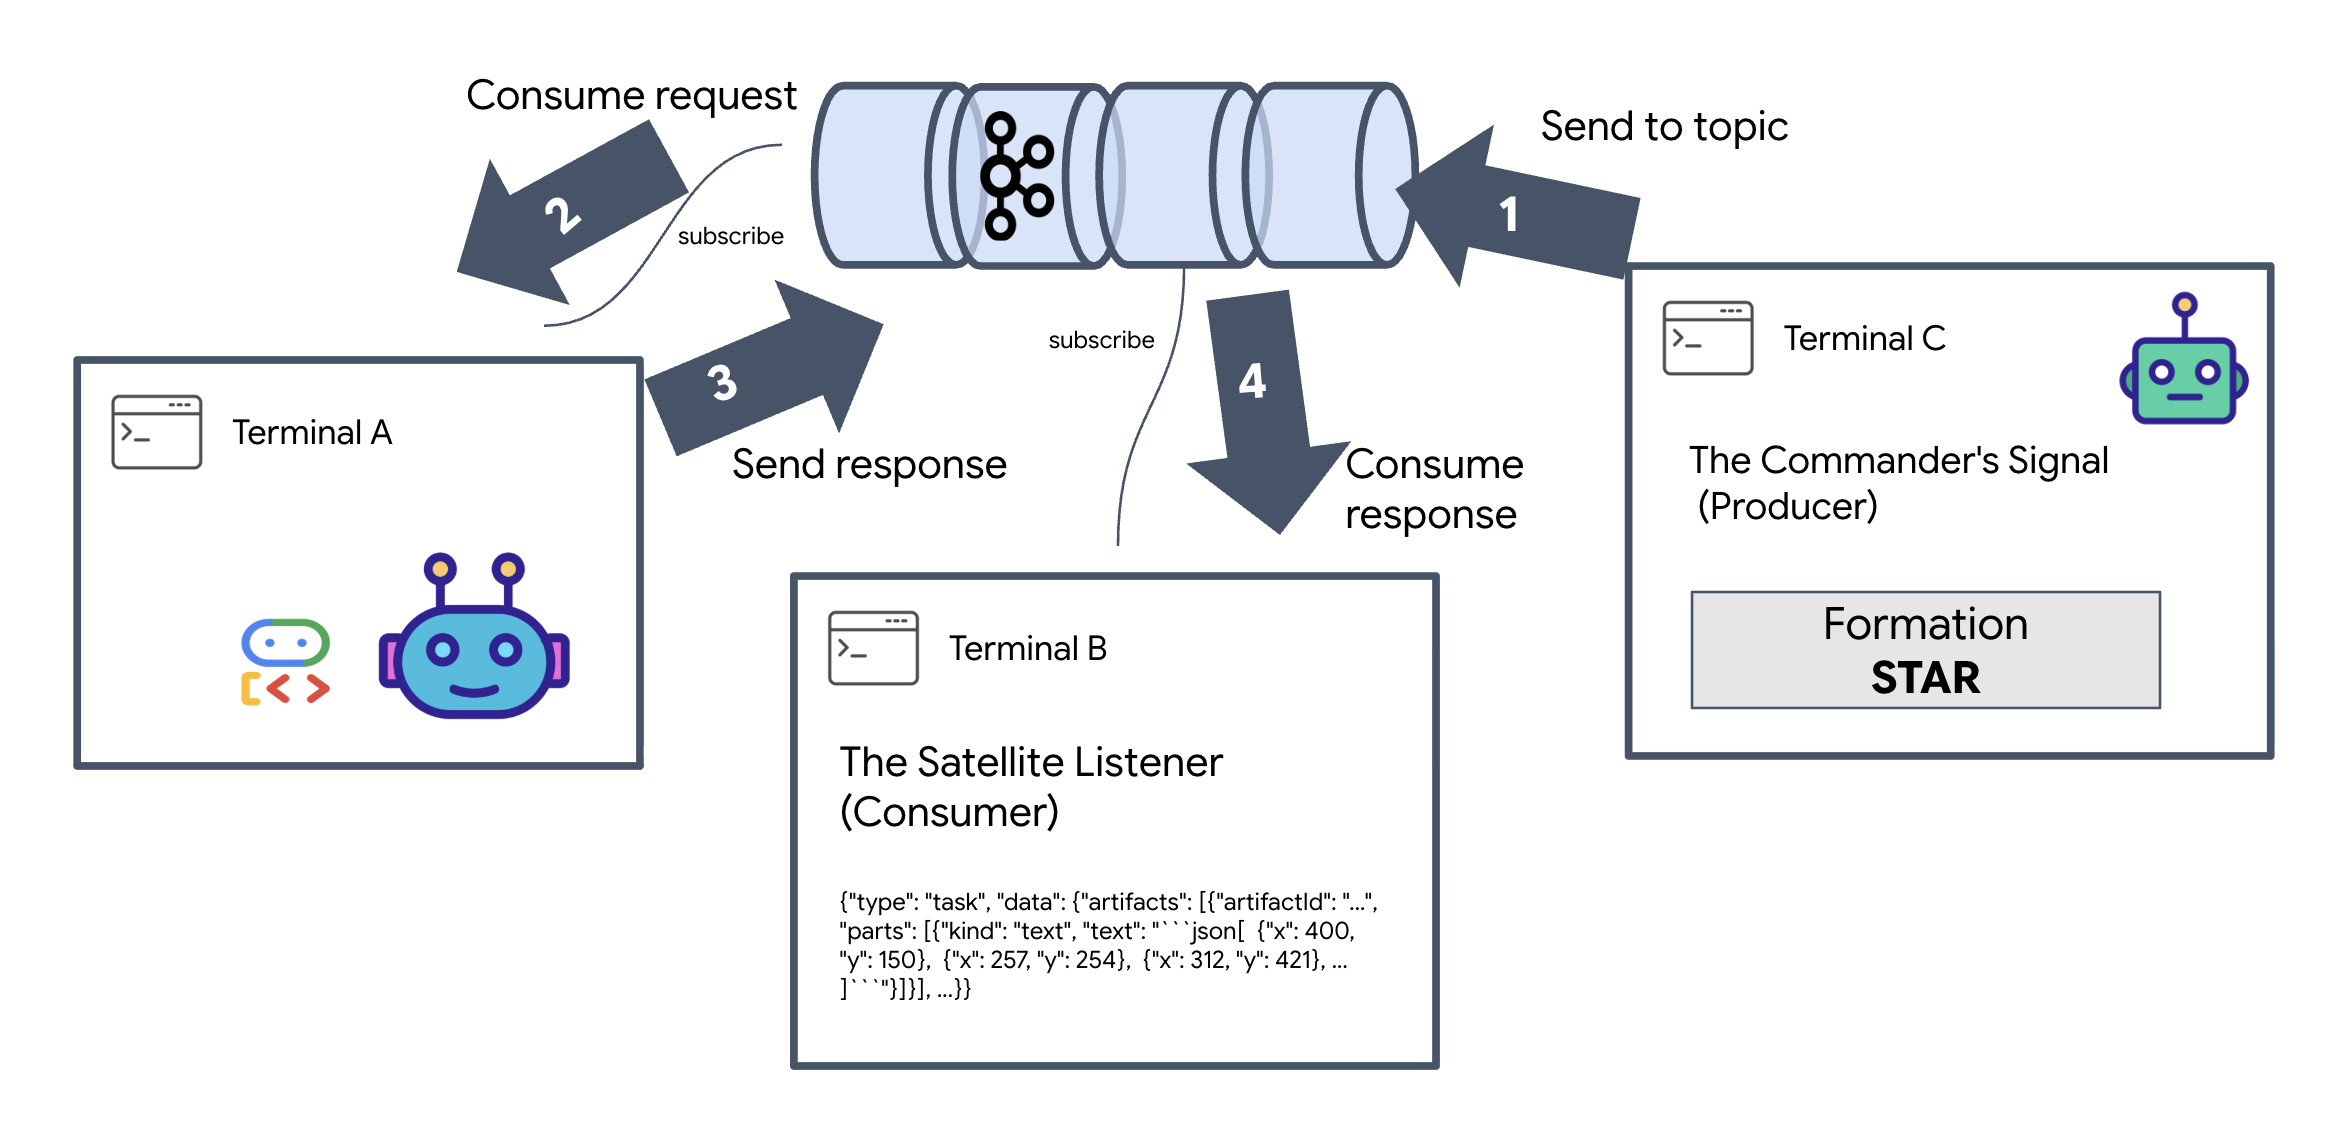
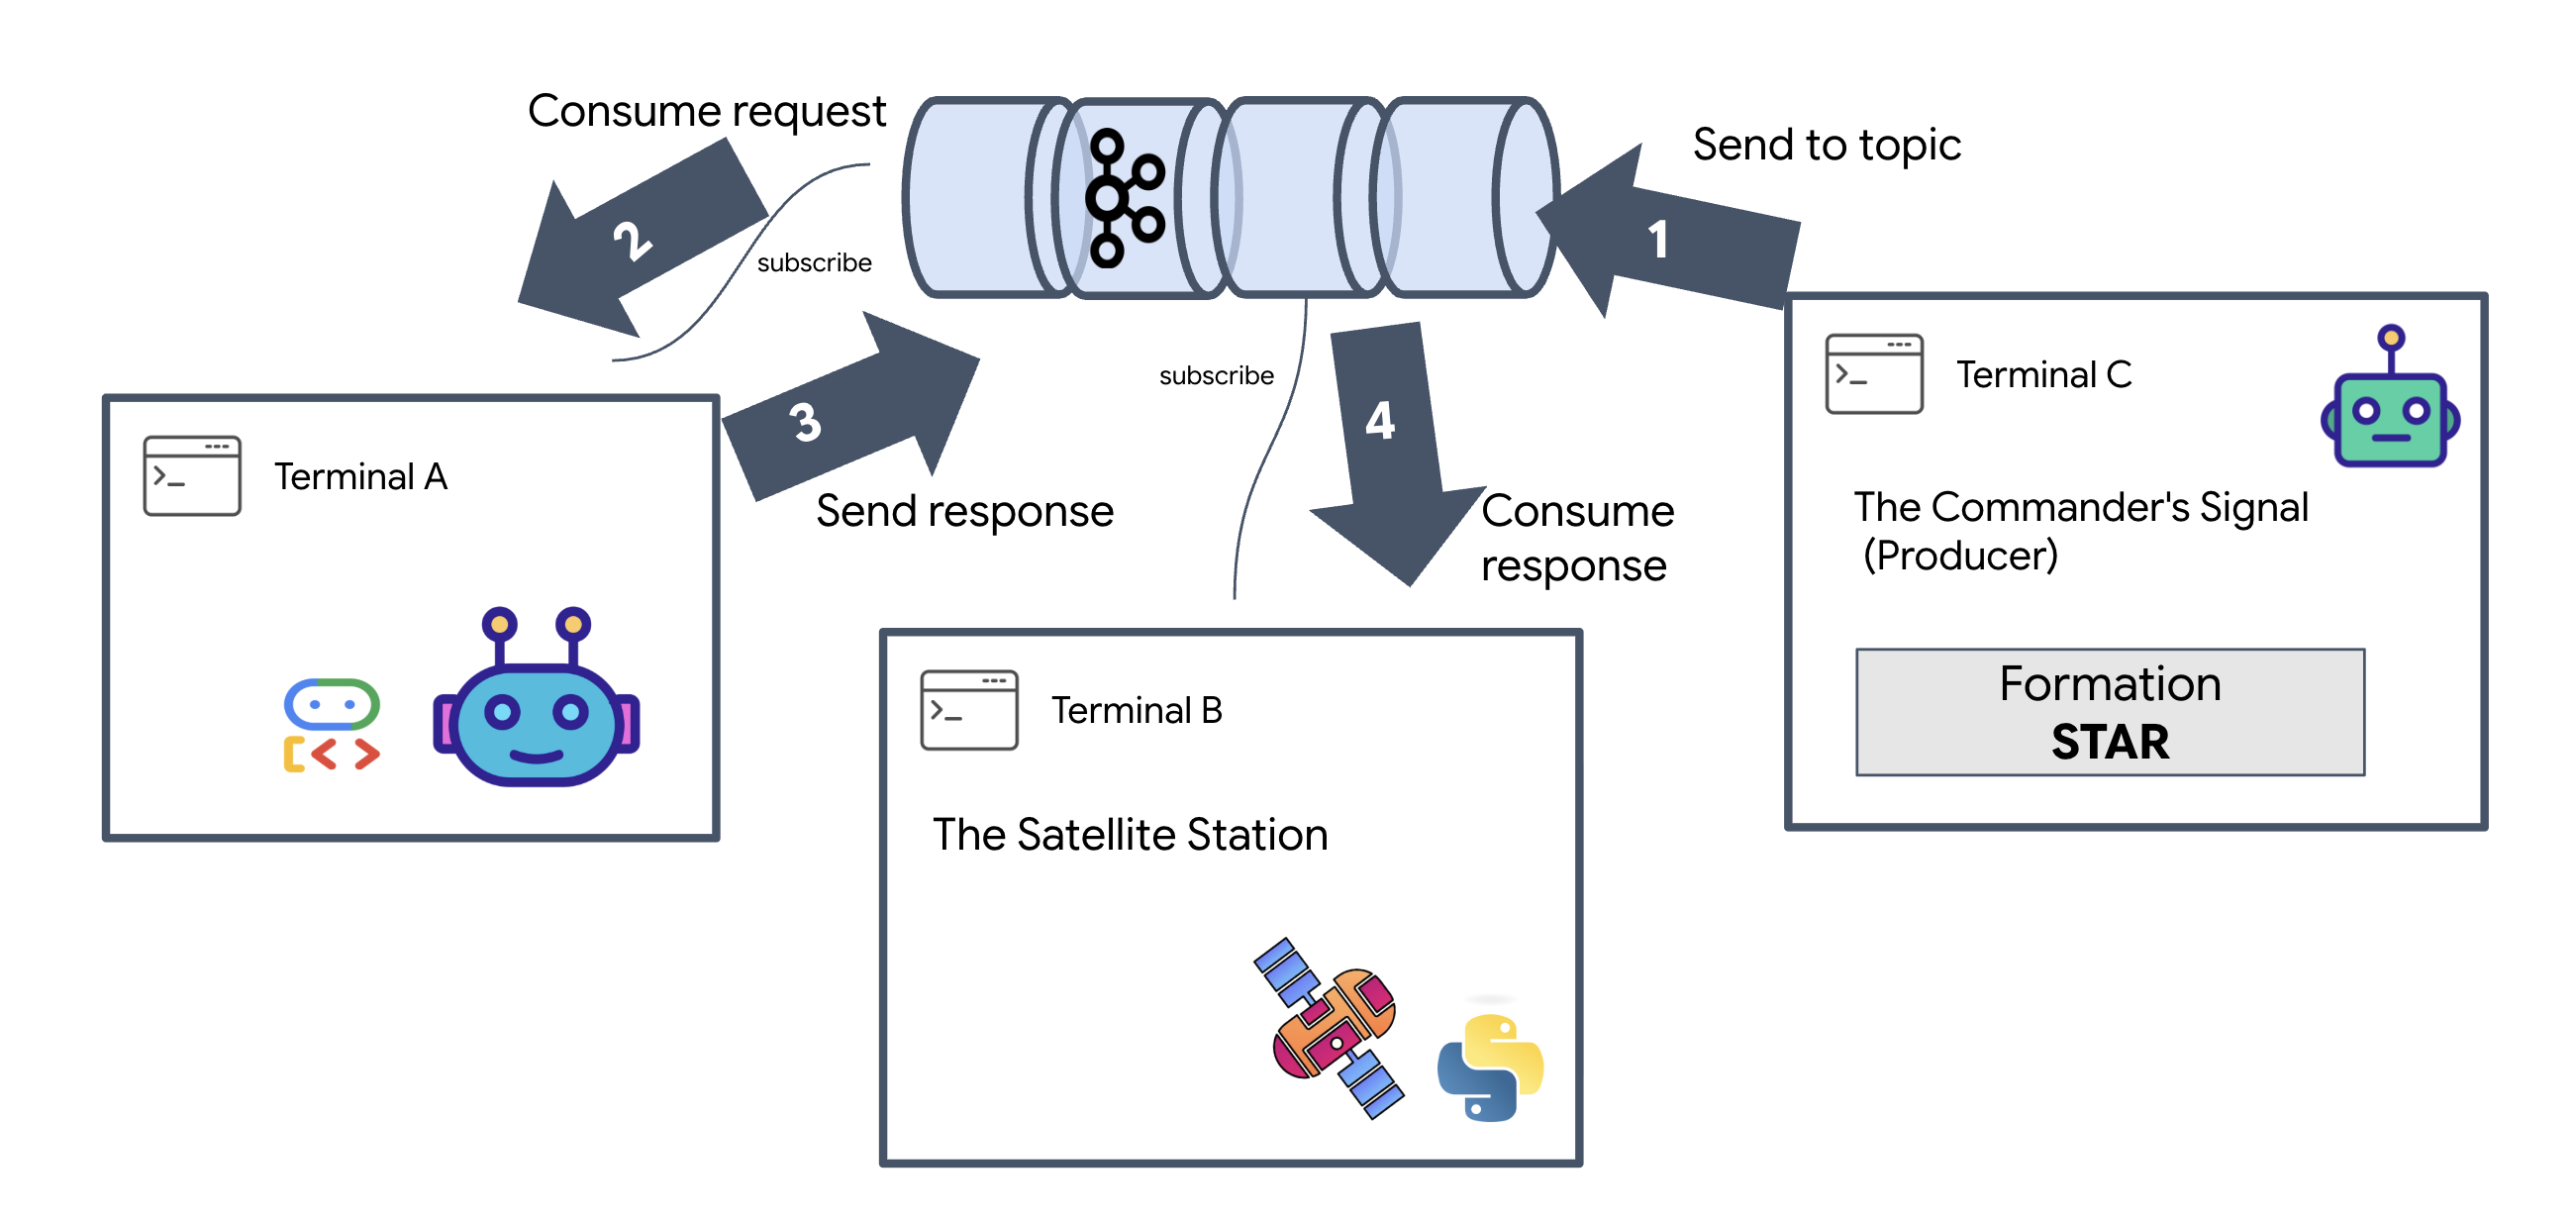
To see the full lifecycle of an event, we will use three separate terminals.
Terminal A: The Formation Agent (A2A Kafka Server)
👉💻 This terminal runs the Python process that listens to Kafka and uses Gemini to do the geometric math.
cd $HOME/way-back-home/level_5
. scripts/check_kafka.sh
# Install the custom Kafka-enabled A2A library
uv pip install git+https://github.com/weimeilin79/a2a-python-kafka.git

# Start the Agent Server
uv run agent/server.py
Wait until you see:
[INFO] Kafka Server App Started. Starting to consume requests...
Terminal B: The Satellite Listener (Consumer)
👉💻 In this terminal, we will listen to the reply topic. This simulates the Satellite waiting for instructions.
# Listen for the AI's response on the satellite channel
docker exec mission-kafka /opt/kafka/bin/kafka-console-consumer.sh \
  --bootstrap-server localhost:9092 \
  --topic a2a-reply-satellite-dashboard \
  --from-beginning \
  --property "print.headers=true"
This terminal will appear idle. It is waiting for the Agent to publish a message.
Terminal C: The Commander's Signal (Producer)
👉💻 Now, we will send a raw A2A-formatted request into the a2a-formation-request topic. We must include specific Kafka Headers so the Agent knows where to send the answer.
echo 'correlation_id=ping-manual-01,reply_topic=a2a-reply-satellite-dashboard|{"method": "message_send", "params": {"message": {"message_id": "msg-001", "role": "user", "parts": [{"text": "STAR"}]}}, "streaming": false, "agent_card": {"name": "DiagnosticTool", "version": "1.0.0"}}' | \
docker exec -i mission-kafka /opt/kafka/bin/kafka-console-producer.sh \
  --bootstrap-server localhost:9092 \
  --topic a2a-formation-request \
  --property "parse.headers=true" \
  --property "headers.key.separator==" \
  --property "headers.delimiter=|"
Analyzing the Result
👀 If the loop is successful, switch to Terminal B. A large JSON block should appear instantly. It will start with the header we sent correlation_id:ping-manual-01. Followed by a task object. If you look closely at the parts section within that JSON, you will see the raw X and Y coordinates Gemini calculated for your 15 pods:
{"type": "task", "data": {"artifacts": [{"artifactId": "...", "parts": [{"kind": "text", "text": "```json\n[\n {\"x\": 400, \"y\": 150},\n {\"x\": 257, \"y\": 254},\n {\"x\": 312, \"y\": 421},\n ... \n]\n```"}]}], ...}}
You have successfully decoupled the agent from the receiver. The "interstellar noise" of request-response latency no longer matters because our system is now entirely Event-Driven.
Before moving on, stop the background processes to free up network ports.
👉💻 In each terminal (A, B, and C):
- Press
Ctrl + Cto terminate the running process.
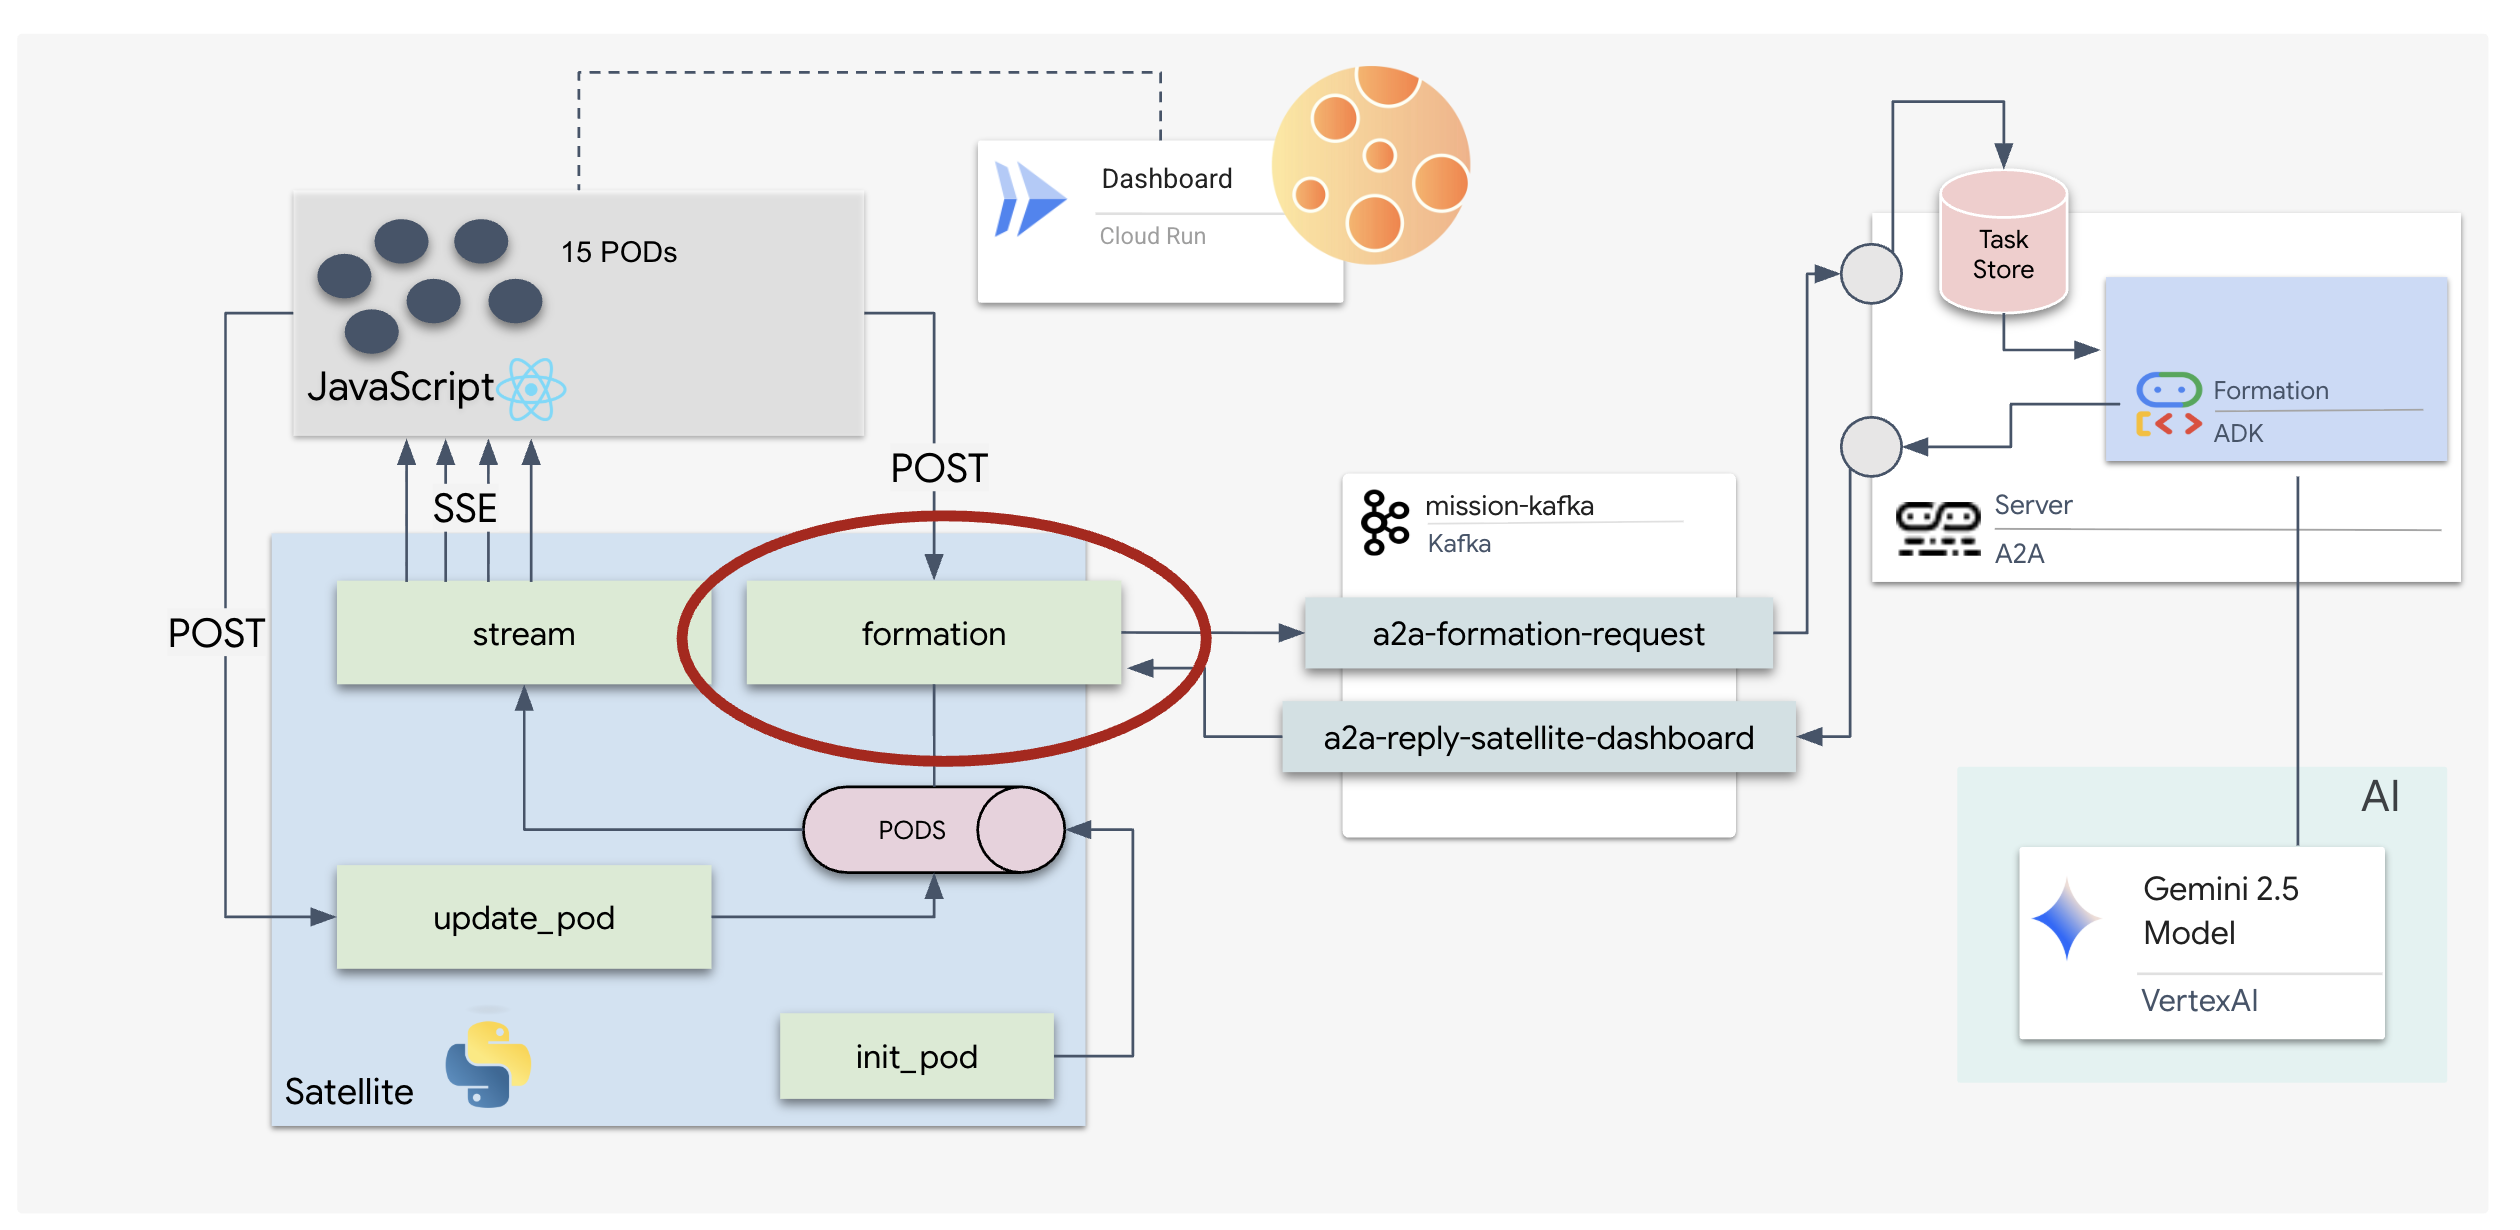
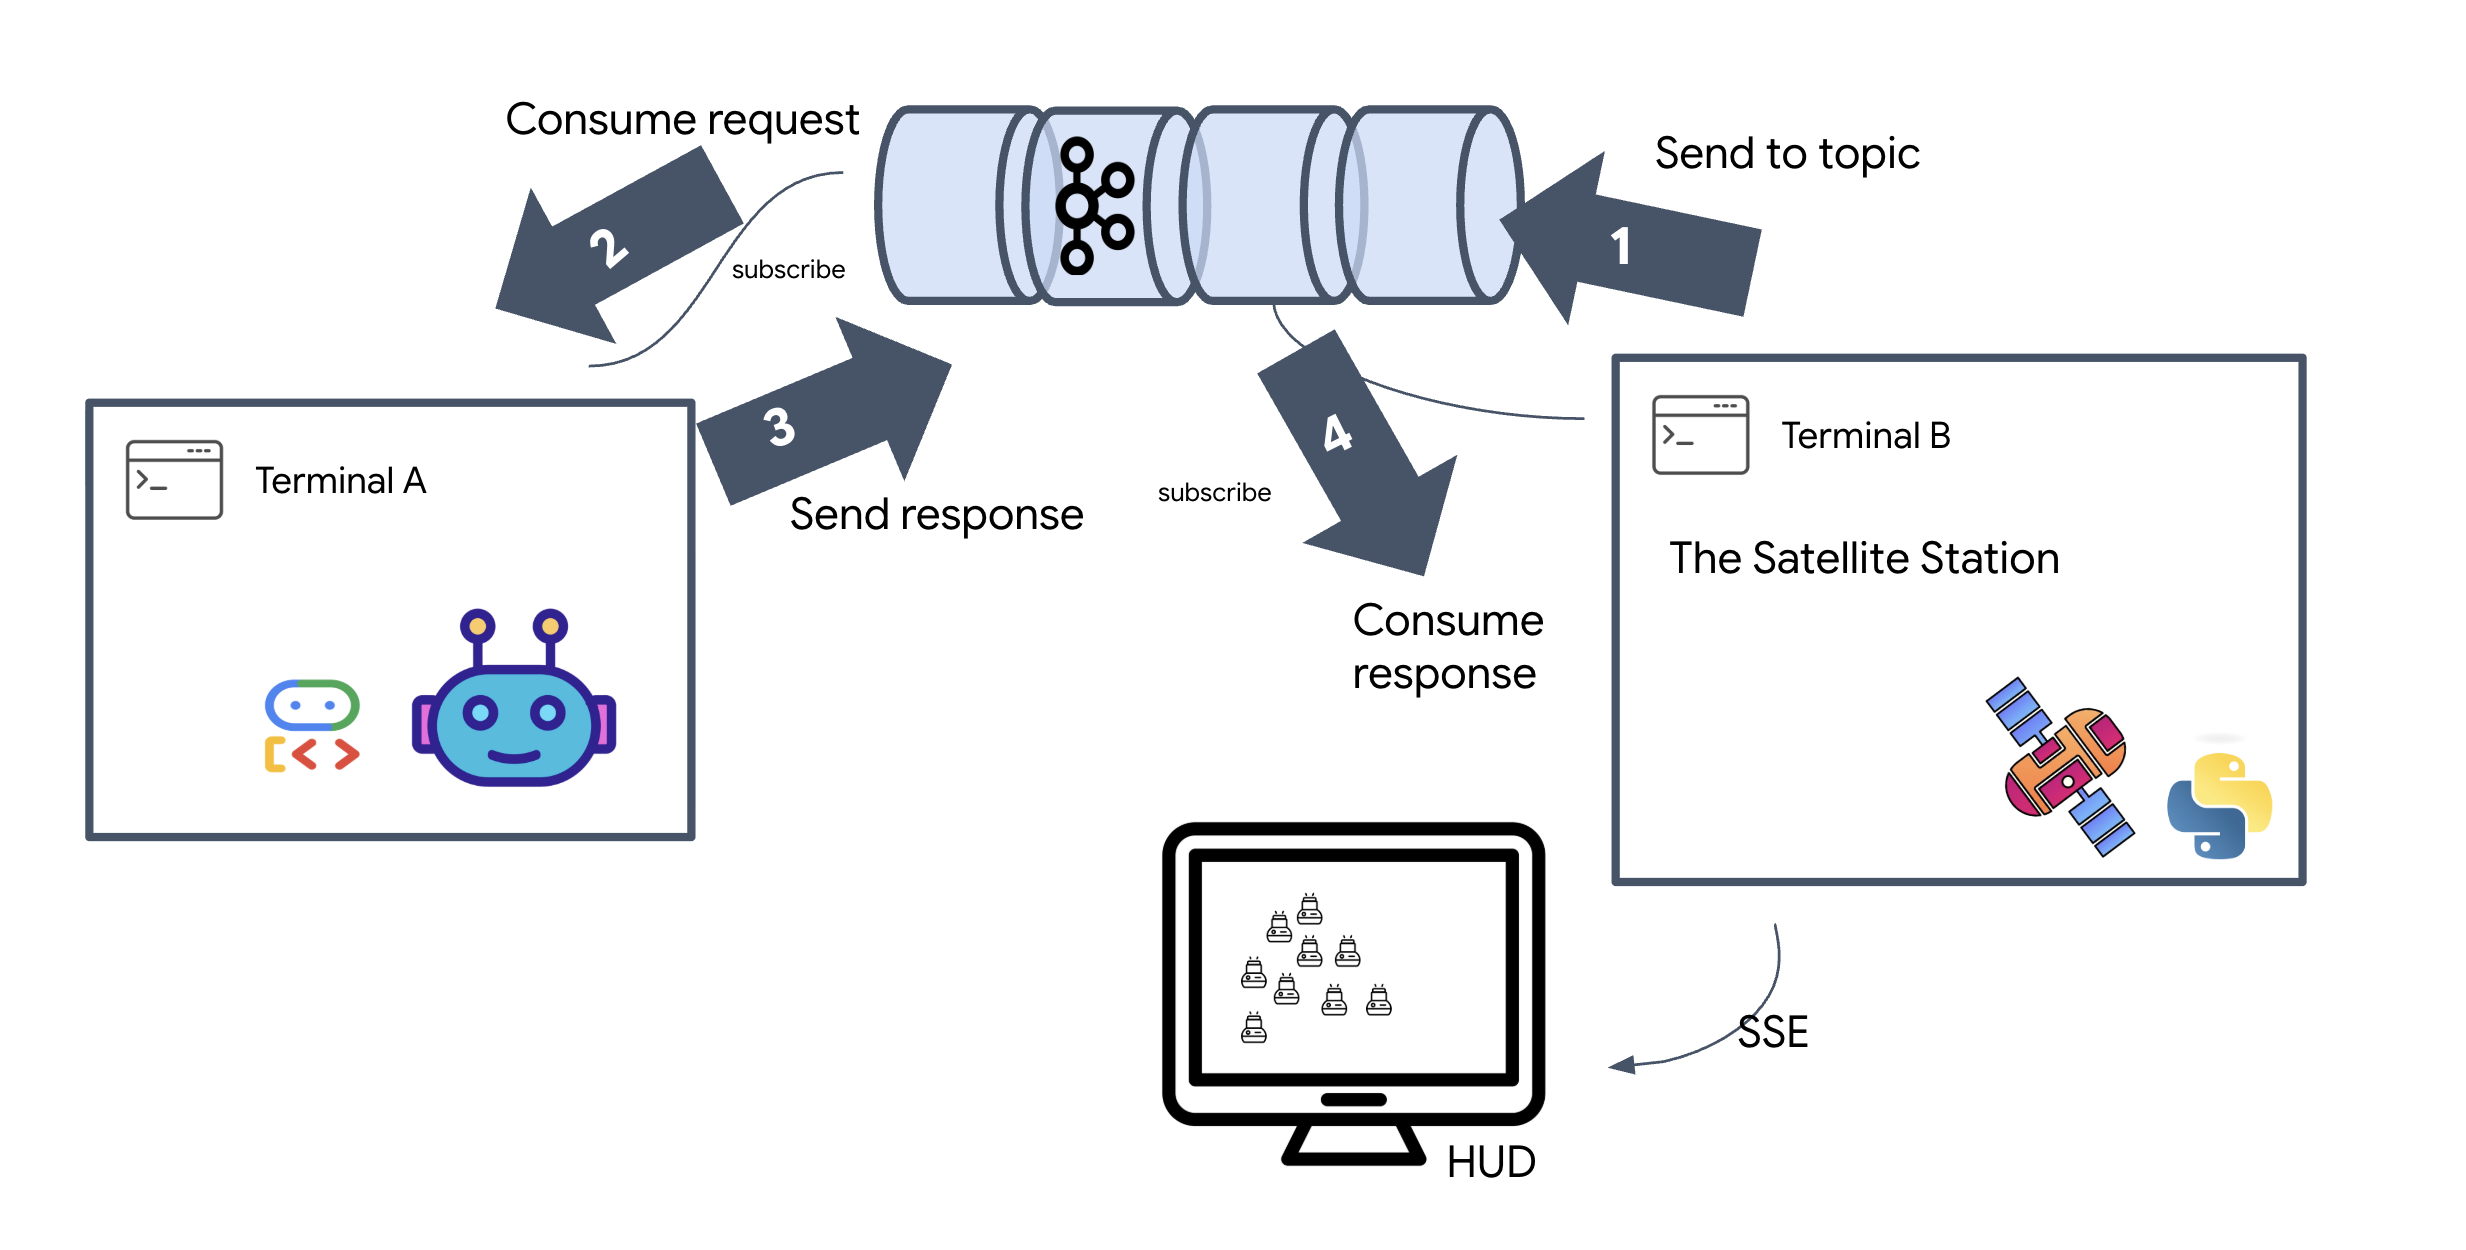
5. The Satellite Station (A2A Kafka Client and SSE)
In this step, we build the Satellite Station. This is the bridge between the Kafka cluster and the pilot's visual display (the React Frontend). This server acts as both a Kafka Client (to talk to the Agent) and an SSE Streamer (to talk to the browser).
What is a Kafka Client?
Think of the Kafka Cluster as a radio station. A Kafka Client is the radio receiver. The KafkaClientTransport allows our application to:
- Produce a message: Send a "Task" (e.g., "Star formation") to the Agent.
- Consume a reply: Listen on a specific "Reply Topic" to get the coordinates back from the Agent.
1. Initializing the Connection
We use FastAPI's lifespan event handler to ensure the Kafka connection starts when the server boots up and closes cleanly when it shuts down.
👉✏️ In $HOME/way-back-home/level_5/satellite/main.py, replace #REPLACE-CONNECT-TO-KAFKA-CLUSTER with the following code:
@asynccontextmanager
async def lifespan(app: FastAPI):
    global kafka_transport
    logger.info("Initializing Kafka Client Transport...")

    bootstrap_server = os.getenv("KAFKA_BOOTSTRAP_SERVERS")
    request_topic = "a2a-formation-request"
    reply_topic = "a2a-reply-satellite-dashboard"

    # Create AgentCard for the Client
    client_card = AgentCard(
        name="SatelliteDashboard",
        description="Satellite Dashboard Client",
        version="1.0.0",
        url="https://example.com/satellite-dashboard",
        capabilities=AgentCapabilities(),
        default_input_modes=["text/plain"],
        default_output_modes=["text/plain"],
        skills=[]
    )

    kafka_transport = KafkaClientTransport(
            agent_card=client_card,
            bootstrap_servers=bootstrap_server,
            request_topic=request_topic,
            reply_topic=reply_topic,
    )

    try:
        await kafka_transport.start()
        logger.info("Kafka Client Transport Started Successfully.")
    except Exception as e:
        logger.error(f"Failed to start Kafka Client: {e}")

    yield

    if kafka_transport:
        logger.info("Stopping Kafka Client Transport...")
        await kafka_transport.stop()
        logger.info("Kafka Client Transport Stopped.")
2. Sending a Command
When you click a button on the dashboard, the /formation endpoint is triggered. It acts as a Producer, wrapping your request into a formal A2A Message and sending it to the agent.
Key Logic:
- Asynchronous Communication:
kafka_transport.send_messagesends the request and waits for the new coordinates to arrive on thereply_topic. - Response Parsing: Gemini might return coordinates inside markdown blocks (e.g.,
json ...). The code below strips those out and converts the string into a Python list of points.
👉✏️ In $HOME/way-back-home/level_5/satellite/main.py, replace #REPLACE-FORMATION-REQUEST with the following code:
@app.post("/formation")
async def set_formation(req: FormationRequest):
    global FORMATION, PODS
    FORMATION = req.formation
    logger.info(f"Received formation request: {FORMATION}")

    if not kafka_transport:
        logger.error("Kafka Transport is not initialized!")
        return {"status": "error", "message": "Backend Not Connected"}

    try:
        # Construct A2A Message
        prompt = f"Create a {FORMATION} formation"
        logger.info(f"Sending A2A Message: '{prompt}'")

        from a2a.types import TextPart, Part, Role
        import uuid

        msg_id = str(uuid.uuid4())
        message_parts = [Part(TextPart(text=prompt))]

        msg_obj = Message(
            message_id=msg_id,
            role=Role.user,
            parts=message_parts
        )

        message_params = MessageSendParams(
            message=msg_obj
        )

        # Send and Wait for Response
        ctx = ClientCallContext()
        ctx.state["kafka_timeout"] = 120.0 # Timeout for GenAI latency
        response = await kafka_transport.send_message(message_params, context=ctx)

        logger.info("Received A2A Response.")

        content = None
        if isinstance(response, Message):
            content = response.parts[0].root.text if response.parts else None
        elif isinstance(response, Task):
            if response.artifacts and response.artifacts[0].parts:
                content = response.artifacts[0].parts[0].root.text

        if content:
            logger.info(f"Response Content: {content[:100]}...")
            try:
                clean_content = content.replace("```json", "").replace("```", "").strip()
                coords = json.loads(clean_content)

                if isinstance(coords, list):
                    logger.info(f"Parsed {len(coords)} coordinates.")
                    for i, pod_target in enumerate(coords):
                        if i < len(PODS):
                            PODS[i]["x"] = pod_target["x"]
                            PODS[i]["y"] = pod_target["y"]
                    return {"status": "success", "formation": FORMATION}
                else:
                    logger.error("Response JSON is not a list.")
            except json.JSONDecodeError as e:
                logger.error(f"Failed to parse Agent JSON response: {e}")
        else:
            logger.error(f"Could not extract content from response type {type(response)}")

    except Exception as e:
        logger.error(f"Error calling agent via Kafka: {e}")
        return {"status": "error", "message": str(e)}
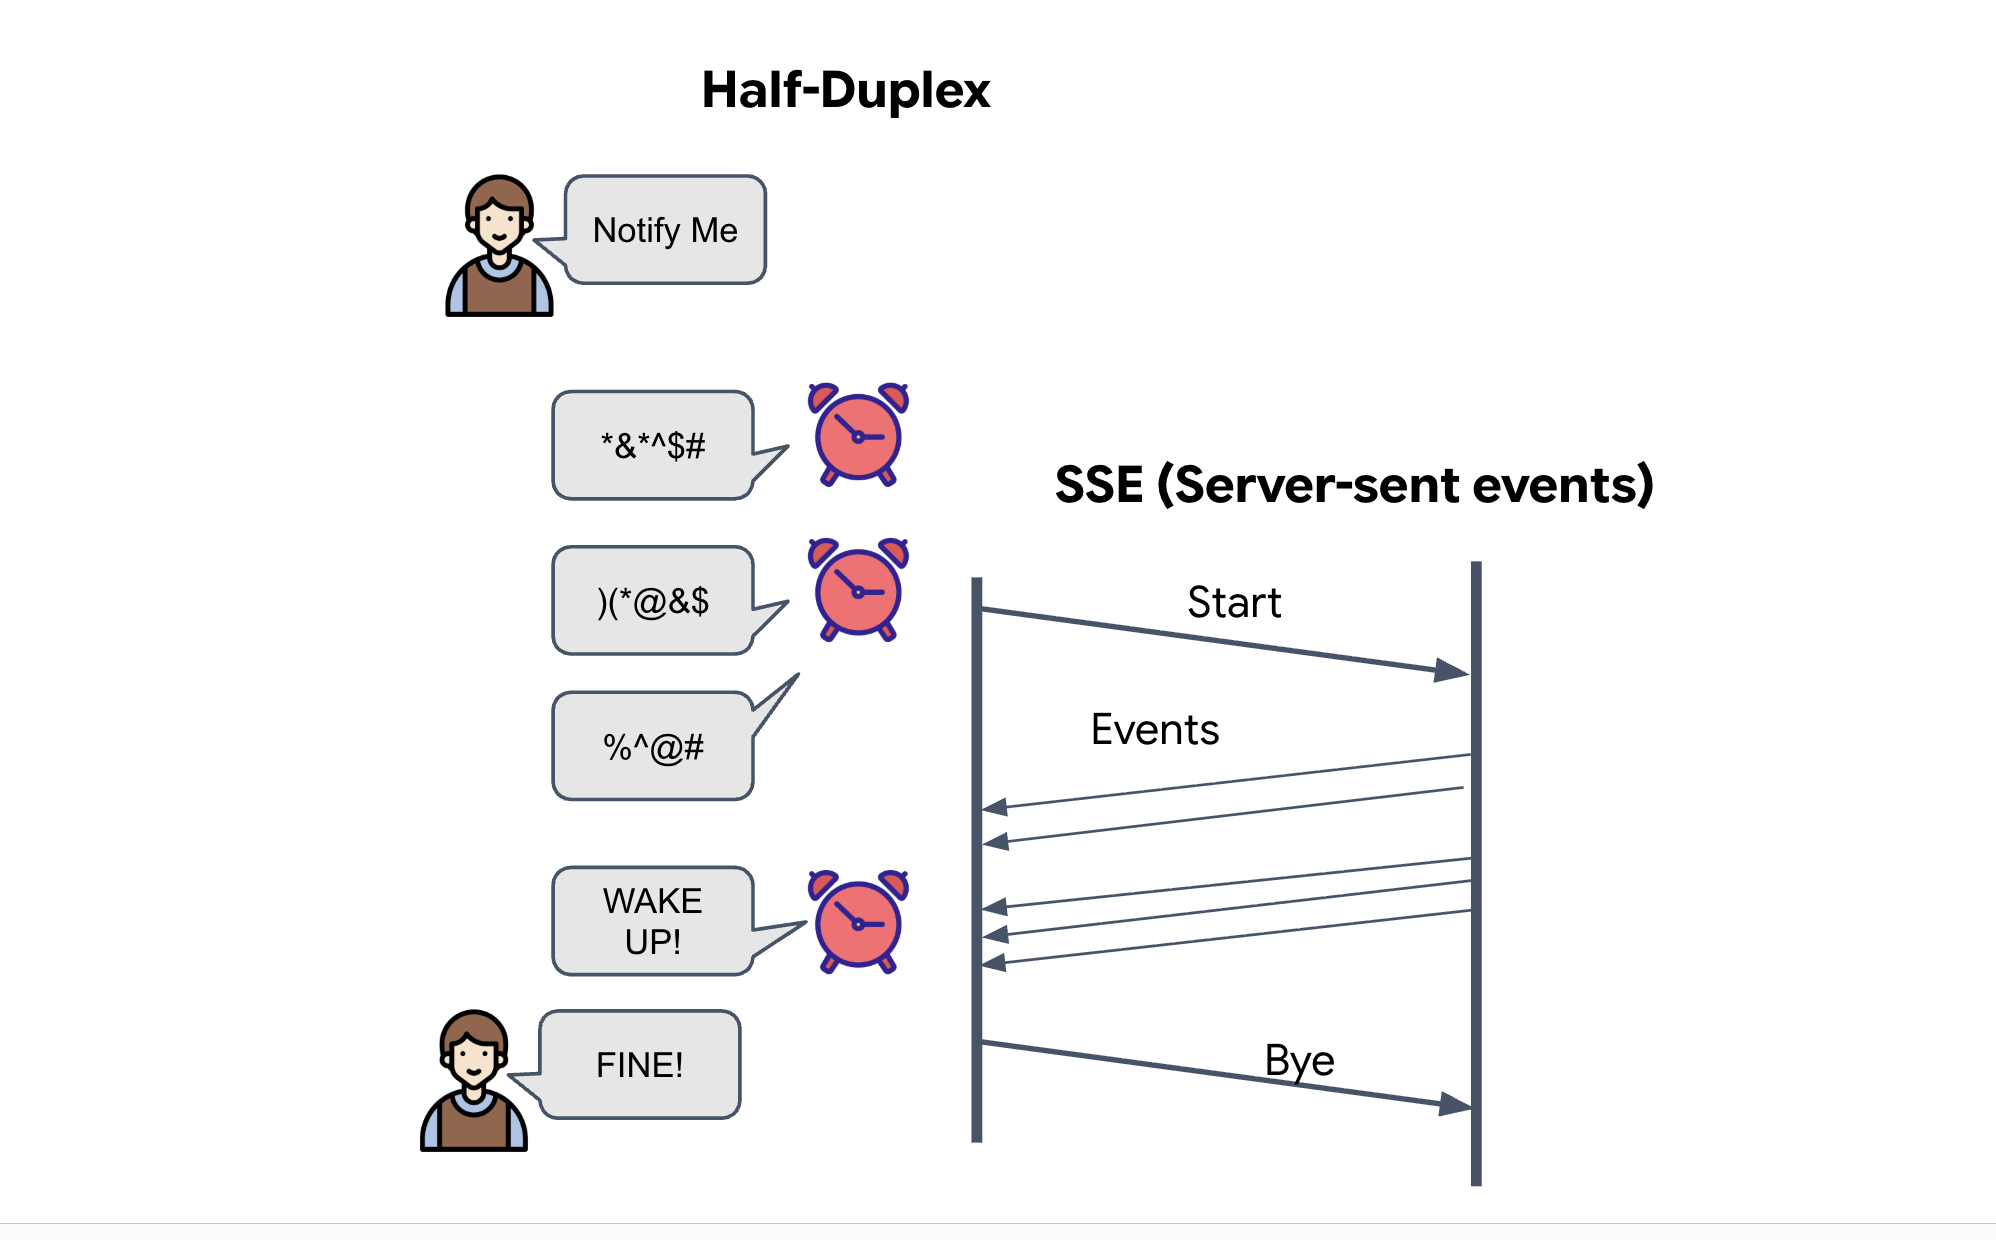
Server-Sent Events (SSE)
Standard APIs use a "Request-Response" model. For our HUD, we need a "Live Stream" of pod positions.
Why SSE Unlike WebSockets (which are bi-directional and more complex), SSE provides a simple, one-way data stream from the server to the browser. It's perfect for dashboards, stock tickers, or interstellar telemetry.
How it works in our code: We create an event_generator, an endless loop that takes the current position of all 15 pods every half-second and "pushes" them to the browser as an update.
👉✏️ In $HOME/way-back-home/level_5/satellite/main.py, replace #REPLACE-SSE-STREAM with the following code:
@app.get("/stream")
async def message_stream(request: Request):
    async def event_generator():
        logger.info("New SSE stream connected")
        try:
            while True:
                current_pods = list(PODS)

                # Send updates one by one to simulate low-bandwidth scanning
                for pod in current_pods:
                     payload = {"pod": pod}
                     yield {
                         "event": "pod_update",
                         "data": json.dumps(payload)
                     }
                     await asyncio.sleep(0.02)

                # Send formation info occasionally
                yield {
                    "event": "formation_update",
                    "data": json.dumps({"formation": FORMATION})
                }

                # Main loop delay
                await asyncio.sleep(0.5)

        except asyncio.CancelledError:
             logger.info("SSE stream disconnected (cancelled)")
        except Exception as e:
             logger.error(f"SSE stream error: {e}")

    return EventSourceResponse(event_generator())
Execute the Full Mission Loop
Let's verify the system works end-to-end before launching the final UI. We'll manually trigger the agent and see the raw data payload on the wire.
Open three separate terminal tabs.
Terminal A: The Formation Agent (A2A Server)
👉💻 This is the ADK Agent that listens for tasks and performs the geometric math.
cd $HOME/way-back-home/level_5
. scripts/check_kafka.sh
# Start the Agent Server
uv run agent/server.py
Terminal B: The Satellite Station (Kafka Client)
👉💻 This FastAPI server acts as the "Receiver," listening for Kafka replies and turning them into a live SSE stream.
cd $HOME/way-back-home/level_5

# Start the Satellite Station
uv run satellite/main.py
Terminal C: The Manual HUD
Send Formation Command (Trigger): 👉💻 In the same terminal C, trigger the formation process:
# Trigger the STAR formation via the Satellite's API
curl -X POST http://localhost:8000/formation \
     -H "Content-Type: application/json" \
     -d '{"formation": "STAR"}'
👀 You should see the new coordinates.
INFO:satellite.main:Received formation request: STAR
INFO:satellite.main:Sending A2A Message: 'Create a STAR formation'
INFO:satellite.main:Received A2A Response.
INFO:satellite.main:Response Content: ```json ...
INFO:satellite.main:Parsed 15 coordinates.
This confirms the Satellite has updated its internal pod coordinates.
👉💻 We will use curl to first listen to the live telemetry stream and then trigger a formation change.
# Connect to the live telemetry feed.
# You should see 'pod_update' events ticking by.
curl -N http://localhost:8000/stream
👀 Watch the output of your curl -N command. The x and y coordinates in the pod_update events will begin to reflect the new positions of the Star formation.
Before proceeding, stop all running processes to free up the communication ports.
In each terminal (A, B, C, and the trigger terminal): Press Ctrl + C.
6. Go Rescue!
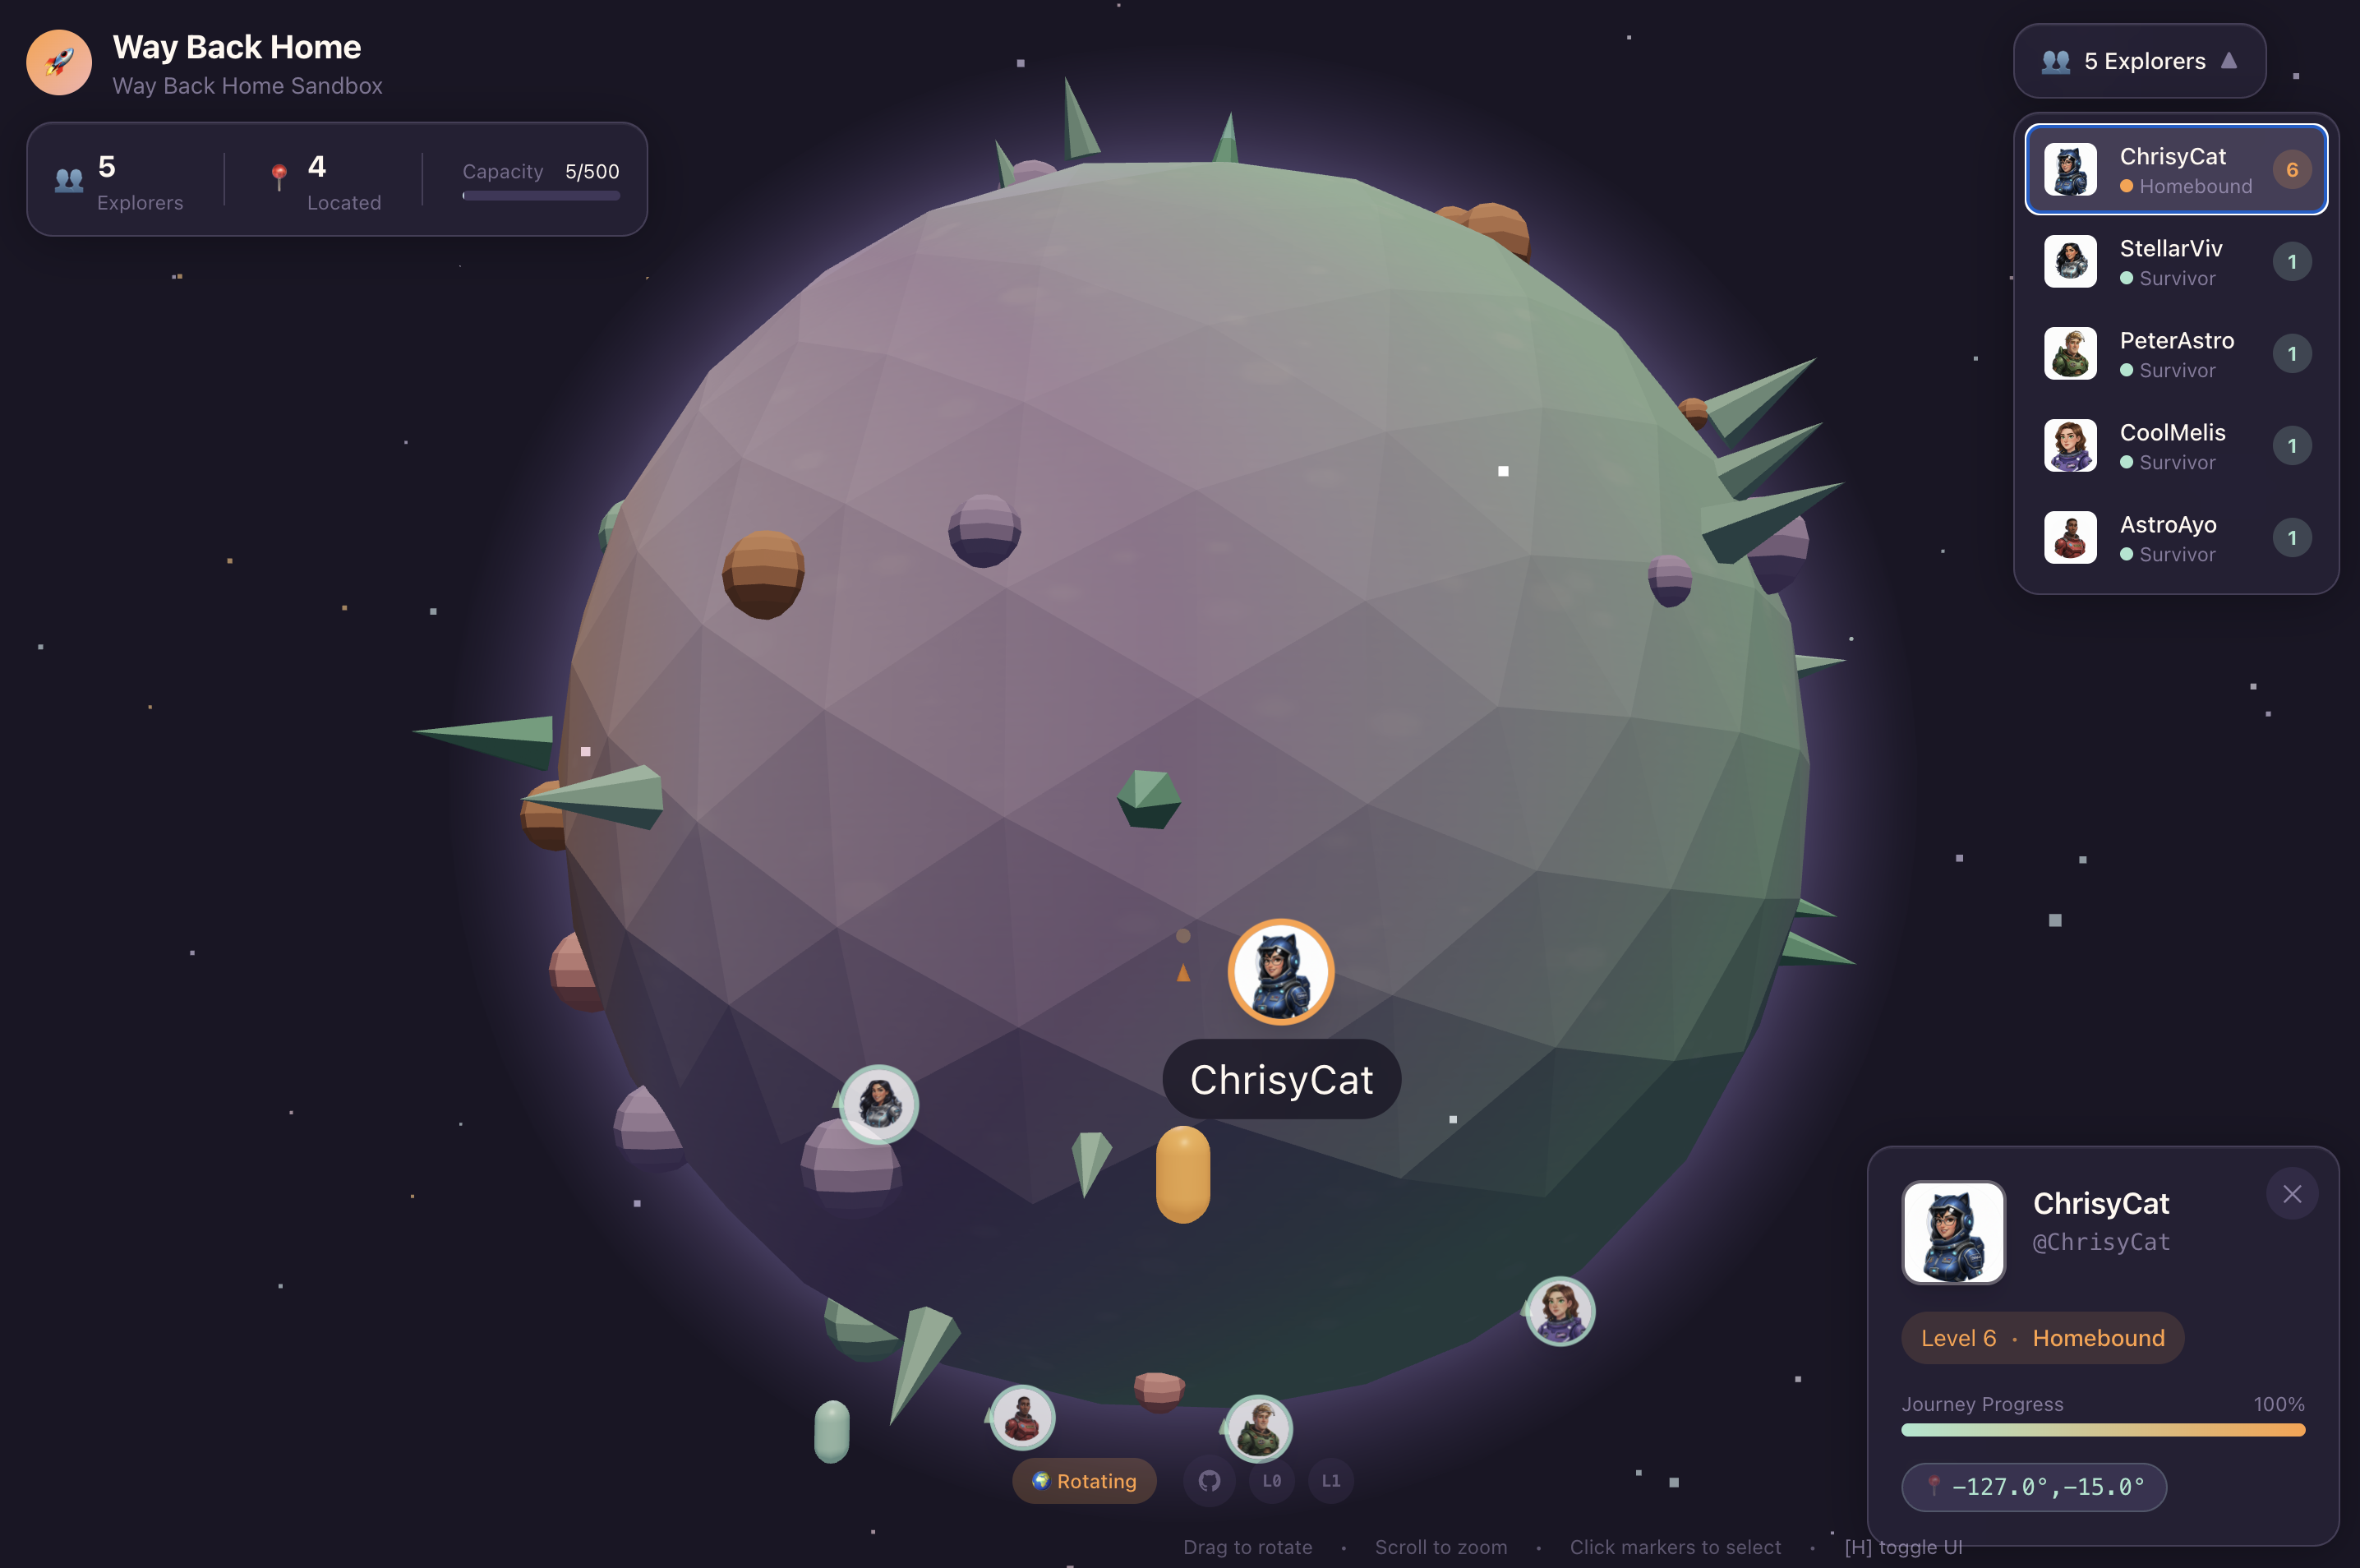
You have successfully established the system. Now, it's time to bring the mission to life. We will now launch the React-based Head-Up Display (HUD). This dashboard connects to the Satellite Station via SSE, allowing you to visualize the 15 pods in real-time.
When you issue a command, you aren't just calling a function; you are triggering an event that travels through Kafka, gets processed by an AI agent, and streams back to your screen as live telemetry.
Open two separate terminal tabs.
Terminal A: The Formation Agent (A2A Server)
👉💻 This is the ADK Agent that listens for tasks and performs geometric math using Gemini. In terminal run:
cd $HOME/way-back-home/level_5
# Start the Agent Server
uv run agent/server.py
Terminal B: The Satellite Station and Visual Dashboard
👉💻 First, build the frontend application.
cd $HOME/way-back-home/level_5/frontend/
npm install
npm run build
👉💻 Now, start the FastAPI server, which will serve both the backend logic and the frontend UI.
cd $HOME/way-back-home/level_5
. scripts/check_kafka.sh
# Start the Satellite Station
uv run satellite/main.py
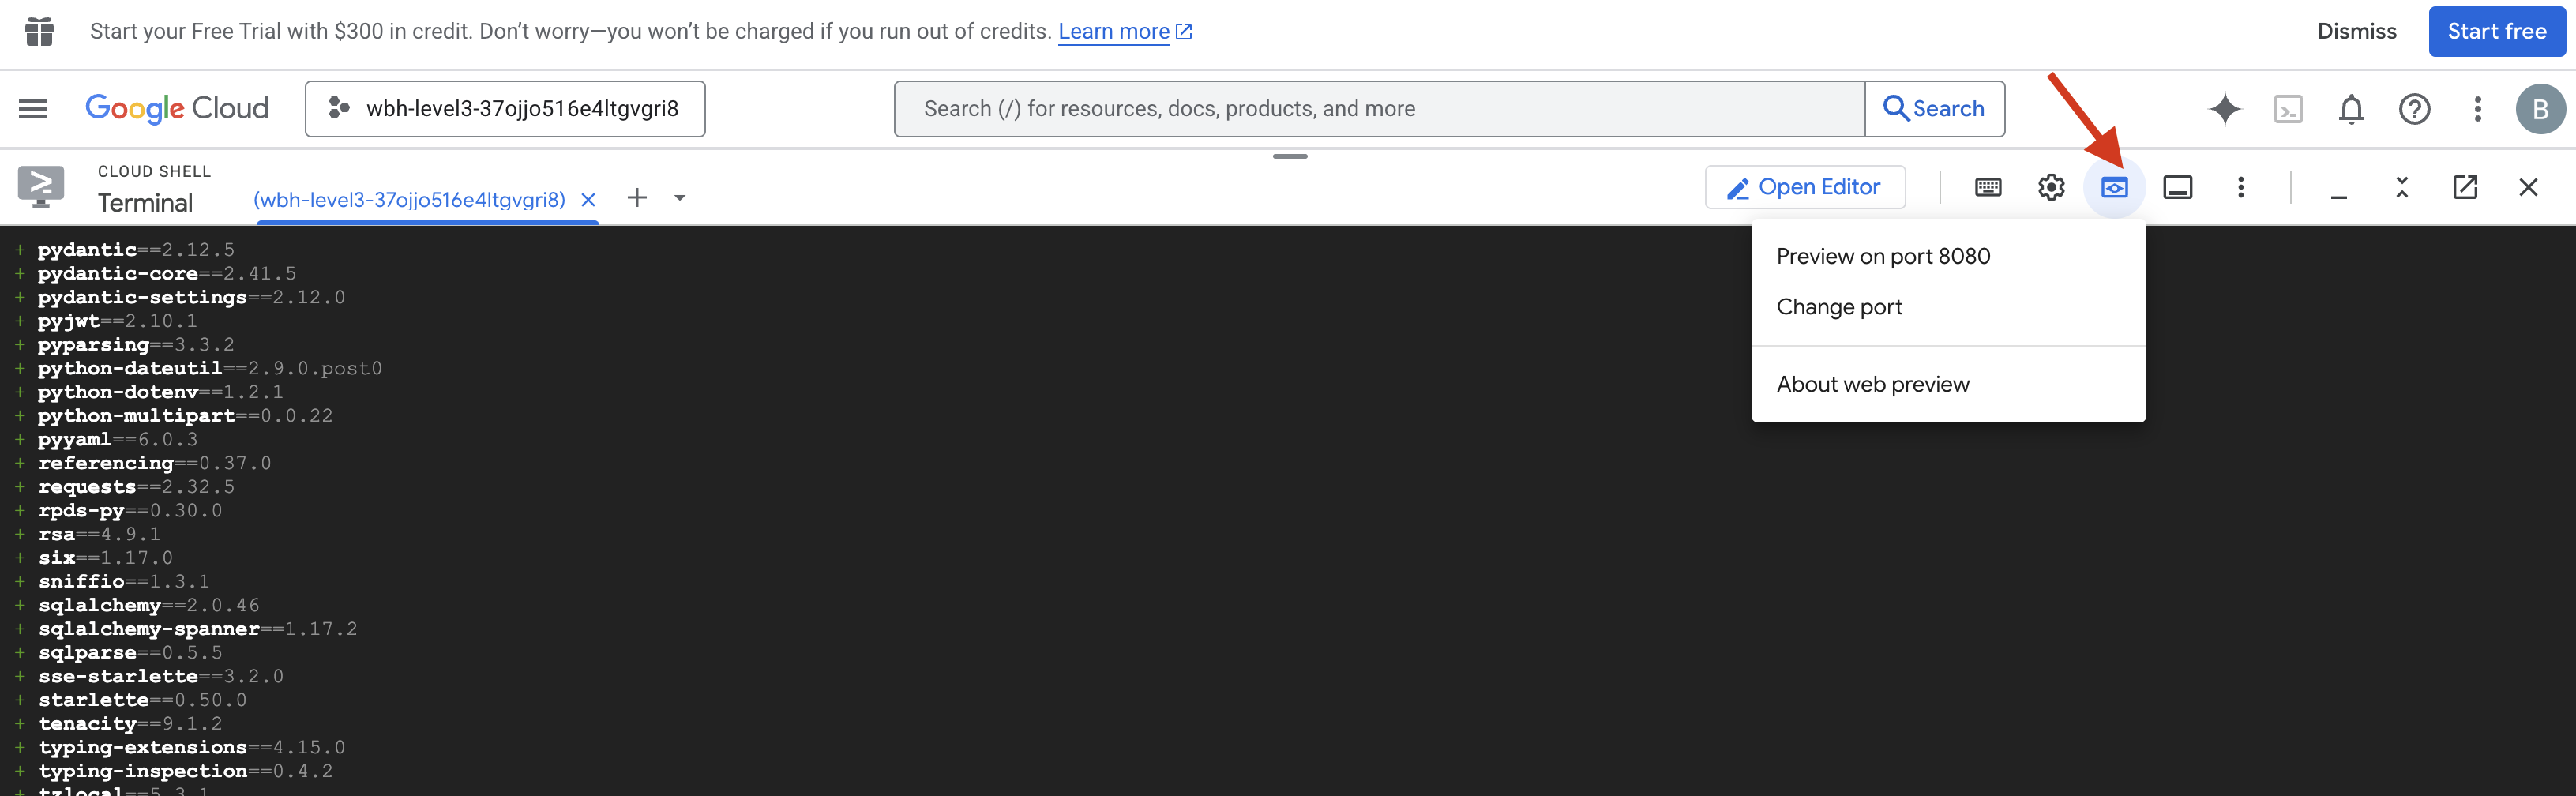
Launch and Verify
- 👉 Open the Preview: In the Cloud Shell toolbar, click the Web preview icon. Select Change port, set it to 8000, and click Change and Preview. A new browser tab will open showing your Starfield HUD.
- 👉 Verify Telemetry Stream:
- Once the UI loads, you should see 15 pods in a random scatter.
- If the pods are subtly pulsing or "jittering," your SSE stream is active, and the Satellite Station is successfully broadcasting their positions.
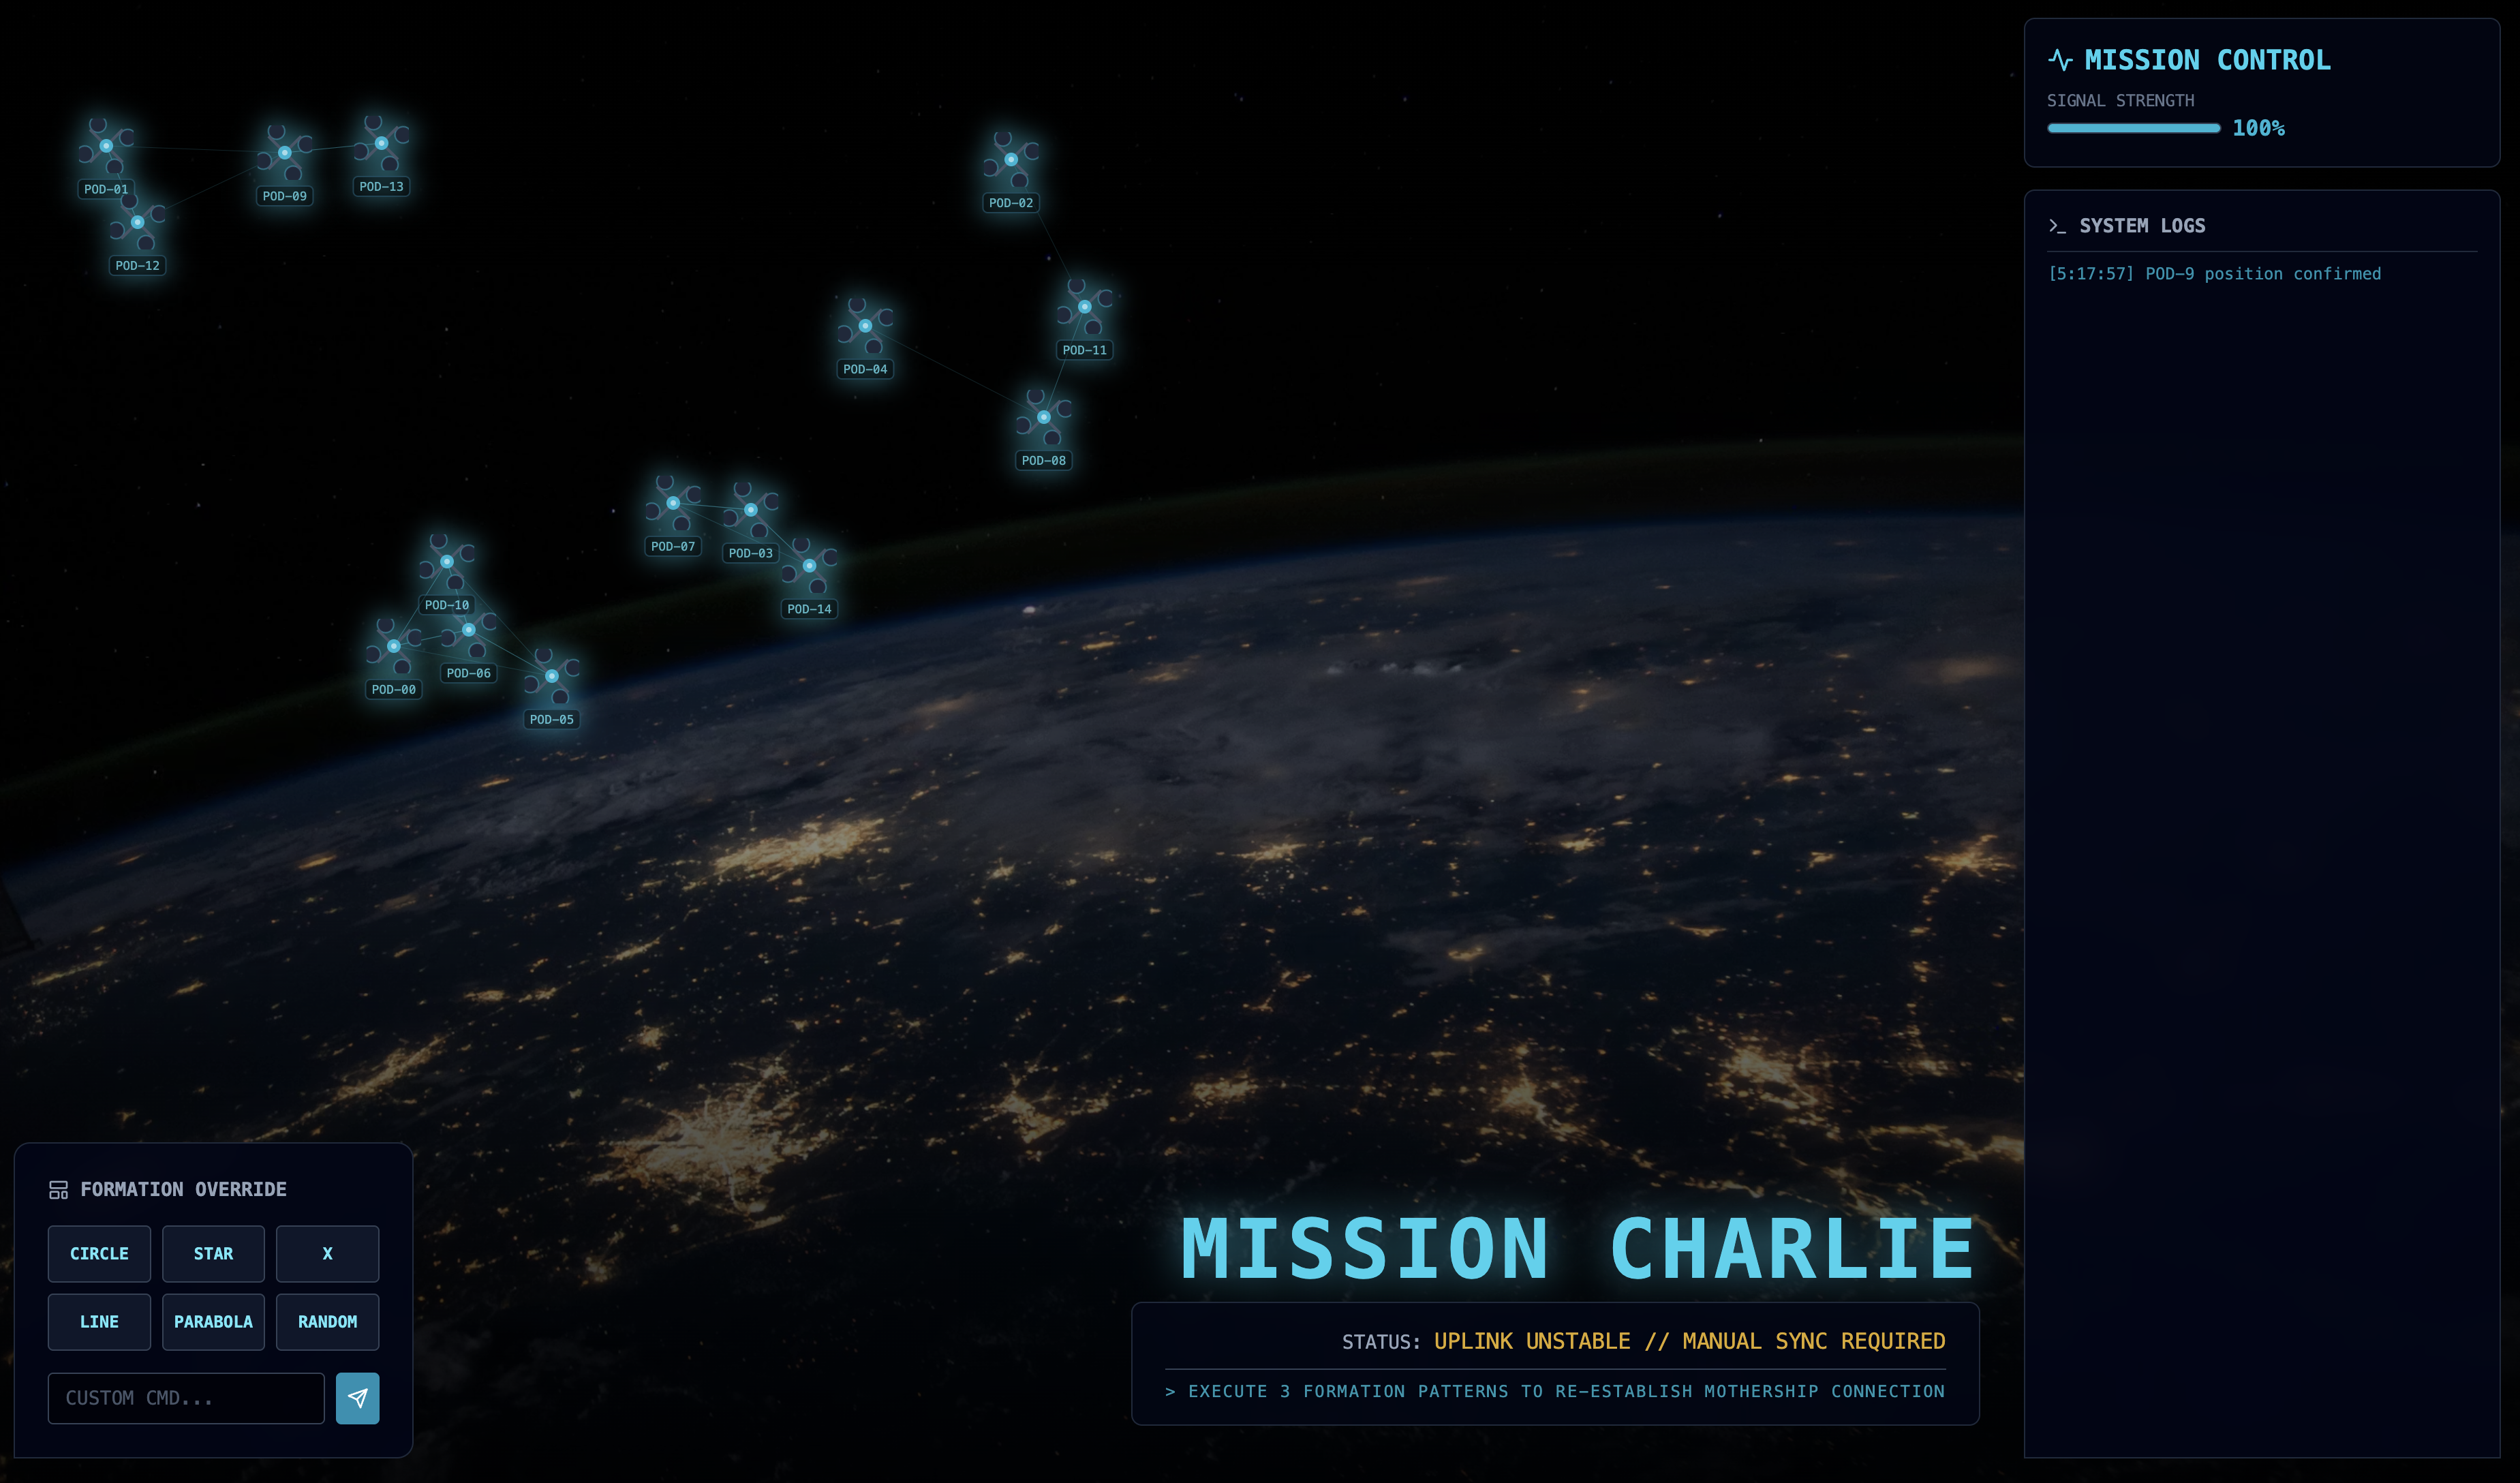
- 👉 Initiate a Formation: Click the "STAR" button on the dashboard.
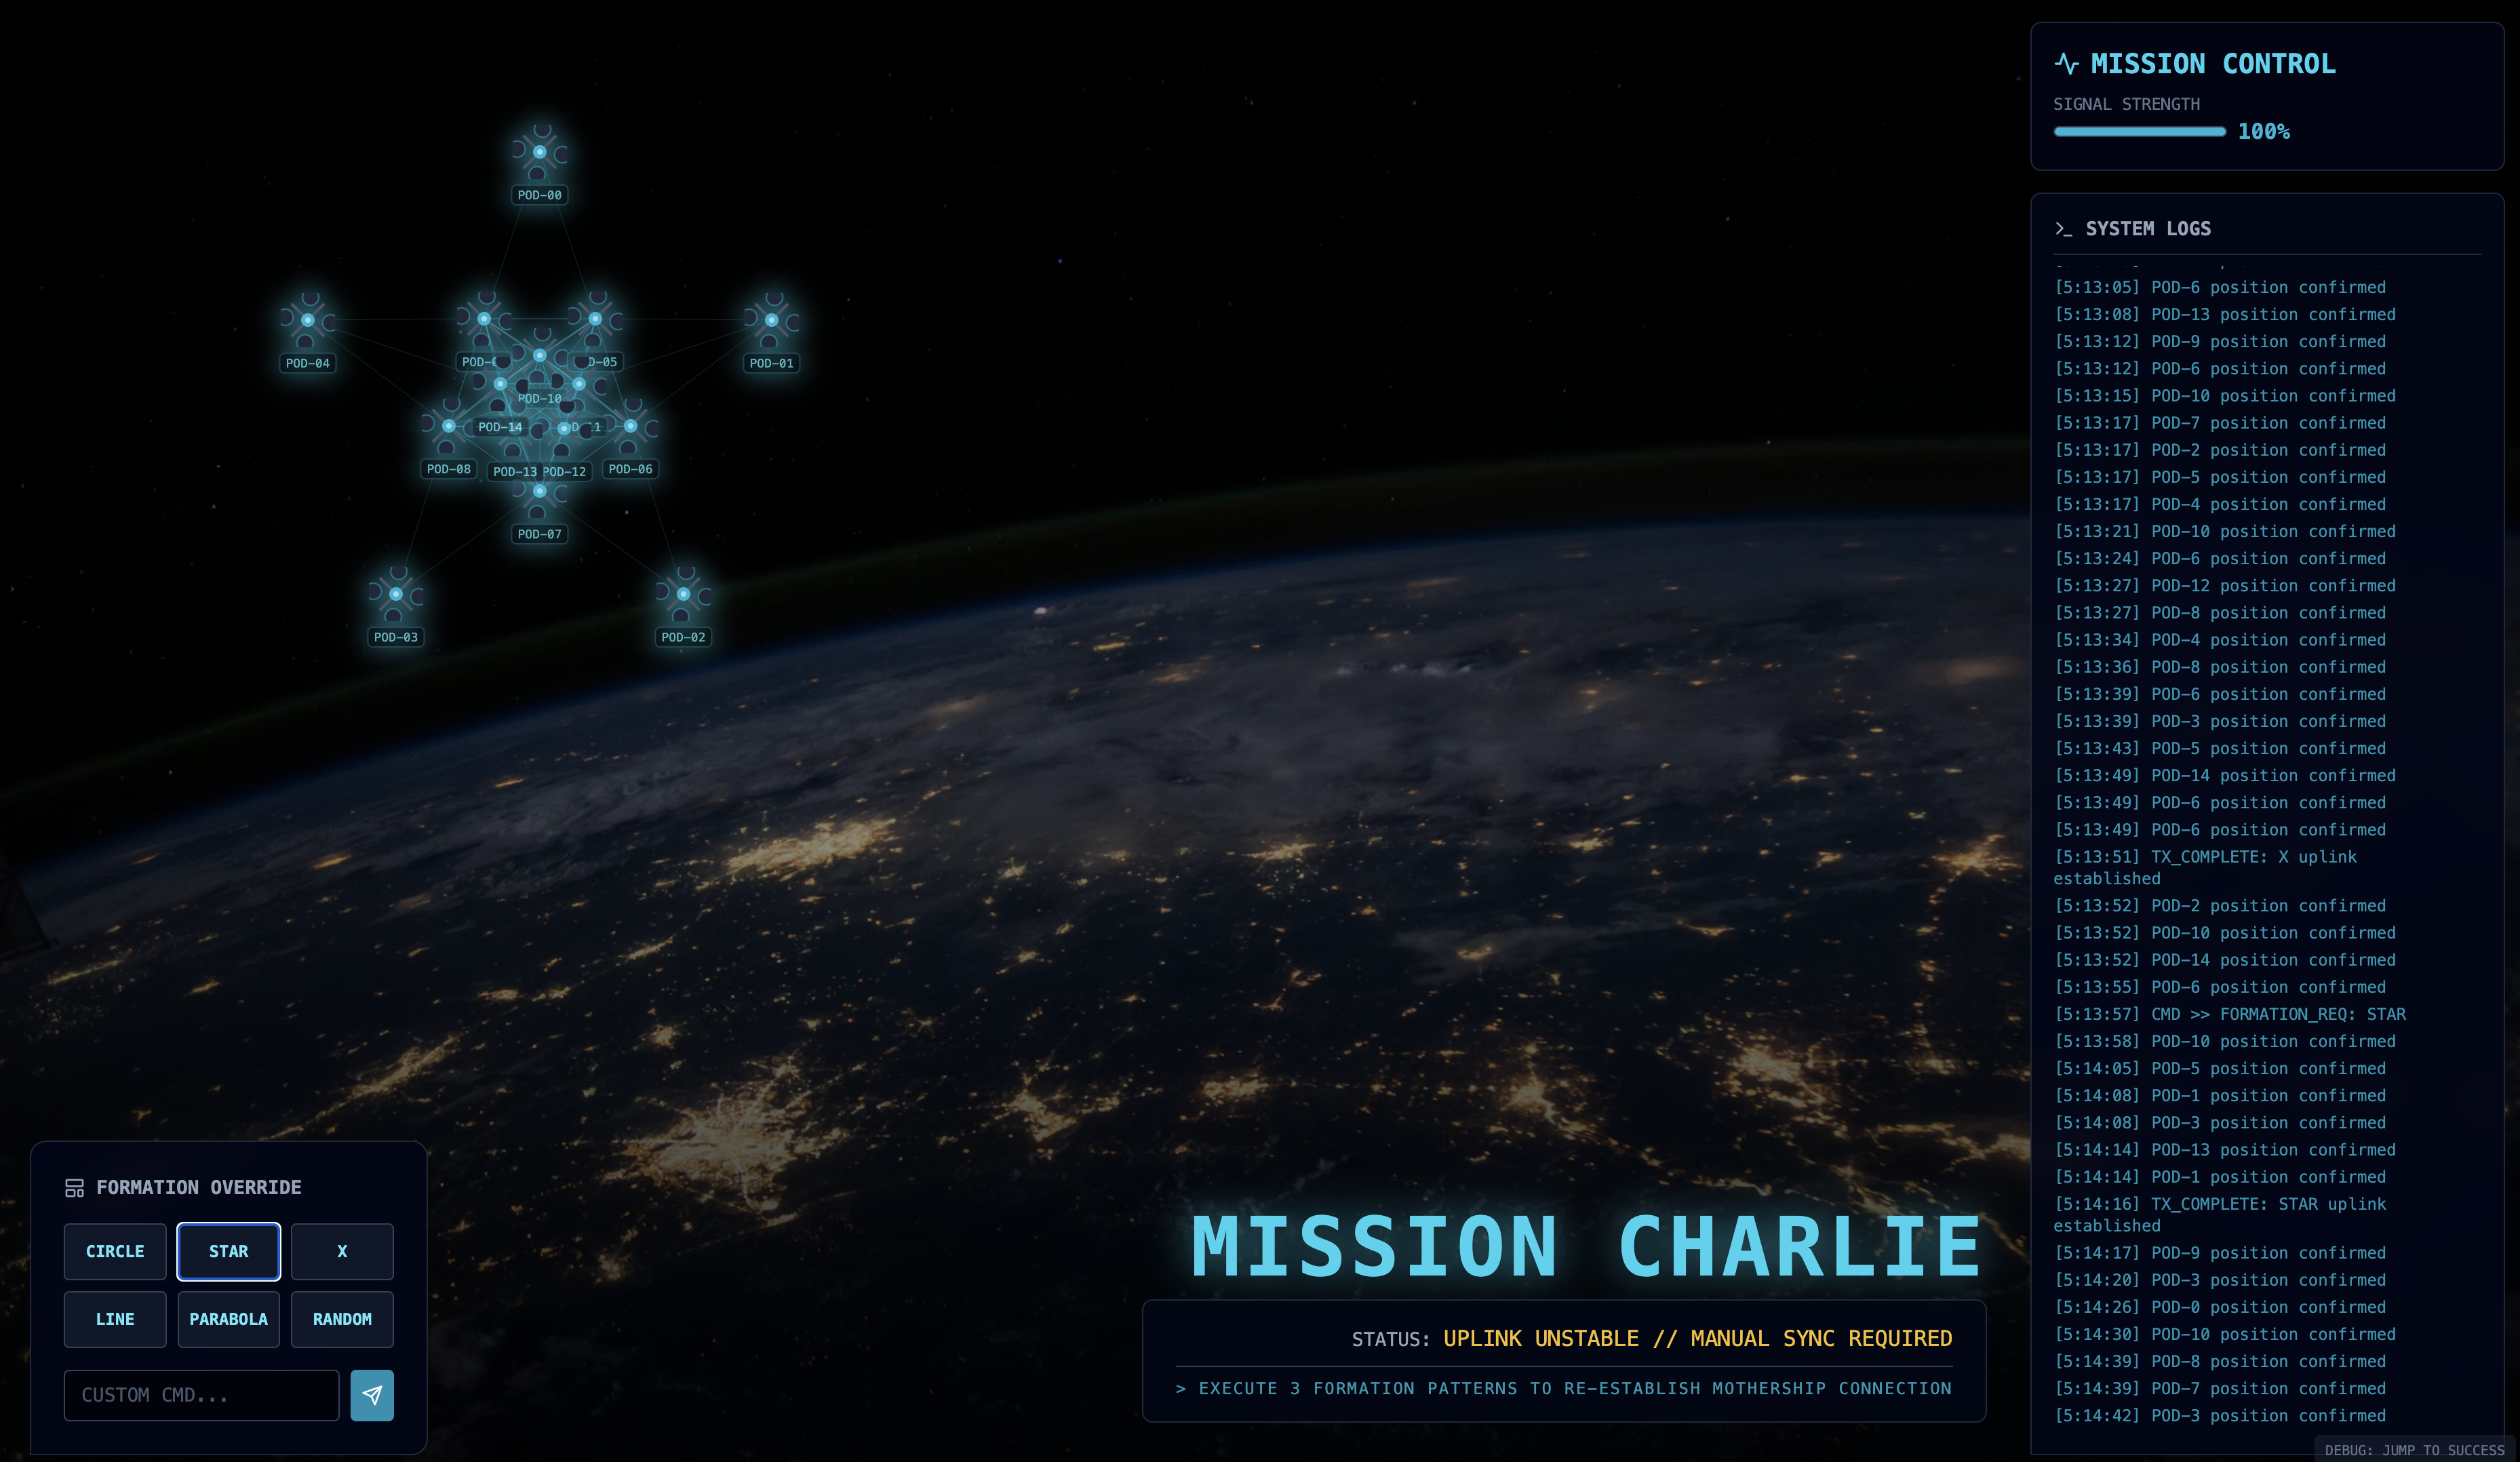
- 👀 Trace the Event Loop: Watch your terminals to see the architecture in action:
- Terminal B (Satellite Station) will log:
Sending A2A Message: 'Create a STAR formation'. - Terminal A (Formation Agent) will show activity as it consults Gemini.
- Terminal B (Satellite Station) will log:
Received A2A Responseand parse the coordinates.
- Terminal B (Satellite Station) will log:
- 👀 Visual Confirmation: Watch the 15 pods on your dashboard glide smoothly from their random positions into a 5-pointed star formation.
- 👉 Experiment:
- For 3 different formations, try "X", or "LINE".
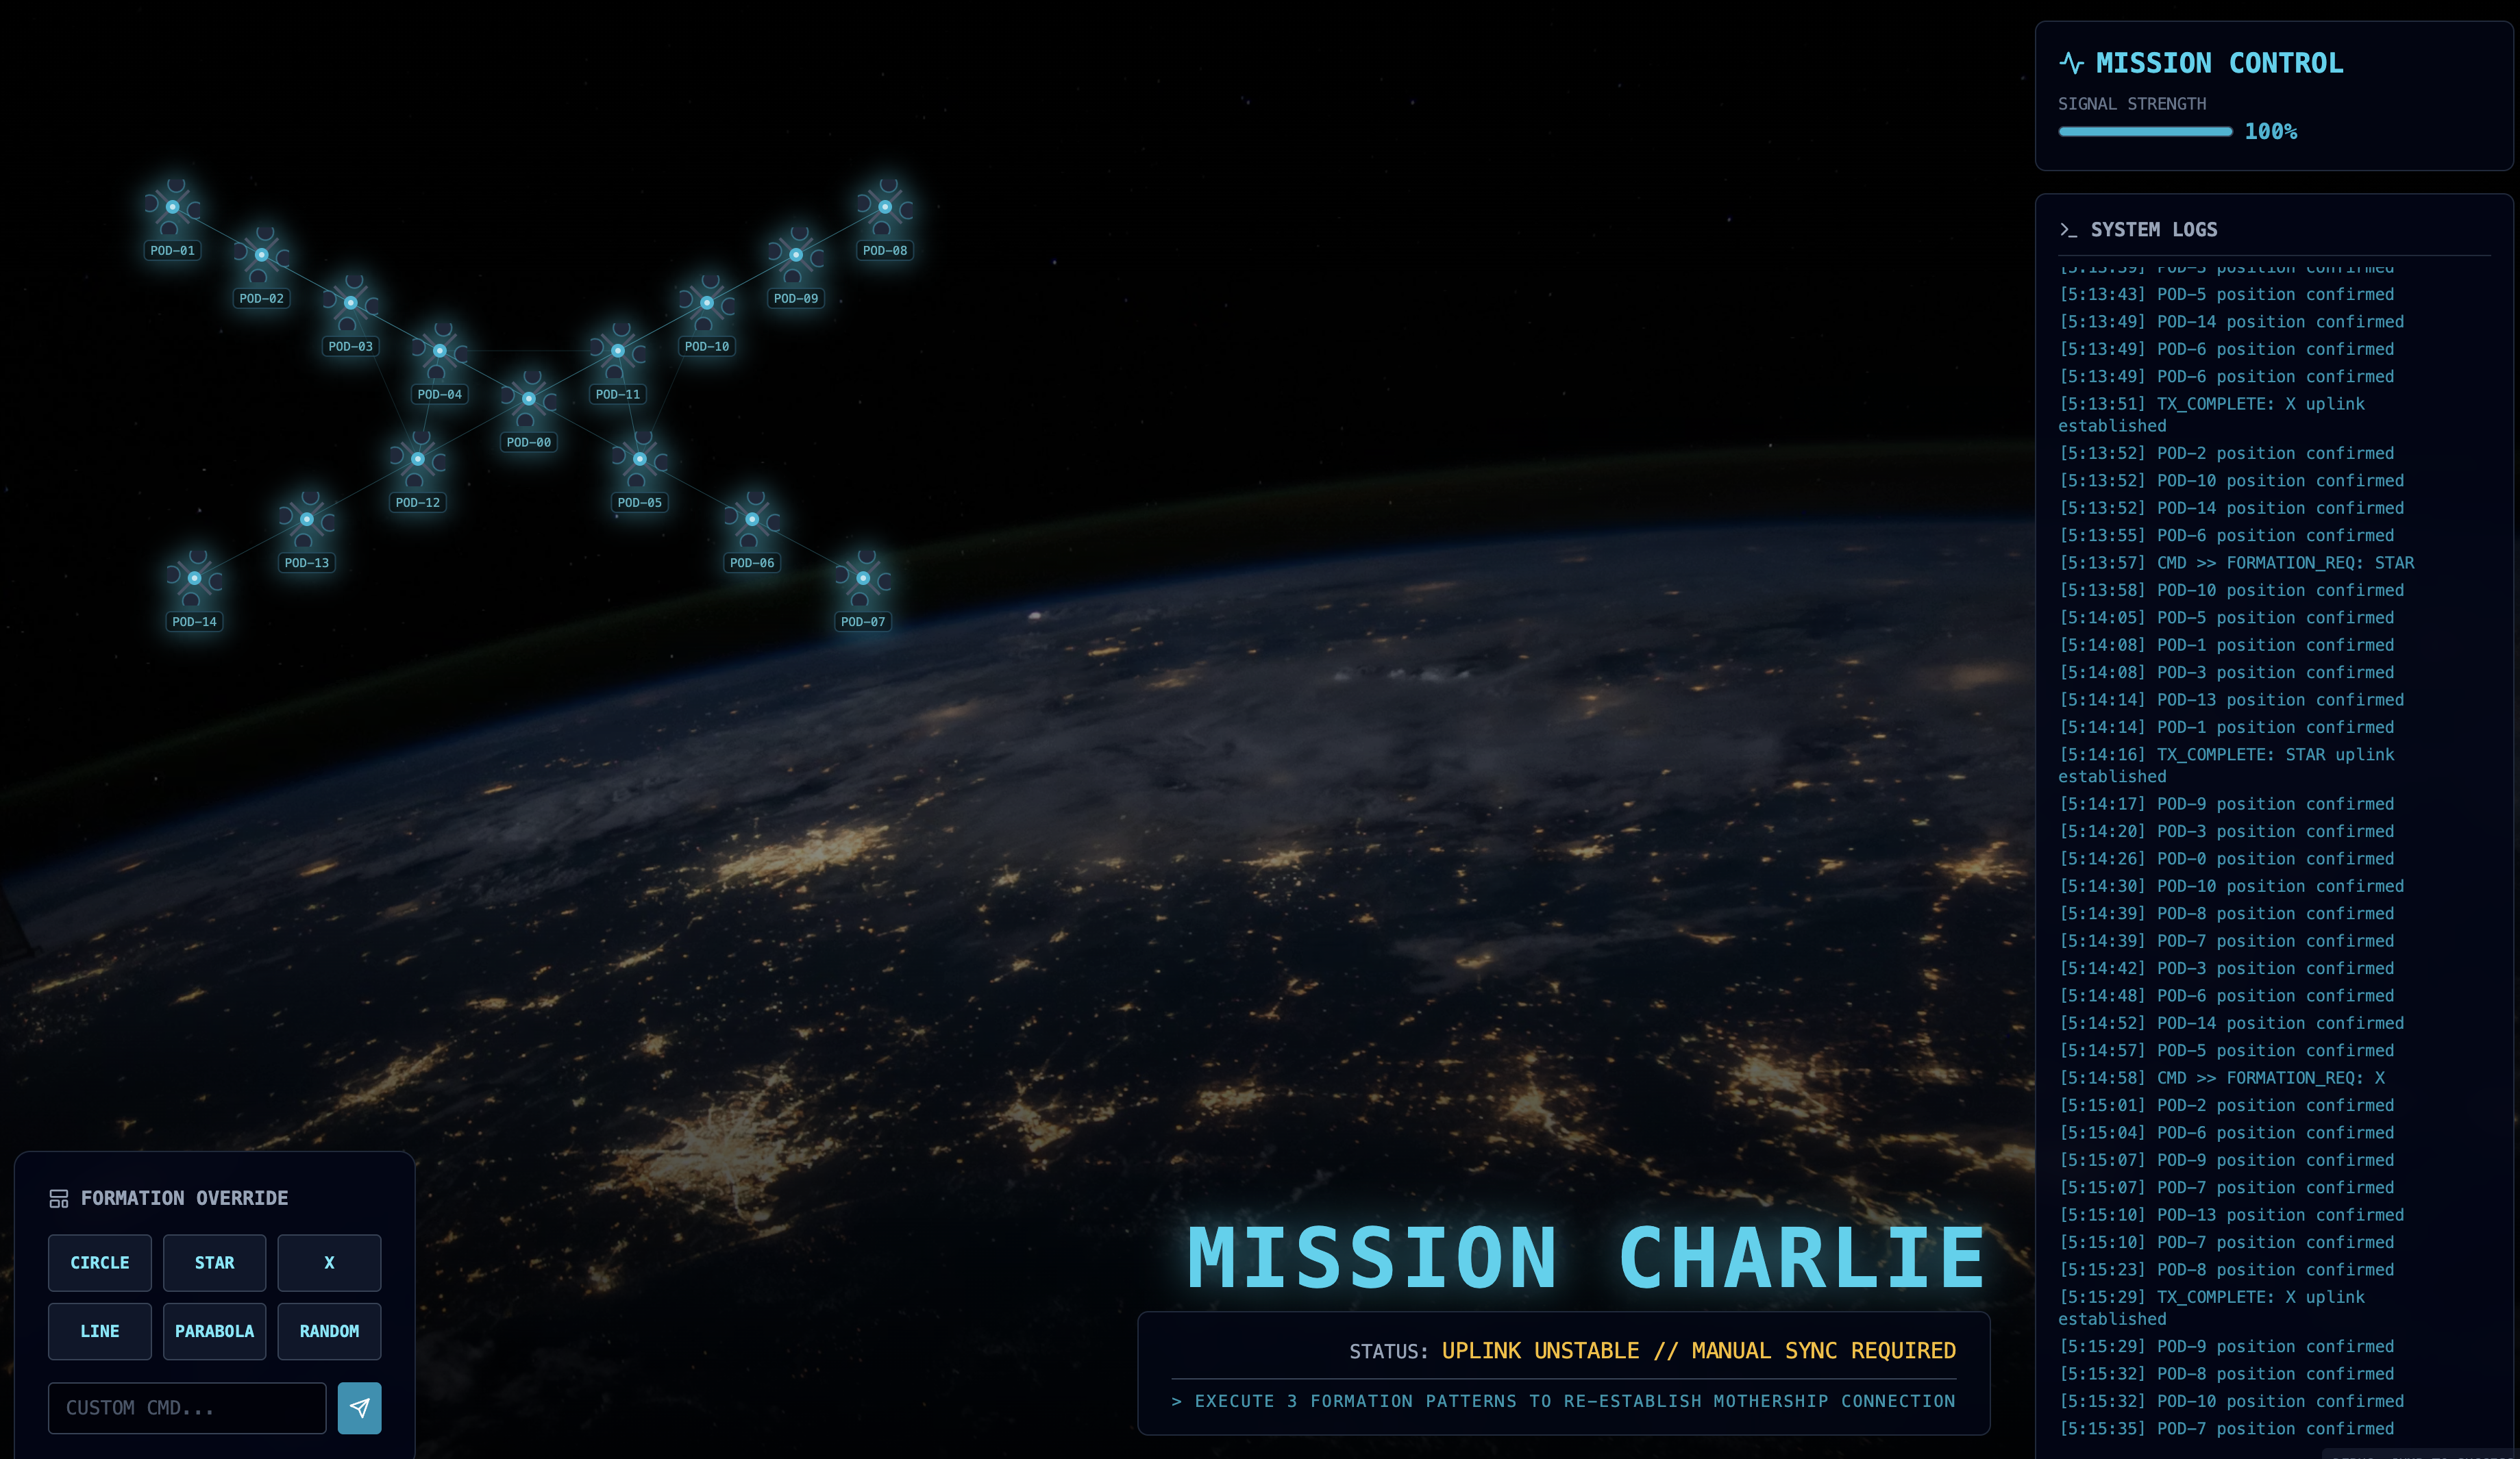
- Custom Intent: Use the manual input to type something unique, like "Heart" or "Triangle".
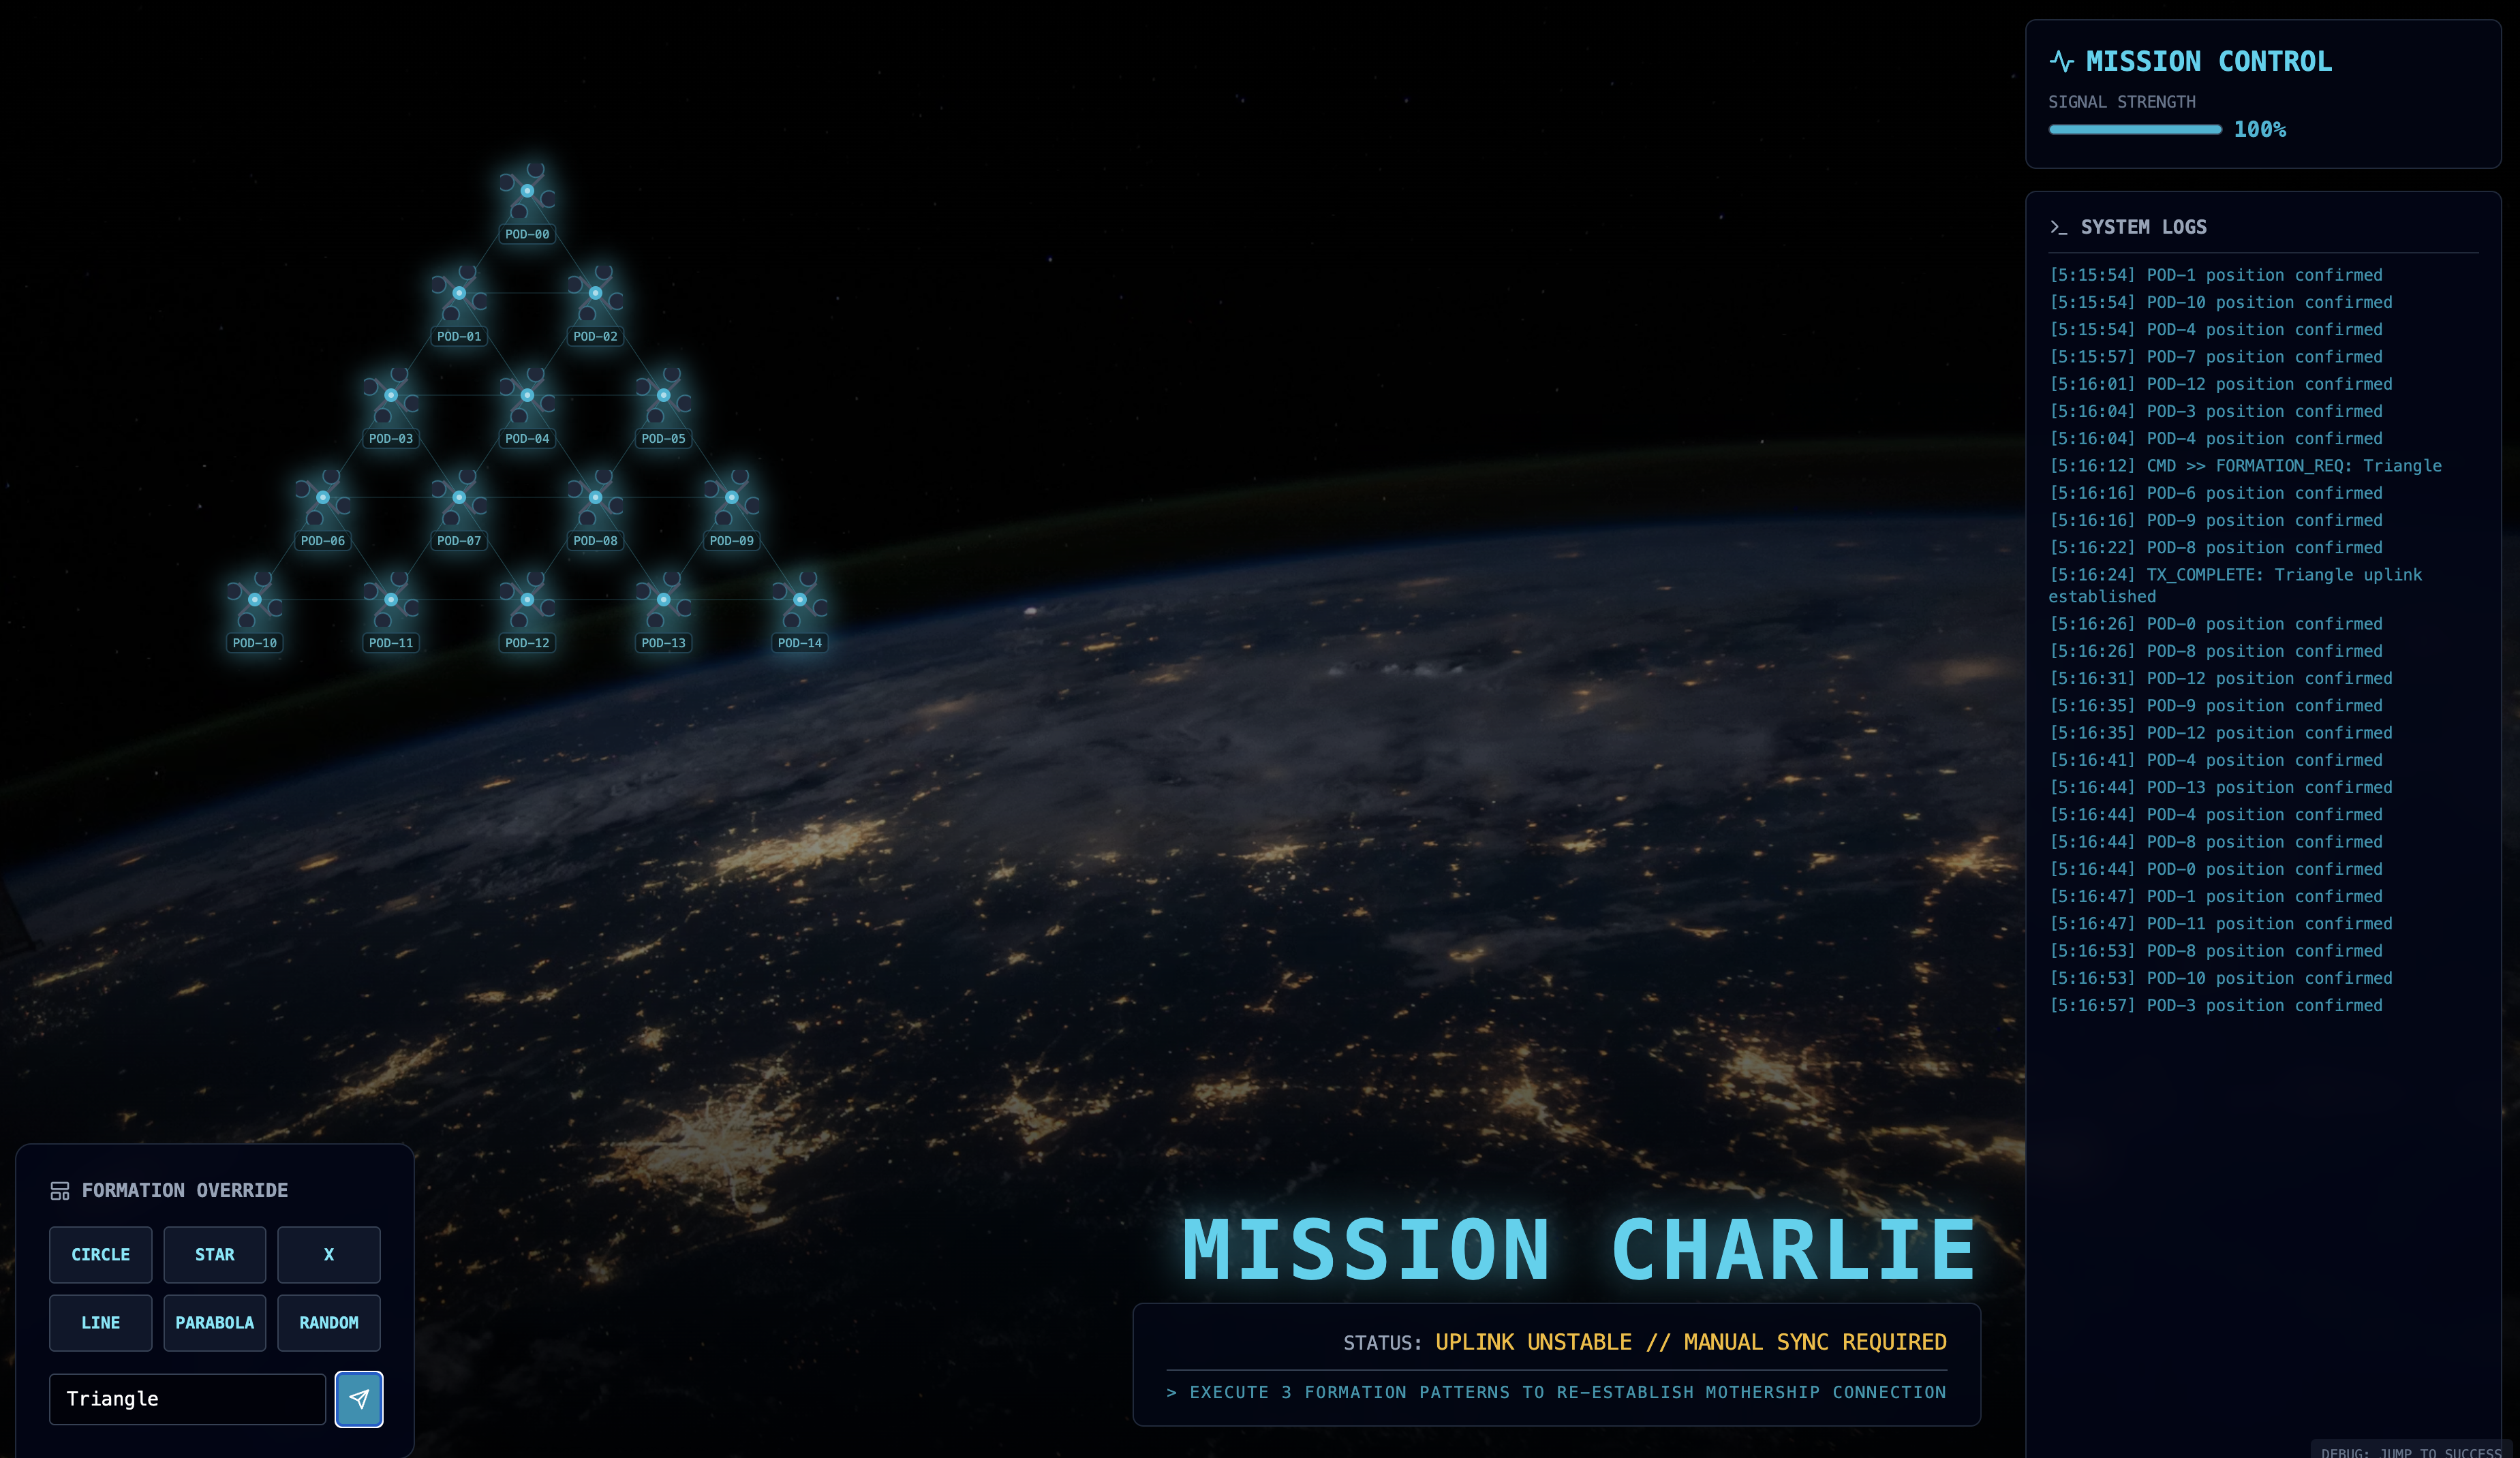
- Because you are using GenAI, the agent will attempt to calculate the math for any geometric shape you can describe!
- For 3 different formations, try "X", or "LINE".
After forming 3 patterns, you have successfully re-established the connection. 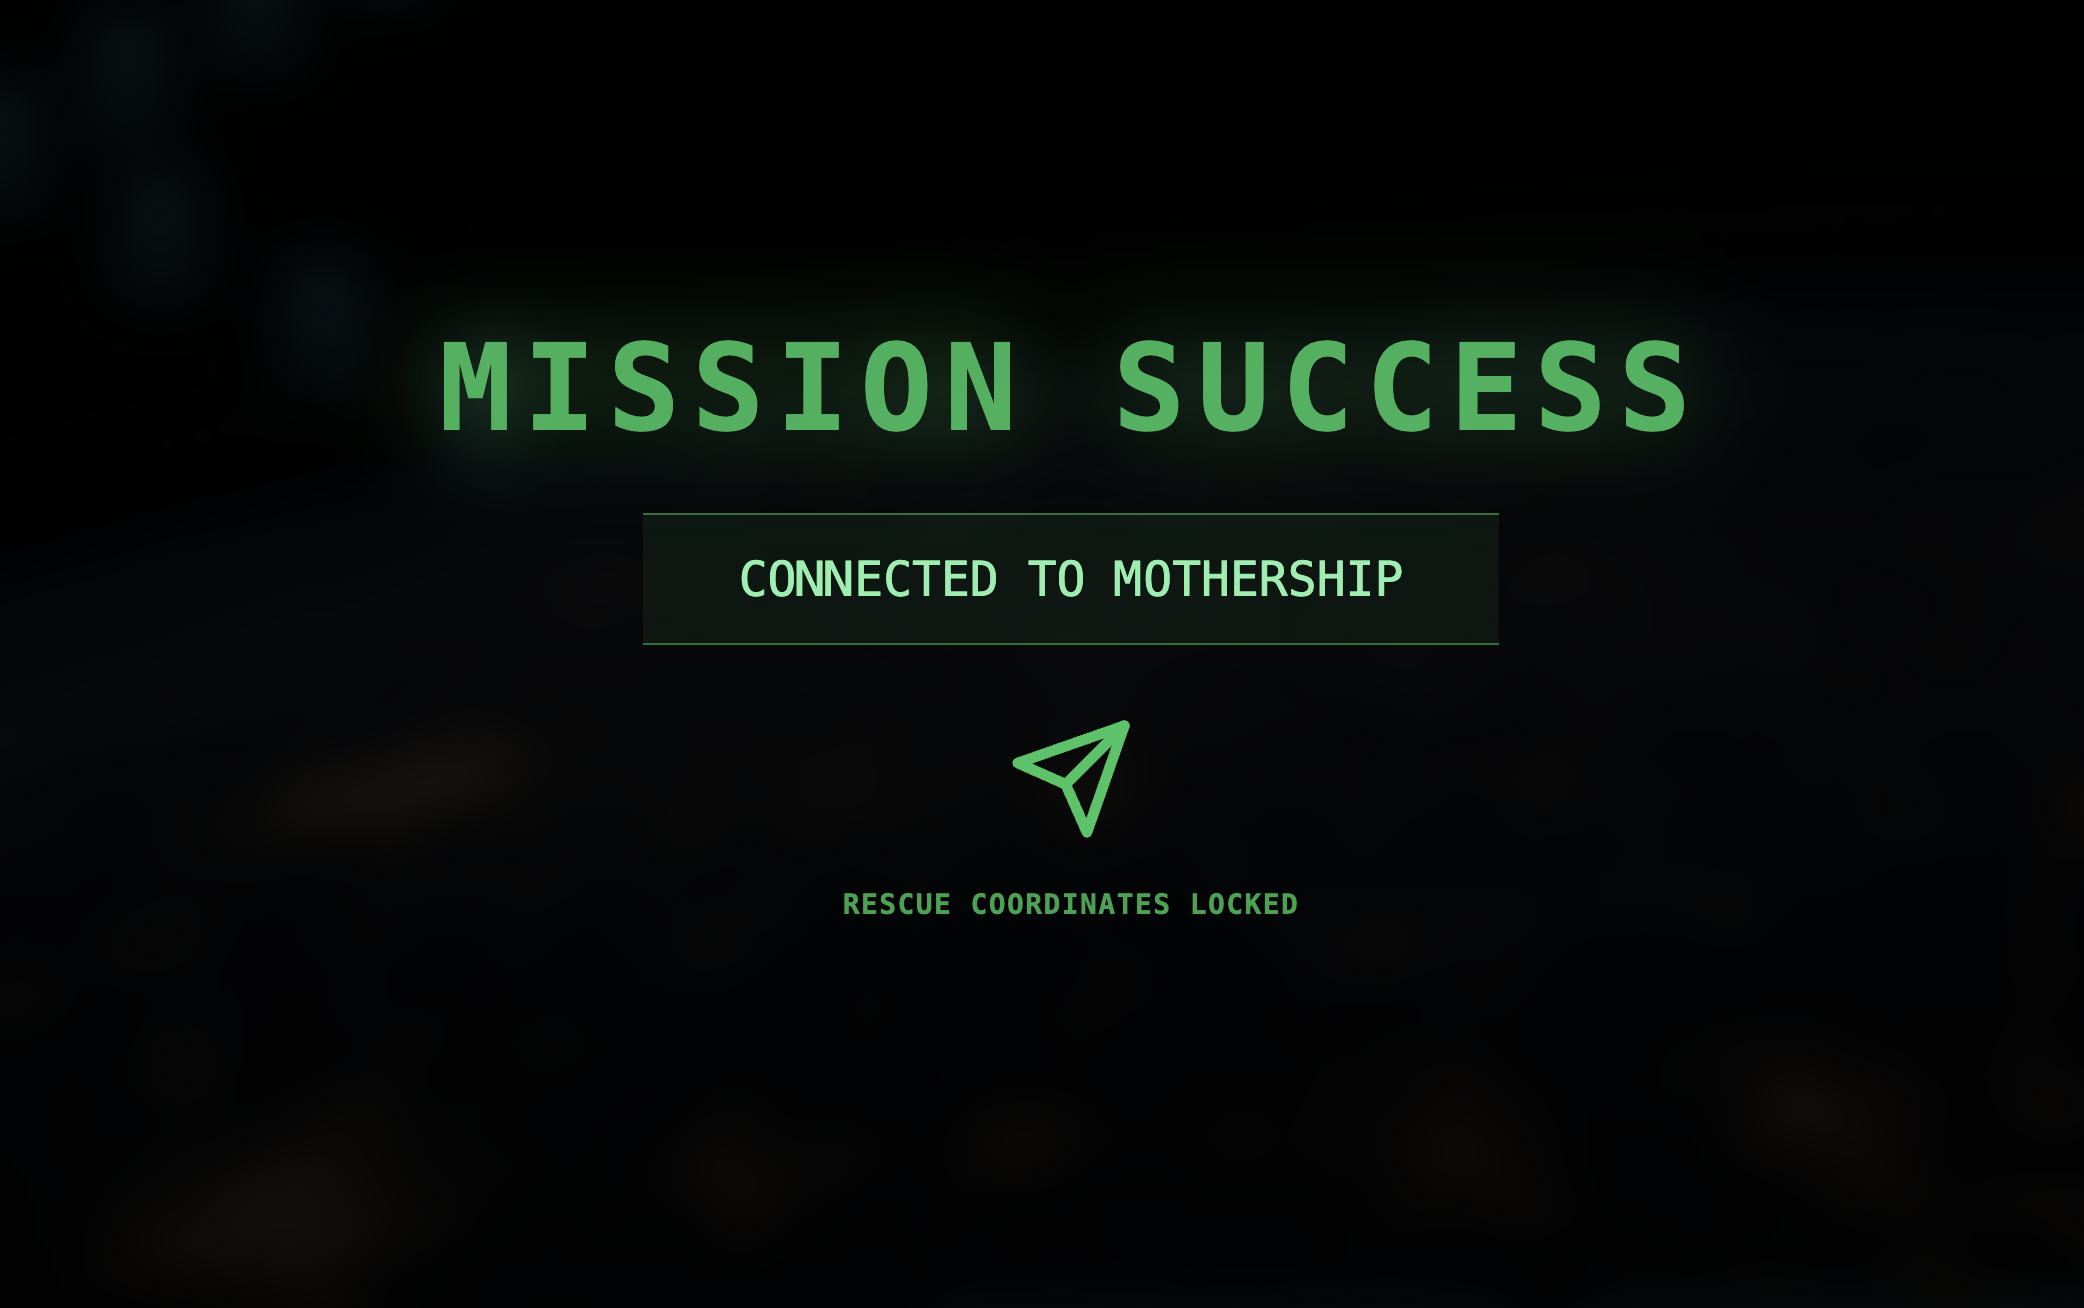
MISSION ACCOMPLISHED!
The stream stabilizes as the data flows through the noise without interruption. Under your command, the 15 ancient pods begin their synchronized dance across the stars.

Through three grueling calibration phases, you watched the telemetry lock into place. With each alignment, the signal grew stronger, finally piercing the interstellar interference like a beacon of hope.
Thanks to you and your masterful implementation of the Event-Driven Agent, the five survivors have been airlifted from the surface of X-42 and are now safe aboard the rescue vessel. Thanks to you, five lives were saved.
If you participated in Level 0, don't forget to check where your progress is on the Way Back Home mission! Your journey back to the stars continues.