

1. 總覽
現在要如何開始使用 AI 建構內容?對大多數人來說,通常是從一個簡單的問題開始:「模型真的能協助解決我一直在思考的問題嗎?」這時 Google AI Studio 就能派上用場。您可以在這裡快速設計任何原型。我一直想改造廚房,相信 Gemini 能幫上忙,但我不是一般承包商,而是工程師。我甚至不確定該問什麼問題,因為有太多需要考慮的事項,例如法規、固定裝置等。因此,我們將逐步進行,請 Gemini 為我們生成非常詳細的提示,然後生成完整的裝修計畫,並將改建工程視覺化!不過,等等。從這裡開始,我該如何實際協助商家擴大規模?輸入 AGENTS!!!
代理是自主程式,會與 AI 模型對話,並使用手邊的工具和脈絡執行目標導向的作業,還能根據事實自主決策!
Agent Development Kit (ADK)
Agent Development Kit (ADK) 是一個彈性十足的模組化框架,可用於開發及部署 AI 代理。ADK 支援將多個不同的代理執行個體整合成多代理系統 (MAS),打造精密的應用程式。
在 ADK 框架下,多代理系統是指由多種代理構成的應用程式。這些代理通常會形成階層架構,彼此協同運作來達成更宏大的目標。這種應用程式建構方式具有顯著優勢,包括模組化能力更強、專業程度與複用性更高、更方便維護,以及能透過專用工作流程代理,定義有條理的控管流程。
建構項目
準備好從原型提示詞轉為建構代理了嗎?我們會建立代理,協助生成廚房翻修專案的提案文件。在本實驗室中,您將:
- 使用 ADK 建構簡單的代理,生成翻修提案文件
- 將生成的裝修提案文件儲存在 Cloud Storage Bucket 中
- 在 Cloud Shell 和代理程式網頁輸出內容中測試代理程式
需求條件
2. 事前準備
建立專案
- 在 Google Cloud 控制台的專案選取器頁面中,選取或建立 Google Cloud 專案。
- 確認 Cloud 專案已啟用計費功能。瞭解如何檢查專案是否已啟用計費功能。
- 按一下這個連結,啟用 Cloud Shell。點選 Cloud Shell 中的對應按鈕,即可在 Cloud Shell 終端機 (用於執行雲端指令) 和編輯器 (用於建構專案) 之間切換。
- 連至 Cloud Shell 後,請使用下列指令檢查驗證是否已完成,專案是否已設為獲派的專案 ID:
gcloud auth list
- 在 Cloud Shell 中執行下列指令,確認 gcloud 指令知道您的專案。
gcloud config list project
- 如果未設定專案,請使用下列指令設定:
gcloud config set project <YOUR_PROJECT_ID>
- 確認已安裝 Python 3.9 以上版本。
如需其他 gcloud 指令和用法,請參閱說明文件。
3. 原型
前往 Google AI Studio。開始輸入提示。我的提示如下:
I want to renovate my kitchen, basically just remodel it. I don't know where to start. So I want to use Gemini to generate a plan. For that I need a good prompt. Give me a short yet detailed prompt that I can use.
調整並設定右側的參數,取得最佳回應。
根據這段簡單的描述,Gemini 為我生成了非常詳細的提示,讓我能開始裝修!也就是說,我們使用 Gemini,讓 AI Studio 和模型提供更優質的回覆。您也可以根據用途選取要使用的模型。
我們選擇了 Gemini 2.5 Pro。這是「思考」模型,因此我們能獲得更多輸出權杖,最多可達 65,000 個權杖,用於長篇分析和詳細文件。啟用 Gemini 2.5 Pro 後,系統會顯示 Gemini 思考方塊。Gemini 2.5 Pro 具備原生推論能力,可接受長脈絡要求。
請參閱以下回應的程式碼片段:
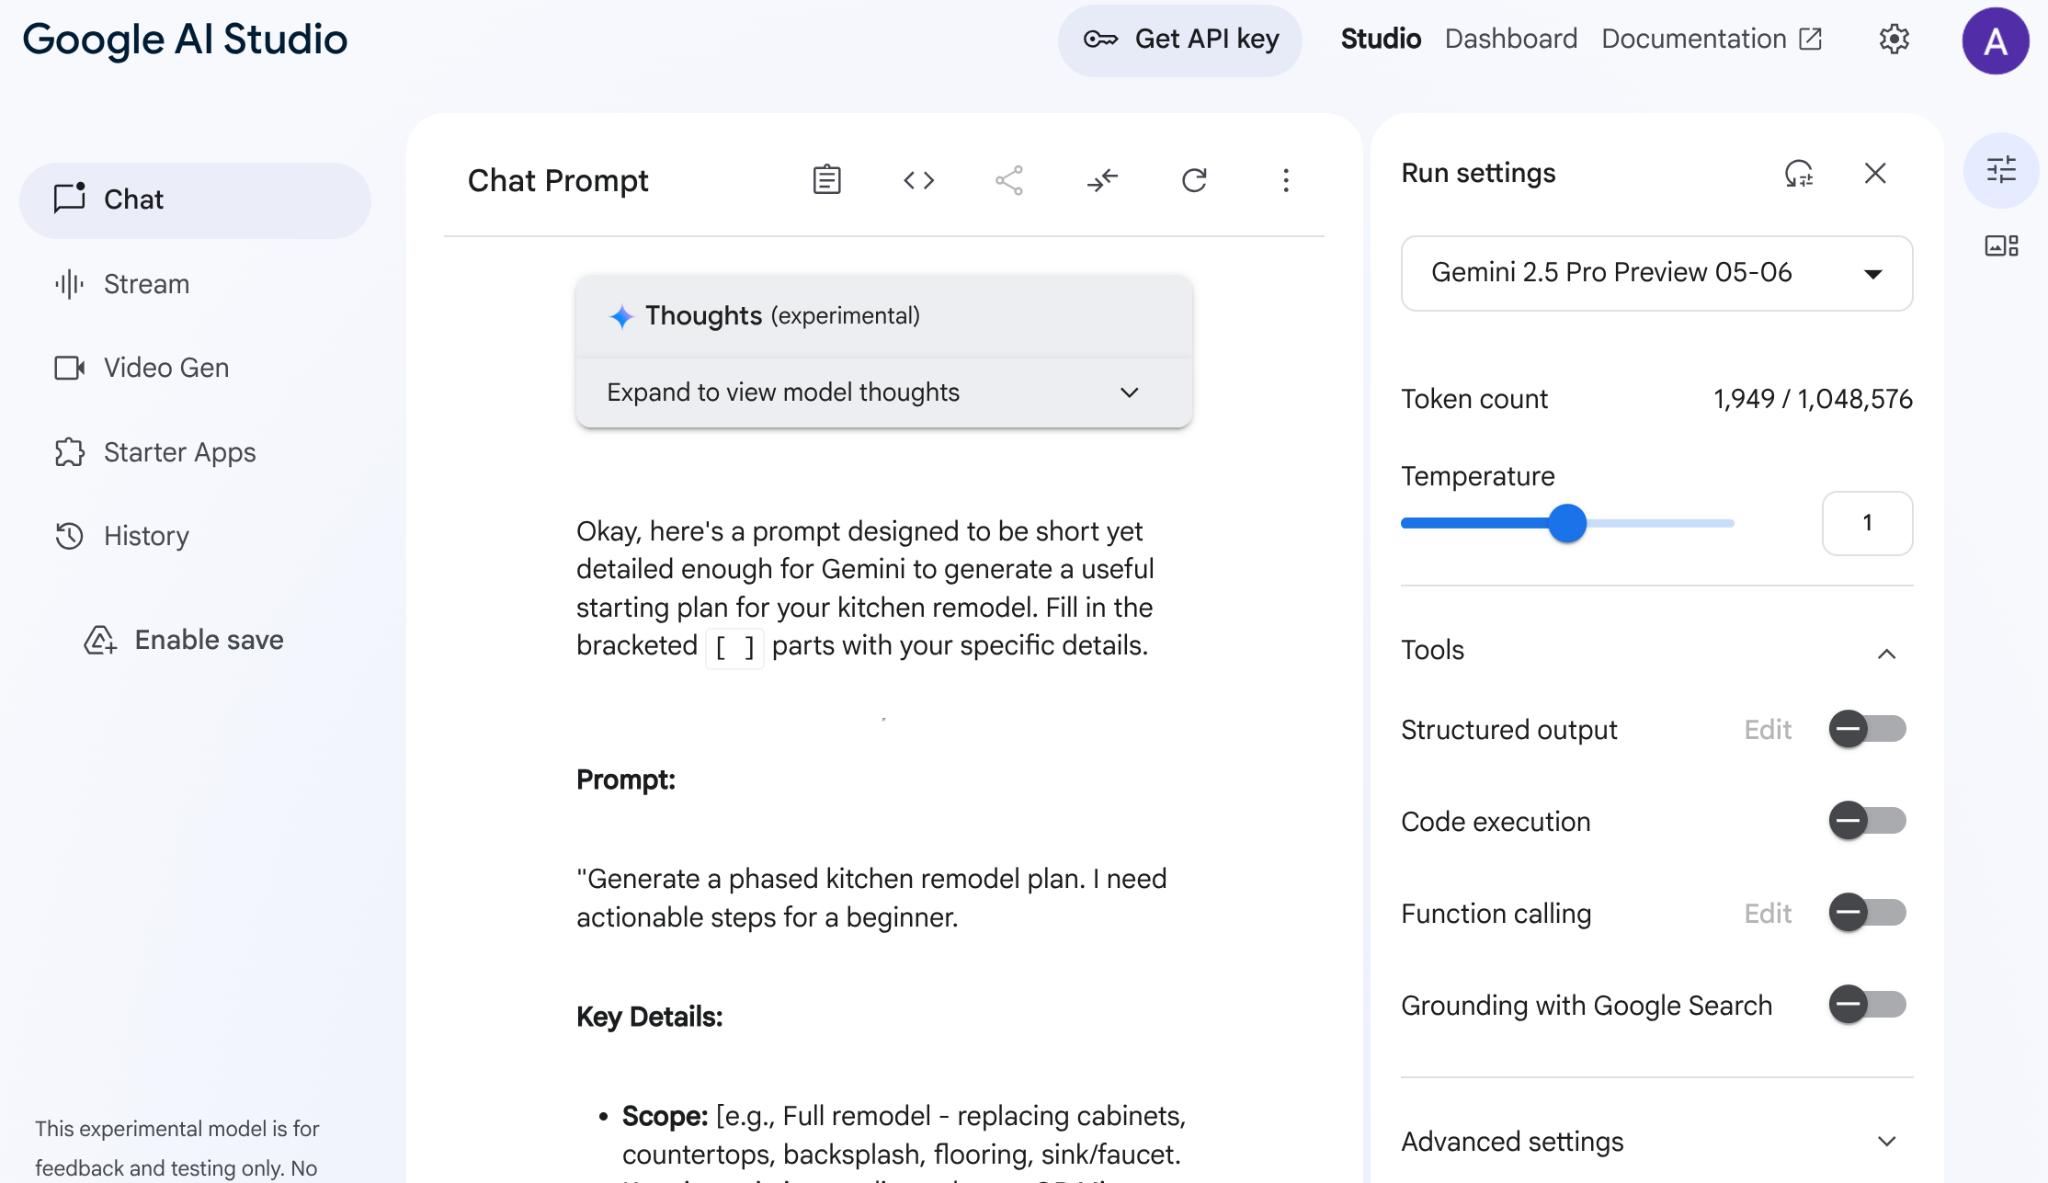
AI Studio 分析我的資料後,生成了櫥櫃、檯面、擋水板、地板、水槽、凝聚力、調色盤和材質選擇等所有項目。Gemini 甚至會引用來源!
現在試著使用其他提示詞,看看這個想法會如何成真。
- 複製這段提示詞並貼到提示詞編輯器:
Add flat and circular light accessories above the island area for my current kitchen in the attached image.
- 附上目前廚房的圖片 (或使用廚房圖片範例)。
- 將模型變更為「Gemini 2.0 Flash 預先發布版圖像生成模型」,即可生成圖像。
我得到以下輸出內容:
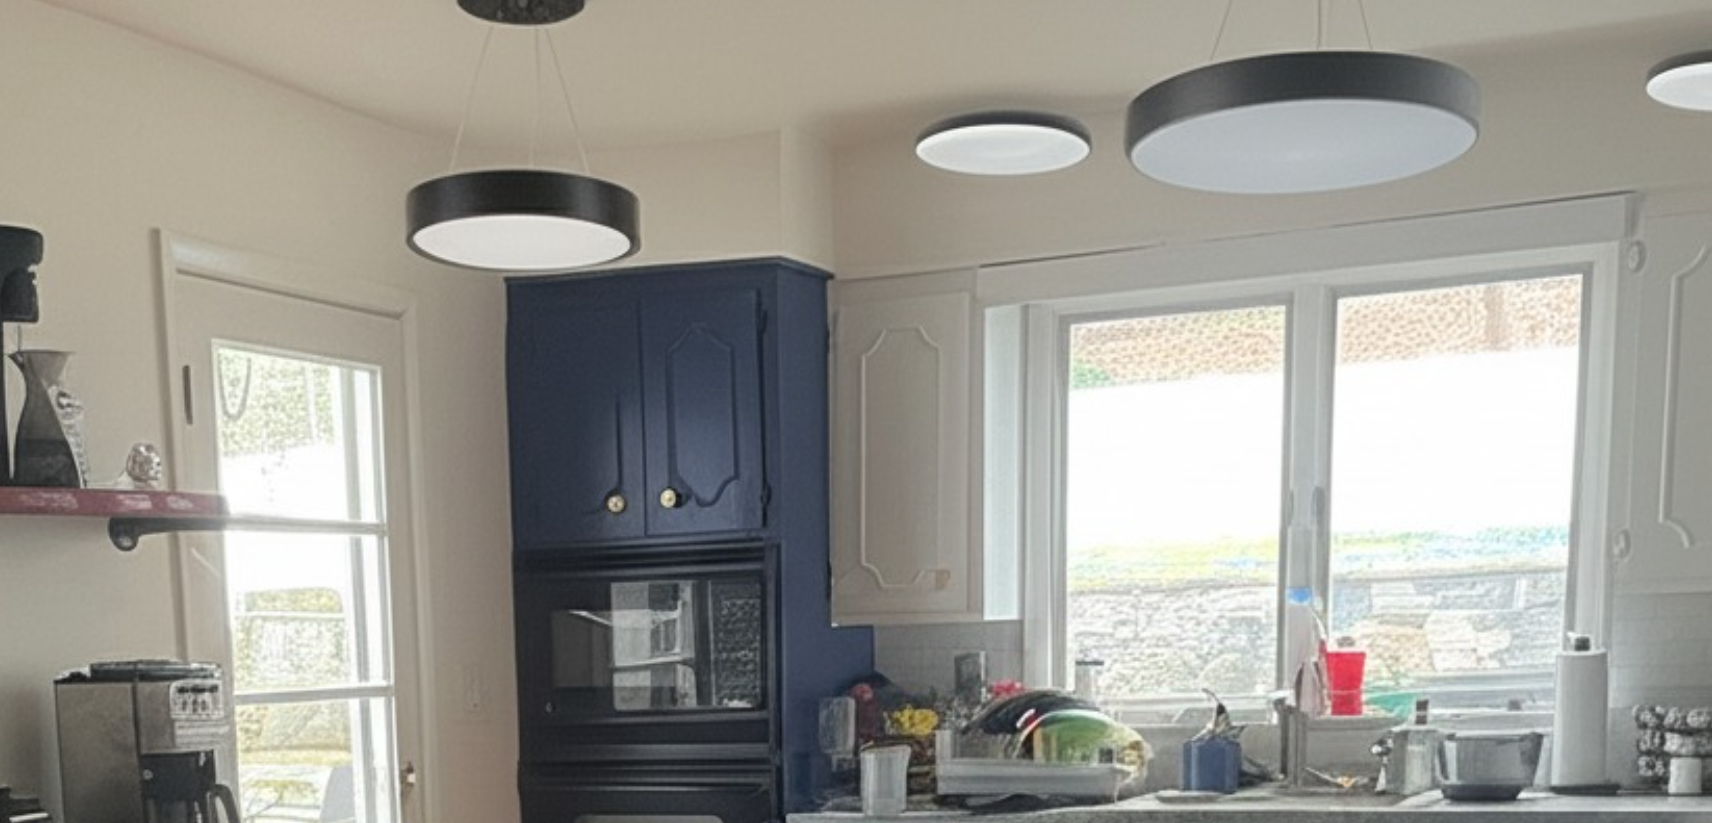
這就是 Gemini 的強大之處!
從解讀影片、生成原生圖片,到以 Google 搜尋為基準提供真實資訊,只有採用 Gemini 技術才能做到。
您可以在 AI Studio 中取得這個原型和 API 金鑰,然後運用 Vertex AI ADK 的強大功能,將原型擴展為完整的代理程式應用程式。
4. 設定 ADK
現在請前往在「事前準備」一節中啟動的 Cloud Shell 終端機:
- 建立並啟用虛擬環境 (建議)
在 Cloud Shell 終端機中建立虛擬環境:
python -m venv .venv
啟動虛擬環境:
source .venv/bin/activate
- 安裝 ADK
pip install google-adk
5. 專案結構
- 在 Cloud Shell 終端機中,於所需專案位置建立代理應用程式的根目錄:
mkdir agentic-apps
- 在主要目錄中,為目前的專案建立一個專屬資料夾:
mkdir renovation-agent
- 前往 Cloud Shell 編輯器建立檔案 (內容先保持空白),打造如下所示的專案架構:
renovation-agent/
        __init__.py
        agent.py
        requirements.txt
        .env
6. 原始碼
- 開啟「init.py」,並使用下列程式碼更新:
from . import agent
- 開啟 agent.py,並使用以下路徑的內容更新檔案:
在 agent.py 中,我們會匯入必要依附元件、從 .env 檔案擷取設定參數,並定義 root_agent,該 root_agent 會產生提案文件並儲存在 Cloud Storage Bucket 中。如要執行 Cloud Storage 步驟,請使用 store_pdf 工具。
注意:目前 PDF 檔案為未格式化的版本!根據社群開發人員的 PR,以下程式碼片段已納入此處 [未經測試],歡迎在 store_pdf 方法中採用:
doc = SimpleDocTemplate(
        pdf_buffer,
        pagesize=letter,
        rightMargin=0.75 * inch,
        leftMargin=0.75 * inch,
        topMargin=0.75 * inch,
        bottomMargin=0.75 * inch
    )

    styles = getSampleStyleSheet()
    story = []

    # --- CUSTOM STYLES FOR HEADERS ---
    # Define a new style for section headers
    styles.add(ParagraphStyle(name='SectionHeader',
                              parent=styles['Normal'],
                              fontName='Helvetica-Bold', # Make it bolder
                              fontSize=14,               # Make it slightly larger
                              leading=16,                # Line spacing
                              spaceAfter=0.15 * inch,    # Space after the header
                              spaceBefore=0.25 * inch,   # Space before the header
                              textColor=black            # Ensure color is bright/black (default is usually black, but explicit is good)
                             ))

    # Define a style for the main document title
    styles.add(ParagraphStyle(name='DocumentTitle',
                              parent=styles['Normal'],
                              fontName='Helvetica-Bold',
                              fontSize=20,
                              leading=24,
                              spaceAfter=0.25 * inch,
                              alignment=TA_CENTER, # Center align the title
                              textColor=black
                             ))
    # ---------------------------------

    paragraphs_raw = pdf_text.split('\n\n')

    # Heuristic for the garbled line issue (as before, temporary)
    if paragraphs_raw and len(paragraphs_raw[-1]) < 50 and any(char in paragraphs_raw[-1] for char in ['io', 'og', 'al', 'op']):
         logger.warning("Detected potentially garbled last paragraph. Attempting to trim/omit.")
         paragraphs_raw[-1] = "11. Entire Agreement:\nThis proposal constitutes the entire agreement between the parties and supersedes all prior discussions and agreements."


    for i, para_text in enumerate(paragraphs_raw):
        para_text = para_text.strip()
        if not para_text:
            continue

        # Special handling for the main document title (PROPOSAL DOCUMENT)
        if i == 0 and "PROPOSAL DOCUMENT" in para_text.upper():
            p = Paragraph("PROPOSAL DOCUMENT", styles['DocumentTitle'])
            story.append(p)
            story.append(Spacer(1, 0.15 * inch)) # Add space after the title
            # Skip the rest of this initial block if it's just the title
            remaining_text_lines = para_text.splitlines()[1:]
            if remaining_text_lines:
                formatted_text = "<br/>".join(remaining_text_lines)
                p = Paragraph(formatted_text, styles['Normal'])
                story.append(p)
                story.append(Spacer(1, 0.1 * inch))
            continue # Move to the next paragraph

        # Check if the paragraph looks like a section header (e.g., starts with a number and dot or just bold text)
        # This is a heuristic and might need fine-tuning based on actual proposal content variability.
        is_section_header = False
        # Check for numbered sections (e.g., "1. Scope of Work:")
        if para_text.startswith(('1.', '2.', '3.', '4.', '5.', '6.', '7.', '8.', '9.', '10.', '11.')):
            is_section_header = True
        # Check for Exhibit headers (e.g., "Exhibit A: Cabinet Design") or Roman numeral headings
        elif para_text.startswith(('Exhibit ', 'I.', 'II.', 'III.', 'IV.', 'V.', 'VI.', 'VII.')):
            is_section_header = True
        # Check for specific known headers
        elif para_text.strip().upper() in ["IN WITNESS WHEREOF,", "EXHIBITS:"]:
            is_section_header = True


        if is_section_header:
            p = Paragraph(para_text, styles['SectionHeader'])
            story.append(p)
            # No additional Spacer here, as SectionHeader style has spaceAfter
        else:
            formatted_text = para_text.replace('\n', '<br/>')
            p = Paragraph(formatted_text, styles['Normal'])
            story.append(p)
            story.append(Spacer(1, 0.1 * inch)) # Standard space after body paragraphs

    doc.build(story)

    pdf_buffer.seek(0)

    # Upload the PDF to GCS
    storage_client = storage.Client()
    bucket = storage_client.bucket(STORAGE_BUCKET)
    blob = bucket.blob(PROPOSAL_DOCUMENT_FILE_NAME)

    blob.upload_from_file(pdf_buffer, content_type="application/pdf")

    logger.info(f"Successfully uploaded PDF to gs://{STORAGE_BUCKET}/{PROPOSAL_DOCUMENT_FILE_NAME}")

except Exception as e:
    logger.error(f"Error writing text to PDF and uploading: {e}")
    raise
finally:
    if 'pdf_buffer' in locals():
        pdf_buffer.close()
return "Successfully uploaded PDF to GCS!!"
- 確認您擁有 Cloud Storage bucket
為了儲存代理生成的提案文件,請建立相應 bucket,並授予存取權給透過 Vertex AI 建立的代理系統。詳細步驟如下:
https://cloud.google.com/storage/docs/creating-buckets#console
將值區命名為「next-demo-store」。如果命名為其他名稱,請記得在 .env 檔案中更新 STORAGE_BUCKET 的值 (在「設定環境變數」步驟中)。
- 如要設定 bucket 的存取權,請前往 Cloud Storage 控制台和 Storage Bucket (在本例中,bucket 名稱為「next-demo-storage」:https://console.cloud.google.com/storage/browser/next-demo-storage)。
依序前往「權限」->「查看主體」->「授予存取權」。將主體選取為「allUsers」,角色選取為「Storage 物件使用者」。
Make sure to not enable "prevent public access". Since this is a demo/study application we are going with a public bucket. Remember to configure permission settings appropriately when you are building your application.
- 建立依附元件清單
在 requirements.txt 中列出所有依附元件。您可以從 repo 複製這項資訊。
單一代理程式系統原始碼說明
agent.py 檔案使用 Agent Development Kit (ADK),定義廚房翻修多代理系統的架構和行為。下文將詳細說明關鍵要素:
代理程式定義
根代理 (自動調度管理工具):proposal_agent
root_agent 就像這個單一代理系統的調度員,會接收初始翻修要求,然後根據具體需求決定該叫用哪些工具。
接著,root_agent 會收集並整理工具的回應,向使用者提供詳盡的回覆,在本例中,我們只有一個工具「store_pdf」。
7. 資料流程與重要概念
使用者透過 ADK 介面 (終端機或網頁版 UI) 發出要求。
- root_agent 收到要求。
- root_agent 會分析要求,並視需要將要求轉送給工具。
- 「store_pdf」工具的用途是將修訂後的文字內容寫入 PDF 檔案,然後上傳至 Google Cloud Storage。
- 接著,這項服務會將回覆傳回給 root_agent。
- root_agent 合併回覆,向使用者提供最終輸出結果。
LLM (大型語言模型)
代理主要依靠 LLM 來生成文字內容、回答問題,以及執行推論工作。LLM 就像「大腦」,是代理理解及回應使用者要求的關鍵。本文中的應用程式使用的 LLM 為 Gemini 2.5。
Google Cloud Storage
用於儲存生成的翻修提案文件。您需要建立 bucket,並授予代理必要的存取權限。
Cloud Run (選用)
OrderingAgent 會使用 Cloud Run 函式調用 AlloyDB 資料。Cloud Run 提供無伺服器環境,可根據 HTTP 要求執行程式碼。
AlloyDB
使用 OrderingAgent 時,必須設定 AlloyDB 資料庫來儲存訂單資訊。
.env 檔案
.env 檔案會儲存 API 金鑰、資料庫憑證和 bucket 名稱等機密資訊,因此請務必妥善保管,不要提交至存放區。這個檔案還會儲存代理和 Google Cloud 專案設定。root_agent 或輔助函式通常會讀取這個檔案中的值,所以請務必妥善設定其中的所有必要變數,包括 Cloud Storage bucket 名稱
8. 模型設定
代理理解使用者要求和生成回覆的能力,是由大型語言模型 (LLM) 驅動。您的代理程式需要安全地呼叫這個外部 LLM 服務,因此需要驗證憑證。如果沒有有效的驗證,LLM 服務會拒絕代理程式的要求,代理程式也無法運作。
- 從 Google AI Studio 取得 API 金鑰。
- 在下一個步驟中設定 .env 檔案時,請將
<<your API KEY>>換成實際的 API 金鑰值。
9. 設定環境變數
- 在範本 .env 檔案中設定參數值,這個檔案位於這個存放區。以我的情況來說,.env 包含下列變數:
GOOGLE_GENAI_USE_VERTEXAI=FALSE
GOOGLE_API_KEY=<<your API KEY>>
GOOGLE_CLOUD_LOCATION = us-central1 <<or your region>>
GOOGLE_CLOUD_PROJECT = <<your project id>>
PROJECT_ID = <<your project id>>
GOOGLE_CLOUD_REGION=us-central1 <<or your region>>
STORAGE_BUCKET = next-demo-store <<or your storage bucket name>>
將預留位置替換為您的值。
10. 執行代理程式
- 使用終端機前往代理程式專案的上層目錄:
cd agentic-apps/renovation-agent
- 安裝所有依附元件
pip install -r requirements.txt
- 您可以在 Cloud Shell 終端機中執行下列指令,執行代理程式:
adk run .
- 如要在 ADK 佈建的網頁版 UI 中執行,請執行以下指令:
注意:您必須從代理程式專案資料夾「外部」執行這項指令,先跳出資料夾,再執行指令:
adk web
- 使用下列提示詞進行測試:
user>>

Hello. Generate Proposal Document for the kitchen remodel requirement in a proper format that applies to a renovation contract. Remember this text will eventually be stored as a pdf file so make sure to have the formatting appropriate. I have no other specification.
11. 結果
指令 adk run . 結果如下所示」

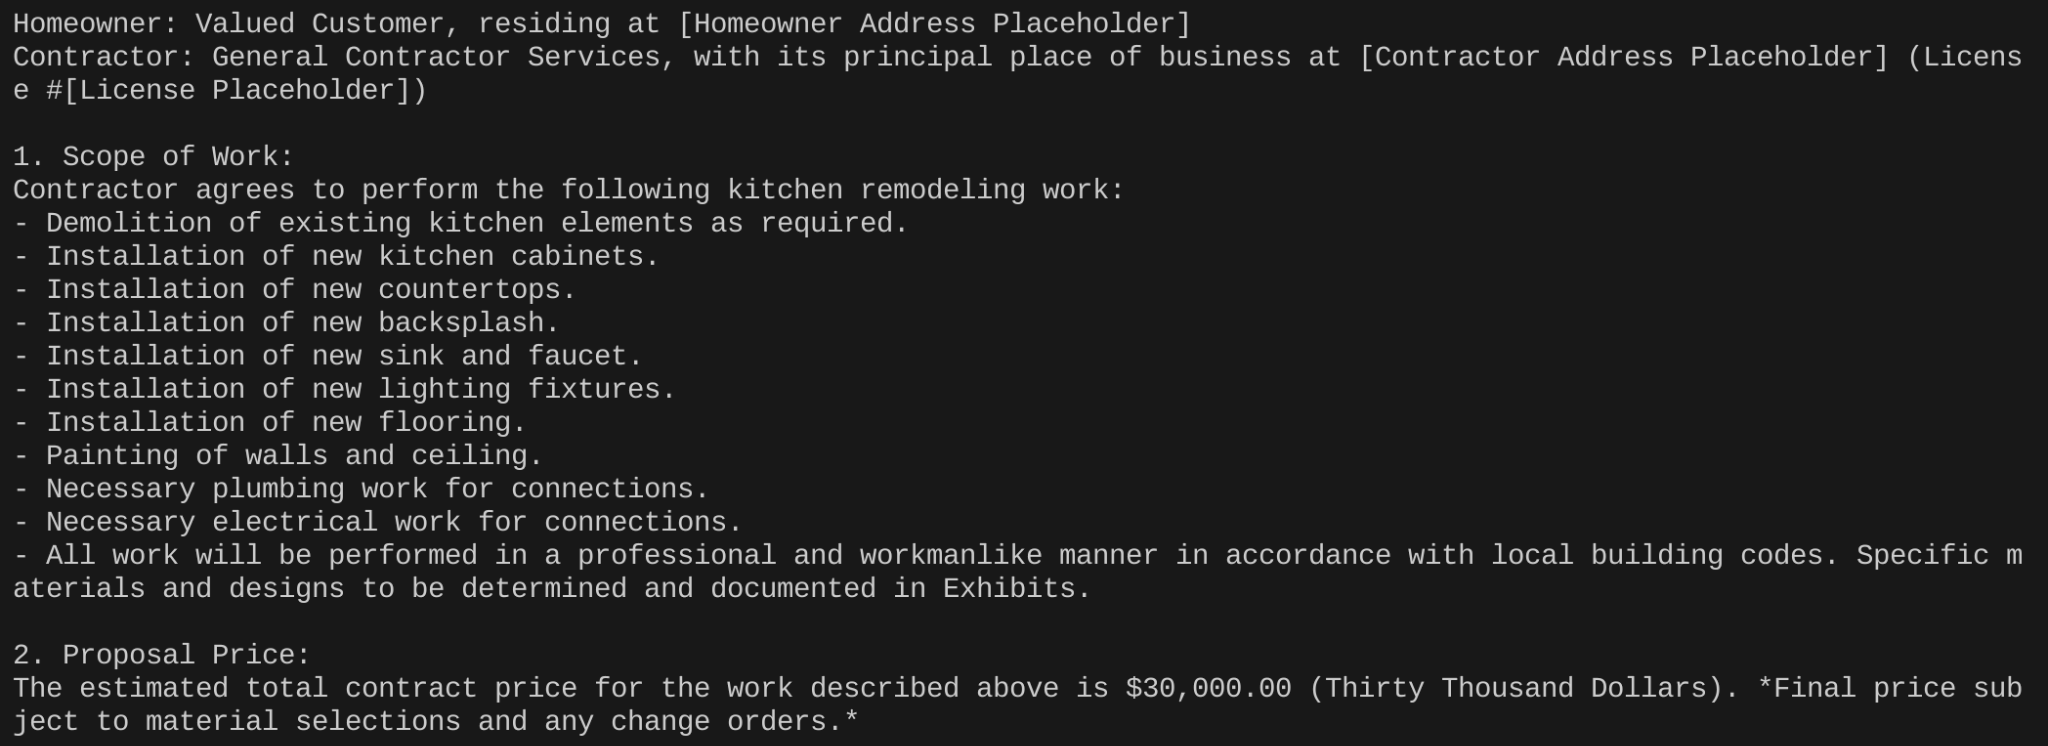
...
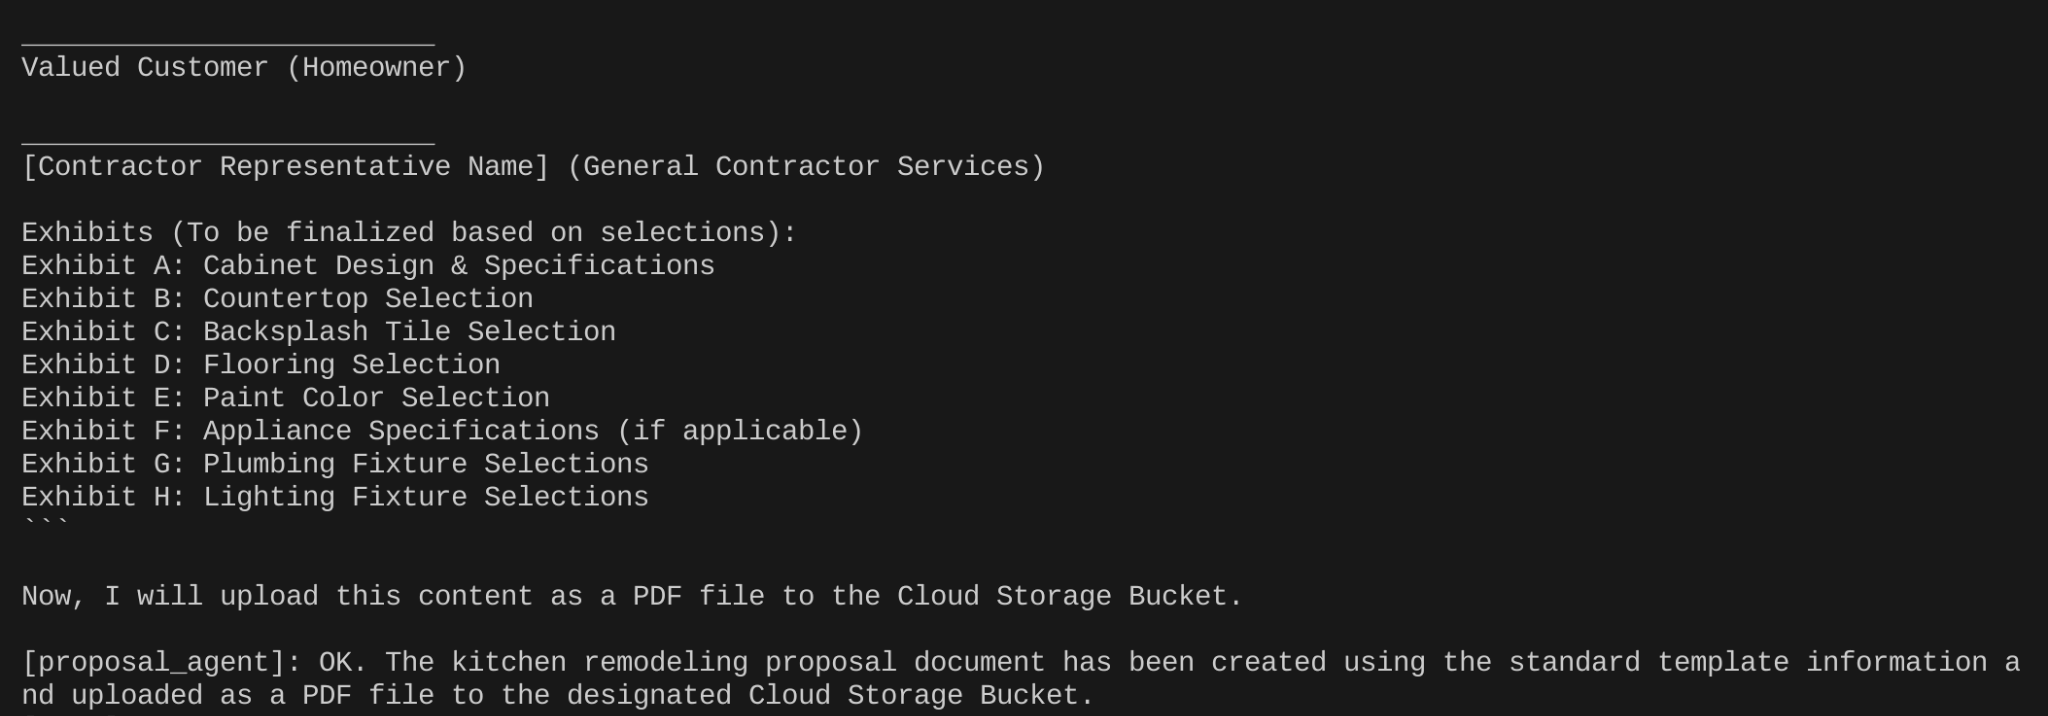
您可以驗證 Cloud Storage Bucket 中是否已建立「Renovation Proposal」文件。
12. 部署至 Cloud Run
- 在專案根資料夾中建立名為 Dockerfile 的檔案:
cd agentic-apps/renovation-agent
- 從 GitHub 存放區複製內容
https://github.com/AbiramiSukumaran/adk-renovation-single-agent/blob/main/Dockerfile
這個 Dockerfile 檔案。
- 使用下列指令部署至 Cloud Run:
adk deploy cloud_run --project=abis-345004 --region=us-central1 --service_name=renovation-agent --app_name=renovation-app --with_ui .
就是這麼簡單!部署完成後,終端機中會顯示端點,即可開始使用。
13. 清理
如要避免系統向您的 Google Cloud 帳戶收取本文所用資源的費用,請按照下列步驟操作:
14. 恭喜
恭喜!您已成功使用 ADK 建立多代理應用程式,並與其互動!這個多代理系統旨在簡化廚房翻修流程,自動處理提案生成、許可證檢查和訂單狀態追蹤等工作。每個代理都擔任特定角色,並由 root_agent 負責協調,提供完善的解決方案。系統提供功能時,會運用 LLM、Google Cloud 服務,並視情況使用外部 API。請點選這個連結,查看產品說明文件。