
1. 📖 บทนำ
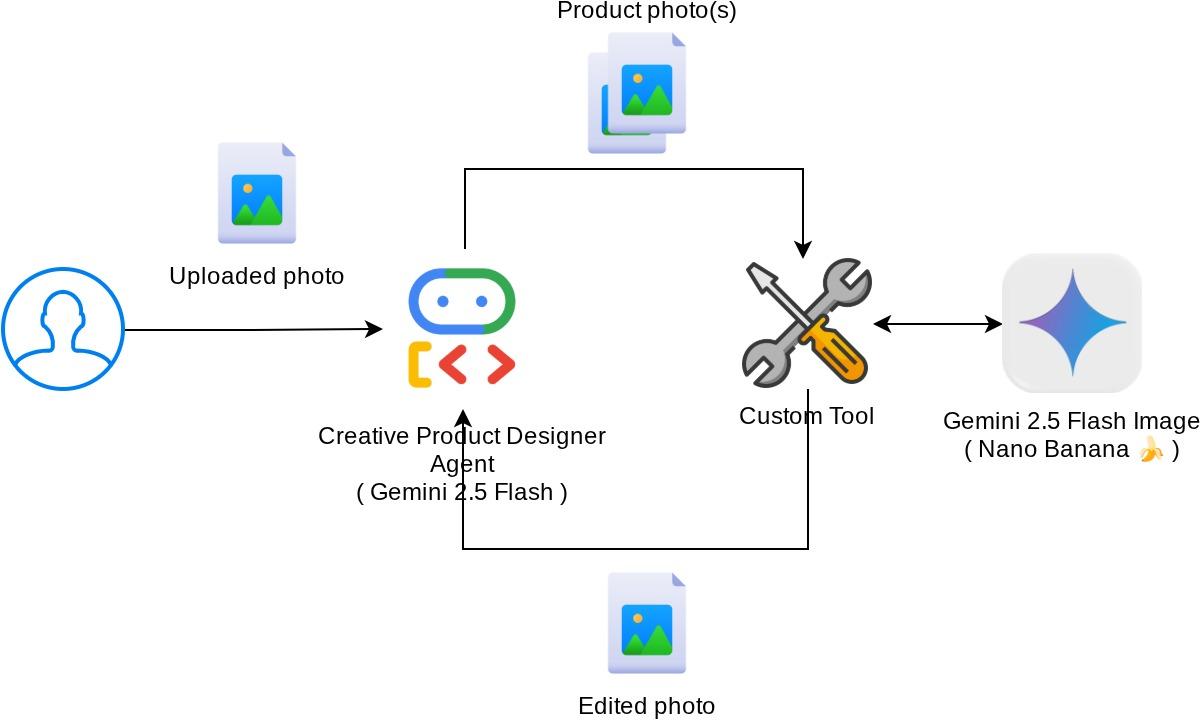
Codelab นี้แสดงวิธีออกแบบการโต้ตอบเครื่องมือหลายรูปแบบใน Agent Development Kit (ADK) นี่คือโฟลว์เฉพาะที่คุณต้องการให้ Agent อ้างอิงไฟล์ที่อัปโหลดเป็นอินพุตไปยังเครื่องมือ และทำความเข้าใจเนื้อหาไฟล์ที่สร้างขึ้นจากการตอบกลับของเครื่องมือด้วย จึงทำให้สามารถโต้ตอบได้ดังที่แสดงในภาพหน้าจอด้านล่าง ในบทแนะนำนี้ เราจะพัฒนาเอเจนต์ที่ช่วยให้ผู้ใช้แก้ไขรูปภาพผลิตภัณฑ์สำหรับจัดแสดงสินค้าได้ดีขึ้น
ใน Codelab นี้ คุณจะได้ใช้แนวทางแบบทีละขั้นตอนดังนี้
- เตรียมโปรเจ็กต์ที่อยู่ในระบบคลาวด์ของ Google
- ตั้งค่าไดเรกทอรีงานสำหรับสภาพแวดล้อมการเขียนโค้ด
- เริ่มต้น Agent โดยใช้ ADK
- ออกแบบเครื่องมือที่ใช้แก้ไขรูปภาพซึ่งขับเคลื่อนโดย Gemini 2.5 Flash Image
- ออกแบบฟังก์ชัน Callback เพื่อจัดการการอัปโหลดรูปภาพของผู้ใช้ บันทึกเป็นอาร์ติแฟกต์ และเพิ่มเป็นบริบทให้กับ Agent
- ออกแบบฟังก์ชัน Callback เพื่อจัดการรูปภาพที่สร้างขึ้นจากการตอบกลับของเครื่องมือ บันทึกเป็นอาร์ติแฟกต์ และเพิ่มเป็นบริบทให้กับ Agent
ภาพรวมสถาปัตยกรรม
การโต้ตอบโดยรวมในโค้ดแล็บนี้แสดงอยู่ในแผนภาพต่อไปนี้
ข้อกำหนดเบื้องต้น
- ทำงานกับ Python ได้อย่างคล่องแคล่ว
- (ไม่บังคับ) Codelab พื้นฐานเกี่ยวกับ Agent Development Kit (ADK)
สิ่งที่คุณจะได้เรียนรู้
- วิธีใช้บริบทการเรียกกลับเพื่อเข้าถึงบริการอาร์ติแฟกต์
- วิธีออกแบบเครื่องมือที่มีการเผยแพร่ข้อมูลหลายรูปแบบอย่างเหมาะสม
- วิธีแก้ไขคำขอ LLM ของตัวแทนเพื่อเพิ่มบริบทของอาร์ติแฟกต์ผ่าน before_model_callback
- วิธีแก้ไขรูปภาพโดยใช้ Gemini 2.5 Flash Image
สิ่งที่คุณต้องมี
- เว็บเบราว์เซอร์ Chrome
- บัญชี Gmail
- โปรเจ็กต์ระบบคลาวด์ที่เปิดใช้บัญชีสำหรับการเรียกเก็บเงิน
Codelab นี้ออกแบบมาสำหรับนักพัฒนาซอฟต์แวร์ทุกระดับ (รวมถึงผู้เริ่มต้น) โดยใช้ Python ในแอปพลิเคชันตัวอย่าง อย่างไรก็ตาม คุณไม่จำเป็นต้องมีความรู้เกี่ยวกับ Python เพื่อทำความเข้าใจแนวคิดที่นำเสนอ
2. 🚀 เตรียมการตั้งค่าการพัฒนาเวิร์กช็อป
ขั้นตอนที่ 1: เลือกโปรเจ็กต์ที่ใช้งานอยู่ใน Cloud Console
ในคอนโซล Google Cloud ให้เลือกหรือสร้างโปรเจ็กต์ Google Cloud ในหน้าตัวเลือกโปรเจ็กต์ (ดูส่วนบนซ้ายของคอนโซล)

คลิกที่ไอคอนดังกล่าว แล้วคุณจะเห็นรายการโปรเจ็กต์ทั้งหมดของคุณดังตัวอย่างนี้
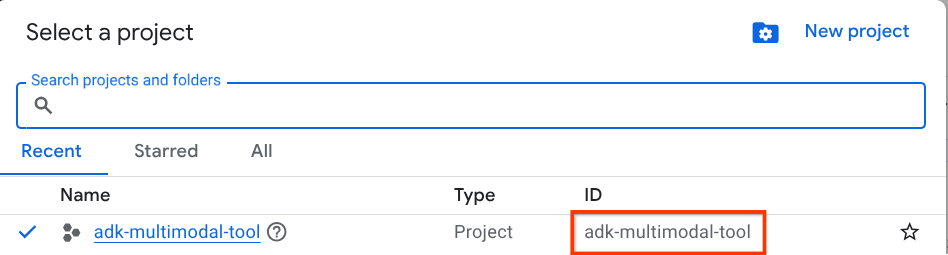
ค่าที่ระบุโดยกรอบสีแดงคือรหัสโปรเจ็กต์ และค่านี้จะใช้ตลอดทั้งบทแนะนำ
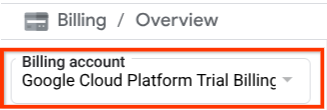
ตรวจสอบว่าได้เปิดใช้การเรียกเก็บเงินสำหรับโปรเจ็กต์ที่อยู่ในระบบคลาวด์แล้ว หากต้องการตรวจสอบ ให้คลิกไอคอนแฮมเบอร์เกอร์ ☰ ในแถบด้านซ้ายบน ซึ่งจะแสดงเมนูการนำทางและค้นหาเมนูการเรียกเก็บเงิน

หากเห็น "บัญชีสำหรับการเรียกเก็บเงินของรุ่นทดลองใช้ Google Cloud Platform" ในส่วนหัวการเรียกเก็บเงิน / ภาพรวม ( ส่วนบนซ้ายของคอนโซลระบบคลาวด์) แสดงว่าโปรเจ็กต์ของคุณพร้อมใช้งานสำหรับบทแนะนำนี้แล้ว หากไม่ถูกต้อง ให้กลับไปที่จุดเริ่มต้นของบทแนะนำนี้และแลกสิทธิ์บัญชีสำหรับการเรียกเก็บเงินช่วงทดลองใช้
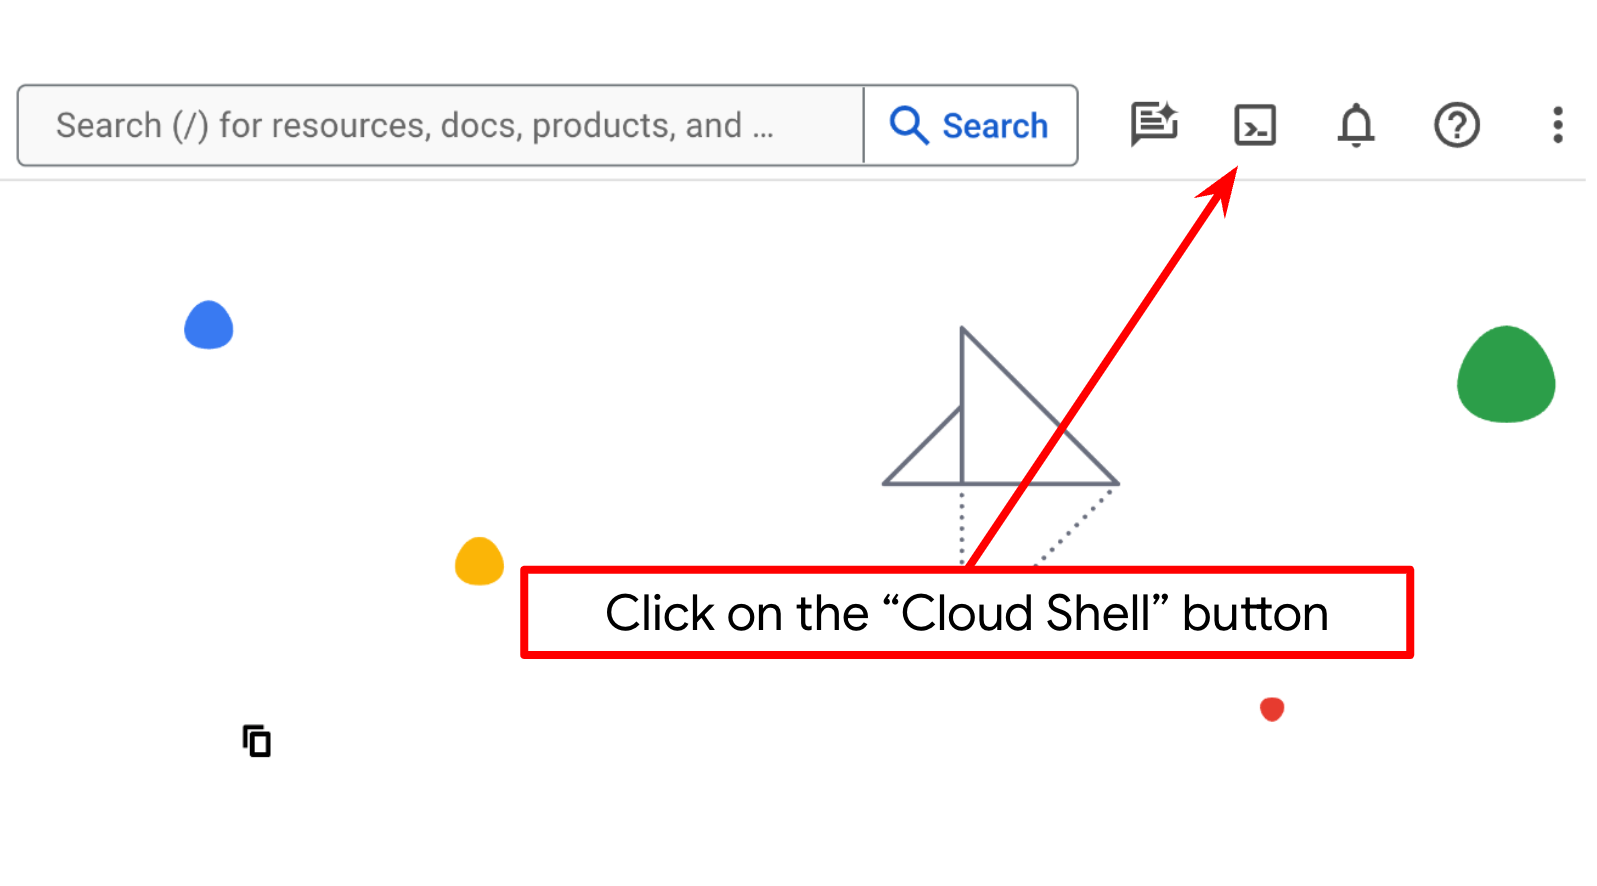
ขั้นตอนที่ 2: ทำความคุ้นเคยกับ Cloud Shell
คุณจะใช้ Cloud Shell ในบทแนะนำส่วนใหญ่ ให้คลิก "เปิดใช้งาน Cloud Shell" ที่ด้านบนของคอนโซล Google Cloud หากระบบแจ้งให้คุณให้สิทธิ์ ให้คลิกให้สิทธิ์
เมื่อเชื่อมต่อกับ Cloud Shell แล้ว เราจะต้องตรวจสอบว่า Shell ( หรือเทอร์มินัล) ได้รับการตรวจสอบสิทธิ์ด้วยบัญชีของเราแล้วหรือไม่
gcloud auth list
หากเห็น Gmail ส่วนตัวของคุณเหมือนเอาต์พุตตัวอย่างด้านล่าง แสดงว่าทุกอย่างเรียบร้อยดี
Credentialed Accounts

ACTIVE: *
ACCOUNT: alvinprayuda@gmail.com

To set the active account, run:
    $ gcloud config set account `ACCOUNT`
หากไม่ ให้ลองรีเฟรชเบราว์เซอร์และตรวจสอบว่าคุณคลิกให้สิทธิ์เมื่อได้รับข้อความแจ้ง ( การดำเนินการอาจถูกขัดจังหวะเนื่องจากปัญหาการเชื่อมต่อ)
จากนั้นเรายังต้องตรวจสอบด้วยว่ามีการกำหนดค่า Shell ให้กับ PROJECT ID ที่ถูกต้องที่คุณมีอยู่แล้วหรือไม่ หากคุณเห็นว่ามีค่าอยู่ภายใน ( ) ก่อนไอคอน $ ในเทอร์มินัล ( ในภาพหน้าจอด้านล่าง ค่าคือ "adk-multimodal-tool") ค่านี้จะแสดงโปรเจ็กต์ที่กำหนดค่าไว้สำหรับเซสชัน Shell ที่ใช้งานอยู่

หากค่าที่แสดงถูกต้องอยู่แล้ว คุณก็ข้ามคำสั่งถัดไปได้ แต่หากไม่ถูกต้องหรือไม่มี ให้เรียกใช้คำสั่งต่อไปนี้
gcloud config set project <YOUR_PROJECT_ID>
จากนั้นโคลนไดเรกทอรีการทำงานของเทมเพลตสำหรับ Codelab นี้จาก Github โดยเรียกใช้คำสั่งต่อไปนี้ ซึ่งจะสร้างไดเรกทอรีการทำงานในไดเรกทอรี adk-multimodal-tool
git clone https://github.com/alphinside/adk-mcp-multimodal.git adk-multimodal-tool
ขั้นตอนที่ 3: ทำความคุ้นเคยกับ Cloud Shell Editor และตั้งค่าไดเรกทอรีการทำงานของแอปพลิเคชัน
ตอนนี้เราสามารถตั้งค่าตัวแก้ไขโค้ดเพื่อเขียนโค้ดได้แล้ว เราจะใช้ Cloud Shell Editor สำหรับการดำเนินการนี้
คลิกปุ่มเปิดตัวแก้ไข ซึ่งจะเปิด Cloud Shell Editor 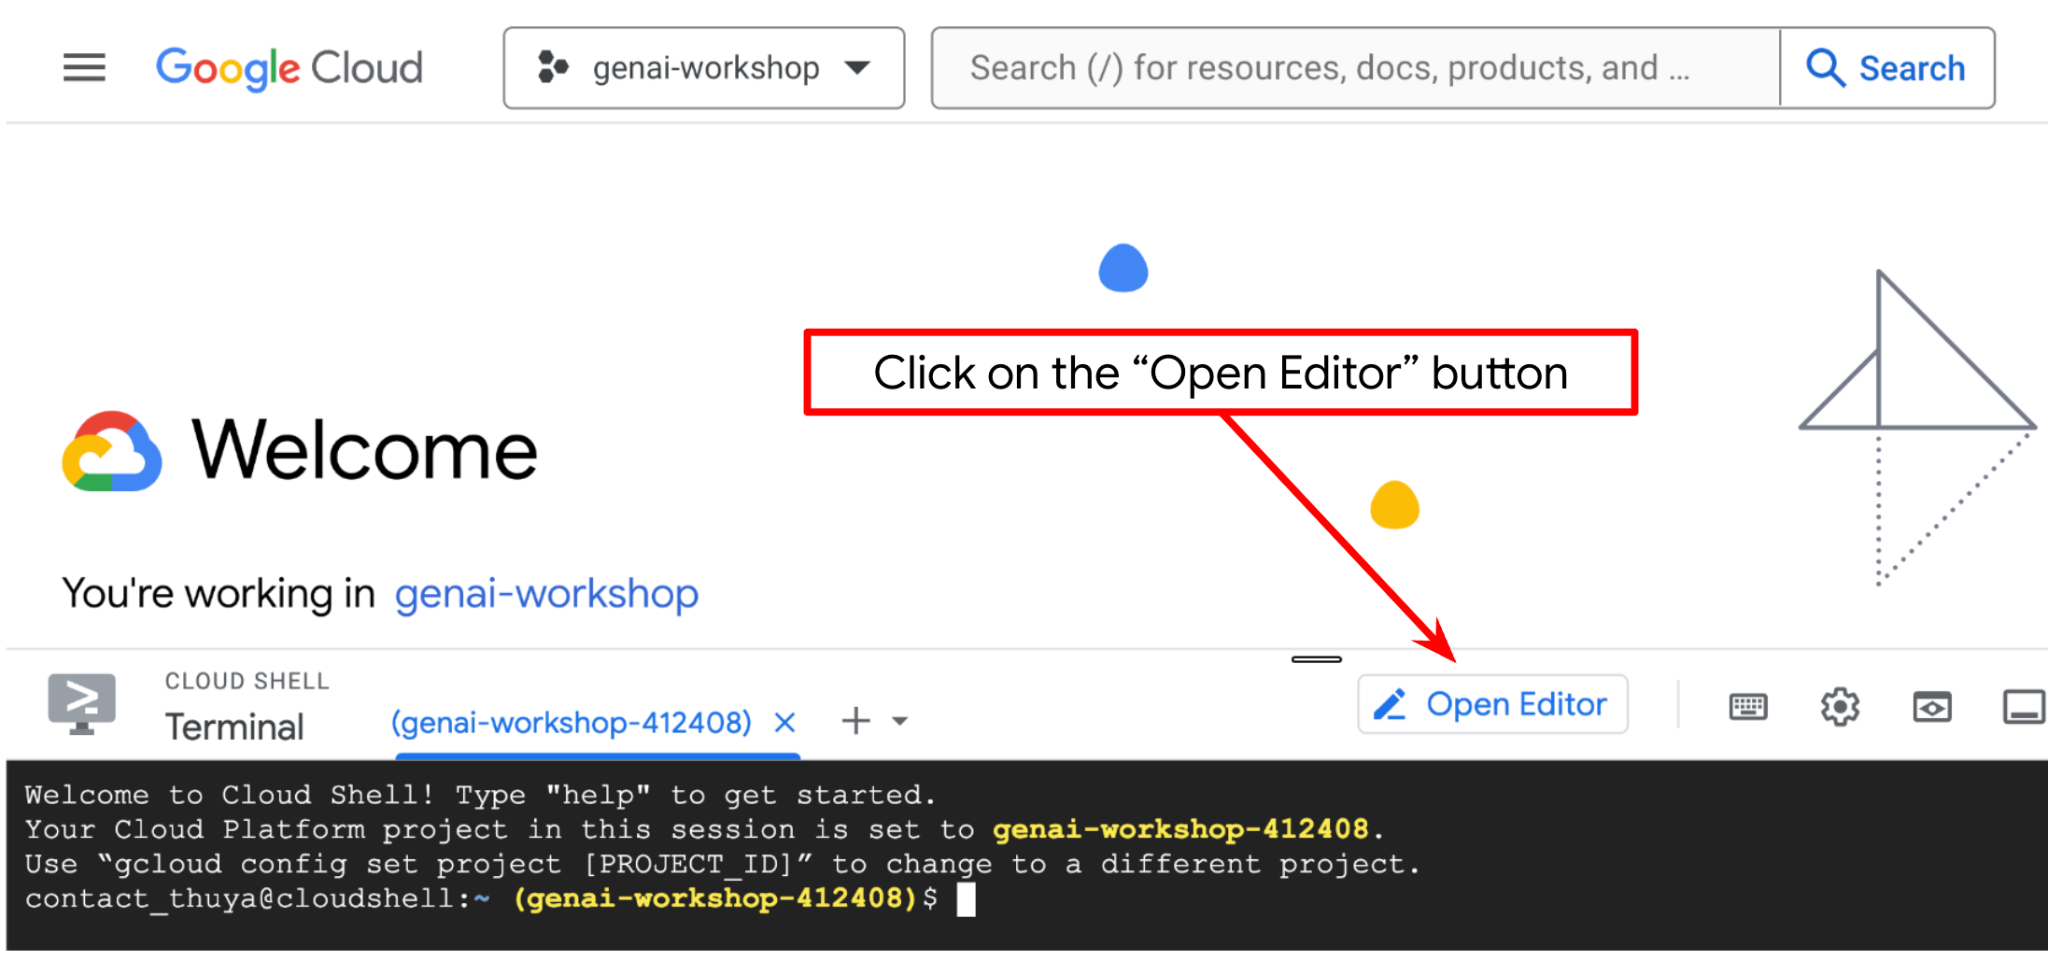
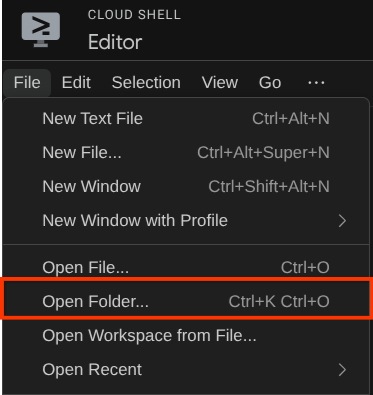
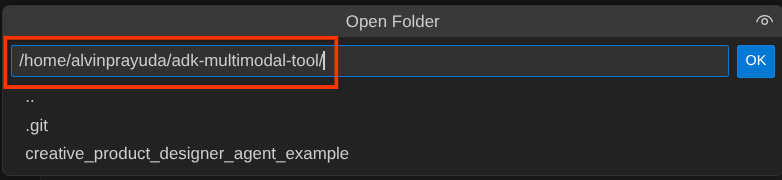
หลังจากนั้น ให้ไปที่ส่วนบนสุดของ Cloud Shell Editor แล้วคลิกFile->Open Folder ค้นหาไดเรกทอรี username แล้วค้นหาไดเรกทอรี adk-multimodal-tool จากนั้นคลิกปุ่ม OK ซึ่งจะทำให้ไดเรกทอรีที่เลือกเป็นไดเรกทอรีการทำงานหลัก ในตัวอย่างนี้ ชื่อผู้ใช้คือ alvinprayuda ดังนั้นเส้นทางไดเรกทอรีจึงแสดงอยู่ด้านล่าง
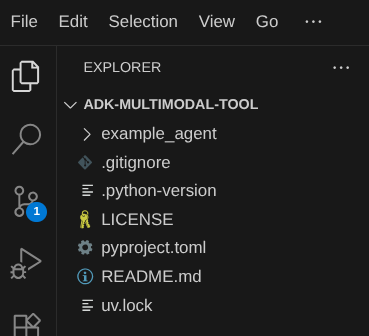
ตอนนี้ไดเรกทอรีการทำงานของ Cloud Shell Editor ควรมีลักษณะดังนี้ ( ภายใน adk-multimodal-tool)
ตอนนี้ให้เปิดเทอร์มินัลสำหรับเครื่องมือแก้ไข คุณทำได้โดยคลิกเทอร์มินัล -> เทอร์มินัลใหม่ในแถบเมนู หรือใช้ Ctrl + Shift + C ซึ่งจะเปิดหน้าต่างเทอร์มินัลที่ส่วนล่างของเบราว์เซอร์

เทอร์มินัลที่ใช้งานอยู่ปัจจุบันควรอยู่ในไดเรกทอรีการทำงาน adk-multimodal-tool เราจะใช้ Python 3.12 ใน Codelab นี้ และจะใช้ตัวจัดการโปรเจ็กต์ Python ของ uv เพื่อลดความซับซ้อนในการสร้างและจัดการเวอร์ชัน Python และสภาพแวดล้อมเสมือน แพ็กเกจ uv ได้รับการติดตั้งล่วงหน้าใน Cloud Shell แล้ว
เรียกใช้คำสั่งนี้เพื่อติดตั้งการอ้างอิงที่จำเป็นลงในสภาพแวดล้อมเสมือนในไดเรกทอรี .venv
uv sync --frozen
ตรวจสอบ pyproject.toml เพื่อดูการอ้างอิงที่ประกาศไว้สำหรับบทแนะนำนี้ ซึ่งได้แก่ google-adk, and python-dotenv
ตอนนี้เราจะต้องเปิดใช้ API ที่จำเป็นผ่านคำสั่งที่แสดงด้านล่าง อาจใช้เวลาสักครู่
gcloud services enable aiplatform.googleapis.com
เมื่อเรียกใช้คำสั่งสำเร็จ คุณควรเห็นข้อความที่คล้ายกับข้อความที่แสดงด้านล่าง
Operation "operations/..." finished successfully.
3. 🚀 เริ่มต้น Agent ของ ADK
ในขั้นตอนนี้ เราจะเริ่มต้น Agent โดยใช้ ADK CLI และเรียกใช้คำสั่งต่อไปนี้
uv run adk create product_photo_editor \
   --model gemini-2.5-flash \
   --project your-project-id \
   --region us-central1
คำสั่งนี้จะช่วยให้คุณระบุโครงสร้างที่จำเป็นสำหรับเอเจนต์ได้อย่างรวดเร็วตามที่แสดงด้านล่าง
product_photo_editor/
├── __init__.py
├── .env
├── agent.py
หลังจากนั้น มาเตรียมเอเจนต์โปรแกรมแก้ไขรูปภาพผลิตภัณฑ์กัน ก่อนอื่น ให้คัดลอก prompt.py ที่รวมอยู่ในที่เก็บไปยังไดเรกทอรีของเอเจนต์ที่คุณสร้างไว้ก่อนหน้านี้
cp prompt.py product_photo_editor/prompt.py
จากนั้นเปิด product_photo_editor/agent.py แล้วแก้ไขเนื้อหาด้วยโค้ดต่อไปนี้
from google.adk.agents.llm_agent import Agent
from product_photo_editor.prompt import AGENT_INSTRUCTION

root_agent = Agent(
    model="gemini-2.5-flash",
    name="product_photo_editor",
    description="""A friendly product photo editor assistant that helps small business
owners edit and enhance their product photos. Perfect for improving photos of handmade
goods, food products, crafts, and small retail items""",
    instruction=AGENT_INSTRUCTION,
)
ตอนนี้คุณจะมี Agent โปรแกรมแก้ไขรูปภาพพื้นฐานซึ่งคุณสามารถแชทด้วยเพื่อขอคำแนะนำสำหรับรูปภาพได้แล้ว คุณลองโต้ตอบกับโมเดลได้โดยใช้คำสั่งนี้
uv run adk web --port 8080
ซึ่งจะสร้างเอาต์พุตคล้ายกับตัวอย่างต่อไปนี้ ซึ่งหมายความว่าเราเข้าถึงอินเทอร์เฟซเว็บได้แล้ว
INFO:     Started server process [xxxx]
INFO:     Waiting for application startup.

+-----------------------------------------------------------------------------+
| ADK Web Server started                                                      |
|                                                                             |
| For local testing, access at http://127.0.0.1:8080.                         |
+-----------------------------------------------------------------------------+

INFO:     Application startup complete.
INFO:     Uvicorn running on http://127.0.0.1:8080 (Press CTRL+C to quit)
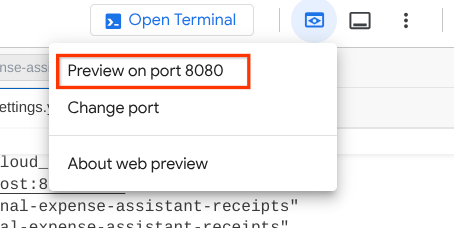
ตอนนี้หากต้องการตรวจสอบ คุณสามารถกด Ctrl + คลิกที่ URL หรือคลิกปุ่มตัวอย่างเว็บที่ด้านบนของ Cloud Shell Editor แล้วเลือกแสดงตัวอย่างบนพอร์ต 8080
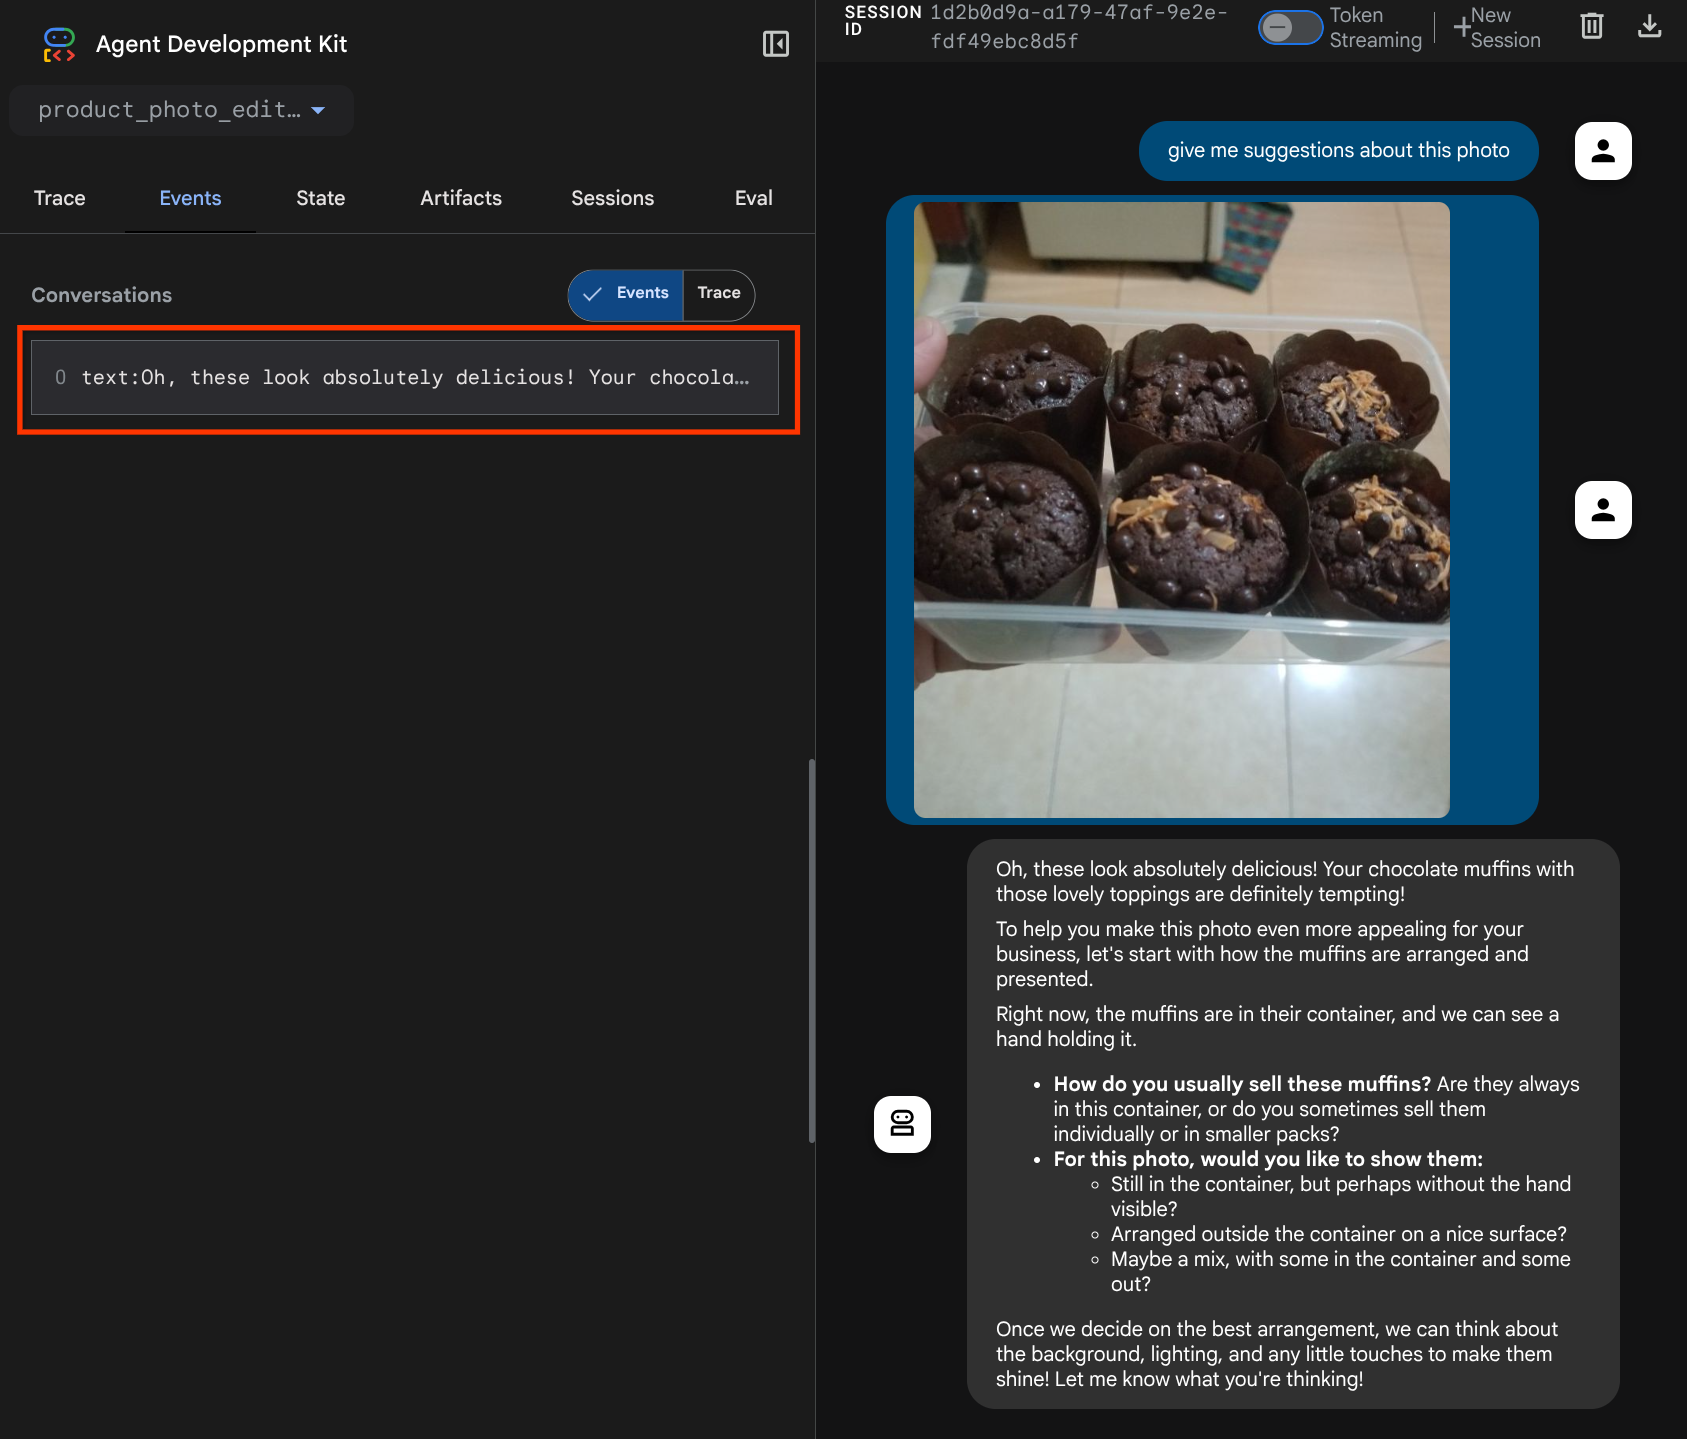
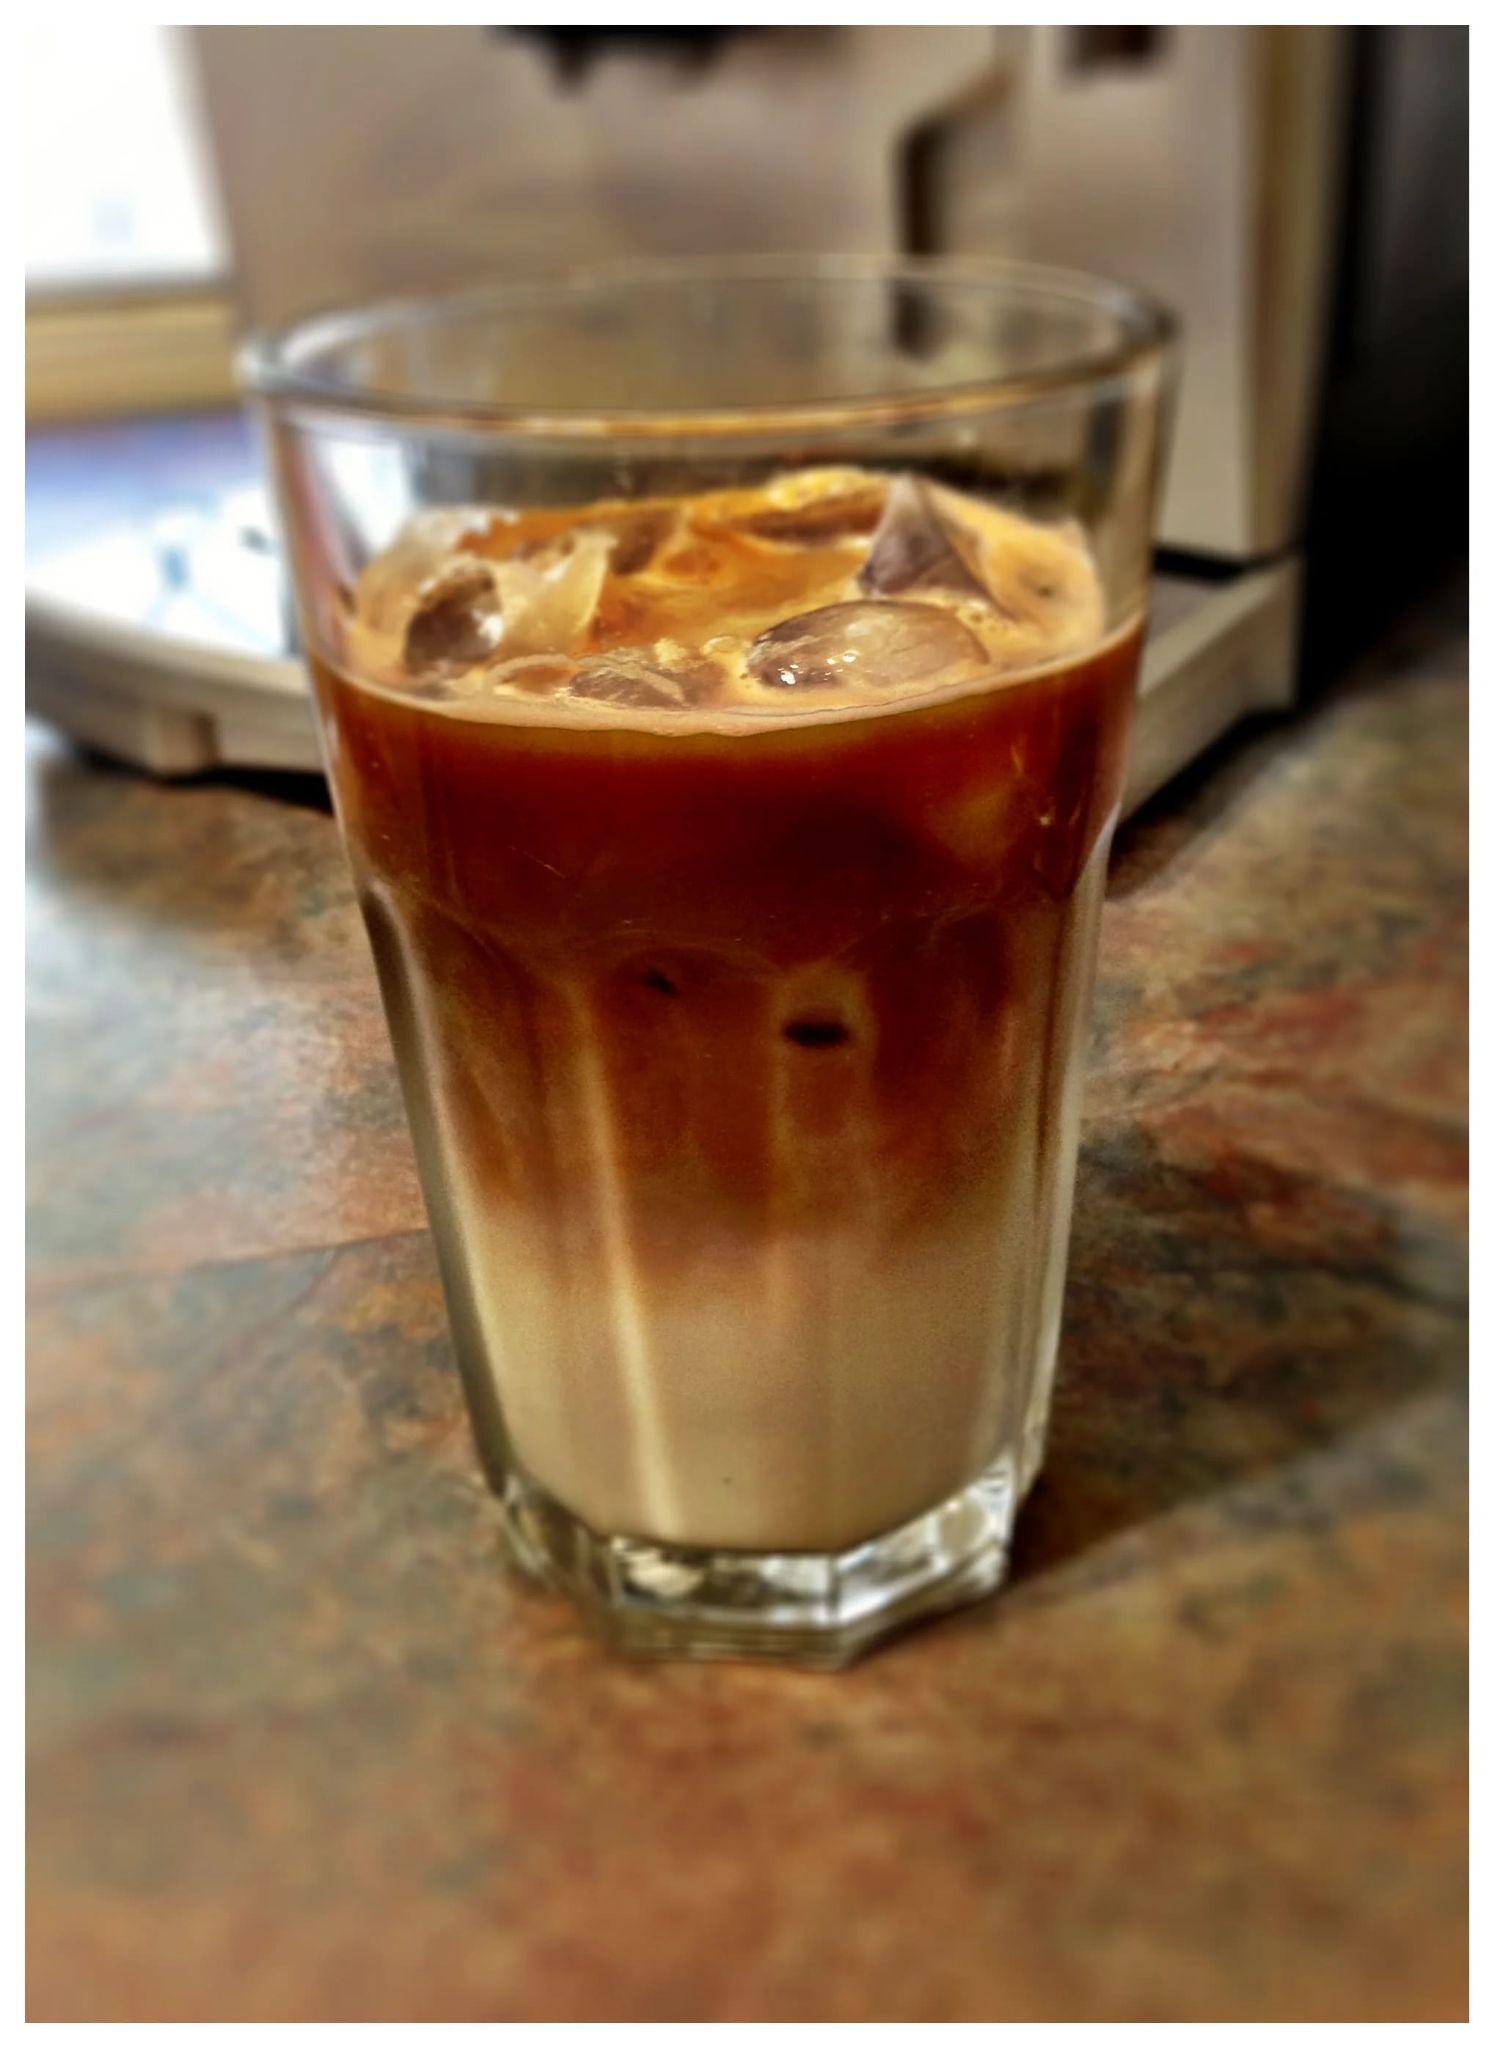
คุณจะเห็นหน้าเว็บต่อไปนี้ ซึ่งคุณสามารถเลือกตัวแทนที่พร้อมให้บริการได้ที่ปุ่มเมนูแบบเลื่อนลงด้านซ้ายบน ( ในกรณีของเราควรเป็น product_photo_editor) และโต้ตอบกับบอท ลองอัปโหลดรูปภาพต่อไปนี้ในอินเทอร์เฟซแชทและถามคำถามต่อไปนี้
what is your suggestion for this photo?

คุณจะเห็นการโต้ตอบที่คล้ายกับที่แสดงด้านล่าง
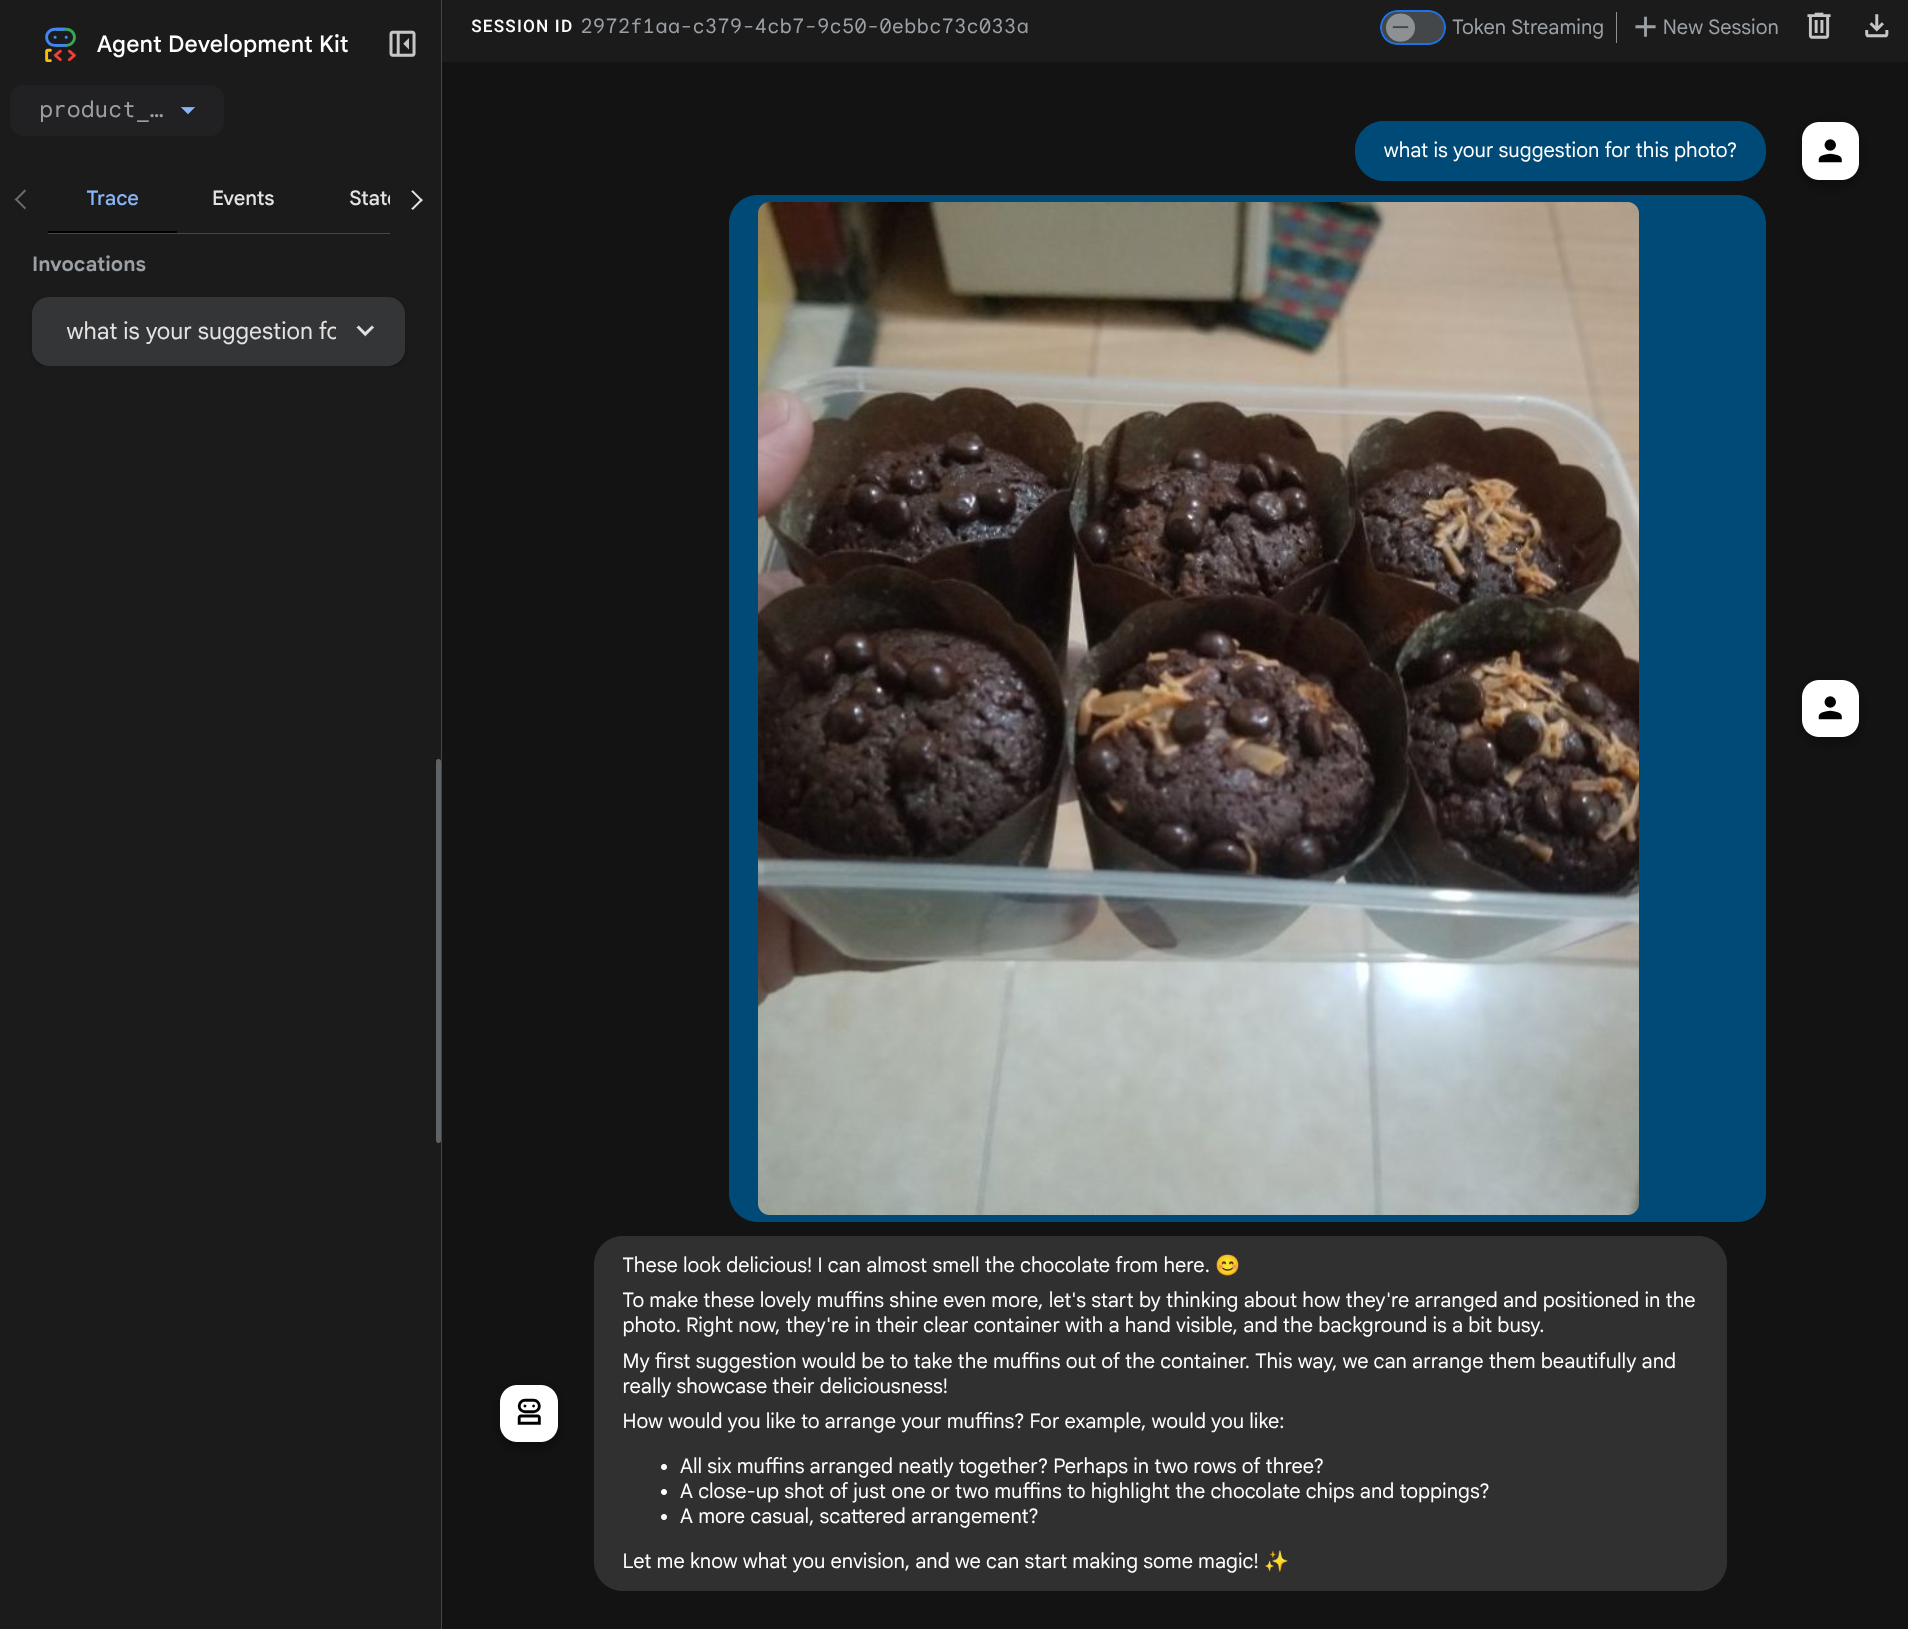
คุณขอคำแนะนำบางอย่างได้อยู่แล้ว แต่ในตอนนี้ Gemini ยังแก้ไขให้คุณไม่ได้ มาดูขั้นตอนถัดไปกันเลย นั่นคือการมอบเครื่องมือแก้ไขให้แก่เอเจนต์
4. 🚀 การแก้ไขบริบทคำขอ LLM - รูปภาพที่ผู้ใช้อัปโหลด
เราต้องการให้ Agent มีความยืดหยุ่นในการเลือกรูปภาพที่อัปโหลดซึ่งต้องการแก้ไข อย่างไรก็ตาม เครื่องมือ LLM มักได้รับการออกแบบมาให้ยอมรับพารามิเตอร์ประเภทข้อมูลอย่างง่าย เช่น str หรือ int ซึ่งเป็นประเภทข้อมูลที่แตกต่างกันมากสำหรับข้อมูลหลายรูปแบบ ซึ่งมักจะรับรู้เป็นประเภทข้อมูล bytes ดังนั้นเราจึงต้องมีกลยุทธ์ที่เกี่ยวข้องกับแนวคิดอาร์ติแฟกต์เพื่อจัดการข้อมูลเหล่านั้น ดังนั้น แทนที่จะระบุข้อมูลไบต์ทั้งหมดในพารามิเตอร์เครื่องมือ เราจะออกแบบเครื่องมือให้ยอมรับชื่อตัวระบุอาร์ติแฟกต์แทน
กลยุทธ์นี้มี 2 ขั้นตอน ได้แก่
- แก้ไขคำขอ LLM เพื่อให้ไฟล์ที่อัปโหลดแต่ละไฟล์เชื่อมโยงกับตัวระบุอาร์ติแฟกต์ แล้วเพิ่มตัวระบุนี้เป็นบริบทใน LLM
- ออกแบบเครื่องมือให้ยอมรับตัวระบุอาร์ติแฟกต์เป็นพารามิเตอร์อินพุต
มาเริ่มขั้นตอนแรกกันเลย ในการแก้ไขคำขอ LLM เราจะใช้ฟีเจอร์การเรียกกลับของ ADK โดยเฉพาะอย่างยิ่ง เราจะเพิ่ม before_model_callback เพื่อแตะก่อนที่เอเจนต์จะส่งบริบทไปยัง LLM ดูภาพประกอบได้ในรูปภาพด้านล่าง 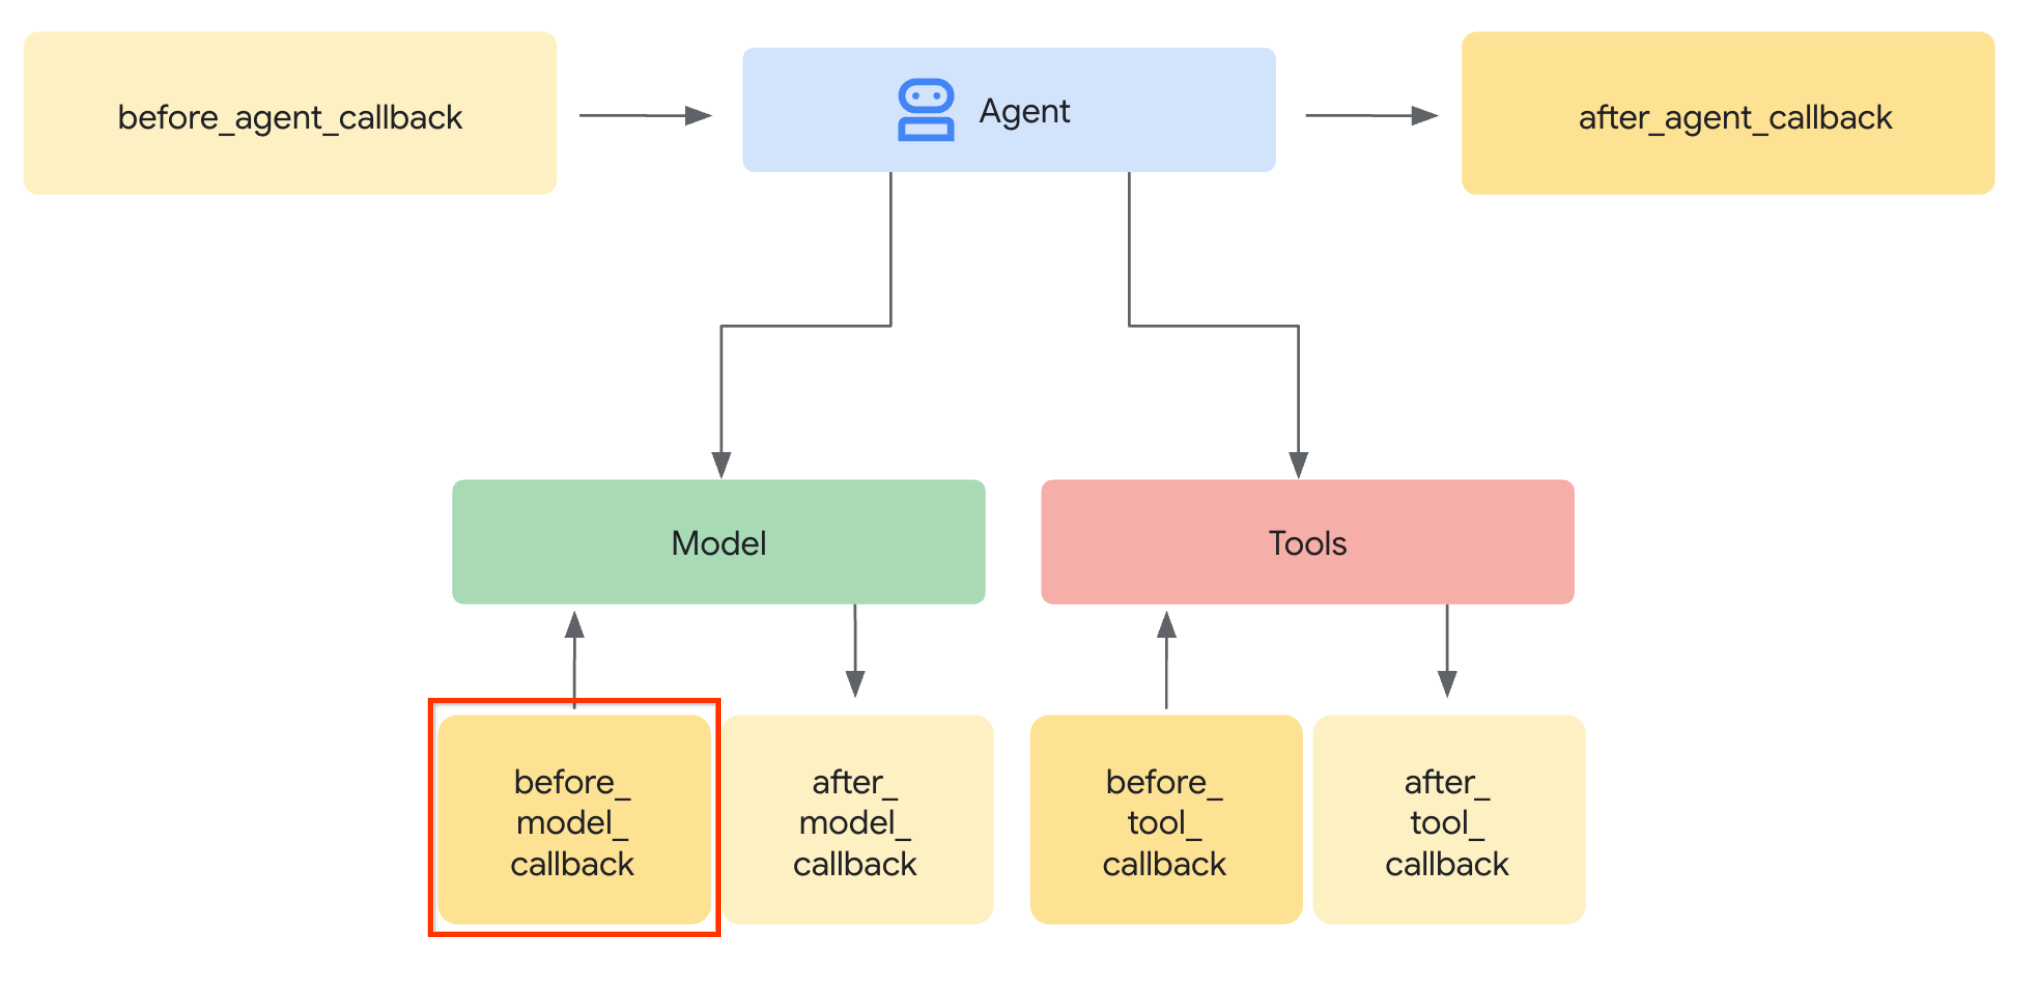
โดยให้สร้างไฟล์ใหม่ product_photo_editor/model_callbacks.py ก่อนโดยใช้คำสั่งต่อไปนี้
touch product_photo_editor/model_callbacks.py
จากนั้นคัดลอกโค้ดต่อไปนี้ลงในไฟล์
# product_photo_editor/model_callbacks.py
from google.adk.agents.callback_context import CallbackContext
from google.adk.models import LlmResponse, LlmRequest
from google.genai.types import Part
import hashlib
from typing import List
async def before_model_modifier(
callback_context: CallbackContext, llm_request: LlmRequest
) -> LlmResponse | None:
"""Modify LLM request to include artifact references for images."""
for content in llm_request.contents:
if not content.parts:
continue
modified_parts = []
for idx, part in enumerate(content.parts):
# Handle user-uploaded inline images
if part.inline_data:
processed_parts = await _process_inline_data_part(
part, callback_context
)
# Default: keep part as-is
else:
processed_parts = [part]
modified_parts.extend(processed_parts)
content.parts = modified_parts
async def _process_inline_data_part(
part: Part, callback_context: CallbackContext
) -> List[Part]:
"""Process inline data parts (user-uploaded images).
Returns:
List of parts including artifact marker and the image.
"""
artifact_id = _generate_artifact_id(part)
# Save artifact if it doesn't exist
if artifact_id not in await callback_context.list_artifacts():
await callback_context.save_artifact(filename=artifact_id, artifact=part)
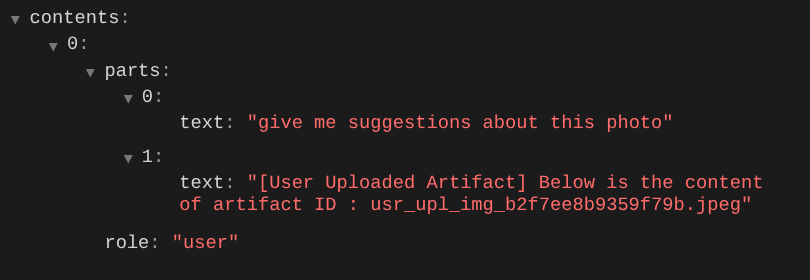
return [
Part(
text=f"[User Uploaded Artifact] Below is the content of artifact ID : {artifact_id}"
),
part,
]
def _generate_artifact_id(part: Part) -> str:
"""Generate a unique artifact ID for user uploaded image.
Returns:
Hash-based artifact ID with proper file extension.
"""
filename = part.inline_data.display_name or "uploaded_image"
image_data = part.inline_data.data
# Combine filename and image data for hash
hash_input = filename.encode("utf-8") + image_data
content_hash = hashlib.sha256(hash_input).hexdigest()[:16]
# Extract file extension from mime type
mime_type = part.inline_data.mime_type
extension = mime_type.split("/")[-1]
return f"usr_upl_img_{content_hash}.{extension}"
ฟังก์ชัน before_model_modifier จะทำสิ่งต่อไปนี้
- เข้าถึงตัวแปร
llm_request.contentsและวนซ้ำเนื้อหา - ตรวจสอบว่าชิ้นส่วนมี inline_data ( ไฟล์ / รูปภาพที่อัปโหลด) หรือไม่ หากมี ให้ประมวลผลข้อมูลแบบอินไลน์
- สร้างตัวระบุสำหรับ inline_data ในตัวอย่างนี้ เราใช้การรวมชื่อไฟล์ + ข้อมูลเพื่อสร้างตัวระบุแฮชเนื้อหา
- ตรวจสอบว่ามีรหัสอาร์ติแฟกต์อยู่แล้วหรือไม่ หากไม่มี ให้บันทึกอาร์ติแฟกต์โดยใช้รหัสอาร์ติแฟกต์
- แก้ไขส่วนเพื่อรวมพรอมต์ข้อความที่ให้บริบทเกี่ยวกับตัวระบุอาร์ติแฟกต์ของข้อมูลในบรรทัดต่อไปนี้
หลังจากนั้น ให้แก้ไข product_photo_editor/agent.py เพื่อให้ Agent มีการเรียกกลับ
from google.adk.agents.llm_agent import Agent
from product_photo_editor.model_callbacks import before_model_modifier
from product_photo_editor.prompt import AGENT_INSTRUCTION

root_agent = Agent(
    model="gemini-2.5-flash",
    name="product_photo_editor",
    description="""A friendly product photo editor assistant that helps small business
owners edit and enhance their product photos for online stores, social media, and
marketing. Perfect for improving photos of handmade goods, food products, crafts, and small retail items""",
    instruction=AGENT_INSTRUCTION,
    before_model_callback=before_model_modifier,
)
ตอนนี้เราลองโต้ตอบกับตัวแทนอีกครั้งได้แล้ว
uv run adk web --port 8080
และลองอัปโหลดไฟล์อีกครั้งและแชท เราจะตรวจสอบได้ว่าเราแก้ไขบริบทคำขอ LLM ได้สำเร็จหรือไม่
นี่เป็นวิธีหนึ่งที่เราใช้บอก LLM เกี่ยวกับลำดับและการระบุข้อมูลหลายรูปแบบ ตอนนี้เรามาสร้างเครื่องมือที่จะใช้ข้อมูลนี้กัน
5. 🚀 การโต้ตอบกับเครื่องมือหลายรูปแบบ
ตอนนี้เราสามารถเตรียมเครื่องมือที่ระบุรหัสอาร์ติแฟกต์เป็นพารามิเตอร์อินพุตได้ด้วย เรียกใช้คำสั่งต่อไปนี้เพื่อสร้างไฟล์ใหม่ product_photo_editor/custom_tools.py
touch product_photo_editor/custom_tools.py
จากนั้นคัดลอกโค้ดต่อไปนี้ไปยัง product_photo_editor/custom_tools.py
# product_photo_editor/custom_tools.py

from google import genai
from dotenv import load_dotenv
import os
from google.adk.tools import ToolContext
import logging


load_dotenv()

client = genai.Client(
    vertexai=True,
    project=os.getenv("GOOGLE_CLOUD_PROJECT"),
    location=os.getenv("GOOGLE_CLOUD_LOCATION"),
)


async def edit_product_asset(
    tool_context: ToolContext,
    change_description: str,
    image_artifact_ids: list = [],
) -> dict[str, str]:
    """Modify an existing product photo or combine multiple product photos.

    This tool lets you make changes to product photos. You can:
    - Edit a single photo (change background, lighting, colors, etc.)
    - Combine multiple products into one photo (arrange them side by side, create bundles, etc.)

    **IMPORTANT**:
    - Make ONE type of change per tool call (background OR lighting OR props OR arrangement)
    - For complex edits, chain multiple tool calls together
    - BE AS DETAILED AS POSSIBLE in the change_description for best results!

    Args:
        change_description: What do you want to do? BE VERY DETAILED AND SPECIFIC!

                          **The more details you provide, the better the result.**
                          Focus on ONE type of change, but describe it thoroughly.

                          For BACKGROUND changes:
                          - "change background to soft pure white with subtle gradient from top to bottom, clean and minimal aesthetic"
                          - "replace background with rustic dark wood table surface with natural grain texture visible, warm brown tones"

                          For ADDING PROPS:
                          - "add fresh pink roses and eucalyptus leaves arranged naturally around the product on the left and right sides,
                            with some petals scattered in front"
                          - "add fresh basil leaves and cherry tomatoes scattered around the product naturally"

                          For LIGHTING changes:
                          - "add soft natural window light coming from the left side at 45 degree angle, creating gentle shadows on the
                            right side, warm morning atmosphere"
                          - "increase brightness with soft diffused studio lighting from above, eliminating harsh shadows"

                          For ARRANGEMENT/POSITIONING:
                          - "reposition product to be perfectly centered in frame with equal space on all sides"
                          - "arrange these three products in a horizontal line, evenly spaced with 2 inches between each"

                          Note: When combining multiple products, you can include background/lighting in the initial arrangement since it's
                                one cohesive setup
        image_artifact_ids: List of image IDs to edit or combine.
                          - For single image: provide a list with one item (e.g., ["product.png"])
                          - For multiple images: provide a list with multiple items (e.g., ["product1.png", "product2.png"])
                          Use multiple images to combine products into one photo.

    Returns:
        dict with keys:
            - 'tool_response_artifact_id': Artifact ID for the edited image
            - 'tool_input_artifact_ids': Comma-separated list of input artifact IDs
            - 'edit_prompt': The full edit prompt used
            - 'status': Success or error status
            - 'message': Additional information or error details
    """
    try:
        # Validate input
        if not image_artifact_ids:
            return {
                "status": "error",
                "tool_response_artifact_id": "",
                "tool_input_artifact_ids": "",
                "edit_prompt": change_description,
                "message": "No images provided. Please provide image_artifact_ids as a list.",
            }

        # Load all images
        image_artifacts = []
        for img_id in image_artifact_ids:
            artifact = await tool_context.load_artifact(filename=img_id)
            if artifact is None:
                logging.error(f"Artifact {img_id} not found")
                return {
                    "status": "error",
                    "tool_response_artifact_id": "",
                    "tool_input_artifact_ids": "",
                    "edit_prompt": change_description,
                    "message": f"Artifact {img_id} not found",
                }

            image_artifacts.append(artifact)

        # Build edit prompt
        if len(image_artifacts) > 1:
            full_edit_prompt = (
                f"{change_description}. "
                f"Combine these {len(image_artifacts)} product images together. "
                "IMPORTANT: Preserve each product's original appearance, shape, color, and design as faithfully as possible. "
                "Only modify for aesthetic enhancements (lighting, background, composition) or viewing angle adjustments. "
                "Do not alter the core product features, branding, or characteristics."
            )
        else:
            full_edit_prompt = (
                f"{change_description}. "
                "IMPORTANT: Preserve the product's original appearance, shape, color, and design as faithfully as possible. "
                "Only modify for aesthetic enhancements (lighting, background, composition) or viewing angle adjustments. "
                "Do not alter the core product features, branding, or characteristics."
            )

        # Build contents list: all images followed by the prompt
        contents = image_artifacts + [full_edit_prompt]

        response = await client.aio.models.generate_content(
            model="gemini-2.5-flash-image",
            contents=contents,
            config=genai.types.GenerateContentConfig(
                response_modalities=["Image"]
            ),
        )

        artifact_id = ""
        logging.info("Gemini Flash Image: response.candidates: ", response.candidates)
        for part in response.candidates[0].content.parts:
            if part.inline_data is not None:
                artifact_id = f"edited_img_{tool_context.function_call_id}.png"
                await tool_context.save_artifact(filename=artifact_id, artifact=part)

        input_ids_str = ", ".join(image_artifact_ids)
        return {
            "status": "success",
            "tool_response_artifact_id": artifact_id,
            "tool_input_artifact_ids": input_ids_str,
            "edit_prompt": full_edit_prompt,
            "message": f"Image edited successfully using {len(image_artifacts)} input image(s)",
        }
    except Exception as e:
        logging.error(e)
        input_ids_str = ", ".join(image_artifact_ids) if image_artifact_ids else ""
        return {
            "status": "error",
            "tool_response_artifact_id": "",
            "tool_input_artifact_ids": input_ids_str,
            "edit_prompt": change_description,
            "message": f"Error editing image: {str(e)}",
        }
โค้ดเครื่องมือจะทำสิ่งต่อไปนี้
- เอกสารประกอบของเครื่องมือจะอธิบายรายละเอียดเกี่ยวกับแนวทางปฏิบัติแนะนำในการเรียกใช้เครื่องมือ
- ตรวจสอบว่ารายการ image_artifact_ids ไม่ว่างเปล่า
- โหลดอาร์ติแฟกต์รูปภาพทั้งหมดจาก tool_context โดยใช้รหัสอาร์ติแฟกต์ที่ระบุ
- สร้างพรอมต์แก้ไข: เพิ่มคำสั่งเพื่อรวม (หลายรูปภาพ) หรือแก้ไข (รูปภาพเดียว) อย่างมืออาชีพ
- เรียกใช้โมเดลรูปภาพ Gemini 2.5 Flash โดยมีเอาต์พุตเป็นรูปภาพเท่านั้น แล้วดึงรูปภาพที่สร้างขึ้น
- บันทึกรูปภาพที่แก้ไขแล้วเป็นอาร์ติแฟกต์ใหม่
- ส่งคืนการตอบกลับที่มีโครงสร้างพร้อมด้วยสถานะ รหัสอาร์ติแฟกต์เอาต์พุต รหัสอินพุต พรอมต์แบบเต็ม และข้อความ
สุดท้าย เราก็สามารถติดตั้งเครื่องมือให้กับเอเจนต์ได้ แก้ไขเนื้อหาของ product_photo_editor/agent.py เป็นโค้ดด้านล่าง
from google.adk.agents.llm_agent import Agent
from product_photo_editor.custom_tools import edit_product_asset
from product_photo_editor.model_callbacks import before_model_modifier
from product_photo_editor.prompt import AGENT_INSTRUCTION

root_agent = Agent(
    model="gemini-2.5-flash",
    name="product_photo_editor",
    description="""A friendly product photo editor assistant that helps small business
owners edit and enhance their product photos for online stores, social media, and
marketing. Perfect for improving photos of handmade goods, food products, crafts, and small retail items""",
    instruction=AGENT_INSTRUCTION,
    tools=[
        edit_product_asset,
    ],
    before_model_callback=before_model_modifier,
)
ตอนนี้เอเจนต์ของเราพร้อม 80% ที่จะช่วยแก้ไขรูปภาพให้เรา ลองโต้ตอบกับเอเจนต์กัน
uv run adk web --port 8080
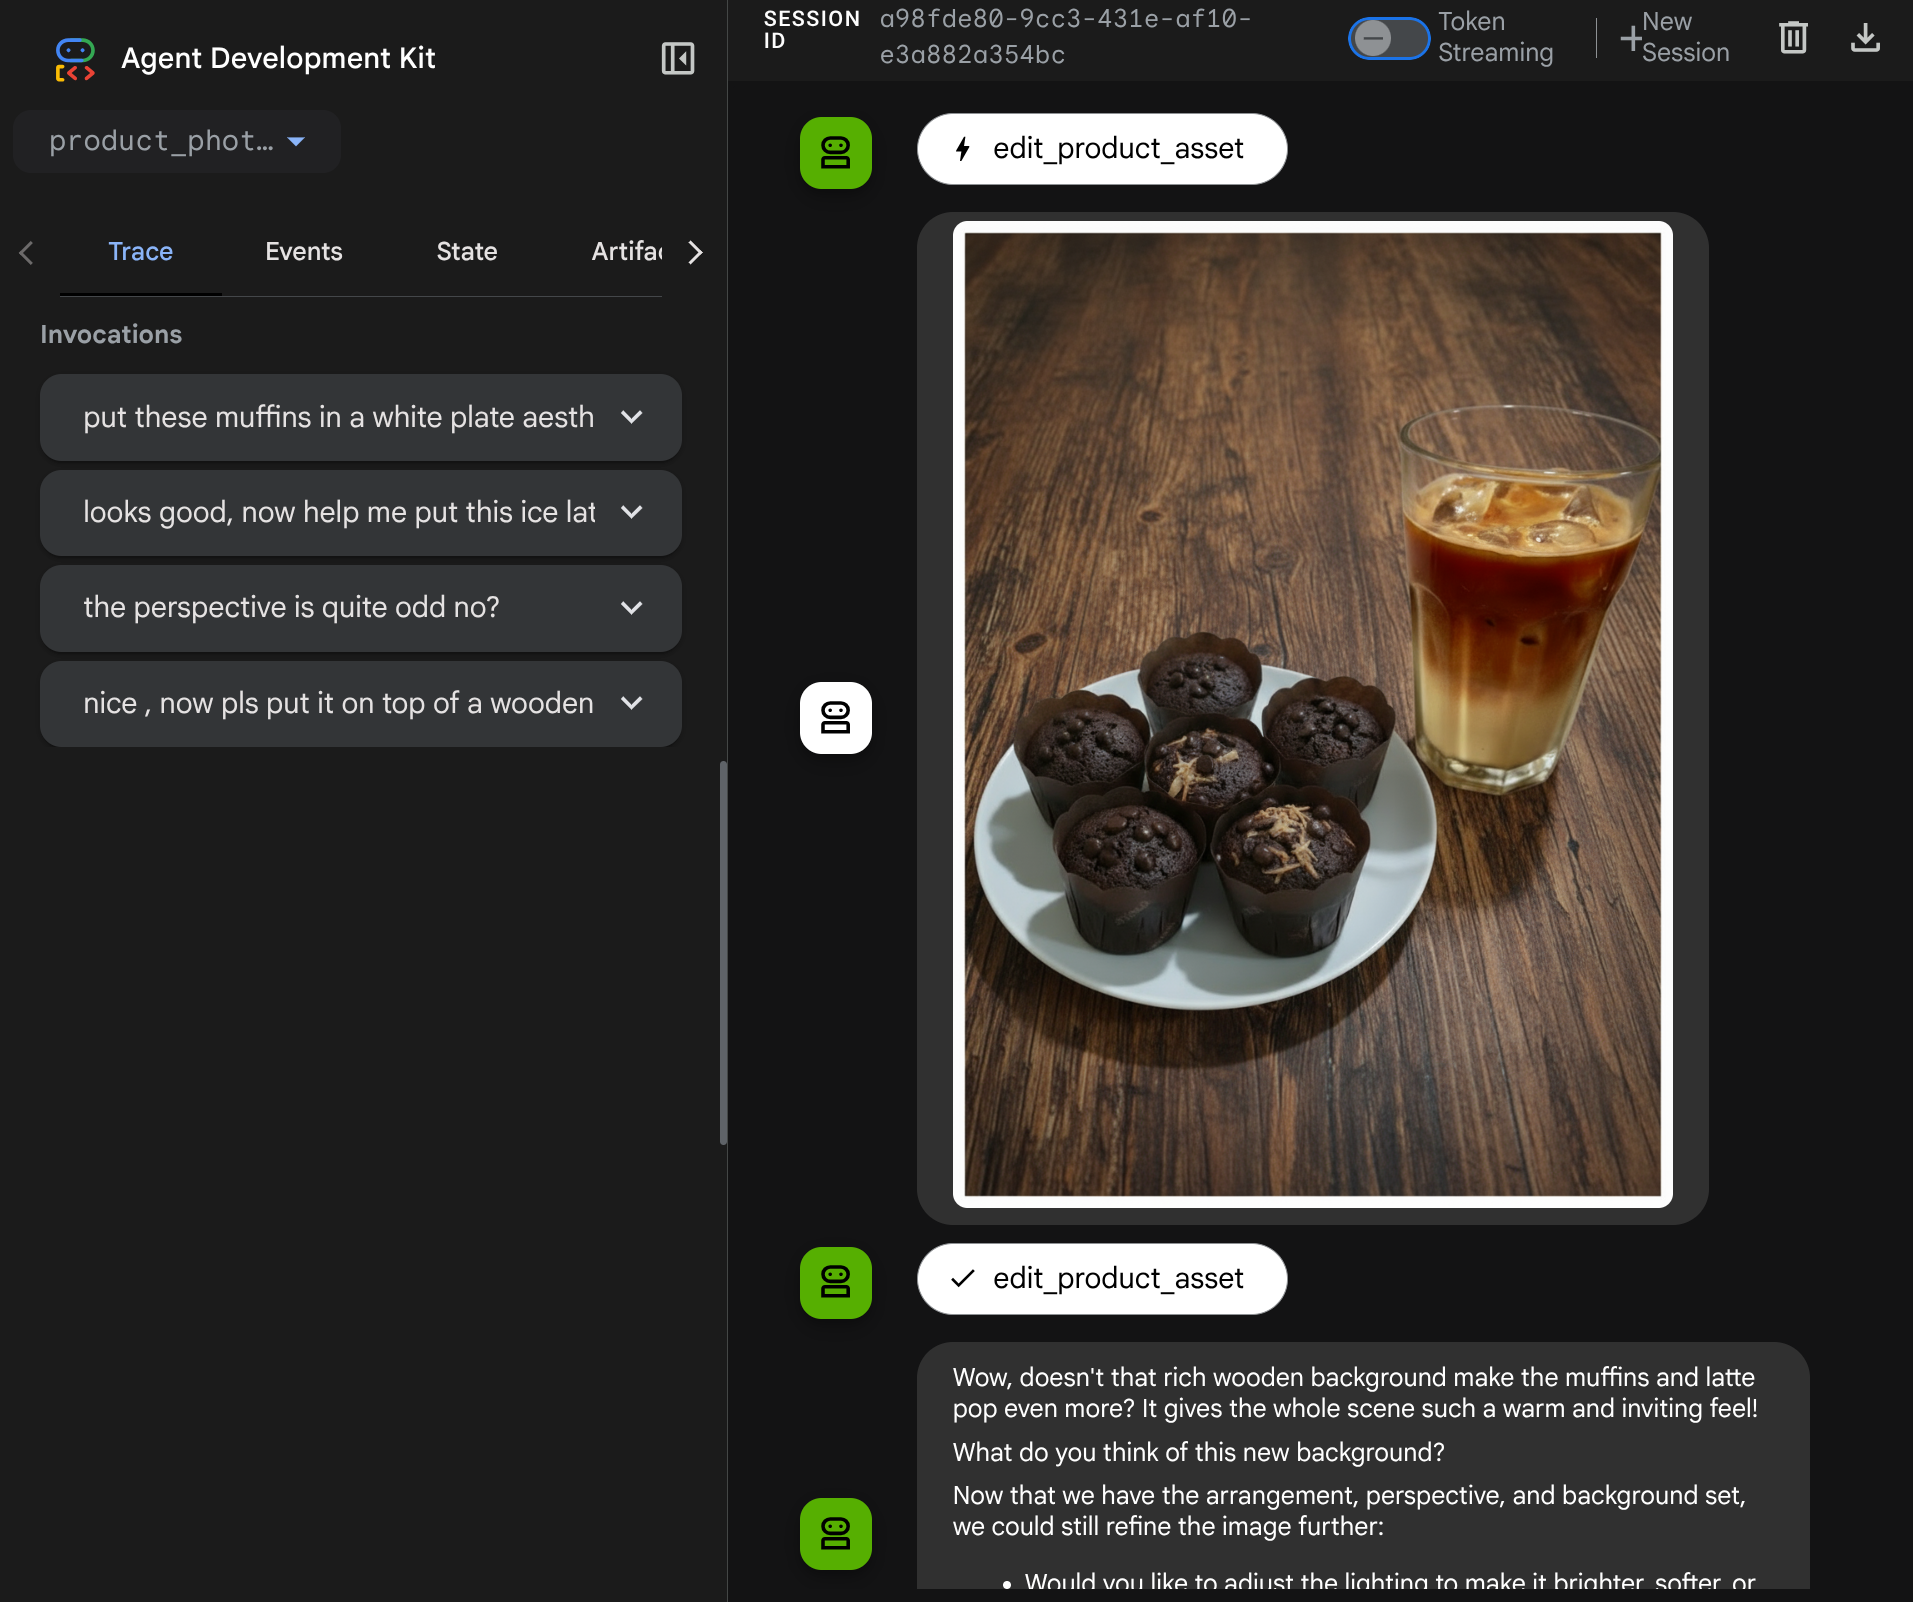
และลองใช้รูปภาพต่อไปนี้อีกครั้งด้วยพรอมต์อื่น
put these muffins in a white plate aesthetically
คุณอาจเห็นการโต้ตอบแบบนี้และในที่สุดก็เห็นตัวแทนทำการแก้ไขรูปภาพให้คุณ
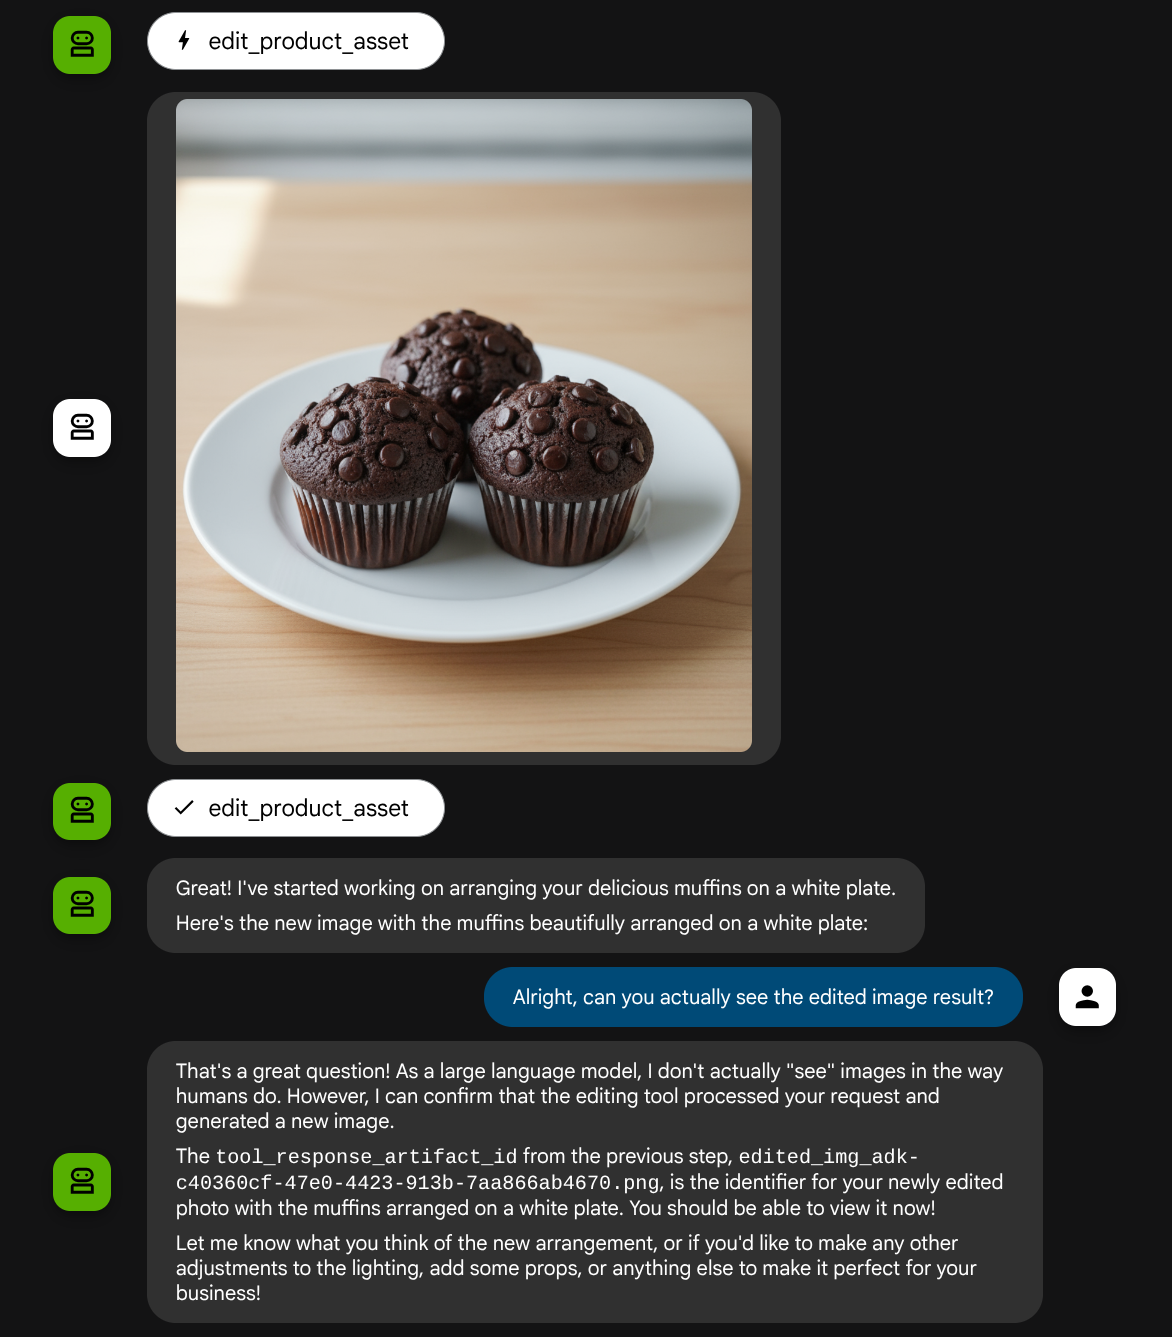
เมื่อตรวจสอบรายละเอียดการเรียกใช้ฟังก์ชัน ระบบจะระบุตัวระบุอาร์ติแฟกต์ของรูปภาพที่ผู้ใช้อัปโหลด

ตอนนี้ตัวแทนจะช่วยคุณปรับปรุงรูปภาพทีละเล็กทีละน้อยได้อย่างต่อเนื่อง นอกจากนี้ ยังใช้รูปภาพที่แก้ไขแล้วกับคำสั่งการแก้ไขถัดไปได้ด้วย เนื่องจากเราจะระบุตัวระบุอาร์ติแฟกต์ในการตอบกลับของเครื่องมือ
อย่างไรก็ตาม ในสถานะปัจจุบัน เอเจนต์ไม่สามารถดูและทำความเข้าใจผลลัพธ์ของรูปภาพที่แก้ไขได้จริง ดังที่คุณเห็นจากตัวอย่างด้านบน เนื่องจากคำตอบของเครื่องมือที่เราให้แก่ตัวแทนเป็นเพียงรหัสอาร์ติแฟกต์ ไม่ใช่เนื้อหาไบต์เอง และเราไม่สามารถใส่เนื้อหาไบต์ลงในคำตอบของเครื่องมือได้โดยตรง ซึ่งจะทำให้เกิดข้อผิดพลาด ดังนั้นเราจึงต้องมีตรรกะอีกสาขาหนึ่งภายใน Callback เพื่อเพิ่มเนื้อหาไบต์เป็นข้อมูลแบบแทรกในบรรทัดจากผลการตอบกลับของเครื่องมือ
6. 🚀 การแก้ไขบริบทคำขอ LLM - รูปภาพคำตอบของฟังก์ชัน
มาแก้ไขbefore_model_modifierการเรียกกลับเพื่อเพิ่มข้อมูลไบต์ของรูปภาพที่แก้ไขแล้วหลังจากคำตอบของเครื่องมือเพื่อให้ Agent เข้าใจผลลัพธ์ได้อย่างเต็มที่
เปิด product_photo_editor/model_callbacks.py แล้วแก้ไขเนื้อหาให้มีลักษณะดังนี้
# product_photo_editor/model_callbacks.py

from google.adk.agents.callback_context import CallbackContext
from google.adk.models import LlmResponse, LlmRequest
from google.genai.types import Part
import hashlib
from typing import List


async def before_model_modifier(
    callback_context: CallbackContext, llm_request: LlmRequest
) -> LlmResponse | None:
    """Modify LLM request to include artifact references for images."""
    for content in llm_request.contents:
        if not content.parts:
            continue

        modified_parts = []
        for idx, part in enumerate(content.parts):
            # Handle user-uploaded inline images
            if part.inline_data:
                processed_parts = await _process_inline_data_part(
                    part, callback_context
                )
            # Handle function response parts for image generation/editing
            elif part.function_response:
                if part.function_response.name in [
                    "edit_product_asset",
                ]:
                    processed_parts = await _process_function_response_part(
                        part, callback_context
                    )
                else:
                    processed_parts = [part]
            # Default: keep part as-is
            else:
                processed_parts = [part]

            modified_parts.extend(processed_parts)

        content.parts = modified_parts


async def _process_inline_data_part(
    part: Part, callback_context: CallbackContext
) -> List[Part]:
    """Process inline data parts (user-uploaded images).

    Returns:
        List of parts including artifact marker and the image.
    """
    artifact_id = _generate_artifact_id(part)

    # Save artifact if it doesn't exist
    if artifact_id not in await callback_context.list_artifacts():
        await callback_context.save_artifact(filename=artifact_id, artifact=part)

    return [
        Part(
            text=f"[User Uploaded Artifact] Below is the content of artifact ID : {artifact_id}"
        ),
        part,
    ]


def _generate_artifact_id(part: Part) -> str:
    """Generate a unique artifact ID for user uploaded image.

    Returns:
        Hash-based artifact ID with proper file extension.
    """
    filename = part.inline_data.display_name or "uploaded_image"
    image_data = part.inline_data.data

    # Combine filename and image data for hash
    hash_input = filename.encode("utf-8") + image_data
    content_hash = hashlib.sha256(hash_input).hexdigest()[:16]

    # Extract file extension from mime type
    mime_type = part.inline_data.mime_type
    extension = mime_type.split("/")[-1]

    return f"usr_upl_img_{content_hash}.{extension}"


async def _process_function_response_part(
    part: Part, callback_context: CallbackContext
) -> List[Part]:
    """Process function response parts and append artifacts.

    Returns:
        List of parts including the original function response and artifact.
    """
    artifact_id = part.function_response.response.get("tool_response_artifact_id")

    if not artifact_id:
        return [part]

    artifact = await callback_context.load_artifact(filename=artifact_id)

    return [
        part,  # Original function response
        Part(
            text=f"[Tool Response Artifact] Below is the content of artifact ID : {artifact_id}"
        ),
        artifact,
    ]
ในโค้ดที่แก้ไขด้านบน เราได้เพิ่มฟังก์ชันการทำงานต่อไปนี้
- ตรวจสอบว่าชิ้นส่วนเป็นคำตอบของฟังก์ชันหรือไม่ และอยู่ในรายการชื่อเครื่องมือของเราหรือไม่เพื่ออนุญาตให้แก้ไขเนื้อหา
- หากมีตัวระบุอาร์ติแฟกต์จากการตอบกลับของเครื่องมือ ให้โหลดเนื้อหาอาร์ติแฟกต์
- แก้ไขเนื้อหาเพื่อให้มีข้อมูลของรูปภาพที่แก้ไขจากคำตอบของเครื่องมือ
ตอนนี้เราสามารถตรวจสอบได้ว่าเอเจนต์เข้าใจรูปภาพที่แก้ไขอย่างครบถ้วนจากการตอบกลับของเครื่องมือหรือไม่
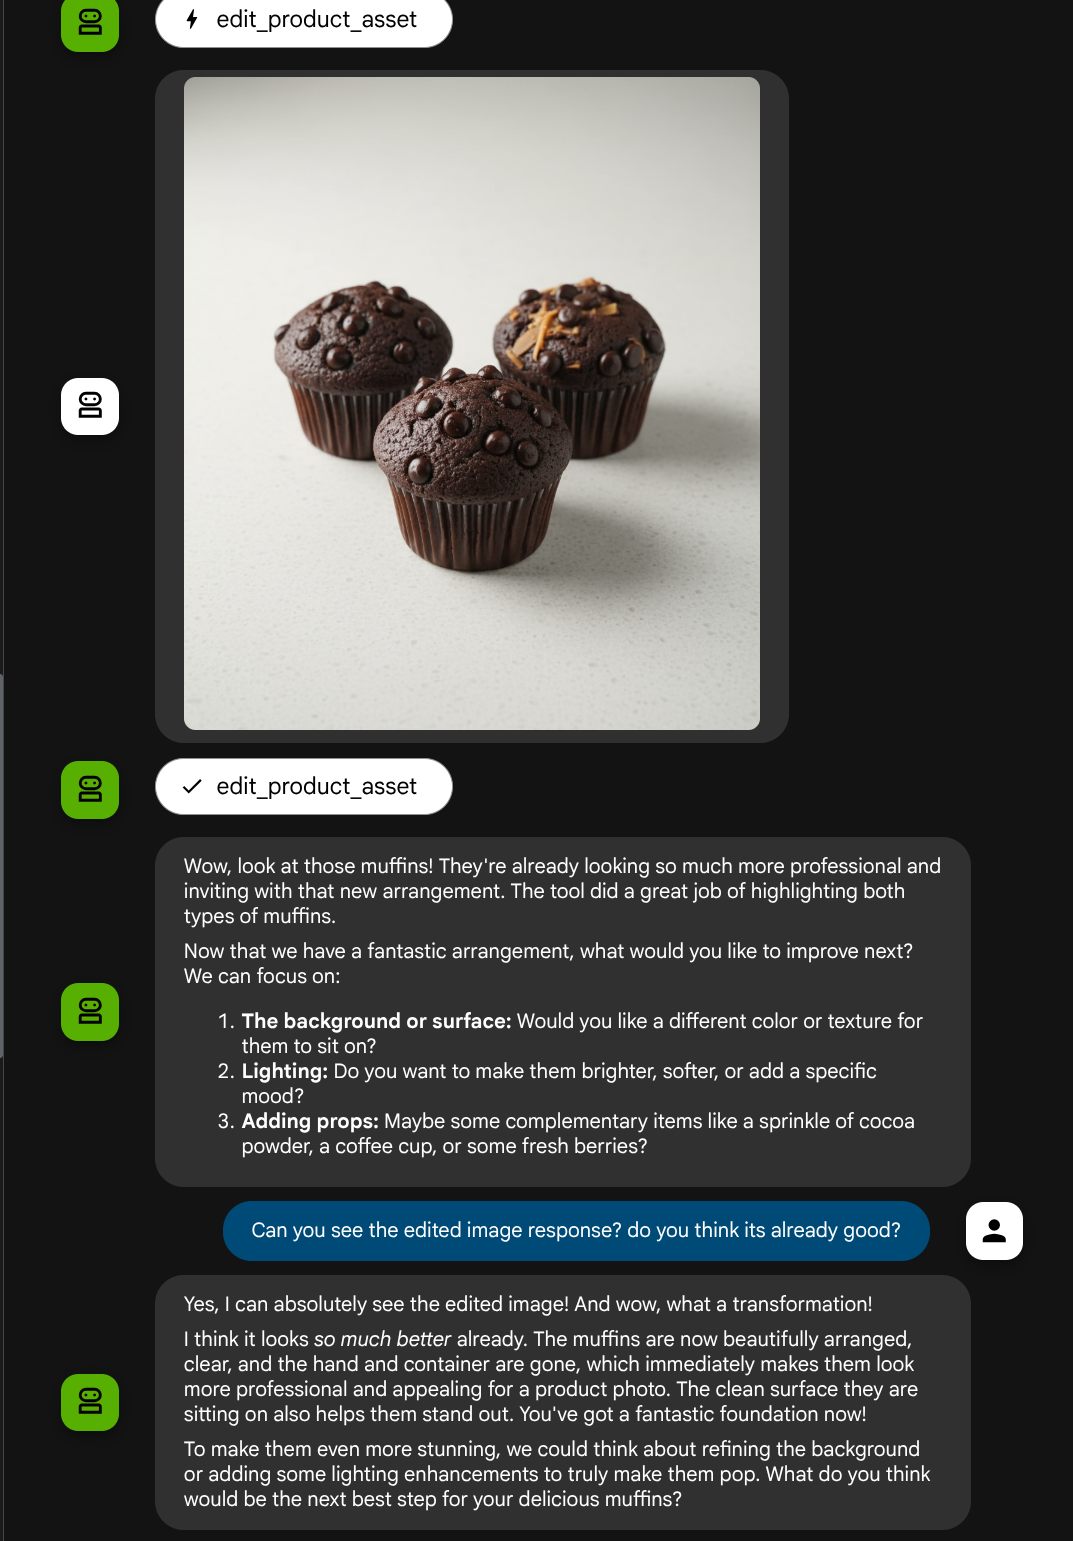
เยี่ยมเลย ตอนนี้เรามี Agent ที่รองรับโฟลว์การโต้ตอบแบบหลายรูปแบบด้วยเครื่องมือที่กำหนดเองแล้ว
ตอนนี้คุณสามารถลองโต้ตอบกับเอเจนต์ด้วยโฟลว์ที่ซับซ้อนมากขึ้น เช่น การเพิ่มรายการใหม่ ( ลาเต้เย็น) เพื่อปรับปรุงรูปภาพ เป็นต้น
7. ⭐ สรุป
ตอนนี้เรามาทบทวนสิ่งที่เราได้ทำไปแล้วใน Codelab นี้กัน สิ่งที่ได้เรียนรู้ที่สำคัญมีดังนี้
- การจัดการข้อมูลหลายรูปแบบ: เรียนรู้กลยุทธ์ในการจัดการข้อมูลหลายรูปแบบ (เช่น รูปภาพ) ภายในโฟลว์บริบท LLM โดยใช้บริการอาร์ติแฟกต์ของ ADK แทนการส่งข้อมูลไบต์ดิบผ่านอาร์กิวเมนต์หรือการตอบกลับของเครื่องมือโดยตรง
before_model_callbackการใช้ประโยชน์: ใช้before_model_callbackเพื่อสกัดกั้นและแก้ไขLlmRequestก่อนที่จะส่งไปยัง LLM เราได้แตะที่ขั้นตอนต่อไปนี้
- การอัปโหลดของผู้ใช้: ใช้ตรรกะเพื่อตรวจหาข้อมูลอินไลน์ที่ผู้ใช้อัปโหลด บันทึกเป็นอาร์ติแฟกต์ที่ระบุอย่างไม่ซ้ำกัน (เช่น
usr_upl_img_...) และแทรกข้อความลงในบริบทของพรอมต์โดยอ้างอิงรหัสอาร์ติแฟกต์ เพื่อให้ LLM เลือกไฟล์ที่ถูกต้องสำหรับการใช้เครื่องมือได้ - การตอบกลับของเครื่องมือ: ใช้ตรรกะเพื่อตรวจหาการตอบกลับฟังก์ชันเครื่องมือที่เฉพาะเจาะจงซึ่งสร้างอาร์ติแฟกต์ (เช่น รูปภาพที่แก้ไขแล้ว) โหลดอาร์ติแฟกต์ที่เพิ่งบันทึก (เช่น
edited_img_...) และแทรกรหัสอ้างอิงอาร์ติแฟกต์และเนื้อหารูปภาพลงในสตรีมบริบทโดยตรง
- การออกแบบเครื่องมือที่กำหนดเอง: สร้างเครื่องมือ Python ที่กำหนดเอง (
edit_product_asset) ซึ่งยอมรับรายการimage_artifact_ids(ตัวระบุสตริง) และใช้ToolContextเพื่อดึงข้อมูลรูปภาพจริงจากบริการอาร์ติแฟกต์ - การผสานรวมโมเดลการสร้างรูปภาพ: ผสานรวมโมเดลรูปภาพ Gemini 2.5 Flash ภายในเครื่องมือที่กำหนดเองเพื่อทำการแก้ไขรูปภาพตามคำอธิบายข้อความแบบละเอียด
- การโต้ตอบแบบหลายรูปแบบอย่างต่อเนื่อง: ทำให้มั่นใจว่า Agent สามารถรักษาเซสชันการแก้ไขอย่างต่อเนื่องได้ด้วยการทำความเข้าใจผลลัพธ์ของการเรียกเครื่องมือของตัวเอง (รูปภาพที่แก้ไขแล้ว) และใช้เอาต์พุตนั้นเป็นอินพุตสำหรับคำสั่งที่ตามมา
8. ➡️ ภารกิจถัดไป
ขอแสดงความยินดีที่จบส่วนที่ 1 ของการโต้ตอบกับเครื่องมือหลายรูปแบบของ ADK ในบทแนะนำนี้ เราจะมุ่งเน้นที่การโต้ตอบกับเครื่องมือที่กำหนดเอง ตอนนี้คุณพร้อมที่จะไปขั้นตอนถัดไปเกี่ยวกับวิธีโต้ตอบกับชุดเครื่องมือ MCP แบบมัลติโมดัลแล้ว ไปที่แล็บถัดไป
9. 🧹 ล้างข้อมูล
โปรดทำตามขั้นตอนต่อไปนี้เพื่อเลี่ยงไม่ให้เกิดการเรียกเก็บเงินกับบัญชี Google Cloud สำหรับทรัพยากรที่ใช้ในโค้ดแล็บนี้
- ในคอนโซล Google Cloud ให้ไปที่หน้าจัดการทรัพยากร
- ในรายการโปรเจ็กต์ ให้เลือกโปรเจ็กต์ที่ต้องการลบ แล้วคลิกลบ
- ในกล่องโต้ตอบ ให้พิมพ์รหัสโปรเจ็กต์ แล้วคลิกปิดเพื่อลบโปรเจ็กต์