
1. 📖 บทนำ
ใน Codelab ก่อนหน้านี้ คุณได้เรียนรู้วิธีออกแบบการโต้ตอบข้อมูลหลายรูปแบบใน ADK ตอนนี้เราจะมาดูขั้นตอนเพิ่มเติมเกี่ยวกับวิธีออกแบบการโต้ตอบข้อมูลหลายรูปแบบกับเซิร์ฟเวอร์ MCP โดยใช้ชุดเครื่องมือ MCP เราจะขยายความสามารถของเอเจนต์เครื่องมือแก้ไขรูปภาพผลิตภัณฑ์ที่พัฒนาไว้ก่อนหน้านี้ให้มีความสามารถในการสร้างวิดีโอสั้นโดยใช้โมเดล Veo ที่ใช้เซิร์ฟเวอร์ MCP ของ Veo
ใน Codelab นี้ คุณจะได้ใช้แนวทางแบบทีละขั้นตอนดังนี้
- เตรียมโปรเจ็กต์ที่อยู่ในระบบคลาวด์ของ Google และไดเรกทอรีเอเจนต์ฐาน
- กำหนดค่าเซิร์ฟเวอร์ MCP ที่ต้องใช้ข้อมูลไฟล์เป็นอินพุต
- การเตรียม ADK Agent ให้เชื่อมต่อกับเซิร์ฟเวอร์ MCP
- ออกแบบกลยุทธ์พรอมต์และฟังก์ชัน Callback เพื่อแก้ไขคำขอการเรียกใช้ฟังก์ชันไปยังชุดเครื่องมือ MCP
- ออกแบบฟังก์ชัน Callback เพื่อจัดการการตอบกลับข้อมูลหลายรูปแบบจากชุดเครื่องมือ MCP
ภาพรวมสถาปัตยกรรม
การโต้ตอบโดยรวมในโค้ดแล็บนี้แสดงอยู่ในแผนภาพต่อไปนี้

ข้อกำหนดเบื้องต้น
- ทำงานกับ Python ได้อย่างคล่องแคล่ว
- (ไม่บังคับ) Codelab พื้นฐานเกี่ยวกับ Agent Development Kit (ADK)
- (ไม่บังคับ) Codelab เครื่องมือหลายรูปแบบของ ADK ตอนที่ 1 : goo.gle/adk-multimodal-tool-1
สิ่งที่คุณจะได้เรียนรู้
- วิธีสร้างวิดีโอสั้นโดยใช้ Veo 3.1 ด้วยพรอมต์และรูปภาพเริ่มต้น
- วิธีพัฒนาเซิร์ฟเวอร์ MCP แบบมัลติโมดอลโดยใช้ FastMCP
- วิธีตั้งค่า ADK เพื่อใช้ชุดเครื่องมือ MCP
- วิธีแก้ไขการเรียกเครื่องมือไปยังชุดเครื่องมือ MCP ผ่านการเรียกกลับของเครื่องมือ
- วิธีแก้ไขการตอบกลับของเครื่องมือจากชุดเครื่องมือ MCP ผ่านการเรียกกลับของเครื่องมือ
สิ่งที่คุณต้องมี
- เว็บเบราว์เซอร์ Chrome
- บัญชี Gmail
- โปรเจ็กต์ระบบคลาวด์ที่เปิดใช้บัญชีสำหรับการเรียกเก็บเงิน
Codelab นี้ออกแบบมาสำหรับนักพัฒนาซอฟต์แวร์ทุกระดับ (รวมถึงผู้เริ่มต้น) โดยใช้ Python ในแอปพลิเคชันตัวอย่าง อย่างไรก็ตาม คุณไม่จำเป็นต้องมีความรู้เกี่ยวกับ Python เพื่อทำความเข้าใจแนวคิดที่นำเสนอ
2. 🚀 ( ไม่บังคับ ) เตรียมการตั้งค่าการพัฒนาเวิร์กช็อป
ขั้นตอนที่ 1: เลือกโปรเจ็กต์ที่ใช้งานอยู่ใน Cloud Console
ในคอนโซล Google Cloud ให้เลือกหรือสร้างโปรเจ็กต์ Google Cloud ในหน้าตัวเลือกโปรเจ็กต์ (ดูส่วนบนซ้ายของคอนโซล)

คลิกที่ไอคอนดังกล่าว แล้วคุณจะเห็นรายการโปรเจ็กต์ทั้งหมดของคุณดังตัวอย่างนี้
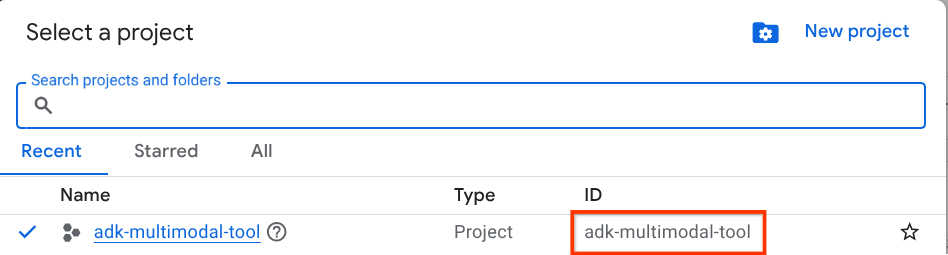
ค่าที่ระบุโดยกรอบสีแดงคือรหัสโปรเจ็กต์ และค่านี้จะใช้ตลอดทั้งบทแนะนำ
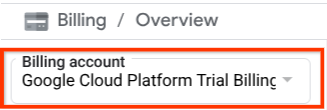
ตรวจสอบว่าได้เปิดใช้การเรียกเก็บเงินสำหรับโปรเจ็กต์ที่อยู่ในระบบคลาวด์แล้ว หากต้องการตรวจสอบ ให้คลิกไอคอนแฮมเบอร์เกอร์ ☰ ในแถบด้านซ้ายบน ซึ่งจะแสดงเมนูการนำทางและค้นหาเมนูการเรียกเก็บเงิน

หากเห็น "บัญชีสำหรับการเรียกเก็บเงินของรุ่นทดลองใช้ Google Cloud Platform" ในส่วนหัวการเรียกเก็บเงิน / ภาพรวม ( ส่วนบนซ้ายของคอนโซลระบบคลาวด์) แสดงว่าโปรเจ็กต์ของคุณพร้อมใช้งานสำหรับบทแนะนำนี้แล้ว หากไม่ถูกต้อง ให้กลับไปที่จุดเริ่มต้นของบทแนะนำนี้และแลกสิทธิ์บัญชีสำหรับการเรียกเก็บเงินช่วงทดลองใช้
ขั้นตอนที่ 2: ทำความคุ้นเคยกับ Cloud Shell
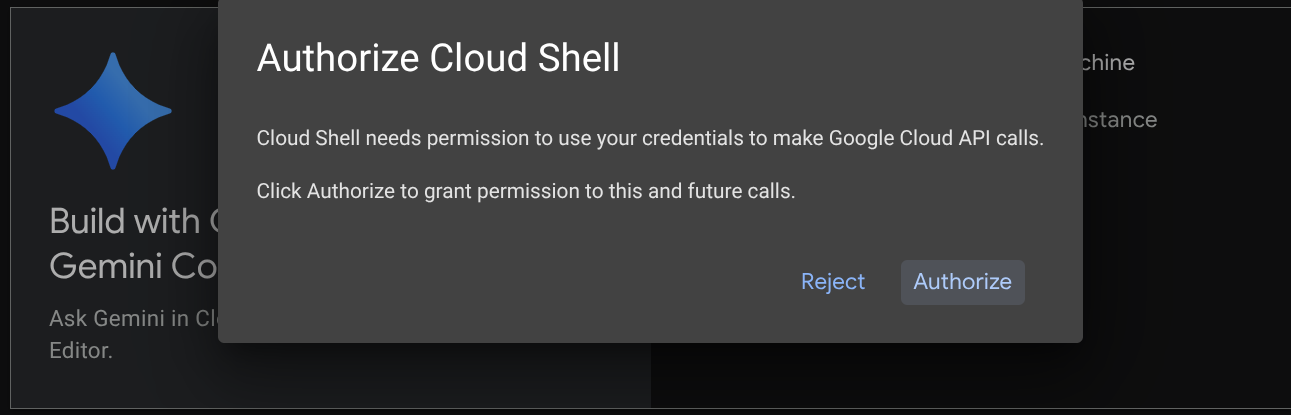
คุณจะใช้ Cloud Shell ในบทแนะนำส่วนใหญ่ ให้คลิก "เปิดใช้งาน Cloud Shell" ที่ด้านบนของคอนโซล Google Cloud หากระบบแจ้งให้คุณให้สิทธิ์ ให้คลิกให้สิทธิ์

เมื่อเชื่อมต่อกับ Cloud Shell แล้ว เราจะต้องตรวจสอบว่า Shell ( หรือเทอร์มินัล) ได้รับการตรวจสอบสิทธิ์ด้วยบัญชีของเราแล้วหรือไม่
gcloud auth list
หากเห็น Gmail ส่วนตัวของคุณเหมือนเอาต์พุตตัวอย่างด้านล่าง แสดงว่าทุกอย่างเรียบร้อยดี
Credentialed Accounts

ACTIVE: *
ACCOUNT: alvinprayuda@gmail.com

To set the active account, run:
    $ gcloud config set account `ACCOUNT`
หากไม่ ให้ลองรีเฟรชเบราว์เซอร์และตรวจสอบว่าคุณคลิกให้สิทธิ์เมื่อได้รับข้อความแจ้ง ( การดำเนินการอาจถูกขัดจังหวะเนื่องจากปัญหาการเชื่อมต่อ)
จากนั้นเรายังต้องตรวจสอบด้วยว่ามีการกำหนดค่า Shell ให้กับ PROJECT ID ที่ถูกต้องที่คุณมีอยู่แล้วหรือไม่ หากคุณเห็นว่ามีค่าอยู่ภายใน ( ) ก่อนไอคอน $ ในเทอร์มินัล ( ในภาพหน้าจอด้านล่าง ค่าคือ "adk-multimodal-tool") ค่านี้จะแสดงโปรเจ็กต์ที่กำหนดค่าไว้สำหรับเซสชัน Shell ที่ใช้งานอยู่

หากค่าที่แสดงถูกต้องอยู่แล้ว คุณก็ข้ามคำสั่งถัดไปได้ แต่หากไม่ถูกต้องหรือไม่มี ให้เรียกใช้คำสั่งต่อไปนี้
gcloud config set project <YOUR_PROJECT_ID>
จากนั้นโคลนไดเรกทอรีการทำงานของเทมเพลตสำหรับ Codelab นี้จาก Github โดยเรียกใช้คำสั่งต่อไปนี้ ซึ่งจะสร้างไดเรกทอรีการทำงานในไดเรกทอรี adk-multimodal-tool
git clone https://github.com/alphinside/adk-mcp-multimodal.git adk-multimodal-tool
ขั้นตอนที่ 3: ทำความคุ้นเคยกับ Cloud Shell Editor และตั้งค่าไดเรกทอรีการทำงานของแอปพลิเคชัน
ตอนนี้เราสามารถตั้งค่าตัวแก้ไขโค้ดเพื่อเขียนโค้ดได้แล้ว เราจะใช้ Cloud Shell Editor สำหรับการดำเนินการนี้
คลิกปุ่มเปิดตัวแก้ไข ซึ่งจะเปิด Cloud Shell Editor 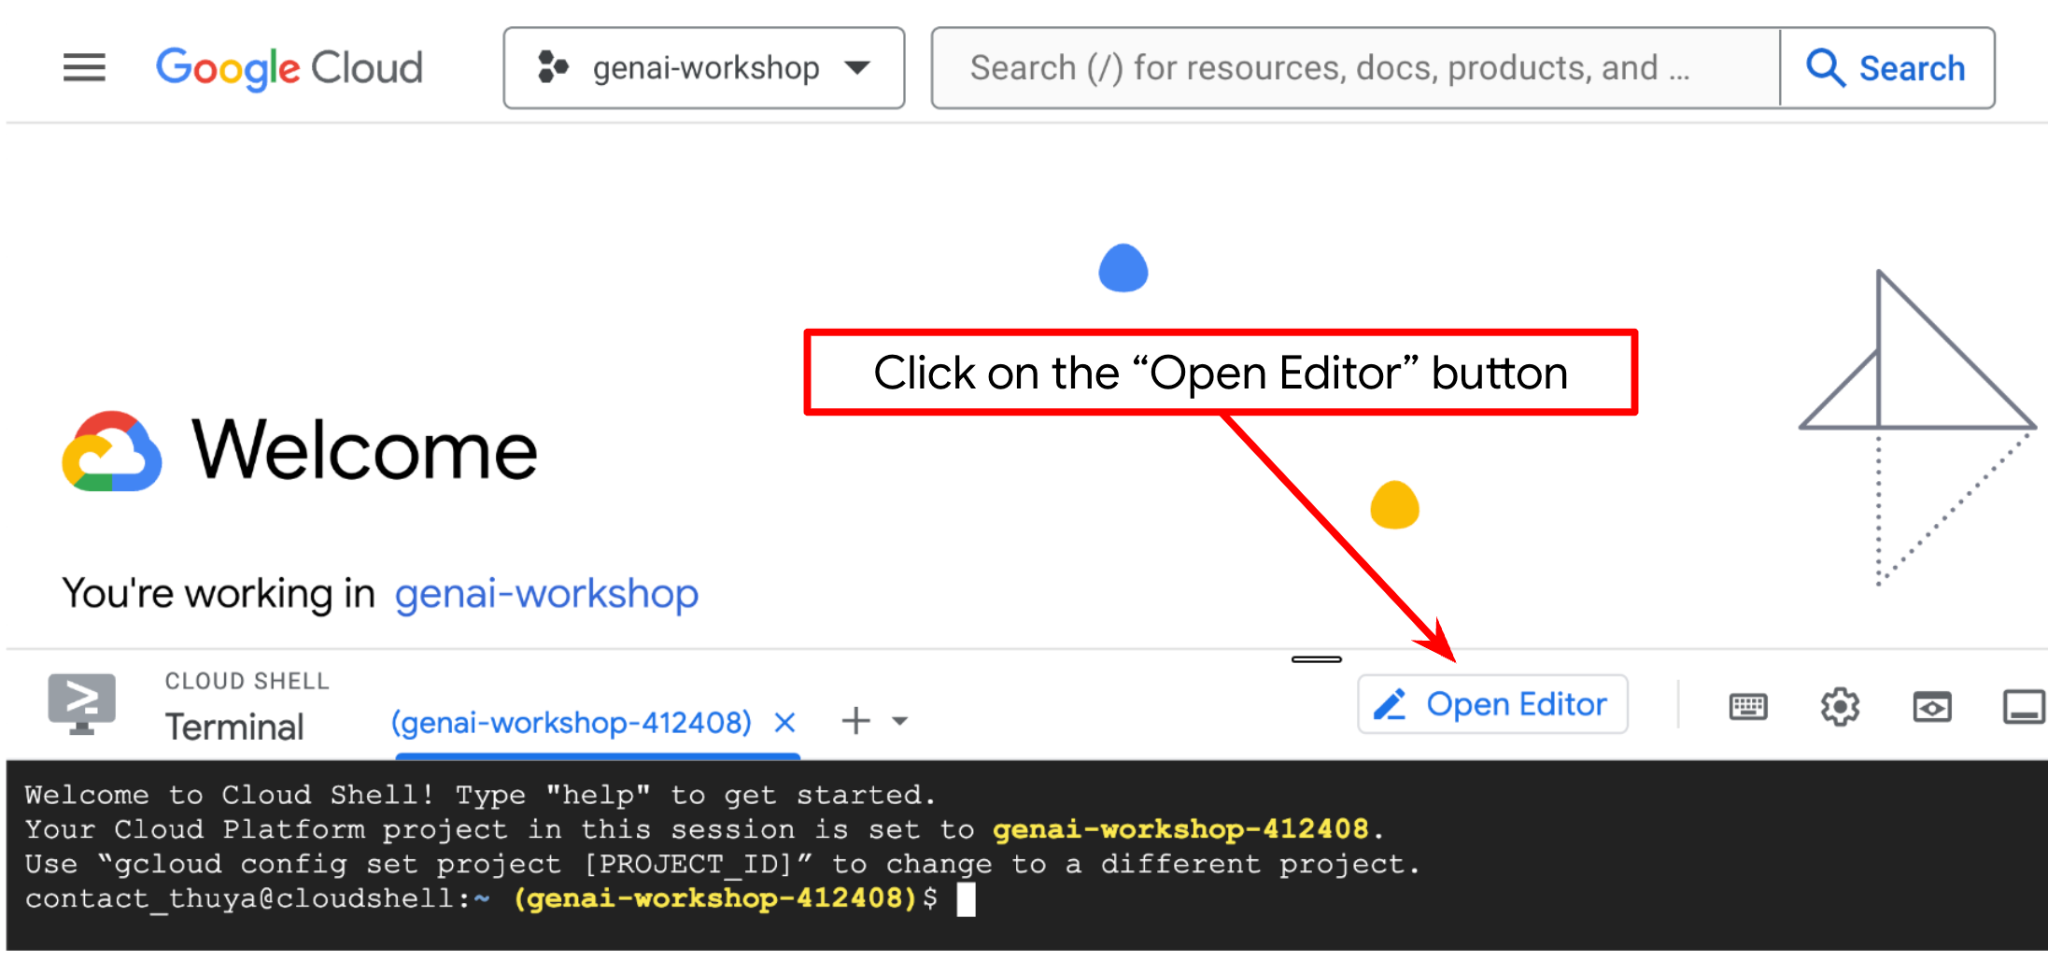
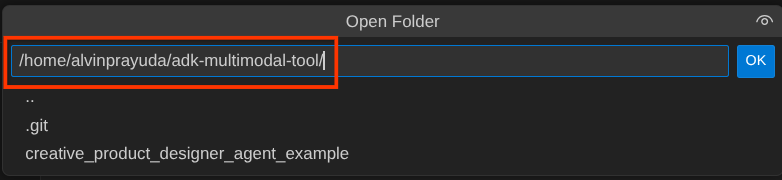
หลังจากนั้น ให้ไปที่ส่วนบนสุดของ Cloud Shell Editor แล้วคลิกFile->Open Folder ค้นหาไดเรกทอรี username แล้วค้นหาไดเรกทอรี adk-multimodal-tool จากนั้นคลิกปุ่ม OK ซึ่งจะทำให้ไดเรกทอรีที่เลือกเป็นไดเรกทอรีการทำงานหลัก ในตัวอย่างนี้ ชื่อผู้ใช้คือ alvinprayuda ดังนั้นเส้นทางไดเรกทอรีจึงแสดงอยู่ด้านล่าง

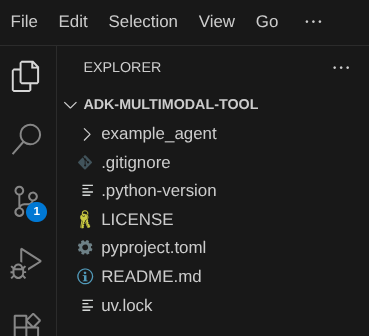
ตอนนี้ไดเรกทอรีการทำงานของ Cloud Shell Editor ควรมีลักษณะดังนี้ ( ภายใน adk-multimodal-tool)
ตอนนี้ให้เปิดเทอร์มินัลสำหรับเครื่องมือแก้ไข คุณทำได้โดยคลิกเทอร์มินัล -> เทอร์มินัลใหม่ในแถบเมนู หรือใช้ Ctrl + Shift + C ซึ่งจะเปิดหน้าต่างเทอร์มินัลที่ส่วนล่างของเบราว์เซอร์

เทอร์มินัลที่ใช้งานอยู่ปัจจุบันควรอยู่ในไดเรกทอรีการทำงาน adk-multimodal-tool เราจะใช้ Python 3.12 ใน Codelab นี้ และจะใช้ตัวจัดการโปรเจ็กต์ Python ของ uv เพื่อลดความซับซ้อนในการสร้างและจัดการเวอร์ชัน Python และสภาพแวดล้อมเสมือน แพ็กเกจ uv ได้รับการติดตั้งล่วงหน้าใน Cloud Shell แล้ว
เรียกใช้คำสั่งนี้เพื่อติดตั้งการอ้างอิงที่จำเป็นลงในสภาพแวดล้อมเสมือนในไดเรกทอรี .venv
uv sync --frozen
ตรวจสอบ pyproject.toml เพื่อดูการอ้างอิงที่ประกาศไว้สำหรับบทแนะนำนี้ ซึ่งได้แก่ google-adk, and python-dotenv
ตอนนี้เราจะต้องเปิดใช้ API ที่จำเป็นผ่านคำสั่งที่แสดงด้านล่าง อาจใช้เวลาสักครู่
gcloud services enable aiplatform.googleapis.com
เมื่อเรียกใช้คำสั่งสำเร็จ คุณควรเห็นข้อความที่คล้ายกับข้อความที่แสดงด้านล่าง
Operation "operations/..." finished successfully.
เราได้จัดเตรียมโครงสร้างเอเจนต์เทมเพลตไว้ให้คุณแล้วภายในไดเรกทอรี part2_starter_agent ในที่เก็บที่โคลน ตอนนี้เราต้องเปลี่ยนชื่อก่อนเพื่อให้พร้อมสำหรับบทแนะนำนี้
mv part1_ckpt_agent product_photo_editor
หลังจากนั้น ให้คัดลอก product_photo_editor/.env.example ไปยัง product_photo_editor/.env
cp product_photo_editor/.env.example product_photo_editor/.env
เมื่อเปิดไฟล์ product_photo_editor/.env คุณจะเห็นเนื้อหาดังที่แสดงด้านล่าง
GOOGLE_GENAI_USE_VERTEXAI=1
GOOGLE_CLOUD_PROJECT=your-project-id
GOOGLE_CLOUD_LOCATION=global
จากนั้นคุณจะต้องอัปเดตค่า your-project-id ด้วยรหัสโปรเจ็กต์ที่ถูกต้องของคุณเอง ตอนนี้เราพร้อมสำหรับขั้นตอนถัดไปแล้ว
3. 🚀 เริ่มต้นเซิร์ฟเวอร์ MCP ของ Veo
ก่อนอื่น ให้สร้างไดเรกทอรีบริการ MCP โดยใช้คำสั่งนี้
mkdir veo_mcp
จากนั้นสร้าง veo_mcp/main.py โดยใช้คำสั่งนี้
touch veo_mcp/main.py
หลังจากนั้น ให้คัดลอกโค้ดต่อไปนี้ไปยัง veo_mcp/main.py
from fastmcp import FastMCP
from typing import Annotated
from pydantic import Field
import base64
import asyncio
import os
from google import genai
from google.genai import types
from dotenv import load_dotenv
import logging

# Load environment variables from .env file
load_dotenv()

mcp = FastMCP("Veo MCP Server")


@mcp.tool
async def generate_video_with_image(
    prompt: Annotated[
        str, Field(description="Text description of the video to generate")
    ],
    image_data: Annotated[
        str, Field(description="Base64-encoded image data to use as starting frame")
    ],
    negative_prompt: Annotated[
        str | None,
        Field(description="Things to avoid in the generated video"),
    ] = None,
) -> dict:
    """Generates a professional product marketing video from text prompt and starting image using Google's Veo API.

    This function uses an image as the first frame of the generated video and automatically
    enriches your prompt with professional video production quality guidelines to create
    high-quality marketing assets suitable for commercial use.

    AUTOMATIC ENHANCEMENTS APPLIED:
    - 4K cinematic quality with professional color grading
    - Smooth, stabilized camera movements
    - Professional studio lighting setup
    - Shallow depth of field for product focus
    - Commercial-grade production quality
    - Marketing-focused visual style

    PROMPT WRITING TIPS:
    Describe what you want to see in the video. Focus on:
    - Product actions/movements (e.g., "rotating slowly", "zooming into details")
    - Desired camera angles (e.g., "close-up of the product", "wide shot")
    - Background/environment (e.g., "minimalist white backdrop", "lifestyle setting")
    - Any specific details about the product presentation

    The system will automatically enhance your prompt with professional production quality.

    Args:
        prompt: Description of the video to generate. Focus on the core product presentation
                you want. The system will automatically add professional quality enhancements.
        image_data: Base64-encoded image data to use as the starting frame
        negative_prompt: Optional prompt describing what to avoid in the video

    Returns:
        dict: A dictionary containing:
            - status: 'success' or 'error'
            - message: Description of the result
            - video_data: Base64-encoded video data (on success only)
    """
    try:
        # Initialize the Gemini client
        client = genai.Client(
            vertexai=True,
            project=os.getenv("GOOGLE_CLOUD_PROJECT"),
            location=os.getenv("GOOGLE_CLOUD_LOCATION"),
        )

        # Decode the image
        image_bytes = base64.b64decode(image_data)
        print(f"Successfully decoded image data: {len(image_bytes)} bytes")

        # Create image object
        image = types.Image(image_bytes=image_bytes, mime_type="image/png")

        # Prepare the config
        config = types.GenerateVideosConfig(
            duration_seconds=8,
            number_of_videos=1,
        )

        if negative_prompt:
            config.negative_prompt = negative_prompt

        # Enrich the prompt for professional marketing quality
        enriched_prompt = enrich_prompt_for_marketing(prompt)

        # Generate the video (async operation)
        operation = client.models.generate_videos(
            model="veo-3.1-generate-preview",
            prompt=enriched_prompt,
            image=image,
            config=config,
        )

        # Poll until the operation is complete
        poll_count = 0
        while not operation.done:
            poll_count += 1
            print(f"Waiting for video generation to complete... (poll {poll_count})")
            await asyncio.sleep(5)
            operation = client.operations.get(operation)

        # Download the video and convert to base64
        video = operation.response.generated_videos[0]

        # Get video bytes and encode to base64
        video_bytes = video.video.video_bytes
        video_base64 = base64.b64encode(video_bytes).decode("utf-8")

        print(f"Video generated successfully: {len(video_bytes)} bytes")

        return {
            "status": "success",
            "message": f"Video with image generated successfully after {poll_count * 5} seconds",
            "complete_prompt": enriched_prompt,
            "video_data": video_base64,
        }
    except Exception as e:
        logging.error(e)
        return {
            "status": "error",
            "message": f"Error generating video with image: {str(e)}",
        }


def enrich_prompt_for_marketing(user_prompt: str) -> str:
    """Enriches user prompt with professional video production quality enhancements.

    Adds cinematic quality, professional lighting, smooth camera work, and marketing-focused
    elements to ensure high-quality product marketing videos.
    """
    enhancement_prefix = """Create a high-quality, professional product marketing video with the following characteristics:

TECHNICAL SPECIFICATIONS:
- 4K cinematic quality with professional color grading
- Smooth, stabilized camera movements
- Professional studio lighting setup with soft, even illumination
- Shallow depth of field for product focus
- High dynamic range (HDR) for vibrant colors

VISUAL STYLE:
- Clean, minimalist aesthetic suitable for premium brand marketing
- Elegant and sophisticated presentation
- Commercial-grade production quality
- Attention to detail in product showcase

USER'S SPECIFIC REQUIREMENTS:
"""

    enhancement_suffix = """

ADDITIONAL QUALITY GUIDELINES:
- Ensure smooth transitions and natural motion
- Maintain consistent lighting throughout
- Keep the product as the clear focal point
- Use professional camera techniques (slow pans, tracking shots, or dolly movements)
- Apply subtle motion blur for cinematic feel
- Ensure brand-appropriate tone and style"""

    return f"{enhancement_prefix}{user_prompt}{enhancement_suffix}"


if __name__ == "__main__":
    mcp.run()
โค้ดต่อไปนี้จะทำสิ่งต่อไปนี้
- สร้างเซิร์ฟเวอร์ FastMCP ที่แสดงเครื่องมือสร้างวิดีโอ Veo 3.1 ให้กับ ADK Agent
- รับรูปภาพที่เข้ารหัส Base64, พรอมต์ข้อความ และพรอมต์เชิงลบเป็นอินพุต
- สร้างวิดีโอความยาว 8 วินาทีแบบไม่พร้อมกันโดยส่งคำขอไปยัง Veo 3.1 API และทำการสำรวจทุกๆ 5 วินาทีจนกว่าจะเสร็จสมบูรณ์
- แสดงข้อมูลวิดีโอที่เข้ารหัส Base64 พร้อมกับพรอมต์ที่เสริม
เครื่องมือ Veo MCP นี้จะต้องใช้ตัวแปรสภาพแวดล้อมเดียวกันกับเอเจนต์ของเรา ดังนั้นเราจึงสามารถคัดลอกและวางไฟล์ .env ได้ เรียกใช้คำสั่งต่อไปนี้เพื่อดำเนินการดังกล่าว
cp product_photo_editor/.env veo_mcp/
ตอนนี้เราสามารถทดสอบได้ว่าเซิร์ฟเวอร์ MCP ทำงานอย่างถูกต้องหรือไม่โดยเรียกใช้คำสั่งนี้
uv run veo_mcp/main.py
และจะแสดงบันทึกของคอนโซลดังนี้
╭────────────────────────────────────────────────────────────────────────────╮
│                                                                            │
│        _ __ ___  _____           __  __  _____________    ____    ____     │
│       _ __ ___ .'____/___ ______/ /_/  |/  / ____/ __ \  |___ \  / __ \    │
│      _ __ ___ / /_  / __ `/ ___/ __/ /|_/ / /   / /_/ /  ___/ / / / / /    │
│     _ __ ___ / __/ / /_/ (__  ) /_/ /  / / /___/ ____/  /  __/_/ /_/ /     │
│    _ __ ___ /_/    \____/____/\__/_/  /_/\____/_/      /_____(*)____/      │
│                                                                            │
│                                                                            │
│                                FastMCP  2.0                                │
│                                                                            │
│                                                                            │
│                 🖥️  Server name:     Veo MCP Server                         │
│                 📦 Transport:       STDIO                                  │
│                                                                            │
│                 🏎️  FastMCP version: 2.12.5                                 │
│                 🤝 MCP SDK version: 1.16.0                                 │
│                                                                            │
│                 📚 Docs:            https://gofastmcp.com                  │
│                 🚀 Deploy:          https://fastmcp.cloud                  │
│                                                                            │
╰────────────────────────────────────────────────────────────────────────────╯


[10/22/25 08:28:53] INFO     Starting MCP server 'Veo MCP Server' with          server.py:1502
                             transport 'stdio'
ตอนนี้ให้หยุดกระบวนการบริการ MCP โดยใช้ CTRL+C ระบบจะเรียกใช้คำสั่งนี้จากชุดเครื่องมือ ADK MCP ในภายหลัง เราสามารถไปยังขั้นตอนถัดไปเพื่ออนุญาตให้ตัวแทนของเราใช้เครื่องมือ MCP นี้ได้
4. 🚀 เชื่อมต่อเซิร์ฟเวอร์ MCP ของ Veo กับ ADK Agent
ตอนนี้เรามาเชื่อมต่อเซิร์ฟเวอร์ MCP ของ Veo เพื่อให้เอเจนต์ของเราใช้งานได้ ก่อนอื่น ให้สร้างสคริปต์อื่นเพื่อเก็บชุดเครื่องมือ โดยเรียกใช้คำสั่งต่อไปนี้
touch product_photo_editor/mcp_tools.py
จากนั้นคัดลอกโค้ดต่อไปนี้ไปยัง product_photo_editor/mcp_tools.py
from google.adk.tools.mcp_tool.mcp_toolset import MCPToolset
from google.adk.tools.mcp_tool.mcp_session_manager import StdioConnectionParams
from mcp import StdioServerParameters


mcp_toolset = MCPToolset(
    connection_params=StdioConnectionParams(
        server_params=StdioServerParameters(
            command="uv",
            args=[
                "run",
                "veo_mcp/main.py",
            ],
        ),
        timeout=120, # seconds
    ),
)

# Option to connect to remote MCP server

# from google.adk.tools.mcp_tool.mcp_session_manager import StreamableHTTPConnectionParams

# mcp_toolset = MCPToolset(
#     connection_params=StreamableHTTPConnectionParams(
#         url="http://localhost:8000/mcp",
#         timeout=120,
#     ),
# )
โค้ดด้านบนแสดงวิธีเชื่อมต่อกับเซิร์ฟเวอร์ MCP โดยใช้ ADK MCPToolset ในตัวอย่างนี้ เราจะเชื่อมต่อกับเซิร์ฟเวอร์ MCP โดยใช้ช่องทางการสื่อสาร STDIO ในคำสั่ง เราจะระบุวิธีเรียกใช้เซิร์ฟเวอร์ MCP และตั้งค่าพารามิเตอร์การหมดเวลา
5. 🚀 การแก้ไขพารามิเตอร์การเรียกใช้เครื่องมือ
ในการประกาศเครื่องมือเซิร์ฟเวอร์ MCP เราได้ออกแบบเครื่องมือ generate_video_with_image ซึ่งระบุสตริง base64 เป็นพารามิเตอร์ของเครื่องมือ เราไม่สามารถขอให้ LLM ทำสิ่งนี้ให้เราได้ ดังนั้นเราจึงต้องออกแบบกลยุทธ์เฉพาะเพื่อจัดการกับปัญหานี้
ในแล็บก่อนหน้านี้ เราจัดการรูปภาพที่ผู้ใช้อัปโหลดและคำตอบของเครื่องมือใน before_model_callback เพื่อบันทึกเป็นอาร์ติแฟกต์ ซึ่งจะแสดงในเทมเพลตเอเจนต์ที่เราเตรียมไว้ก่อนหน้านี้ด้วย เราจะใช้ข้อมูลนี้และใช้กลยุทธ์ต่อไปนี้
- สั่งให้ LLM ส่งค่า artifact_id เสมอหากพารามิเตอร์เครื่องมือที่เฉพาะเจาะจงกำหนดให้ส่งข้อมูลสตริง base64
- ดักจับการเรียกใช้เครื่องมือใน
before_tool_callbackและแปลงพารามิเตอร์จาก artifact_id เป็นเนื้อหาไบต์โดยการโหลดอาร์ติแฟกต์และเขียนทับอาร์กิวเมนต์ของเครื่องมือ
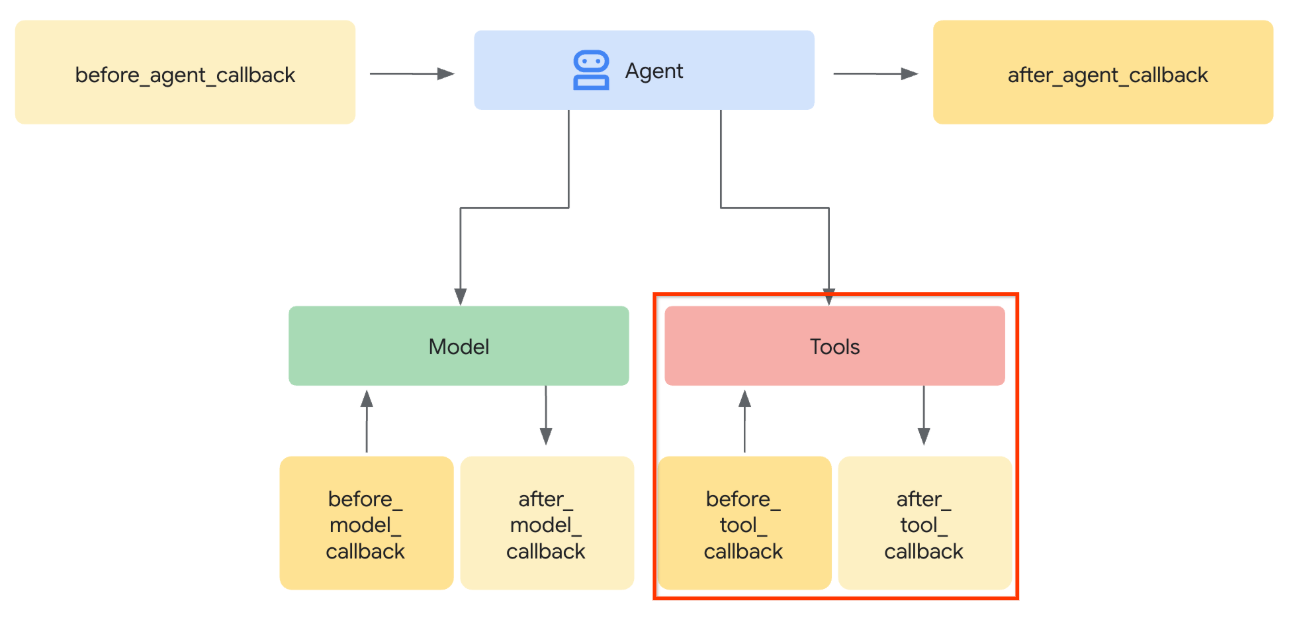
ดูภาพด้านล่างเพื่อดูภาพของส่วนที่เราจะสกัดกั้น
ก่อนอื่น มาเตรียมฟังก์ชัน before_tool_callback กัน โดยสร้างไฟล์ใหม่ product_photo_editor/tool_callbacks.py โดยเรียกใช้คำสั่งต่อไปนี้
touch product_photo_editor/tool_callbacks.py
จากนั้นคัดลอกโค้ดต่อไปนี้ลงในไฟล์
# product_photo_editor/tool_callbacks.py

from google.genai.types import Part
from typing import Any
from google.adk.tools.tool_context import ToolContext
from google.adk.tools.base_tool import BaseTool
from google.adk.tools.mcp_tool.mcp_tool import McpTool
import base64
import logging
import json
from mcp.types import CallToolResult


async def before_tool_modifier(
    tool: BaseTool, args: dict[str, Any], tool_context: ToolContext
):
    # Identify which tool input should be modified
    if isinstance(tool, McpTool) and tool.name == "generate_video_with_image":
        logging.info("Modify tool args for artifact: %s", args["image_data"])
        # Get the artifact filename from the tool input argument
        artifact_filename = args["image_data"]
        artifact = await tool_context.load_artifact(filename=artifact_filename)
        file_data = artifact.inline_data.data

        # Convert byte data to base64 string
        base64_data = base64.b64encode(file_data).decode("utf-8")

        # Then modify the tool input argument
        args["image_data"] = base64_data
โค้ดด้านบนแสดงขั้นตอนต่อไปนี้
- ตรวจสอบว่าเครื่องมือที่เรียกใช้เป็นออบเจ็กต์ McpTool และเป็นการเรียกใช้เครื่องมือเป้าหมายที่เราต้องการแก้ไข
- รับค่าของอาร์กิวเมนต์
image_dataซึ่งเป็นอาร์กิวเมนต์ที่ขอในรูปแบบ base64 แต่เราขอให้ LLM แสดงผล artifact_id ในอาร์กิวเมนต์นั้น - โหลดอาร์ติแฟกต์โดยใช้บริการอาร์ติแฟกต์ใน
tool_context - เขียนทับ
image_dataอาร์กิวเมนต์ด้วยข้อมูล base64
ตอนนี้เราจะต้องเพิ่มการเรียกกลับนี้ไปยังตัวแทน และแก้ไขวิธีการเล็กน้อยเพื่อให้ตัวแทนจะกรอกอาร์กิวเมนต์เครื่องมือ base64 ด้วยรหัสอาร์ติแฟกต์แทนเสมอ
เปิด product_photo_editor/agent.py แล้วแก้ไขเนื้อหาด้วยโค้ดต่อไปนี้
# product_photo_editor/agent.py

from google.adk.agents.llm_agent import Agent
from product_photo_editor.custom_tools import edit_product_asset
from product_photo_editor.mcp_tools import mcp_toolset
from product_photo_editor.model_callbacks import before_model_modifier
from product_photo_editor.tool_callbacks import before_tool_modifier
from product_photo_editor.prompt import AGENT_INSTRUCTION

root_agent = Agent(
    model="gemini-2.5-flash",
    name="product_photo_editor",
    description="""A friendly product photo editor assistant that helps small business
owners edit and enhance their product photos. Perfect for improving photos of handmade
goods, food products, crafts, and small retail items""",
    instruction=AGENT_INSTRUCTION
    + """
**IMPORTANT: Base64 Argument Rule on Tool Call**

If you found any tool call arguments that requires base64 data,
ALWAYS provide the artifact_id of the referenced file to
the tool call. NEVER ask user to provide base64 data.
Base64 data encoding process is out of your
responsibility and will be handled in another part of the system.
""",
    tools=[
        edit_product_asset,
        mcp_toolset,
    ],
    before_model_callback=before_model_modifier,
    before_tool_callback=before_tool_modifier,
)
เอาล่ะ ตอนนี้เรามาลองโต้ตอบกับตัวแทนเพื่อทดสอบการแก้ไขนี้กัน เรียกใช้คำสั่งต่อไปนี้เพื่อเรียกใช้ UI ของนักพัฒนาเว็บ
uv run adk web --port 8080
ซึ่งจะสร้างเอาต์พุตคล้ายกับตัวอย่างต่อไปนี้ ซึ่งหมายความว่าเราเข้าถึงอินเทอร์เฟซเว็บได้แล้ว
INFO:     Started server process [xxxx]
INFO:     Waiting for application startup.

+-----------------------------------------------------------------------------+
| ADK Web Server started                                                      |
|                                                                             |
| For local testing, access at http://127.0.0.1:8080.                         |
+-----------------------------------------------------------------------------+

INFO:     Application startup complete.
INFO:     Uvicorn running on http://127.0.0.1:8080 (Press CTRL+C to quit)
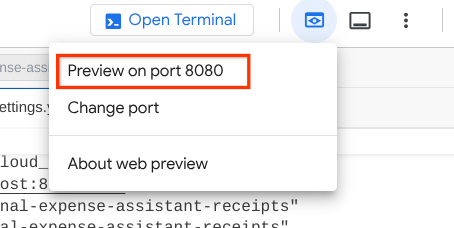
ตอนนี้หากต้องการตรวจสอบ คุณสามารถกด Ctrl + คลิกที่ URL หรือคลิกปุ่มตัวอย่างเว็บที่ด้านบนของ Cloud Shell Editor แล้วเลือกแสดงตัวอย่างบนพอร์ต 8080
คุณจะเห็นหน้าเว็บต่อไปนี้ ซึ่งคุณสามารถเลือกตัวแทนที่พร้อมให้บริการได้ที่ปุ่มเมนูแบบเลื่อนลงด้านซ้ายบน ( ในกรณีของเราควรเป็น product_photo_editor) และโต้ตอบกับบอท
จากนั้นอัปโหลดรูปภาพต่อไปนี้และขอให้ตัวแทนสร้างคลิปโปรโมตจากรูปภาพดังกล่าว
Generate a slow zoom in and moving from left and right animation

คุณจะพบข้อผิดพลาดต่อไปนี้
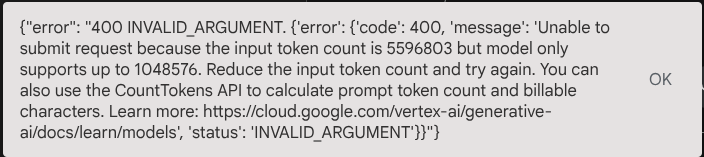
เหตุผล เนื่องจากเครื่องมือแสดงผลลัพธ์ในรูปแบบสตริง base64 โดยตรงด้วย จึงทำให้เกินโทเค็นสูงสุด ตอนนี้เรามาจัดการข้อผิดพลาดนี้ในส่วนถัดไปกัน
6. 🚀 การแก้ไขคำตอบของเครื่องมือ
ในส่วนนี้ เราจะจัดการการตอบกลับของเครื่องมือจากการตอบกลับของ MCP เราจะดำเนินการต่อไปนี้
- จัดเก็บวิดีโอตอบกลับโดยเครื่องมือในบริการอาร์ติแฟกต์
- ส่งตัวระบุอาร์ติแฟกต์กลับไปยัง Agent แทน
เราขอแจ้งให้ทราบว่าเราจะแตะในรันไทม์ของเอเจนต์ต่อไปนี้
ก่อนอื่น มาใช้ฟังก์ชัน Callback กัน เปิด product_photo_editor/tool_callbacks.py แล้วแก้ไขเพื่อใช้ after_tool_modifier
# product_photo_editor/tool_callbacks.py

from google.genai.types import Part
from typing import Any
from google.adk.tools.tool_context import ToolContext
from google.adk.tools.base_tool import BaseTool
from google.adk.tools.mcp_tool.mcp_tool import McpTool
import base64
import logging
import json
from mcp.types import CallToolResult


async def before_tool_modifier(
    tool: BaseTool, args: dict[str, Any], tool_context: ToolContext
):
    # Identify which tool input should be modified
    if isinstance(tool, McpTool) and tool.name == "generate_video_with_image":
        logging.info("Modify tool args for artifact: %s", args["image_data"])
        # Get the artifact filename from the tool input argument
        artifact_filename = args["image_data"]
        artifact = await tool_context.load_artifact(filename=artifact_filename)
        file_data = artifact.inline_data.data

        # Convert byte data to base64 string
        base64_data = base64.b64encode(file_data).decode("utf-8")

        # Then modify the tool input argument
        args["image_data"] = base64_data


async def after_tool_modifier(
    tool: BaseTool,
    args: dict[str, Any],
    tool_context: ToolContext,
    tool_response: dict | CallToolResult,
):
    if isinstance(tool, McpTool) and tool.name == "generate_video_with_image":
        tool_result = json.loads(tool_response.content[0].text)

        # Get the expected response field which contains the video data
        video_data = tool_result["video_data"]
        artifact_filename = f"video_{tool_context.function_call_id}.mp4"

        # Convert base64 string to byte data
        video_bytes = base64.b64decode(video_data)

        # Save the video as artifact
        await tool_context.save_artifact(
            filename=artifact_filename,
            artifact=Part(inline_data={"mime_type": "video/mp4", "data": video_bytes}),
        )

        # Remove the video data from the tool response
        tool_result.pop("video_data")

        # Then modify the tool response to include the artifact filename and remove the base64 string
        tool_result["video_artifact_id"] = artifact_filename
        logging.info(
            "Modify tool response for artifact: %s", tool_result["video_artifact_id"]
        )

        return tool_result
หลังจากนั้น เราต้องติดตั้งฟังก์ชันนี้ให้กับเอเจนต์ เปิด product_photo_editor/agent.py แล้วแก้ไขเป็นโค้ดต่อไปนี้
# product_photo_editor/agent.py

from google.adk.agents.llm_agent import Agent
from product_photo_editor.custom_tools import edit_product_asset
from product_photo_editor.mcp_tools import mcp_toolset
from product_photo_editor.model_callbacks import before_model_modifier
from product_photo_editor.tool_callbacks import (
    before_tool_modifier,
    after_tool_modifier,
)
from product_photo_editor.prompt import AGENT_INSTRUCTION

root_agent = Agent(
    model="gemini-2.5-flash",
    name="product_photo_editor",
    description="""A friendly product photo editor assistant that helps small business
owners edit and enhance their product photos. Perfect for improving photos of handmade
goods, food products, crafts, and small retail items""",
    instruction=AGENT_INSTRUCTION
    + """
**IMPORTANT: Base64 Argument Rule on Tool Call**

If you found any tool call arguments that requires base64 data,
ALWAYS provide the artifact_id of the referenced file to
the tool call. NEVER ask user to provide base64 data.
Base64 data encoding process is out of your
responsibility and will be handled in another part of the system.
""",
    tools=[
        edit_product_asset,
        mcp_toolset,
    ],
    before_model_callback=before_model_modifier,
    before_tool_callback=before_tool_modifier,
    after_tool_callback=after_tool_modifier,
)
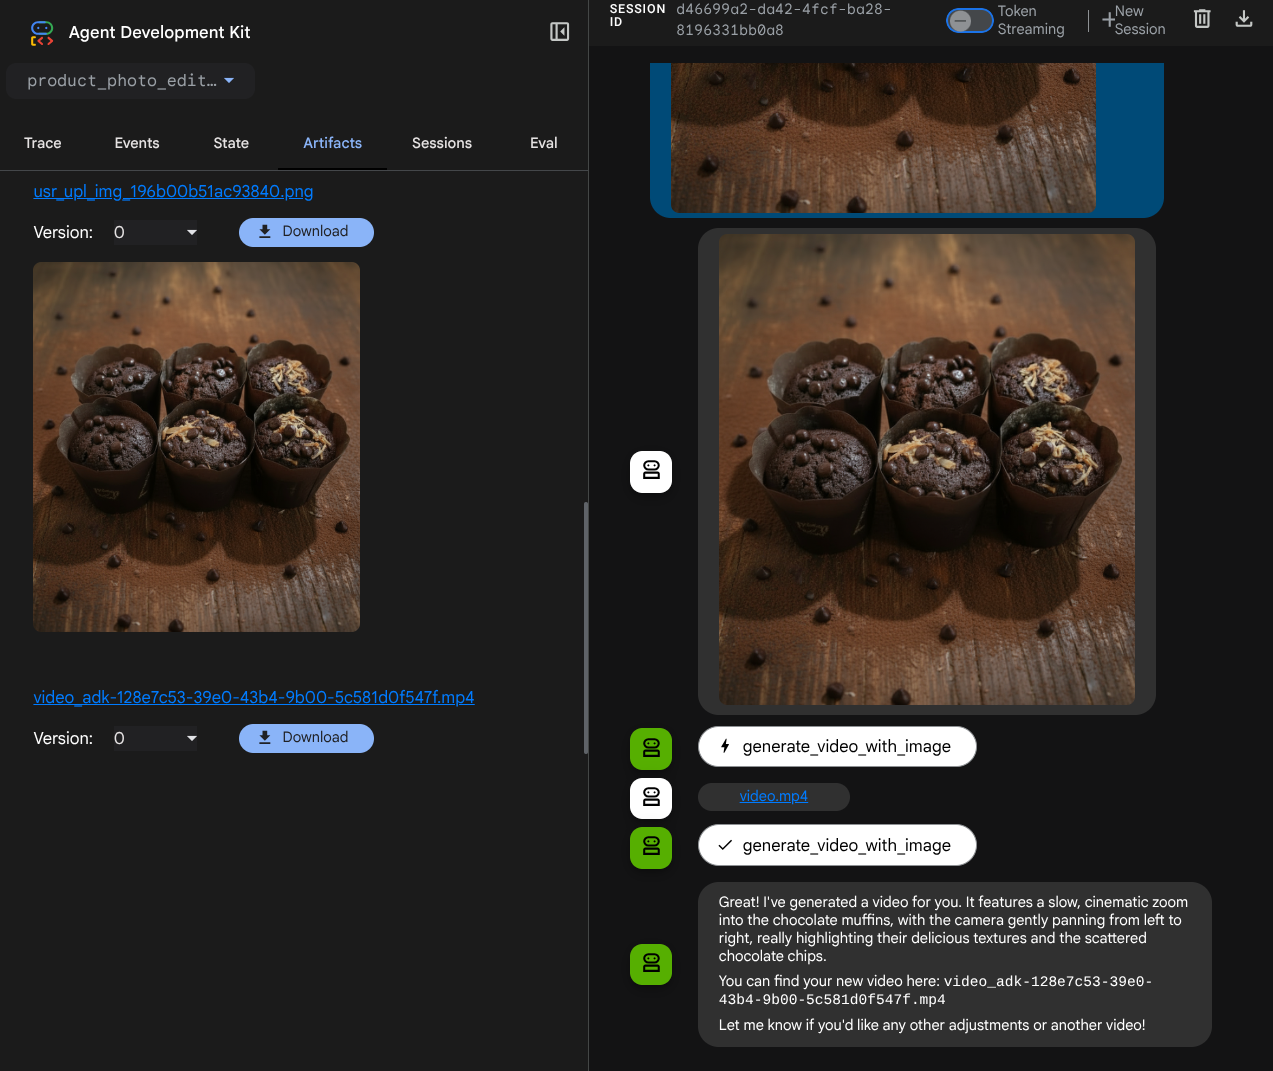
เรียบร้อย ตอนนี้คุณขอให้ตัวแทนไม่เพียงช่วยแก้ไขรูปภาพ แต่ยังสร้างวิดีโอให้คุณได้ด้วย เรียกใช้คำสั่งต่อไปนี้อีกครั้ง
uv run adk web --port 8080
จากนั้นลองสร้างวิดีโอโดยใช้รูปภาพนี้
Generate a slow zoom in and moving from left and right animation
คุณจะเห็นวิดีโอที่สร้างขึ้นตามตัวอย่างที่แสดงด้านล่างและบันทึกเป็นอาร์ติแฟกต์แล้ว
7. ⭐ สรุป
ตอนนี้เรามาทบทวนสิ่งที่เราได้ทำไปแล้วใน Codelab นี้กัน สิ่งที่ได้เรียนรู้ที่สำคัญมีดังนี้
- การจัดการข้อมูลหลายรูปแบบ (I/O ของเครื่องมือ): เสริมกลยุทธ์ในการจัดการข้อมูลหลายรูปแบบ (เช่น รูปภาพและวิดีโอ) สำหรับ I/O ของเครื่องมือโดยใช้บริการอาร์ติแฟกต์ของ ADK และ Callback เฉพาะทางแทนการส่งข้อมูลไบต์ดิบโดยตรง
- การผสานรวมชุดเครื่องมือ MCP: พัฒนาและผสานรวมเซิร์ฟเวอร์ MCP ของ Veo ภายนอกโดยใช้ FastMCP ผ่านชุดเครื่องมือ MCP ของ ADK เพื่อเพิ่มความสามารถในการสร้างวิดีโอให้กับเอเจนต์
- การแก้ไขอินพุตเครื่องมือ (before_tool_callback): ใช้การเรียกกลับเพื่อสกัดกั้นการเรียกใช้เครื่องมือ generate_video_with_image โดยแปลง artifact_id ของไฟล์ (ที่ LLM เลือก) เป็นข้อมูลรูปภาพที่เข้ารหัส Base64 ที่จำเป็นสำหรับอินพุตของเซิร์ฟเวอร์ MCP
- การแก้ไขเอาต์พุตของเครื่องมือ (after_tool_callback): ใช้ Callback เพื่อสกัดกั้นการตอบกลับวิดีโอที่เข้ารหัส Base64 ขนาดใหญ่จากเซิร์ฟเวอร์ MCP บันทึกวิดีโอเป็นอาร์ติแฟกต์ใหม่ และส่งคืนการอ้างอิง video_artifact_id ที่สะอาดไปยัง LLM
8. 🧹 ล้างข้อมูล
โปรดทำตามขั้นตอนต่อไปนี้เพื่อเลี่ยงไม่ให้เกิดการเรียกเก็บเงินกับบัญชี Google Cloud สำหรับทรัพยากรที่ใช้ในโค้ดแล็บนี้
- ในคอนโซล Google Cloud ให้ไปที่หน้าจัดการทรัพยากร
- ในรายการโปรเจ็กต์ ให้เลือกโปรเจ็กต์ที่ต้องการลบ แล้วคลิกลบ
- ในกล่องโต้ตอบ ให้พิมพ์รหัสโปรเจ็กต์ แล้วคลิกปิดเพื่อลบโปรเจ็กต์