
1. 📖 简介
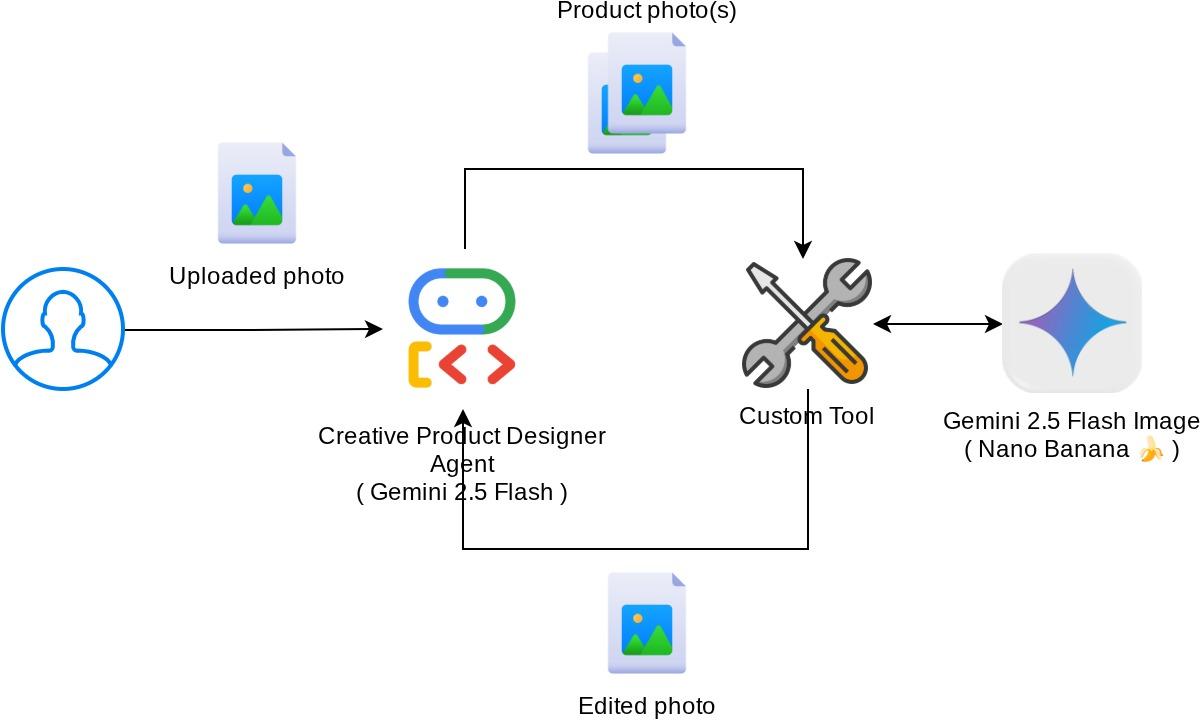
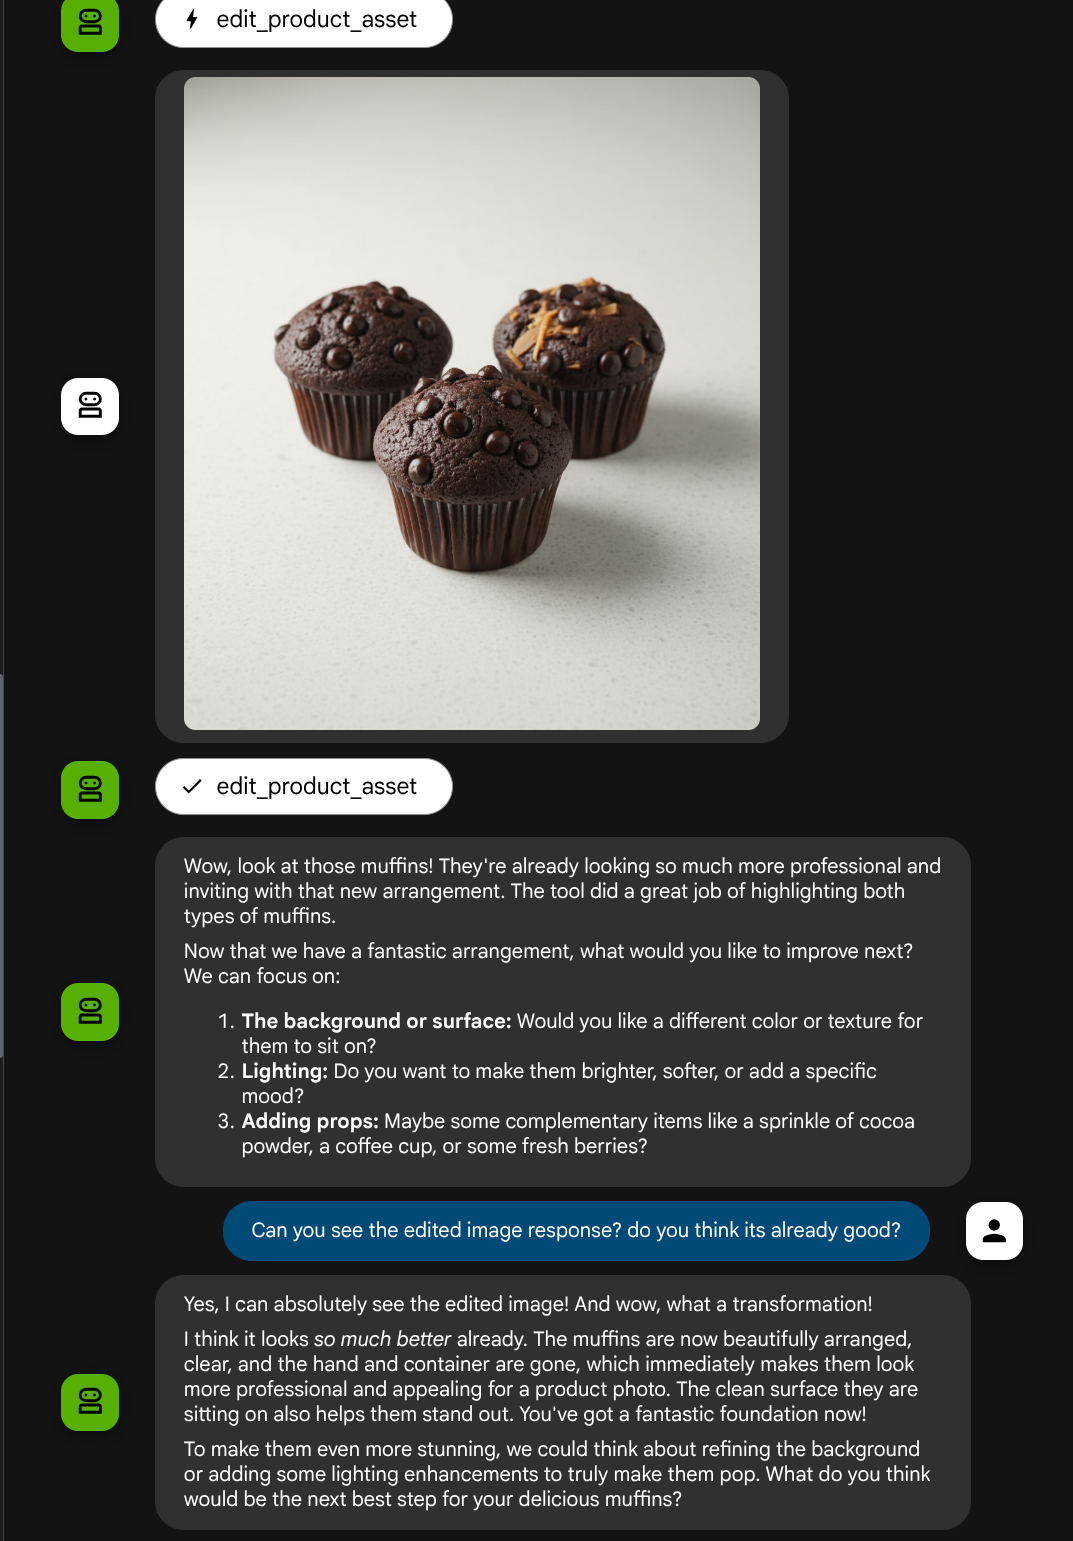
此 Codelab 演示了如何在智能体开发套件 (ADK) 中设计多模态工具交互。这是一个特定的流程,您希望智能体将上传的文件作为工具的输入,并了解工具响应生成的文件内容。因此,可以进行如下屏幕截图所示的交互。在本教程中,我们将开发一个智能体,该智能体能够帮助用户为其产品展示编辑更好的照片
通过此 Codelab,您将采用以下分步方法:
- 准备 Google Cloud 项目
- 为编码环境设置工作目录
- 使用 ADK 初始化智能体
- 设计一个可用于编辑由 Gemini 2.5 Flash Image 提供支持的照片的工具
- 设计一个回调函数来处理用户图片上传、将其保存为制品并将其作为上下文添加到智能体
- 设计一个回调函数来处理工具响应生成的图片、将其保存为制品并将其作为上下文添加到智能体
架构概览
此 Codelab 中的整体交互如下图所示
前提条件
- 能够熟练使用 Python
- (可选)有关智能体开发套件 (ADK) 的基础 Codelab
学习内容
- 如何利用回调上下文访问制品服务
- 如何设计具有适当多模态数据传播的工具
- 如何修改智能体 LLM 请求以通过 before_model_callback 添加制品上下文
- 如何使用 Gemini 2.5 Flash Image 编辑图片
所需条件
- Chrome 网络浏览器
- Gmail 账号
- 启用了结算账号的 Cloud 项目
此 Codelab 专为各种水平的开发者(包括新手)设计,在示例应用中使用 Python。不过,您无需具备 Python 知识即可理解所介绍的概念。
2. 🚀 准备研讨会开发设置
第 1 步:在 Cloud 控制台中选择有效项目
在 Google Cloud 控制台的项目选择器页面上,选择或创建一个 Google Cloud 项目(请参阅控制台的左上角部分)

点击该项目,您将看到所有项目的列表,如以下示例所示:
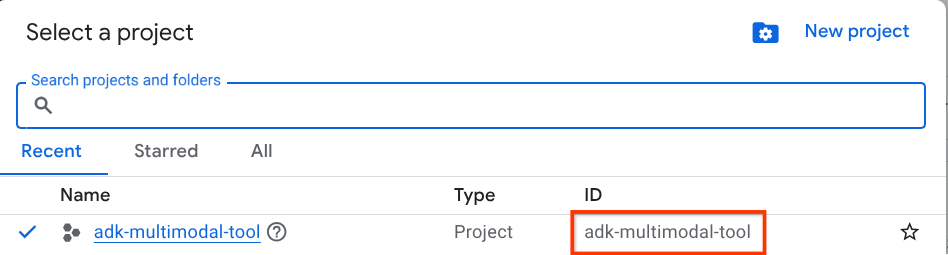
红色框中指示的值是项目 ID ,本教程将使用此值。
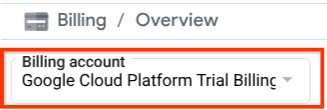
确保您的云项目已启用结算功能。如需检查此设置,请点击左上角栏中的汉堡菜单图标 ☰,该图标会显示导航菜单,然后找到“结算”菜单

如果您在结算 / 概览 标题(Cloud 控制台的左上角部分 )下看到 “Google Cloud Platform 试用结算账号” ,则表示您的项目已准备好用于本教程。如果不是,请返回本教程的开头并兑换试用结算账号
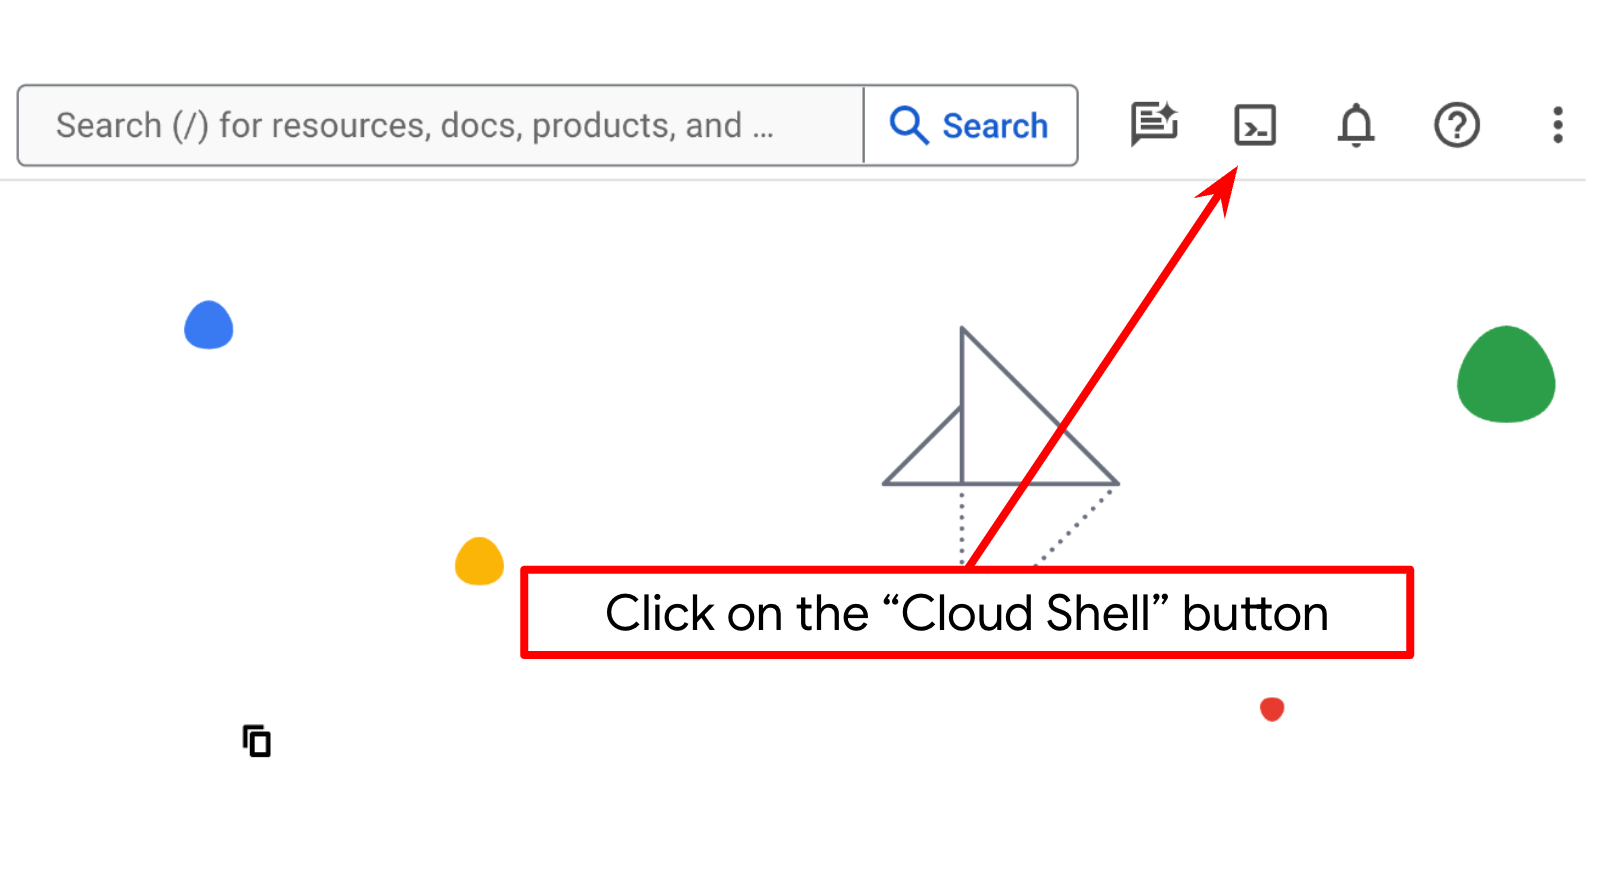
第 2 步:熟悉 Cloud Shell
您将在教程的大部分内容中使用 Cloud Shell,请点击 Google Cloud 控制台顶部的“激活 Cloud Shell” 。如果系统提示您授权,请点击授权

连接到 Cloud Shell 后,我们需要检查 Shell(或终端)是否已通过我们的账号进行身份验证
gcloud auth list
如果您看到个人 Gmail 账号,如以下示例输出所示,则一切正常
Credentialed Accounts

ACTIVE: *
ACCOUNT: alvinprayuda@gmail.com

To set the active account, run:
    $ gcloud config set account `ACCOUNT`
如果不是,请尝试刷新浏览器,并确保在系统提示时点击授权 (可能会因连接问题而中断)
接下来,我们还需要检查 Shell 是否已配置为正确的项目 ID。如果您在终端中看到 $符号之前的 ( ) 内有值(在下面的屏幕截图中,该值为“adk-multimodal-tool”),则表示此值显示了为有效 Shell 会话配置的项目。

如果显示的值 已经正确 ,您可以跳过 下一个命令 。但是,如果该值不正确或缺失,请运行以下命令
gcloud config set project <YOUR_PROJECT_ID>
然后,从 GitHub 克隆此 Codelab 的模板工作目录,运行以下命令。它将在 adk-multimodal-tool 目录中创建工作目录
git clone https://github.com/alphinside/adk-mcp-multimodal.git adk-multimodal-tool
第 3 步:熟悉 Cloud Shell 编辑器并设置应用工作目录
现在,我们可以设置代码编辑器来执行一些编码操作。我们将使用 Cloud Shell 编辑器
点击打开编辑器 按钮,系统将打开 Cloud Shell 编辑器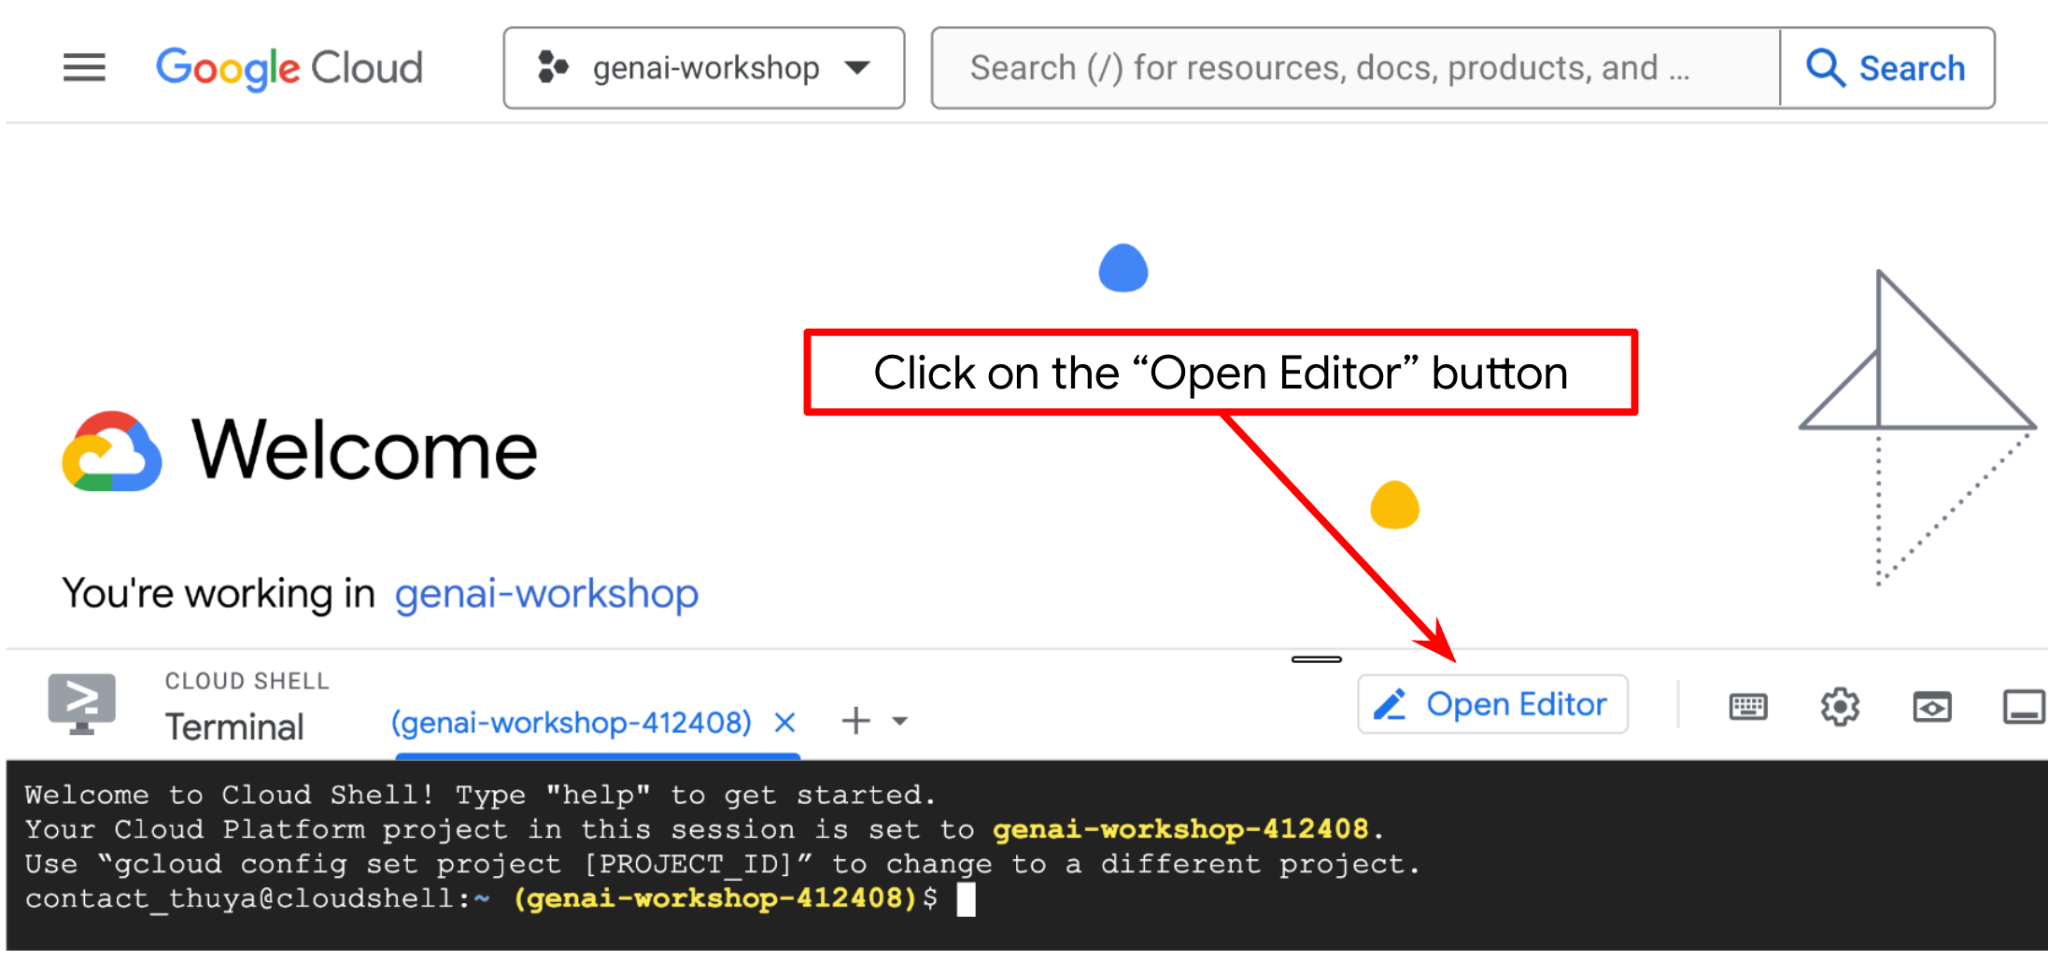
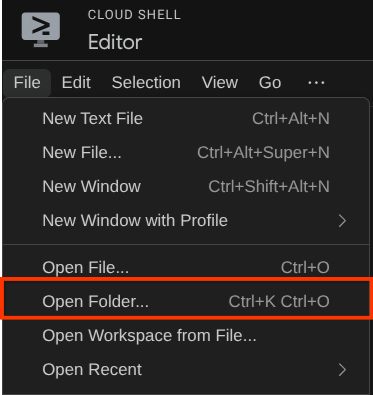
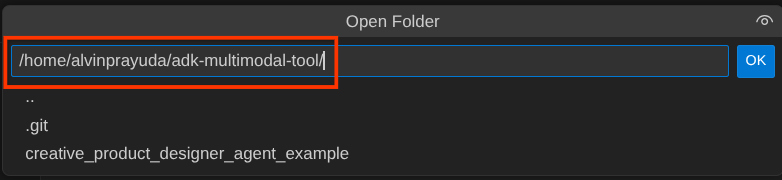
之后,前往 Cloud Shell 编辑器的顶部部分,依次点击文件 -> 打开文件夹,找到您的用户名目录,然后找到adk-multimodal-tool目录,然后点击“确定”按钮。这会将所选目录设为主工作目录。在此示例中,用户名是 alvinprayuda,因此目录路径如下所示
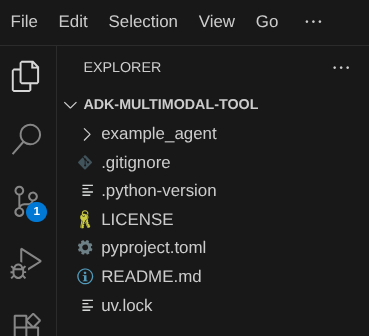
现在,您的 Cloud Shell 编辑器工作目录应如下所示(在 adk-multimodal-tool 内)
现在,打开编辑器的终端。您可以在菜单栏中依次点击 Terminal -> New Terminal ,或使用 Ctrl + Shift + C ,这将在浏览器的底部打开一个终端窗口

您当前有效的终端应位于 adk-multimodal-tool 工作目录中。在此 Codelab 中,我们将使用 Python 3.12,并使用 uv Python 项目管理器 来简化创建和管理 Python 版本和虚拟环境的需求。此 uv 软件包已预安装在 Cloud Shell 上。
运行此命令,将所需的依赖项安装到 .venv 目录中的虚拟环境
uv sync --frozen
检查 pyproject.toml 以查看本教程的声明依赖项,即 google-adk, and python-dotenv。
现在,我们需要通过以下命令启用所需的 API。这可能需要一段时间。
gcloud services enable aiplatform.googleapis.com
成功执行该命令后,您应该会看到类似于以下内容的消息:
Operation "operations/..." finished successfully.
3. 🚀 初始化 ADK 智能体
在此步骤中,我们将使用 ADK CLI 初始化智能体,运行以下命令
uv run adk create product_photo_editor \
   --model gemini-2.5-flash \
   --project your-project-id \
   --region us-central1
此命令将帮助您快速提供智能体所需的结构,如下所示:
product_photo_editor/
├── __init__.py
├── .env
├── agent.py
之后,让我们准备 product photo editor 智能体。首先,将代码库中已包含的 prompt.py 复制到您之前创建的智能体目录
cp prompt.py product_photo_editor/prompt.py
然后,打开 product_photo_editor/agent.py 并使用以下代码修改内容
from google.adk.agents.llm_agent import Agent
from product_photo_editor.prompt import AGENT_INSTRUCTION

root_agent = Agent(
    model="gemini-2.5-flash",
    name="product_photo_editor",
    description="""A friendly product photo editor assistant that helps small business
owners edit and enhance their product photos. Perfect for improving photos of handmade
goods, food products, crafts, and small retail items""",
    instruction=AGENT_INSTRUCTION,
)
现在,您将拥有基本照片编辑器智能体,您可以与该智能体聊天,以获取照片建议。您可以尝试使用以下命令与其互动
uv run adk web --port 8080
它将生成类似于以下示例的输出,这意味着我们已经可以访问 Web 界面
INFO:     Started server process [xxxx]
INFO:     Waiting for application startup.

+-----------------------------------------------------------------------------+
| ADK Web Server started                                                      |
|                                                                             |
| For local testing, access at http://127.0.0.1:8080.                         |
+-----------------------------------------------------------------------------+

INFO:     Application startup complete.
INFO:     Uvicorn running on http://127.0.0.1:8080 (Press CTRL+C to quit)
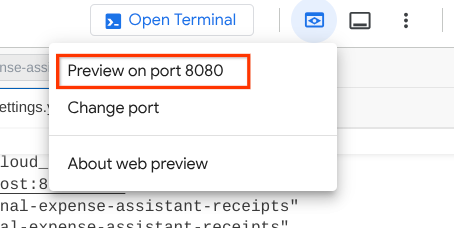
现在,如需进行检查,您可以 Ctrl + 点击 网址,或点击 Cloud Shell 编辑器顶部区域的 Web 预览 按钮,然后选择在端口 8080 上预览
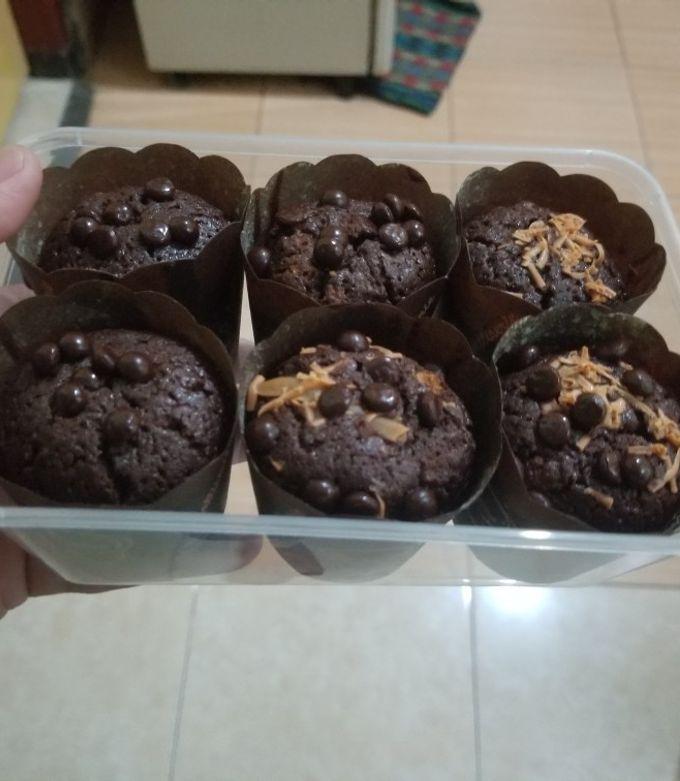
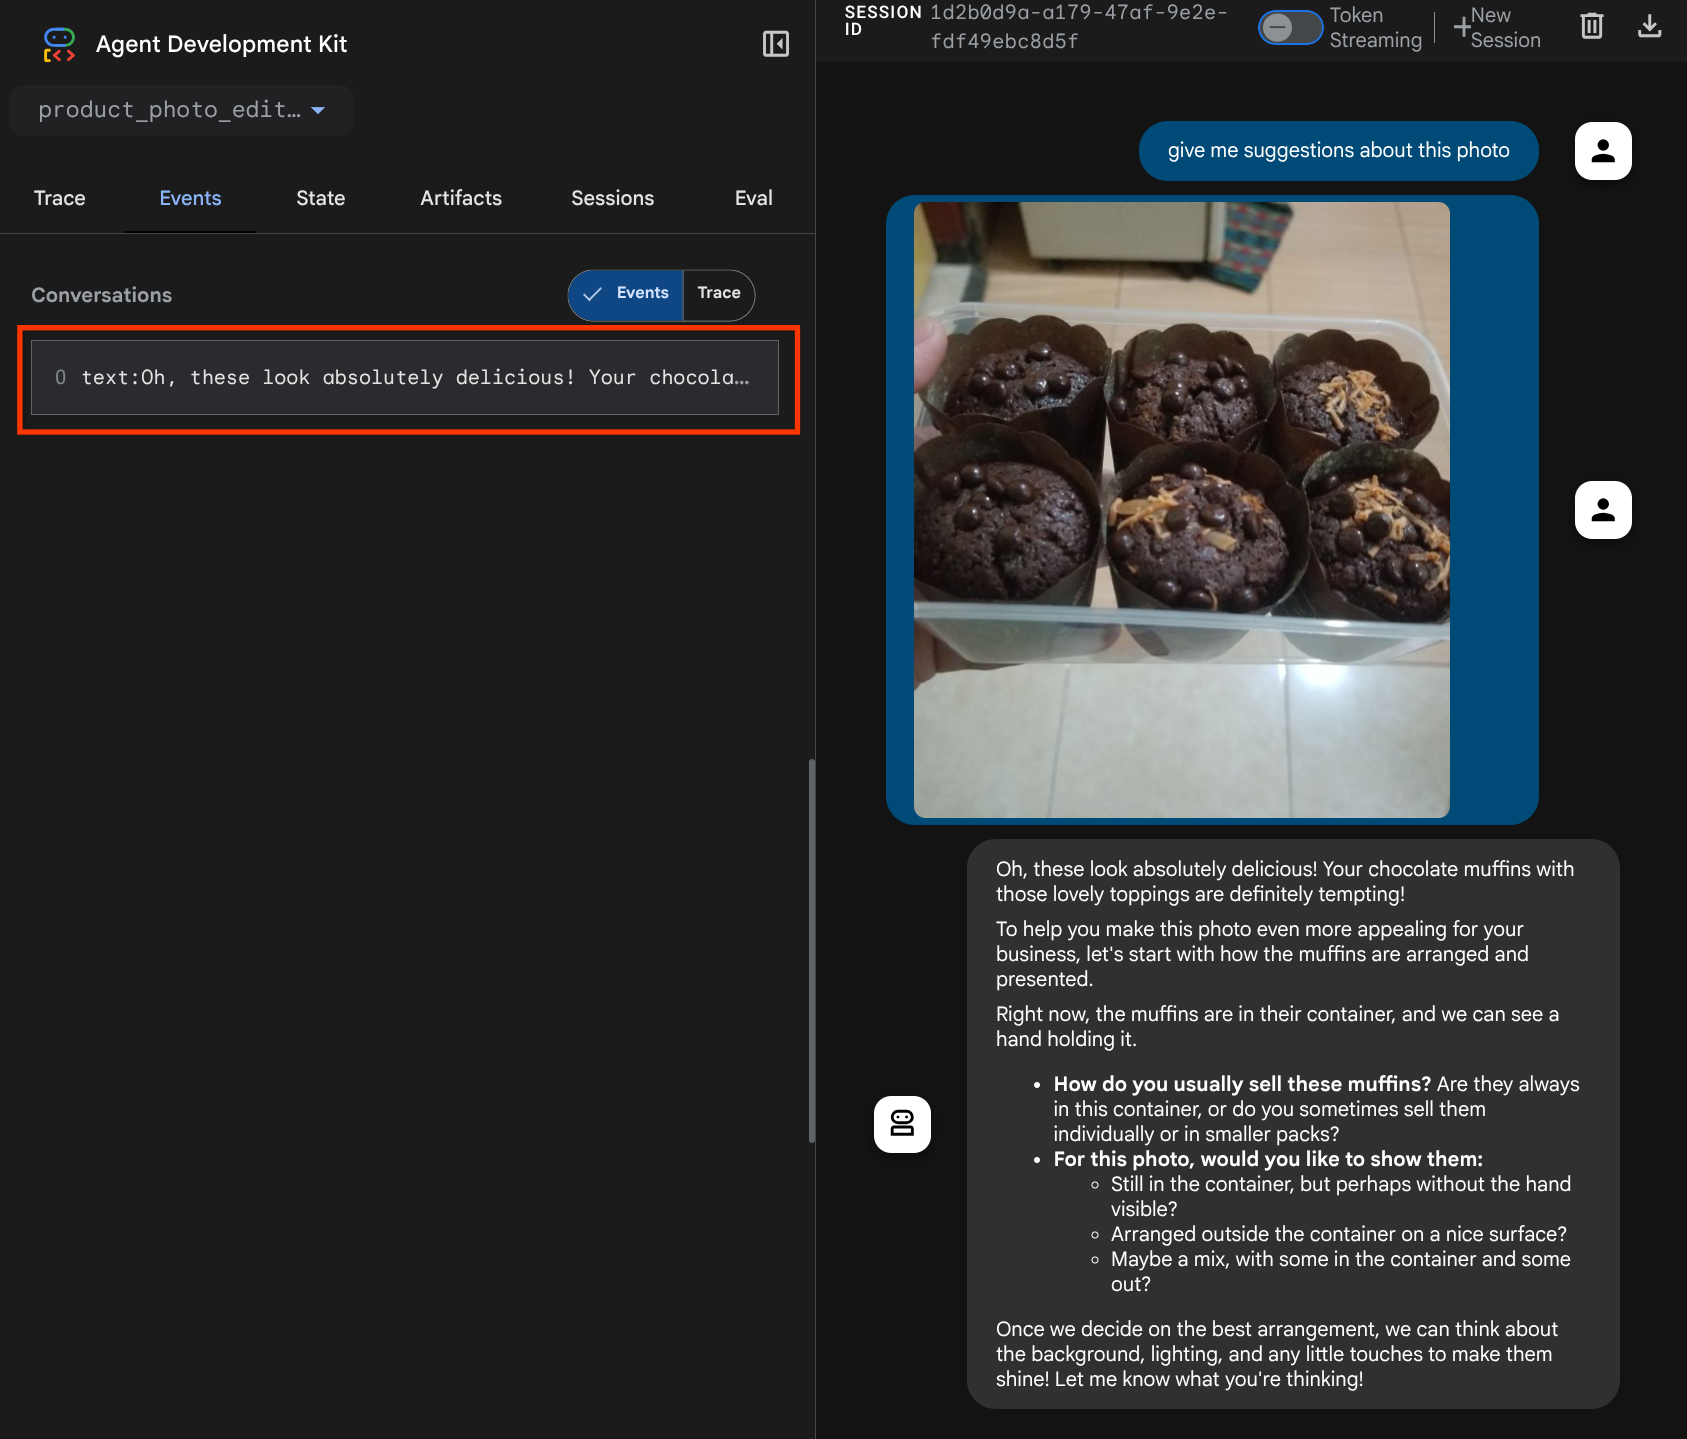
您将看到以下网页,您可以在左上角的下拉按钮中选择可用的智能体(在我们的示例中,应该是 product_photo_editor ),并与该机器人互动。尝试在聊天界面中上传以下图片并提出以下问题
what is your suggestion for this photo?
您将看到类似于以下内容的互动
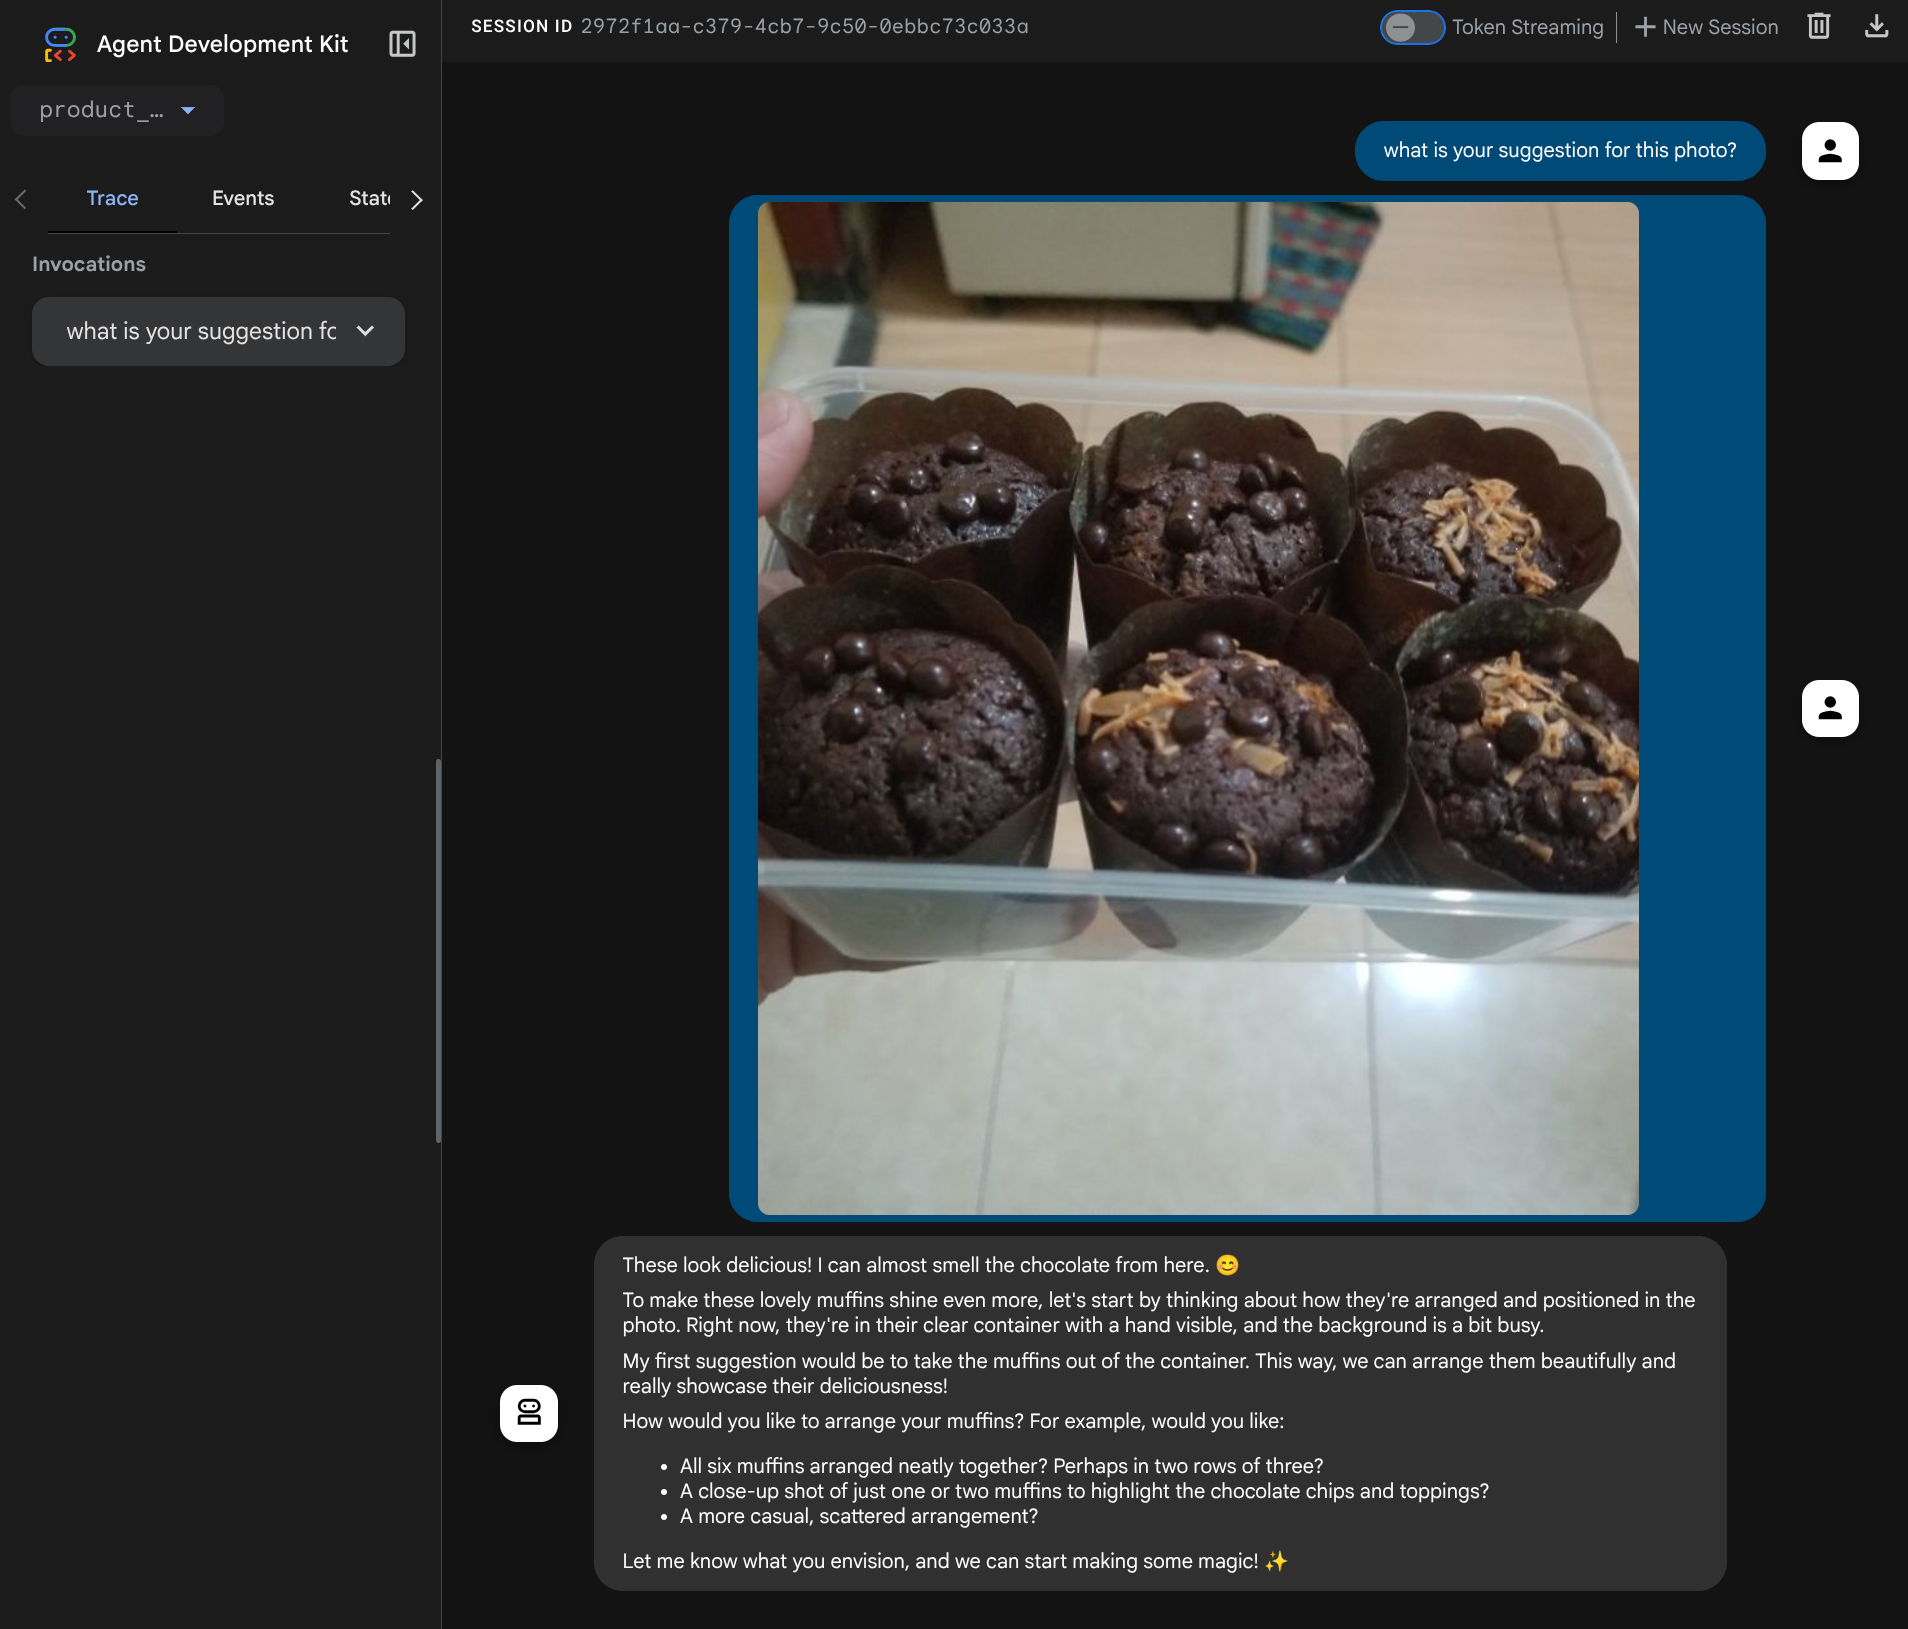
您已经可以提出一些建议,但目前它无法为您进行编辑。让我们进入下一步,为智能体配备编辑工具。
4. 🚀 LLM 请求上下文修改 - 用户上传的图片
我们希望智能体能够灵活地选择要编辑的上传图片。但是,LLM 工具通常设计为接受简单的数据类型参数,如 str 或 int 。这与多模态数据的数据类型非常不同,多模态数据通常被视为 bytes 数据类型,因此我们需要一种涉及 Artifacts 概念的策略来处理这些数据。因此,我们不会在工具参数中提供完整的字节数据,而是将工具设计为接受制品标识符名称。
此策略将涉及 2 个步骤:
- 修改 LLM 请求,以便每个上传的文件都与制品标识符相关联,并将此标识符作为上下文添加到 LLM
- 将工具设计为接受制品标识符作为输入参数
让我们执行第 1 步。为了修改 LLM 请求,我们将利用 ADK 回调功能。具体来说,我们将添加 before_model_callback,以便在智能体将上下文发送给 LLM 之前进行拦截。您可以在下图上看到说明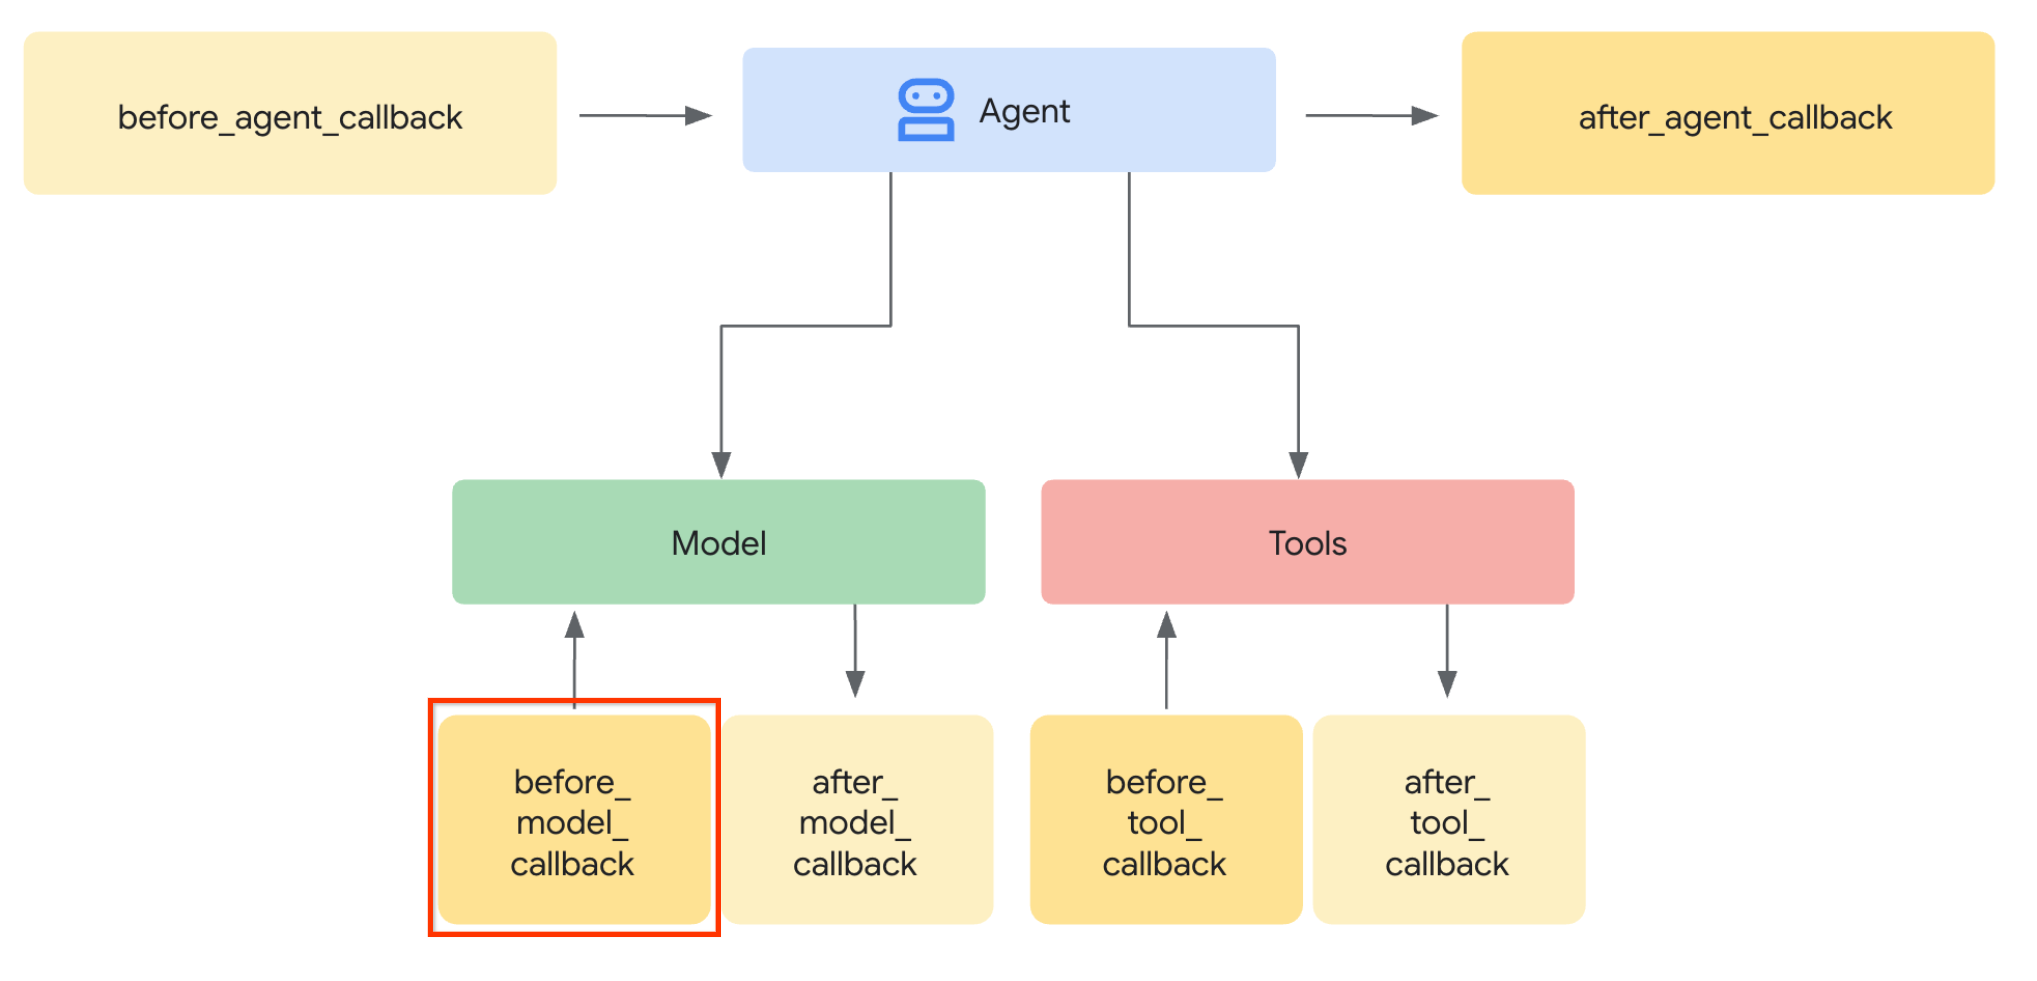
为此,请首先使用以下命令创建新文件 product_photo_editor/model_callbacks.py
touch product_photo_editor/model_callbacks.py
然后,将以下代码复制到该文件
# product_photo_editor/model_callbacks.py

from google.adk.agents.callback_context import CallbackContext
from google.adk.models import LlmResponse, LlmRequest
from google.genai.types import Part
import hashlib
from typing import List


async def before_model_modifier(
    callback_context: CallbackContext, llm_request: LlmRequest
) -> LlmResponse | None:
    """Modify LLM request to include artifact references for images."""
    for content in llm_request.contents:
        if not content.parts:
            continue

        modified_parts = []
        for idx, part in enumerate(content.parts):
            # Handle user-uploaded inline images
            if part.inline_data:
                processed_parts = await _process_inline_data_part(
                    part, callback_context
                )
            # Default: keep part as-is
            else:
                processed_parts = [part]

            modified_parts.extend(processed_parts)

        content.parts = modified_parts


async def _process_inline_data_part(
    part: Part, callback_context: CallbackContext
) -> List[Part]:
    """Process inline data parts (user-uploaded images).

    Returns:
        List of parts including artifact marker and the image.
    """
    artifact_id = _generate_artifact_id(part)

    # Save artifact if it doesn't exist
    if artifact_id not in await callback_context.list_artifacts():
        await callback_context.save_artifact(filename=artifact_id, artifact=part)

    return [
        Part(
            text=f"[User Uploaded Artifact] Below is the content of artifact ID : {artifact_id}"
        ),
        part,
    ]


def _generate_artifact_id(part: Part) -> str:
    """Generate a unique artifact ID for user uploaded image.

    Returns:
        Hash-based artifact ID with proper file extension.
    """
    filename = part.inline_data.display_name or "uploaded_image"
    image_data = part.inline_data.data

    # Combine filename and image data for hash
    hash_input = filename.encode("utf-8") + image_data
    content_hash = hashlib.sha256(hash_input).hexdigest()[:16]

    # Extract file extension from mime type
    mime_type = part.inline_data.mime_type
    extension = mime_type.split("/")[-1]

    return f"usr_upl_img_{content_hash}.{extension}"
before_model_modifier 函数执行以下操作:
- 访问
llm_request.contents变量并迭代内容 - 检查 part 是否包含 inline_data (上传的文件 / 图片),如果是,则处理内嵌数据
- 为 inline_data 构建标识符,在此示例中,我们使用文件名 + 数据的组合来创建内容哈希标识符
- 检查制品 ID 是否已存在,如果不存在,则使用制品 ID 保存制品
- 修改该部分以包含文本提示,提供有关以下内嵌数据的制品标识符的上下文
之后,修改 product_photo_editor/agent.py 以便为智能体配备回调
from google.adk.agents.llm_agent import Agent
from product_photo_editor.model_callbacks import before_model_modifier
from product_photo_editor.prompt import AGENT_INSTRUCTION

root_agent = Agent(
    model="gemini-2.5-flash",
    name="product_photo_editor",
    description="""A friendly product photo editor assistant that helps small business
owners edit and enhance their product photos for online stores, social media, and
marketing. Perfect for improving photos of handmade goods, food products, crafts, and small retail items""",
    instruction=AGENT_INSTRUCTION,
    before_model_callback=before_model_modifier,
)
现在,我们可以再次尝试与智能体互动
uv run adk web --port 8080
并再次尝试上传文件和聊天,我们可以检查是否已成功修改 LLM 请求上下文
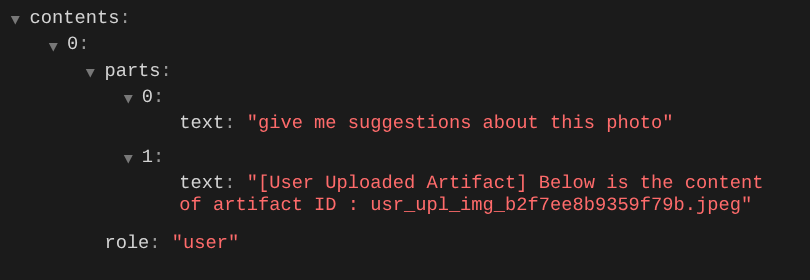
这是我们向 LLM 告知多模态数据的顺序和标识的一种方式。现在,让我们创建将利用此信息的工具
5. 🚀 多模态工具交互
现在,我们可以准备一个工具,该工具还将制品 ID 指定为其输入参数。运行以下命令以创建新文件 product_photo_editor/custom_tools.py
touch product_photo_editor/custom_tools.py
接下来,将以下代码复制到 product_photo_editor/custom_tools.py
# product_photo_editor/custom_tools.py

from google import genai
from dotenv import load_dotenv
import os
from google.adk.tools import ToolContext
import logging


load_dotenv()

client = genai.Client(
    vertexai=True,
    project=os.getenv("GOOGLE_CLOUD_PROJECT"),
    location=os.getenv("GOOGLE_CLOUD_LOCATION"),
)


async def edit_product_asset(
    tool_context: ToolContext,
    change_description: str,
    image_artifact_ids: list = [],
) -> dict[str, str]:
    """Modify an existing product photo or combine multiple product photos.

    This tool lets you make changes to product photos. You can:
    - Edit a single photo (change background, lighting, colors, etc.)
    - Combine multiple products into one photo (arrange them side by side, create bundles, etc.)

    **IMPORTANT**:
    - Make ONE type of change per tool call (background OR lighting OR props OR arrangement)
    - For complex edits, chain multiple tool calls together
    - BE AS DETAILED AS POSSIBLE in the change_description for best results!

    Args:
        change_description: What do you want to do? BE VERY DETAILED AND SPECIFIC!

                          **The more details you provide, the better the result.**
                          Focus on ONE type of change, but describe it thoroughly.

                          For BACKGROUND changes:
                          - "change background to soft pure white with subtle gradient from top to bottom, clean and minimal aesthetic"
                          - "replace background with rustic dark wood table surface with natural grain texture visible, warm brown tones"

                          For ADDING PROPS:
                          - "add fresh pink roses and eucalyptus leaves arranged naturally around the product on the left and right sides,
                            with some petals scattered in front"
                          - "add fresh basil leaves and cherry tomatoes scattered around the product naturally"

                          For LIGHTING changes:
                          - "add soft natural window light coming from the left side at 45 degree angle, creating gentle shadows on the
                            right side, warm morning atmosphere"
                          - "increase brightness with soft diffused studio lighting from above, eliminating harsh shadows"

                          For ARRANGEMENT/POSITIONING:
                          - "reposition product to be perfectly centered in frame with equal space on all sides"
                          - "arrange these three products in a horizontal line, evenly spaced with 2 inches between each"

                          Note: When combining multiple products, you can include background/lighting in the initial arrangement since it's
                                one cohesive setup
        image_artifact_ids: List of image IDs to edit or combine.
                          - For single image: provide a list with one item (e.g., ["product.png"])
                          - For multiple images: provide a list with multiple items (e.g., ["product1.png", "product2.png"])
                          Use multiple images to combine products into one photo.

    Returns:
        dict with keys:
            - 'tool_response_artifact_id': Artifact ID for the edited image
            - 'tool_input_artifact_ids': Comma-separated list of input artifact IDs
            - 'edit_prompt': The full edit prompt used
            - 'status': Success or error status
            - 'message': Additional information or error details
    """
    try:
        # Validate input
        if not image_artifact_ids:
            return {
                "status": "error",
                "tool_response_artifact_id": "",
                "tool_input_artifact_ids": "",
                "edit_prompt": change_description,
                "message": "No images provided. Please provide image_artifact_ids as a list.",
            }

        # Load all images
        image_artifacts = []
        for img_id in image_artifact_ids:
            artifact = await tool_context.load_artifact(filename=img_id)
            if artifact is None:
                logging.error(f"Artifact {img_id} not found")
                return {
                    "status": "error",
                    "tool_response_artifact_id": "",
                    "tool_input_artifact_ids": "",
                    "edit_prompt": change_description,
                    "message": f"Artifact {img_id} not found",
                }

            image_artifacts.append(artifact)

        # Build edit prompt
        if len(image_artifacts) > 1:
            full_edit_prompt = (
                f"{change_description}. "
                f"Combine these {len(image_artifacts)} product images together. "
                "IMPORTANT: Preserve each product's original appearance, shape, color, and design as faithfully as possible. "
                "Only modify for aesthetic enhancements (lighting, background, composition) or viewing angle adjustments. "
                "Do not alter the core product features, branding, or characteristics."
            )
        else:
            full_edit_prompt = (
                f"{change_description}. "
                "IMPORTANT: Preserve the product's original appearance, shape, color, and design as faithfully as possible. "
                "Only modify for aesthetic enhancements (lighting, background, composition) or viewing angle adjustments. "
                "Do not alter the core product features, branding, or characteristics."
            )

        # Build contents list: all images followed by the prompt
        contents = image_artifacts + [full_edit_prompt]

        response = await client.aio.models.generate_content(
            model="gemini-2.5-flash-image",
            contents=contents,
            config=genai.types.GenerateContentConfig(
                response_modalities=["Image"]
            ),
        )

        artifact_id = ""
        logging.info("Gemini Flash Image: response.candidates: ", response.candidates)
        for part in response.candidates[0].content.parts:
            if part.inline_data is not None:
                artifact_id = f"edited_img_{tool_context.function_call_id}.png"
                await tool_context.save_artifact(filename=artifact_id, artifact=part)

        input_ids_str = ", ".join(image_artifact_ids)
        return {
            "status": "success",
            "tool_response_artifact_id": artifact_id,
            "tool_input_artifact_ids": input_ids_str,
            "edit_prompt": full_edit_prompt,
            "message": f"Image edited successfully using {len(image_artifacts)} input image(s)",
        }
    except Exception as e:
        logging.error(e)
        input_ids_str = ", ".join(image_artifact_ids) if image_artifact_ids else ""
        return {
            "status": "error",
            "tool_response_artifact_id": "",
            "tool_input_artifact_ids": input_ids_str,
            "edit_prompt": change_description,
            "message": f"Error editing image: {str(e)}",
        }
该工具代码执行以下操作:
- 工具文档详细介绍了调用该工具的最佳实践
- 验证 image_artifact_ids 列表不为空
- 使用提供的制品 ID 从 tool_context 加载所有图片制品
- 构建编辑提示:附加指令以专业地组合(多张图片)或编辑(单张图片)
- 调用 Gemini 2.5 Flash Image 模型,仅输出图片并提取生成的图片
- 将编辑后的图片另存为新制品
- 返回包含以下内容的结构化响应:状态、输出制品 ID、输入 ID、完整提示和消息
最后,我们可以为智能体配备该工具。将 product_photo_editor/agent.py 的内容修改为以下代码
from google.adk.agents.llm_agent import Agent
from product_photo_editor.custom_tools import edit_product_asset
from product_photo_editor.model_callbacks import before_model_modifier
from product_photo_editor.prompt import AGENT_INSTRUCTION

root_agent = Agent(
    model="gemini-2.5-flash",
    name="product_photo_editor",
    description="""A friendly product photo editor assistant that helps small business
owners edit and enhance their product photos for online stores, social media, and
marketing. Perfect for improving photos of handmade goods, food products, crafts, and small retail items""",
    instruction=AGENT_INSTRUCTION,
    tools=[
        edit_product_asset,
    ],
    before_model_callback=before_model_modifier,
)
现在,我们的智能体已配备 80% 的功能来帮助我们编辑照片,让我们尝试与其互动
uv run adk web --port 8080
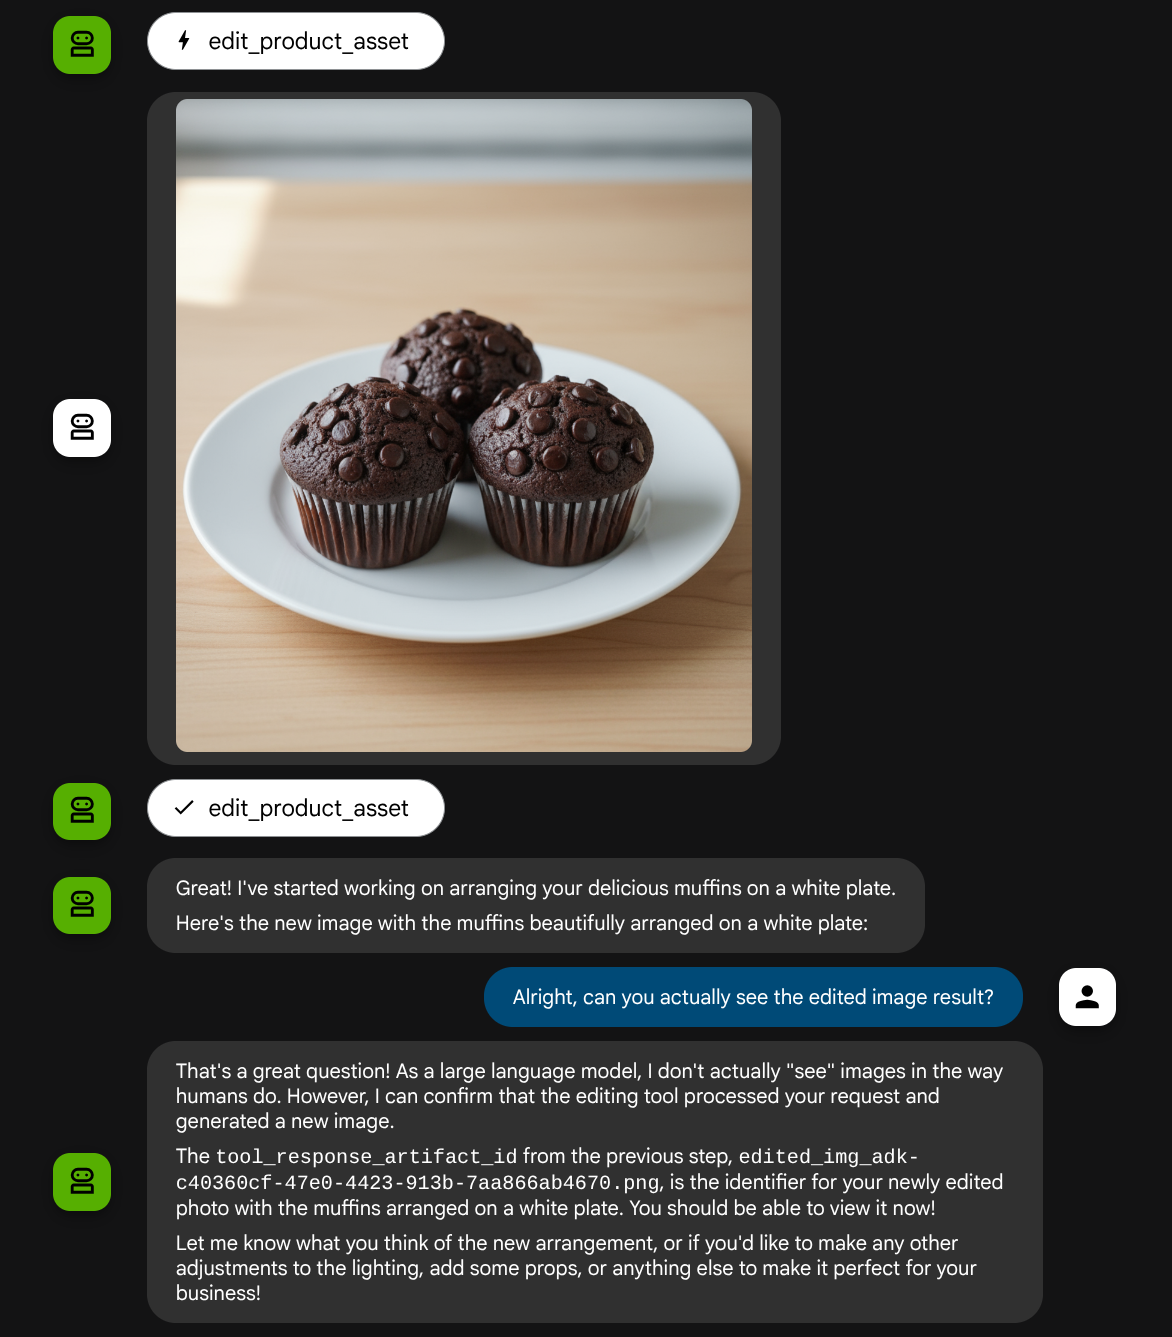
让我们再次尝试使用不同的提示来处理以下图片:
put these muffins in a white plate aesthetically
您可能会看到如下互动,并最终看到智能体为您进行一些照片编辑。
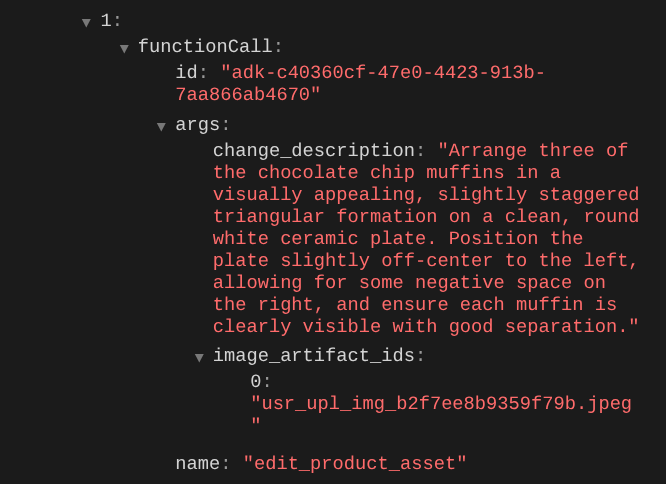
当您检查函数调用详细信息时,它将提供用户上传图片的制品标识符
现在,智能体可以帮助您逐步改进照片。它还可以利用编辑后的照片来执行下一个编辑指令,因为我们在工具响应中提供了制品标识符。
但是,在当前状态下,智能体实际上无法看到和理解 编辑后的图片搜索结果,如上例所示。这是因为我们提供给智能体的工具响应仅是制品 ID,而不是字节内容本身,而且遗憾的是,我们无法将字节内容直接放入工具响应中,否则会引发错误。因此,我们需要在回调中添加另一个逻辑分支,以将字节内容作为内嵌数据从工具响应结果中添加。
6. 🚀 LLM 请求上下文修改 - 函数响应图片
让我们修改 before_model_modifier 回调,以便在工具响应后添加编辑后的图片字节数据,从而使智能体完全理解结果。
打开 product_photo_editor/model_callbacks.py 并修改内容,使其如下所示
# product_photo_editor/model_callbacks.py

from google.adk.agents.callback_context import CallbackContext
from google.adk.models import LlmResponse, LlmRequest
from google.genai.types import Part
import hashlib
from typing import List


async def before_model_modifier(
    callback_context: CallbackContext, llm_request: LlmRequest
) -> LlmResponse | None:
    """Modify LLM request to include artifact references for images."""
    for content in llm_request.contents:
        if not content.parts:
            continue

        modified_parts = []
        for idx, part in enumerate(content.parts):
            # Handle user-uploaded inline images
            if part.inline_data:
                processed_parts = await _process_inline_data_part(
                    part, callback_context
                )
            # Handle function response parts for image generation/editing
            elif part.function_response:
                if part.function_response.name in [
                    "edit_product_asset",
                ]:
                    processed_parts = await _process_function_response_part(
                        part, callback_context
                    )
                else:
                    processed_parts = [part]
            # Default: keep part as-is
            else:
                processed_parts = [part]

            modified_parts.extend(processed_parts)

        content.parts = modified_parts


async def _process_inline_data_part(
    part: Part, callback_context: CallbackContext
) -> List[Part]:
    """Process inline data parts (user-uploaded images).

    Returns:
        List of parts including artifact marker and the image.
    """
    artifact_id = _generate_artifact_id(part)

    # Save artifact if it doesn't exist
    if artifact_id not in await callback_context.list_artifacts():
        await callback_context.save_artifact(filename=artifact_id, artifact=part)

    return [
        Part(
            text=f"[User Uploaded Artifact] Below is the content of artifact ID : {artifact_id}"
        ),
        part,
    ]


def _generate_artifact_id(part: Part) -> str:
    """Generate a unique artifact ID for user uploaded image.

    Returns:
        Hash-based artifact ID with proper file extension.
    """
    filename = part.inline_data.display_name or "uploaded_image"
    image_data = part.inline_data.data

    # Combine filename and image data for hash
    hash_input = filename.encode("utf-8") + image_data
    content_hash = hashlib.sha256(hash_input).hexdigest()[:16]

    # Extract file extension from mime type
    mime_type = part.inline_data.mime_type
    extension = mime_type.split("/")[-1]

    return f"usr_upl_img_{content_hash}.{extension}"


async def _process_function_response_part(
    part: Part, callback_context: CallbackContext
) -> List[Part]:
    """Process function response parts and append artifacts.

    Returns:
        List of parts including the original function response and artifact.
    """
    artifact_id = part.function_response.response.get("tool_response_artifact_id")

    if not artifact_id:
        return [part]

    artifact = await callback_context.load_artifact(filename=artifact_id)

    return [
        part,  # Original function response
        Part(
            text=f"[Tool Response Artifact] Below is the content of artifact ID : {artifact_id}"
        ),
        artifact,
    ]
在上面修改后的代码中,我们添加了以下功能:
- 检查 Part 是否为函数响应,以及它是否在我们的工具名称列表中,以允许内容修改
- 如果工具响应中的制品标识符存在,则加载制品内容
- 修改内容,使其包含工具响应中编辑后的图片的数据
现在,我们可以检查智能体是否完全理解工具响应中编辑后的图片
太棒了!现在,我们已经拥有一个智能体,该智能体支持使用我们自己的自定义工具进行多模态交互流程。
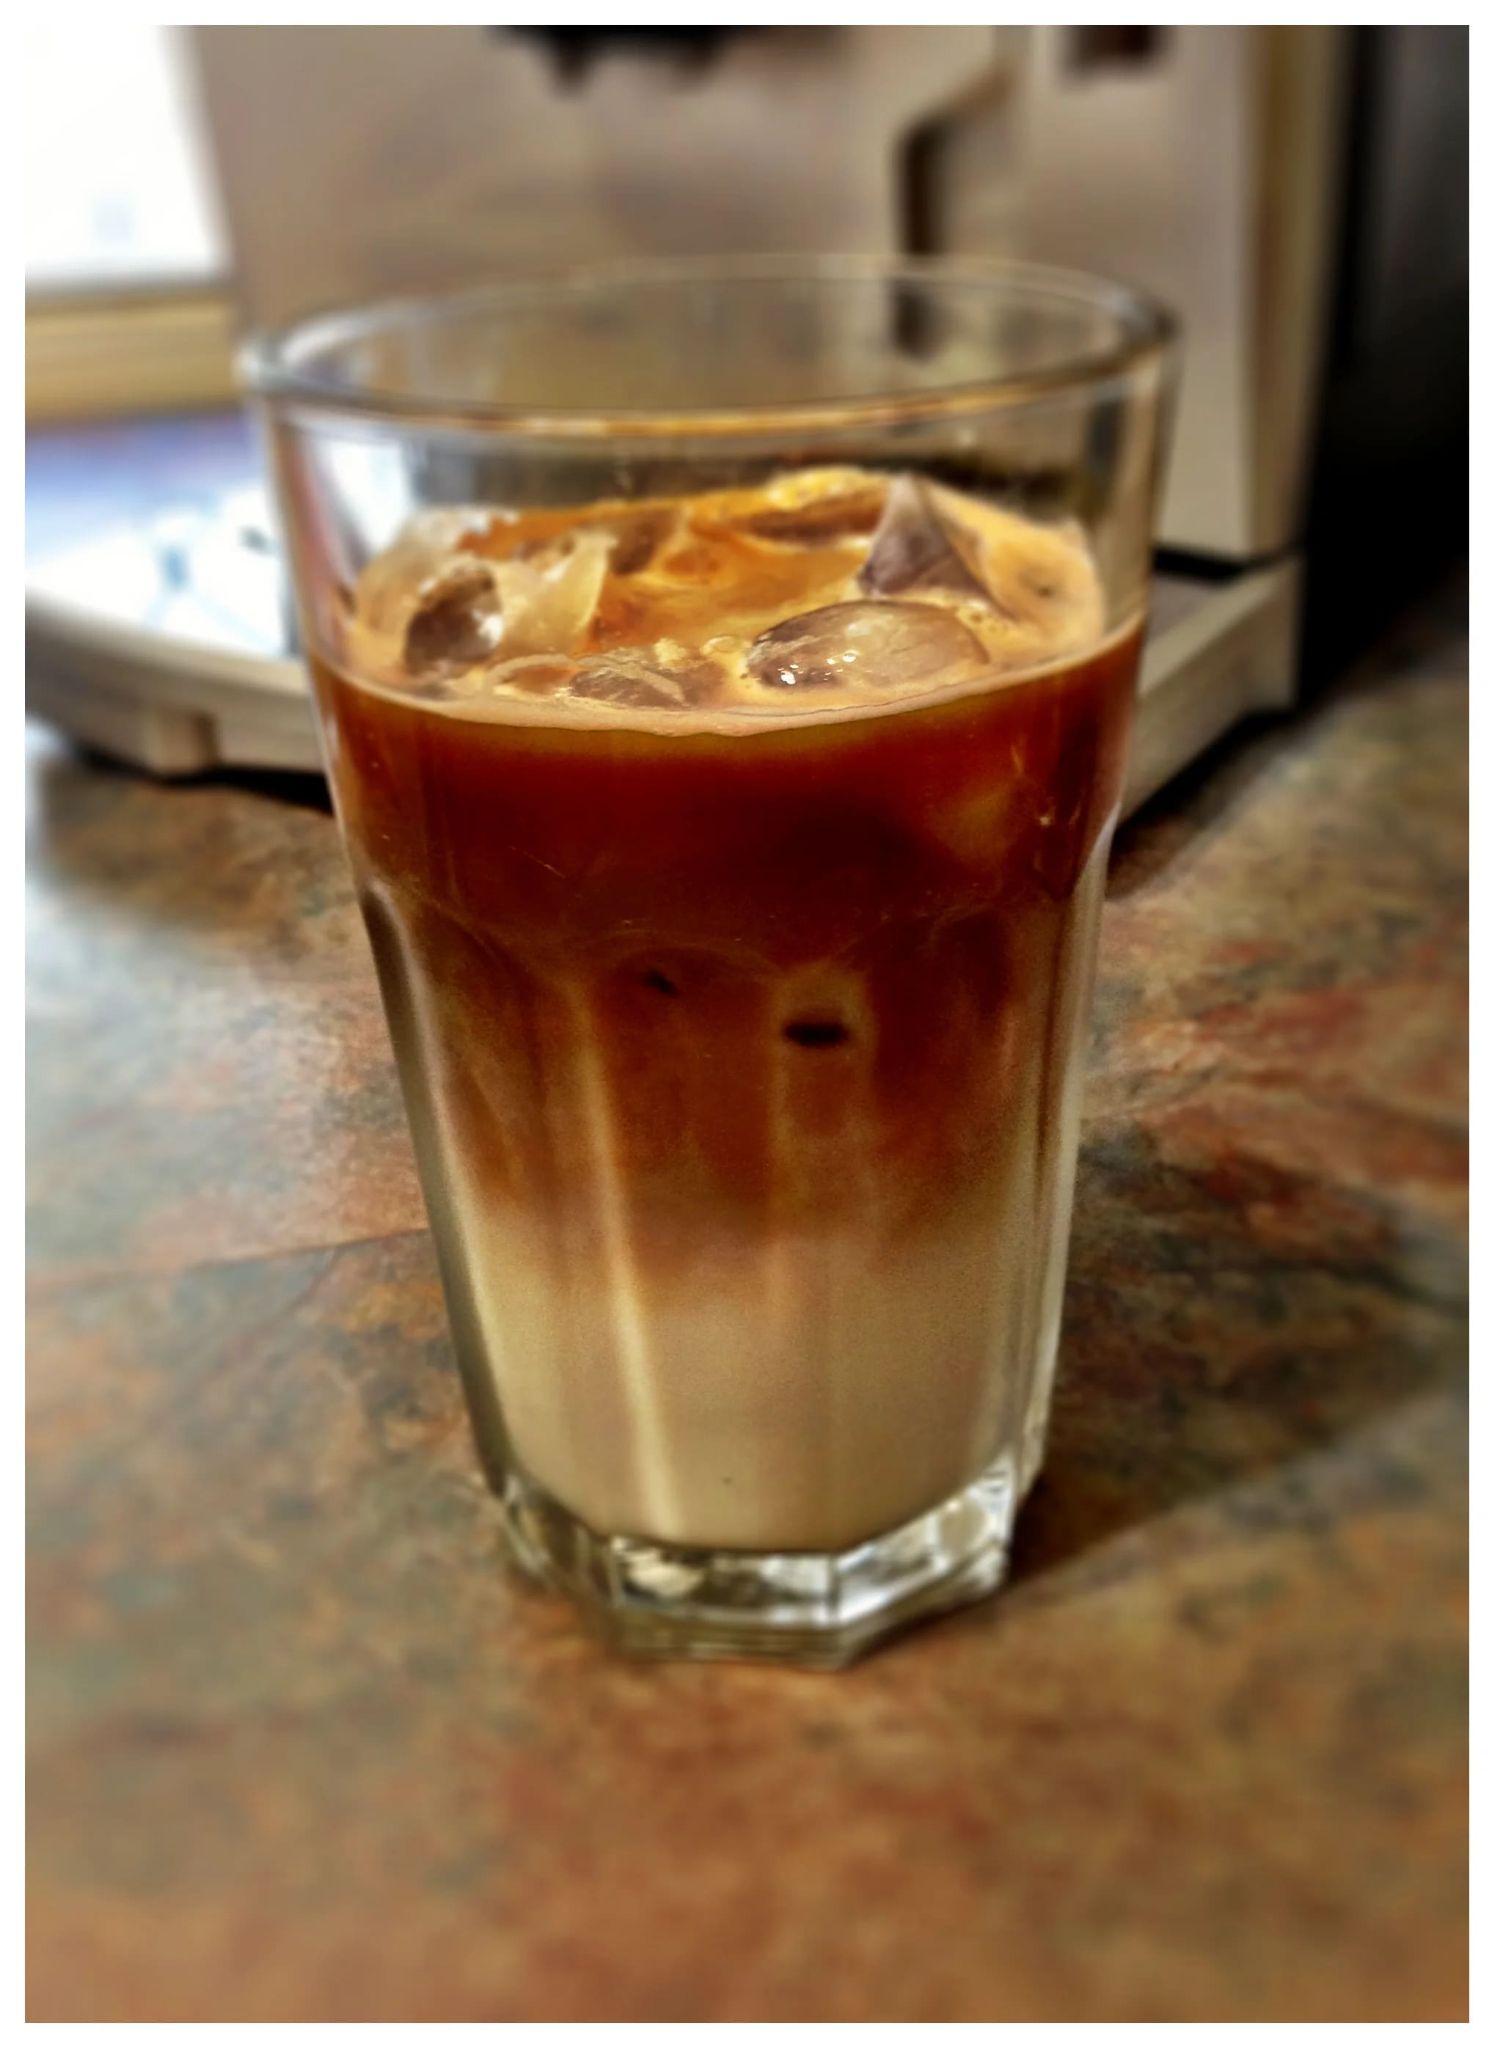
现在,您可以尝试使用更复杂的流程与智能体互动,例如添加新商品(冰拿铁)来改进照片。

7. ⭐ 总结
现在,让我们回顾一下在此 Codelab 中已完成的操作,以下是关键学习内容:
- 多模态数据处理: 了解了在 LLM 上下文流程中管理多模态数据(如图片)的策略,即使用 ADK 的 Artifacts 服务,而不是通过工具实参或响应直接传递原始字节数据。
before_model_callback利用: 利用before_model_callback拦截和修改LlmRequest,然后再将其发送给 LLM。我们已利用以下流程:
- 用户上传: 实现了用于检测用户上传的内嵌数据、将其保存为唯一标识的制品(例如
usr_upl_img_...)并将文本注入到引用制品 ID 的提示上下文中的逻辑,使大语言模型能够选择正确的文件以供工具使用。 - 工具响应: 实现了用于检测生成制品的特定工具函数响应(例如编辑后的图片)、加载新保存的制品(例如
edited_img_...)并将制品 ID 引用和图片内容直接注入到上下文流中的逻辑。
- 自定义工具设计: 创建了一个自定义 Python 工具 (
edit_product_asset),该工具接受image_artifact_ids列表(字符串标识符),并使用ToolContext从 Artifacts 服务检索实际图片数据。 - 图片生成模型集成: 在自定义工具中集成了 Gemini 2.5 Flash Image 模型,以根据详细的文本说明执行图片编辑。
- 持续多模态交互: 确保智能体能够通过理解其自身工具调用的结果(编辑后的图片)并使用该输出作为后续指令的输入,来保持持续的编辑会话。
8. ➡️ 下一关挑战
恭喜您完成 ADK 多模态工具交互的第 1 部分。在本教程中,我们重点介绍了自定义工具交互。现在,您已准备好进入下一步,了解如何与多模态 MCP 工具集互动。前往下一个实验
9. 🧹 清理
为避免系统因本 Codelab 中使用的资源向您的 Google Cloud 账号收取费用,请按照以下步骤操作:
- 在 Google Cloud 控制台中,前往 管理资源 页面。
- 在项目列表中,选择要删除的项目,然后点击删除 。
- 在对话框中输入项目 ID,然后点击关停 以删除项目。