
۱. 📖 مقدمه
در آزمایشگاه کد قبلی، شما در مورد نحوه طراحی یک تعامل داده چندوجهی در ADK یاد گرفتید. اکنون ما یک گام فراتر در مورد نحوه طراحی یک تعامل داده چندوجهی با MCP Server با استفاده از MCP Toolset برمیداریم. ما قابلیتهای عامل ویرایشگر عکس محصول که قبلاً توسعه داده شده است را با قابلیتهایی برای تولید ویدیوهای کوتاه با استفاده از مدل Veo با استفاده از Veo MCP Server گسترش خواهیم داد.
Through the codelab, you will employ a step by step approach as follows:
- Prepare Google Cloud project and base agent directory
- Configure a MCP Server which require file data as input
- Equipping the ADK agent to connect with the MCP Server
- Design a prompt strategy and callback function to modify function call request to MCP Toolset
- Design a callback function to handle multimodal data response from MCP Toolset
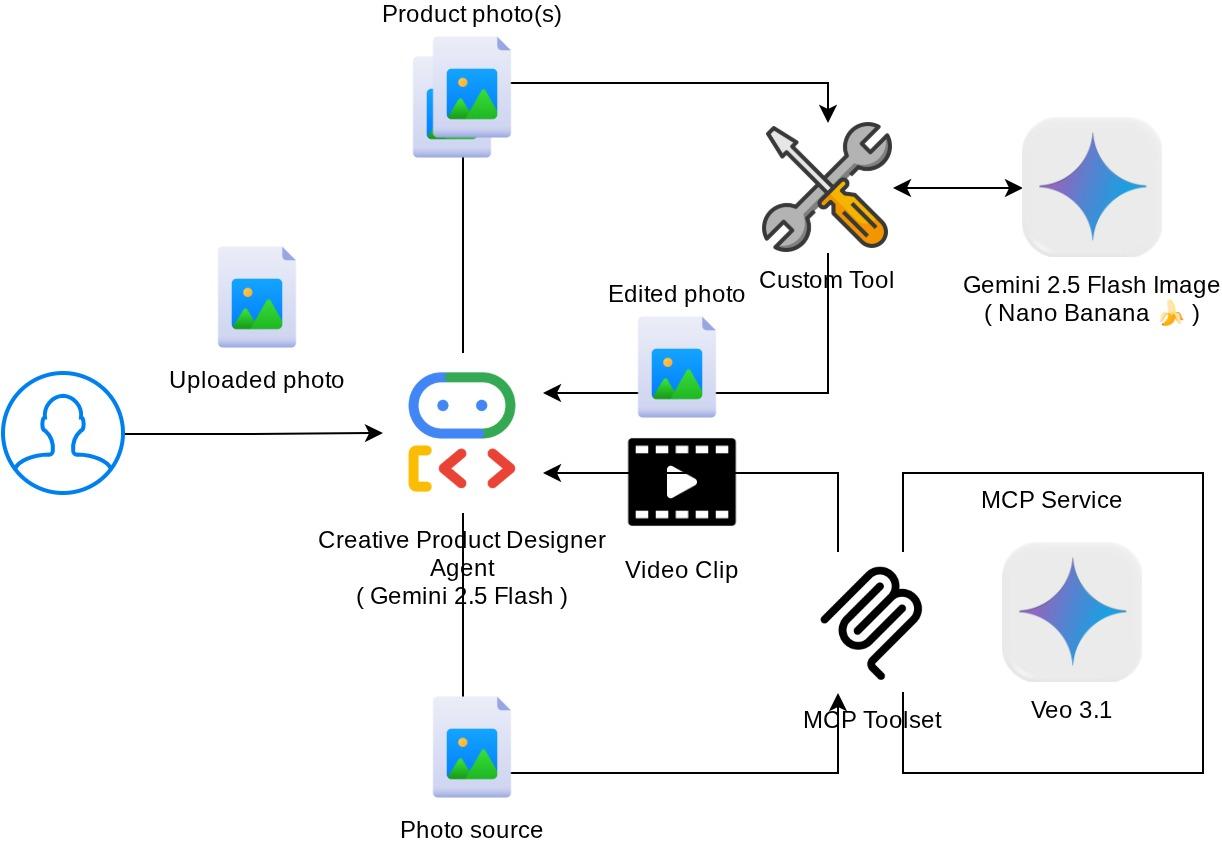
نمای کلی معماری
The overall interaction in this codelab is shown in the following diagram
پیشنیازها
- کار راحت با پایتون
- (Optional) Foundational codelabs about Agent Development Kit (ADK)
- (Optional) ADK Multimodal Tool Part 1 codelab : goo.gle/adk-multimodal-tool-1
آنچه یاد خواهید گرفت
- How to create short video using Veo 3.1 with prompt and image starter
- How to develop Multimodal MCP Server using FastMCP
- نحوه تنظیم ADK برای استفاده از مجموعه ابزارهای MCP
- How to modify tool call to MCP Toolset via tool callback
- How to modify tool response from MCP Toolset via tool callback
آنچه نیاز دارید
- مرورگر وب کروم
- یک حساب جیمیل
- یک پروژه ابری با حساب صورتحساب فعال
این آزمایشگاه کد که برای توسعهدهندگان در تمام سطوح (از جمله مبتدیان) طراحی شده است، در برنامه نمونه خود از پایتون استفاده میکند. با این حال، برای درک مفاهیم ارائه شده، دانش پایتون لازم نیست.
2. 🚀 ( Optional ) Preparing Workshop Development Setup
Step 1: Select Active Project in the Cloud Console
In the Google Cloud Console , on the project selector page, select or create a Google Cloud project (see top left section of your console)

Click on it, and you will see list of all of your project like this example,
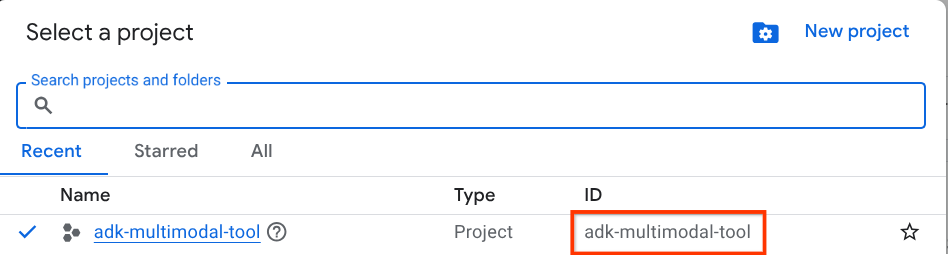
The value that is indicated by the red box is the PROJECT ID and this value will be used throughout the tutorial.
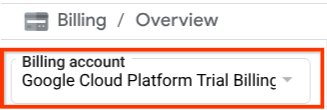
Make sure that billing is enabled for your Cloud project. To check this, click on the burger icon ☰ on your top left bar which shows the Navigation Menu and find the Billing menu

اگر عبارت «حساب پرداخت آزمایشی پلتفرم ابری گوگل» را زیر عنوان «پرداخت / بررسی اجمالی » ( قسمت بالا سمت چپ کنسول ابری خود ) مشاهده کردید، پروژه شما آماده استفاده برای این آموزش است. در غیر این صورت، به ابتدای این آموزش برگردید و حساب پرداخت آزمایشی را فعال کنید.
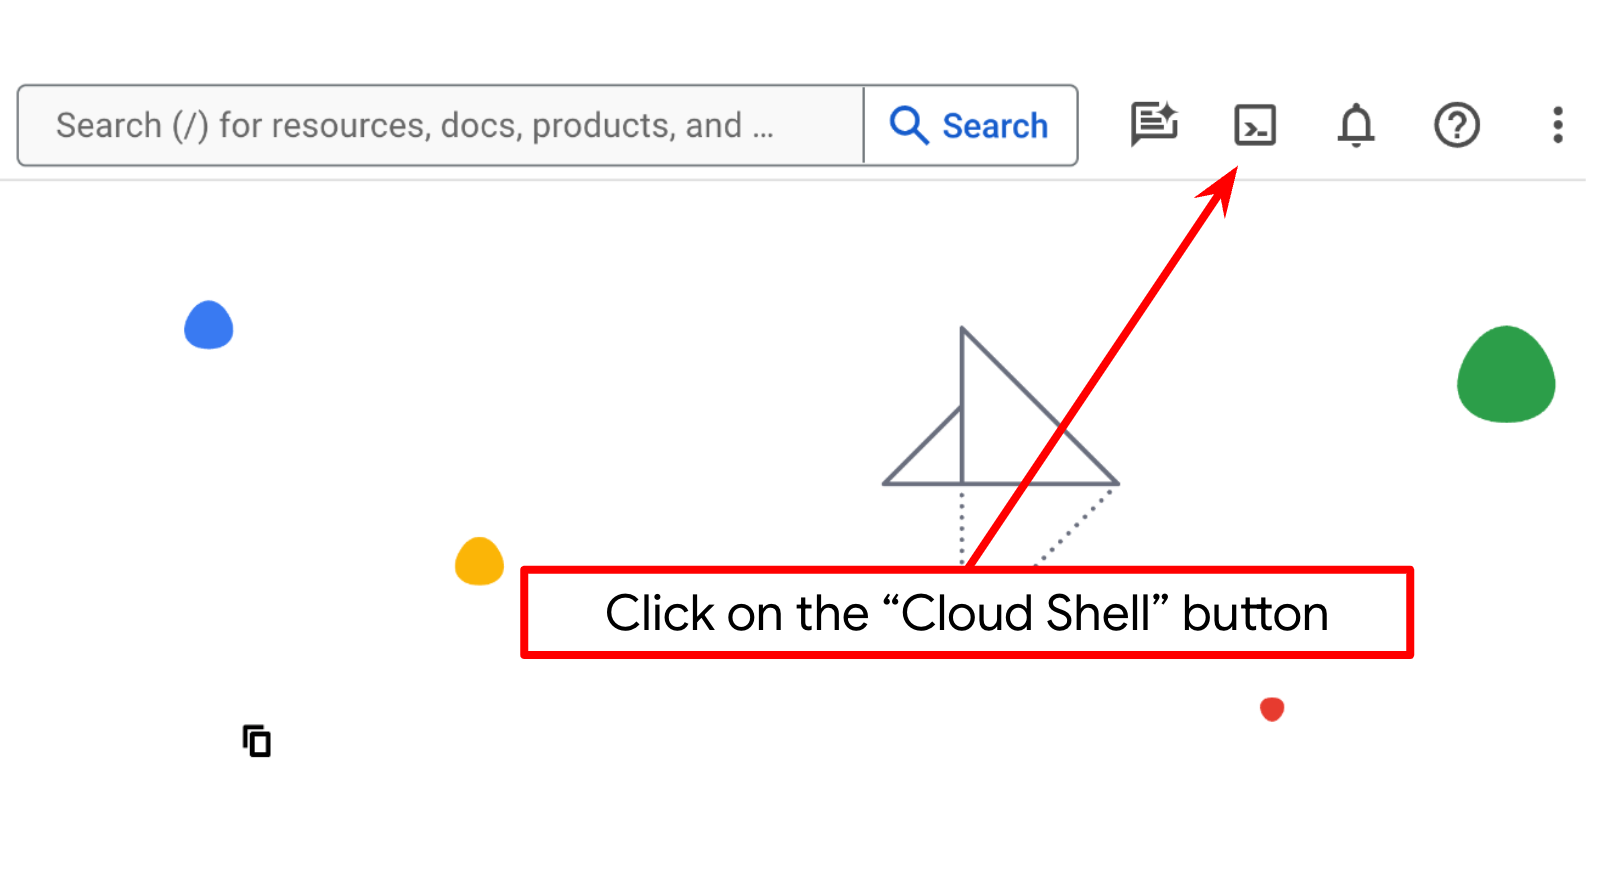
مرحله ۲: آشنایی با Cloud Shell
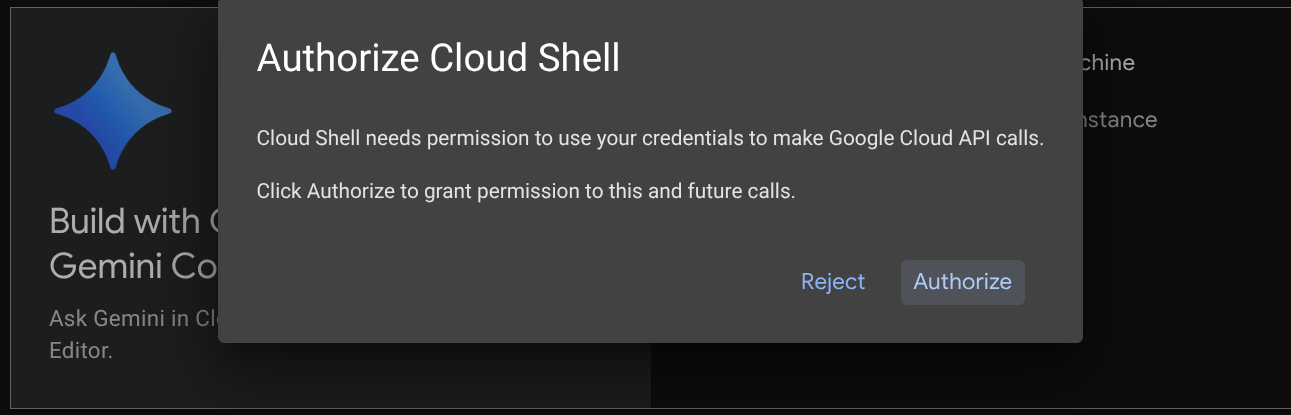
You'll use Cloud Shell for most part of the tutorials, Click Activate Cloud Shell at the top of the Google Cloud console. If it prompts you to authorize, click Authorize
Once connected to Cloud Shell, we will need to check whether the shell ( or terminal ) is already authenticated with our account
gcloud auth list
If you see your personal gmail like below example output, all is good
Credentialed Accounts

ACTIVE: *
ACCOUNT: alvinprayuda@gmail.com

To set the active account, run:
    $ gcloud config set account `ACCOUNT`
If not, try refreshing your browser and ensure you click the Authorize when prompted ( it might be interrupted due to connection issue )
در مرحله بعد، باید بررسی کنیم که آیا پوسته از قبل با شناسه پروژه صحیحی که دارید پیکربندی شده است یا خیر، اگر مقداری را داخل () قبل از نماد $ در ترمینال مشاهده کردید (در تصویر زیر، مقدار "adk-multimodal-tool" است)، این مقدار پروژه پیکربندی شده برای جلسه پوسته فعال شما را نشان میدهد.

If the shown value is already correct , you can skip the next command . However if it's not correct or missing, run the following command
gcloud config set project <YOUR_PROJECT_ID>
Then, clone the template working directory for this codelab from Github, run the following command. It will create the working directory in the adk-multimodal-tool directory
git clone https://github.com/alphinside/adk-mcp-multimodal.git adk-multimodal-tool
Step 3: Familiarize with Cloud Shell Editor and Setup Application Working Directory
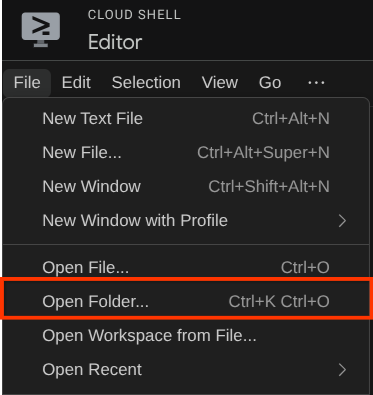
Now, we can set up our code editor to do some coding stuff. We will use the Cloud Shell Editor for this
Click on the Open Editor button, this will open a Cloud Shell Editor 
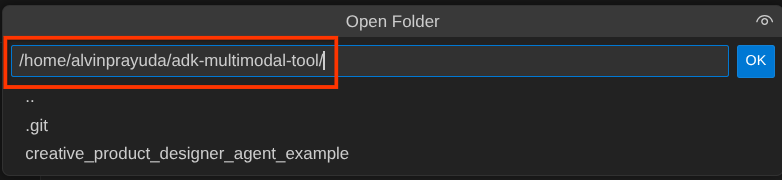
پس از آن، به بخش بالای ویرایشگر Cloud Shell بروید و روی File->Open Folder کلیک کنید، پوشه نام کاربری خود را پیدا کنید و پوشه adk-multimodal-tool را پیدا کنید و سپس روی دکمه OK کلیک کنید. این کار پوشه انتخاب شده را به عنوان پوشه اصلی کار تبدیل میکند. در این مثال، نام کاربری alvinprayuda است، از این رو مسیر پوشه در زیر نشان داده شده است.
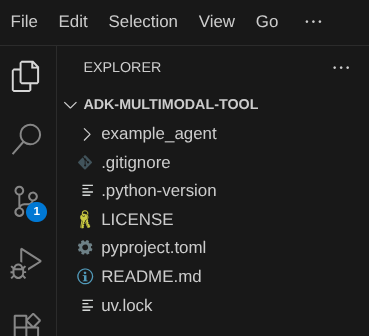
Now, your Cloud Shell Editor working directory should look like this ( inside adk-multimodal-tool )
حالا، ترمینال ویرایشگر را باز کنید. میتوانید این کار را با کلیک روی ترمینال -> ترمینال جدید در نوار منو انجام دهید، یا از Ctrl + Shift + C استفاده کنید، این کار یک پنجره ترمینال در قسمت پایین مرورگر باز میکند.

ترمینال فعال فعلی شما باید در دایرکتوری کاری adk-multimodal-tool باشد. ما در این آزمایشگاه کد از پایتون ۳.۱۲ استفاده خواهیم کرد و از uv python project manager برای سادهسازی نیاز به ایجاد و مدیریت نسخه پایتون و محیط مجازی استفاده خواهیم کرد. این بسته uv از قبل روی Cloud Shell نصب شده است.
Run this command to install the required dependencies to the virtual environment on the .venv directory
uv sync --frozen
Check the pyproject.toml to see the declared dependencies for this tutorial which are google-adk, and python-dotenv .
Now, we will need to enable the required APIs via the command shown below. This could take a while.
gcloud services enable aiplatform.googleapis.com
در صورت اجرای موفقیتآمیز دستور، باید پیامی مشابه آنچه در زیر نشان داده شده است را مشاهده کنید:
Operation "operations/..." finished successfully.
The template agent structure is already provided for you inside part2_starter_agent directory on the cloned repository. Now, we will need to rename it first to be ready for this tutorial
mv part1_ckpt_agent product_photo_editor
After that, copy the product_photo_editor/.env.example to product_photo_editor/.env
cp product_photo_editor/.env.example product_photo_editor/.env
When you open the product_photo_editor/.env file, you will see content like shown below
GOOGLE_GENAI_USE_VERTEXAI=1
GOOGLE_CLOUD_PROJECT=your-project-id
GOOGLE_CLOUD_LOCATION=global
Then, you will need to update the your-project-id value with the correct your own project ID. Now we are ready for the next step
۳. 🚀 مقداردهی اولیه سرور Veo MCP
ابتدا، بیایید دایرکتوری سرویس MCP را با استفاده از این دستور ایجاد کنیم.
mkdir veo_mcp
Then, create the veo_mcp/main.py by using this command
touch veo_mcp/main.py
After that copy the following code the veo_mcp/main.py
from fastmcp import FastMCP
from typing import Annotated
from pydantic import Field
import base64
import asyncio
import os
from google import genai
from google.genai import types
from dotenv import load_dotenv
import logging

# Load environment variables from .env file
load_dotenv()

mcp = FastMCP("Veo MCP Server")


@mcp.tool
async def generate_video_with_image(
    prompt: Annotated[
        str, Field(description="Text description of the video to generate")
    ],
    image_data: Annotated[
        str, Field(description="Base64-encoded image data to use as starting frame")
    ],
    negative_prompt: Annotated[
        str | None,
        Field(description="Things to avoid in the generated video"),
    ] = None,
) -> dict:
    """Generates a professional product marketing video from text prompt and starting image using Google's Veo API.

    This function uses an image as the first frame of the generated video and automatically
    enriches your prompt with professional video production quality guidelines to create
    high-quality marketing assets suitable for commercial use.

    AUTOMATIC ENHANCEMENTS APPLIED:
    - 4K cinematic quality with professional color grading
    - Smooth, stabilized camera movements
    - Professional studio lighting setup
    - Shallow depth of field for product focus
    - Commercial-grade production quality
    - Marketing-focused visual style

    PROMPT WRITING TIPS:
    Describe what you want to see in the video. Focus on:
    - Product actions/movements (e.g., "rotating slowly", "zooming into details")
    - Desired camera angles (e.g., "close-up of the product", "wide shot")
    - Background/environment (e.g., "minimalist white backdrop", "lifestyle setting")
    - Any specific details about the product presentation

    The system will automatically enhance your prompt with professional production quality.

    Args:
        prompt: Description of the video to generate. Focus on the core product presentation
                you want. The system will automatically add professional quality enhancements.
        image_data: Base64-encoded image data to use as the starting frame
        negative_prompt: Optional prompt describing what to avoid in the video

    Returns:
        dict: A dictionary containing:
            - status: 'success' or 'error'
            - message: Description of the result
            - video_data: Base64-encoded video data (on success only)
    """
    try:
        # Initialize the Gemini client
        client = genai.Client(
            vertexai=True,
            project=os.getenv("GOOGLE_CLOUD_PROJECT"),
            location=os.getenv("GOOGLE_CLOUD_LOCATION"),
        )

        # Decode the image
        image_bytes = base64.b64decode(image_data)
        print(f"Successfully decoded image data: {len(image_bytes)} bytes")

        # Create image object
        image = types.Image(image_bytes=image_bytes, mime_type="image/png")

        # Prepare the config
        config = types.GenerateVideosConfig(
            duration_seconds=8,
            number_of_videos=1,
        )

        if negative_prompt:
            config.negative_prompt = negative_prompt

        # Enrich the prompt for professional marketing quality
        enriched_prompt = enrich_prompt_for_marketing(prompt)

        # Generate the video (async operation)
        operation = client.models.generate_videos(
            model="veo-3.1-generate-preview",
            prompt=enriched_prompt,
            image=image,
            config=config,
        )

        # Poll until the operation is complete
        poll_count = 0
        while not operation.done:
            poll_count += 1
            print(f"Waiting for video generation to complete... (poll {poll_count})")
            await asyncio.sleep(5)
            operation = client.operations.get(operation)

        # Download the video and convert to base64
        video = operation.response.generated_videos[0]

        # Get video bytes and encode to base64
        video_bytes = video.video.video_bytes
        video_base64 = base64.b64encode(video_bytes).decode("utf-8")

        print(f"Video generated successfully: {len(video_bytes)} bytes")

        return {
            "status": "success",
            "message": f"Video with image generated successfully after {poll_count * 5} seconds",
            "complete_prompt": enriched_prompt,
            "video_data": video_base64,
        }
    except Exception as e:
        logging.error(e)
        return {
            "status": "error",
            "message": f"Error generating video with image: {str(e)}",
        }


def enrich_prompt_for_marketing(user_prompt: str) -> str:
    """Enriches user prompt with professional video production quality enhancements.

    Adds cinematic quality, professional lighting, smooth camera work, and marketing-focused
    elements to ensure high-quality product marketing videos.
    """
    enhancement_prefix = """Create a high-quality, professional product marketing video with the following characteristics:

TECHNICAL SPECIFICATIONS:
- 4K cinematic quality with professional color grading
- Smooth, stabilized camera movements
- Professional studio lighting setup with soft, even illumination
- Shallow depth of field for product focus
- High dynamic range (HDR) for vibrant colors

VISUAL STYLE:
- Clean, minimalist aesthetic suitable for premium brand marketing
- Elegant and sophisticated presentation
- Commercial-grade production quality
- Attention to detail in product showcase

USER'S SPECIFIC REQUIREMENTS:
"""

    enhancement_suffix = """

ADDITIONAL QUALITY GUIDELINES:
- Ensure smooth transitions and natural motion
- Maintain consistent lighting throughout
- Keep the product as the clear focal point
- Use professional camera techniques (slow pans, tracking shots, or dolly movements)
- Apply subtle motion blur for cinematic feel
- Ensure brand-appropriate tone and style"""

    return f"{enhancement_prefix}{user_prompt}{enhancement_suffix}"


if __name__ == "__main__":
    mcp.run()
کد زیر کارهای زیر را انجام میدهد:
- Creates a FastMCP server that exposes a Veo 3.1 video generation tool to ADK agents
- Accepts base64-encoded images,text prompts,and negative prompts as input
- Generates 8-second videos asynchronously by submitting requests to Veo 3.1 API and polling every 5 seconds until completion
- Returns base64-encoded video data along with the enriched prompt
This Veo MCP tool will require the same environment variable with our agent, so we can just copy paste the .env file. Run the following command to do that
cp product_photo_editor/.env veo_mcp/
اکنون میتوانیم با اجرای این دستور، عملکرد صحیح سرور MCP را بررسی کنیم.
uv run veo_mcp/main.py
و گزارش کنسول را به این شکل نشان میدهد
╭────────────────────────────────────────────────────────────────────────────╮
│                                                                            │
│        _ __ ___  _____           __  __  _____________    ____    ____     │
│       _ __ ___ .'____/___ ______/ /_/  |/  / ____/ __ \  |___ \  / __ \    │
│      _ __ ___ / /_  / __ `/ ___/ __/ /|_/ / /   / /_/ /  ___/ / / / / /    │
│     _ __ ___ / __/ / /_/ (__  ) /_/ /  / / /___/ ____/  /  __/_/ /_/ /     │
│    _ __ ___ /_/    \____/____/\__/_/  /_/\____/_/      /_____(*)____/      │
│                                                                            │
│                                                                            │
│                                FastMCP  2.0                                │
│                                                                            │
│                                                                            │
│                 🖥️  Server name:     Veo MCP Server                         │
│                 📦 Transport:       STDIO                                  │
│                                                                            │
│                 🏎️  FastMCP version: 2.12.5                                 │
│                 🤝 MCP SDK version: 1.16.0                                 │
│                                                                            │
│                 📚 Docs:            https://gofastmcp.com                  │
│                 🚀 Deploy:          https://fastmcp.cloud                  │
│                                                                            │
╰────────────────────────────────────────────────────────────────────────────╯


[10/22/25 08:28:53] INFO     Starting MCP server 'Veo MCP Server' with          server.py:1502
                             transport 'stdio'
Now kill the MCP service process using CTRL+C. This command will be invoked from ADK MCP Toolset later on. We can move to the next step to allow our agent utilize this MCP tools
۴. 🚀 سرور Veo MCP را به ADK Agent متصل کنید
Now, let's connect the Veo MCP server so that it can be utilized by our agent. First, let's create a different script to contain the toolset, run the following command
touch product_photo_editor/mcp_tools.py
Then, copy the following code to the product_photo_editor/mcp_tools.py
from google.adk.tools.mcp_tool.mcp_toolset import MCPToolset
from google.adk.tools.mcp_tool.mcp_session_manager import StdioConnectionParams
from mcp import StdioServerParameters


mcp_toolset = MCPToolset(
    connection_params=StdioConnectionParams(
        server_params=StdioServerParameters(
            command="uv",
            args=[
                "run",
                "veo_mcp/main.py",
            ],
        ),
        timeout=120, # seconds
    ),
)

# Option to connect to remote MCP server

# from google.adk.tools.mcp_tool.mcp_session_manager import StreamableHTTPConnectionParams

# mcp_toolset = MCPToolset(
#     connection_params=StreamableHTTPConnectionParams(
#         url="http://localhost:8000/mcp",
#         timeout=120,
#     ),
# )
کد بالا نشان میدهد که چگونه میتوانیم با استفاده از ADK MCPToolset به یک سرور MCP متصل شویم. در این مثال ما با استفاده از کانال ارتباطی STDIO به سرور MCP متصل میشویم. در دستور مشخص میکنیم که چگونه میتوانیم سرور MCP را اجرا کنیم و پارامتر timeout را تنظیم میکنیم.
۵. 🚀 اصلاح پارامتر فراخوانی ابزار
در اعلان ابزار سرور MCP، ما ابزار generate_video_with_image را طراحی کردیم که رشته base64 را به عنوان پارامترهای ابزار مشخص میکند. ما نمیتوانیم از LLM بخواهیم که این کار را برای ما انجام دهد، از این رو باید یک استراتژی خاص برای مدیریت این موضوع طراحی کنیم.
در تمرین قبلی، تصویر پاسخ آپلود شده توسط کاربر و ابزار را در before_model_callback مدیریت کردیم تا به عنوان یک مصنوع ذخیره شود، که در الگوی عامل که قبلاً آماده شده است نیز منعکس شده است. ما از این استفاده خواهیم کرد و استراتژیهای زیر را انجام خواهیم داد:
- به LLM دستور دهید که اگر پارامتر ابزار خاصی نیاز به ارسال دادههای رشتهای base64 دارد، همیشه مقدار artifact_id را ارسال کند.
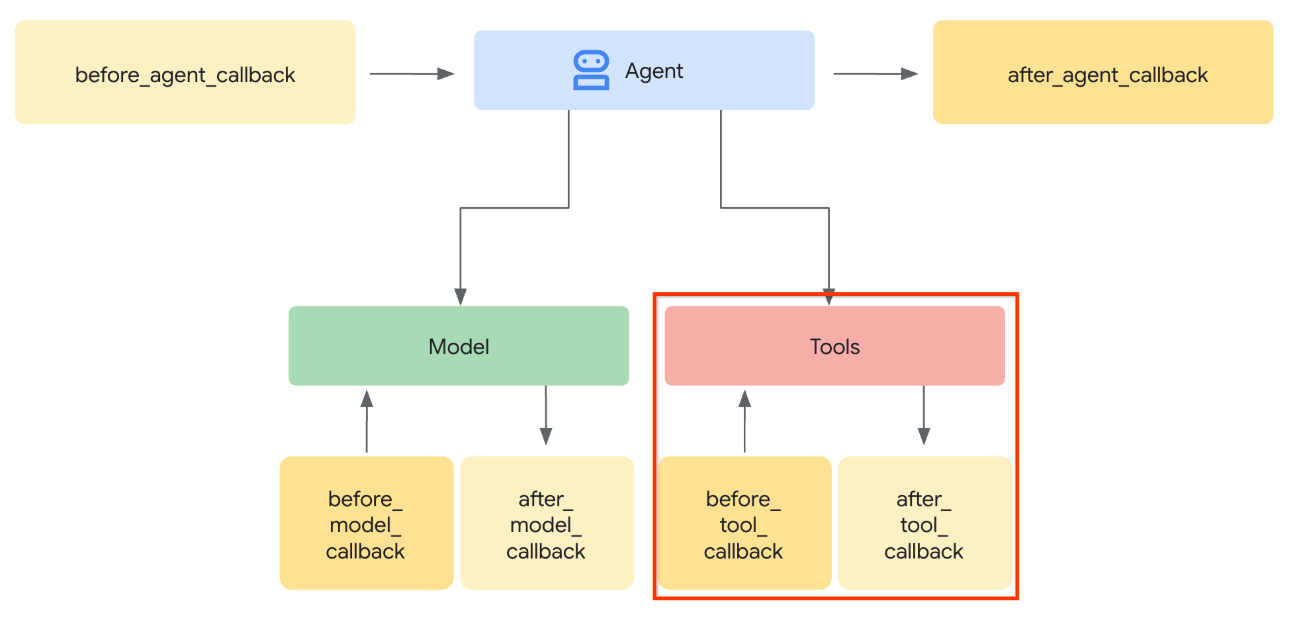
- Intercept the tool call invocation in the
before_tool_callbackand transform the parameter from the artifact_id to its bytes content by loading the artifact and overwrite the tool arguments
See image below for the visualization of of the part that we will intercept
First, let's prepare the before_tool_callback function, create a new file product_photo_editor/tool_callbacks.py by running the following command
touch product_photo_editor/tool_callbacks.py
سپس کد زیر را در فایل کپی کنید
# product_photo_editor/tool_callbacks.py

from google.genai.types import Part
from typing import Any
from google.adk.tools.tool_context import ToolContext
from google.adk.tools.base_tool import BaseTool
from google.adk.tools.mcp_tool.mcp_tool import McpTool
import base64
import logging
import json
from mcp.types import CallToolResult


async def before_tool_modifier(
    tool: BaseTool, args: dict[str, Any], tool_context: ToolContext
):
    # Identify which tool input should be modified
    if isinstance(tool, McpTool) and tool.name == "generate_video_with_image":
        logging.info("Modify tool args for artifact: %s", args["image_data"])
        # Get the artifact filename from the tool input argument
        artifact_filename = args["image_data"]
        artifact = await tool_context.load_artifact(filename=artifact_filename)
        file_data = artifact.inline_data.data

        # Convert byte data to base64 string
        base64_data = base64.b64encode(file_data).decode("utf-8")

        # Then modify the tool input argument
        args["image_data"] = base64_data
The code above shows the following steps:
- بررسی کنید که آیا ابزار فراخوانی شده یک شیء McpTool است و آیا فراخوانی ابزار مورد نظر همان فراخوانی است که میخواهیم تغییر دهیم یا خیر.
- مقدار آرگومانهای
image_dataرا دریافت کنید که در آن آرگومانی است که با فرمت base64 درخواست شده است اما ما از LLM میخواهیم که artifact_id را روی آن برگرداند. - با استفاده از سرویس artifact در
tool_contextartifact را بارگذاری کنید. - آرگومانهای
image_dataرا با دادههای base64 بازنویسی کنید
حال، باید این فراخوانی را به عامل اضافه کنیم و همچنین دستورالعملها را کمی تغییر دهیم تا عامل همیشه آرگومانهای ابزار base64 را با شناسه مصنوع پر کند.
فایل product_photo_editor/agent.py را باز کنید و محتوای آن را با کد زیر تغییر دهید.
# product_photo_editor/agent.py

from google.adk.agents.llm_agent import Agent
from product_photo_editor.custom_tools import edit_product_asset
from product_photo_editor.mcp_tools import mcp_toolset
from product_photo_editor.model_callbacks import before_model_modifier
from product_photo_editor.tool_callbacks import before_tool_modifier
from product_photo_editor.prompt import AGENT_INSTRUCTION

root_agent = Agent(
    model="gemini-2.5-flash",
    name="product_photo_editor",
    description="""A friendly product photo editor assistant that helps small business
owners edit and enhance their product photos. Perfect for improving photos of handmade
goods, food products, crafts, and small retail items""",
    instruction=AGENT_INSTRUCTION
    + """
**IMPORTANT: Base64 Argument Rule on Tool Call**

If you found any tool call arguments that requires base64 data,
ALWAYS provide the artifact_id of the referenced file to
the tool call. NEVER ask user to provide base64 data.
Base64 data encoding process is out of your
responsibility and will be handled in another part of the system.
""",
    tools=[
        edit_product_asset,
        mcp_toolset,
    ],
    before_model_callback=before_model_modifier,
    before_tool_callback=before_tool_modifier,
)
بسیار خوب، حالا بیایید سعی کنیم با عامل تعامل داشته باشیم تا این تغییر را آزمایش کنیم. دستور زیر را برای اجرای رابط کاربری توسعه وب اجرا کنید.
uv run adk web --port 8080
خروجی مانند مثال زیر تولید میشود، به این معنی که ما از قبل میتوانیم به رابط وب دسترسی داشته باشیم.
INFO:     Started server process [xxxx]
INFO:     Waiting for application startup.

+-----------------------------------------------------------------------------+
| ADK Web Server started                                                      |
|                                                                             |
| For local testing, access at http://127.0.0.1:8080.                         |
+-----------------------------------------------------------------------------+

INFO:     Application startup complete.
INFO:     Uvicorn running on http://127.0.0.1:8080 (Press CTRL+C to quit)
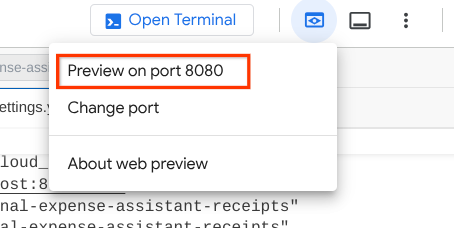
اکنون، برای بررسی آن میتوانید Ctrl + Click را روی URL نگه دارید یا روی دکمه پیشنمایش وب در قسمت بالای ویرایشگر Cloud Shell خود کلیک کنید و پیشنمایش را روی پورت ۸۰۸۰ انتخاب کنید.
صفحه وب زیر را مشاهده خواهید کرد که در آن میتوانید عوامل موجود را از طریق دکمه کشویی بالا سمت چپ انتخاب کنید (در مورد ما باید product_photo_editor باشد) و با ربات تعامل داشته باشید.
Then, upload the following image and ask the agent to generate promotional clip from it
Generate a slow zoom in and moving from left and right animation

با خطای زیر مواجه خواهید شد
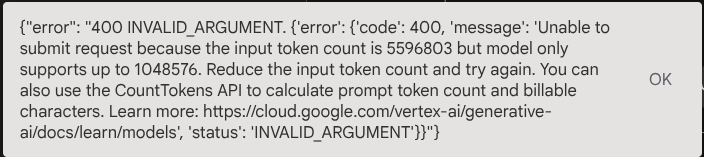
چرا؟ چون ابزار نتایج را مستقیماً به شکل رشته base64 نیز برمیگرداند، که از حداکثر توکن تجاوز میکند. حال، بیایید این خطا را در بخش بعدی مدیریت کنیم.
۶. 🚀 اصلاح پاسخ ابزار
در این بخش، پاسخ ابزار از پاسخ MCP را مدیریت خواهیم کرد. ما کارهای زیر را انجام خواهیم داد:
- پاسخ ویدیویی توسط ابزار را در سرویس مصنوع ذخیره کنید
- شناسه مصنوع را به عامل برگردانید
As a reminder we will tap in the following agent runtime
ابتدا، بیایید تابع فراخوانی را پیادهسازی کنیم، فایل product_photo_editor/tool_callbacks.py را باز کرده و آن را برای پیادهسازی after_tool_modifier تغییر دهیم.
# product_photo_editor/tool_callbacks.py

from google.genai.types import Part
from typing import Any
from google.adk.tools.tool_context import ToolContext
from google.adk.tools.base_tool import BaseTool
from google.adk.tools.mcp_tool.mcp_tool import McpTool
import base64
import logging
import json
from mcp.types import CallToolResult


async def before_tool_modifier(
    tool: BaseTool, args: dict[str, Any], tool_context: ToolContext
):
    # Identify which tool input should be modified
    if isinstance(tool, McpTool) and tool.name == "generate_video_with_image":
        logging.info("Modify tool args for artifact: %s", args["image_data"])
        # Get the artifact filename from the tool input argument
        artifact_filename = args["image_data"]
        artifact = await tool_context.load_artifact(filename=artifact_filename)
        file_data = artifact.inline_data.data

        # Convert byte data to base64 string
        base64_data = base64.b64encode(file_data).decode("utf-8")

        # Then modify the tool input argument
        args["image_data"] = base64_data


async def after_tool_modifier(
    tool: BaseTool,
    args: dict[str, Any],
    tool_context: ToolContext,
    tool_response: dict | CallToolResult,
):
    if isinstance(tool, McpTool) and tool.name == "generate_video_with_image":
        tool_result = json.loads(tool_response.content[0].text)

        # Get the expected response field which contains the video data
        video_data = tool_result["video_data"]
        artifact_filename = f"video_{tool_context.function_call_id}.mp4"

        # Convert base64 string to byte data
        video_bytes = base64.b64decode(video_data)

        # Save the video as artifact
        await tool_context.save_artifact(
            filename=artifact_filename,
            artifact=Part(inline_data={"mime_type": "video/mp4", "data": video_bytes}),
        )

        # Remove the video data from the tool response
        tool_result.pop("video_data")

        # Then modify the tool response to include the artifact filename and remove the base64 string
        tool_result["video_artifact_id"] = artifact_filename
        logging.info(
            "Modify tool response for artifact: %s", tool_result["video_artifact_id"]
        )

        return tool_result
پس از آن، باید عامل خود را به این تابع مجهز کنیم. فایل product_photo_editor/agent.py را باز کنید و آن را به کد زیر تغییر دهید.
# product_photo_editor/agent.py

from google.adk.agents.llm_agent import Agent
from product_photo_editor.custom_tools import edit_product_asset
from product_photo_editor.mcp_tools import mcp_toolset
from product_photo_editor.model_callbacks import before_model_modifier
from product_photo_editor.tool_callbacks import (
    before_tool_modifier,
    after_tool_modifier,
)
from product_photo_editor.prompt import AGENT_INSTRUCTION

root_agent = Agent(
    model="gemini-2.5-flash",
    name="product_photo_editor",
    description="""A friendly product photo editor assistant that helps small business
owners edit and enhance their product photos. Perfect for improving photos of handmade
goods, food products, crafts, and small retail items""",
    instruction=AGENT_INSTRUCTION
    + """
**IMPORTANT: Base64 Argument Rule on Tool Call**

If you found any tool call arguments that requires base64 data,
ALWAYS provide the artifact_id of the referenced file to
the tool call. NEVER ask user to provide base64 data.
Base64 data encoding process is out of your
responsibility and will be handled in another part of the system.
""",
    tools=[
        edit_product_asset,
        mcp_toolset,
    ],
    before_model_callback=before_model_modifier,
    before_tool_callback=before_tool_modifier,
    after_tool_callback=after_tool_modifier,
)
کار تمام است، حالا میتوانید از اپراتور بخواهید که نه تنها در ویرایش عکس به شما کمک کند، بلکه برای شما ویدیو هم بسازد! دستور زیر را دوباره اجرا کنید
uv run adk web --port 8080
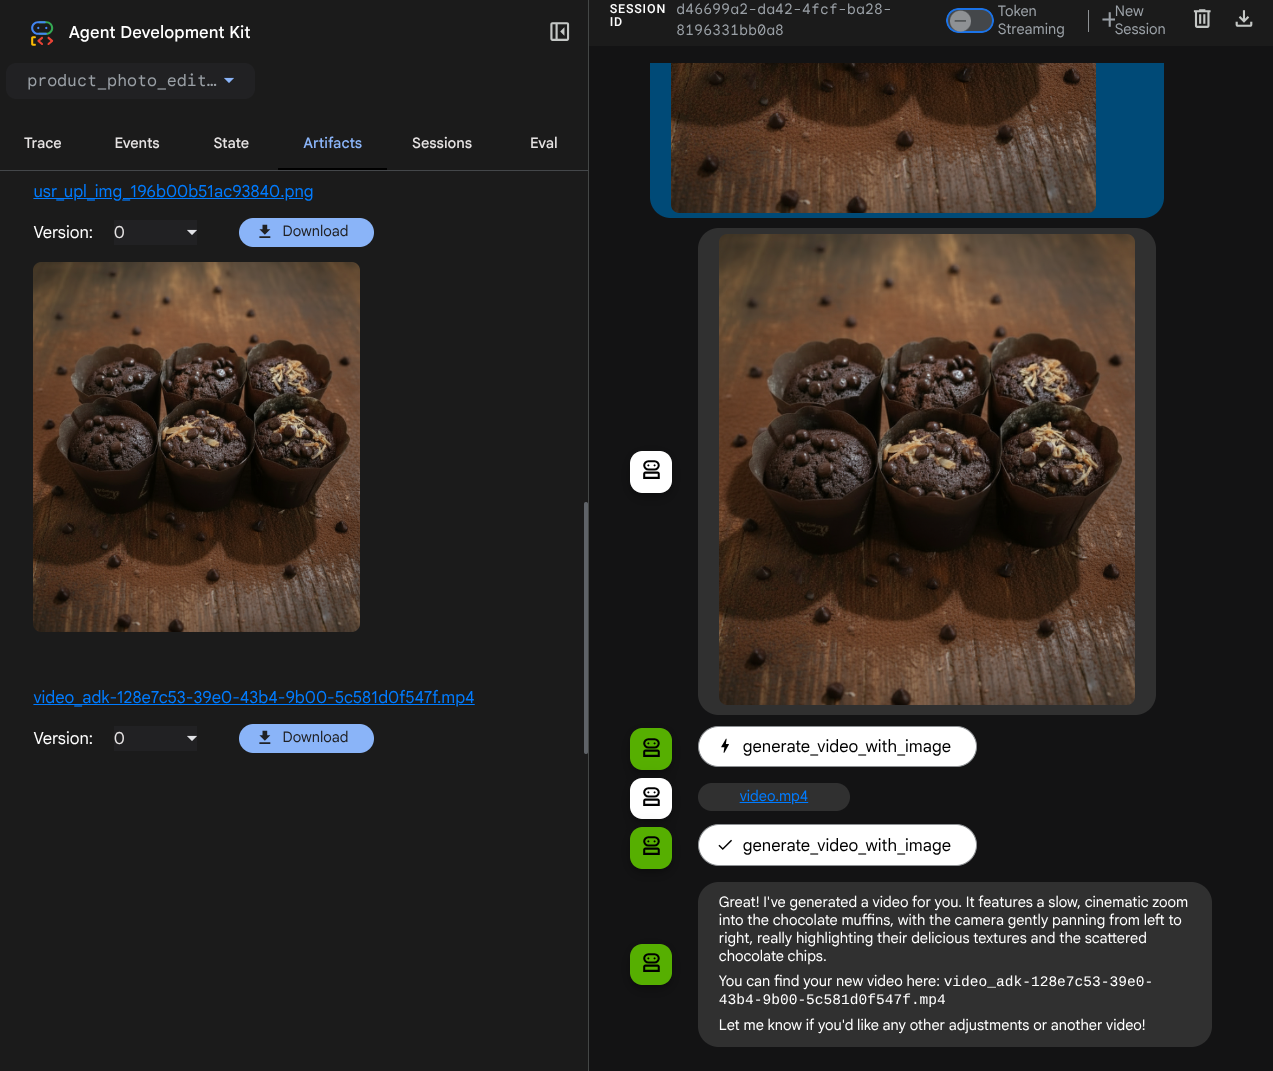
سپس، سعی کنید با استفاده از این تصویر، ویدیو بسازید
Generate a slow zoom in and moving from left and right animation
خواهید دید که ویدیو مانند مثال زیر تولید شده و از قبل به عنوان مصنوع ذخیره شده است.
7. ⭐ Summary
حالا بیایید دوباره به کارهایی که در طول این آزمایش کد انجام دادهایم نگاهی بیندازیم، نکات کلیدی این آموزش این است:
- مدیریت دادههای چندوجهی (ورودی/خروجی ابزار) : با استفاده از سرویس Artifacts و فراخوانیهای تخصصی ADK به جای ارسال مستقیم دادههای خام بایتی، استراتژی مدیریت دادههای چندوجهی (مانند تصاویر و ویدیوها) برای ورودی و خروجی ابزار تقویت شد.
- MCP Toolset Integration : Developed and integrated an external Veo MCP Server using FastMCP via the ADK MCP Toolset to add video generation capabilities to the agent.
- اصلاح ورودی ابزار (before_tool_callback) : یک فراخوانی مجدد برای رهگیری فراخوانی ابزار generate_video_with_image پیادهسازی شد که artifact_id فایل (انتخاب شده توسط LLM) را به دادههای تصویر کدگذاری شده base64 مورد نیاز برای ورودی سرور MCP تبدیل میکند.
- اصلاح خروجی ابزار (after_tool_callback) : یک فراخوانی برای رهگیری پاسخ ویدیوی بزرگ کدگذاری شده با base64 از سرور MCP، ذخیره ویدیو به عنوان یک مصنوع جدید و بازگرداندن یک مرجع video_artifact_id تمیز به LLM پیادهسازی شد.
8. 🧹 Clean up
برای جلوگیری از تحمیل هزینه به حساب Google Cloud خود برای منابع استفاده شده در این codelab، این مراحل را دنبال کنید:
- در کنسول گوگل کلود، به صفحه مدیریت منابع بروید.
- در لیست پروژهها، پروژهای را که میخواهید حذف کنید انتخاب کنید و سپس روی «حذف» کلیک کنید.
- در کادر محاورهای، شناسه پروژه را تایپ کنید و سپس برای حذف پروژه، روی خاموش کردن کلیک کنید.