
1. 📖 מבוא
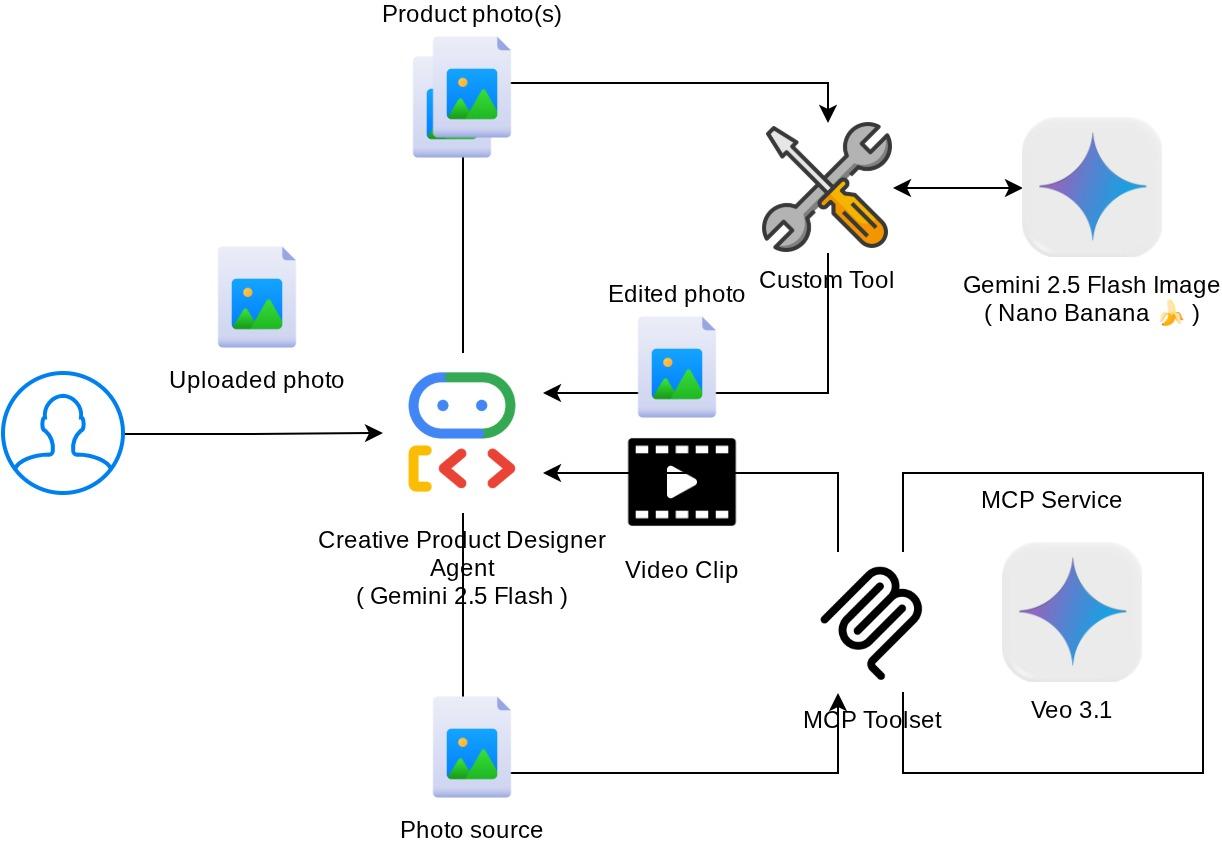
ב-codelab הקודם למדתם איך לעצב אינטראקציה עם נתונים מרובי-אופנים ב-ADK. עכשיו נסביר איך לתכנן אינטראקציה עם נתונים מולטי-מודאליים באמצעות שרת MCP וערכת הכלים של MCP. אנחנו נרחיב את היכולות של סוכן עריכת תמונות המוצר שפיתחנו בעבר, ונוסיף לו יכולות ליצירת סרטונים קצרים באמצעות מודל Veo, תוך שימוש בשרת Veo MCP.
במהלך ה-codelab, תשתמשו בגישה שלב אחר שלב באופן הבא:
- הכנת פרויקט בענן של Google וספריית סוכן בסיסית
- הגדרת שרת MCP שנדרשים לו נתונים מקובץ כקלט
- הגדרת סוכן ADK להתחברות לשרת MCP
- עיצוב אסטרטגיית הנחיות ופונקציית קריאה חוזרת לשינוי בקשה להפעלת פונקציה לכלי MCP Toolset
- עיצוב פונקציית קריאה חוזרת (callback) לטיפול בתגובה של נתונים מולטי-מודאליים מתוך ערכת הכלים של MCP
סקירה כללית של הארכיטקטורה
האינטראקציה הכוללת ב-codelab הזה מוצגת בתרשים הבא
דרישות מוקדמות
- ניסיון בעבודה עם Python
- (אופציונלי) שיעורי Codelab בסיסיים בנושא ערכה לפיתוח סוכנים (ADK)
- (אופציונלי) סדנת קוד בנושא ADK Multimodal Tool Part 1 : goo.gle/adk-multimodal-tool-1
מה תלמדו
- איך יוצרים סרטון קצר באמצעות Veo 3.1 עם הנחיה ותמונה ראשונית
- איך מפתחים שרת MCP מולטי-מודאלי באמצעות FastMCP
- איך מגדירים את ADK לשימוש ב-MCP Toolset
- איך משנים קריאה לכלים ב-MCP Toolset באמצעות קריאה חוזרת לכלים
- איך משנים את התשובה של כלי מתוך ערכת כלי ה-MCP באמצעות קריאה חוזרת לכלים
מה תצטרכו
- דפדפן האינטרנט Chrome
- חשבון Gmail
- פרויקט ב-Cloud שמופעל בו חשבון לחיוב
בשיעור Codelab הזה, שמיועד למפתחים בכל הרמות (כולל מתחילים), נעשה שימוש ב-Python באפליקציה לדוגמה. עם זאת, לא נדרש ידע ב-Python כדי להבין את המושגים שמוצגים.
2. 🚀 ( אופציונלי ) הכנת סביבת פיתוח לסדנה
שלב 1: בוחרים פרויקט פעיל ב-Cloud Console
במסוף Google Cloud, בדף לבחירת הפרויקט, בוחרים או יוצרים פרויקט ב-Google Cloud (ראו את הקטע הימני העליון במסוף).

לוחצים עליו ורואים רשימה של כל הפרויקטים, כמו בדוגמה הזו:
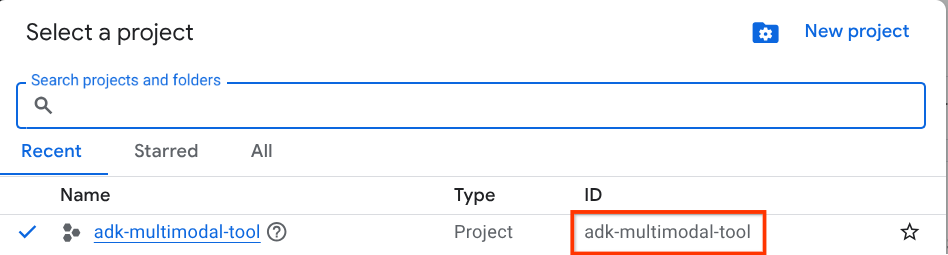
הערך שמסומן בתיבה האדומה הוא מזהה הפרויקט, והוא ישמש לאורך כל המדריך.
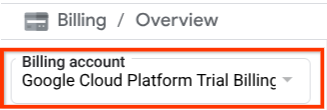
הקפידו לוודא שהחיוב מופעל בפרויקט שלכם ב-Cloud. כדי לבדוק את זה, לוחצים על סמל ההמבורגר ☰ בסרגל הימני העליון כדי להציג את תפריט הניווט, ומחפשים את תפריט החיוב.

אם הכותרת Billing / Overview ( בפינה הימנית העליונה של מסוף Cloud ) מופיעה עם הכיתוב Google Cloud Platform Trial Billing Account, הפרויקט שלכם מוכן לשימוש במדריך הזה. אם לא, חוזרים לתחילת המדריך הזה ומממשים את תקופת הניסיון של חשבון החיוב
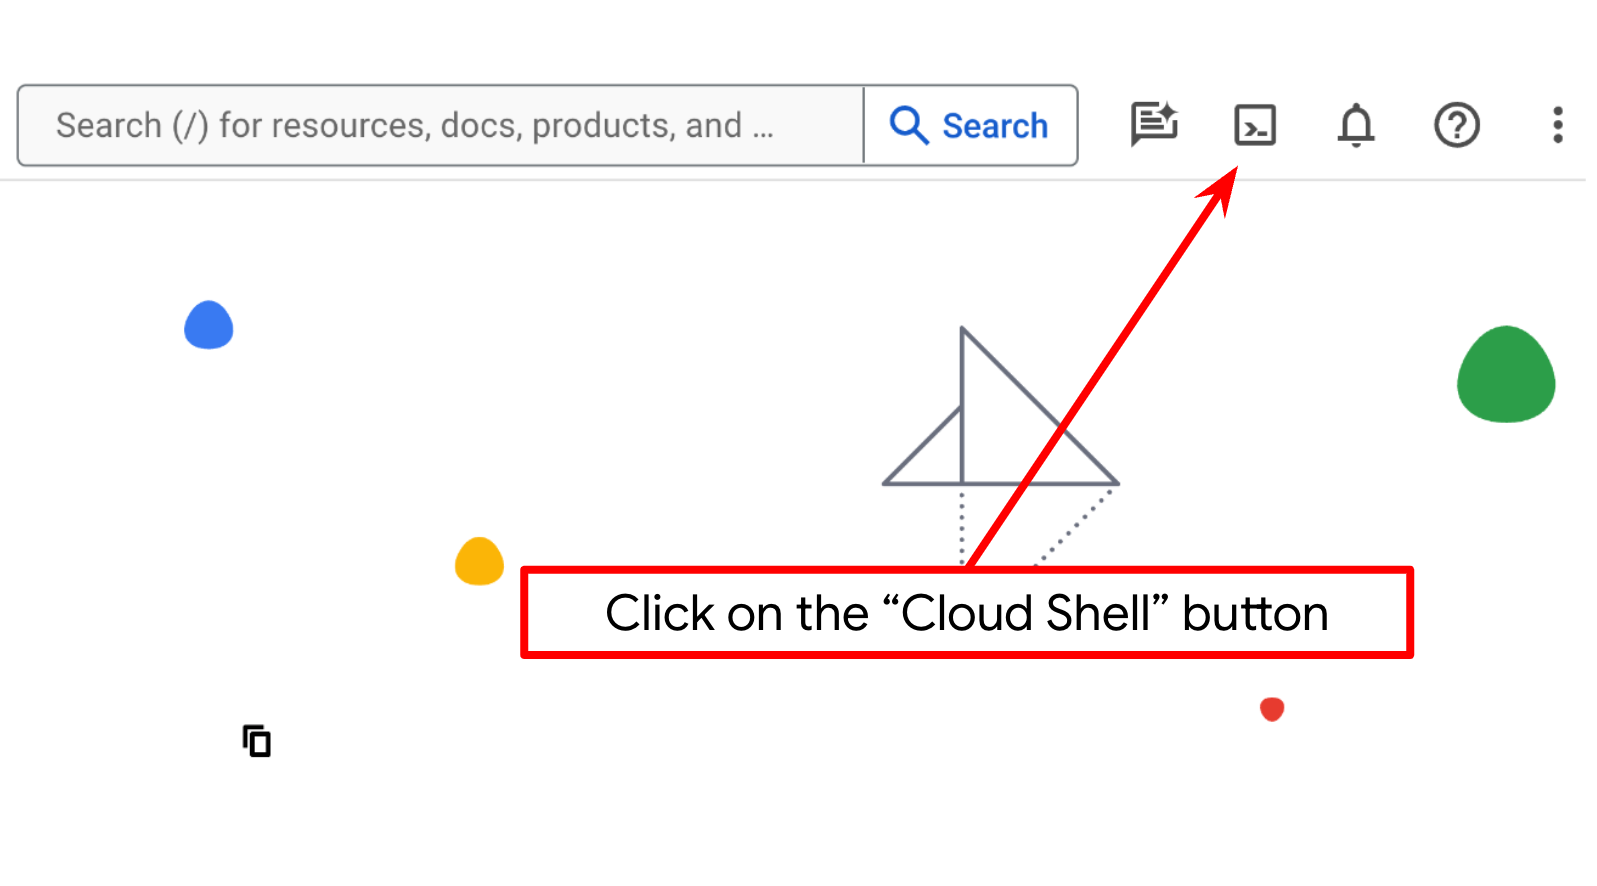
שלב 2: הכרת Cloud Shell
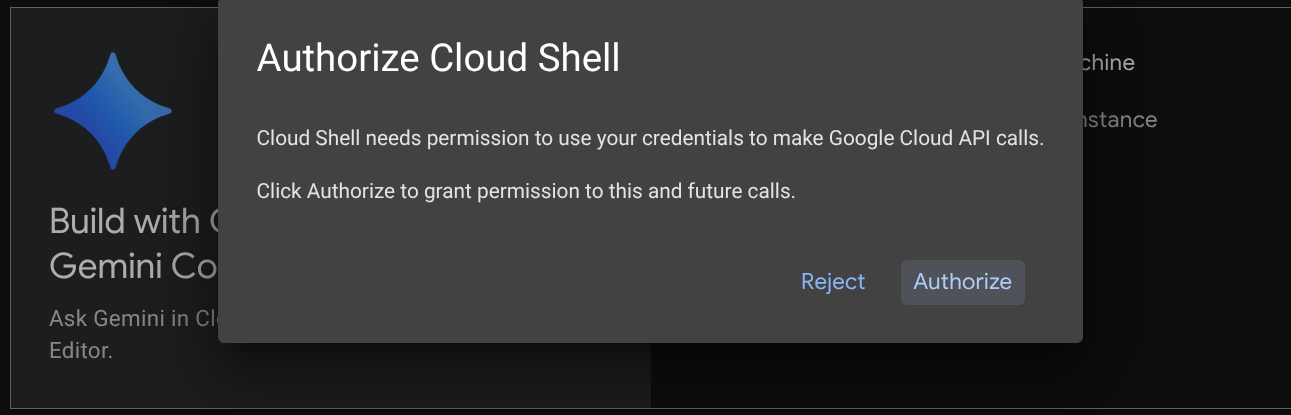
ברוב חלקי המדריכים תשתמשו ב-Cloud Shell. לוחצים על 'הפעלת Cloud Shell' בחלק העליון של מסוף Google Cloud. אם מוצגת בקשה לאישור, לוחצים על אישור.
אחרי שמתחברים ל-Cloud Shell, צריך לבדוק אם המעטפת ( או הטרמינל) כבר מאומתת בחשבון שלנו.
gcloud auth list
אם אתם רואים את כתובת Gmail האישית שלכם כמו בדוגמה שלמטה, הכול בסדר
Credentialed Accounts

ACTIVE: *
ACCOUNT: alvinprayuda@gmail.com

To set the active account, run:
    $ gcloud config set account `ACCOUNT`
אם לא, כדאי לרענן את הדפדפן ולוודא שלוחצים על אישור כשמופיעה הבקשה ( יכול להיות שהתהליך יופסק בגלל בעיה בחיבור).
בנוסף, צריך לבדוק אם ה-Shell כבר מוגדר למזהה הפרויקט הנכון שיש לכם. אם מופיע ערך בתוך ( ) לפני הסמל $ במסוף ( בצילום המסך שלמטה, הערך הוא "adk-multimodal-tool"), הערך הזה מציין את הפרויקט שהוגדר עבור סשן ה-Shell הפעיל.

אם הערך שמוצג כבר נכון, אפשר לדלג על הפקודה הבאה. אבל אם הוא לא נכון או חסר, מריצים את הפקודה הבאה
gcloud config set project <YOUR_PROJECT_ID>
לאחר מכן, משכפלים את ספריית העבודה של התבנית בשביל ה-codelab הזה מ-GitHub, ומריצים את הפקודה הבאה. ספריית העבודה תיצור בספרייה adk-multimodal-tool
git clone https://github.com/alphinside/adk-mcp-multimodal.git adk-multimodal-tool
שלב 3: היכרות עם Cloud Shell Editor והגדרת ספריית העבודה של האפליקציה
עכשיו אפשר להגדיר את עורך הקוד כדי לבצע פעולות שקשורות לקוד. נשתמש ב-Cloud Shell Editor לצורך זה
לוחצים על הלחצן Open Editor כדי לפתוח את Cloud Shell Editor 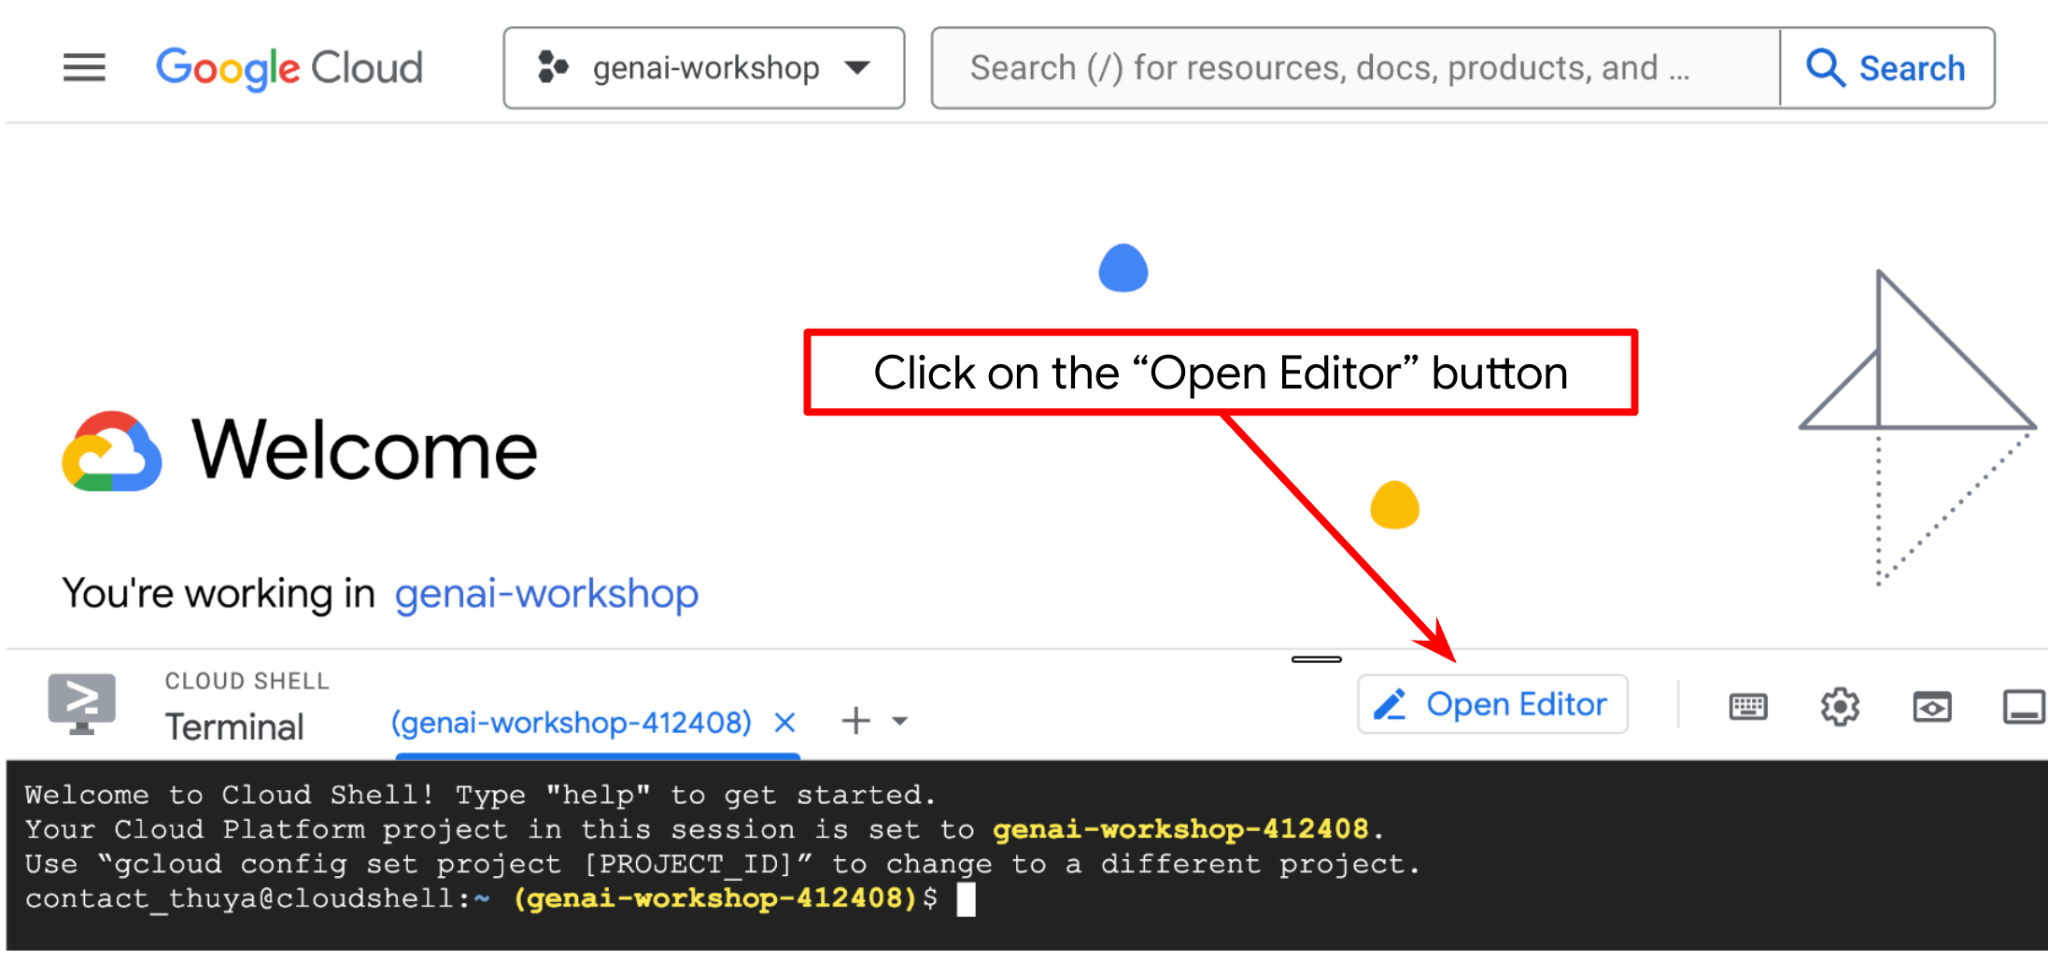 .
.
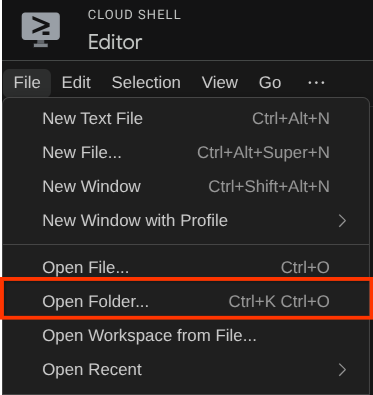
אחרי זה, עוברים לחלק העליון של Cloud Shell Editor, לוחצים על File->Open Folder (קובץ > פתיחת תיקייה), מאתרים את ספריית שם המשתמש ואת הספרייה adk-multimodal-tool, ואז לוחצים על הלחצן OK (אישור). הפעולה הזו תגרום לכך שהספרייה שנבחרה תהפוך לספריית העבודה הראשית. בדוגמה הזו, שם המשתמש הוא alvinprayuda, ולכן נתיב הספרייה מוצג למטה
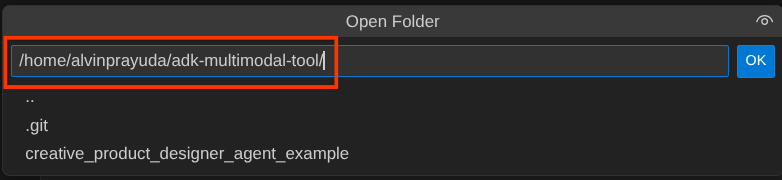
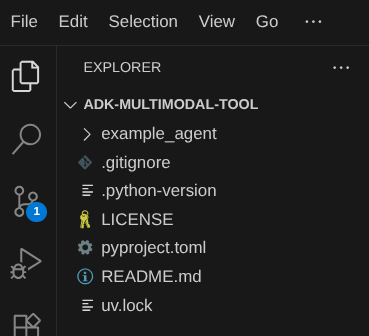
עכשיו, ספריית העבודה שלכם ב-Cloud Shell Editor אמורה להיראות כך ( בתוך adk-multimodal-tool)
עכשיו פותחים את הטרמינל של כלי העריכה. כדי לעשות את זה, לוחצים על Terminal -> New Terminal בסרגל התפריטים , או משתמשים בקיצור הדרך Ctrl + Shift + C. חלון טרמינל ייפתח בחלק התחתון של הדפדפן.

הטרמינל הפעיל הנוכחי צריך להיות בתוך ספריית העבודה adk-multimodal-tool. בשיעור Codelab הזה נשתמש ב-Python 3.12 וב-uv python project manager כדי לפשט את הצורך ביצירה ובניהול של גרסת Python וסביבה וירטואלית. החבילה uv כבר מותקנת מראש ב-Cloud Shell.
מריצים את הפקודה הזו כדי להתקין את התלות הנדרשת בסביבה הווירטואלית בספרייה .venv
uv sync --frozen
בודקים את הקובץ pyproject.toml כדי לראות את התלויות שהוגדרו במדריך הזה, שהן google-adk, and python-dotenv.
עכשיו צריך להפעיל את ממשקי ה-API הנדרשים באמצעות הפקודה שמוצגת למטה. הפעולה עשויה להימשך זמן-מה.
gcloud services enable aiplatform.googleapis.com
אם הפקודה תפעל בהצלחה, תוצג הודעה שדומה לזו שמופיעה בהמשך:
Operation "operations/..." finished successfully.
מבנה סוכן התבנית כבר מסופק לכם בספרייה part2_starter_agent במאגר המשוכפל. עכשיו נצטרך לשנות את השם שלו כדי להתכונן למדריך הזה
mv part1_ckpt_agent product_photo_editor
אחרי זה, מעתיקים את product_photo_editor/.env.example אל product_photo_editor/.env
cp product_photo_editor/.env.example product_photo_editor/.env
כשפותחים את הקובץ product_photo_editor/.env, מוצג תוכן כמו זה שמופיע בהמשך
GOOGLE_GENAI_USE_VERTEXAI=1
GOOGLE_CLOUD_PROJECT=your-project-id
GOOGLE_CLOUD_LOCATION=global
לאחר מכן, תצטרכו לעדכן את הערך your-project-id במזהה הפרויקט הנכון שלכם. עכשיו אפשר לעבור לשלב הבא
3. 🚀 הפעלת שרת ה-MCP של Veo
קודם כל, ניצור את ספריית שירותי ה-MCP באמצעות הפקודה הזו
mkdir veo_mcp
לאחר מכן, יוצרים את הקובץ veo_mcp/main.py באמצעות הפקודה הזו
touch veo_mcp/main.py
אחרי זה מעתיקים את הקוד הבא אל veo_mcp/main.py
from fastmcp import FastMCP
from typing import Annotated
from pydantic import Field
import base64
import asyncio
import os
from google import genai
from google.genai import types
from dotenv import load_dotenv
import logging

# Load environment variables from .env file
load_dotenv()

mcp = FastMCP("Veo MCP Server")


@mcp.tool
async def generate_video_with_image(
    prompt: Annotated[
        str, Field(description="Text description of the video to generate")
    ],
    image_data: Annotated[
        str, Field(description="Base64-encoded image data to use as starting frame")
    ],
    negative_prompt: Annotated[
        str | None,
        Field(description="Things to avoid in the generated video"),
    ] = None,
) -> dict:
    """Generates a professional product marketing video from text prompt and starting image using Google's Veo API.

    This function uses an image as the first frame of the generated video and automatically
    enriches your prompt with professional video production quality guidelines to create
    high-quality marketing assets suitable for commercial use.

    AUTOMATIC ENHANCEMENTS APPLIED:
    - 4K cinematic quality with professional color grading
    - Smooth, stabilized camera movements
    - Professional studio lighting setup
    - Shallow depth of field for product focus
    - Commercial-grade production quality
    - Marketing-focused visual style

    PROMPT WRITING TIPS:
    Describe what you want to see in the video. Focus on:
    - Product actions/movements (e.g., "rotating slowly", "zooming into details")
    - Desired camera angles (e.g., "close-up of the product", "wide shot")
    - Background/environment (e.g., "minimalist white backdrop", "lifestyle setting")
    - Any specific details about the product presentation

    The system will automatically enhance your prompt with professional production quality.

    Args:
        prompt: Description of the video to generate. Focus on the core product presentation
                you want. The system will automatically add professional quality enhancements.
        image_data: Base64-encoded image data to use as the starting frame
        negative_prompt: Optional prompt describing what to avoid in the video

    Returns:
        dict: A dictionary containing:
            - status: 'success' or 'error'
            - message: Description of the result
            - video_data: Base64-encoded video data (on success only)
    """
    try:
        # Initialize the Gemini client
        client = genai.Client(
            vertexai=True,
            project=os.getenv("GOOGLE_CLOUD_PROJECT"),
            location=os.getenv("GOOGLE_CLOUD_LOCATION"),
        )

        # Decode the image
        image_bytes = base64.b64decode(image_data)
        print(f"Successfully decoded image data: {len(image_bytes)} bytes")

        # Create image object
        image = types.Image(image_bytes=image_bytes, mime_type="image/png")

        # Prepare the config
        config = types.GenerateVideosConfig(
            duration_seconds=8,
            number_of_videos=1,
        )

        if negative_prompt:
            config.negative_prompt = negative_prompt

        # Enrich the prompt for professional marketing quality
        enriched_prompt = enrich_prompt_for_marketing(prompt)

        # Generate the video (async operation)
        operation = client.models.generate_videos(
            model="veo-3.1-generate-preview",
            prompt=enriched_prompt,
            image=image,
            config=config,
        )

        # Poll until the operation is complete
        poll_count = 0
        while not operation.done:
            poll_count += 1
            print(f"Waiting for video generation to complete... (poll {poll_count})")
            await asyncio.sleep(5)
            operation = client.operations.get(operation)

        # Download the video and convert to base64
        video = operation.response.generated_videos[0]

        # Get video bytes and encode to base64
        video_bytes = video.video.video_bytes
        video_base64 = base64.b64encode(video_bytes).decode("utf-8")

        print(f"Video generated successfully: {len(video_bytes)} bytes")

        return {
            "status": "success",
            "message": f"Video with image generated successfully after {poll_count * 5} seconds",
            "complete_prompt": enriched_prompt,
            "video_data": video_base64,
        }
    except Exception as e:
        logging.error(e)
        return {
            "status": "error",
            "message": f"Error generating video with image: {str(e)}",
        }


def enrich_prompt_for_marketing(user_prompt: str) -> str:
    """Enriches user prompt with professional video production quality enhancements.

    Adds cinematic quality, professional lighting, smooth camera work, and marketing-focused
    elements to ensure high-quality product marketing videos.
    """
    enhancement_prefix = """Create a high-quality, professional product marketing video with the following characteristics:

TECHNICAL SPECIFICATIONS:
- 4K cinematic quality with professional color grading
- Smooth, stabilized camera movements
- Professional studio lighting setup with soft, even illumination
- Shallow depth of field for product focus
- High dynamic range (HDR) for vibrant colors

VISUAL STYLE:
- Clean, minimalist aesthetic suitable for premium brand marketing
- Elegant and sophisticated presentation
- Commercial-grade production quality
- Attention to detail in product showcase

USER'S SPECIFIC REQUIREMENTS:
"""

    enhancement_suffix = """

ADDITIONAL QUALITY GUIDELINES:
- Ensure smooth transitions and natural motion
- Maintain consistent lighting throughout
- Keep the product as the clear focal point
- Use professional camera techniques (slow pans, tracking shots, or dolly movements)
- Apply subtle motion blur for cinematic feel
- Ensure brand-appropriate tone and style"""

    return f"{enhancement_prefix}{user_prompt}{enhancement_suffix}"


if __name__ == "__main__":
    mcp.run()
הקוד הבא מבצע את הפעולות הבאות:
- יצירת שרת FastMCP שחושף כלי ליצירת סרטונים של Veo 3.1 לסוכני ADK
- מקבל כקלט תמונות עם קידוד base64, הנחיות טקסט והנחיות שליליות
- יצירת סרטונים באורך 8 שניות באופן אסינכרוני על ידי שליחת בקשות ל-Veo 3.1 API וביצוע סקר כל 5 שניות עד לסיום
- מחזירה נתוני וידאו בקידוד Base64 יחד עם ההנחיה המשופרת
כדי להשתמש בכלי הזה של Veo MCP, צריך להגדיר את אותו משתנה סביבה כמו בסוכן שלנו, ולכן אפשר פשוט להעתיק ולהדביק את הקובץ .env. מריצים את הפקודה הבאה כדי לעשות זאת
cp product_photo_editor/.env veo_mcp/
עכשיו אפשר לבדוק אם שרת ה-MCP פועל בצורה תקינה על ידי הפעלת הפקודה הבאה
uv run veo_mcp/main.py
יוצג יומן מסוף כמו זה
╭────────────────────────────────────────────────────────────────────────────╮
│                                                                            │
│        _ __ ___  _____           __  __  _____________    ____    ____     │
│       _ __ ___ .'____/___ ______/ /_/  |/  / ____/ __ \  |___ \  / __ \    │
│      _ __ ___ / /_  / __ `/ ___/ __/ /|_/ / /   / /_/ /  ___/ / / / / /    │
│     _ __ ___ / __/ / /_/ (__  ) /_/ /  / / /___/ ____/  /  __/_/ /_/ /     │
│    _ __ ___ /_/    \____/____/\__/_/  /_/\____/_/      /_____(*)____/      │
│                                                                            │
│                                                                            │
│                                FastMCP  2.0                                │
│                                                                            │
│                                                                            │
│                 🖥️  Server name:     Veo MCP Server                         │
│                 📦 Transport:       STDIO                                  │
│                                                                            │
│                 🏎️  FastMCP version: 2.12.5                                 │
│                 🤝 MCP SDK version: 1.16.0                                 │
│                                                                            │
│                 📚 Docs:            https://gofastmcp.com                  │
│                 🚀 Deploy:          https://fastmcp.cloud                  │
│                                                                            │
╰────────────────────────────────────────────────────────────────────────────╯


[10/22/25 08:28:53] INFO     Starting MCP server 'Veo MCP Server' with          server.py:1502
                             transport 'stdio'
עכשיו צריך להפסיק את התהליך של שירות ה-MCP באמצעות CTRL+C. הפקודה הזו תופעל מאוחר יותר מתוך ADK MCP Toolset. אנחנו יכולים לעבור לשלב הבא כדי לאפשר לסוכן שלנו להשתמש בכלים האלה של MCP
4. 🚀 חיבור של שרת ה-MCP של Veo לסוכן ADK
עכשיו נחבר את שרת ה-MCP של Veo כדי שהסוכן שלנו יוכל להשתמש בו. קודם כל, ניצור סקריפט אחר שיכיל את ערכת הכלים. מריצים את הפקודה הבאה
touch product_photo_editor/mcp_tools.py
לאחר מכן, מעתיקים את הקוד הבא אל product_photo_editor/mcp_tools.py
from google.adk.tools.mcp_tool.mcp_toolset import MCPToolset
from google.adk.tools.mcp_tool.mcp_session_manager import StdioConnectionParams
from mcp import StdioServerParameters


mcp_toolset = MCPToolset(
    connection_params=StdioConnectionParams(
        server_params=StdioServerParameters(
            command="uv",
            args=[
                "run",
                "veo_mcp/main.py",
            ],
        ),
        timeout=120, # seconds
    ),
)

# Option to connect to remote MCP server

# from google.adk.tools.mcp_tool.mcp_session_manager import StreamableHTTPConnectionParams

# mcp_toolset = MCPToolset(
#     connection_params=StreamableHTTPConnectionParams(
#         url="http://localhost:8000/mcp",
#         timeout=120,
#     ),
# )
בדוגמת הקוד שלמעלה אפשר לראות איך מתחברים לשרת MCP באמצעות ADK MCPToolset. בדוגמה הזו אנחנו מתחברים לשרת ה-MCP באמצעות ערוץ התקשורת STDIO. בפקודה אנחנו מציינים איך להריץ את שרת ה-MCP ומגדירים את פרמטר פסק הזמן.
5. 🚀 שינוי פרמטרים של הפעלת כלי
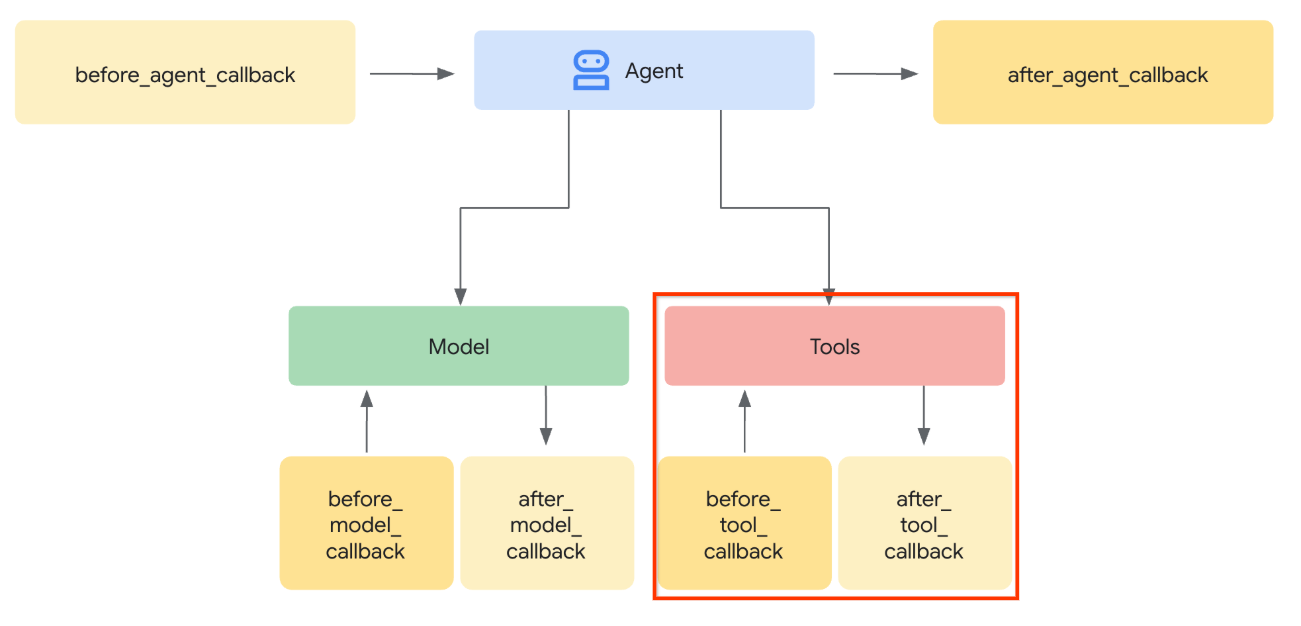
בהצהרת הכלי של שרת ה-MCP, עיצבנו את הכלי generate_video_with_image שמציין מחרוזת base64 כפרמטרים של הכלי. אנחנו לא יכולים לבקש מ-LLM לעשות את זה בשבילנו, ולכן אנחנו צריכים לתכנן אסטרטגיה ספציפית לטיפול בזה.
במעבדה הקודמת, טיפלנו בתמונה שהמשתמש העלה ובתשובה של הכלי ב-before_model_callback כדי לשמור אותה כארטיפקט, וזה גם משתקף בתבנית הסוכן שהכנו קודם. נשתמש במידע הזה ונפעל לפי האסטרטגיות הבאות:
- מנחים את ה-LLM לשלוח תמיד את הערך של artifact_id אם פרמטר ספציפי של כלי דורש לשלוח נתונים של מחרוזת base64
- מיירטים את הקריאה להפעלת הכלי ב-
before_tool_callback, טוענים את הארטיפקט, משנים את הפרמטר מ-artifact_id לתוכן הבייטים שלו ומחליפים את הארגומנטים של הכלי
בתמונה שלמטה אפשר לראות את החלק שיירט.
קודם כל, נכין את הפונקציה before_tool_callback. כדי ליצור קובץ חדש product_photo_editor/tool_callbacks.py, מריצים את הפקודה הבאה:
touch product_photo_editor/tool_callbacks.py
לאחר מכן, מעתיקים את הקוד הבא לקובץ
# product_photo_editor/tool_callbacks.py

from google.genai.types import Part
from typing import Any
from google.adk.tools.tool_context import ToolContext
from google.adk.tools.base_tool import BaseTool
from google.adk.tools.mcp_tool.mcp_tool import McpTool
import base64
import logging
import json
from mcp.types import CallToolResult


async def before_tool_modifier(
    tool: BaseTool, args: dict[str, Any], tool_context: ToolContext
):
    # Identify which tool input should be modified
    if isinstance(tool, McpTool) and tool.name == "generate_video_with_image":
        logging.info("Modify tool args for artifact: %s", args["image_data"])
        # Get the artifact filename from the tool input argument
        artifact_filename = args["image_data"]
        artifact = await tool_context.load_artifact(filename=artifact_filename)
        file_data = artifact.inline_data.data

        # Convert byte data to base64 string
        base64_data = base64.b64encode(file_data).decode("utf-8")

        # Then modify the tool input argument
        args["image_data"] = base64_data
הקוד שלמעלה מציג את השלבים הבאים:
- בודקים אם הכלי שהופעל הוא אובייקט McpTool ואם הוא קריאת הכלי הממוקדת שאותה רוצים לשנות
- קבלת הערך של הארגומנטים
image_data, שבו הארגומנט המבוקש הוא בפורמט base64, אבל אנחנו מבקשים מ-LLM להחזיר את artifact_id - טוענים את הארטיפקט באמצעות שירות הארטיפקטים ב-
tool_context - מחליפים את הארגומנטים
image_dataבנתוני base64.
עכשיו צריך להוסיף את הקריאה החוזרת הזו לסוכן, וגם לשנות קצת את ההוראות כדי שהסוכן תמיד ימלא את ארגומנטי הכלי base64 במזהה הארטיפקט.
פותחים את product_photo_editor/agent.py ומשנים את התוכן באמצעות הקוד הבא
# product_photo_editor/agent.py

from google.adk.agents.llm_agent import Agent
from product_photo_editor.custom_tools import edit_product_asset
from product_photo_editor.mcp_tools import mcp_toolset
from product_photo_editor.model_callbacks import before_model_modifier
from product_photo_editor.tool_callbacks import before_tool_modifier
from product_photo_editor.prompt import AGENT_INSTRUCTION

root_agent = Agent(
    model="gemini-2.5-flash",
    name="product_photo_editor",
    description="""A friendly product photo editor assistant that helps small business
owners edit and enhance their product photos. Perfect for improving photos of handmade
goods, food products, crafts, and small retail items""",
    instruction=AGENT_INSTRUCTION
    + """
**IMPORTANT: Base64 Argument Rule on Tool Call**

If you found any tool call arguments that requires base64 data,
ALWAYS provide the artifact_id of the referenced file to
the tool call. NEVER ask user to provide base64 data.
Base64 data encoding process is out of your
responsibility and will be handled in another part of the system.
""",
    tools=[
        edit_product_asset,
        mcp_toolset,
    ],
    before_model_callback=before_model_modifier,
    before_tool_callback=before_tool_modifier,
)
בסדר, עכשיו ננסה ליצור אינטראקציה עם הנציג כדי לבדוק את השינוי הזה. מריצים את הפקודה הבאה כדי להפעיל את ממשק המשתמש של כלי הפיתוח לאינטרנט
uv run adk web --port 8080
יוצג פלט כמו בדוגמה הבאה, כלומר כבר יש לנו גישה לממשק האינטרנט
INFO:     Started server process [xxxx]
INFO:     Waiting for application startup.

+-----------------------------------------------------------------------------+
| ADK Web Server started                                                      |
|                                                                             |
| For local testing, access at http://127.0.0.1:8080.                         |
+-----------------------------------------------------------------------------+

INFO:     Application startup complete.
INFO:     Uvicorn running on http://127.0.0.1:8080 (Press CTRL+C to quit)
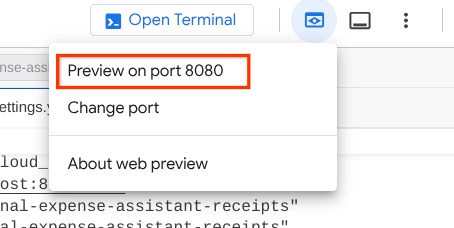
כדי לבדוק את כתובת ה-URL, אפשר ללחוץ על Ctrl + Click או ללחוץ על הלחצן Web Preview בחלק העליון של Cloud Shell Editor ולבחור באפשרות Preview on port 8080.
יוצג דף אינטרנט שבו תוכלו לבחור סוכנים זמינים באמצעות הלחצן הנפתח בפינה הימנית העליונה ( במקרה הזה, האפשרות שצריך לבחור היא product_photo_editor) ולקיים אינטראקציה עם הבוט.
לאחר מכן, מעלים את התמונה הבאה ומבקשים מהסוכן ליצור ממנה קליפ לקידום מכירות
Generate a slow zoom in and moving from left and right animation

תופיע השגיאה הבאה
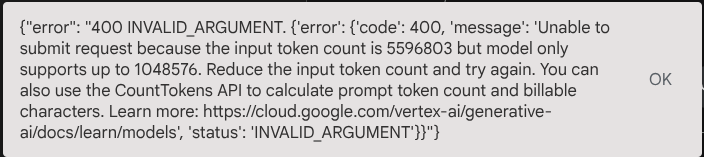
למה? הכלי גם החזיר תוצאות ישירות בצורה של מחרוזת base64, ולכן הוא חורג מהאסימון המקסימלי. עכשיו נטפל בשגיאה הזו בקטע הבא.
6. 🚀 שינוי תשובות של כלים
בקטע הזה נטפל בתגובה של הכלי מתוך התגובה של ה-MCP. אנחנו נבצע את הפעולות הבאות:
- שמירת סרטון התגובה על ידי הכלי בשירות הארטיפקטים
- החזרת מזהה הארטיפקט לסוכן במקום זאת
רצינו להזכיר לך שנשתמש ב-runtime של הסוכן הבא
קודם כל, נטמיע את פונקציית הקריאה החוזרת. פותחים את הקובץ product_photo_editor/tool_callbacks.py ומשנים אותו כדי להטמיע את after_tool_modifier
# product_photo_editor/tool_callbacks.py

from google.genai.types import Part
from typing import Any
from google.adk.tools.tool_context import ToolContext
from google.adk.tools.base_tool import BaseTool
from google.adk.tools.mcp_tool.mcp_tool import McpTool
import base64
import logging
import json
from mcp.types import CallToolResult


async def before_tool_modifier(
    tool: BaseTool, args: dict[str, Any], tool_context: ToolContext
):
    # Identify which tool input should be modified
    if isinstance(tool, McpTool) and tool.name == "generate_video_with_image":
        logging.info("Modify tool args for artifact: %s", args["image_data"])
        # Get the artifact filename from the tool input argument
        artifact_filename = args["image_data"]
        artifact = await tool_context.load_artifact(filename=artifact_filename)
        file_data = artifact.inline_data.data

        # Convert byte data to base64 string
        base64_data = base64.b64encode(file_data).decode("utf-8")

        # Then modify the tool input argument
        args["image_data"] = base64_data


async def after_tool_modifier(
    tool: BaseTool,
    args: dict[str, Any],
    tool_context: ToolContext,
    tool_response: dict | CallToolResult,
):
    if isinstance(tool, McpTool) and tool.name == "generate_video_with_image":
        tool_result = json.loads(tool_response.content[0].text)

        # Get the expected response field which contains the video data
        video_data = tool_result["video_data"]
        artifact_filename = f"video_{tool_context.function_call_id}.mp4"

        # Convert base64 string to byte data
        video_bytes = base64.b64decode(video_data)

        # Save the video as artifact
        await tool_context.save_artifact(
            filename=artifact_filename,
            artifact=Part(inline_data={"mime_type": "video/mp4", "data": video_bytes}),
        )

        # Remove the video data from the tool response
        tool_result.pop("video_data")

        # Then modify the tool response to include the artifact filename and remove the base64 string
        tool_result["video_artifact_id"] = artifact_filename
        logging.info(
            "Modify tool response for artifact: %s", tool_result["video_artifact_id"]
        )

        return tool_result
אחרי כן, צריך להוסיף את הפונקציה הזו לסוכן. פותחים את הקובץ product_photo_editor/agent.py ומשנים אותו לקוד הבא
# product_photo_editor/agent.py

from google.adk.agents.llm_agent import Agent
from product_photo_editor.custom_tools import edit_product_asset
from product_photo_editor.mcp_tools import mcp_toolset
from product_photo_editor.model_callbacks import before_model_modifier
from product_photo_editor.tool_callbacks import (
    before_tool_modifier,
    after_tool_modifier,
)
from product_photo_editor.prompt import AGENT_INSTRUCTION

root_agent = Agent(
    model="gemini-2.5-flash",
    name="product_photo_editor",
    description="""A friendly product photo editor assistant that helps small business
owners edit and enhance their product photos. Perfect for improving photos of handmade
goods, food products, crafts, and small retail items""",
    instruction=AGENT_INSTRUCTION
    + """
**IMPORTANT: Base64 Argument Rule on Tool Call**

If you found any tool call arguments that requires base64 data,
ALWAYS provide the artifact_id of the referenced file to
the tool call. NEVER ask user to provide base64 data.
Base64 data encoding process is out of your
responsibility and will be handled in another part of the system.
""",
    tools=[
        edit_product_asset,
        mcp_toolset,
    ],
    before_model_callback=before_model_modifier,
    before_tool_callback=before_tool_modifier,
    after_tool_callback=after_tool_modifier,
)
הפעולה הסתיימה, ועכשיו אפשר לבקש מהסוכן לא רק לערוך את התמונה, אלא גם ליצור סרטון בשבילכם. מריצים שוב את הפקודה הבאה
uv run adk web --port 8080
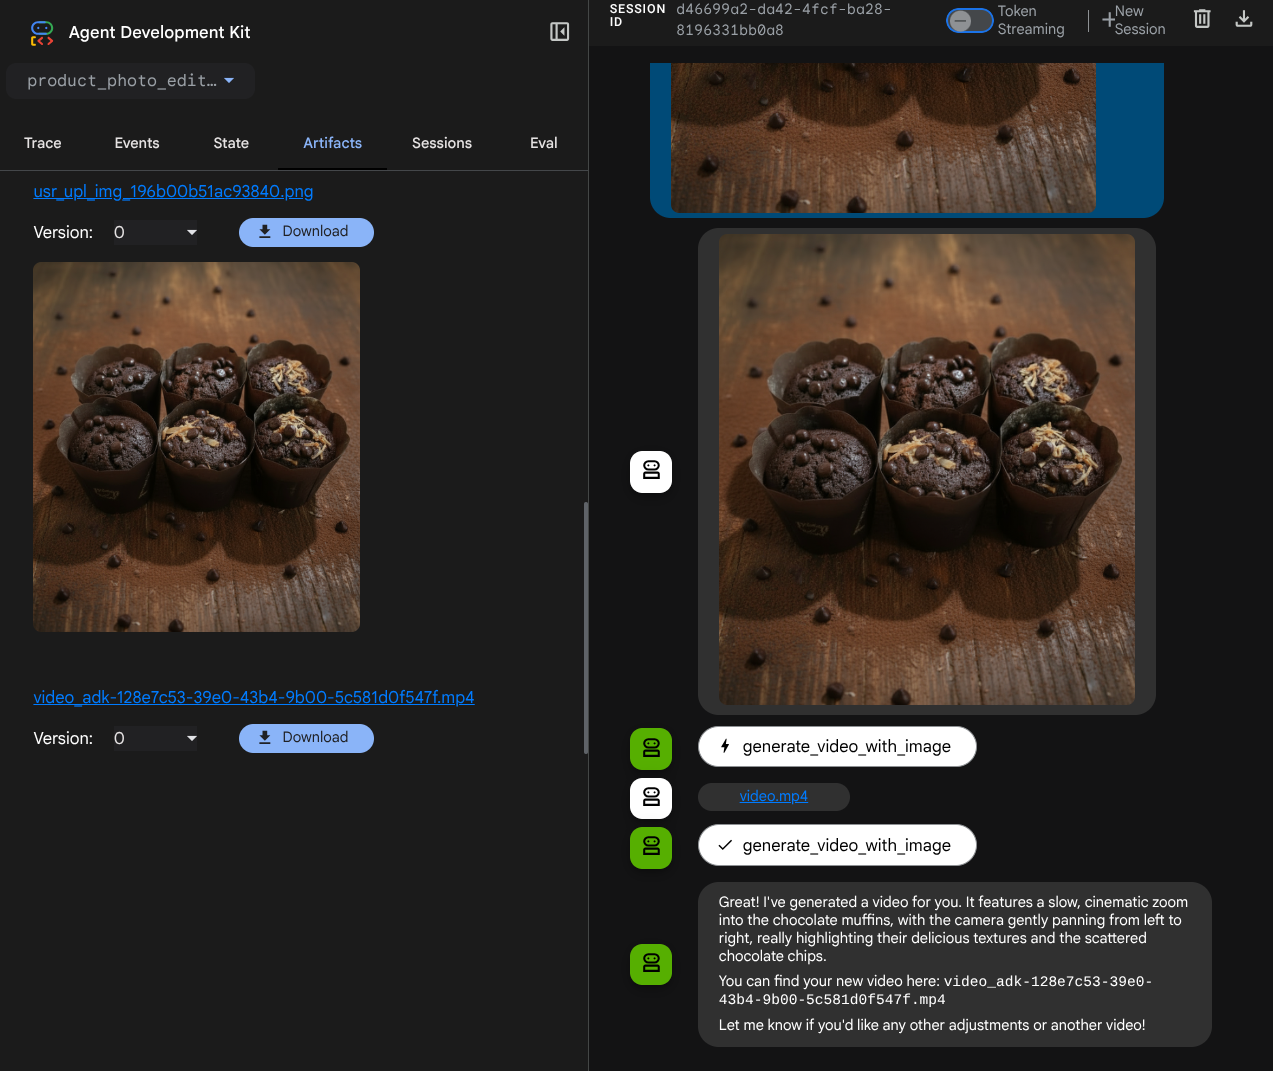
אחר כך, נסו ליצור סרטון באמצעות התמונה הזו
Generate a slow zoom in and moving from left and right animation
הסרטון שנוצר יופיע כמו בדוגמה שבהמשך, והוא כבר יישמר כארטיפקט.
7. סיכום ⭐
עכשיו נחזור למה שכבר עשינו במהלך ה-Codelab הזה, והנה המסקנה העיקרית:
- טיפול בנתונים מולטי-מודאליים (קלט/פלט של כלים): חיזקנו את האסטרטגיה לניהול נתונים מולטי-מודאליים (כמו תמונות וסרטונים) עבור קלט ופלט של כלים באמצעות שירות הארטיפקטים של ADK וקריאות חוזרות (callback) מיוחדות, במקום להעביר נתוני בייטים גולמיים ישירות.
- שילוב של ערכת הכלים של MCP: פיתחנו ושילבנו שרת MCP חיצוני של Veo באמצעות FastMCP דרך ערכת הכלים של ADK MCP כדי להוסיף לסוכן יכולות של יצירת סרטונים.
- שינוי קלט של כלי (before_tool_callback): הוטמעה קריאה חוזרת (callback) כדי ליירט את הקריאה לכלי generate_video_with_image, ולשנות את artifact_id של הקובץ (שנבחר על ידי ה-LLM) לנתוני התמונה שמקודדים ב-base64 שנדרשים לקלט של שרת ה-MCP.
- שינוי הפלט של הכלי (after_tool_callback): הטמענו קריאה חוזרת כדי ליירט את תגובת הווידאו הגדולה בקידוד base64 מהשרת של MCP, לשמור את הווידאו כארטיפקט חדש ולהחזיר הפניה נקייה של video_artifact_id ל-LLM.
8. 🧹 ניקוי
כדי לא לצבור חיובים לחשבון Google Cloud על המשאבים שבהם השתמשתם ב-Code Lab הזה:
- במסוף Google Cloud, עוברים לדף Manage resources.
- ברשימת הפרויקטים, בוחרים את הפרויקט שרוצים למחוק ולוחצים על Delete.
- כדי למחוק את הפרויקט, כותבים את מזהה הפרויקט בתיבת הדו-שיח ולוחצים על Shut down.