
1. 📖 はじめに
前の Codelab では、ADK でマルチモーダル データ インタラクションを設計する方法について学習しました。ここでは、MCP ツールセットを使用して MCP サーバーでマルチモーダル データ インタラクションを設計する方法について説明します。Veo MCP サーバーを利用して Veo モデルを使用して短い動画を生成する機能を、以前に開発した商品写真エディタ エージェントに追加します。
この Codelab では、次の手順で進めます。
- Google Cloud プロジェクトとベース エージェント ディレクトリを準備する
- ファイルデータを入力として必要とする MCP サーバーを構成する
- MCP サーバーに接続する ADK エージェントを準備する
- MCP ツールセットへの関数呼び出しリクエストを変更するためのプロンプト戦略とコールバック関数を設計する
- MCP ツールセットからのマルチモーダル データ レスポンスを処理するコールバック関数を設計する
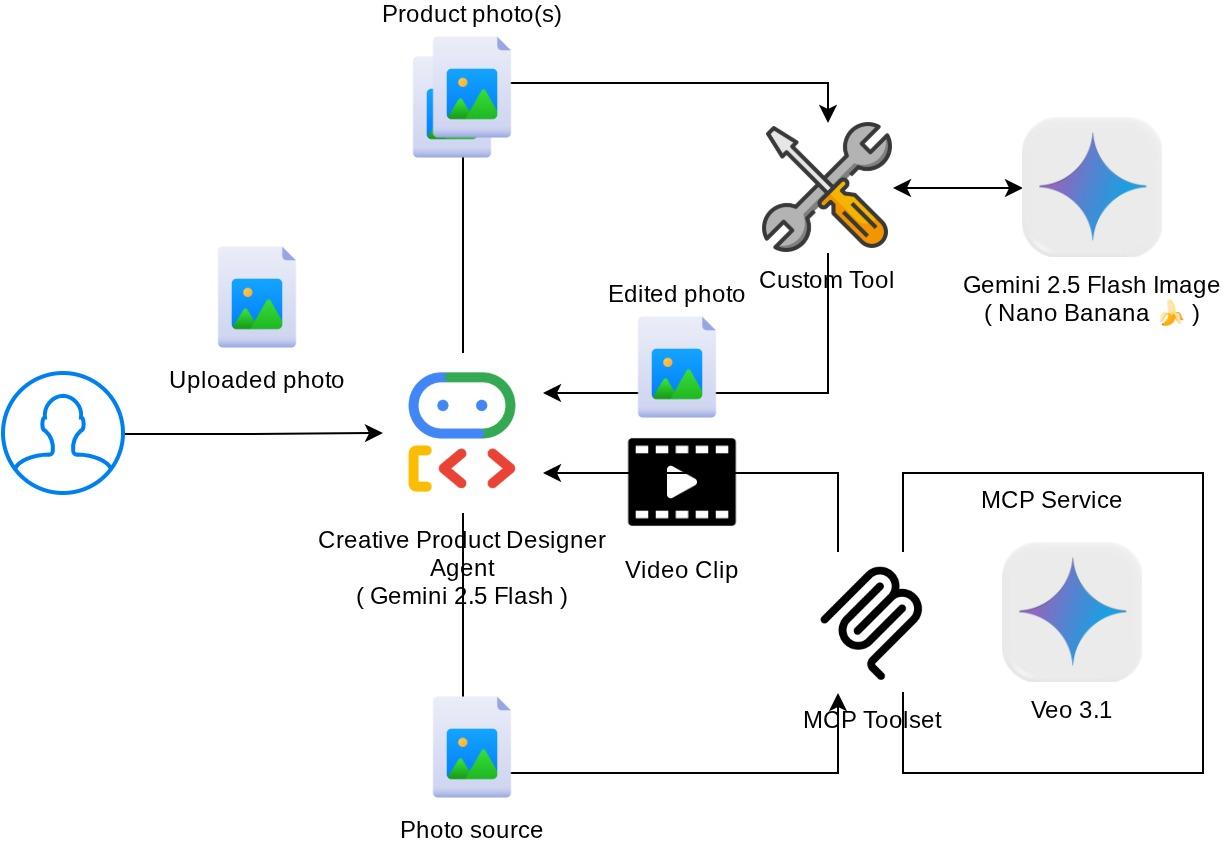
アーキテクチャの概要
この Codelab の全体的なインタラクションを次の図に示します。
前提条件
- Python の操作に慣れている
- (省略可)Agent Development Kit(ADK)に関する基礎 Codelab
- (省略可)ADK マルチモーダル ツール パート 1 Codelab : goo.gle/adk-multimodal-tool-1
学習内容
- プロンプトと画像スターターを使用して Veo 3.1 でショート動画を作成する方法
- FastMCP を使用してマルチモーダル MCP サーバーを開発する方法
- MCP ツールセットを使用するように ADK を設定する方法
- ツール コールバックを使用して MCP ツールセットへのツール呼び出しを変更する方法
- ツール コールバックを使用して MCP ツールセットからのツール レスポンスを変更する方法
必要なもの
- Chrome ウェブブラウザ
- Gmail アカウント
- 請求先アカウントが有効になっている Cloud プロジェクト
この Codelab は、初心者を含むあらゆるレベルのデベロッパーを対象としており、サンプル アプリケーションでは Python を使用しています。ただし、ここで説明するコンセプトを理解するうえで Python の知識は必要ありません。
2. 🚀(省略可)ワークショップ開発環境を準備する
ステップ 1: Cloud Console で有効なプロジェクトを選択する
[Google Cloud コンソール] の [プロジェクト セレクタ] ページで、Google Cloud プロジェクトを選択または作成します(コンソールの左上をご覧ください)。

クリックすると、次の例のようにプロジェクトの一覧が表示されます。
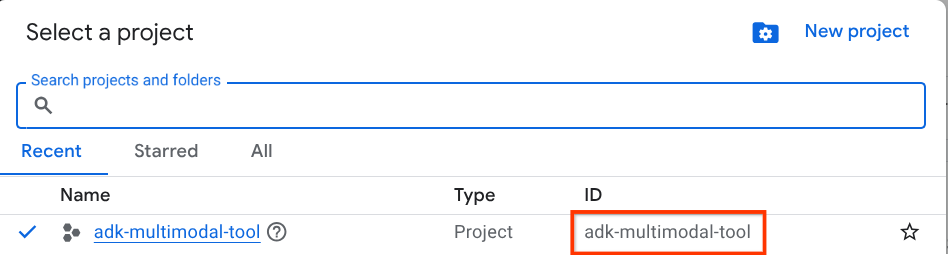
赤いボックスで示されている値はプロジェクト ID であり、この値はチュートリアル全体で使用されます。
Cloud プロジェクトに対して課金が有効になっていることを確認します。これを確認するには、左上のバーにあるハンバーガー アイコン ☰ をクリックしてナビゲーション メニューを表示し、[請求] メニューを見つけます。

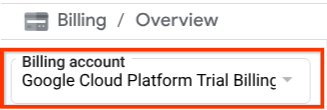
[請求 / 概要] タイトル( Cloud コンソールの左上 )の下に「Google Cloud Platform トライアル請求先アカウント」が表示されている場合、このチュートリアルでプロジェクトを使用する準備ができています。表示されていない場合は、このチュートリアルの最初に戻って、トライアル請求先アカウントを利用してください。
ステップ 2: Cloud Shell に慣れる
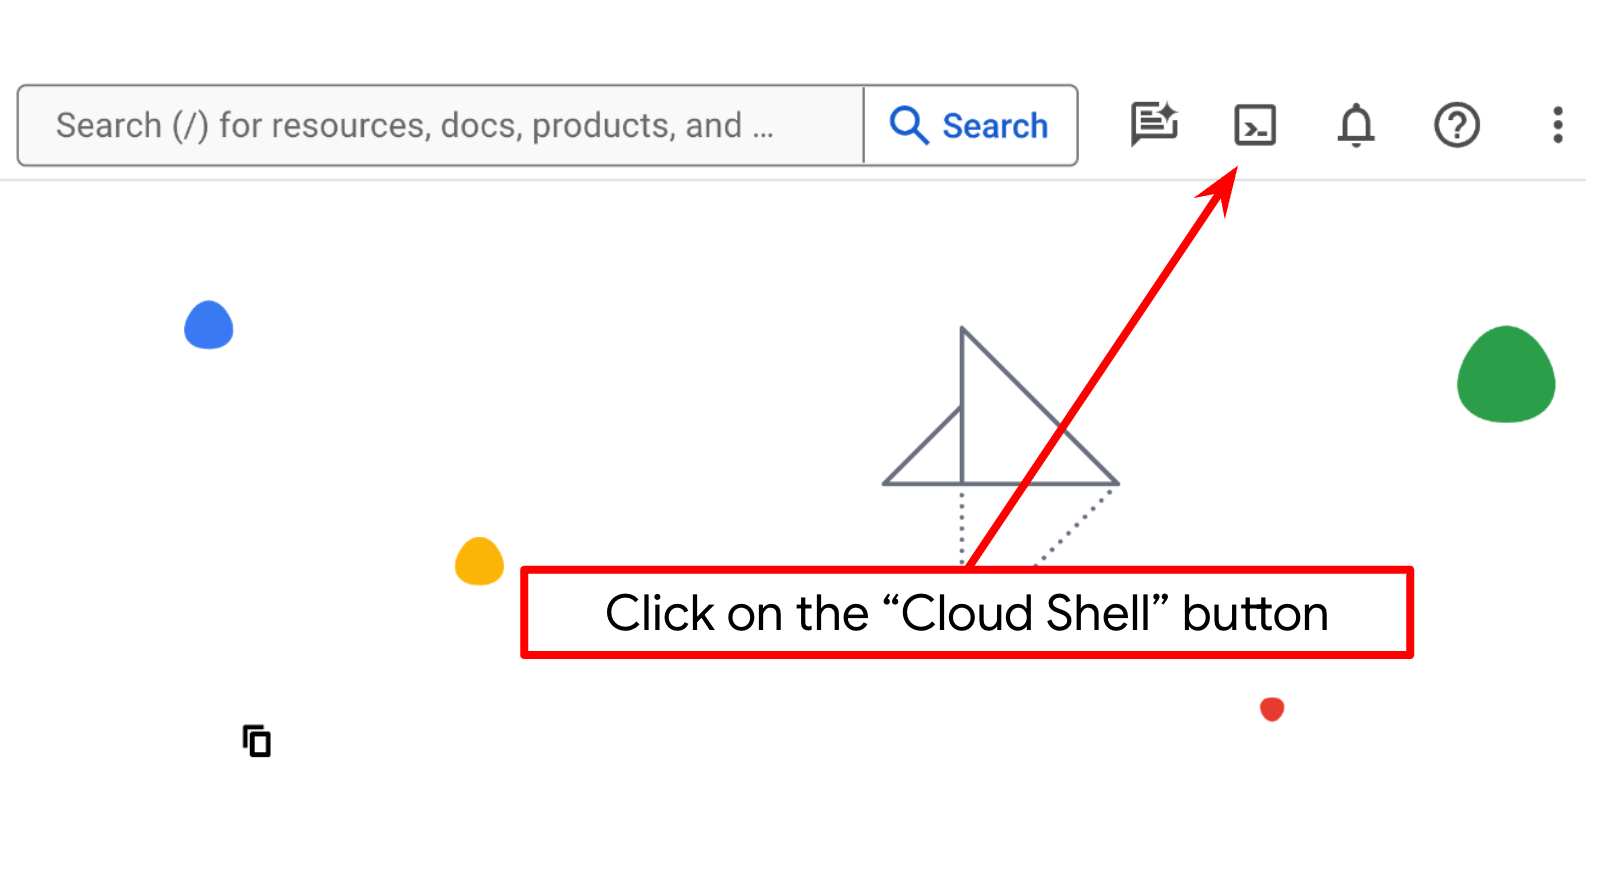
チュートリアルのほとんどの部分で Cloud Shell を使用します。Google Cloud コンソールの上部にある [Cloud Shell をアクティブにする] をクリックします。承認を求めるメッセージが表示されたら、[承認] をクリックします。
Cloud Shell に接続したら、シェル(またはターミナル)がアカウントで認証されているかどうかを確認する必要があります。
gcloud auth list
次の出力例のように個人の Gmail が表示されていれば、問題ありません。
Credentialed Accounts

ACTIVE: *
ACCOUNT: alvinprayuda@gmail.com

To set the active account, run:
    $ gcloud config set account `ACCOUNT`
表示されていない場合は、ブラウザを更新して、プロンプトが表示されたら [承認] をクリックしてください(接続の問題で中断される可能性があります)。
次に、シェルが正しいプロジェクト ID に構成されているかどうかを確認する必要があります。ターミナルの $アイコンの前に ()で囲まれた値 が表示されている場合(次のスクリーンショットでは、値は 「adk-multimodal-tool」 )、この値はアクティブなシェル セッションに構成されたプロジェクトを示します。

表示された値 がすでに正しい 場合は、次のコマンド をスキップ できます。正しくない場合や表示されていない場合は、次のコマンドを実行します。
gcloud config set project <YOUR_PROJECT_ID>
次に、この Codelab のテンプレート作業ディレクトリを GitHub からクローンします。次のコマンドを実行します。これにより、adk-multimodal-tool ディレクトリに作業ディレクトリが作成されます。
git clone https://github.com/alphinside/adk-mcp-multimodal.git adk-multimodal-tool
ステップ 3: Cloud Shell エディタに慣れ、アプリケーションの作業ディレクトリを設定する
これで、コードエディタを設定してコーディングを行うことができます。ここでは Cloud Shell エディタを使用します。
[エディタを開く] ボタンをクリックすると、Cloud Shell エディタが開きます。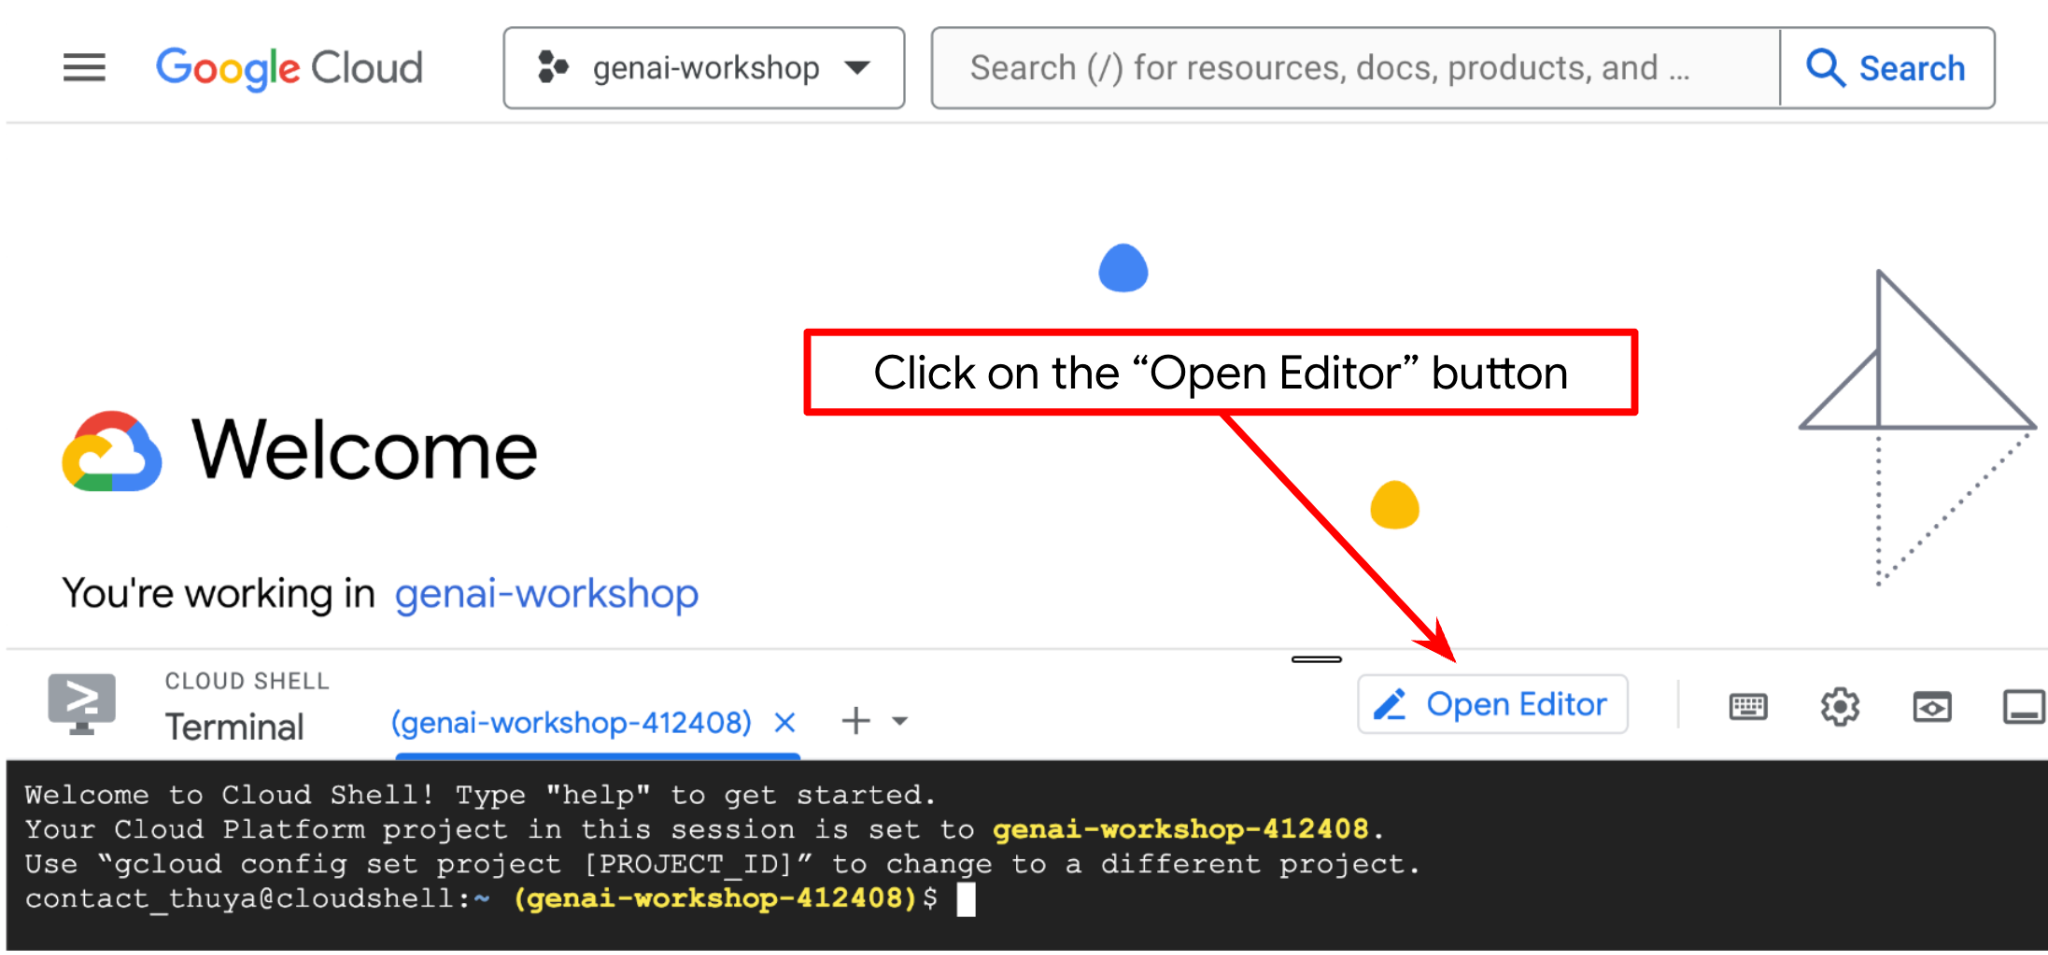
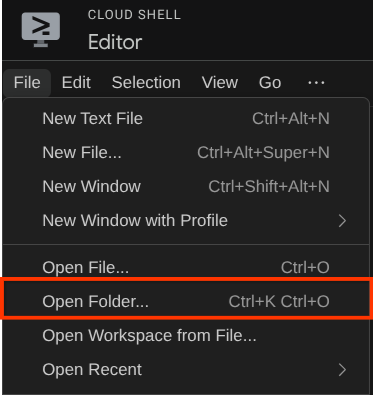
次に、Cloud Shell エディタの上部にある [ファイル -> フォルダを開く] に移動し、ユーザー名 ディレクトリを見つけて、adk-multimodal-tool ディレクトリを見つけて [OK] ボタンをクリックします。これにより、選択したディレクトリがメインの作業ディレクトリになります。この例では、ユーザー名は alvinprayuda であるため、ディレクトリ パスは次のようになります。
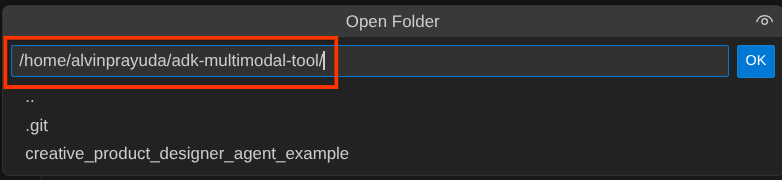
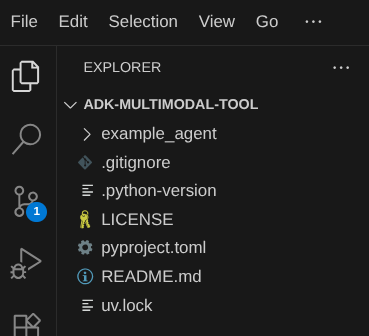
これで、Cloud Shell エディタの作業ディレクトリは次のようになります(adk-multimodal-tool 内)。
次に、エディタのターミナルを開きます。メニューバーで [ターミナル -> 新しいターミナル] をクリックするか、[Ctrl+Shift+C] を使用すると、ブラウザの下部にターミナル ウィンドウが開きます。

現在アクティブなターミナルは、adk-multimodal-tool 作業ディレクトリ内にある必要があります。この Codelab では Python 3.12 を使用し、uv Python プロジェクト マネージャーを使用して、Python のバージョンと仮想環境の作成と管理の必要性を簡素化します。この uv パッケージは、Cloud Shell にすでにプリインストールされています。
次のコマンドを実行して、.venv ディレクトリの仮想環境に必要な依存関係をインストールします。
uv sync --frozen
pyproject.toml を確認して、このチュートリアルの宣言された依存関係(google-adk, and python-dotenv)を確認します。
次に、次のコマンドを使用して必要な API を有効にする必要があります。これには時間がかかることがあります。
gcloud services enable aiplatform.googleapis.com
コマンドが正常に実行されると、次のようなメッセージが表示されます。
Operation "operations/..." finished successfully.
テンプレート エージェント構造は、クローンしたリポジトリの part2_starter_agent ディレクトリにすでに用意されています。このチュートリアルで使用できるように、まず名前を変更する必要があります。
mv part1_ckpt_agent product_photo_editor
次に、product_photo_editor/.env.example を product_photo_editor/.env にコピーします。
cp product_photo_editor/.env.example product_photo_editor/.env
product_photo_editor/.env ファイルを開くと、次のような内容が表示されます。
GOOGLE_GENAI_USE_VERTEXAI=1
GOOGLE_CLOUD_PROJECT=your-project-id
GOOGLE_CLOUD_LOCATION=global
次に、your-project-id の値を実際のプロジェクト ID に更新する必要があります。これで次のステップに進む準備ができました。
3. 🚀 Veo MCP サーバーを初期化する
まず、次のコマンドを使用して MCP サービス ディレクトリを作成します。
mkdir veo_mcp
次に、次のコマンドを使用して veo_mcp/main.py を作成します。
touch veo_mcp/main.py
次に、次のコードを veo_mcp/main.py にコピーします。
from fastmcp import FastMCP
from typing import Annotated
from pydantic import Field
import base64
import asyncio
import os
from google import genai
from google.genai import types
from dotenv import load_dotenv
import logging

# Load environment variables from .env file
load_dotenv()

mcp = FastMCP("Veo MCP Server")


@mcp.tool
async def generate_video_with_image(
    prompt: Annotated[
        str, Field(description="Text description of the video to generate")
    ],
    image_data: Annotated[
        str, Field(description="Base64-encoded image data to use as starting frame")
    ],
    negative_prompt: Annotated[
        str | None,
        Field(description="Things to avoid in the generated video"),
    ] = None,
) -> dict:
    """Generates a professional product marketing video from text prompt and starting image using Google's Veo API.

    This function uses an image as the first frame of the generated video and automatically
    enriches your prompt with professional video production quality guidelines to create
    high-quality marketing assets suitable for commercial use.

    AUTOMATIC ENHANCEMENTS APPLIED:
    - 4K cinematic quality with professional color grading
    - Smooth, stabilized camera movements
    - Professional studio lighting setup
    - Shallow depth of field for product focus
    - Commercial-grade production quality
    - Marketing-focused visual style

    PROMPT WRITING TIPS:
    Describe what you want to see in the video. Focus on:
    - Product actions/movements (e.g., "rotating slowly", "zooming into details")
    - Desired camera angles (e.g., "close-up of the product", "wide shot")
    - Background/environment (e.g., "minimalist white backdrop", "lifestyle setting")
    - Any specific details about the product presentation

    The system will automatically enhance your prompt with professional production quality.

    Args:
        prompt: Description of the video to generate. Focus on the core product presentation
                you want. The system will automatically add professional quality enhancements.
        image_data: Base64-encoded image data to use as the starting frame
        negative_prompt: Optional prompt describing what to avoid in the video

    Returns:
        dict: A dictionary containing:
            - status: 'success' or 'error'
            - message: Description of the result
            - video_data: Base64-encoded video data (on success only)
    """
    try:
        # Initialize the Gemini client
        client = genai.Client(
            vertexai=True,
            project=os.getenv("GOOGLE_CLOUD_PROJECT"),
            location=os.getenv("GOOGLE_CLOUD_LOCATION"),
        )

        # Decode the image
        image_bytes = base64.b64decode(image_data)
        print(f"Successfully decoded image data: {len(image_bytes)} bytes")

        # Create image object
        image = types.Image(image_bytes=image_bytes, mime_type="image/png")

        # Prepare the config
        config = types.GenerateVideosConfig(
            duration_seconds=8,
            number_of_videos=1,
        )

        if negative_prompt:
            config.negative_prompt = negative_prompt

        # Enrich the prompt for professional marketing quality
        enriched_prompt = enrich_prompt_for_marketing(prompt)

        # Generate the video (async operation)
        operation = client.models.generate_videos(
            model="veo-3.1-generate-preview",
            prompt=enriched_prompt,
            image=image,
            config=config,
        )

        # Poll until the operation is complete
        poll_count = 0
        while not operation.done:
            poll_count += 1
            print(f"Waiting for video generation to complete... (poll {poll_count})")
            await asyncio.sleep(5)
            operation = client.operations.get(operation)

        # Download the video and convert to base64
        video = operation.response.generated_videos[0]

        # Get video bytes and encode to base64
        video_bytes = video.video.video_bytes
        video_base64 = base64.b64encode(video_bytes).decode("utf-8")

        print(f"Video generated successfully: {len(video_bytes)} bytes")

        return {
            "status": "success",
            "message": f"Video with image generated successfully after {poll_count * 5} seconds",
            "complete_prompt": enriched_prompt,
            "video_data": video_base64,
        }
    except Exception as e:
        logging.error(e)
        return {
            "status": "error",
            "message": f"Error generating video with image: {str(e)}",
        }


def enrich_prompt_for_marketing(user_prompt: str) -> str:
    """Enriches user prompt with professional video production quality enhancements.

    Adds cinematic quality, professional lighting, smooth camera work, and marketing-focused
    elements to ensure high-quality product marketing videos.
    """
    enhancement_prefix = """Create a high-quality, professional product marketing video with the following characteristics:

TECHNICAL SPECIFICATIONS:
- 4K cinematic quality with professional color grading
- Smooth, stabilized camera movements
- Professional studio lighting setup with soft, even illumination
- Shallow depth of field for product focus
- High dynamic range (HDR) for vibrant colors

VISUAL STYLE:
- Clean, minimalist aesthetic suitable for premium brand marketing
- Elegant and sophisticated presentation
- Commercial-grade production quality
- Attention to detail in product showcase

USER'S SPECIFIC REQUIREMENTS:
"""

    enhancement_suffix = """

ADDITIONAL QUALITY GUIDELINES:
- Ensure smooth transitions and natural motion
- Maintain consistent lighting throughout
- Keep the product as the clear focal point
- Use professional camera techniques (slow pans, tracking shots, or dolly movements)
- Apply subtle motion blur for cinematic feel
- Ensure brand-appropriate tone and style"""

    return f"{enhancement_prefix}{user_prompt}{enhancement_suffix}"


if __name__ == "__main__":
    mcp.run()
次のコードは、次の処理を行います。
- Veo 3.1 動画生成ツールを ADK エージェントに公開する FastMCP サーバーを作成します。
- base64 エンコードされた画像、テキスト プロンプト、ネガティブ プロンプトを入力として受け入れます。
- Veo 3.1 API にリクエストを送信し、完了するまで 5 秒ごとにポーリングして、8 秒の動画を非同期で生成します。
- base64 エンコードされた動画データを、エンリッチされたプロンプトとともに返します。
この Veo MCP ツールにはエージェントと同じ環境変数が必要なため、.env ファイルをコピーして貼り付けるだけで済みます。次のコマンドを実行します。
cp product_photo_editor/.env veo_mcp/
次のコマンドを実行して、MCP サーバーが正しく実行されているかどうかをテストできます。
uv run veo_mcp/main.py
次のようなコンソールログが表示されます。
╭────────────────────────────────────────────────────────────────────────────╮
│                                                                            │
│        _ __ ___  _____           __  __  _____________    ____    ____     │
│       _ __ ___ .'____/___ ______/ /_/  |/  / ____/ __ \  |___ \  / __ \    │
│      _ __ ___ / /_  / __ `/ ___/ __/ /|_/ / /   / /_/ /  ___/ / / / / /    │
│     _ __ ___ / __/ / /_/ (__  ) /_/ /  / / /___/ ____/  /  __/_/ /_/ /     │
│    _ __ ___ /_/    \____/____/\__/_/  /_/\____/_/      /_____(*)____/      │
│                                                                            │
│                                                                            │
│                                FastMCP  2.0                                │
│                                                                            │
│                                                                            │
│                 🖥️  Server name:     Veo MCP Server                         │
│                 📦 Transport:       STDIO                                  │
│                                                                            │
│                 🏎️  FastMCP version: 2.12.5                                 │
│                 🤝 MCP SDK version: 1.16.0                                 │
│                                                                            │
│                 📚 Docs:            https://gofastmcp.com                  │
│                 🚀 Deploy:          https://fastmcp.cloud                  │
│                                                                            │
╰────────────────────────────────────────────────────────────────────────────╯


[10/22/25 08:28:53] INFO     Starting MCP server 'Veo MCP Server' with          server.py:1502
                             transport 'stdio'
Ctrl+C を使用して MCP サービス プロセスを強制終了します。このコマンドは、後で ADK MCP ツールセットから呼び出されます。次のステップに進んで、エージェントがこの MCP ツールを利用できるようにします。
4. 🚀 Veo MCP サーバーを ADK エージェントに接続する
次に、エージェントで使用できるように Veo MCP サーバーを接続します。まず、ツールセットを含む別のスクリプトを作成します。次のコマンドを実行します。
touch product_photo_editor/mcp_tools.py
次に、次のコードを product_photo_editor/mcp_tools.py にコピーします。
from google.adk.tools.mcp_tool.mcp_toolset import MCPToolset
from google.adk.tools.mcp_tool.mcp_session_manager import StdioConnectionParams
from mcp import StdioServerParameters


mcp_toolset = MCPToolset(
    connection_params=StdioConnectionParams(
        server_params=StdioServerParameters(
            command="uv",
            args=[
                "run",
                "veo_mcp/main.py",
            ],
        ),
        timeout=120, # seconds
    ),
)

# Option to connect to remote MCP server

# from google.adk.tools.mcp_tool.mcp_session_manager import StreamableHTTPConnectionParams

# mcp_toolset = MCPToolset(
#     connection_params=StreamableHTTPConnectionParams(
#         url="http://localhost:8000/mcp",
#         timeout=120,
#     ),
# )
上記のコードは、ADK MCPToolset を使用して MCP サーバーに接続する方法を示しています。この例では、STDIO 通信チャネルを使用して MCP サーバーに接続します。このコマンドでは、MCP サーバーの実行方法を指定し、タイムアウト パラメータを設定します。
5. 🚀 ツール呼び出しパラメータの変更
MCP サーバーツールの宣言では、ツールパラメータとして base64 文字列を指定するツール generate_video_with_image を設計しました。LLM にこの処理を依頼することはできないため、この処理を行うための具体的な戦略を設計する必要があります。
前のラボでは、ユーザーがアップロードした画像とツール レスポンス画像を before_model_callback で処理してアーティファクトとして保存しました。これは、事前に準備したエージェント テンプレートにも反映されています。これを利用して、次の戦略を実施します。
- 特定のツールパラメータで base64 文字列データの送信が必要な場合は、常に artifact_id 値を送信するように LLM に指示します。
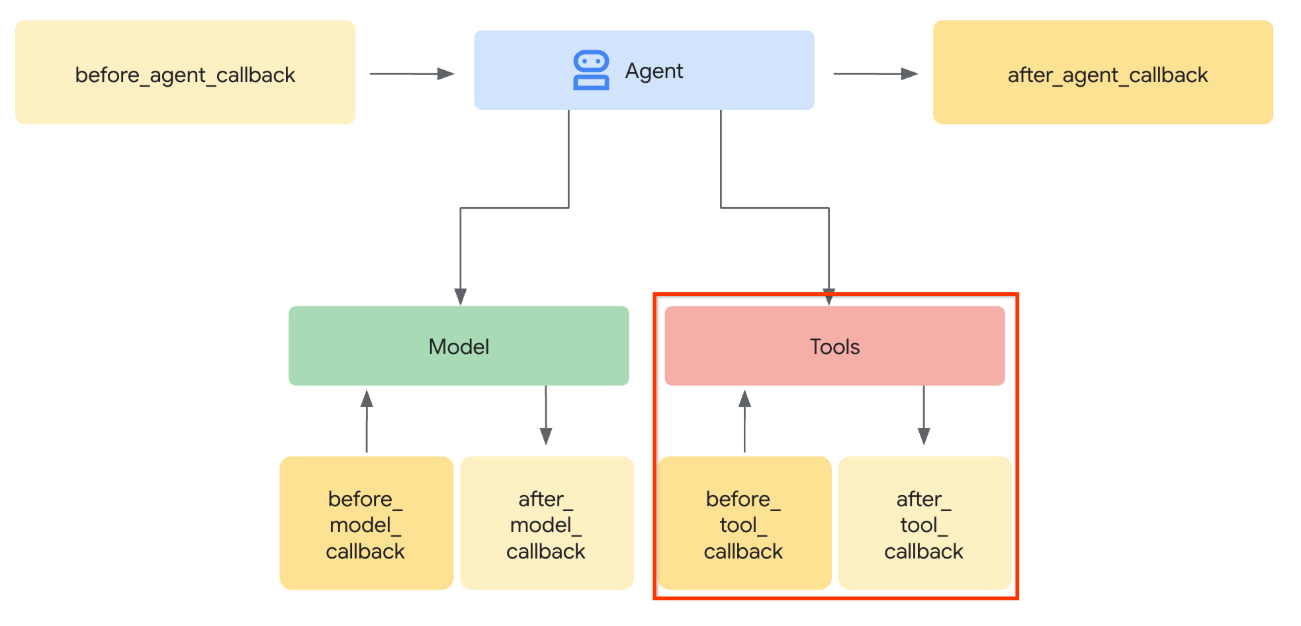
before_tool_callbackでツール呼び出しの呼び出しをインターセプトし、アーティファクトを読み込んでパラメータを artifact_id からバイト コンテンツに変換し、ツール引数を上書きします。
インターセプトする部分の可視化については、次の画像をご覧ください。
まず、before_tool_callback 関数を準備します。次のコマンドを実行して、新しいファイル product_photo_editor/tool_callbacks.py を作成します。
touch product_photo_editor/tool_callbacks.py
次に、次のコードをファイルにコピーします。
# product_photo_editor/tool_callbacks.py

from google.genai.types import Part
from typing import Any
from google.adk.tools.tool_context import ToolContext
from google.adk.tools.base_tool import BaseTool
from google.adk.tools.mcp_tool.mcp_tool import McpTool
import base64
import logging
import json
from mcp.types import CallToolResult


async def before_tool_modifier(
    tool: BaseTool, args: dict[str, Any], tool_context: ToolContext
):
    # Identify which tool input should be modified
    if isinstance(tool, McpTool) and tool.name == "generate_video_with_image":
        logging.info("Modify tool args for artifact: %s", args["image_data"])
        # Get the artifact filename from the tool input argument
        artifact_filename = args["image_data"]
        artifact = await tool_context.load_artifact(filename=artifact_filename)
        file_data = artifact.inline_data.data

        # Convert byte data to base64 string
        base64_data = base64.b64encode(file_data).decode("utf-8")

        # Then modify the tool input argument
        args["image_data"] = base64_data
上記のコードは、次の手順を示しています。
- 呼び出されたツールが McpTool オブジェクトであるかどうか、変更するターゲット ツール呼び出しであるかどうかを確認します。
image_data引数の値を取得します。これは base64 形式でリクエストされた引数ですが、LLM に artifact_id を返すようにリクエストします。tool_contextでアーティファクト サービスを利用してアーティファクトを読み込みます。image_data引数を base64 データで上書きします。
次に、このコールバックをエージェントに追加し、エージェントが常に base64 ツール引数を artifact ID で入力するように、手順を少し変更する必要があります。
product_photo_editor/agent.py を開き、次のコードで内容を変更します。
# product_photo_editor/agent.py

from google.adk.agents.llm_agent import Agent
from product_photo_editor.custom_tools import edit_product_asset
from product_photo_editor.mcp_tools import mcp_toolset
from product_photo_editor.model_callbacks import before_model_modifier
from product_photo_editor.tool_callbacks import before_tool_modifier
from product_photo_editor.prompt import AGENT_INSTRUCTION

root_agent = Agent(
    model="gemini-2.5-flash",
    name="product_photo_editor",
    description="""A friendly product photo editor assistant that helps small business
owners edit and enhance their product photos. Perfect for improving photos of handmade
goods, food products, crafts, and small retail items""",
    instruction=AGENT_INSTRUCTION
    + """
**IMPORTANT: Base64 Argument Rule on Tool Call**

If you found any tool call arguments that requires base64 data,
ALWAYS provide the artifact_id of the referenced file to
the tool call. NEVER ask user to provide base64 data.
Base64 data encoding process is out of your
responsibility and will be handled in another part of the system.
""",
    tools=[
        edit_product_asset,
        mcp_toolset,
    ],
    before_model_callback=before_model_modifier,
    before_tool_callback=before_tool_modifier,
)
それでは、エージェントとやり取りして、この変更をテストしてみましょう。次のコマンドを実行して、ウェブ開発 UI を実行します。
uv run adk web --port 8080
次の例のような出力が生成されます。これは、ウェブ インターフェースにアクセスできることを意味します。
INFO:     Started server process [xxxx]
INFO:     Waiting for application startup.

+-----------------------------------------------------------------------------+
| ADK Web Server started                                                      |
|                                                                             |
| For local testing, access at http://127.0.0.1:8080.                         |
+-----------------------------------------------------------------------------+

INFO:     Application startup complete.
INFO:     Uvicorn running on http://127.0.0.1:8080 (Press CTRL+C to quit)
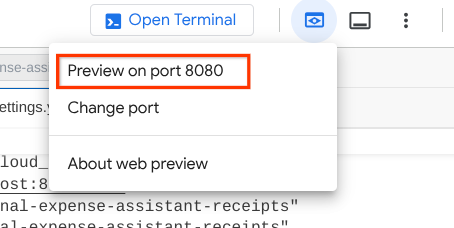
確認するには、URL を Ctrl+クリック するか、Cloud Shell エディタの上部にある [ウェブでプレビュー] ボタンをクリックして、[ポート 8080 でプレビュー] を選択します。
次のウェブページが表示されます。左上のプルダウン ボタンで利用可能なエージェントを選択し(この場合は product_photo_editor )、bot とやり取りできます。
次に、次の画像をアップロードし、エージェントにプロモーション クリップを生成するように依頼します。
Generate a slow zoom in and moving from left and right animation

次のエラーが発生します。
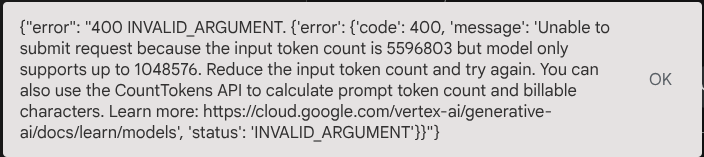
その理由は、ツールが結果を base64 文字列の形式で直接返したため、最大トークン数を超えているためです。次のセクションでこのエラーを処理しましょう。
6. 🚀 ツール レスポンスの変更
このセクションでは、MCP レスポンスからのツール レスポンスを処理します。次の処理を行います。
- ツールによる動画レスポンスをアーティファクト サービスに保存します。
- 代わりにアーティファクト識別子をエージェントに返します。
次のエージェント ランタイムでタップします。
まず、コールバック関数を実装します。product_photo_editor/tool_callbacks.py を開き、after_tool_modifier を実装するように変更します。
# product_photo_editor/tool_callbacks.py

from google.genai.types import Part
from typing import Any
from google.adk.tools.tool_context import ToolContext
from google.adk.tools.base_tool import BaseTool
from google.adk.tools.mcp_tool.mcp_tool import McpTool
import base64
import logging
import json
from mcp.types import CallToolResult


async def before_tool_modifier(
    tool: BaseTool, args: dict[str, Any], tool_context: ToolContext
):
    # Identify which tool input should be modified
    if isinstance(tool, McpTool) and tool.name == "generate_video_with_image":
        logging.info("Modify tool args for artifact: %s", args["image_data"])
        # Get the artifact filename from the tool input argument
        artifact_filename = args["image_data"]
        artifact = await tool_context.load_artifact(filename=artifact_filename)
        file_data = artifact.inline_data.data

        # Convert byte data to base64 string
        base64_data = base64.b64encode(file_data).decode("utf-8")

        # Then modify the tool input argument
        args["image_data"] = base64_data


async def after_tool_modifier(
    tool: BaseTool,
    args: dict[str, Any],
    tool_context: ToolContext,
    tool_response: dict | CallToolResult,
):
    if isinstance(tool, McpTool) and tool.name == "generate_video_with_image":
        tool_result = json.loads(tool_response.content[0].text)

        # Get the expected response field which contains the video data
        video_data = tool_result["video_data"]
        artifact_filename = f"video_{tool_context.function_call_id}.mp4"

        # Convert base64 string to byte data
        video_bytes = base64.b64decode(video_data)

        # Save the video as artifact
        await tool_context.save_artifact(
            filename=artifact_filename,
            artifact=Part(inline_data={"mime_type": "video/mp4", "data": video_bytes}),
        )

        # Remove the video data from the tool response
        tool_result.pop("video_data")

        # Then modify the tool response to include the artifact filename and remove the base64 string
        tool_result["video_artifact_id"] = artifact_filename
        logging.info(
            "Modify tool response for artifact: %s", tool_result["video_artifact_id"]
        )

        return tool_result
次に、この関数をエージェントに装備する必要があります。product_photo_editor/agent.py を開き、次のコードに変更します。
# product_photo_editor/agent.py

from google.adk.agents.llm_agent import Agent
from product_photo_editor.custom_tools import edit_product_asset
from product_photo_editor.mcp_tools import mcp_toolset
from product_photo_editor.model_callbacks import before_model_modifier
from product_photo_editor.tool_callbacks import (
    before_tool_modifier,
    after_tool_modifier,
)
from product_photo_editor.prompt import AGENT_INSTRUCTION

root_agent = Agent(
    model="gemini-2.5-flash",
    name="product_photo_editor",
    description="""A friendly product photo editor assistant that helps small business
owners edit and enhance their product photos. Perfect for improving photos of handmade
goods, food products, crafts, and small retail items""",
    instruction=AGENT_INSTRUCTION
    + """
**IMPORTANT: Base64 Argument Rule on Tool Call**

If you found any tool call arguments that requires base64 data,
ALWAYS provide the artifact_id of the referenced file to
the tool call. NEVER ask user to provide base64 data.
Base64 data encoding process is out of your
responsibility and will be handled in another part of the system.
""",
    tools=[
        edit_product_asset,
        mcp_toolset,
    ],
    before_model_callback=before_model_modifier,
    before_tool_callback=before_tool_modifier,
    after_tool_callback=after_tool_modifier,
)
これで、エージェントに写真の編集だけでなく、動画の生成も依頼できるようになりました。次のコマンドをもう一度実行します。
uv run adk web --port 8080
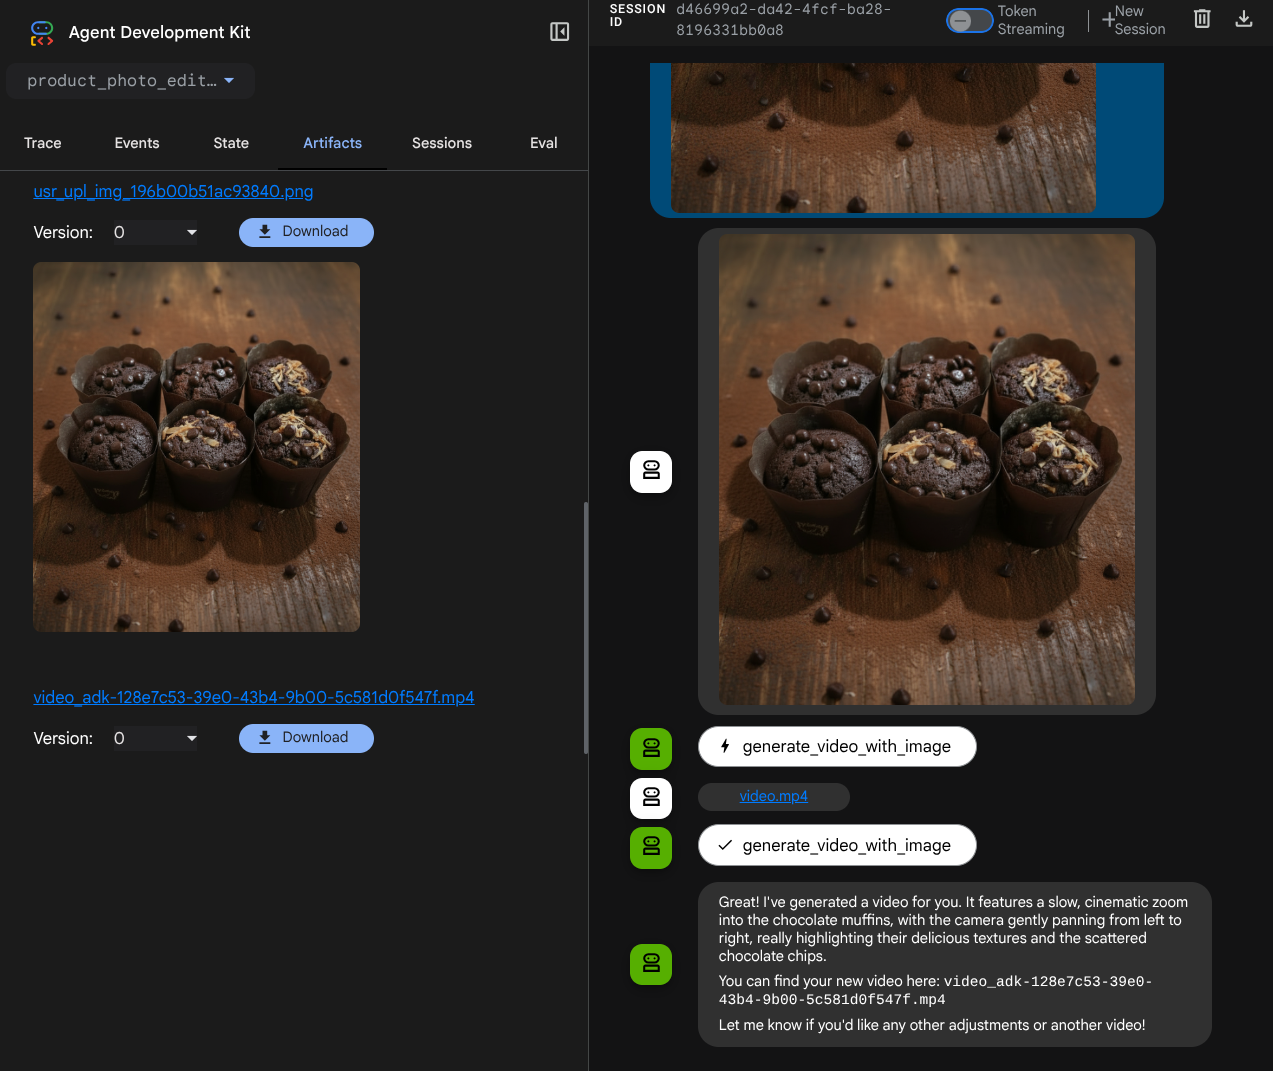
次に、この画像を使用して動画を作成してみます。
Generate a slow zoom in and moving from left and right animation
次の例のように動画が生成され、アーティファクトとして保存されます。
7. ⭐ まとめ
この Codelab で行ったことを振り返ってみましょう。主な学習内容は次のとおりです。
- マルチモーダル データ処理(ツール I/O): 生のバイトデータを直接渡すのではなく、ADK のアーティファクト サービスと専用のコールバックを使用して、ツールの入力と出力のマルチモーダル データ(画像や動画など)を管理する戦略を強化しました。
- MCP ツールセットの統合: ADK MCP ツールセットを介して FastMCP を使用して外部の Veo MCP サーバーを開発して統合し、エージェントに動画生成機能を追加しました。
- ツール入力の変更(before_tool_callback): generate_video_with_image ツール呼び出しをインターセプトし、LLM によって選択されたファイルの artifact_id を MCP サーバーの入力に必要な base64 エンコードされた画像データに変換するコールバックを実装しました。
- ツール出力の変更(after_tool_callback): MCP サーバーからの大きな base64 エンコードされた動画レスポンスをインターセプトし、動画を新しいアーティファクトとして保存し、クリーンな video_artifact_id 参照を LLM に返すコールバックを実装しました。
8. 🧹 クリーンアップ
この Codelab で使用したリソースについて、Google Cloud アカウントに課金されないようにするには、次の手順を行います。
- Google Cloud コンソールで、[リソースの管理] ページに移動します。
- プロジェクト リストで、削除するプロジェクトを選択し、[削除] をクリックします。
- ダイアログでプロジェクト ID を入力し、[シャットダウン] をクリックしてプロジェクトを削除します。