
1. 📖 소개
이전 Codelab에서는 ADK에서 멀티모달 데이터 상호작용을 설계하는 방법을 알아봅니다. 이제 MCP 도구 세트를 사용하여 MCP 서버와의 멀티모달 데이터 상호작용을 설계하는 방법을 자세히 알아보겠습니다. Veo MCP 서버를 활용하는 Veo 모델을 사용하여 짧은 동영상을 생성하는 기능을 통해 이전에 개발된 제품 사진 편집기 에이전트의 기능을 확장할 예정입니다.
Codelab을 통해 다음과 같이 단계별 접근 방식을 사용합니다.
- Google Cloud 프로젝트 및 기본 에이전트 디렉터리 준비
- 파일 데이터를 입력으로 요구하는 MCP 서버 구성
- MCP 서버에 연결할 수 있도록 ADK 에이전트 장착
- MCP 도구 세트에 대한 함수 호출 요청을 수정하는 프롬프트 전략 및 콜백 함수 설계
- MCP 도구 세트의 멀티모달 데이터 응답을 처리하는 콜백 함수 설계
아키텍처 개요
이 Codelab의 전체 상호작용은 다음 다이어그램에 나와 있습니다.

기본 요건
- Python 사용에 능숙함
- (선택사항) 에이전트 개발 키트 (ADK)에 관한 기초 Codelab
- (선택사항) ADK 멀티모달 도구 1부 Codelab : goo.gle/adk-multimodal-tool-1
학습할 내용
- 프롬프트 및 이미지 스타터를 사용하여 Veo 3.1로 짧은 형식 동영상을 만드는 방법
- FastMCP를 사용하여 멀티모달 MCP 서버를 개발하는 방법
- MCP 도구 세트를 사용하도록 ADK를 설정하는 방법
- 도구 콜백을 통해 MCP 도구 모음으로 도구 호출을 수정하는 방법
- 도구 콜백을 통해 MCP 도구 모음의 도구 응답을 수정하는 방법
필요한 항목
- Chrome 웹브라우저
- Gmail 계정
- 결제 계정이 사용 설정된 Cloud 프로젝트
이 Codelab은 초보자를 포함한 모든 수준의 개발자를 대상으로 하며 샘플 애플리케이션에서 Python을 사용합니다. 하지만 제시된 개념을 이해하는 데 Python 지식이 필요하지는 않습니다.
2. 🚀 ( 선택사항) 워크숍 개발 설정 준비
1단계: Cloud Console에서 활성 프로젝트 선택하기
Google Cloud 콘솔의 프로젝트 선택기 페이지에서 Google Cloud 프로젝트를 선택하거나 만듭니다 (콘솔의 왼쪽 상단 섹션 참고).

클릭하면 다음 예와 같이 모든 프로젝트 목록이 표시됩니다.

빨간색 상자로 표시된 값이 프로젝트 ID이며 이 값은 튜토리얼 전체에서 사용됩니다.
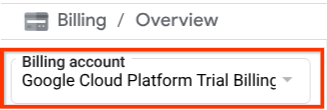
Cloud 프로젝트에 결제가 사용 설정되어 있는지 확인합니다. 이를 확인하려면 왼쪽 상단 표시줄에 있는 햄버거 아이콘 ☰을 클릭하여 탐색 메뉴를 표시하고 결제 메뉴를 찾습니다.

결제 / 개요 제목 ( 클라우드 콘솔의 왼쪽 상단 섹션) 아래에 'Google Cloud Platform 무료 체험판 결제 계정'이 표시되면 이 튜토리얼에서 프로젝트를 사용할 준비가 된 것입니다. 그렇지 않은 경우 이 튜토리얼의 시작 부분으로 돌아가서 체험판 결제 계정을 사용하세요.
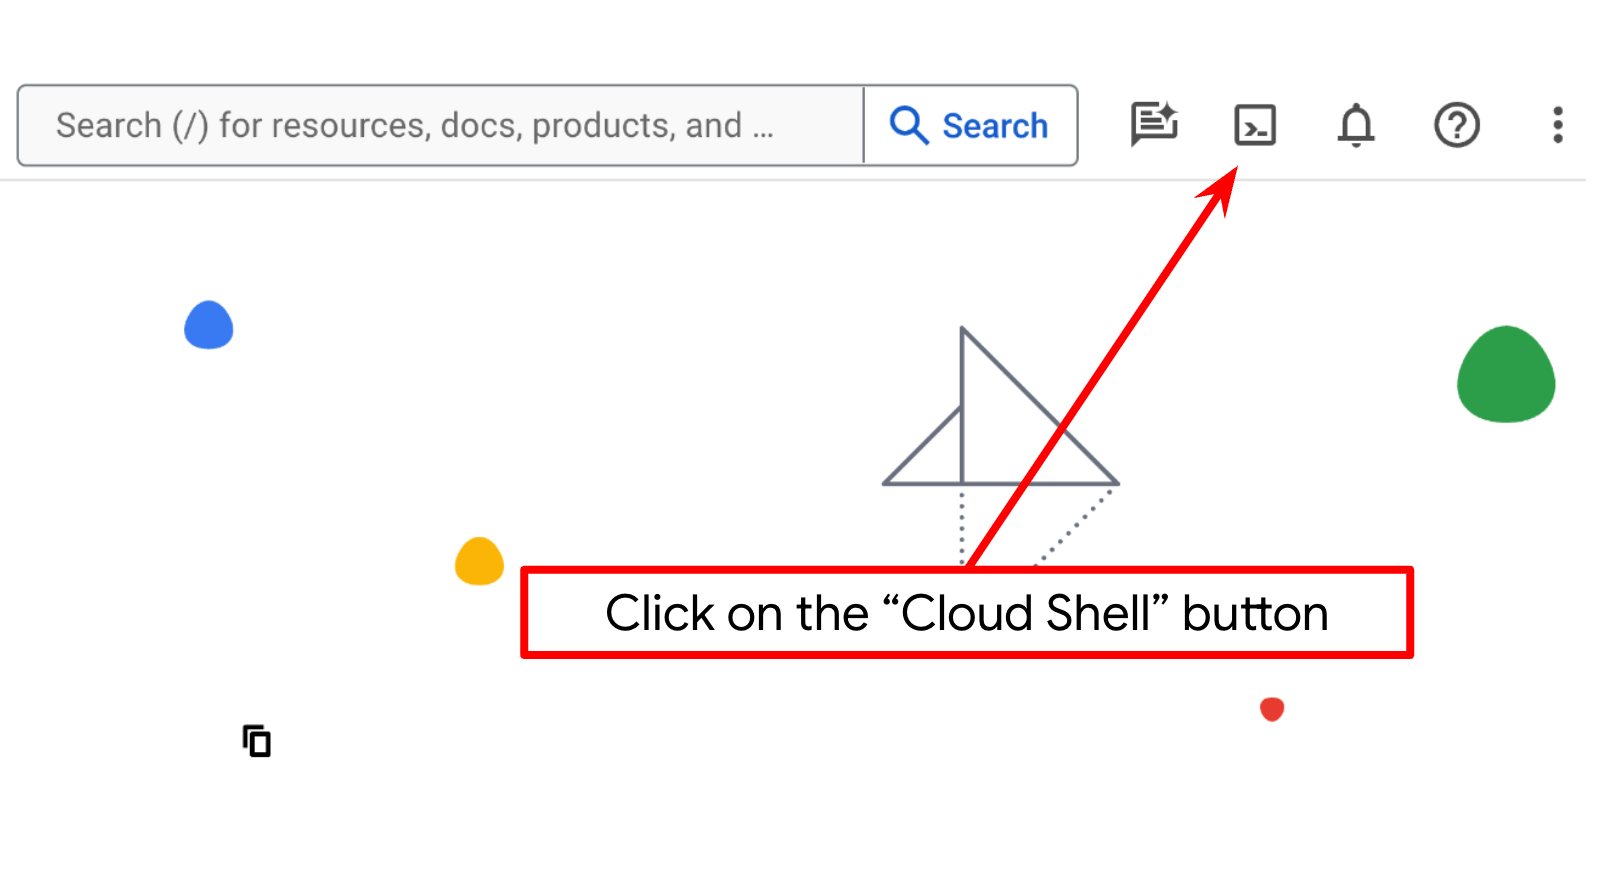
2단계: Cloud Shell 살펴보기
튜토리얼의 대부분에서 Cloud Shell을 사용합니다. Google Cloud 콘솔 상단에서 Cloud Shell 활성화를 클릭합니다. 승인을 요청하는 메시지가 표시되면 승인을 클릭합니다.

Cloud Shell에 연결되면 셸 ( 또는 터미널)이 계정으로 이미 인증되었는지 확인해야 합니다.
gcloud auth list
아래 예시 출력과 같이 개인 Gmail이 표시되면 모든 것이 정상입니다.
Credentialed Accounts

ACTIVE: *
ACCOUNT: alvinprayuda@gmail.com

To set the active account, run:
    $ gcloud config set account `ACCOUNT`
그렇지 않은 경우 브라우저를 새로고침하고 메시지가 표시되면 승인을 클릭하세요 ( 연결 문제로 인해 중단될 수 있음).
다음으로, 셸이 이미 보유한 올바른 프로젝트 ID로 구성되어 있는지 확인해야 합니다. 터미널에서 $아이콘 앞에 괄호 안에 값이 표시되면(아래 스크린샷에서 값은 'adk-multimodal-tool'임) 이 값은 활성 셸 세션에 구성된 프로젝트를 보여줍니다.

표시된 값이 이미 올바른 경우 다음 명령어를 건너뛸 수 있습니다. 하지만 올바르지 않거나 누락된 경우 다음 명령어를 실행합니다.
gcloud config set project <YOUR_PROJECT_ID>
그런 다음 GitHub에서 이 Codelab의 템플릿 작업 디렉터리를 클론하고 다음 명령어를 실행합니다. adk-multimodal-tool 디렉터리에 작업 디렉터리가 생성됩니다.
git clone https://github.com/alphinside/adk-mcp-multimodal.git adk-multimodal-tool
3단계: Cloud Shell 편집기 숙지 및 애플리케이션 작업 디렉터리 설정
이제 코드 편집기를 설정하여 코딩 작업을 할 수 있습니다. 이를 위해 Cloud Shell 편집기를 사용합니다.
편집기 열기 버튼을 클릭하면 Cloud Shell 편집기 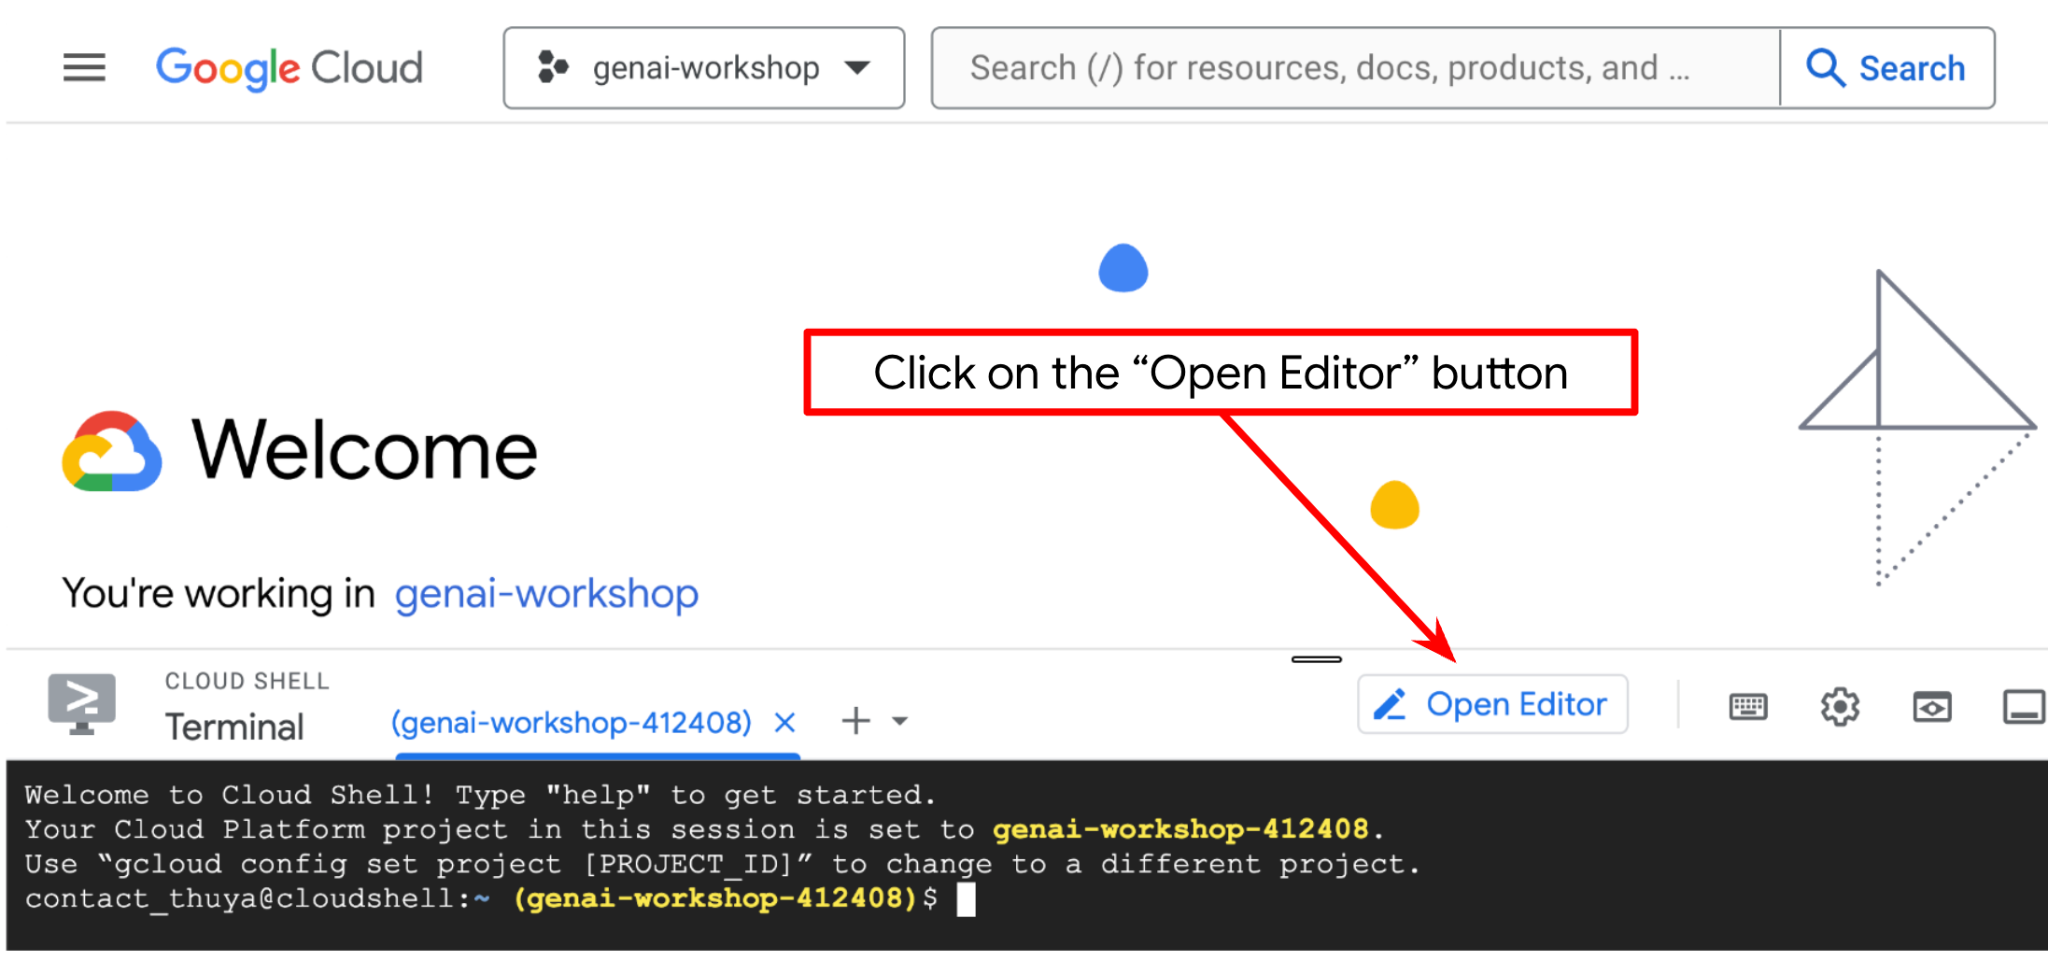 가 열립니다.
그런 다음 Cloud Shell 편집기의 상단 섹션으로 이동하여 File->Open Folder를 클릭하고 username 디렉터리를 찾은 다음 adk-multimodal-tool 디렉터리를 찾아 OK 버튼을 클릭합니다. 이렇게 하면 선택한 디렉터리가 기본 작업 디렉터리가 됩니다. 이 예시에서 사용자 이름은 alvinprayuda이므로 디렉터리 경로는 아래와 같습니다.
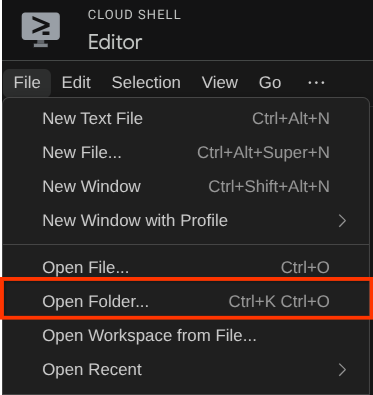
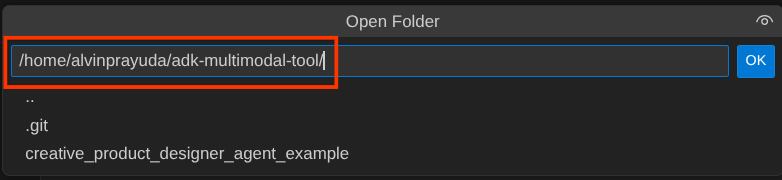
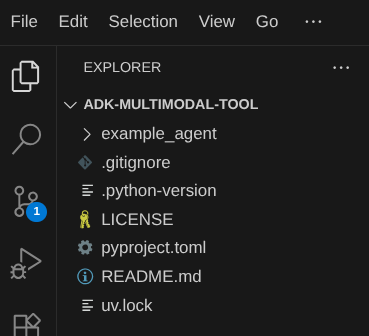
이제 Cloud Shell 편집기 작업 디렉터리가 다음과 같이 표시됩니다 ( adk-multimodal-tool 내부).
이제 편집기의 터미널을 엽니다. 메뉴 바에서 터미널 -> 새 터미널을 클릭하거나 Ctrl + Shift + C를 사용하여 브라우저 하단에 터미널 창을 열 수 있습니다.

현재 활성 터미널은 adk-multimodal-tool 작업 디렉터리 내에 있어야 합니다. 이 Codelab에서는 Python 3.12를 사용하고 uv python 프로젝트 관리자를 사용하여 Python 버전과 가상 환경을 만들고 관리할 필요성을 간소화합니다. 이 uv 패키지는 Cloud Shell에 이미 사전 설치되어 있습니다.
이 명령어를 실행하여 .venv 디렉터리의 가상 환경에 필요한 종속 항목을 설치합니다.
uv sync --frozen
pyproject.toml을 확인하여 이 튜토리얼의 선언된 종속 항목인 google-adk, and python-dotenv를 확인합니다.
이제 아래에 표시된 명령어를 통해 필요한 API를 사용 설정해야 합니다. 잠시 시간이 소요될 수 있습니다.
gcloud services enable aiplatform.googleapis.com
명령어가 성공적으로 실행되면 아래와 비슷한 메시지가 표시됩니다.
Operation "operations/..." finished successfully.
템플릿 에이전트 구조는 클론된 저장소의 part2_starter_agent 디렉터리 내에 이미 제공되어 있습니다. 이제 이 튜토리얼을 위해 먼저 이름을 변경해야 합니다.
mv part1_ckpt_agent product_photo_editor
그런 다음 product_photo_editor/.env.example을 product_photo_editor/.env에 복사합니다.
cp product_photo_editor/.env.example product_photo_editor/.env
product_photo_editor/.env 파일을 열면 아래와 같은 콘텐츠가 표시됩니다.
GOOGLE_GENAI_USE_VERTEXAI=1
GOOGLE_CLOUD_PROJECT=your-project-id
GOOGLE_CLOUD_LOCATION=global
그런 다음 your-project-id 값을 올바른 자체 프로젝트 ID로 업데이트해야 합니다. 이제 다음 단계를 진행할 준비가 되었습니다.
3. 🚀 Veo MCP 서버 초기화
먼저 이 명령어를 사용하여 MCP 서비스 디렉터리를 만듭니다.
mkdir veo_mcp
그런 다음 다음 명령어를 사용하여 veo_mcp/main.py를 만듭니다.
touch veo_mcp/main.py
그런 다음 다음 코드를 veo_mcp/main.py에 복사합니다.
from fastmcp import FastMCP
from typing import Annotated
from pydantic import Field
import base64
import asyncio
import os
from google import genai
from google.genai import types
from dotenv import load_dotenv
import logging

# Load environment variables from .env file
load_dotenv()

mcp = FastMCP("Veo MCP Server")


@mcp.tool
async def generate_video_with_image(
    prompt: Annotated[
        str, Field(description="Text description of the video to generate")
    ],
    image_data: Annotated[
        str, Field(description="Base64-encoded image data to use as starting frame")
    ],
    negative_prompt: Annotated[
        str | None,
        Field(description="Things to avoid in the generated video"),
    ] = None,
) -> dict:
    """Generates a professional product marketing video from text prompt and starting image using Google's Veo API.

    This function uses an image as the first frame of the generated video and automatically
    enriches your prompt with professional video production quality guidelines to create
    high-quality marketing assets suitable for commercial use.

    AUTOMATIC ENHANCEMENTS APPLIED:
    - 4K cinematic quality with professional color grading
    - Smooth, stabilized camera movements
    - Professional studio lighting setup
    - Shallow depth of field for product focus
    - Commercial-grade production quality
    - Marketing-focused visual style

    PROMPT WRITING TIPS:
    Describe what you want to see in the video. Focus on:
    - Product actions/movements (e.g., "rotating slowly", "zooming into details")
    - Desired camera angles (e.g., "close-up of the product", "wide shot")
    - Background/environment (e.g., "minimalist white backdrop", "lifestyle setting")
    - Any specific details about the product presentation

    The system will automatically enhance your prompt with professional production quality.

    Args:
        prompt: Description of the video to generate. Focus on the core product presentation
                you want. The system will automatically add professional quality enhancements.
        image_data: Base64-encoded image data to use as the starting frame
        negative_prompt: Optional prompt describing what to avoid in the video

    Returns:
        dict: A dictionary containing:
            - status: 'success' or 'error'
            - message: Description of the result
            - video_data: Base64-encoded video data (on success only)
    """
    try:
        # Initialize the Gemini client
        client = genai.Client(
            vertexai=True,
            project=os.getenv("GOOGLE_CLOUD_PROJECT"),
            location=os.getenv("GOOGLE_CLOUD_LOCATION"),
        )

        # Decode the image
        image_bytes = base64.b64decode(image_data)
        print(f"Successfully decoded image data: {len(image_bytes)} bytes")

        # Create image object
        image = types.Image(image_bytes=image_bytes, mime_type="image/png")

        # Prepare the config
        config = types.GenerateVideosConfig(
            duration_seconds=8,
            number_of_videos=1,
        )

        if negative_prompt:
            config.negative_prompt = negative_prompt

        # Enrich the prompt for professional marketing quality
        enriched_prompt = enrich_prompt_for_marketing(prompt)

        # Generate the video (async operation)
        operation = client.models.generate_videos(
            model="veo-3.1-generate-preview",
            prompt=enriched_prompt,
            image=image,
            config=config,
        )

        # Poll until the operation is complete
        poll_count = 0
        while not operation.done:
            poll_count += 1
            print(f"Waiting for video generation to complete... (poll {poll_count})")
            await asyncio.sleep(5)
            operation = client.operations.get(operation)

        # Download the video and convert to base64
        video = operation.response.generated_videos[0]

        # Get video bytes and encode to base64
        video_bytes = video.video.video_bytes
        video_base64 = base64.b64encode(video_bytes).decode("utf-8")

        print(f"Video generated successfully: {len(video_bytes)} bytes")

        return {
            "status": "success",
            "message": f"Video with image generated successfully after {poll_count * 5} seconds",
            "complete_prompt": enriched_prompt,
            "video_data": video_base64,
        }
    except Exception as e:
        logging.error(e)
        return {
            "status": "error",
            "message": f"Error generating video with image: {str(e)}",
        }


def enrich_prompt_for_marketing(user_prompt: str) -> str:
    """Enriches user prompt with professional video production quality enhancements.

    Adds cinematic quality, professional lighting, smooth camera work, and marketing-focused
    elements to ensure high-quality product marketing videos.
    """
    enhancement_prefix = """Create a high-quality, professional product marketing video with the following characteristics:

TECHNICAL SPECIFICATIONS:
- 4K cinematic quality with professional color grading
- Smooth, stabilized camera movements
- Professional studio lighting setup with soft, even illumination
- Shallow depth of field for product focus
- High dynamic range (HDR) for vibrant colors

VISUAL STYLE:
- Clean, minimalist aesthetic suitable for premium brand marketing
- Elegant and sophisticated presentation
- Commercial-grade production quality
- Attention to detail in product showcase

USER'S SPECIFIC REQUIREMENTS:
"""

    enhancement_suffix = """

ADDITIONAL QUALITY GUIDELINES:
- Ensure smooth transitions and natural motion
- Maintain consistent lighting throughout
- Keep the product as the clear focal point
- Use professional camera techniques (slow pans, tracking shots, or dolly movements)
- Apply subtle motion blur for cinematic feel
- Ensure brand-appropriate tone and style"""

    return f"{enhancement_prefix}{user_prompt}{enhancement_suffix}"


if __name__ == "__main__":
    mcp.run()
다음 코드는 다음 작업을 실행합니다.
- ADK 에이전트에 Veo 3.1 동영상 생성 도구를 노출하는 FastMCP 서버를 만듭니다.
- base64 인코딩 이미지,텍스트 프롬프트,부정적 프롬프트를 입력으로 허용합니다.
- Veo 3.1 API에 요청을 제출하고 완료될 때까지 5초마다 폴링하여 8초 분량의 동영상을 비동기식으로 생성합니다.
- 강화된 프롬프트와 함께 base64로 인코딩된 동영상 데이터를 반환합니다.
이 Veo MCP 도구에는 에이전트와 동일한 환경 변수가 필요하므로 .env 파일을 복사하여 붙여넣으면 됩니다. 다음 명령어를 실행하여 이를 수행합니다.
cp product_photo_editor/.env veo_mcp/
이제 다음 명령어를 실행하여 MCP 서버가 올바르게 실행되는지 테스트할 수 있습니다.
uv run veo_mcp/main.py
그러면 다음과 같은 콘솔 로그가 표시됩니다.
╭────────────────────────────────────────────────────────────────────────────╮
│                                                                            │
│        _ __ ___  _____           __  __  _____________    ____    ____     │
│       _ __ ___ .'____/___ ______/ /_/  |/  / ____/ __ \  |___ \  / __ \    │
│      _ __ ___ / /_  / __ `/ ___/ __/ /|_/ / /   / /_/ /  ___/ / / / / /    │
│     _ __ ___ / __/ / /_/ (__  ) /_/ /  / / /___/ ____/  /  __/_/ /_/ /     │
│    _ __ ___ /_/    \____/____/\__/_/  /_/\____/_/      /_____(*)____/      │
│                                                                            │
│                                                                            │
│                                FastMCP  2.0                                │
│                                                                            │
│                                                                            │
│                 🖥️  Server name:     Veo MCP Server                         │
│                 📦 Transport:       STDIO                                  │
│                                                                            │
│                 🏎️  FastMCP version: 2.12.5                                 │
│                 🤝 MCP SDK version: 1.16.0                                 │
│                                                                            │
│                 📚 Docs:            https://gofastmcp.com                  │
│                 🚀 Deploy:          https://fastmcp.cloud                  │
│                                                                            │
╰────────────────────────────────────────────────────────────────────────────╯


[10/22/25 08:28:53] INFO     Starting MCP server 'Veo MCP Server' with          server.py:1502
                             transport 'stdio'
이제 Ctrl+C를 사용하여 MCP 서비스 프로세스를 종료합니다. 이 명령어는 나중에 ADK MCP 도구 모음에서 호출됩니다. 에이전트가 이 MCP 도구를 사용할 수 있도록 다음 단계로 이동할 수 있습니다.
4. 🚀 Veo MCP 서버를 ADK 에이전트에 연결
이제 에이전트가 사용할 수 있도록 Veo MCP 서버를 연결해 보겠습니다. 먼저 도구 모음을 포함하는 다른 스크립트를 만들어 보겠습니다. 다음 명령어를 실행합니다.
touch product_photo_editor/mcp_tools.py
그런 다음 다음 코드를 product_photo_editor/mcp_tools.py에 복사합니다.
from google.adk.tools.mcp_tool.mcp_toolset import MCPToolset
from google.adk.tools.mcp_tool.mcp_session_manager import StdioConnectionParams
from mcp import StdioServerParameters


mcp_toolset = MCPToolset(
    connection_params=StdioConnectionParams(
        server_params=StdioServerParameters(
            command="uv",
            args=[
                "run",
                "veo_mcp/main.py",
            ],
        ),
        timeout=120, # seconds
    ),
)

# Option to connect to remote MCP server

# from google.adk.tools.mcp_tool.mcp_session_manager import StreamableHTTPConnectionParams

# mcp_toolset = MCPToolset(
#     connection_params=StreamableHTTPConnectionParams(
#         url="http://localhost:8000/mcp",
#         timeout=120,
#     ),
# )
위 코드는 ADK MCPToolset을 사용하여 MCP 서버에 연결하는 방법을 보여줍니다. 이 예에서는 STDIO 통신 채널을 사용하여 MCP 서버에 연결합니다. 명령어에서 MCP 서버를 실행하는 방법과 제한 시간 매개변수를 설정하는 방법을 지정합니다.
5. 🚀 도구 호출 매개변수 수정
MCP 서버 도구 선언에서 base64 문자열을 도구 매개변수로 지정하는 도구 generate_video_with_image를 설계했습니다. LLM에 이 작업을 요청할 수 없으므로 이를 처리하기 위한 구체적인 전략을 설계해야 합니다.
이전 실습에서는 아티팩트로 저장될 사용자 업로드 및 도구 응답 이미지를 before_model_callback에서 처리했으며, 이는 이전에 준비한 에이전트 템플릿에도 반영됩니다. 이 정보를 활용하여 다음 전략을 실행합니다.
- 특정 도구 매개변수에서 base64 문자열 데이터를 전송해야 하는 경우 항상 artifact_id 값을 전송하도록 LLM에 지시
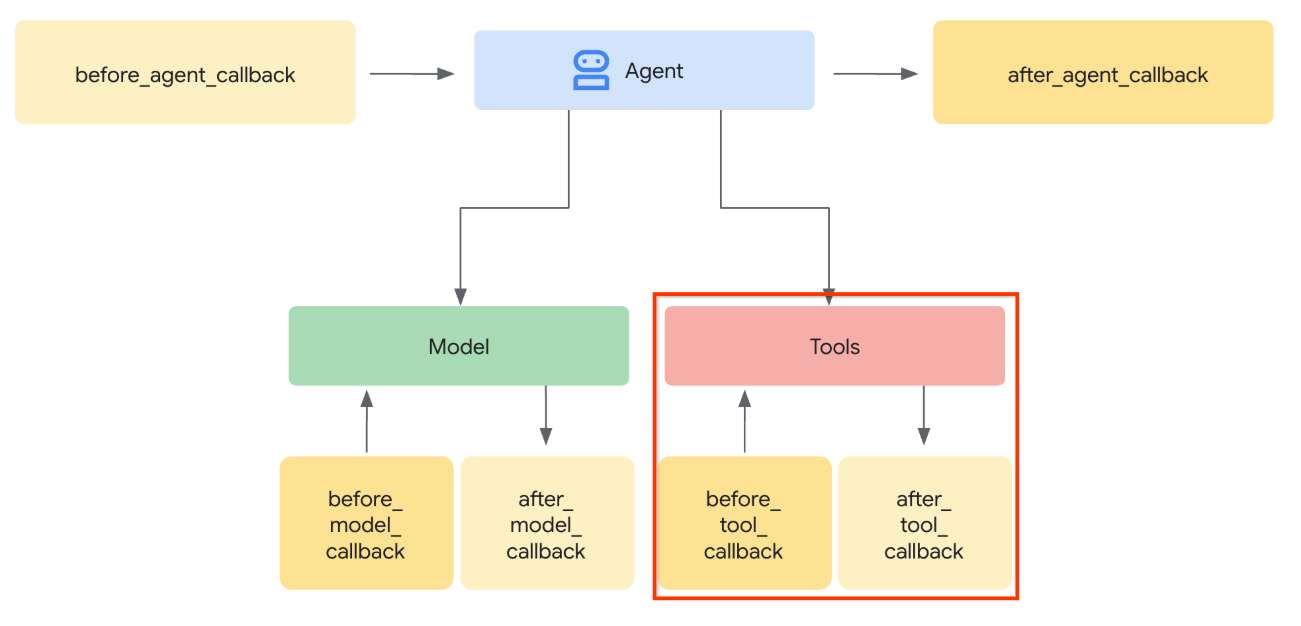
before_tool_callback에서 도구 호출을 가로채고 아티팩트를 로드하여 artifact_id에서 바이트 콘텐츠로 매개변수를 변환하고 도구 인수를 덮어씁니다.
차단할 부분의 시각화는 아래 이미지를 참고하세요.
먼저 다음 명령어를 실행하여 before_tool_callback 함수를 준비하고 새 파일 product_photo_editor/tool_callbacks.py를 만듭니다.
touch product_photo_editor/tool_callbacks.py
그런 다음 다음 코드를 파일에 복사합니다.
# product_photo_editor/tool_callbacks.py

from google.genai.types import Part
from typing import Any
from google.adk.tools.tool_context import ToolContext
from google.adk.tools.base_tool import BaseTool
from google.adk.tools.mcp_tool.mcp_tool import McpTool
import base64
import logging
import json
from mcp.types import CallToolResult


async def before_tool_modifier(
    tool: BaseTool, args: dict[str, Any], tool_context: ToolContext
):
    # Identify which tool input should be modified
    if isinstance(tool, McpTool) and tool.name == "generate_video_with_image":
        logging.info("Modify tool args for artifact: %s", args["image_data"])
        # Get the artifact filename from the tool input argument
        artifact_filename = args["image_data"]
        artifact = await tool_context.load_artifact(filename=artifact_filename)
        file_data = artifact.inline_data.data

        # Convert byte data to base64 string
        base64_data = base64.b64encode(file_data).decode("utf-8")

        # Then modify the tool input argument
        args["image_data"] = base64_data
위 코드는 다음 단계를 보여줍니다.
- 호출된 도구가 McpTool 객체이고 수정하려는 타겟 도구 호출인지 확인합니다.
- base64 형식으로 요청된 인수이지만 LLM에 artifact_id를 반환하도록 요청하는
image_data인수의 값을 가져옵니다. tool_context에서 아티팩트 서비스를 활용하여 아티팩트를 로드합니다.image_data인수를 base64 데이터로 덮어씁니다.
이제 이 콜백을 에이전트에 추가하고 에이전트가 항상 base64 도구 인수를 아티팩트 ID로 채우도록 안내를 약간 수정해야 합니다.
product_photo_editor/agent.py를 열고 콘텐츠를 다음 코드로 수정합니다.
# product_photo_editor/agent.py

from google.adk.agents.llm_agent import Agent
from product_photo_editor.custom_tools import edit_product_asset
from product_photo_editor.mcp_tools import mcp_toolset
from product_photo_editor.model_callbacks import before_model_modifier
from product_photo_editor.tool_callbacks import before_tool_modifier
from product_photo_editor.prompt import AGENT_INSTRUCTION

root_agent = Agent(
    model="gemini-2.5-flash",
    name="product_photo_editor",
    description="""A friendly product photo editor assistant that helps small business
owners edit and enhance their product photos. Perfect for improving photos of handmade
goods, food products, crafts, and small retail items""",
    instruction=AGENT_INSTRUCTION
    + """
**IMPORTANT: Base64 Argument Rule on Tool Call**

If you found any tool call arguments that requires base64 data,
ALWAYS provide the artifact_id of the referenced file to
the tool call. NEVER ask user to provide base64 data.
Base64 data encoding process is out of your
responsibility and will be handled in another part of the system.
""",
    tools=[
        edit_product_asset,
        mcp_toolset,
    ],
    before_model_callback=before_model_modifier,
    before_tool_callback=before_tool_modifier,
)
이제 에이전트와 상호작용하여 이 수정사항을 테스트해 보겠습니다. 다음 명령어를 실행하여 웹 개발 UI를 실행합니다.
uv run adk web --port 8080
다음 예와 같은 출력이 생성됩니다. 이는 웹 인터페이스에 이미 액세스할 수 있음을 의미합니다.
INFO:     Started server process [xxxx]
INFO:     Waiting for application startup.

+-----------------------------------------------------------------------------+
| ADK Web Server started                                                      |
|                                                                             |
| For local testing, access at http://127.0.0.1:8080.                         |
+-----------------------------------------------------------------------------+

INFO:     Application startup complete.
INFO:     Uvicorn running on http://127.0.0.1:8080 (Press CTRL+C to quit)
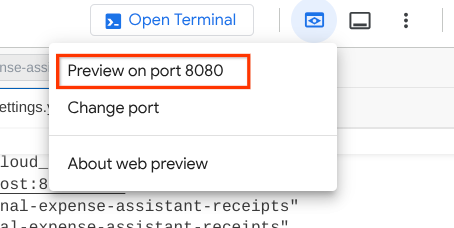
이제 URL을 Ctrl + 클릭하거나 Cloud Shell 편집기의 상단 영역에 있는 웹 미리보기 버튼을 클릭하고 포트 8080에서 미리보기를 선택하여 확인할 수 있습니다.
다음 웹페이지가 표시되며, 여기에서 왼쪽 상단의 드롭다운 버튼 ( 이 경우 product_photo_editor)에서 사용 가능한 에이전트를 선택하고 봇과 상호작용할 수 있습니다.
그런 다음 다음 이미지를 업로드하고 에이전트에게 이 이미지로 프로모션 클립을 생성해 달라고 요청합니다.
Generate a slow zoom in and moving from left and right animation

다음 오류가 발생합니다.
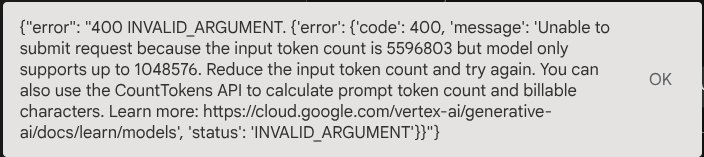
왜냐하면 도구에서 base64 문자열 형식으로 결과를 직접 반환하므로 최대 토큰을 초과합니다. 이제 다음 섹션에서 이 오류를 처리해 보겠습니다.
6. 🚀 도구 응답 수정
이 섹션에서는 MCP 응답에서 도구 응답을 처리합니다. 다음 작업을 수행합니다.
- 도구의 동영상 응답을 아티팩트 서비스에 저장
- 아티팩트 식별자를 에이전트에 대신 반환
다음 상담사 런타임에서 탭합니다.
먼저 콜백 함수를 구현합니다. product_photo_editor/tool_callbacks.py를 열고 after_tool_modifier를 구현하도록 수정합니다.
# product_photo_editor/tool_callbacks.py

from google.genai.types import Part
from typing import Any
from google.adk.tools.tool_context import ToolContext
from google.adk.tools.base_tool import BaseTool
from google.adk.tools.mcp_tool.mcp_tool import McpTool
import base64
import logging
import json
from mcp.types import CallToolResult


async def before_tool_modifier(
    tool: BaseTool, args: dict[str, Any], tool_context: ToolContext
):
    # Identify which tool input should be modified
    if isinstance(tool, McpTool) and tool.name == "generate_video_with_image":
        logging.info("Modify tool args for artifact: %s", args["image_data"])
        # Get the artifact filename from the tool input argument
        artifact_filename = args["image_data"]
        artifact = await tool_context.load_artifact(filename=artifact_filename)
        file_data = artifact.inline_data.data

        # Convert byte data to base64 string
        base64_data = base64.b64encode(file_data).decode("utf-8")

        # Then modify the tool input argument
        args["image_data"] = base64_data


async def after_tool_modifier(
    tool: BaseTool,
    args: dict[str, Any],
    tool_context: ToolContext,
    tool_response: dict | CallToolResult,
):
    if isinstance(tool, McpTool) and tool.name == "generate_video_with_image":
        tool_result = json.loads(tool_response.content[0].text)

        # Get the expected response field which contains the video data
        video_data = tool_result["video_data"]
        artifact_filename = f"video_{tool_context.function_call_id}.mp4"

        # Convert base64 string to byte data
        video_bytes = base64.b64decode(video_data)

        # Save the video as artifact
        await tool_context.save_artifact(
            filename=artifact_filename,
            artifact=Part(inline_data={"mime_type": "video/mp4", "data": video_bytes}),
        )

        # Remove the video data from the tool response
        tool_result.pop("video_data")

        # Then modify the tool response to include the artifact filename and remove the base64 string
        tool_result["video_artifact_id"] = artifact_filename
        logging.info(
            "Modify tool response for artifact: %s", tool_result["video_artifact_id"]
        )

        return tool_result
그런 다음 상담사에게 이 기능을 장착해야 합니다. product_photo_editor/agent.py를 열고 다음 코드로 수정합니다.
# product_photo_editor/agent.py

from google.adk.agents.llm_agent import Agent
from product_photo_editor.custom_tools import edit_product_asset
from product_photo_editor.mcp_tools import mcp_toolset
from product_photo_editor.model_callbacks import before_model_modifier
from product_photo_editor.tool_callbacks import (
    before_tool_modifier,
    after_tool_modifier,
)
from product_photo_editor.prompt import AGENT_INSTRUCTION

root_agent = Agent(
    model="gemini-2.5-flash",
    name="product_photo_editor",
    description="""A friendly product photo editor assistant that helps small business
owners edit and enhance their product photos. Perfect for improving photos of handmade
goods, food products, crafts, and small retail items""",
    instruction=AGENT_INSTRUCTION
    + """
**IMPORTANT: Base64 Argument Rule on Tool Call**

If you found any tool call arguments that requires base64 data,
ALWAYS provide the artifact_id of the referenced file to
the tool call. NEVER ask user to provide base64 data.
Base64 data encoding process is out of your
responsibility and will be handled in another part of the system.
""",
    tools=[
        edit_product_asset,
        mcp_toolset,
    ],
    before_model_callback=before_model_modifier,
    before_tool_callback=before_tool_modifier,
    after_tool_callback=after_tool_modifier,
)
이제 에이전트에게 사진 편집뿐만 아니라 동영상 생성도 요청할 수 있습니다. 다음 명령어를 다시 실행합니다.
uv run adk web --port 8080
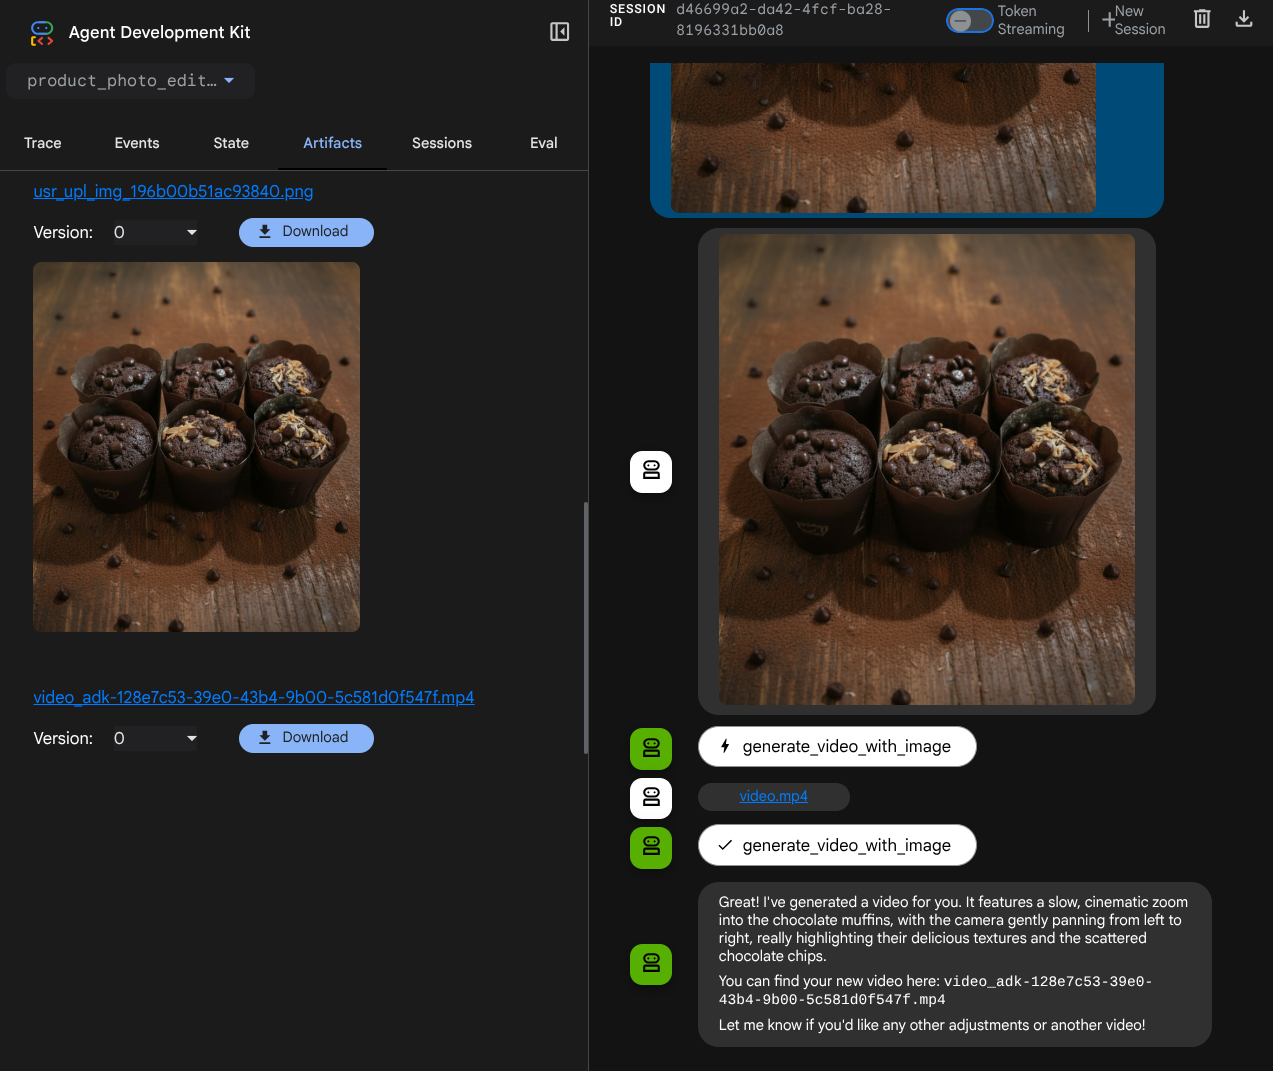
그런 다음 이 이미지를 사용하여 동영상을 만들어 보세요.
Generate a slow zoom in and moving from left and right animation
아래 예시와 같이 생성된 동영상이 아티팩트로 저장되어 표시됩니다.
7. ⭐ 요약
이제 이 Codelab에서 이미 수행한 작업을 다시 살펴보겠습니다. 주요 학습 내용은 다음과 같습니다.
- 멀티모달 데이터 처리 (도구 I/O): 원시 바이트 데이터를 직접 전달하는 대신 ADK의 아티팩트 서비스와 특수 콜백을 사용하여 도구 입력 및 출력을 위한 멀티모달 데이터 (예: 이미지 및 동영상)를 관리하는 전략을 강화했습니다.
- MCP 도구 세트 통합: ADK MCP 도구 세트를 통해 FastMCP를 사용하여 외부 Veo MCP 서버를 개발하고 통합하여 에이전트에 동영상 생성 기능을 추가했습니다.
- 도구 입력 수정 (before_tool_callback): generate_video_with_image 도구 호출을 가로채는 콜백을 구현하여 파일의 artifact_id (LLM에서 선택)를 MCP 서버의 입력에 필요한 base64로 인코딩된 이미지 데이터로 변환했습니다.
- 도구 출력 수정 (after_tool_callback): MCP 서버에서 큰 base64 인코딩 동영상 응답을 가로채고, 동영상을 새 아티팩트로 저장하고, LLM에 깨끗한 video_artifact_id 참조를 반환하는 콜백을 구현했습니다.
8. 🧹 정리
이 Codelab에서 사용한 리소스의 비용이 Google Cloud 계정에 청구되지 않도록 하려면 다음 단계를 따르세요.
- Google Cloud 콘솔에서 리소스 관리 페이지로 이동합니다.
- 프로젝트 목록에서 삭제할 프로젝트를 선택하고 삭제를 클릭합니다.
- 대화상자에서 프로젝트 ID를 입력하고 종료를 클릭하여 프로젝트를 삭제합니다.