
1. Overview
In Part 1, we successfully transformed chaotic, unstructured PDFs into clean, intelligent and structured tables in BigQuery using Knowledge Catalog and DataScan. Now, we have a robust data warehouse. In Part 2, we set up AlloyDB as our transactional backbone and federated our BigQuery tables into it, creating a unified data layer without duplicating a single byte.
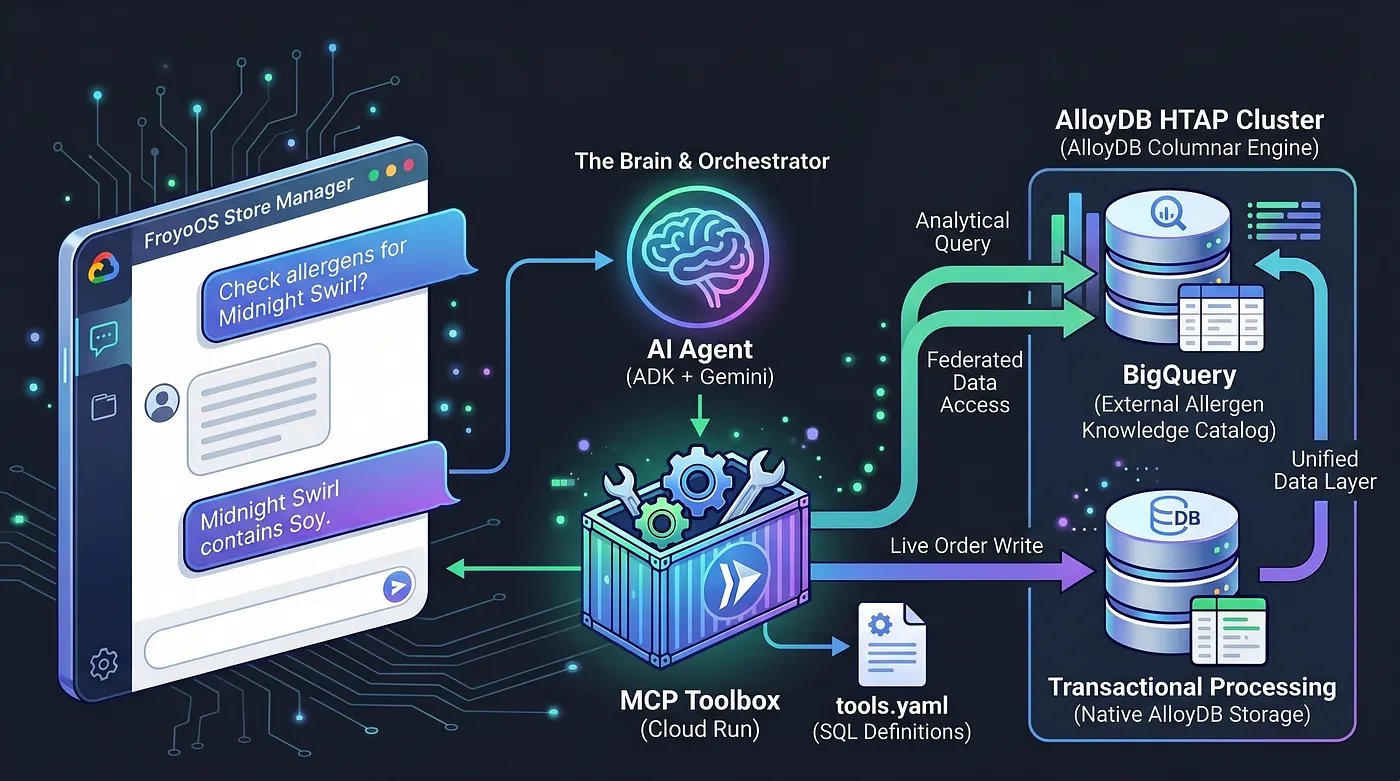
Today, we build the brain. We are creating a Multi-Agent application — the "FroyoOS Store Manager" — that sits on top of this data layer to answer questions, check allergens, and process live orders.
The Challenge: Decoupling AI from your Agent
When building an AI Agent that needs to talk to databases, the most common anti-pattern is forcing the data and AI logic directly into your Python application. This makes your app fragile, insecure, and incredibly difficult to maintain as your data architecture grows.
To solve this, we are using the Model Context Protocol (MCP) Toolbox. The MCP Toolbox acts as our unified data abstraction layer. We define our database operations declaratively in a simple tools.yaml file. We deploy this toolbox as a secure, serverless endpoint on Google Cloud Run. Our AI Agent simply connects to this endpoint and says, "Execute the ‘place_order' tool."
The Power of HTAP
Before we start building the agent, let's talk about why the title of this post specifically calls out HTAP (Hybrid Transactional/Analytical Processing).
In a traditional architecture, if an AI Agent needed to process a live user order (a transactional OLTP workload) and cross-reference thousands of complex ingredient mappings (an analytical OLAP workload), your Python application would have to juggle connections to two entirely different databases. This creates severe latency, security overhead, and fragile state management.
We turned AlloyDB into an HTAP powerhouse by natively federating our BigQuery data warehouse directly into PostgreSQL. Because of this HTAP architecture, our AI Agent today only needs to talk to one database endpoint. It can insert live transactions into the live_orders table and run heavy analytical scans against the federated BigQuery froyo_data dataset in the exact same breath, without duplicating a single byte of data. Let's see how we expose this engine to our AI.
Let's start building!
What you'll learn
- How to set up AlloyDB Cluster, Instance and Networking at the click of a button
- How to set up extension to prepare for the federation
- How to set up federation from BigQuery to AlloyDB
- Test it out
Requirements
2. Before you begin
Create a project
- In the Google Cloud Console, on the project selector page, select or create a Google Cloud project.
- Make sure that billing is enabled for your Cloud project. Learn how to check if billing is enabled on a project.
- You'll use Cloud Shell, a command-line environment running in Google Cloud. Click Activate Cloud Shell at the top of the Google Cloud console.

- Once connected to Cloud Shell, you check that you're already authenticated and that the project is set to your project ID using the following command:
gcloud auth list
- Run the following command in Cloud Shell to confirm that the gcloud command knows about your project.
gcloud config list project
- If you want to authenticate
gcloud auth login
- If your project is not set, use the following command to set it:
export PROJECT_ID=<YOUR_PROJECT_ID>
gcloud config set project <YOUR_PROJECT_ID>
- Enable the required APIs: Run this command to enable all the required APIs:
gcloud services enable \
  alloydb.googleapis.com \
  bigquery.googleapis.com \
  run.googleapis.com \
  cloudbuild.googleapis.com \
  artifactregistry.googleapis.com \
  iam.googleapis.com \
  secretmanager.googleapis.com \
  compute.googleapis.com \
  servicenetworking.googleapis.com
Gotchas & Troubleshooting
The "Ghost Project" Syndrome | You ran |
The Billing Barricade | You enabled the project, but forgot the billing account. AlloyDB is a high-performance engine; it won't start if the "gas tank" (billing) is empty. |
API Propagation Lag | You clicked "Enable APIs," but the command line still says |
Quota Quags | If you're using a brand-new trial account, you might hit a regional quota for AlloyDB instances. If |
3. Preparing the Data
Ensure that the structured data that we extracted from unstructured PDFs are available in BigQuery and the AlloyDB federation of BigQuery data is also established and tested. If you haven't completed those steps, this is a good time to go and execute those simple steps from here and here for parts 1 and 2 respectively.
Note:
If you are trying this codelab, you shouldn't execute the cleanup step of part 2 (deleting the cluster and instance step) because we need the AlloyDB orchestration for our agentic system demonstrated here.
In addition to this data we already created in part 2, we need to create one additional table in the AlloyDB instance. Go to AlloyDB Studio using the link:
https://console.cloud.google.com/alloydb/locations/us-central1/clusters/my-alloydb-cluster/studio
Change the cluster name in the link above if you are using a different cluster.
In the AlloyDB Studio, in a new Query Editor tab, run the following statement:
CREATE TABLE live_orders (
    order_id SERIAL PRIMARY KEY,
    customer_name VARCHAR(100),
    product_id VARCHAR(100),
    quantity INT,
    order_status VARCHAR(50) DEFAULT 'Pending',
    created_at TIMESTAMP DEFAULT CURRENT_TIMESTAMP
);
This should create the live_orders table in your database.
4. Defining the Abstraction (The tools.yaml)
First, we formally register our database operations. We create a tools.yaml file that defines how our agent interacts with the AlloyDB which has both the transactional and analytical data (analytical data from BigQuery federation).
- Go to your Cloud Shell Terminal. Toggle to Editor mode.
- Create a new folder in your root directory: "froyo-agent"
- Inside the folder, create a tools.yaml file and paste the following content: (replace with your own values for project, cluster, instance, and password)
# tools.yaml
sources:
    alloydb-source:
        kind: "alloydb-postgres"
        project: "*******"
        region: "us-central1"
        cluster: "my-alloydb-cluster"
        instance: "my-primary-inst"
        database: "postgres"
        user: "postgres"
        password: "*******"
        ipType: "private"


tools:
  check_allergens:
    kind: postgres-sql
    source: alloydb-source
    description: Queries the federated BigQuery tables to find allergens for a product.
    statement: |
      SELECT a.allergen_name
      FROM consistsof c
      INNER JOIN product p ON c.product_id = p.product_id
      INNER JOIN ingredient i ON c.ingredient_id = i.ingredient_name
      INNER JOIN containsallergen a ON i.ingredient_id = a.ingredient_id
      WHERE UPPER(p.product_name) LIKE UPPER($1)
    parameters:
      - name: product_name
        type: string
        description: The name of the product to check. (e.g., '%Midnight%')


  place_order:
    kind: postgres-sql
    source: alloydb-source
    description: Inserts a new live transaction into the native AlloyDB orders table.
    statement: |
      INSERT INTO live_orders (customer_name, product_id, quantity)
      VALUES ($1, (SELECT product_id FROM product WHERE product_name ILIKE '%' || $2 || '%' LIMIT 1), $3) RETURNING order_id;
    parameters:
      - name: customer_name
        type: string
        description: The name of the customer placing the order.
      - name: product_name
        type: string
        description: The name of the product being ordered.
      - name: quantity
        type: integer
        description: The quantity of the product being ordered.


toolsets:
  alloydb_tools:
    - check_allergens
    - place_order
We have limited our agent capabilities to 2 tools — check allergens and place order.
5. Deploying the Toolbox to Cloud Run
To make this available to our application, we securely deploy the toolbox using the gcloud CLI. This creates our abstraction layer endpoint.
- Toggle to the Cloud Shell Terminal, and navigate into the working directory by running the command:
cd froyo-agent
- Save the tools.yaml in a secret named "tools-froyo":
gcloud secrets create tools-froyo --data-file=tools.yaml
- Deploy the MCP Toolbox container to Cloud Run
export IMAGE=us-central1-docker.pkg.dev/database-toolbox/toolbox/toolbox:latest
gcloud run deploy toolbox-froyo \
    --image $IMAGE \
    --service-account toolbox-identity \
    --region us-central1 \
    --set-secrets "/app/tools.yaml=tools-froyo:latest" \
    --args="--config=/app/tools.yaml","--address=0.0.0.0","--port=8080" \
    --network easy-alloydb-vpc \
    --subnet easy-alloydb-subnet \
    --allow-unauthenticated \
    --vpc-egress private-ranges-only
The "network" and "subnet" values need to be replaced if you have used values different from what we configured in Part 2 codelab.
- Note down the resulting Cloud Run URL (e.g., https://toolbox-froyo-xxx.run.app).
We will use this deployed MCP Toolbox endpoint in the agent configuration step.
6. The Agentic Backend (app.py)
With our database abstracted away, our Python code can focus entirely on orchestration and reasoning.
We are using Agent Development Kit (ADK) alongside Flask. The ADK provides enterprise-grade session memory (InMemorySessionService), meaning our agent remembers the context of the conversation. It natively integrates with ToolboxSyncClient to seamlessly pull our tools from Cloud Run.
Here's your app.py:
https://github.com/AbiramiSukumaran/froyo-data/blob/main/app.py
The simple Python Flask app connects the ADK agent to the tools we have defined in our Toolbox that in turn interacts with AlloyDB (and BigQuery federated data as well) and responds to the user.
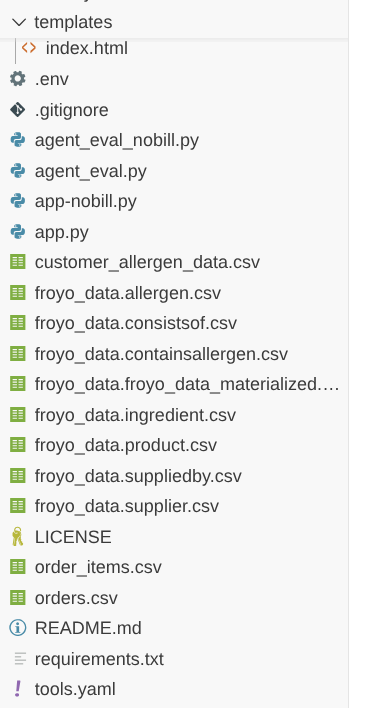
To get this project in your Cloud Shell Editor, you can clone the repository for the agent by running the following commands from your Cloud Shell Terminal:
cd

git clone https://github.com/AbiramiSukumaran/froyo-data
You should see the following project structure:
Steps to continue to experience the data without the billing account:
- The following data files are made available in the repo for convenience:
- https://github.com/AbiramiSukumaran/froyo-data/blob/main/froyo_data.allergen.csv
- https://github.com/AbiramiSukumaran/froyo-data/blob/main/froyo_data.consistsof.csv
- https://github.com/AbiramiSukumaran/froyo-data/blob/main/froyo_data.containsallergen.csv
- https://github.com/AbiramiSukumaran/froyo-data/blob/main/froyo_data.froyo_data_materialized.csv
- https://github.com/AbiramiSukumaran/froyo-data/blob/main/froyo_data.ingredient.csv
- https://github.com/AbiramiSukumaran/froyo-data/blob/main/froyo_data.product.csv
- https://github.com/AbiramiSukumaran/froyo-data/blob/main/froyo_data.suppliedby.csv
- https://github.com/AbiramiSukumaran/froyo-data/blob/main/froyo_data.supplier.csv
These files should be present in the same folder as the app.py.
B. The Python file named app-nobill.py in the same path
- In the project root folder, there is a file named app-nobill.py
- This file is designed to create the same app experience but without the explicit need to connect to these data sources as the data has been made available in files.
- All the other files as mentioned in the lab should be intact for this version also (just no need to execute the app.py file)
7. The UI and Running the App
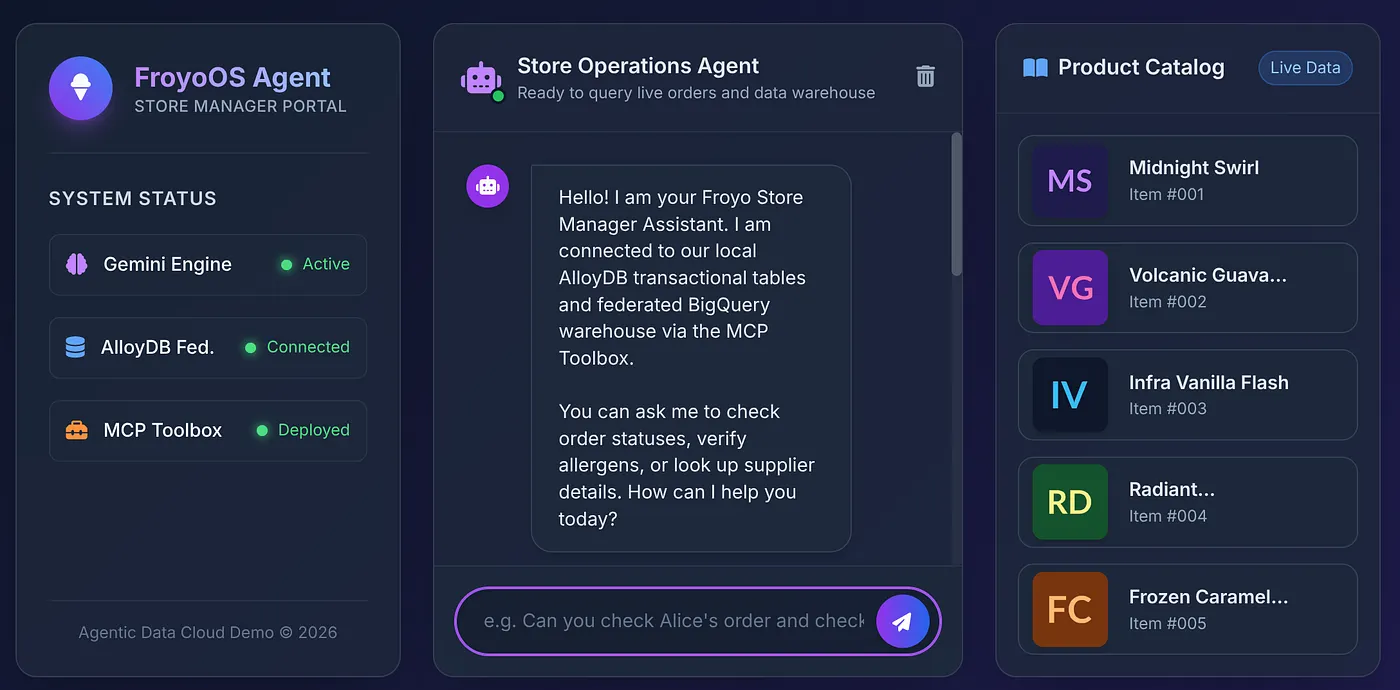
To give our Store Managers a proper experience, we created a sleek, glassmorphic UI (templates/index.html) featuring a live product catalog sidebar and an interactive chat interface.
You can find the index.html in the repo file here:
https://github.com/AbiramiSukumaran/froyo-data/blob/main/templates/index.html
Before running the application, ensure you have your dependencies in your requirements.txt file with the following content:
Flask>=3.0.0
google-genai>=0.1.0
mcp>=1.0.0
google-adk
toolbox-core
toolbox-langchain
python-dotenv
and your .env file populated:
GOOGLE_API_KEY=***
MCP_TOOLBOX_SERVER_URL=***
How to get your GOOGLE_API_KEY ?
Follow the instructions in this blog to set up your Google API Key.
How to get your MCP_TOOLBOX_SERVER_URL?
We set this up in the previous step in this codelab and you copied the deployed MCP Toolbox endpoint. Use that link in for the MCP_TOOLBOX_SERVER_URL environment variable.
Run your app:
From the Cloud Shell Terminal, making sure you're in the project folder, run the following commands one by one:
Navigate into the project root folder:
cd froyo-data
Install dependencies:
pip install -r requirements.txt
Executing the python file:
python app.py
Click the link that shows up in the terminal or open http://localhost:8080!
8. The Ultimate Test
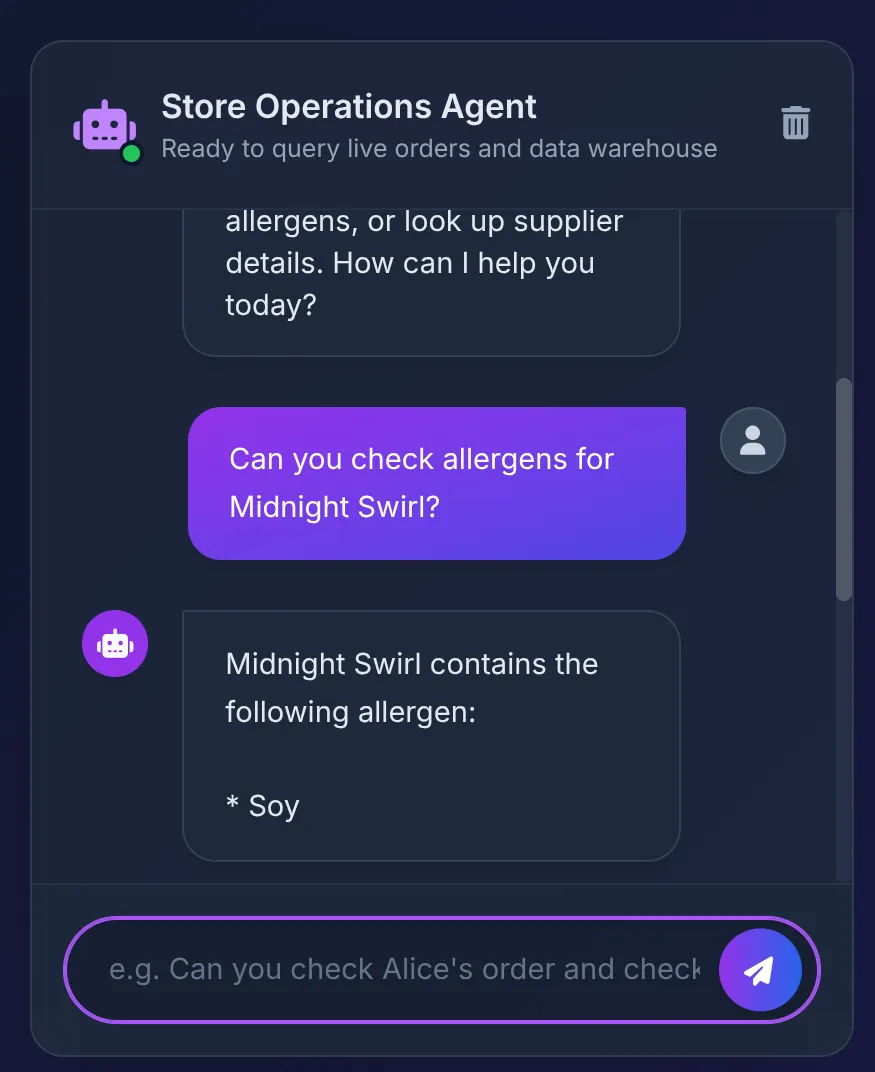
Let's click a product from the catalog to ask the agent:
Does Midnight Swirl have any allergens?
You should see the response:
Behind the scenes:
- The ADK Agent receives the prompt and decides to use the check_allergens tool.
- It securely calls the MCP Toolbox on Cloud Run.
- The Toolbox executes the query in AlloyDB, which instantly federates to BigQuery to scan the complex relationships we built in Part 1.
- The database returns "Soy", which the Agent neatly summarizes in the UI.
Next, we say:
Order 2 Midnight Swirl for Alice.
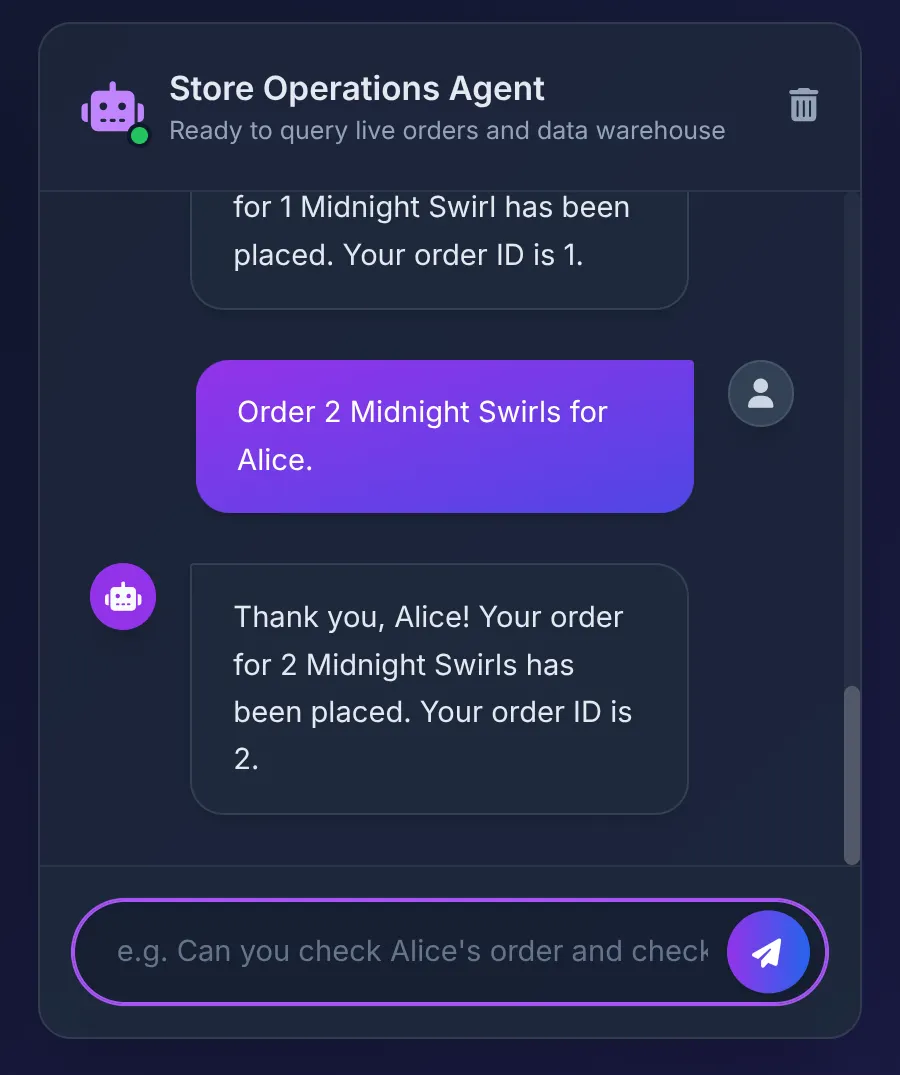
The Agent passes the string "Midnight Swirl" to the Toolbox. The underlying SQL dynamically resolves the string to an integer ID via BigQuery, inserts the live order into AlloyDB, and confirms the transaction.
Code Repo
9. Clean up
Once this lab is done, do not forget to delete the AlloyDB cluster and instance.
It should clean up the cluster along with its instance(s).
10. Congratulations on your Agent!
Think about what we just accomplished:
Our well orchestrated agentic system interacts just with MCP Toolbox for databases. This behind the scenes handles the tool call and the data to AI logic of our application, keeping the flow simple:
- Our transactional app (running on AlloyDB) can handle rapid, concurrent user sessions.
- When it needs heavy analytical data or historical context (like supplier details or complex ingredient mappings), it queries the BigQuery froyo_dataschema.
- Zero ETL. No data pipelines breaking. No out-of-sync databases. We store once (in BQ) and compute where we need it.
Now that our agent & data foundation — both analytical and transactional — are complete, lets move onto the next part.
What's Next?
Our Agent works perfectly... on the happy path. In Part 4, we are going to build an Agent Evaluation pipeline to rigorously test the validity, grounding, and performance of our agentic system. See you there!