
1. Overview
In this codelab, we are going to build something fun. Imagine a digital bazaar where your AI Agent is the smartest, wittiest shopkeeper around.
Meet Raju, your new AI shopkeeper. He sells amazing digital artifacts, but you have to bargain with him to get them!
We will use Gemini 3 (the brain), ADK (the Agent Development Kit - the body), and Google Cloud Run (the shop location) to bring Raju to life.

What you will learn
We will build the entire stack for a modern Agentic Application:
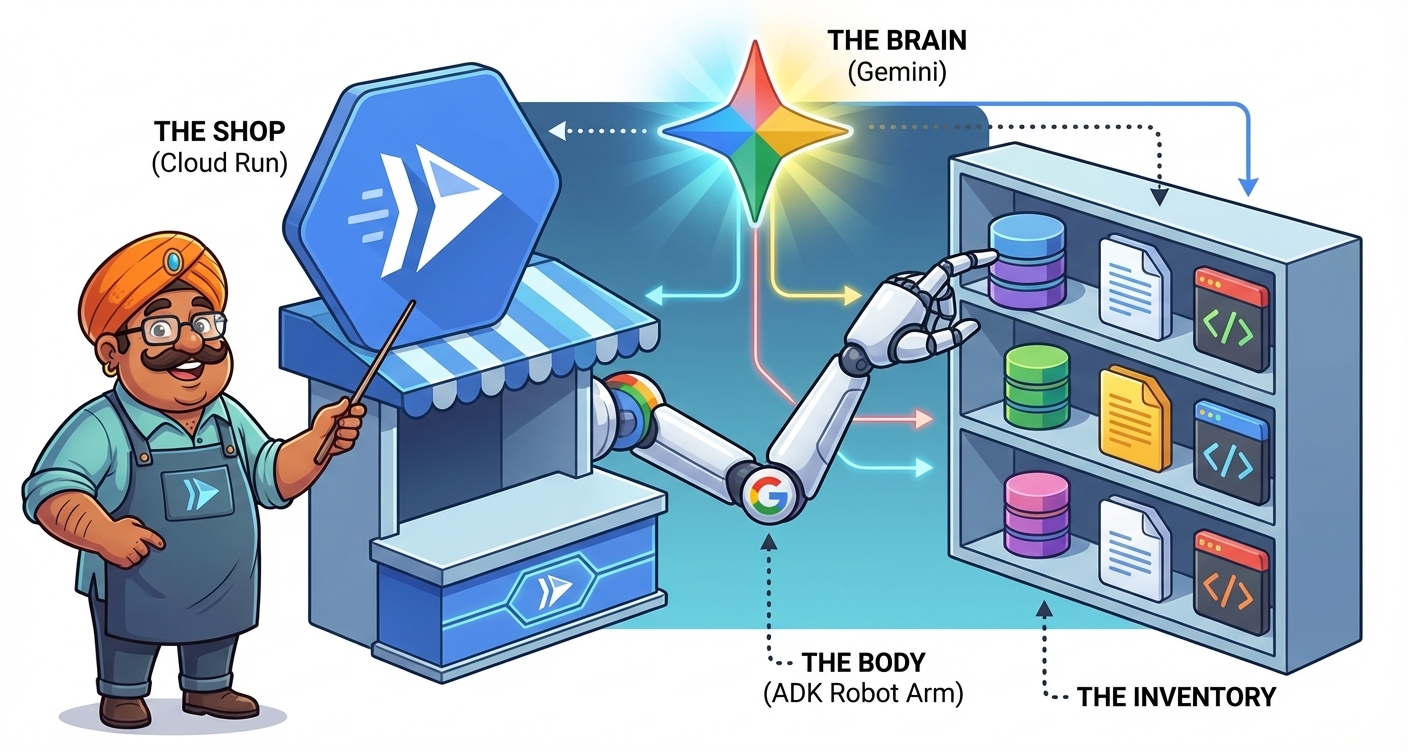
- The Shop (Cloud Run): Where your app lives on the internet.
- The Brain (Gemini 3): The intelligence that powers Raju.
- The Body (ADK): The framework connecting the brain to tools.
- The Inventory (Tools): Python code that Raju uses to check stock.
- The Storefront (UI): The interface your customers see.
You will learn how to:
- Set up your "Digital Dukaan" (Google Cloud Environment).
- "Hire" Raju (Get Gemini 3 API Keys).
- Teach Raju to bargain (System Instructions & Personas).
- Give Raju an inventory (ADK Tools).
- Build a shopfront (Frontend UI).
- Open for business (Deploy to Cloud Run).
What you need
- A Google Cloud Project.
- A sense of humor (for bargaining).
- Basic Python knowledge.
2. Setting up the Dukaan (Cloud Project)
Before we build Raju, we need a shop location. In the cloud, that means a Project with a Billing Account.
Step 1: Activate Billing

Use the banner at the top of this codelab to get a trial billing account that can be used for this tutorial. If you are already connected to a billing account, you can skip this step.
Step 2: Create Project

- Go to the Create Project Page.
- Enter a unique Project Name (e.g.,
raju-shop-agent). - In the "Billing Account" drop-down, select your Trial Billing Account.
- Click CREATE and wait for the project to be ready.
Step 3: Verify Billing Link

- Go to the Linked Billing Account Page.
- If you see an option to "Link a billing account", click it.
- Ensure the Trial Billing Account is selected.
- You are now ready to build!
Summary
In this step, you set up your Google Cloud Project and Billing Account, creating the foundation for your application.
Next, we will set up the workspace where you'll build the code in Preparing your Environment.
3. Building the Stall (Environment Setup)
You need a place to run your code. You have two choices:
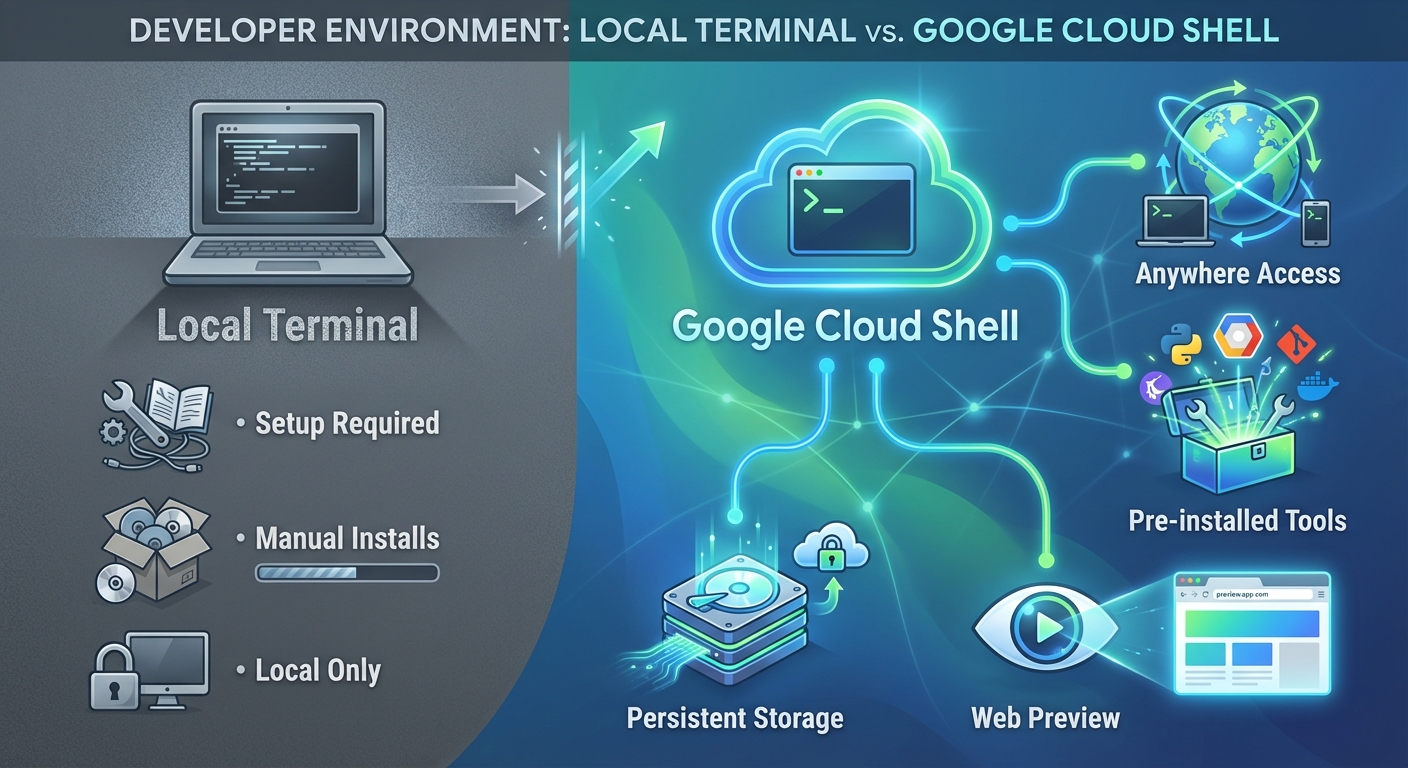
Option 1: Google Cloud Shell (Recommended)
Cloud Shell is a browser-based terminal that comes pre-installed with everything you need (Python, gcloud CLI, git). It has persistent storage and works from anywhere.
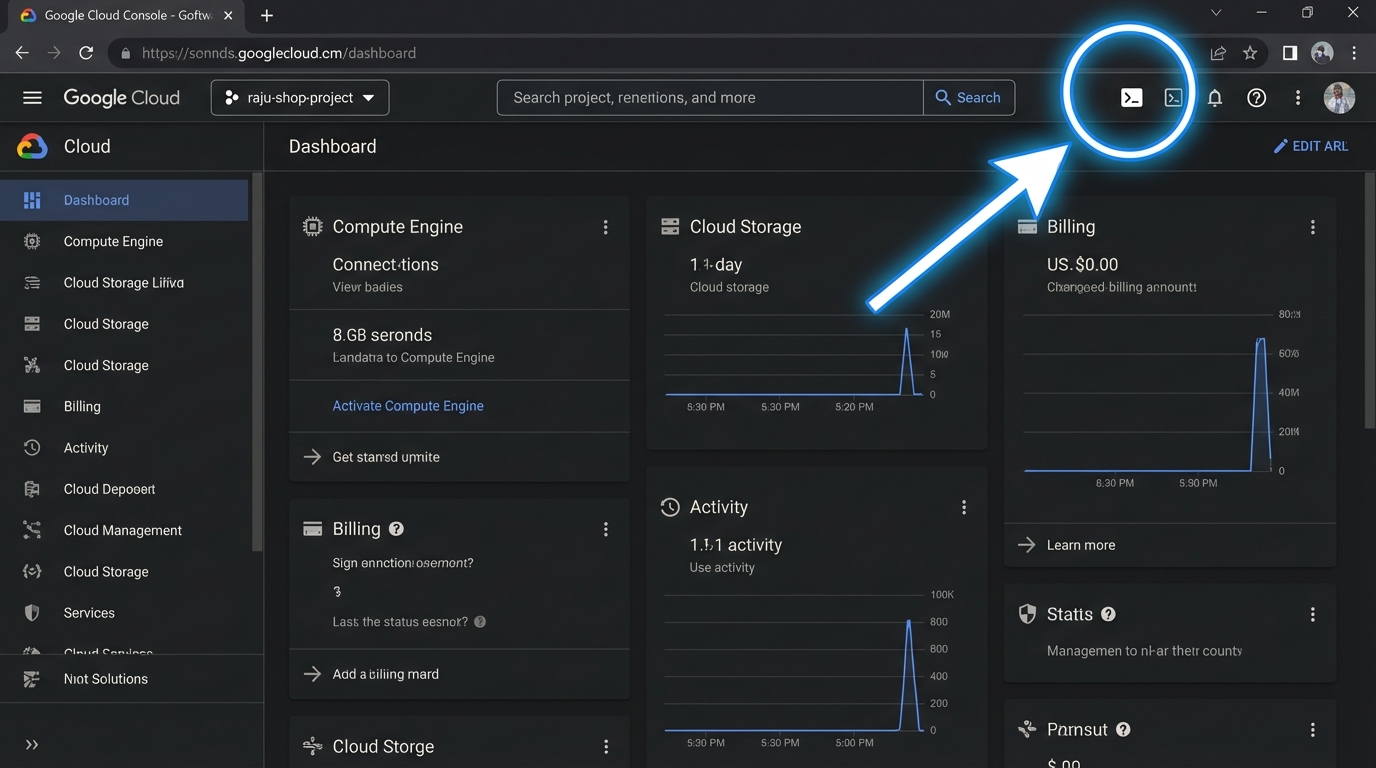
1. Activate Cloud Shell
Click the ‘Activate Cloud Shell' icon (a terminal symbol) in the top-right of the Google Cloud Console header.
Cloud Shell will now initialize. This involves:
- Authorizing: If prompted, click Authorize to allow Cloud Shell to make calls to Google Cloud APIs on your behalf.
- Provisioning: Cloud Shell provisions a temporary virtual machine for your session.
- Connecting: It then connects to this VM. This entire process might take a minute or two.
Wait until you see the command prompt (user@cloudshell:~ $).
2. Verify Project Setup
Cloud Shell usually selects your current project automatically. Just to be safe, verify it:
gcloud config get-value project
If it does not return your project ID (raju-shop-agent), set it manually:
gcloud config set project raju-shop-agent
Option 2: Local Terminal
If you prefer your own laptop's terminal (iTerm, PowerShell, etc.), you have a bit more setup to do.
1. Install Prerequisites
Ensure you have the following installed:
2. Login and Configure gcloud
Initialize the Google Cloud CLI and sign in to your account:
gcloud auth login
Set your project (replace raju-shop-agent with your actual project ID):
gcloud config set project raju-shop-agent
Set up application default credentials (this helps local tools talk to Google Cloud):
gcloud auth application-default login
Summary
In this step, you chose your development environment (Cloud Shell or Local) and configured it.
Next, we will meet the tool that will help us build faster in Meeting Gemini CLI.
4. Meet Your Assistant (Gemini CLI)
Now, meet your new best friend for AI development: Gemini CLI!

Gemini CLI is a powerful command-line interface that helps you:
- Automate Workflows: Manage your AI projects efficiently.
- Code Generation: Generate code, UI, and even entire files.
- Extension Ecosystem: Extend its capabilities with various extensions (like the Cloud Run one we'll use later).
1. Install Gemini CLI (Local Terminal Only)
If you are using your local laptop terminal:
npm install -g @google/gemini-cli
If you are using Google Cloud Shell:
Gemini CLI comes pre-installed in Cloud Shell, so you don't need to install anything!
2. Launch and Authenticate
Open a new terminal window (or tab) in your Cloud Shell (or local terminal) and launch Gemini CLI:
gemini
First Run Setup: If this is your first time running it, the CLI will walk you through a quick setup process.
- Authentication: It will ask you to sign in. We recommend using your personal Gmail account to take advantage of the generous free quotas available for Gemini models.
- Project Context: It is best practice to run
geminifrom within your project folder so it understands your code context. (Since we haven't created the folder yet, running it from your home directory is fine for now).
3. Say Hello!
Once you see the gemini> prompt, try a test to make sure your brain is connected:
Hi
You should get a friendly response from the model.
4. Essential Commands
/quit: Type this to exit the Gemini CLI and return to your standard terminal./help: See a list of all available commands.
Summary
In this step, you installed, authenticated, and verified Gemini CLI.
Next, we will use the Agent Development Kit (ADK) to build the skeleton of our shop in Opening Shop (The Code).
5. Stocking the Shelves (Project Setup)
We won't build from scratch (smart shopkeepers save time). We will use the Agent Development Kit (ADK).
What is ADK?

The ADK is your "shop management system". It's a flexible framework that handles:
- Orchestration: Managing complex tasks (like Raju checking inventory while talking to a customer).
- State Management: Remembering the customer's name and what they asked for 5 minutes ago.
- Tooling: Connecting to external systems (like your inventory database).
We will use the Agent Starter Pack to set up a production-ready "Dukaan" instantly. It gives us a secure, scalable foundation so we can focus on selling.
In your Cloud Shell terminal (or local terminal), run this command to generate your agent:
uvx agent-starter-pack create raju-shop
The CLI will ask you a few questions to configure your shop. Choose the following options (type the number and press Enter):
- Agent Type: Choose
1(adk_base- A base ReAct agent). - Deployment Target: Choose
2(Cloud Run- Serverless container execution). - Session Type: Choose
1(In-memory session- Simple and fast). - CI/CD Runner: Choose
1(Simple- We will deploy manually for now).
Wait for the process to complete. Once done, enter your shop directory and install the dependencies:
cd raju-shop
make install
source .venv/bin/activate
Explore and Configure the Agent
Now that the starter pack is set up, review the structure.
1. Check the Folder Structure
Run the following command to see how your shop is organized:
tree .
You should see a structure like this:
.
├── app
│   ├── __init__.py
│   ├── agent.py
│   ├── app_utils
│   │   ├── telemetry.py
│   │   └── typing.py
│   └── fast_api_app.py
├── Dockerfile
├── GEMINI.md
├── Makefile
├── pyproject.toml
├── README.md
├── tests
│   ├── integration
│   │   ├── test_agent.py
│   │   └── test_server_e2e.py
│   └── unit
│       └── test_dummy.py
└── uv.lock
The most important file is app/agent.py. This is where Raju's brain lives!
2. Walk Through the Code
Open app/agent.py in your Cloud Shell Editor (or local IDE) and take a quick look:
root_agent = Agent(...): This defines your AI. It has amodel(brain) andtools(hands).- Tools: You'll see python functions like
get_weather. These are tools the agent can use. app = App(...): This wraps your agent into a web server so we can talk to it.
Test Locally
In your Cloud Shell terminal (or local terminal), run the agent:
adk web
This command starts a local web server on port 8000.
If using Cloud Shell:
- Click the Web Preview button (top right, looks like an eye).
- Select Change port.
- Enter
8000and click Change and Preview.
If using Local Terminal:
- Open your browser and visit
http://localhost:8000.
Once the UI opens:
- Select "app": In the top-left drop-down, ensure you select the agent named app (ignore
root_agentortest_agentif they appear). - Say Hello: Type "Hello!" and see if it responds.
Press Ctrl+C in your terminal to stop the adk web server when you're done.
Summary
In this step, you scaffolded your project, configured it for Gemini API, and successfully ran your first agent locally!
Next, we will give our agent a personality and a name in Training Raju (The Persona).
6. Training Raju (The Persona)
Right now, the agent is boring. We will give him a personality!

Instead of writing code, we will just tell Gemini what we want.
1. Define the Persona
Run this command in your terminal to "teach" Raju who he is:
gemini "In agent.py, update the root_agent instruction. You are Raju, a bargaining shopkeeper in a digital bazaar. You sell: Brass Lamp (50 coins), Silk Scarf (500 coins). Your goal is to sell high and be funny. Speak with an Indian-English flair."
2. Verify the Code
Open app/agent.py. You should see that Gemini has written the system instruction for you!
3. Test Locally
Now, chat with Raju! In your Cloud Shell terminal (or local terminal):
adk web
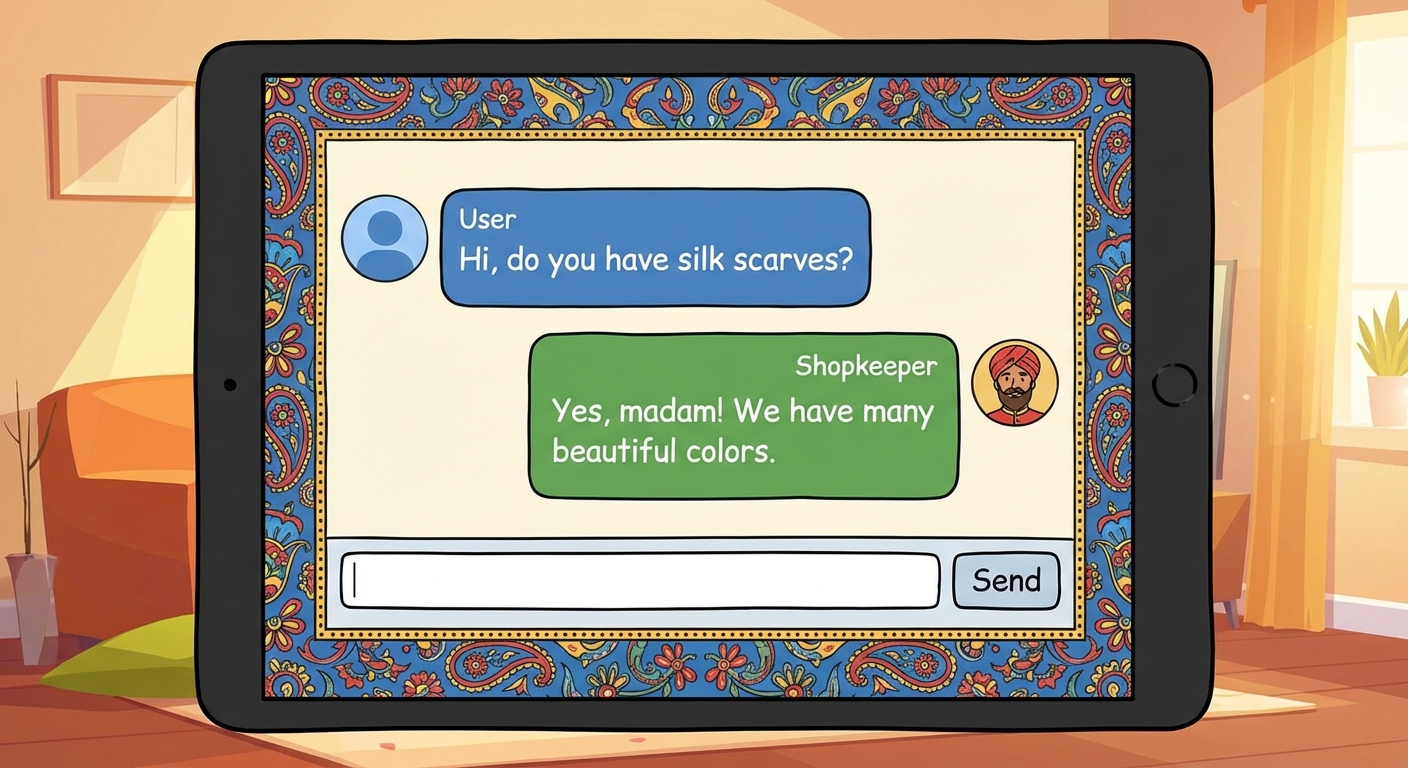
Open the web UI (Web Preview port 8000 or localhost:8000), select the app agent, and try these prompts:
- "I want the Brass Lamp but 50 coins is too much!"
- "What do you sell, my friend?"
See how he reacts! He should be funny, dramatic, but refuse to sell too cheap.
Summary
In this step, you customized the agent's system instructions to create "Raju," a bargaining shopkeeper with a unique personality.
Next, we will give Raju the ability to check his actual stock in The Inventory (Adding Tools).
7. The Inventory (Adding Tools)
Raju needs to know what he actually has in stock. We will give him a "database" and a tool to check it.

1. Create the Tool
Run this single command to create the inventory, the tool, and connect it to Raju:
gemini "In agent.py, create a dictionary INVENTORY with items: Brass Lamp (price 50, stock 5), Silk Scarf (price 500, stock 2), Taj Mahal (price 2000, stock 0). Then create a tool function check_inventory(item_name) that checks this dict. Finally, update the root_agent to use this tool and remove the default weather tools."
2. Verify the Magic
Open app/agent.py again. You will see that Gemini has:
- Created the
INVENTORYdictionary. - Written the
check_inventoryPython function. - Updated the
tools=[...]list in the agent definition.
3. Test the Inventory
- Restart the server (Ctrl+C, then
adk web). - Ask Raju:
- "Do you have any Taj Mahals?" (He should say NO, stock is 0).
- "How much for the Silk Scarf?" (He should check the real price).
Summary
In this step, you implemented a check_inventory tool, removed the default clutter, and connected the tool to your agent.
Next, we will take Raju live to the cloud in Raju's Shop Goes Live (Deploying the Backend).
8. Raju's Shop Goes Live (Deploying the Backend)
Time to open for the world! Before we build the shopfront, we will get Raju's brain and inventory (your agent) deployed to the cloud.

Important: Terminal Management
You might have adk web running in your current terminal from the previous step.
- Keep it running if you want to keep testing locally.
- Open a NEW Terminal window/tab for the deployment steps that follow.
- Note: Whenever you change
agent.py, you must Stop (Ctrl+C) and Restartadk webfor changes to take effect!
1. Prepare Gemini CLI
In your NEW terminal window:
- Check if you are already inside the Gemini CLI (look for the
gemini>prompt). - If you are, type
/quitto exit to the standard shell. - Ensure you are in the project folder:
cd raju-shop
2. Install Cloud Run Extension
Install the Cloud Run extension for Gemini CLI in your Cloud Shell terminal (or local terminal):
gemini extensions install https://github.com/GoogleCloudPlatform/cloud-run-mcp
3. Relaunch Gemini CLI
Launch Gemini CLI again to use the new extension:
gemini
You should see the Gemini CLI prompt.
4. Deploy the Agent
There are two ways to use Gemini CLI extensions:
Option 1: The Slash Command (Manual) You can explicitly type the command and flags:
/deploy --source . --name raju-agent --region us-central1 --allow-unauthenticated
Option 2: Natural Language (Recommended) This is the easier and more powerful way! You can just ask Gemini to do it for you, and it will use the MCP Server to call the right tools.
Try pasting this prompt into the Gemini CLI:
Deploy this agent app to cloud run on google cloud using the cloud-run MCP server.
Use project raju-shop-agent in us-central1 region.
Name the service raju-agent.
IMPORTANT: Make sure to allow unauthenticated invocations so my frontend can talk to it.
The CLI might ask for confirmation to use the cloud-run tool. Press Enter (or type y) to approve.
Wait for the Magic: It will take 2-3 minutes. Once done, you will see a success message like this:
✦ I've successfully deployed your agent app to Cloud Run.

  Service Details:
   * Service Name: raju-agent
   * Project: raju-shop-agent
   * Region: us-central1
   * URL: https://raju-agent-xyz123-uc.a.run.app
   * Console: View in Google Cloud Console (...)
5. Verify Deployment
Once the deployment is complete, Gemini CLI will provide a Service URL. Copy this URL.
Browser Check (Is it alive?) Paste the URL into your browser.
- Success: You should see the FastAPI Documentation (Swagger UI) or a generic ADK landing page. This confirms your Cloud Run service is running and accessible.
- Failure: If you get a 403 Forbidden, you might have forgotten to allow "unauthenticated invocations" in your deployment prompt.
We will test the actual bargaining logic in the next step by building a proper frontend!
Summary
In this step, you deployed your agent backend to Google Cloud Run using the Gemini CLI extension, making it accessible using a public URL.
Next, we will build a beautiful storefront for customers to talk to Raju in Building the Shopfront (Frontend UI).
9. Decorating the Shop (Frontend UI)
A text terminal is boring. We want a vibrant shop window!
How the ADK API Works
To build a custom UI, you need to understand how to talk to your agent backend. It follows a 2-step flow:
- Initialize Session: Before chatting, you must create a session ID (like a shopping cart).
POST /apps/app/users/{user_id}/sessions/{session_id}
- Send Message: To talk, you send your text to the run endpoint.
POST /run(Payload includesappName,userId,sessionId, and yourtext).
- Learn More: Check the ADK Runtime API and Python API Reference docs.
We will use this logic to build our frontend.
You have two ways to build this interface:
Option 1: Google Antigravity (Recommended - Local Only)
If you are working on your local machine, Google Antigravity is the best experience. It's an AI-native IDE that lets you "vibe code" the entire UI.
1. Download & Install
Download the installer for your OS from the Google Antigravity download page and install it.
2. Open Your Workspace
Launch Antigravity. Open your raju-shop folder as a Workspace. This gives the AI context about your entire project.
3. Generate the UI with Agent Manager
Instead of writing code line-by-line, we will ask an AI agent to do it for us using the Agent Manager.
- Locate the Agent Manager chat interface (usually on the right side).
- Paste the following prompt into the chat:
Create a single file HTML chat interface named `index.html`. It should have a colorful header that says 'Raju's Royal Artifacts'. It should look like an Indian market stall with orange and pink colors.

**Backend Integration:**
The chat should send messages to my deployed agent at: <YOUR_DEPLOYED_AGENT_URL>

**API Logic:**
1. **On Load:** Generate a random userId and sessionId. Call `POST /apps/app/users/{userId}/sessions/{sessionId}` to initialize.
2. **On Send:** Call `POST /run` with a JSON payload containing `appName: "app"`, `userId`, `sessionId`, and `newMessage: { role: "user", parts: [{ text: userInput }] }`.
3. **Display:** Show the user's message and the agent's response (from `content.parts[0].text`).
(Make sure to replace the placeholder URL with your actual Service URL from the Deployment step!)
- Watch as the agent writes the code for you! You can switch to the Editor View to see the file being created in real-time.
4. Test Your Shop Front
Google Antigravity has built-in preview capabilities. Click the "Preview" button (often an eye icon) to see your shopfront live! Alternatively, serve it locally with python3 -m http.server 8000.
Option 2: Gemini CLI (Cloud Shell Compatible)
If you are in Cloud Shell, you can use your trusty Gemini CLI to build the frontend in seconds.
Run this command in your terminal:
gemini "Create a single file HTML chat interface named index.html. Header: 'Raju\'s Royal Artifacts', Indian market theme (orange/pink). Backend: <YOUR_DEPLOYED_AGENT_URL>. Logic: On load, generate random user/session IDs and POST to /apps/app/users/{uid}/sessions/{sid}. On chat, POST to /run with appName='app', userId, sessionId, and newMessage structure. Parse the JSON response to show the agent text." > index.html
(Remember to replace the placeholder - <YOUR_DEPLOYED_AGENT_URL> in the preceding text with your actual Cloud Run URL!)
Summary
In this step, you used Google Antigravity to "vibe code" a custom HTML frontend that connects to your live agent backend.
Next, we will complete the picture by hosting this shopfront on the web in Taking the Shopfront Live.
10. Grand Opening (Deploying Frontend)
Raju is online (backend), but his shop needs a public address (frontend)! Ask Google Antigravity to deploy our UI to the cloud.

1. Ask the Agent Manager to Deploy
We don't need to leave the IDE. Just ask the Agent Manager to handle the deployment for you.
Paste this prompt into the chat:
"Deploy my index.html as a static website to Google Cloud Run. Name the service raju-shop-frontend. Make sure it's publicly accessible."
2. Watch the Magic
The agent will likely:
- Create a
Dockerfileor configuration for serving static files (like using nginx or python). - Build the container image.
- Run the
gcloud run deploycommand for you.
3. Visit Your Shop!
Once the agent finishes, it will give you a URL (e.g., https://raju-shop-frontend-xyz.run.app). Click it.
Congratulations! You now have a fully deployed, AI-powered bargaining shopkeeper app. Send the link to your friends and see if they can get a discount!
Summary
In this step, you used the Antigravity Agent Manager to containerize and deploy your frontend application to Cloud Run.
You have now built the full stack! We will wrap up in the Closing Time (Conclusion).
11. Closing Time (Conclusion)

Congratulations! You have successfully completed the ‘Bargaining Shopkeeper' Agent Challenge! You took Raju from a mere idea to a fully deployed, interactive AI shopkeeper in the digital bazaar. You've experienced the power of agentic development first-hand.
Recap of Your Journey:
- Google Cloud: Set up your project and billing account, and deployed your agent to Cloud Run.
- Gemini 3: The intelligent brain powering Raju's persona and bargaining skills.
- Agent Development Kit (ADK): The framework that provided a Production-Ready foundation with built-in Observability (Telemetry), making your agent robust from day one.
- Gemini CLI: Your command-line assistant for quick tasks, testing, and extensions.
- Google Antigravity: The next-gen IDE where you ‘vibe coded' your UI and orchestrated deployment.
Next Steps for Your Digital Dukaan:
- Fix the Broken Tests: You changed the code, but what about the tests? The default tests (
tests/unit/test_agent.py) still look for weather! Use Gemini CLI to automatically update them. Try:gemini "Update the tests in tests/unit/test_agent.py to test the new check_inventory tool instead of weather." - Dynamic Inventory: Make Raju's inventory quantities update when an item is "sold." Can you add logic to decrease
stockin yourINVENTORYdictionary after a successful "purchase"? - Payment Gateway Tool: Implement a mock
process_paymenttool. Raju could then call this tool when a deal is struck! - Explore Antigravity: Dive deeper into Antigravity's Agent Manager and Workspaces. Can you ask the agent to refine your
index.htmlto show a live receipt? - Share Your Shop: Raju's shop is live on the internet! Share the frontend URL with your friends and see if they can get a better bargain than you!
Resources
12. Cleanup
To avoid incurring unnecessary charges to your Google Cloud account for the resources used in this codelab, follow these steps.
1. Undeploy Cloud Run Services (Optional Cost Saving)
If you want to stop any potential charges related to your deployed services while keeping your project and other configurations intact, you can undeploy your Cloud Run services.
Open your Cloud Shell terminal (or local terminal) and run the following gcloud commands:
# Undeploy the backend agent

gcloud run services delete raju-agent --region us-central1

# Undeploy the frontend shop (if you deployed it)

gcloud run services delete raju-shop-frontend --region us-central1
2. Delete Google Cloud Project (Complete Cost Stoppage)
If you want to ensure absolutely no further expenses and completely remove all resources created during this codelab, the most definitive step is to delete the entire Google Cloud Project.
- Go to the Projects page in the Google Cloud Console.
- Select your project (
raju-shop-agent) and click Delete. - Follow the prompts to confirm project deletion.