
1. Overview
Artifact Registry is the fully-managed package manager for and provides a unified tool to manage your OCI container images and language packages (such as Maven and npm).
Artifact registry is fully integrated with Google Cloud wide range of other Google Cloud services like in the following examples:
- Cloud Build can directly upload image artifacts to Artifact Registry.
- Cloud Deploy can deploy the Artifact Registry Images directly to various runtime environments.
- It provides images to the container runtimes like Cloud Run and GKE and enables advanced performance optimization capabilities like image streaming.
- Artifact Registry can serve as a detection point for Artifact Analysis to continuously monitor for known vulnerabilities.
- Cloud IAM provides consistent and granular control over artifact access and permissions.
This lab will walk you through many of these features in the form of a hands-on tutorial.
What you will learn
What are the learning objectives of this lab?
- Create different repositories for Containers and Language Packages
- Create and use container images with Artifact Registry
- Use Artifact registry to analyze the security posture and content of your artifacts
- Configure and use Artifact Registry for Java Maven Dependencies
2. Setup and Requirements
Self-paced environment setup
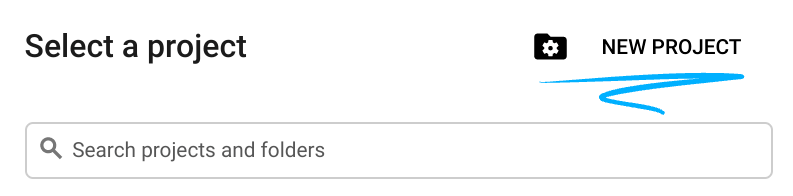
- Sign-in to the Google Cloud Console and create a new project or reuse an existing one. If you don't already have a Gmail or Google Workspace account, you must create one.

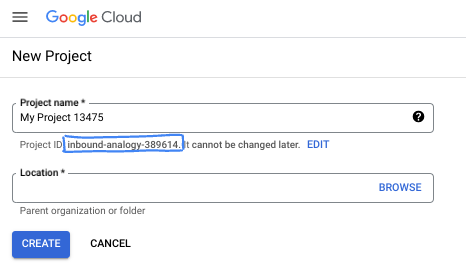
- The Project name is the display name for this project's participants. It is a character string not used by Google APIs. You can always update it.
- The Project ID is unique across all Google Cloud projects and is immutable (cannot be changed after it has been set). The Cloud Console auto-generates a unique string; usually you don't care what it is. In most codelabs, you'll need to reference your Project ID (typically identified as
PROJECT_ID). If you don't like the generated ID, you might generate another random one. Alternatively, you can try your own, and see if it's available. It can't be changed after this step and remains for the duration of the project. - For your information, there is a third value, a Project Number, which some APIs use. Learn more about all three of these values in the documentation.
- Next, you'll need to enable billing in the Cloud Console to use Cloud resources/APIs. Running through this codelab won't cost much, if anything at all. To shut down resources to avoid incurring billing beyond this tutorial, you can delete the resources you created or delete the project. New Google Cloud users are eligible for the $300 USD Free Trial program.
Set up gcloud
In Cloud Shell, set your project ID and project number. Save them as PROJECT_ID and PROJECT_NUMBER variables.
export PROJECT_ID=$(gcloud config get-value project)
export PROJECT_NUMBER=$(gcloud projects describe $PROJECT_ID --format='value(projectNumber)')
Enable Google Services
gcloud services enable \
  cloudresourcemanager.googleapis.com \
  run.googleapis.com \
  artifactregistry.googleapis.com \
  containerregistry.googleapis.com \
  containerscanning.googleapis.com \
  binaryauthorization.googleapis.com \
  cloudbuild.googleapis.com
Get the source code
The source code for this lab is located in the GoogleCloudPlatform organization on GitHub. Clone it with the command below.
git clone https://github.com/GoogleCloudPlatform/java-docs-samples
3. Pushing Container Images
Create a Docker Repository on Artifact registry
As mentioned before Artifact Registry supports different repository formats that allow you to manage container images and language packages. The interactions with the different types of artifact repositories are defined in specifications and are widely adopted standards. For example the requests for Maven dependencies are different from requests for Node dependencies.
To support a specific artifact API specifications, Artifact Registry needs to manage your artifacts in the corresponding repository types. When you create a new repository you pass in the --repository-format flag to indicate the type of repository.
To create a first repository for Docker images run the following command from Cloud Shell:
gcloud artifacts repositories create container-example --repository-format=docker \
--location=us-central1 --description="Example Docker repository"
Click Authorize if the Cloud Shell authorization prompt appears
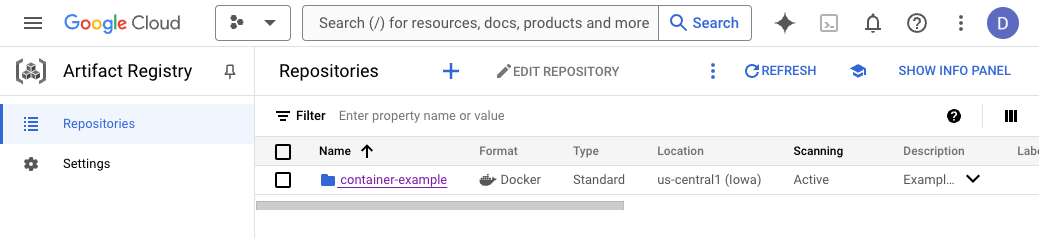
Go to Google Cloud Console - Artifact Registry - Repositories and notice your newly created Docker repository named container-example, if you click on it you can see that it's empty at the moment
Configure Docker Authentication to Artifact Registry
When connecting to Artifact Registry credentials are required in order to provide access. Rather than set up separate credentials, Docker can be configured to use your gcloud credentials seamlessly.
From Cloud Shell run the following command to configure Docker to use the Google Cloud CLI to authenticate requests to Artifact Registry in the us-central1 region,
gcloud auth configure-docker us-central1-docker.pkg.dev
If the command will prompt for a confirmation to change the Cloud Shell docker configuration, hit enter.
Explore the sample Application
A sample application is provided in the git repository you cloned in an earlier step. Change into the java directory and review the application code.
cd java-docs-samples/run/helloworld/
ls
The folder contains an example Java application that renders a simple web page: in addition to various files not relevant for this specific lab, it contains the source code, under the src folder, and a Dockerfile we will use to build a container image.
Build the Container Image
Before you can store container images in Artifact Registry you will need to create one.
Run the following command to build the container image and tag it with the full artifact registry path:
docker build -t us-central1-docker.pkg.dev/$PROJECT_ID/container-example/java-hello-world:tag1 .
Push the Container Image to Artifact Registry
Run the following command to push the container image to the repository created previously:
docker push us-central1-docker.pkg.dev/$PROJECT_ID/container-example/java-hello-world:tag1
Review the image in Artifact Registry
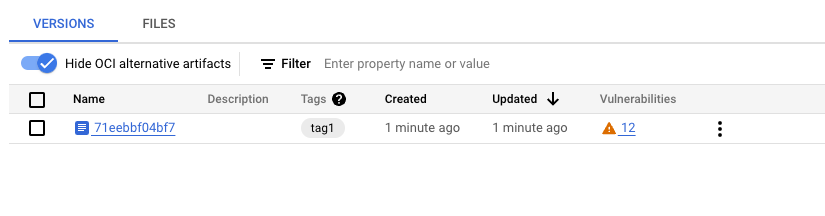
Go to Google Cloud Console - Artifact Registry - Repositories. Open the container-example repository and verify that the java-hello-world image is there.

Click on the image and note the image tagged tag1. Because we enabled automatic scanning of images via the containerscanning.googleapis.com service, you can see that Vulnerability Scanning is either running or already completed. Once it has completed you can see the number of vulnerabilities that were detected for this image revision. We will explore vulnerabilities and other artifact insights in the next section.
4. Inspecting Container Images
Now that you pushed your first image to the container-example repository, we can look at it in some more detail. On the versions tab click the version that we just created. To show the image in more detail:
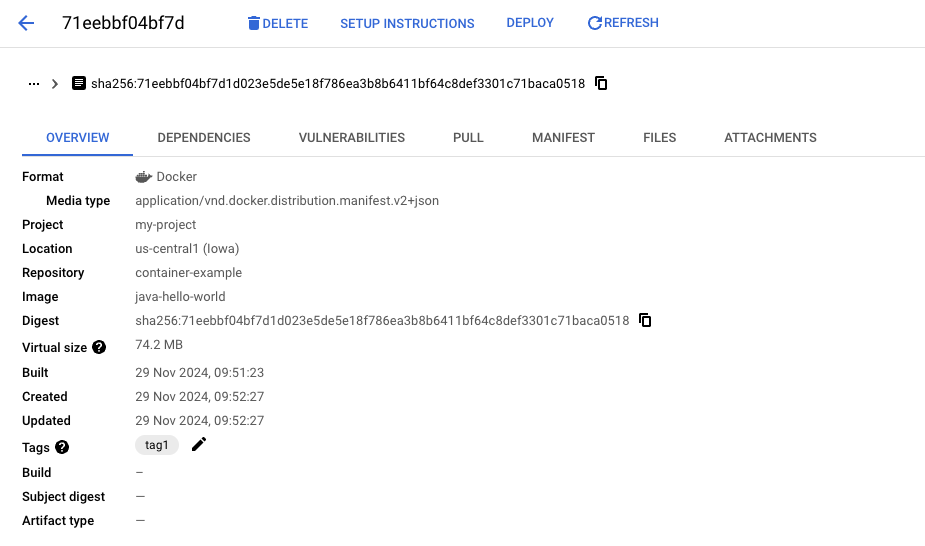
The upper copy button is especially useful as it provides an easy way to access the fully qualified image URI to that image version including the SHA-hash. This URI can then be used to pull a specific image version or as an image reference in a Kubernetes Deployment or a Cloud Run Service. To test the image URI you can run the following command in Cloud Shell:
docker pull $IMAGE_URI
Understanding Dependencies
Moving to the "Dependencies" tab at the top you can see all the dependencies that were detected in your image. Note that it lists both the dependencies at the language dependencies and the OS level. You can also see the software licenses that are attached to each of the dependencies.
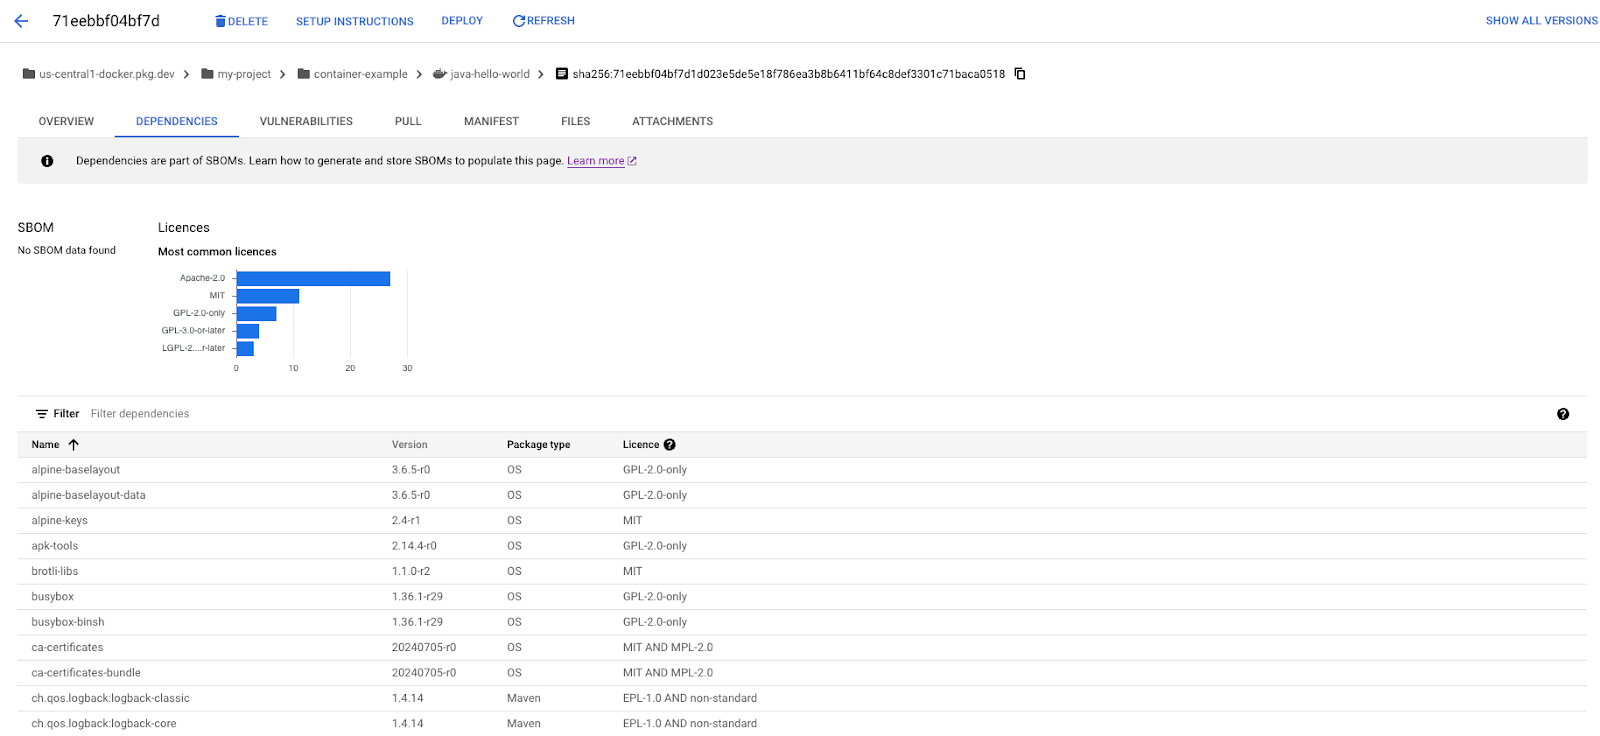
If you look closely you can see that the SBOM information isn't yet populated. To populate the SOM for your artifact you can run the following command in Cloud Shell using the fully qualified image URI that we can copy from the breadcrumb bar at the top.
gcloud artifacts sbom export --uri $IMAGE_URI
Once you refresh the page it will now contain a link to the automatically generated SBOM stored in Cloud Storage. If you rely on SBOMs for your images, you might want to automatically generate SBOMs for your artifacts and make the generation part of your CI/CD pipeline.
Exploring Image Vulnerabilities
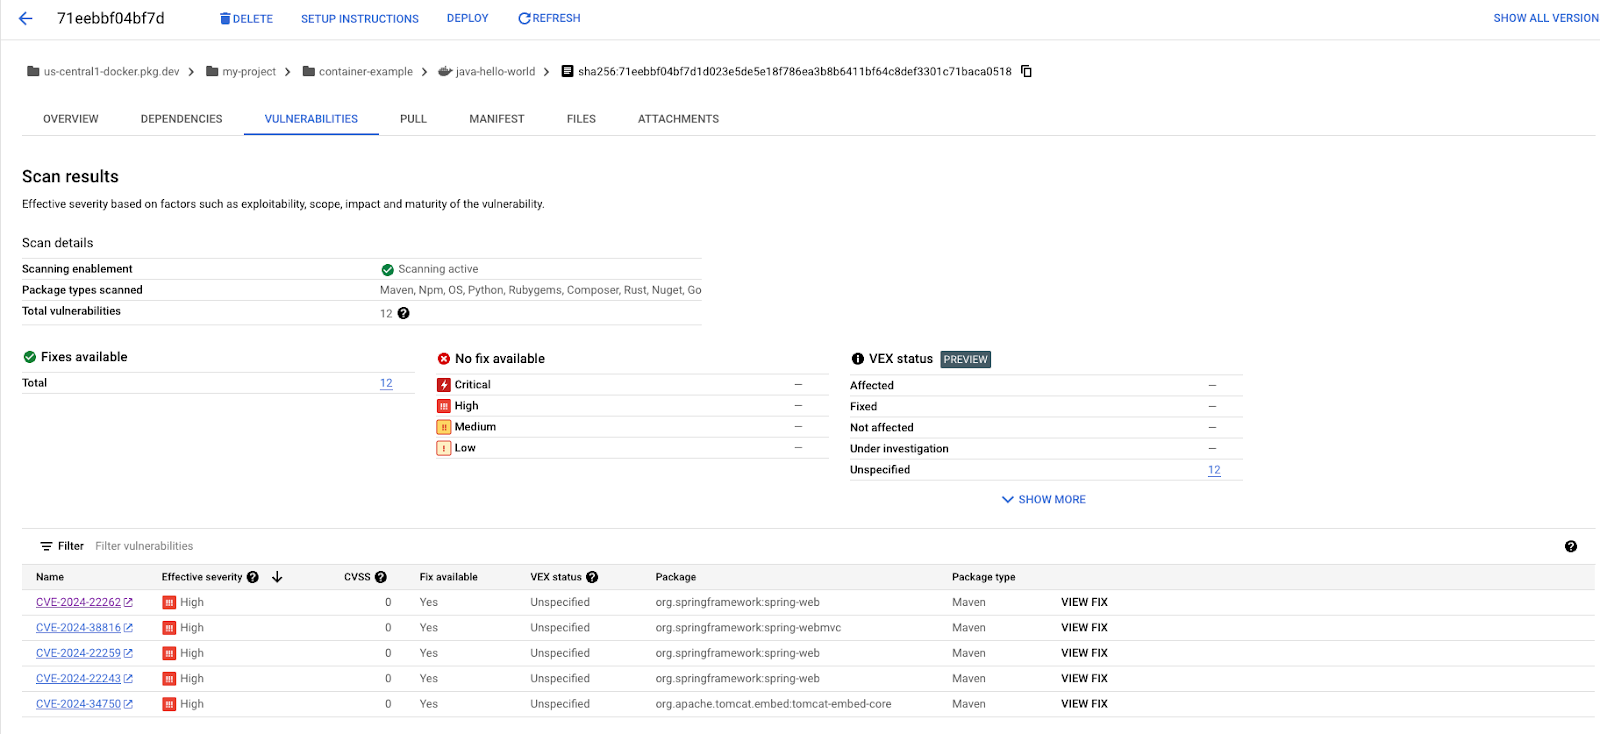
When you click the "Vulnerabilities" tab on the top of the view you can see all vulnerabilities that were detected in your image. In addition to the summary of the vulnerabilities on the top you can see the full list of vulnerabilities in the table at the bottom. Each row links to the CVE bulletin, indicating its severity and the package it originated from. For vulnerabilities where a fix is available it also gives instructions on how to update the dependencies to fix the vulnerability.
5. Virtual and Remote Repositories
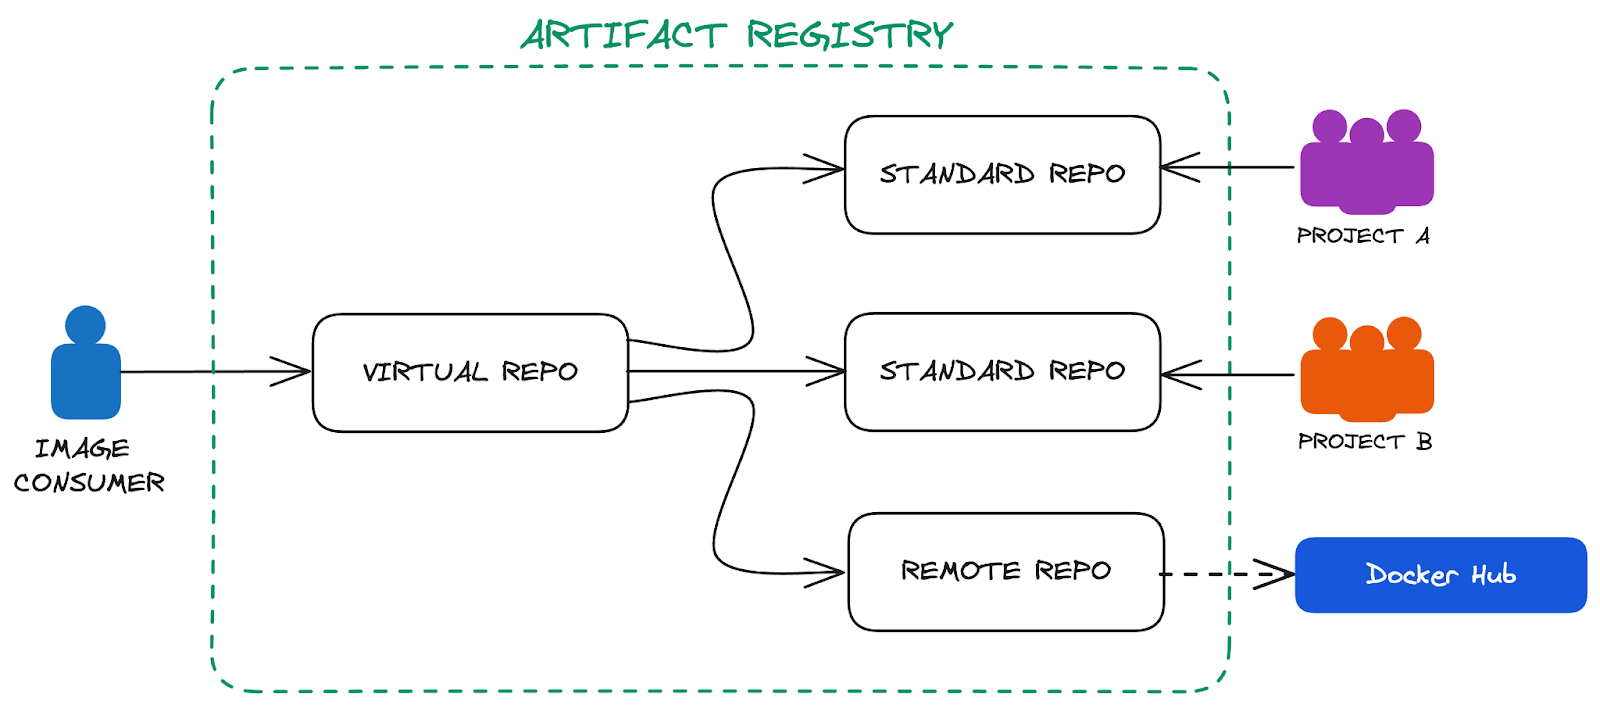
In the previous section we used a single image repository to push and pull our images. This works great for small scale use cases but provides challenges especially for larger organizations with different teams that require autonomy over their repositories. It is common for teams or business units to have their own image repository with their own permissions and configuration. To simplify the use of the images in these repositories and to shield the consumer from the underlying organizational structure, Artifact Registry provides virtual repositories that can aggregate resources from multiple underlying repositories. A potential architecture could look like this:
Remote Repository for Docker Hub
Docker Hub is a popular public image registry and hosts many open-source container images. Whilst using the public repository directly is straightforward, it comes with a number of challenges in a production environment that we can overcome with Remote repositories in Artifact Registry.
Remote repositories give you the ability to proxy the requests to the upstream registry and cache images along the way. This not only reduces the download times of the images but also removes the dependency on the uptime of the external service and gives you the ability to apply the same security and access policies that you apply to your own images.
To create a remote repository for Docker Hub you can run the following command in Cloud Shell:
gcloud artifacts repositories create dockerhub \
  --repository-format=docker \
  --mode=remote-repository \
  --remote-docker-repo=docker-hub \
  --location=us-central1 \
  --description="Example Remote Repo for Docker Hub"
You should now see an additional repository in your Artifact Registry repositories list:

To test if your remote repository is able to proxy requests to the remote repository run the following command in Cloud Shell to pull the nginx image:
docker pull us-central1-docker.pkg.dev/$PROJECT_ID/dockerhub/nginx:stable-alpine
Once the pull succeeds you can also look at the repository in the Cloud Console and that the cached nginx image now provides the same dependency and vulnerability reporting that we had seen for the image that you built yourself.
Creating a Virtual Repository
By following the processes that we used so far you can create a number of repositories for each team or business and clearly define ownership and IAM permissions for each. We can also create proxies for remote repositories making it easier and safer to consume third party images. The downside of this large number of repositories is apparent if you shift your perspective to the consumer of these images. How should a developer know which image repository they should use in their deployment?
To simplify the consumption and hide the underlying repositories behind an abstraction layer you can create a virtual repository in Artifact Registry with the following command in Cloud Shell:
gcloud projects add-iam-policy-binding $PROJECT_ID \
    --member serviceAccount:service-$PROJECT_NUMBER@gcp-sa-artifactregistry.iam.gserviceaccount.com \
    --role roles/artifactregistry.reader

cat <<EOF > /tmp/upstream.json
[{
"id" : "hello-repo",
"repository" : "projects/$PROJECT_ID/locations/us-central1/repositories/container-example",
"priority" : 100
},{
"id" : "dockerhub",
"repository" : "projects/$PROJECT_ID/locations/us-central1/repositories/dockerhub",
"priority" : 101
}]
EOF

gcloud artifacts repositories create all-images \
    --repository-format=docker \
    --mode=virtual-repository \
    --location=us-central1 \
    --upstream-policy-file=/tmp/upstream.json \
    --description="Example Virtual Repo"
We can now pull the images from the virtual repository without exposing the underlying structure. To verify everything works as expected you can run the following commands in Cloud Shell:
docker pull us-central1-docker.pkg.dev/$PROJECT_ID/all-images/java-hello-world:tag1

docker pull us-central1-docker.pkg.dev/$PROJECT_ID/all-images/nginx:stable-alpine
6. Deploy to Cloud Run
With the respective repositories and images in place we can now turn to using them in a deployment. To illustrate an example use case and to avoid deploying additional infrastructure we will deploy our container to Cloud Run. In its simplest form the deployment can be achieved by running the following command in Cloud Shell:
gcloud run deploy hello-world \
  --image us-central1-docker.pkg.dev/$PROJECT_ID/all-images/java-hello-world:tag1 \
  --region us-central1 \
  --allow-unauthenticated
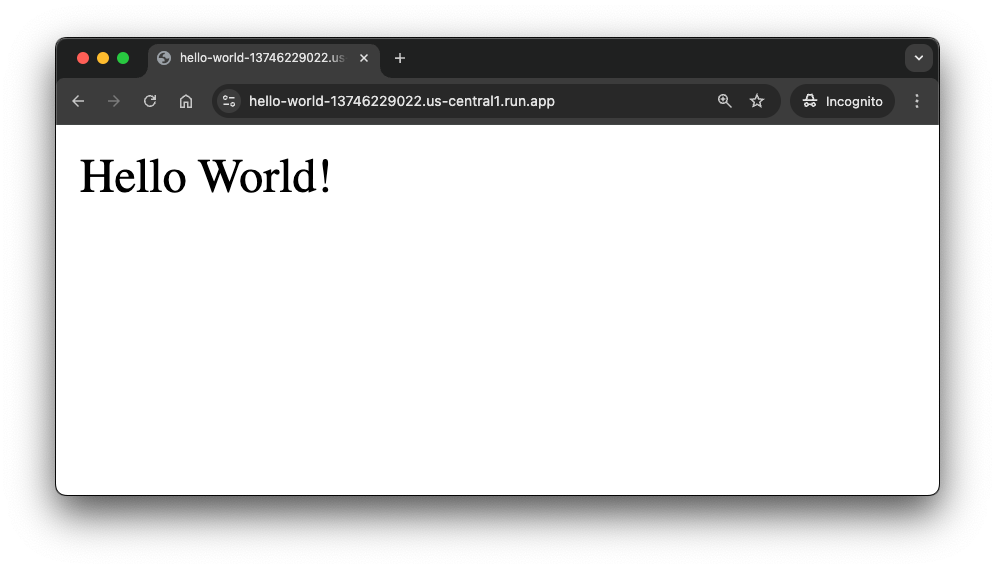
Once the deployment is finished it will show the automatically generated URL under which you can access your service.
Deploying container to Cloud Run service [hello-world] in project [my-project] region [us-central1]
OK Deploying... Done.
  OK Creating Revision...
  OK Routing traffic...
  OK Setting IAM Policy...
Done.
Service [hello-world] revision [hello-world-00001-wtc] has been deployed and is serving 100 percent of traffic.
Service URL: https://hello-world-13746229022.us-central1.run.app
If you open that URL in a new browser tab you should see the successful "Hello World" message.
7. Strengthen the Supply Chain Security
Now that your Container image has made it to a live deployment, it might be a good time to look at how we can strengthen our end to end supply chain. In the previous section we looked at how the container analysis of Artifact Registry provides insights into the libraries and licenses that are used in the image. However it is still possible for malicious actors to introduce harmful content into your image along the supply chain. In this section we will explore how we can use the SLSA framework to introduce attestation for the build artifacts and even leverage cryptographic signatures of the artifacts themselves to ensure only trusted artifacts can be deployed to our Cloud Run runtime.
SLSA Attestation with Cloud Build
The SLSA framework provides different levels of evidence for supply chain artifacts. The specification and implementation might seem daunting at first glance but with Cloud Build creating SLSA attestation is as simple as adding creating a cloudbuild.yaml specification with the requestedVerifyOption set to VERIFIED.
For our application we can run the following command in Cloud Shell to create a cloudbuild.yaml file in the helloworld folder.
cat <<EOF > cloudbuild.yaml
steps:
- name: 'gcr.io/cloud-builders/docker'
  args: ['build', '-t', '\$_IMAGE_URI', '.']
- name: 'gcr.io/cloud-builders/docker'
  args: ['push', '\$_IMAGE_URI']
images:
- '\$_IMAGE_URI'
options:
  requestedVerifyOption: VERIFIED
substitutions:
  _IMAGE_URI: us-central1-docker.pkg.dev/$PROJECT_ID/container-example/java-hello-world:latest
EOF
Now we create a new Cloud Build Job that builds a new version of our Java Hello World Image by running the following command in Cloud Shell.
gcloud builds submit --substitutions=_IMAGE_URI=us-central1-docker.pkg.dev/$PROJECT_ID/container-example/java-hello-world:cloud-build
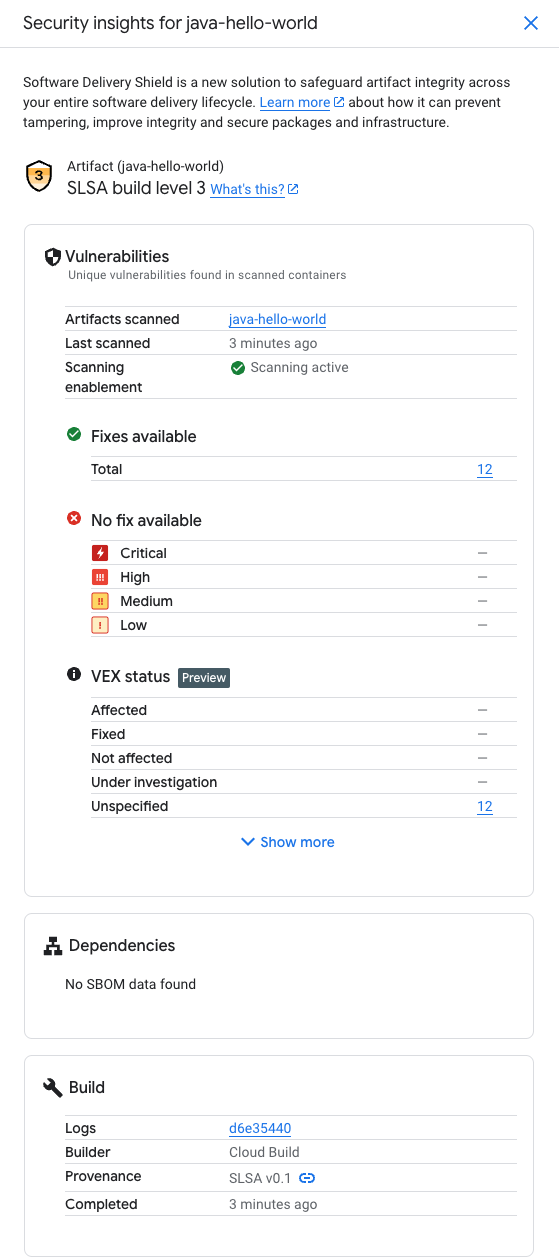
Once the build has completed we can head to the Cloud Build UI in the Google Cloud Console and view the SLSA Level we achieved by opening our build and then looking at the Build Artifacts under Build Summary. The image seen there has a button to see the "Security Insights". When you click on it you see the SLSA attestation as well as the familiar vulnerability reports that we saw before in the Artifact Registry UI when we pushed our local build.
The SLSA provenance for our image can also be retrieved by running the following command in Cloud Shell:
gcloud artifacts docker images describe \
"us-central1-docker.pkg.dev/$PROJECT_ID/container-example/java-hello-world:cloud-build" \
 --show-provenance
Require Cloud Build Provenance with Binary Authorization
With the Cloud Build pipeline in place wouldn't it be great to ensure that all the images we deploy to production were built using that programmable and reproducible build environment?
This is where Binary Authorization comes in. It allows you to put a gatekeeper in front of your container runtimes that inspects the container image and verifies the existence of a trusted attestation. If no attestation is found it either creates audit log entries or blocks the deployment entirely depending on the configuration.
To change the default Binary Authorization configuration of our project to require the built-in attestation issued by Cloud Run, we run the following command in Cloud Shell:
cat << EOF > /tmp/policy.yaml
defaultAdmissionRule:
  enforcementMode: ENFORCED_BLOCK_AND_AUDIT_LOG
  evaluationMode: REQUIRE_ATTESTATION
  requireAttestationsBy:
  - projects/$PROJECT_ID/attestors/built-by-cloud-build
name: projects/$PROJECT_ID/policy
EOF

gcloud container binauthz policy import /tmp/policy.yaml
Here you could obviously also add your own custom Attestors but that is outside the scope of this codelab and left as an optional extra curricular homework exercise.
To enforce binary authorization on our Cloud Run Service we run the following command in Cloud Shell:
gcloud run services update hello-world \
  --region us-central1 \
  --binary-authorization=default
Let's test our Binary Authorization is applied correctly by re-deploying the locally built image first
gcloud run deploy hello-world \
  --image us-central1-docker.pkg.dev/$PROJECT_ID/all-images/java-hello-world:tag1 \
  --region us-central1
As expected you should get an error message that explains why the image could not be deployed that looks something like this:
Image us-central1-docker.pkg.dev/my-project/all-images/java-hello-world@sha256:71eebbf04bf7d1d023e5de5e18f786ea3b8b6411bf64c8def3301c71baca0518 denied by attestor projects/my-project/attestors/built-by-cloud-build: No attestations found that were valid and signed by a key trusted by the attestor
To deploy a new version to our Cloud Run service we therefore need to provide an image that was built with Cloud Build.
gcloud run deploy hello-world \
  --image us-central1-docker.pkg.dev/$PROJECT_ID/all-images/java-hello-world:cloud-build \
  --region us-central1
This time around the deployment should succeed and show a successful deployment message similar to the one below:
Deploying container to Cloud Run service [hello-world] in project [my-project] region [us-central1]
OK Deploying... Done.
  OK Creating Revision...
  OK Routing traffic...
Done.
Service [hello-world] revision [hello-world-00005-mq4] has been deployed and is serving 100 percent of traffic.
Service URL: https://hello-world-13746229022.us-central1.run.app
8. Managing Java Maven language packages
In this section you will see how to set up an Artifact Registry Java repository and upload packages to it, leveraging them in different applications.
Create a Maven package repository
From Cloud Shell run the following command to create a repository for Java artifacts:
gcloud artifacts repositories create java-repo \
    --repository-format=maven \
    --location=us-central1 \
    --description="Example Java Maven Repo"
Click Authorize if the Cloud Shell authorization prompt appears
Go to Google Cloud Console - Artifact Registry - Repositories and notice your newly created Maven repository named java-repo, if you click on it you can see that it's empty at the moment.
Set up authentication to Artifact Repository
Use the following command to update the well-known location for Application Default Credentials (ADC) with your user account credentials so that the Artifact Registry credential helper can authenticate using them when connecting with repositories:
gcloud auth login --update-adc
Configure Maven for Artifact Registry
Run the following command to print the repository configuration to add to your Java project:
gcloud artifacts print-settings mvn \
    --repository=java-repo \
    --location=us-central1 | tee config.xml
Open the pom.xml in Cloud Shell Editor by running the following command in Cloud Shell from within the helloworld directory:
cloudshell edit pom.xml
and add the returned settings to the appropriate sections in the file,
Update the distributionManagement section
<distributionManagement>
   <snapshotRepository>
     <id>artifact-registry</id>
     <url>artifactregistry://us-central1-maven.pkg.dev/<PROJECT>/java-repo</url>
   </snapshotRepository>
   <repository>
     <id>artifact-registry</id>
     <url>artifactregistry://us-central1-maven.pkg.dev/<PROJECT>/java-repo</url>
   </repository>
</distributionManagement>
Update the repositories section
 <repositories>
   <repository>
     <id>artifact-registry</id>
     <url>artifactregistry://us-central1-maven.pkg.dev/<PROJECT>/java-repo</url>
     <releases>
       <enabled>true</enabled>
     </releases>
     <snapshots>
       <enabled>true</enabled>
     </snapshots>
   </repository>
 </repositories>
Update the extensions section under build
   <extensions>
     <extension>
       <groupId>com.google.cloud.artifactregistry</groupId>
       <artifactId>artifactregistry-maven-wagon</artifactId>
       <version>2.1.0</version>
     </extension>
   </extensions>
Here's an example of the complete file for your reference. Ensure to replace <PROJECT> with your project id.
<?xml version="1.0" encoding="UTF-8"?>
<project xmlns="http://maven.apache.org/POM/4.0.0" xmlns:xsi="http://www.w3.org/2001/XMLSchema-instance"  xsi:schemaLocation="http://maven.apache.org/POM/4.0.0 http://maven.apache.org/xsd/maven-4.0.0.xsd">
 <modelVersion>4.0.0</modelVersion>
 <groupId>com.example.run</groupId>
 <artifactId>helloworld</artifactId>
 <version>0.0.1-SNAPSHOT</version>
 <packaging>jar</packaging>

 <parent>
   <groupId>com.google.cloud.samples</groupId>
   <artifactId>shared-configuration</artifactId>
   <version>1.2.0</version>
 </parent>
 <dependencyManagement>
   <dependencies>
     <dependency>
       <groupId>org.springframework.boot</groupId>
       <artifactId>spring-boot-dependencies</artifactId>
       <version>${spring-boot.version}</version>
       <type>pom</type>
       <scope>import</scope>
     </dependency>
   </dependencies>
 </dependencyManagement>
 <properties>
   <project.build.sourceEncoding>UTF-8</project.build.sourceEncoding>
   <project.reporting.outputEncoding>UTF-8</project.reporting.outputEncoding>
   <maven.compiler.target>17</maven.compiler.target>
   <maven.compiler.source>17</maven.compiler.source>
   <spring-boot.version>3.2.2</spring-boot.version>
 </properties>
 <dependencies>
   <dependency>
     <groupId>org.springframework.boot</groupId>
     <artifactId>spring-boot-starter-web</artifactId>
   </dependency>
   <dependency>
     <groupId>org.springframework.boot</groupId>
     <artifactId>spring-boot-starter-test</artifactId>
     <scope>test</scope>
   </dependency>
   <dependency>
     <groupId>org.junit.vintage</groupId>
     <artifactId>junit-vintage-engine</artifactId>
     <scope>test</scope>
   </dependency>
   <dependency>
     <groupId>junit</groupId>
     <artifactId>junit</artifactId>
     <scope>test</scope>
   </dependency>
 </dependencies>
 <!-- [START Artifact Registry Config] -->
 <distributionManagement>
   <snapshotRepository>
     <id>artifact-registry</id>
     <url>artifactregistry://us-central1-maven.pkg.dev/<PROJECT>/java-repo</url>
   </snapshotRepository>
   <repository>
     <id>artifact-registry</id>
     <url>artifactregistry://us-central1-maven.pkg.dev/<PROJECT>/java-repo</url>
   </repository>
 </distributionManagement>

 <repositories>
   <repository>
     <id>artifact-registry</id>
     <url>artifactregistry://us-central1-maven.pkg.dev/<PROJECT>/java-repo</url>
     <releases>
       <enabled>true</enabled>
     </releases>
     <snapshots>
       <enabled>true</enabled>
     </snapshots>
   </repository>
 </repositories>
  <build>
   <extensions>
     <extension>
       <groupId>com.google.cloud.artifactregistry</groupId>
       <artifactId>artifactregistry-maven-wagon</artifactId>
       <version>2.2.0</version>
     </extension>
   </extensions>
 <!-- [END Artifact Registry Config] -->

   <plugins>
     <plugin>
       <groupId>org.springframework.boot</groupId>
       <artifactId>spring-boot-maven-plugin</artifactId>
       <version>${spring-boot.version}</version>
       <executions>
         <execution>
           <goals>
             <goal>repackage</goal>
           </goals>
         </execution>
       </executions>
     </plugin>
     <plugin>
       <groupId>com.google.cloud.tools</groupId>
       <artifactId>jib-maven-plugin</artifactId>
       <version>3.4.0</version>
       <configuration>
         <to>
           <image>gcr.io/PROJECT_ID/helloworld</image>
         </to>
       </configuration>
     </plugin>
   </plugins>
 </build>
 </project>
Upload your Java package to Artifact Registry
With Artifact Registry configured in Maven, you can now use Artifact Registry to store Java Jars for use by other projects in your organization.
Run the following command to upload your Java package to Artifact Registry:
mvn deploy
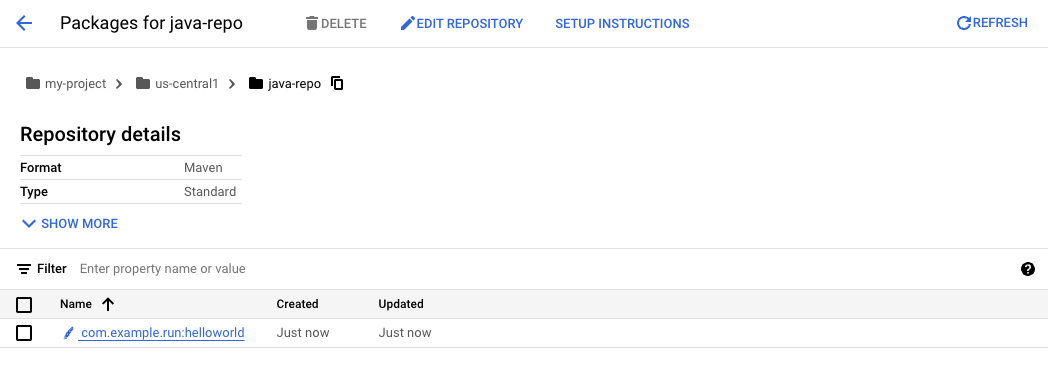
Check the Java package in Artifact Registry
Go to Cloud Console - Artifact Registry - Repositories Click into java-repo and check that the helloworld binary artifact is there:
9. Congratulations!
Congratulations, you finished the codelab!
What you've covered
- Created Repositories for Containers and Language Packages
- Managed container images with Artifact Registry
- Integrated Artifact Registry with Cloud Code
- Configured Maven to use Artifact Registry for Java Dependencies
Cleanup
Run the following command in Cloud Shell to delete the entire project
gcloud projects delete $PROJECT_ID