
১. ভূমিকা
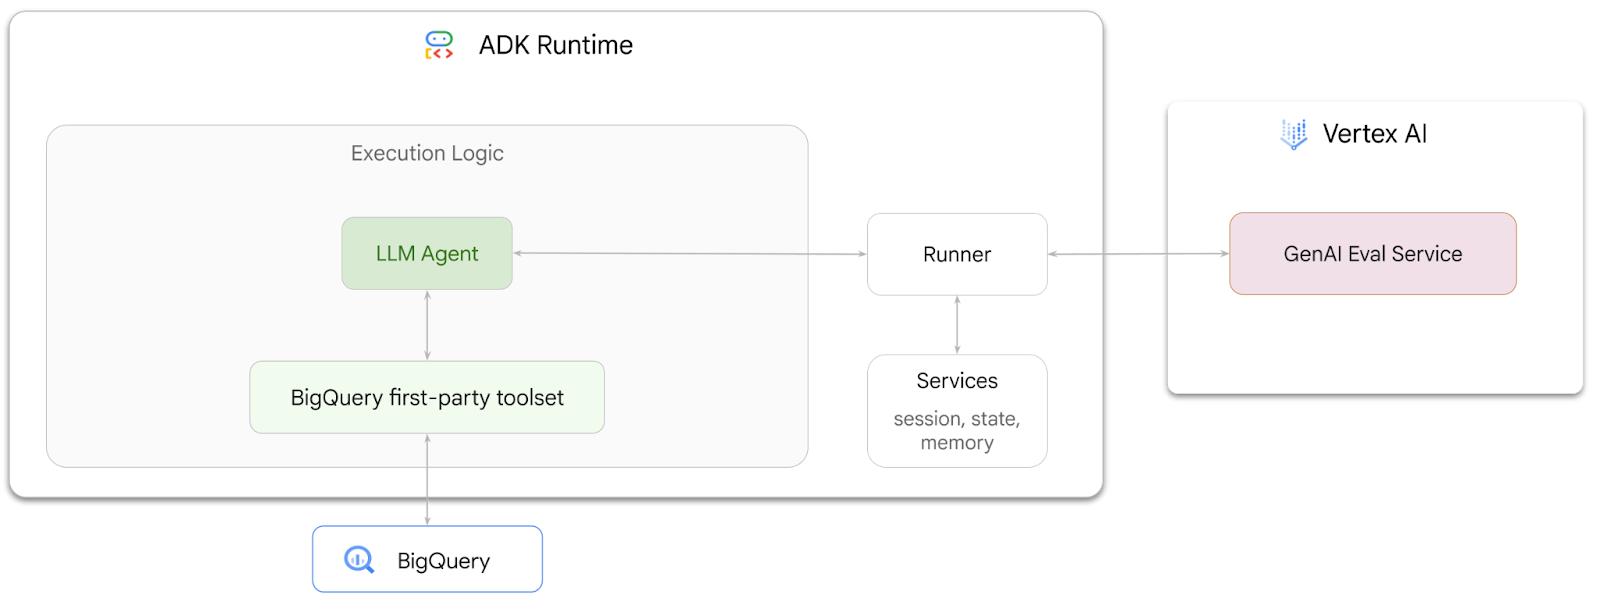
এই কোডল্যাবে আপনি এজেন্ট ডেভেলপমেন্ট কিট (ADK ) ব্যবহার করে BigQuery- তে সংরক্ষিত ডেটা সম্পর্কিত প্রশ্নের উত্তর দিতে পারে এমন এজেন্ট তৈরি করতে শিখবেন। এছাড়াও আপনি Vertex AI-এর GenAI ইভ্যালুয়েশন সার্ভিস ব্যবহার করে এই এজেন্টগুলোকে মূল্যায়ন করবেন।
আপনি যা করবেন
- ADK- তে একটি কথোপকথনমূলক অ্যানালিটিক্স এজেন্ট তৈরি করুন
- এই এজেন্টটিকে ADK-এর BigQuery-এর জন্য তৈরি ফার্স্ট-পার্টি টুলসেট দিয়ে সজ্জিত করুন, যাতে এটি BigQuery-তে সংরক্ষিত ডেটার সাথে ইন্টারঅ্যাক্ট করতে পারে।
- Vertex AI GenAI Evaluation পরিষেবা ব্যবহার করে আপনার এজেন্টের জন্য একটি মূল্যায়ন কাঠামো তৈরি করুন।
- কিছু আদর্শ প্রতিক্রিয়ার সাপেক্ষে এই এজেন্টের মূল্যায়ন চালান।
আপনার যা যা লাগবে
- ক্রোমের মতো একটি ওয়েব ব্রাউজার
- বিলিং সক্ষম করা একটি গুগল ক্লাউড প্রজেক্ট, অথবা
- একটি জিমেইল অ্যাকাউন্ট। পরবর্তী অংশে দেখানো হবে কীভাবে এই কোডল্যাবের জন্য বিনামূল্যে ৫ ডলার ক্রেডিট রিডিম করতে হয় এবং একটি নতুন প্রজেক্ট সেট আপ করতে হয়।
এই কোডল্যাবটি নতুনদের সহ সকল স্তরের ডেভেলপারদের জন্য। আপনি ADK ডেভেলপমেন্টের জন্য গুগল ক্লাউড শেল-এর কমান্ড-লাইন ইন্টারফেস এবং পাইথন কোড ব্যবহার করবেন। আপনাকে পাইথন বিশেষজ্ঞ হতে হবে না, তবে কোড কীভাবে পড়তে হয় সে সম্পর্কে প্রাথমিক ধারণা থাকলে বিষয়গুলো বুঝতে সুবিধা হবে।
২. শুরু করার আগে
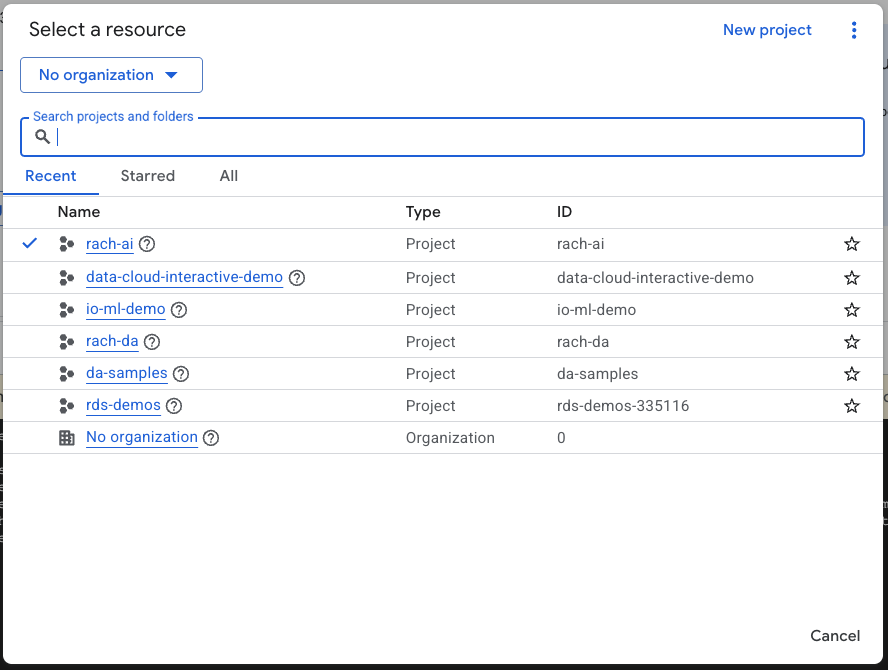
একটি গুগল ক্লাউড প্রজেক্ট তৈরি করুন
- গুগল ক্লাউড কনসোলের প্রজেক্ট সিলেক্টর পেজে, একটি গুগল ক্লাউড প্রজেক্ট নির্বাচন করুন বা তৈরি করুন ।
- আপনার ক্লাউড প্রোজেক্টের জন্য বিলিং চালু আছে কিনা তা নিশ্চিত করুন। কোনো প্রোজেক্টে বিলিং চালু আছে কিনা তা কীভাবে পরীক্ষা করবেন, তা জেনে নিন।
ক্লাউড শেল শুরু করুন
ক্লাউড শেল হলো গুগল ক্লাউডে চালিত একটি কমান্ড-লাইন পরিবেশ, যা প্রয়োজনীয় টুলস সহ আগে থেকেই লোড করা থাকে।
- Google Cloud কনসোলের শীর্ষে থাকা Activate Cloud Shell-এ ক্লিক করুন:

- ক্লাউড শেলে সংযুক্ত হওয়ার পর, আপনার প্রমাণীকরণ যাচাই করতে এই কমান্ডটি চালান:
gcloud auth list
- আপনার প্রজেক্টটি gcloud ব্যবহারের জন্য কনফিগার করা হয়েছে কিনা তা নিশ্চিত করতে নিম্নলিখিত কমান্ডটি চালান:
gcloud config list project
- আপনার প্রজেক্ট সেট করতে নিম্নলিখিত কমান্ডটি ব্যবহার করুন:
export PROJECT_ID=<YOUR_PROJECT_ID>
gcloud config set project $PROJECT_ID
এপিআই সক্ষম করুন
- প্রয়োজনীয় সকল এপিআই এবং সার্ভিস সক্রিয় করতে এই কমান্ডটি চালান:
gcloud services enable bigquery.googleapis.com \
                       aiplatform.googleapis.com \
                       cloudresourcemanager.googleapis.com
- কমান্ডটি সফলভাবে কার্যকর হলে, আপনি নিচে দেখানো বার্তার মতো একটি বার্তা দেখতে পাবেন:
Operation "operations/..." finished successfully.
৩. একটি BigQuery ডেটাসেট তৈরি করুন
- BigQuery-তে ecommerce নামে একটি নতুন ডেটাসেট তৈরি করতে Cloud Shell-এ নিম্নলিখিত কমান্ডটি চালান:
bq mk --dataset --location=US ecommerce
BigQuery পাবলিক ডেটাসেট thelook_ecommerce- এর একটি স্ট্যাটিক সাবসেট একটি পাবলিক গুগল ক্লাউড স্টোরেজ বাকেটে AVRO ফাইল হিসেবে সংরক্ষিত আছে।
- এই Avro ফাইলগুলিকে (events, order_items, products, users, orders) BigQuery-তে টেবিল হিসেবে লোড করতে Cloud Shell-এ এই কমান্ডটি চালান:
bq load --source_format=AVRO --autodetect \
    ecommerce.events \
  gs://sample-data-and-media/thelook_dataset_snapshot/events/*.avro.gz

bq load --source_format=AVRO --autodetect \
    ecommerce.order_items \
    gs://sample-data-and-media/thelook_dataset_snapshot/order_items/*.avro.gz

bq load --source_format=AVRO --autodetect \
    ecommerce.products \
    gs://sample-data-and-media/thelook_dataset_snapshot/products/*.avro.gz

bq load --source_format=AVRO --autodetect \
    ecommerce.users \
    gs://sample-data-and-media/thelook_dataset_snapshot/users/*.avro.gz

bq load --source_format=AVRO --autodetect \
    ecommerce.orders \
gs://sample-data-and-media/thelook_dataset_snapshot/orders/*.avro.gz
bq load --source_format=AVRO --autodetect \
    ecommerce.inventory_items \
    gs://sample-data-and-media/thelook_dataset_snapshot/inventory_items/*.avro.gz
bq load --source_format=AVRO --autodetect \
    ecommerce.distribution_centers \
    gs://sample-data-and-media/thelook_dataset_snapshot/distribution_centers/*.avro.gz
এই প্রক্রিয়াটিতে কয়েক মিনিট সময় লাগতে পারে।
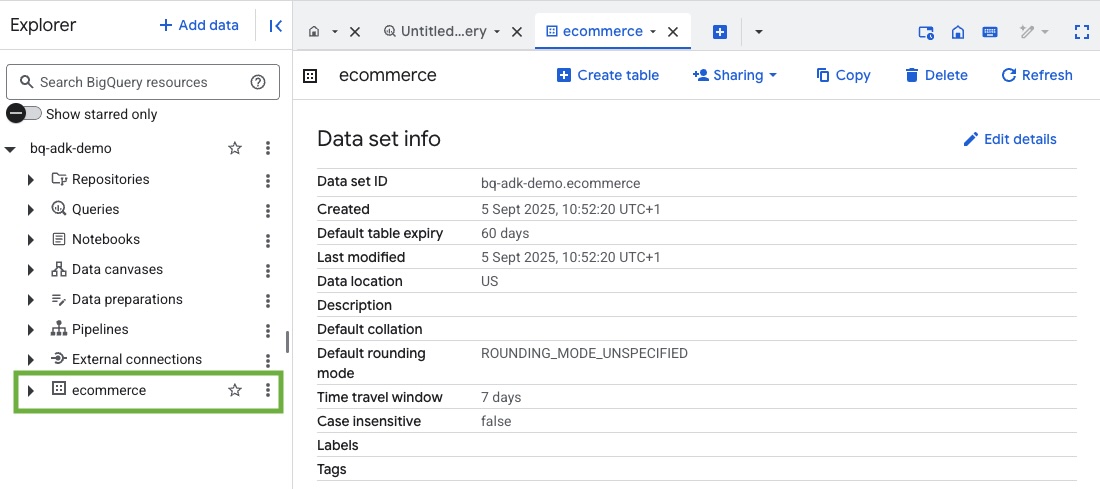
- আপনার গুগল ক্লাউড প্রজেক্টের BigQuery কনসোলে গিয়ে ডেটাসেট এবং টেবিলগুলো তৈরি হয়েছে কিনা তা যাচাই করুন:
৪. ADK এজেন্টদের জন্য পরিবেশ প্রস্তুত করুন
ক্লাউড শেলে ফিরে যান এবং নিশ্চিত করুন যে আপনি আপনার হোম ডিরেক্টরিতে আছেন। আমরা একটি ভার্চুয়াল পাইথন এনভায়রনমেন্ট তৈরি করব এবং প্রয়োজনীয় প্যাকেজগুলো ইনস্টল করব।
- ক্লাউড শেলে একটি নতুন টার্মিনাল ট্যাব খুলুন এবং bigquery-adk-codelab নামের একটি ফোল্ডার তৈরি করতে ও সেখানে যেতে এই কমান্ডটি চালান:
mkdir bigquery-adk-codelab
cd bigquery-adk-codelab
- একটি ভার্চুয়াল পাইথন পরিবেশ তৈরি করুন:
python -m venv .venv
- ভার্চুয়াল পরিবেশ সক্রিয় করুন:
source .venv/bin/activate
- গুগলের ADK এবং AI-Platform পাইথন প্যাকেজগুলো ইনস্টল করুন। bigquery এজেন্ট মূল্যায়ন করার জন্য AI platform এবং pandas প্যাকেজ প্রয়োজন।
pip install google-adk google-cloud-aiplatform[evaluation] pandas
৫. একটি ADK অ্যাপ্লিকেশন তৈরি করুন
এখন, চলুন আমাদের BigQuery এজেন্ট তৈরি করি। এই এজেন্টটি BigQuery-তে সংরক্ষিত ডেটা সম্পর্কে স্বাভাবিক ভাষার প্রশ্নের উত্তর দেওয়ার জন্য ডিজাইন করা হবে।
- প্রয়োজনীয় ফোল্ডার ও ফাইলসহ একটি নতুন এজেন্ট অ্যাপ্লিকেশন তৈরি করতে adk create ইউটিলিটি কমান্ডটি চালান:
adk create data_agent_app
নির্দেশনাগুলো অনুসরণ করুন:
- মডেলের জন্য gemini-2.5-flash নির্বাচন করুন।
- ব্যাকএন্ডের জন্য ভার্টেক্স এআই বেছে নিন।
- আপনার ডিফল্ট গুগল ক্লাউড প্রজেক্ট আইডি এবং অঞ্চল নিশ্চিত করুন।
নীচে একটি নমুনা মিথস্ক্রিয়া দেখানো হলো:

- ক্লাউড শেল এডিটর খুলতে এবং নতুন তৈরি করা ফোল্ডার ও ফাইলগুলো দেখতে, ক্লাউড শেলের ওপেন এডিটর বাটনে ক্লিক করুন :

তৈরি হওয়া ফাইলগুলো লক্ষ্য করুন:
bigquery-adk-codelab/
├── .venv/
└── data_agent_app/
    ├── __init__.py
    ├── agent.py
    └── .env
- init.py: ফোল্ডারটিকে একটি পাইথন মডিউল হিসেবে চিহ্নিত করে।
- agent.py: এতে এজেন্টের প্রাথমিক সংজ্ঞা রয়েছে।
- .env: আপনার প্রোজেক্টের এনভায়রনমেন্ট ভেরিয়েবলগুলো এতে থাকে (এই ফাইলটি দেখার জন্য আপনাকে ভিউ > টগল হিডেন ফাইলস-এ ক্লিক করতে হতে পারে)
প্রম্পট থেকে যে ভেরিয়েবলগুলো সঠিকভাবে সেট করা হয়নি, সেগুলো আপডেট করুন:
GOOGLE_GENAI_USE_VERTEXAI=1
GOOGLE_CLOUD_PROJECT=<YOUR_GOOGLE_PROJECT_ID>
GOOGLE_CLOUD_LOCATION=<YOUR_GOOGLE_CLOUD_REGION>
৬. আপনার এজেন্টকে সংজ্ঞায়িত করুন এবং এটিকে BigQuery টুলসেটটি বরাদ্দ করুন।
BigQuery টুলসেট ব্যবহার করে BigQuery-এর সাথে ইন্টারঅ্যাক্ট করে এমন একটি ADK এজেন্ট সংজ্ঞায়িত করতে, agent.py ফাইলের বিদ্যমান বিষয়বস্তু নিম্নলিখিত কোড দিয়ে প্রতিস্থাপন করুন।
আপনাকে এজেন্টের নির্দেশাবলীতে থাকা প্রজেক্ট আইডিটি আপনার আসল প্রজেক্ট আইডি দিয়ে অবশ্যই আপডেট করতে হবে:
from google.adk.agents import Agent
from google.adk.tools.bigquery import BigQueryCredentialsConfig, BigQueryToolset
import google.auth
import dotenv

dotenv.load_dotenv()

credentials, _ = google.auth.default()
credentials_config = BigQueryCredentialsConfig(credentials=credentials)
bigquery_toolset = BigQueryToolset(
  credentials_config=credentials_config
)

root_agent = Agent(
 model="gemini-2.5-flash",
 name="bigquery_agent",
 description="Agent that answers questions about BigQuery data by executing SQL queries.",
 instruction=(
     """
       You are a BigQuery data analysis agent.
       You are able to answer questions on data stored in project-id: '<YOUR_PROJECT_ID>' on the `ecommerce` dataset.
     """
 ),
 tools=[bigquery_toolset]
)

def get_bigquery_agent():
 return root_agent
BigQuery টুলসেট একটি এজেন্টকে মেটাডেটা ফেচ করতে এবং BigQuery ডেটার উপর SQL কোয়েরি এক্সিকিউট করার ক্ষমতা প্রদান করে। টুলসেটটি ব্যবহার করার জন্য, আপনাকে অবশ্যই অথেন্টিকেট করতে হবে, যার সবচেয়ে প্রচলিত বিকল্পগুলো হলো: ডেভেলপমেন্টের জন্য অ্যাপ্লিকেশন ডিফল্ট ক্রেডেনশিয়ালস (ADC), যখন এজেন্টকে কোনো নির্দিষ্ট ব্যবহারকারীর পক্ষ থেকে কাজ করতে হয় তখন ইন্টারেক্টিভ OAuth, অথবা নিরাপদ, প্রোডাকশন-লেভেল অথেন্টিকেশনের জন্য সার্ভিস অ্যাকাউন্ট ক্রেডেনশিয়ালস।
এখান থেকে, আপনি ক্লাউড শেলে ফিরে গিয়ে এই কমান্ডটি চালিয়ে আপনার এজেন্টের সাথে চ্যাট করতে পারেন:
adk web
ওয়েবসার্ভার চালু হয়েছে জানিয়ে আপনি একটি বিজ্ঞপ্তি দেখতে পাবেন:
...
INFO:     Started server process [2735]
INFO:     Waiting for application startup.

+-----------------------------------------------------------------------------+
| ADK Web Server started                                                      |                                                      |
| For local testing, access at http://127.0.0.1:8000.                         |
+-----------------------------------------------------------------------------+

INFO:     Application startup complete.
INFO:     Uvicorn running on http://127.0.0.1:8000
ADK ওয়েব চালু করতে প্রদত্ত ইউআরএল-এ ক্লিক করুন - আপনি ডেটাসেট সম্পর্কে আপনার এজেন্টকে কিছু প্রশ্ন জিজ্ঞাসা করতে পারেন:
adk web বন্ধ করুন এবং ওয়েব সার্ভারটি শাটডাউন করতে টার্মিনালে Ctrl + C চাপুন।
৭. মূল্যায়নের জন্য আপনার এজেন্টকে প্রস্তুত করুন।
এখন আপনি আপনার BigQuery এজেন্ট সংজ্ঞায়িত করেছেন, মূল্যায়নের জন্য এটিকে চালনাযোগ্য করতে হবে।
নিচের কোডটিতে run_conversation নামের একটি ফাংশন সংজ্ঞায়িত করা হয়েছে, যা একটি এজেন্ট তৈরি করা, একটি সেশন চালানো এবং চূড়ান্ত প্রতিক্রিয়া পুনরুদ্ধার করার জন্য ইভেন্টগুলো প্রক্রিয়াকরণের মাধ্যমে কথোপকথনের প্রবাহ পরিচালনা করে।
- ক্লাউড এডিটরে ফিরে যান এবং bigquery-adk-codelab ডিরেক্টরিতে
run_agent.pyনামে একটি নতুন ফাইল তৈরি করে নিচের কোডটি কপি/পেস্ট করুন:
from data_agent_app.agent import get_bigquery_agent
from google.adk.sessions import InMemorySessionService
from google.adk.runners import Runner
from google.genai import types
import uuid

APP_NAME = "data_agent_app"
USER_ID = "biquery_user_101"


async def run_conversation(prompt: str):
   """Runs a conversation with the BigQuery agent using the ADK Runner."""

   session_service = InMemorySessionService()
   session_id = f"{APP_NAME}-{uuid.uuid4().hex[:8]}"
   root_agent = get_bigquery_agent()

   runner = Runner(
       agent=root_agent, app_name=APP_NAME, session_service=session_service
   )
   session = await session_service.create_session(
       app_name=APP_NAME, user_id=USER_ID, session_id=session_id
   )
   final_response_text = "Unable to retrieve final response."
   tool_calls = []

   try:
       # Run the agent and process the events as they are generated
       async for event in runner.run_async(
           user_id=USER_ID,
           session_id=session_id,
           new_message=types.Content(role="user", parts=[types.Part(text=prompt)]),
       ):

           if (
               event.content
               and event.content.parts
               and event.content.parts[0].function_call
           ):

               func_call = event.content.parts[0].function_call

               tool_call = {
                   "tool_name": func_call.name,
                   "tool_input": dict(func_call.args),
               }
               tool_calls.append(tool_call)

           if event.is_final_response():
               if event.content and event.content.parts:
                   final_response_text = event.content.parts[0].text
               break

   except Exception as e:
       print(f"Error in run_conversation: {e}")
       final_response_text = f"An error occurred during the conversation: {e}"

   return {
       "response": final_response_text,
       "predicted_trajectory": tool_calls
   }
নিচের কোডটি এই রানযোগ্য ফাংশনটিকে কল করতে এবং ফলাফল ফেরত দিতে ইউটিলিটি ফাংশনগুলো সংজ্ঞায়িত করে। এতে মূল্যায়ন ফলাফল প্রিন্ট ও সংরক্ষণ করার জন্য সহায়ক ফাংশনও অন্তর্ভুক্ত রয়েছে:
- bigquery-adk-codelab ডিরেক্টরিতে
utils.pyনামে একটি নতুন ফাইল তৈরি করুন এবং এই কোডটি utils.py ফাইলে কপি/পেস্ট করুন:
import json
import os
import asyncio
import run_agent
import numbers
import math


def get_agent_response(prompt: str) -> dict:
   """Invokes the agent with a prompt and returns its response."""

   try:
       response = asyncio.run(run_agent.run_conversation(prompt))  # Invoke the agent
       return response
   except Exception as e:
       return {"response": "Error: Agent failed to produce a response."}


def save_evaluation_results(eval_result, experiment_run):
   """Processes, saves, and prints the evaluation results for a single run."""

   os.makedirs("eval_results", exist_ok=True)
   output_file_path = os.path.join(
       "eval_results", f"bq_agent_eval_results_{experiment_run}.json"
   )

   # Prepare data for JSON serialization
   eval_result_dict = {
       "summary_metrics": eval_result.summary_metrics,
       "pointwise_metrics": eval_result.metrics_table.to_dict("records"),
   }
   # --- Save the results as a JSON file ---
   with open(output_file_path, "w") as f:
       json.dump(eval_result_dict, f, indent=4)
   print(f"Results for run '{experiment_run}' saved to {output_file_path}")


def print_evaluation_summary(eval_result):
   """Prints a detailed summary of the evaluation results, including summary-level and aggregated pointwise metrics."""

   pointwise_metrics = eval_result.metrics_table
   # Print summary metrics for the current run
   summary_metrics = eval_result.summary_metrics
   if summary_metrics:
       for key, value in summary_metrics.items():
           if isinstance(value, numbers.Real) and not math.isnan(value):
               value = f"{value:.2f}"

           metric_name = key.replace("/mean", "").replace("_", " ").title()
           print(f"- {metric_name}: {key}: {value}")
   else:
       print("No summary metrics found for this run.")
   print("\n" + "=" * 50 + "\n")

   if not pointwise_metrics.empty:
       total_questions = len(pointwise_metrics)
       avg_completeness_score = pointwise_metrics["completeness_metric/score"].mean()
       avg_factual_accuracy_score = pointwise_metrics[
           "factual_accuracy_metric/score"
       ].mean()
       print("\n" + "=" * 50 + "\n")
       print("--- Aggregated Evaluation Summary ---")
       print(f"Total questions in evaluation dataset: {total_questions}")
       print(f"Average Completeness Score: {avg_completeness_score:.2f}")
       print(f"Average Factual Accuracy Score: {avg_factual_accuracy_score:.2f}")
       print("\n" + "=" * 50 + "\n")
   else:
       print("\nNo successful evaluation runs were completed.")
৮. একটি মূল্যায়ন ডেটাসেট তৈরি করুন।
আপনার এজেন্টকে মূল্যায়ন করতে, আপনাকে একটি মূল্যায়ন ডেটাসেট তৈরি করতে হবে, আপনার মূল্যায়ন মেট্রিকগুলো নির্ধারণ করতে হবে এবং মূল্যায়ন টাস্কটি চালাতে হবে ।
মূল্যায়ন ডেটাসেটে প্রশ্ন ( প্রম্পট ) এবং সেগুলোর সংশ্লিষ্ট সঠিক উত্তরের ( রেফারেন্স ) একটি তালিকা রয়েছে। মূল্যায়ন পরিষেবাটি আপনার এজেন্টের প্রতিক্রিয়াগুলো তুলনা করতে এবং সেগুলো নির্ভুল কিনা তা নির্ধারণ করতে এই জোড়াগুলো ব্যবহার করবে।
- bigquery-adk-codelab ডিরেক্টরিতে evaluation_dataset.json নামে একটি নতুন ফাইল তৈরি করুন এবং নিচের ইভ্যালুয়েশন ডেটাসেটটি কপি/পেস্ট করুন:
[
   {
       "prompt": "What tables are available in the dataset `ecommerce`?",
       "reference": "The tables available in the dataset `ecommerce` are: `distribution_centers`, `events`, `inventory_items`, `order_items`, `orders`, `products`, and `users`."
   },
   {
       "prompt": "How many users are there in total?",
       "reference": "There are 100,000 users in total."
   },
   {
       "prompt": "Find the email and age of the user with id 72685.",
       "reference": "The email address of user 72685 is lindseybrennan@example.org and their age is 59."
   },
   {
       "prompt": "How many orders have a status of Complete?",
       "reference": "There are 31,077 orders with a status of 'complete'."
   },
   {
       "prompt": "Which distribution center has the highest latitude, and what is it's latitude?",
       "reference": "Chicago IL is the distribution center with the highest latitude, with a latitude of 41.84."
   },
   {
       "prompt": "Retrieve the order id for all orders with a status of cancelled placed on the 1st June 2023 before 6am.",
       "reference": "The order IDs for all orders with a status of 'cancelled' placed on the 1st June 2023 before 6am are: 26622, 49223"
   },
   {
       "prompt": "What id the full name and user ids of the top 5 users with the most orders.",
       "reference": "The top 5 users with the most orders are: Kristine Pennington (user ID 77359), Anthony Bright (user ID 4137), David Bean (user ID 30740), Michelle Wright (user ID 54563), and Matthew Reynolds (user ID 41136), each with 4 total orders."
   },
   {
       "prompt": "Which distribution center is associated with the highest average retail price of its products, and what is the average retail price?",
       "reference": "The distribution center associated with the highest average retail price of its products is Houston TX, with an average retail price of $69.74."
   },
   {
       "prompt": "How many events were of type 'purchase' in Seoul during May 2024?",
       "reference": "In May 2024, there were 57 'purchase' events recorded in Seoul."
   },
   {
       "prompt": "For orders placed in June 2023, how many took three days or longer to be delivered after they were shipped?",
       "reference": "In June 2023, there were 318 orders with a time difference of of 3 days or more between when they were shipped and delivered."
   },
   {
       "prompt": "What are the names of the products and their respective retail price that have never been sold, but have a retail price greater than $210?",
       "reference": "The products that have never been sold but have a retail price greater than $210 are:\n- Tommy Hilfiger Men's 2 Button Side Vent Windowpane Trim Fit Sport Coat, with a retail price of $249.9\n- MICHAEL Michael Kors Women's Hooded Leather Jacket: $211.11"
   },
   {
       "prompt": "List the id and first name of users between the ages of 70 and 75 who have Facebook were sourced from Facebook and are located in California.",
       "reference": "The users between the ages of 70 and 75 from California with 'Facebook' as their traffic source are:\n- Julie (ID: 25379)\n- Sherry (ID: 85196)\n- Kenneth (ID: 82238)\n- Lindsay (ID: 64079)\n- Matthew (ID: 99612)"
   },
   {
       "prompt": "Identify the full name and user id of users over the age of 67 who live within 3.5 kilometers of any distribution_center.",
       "reference": "The users over the age of 67 who live within 3.5 kilometers of any distribution center are:\n- William Campbell (user ID: 26082)\n- Becky Cantrell (user ID: 39008)"
   },
   {
       "prompt": "What is the median age of users for each gender?",
       "reference": "The median age for female users is 41, and the median age for male users is 41."
   },
   {
       "prompt": "What is the average sale price of complete orders compared to returned orders, and what is the percentage difference (to two decimal places) between them?",
       "reference": "The average sale price for 'Complete' orders was $59.56, while for 'Returned' orders it was $59.76. This represents a percentage difference of 0.34%."
   }
]
৯. আপনার মূল্যায়ন মানদণ্ড নির্ধারণ করুন
আপনার BigQuery ডেটা সম্পর্কিত প্রশ্নের উত্তর দেওয়ার ক্ষেত্রে এজেন্টের সক্ষমতা মূল্যায়ন করতে আমরা এখন দুটি কাস্টম মেট্রিক ব্যবহার করব, যেগুলোর উভয়ই ১ থেকে ৫ পর্যন্ত স্কোর প্রদান করবে:
- তথ্যগত নির্ভুলতা পরিমাপক: এর মাধ্যমে যাচাই করা হয় যে, উত্তরে উপস্থাপিত সমস্ত উপাত্ত ও ঘটনা বাস্তব সত্যের সাথে তুলনা করে সুনির্দিষ্ট ও সঠিক কিনা।
- সম্পূর্ণতার পরিমাপক: এটি পরিমাপ করে যে, ব্যবহারকারীর অনুরোধ করা এবং সঠিক উত্তরে উপস্থিত সমস্ত মূল তথ্য কোনো গুরুত্বপূর্ণ বাদ পড়া ছাড়াই প্রতিক্রিয়াটিতে অন্তর্ভুক্ত আছে কি না।
- অবশেষে, bigquery-adk-codelab ডিরেক্টরিতে
evaluate_agent.pyনামে একটি নতুন ফাইল তৈরি করুন এবং মেট্রিক ডেফিনিশন কোডটি evaluate_agent.py ফাইলে কপি/পেস্ট করুন:
import uuid
import pandas as pd
from datetime import datetime
from vertexai.preview.evaluation import EvalTask
from vertexai.preview.evaluation.metrics import (
   PointwiseMetricPromptTemplate,
   PointwiseMetric,
   TrajectorySingleToolUse,
)
from utils import save_evaluation_results, print_evaluation_summary, get_agent_response

factual_accuracy_metric = PointwiseMetric(
   metric="factual_accuracy_metric",
   metric_prompt_template=PointwiseMetricPromptTemplate(
       instruction="""You are an expert evaluator assessing the factual accuracy of an AI's answer to a user's question, given a natural language prompt and a 'reference' (ground truth) answer. Your task is to determine if all factual information in the AI's answer is precise and correct when compared to the reference.""",
       criteria={
           "Accuracy": """The AI's answer must present factual information (numerical values, names, dates, specific values) that are **identical** to or an exact logical derivation from the reference.
          - **Wording may vary, but the core factual information must be the same.**
          - No numerical discrepancies.
          - No incorrect names or identifiers.
          - No fabricated or misleading details.
          - Note: Minor rounding of numerical values that doesn't alter the core meaning or lead to significant misrepresentation is generally acceptable, assuming the prompt doesn't ask for exact precision."""
       },
       rating_rubric={
           "5": "Excellent: The response is entirely factually correct. **All factual information precisely matches the reference.** There are absolutely no inaccuracies or misleading details.",
           "3": "Good: The response is generally accurate, but contains minor, non-critical factual inaccuracies (e.g., a negligible rounding difference or slightly wrong detail) that do not impact the core understanding.",
           "1": "Poor: The response contains significant factual errors, major numerical discrepancies, or fabricated information that makes the answer incorrect or unreliable."
       },
       input_variables=["prompt", "reference", "response"],
   ),
)

completeness_metric = PointwiseMetric(
   metric="completeness_metric",
   metric_prompt_template=PointwiseMetricPromptTemplate(
       instruction="""You are an expert evaluator assessing the completeness of an AI's answer to a user's question, given a natural language prompt and a 'reference' (ground truth) answer. Your task is to determine if the AI's answer provides all the essential information requested by the user and present in the reference.""",
       criteria={
           "Completeness": """The AI's answer must include **all** key pieces of information explicitly or implicitly requested by the prompt and present in the reference.
          - No omissions of critical facts.
          - All requested attributes (e.g., age AND email, not just one) must be present.
          - If the reference provides a multi-part answer, all parts must be covered."""
       },
       rating_rubric={
           "5": "Excellent: The response is perfectly complete. **All key information requested by the prompt and present in the reference is included.** There are absolutely no omissions.",
           "3": "Good: The response is mostly complete. It has only a slight, non-critical omission that does not impact the core understanding or utility of the answer.",
           "1": "Poor: The response is critically incomplete. Essential parts of the requested information are missing, making the answer less useful or unusable for the user's purpose."
       },
       input_variables=["prompt", "reference", "response"],
   ),
)

tool_use_metric = TrajectorySingleToolUse(tool_name="list_table_ids")
ট্র্যাজেক্টরি মূল্যায়নের জন্য আমি TrajectorySingleToolUse মেট্রিকটিও অন্তর্ভুক্ত করেছি। যখন এই মেট্রিকগুলো উপস্থিত থাকে, তখন এজেন্ট টুলের কলগুলো (যার মধ্যে BigQuery-এর বিপরীতে তৈরি ও কার্যকর করা র SQL-ও অন্তর্ভুক্ত) মূল্যায়ন প্রতিক্রিয়ায় অন্তর্ভুক্ত হবে, যা বিস্তারিত পরিদর্শনের সুযোগ করে দেবে।
TrajectorySingleToolUse মেট্রিকটি নির্ধারণ করে যে কোনো এজেন্ট একটি নির্দিষ্ট টুল ব্যবহার করেছে কি না। এক্ষেত্রে, আমি list_table_ids বেছে নিয়েছি, কারণ আমরা আশা করি যে ইভ্যালুয়েশন ডেটাসেটের প্রতিটি প্রশ্নের জন্য এই টুলটি কল করা হবে। অন্যান্য ট্র্যাজেক্টরি মেট্রিকের মতো নয়, এই মেট্রিকটির জন্য আপনাকে ইভ্যালুয়েশন ডেটাসেটের প্রতিটি প্রশ্নের জন্য সমস্ত প্রত্যাশিত টুল কল এবং আর্গুমেন্ট নির্দিষ্ট করতে হবে না।
১০. আপনার মূল্যায়ন কাজটি তৈরি করুন
EvalTask মূল্যায়ন ডেটাসেট এবং কাস্টম মেট্রিকগুলো গ্রহণ করে একটি নতুন মূল্যায়ন পরীক্ষা স্থাপন করে।
এই ফাংশন, run_eval, হলো মূল্যায়নের মূল চালিকাশক্তি। এটি একটি EvalTask-এর মধ্যে লুপ চালিয়ে ডেটাসেটের প্রতিটি প্রশ্নের উপর আপনার এজেন্টকে চালনা করে। প্রতিটি প্রশ্নের জন্য, এটি এজেন্টের প্রতিক্রিয়া রেকর্ড করে এবং তারপর আপনার পূর্বে সংজ্ঞায়িত মেট্রিকগুলো ব্যবহার করে সেটিকে গ্রেড দেয়।
evaluate_agent.py ফাইলের শেষে নিম্নলিখিত কোডটি কপি/পেস্ট করুন:
def run_eval():
   eval_dataset = pd.read_json("evaluation_dataset.json")

   # Generate a unique run name
   current_time = datetime.now().strftime("%Y%m%d-%H%M%S")
   experiment_run_id = f"{current_time}-{uuid.uuid4().hex[:8]}"

   print(f"--- Starting evaluation: ({experiment_run_id}) ---")

   # Define the evaluation task with your dataset and metrics
   eval_task = EvalTask(
       dataset=eval_dataset,
       metrics=[
           factual_accuracy_metric,
           completeness_metric,
           tool_use_metric,
       ],
       experiment="evaluate-bq-data-agent"
   )

   try:
       eval_result = eval_task.evaluate(
           runnable=get_agent_response, experiment_run_name=experiment_run_id
       )
       save_evaluation_results(eval_result, experiment_run_id)
       print_evaluation_summary(eval_result)

   except Exception as e:
       print(f"An error occurred during evaluation run: {e}")


if __name__ == "__main__":
   run_eval()
ফলাফলগুলো সংক্ষিপ্ত করে একটি JSON ফাইলে সংরক্ষণ করা হয়।
১১. আপনার মূল্যায়ন চালান
এখন যেহেতু আপনার এজেন্ট, মূল্যায়ন মেট্রিক এবং মূল্যায়ন ডেটাসেট প্রস্তুত, আপনি মূল্যায়নটি চালাতে পারেন।
ক্লাউড শেলে ফিরে যান, নিশ্চিত করুন যে আপনি bigquery-adk-codelab ডিরেক্টরিতে আছেন এবং নিম্নলিখিত কমান্ডটি ব্যবহার করে ইভ্যালুয়েশন স্ক্রিপ্টটি চালান:
python evaluate_agent.py
মূল্যায়ন অগ্রসর হওয়ার সাথে সাথে আপনি এই ধরনের আউটপুট দেখতে পাবেন:
Evaluation Took:11.410560518999773 seconds
Results for run '20250922-130011-300ea89b' saved to eval_results/bq_agent_eval_results_20250922-130011-300ea89b.json
- Row Count: row_count: 15.00
- Factual Accuracy Metric: factual_accuracy_metric/mean: 2.60
- Factual Accuracy Metric/Std: factual_accuracy_metric/std: 1.88
- Completeness Metric: completeness_metric/mean: 2.87
- Completeness Metric/Std: completeness_metric/std: 2.07
- Trajectory Single Tool Use: trajectory_single_tool_use/mean: 0.90
- Trajectory Single Tool Use/Std: trajectory_single_tool_use/std: 0.32
- Latency In Seconds: latency_in_seconds/mean: 9.77
- Latency In Seconds/Std: latency_in_seconds/std: 5.65
- Failure: failure/mean: 0.00
- Failure/Std: failure/std: 0.00
যদি আপনি নীচের মতো কোনো ত্রুটির সম্মুখীন হন, তার মানে হলো এজেন্টটি একটি নির্দিষ্ট রানের জন্য কোনো টুল কল করেনি; আপনি পরবর্তী ধাপে এজেন্টের আচরণ আরও খতিয়ে দেখতে পারেন।
Error encountered for metric trajectory_single_tool_use at dataset index 1: Error: 400 List of Field: trajectory_single_tool_use_input.instances[0].predicted_trajectory; Message: Required field is not set.
ফলাফলের ব্যাখ্যা:
data_agent_app ডিরেক্টরির অন্তর্গত eval_results ফোল্ডারে যান এবং bq_agent_eval_results_*.json নামের মূল্যায়ন ফলাফল ফাইলটি খুলুন:
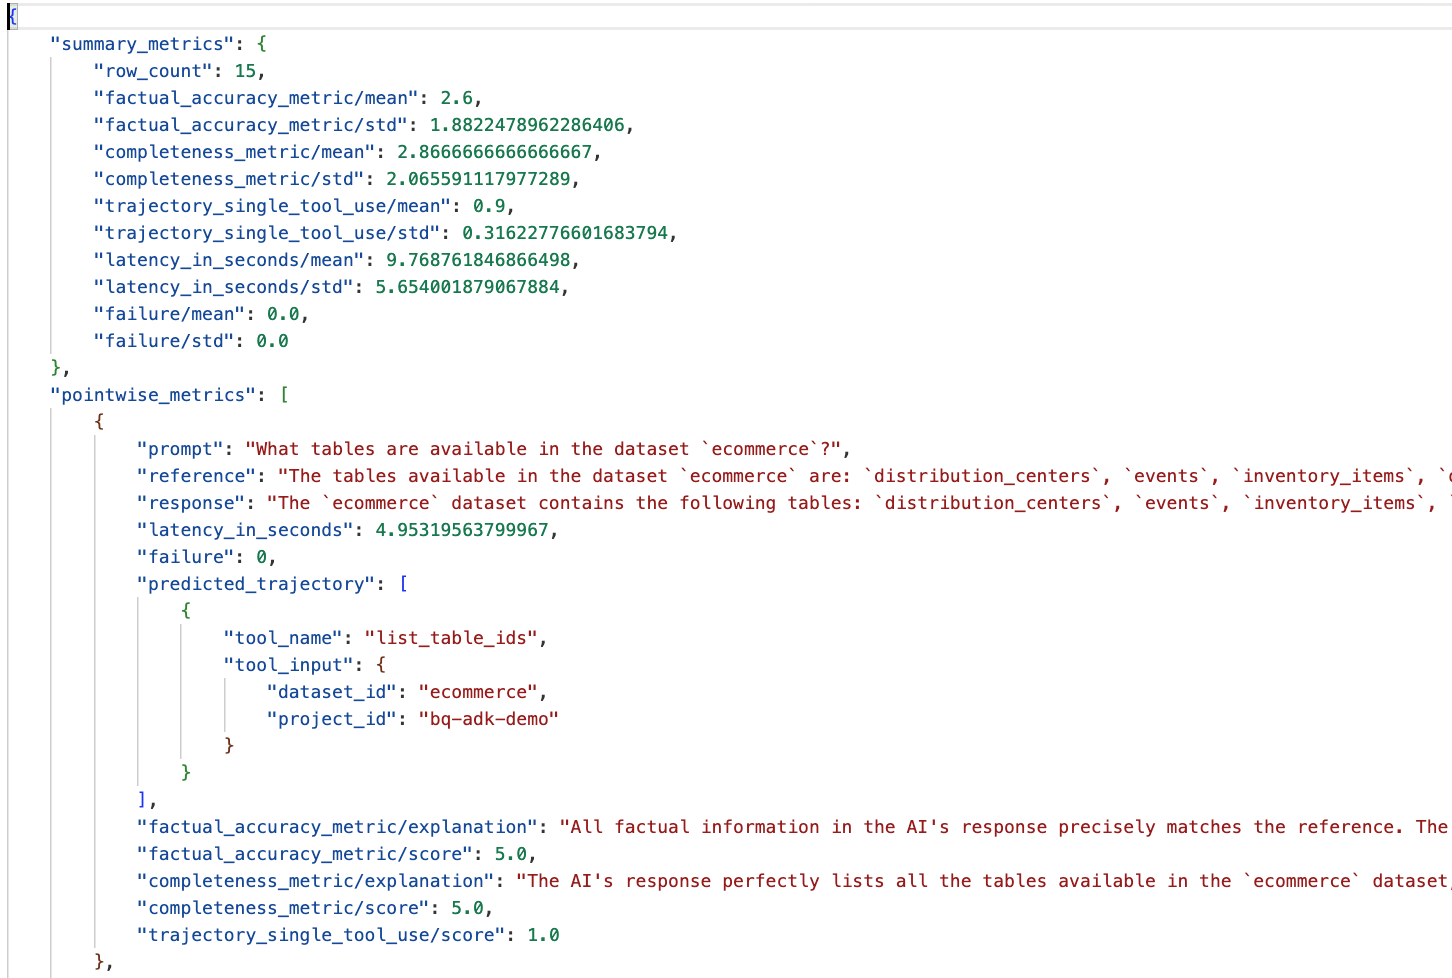
- সারাংশ মেট্রিক্স: ডেটাসেট জুড়ে আপনার এজেন্টের পারফরম্যান্সের একটি সামগ্রিক চিত্র প্রদান করে।
- তথ্যগত নির্ভুলতা এবং সম্পূর্ণতার পয়েন্টভিত্তিক পরিমাপ: ৫-এর কাছাকাছি স্কোর উচ্চতর নির্ভুলতা এবং সম্পূর্ণতা নির্দেশ করে। প্রতিটি প্রশ্নের জন্য একটি স্কোর থাকবে এবং সেই স্কোরটি কেন দেওয়া হয়েছে তার একটি লিখিত ব্যাখ্যাও থাকবে।
- পূর্বাভাসিত গতিপথ: এটি হলো এজেন্টদের দ্বারা চূড়ান্ত প্রতিক্রিয়ায় পৌঁছানোর জন্য ব্যবহৃত টুল কলগুলোর তালিকা। এর মাধ্যমে আমরা এজেন্ট দ্বারা তৈরি যেকোনো SQL কোয়েরি দেখতে পারব।
আমরা দেখতে পাচ্ছি যে, গড় সম্পূর্ণতা এবং তথ্যগত নির্ভুলতার গড় স্কোর যথাক্রমে ২.৮৭ এবং ২.৬।
ফলাফল খুব একটা ভালো নয়! চলো আমাদের এজেন্টের প্রশ্নোত্তরের দক্ষতা উন্নত করার চেষ্টা করি।
১২. আপনার এজেন্টের মূল্যায়ন ফলাফল উন্নত করুন
bigquery-adk-codelab ডিরেক্টরিতে থাকা agent.py ফাইলে যান এবং এজেন্টের মডেল ও সিস্টেম নির্দেশাবলী আপডেট করুন। মনে রাখবেন, <YOUR_PROJECT_ID> এর জায়গায় আপনার প্রজেক্ট আইডি বসাতে হবে:
root_agent = Agent(
 model="gemini-2.5-flash",
 name="bigquery_agent",
 description="Agent that answers questions about BigQuery data by executing SQL queries.",
 instruction=(
     """
     You are a data analysis agent with access to several BigQuery tools.
     Use the appropriate tools to fetch relevant BigQuery metadata and execute SQL queries.
     You must use these tools to answer the user's questions.
     Run these queries in the project-id: '<YOUR_PROJECT_ID>' on the `ecommerce` dataset.
    """
 ),
 tools=[bigquery_toolset]
)
এখন টার্মিনালে ফিরে যান এবং মূল্যায়নটি পুনরায় চালান:
python evaluate_agent.py
আপনি দেখতে পাবেন ফলাফল এখন অনেক ভালো:
==================================================

--- Aggregated Evaluation Summary ---
Total questions in evaluation dataset: 15
Average Completeness Score: 4.73
Average Factual Accuracy Score: 4.20

==================================================
আপনার এজেন্টের মূল্যায়ন একটি পুনরাবৃত্তিমূলক প্রক্রিয়া। মূল্যায়নের ফলাফল আরও উন্নত করতে, আপনি BigQuery-তে সিস্টেম নির্দেশাবলী, মডেল প্যারামিটার বা এমনকি মেটাডেটা পরিবর্তন করতে পারেন — আরও কিছু ধারণার জন্য এই টিপস এবং ট্রিকসগুলো দেখুন।
১৩. পরিষ্কার করা
আপনার গুগল ক্লাউড অ্যাকাউন্টে চলমান চার্জ এড়ানোর জন্য, এই কর্মশালার সময় আমাদের তৈরি করা রিসোর্সগুলো মুছে ফেলা জরুরি।
আপনি যদি এই কোডল্যাবের জন্য কোনো নির্দিষ্ট BigQuery ডেটাসেট বা টেবিল (যেমন, ইকমার্স ডেটাসেট) তৈরি করে থাকেন, তাহলে আপনি সেগুলি মুছে ফেলতে পারেন:
bq rm -r $PROJECT_ID:ecommerce
bigquery-adk-codelab ডিরেক্টরি এবং এর ভেতরের সবকিছু মুছে ফেলতে:
cd .. # Go back to your home directory if you are still in bigquery-adk-codelab
rm -rf bigquery-adk-codelab
১৪. অভিনন্দন
অভিনন্দন! আপনি এজেন্ট ডেভেলপমেন্ট কিট (ADK) ব্যবহার করে সফলভাবে একটি BigQuery এজেন্ট তৈরি এবং মূল্যায়ন করেছেন। আপনি এখন জানেন কীভাবে BigQuery টুলস ব্যবহার করে একটি ADK এজেন্ট সেট আপ করতে হয় এবং কাস্টম মূল্যায়ন মেট্রিক্স ব্যবহার করে এর পারফরম্যান্স পরিমাপ করতে হয়।