
1. Welcome
This codelab is part of the Advanced Android Development training course, developed by the Google Developers Training team. You will get the most value out of this course if you work through the codelabs in sequence.
For complete details about the course, see the Advanced Android Development overview.
Introduction
Building apps with Google Maps allows you to add features to your app such as satellite imagery, robust UI controls, location tracking, and location markers. You can add value to the standard Google Maps by showing information from your own data set, such as the locations of well-known fishing or climbing areas. You can also create games tied to the real world, like Pokemon Go.
In this practical, you create a Google Maps app called Wander.
What you should already know
You should be familiar with:
- Basic functionality of Google Maps.
- Runtime permissions.
- Creating, building, and running apps in Android Studio.
- Including external libraries in your
build.gradlefile.
What you'll learn
- Integrate a Google Map in your app.
- Display different map types.
- Style the Google Map.
- Add markers to your map.
- Enable the user to place a marker on a point of interest (POI).
- Enable location tracking.
- Enable Google Street View.
What you'll do
- Get an API key from the Google API Console and register the key to your app.
- Create the
Wanderapp, which has an embedded Google Map. - Add custom features to your app such as markers, styling, and location tracking.
- Enable location tracking and Street View in your app.
2. App overview
In this practical you create the Wander app, which is a styled Google Map. The Wander app allows you to drop markers onto locations, see your location in real time, and look at Street View panoramas.
|
|
3. Task 1. Set up the project and get an API Key
The Google Maps API, like the Places API, requires an API key. To obtain the API key, you register your project in the Google API Console. The API key is tied to a digital certificate that links the app to its author. For more about using digital certificates and signing your app, see Sign Your App.
In this practical, you use the API key for the debug certificate. The debug certificate is insecure by design, as described in Sign your debug build. Published Android apps that use the Google Maps API require a second API key: the key for the release certificate. For more information about obtaining a release certificate, see Get API Key.
Android Studio includes a Google Maps Activity template, which generates helpful template code. The template code includes a google_maps_api.xml file containing a link that simplifies obtaining an API key.
1.1 Create the Wander project with the Maps template
- Create a new Android Studio project.
- Name the new app "Wander". Accept the defaults until you get to the Add an Activity page.
- Select the Google Maps Activity template.
- Leave the default Activity Name and Layout Name.
- Change the Title to "Wander" and click Finish.
Android Studio creates several maps-related additional files:
google_maps_api**.xml**
You use this configuration file to hold your API key. The template generates two google_maps_api.xml files: one for debug and one for release. The file for the API key for the debug certificate is located in src/debug/res/values. The file for the API key for the release certificate is located in src/release/res/values. In this practical we only use the debug certificate.
activity_maps.xml
This layout file contains a single fragment that fills the entire screen. The SupportMapFragment class is a subclass of the Fragment class. You can include SupportMapFragment in a layout file using a <fragment> tag in any ViewGroup, with an additional attribute:
android:name="com.google.android.gms.maps.SupportMapFragment"
MapsActivity.java
The MapsActivity.java file instantiates the SupportMapFragment class and uses the class's getMapAsync() method to prepare the Google Map. The activity that contains the SupportMapFragment must implement the OnMapReadyCallback interface and that interface's onMapReady() method. The getMapAsync() method returns a GoogleMap object, signifying that the map is loaded.
1.2 Obtain the API key
- Open the debug version of the
google_maps_api.xmlfile.
The file includes a comment with a long URL. The URL's parameters include specific information about your app.
- Copy and paste the URL into a browser.
- Follow the prompts to create a project in the Google API Console. Because of the parameters in the provided URL, the API Console knows to automatically enable the Google Maps Android API
- Create an API key and click Restrict Key to restrict the key's use to Android apps. The generated API key should start with
AIza. - In the
google_maps_api.xmlfile, paste the key into thegoogle_maps_keystring where it saysYOUR_KEY_HERE. - Run your app. You have an embedded map in your activity, with a marker set in Sydney, Australia. (The Sydney marker is part of the template, and you change it later.)
4. Task 2. Add map types and markers
Google Maps include several map types: normal, hybrid, satellite, terrain, and "none." In this task you add an app bar with an options menu that allows the user to change the map type. You move the map's starting location to your own home location. Then you add support for markers, which indicate single locations on a map and can include a label.
2.1 Add map types
The type of map that your user wants depends on the kind of information they need. When using maps for navigation in your car, it's helpful to see street names clearly. When you are hiking, you probably care more about how much you have to climb to get to the top of the mountain. In this step, you add an app bar with an options menu that allows the user to change the map type.
- To create a new menu XML file, right-click on your
resdirectory and select New > Android Resource File. - In the dialog, name the file
map_options. Choose Menu for the resource type. Click OK. - Replace the code in the new file with the following code to create the map options. The "none" map type is omitted, because "none" results in the lack of any map at all.
<?xml version="1.0" encoding="utf-8"?>
<menu xmlns:android="http://schemas.android.com/apk/res/android"
   xmlns:app="http://schemas.android.com/apk/res-auto">
   <item android:id="@+id/normal_map"
       android:title="@string/normal_map"
       app:showAsAction="never"/>
   <item android:id="@+id/hybrid_map"
       android:title="@string/hybrid_map"
       app:showAsAction="never"/>
   <item android:id="@+id/satellite_map"
       android:title="@string/satellite_map"
       app:showAsAction="never"/>
   <item android:id="@+id/terrain_map"
       android:title="@string/terrain_map"
       app:showAsAction="never"/>
</menu>
- Create string resources for the
titleattributes. - In the
MapsActivityfile, change the class to extend theAppCompatActivityclass instead of extending theFragmentActivityclass. UsingAppCompatActivitywill show the app bar, and therefore it will show the menu. - In
MapsActivity, override theonCreateOptionsMenu()method and inflate themap_optionsfile:
@Override
public boolean onCreateOptionsMenu(Menu menu) {
   MenuInflater inflater = getMenuInflater();
   inflater.inflate(R.menu.map_options, menu);
   return true;
}
- To change the map type, use the
setMapType() method on theGoogleMapobject, passing in one of the map-type constants.
Override the onOptionsItemSelected() method. Paste the following code to change the map type when the user selects one of the menu options:
    @Override
    public boolean onOptionsItemSelected(MenuItem item) {
       // Change the map type based on the user's selection.
       switch (item.getItemId()) {
           case R.id.normal_map:
               mMap.setMapType(GoogleMap.MAP_TYPE_NORMAL);
               return true;
           case R.id.hybrid_map:
               mMap.setMapType(GoogleMap.MAP_TYPE_HYBRID);
               return true;
           case R.id.satellite_map:
               mMap.setMapType(GoogleMap.MAP_TYPE_SATELLITE);
               return true;
           case R.id.terrain_map:
               mMap.setMapType(GoogleMap.MAP_TYPE_TERRAIN);
               return true;
           default:
               return super.onOptionsItemSelected(item);
       }
    }
- Run the app. Use the menu in the app bar to change the map type. Notice how the map's appearance changes.
2.2 Move the default map location
By default, the onMapReady() callback includes code that places a marker in Sydney, Australia, where Google Maps was created. The default callback also animates the map to pan to Sydney. In this step, you make the map pan to your home location without placing a marker, then zoom to a level you specify.
- In the
onMapReady()method, remove the code that places the marker in Sydney and moves the camera. - Go to www.google.com/maps in your browser and find your home.
- Right-click on the location and select What's here?
Near the bottom of the screen, a small window pops up with location information, including latitude and longitude.
- Create a new
LatLngobject calledhome. In theLatLngobject, use the coordinates you found from Google Maps in the browser. - Create a
floatvariable calledzoomand set the variable to your desired initial zoom level. The following list gives you an idea of what level of detail each level of zoom shows:
1: World5: Landmass/continent10: City15: Streets20: Buildings
- Create a
CameraUpdateobject usingCameraUpdateFactory.newLatLngZoom(), passing in yourLatLngobject andzoomvariable. Pan and zoom the camera by callingmoveCamera()on theGoogleMapobject, passing in the newCameraUpdateobject:
mMap.moveCamera(CameraUpdateFactory.newLatLngZoom(home, zoom));
- Run the app. The map should pan to your home and zoom into the desired level.
2.3 Add map markers
Google Maps can single out a location using a marker, which you create using the Marker class. The default marker uses the standard Google Maps icon: 
You can extend markers to show contextual information in info windows.
In this step, you add a marker when the user touches and holds a location on the map. You then add an InfoWindow that displays the coordinates of the marker when the marker is tapped.
- Create a method stub in
MapsActivitycalledsetMapLongClick()that takes afinalGoogleMapas an argument and returnsvoid:
private void setMapLongClick(final GoogleMap map) {}
- Use the
GoogleMapobject'ssetOnMapLongClickListener()method to place a marker where the user touches and holds. Pass in a new instance ofOnMapLongClickListenerthat overrides theonMapLongClick()method. The incoming argument is aLatLngobject that contains the coordinates of the location the user pressed:
private void setMapLongClick(final GoogleMap map) {
   map.setOnMapLongClickListener(new GoogleMap.OnMapLongClickListener() {
       @Override
       public void onMapLongClick(LatLng latLng) {
       }
   });
}
- Inside
onMapLongClick(), call theaddMarker()method. Pass in a newMarkerOptionsobject with the position set to the passed-inLatLng:
map.addMarker(new MarkerOptions().position(latLng));
- Call
setMapLongClick()at the end of theonMapReady()method. Pass inmMap. - Run the app. Touch and hold on the map to place a marker at a location.
- Tap the marker, which centers it on the screen.
Navigation buttons appear at the bottom-left side of the screen, allowing the user to use the Google Maps app to navigate to the marked position.
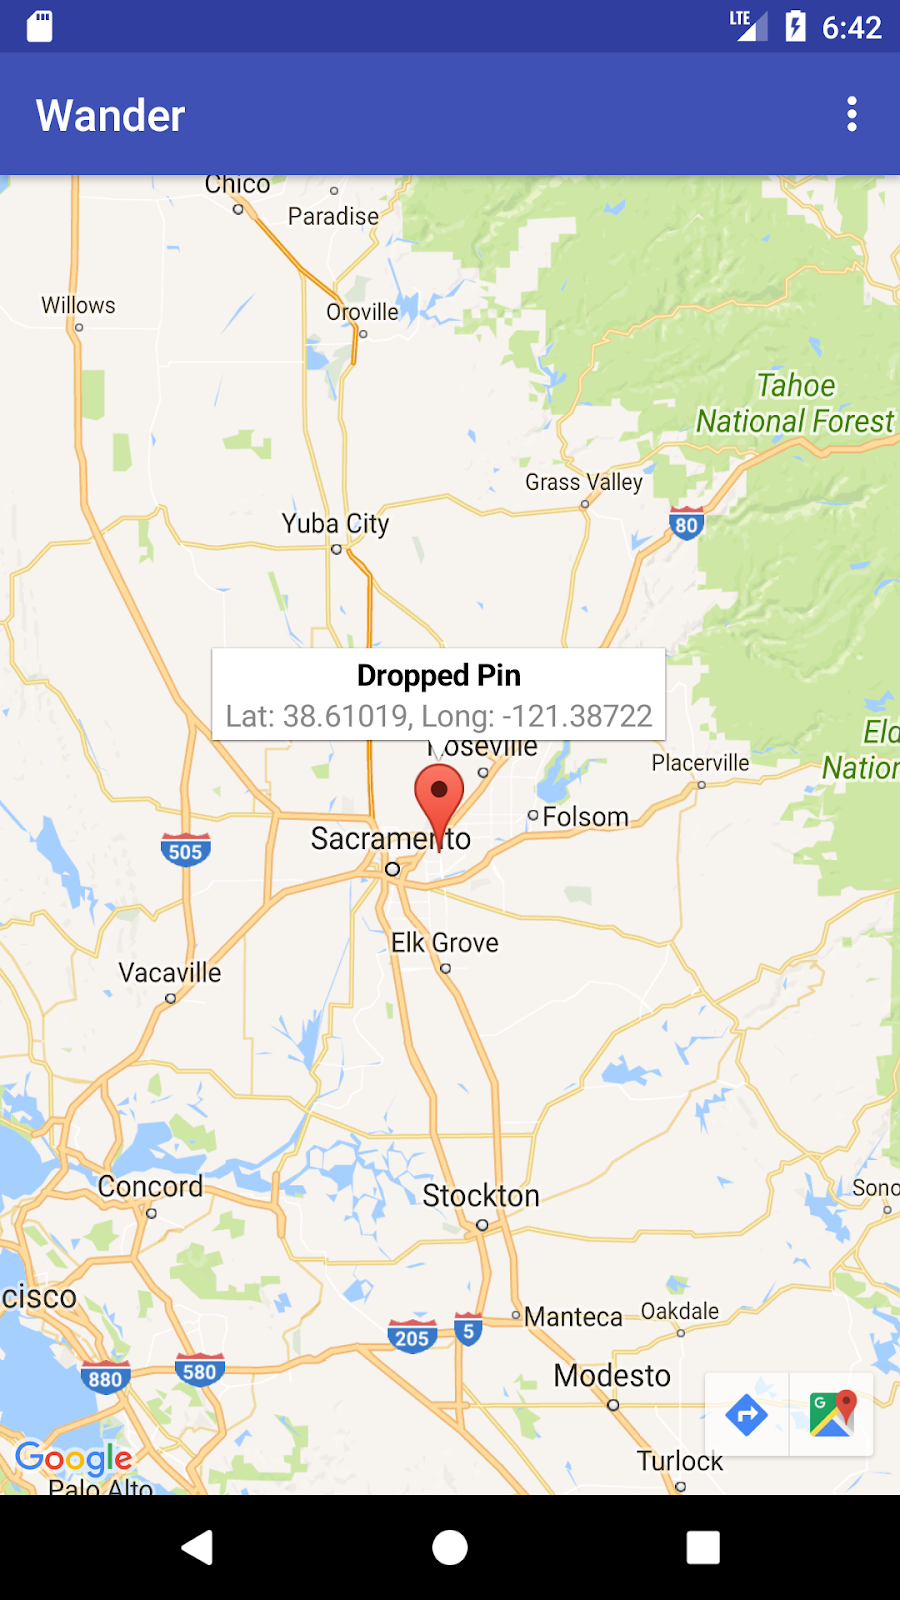
To add an info window for the marker:
- In the
MarkerOptionsobject, set thetitlefield and thesnippetfield. - In
onMapLongClick(), set thetitlefield to "Dropped Pin." Set thesnippetfield to the location coordinates inside theaddMarker()method.
map.setOnMapLongClickListener(new GoogleMap.OnMapLongClickListener() {
   @Override
   public void onMapLongClick(LatLng latLng) {
       String snippet = String.format(Locale.getDefault(),
               "Lat: %1$.5f, Long: %2$.5f",
               latLng.latitude,
               latLng.longitude);

       map.addMarker(new MarkerOptions()
               .position(latLng)
               .title(getString(R.string.dropped_pin))
               .snippet(snippet));
   }
});
- Run the app. Touch and hold on the map to drop a location marker. Tap the marker to show the info window.
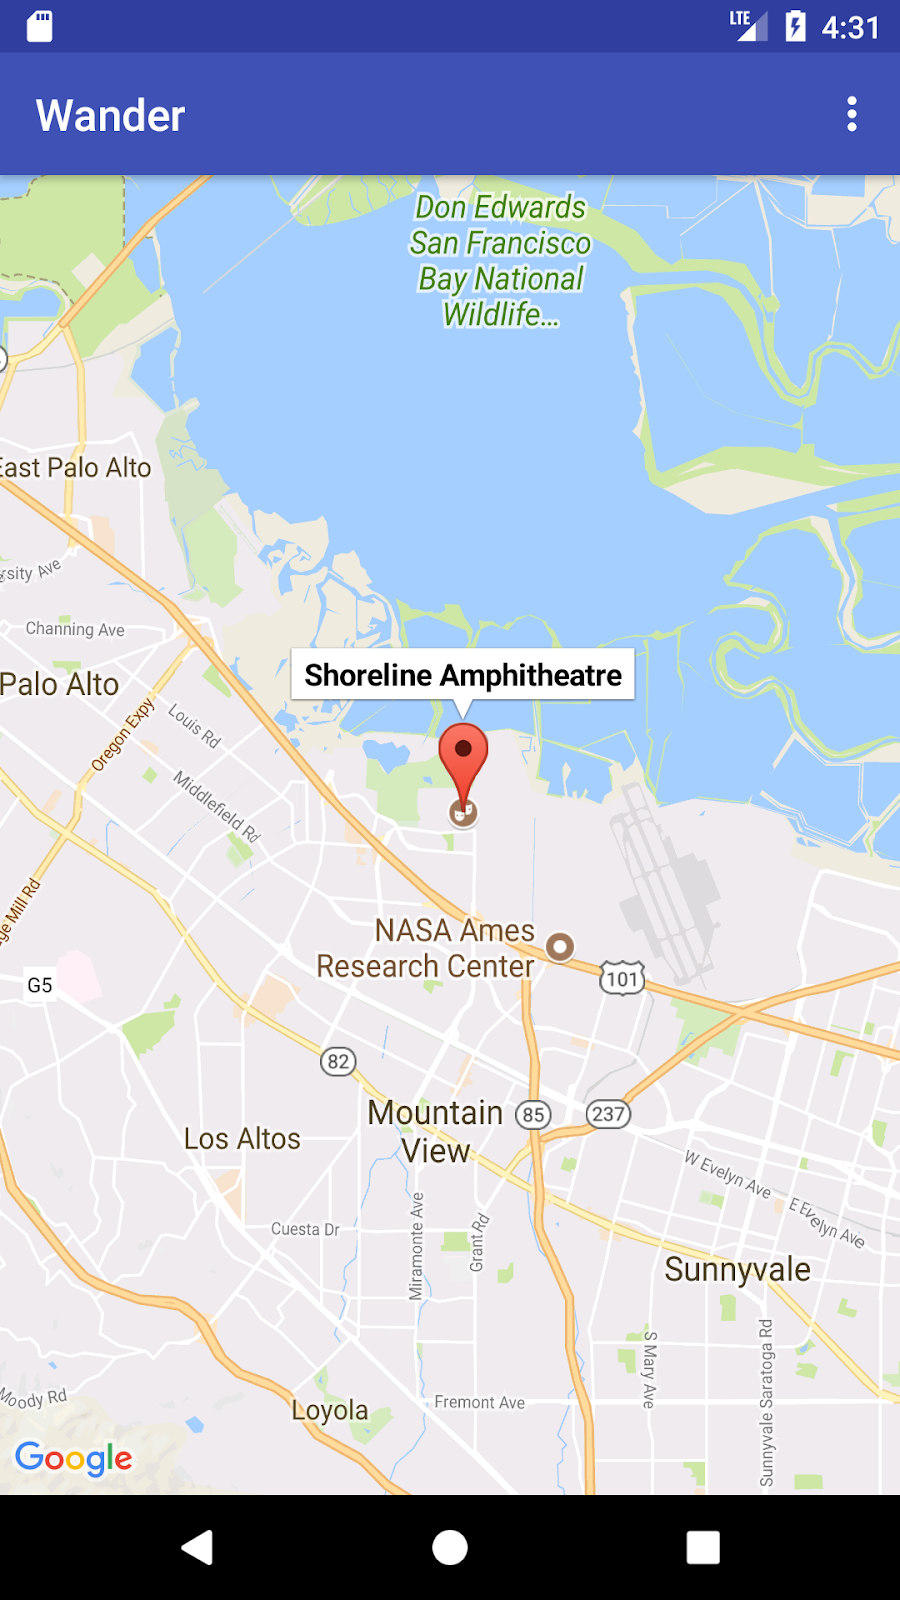
2.4 Add POI listener
By default, points of interest (POIs) appear on the map along with their corresponding icons. POIs include parks, schools, government buildings, and more. When the map type is set to normal, business POIs also appear on the map. Business POIs represent businesses such as shops, restaurants, and hotels.
In this step, you add a GoogleMap.OnPoiClickListener to the map. This click-listener places a marker on the map immediately, instead of waiting for a touch & hold. The click-listener also displays the info window that contains the POI name.
- Create a method stub in
MapsActivitycalledsetPoiClick()that takes afinalGoogleMapas an argument, and returnsvoid:
private void setPoiClick(final GoogleMap map) {}
- In the
setPoiClick()method, set anOnPoiClickListeneron the passed-inGoogleMap:
map.setOnPoiClickListener(new GoogleMap.OnPoiClickListener() {
   @Override
   public void onPoiClick(PointOfInterest poi) {
   }
});
- In the
onPoiClick()method, place a marker at the POI location. Set the title to the name of the POI. Save the result to a variable calledpoiMarker.
public void onPoiClick(PointOfInterest poi) {
   Marker poiMarker = mMap.addMarker(new MarkerOptions()
       .position(poi.latLng)
       .title(poi.name);
}
- Call
showInfoWindow()onpoiMarkerto immediately show the info window.
poiMarker.showInfoWindow();
- Call
setPoiClick()at the end ofonMapReady(). Pass inmMap. - Run your app and find a POI such as a park. Tap on the POI to place a marker on it and display the POI's name in an info window.
5. Task 3. Style your map
You can customize Google Maps in many ways, giving your map a unique look and feel.
You can customize a MapFragment object using the available XML attributes, as you would customize any other fragment. However, in this step you customize the look and feel of the content of the MapFragment, using methods on the GoogleMap object. You use the online Styling Wizard to add a style to your map and customize your markers. You also add a GroundOverlay to your home location that scales and rotates with the map.
3.1 Add a style to your map
To create a customized style for your map, you generate a JSON file that specifies how features in the map are displayed.You don't have to create this JSON file manually: Google provides the Styling Wizard, which generates the JSON for you after you visually style your map. In this practical, you style the map for "night mode," meaning that the map uses dim colors and low contrast for use at night.
- Navigate to https://mapstyle.withgoogle.com/ in your browser.
- Select Create a Style.
- Select the Night theme.
- Click More Options at the bottom of the menu.
- At the bottom of the Feature type list, select Water > Fill. Change the color of the water to a dark blue (for example, #160064).
- Click Finish. Copy the JSON code from the resulting pop-up window.
- In Android Studio, create a resource directory called
rawin theresdirectory. Create a file inres/rawcalledmap_style.json. - Paste the JSON code into the new resource file.
- To set the JSON style to the map, call
setMapStyle()on theGoogleMapobject. Pass in aMapStyleOptionsobject, which loads the JSON file. ThesetMapStyle()method returns a boolean indicating the success of the styling. If the file can't be loaded, the method throws aResources.NotFoundException.
Copy the following code into the onMapReady() method to style the map. You may need to create a TAG string for your log statements:
     try {
        // Customize the styling of the base map using a JSON object defined
        // in a raw resource file.
        boolean success = googleMap.setMapStyle(
           MapStyleOptions.loadRawResourceStyle(
                   this, R.raw.map_style));

        if (!success) {
            Log.e(TAG, "Style parsing failed.");
        }
     } catch (Resources.NotFoundException e) {
        Log.e(TAG, "Can't find style. Error: ", e);
     }
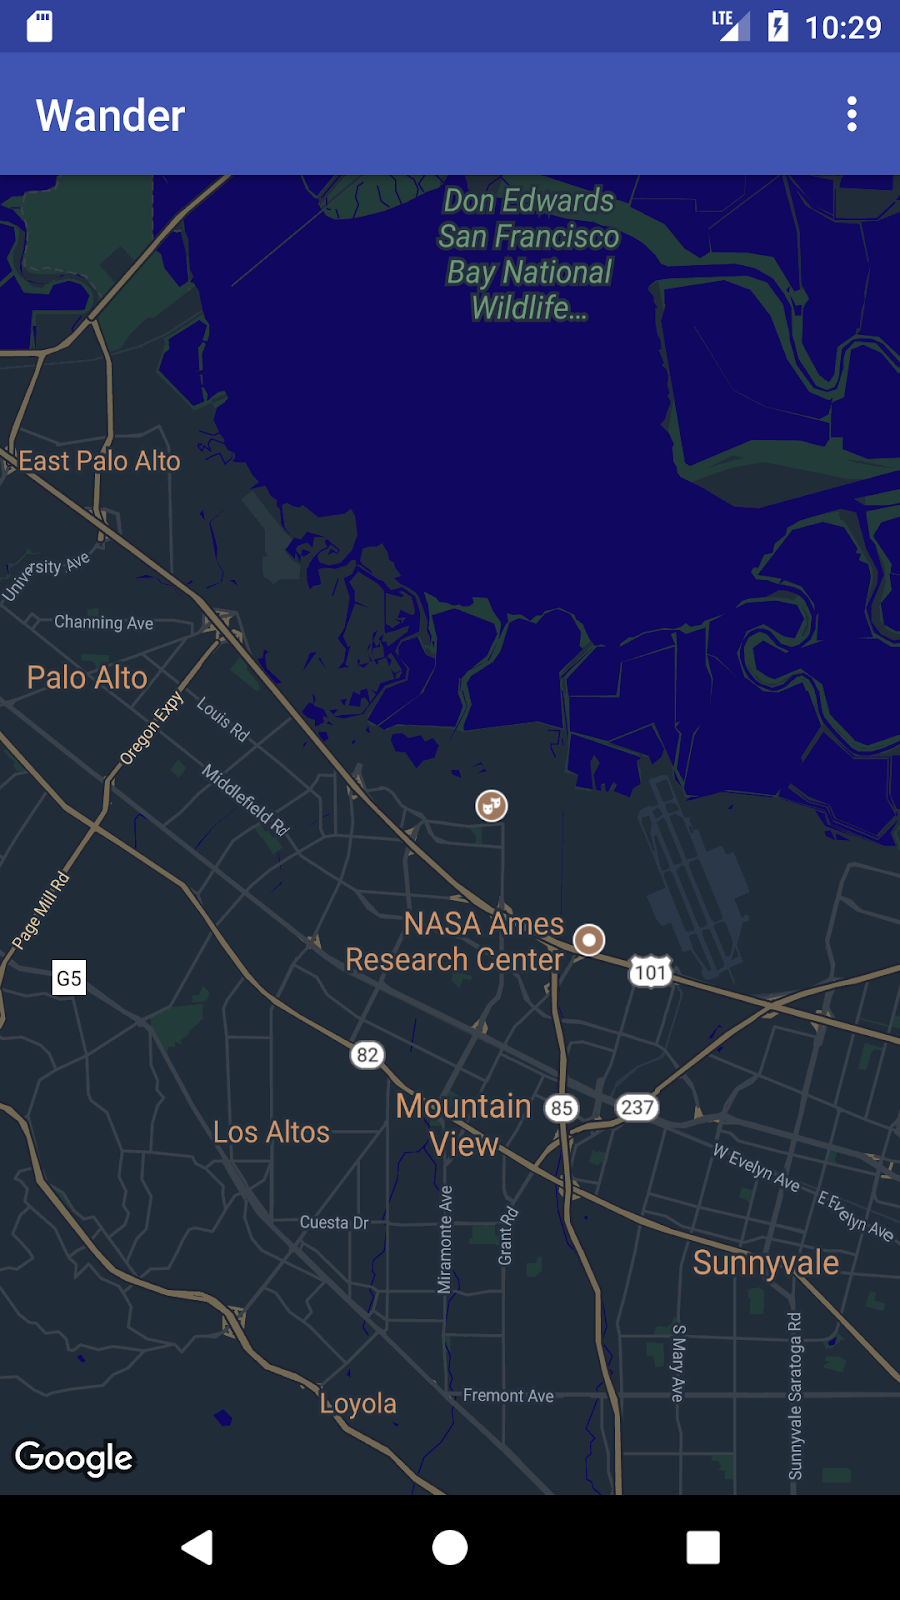
- Run your app. The new styling should be visible when the map is in
normalmode.
3.2 Style your marker
You can personalize your map further by styling the map markers. In this step, you change the default red markers to match the night mode color scheme.
- In the
onMapLongClick()method, add the following line of code to theMarkerOptions()constructor to use the default marker but change the color to blue:
.icon(BitmapDescriptorFactory.defaultMarker
       (BitmapDescriptorFactory.HUE_BLUE))
- Run the app. The markers you place are now shaded blue, which is more consistent with the night-mode theme of the app.
Note that POI markers are still red, because you didn't add styling to the onPoiClick() method.
3.3 Add an overlay
One way you can customize the Google Map is by drawing on top of it. This technique is useful if you want to highlight a particular type of location, such as popular fishing spots. Three types of overlays are supported:
- Shapes: You can add polylines, polygons, and circles to the map.
TileOverlayobjects: A tile overlay defines a set of images that are added on top of the base map tiles. Tile overlays are useful when you want to add extensive imagery to the map. A typical tile overlay covers a large geographical area.GroundOverlayobjects: A ground overlay is an image that is fixed to a map. Unlike markers, ground overlays are oriented to the Earth's surface rather than to the screen. Rotating, tilting, or zooming the map changes the orientation of the image. Ground overlays are useful when you wish to fix a single image at one area on the map
In this step, you add a ground overlay in the shape of an Android to your home location.
- Download this Android image and save it in your
res/drawablefolder. - In
onMapReady(), after the call to move the camera to the home position, create aGroundOverlayOptionsobject. Assign the object to a variable calledhomeOverlay:
GroundOverlayOptions homeOverlay = new GroundOverlayOptions();
- Use the
BitmapDescriptorFactory.fromResource()method to create aBitmapDescriptorobject from the above image. Pass the object into theimage()method of theGroundOverlayOptionsobject:
GroundOverlayOptions homeOverlay = new GroundOverlayOptions()
    .image(BitmapDescriptorFactory.fromResource(R.drawable.android));
- Set the
positionproperty for theGroundOverlayOptionsobject by calling theposition()method. Pass in thehomeLatLngobject and afloatfor the width in meters of the desired overlay. For this example, a width of 100 m works well:
GroundOverlayOptions homeOverlay = new GroundOverlayOptions()
     .image(BitmapDescriptorFactory.fromResource(R.drawable.android))
       .position(home, 100);
- Call
addGroundOverlay()on theGoogleMapobject. Pass in yourGroundOverlayOptionsobject:
mMap.addGroundOverlay(homeOverlay);
- Run the app. Zoom in on your home location, and you see the Android image as an overlay.
6. Task 4. Enable location tracking and Street View
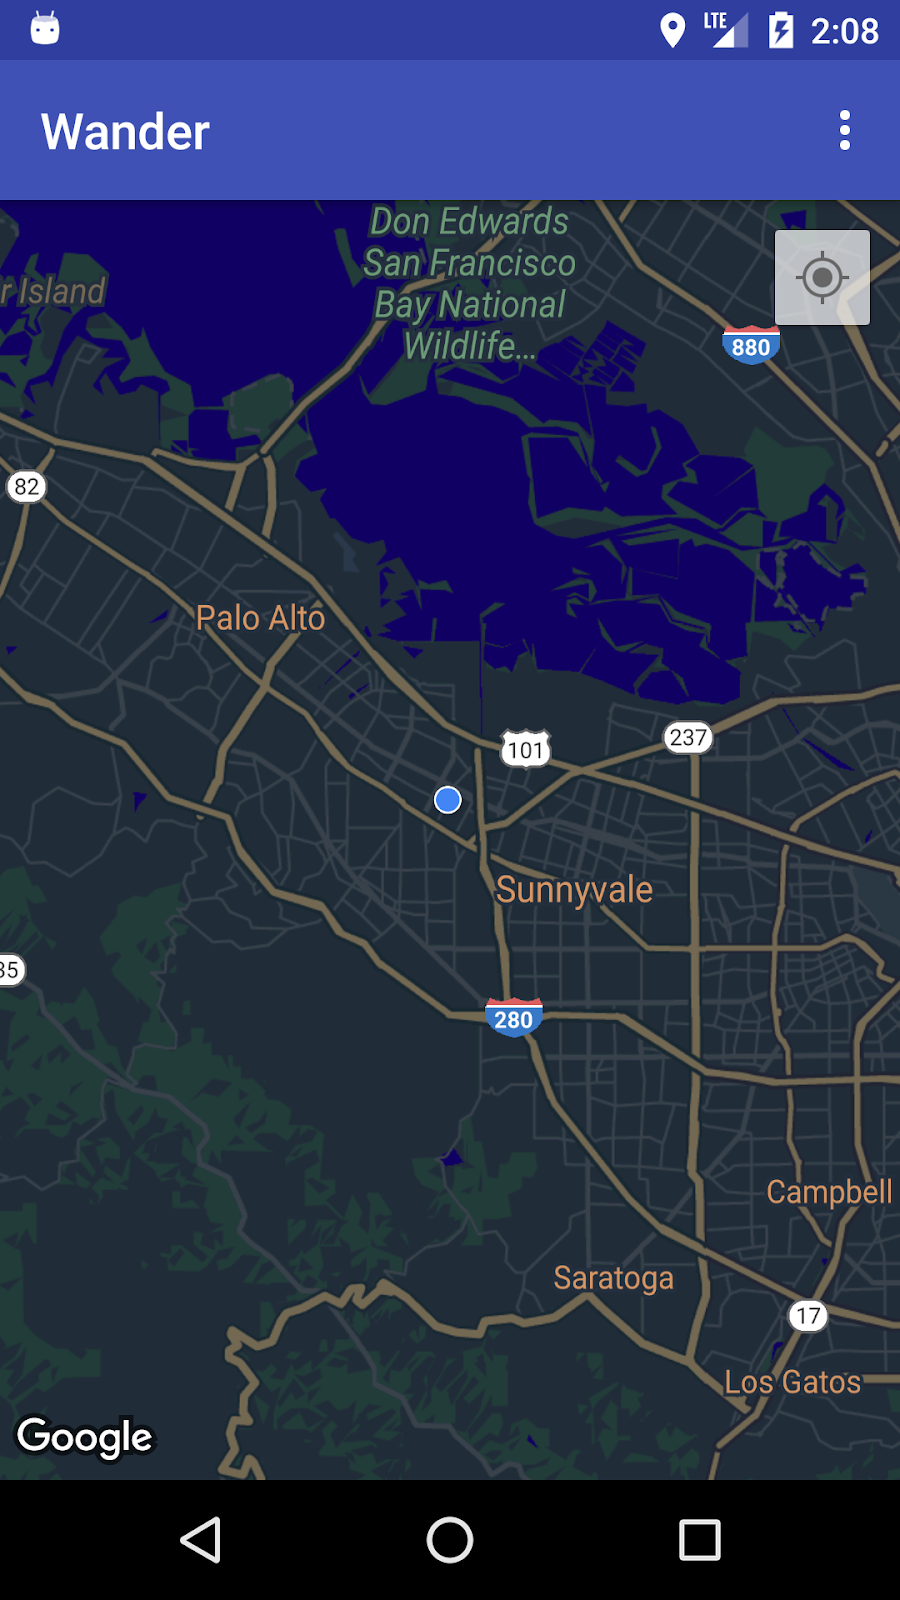
Users often use Google Maps to see their current location, and you can obtain device location using the Location Services API. To display the device location on your map without further use of Location data, you can use the location-data layer.
The location-data layer adds a My Location button to the top-right side of the map. When the user taps the button, the map centers on the device's location. The location is shown as a blue dot if the device is stationary, and as a blue chevron if the device is moving.
You can provide additional information about a location using Google Street View, which is a navigable panorama photo of a given location.
In this task, you enable the location-data layer and Street View so that when the user taps the info window for the POI marker, the map goes into to Street View mode.
4.1 Enable location tracking
Enabling location tracking in Google Maps requires a single line of code. However, you must make sure that the user has granted location permissions (using the runtime-permission model).
In this step, you request location permissions and enable the location tracking.
- In the
AndroidManifest.xmlfile, verify that theFINE_LOCATIONpermission is already present. Android Studio inserted this permission when you selected the Google Maps template. - To enable location tracking in your app, create a method in the
MapsActivitycalledenableMyLocation()that takes no arguments and doesn't return anything. - Define the
enableMyLocation()method. Check for theACCESS_FINE_LOCATIONpermission. If the permission is granted, enable the location layer. Otherwise, request the permission:
private void enableMyLocation() {
   if (ContextCompat.checkSelfPermission(this,
           Manifest.permission.ACCESS_FINE_LOCATION)
           == PackageManager.PERMISSION_GRANTED) {
       mMap.setMyLocationEnabled(true);
   } else {
       ActivityCompat.requestPermissions(this, new String[]
                       {Manifest.permission.ACCESS_FINE_LOCATION},
               REQUEST_LOCATION_PERMISSION);
   }
}
- Call
enableMyLocation()from theonMapReady()callback to enable the location layer. - Override the
onRequestPermissionsResult()method. If the permission is granted, callenableMyLocation():
@Override
public void onRequestPermissionsResult(int requestCode,
       @NonNull String[] permissions,
       @NonNull int[] grantResults) {
   // Check if location permissions are granted and if so enable the
   // location data layer.
   switch (requestCode) {
       case REQUEST_LOCATION_PERMISSION:
           if (grantResults.length > 0
                   && grantResults[0]
                   == PackageManager.PERMISSION_GRANTED) {
               enableMyLocation();
               break;
           }
   }
}
- Run the app. The top-right corner now contains the My Location button, which displays the device's current location.
4.2 Enable Street View
Google Maps provides Street View, which is a panoramic view of a location with controls for navigating along a designated path. Street View does not have global coverage.
In this step, you enable a Street View panorama that is activated when the user taps a POI's info window. You need to do two things:
- Distinguish POI markers from other markers, because you want your app's functionality to work only on POI markers. This way, you can start Street View when the user taps a POI info window, but not when the user taps any other type of marker.
The Marker class includes a setTag() method that allows you to attach data. (The data can be anything that extends from Object). You will set a tag on the markers that are created when users click POIs.
- When the user taps a tagged info window in an
OnInfoWindowClickListener, replace theMapFragmentwith aStreetViewPanoramaFragment. (The code below usesSupportMapFragmentandSupportStreetViewPanoramaFragmentto support Android versions below API 12.)
If any of the fragments change at runtime, you must add them in the containing Activity class, and not statically in XML.
Tag the POI marker
- In the
onPoiClick()callback, callsetTag()onpoiMarker. Pass in any arbitrary string:
poiMarker.setTag("poi");
Replace the static SupportMapFragment with a runtime instance
- Open
activity_maps.xmland change the element to a frame layout that will serve as the container for your fragments:
<FrameLayout xmlns:android="http://schemas.android.com/apk/res/android"
   android:id="@+id/fragment_container"
   android:layout_width="match_parent"
   android:layout_height="match_parent" />
- In
onCreate()inMapsActivity, remove the code that finds theSupportMapFragmentby ID, because there is no longer a staticSupportMapFragmentin the XML. Instead, create a new runtime instance of theSupportMapFragmentby callingSupportMapFragment.newInstance():
SupportMapFragment mapFragment = SupportMapFragment.newInstance();
- Add the fragment to the
FrameLayoutusing a fragment transaction with theFragmentManager:
getSupportFragmentManager().beginTransaction()
       .add(R.id.fragment_container, mapFragment).commit();
- Keep the line of code that triggers the asynchronous loading of the map:
mapFragment.getMapAsync(this);
Set an OnInfoWindowClickListener and check the marker tag
- Create a method stub in
MapsActivitycalledsetInfoWindowClickToPanorama()that takes aGoogleMapas an argument and returnsvoid:
private void setInfoWindowClickToPanorama(GoogleMap map) {}
- Set an
OnInfoWindowClickListenerto theGoogleMap:
map.setOnInfoWindowClickListener(
       new GoogleMap.OnInfoWindowClickListener() {
           @Override
           public void onInfoWindowClick(Marker marker) {
           }
       });
- In the
onInfoWindowClick()method, check whether the marker contains the string tag you set in theonPoiClick()method:
if (marker.getTag() == "poi") {}
Replace the SupportMapFragment with a SupportStreetViewPanoramaFragment
- In the case where the marker contains the tag, specify the location for the Street View panorama by using a
StreetViewPanoramaOptionsobject. Set the object'spositionproperty to the position of the passed-in marker:
StreetViewPanoramaOptions options =
       new StreetViewPanoramaOptions().position(
               marker.getPosition());
- Create a new instance of
SupportStreetViewPanoramaFragment, passing in theoptionsobject you created:
SupportStreetViewPanoramaFragment streetViewFragment
       = SupportStreetViewPanoramaFragment
       .newInstance(options);
- Start a fragment transaction. Replace the contents of the fragment container with the new fragment,
streetViewFragment. Add the transaction to the back stack, so that pressing back will navigate back to theSupportMapFragmentand not exit the app:
getSupportFragmentManager().beginTransaction()
       .replace(R.id.fragment_container,
               streetViewFragment)
       .addToBackStack(null).commit();
- Call
setInfoWindowClickToPanorama(mMap)inonMapReady()after the call tosetPoiClick(). - Run the app. Zoom into a city that has Street View coverage, such as Mountain View (home of Google HQ), and find a POI, such as a park. Tap on the POI to place a marker and show the info window. Tap the info window to enter Street View mode for the location of the marker. Press the back button to return to the map fragment.

7. Solution code
Wander solution code.
8. Coding challenge
Challenge: If you tap the info window for a POI in a location where there is no Street View coverage, you see a black screen.
- To check whether Street View is available in an area, implement the
OnStreetViewPanomaraReadycallback in combination with theStreetViewPanorama.OnStreetViewPanoramaChangeListener. - If Street View isn't available in a selected area, go back to the map fragment and show an error.
9. Summary
- To use the Maps API, you need an API key from the Google API Console.
- In Android Studio, using the Google Maps Activity template generates an
Activitywith a singleSupportMapFragmentin the app's layout. The template also adds theACCESS_FINE_PERMISSIONto the app manifest, implements theOnMapReadyCallbackin your activity, and overrides the requiredonMapReady()method.
To change the map type of a GoogleMap at runtime, use the GoogleMap.setMapType() method. A Google Map can be one of the following map types:
- Normal: Typical road map. Shows roads, some features built by humans, and important natural features like rivers. Road and feature labels are also visible.
- Hybrid: Satellite photograph data with road maps added. Road and feature labels are also visible.
- Satellite: Photograph data. Road and feature labels are not visible.
- Terrain: Topographic data. The map includes colors, contour lines and labels, and perspective shading. Some roads and labels are also visible.
- None**:** No map.
About Google Maps:
- A marker is an indicator for a specific geographic location.
- When tapped, the marker's default behavior is to display an info window with information about the location.
- By default, points of interest (POIs) appear on the base map along with their corresponding icons. POIs include parks, schools, government buildings, and more.
- In addition, business POIs (shops, restaurants, hotels, and more) appear by default on the map when the map type is
normal. - You can capture clicks on POIs using the
OnPoiClickListener. - You can change the visual appearance of almost all elements of a Google Map using the Styling Wizard. The Styling Wizard generates a JSON file that you pass into the Google Map using the
setMapStyle()method. - You can customize your markers by changing the default color, or replacing the default marker icon with a custom image.
Other important information:
- Use a ground overlay to fix an image to a geographic location.
- Use a
GroundOverlayOptionsobject to specify the image, the image's size in meters, and the image's position. Pass this object to theGoogleMap.addGroundOverlay()method to set the overlay to the map. - Provided that your app has the
ACCESS_FINE_LOCATIONpermission, you can enable location tracking using themMap.setMyLocationEnabled(true)method. - Google Street View provides panoramic 360-degree views from designated roads throughout its coverage area.
- Use the
StreetViewPanoramaFragment.newInstance()method to create a new Street View fragment. - To specify the options for the view, use a
StreetViewPanoramaOptionsobject. Pass the object into thenewInstance()method.
10. Learn more
The related concept documentation is in 9.1: Google Maps API.
Android developer documentation:
- Getting Started with the Google Maps Android API
- Adding a Map with a Marker
- Map Objects
- Adding a Styled Map
- Street View
- Ground Overlays
Reference documentation:
11. Homework
This section lists possible homework assignments for students who are working through this codelab as part of a course led by an instructor. It's up to the instructor to do the following:
- Assign homework if required.
- Communicate to students how to submit homework assignments.
- Grade the homework assignments.
Instructors can use these suggestions as little or as much as they want, and should feel free to assign any other homework they feel is appropriate.
If you're working through this codelab on your own, feel free to use these homework assignments to test your knowledge.
Build and run an app
- Create a new app that uses the Google Maps Activity template, which loads Google Maps when the app launches.
- When the Google Map is loaded, move the camera to your school location, your home location, or some other location that has meaning for you.
- Add two markers to the map, one at your school location and one at your home or some other meaningful location.
- Customize the marker icons by changing the default color or replacing the default marker icon with a custom image.
Hint: See the onMapReady (GoogleMap googleMap) documentation.
Answer these questions
Question 1
Which method is called when the map is loaded and ready to be used in the app ?
onMapReady (GoogleMapgoogleMap)onMapLoaded (GoogleMapgoogleMap)onMapCreate (GoogleMapgoogleMap)onMapInitialize (GoogleMapgoogleMap)
Question 2
Which Android components can you use to include Google Maps in your app ?
MapViewandMapFragmentMapFragmentandMapActivityMapViewandMapActivity- Only
MapFragment
Question 3
What types of maps does the Google Maps Android API offer?
- Normal, hybrid, terrain, satellite, and roadmap
- Normal, hybrid, terrain, satellite, and "none"
- Hybrid, terrain, satellite, roadmap, and "none"
- Normal, terrain, satellite, imagemap, and "none"
Question 4
What interface do you implement to add on-click functionality to a point of interest (POI)?
GoogleMap.OnPoiListenerGoogleMap.OnPoiClickListenerGoogleMap.OnPoiClickGoogleMap.OnPoiClicked
Submit your app for grading
Guidance for graders
Check that the app has the following features:
- When the app is launched, the Google Map is displayed correctly, indicating that an API key was generated properly.
- After the Google Map loads, the camera moves to the student's home or school location. In the code, this step should happen in the
onMapReady (GoogleMap googleMap)callback method. - Markers are displayed at the student's school location and another location, such as the student's home.
- The two markers are customized. For example, the markers use a color other than the default red color, or they use a custom icon.
12. Next codelab
To see all the codelabs in the Advanced Android Development training course, visit the Advanced Android Development codelabs landing page.