1. Introduction
Last Updated: 2024-11-01
How do we modernize an old PHP application to Google Cloud?
(📽️ watch a 7 minutes introductory video to this codelab)
It is common to have legacy applications running on-prem that need to be modernized. This means making them scalable, secure, and deployable in different environments.
In this workshop, you will:
- Containerize the PHP Application.
- Move to a Managed Database Service ( Cloud SQL).
- Deploy to Cloud Run (it's zero-ops alternative to GKE/Kubernetes).
- Secure the Application with Identity and Access Management (IAM) and Secret Manager.
- Define a CI/CD pipeline via Cloud Build. Cloud Build can be connected with your Git repo hosted on popular Git providers such as GitHub or GitLab, and be trigger at any push to main, for example.
- Host the application pictures on Cloud Storage. This is achieved through mounting, and no code is needed to change the app.
- Introduce Gen AI functionality through Gemini, orchestrated via Cloud Functions (serverless).
- Familiarize with SLOs and operating your newly refreshed app.
By following these steps, you can gradually modernize your PHP application, improving its scalability, security, and deployment flexibility. Moreover, moving to Google Cloud allows you to leverage its powerful infrastructure and services to ensure your application runs smoothly in a cloud-native environment.
We believe that what you will learn following these simple steps can be applied for your own application and organization with different language/stack and different use cases.
About the App
The application ( code, under MIT license) that you will fork is a basic PHP 5.7 application with MySQL authentication. The main idea of the App is to provide a platform where users can upload photos, and administrators have the ability to tag inappropriate images. The application has two tables:
- Users. Comes precompiled with admins. New people can register.
- Images. Comes with a few sample images. Logged in users can upload new pictures. We will add some magic here.
Your Goal
We want to modernize the old application in order to have it in Google Cloud. We will leverage its tools and services to improve scalability, enhance security, automate infrastructure management, and integrate advanced features like image processing, monitoring, and data storage using services such as Cloud SQL, Cloud Run, Cloud Build, Secret Manager and more.
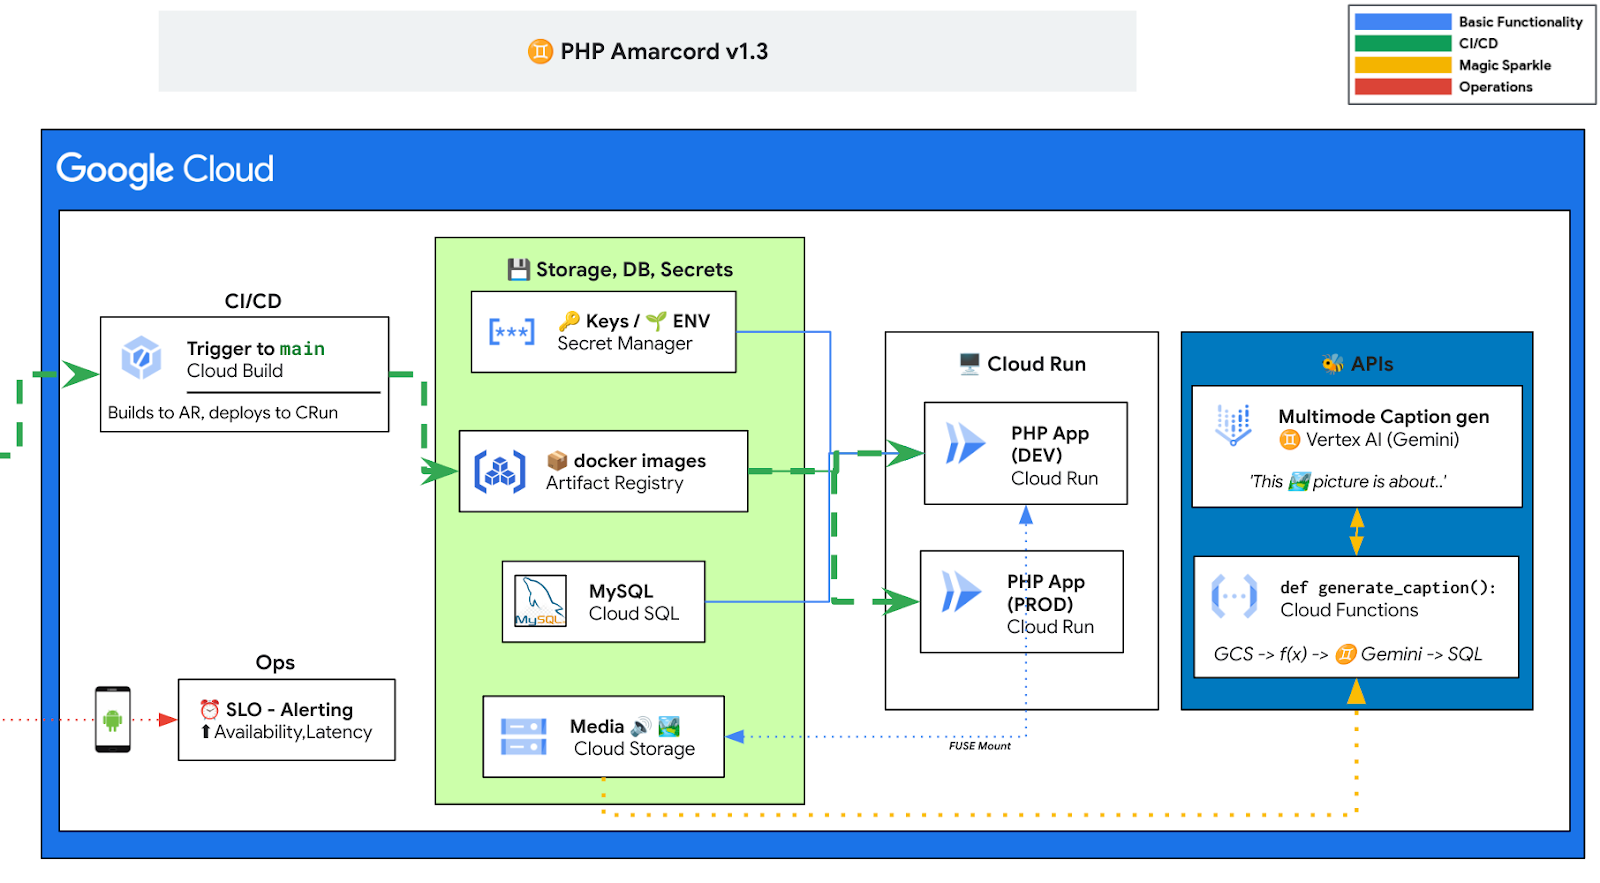
More importantly, we want to do it step-by-step so you can learn what's the thought process behind every step, and usually each step unlocks new possibilities for the next ones (example: modules 2 -> 3, and 6 -> 7).
Not convinced yet? Check this 7 minutes video on youtube.
What you'll need
- A computer with a browser, connected to the internet.
- Some GCP credits. See next step for it.
- You will use cloud Shell. It comes with all preinstalled commands you'll need and an IDE.
- GitHub account. You need this to branch the original code 🧑🏻💻 gdgpescara/app-mod-workshop with your own git repo. This is needed to have your own CI/CD pipeline (automatic commit -> build -> deploy)
Sample solutions can be found here:
- The author repo: https://github.com/Friends-of-Ricc/app-mod-workshop
- The original workshop repo, under
.solutions/folders, per chapter.
This workshop is designed to be completed on Cloud Shell (on a browser).
However, it can be also attempted from your local computer.
2. Credit set up and Fork
Redeem the GCP credit and set up your GCP environment [optional]
To run this workshop, you need a Billing Account with some credit. If you already have your own billing, you can skip this step.
Create a brand new Google Gmail account (*) to link to your GCP credit. Ask your instructor the link to redeem the GCP credit or use the credits here: bit.ly/PHP-Amarcord-credits .
Sign in with the newly created account and follow the instructions.
(
) Why do I need a brand new gmail account?*
We've seen people failing the codelab as their account (particularly work or students emails) had a previous exposure to GCP and had Organizational policies restricting their ability to do it. We recommend either creating a new gmail account or to use an existing GMail account (gmail.com) with no prior exposure to GCP.
Click the button to redeem the credit.
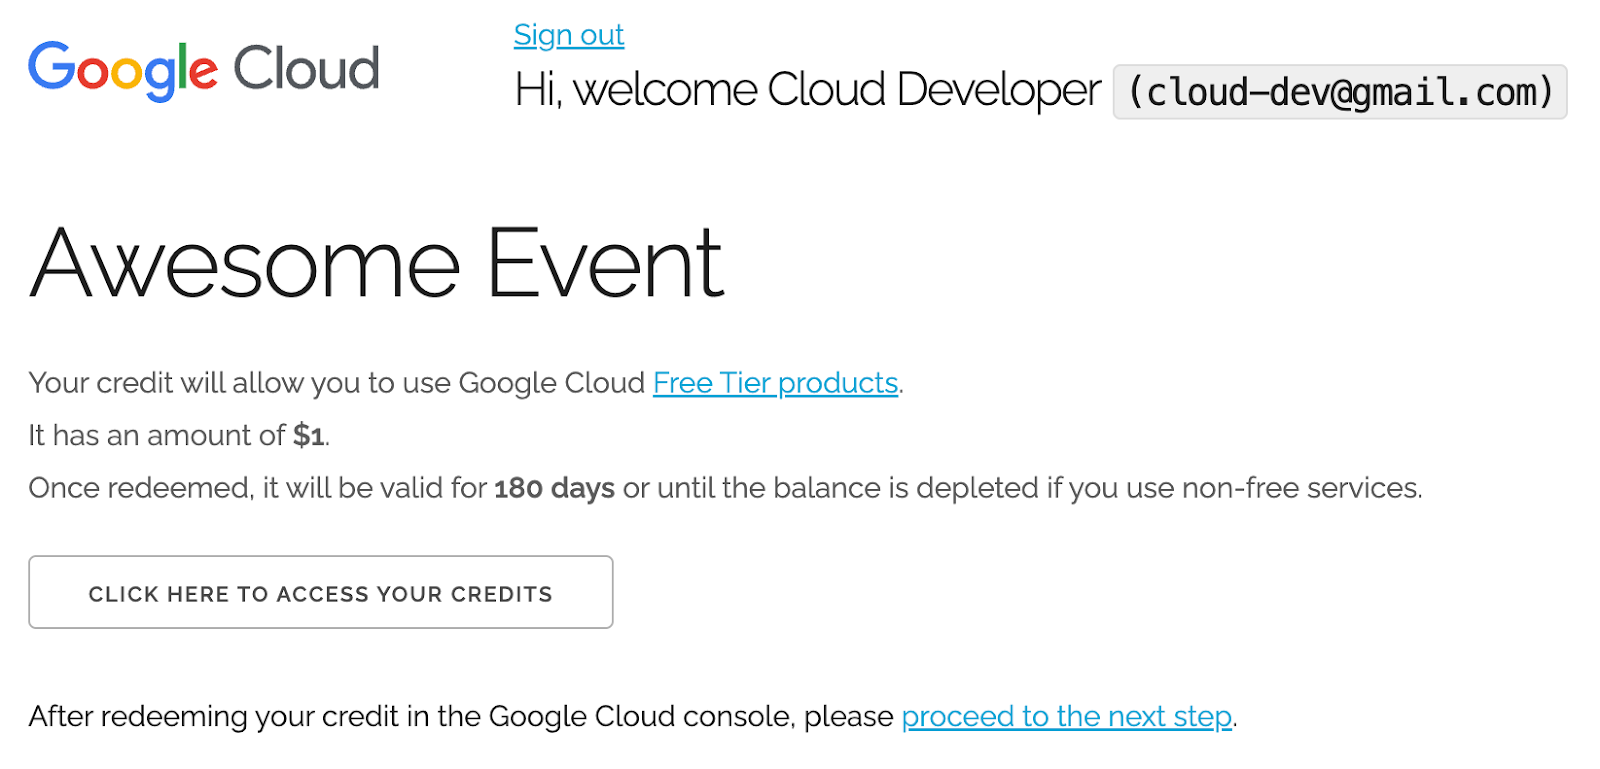
Fill in the following form with your Name and Lastname and agree with Terms and Conditions.
You might have to wait a few seconds before the Billing Account appears here: https://console.cloud.google.com/billing
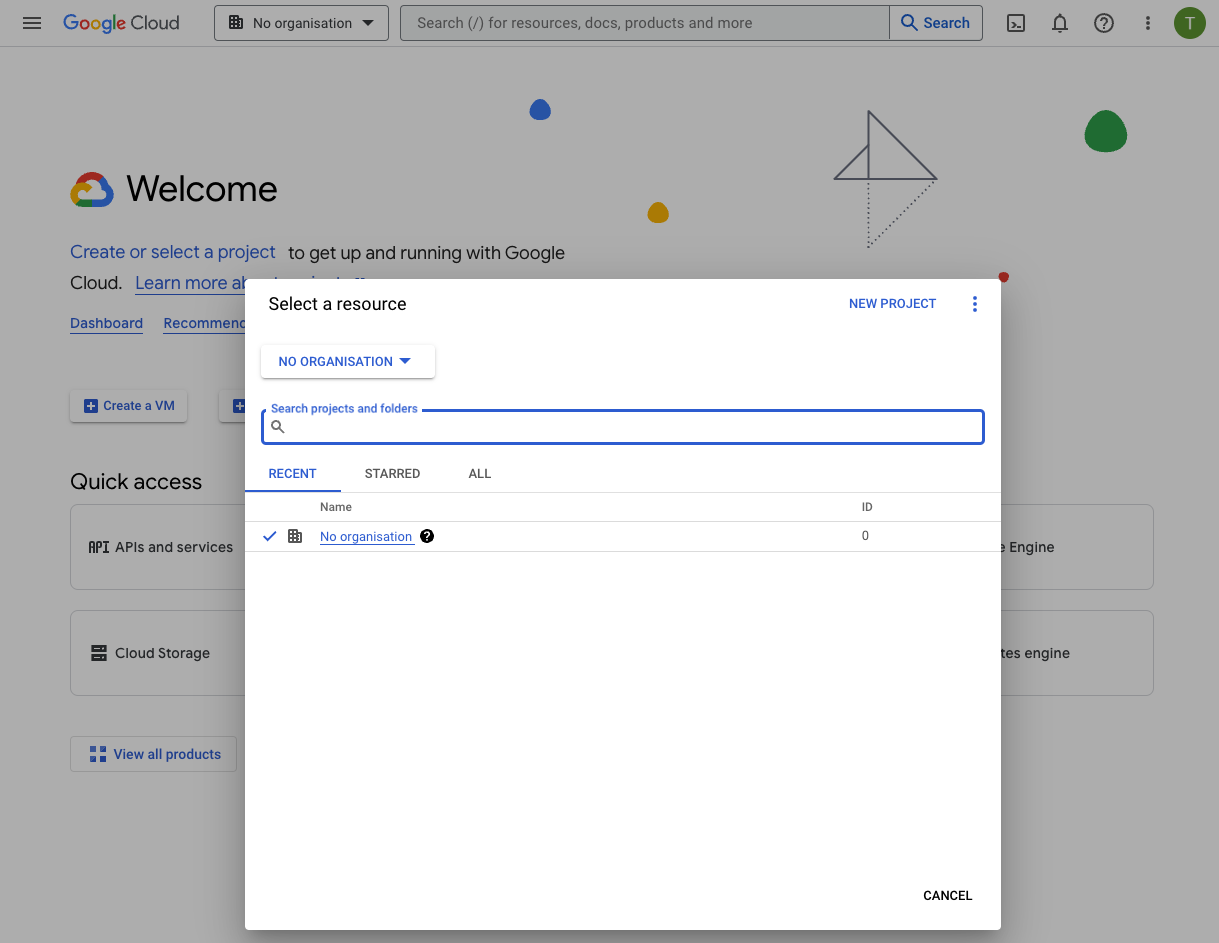
Once done open the Google Cloud Console and create a new project clicking the Project Selector at the top left dropdown menu where the "No organization" is shown. See below
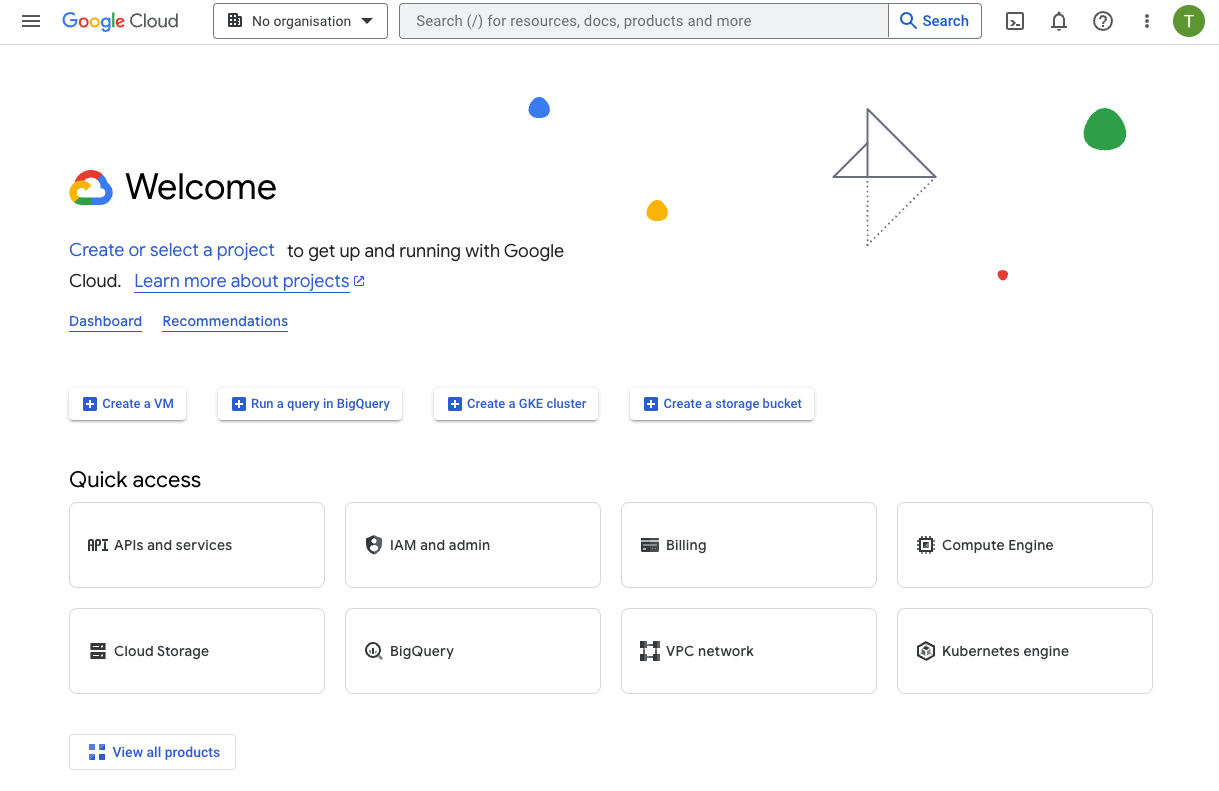
Create a new project if you don't have one as shown in the screenshot below. There is a "NEW PROJECT" option on the top right corner.
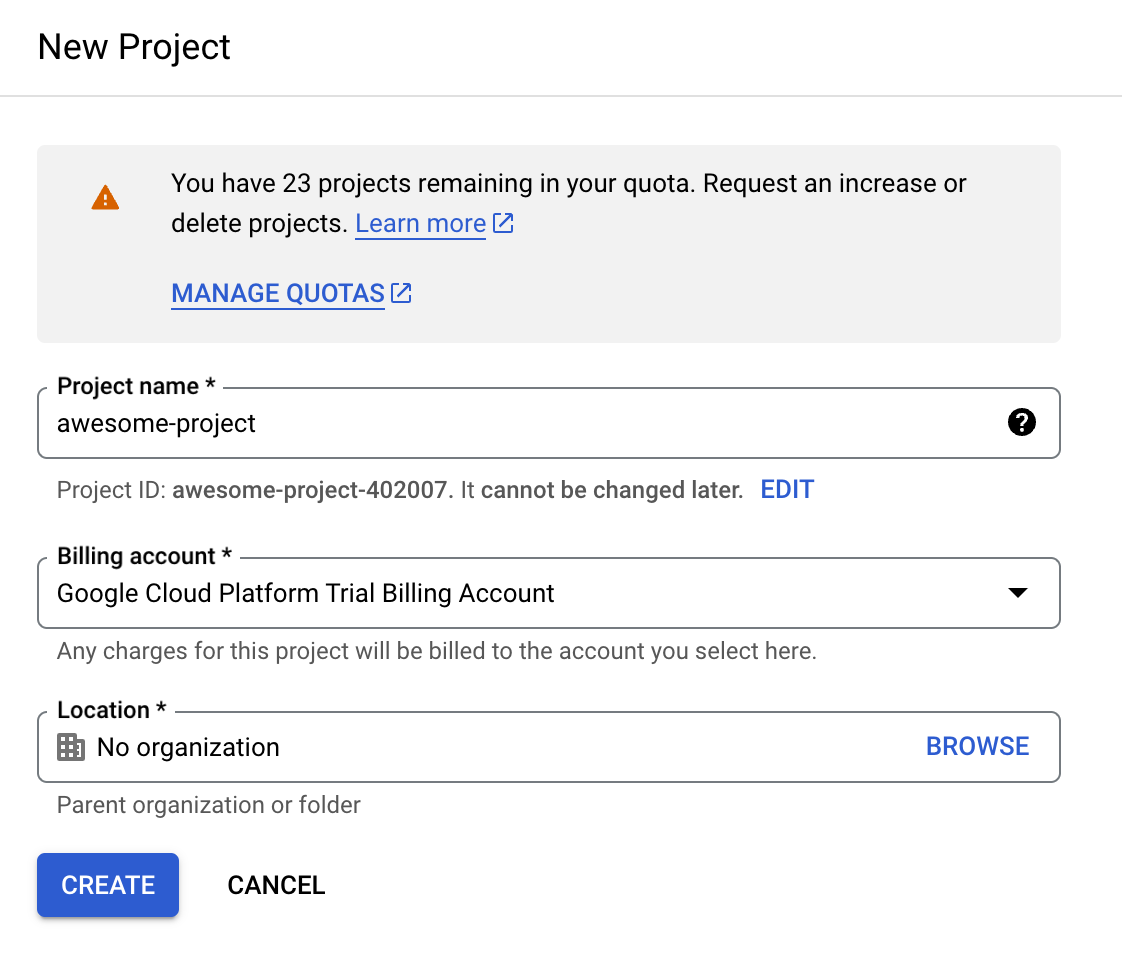
Make sure to link the new project with the GCP trial billing account as follows.
You are all set to use the Google Cloud Platform. If you are a beginner or you just want to do everything in a Cloud environment you can access Cloud Shell and its editor via the following button on the top left corner as shown below.
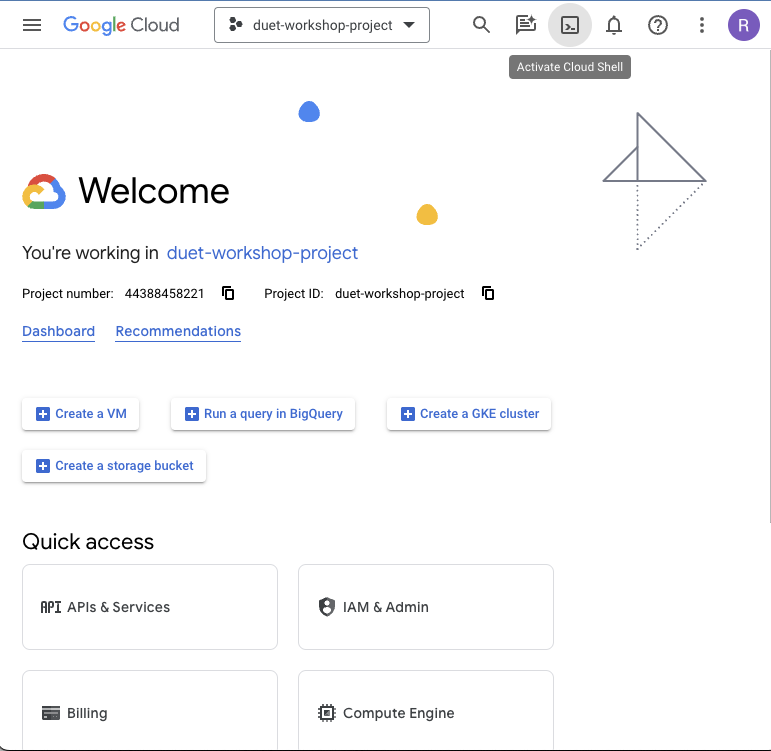
Make sure your new project is selected on the top left:
Not selected (bad):

Selected (good):

Fork the App from GitHub
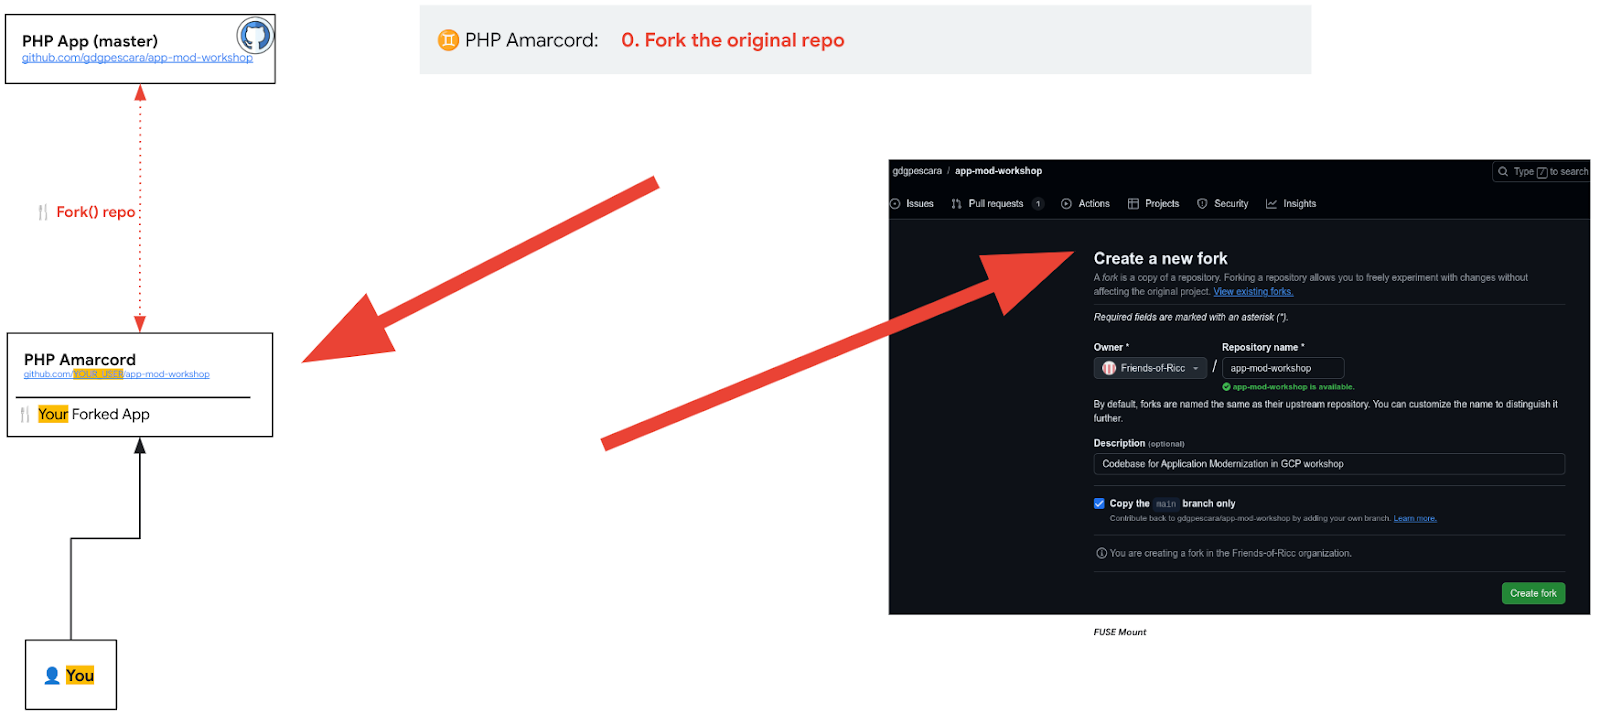
- Go to the demo app: https://github.com/gdgpescara/app-mod-workshop
- Click 🍴 fork.
- If you don't have a github account, you need to create a new one.
- Edit things as you wish.
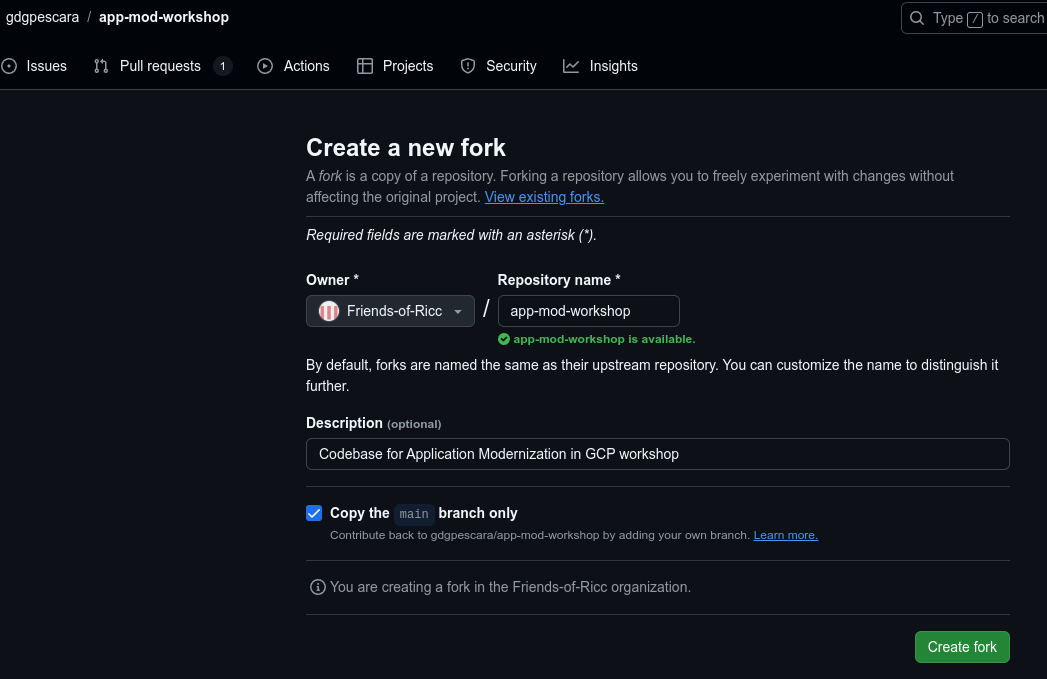
- Clone the App code using
git clonehttps://github.com/YOUR-GITHUB-USER/YOUR-REPO-NAME
- Open the cloned project folder with your favorite editor. If you choose Cloud Shell you can do it by clicking "Open Editor" as shown below.

You have everything you need with Google Cloud Shell Editor as the following figure shows
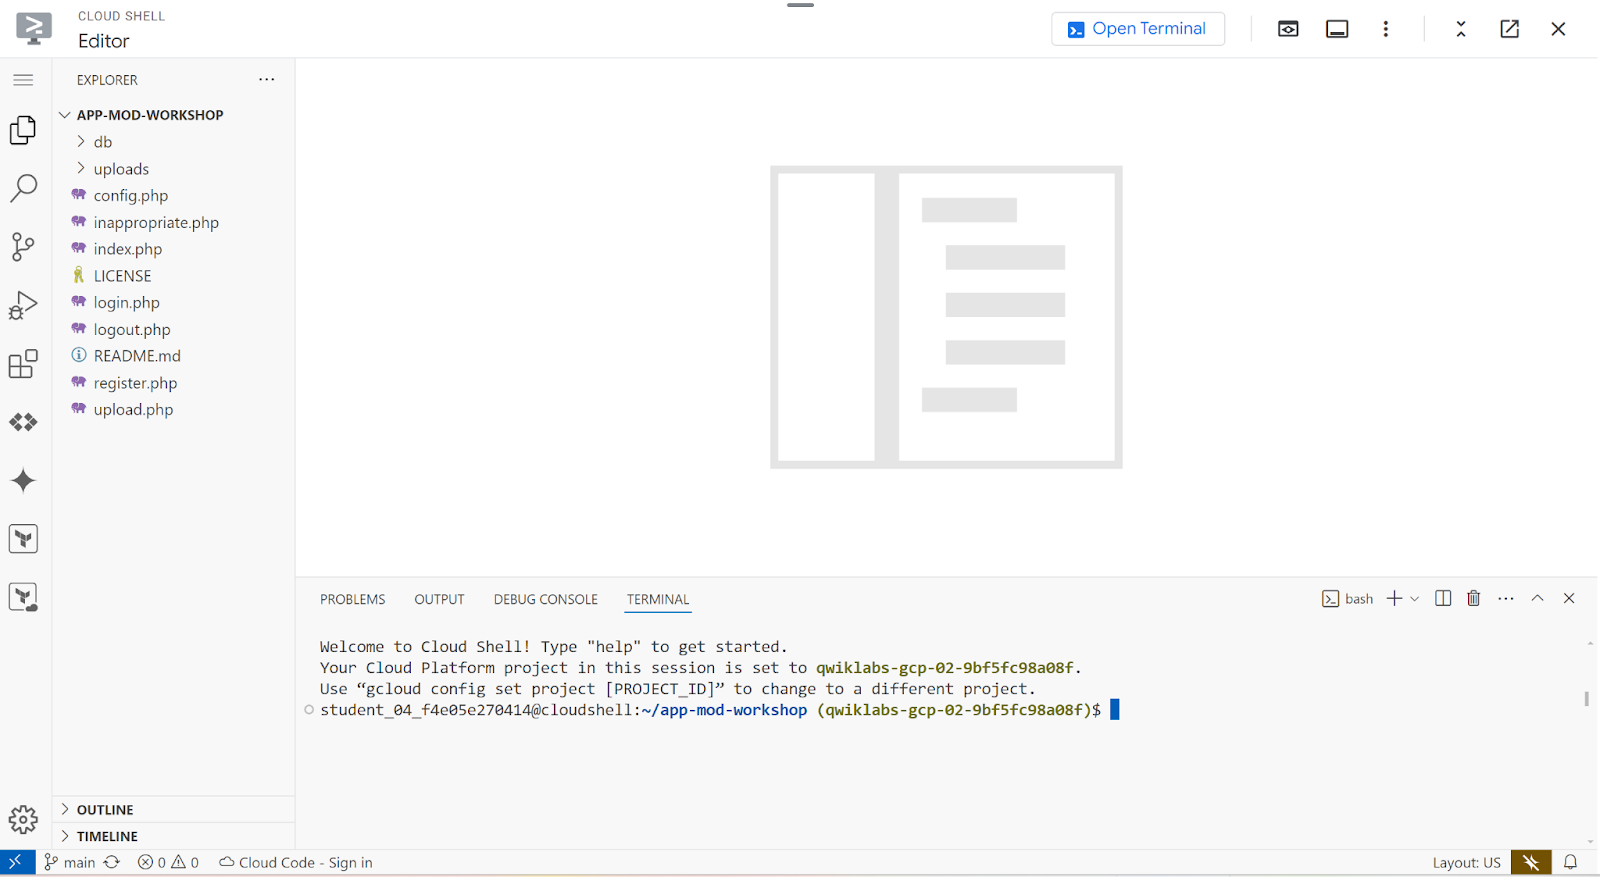
This can be achieved visually by clicking "Open Folder" and selecting the folder, likely app-mod-workshop in your home folder.
3. Module 1: Create a SQL Instance
Create the Google Cloud SQL Instance
Our PHP App will connect to a MySQL database and therefore we need to replicate it to Google Cloud for a migration with no pain. Cloud SQL is the perfect match as it allows you to run a fully managed MySQL database in Cloud. These are the steps to follow:
- Go to Cloud SQL page: https://console.cloud.google.com/sql/instances
- Click "Create Instance"
- Enable API (if needed). This might take a few seconds.
- Choose MySQL.
- (We are trying to get you the cheapest version, so it lasts longer):
- Edition: Enterprise
- Preset: development (we tried Sandbox and didn't work for us)
- Mysql Ver: 5.7 (wow, a blast from the past!)
- Instance id: choose
appmod-phpapp(if you change this, remember to change also future scripts and solutions accordingly). - Password: whatever you want but note it down as CLOUDSQL_INSTANCE_PASSWORD
- Region: keep the same as you've chose for the rest of the app (eg, Milan =
europe-west8) - Zonal avail: Single Zone (we're saving money for the demo)
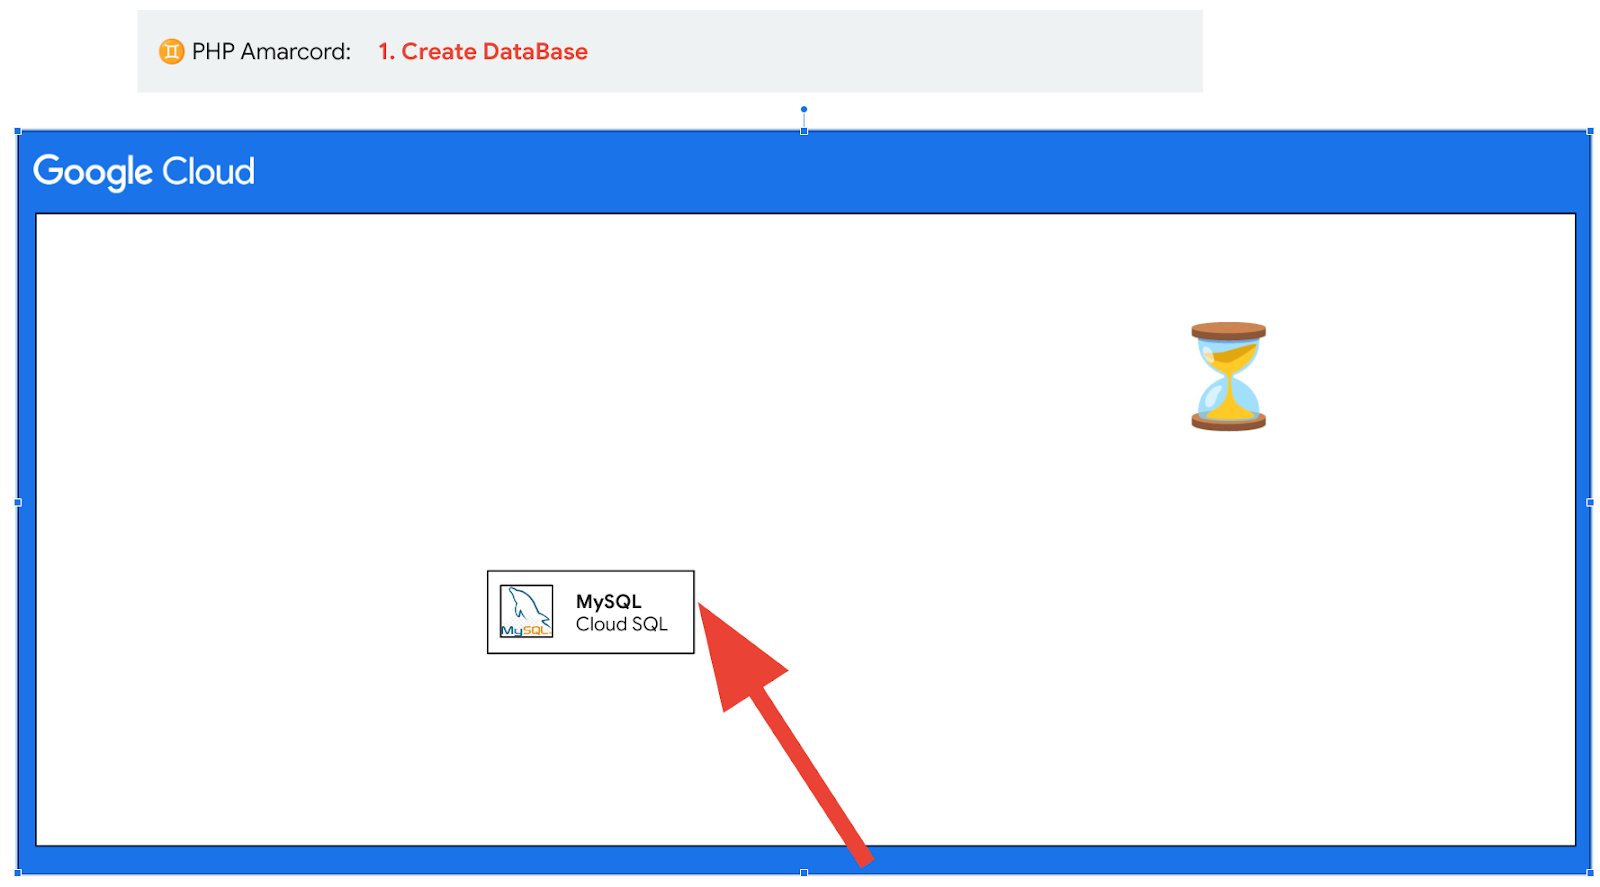
Click Create Instance button to deploy Cloud SQL database; ⌛ it takes around 10 minutes to comple⌛. In the meantime continue reading the documentation; you can also start solving the next module ("Containerize your PHP App") as it has no dependencies on this module in the first part (until you fix the DB connection).
Note. This instance should cost you ~7$/day. Make sure to spin it off after the workshop.
Create image_catalog DB and User in Cloud SQL
The App project comes with a db/ folder that contains two sql files:
- 01_schema.sql : Contains SQL code to create two tables that contain Users and Images data.
- 02_seed.sql: Contains SQL code to seed data into the previous created tables.
These files will be used later once the image_catalog database will be created. You can do this by doing the following steps:
- Open your instance and Click on Databases tab:
- click "Create Database"
- call it
image_catalog(as in the PHP app config).
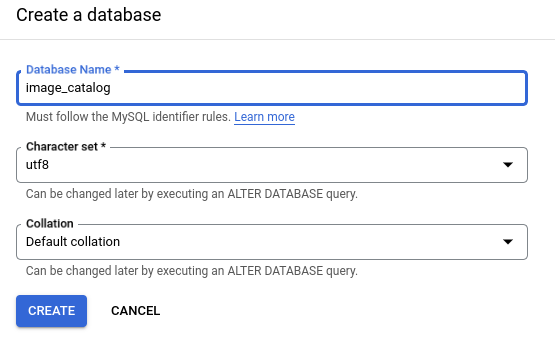
Then we create the database user. With this we can authenticate into the image_catalog database.
- Now click on Users tab
- Click "Add user account".
- User: let's create one:
- Username:
appmod-phpapp-user - Password: Choose something that you can remember, or click "generate"
- Keep "Allow any host (%)".
- click ADD.
Open the DB to well-known IPs.
Note all DBs in Cloud SQL are born ‘isolated'. You need to explicitly set up a network to be accessible from.
- Click on your instance
- Open the Menu "Connections"
- Click on the "Networking" tab.
- Click under "Authorized networks". Now add a network (ie, a subnet).
- For now, let's choose a quick yet INSECURE settings in order to let the App work - you might want to restrict it later to the IPs you trust:
- Name: "Everyone in the world - INSECURE".
- Network: "
0.0.0.0/0"(Note: this is the INSECURE part!) - Click DONE
- Click save.
You should see something like this:
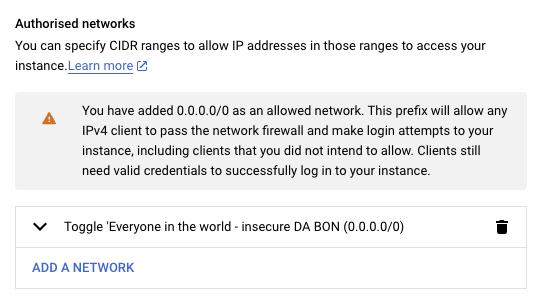
Note. This solution is a good compromise to finish the workshop in O(hours). However, check the SECURITY doc to help secure your solution for production!
Time to test the DB connection!
Let's see if the image_catalog user we have created before works.
Access the "Cloud SQL Studio" inside the instance and enter the Database, User and Password to be authenticated as shown below:
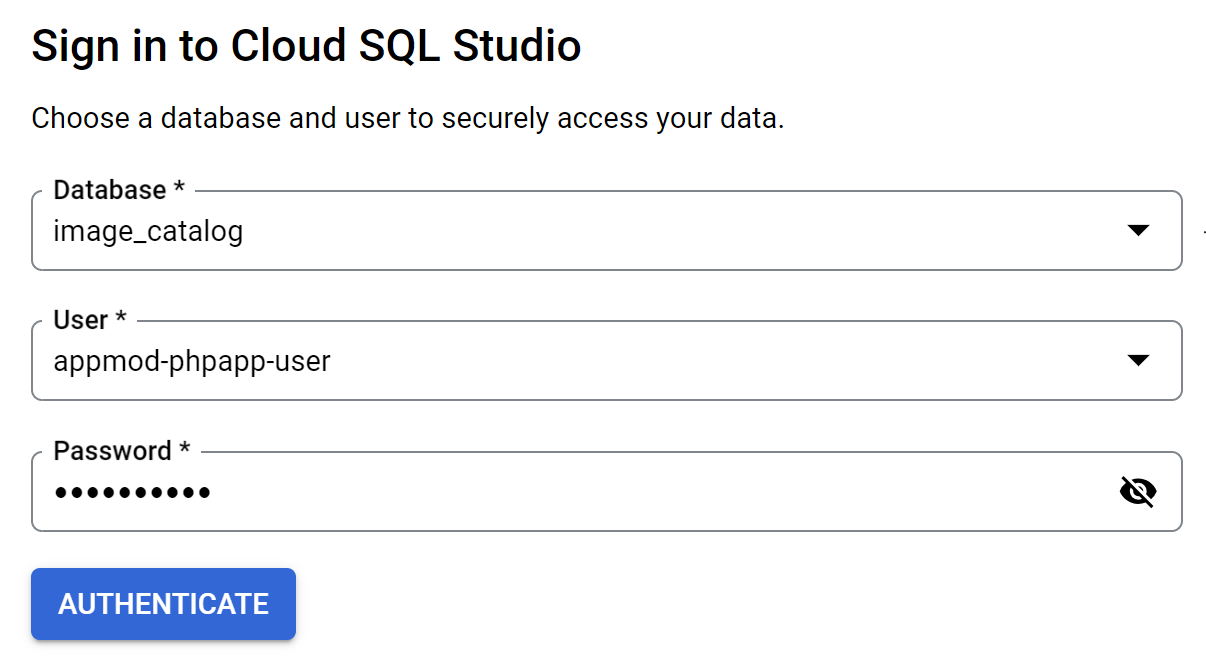
Now that you are in you can open the SQL Editor and proceed to the next section.
Import the Database from codebase
Use the SQL Editor to import the image_catalog tables with their data. Copy the SQL code from the files in the repo ( 01_schema.sql and then 02_seed.sql) and execute them one after the other in a sequential order.
After this you should get two tables in the image_catalog, which are users and images as shown below:
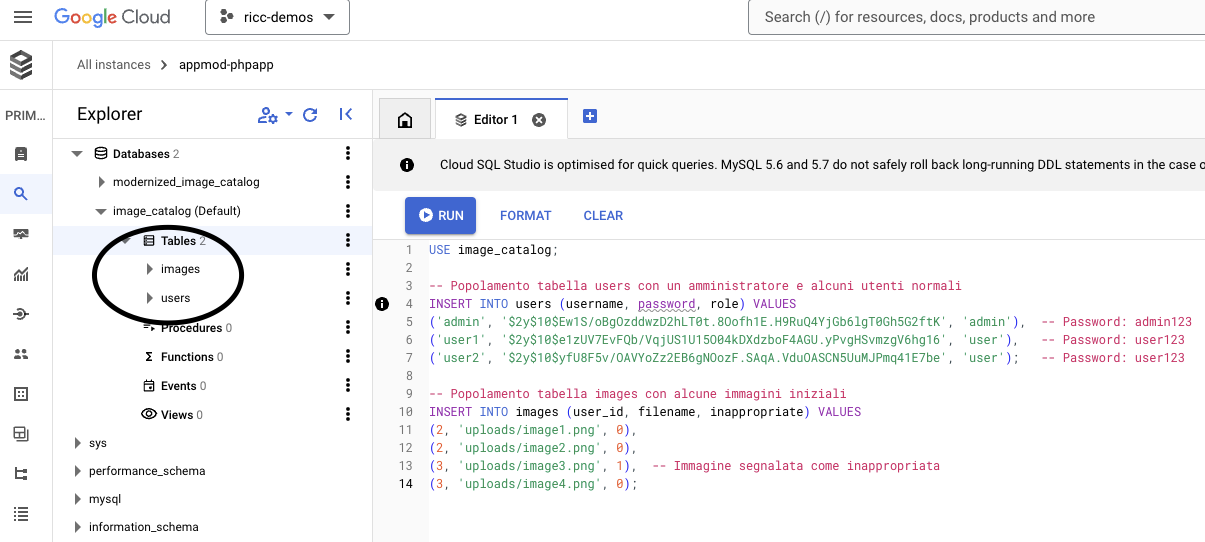
You can test it by running the following in the editor: select * from images;
Also make sure to note down the Public IP address of the Cloud SQL instance, you'll need it later. To get the IP, go to the CLoud SQL instance main page under the Overview page. (Overview > Connect to this Instance > Public IP Address).
4. Module 2: Containerize your PHP App
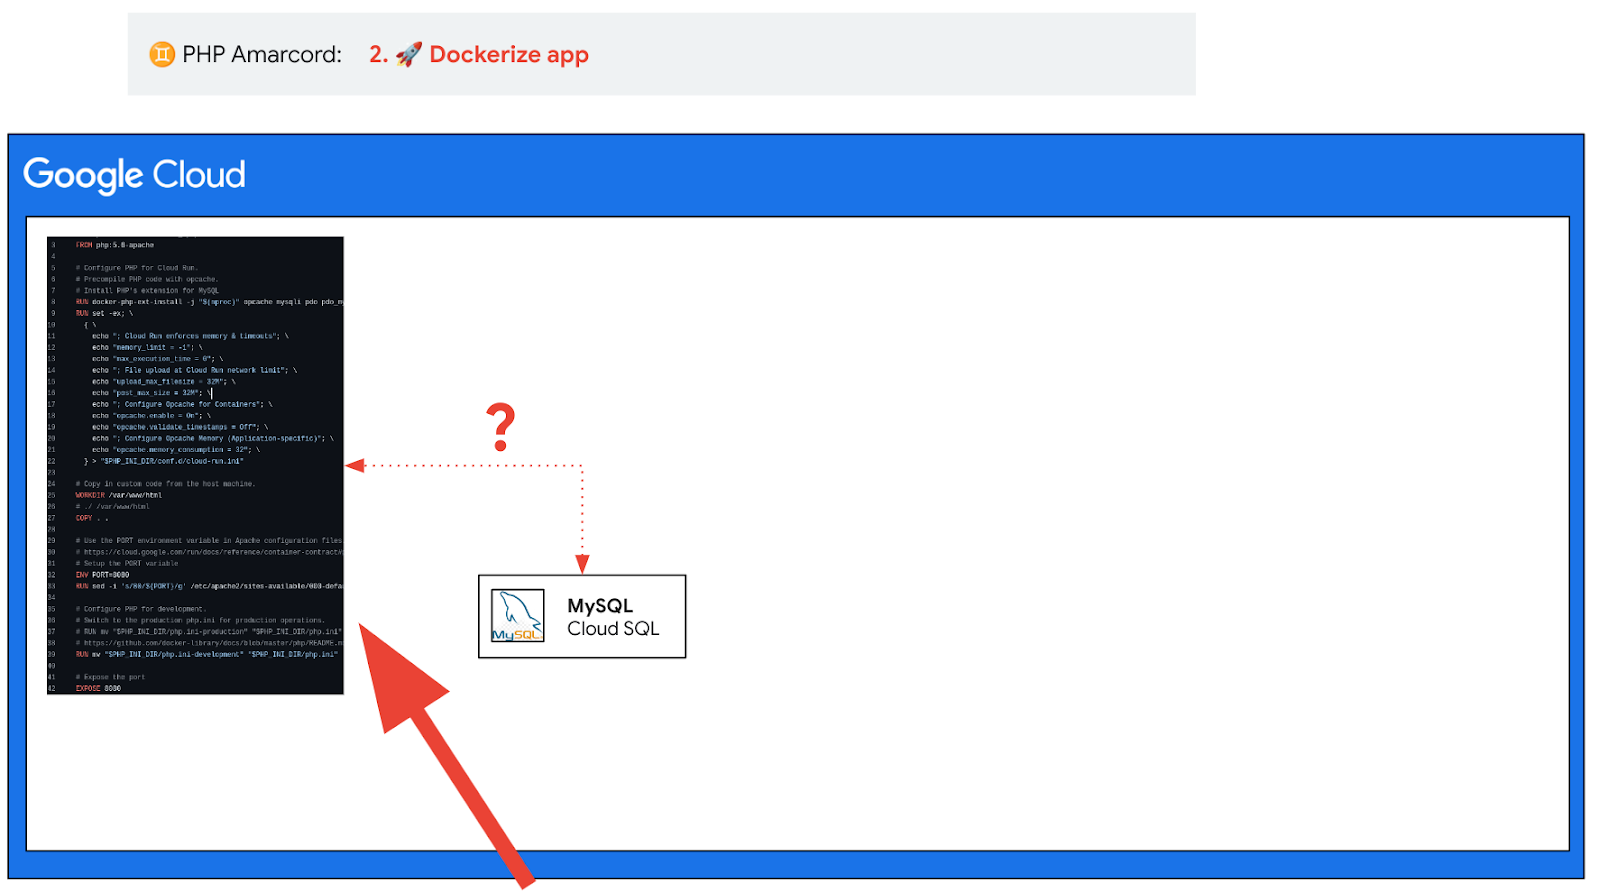
We want to build this app for the cloud.
This means packaging the code in some sort of ZIP file which contains all the info to run it in the Cloud.
There are a few ways to package it:
- Docker. Very popular, but quite complex to set up correctly.
- Buildpacks. Less popular, but tends to ‘auto guess' what to build and what to run. Often it just works!
In the context of this workshop, we will assume that you use Docker.
If you chose to use the Cloud Shell, this is the time to re-open it (click on the top right of the cloud console).

This should open a convenient shell on the bottom of the page, where you should have forked the code in the set-up step.

Docker
If you want to have control, this is the right solution for you. This makes sense when you need to configure specific libraries, and inject certain non-obvious behaviors (a chmod in uploads, a non-standard executable in your app, ..)
As we want to ultimately deploy our containerized application to Cloud Run, check the following documentation. How would you back port it from php 8 to PHP 5.7? Maybe you can use Gemini for it. In alternative, you can use this pre-baked version:
# Use the official PHP image: https://hub.docker.com/_/php
FROM php:5.6-apache

# Configure PHP for Cloud Run.
# Precompile PHP code with opcache.
# Install PHP's extension for MySQL
RUN docker-php-ext-install -j "$(nproc)" opcache mysqli pdo pdo_mysql && docker-php-ext-enable pdo_mysql

RUN set -ex; \
  { \
    echo "; Cloud Run enforces memory & timeouts"; \
    echo "memory_limit = -1"; \
    echo "max_execution_time = 0"; \
    echo "; File upload at Cloud Run network limit"; \
    echo "upload_max_filesize = 32M"; \
    echo "post_max_size = 32M"; \
    echo "; Configure Opcache for Containers"; \
    echo "opcache.enable = On"; \
    echo "opcache.validate_timestamps = Off"; \
    echo "; Configure Opcache Memory (Application-specific)"; \
    echo "opcache.memory_consumption = 32"; \
  } > "$PHP_INI_DIR/conf.d/cloud-run.ini"

# Copy in custom code from the host machine.
WORKDIR /var/www/html

COPY . .

# Setup the PORT environment variable in Apache configuration files: https://cloud.google.com/run/docs/reference/container-contract#port
ENV PORT=8080

# Tell Apache to use 8080 instead of 80.
RUN sed -i 's/80/${PORT}/g' /etc/apache2/sites-available/000-default.conf /etc/apache2/ports.conf

# Note: This is quite insecure and opens security breaches. See last chapter for hardening ideas.
# Uncomment at your own risk:
#RUN chmod 777 /var/www/html/uploads/

# Configure PHP for development.
# Switch to the production php.ini for production operations.
# RUN mv "$PHP_INI_DIR/php.ini-production" "$PHP_INI_DIR/php.ini"
# https://github.com/docker-library/docs/blob/master/php/README.md#configuration
RUN mv "$PHP_INI_DIR/php.ini-development" "$PHP_INI_DIR/php.ini"

# Expose the port
EXPOSE 8080
Latest Dockerfile version is available here.
In order to test our application locally, we need to change the config.php file in such a way our PHP App will connect with the MYSQL db available on Google CloudSQL. Based on what you have set up before, fill in the blanks:
<?php
// Database configuration
$db_host = '____________';
$db_name = '____________';
$db_user = '____________';
$db_pass = '____________';

try {
    $pdo = new PDO("mysql:host=$db_host;dbname=$db_name", $db_user, $db_pass);
    $pdo->setAttribute(PDO::ATTR_ERRMODE, PDO::ERRMODE_EXCEPTION);
} catch (PDOException $e) {
    die("Errore di connessione: " . $e->getMessage());
}

session_start();
?>
DB_HOSTis the Cloud SQL public IP address, you can find it in the SQL console:

DB_NAMEshould be unchanged:image_catalogDB_USERshould beappmod-phpapp-userDB_PASSis something you chose. Set it up in single quotes and escape as needed.
Also, feel free to translate the few 🇮🇹 Italian pieces to English with the help of Gemini!
Ok, now that you have the Dockerfile and have configured your PHP App to connect to your DB, let's try this out!
Install docker if you don't have it yet ( link). You don't need this if you are using Cloud Shell (how cool is that?).
Now try to build and run your Containerized PHP App with the appropriate docker build and run commands.
# Build command - don't forget the final . This works if Dockerfile is inside the code folder:
$ docker build -t my-php-app-docker .

# Local Run command: most likely ports will be 8080:8080
$ docker run -it -p <CONTAINER_PORT>:<LOCAL_MACHINE_PORT> my-php-app-docker
If everything is working you should be able to see the following web page when connected to local host! Now your app is running on port 8080, click "Web preview" icon (a browser with an eye) and then Preview on port 8080 (or "Change port" for any other port)

Testing the result on your browser
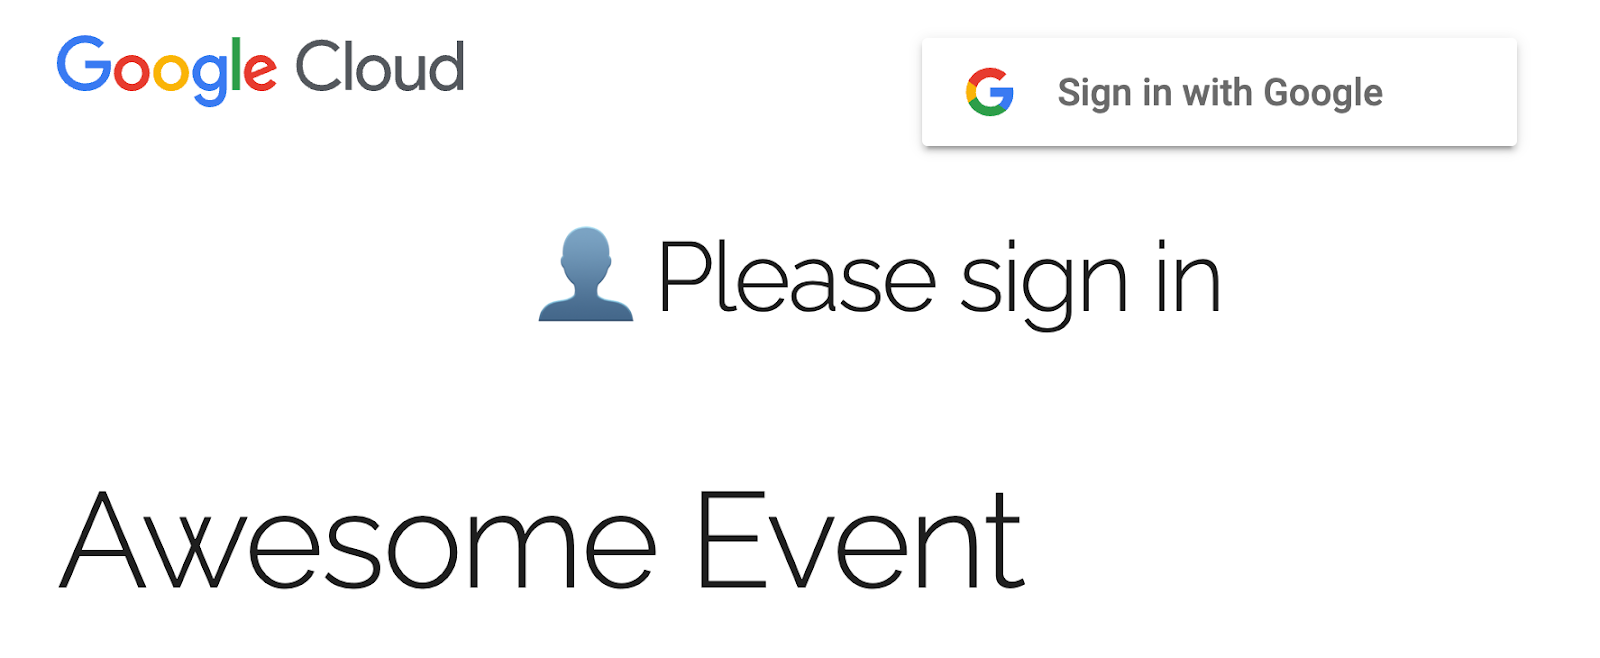
Now your application should look something like this:
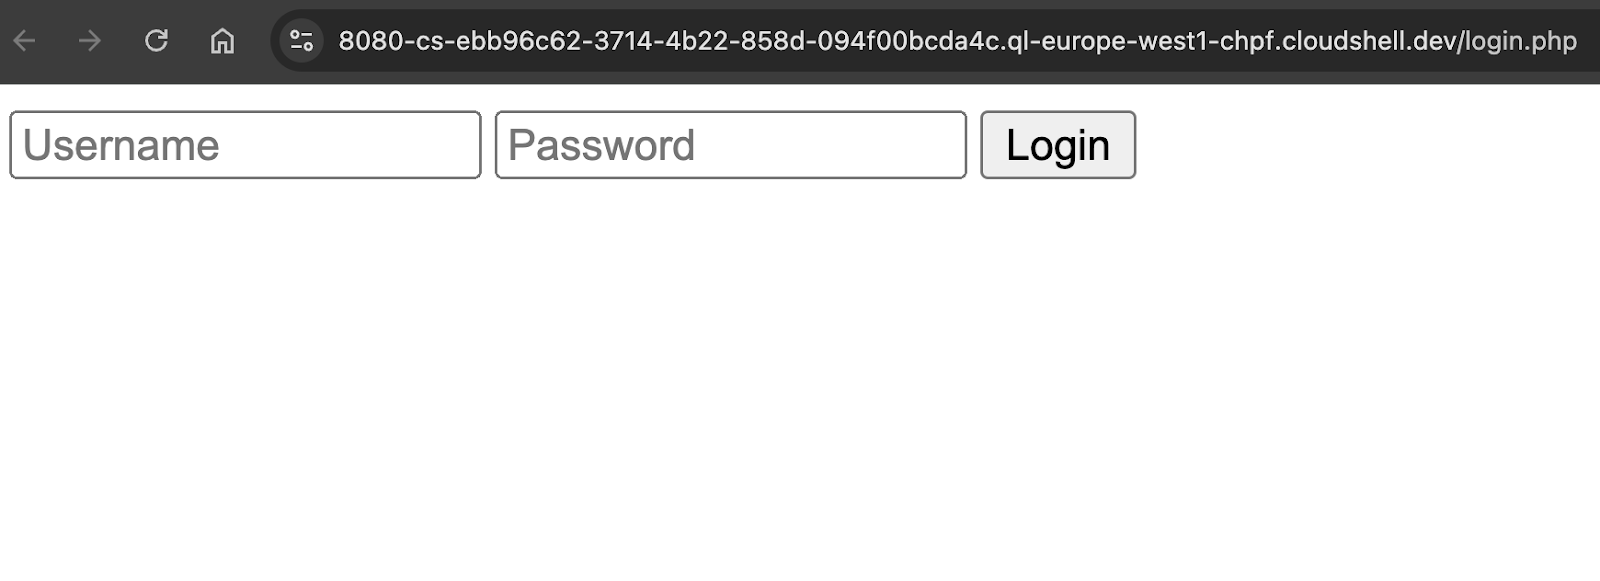
And if you login with Admin/admin123 you should see something like this.
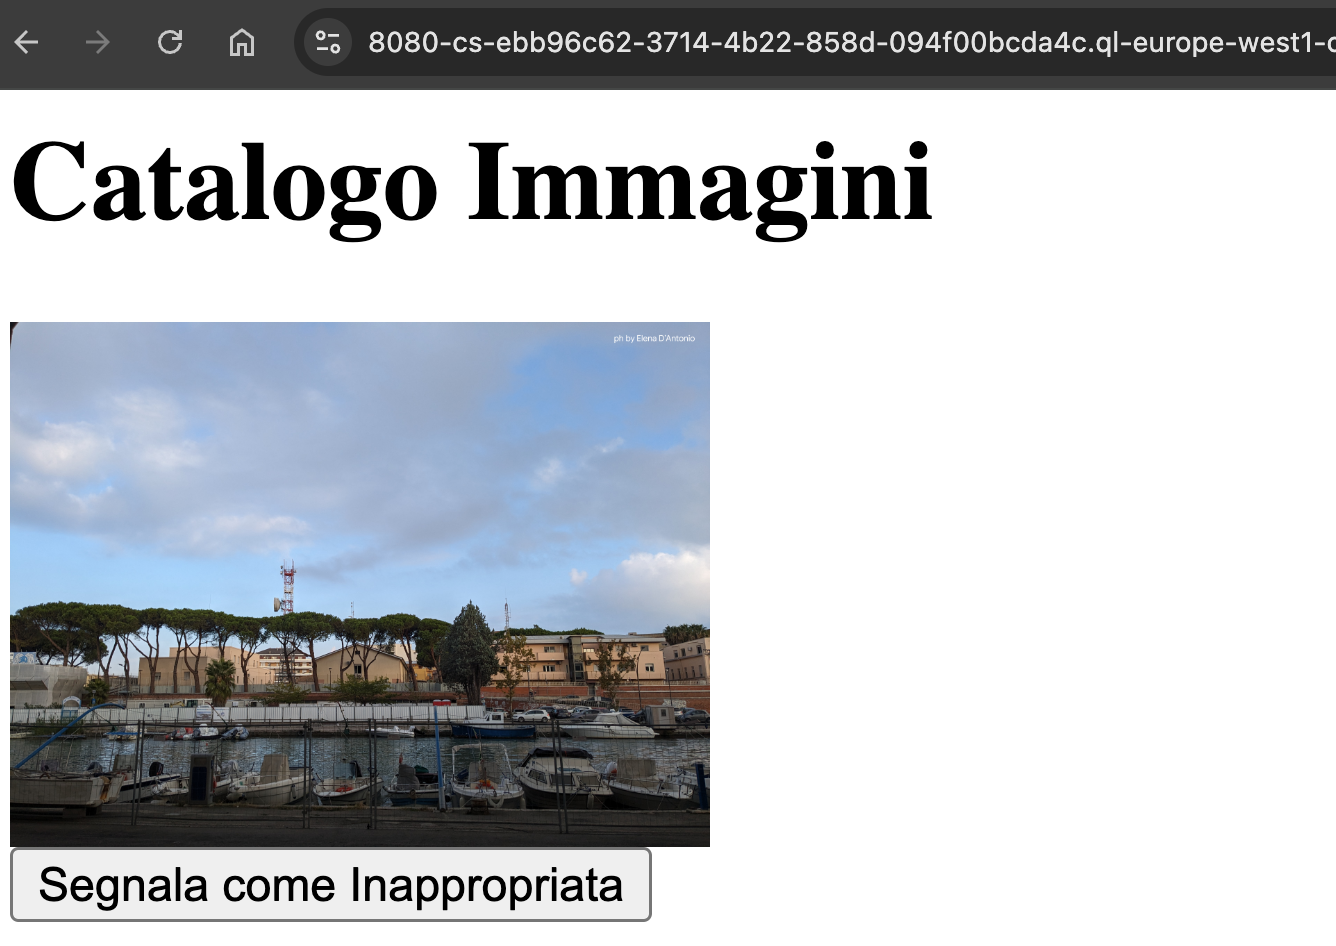
Great!!! Apart from the Italian text, it's working! 🎉🎉🎉
If your dockerization is good but the DB credentials are wrong, you might get something like this:

Try again, you're close!
Saving to Artifact Registry [optional]
By now, you should have a working containerized PHP application ready to be deployed to the cloud. Next, we need a place in the cloud to store our Docker image and make it accessible for deployment to Google Cloud services like Cloud Run. This storage solution is called Artifact Registry, a fully-managed Google Cloud service designed for storing application artifacts, including Docker container images, Maven packages, npm modules, and more.
Let's create a repository in Google Cloud Artifact Registry using the appropriate button.

Choose a valid name, the format and the region suitable for storing the artifacts.
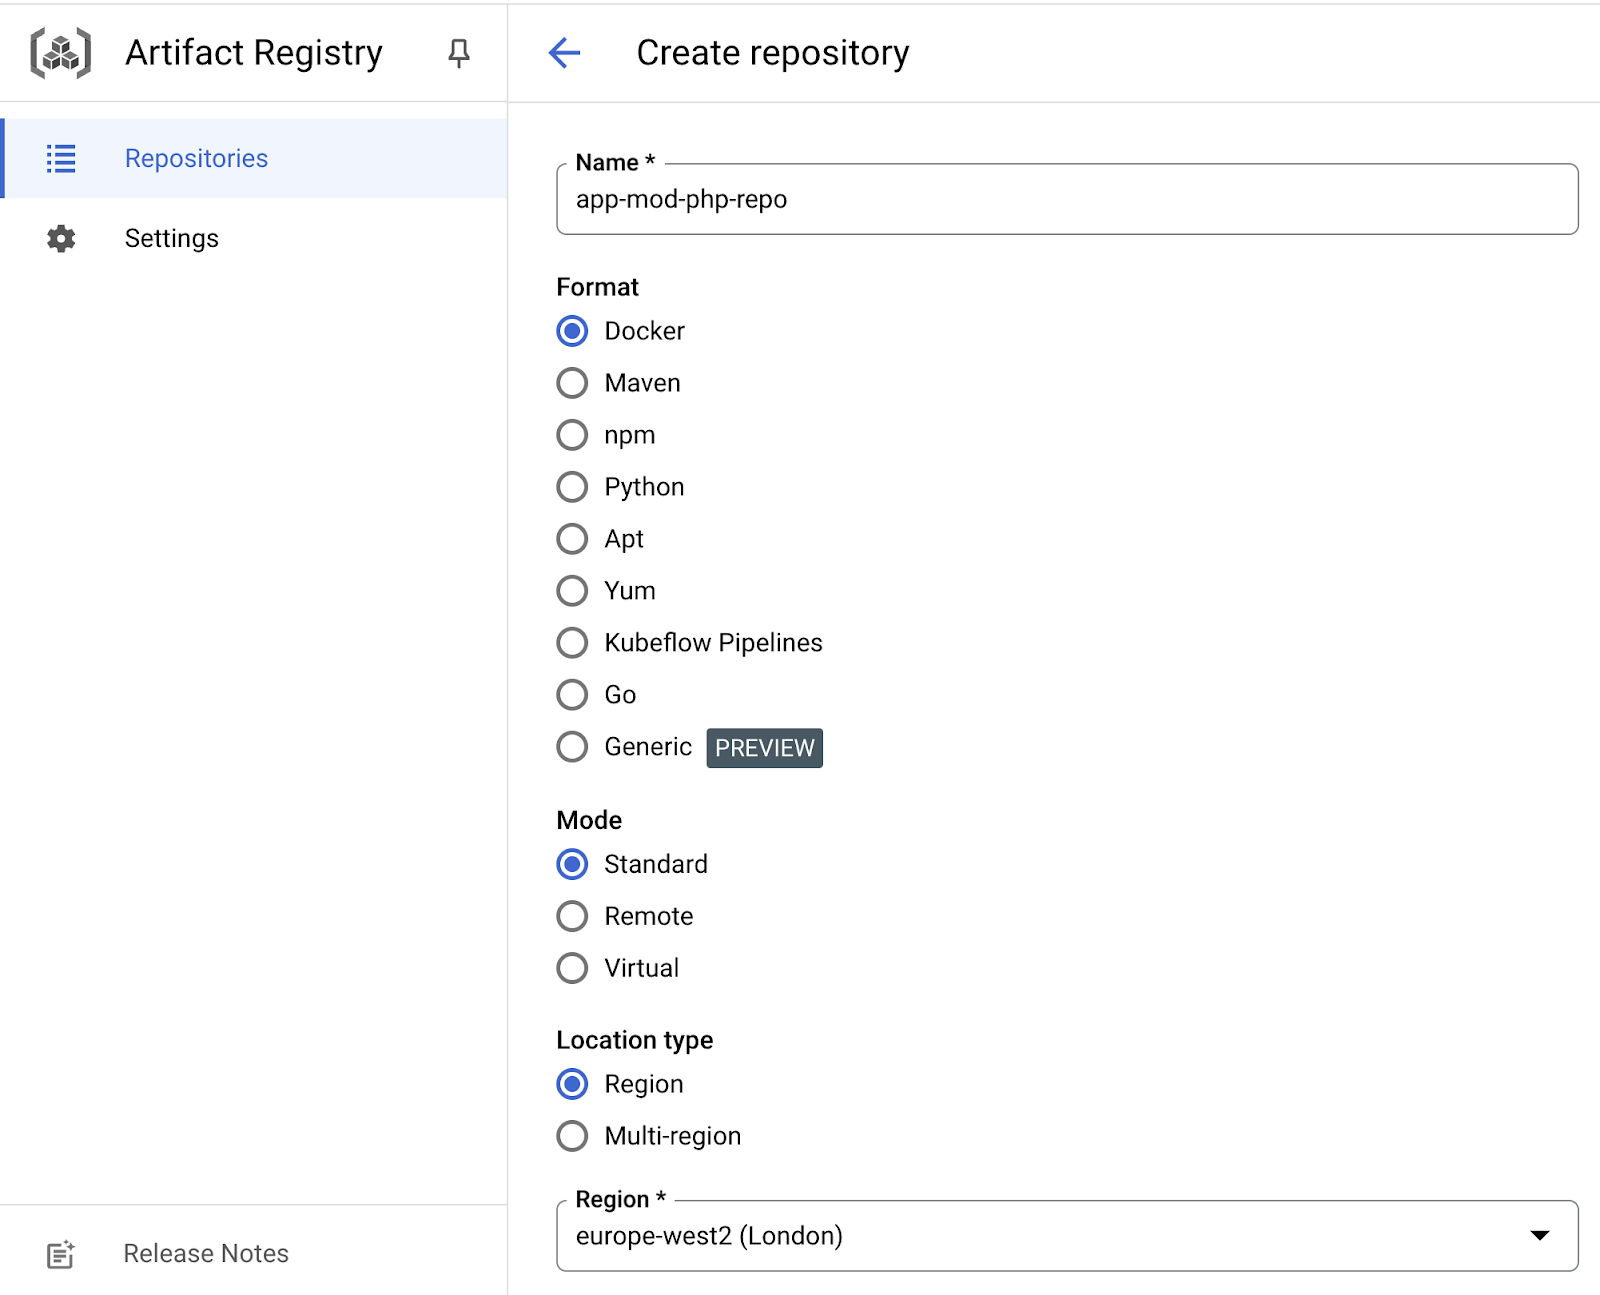
Back to your local development environment tag and push the App container image to the Artifact Registry repository just created. Complete the following commands to do so.
- docker tag SOURCE_IMAGE[:TAG] TARGET_IMAGE[:TAG]
- docker push TARGET_IMAGE[:TAG]
The result should look like the following screenshot.
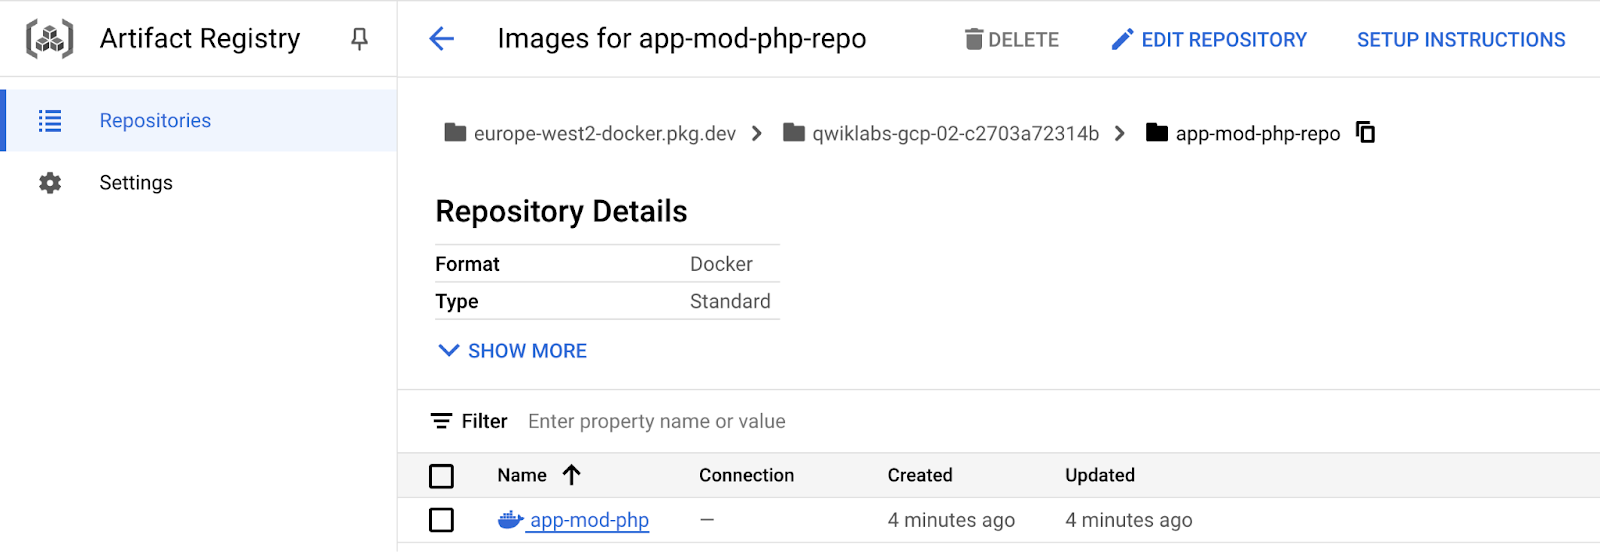
Hooray 🎉🎉🎉 you can move to the next level. Before then, maybe spend 2 minutes trying upload/login/logout and familiarizing with the app endpoints.You'll need them later.
Possible errors
If you get containerization errors, try using Gemini to explain and fix the error, providing:
- Your current Dockerfile
- The error received
- [if needed] the PHP code being executed.
Upload Permissions. Also try the /upload.php endpoint and try uploading a picture. You might get a the error below. If so, you have some chmod/chown fix to do in the Dockerfile.
Warning: move_uploaded_file(uploads/image (3).png): failed to open stream: Permission denied in /var/www/html/upload.php on line 11
PDOException "could not find driver" (or "Errore di connessione: could not find driver"). Ensure your Dockerfile has the proper PDO libraries for mysql (pdo_mysql), to connect to the DB. Get inspiration from solutions in here.
Unable to forward your request to a backend. Couldn't connect to a server on port 8080. This means you probably are exposing the wrong port. Make sure you're exposing the port from which Apache/Nginx are actually serving. This is not trivial. If possible, try to make that port 8080 (makes life easier with Cloud Run). If you want to keep port 80 (eg, because Apache wants it that way), use a different command to run it:
$ docker run -it -p 8080:80 # force 80
# Use the PORT environment variable in Apache configuration files.
# https://cloud.google.com/run/docs/reference/container-contract#port
RUN sed -i 's/80/${PORT}/g' /etc/apache2/sites-available/000-default.conf /etc/apache2/ports.conf
5. Module 3: Deploy the App to Cloud Run
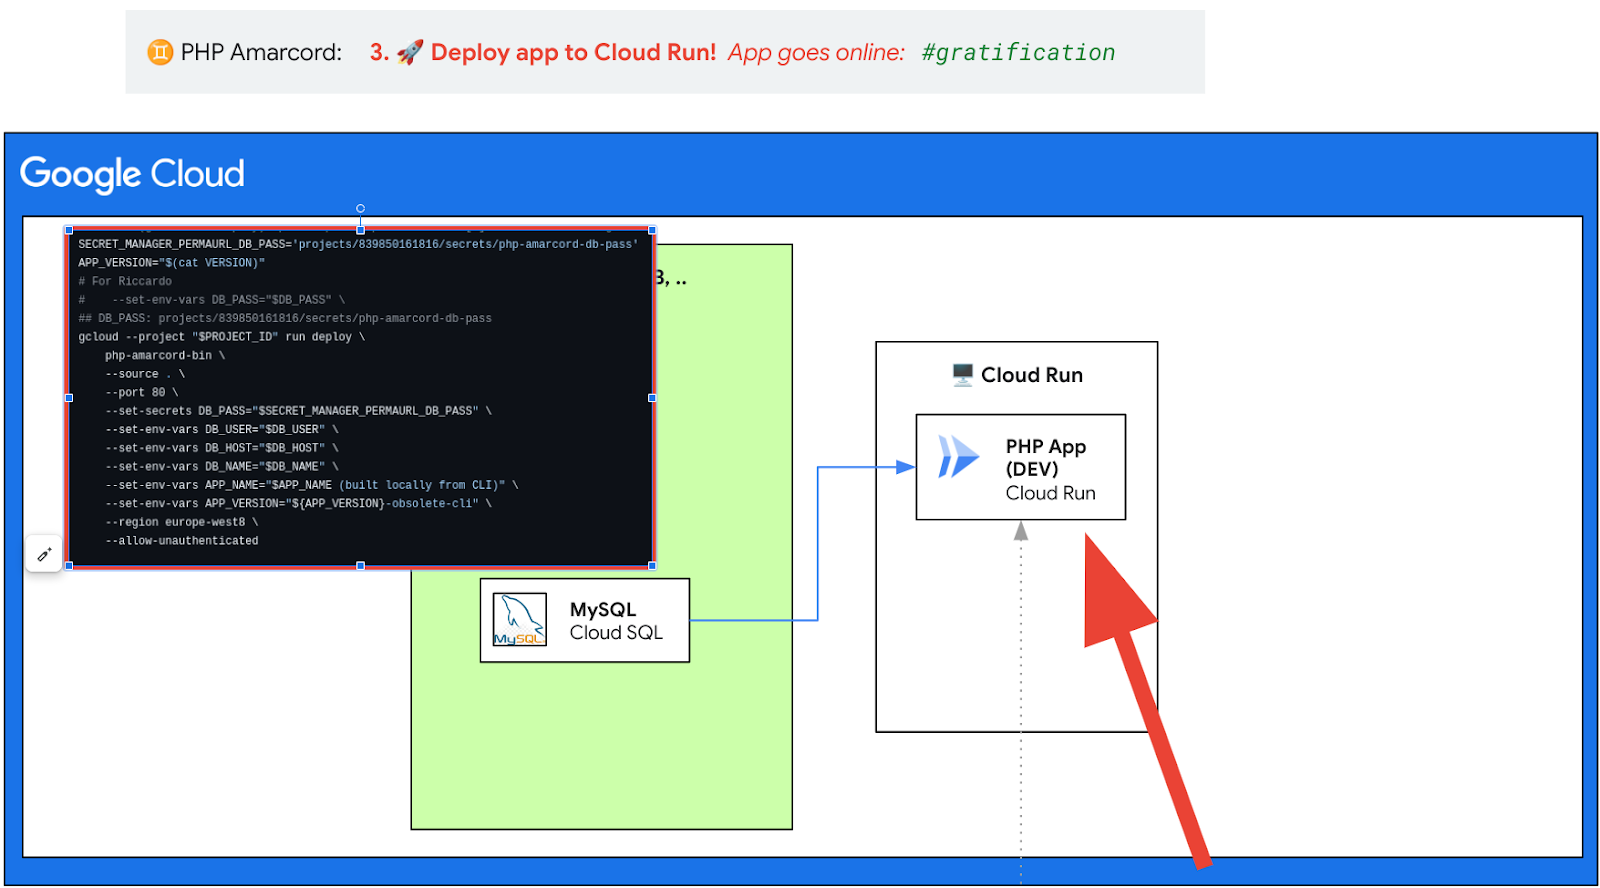
Why Cloud Run?
Fair question! Years ago, you would have surely chosen Google App Engine.
Simply put, today, Cloud Run has a newer tech stack, it's easier to deploy, cheaper, and scales down to 0 when you don't use it. With its flexibility to run any stateless container and its integration with various Google Cloud services, it's ideal for deploying microservices and modern applications with minimal overhead and maximum efficiency.
More specifically, Cloud Run is a fully managed platform by Google Cloud that enables you to run stateless containerized applications in a serverless environment. It automatically handles all infrastructure, scaling from zero to meet incoming traffic and down when idle, making it cost-effective and efficient. Cloud Run supports any language or library as long as it's packaged in a container, allowing great flexibility in development. It integrates well with other Google Cloud services and is suitable for building microservices, APIs, websites, and event-driven applications without needing to manage server infrastructure.
Prerequisites
To accomplish this task you should have gcloud installed in your local machine. If not see the instructions here. Instead if you are on Google Cloud Shell there are no actions to take.
Before deploying...
If you are working in your local environment, authenticate to Google Cloud with the following
$ gcloud auth login –update-adc # not needed in Cloud Shell
This should authenticate you through a OAuth login on your browser. Make sure that you login through Chrome with the same user (eg vattelapesca@gmail.com) who is logged into Google Cloud with billing enabled.
Enable Cloud Run API with the following command:
$ gcloud services enable run.googleapis.com cloudbuild.googleapis.com
At this point everything is ready to deploy to Cloud Run.
Deploy your App to Cloud Run via gcloud
The command that allows you to deploy the App on Cloud Run is the gcloud run deploy. There are several options to set in order to achieve your goal. The minimum set of options (which you can provide via command line, or the tool will ask you with interactive prompt) are the following:
- Name of the Cloud Run Service you want to deploy for your App. A Cloud Run Service will return to you an URL that provides an endpoint to your App.
- Google Cloud Region where your App will run. (
--regionREGION) - Container Image that wraps your App.
- Environment Variables that your App needs to use during its execution.
- The Allow-Unauthenticated flag that permits to everyone to access to your App without further authentication.
Consult the documentation (or scroll down for a possible solution) see to see how to apply this option to your command line.
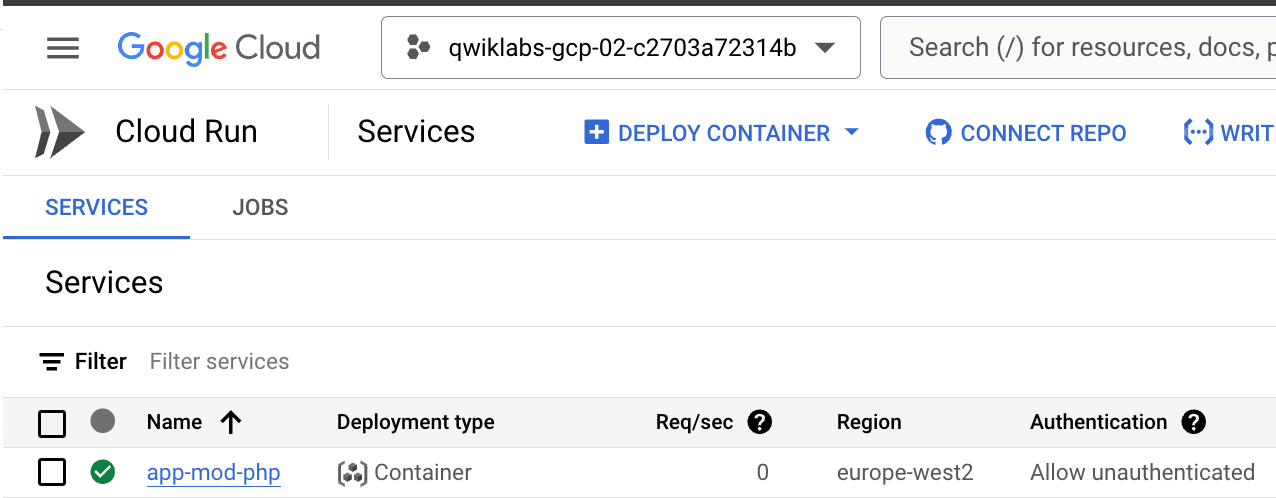
The deployment will take a few minutes. If everything is correct you should see something like this in the Google Cloud Console.

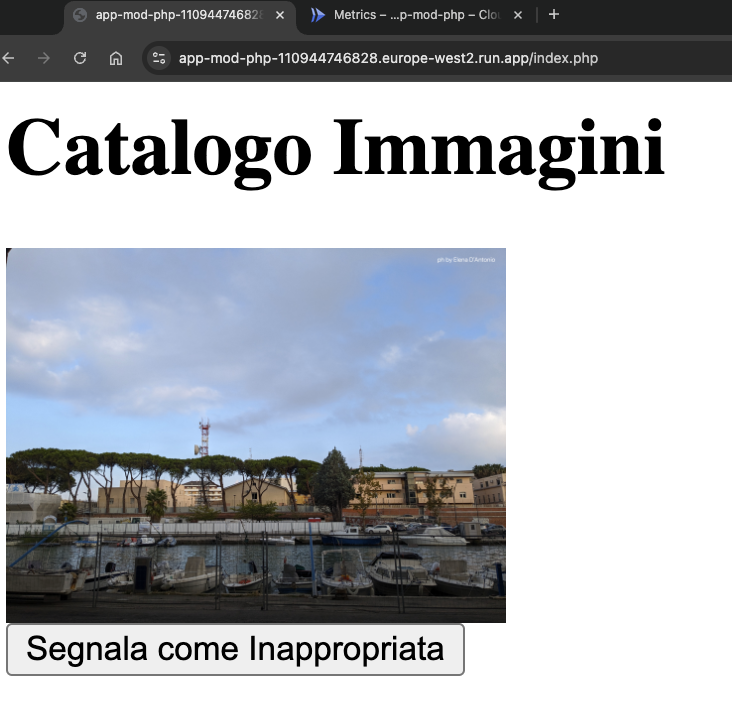
Click on the URL provided by Cloud Run and test your Application. Once authenticated you should see something like this.
"gcloud run deploy" with no arguments
You might have noticed that gcloud run deploy asks you the right questions and fill the blanks you left. This is amazing!
However, in a few modules we're going to add this command to a Cloud Build trigger so we can't afford interactive questions. We need to fill in every option in the command. So you want to craft the golden gcloud run deploy --option1 blah --foo bar --region your-fav-region. How do you do it?
- repeat steps 2-3-4 until gcloud stops asking questions:
- [LOOP]
gcloud run deploywith options found so far - [LOOP] systems ask for option X
- [LOOP] Search in public docs how to set up X from CLI adding option
--my-option [my-value]. - Back to step 2 now, unless gcloud completes without further questions.
- This gcloud run deploy BLAH BLAH BLAH rocks! Save the command somewhere, you'll need it later for Cloud Build step!
A possible solution is here. Docs are here.
Hooray 🎉🎉🎉 You successfully have deployed your App in Google Cloud achieving the first step of Modernization.
6. Module 4: Clean Password with Secret Manager
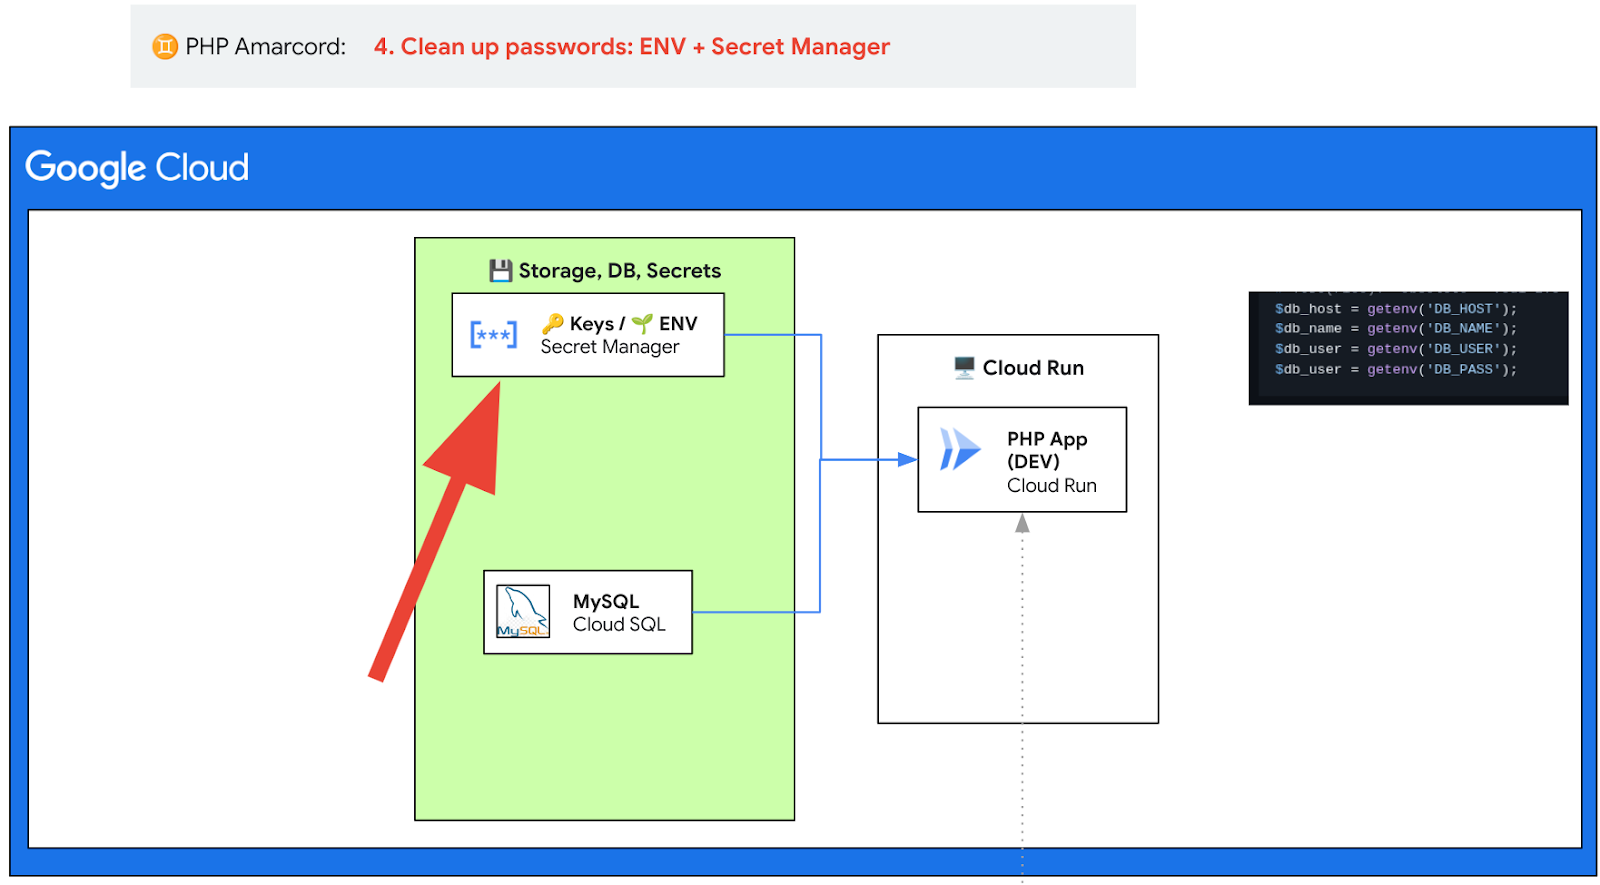
In the previous step we were able to deploy and run successfully our App in Cloud Run. However, we did it with a security bad practice: supplying some secrets in cleartext.
First iteration: Update your config.php to use ENV
You might have noticed that we put the DB password straight into the code in the config.php file. This is fine for testing purposes and to see if the App works. But you cannot commit/use code such that in a production environment. The password (and other DB connection parameters) should be read dynamically and provided to the App at runtime. Change the config.php file so that it reads the db parameters from ENV variables. If it fails you should consider setting default values. This is good in case you fail to load ENV, so the page output will tell you if it's using the default values. Fill the blanks and replace the code in the config.php.
<?php
// Database configuration with ENV variables. Set default values as well
$db_host = getenv('DB_HOST') ?: 'localhost';
$db_name = getenv('DB_NAME') ?: 'image_catalog';
$db_user = getenv('DB_USER') ?: 'appmod-phpapp-user';
$db_pass = getenv('DB_PASS') ?: 'wrong_password';
// Note getenv() is PHP 5.3 compatible
try {
    $pdo = new PDO("mysql:host=$db_host;dbname=$db_name", $db_user, $db_pass);
    $pdo->setAttribute(PDO::ATTR_ERRMODE, PDO::ERRMODE_EXCEPTION);
} catch (PDOException $e) {
    die("Errore di connessione: " . $e->getMessage());
}

session_start();
?>
As your App is containerized you need to provide a way to supply the ENV variables to the App. This can be done in a few ways:
- At build time, on the Dockerfile. Add to your previous Dockerfile the 4 parameters using the syntax ENV DB_VAR=ENV_VAR_VALUE. This will set up default values which can be overridden at runtime. For instance, ‘DB_NAME' and ‘DB_USER' could be set here and nowhere else.
- At run time. You can set up these variables for Cloud Run, both from CLI or from UI. This is the right place to put all your 4 variables (unless you want to keep the defaults set in Dockerfile).
In localhost, you might want to put your ENV variables in a .env file (check solutions folder).
Also make sure that .env is added to your .gitignore : you don't want to push your secrets to Github!
echo .env >> .gitignore
After that, you can test the instance locally:
docker run -it -p 8080:8080 --env-file .env my-php-app-docker
Now you have achieved the following:
- Your App will read variable dynamically from your ENV
- You improved the security as you have removed the DB password from your code)
You can now deploy a new revision to Cloud Run. Let's jump on the UI and set the environment variables manually:
- Go to https://console.cloud.google.com/run
- Click on your app
- Click "Edit and deploy a new revision"
- On first tab "Container(s)" click on the lower tab "Variables and secrets"
- Click "+ Add variable" and add all the needed variables. You should end up with something like this:
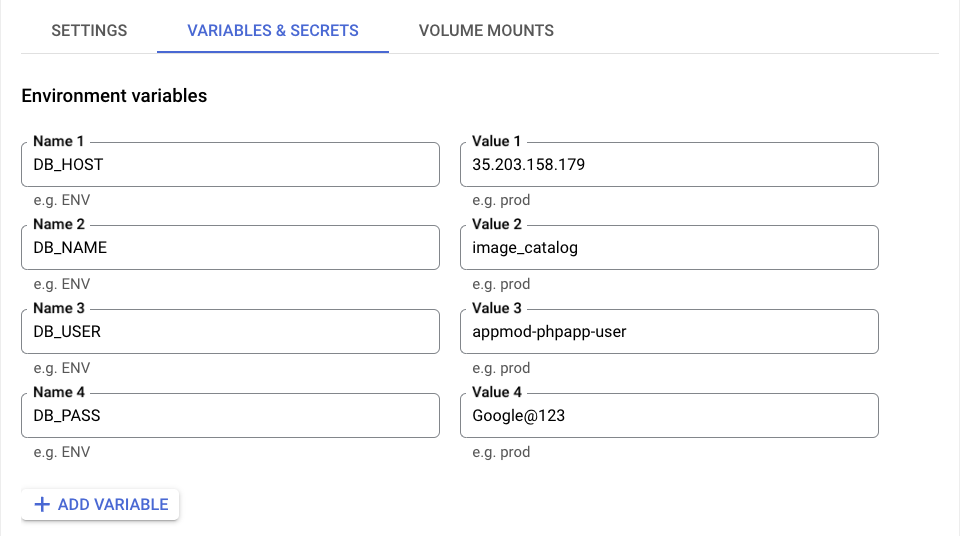
Is this perfect? No. your PASS is still visible to most operators. This can be mitigated with Google Cloud Secret Manager.
Second iteration: Secret Manager
Your passwords have disappeared from your own code: victory! But wait - are we safe yet?
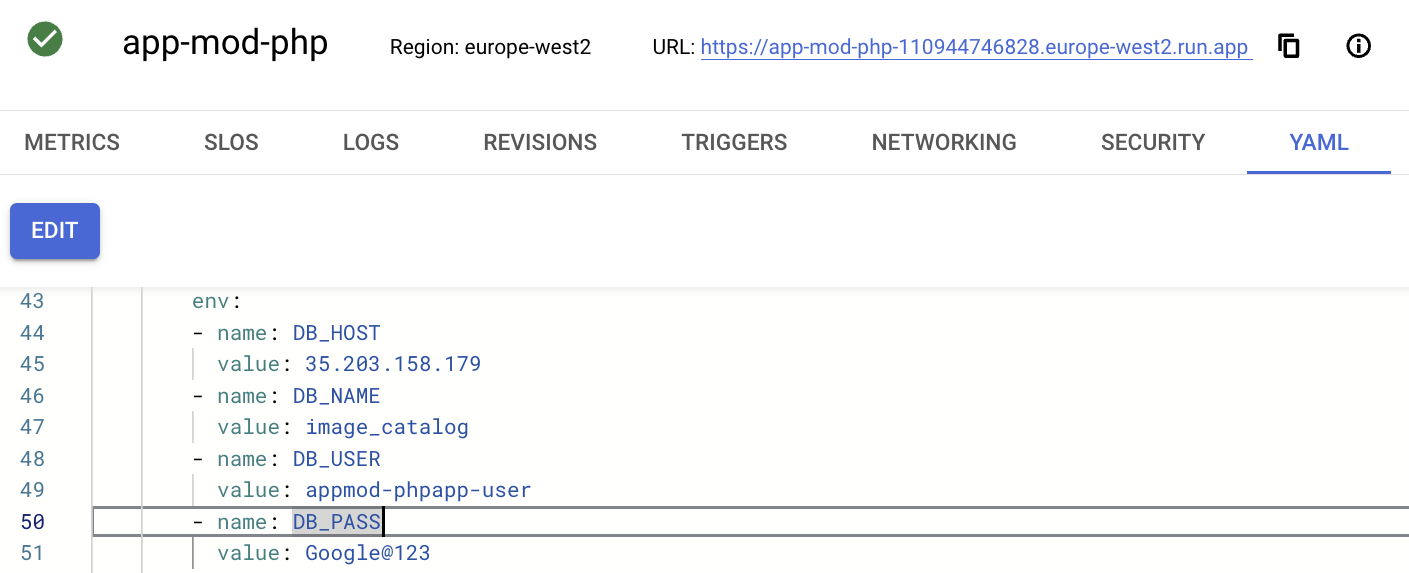
Your passwords are still visible to anyone who has access to the Google Cloud Console. In fact, if you access the Cloud Run YAML deployment file you will be able to retrieve it. Or if you try to edit or deploy a new Cloud Run revision, the password is visible in the Variables & Secrets section as shown in the screenshots below.
Google Cloud Secret Manager is a secure, centralized service for managing sensitive information like API keys, passwords, certificates, and other secrets.
It enables you to store, manage, and access secrets with fine-grained permissions and robust encryption. Integrated with Google Cloud's Identity and Access Management (IAM), Secret Manager allows you to control who can access specific secrets, ensuring data security and regulatory compliance.
It also supports automatic secret rotation and versioning, simplifying secret lifecycle management and enhancing security in applications across Google Cloud services.
To access the Secret Manager navigate from the Hamburger menu to the Security services and find it under the Data Protection section as shown in the screenshot below.
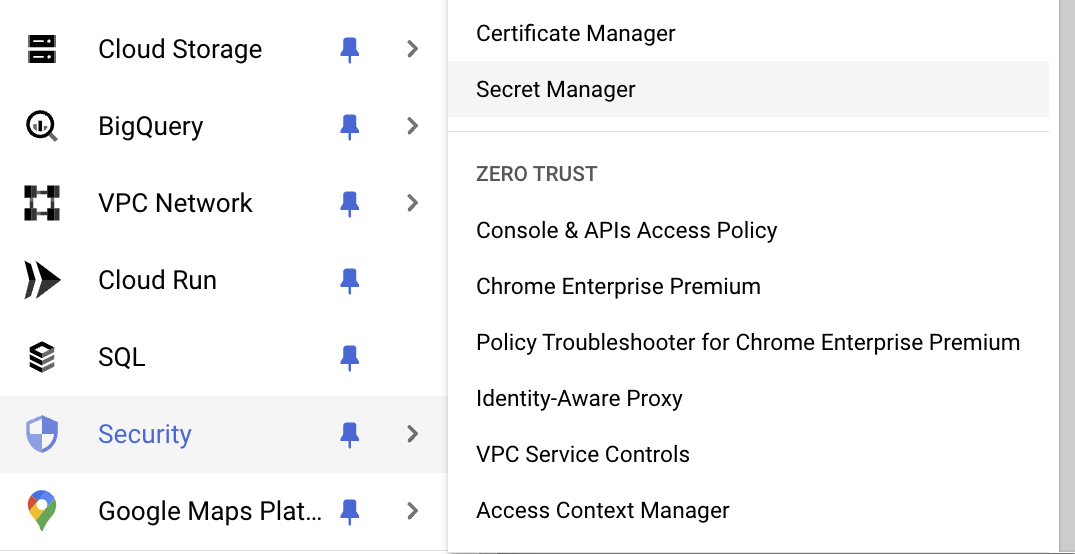
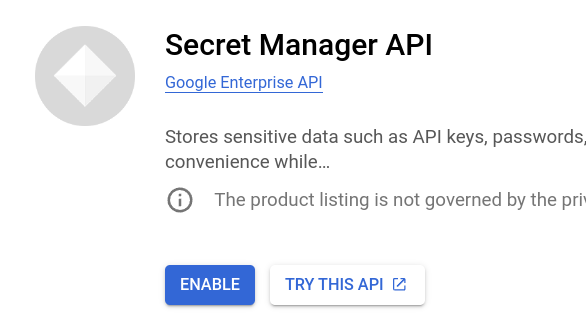
Enable the Secret Manager API once you are there as per the following image.
- Now click "Create a secret": Let's call it rationally:
- Name:
php-amarcord-db-pass - Secret value: ‘your DB password' (ignore the "upload file" part).
- annotate this secret link, should look like
projects/123456789012/secrets/php-amarcord-db-pass. This is the unique pointer to your secret (For Terraform, Cloud Run, and others). The number is your unique project number.
Tip: Try to use a consistent naming conventions for your secrets, specializing left to right, for instance: cloud-devrel-phpamarcord-dbpass
- Organization (with the company)
- Team (within the org)
- Application (within the team)
- Variable name (within the app)
This will allow you to have easy regexes to find all your secrets for a single app.
Create a new Cloud Run revision
Now that we have a new Secret in place, we need to get rid of the DB_PASS ENV variable and substitute it with the new Secret. So:
- Access to Cloud Run using the Google Cloud Console
- Choose the app.
- Click "Edit & Deploy a New Revision"
- locate "Variables & Secrets" tab.
- Use the "+ Reference a Secret" button to reset the DB_PASS ENV variable.
- Use the same "DB_PASS" for the referenced Secrets and use latest version.
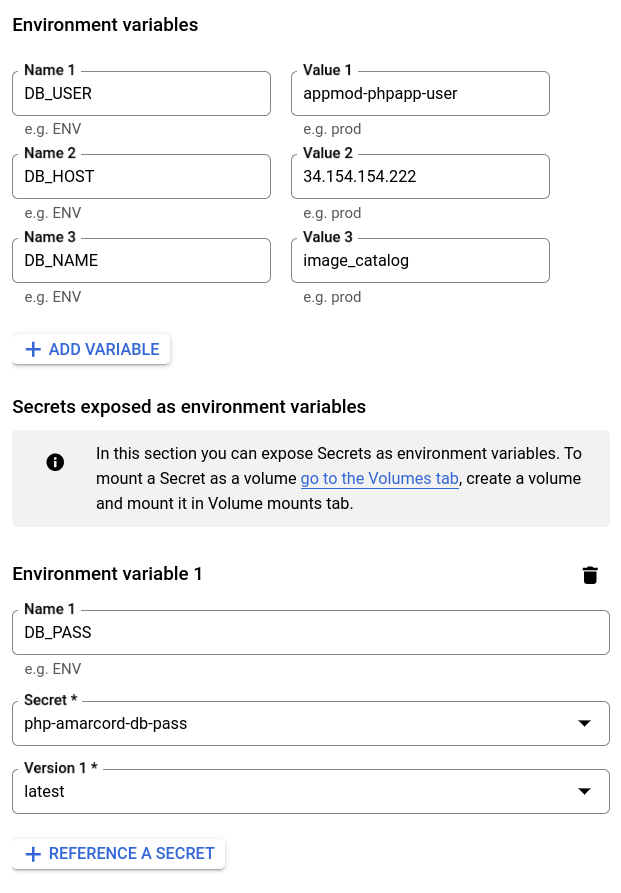
Once done, you should get the following error

Try to figure out how to fix it. To solve this you need to access the IAM & Admin section and change the granting permissions. Happy debugging!
Once you have figured it out, go back to Cloud Run and redeploy a new revision. The result should look like the following figure:
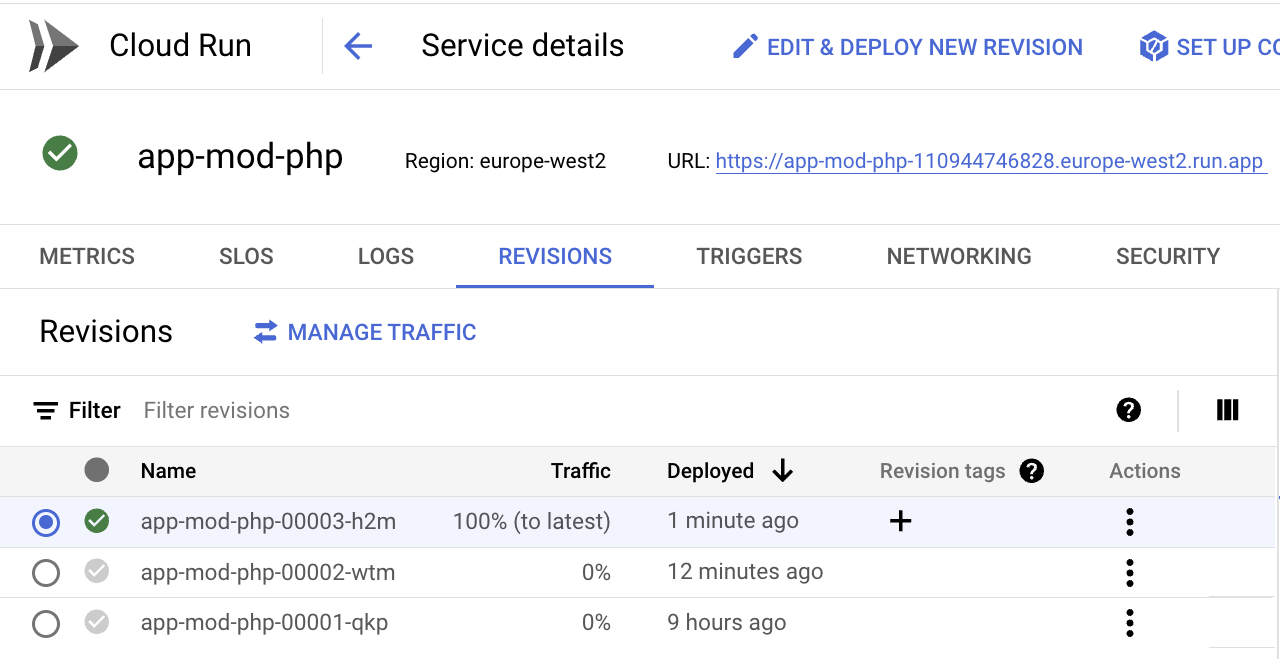
Tip: the Developer Console (UI) is great at pointing out permission issues. Take time to navigate all the links for your Cloud entities!
7. Module 5: Setup your CI/CD with Cloud Build
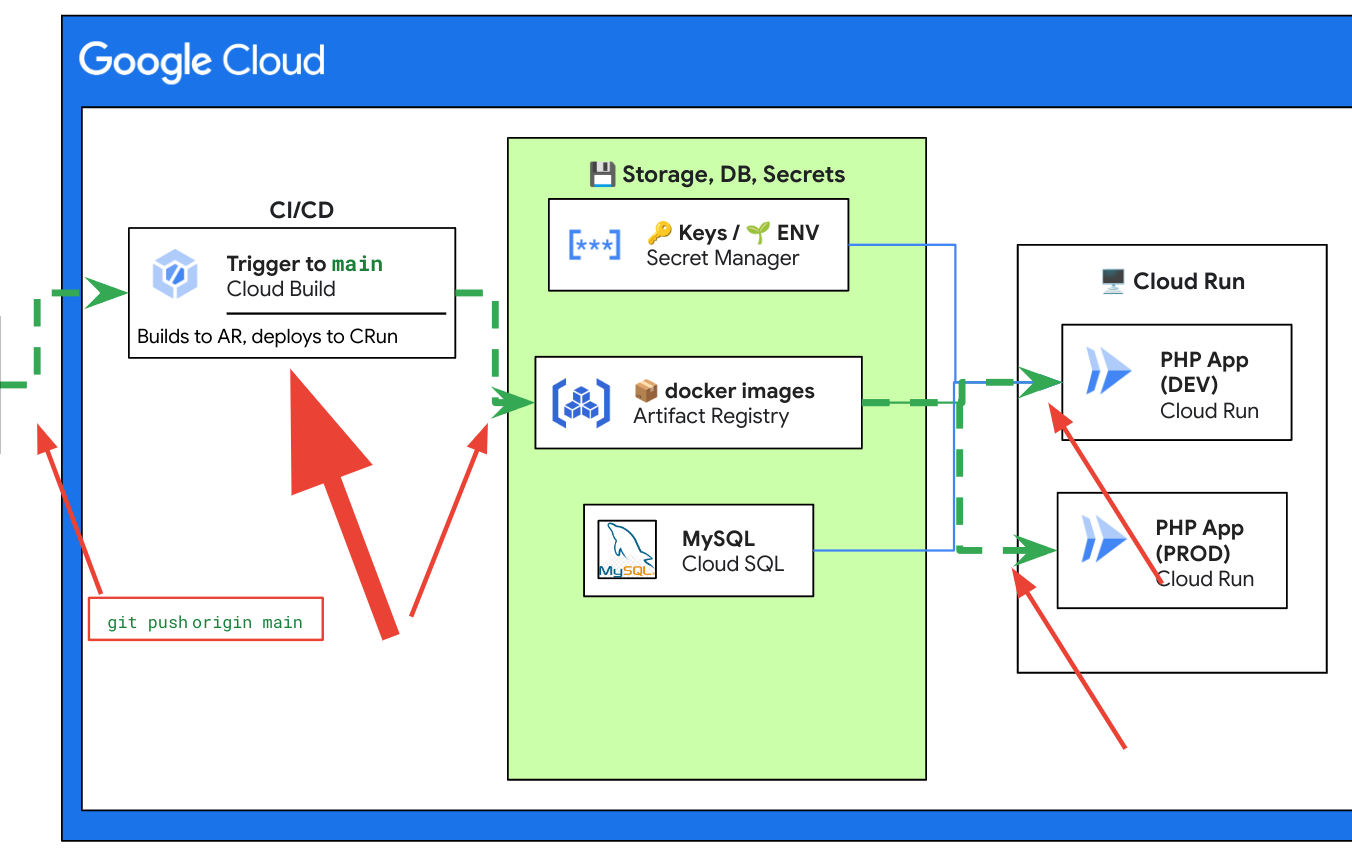
Why a CI/CD Pipeline?
By now, you should have typed gcloud run deploy a few times, maybe answering the same question over and over again.
Tired of manually deploying your app with gcloud run deploy? Wouldn't it be great if your app could automatically deploy itself every time you push a new change to your Git repository?
To use a CI/CD pipeline, you'll need two things:
- A Personal Git Repository: Luckily, you should have already forked the workshop repository to your GitHub account in Step 2. If not, go back and complete that step. Your forked repository should look like this:
https://github.com/<YOUR_GITHUB_USER>/app-mod-workshop - Cloud Build. This amazing and cheap service allows you to configure build automations for pretty much everything: Terraform, dockerized apps, ..
This section will focus on setting up Cloud Build.
Enter Cloud Build!
We will use Cloud Build to do this:
- build your source (with Dockerfile). Think of this as a "big .zip file" which contains all you need to build and run it (your "build artifact").
- push this artifact to Artifact Registry (AR).
- Then issue a deployment from AR to Cloud Run for app "php-amarcord"
- This will create a new version ("revision") of the existing app (think of a layer with the new code) and we will configure it to divert the traffic to the new version if the push succeeds.
This is an example of some builds for my php-amarcord app:
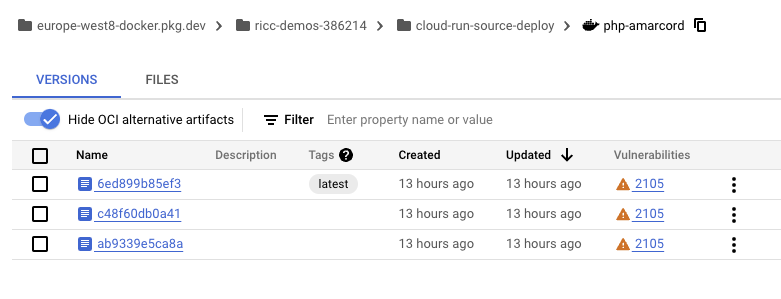
How do we do all of this?
- By crafting one perfect YAML file:
cloudbuild.yaml - By creating a Cloud Build trigger.
- By connecting to our github repo through the Cloud Build UI.
Create trigger (and Connect Repository)
- Go to https://console.cloud.google.com/cloud-build/triggers
- Click "Create Trigger".
- Compile:
- Name: Something meaningful like
on-git-commit-build-php-app - Event: Push to branch
- Source: "Connect new repository"
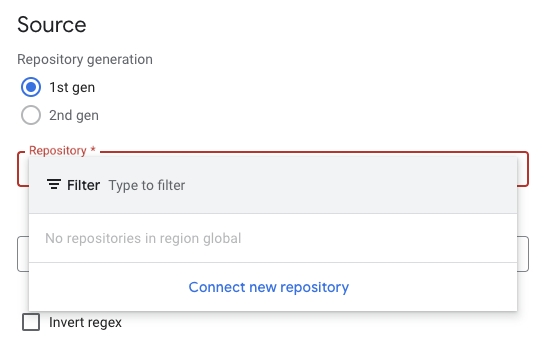
- This will open a window on the right: "Connect repository"
- Source provider: "Github" (first)
- "Continue"
- Authenticate will open a window on github to cross-authenticate. Follow the flow and be patient. If you have many repos it might take you a while.
- "Select repo" Select your account/repo and tick the "I understand..." part.
- If you got the error: The GitHub App is not installed on any of your repositories proceed clicking on "Install Google Cloud Build" and follow the instructions.
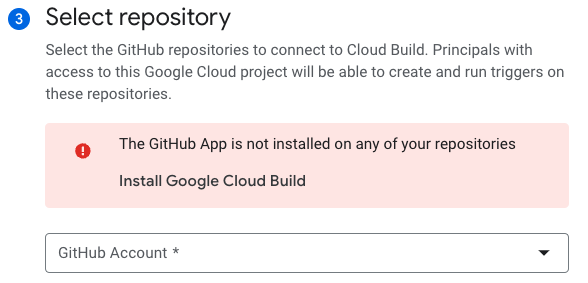 Click Connect
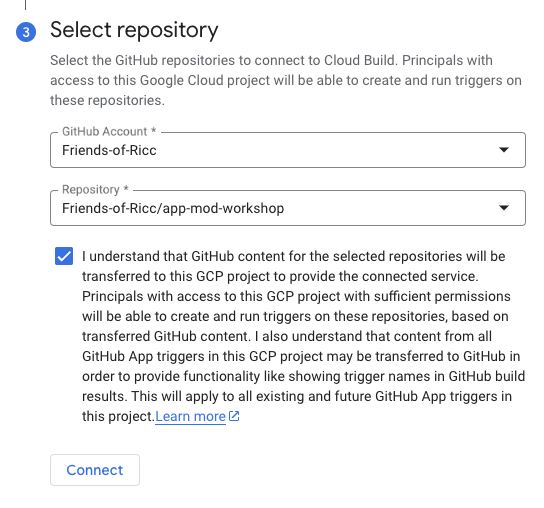
- Bingo! Your repo is now connected.
- Back to the Trigger part....
- Configuration: Autodetected (*)
- Advanced: Select the service account "[PROJECT_NUMBER]- compute@developer.gserviceaccount.com"
- xxxxx is your project ID
- The default compute service account is fair for a lab approach - don't use it in production! ( Learn more).
- leave everything else as is.
- Click on the "Create" button.
(*) This is the simplest way as it checks for Dockerfile or cloudbuild.yaml. However, the cloudbuild.yaml gives you real power to decide what do do at which step.
I've got the power!
Now, the trigger won't work unless you give the Cloud Build service account (what is a service account? The email of a "robot" who acts on your behalf for a task - in this case building stuff in the Cloud!).
Your SA will fail to build and deploy unless you empower him to do it. Luckily it's easy!
- go to "Cloud Build" > " Settings".
- "[PROJECT_NUMBER]- compute@developer.gserviceaccount.com" service account
- Tick these boxes:
- Cloud Run
- Secret Manager
- Service Accounts
- Cloud Build
- Also tick the "Set as preferred service account"
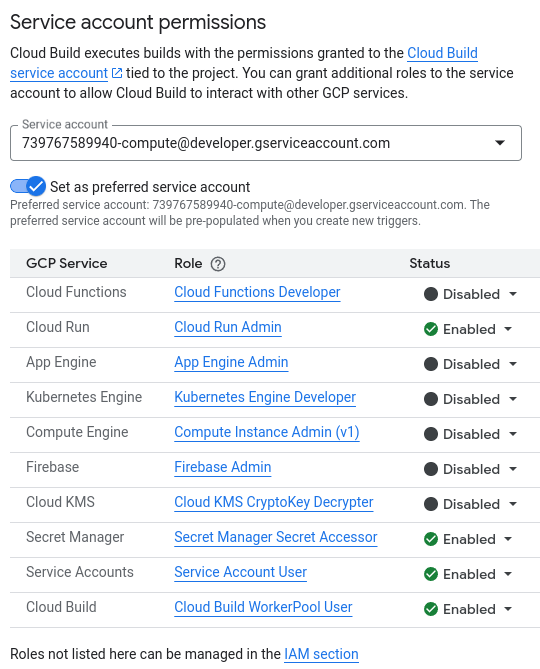
Where's the Cloud Build YAML?
We strongly encourage you to spend some time creating your own cloud Build YAML.
However, if you don't have time, or you don't want to make time, you can get some inspiration in this solution folder: .solutions
Now you can push a change to github and observe Cloud Build to its part.
Setting up Cloud Build can be tricky. Expect some back and forth by:
- Checking logs in https://console.cloud.google.com/cloud-build/builds;region=global
- Finding your error.
- Fixing in the code, and re-issuing git commit / git push.
- Sometimes the error is not in code, but in some configuration. In that case, you can issue a new build from UI (cloud build > "Triggers" > Run)

Note that if you use this solution, there is still some work to do. For instance, you need to set the ENV variables for the newly created dev/prod endpoints:
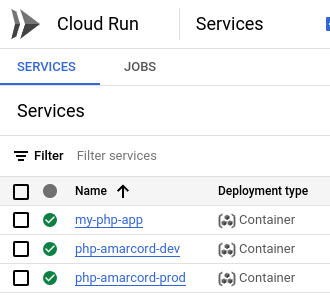
You can do this in two ways:
- Via UI - by setting ENV variables again
- Via CLI by crafting the "perfect" script for you. An example can be found here: gcloud-run-deploy.sh . You need to tweak a few things, for instance the endpoint and project number; You can find your project number in the Cloud Overview.
How do i commit code to github?
It's beyond the scope of this workshop to teach you the best way to git push to github. However, in case your are stuck and you're in Cloud Shell, there are two ways:
- CLI. Add an ssh key locally and add a remote with git@github.com:YOUR_USER/app-mod-workshop.git (instead of http)
- VSCode. If you use the Cloud Shell editor, ou can use the Source control (ctrl-shift-G) tab, click on "sync changes" and follow instructions. You should be able to authenticate your github account to vscode and the pull/push from there become a breeze.

Remember to git add clodubuild.yaml among other files, or it won't work.
Deep vs Shallow "dev/prod parity" [optional]
If you copied the model version from here, you're going to have two identical DEV and PROD versions. This is cool, and in line with the rule 10 of The Twelve-Factor App.
However, we are using two different Web endpoints to have an app pointing to the same Database. This is good enough for a workshop; however, in real life, you want to spend some time to create a proper prod environment. This means having two databases (one for dev and one for prod) and also choosing where to have them for disaster recovery / high availability. This goes beyond the scope of this workshop, but it's some food for thought.
If you have time to do a "deep" version of production, please keep in mind all the resources you need to duplicate, like:
- Cloud SQL Database (and probably SQL instance).
- GCS bucket
- Cloud Function.
- You might use Gemini 1.5 Flash as a model in dev (cheaper, faster), and Gemini 1.5 Pro (more powerful).
In general, every time you do something about the app, think critically: should production has this same value or not? And if not, duplicate your effort. This of course is a lot easier with Terraform, where you can inject your environment (-dev, -prod) as a suffix to your resources.
8. Module 6: Move to Google Cloud Storage
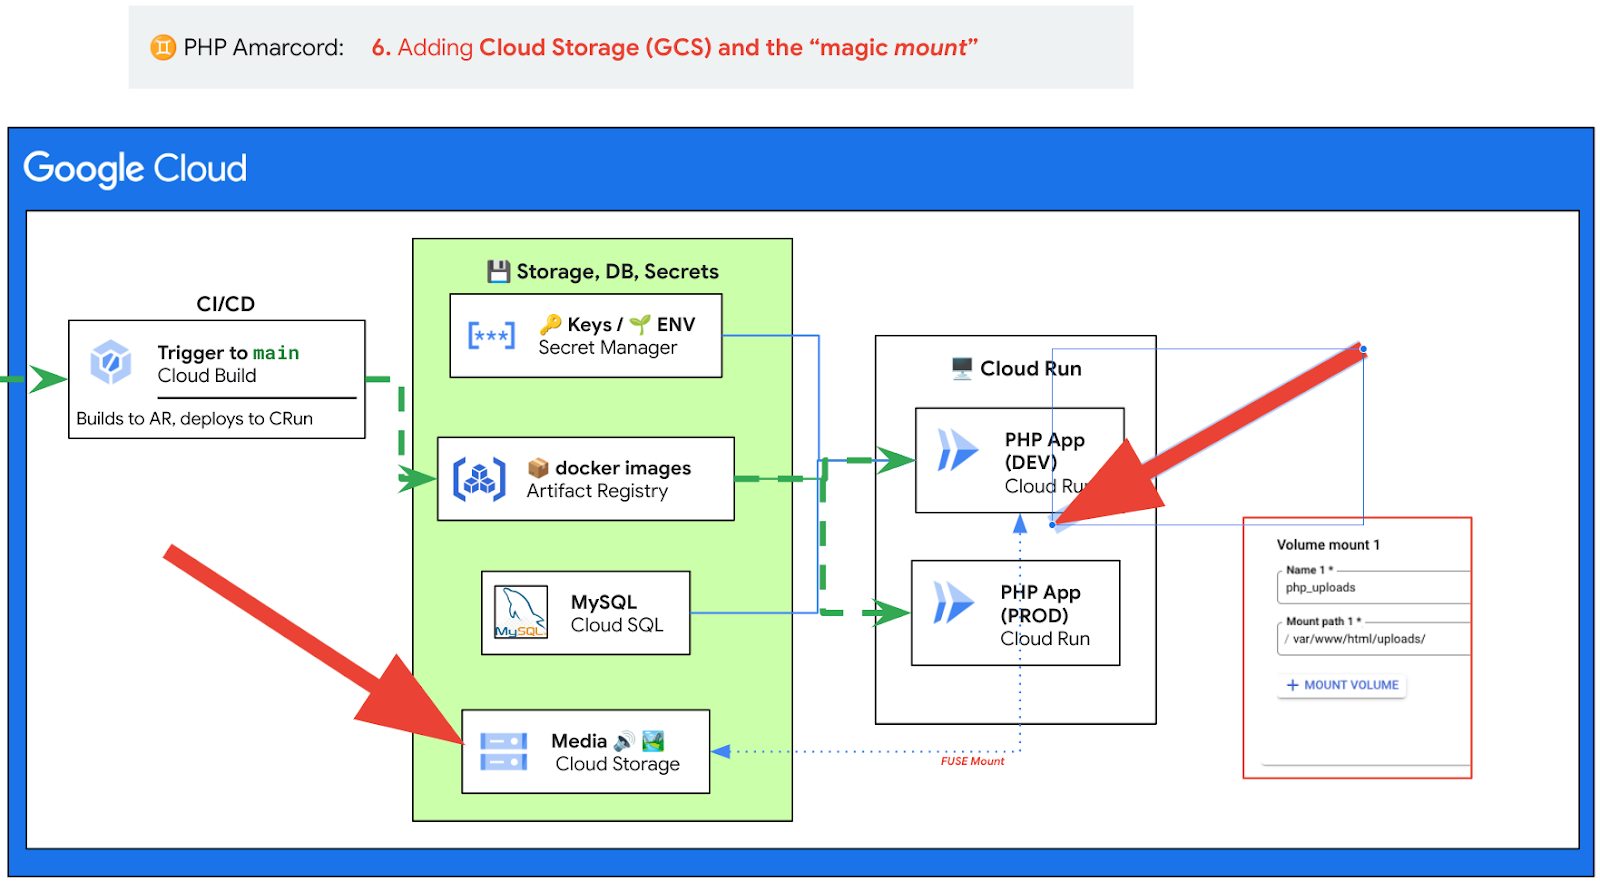
Storage
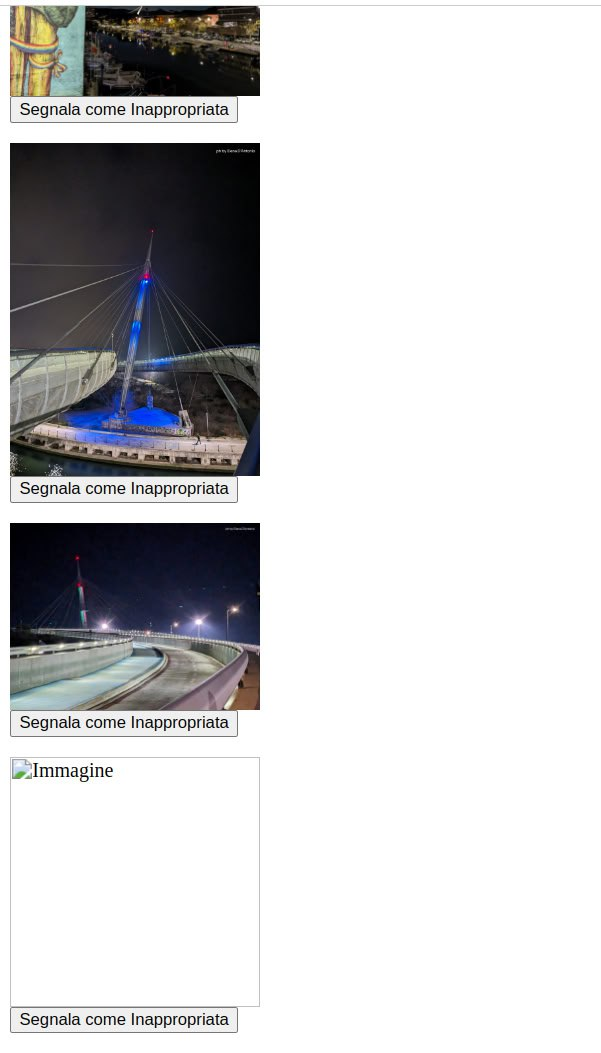
Currently the app stored the state in a docker container. If the machine breaks, the app explodes, or simply if you push a new revision, a new revision will be scheduled, with a new, empty storage: 🙈
How do we fix it? there are a number of approaches.
- Store images in the DB. That's what i've ended up doing with my previous PHP app. It's the simplest solution as it doesn't add complexity to it. But it adds latency and load to your DB for sure!
- Migrate your Cloud Run app to a storage-friendly solution: GCE + Persistent disk? Maybe GKE + Storage? Note: what you gain in control, you lose in agility.
- Move to GCS. Google Cloud Storage offers best in class Storage for the whole of Google Cloud and it's the most Cloud idiomatic solution. However, it requires us with getting dirty with PHP libraries. Do we have PHP 5.7 libraries for GCS? Does
PHP 5.7even supportComposer(seems like PHP 5.3.2 is the earliest version supported by Composer)? - Maybe use a docker sidecar?
- Or maybe use GCS Cloud Run Volume Mounts. This sounds amazing.
🤔 Migrate storage (open ended)
[Open Ended] In this exercise, we want you to find a solution to move your images in a way which is persisted in some way.
Acceptance test
I don't want to tell you the solution, but I want this to happen:
- You upload
newpic.jpg. You see it in the app. - You upgrade the app to a new version.
newpic.jpgis still there, visible.
💡 Possible solution (GCS Cloud Run Volume Mounts)
This is a very elegant solution which allows us to achieve stateful file uploads while not touching the code AT ALL (apart from showing an image description, but that's trivial and just for eye satisfaction).
This should allow you to mount a folder from Cloud Run to GCS, so:
- All uploads to GCS will actually be visible in your app.
- All uploads to your app will actually be uploaded to GCS
- Magic will happen tyo objects uploaded in GCS (chapter 7).
Note. Please read the FUSE fine print. This is NOT ok if performance is an issue.
Create a GCS bucket
GCS is the omni-present storage service of Google Cloud. It's battle-tested, and is used by every GCP service needing storage.
Note that Cloud Shell export PROJECT_ID as GOOGLE_CLOUD_PROJECT:
$ export PROJECT_ID=$GOOGLE_CLOUD_PROJECT
#!/bin/bash

set -euo pipefail

# Your Cloud Run Service Name, eg php-amarcord-dev
SERVICE_NAME='php-amarcord-dev'
BUCKET="${PROJECT_ID}-public-images"
GS_BUCKET="gs://${BUCKET}"

# Create bucket
gsutil mb -l "$GCP_REGION" -p "$PROJECT_ID" "$GS_BUCKET/"

# Copy original pictures there - better if you add an image of YOURS before.
gsutil cp ./uploads/*.png "$GS_BUCKET/"
Configure Cloud Run to mount the bucket in the /uploads/ folder
Now let's come to the elegant part. We create a volume php_uploads and instruct Cloud Run to do a FUSE mount on MOUNT_PATH (something like /var/www/html/uploads/):
#!/bin/bash

set -euo pipefail

# .. keep variables from previous script..

# Uploads folder within your docker container.
# Tweak it for your app code.
MOUNT_PATH='/var/www/html/uploads/'

# Inject a volume mount to your GCS bucket in the right folder.
gcloud --project "$PROJECT_ID" beta run services update "$SERVICE_NAME" \
    --region $GCP_REGION \
    --execution-environment gen2 \
    --add-volume=name=php_uploads,type=cloud-storage,bucket="$BUCKET"  \
    --add-volume-mount=volume=php_uploads,mount-path="$MOUNT_PATH"
Now, repeat this step for all the endpoints you want to point to Cloud Storage.
You can also achieve the same from UI
- Under "Volumes" tab, create a Volume Mounts pointing to your bucket, of type "Cloud Storage bucket", for example with name "php_uploads".
- Under Container(s) > Volume Mounts mount the volume you just created on the volume point requested by your app. It depends on the dockerfile, but it might look like
var/www/html/uploads/.
Either way, if it works, editing the new Cloud Run revision should show you something like this:
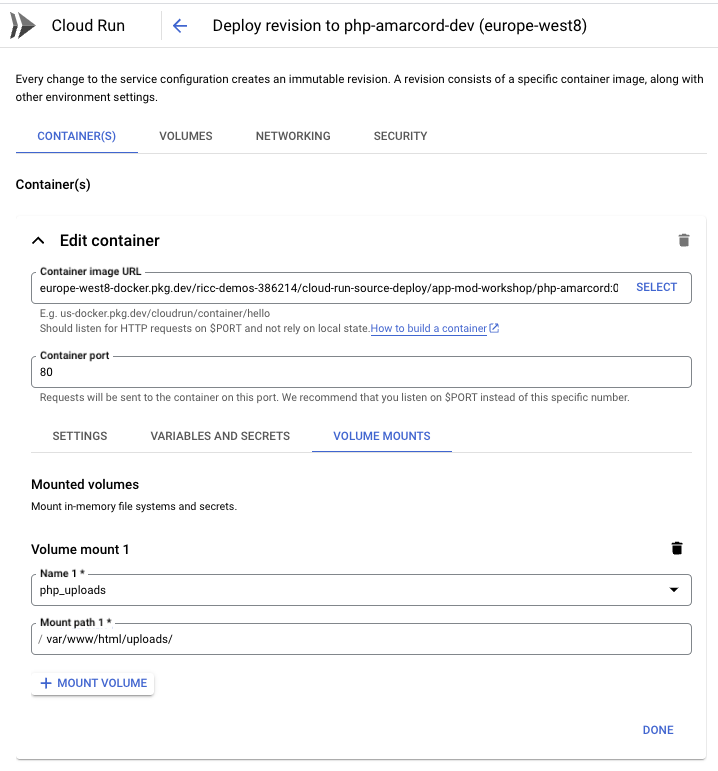
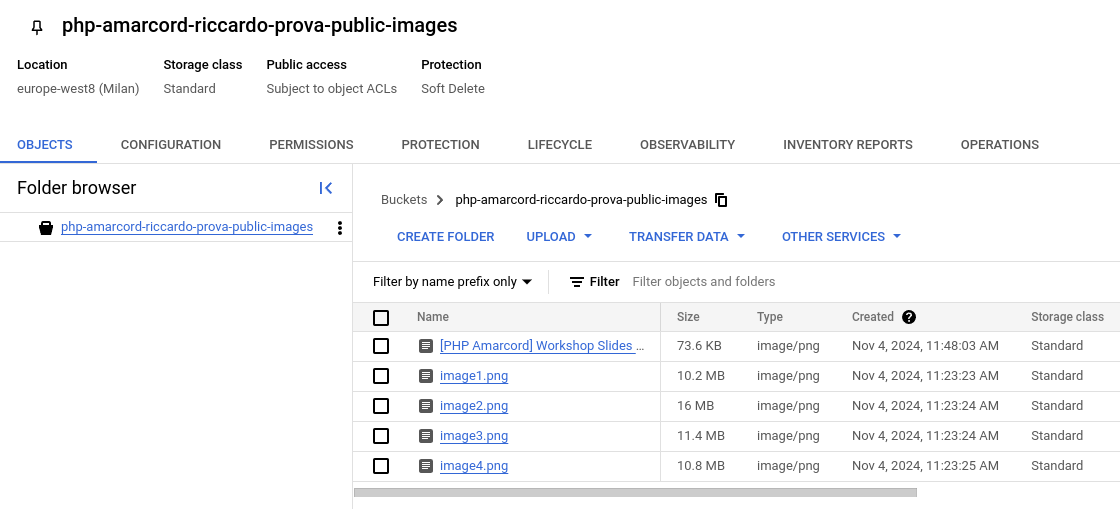
Now test the new application uploading one new image to the /upload.php endpoint.
The images should flow seamlessly on GCS without writing a single line of PHP:
What just happened?
Something very magical has happened.
An old application with old code is still doing its job. A new, modernized stack allows us to have all the images/pictures in our app comfortably sitting in a stateful Cloud Bucket. Now the sky is the limit:
- Want to send an email every time an image with "dangerous" or "nude" comes in? You can do that without touching the PHP code.
- Want to use a Gemini Multimodal model every time an image comes in to describe it, and upload the DB with its description? You can do that without touching the PHP code. You don't believe me? Keep reading on in chapter 7.
We've just unlocked a big space of opportunity here.
9. Module 7: Empower your App with Google Gemini
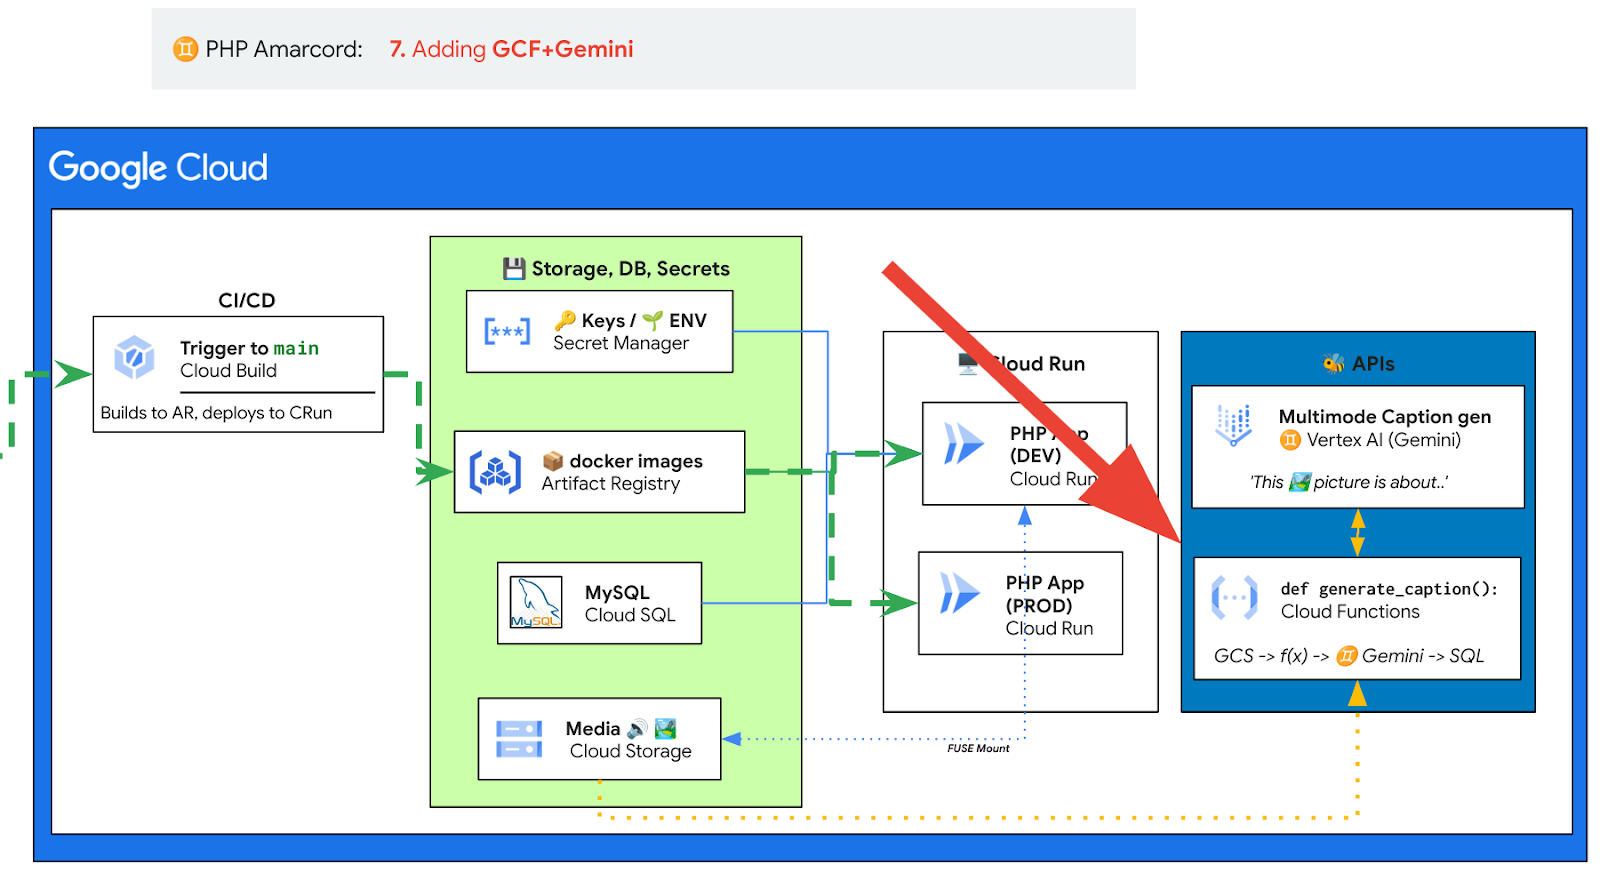
Now you have an awesome modernized, shiny new PHP app (like a 2024 Fiat 126) with Cloudified storage.
What can you do with it?
Prerequisites
In the previous chapter, a model solution allowed us to mount images /uploads/ on GCS, de facto separating the App logic from the image storage.
This exercise requires you to:
- Have successfully completed exercise in chapter 6 (storage).
- Have a GCS bucket with the image uploads, where people upload pictures on your app and pictures flow to your bucket.
Set up a Cloud function (in python)
Have you ever wondered how to implement an event-driven application? Something like:
- when <event> happens => send an email
- when <event> happens => if <condition> is true, then update the Database.
Event can be anything, from new record available in BigQuery, a new object changed in a folder in GCS, or a new message is waiting in a queue in Pub/Sub.
Google Cloud supports multiple paradigms to achieve this. Most notably:
- EventArc. See how to receive GCS events. Great to create DAGs and orchestrate actions based on if-then-else in the CLoud.
- Cloud Scheduler. Great for a midnight cron job in the Cloud, for instance.
- Cloud Workflows. Similarly to Event Arc, allows you to
- Cloud Run Functions (familiarly known as
lambdas). - Cloud Composer. Basically Google version of Apache Airflow, also great for DAGs.
In this exercise, we'll delve into Cloud Function to achieve a quite spectacular result. And we will provide optional exercises for you.
Note that sample code is provided under .solutions/
Set up a Cloud function (🐍 python)
We are trying to create a very ambitious GCF.
- When a new image is created on GCS.. (probably as someone has uploaded it on the app - but not only)
- .. call Gemini to describe it and get a textual description of the image .. (would be nice to check the MIME and ensure its an image and not a PDF, MP3, or Text)
- .. and update the DB with this description. (this might require patching the DB to add a
descriptioncolumn to theimagestable).
Patch the DB to add description to images
- Open Cloud SQL Studio:
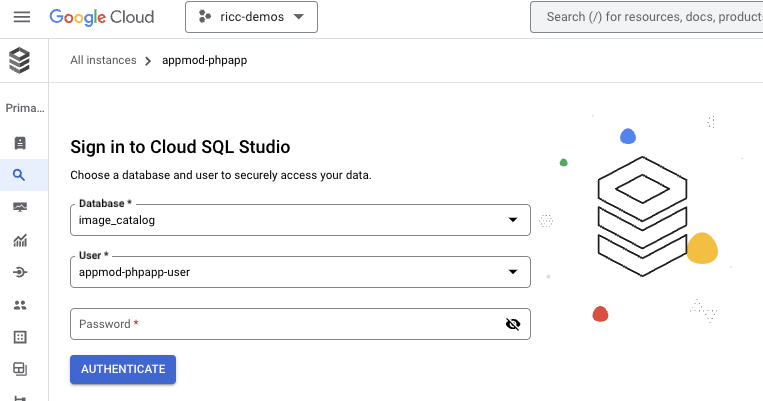
- Put your user and password for the Images DB
- Inject this SQL which adds a column for an image description:
ALTER TABLE images ADD COLUMN description TEXT;
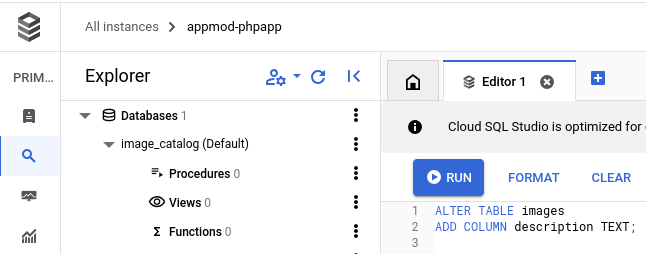
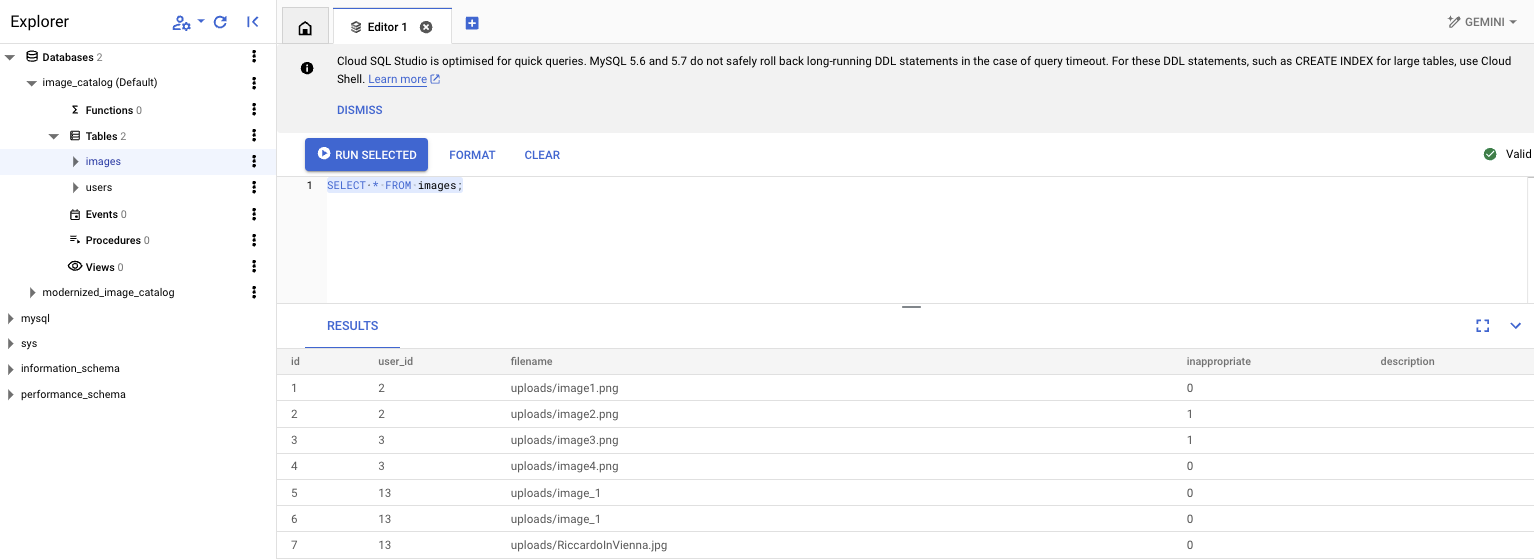
And bingo! Try now to check if it worked:
SELECT * FROM images;
You should see the new description column:
Write the Gemini f(x)
Note. This function was actually created with Gemini Code assist help.
Note. Creating this function you might incur into IAM permission errors. Some are documented below under "Possible errors" paragraph.
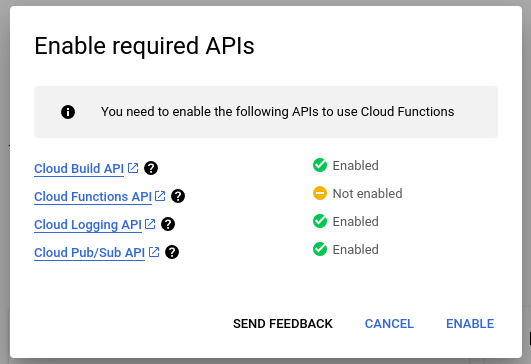
- Enable the APIs
- Go to https://console.cloud.google.com/functions/list
- Click "Create Function"
- Enable APIs from API wizard:
You can either create the GCF from UI or from command line. Here we will use the command line.
A possible code can be found under .solutions/
- Create a folder to host your code, eg "gcf/". Enter the folder.
- Create a
requirements.txtfile:
google-cloud-storage
google-cloud-aiplatform
pymysql
- Create a python function. Sample code here: gcf/main.py.
#!/usr/bin/env python

"""Complete this"""

from google.cloud import storage
from google.cloud import aiplatform
import vertexai
from vertexai.generative_models import GenerativeModel, Part
import os
import pymysql
import pymysql.cursors

# Replace with your project ID
PROJECT_ID = "your-project-id"
GEMINI_MODEL = "gemini-1.5-pro-002"
DEFAULT_PROMPT = "Generate a caption for this image: "

def gemini_describe_image_from_gcs(gcs_url, image_prompt=DEFAULT_PROMPT):
    pass

def update_db_with_description(image_filename, caption, db_user, db_pass, db_host, db_name):
    pass

def generate_caption(event, context):
    """
    Cloud Function triggered by a GCS event.
    Args:
        event (dict): The dictionary with data specific to this type of event.
        context (google.cloud.functions.Context): The context parameter contains
                                                event metadata such as event ID
                                                and timestamp.
    """
    pass
- Push the function. You can use a script similar to this: gcf/push-to-gcf.sh.
Note 1. Make sure to source the ENVs with the right values, or just add them on top (GS_BUCKET=blah, ..):
Note 2. This will push all the local code (.) so make sure to surround your code in a specific folder and to use .gcloudignore like a pro to avoid pushing huge libraries. ( example).
#!/bin/bash

set -euo pipefail

# add your logic here, for instance:
source .env || exit 2

echo "Pushing ☁️ f(x)☁ to 🪣 $GS_BUCKET, along with DB config.. (DB_PASS=$DB_PASS)"

gcloud --project "$PROJECT_ID" functions deploy php_amarcord_generate_caption \
    --runtime python310 \
    --region "$GCP_REGION" \
    --trigger-event google.cloud.storage.object.v1.finalized \
    --trigger-resource "$BUCKET" \
    --set-env-vars "DB_HOST=$DB_HOST,DB_NAME=$DB_NAME,DB_PASS=$DB_PASS,DB_USER=$DB_USER" \
    --source . \
    --entry-point generate_caption \
    --gen2
Note: in this example, generate_caption will be the invoked method, and Cloud Function will pass the GCS event to it with all the relevant info (bucket name, object name, ..). Take some time to debug that event python dict.
Testing the function
Unit Tests
The function has many moving parts. You might want to be able to test all the single ones.
An example is in gcf/test.py.
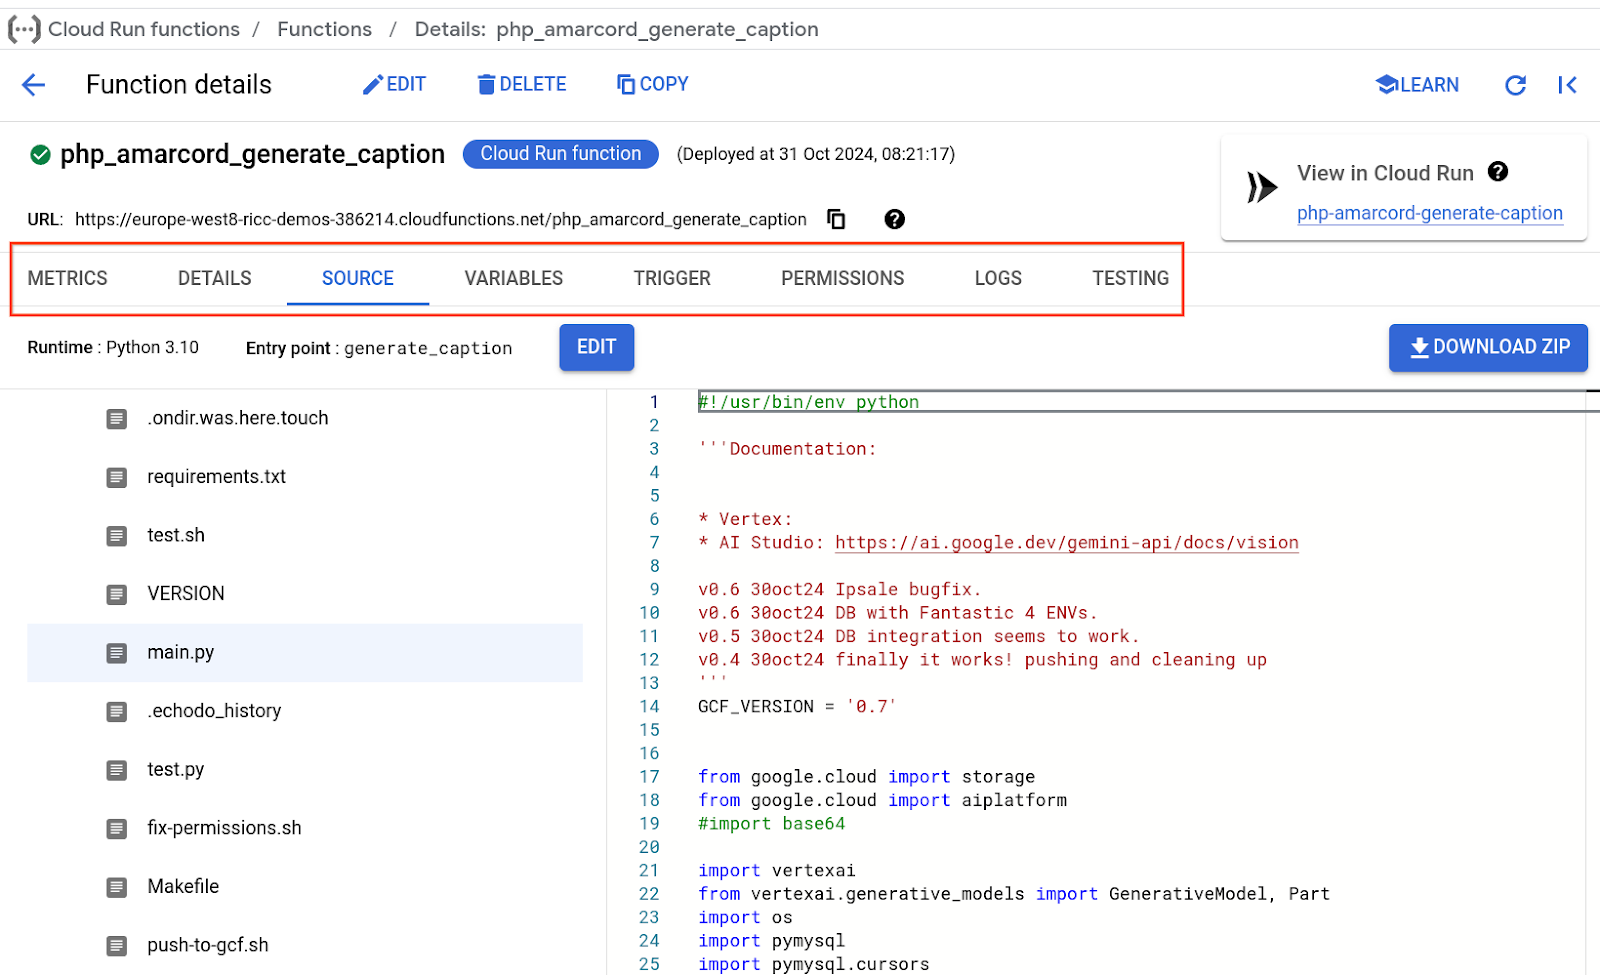
Cloud Functions UI
Also take some time to explore your function on the UI. Every tab is worth exploring, particularly the Source (my favourite), Variables, Trigger, and Logs; You'll spend a lot of time in the Logs to troubleshoots errors (also see possible errors on the bottom of this page). also make sure to check Permissions.
E2E Test
Time to manually test the function!
- Go to your app, and login
- Upload a picture (not too big, we've seen issues with big images)
- check on UI the picture is uploaded.
- Check on Cloud SQL Studio that the description has been updated. Login and run this query:
SELECT * FROM images.
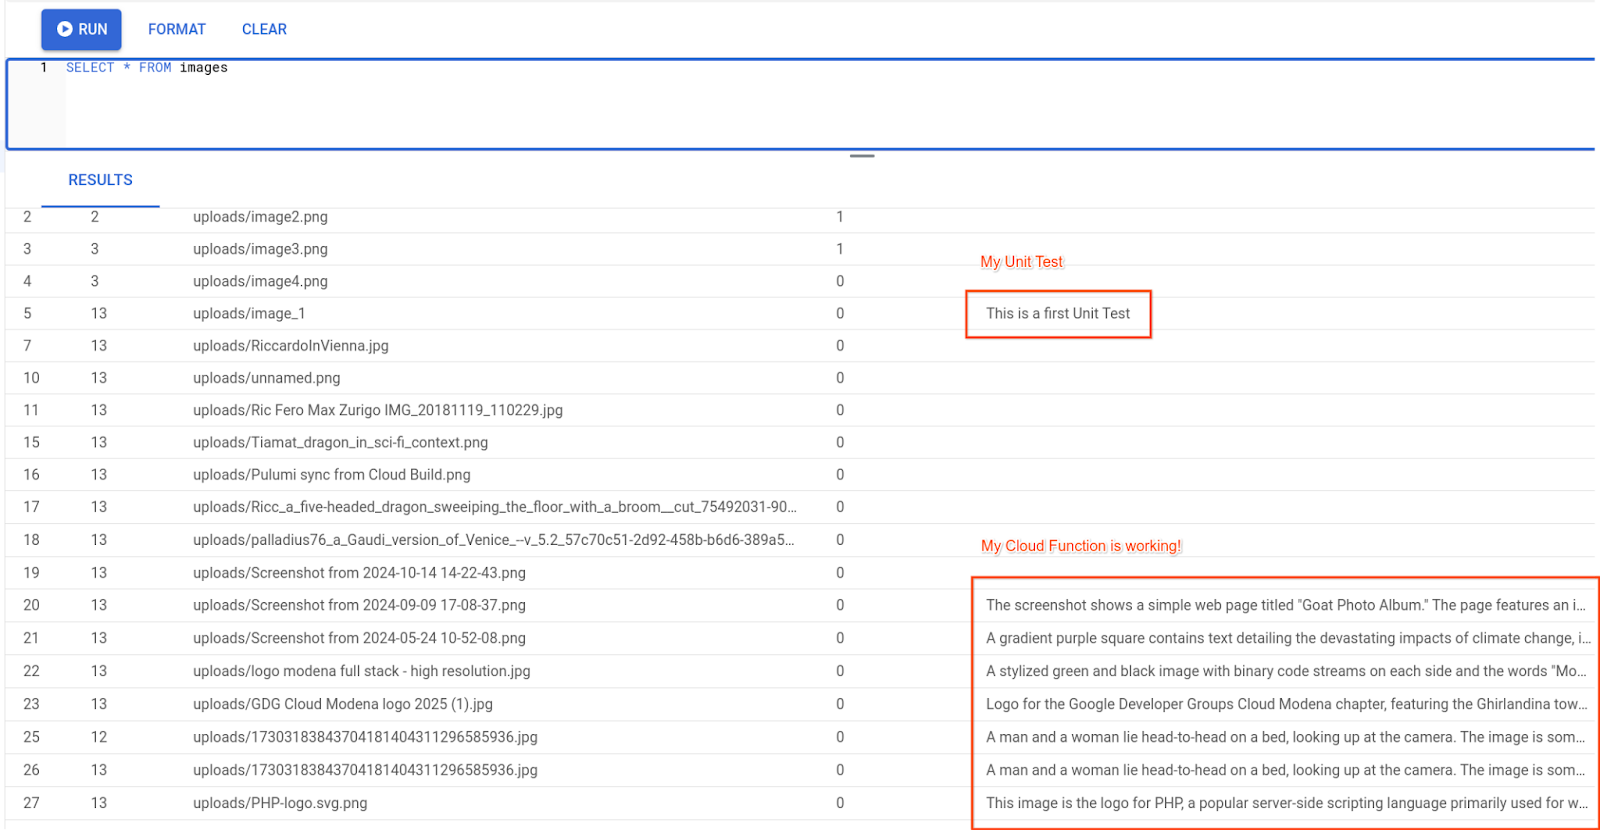
And it works! We might also want to update the frontend to show that description.
Update PHP to show [optional]
We have proven the app works. However, it would be nice that the users could also see that description.
We don't need to be PHP experts to add the description to the index.php. This code should do (yes, Gemini wrote it for me too!):
<?php if (!empty($image['description'])): ?>
    <p class="font-bold">Gemini Caption:</p>
    <p class="italic"><?php echo $image['description']; ?></p>
<?php endif; ?>
Position this code inside the foreach at your own taste.
In the next steps we also see a prettier UI version, thanks to Gemini Code Assist. A pretty version might look like this:
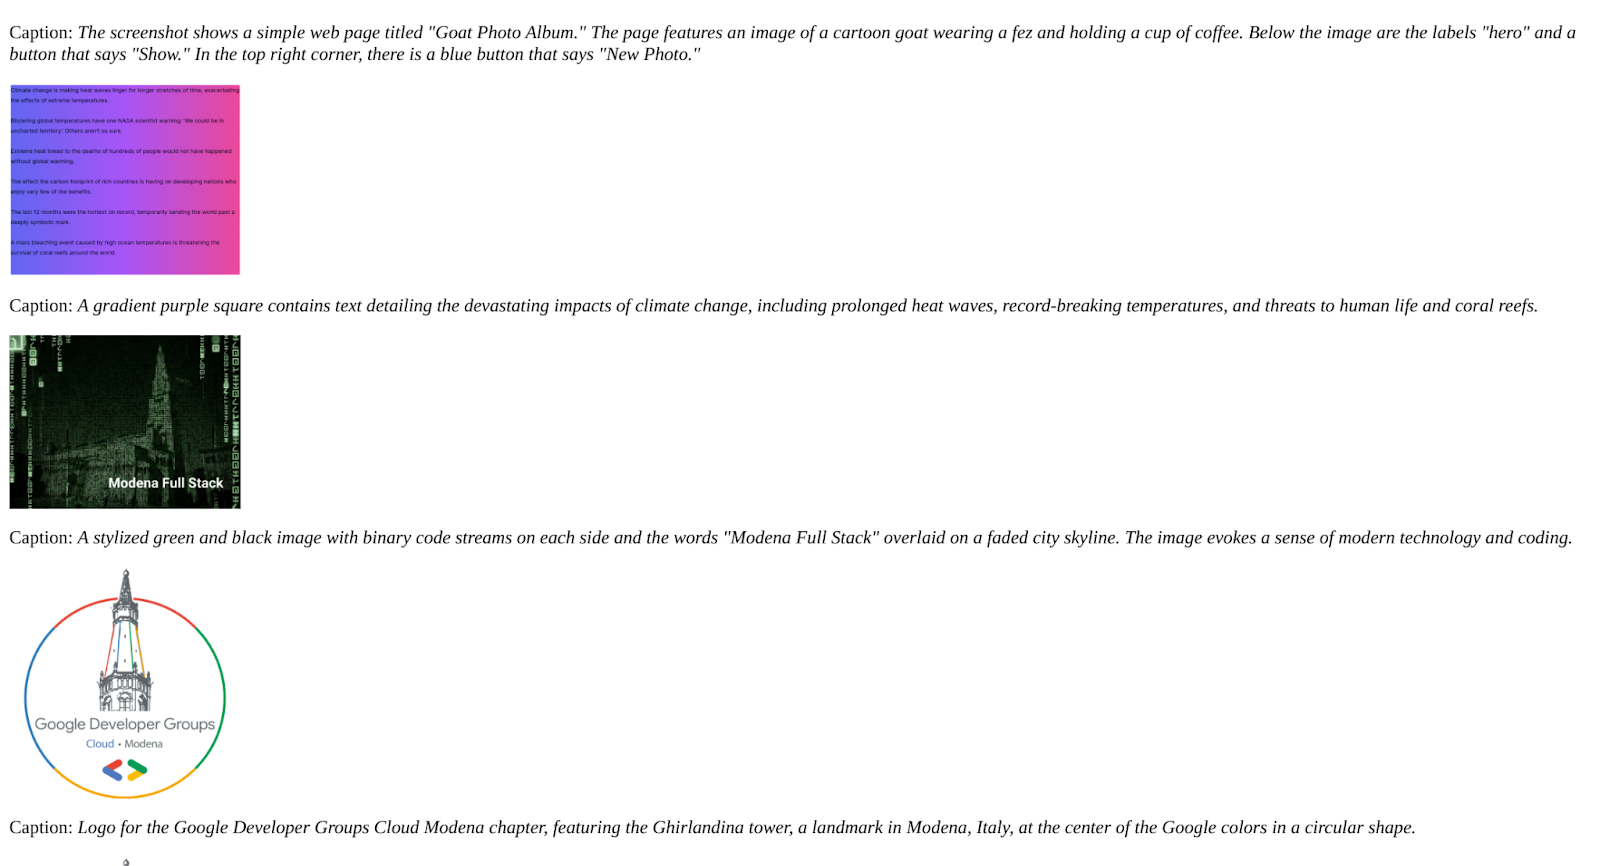
Conclusions
You got a Cloud Function triggered on new objects landing on GCS which is able to annotate the content of the image like a human could do, and automatically update the DB. Wow!
What's next? You could follow the same reasoning to achieve two great functionalities.
[optional] Add further Cloud Functions [open ended]
A couple of additional features come to mind.
📩 Email Trigger
An email trigger which sends you an email every time someone sends a picture.
- Too often? Add a further constraint: A BIG picture, or a picture whose Gemini content contains the words "nude/nudity/violent".
- Consider checking
EventArcfor this.
🚫 Auto-moderate inappropriate pics
Currently a human admin is flagging images for "inappropriate". How about having Gemini doing the heavy lifting and moderating the space? Add a test to flag inappropriate trigger content and update the DB as we learnt in the previous function. This means basically taking the previous function, changing the prompt, and updating the DB based on the answer.
Caveat. Generative AI has unpredictable outputs. Make sure the "creative output" from Gemini is put "on rails". You might ask a deterministic answer like a confidence score from 0 to 1, a JSON, .. You can achieve this in many ways, for example: * Using python libraries pydantic, langchain, .. * Use Gemini Structured Output.
Tip. You could have MULTIPLE functions or have a single prompt which enforces a JSON answer (works greta with "Gemini Structured Output"as highlighted above) like:
What would the prompt be to generate this?
{
    "description": "This is the picture of an arrosticino",
    "suitable": TRUE
}
You could add in the prompt additional fields to get insights like: is there something good about it? Bad about it? Do you recognize the place? Is there some text (OCR has never been easier):
goods: "It looks like yummie food"bads: "It looks like unhealthy food"OCR: "Da consumare preferibilmente prima del 10 Novembre 2024"location: "Pescara, Lungomare"
While it's usually better to have N function for N outcomes, it's incredibly rewarding to do one which does 10 things. Check this article by Riccardo to see how.
Possible errors (mostly IAM / permissions)
The first I've developed this solution I came onto some IAM permission issues. I will add them here for empathy and to give some ideas on how to fix them.
Error: not enough permissions for Service Account
- Note that for deploying a GCF function which listens to a GCS bucket you need to set up proper permissions to the Service Account you are using for the job, as in figure:
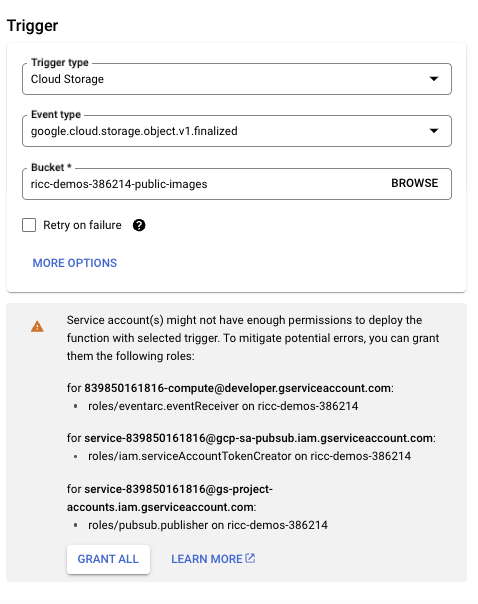
You might also have to enable EventArc APIs - what a few minutes before they become fully available.
Error: Missing Cloud Run invoker
- Another comment from UI for GCF permissioning is this ( Cloud run Invoker role):

This error can be fixed running the command in the image, which is similar to fix-permissions.sh
This issue is described here: https://cloud.google.com/functions/docs/securing/authenticating
Error: Memory limit exceeded
The first time I ran it, my logs could said: "‘Memory limit of 244 MiB exceeded with 270 MiB used. Consider increasing the memory limit, see https://cloud.google.com/functions/docs/configuring/memory'". Again, add RAM to your GCF. This is super easy to do in the UI. Here's a possible bump:

Alternatively, you can also fix your Cloud run deployment script to bump MEM/CPU. This takes a bit longer.
Error: PubSub Published
Creatuing a trigger with GCF v1 gave once this error:
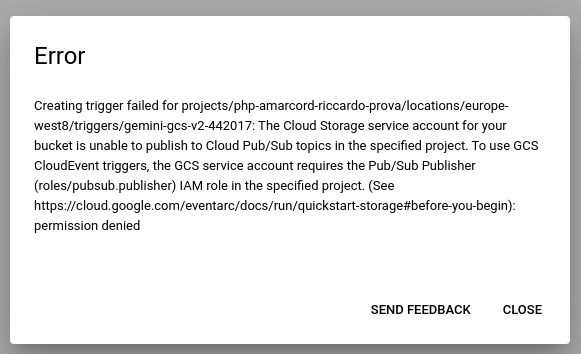
Again, this is easy to fix by going to IAM and giving your Service Account the "Pub/Sub Publisher" role.
Error: Vertex AI has not been used
If you receive this error:
Permission Denied: 403 Vertex AI API has not been used in project YOUR_PROJECT before or it is disabled. Enable it by visiting https://console.developers.google.com/apis/api/aiplatform.googleapis.com/overview?project=YOR_PROJECT
You just need to enable Vertex AI APis. The easiest way to enable ALL needed APIs is this:
- https://console.cloud.google.com/vertex-ai
- Click the "enable all recommended APIS".
Error: EventArc Trigger not found.
If you get this, please redeploy the function.

Error: 400 Service agents are being provisioned
400 Service agents are being provisioned ( https://cloud.google.com/vertex-ai/docs/general/access-control#service-agents ). Service agents are needed to read the Cloud Storage file provided. So please try again in a few minutes.
If this happens, wait some time or ask a Googler.
10. Module 8: Create Availability SLOs
In the Chapter we try to achieve this:
- Creating SLIs
- Creating SLOs based on the SLIs
- Creating Alerts based on SLOs
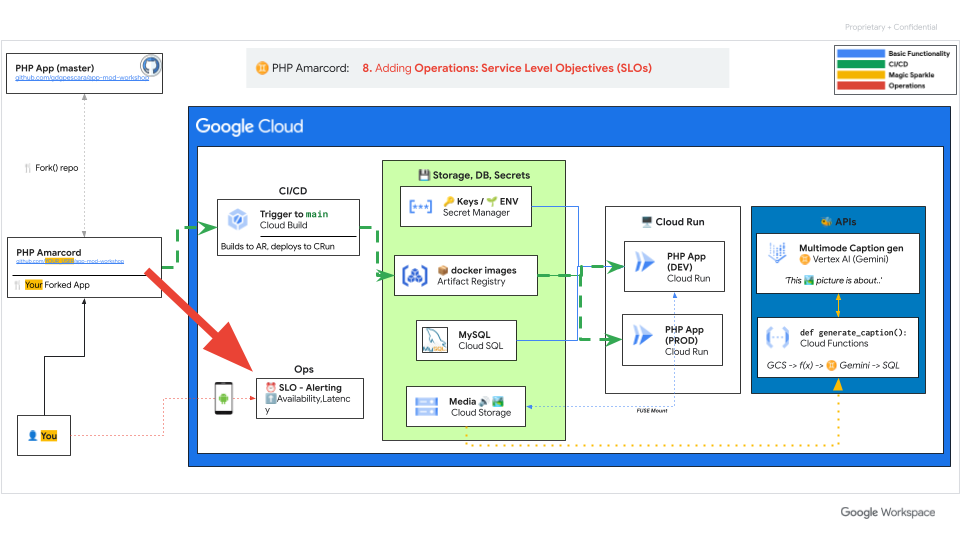
This is a very dear topic to the author, since Riccardo works in the SRE / DevOps area of Google Cloud.
(open-ended) Create SLIs and SLOs for this app
How good is an app if you can't tell when it's down?
What is an SLO?
Oh my! Google invented SLOs! To read more about it I can suggest:
- SRE Book - chapter 2 - Implementing SLOs. ( 👉 more SREbooks)
- Art of SLOs ( awesome video). It's a fantastic training to learn more about how to craft a perfect SLO for your service.
- SRE course on Coursera. I contributed to it!
Step 1: Create Availability SLI/SLO
Let's start with Availability SLO, as it's the easiest and possibly the most important thing you want to measure.
Luckily Cloud run comes with pre built SLO support, thanks to Istio.
Once your app is on Cloud run, this is super simple to achieve, it takes me 30 seconds.
- Go to your Cloud Run page.
- Click/select your app.
- Select the
SLOstab. - Click "+ Create SLO".
- Availability, Request-based
- Continue
- Calendar Month / 99%.
- click "Create SLO".
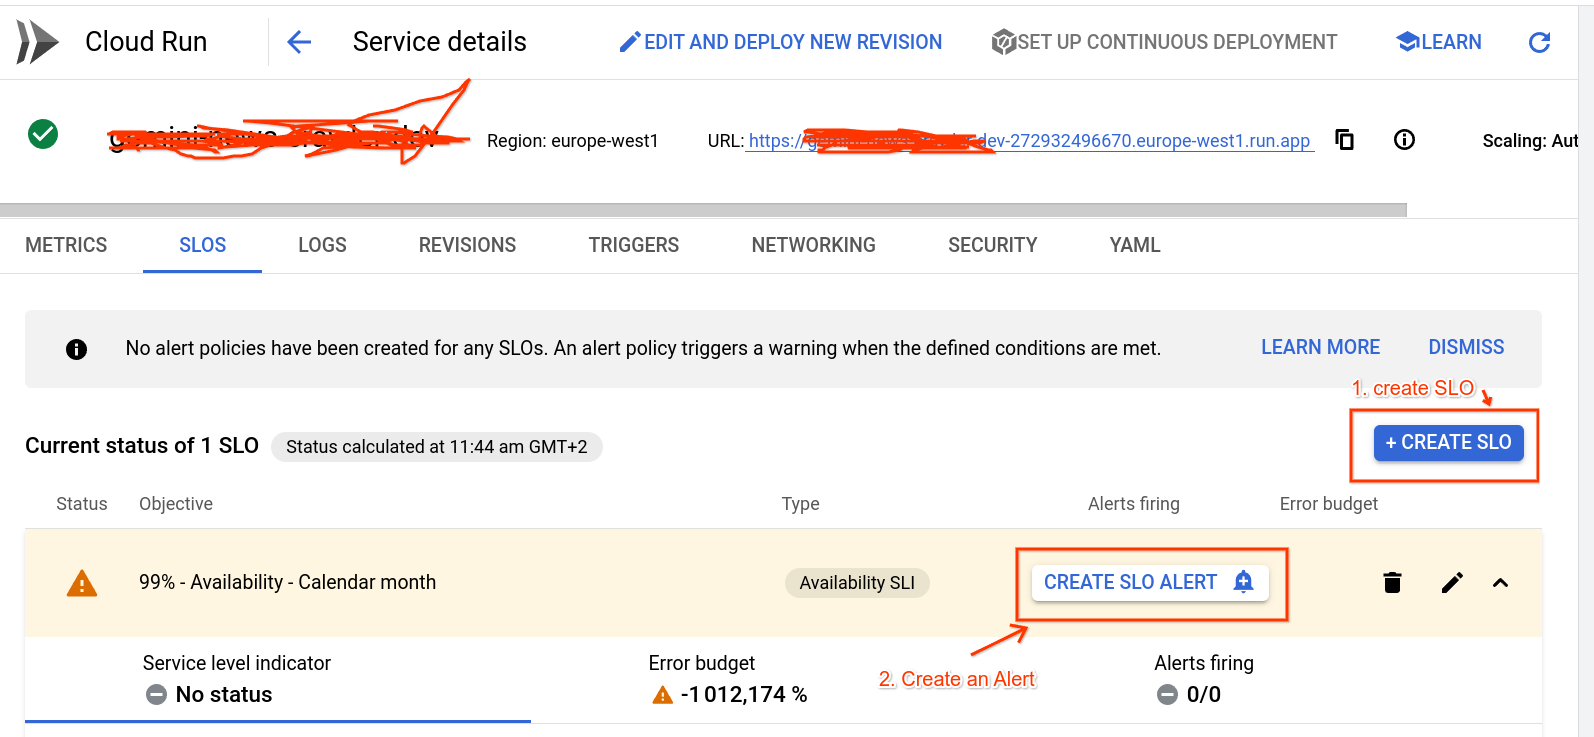
Step 2: set up Alerting on this SLO
I suggest to create 2 alerts:
- One with a low burnrate ("Slowburn") to alert you via email (simulates low pri ticket).
- One with a high burnrate ("Fastburn") to alert you via SMS (simulates high pri ticket / pager)
Go to your SLO tab from before.
Do this twice:

- Click "Create SLO Alert" (the 🔔 button with a plus inside, to the right)
- Lookback duration, Burn Rate threshold:
- [FAST]. First:
60min /10x - [SLOW]. Second:
720min /2x - Notification channel: click on Manage notification channels
- First, "Email" -> Add new -> ..
- Second, "SMS" -> Add new -> Verify on the phone.
- Tip: I like to use emoji in the names! It's fun for demos.
- when done, click the big X on top right.
- Select phone first (fast), email next (slow).
- Add some sample documentation like:
[PHP Amarcord] Riccardo told me to type sudo reboot or to check documentation in http://example.com/playbooks/1.php but I guess he was joking.
Bingo!
Final result
We can consider this exercise finished once you have 1 working SLO + 2x alerts for your availability, and it's alerting to your email and to your phone.
If you want you can add a Latency (and I strongly encourage you to do so) or even a more complex one. For latency, choose a latency you deem reasonable; when in doubt, choose 200ms.
11. Next steps
You've completed EVERYTHING, what's missing?
Some food for thought:
Play with Gemini
You can use Gemini in two flavours:
- Vertex AI. The "Enterprise way", intertwined with your GCP, which we've explored in chapter 7 (GCF+Gemini). All authentication magically works, and services beautifully interconnect.
- Google AI. The "Consumer way". You get a Gemini API Key from here and start building little scripts which can be tied onto any workload you already have (proprietary work, other clouds, localhost, ..). You just substitute your API key and the code starts magically to work.
We encourage you to try exploring the (2) with your own pet projects.
UI Lifting
I'm no good at UIs. But Gemini is! You can just take a single PHP page, and say something like this:
I have a VERY old PHP application. I want to touch it as little as possible. Can you help me:

1. add some nice CSS to it, a single static include for tailwind or similar, whatever you prefer
2. Transform the image print with description into cards, which fit 4 per line in the canvas?

Here's the code:

-----------------------------------
[Paste your PHP page, for instance index.php - mind the token limit!]
You can easily get this in less than 5 minutes, one Cloud Build away! :)
The response from Gemini was perfect (meaning, I didn't have to change a thing):
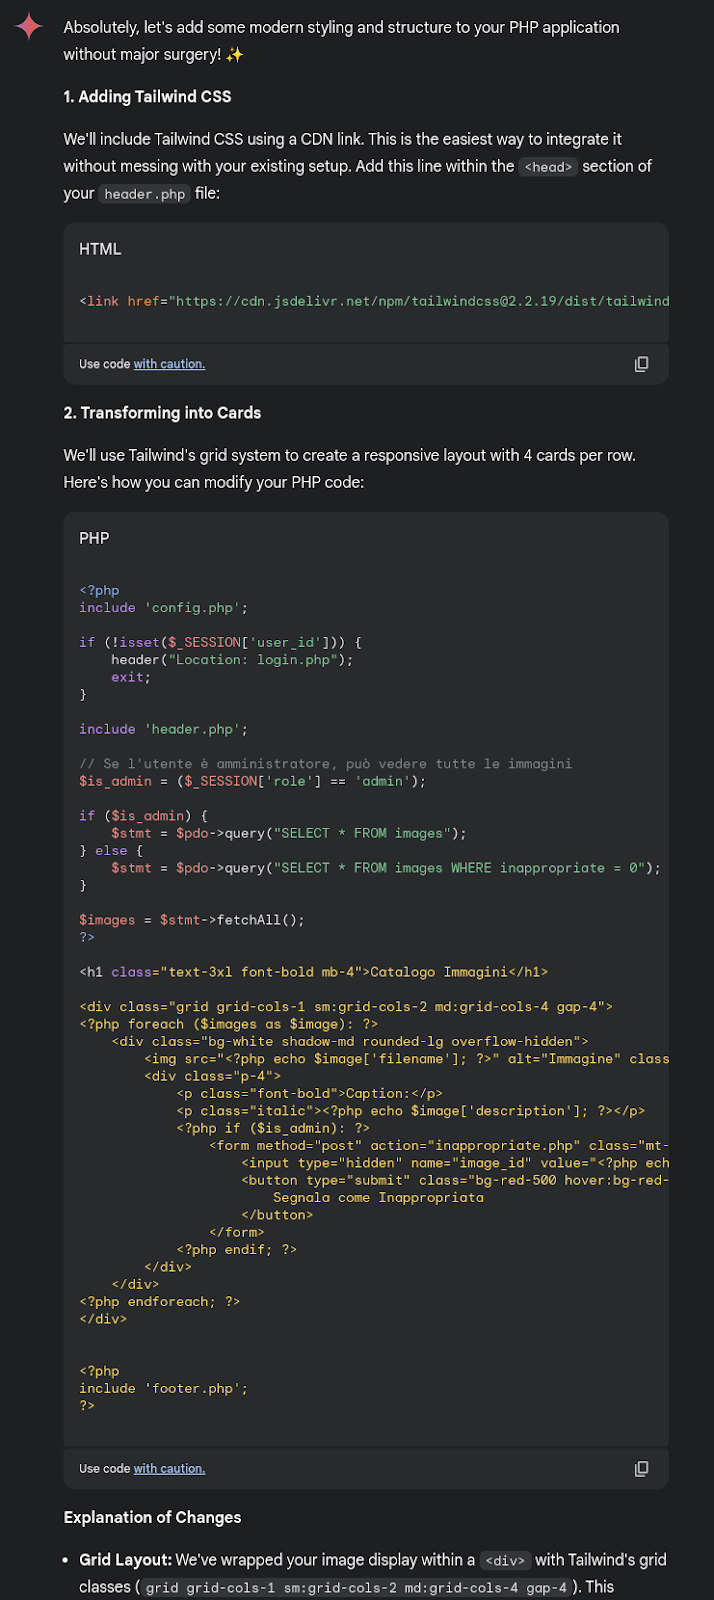
And here's the new layout in the author's personal app:
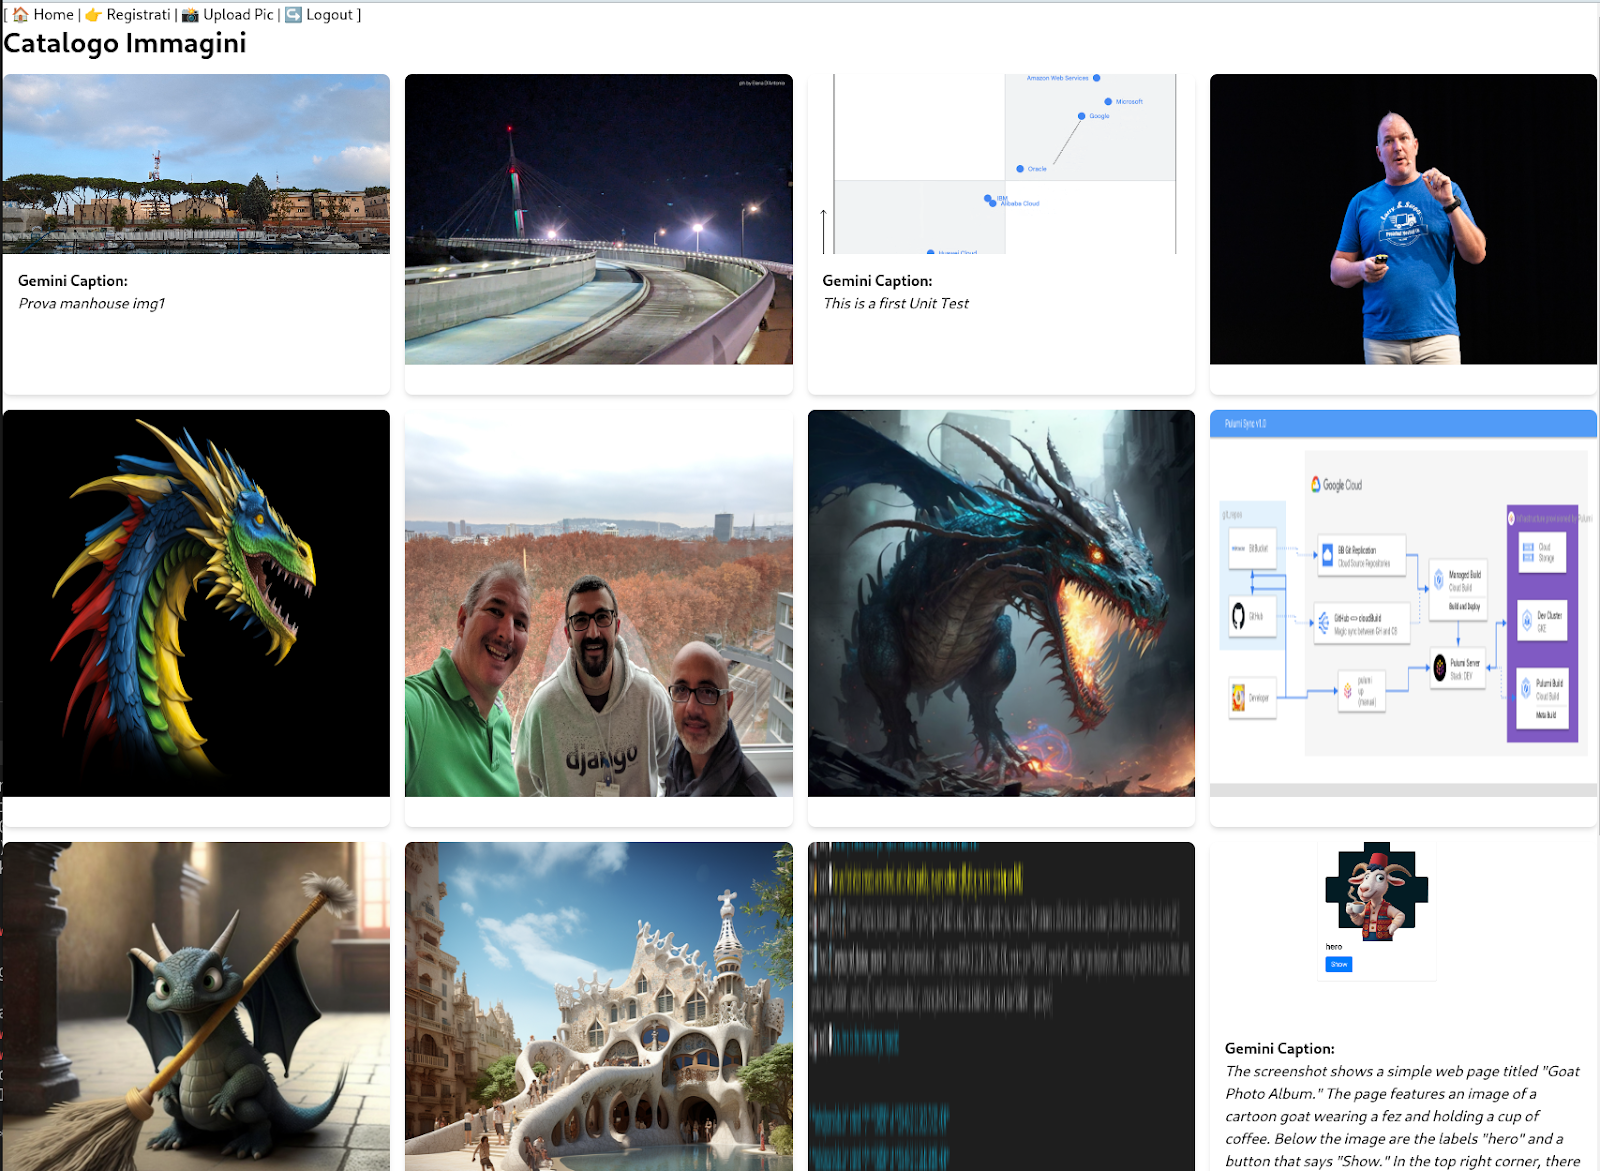
Note: the code is pasted as image as we don't want to encourage you to take the code, but to get Gemini to write the code for you, with your own creative UI/frontend constraints; trust me, you're left with very minor changes afterwards.
Security
Properly securing this app is a non-goal for this 4-hour workshop, as it would increase the time to complete this workshop by 1-2 orders of magnitude.
However, this topic is super-important! We've collected some ideas in SECURITY.
12. Congratulations!
Congratulations 🎉🎉🎉 , you've successfully modernized your legacy PHP application with Google Cloud.

In summary in this codelab you have learned:
- How to deploy a database in Google Cloud SQL and how to migrate your existing database into it.
- How to containerize your PHP application with Docker and Buildpacks and store its image to Google Cloud Artifact Registry
- How to deploy your containerized App to Cloud Run and make it run with Cloud SQL
- How to secretly store/use sensitive configuration parameters (such as DB password) using Google Secret Manager
- How to set up your CI/CD pipeline with Google Cloud Build to automatically build and deploy your PHP App at any code push to your GitHub repo.
- How to use Cloud Storage to "cloudify" your app resources
- How to leverage serverless technologies to build amazing workflows on top of Google Cloud without touching your app code.
- Use Gemini multimodal capabilities for a fitting use case.
- Implement SRE principles within Google Cloud
This is a great start for your journey into Application modernization with Google Cloud!
🔁 Feedback
If you want to tell us about your experience with this workshop, consider filing this feedback form.
We welcome your feedback as well as PRs for pieces of code you're particularly proud of.
🙏 Thanks
The author would like to thank Mirko Gilioli and Maurizio Ipsale from Datatonic for help on the writeup and testing the solution.

