
程式碼研究室簡介
1. 引言
歡迎來到 Apps Script 基礎知識的第 4 單元,其中有 Google 試算表的程式碼研究室播放清單。
完成這個程式碼研究室後,您可以瞭解如何使用 Apps Script 設定試算表資料的格式,並撰寫函式來建立包含從公開 API 擷取的格式化資料的組織試算表。
課程內容
- 如何在 Apps Script 中套用各種 Google 試算表格式設定作業。
- 如何使用 Apps Script 將 JSON 物件及其屬性轉換為已整理的資料工作表。
事前準備
這是「Google Apps 試算表基礎入門」播放清單中的第四項程式碼研究室。開始進行這個程式碼研究室之前,請務必完成先前的程式碼研究室:
軟硬體需求
- 上一次在這個播放清單研究室中探討的 Apps Script 基本主題。
- 熟悉 Apps Script 編輯器的基本功能
- Google 試算表的基本概念
- 可讀取試算表 A1 標記法
- 熟悉 JavaScript 及其
String類別
2. 設定
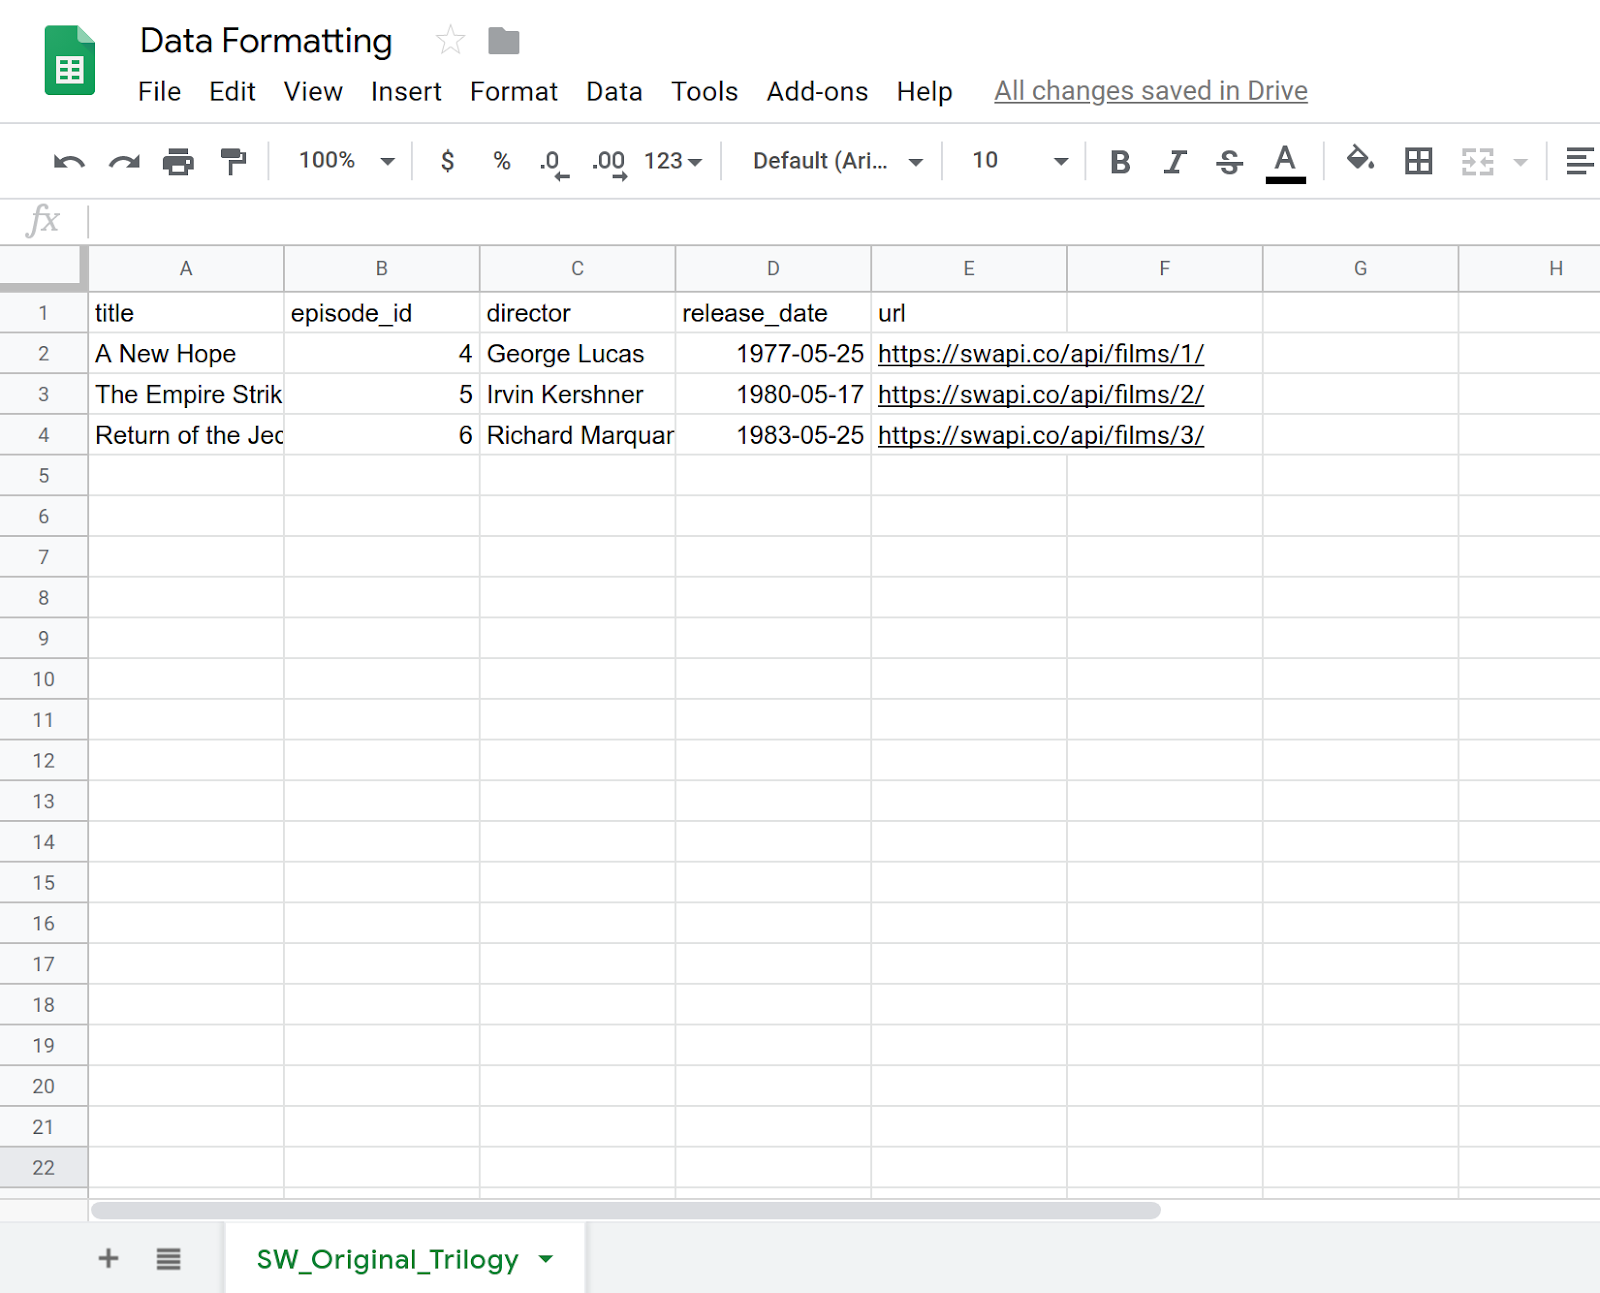
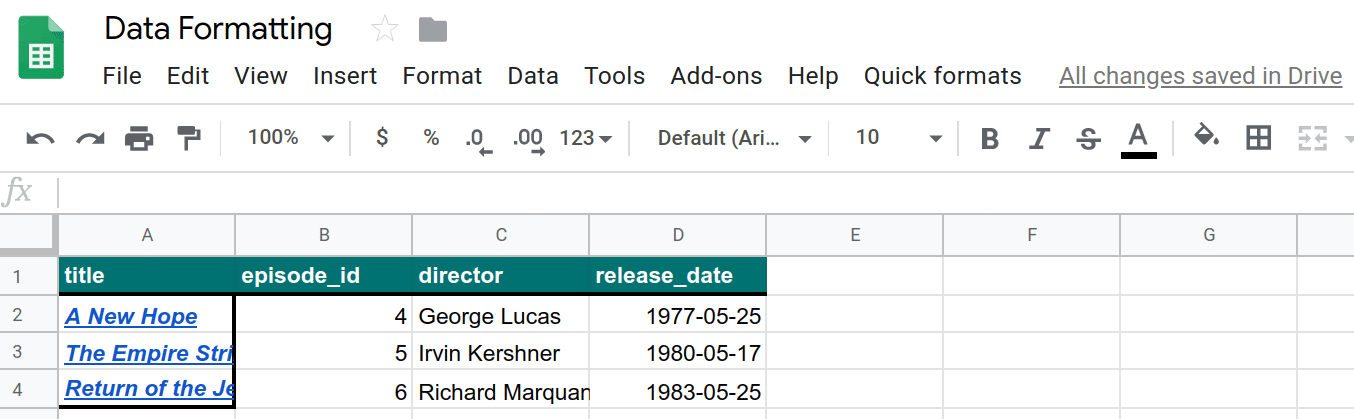
如要繼續操作,請先建立一份內含部分資料的試算表。和以往一樣,我們已提供一份工作表供您複製。步驟如下:
- 按一下這個連結即可複製資料工作表,然後按一下 [建立副本]。系統會將新試算表放置在您的 Google 雲端硬碟資料夾中,並命名為「資料格式複本」。
- 按一下試算表標題,然後將標題從「資料格式複製」變更為「資料格式」。你的工作表看起來應該會像這樣,其中包含前三部星際大戰電影的基本資訊:
- 選取 [Extensions] (擴充功能) > [Apps Script],即可開啟指令碼編輯器。
- 按一下 Apps Script 專案標題,然後將標題從「無標題專案」變更為「資料格式」。按一下 [重新命名] 即可儲存標題變更。
有了這份試算表和專案,您就可以開始使用程式碼研究室。請參閱下一節,瞭解如何開始使用 Apps Script 的基本格式。
3. 建立自訂選單
您可以為試算表套用 Apps Apps Script 的多種基本格式設定方法。下列練習示範如何設定資料格式。為了方便您管理格式動作,請建立自訂選單,其中包含您需要的項目。自訂資料程式碼研究室說明瞭建立自訂選單的程序,但我們會在這裡再次簡要說明。
導入作業
讓我們建立自訂選單。
- 在 Apps Script 編輯器中,將指令碼專案內的程式碼替換為以下內容:
/**
 * A special function that runs when the spreadsheet is opened
 * or reloaded, used to add a custom menu to the spreadsheet.
 */
function onOpen() {
  // Get the spreadsheet's user-interface object.
  var ui = SpreadsheetApp.getUi();

  // Create and add a named menu and its items to the menu bar.
  ui.createMenu('Quick formats')
   .addItem('Format row header', 'formatRowHeader')
   .addItem('Format column header', 'formatColumnHeader')
   .addItem('Format dataset', 'formatDataset')
  .addToUi();
}
- 儲存指令碼專案。
- 在指令碼編輯器中,從函式清單中選取
onOpen,然後按一下 [執行]。這會執行onOpen()以重建試算表選單,因此您不必重新載入試算表。
程式碼審查
不妨閱讀這段程式碼,瞭解程式碼的運作方式。在 onOpen() 中,第一行使用 getUi() 方法取得 Ui 物件,表示這個指令碼所連結的有效試算表的使用者介面。
下一行會建立選單 (Quick formats)、將選單項目 (Format row header、Format column header 和 Format dataset) 新增至選單,然後再將這個選單新增至試算表的介面。分別使用 createMenu(caption)、addItem(caption, functionName) 和 addToUi() 方法來完成上述操作。
addItem(caption, functionName) 方法會在選單項目標籤和 Apps Script 函式之間建立連結,以便在選取選單項目時執行。舉例來說,選取 [Format row header] 選單項目會導致試算表嘗試執行 formatRowHeader() 函式 (目前不存在)。
結果
在試算表中按一下「Quick formats」選單,即可查看新的選單項目:
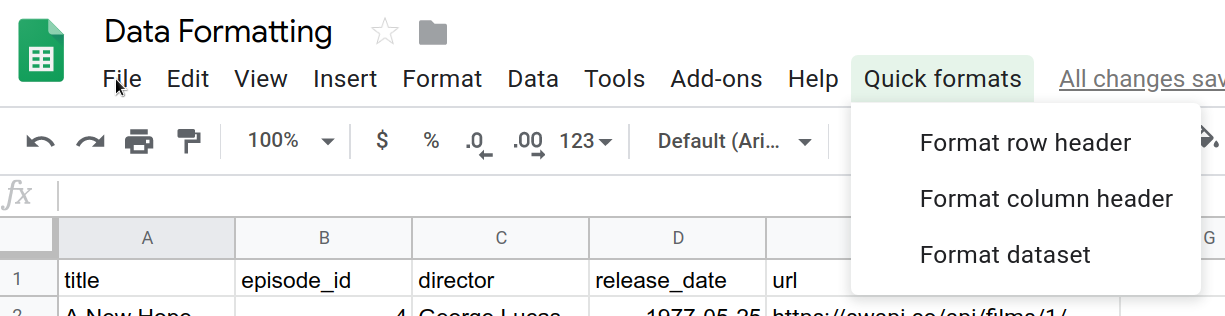
由於按下這些項目後,您沒有執行對應的功能,因此發生錯誤,因此接下來要做的操作。
4. 設定標題列格式
試算表中的資料集通常會有標題列,用於識別每一欄的資料。設定標題列的格式可將圖表列與試算表中的其他資料區隔開來。
在第一個程式碼研究室中,您已為標頭建立一個巨集並調整其程式碼。在這裡,您將使用 Apps Script 從頭開始設定標題列的格式。您所建立的標題列會將粗體文字設為粗體,將背景設為深藍色,並為文字加上白色顏色,並加上一些純框線。
導入作業
如要執行格式設定作業,您必須使用先前用過的試算表服務方法,但是現在您還需要使用部分服務的格式設定方法。步驟如下:
- 在 Apps Script 編輯器中,將以下函式新增至指令碼專案結尾:
/**
 * Formats top row of sheet using our header row style.
 */
function formatRowHeader() {
  // Get the current active sheet and the top row's range.
  var sheet = SpreadsheetApp.getActiveSheet();
  var headerRange = sheet.getRange(1, 1, 1, sheet.getLastColumn());

  // Apply each format to the top row: bold white text,
  // blue-green background, and a solid black border
  // around the cells.
  headerRange
    .setFontWeight('bold')
    .setFontColor('#ffffff')
    .setBackground('#007272')
    .setBorder(
      true, true, true, true, null, null,
      null,
      SpreadsheetApp.BorderStyle.SOLID_MEDIUM);

}
- 儲存指令碼專案。
程式碼審查
導入 Apps Script 程式碼就像要處理許多格式工作一樣簡單。前兩行使用您之前看到的方法,查找電流工作表 (sheet) 和工作表第一行 (headerRange)) 的引用。 Sheet.getRange(row, column, numRows, numColumns) 方法指定第一行,包括其中有列的列。Sheet.getLastColumn() 方法會傳回工作表中最後一欄的欄索引資料。在本範例中,我們是 E 欄 (url)。
其餘程式碼只會呼叫各種 Range 方法來將格式設定選項套用至「headerRange」中的所有儲存格。為了讓程式碼更易於閱讀,我們使用「方法鏈」依序呼叫各個格式方法:
Range.setFontWeight(fontWeight)可用來將字型粗細設為粗體。Range.setFontColor(color)可用來將字型設為白色。Range.setBackground(color)可用來將背景顏色設為深藍色。- 「
setBorder(top, left, bottom, right, vertical, horizontal, color, style)」會在範圍的儲存格周圍加上黑色的框線。
最後一種方法有好幾個參數,現在讓我們來看看各個項目的運作方式。這裡的前四個參數 (全部設為 true) 代表 Apps Script 應在範圍的上方、下方及範圍左側和右側加入框線。第五個和第六參數 (null 和 null) 會指示 Apps Script,避免變更所選範圍內的所有框線。第七個參數 (null) 表示框線的顏色應預設為黑色。最後,最後一個參數會指定要使用的邊框樣式類型,擷取自 SpreadsheetApp.BorderStyle 提供的選項。
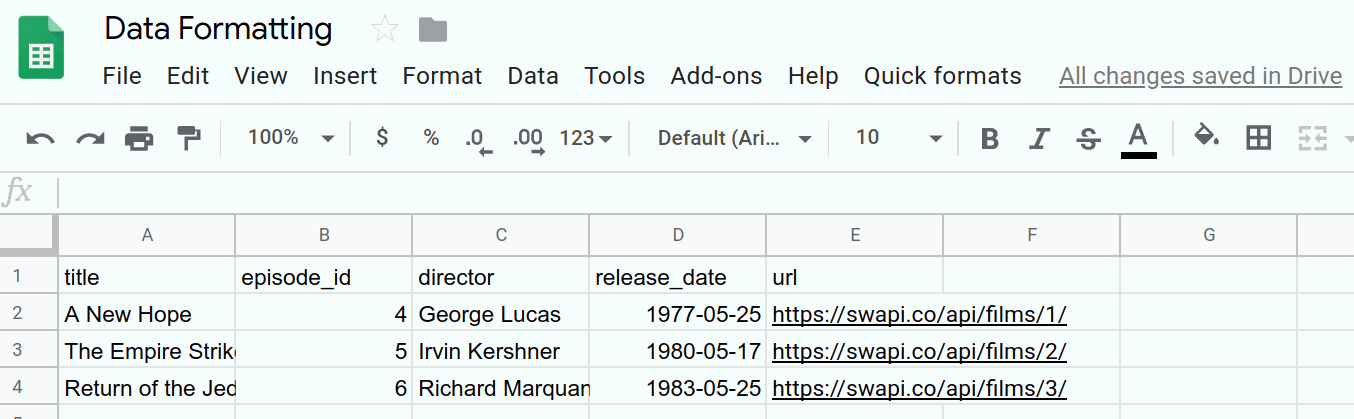
結果
您可以按照下列步驟,查看格式設定函式:
- 如果尚未儲存指令碼專案,請先前往 Apps Script 編輯器儲存。
- 按一下 [快速格式(&G;格式化列列) 選單項目。
結果應如下所示:
您已完成自動格式化工作。下一節將說明相同技巧,為欄標題建立不同的格式樣式。
5. 設定欄標題格式
假如您可以建立個人化的列標題,也可以建立欄標題。欄標題可提高特定資料集的可讀性。舉例來說,您可以透過下列格式選項改善這份試算表中的 titles 欄:
- 使用粗體文字效果
- 使用斜體文字
- 新增儲存格框線
- 使用 url 資料欄內容插入超連結。新增這些超連結後,您可以移除 url 欄來清除工作表。
接下來,請導入 formatColumnHeader() 函式,將這些變更套用到工作表的第一欄。為了讓程式碼更容易閱讀,您也會實作兩項輔助功能。
導入作業
和以往一樣,您必須新增函式來自動設定欄標題格式。步驟如下:
- 在 Apps Script 編輯器中,將以下
formatColumnHeader()函式加到指令碼專案結尾:
/**
 * Formats the column header of the active sheet.
 */
function formatColumnHeader() {
  var sheet = SpreadsheetApp.getActiveSheet();

  // Get total number of rows in data range, not including
  // the header row.
  var numRows = sheet.getDataRange().getLastRow() - 1;

  // Get the range of the column header.
  var columnHeaderRange = sheet.getRange(2, 1, numRows, 1);

  // Apply text formatting and add borders.
  columnHeaderRange
    .setFontWeight('bold')
    .setFontStyle('italic')
    .setBorder(
      true, true, true, true, null, null,
      null,
      SpreadsheetApp.BorderStyle.SOLID_MEDIUM);

  // Call helper method to hyperlink the first column contents
  // to the url column contents.
  hyperlinkColumnHeaders_(columnHeaderRange, numRows);
}
- 將下列輔助函式新增至指令碼專案結尾的
formatColumnHeader()函式之後:
/**
 * Helper function that hyperlinks the column header with the
 * 'url' column contents. The function then removes the column.
 *
 * @param {object} headerRange The range of the column header
 *   to update.
 * @param {number} numRows The size of the column header.
 */
function hyperlinkColumnHeaders_(headerRange, numRows) {
  // Get header and url column indices.
  var headerColIndex = 1;
  var urlColIndex = columnIndexOf_('url');

  // Exit if the url column is missing.
  if(urlColIndex == -1)
    return;

  // Get header and url cell values.
  var urlRange =
    headerRange.offset(0, urlColIndex - headerColIndex);
  var headerValues = headerRange.getValues();
  var urlValues = urlRange.getValues();

  // Updates header values to the hyperlinked header values.
  for(var row = 0; row < numRows; row++){
    headerValues[row][0] = '=HYPERLINK("' + urlValues[row]
      + '","' + headerValues[row] + '")';
  }
  headerRange.setValues(headerValues);

  // Delete the url column to clean up the sheet.
  SpreadsheetApp.getActiveSheet().deleteColumn(urlColIndex);
}

/**
 * Helper function that goes through the headers of all columns
 * and returns the index of the column with the specified name
 * in row 1. If a column with that name does not exist,
 * this function returns -1. If multiple columns have the same
 * name in row 1, the index of the first one discovered is
 * returned.
 *
 * @param {string} colName The name to find in the column
 *   headers.
 * @return The index of that column in the active sheet,
 *   or -1 if the name isn't found.
 */
function columnIndexOf_(colName) {
  // Get the current column names.
  var sheet = SpreadsheetApp.getActiveSheet();
  var columnHeaders =
    sheet.getRange(1, 1, 1, sheet.getLastColumn());
  var columnNames = columnHeaders.getValues();

  // Loops through every column and returns the column index
  // if the row 1 value of that column matches colName.
  for(var col = 1; col <= columnNames[0].length; col++)
  {
    if(columnNames[0][col-1] === colName)
      return col;
  }

  // Returns -1 if a column named colName does not exist.
  return -1;
}
- 儲存指令碼專案。
程式碼審查
讓我們逐一查看這三項功能中的程式碼:
formatColumnHeader()
或許您已預期,這個函式的前幾行會設定參照工作表和範圍的變數,因此對:
- 使用中的工作表儲存在
sheet。 - 系統會計算欄標題中的列數,並儲存在
numRows中。這裡的程式碼減去一個,因此資料列計數未包含欄標題:title。 - 涵蓋欄標題的範圍是儲存在
columnHeaderRange中。
接著,程式碼會將框線套用粗體並套用粗體範圍,就像在 formatRowHeader() 中一樣。Range.setFontStyle(fontStyle) 也會用於將文字設為斜體。
在標頭欄中加入超連結較為複雜,因此 formatColumnHeader() 會呼叫 hyperlinkColumnHeaders_(headerRange, numRows) 以處理工作。如此以保持程式碼易讀且易於閱讀。
hyperlinkColumnHeaders_(headerRange, numRows)
這個輔助函式會先識別標頭 (假設為索引 1) 欄和 url 欄的資料欄索引,呼叫 columnIndexOf_('url') 以取得網址欄索引。如果找不到「url」欄,該方法會結束,但不會修改任何資料。
此函式會取得新的範圍 (urlRange),其涵蓋標題欄列對應的網址。只要使用 Range.offset(rowOffset, columnOffset) 方法,即可確保這兩個範圍的大小相同。然後擷取「headerColumn」和「url」欄的值 (headerValues 和 urlValues)。
接著,這個函式會在每個欄標題標頭儲存格之間循環播放,並將其替換為以標頭和 url 欄內容建構的 =HYPERLINK() 試算表公式。然後使用 Range.setValues(values) 將修改過的標頭值插入工作表中。
最後,為了協助保持工作表簡潔並避免多餘資訊,系統會呼叫 Sheet.deleteColumn(columnPosition) 移除「url」欄。
columnIndexOf_(colName)
此輔助程式功能只是一個簡單的公用程式函式,能夠搜尋工作表的第一列名稱。前三行指的是您已看過試算表第 1 列的欄標題名稱清單。這些名稱會儲存在變數欄名稱中。
接著,函式會依序審核各個名稱。如果找到符合搜尋條件的名稱,就會停止並傳回該欄的索引。如果它在名名列表的末尾未找到名後,返回 -1 以表示名為找不到名。
結果
您可以按照下列步驟,查看格式設定函式:
- 如果尚未儲存指令碼專案,請先前往 Apps Script 編輯器儲存。
- 按一下 [快速格式 (格式:欄標題格式)] 選單項目。
結果應如下所示:
現在,系統已自動執行其他格式化工作。設定資料欄和資料列標題格式後,下一節將說明如何設定資料的格式。
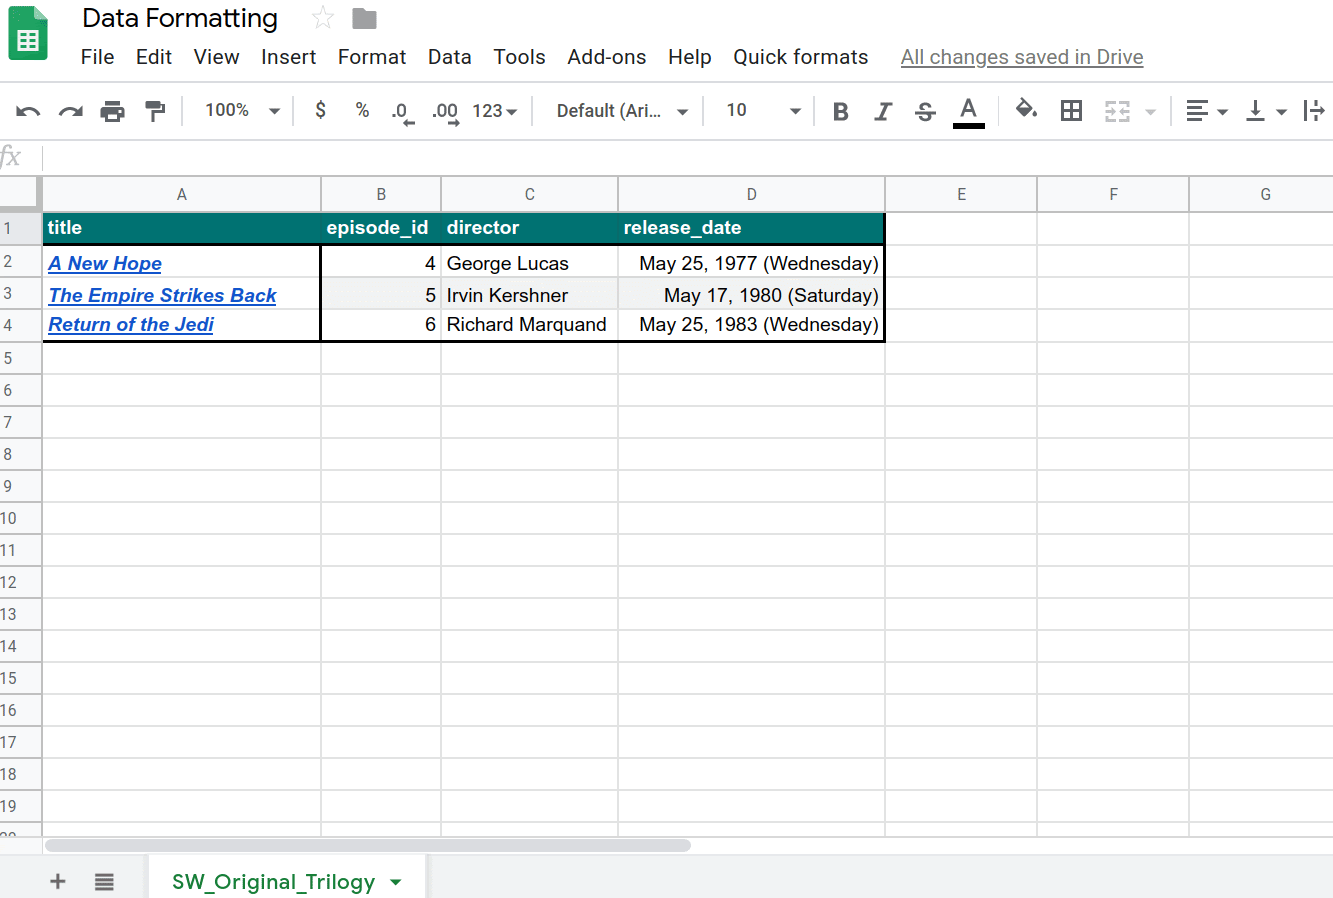
6. 設定資料集格式
設定標題後,我們先建立函式,設定工作表中其餘資料的格式。我們會使用以下格式設定選項:
- 交替列背景顏色 (又稱 banding)
- 變更日期格式
- 套用框線
- 自動調整所有資料欄和資料列
現在,系統會建立函式 formatDataset() 和額外的輔助方法,將這些格式套用到工作表資料。
導入作業
和先前一樣,請新增函式來自動設定資料格式。步驟如下:
- 在 Apps Script 編輯器中,將以下
formatDataset()函式加到指令碼專案結尾:
/**
 * Formats the sheet data, excluding the header row and column.
 * Applies the border and banding, formats the 'release_date'
 * column, and autosizes the columns and rows.
 */
function formatDataset() {
  // Get the active sheet and data range.
  var sheet = SpreadsheetApp.getActiveSheet();
  var fullDataRange = sheet.getDataRange();

  // Apply row banding to the data, excluding the header
  // row and column. Only apply the banding if the range
  // doesn't already have banding set.
  var noHeadersRange = fullDataRange.offset(
    1, 1,
    fullDataRange.getNumRows() - 1,
    fullDataRange.getNumColumns() - 1);

  if (! noHeadersRange.getBandings()[0]) {
    // The range doesn't already have banding, so it's
    // safe to apply it.
    noHeadersRange.applyRowBanding(
      SpreadsheetApp.BandingTheme.LIGHT_GREY,
      false, false);
  }

  // Call a helper function to apply date formatting
  // to the column labeled 'release_date'.
  formatDates_( columnIndexOf_('release_date') );

  // Set a border around all the data, and resize the
  // columns and rows to fit.
  fullDataRange.setBorder(
    true, true, true, true, null, null,
    null,
    SpreadsheetApp.BorderStyle.SOLID_MEDIUM);

  sheet.autoResizeColumns(1, fullDataRange.getNumColumns());
  sheet.autoResizeRows(1, fullDataRange.getNumRows());
}
- 請在
formatDataset()函式之後,在指令碼專案結尾加入下列輔助函式:
/**
 * Helper method that applies a
 * "Month Day, Year (Day of Week)" date format to the
 * indicated column in the active sheet.
 *
 * @param {number} colIndex The index of the column
 *   to format.
 */
function formatDates_(colIndex) {
  // Exit if the given column index is -1, indicating
  // the column to format isn't present in the sheet.
  if (colIndex < 0)
    return;

  // Set the date format for the date column, excluding
  // the header row.
  var sheet = SpreadsheetApp.getActiveSheet();
  sheet.getRange(2, colIndex, sheet.getLastRow() - 1, 1)
    .setNumberFormat("mmmm dd, yyyy (dddd)");
}
- 儲存指令碼專案。
程式碼審查
以下將分別介紹這兩種功能的程式碼:
formatDataset()
此函式與先前實作的格式格式類似。首先,它會取得變數來存放使用中工作表 (工作表) 和資料範圍 (fullDataRange)。
其次,它會使用 Range.offset(rowOffset, columnOffset, numRows, numColumns) 方法建立範圍 (noHeadersRange),範圍涵蓋工作表中的所有資料 (欄和列標題除外)。接著,程式碼會驗證這個新範圍是否已包含既有的頻寬 (使用 Range.getBandings())。這是必要的步驟,原因是如果您嘗試套用新頻帶,則 Apps Script 會擲回錯誤。如果不存在錶帶,函式則會使用 Range.applyRowBanding(bandingTheme, showHeader, showFooter) 新增淺灰色條紋。否則,函式會一直執行。
下一個步驟會呼叫 formatDates_(colIndex) 輔助函式,以在標示「release_date'」(如下文) 的欄中設定日期格式。您必須使用先前實作的 columnIndexOf_(colName) 輔助函式指定這個資料欄。
最後,通過添加另一個框線(如前一個)完成格式化,使用Sheet.autoResizeColumns(columnPosition)和Sheet.autoResizeColumns(columnPosition) 方法自動調整每列和行。
formatDates_(colIndex)
這項輔助函式會使用提供的欄索引,將特定日期格式套用至資料欄。具體來說,它的格式是「月日, 年份 (星期幾)」。
首先,函式會檢查提供的欄索引是否有效 (也就是等於 0 或大於 0)。如果沒有,則會傳回任何結果。這項檢查可防止因工作表不含「release_date'」欄而造成的錯誤。
資料欄索引通過驗證後,函式會取得涵蓋該資料欄的範圍 (不包含其標題列),並使用 Range.setNumberFormat(numberFormat) 套用格式設定。
結果
您可以按照下列步驟,查看格式設定函式:
- 如果尚未儲存指令碼專案,請先前往 Apps Script 編輯器儲存。
- 按一下 [Quick format > 格式化資料集] 選單項目。
結果應如下所示:
您已經自動化處理其他的格式化工作。現在已可使用這些格式設定指令,現在請再加入其他資料,即可將這些格式套用到其中。
7. 擷取 API 資料並設定格式
到目前為止,在這個程式碼研究室中,您已經學會如何使用 Apps Script 做為試算表格式的替代方法。接下來,您撰寫的程式碼會從公用 API 擷取資料並插入試算表,然後設定格式,讓使用者能夠輕鬆讀取。
在上一次的程式碼研究室中,您已學習如何從 API 提取資料。您會使用同樣的技術。在這個練習過程中,我們會使用公開的 Star Wars API (SWAPI) 來填入試算表。具體而言,您會使用這個 API 取得原始三顆星際大戰電影中主要角色的相關資訊。
您的程式碼將呼叫 API,以取得大量的 JSON 資料、剖析回應、將資料放在新工作表中,然後設定工作表的格式。
導入作業
在本節中,您將會新增一些菜單品項。每個選單項目會呼叫包裝函式指令碼,以便將特定項目變數傳送至主要函式 (createResourceSheet_())。您會實作這個函式,以及其他 3 個輔助函式。和先前一樣,輔助函式可協助您隔離出邏輯部分的工作,並保持程式碼的可讀性。
執行下列動作:
- 在 Apps Script 編輯器中,將
onOpen()函式更新為指令碼專案內的下列項目:
/**
 * A special function that runs when the spreadsheet is opened
 * or reloaded, used to add a custom menu to the spreadsheet.
 */
function onOpen() {
  // Get the Ui object.
  var ui = SpreadsheetApp.getUi();

  // Create and add a named menu and its items to the menu bar.
  ui.createMenu('Quick formats')
    .addItem('Format row header', 'formatRowHeader')
    .addItem('Format column header', 'formatColumnHeader')
    .addItem('Format dataset', 'formatDataset')
    .addSeparator()
    .addSubMenu(ui.createMenu('Create character sheet')
                .addItem('Episode IV', 'createPeopleSheetIV')
                .addItem('Episode V', 'createPeopleSheetV')
                .addItem('Episode VI', 'createPeopleSheetVI')
                )
    .addToUi();
}
- 儲存指令碼專案。
- 在指令碼編輯器中,從函式清單中選取
onOpen,然後按一下 [執行]。這會執行onOpen(),以您新增的選項重建試算表選單。 - 如要建立 Apps Script 檔案,請依序按一下「檔案」旁邊的「新增檔案」圖示
 [指令碼]。
 - 為新的指令碼命名「API」並按下 Enter 鍵。(Apps Script 會自動將
.gs副檔名附加到指令碼的檔案名稱)。 - 將新 API.gs 檔案中的程式碼改為:
/**
 * Wrapper function that passes arguments to create a
 * resource sheet describing the characters from Episode IV.
 */
function createPeopleSheetIV() {
  createResourceSheet_('characters', 1, "IV");
}

/**
 * Wrapper function that passes arguments to create a
 * resource sheet describing the characters from Episode V.
 */
function createPeopleSheetV() {
  createResourceSheet_('characters', 2, "V");
}

/**
 * Wrapper function that passes arguments to create a
 * resource sheet describing the characters from Episode VI.
 */
function createPeopleSheetVI() {
  createResourceSheet_('characters', 3, "VI");
}

/**
 * Creates a formatted sheet filled with user-specified
 * information from the Star Wars API. If the sheet with
 * this data exists, the sheet is overwritten with the API
 * information.
 *
 * @param {string} resourceType The type of resource.
 * @param {number} idNumber The identification number of the film.
 * @param {number} episodeNumber The Star Wars film episode number.
 *   This is only used in the sheet name.
 */
function createResourceSheet_(
    resourceType, idNumber, episodeNumber) {

  // Fetch the basic film data from the API.
  var filmData = fetchApiResourceObject_(
      "https://swapi.dev/api/films/" + idNumber);

  // Extract the API URLs for each resource so the code can
  // call the API to get more data about each individually.
  var resourceUrls = filmData[resourceType];

  // Fetch each resource from the API individually and push
  // them into a new object list.
  var resourceDataList = [];
  for(var i = 0; i < resourceUrls.length; i++){
    resourceDataList.push(
      fetchApiResourceObject_(resourceUrls[i])
    );
  }

  // Get the keys used to reference each part of data within
  // the resources. The keys are assumed to be identical for
  // each object since they're all the same resource type.
  var resourceObjectKeys = Object.keys(resourceDataList[0]);

  // Create the sheet with the appropriate name. It
  // automatically becomes the active sheet when it's created.
  var resourceSheet = createNewSheet_(
      "Episode " + episodeNumber + " " + resourceType);

  // Add the API data to the new sheet, using each object
  // key as a column header.
  fillSheetWithData_(resourceSheet, resourceObjectKeys, resourceDataList);

  // Format the new sheet using the same styles the
  // 'Quick Formats' menu items apply. These methods all
  // act on the active sheet, which is the one just created.
  formatRowHeader();
  formatColumnHeader();
  formatDataset();

}
- 在 API.gs 指令碼專案檔案的結尾加入以下輔助函式:
/**
 * Helper function that retrieves a JSON object containing a
 * response from a public API.
 *
 * @param {string} url The URL of the API object being fetched.
 * @return {object} resourceObject The JSON object fetched
 *   from the URL request to the API.
 */
function fetchApiResourceObject_(url) {
  // Make request to API and get response.
  var response =
    UrlFetchApp.fetch(url, {'muteHttpExceptions': true});

  // Parse and return the response as a JSON object.
  var json = response.getContentText();
  var responseObject = JSON.parse(json);
  return responseObject;
}

/**
 * Helper function that creates a sheet or returns an existing
 * sheet with the same name.
 *
 * @param {string} name The name of the sheet.
 * @return {object} The created or existing sheet
 *   of the same name. This sheet becomes active.
 */
function createNewSheet_(name) {
  var ss = SpreadsheetApp.getActiveSpreadsheet();

  // Returns an existing sheet if it has the specified
  // name. Activates the sheet before returning.
  var sheet = ss.getSheetByName(name);
  if (sheet) {
    return sheet.activate();
  }

  // Otherwise it makes a sheet, set its name, and returns it.
  // New sheets created this way automatically become the active
  // sheet.
  sheet = ss.insertSheet(name);
  return sheet;
}

/**
 * Helper function that adds API data to the sheet.
 * Each object key is used as a column header in the new sheet.
 *
 * @param {object} resourceSheet The sheet object being modified.
 * @param {object} objectKeys The list of keys for the resources.
 * @param {object} resourceDataList The list of API
 *   resource objects containing data to add to the sheet.
 */
function fillSheetWithData_(
    resourceSheet, objectKeys, resourceDataList) {
  // Set the dimensions of the data range being added to the sheet.
  var numRows = resourceDataList.length;
  var numColumns = objectKeys.length;

  // Get the resource range and associated values array. Add an
  // extra row for the column headers.
  var resourceRange =
    resourceSheet.getRange(1, 1, numRows + 1, numColumns);
  var resourceValues = resourceRange.getValues();

  // Loop over each key value and resource, extracting data to
  // place in the 2D resourceValues array.
  for (var column = 0; column < numColumns; column++) {

    // Set the column header.
    var columnHeader = objectKeys[column];
    resourceValues[0][column] = columnHeader;

    // Read and set each row in this column.
    for (var row = 1; row < numRows + 1; row++) {
      var resource = resourceDataList[row - 1];
      var value = resource[columnHeader];
      resourceValues[row][column] = value;
    }
  }

  // Remove any existing data in the sheet and set the new values.
  resourceSheet.clear()
  resourceRange.setValues(resourceValues);
}
- 儲存指令碼專案。
程式碼審查
你剛加入了許多程式碼。讓我們逐一介紹各項功能,以瞭解其運作方式:
onOpen()
你在「Quick formats」選單中新增了幾個菜單品項。您已設定分隔線,然後使用 Menu.addSubMenu(menu) 方法建立含有三個新項目的巢狀選單結構。使用 Menu.addItem(caption, functionName) 方法加入新項目。
包裝函式函式
新增的選單項目皆有類似的用途,例如:從擷取自 SWAPI 的資料建立工作表。唯一的差別在於他們是專注於不同的電影。
需要編寫單一函式以建立工作表,然後讓函式接受 參數,以判斷要使用的影片。然而,Menu.addItem(caption, functionName) 方法並不能在選單呼叫時將參數傳遞給該方法。那麼,如何避免重複撰寫相同的程式碼三次?
答案就是「包裝函式函式」。這是一種輕量函式,可讓您呼叫另一個使用特定參數集的另一個函式。
這裡使用了 createPeopleSheetIV()、createPeopleSheetV() 和 createPeopleSheetVI() 三個包裝函式函式。選單項目已連結至這些函式。按一下選單項目後,包裝函式函式便會執行並立即呼叫主工作表建立工具函式 createResourceSheet_(resourceType, idNumber, episodeNumber),並傳遞選單項目適用的參數。在這種情況下,請先要求工作表製作工具功能建立一份工作表,其中含有某部星際大戰電影中的主要角色資料。
createResourceSheet_(resourceType, idNumber, episodeNumber)
這是此練習的主要工作表建立工具功能。透過某些輔助函式的輔助,您可以取得 API 資料、剖析、建立工作表、將 API 資料寫入工作表,然後使用您在前一節建立的函式設定工作表格式。詳細說明如下:
首先,函式會使用 fetchApiResourceObject_(url) 要求 API 擷取基本電影資訊。API 回應包含一組網址,可讓程式碼取得影片中特定人物的詳細資訊 (這裡稱為「資源」)。程式碼會在 resourceUrls 陣列中收集所有資訊。
接著,程式碼會重複使用 fetchApiResourceObject_(url),以呼叫 API 中所有 resourceUrls 資源網址。結果會儲存在 resourceDataList 陣列中。此陣列中的每個元素都是一個物件,用來描述與電影不同的角色。
資源資料物件有多個對應的鍵,可對應到該字元的相關資訊。例如,「name'」鍵對應到電影中的角色名稱。假設每個資源資料物件的金鑰都相同,因為它們通常都是使用一般的物件結構。稍後必須有金鑰清單,因此程式碼會使用 JavaScript Object.keys() 方法將金鑰清單儲存在 resourceObjectKeys 中。
接著,製作工具函式會呼叫 createNewSheet_(name) 輔助函式,藉此建立用來放置新資料的工作表。呼叫這個輔助程式也會同時啟用新工作表。
工作表建立完成後,系統會呼叫輔助函式 fillSheetWithData_(resourceSheet, objectKeys, resourceDataList),將所有工作表資料新增至工作表。
最後,呼叫您先前建立的所有格式函式,都對新資料套用相同的格式設定規則。由於新的工作表是有效的工作表,因此程式碼無需重新修改即可重複使用這些功能。
fetchApiResourceObject_(url)
這個輔助程式功能與前一個程式碼研究室使用資料中使用的 fetchBookData_(ISBN) 輔助函式類似。這會使用指定的網址,並使用 UrlFetchApp.fetch(url, params) 方法取得回應。接著,系統會使用 HTTPResponse.getContextText() 和 JavaScript JSON.parse(json) 方法,將回應剖析為 JSON 物件。然後傳回產生的 JSON 物件。
createNewSheet_(name)
這個輔助程式的功能相當簡單。首先,則會檢查試算表中是否有指定名稱的工作表。如果輸入的話,函式就會啟用工作表並傳回結果。
如果工作表不存在,函式會使用 Spreadsheet.insertSheet(sheetName) 建立、啟用工作表,並傳回新的工作表。
fillSheetWithData_(resourceSheet, objectKeys, resourceDataList)
這項輔助程式函式會負責將 API 資料填入新的工作表。以新工作表、物件金鑰清單和 API 資源物件清單為參數。每個物件鍵代表新工作表中的一個資料欄,而每個資源物件則代表一個資料列。
首先,此函式會計算顯示新 API 資料所需的列數和欄數。這是個別的資源和金鑰清單的大小。接著,函式會定義將放置資料的輸出範圍 (resourceRange),並新增一列來存放欄標題。resourceValues 變數包含從 resourceRange 中擷取的 2D 值陣列。
接著,函式會在 objectKeys 清單中的每個物件金鑰上循環播放。索引鍵已設為資料欄標題,然後會循環檢查每個資源物件。每對 (列、欄) 組合,對應的 API 資訊就會複製到 resourceValues[row][column] 元素中。
填完「resourceValues」後,系統會使用 Sheet.clear() 清除目標工作表,以包含先前選單項目點擊的資料。最後,新的值會寫入工作表中。
結果
您可以透過以下方式查看作業結果:
- 如果尚未儲存指令碼專案,請先前往 Apps Script 編輯器儲存。
- 按一下 [快速格式(&G);建立角色表(&G);第 4 集] 選單項目。
結果應如下所示:
您現在已編寫程式碼,將資料匯入「試算表」並自動設定格式。
8. 結語
恭喜您完成這個程式碼研究室。您已經看過一些可以應用在 Apps Script 專案中的試算表格式選項,並且建置了一項令人驚豔的應用程式,可以匯入及設定大型 API 資料集的格式。
這個程式碼研究室是否對您有幫助?
您學到的內容
後續步驟
這個播放清單中的下一個程式碼研究室將示範如何使用 Apps Script,以圖表呈現圖表中的資料,並將圖表匯出至 Google 簡報。
如要尋找下一個程式碼研究室,請參閱在 Google 簡報中圖表呈現資料。