
1. Introducción
Los avances recientes en el aprendizaje automático hicieron que sea relativamente fácil para las computadoras reconocer objetos en imágenes. En este codelab, te guiaremos por un recorrido integral para compilar un modelo de clasificación de imágenes que pueda reconocer diferentes tipos de objetos y, luego, implementar el modelo en una app para Android y iOS. ML Kit y AutoML te permiten compilar e implementar el modelo a gran escala sin necesidad de tener experiencia en aprendizaje automático.
¿Qué es ML Kit?
ML Kit es un SDK para dispositivos móviles que lleva la experiencia de Google en el aprendizaje automático a las apps para iOS y Android a través de un paquete eficaz, pero fácil de usar. Independientemente de si eres nuevo o tienes experiencia en el aprendizaje automático, puedes implementar fácilmente la funcionalidad que necesites con solo unas pocas líneas de código. Existen varias APIs que pueden reconocer texto, rostros, etcétera, que puedes usar de inmediato. Sin embargo, si necesitas reconocer objetos que no son compatibles con las APIs, como reconocer diferentes tipos de flores a partir de una imagen, debes entrenar tu propio modelo. Aquí es donde AutoML puede ayudarte.
¿Qué es AutoML?
Cloud AutoML es un conjunto de productos de aprendizaje automático que permite a los desarrolladores con experiencia limitada en esta área entrenar modelos de alta calidad específicos para sus necesidades comerciales, aprovechando el aprendizaje por transferencia de vanguardia y la tecnología de búsqueda de arquitectura neuronal de Google.
En este codelab, usaremos AutoML Vision Edge en ML Kit para entrenar un modelo de clasificación de flores. El modelo se entrena en la nube, pero la app lo incluye o descarga para ejecutar inferencias completamente en el dispositivo.

Qué aprenderás
- Cómo entrenar un modelo de clasificación de imágenes con AutoML Vision Edge en ML Kit
- Cómo ejecutarlo en una app de ejemplo para Android o iOS con el SDK de ML Kit
Requisitos
Para la app para Android
- Una versión reciente de Android Studio (v3.4 o posterior)
- Emulador de Android Studio con Play Store o un dispositivo Android físico (v5.0 o versiones posteriores)
- Conocimientos básicos sobre el desarrollo de Android en Kotlin
Para la app para iOS
- Una versión reciente de Xcode (v10.2 o posterior)
- Simulador de iOS o un dispositivo iOS físico (v9.0 o versiones posteriores)
- CocoaPods
- Conocimientos básicos sobre el desarrollo para iOS en Swift
2. Configuración
Descarga el código y el conjunto de datos de entrenamiento
Descarga un archivo ZIP que contiene el código fuente de este codelab y un conjunto de datos de entrenamiento. Extrae el archivo en tu máquina local.
Crea un proyecto en Firebase console
- Ve a Firebase console.
- Selecciona Create New Project y asígnale el nombre "ML Kit Codelab".
Configura la app para Android
- Agrega nuestra app para Android al proyecto de Firebase. Nombre del paquete de Android:
com.google.firebase.codelab.mlkit.automl - Descarga el archivo de configuración
google-services.jsony colócalo en la app para Android enandroid/mlkit-automl/app/google-services.json.
Configura la app para iOS
- Agrega nuestra app para iOS al proyecto de Firebase. ID del paquete de iOS:
com.google.firebase.codelab.mlkit.automl - Descarga el archivo de configuración
GoogleService-Info.plisty sigue las instrucciones para colocarlo en la app para iOS enios/mlkit-automl/GoogleService-Info.plist.
3. Prepara el conjunto de datos de entrenamiento
Para entrenar un modelo que reconozca diferentes tipos de objetos, debes preparar un conjunto de imágenes y etiquetar cada una de ellas. Creamos un archivo de fotos de flores con licencia de Creative Commons para que lo uses en este codelab.
El conjunto de datos se empaqueta en un archivo ZIP llamado flower_photos.zip que se incluye en el archivo ZIP que descargaste en el paso anterior.
Explora el conjunto de datos
Si extraes el archivo flower_photos.zip, verás que el conjunto de datos contiene imágenes de 5 tipos de flores: dientes de león, margaritas, tulipanes, girasoles y rosas, que están organizadas en carpetas con el nombre de las flores. Esta es una forma práctica de crear un conjunto de datos de entrenamiento para AutoML y entrenar un modelo de clasificación de imágenes.
Hay 200 imágenes para cada tipo de flor en este conjunto de datos de entrenamiento. Solo necesitas un mínimo de 10 imágenes por clase para entrenar un modelo. Sin embargo, por lo general, más imágenes de entrenamiento generarán mejores modelos.


4. Entrenar un modelo
Sube el conjunto de datos de entrenamiento
- En Firebase console, abre el proyecto que acabas de crear.
- Selecciona ML Kit > AutoML.
- Es posible que veas algunas pantallas de bienvenida. Selecciona Comenzar cuando corresponda.
- Una vez que finalice el progreso de la configuración, selecciona Agregar conjunto de datos y asígnale el nombre "Flores".
- En Objetivo del modelo, elige Clasificación de una sola etiqueta,ya que los datos de entrenamiento solo contienen una etiqueta por imagen.
- Selecciona Crear.
- Sube el archivo
flower_photos.zipque descargaste en el paso anterior para importar el conjunto de datos de entrenamiento de flores. - Espera unos minutos a que finalice la tarea de importación.
- Ahora puedes confirmar que el conjunto de datos se importó correctamente.
- Como todas las imágenes del conjunto de datos de entrenamiento se etiquetaron, puedes continuar con el entrenamiento de un modelo.

Entrena un modelo de clasificación de imágenes
Como nuestro modelo se ejecutará en un dispositivo móvil con potencia de procesamiento y almacenamiento limitados, debemos tener en cuenta no solo la exactitud del modelo, sino también su tamaño y velocidad. Siempre hay una compensación entre la precisión, la latencia (es decir, cuánto tiempo tarda en clasificar una imagen) y el tamaño del modelo. Por lo general, un modelo con mayor precisión también es más grande y tardará más en clasificar una imagen.
AutoML te ofrece varias opciones: puedes elegir optimizar la precisión, la latencia y el tamaño del modelo, o bien lograr un equilibrio entre ellas. También puedes elegir cuánto tiempo permitirás que se entrene el modelo. Los conjuntos de datos más grandes necesitan más tiempo de entrenamiento.

Estos son los pasos que debes seguir si quieres entrenar el modelo por tu cuenta.
- Selecciona Entrenar modelo.
- Selecciona la opción Uso general y un tiempo de entrenamiento de 1 hora de procesamiento.
- Espera un tiempo (probablemente, varias horas) para que finalice la tarea de entrenamiento.
- Una vez que finalice la tarea de entrenamiento, verás las métricas de evaluación sobre el rendimiento del modelo entrenado.

5. Usa el modelo en apps para dispositivos móviles
Preparación
- Este codelab contiene apps de ejemplo para Android y iOS que demuestran cómo usar el modelo de clasificación de imágenes que entrenamos anteriormente en una app para dispositivos móviles. Las dos apps tienen funciones similares. Puedes elegir la plataforma con la que te sientas más cómodo.
- Antes de continuar, asegúrate de haber descargado las apps de ejemplo y de haberlas configurado en el paso 2.
- También asegúrate de que tu entorno local esté configurado para poder compilar apps para la plataforma que elegiste (Android/iOS).
Descarga el modelo de clasificación de imágenes
- Si entrenaste un modelo en el paso anterior, selecciona Descargar para obtenerlo.
- Si no entrenaste un modelo o tu tarea de entrenamiento aún no finalizó, puedes usar el modelo que se incluye en las apps de ejemplo.
Agrega el modelo a las apps de ejemplo
Solo debes agregar el modelo a las apps de ejemplo, y funcionará de inmediato. Si deseas obtener una guía completa para integrar AutoML de ML Kit en tu app, consulta nuestra documentación ( Android, iOS). El código que interactúa con el SDK de ML Kit se encuentra en los archivos ImageClassifier.kt y ImageClassifier.swift, respectivamente, por lo que puedes comenzar desde allí para explorar cómo funcionan las apps.
Existen dos opciones para implementar el modelo: local y remota.
- El modelo local se usa principalmente para incluir el modelo de clasificación de imágenes en el archivo binario de tu app, aunque también se puede proporcionar un modelo guardado en el almacenamiento local. Con el agrupamiento, el modelo está disponible de inmediato para los usuarios después de que descargan tu app de App Store o Play Store, y funcionará sin conexión a Internet.
- Un modelo remoto significa que el modelo está alojado en Firebase y solo se descargará en el dispositivo del usuario cuando sea necesario por primera vez. Después de eso, el modelo también funcionará sin conexión.

App para Android
- Abre Android Studio.
- Importa la app para Android en
android/mlkit-automl/. - (Opcional) Extrae el modelo que descargaste y copia su contenido en el modelo que se incluye en la app de ejemplo.

- Ahora, haz clic en Ejecutar (
 ) en la barra de herramientas de Android Studio y verifica que pueda reconocer diferentes tipos de flores.
App para iOS
- Abre la terminal y ve a la carpeta
ios/mlkit-automl/. - Ejecuta
pod installpara descargar dependencias a través de CocoaPods. - Ejecuta
open MLVisionExample.xcworkspace/para abrir el espacio de trabajo del proyecto en Xcode. - (Opcional) Extrae el modelo que descargaste y copia su contenido en el modelo que se incluye en la app de ejemplo en
ios/ml-automl/Resources/automl/ .
. - Ahora haz clic en Ejecutar (
 ) en la barra de herramientas de Xcode y verifica que pueda reconocer diferentes tipos de flores.

6. (Opcional) Usa el modelo remoto
El modelo remoto de ML Kit te permite no incluir modelos de TensorFlow Lite en el objeto binario de tu app, sino descargarlos a pedido desde Firebase cuando sea necesario. Los modelos remotos tienen varios beneficios en comparación con los modelos locales:
- Objeto binario de la app más pequeño
- Poder actualizar los modelos sin actualizar la app
- Pruebas A/B con varias versiones de un modelo
En este paso, publicaremos un modelo remoto y lo usaremos en las apps de ejemplo. Asegúrate de haber terminado de entrenar tu modelo en el paso 4 de este codelab.
Publica el modelo
- Ve a Firebase console.
- Selecciona el proyecto "ML Kit AutoML Codelab" que creaste anteriormente.
- Selecciona ML Kit > AutoML.
- Selecciona el conjunto de datos "Flores" que creaste antes.
- Confirma que se completó la tarea de entrenamiento y, luego, selecciona el modelo.
- Selecciona Publicar y asígnale el nombre "mlkit_flowers".

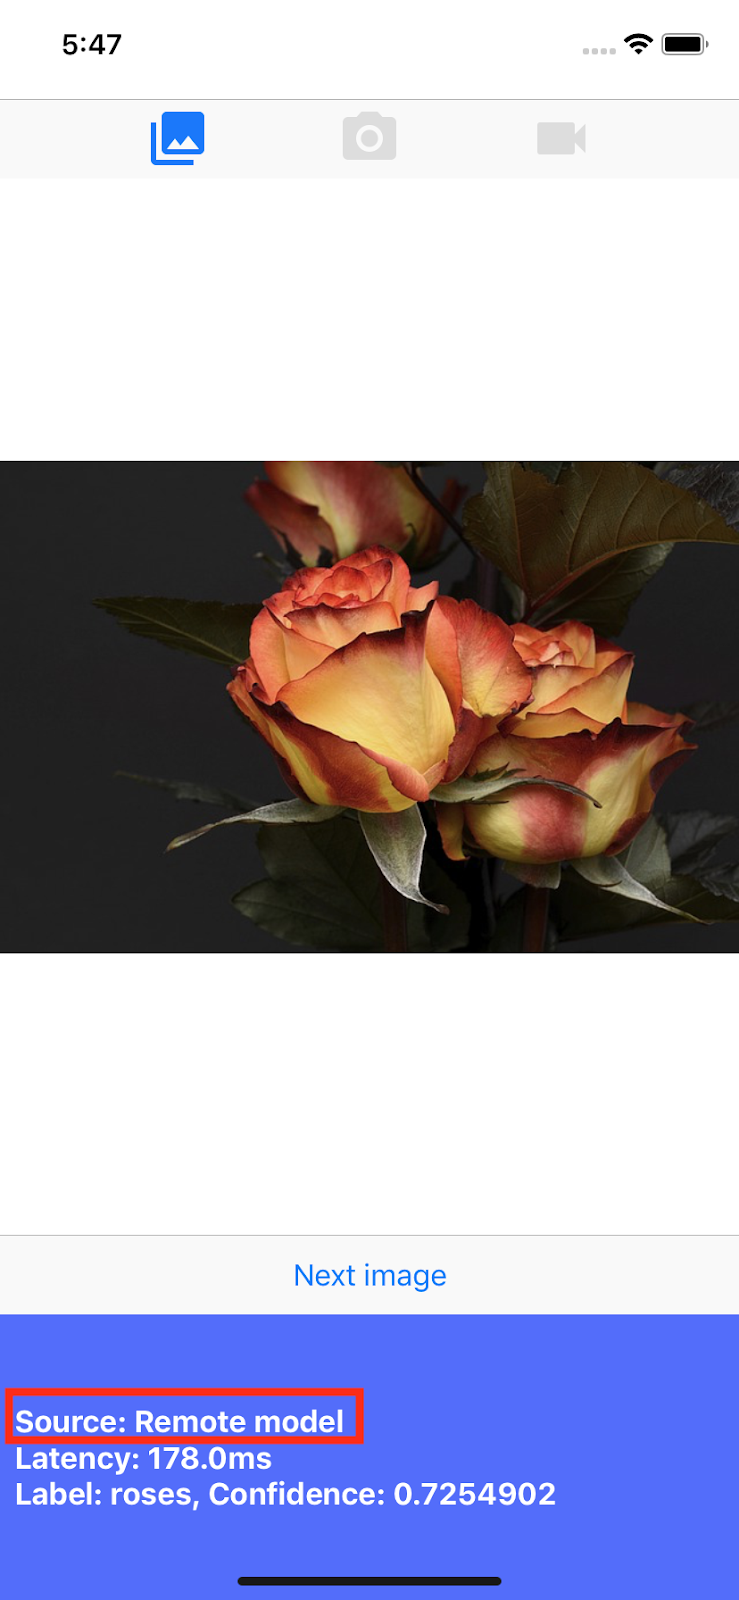
Reconoce flores con el modelo remoto
Las apps de ejemplo están configuradas para usar el modelo remoto si está disponible. Después de publicar el modelo remoto, solo debes volver a ejecutar las apps para activar la descarga del modelo. Puedes verificar que la app esté usando el modelo remoto si observas el valor "Fuente" en el pie de página de la pantalla de la app. Si no funciona, consulta la sección "Solución de problemas" a continuación.

Solución de problemas
Si la app de ejemplo sigue usando el modelo local, verifica que el nombre del modelo remoto esté configurado correctamente dentro del código.
App para Android
- Ve a
ImageClassifier.kty busca este bloque.
val remoteModel = FirebaseRemoteModel.Builder(REMOTE_MODEL_NAME).build()
- Verifica que el nombre del modelo establecido en el código coincida con el nombre del modelo que publicaste antes a través de Firebase Console.
- Ahora, haz clic en Run ( ) en la barra de herramientas de Android Studio para volver a ejecutar la app.
App para iOS
- Ve a
ImageClassifier.swifty busca este bloque:
return RemoteModel(
  name: Constant.remoteAutoMLModelName,
  allowsModelUpdates: true,
  initialConditions: initialConditions,
  updateConditions: updateConditions
)
- Verifica que el nombre del modelo establecido en el código coincida con el nombre del modelo que publicaste anteriormente a través de Firebase Console.
- Ahora haz clic en Ejecutar ( ) en la barra de herramientas de Xcode para volver a ejecutar la app.
7. ¡Felicitaciones!
Completaste un recorrido integral para entrenar un modelo de clasificación de imágenes con tus propios datos de entrenamiento usando AutoML y, luego, usar el modelo en una app para dispositivos móviles con ML Kit.
Consulta nuestra documentación para obtener información sobre cómo integrar AutoML Vision Edge en el Kit de ML a tu propia app.
También puedes probar nuestras apps de ejemplo del Kit de AA para ver otras funciones del Kit de AA de Firebase.
Ejemplos de Android
Muestras de iOS