لمحة عن هذا الدرس التطبيقي حول الترميز
1. مقدّمة حول CFT 101

تاريخ آخر تعديل: 2020-03-03
ما هي مجموعة أدوات Cloud Foundation؟
في الواقع، توفّر خدمة CFT نماذج حول أفضل الممارسات للبدء بسرعة في Google Cloud Platform. ستتعرّف في هذا البرنامج التعليمي على كيفية المساهمة في مجموعة أدوات Cloud Foundation.
المتطلبات
- حساب على GitHub
- تثبيت Docker على جهازك ( تثبيت على نظام التشغيل Mac أو تثبيت من Windows)
- أداة تعديل الرموز لتعديل الرمز (مثال: Visual Studio Code)
- الإلمام بأساسيات Git وGitHub
- بعض الخبرة في استخدام Terraform والبنية الأساسية كتعليمة برمجية
- إذن بمنح دور "مُنشئ المشروع" لحساب الخدمة
ما الذي ستنشئه
في هذا الدرس التطبيقي حول الترميز، ستتعلّم كيفية المساهمة في مجموعة أدوات Cloud Foundation (CFT).
وسوف تقوم بما يلي:
- إعداد بيئة تطوير برامج للمساعدة في استخدام ملفات CFT
- إضافة ميزة إلى وحدة CFT
- إضافة اختبارات للميزة المُضافة
- إجراء اختبارات التكامل في واجهة CFT
- تنفيذ اختبارات الوبر
- الالتزام بالرمز البرمجي إلى GitHub وإرسال طلب سحب (PR)
عليك تنفيذ كل الخطوات المذكورة أعلاه من خلال إضافة ميزة جديدة إلى وحدة CFT في Google Cloud Storage. ستضيف تصنيفًا باسم ""silly_label"" ستتم إضافته تلقائيًا إلى جميع الحِزم التي تم إنشاؤها من خلال وحدة GCS CFT. ستتمكن أيضًا من كتابة اختبارات للتحقق من صحة الميزة وضمان الدمج الكامل.
2. إعداد بيئة تطوير البرامج
ويمكنك استخدام Cloud Shell لأغراض التطوير إن أردت ذلك. إذا كنت لا تريد استخدام Cloud Shell للمساهمة في CFT، يمكنك إعداد بيئة التطوير على جهازك.
إعداد Git
يعتمد GitHub على نظام تحكّم في الإصدار مفتوح المصدر (VCS) يُسمى Git. يكون Git مسؤولاً عن كل العمليات المتعلّقة بـ GitHub والتي تحدث محليًا على جهازك أو Cloud Shell.
- عند استخدام Cloud Shell، لن تحتاج إلى تثبيت git وذلك لأنه مثبَّت مسبقًا.
$ git --version
# This will display the git version on the Cloud Shell.
إذا كنت تقوم بإعداد بيئة مطوري البرامج على جهازك، فأنت بحاجة إلى تثبيت Git.
ضبط اسم المستخدم وعنوان البريد الإلكتروني في Git
تستخدم Git اسم مستخدم لربط عمليات الإتمام بهوية. اسم مستخدم Git ليس مطابقًا لاسم مستخدم GitHub.
يمكنك تغيير الاسم المرتبط بـ Git باستخدام الأمر git config. إنّ تغيير الاسم المرتبط بـ Git الذي يلتزم به باستخدام git config سيؤثر فقط في التزاماتك المستقبلية ولن يؤدي إلى تغيير الاسم المستخدَم في عمليات الربط السابقة.
لقد أعددت Git بنجاح وستتمكن من إنشاء فروع ونسخها واستنساخها. سنستخدم Git على نطاق واسع في هذا الدرس التطبيقي حول الترميز.
3. مستودع GCS الخاص بـ Fork CFT
إنشاء مستودع CFT
في الخطوة السابقة، يمكنك إعداد Git على جهازك المحلي أو Cloud Shell. يجب الآن استخدام مستودع CFT في Google Cloud Storage لبدء المساهمة.
الشوكة هي نسخة من مستودع. يتيح لك تشعب المستودع تجربة التغييرات بحرية دون التأثير على المشروع الأصلي.
الأكثر شيوعًا، تُستخدم الشوك إما لاقتراح تغييرات على مشروع شخص آخر أو لاستخدام مشروع شخص آخر كنقطة بداية لفكرتك الخاصة.
على سبيل المثال، يمكنك استخدام الشوك لاقتراح تغييرات تتعلق بإصلاح الأخطاء. لإصلاح خطأ، يمكنك إجراء ما يلي:
- إرسال نسخة من المستودع.
- إصلاح المشكلة.
- أرسل طلب سحب إلى مالك المشروع.
خطوات إنشاء مستودع CFT:
- افتح متصفّح الويب وانتقِل إلى مستودع terraform-google-modules/terraform-google-cloud-storage. سنستخدم هذا المستودع للدرس التطبيقي حول الترميز بالكامل.
- في أعلى يسار الصفحة، انقر على شوكة.

- سيظهر لك خيار تحديد المكان الذي تريد الحصول على معلومات فيه، واختَر ملفك الشخصي، وسيتم تقسيم بيانات المستودع.
استنساخ شوكتك محليًا
الشوكة التي أنشأتها هي نسخة من مستودع وحدات GCS. وستنسخ الآن هذا المستودع إلى بيئتك المحلية لإضافة ميزتك الجديدة.
خطوات استنساخ شوكتك:
- افتح متصفّح الويب وانتقِل إلى الشكل على terraform-google-modules/terraform-google-cloud-storage.
- في أعلى يسار الصفحة، ستجد الخيار "نسخ أو تنزيل". انقر فوقه.

- بعد النقر فوق الزر "نسخ أو تنزيل" انقر على "Notepad" لنسخ عنوان URL للشوكة. ستستخدم عنوان URL هذا لاستنساخ شوكتك إلى بيئتك المحلية.

- انتقِل إلى نافذة طرفية في VSCode أو في جهازك واستنساخ الشوكة.
$ git clone <url>
# This command will clone your fork locally.
# Paste the copied URL from the previous step.
- الآن بعد أن استنسخت شوكتك محليًا، يجب عليك الانتقال إلى مستودعك، وإنشاء فرع جديد من الشوكة وإجراء تغييرات على التعليمات البرمجية للفرع المؤقت.
حسب الاصطلاح، يمكنك تسمية الفرع على النحو التالي:
- لطلبات الميزات:
feature/feature-name - للحصول على التحديثات الداخلية،
internal/change-name - لإصلاح الأخطاء:
bugfix/issue-name
بما أنّك تضيف ميزة جديدة، يمكنك الاتصال بفرعك المؤقت feature/silly_label
$ cd terraform-google-cloud-storage
# This command takes you into the cloned directory on your local machine.

$ git branch
# This command tells your current branch
# When you run this for the first time after you have cloned, your
# output should say "master", that is your fork.

$ git checkout -b feature/silly_label
# This command creates a new branch on your fork and switches your
# branch to the newly created branch.

$ git branch
# This command will confirm your current branch to be "feature/silly_label"
أصبحت جاهزًا الآن لبدء العمل على مجموعة أدوات Cloud Foundation.
4. إنشاء بيئة اختبار
تعتمد عملية تطوير CFT العادية على استخدام مشروع اختباري معزول للاختبار. سترشدك هذه الخطوة خلال إنشاء المشروع التجريبي (استنادًا إلى الإعدادات العادية) عبر حساب الخدمة.
0. تثبيت Docker Engine
إذا كنت تستخدم جهازك لأغراض التطوير، عليك تثبيت Docker Engine.
1. تثبيت Google Cloud SDK
لن تحتاج إلى تثبيت Google Cloud SDK إذا كنت تستخدم Cloud Shell على Google Cloud Platform.
انتقِل إلى Google Cloud SDK ونزِّل أداة التثبيت التفاعلية لنظامك الأساسي.
2- ضبط الإعدادات
لإنشاء بيئة اختبار، ستحتاج إلى مؤسسة Google Cloud ومجلد اختبار وحساب فوترة. يجب ضبط هذه القيم عبر متغيرات البيئة:
export TF_VAR_org_id="your_org_id"
export TF_VAR_folder_id="your_folder_id"
export TF_VAR_billing_account="your_billing_account_id"
3 إعداد حساب الخدمة
قبل إنشاء بيئة اختبار، عليك تنزيل مفتاح حساب الخدمة إلى بيئة الاختبار. سيتطلب حساب الخدمة هذا أدوار منشئ المشروع ومستخدم حساب الفوترة ومُشاهد المؤسسة. تساعدك هذه الخطوات في إنشاء حساب خدمة جديد، ولكن يمكنك أيضًا إعادة استخدام حساب حالي.
3.1 إنشاء مشروع أوّلي في Google Cloud Platform أو اختياره
قبل إنشاء حساب الخدمة، يجب اختيار مشروع لاستضافتها فيه. يمكنك أيضًا إنشاء مشروع جديد.
gcloud config set core/project YOUR_PROJECT_ID
3.2 تفعيل Google Cloud APIs
فعِّل واجهات Google Cloud API التالية في مشروعك الأساسي:
gcloud services enable cloudresourcemanager.googleapis.com
gcloud services enable iam.googleapis.com
gcloud services enable cloudbilling.googleapis.com
3.3 إنشاء حساب الخدمة
أنشئ حساب خدمة جديدًا لإدارة بيئة الاختبار:
# Creating a service account for CFT.
gcloud iam service-accounts create cft-onboarding \
  --description="CFT Onboarding Terraform Service Account" \
  --display-name="CFT Onboarding"

# Assign SERVICE_ACCOUNT environment variable for later steps
export SERVICE_ACCOUNT=cft-onboarding@$(gcloud config get-value core/project).iam.gserviceaccount.com
تأكَّد من إنشاء حساب الخدمة:
gcloud iam service-accounts list --filter="EMAIL=${SERVICE_ACCOUNT}"
3.4 منح أدوار "صانع المشروع" و"مستخدم حساب الفوترة" و"مُشاهد المؤسسة" لحساب الخدمة:
gcloud resource-manager folders add-iam-policy-binding ${TF_VAR_folder_id} \
  --member="serviceAccount:${SERVICE_ACCOUNT}" \
  --role="roles/resourcemanager.projectCreator"
gcloud organizations add-iam-policy-binding ${TF_VAR_org_id} \
  --member="serviceAccount:${SERVICE_ACCOUNT}" \
  --role="roles/billing.user"
gcloud organizations add-iam-policy-binding ${TF_VAR_org_id} \
  --member="serviceAccount:${SERVICE_ACCOUNT}" \
  --role="roles/resourcemanager.organizationViewer"
لديك الآن حساب خدمة يمكن استخدامه لإدارة بيئة الاختبار.
4- منح دور "مستخدم حساب الفوترة" في مورد حساب الفوترة
4.1 استرجاع سياسة "إدارة الهوية وإمكانية الوصول" الخاصة بحساب الفوترة
تنزيل الالتزامات الحالية لسياسة "إدارة الهوية وإمكانية الوصول" في حساب الفوترة
gcloud beta billing accounts get-iam-policy ${TF_VAR_billing_account} | tee policy.yml
4.2 تعديل السياسة لتضمين حساب الخدمة
عدِّل ملف policy.yml لإضافة عملية ربط جديدة لحساب الخدمة بالدور "roles/billing.user".
bindings:
- members:
  - serviceAccount:cft-onboarding@<YOUR_PROJECT_ID>.iam.gserviceaccount.com
  role: roles/billing.user
4.3 تعديل سياسة حساب الفوترة
تطبيق التغييرات على حساب الفوترة
gcloud beta billing accounts set-iam-policy ${TF_VAR_billing_account} policy.yml
5- تحضير بيانات اعتماد Terraform
لإنشاء بيئة اختبار، عليك تنزيل مفتاح حساب الخدمة في واجهة الأوامر.
5.1 مفتاح حساب الخدمة
إنشاء مفتاح حساب خدمة وتنزيله لتطبيق Terraform
gcloud iam service-accounts keys create cft.json --iam-account=${SERVICE_ACCOUNT}
5.2 إعداد بيانات اعتماد Terraform
أدخِل المفتاح إلى Terraform باستخدام متغير البيئة SERVICE_ACCOUNT_JSON، مع ضبط القيمة على contents لمفتاح حساب الخدمة.
export SERVICE_ACCOUNT_JSON=$(< cft.json)
6- إنشاء مشروع تجريبي لعمليات نشر Terraform
الآن بعد أن تم إعداد كل شيء، يمكنك إنشاء المشروع التجريبي باستخدام أمر واحد. شغِّل الأمر التالي من جذر الدليل terraform-google-cloud-storage:
make docker_test_prepare
ستظهر لك النتائج أدناه عند تشغيل make docker_test_prepare، وستتلقّى في النهاية مَعلمة project_id التجريبية التي تم إنشاؤها حيث يمكنك نشر وحدة Cloud Storage واختبارها باستخدام ميزتك الجديدة.
macbookpro3:terraform-google-cloud-storage user$ make docker_test_prepare
docker run --rm -it \
                -e SERVICE_ACCOUNT_JSON \
                -e TF_VAR_org_id \
                -e TF_VAR_folder_id \
                -e TF_VAR_billing_account \
                -v /Users/cft/terraform-google-cloud-storage:/workspace \
                gcr.io/cloud-foundation-cicd/cft/developer-tools:0.8.0 \
                /usr/local/bin/execute_with_credentials.sh prepare_environment
Activated service account credentials for: [cft-onboarding@<project_id>.iam.gserviceaccount.com]
Activated service account credentials for: [cft-onboarding@<project_id>.iam.gserviceaccount.com]
Initializing modules...

Initializing the backend...

Initializing provider plugins...

The following providers do not have any version constraints in configuration,
so the latest version was installed.

To prevent automatic upgrades to new major versions that may contain breaking
changes, it is recommended to add version = "..." constraints to the
corresponding provider blocks in configuration, with the constraint strings
suggested below.

* provider.google-beta: version = "~> 3.9"
* provider.null: version = "~> 2.1"
* provider.random: version = "~> 2.2"

Terraform has been successfully initialized!

You may now begin working with Terraform. Try running "terraform plan" to see
any changes that are required for your infrastructure. All Terraform commands
should now work.

If you ever set or change modules or backend configuration for Terraform,
rerun this command to reinitialize your working directory. If you forget, other
commands will detect it and remind you to do so if necessary.
module.project.module.project-factory.null_resource.preconditions: Refreshing state... [id=8723188031607443970]
module.project.module.project-factory.null_resource.shared_vpc_subnet_invalid_name[0]: Refreshing state... [id=5109975723938185892]
module.project.module.gsuite_group.data.google_organization.org[0]: Refreshing state...
module.project.module.project-factory.random_id.random_project_id_suffix: Refreshing state... [id=rnk]
module.project.module.project-factory.google_project.main: Refreshing state... [id=<project-id>]
module.project.module.project-factory.google_project_service.project_services[0]: Refreshing state... [id=<project-id>/storage-api.googleapis.com]
module.project.module.project-factory.google_project_service.project_services[1]: Refreshing state... [id=<project-id>/cloudresourcemanager.googleapis.com]
module.project.module.project-factory.google_project_service.project_services[2]: Refreshing state... [id=<project-id>/compute.googleapis.com]
module.project.module.project-factory.data.null_data_source.default_service_account: Refreshing state...
module.project.module.project-factory.google_service_account.default_service_account: Refreshing state... [id=projects/ci-cloud-storage-ae79/serviceAccounts/project-service-account@<project-id>.iam.gserv
iceaccount.com]
module.project.module.project-factory.google_project_service.project_services[3]: Refreshing state... [id=<project-id>/serviceusage.googleapis.com]
module.project.module.project-factory.null_resource.delete_default_compute_service_account[0]: Refreshing state... [id=3576396874950891283]
google_service_account.int_test: Refreshing state... [id=projects/<project-id>/serviceAccounts/cft-onboarding@<project-id>.iam.gserviceaccount.com]
google_service_account_key.int_test: Refreshing state... [id=projects/<project-id>/serviceAccounts/cft-onboarding@<project-id>.iam.gserviceaccount.com/keys/351009a1e011e88049ab2097994d1c627a61
6961]
google_project_iam_member.int_test[1]: Refreshing state... [id=<project-id>/roles/iam.serviceAccountUser/serviceaccount:cft-onboarding@<project-id>.iam.gserviceaccount.com]
google_project_iam_member.int_test[0]: Refreshing state... [id=<project-id>/roles/storage.admin/serviceaccount:cft-onboarding@<project-id>.iam.gserviceaccount.com]

Apply complete! Resources: 0 added, 0 changed, 0 destroyed.

Outputs:

project_id = <test-project-id>
sa_key = <sensitive>
Found test/setup/make_source.sh. Using it for additional explicit environment configuration.
لقد أنشأت الآن مشروعًا تجريبيًا تمت الإشارة إليه بواسطة project_id كما ترى في إخراج وحدة التحكم. تم إعداد بيئة التطوير والاختبار.
5. إضافة ميزة جديدة إلى وحدة CFT
بعد الانتهاء من إعداد بيئة التطوير والاختبار، لنبدأ في إضافة التصنيف "silly_label". بوحدة CFT للتخزين في google-cloud.
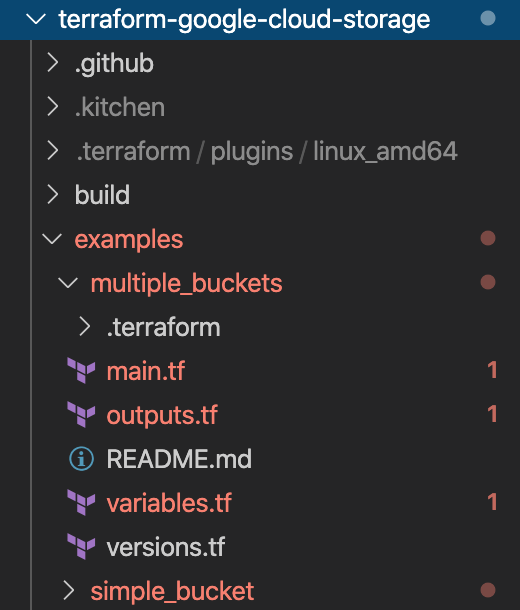
تأكد من وجودك في terraform-google-cloud-storage وافتح ملف main.tf كما ترى أدناه في هيكل المجلد.
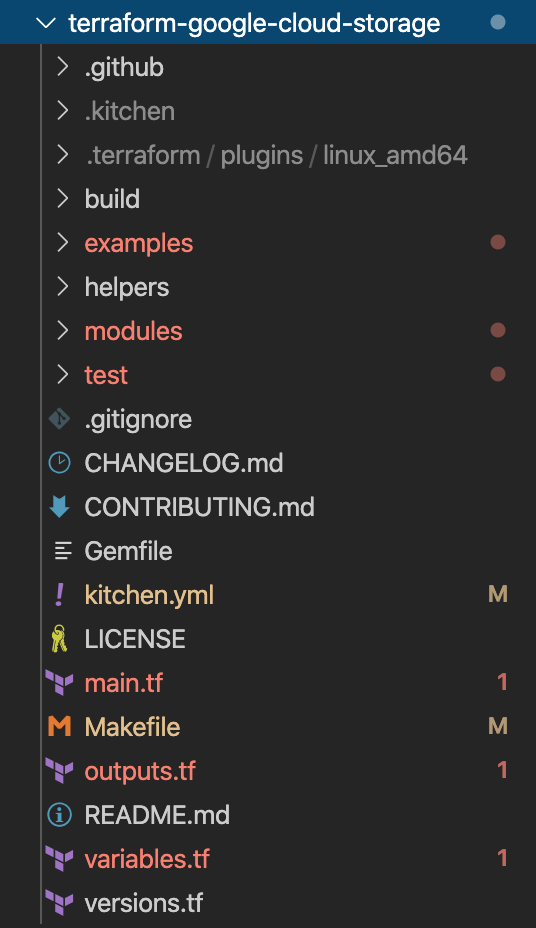
منذ "silly_label" تسمية، ستضيف الميزة في السطر 27 إلى المتغير "labels" في main.tf، كما هو موضّح أدناه:
terraform-google-cloud-storage/main.tf
resource "google_storage_bucket" "buckets" {
 <...>
 storage_class = var.storage_class
 // CODELAB:Add silly label in labels variable
 labels        = merge(var.labels, { name = replace("${local.prefix}${lower(element(var.names, count.index))}", ".", "-") }, { "silly" = var.silly_label })
 force_destroy = lookup(
 <...>
}
الآن، ستضيف المتغير silly_label في ratings.tf الذي تراه في هيكل المجلد أعلاه.
انسخ التعليمة البرمجية أدناه والصقها في السطر 29 في rating.tf وتأكد من أن لديك حرف سطر جديد أعلى وأسفل كتلة المتغير التي تضيفها.
terraform-google-cloud-storage/variables.tf
variable "names" {
 description = "Bucket name suffixes."
 type        = list(string)
}

// CODELAB: Add "silly_label" variable to variables.tf between "names" and "location"
variable "silly_label" {
 description = "Sample label for bucket."
 type        = string
}

variable "location" {
 description = "Bucket location."
 default     = "EU"
}
6. إضافة ميزة جديدة إلى مثال على حزمة تخزين
لقد أضفت ميزتك إلى main.tf للوحدة، والآن ستختبر الميزة المضافة من خلال مثال.
تصنيف "silly_label" يجب إضافته إلى example/Multiple-buckets/main.tf
سيتم استخدام هذا المثال بواسطة أداة في الخطوة التالية لإجراء اختبارات الدمج.
انسخ السطر silly_label أدناه والصقه في السطر 27 في main.tf على العنوان terraform-google-cloud-storage/examples/Multiple-buckets/ كما هو موضّح في بنية المجلد:
terraform-google-cloud-storage/examples/multiple-buckets/main.tf
module "cloud_storage" {
 <...>
 // CODELAB: Add "silly_label" as an example to main.tf.
 silly_label        = "awesome"

 <..>
}
7. كتابة اختبار Inspec للتحقّق من الميزة
لقد أضفت ميزتك إلى main.tf للوحدة، ثم أضفت الميزة إلى مثال Multi_buckets ليتم اختبارها من خلال التجهيزات. يجب اختبار الميزة من خلال اختبار دمج InSpec مكتوبًا بلغة Ruby.
ستضيف اختباراتك الجديدة في ملف gsutil.rb الموجود في بنية المجلد أدناه:
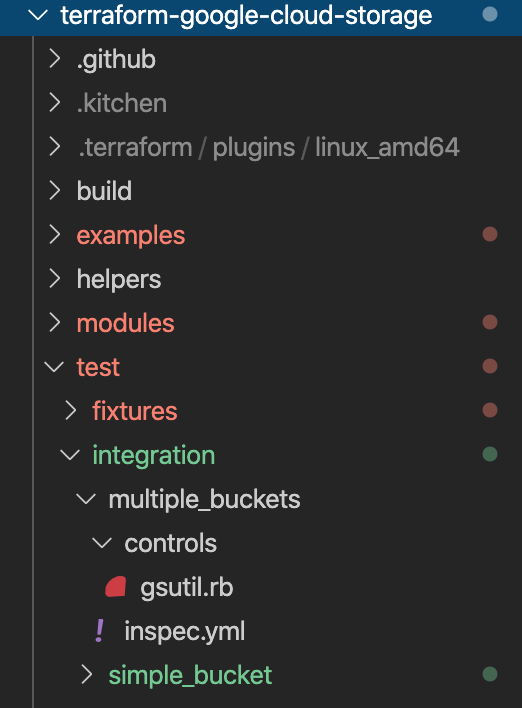
لقد أضفت التصنيف "silly_label" في جميع الحِزم التي يتم إنشاؤها من خلال الوحدة Multi_buckets وعليك الآن كتابة اختبارات لاختبار الميزة الجديدة.
في التعليمة البرمجية أدناه، تحصل على تسمية كل مجموعة من خلال الأمر gsutil ثم تتحقق من الإخراج المرتج من الأمر.
terraform-google-cloud-storage/test/integration/multiple-buckets/controls/gsutil.rb
control "gsutil" do
 <..>

# CODELAB: Copy paste the below test in gsutil.rb to test silly_label feature.

# command to get the labels for bucket_1
describe command("gsutil label get gs://#{attribute("names_list")[0]}") do
   //check if the command gave a valid response
   its(:exit_status) { should eq 0 }
   its(:stderr) { should eq "" }

   //parse the command's output into JSON
   let!(:data) do
     if subject.exit_status == 0
         JSON.parse(subject.stdout)
     else
         {}
     end
   end

   # check if bucket_1 has the new "silly" label with the value "awesome"
   describe "bucket_1" do
   it "has label" do
       data.each do |bucket|
           expect(data["silly"]).to include("awesome")
       end
     end
   end
 end
8. إجراء اختبارات التكامل في واجهة CFT
اختبار الدمج
تُستخدم اختبارات الدمج للتحقق من سلوك الوحدة الجذر والوحدات الفرعية وأمثلة الوحدات. يجب أن تكون الإضافات والتغييرات والإصلاحات مصحوبة بالاختبارات.
يتم إجراء اختبارات الدمج باستخدام Kitchen وKitchen-Terraform وInSpec. يتم تجميع هذه الأدوات داخل صورة Docker لتسهيل العملية.
وتتمثّل الاستراتيجية العامة لهذه الاختبارات في التحقّق من سلوك نماذج النماذج، وبالتالي ضمان صحة عمل كل من الوحدة الجذر والوحدات الفرعية ونموذج الوحدات.
في عملية التنفيذ التفاعلي، يتم تنفيذ كل خطوة من خلال أوامر متعددة.
- شغِّل
make docker_runلبدء اختبار حاوية Docker في الوضع التفاعلي.
Make هي أداة لأتمتة الإصدار تنشئ تلقائيًا برامج ومكتبات قابلة للتنفيذ من رمز المصدر عن طريق قراءة ملفات تسمى Makefiles التي تحدد كيفية اشتقاق البرنامج المستهدف. عند إجراء تغييرات على الملف، يجب أن يتم تعديل حاوية Docker تلقائيًا.
عند تشغيل make docker_run، يتم إنشاء مساحة عمل في حاوية Docker وتفعيل بيانات الاعتماد لحساب الخدمة. سيتم استخدام مساحة العمل في الخطوات التالية لإجراء الاختبارات.
سيظهر الناتج أدناه في الوحدة الطرفية:
Activated service account credentials for: [cft@<PROJECT_ID>.iam.gserviceaccount.com]
- نفِّذ
kitchen_do listلسرد جميع النُسخ الافتراضية في مساحة العمل التي تحتوي على اختبارات دمج.You will see the below output in your terminal.
[root@<CONTAINER_ID> workspace]# kitchen_do list
Automatically setting inputs from outputs of test/setup
Found test/source.sh. Using it for additional explicit environment configuration.
Activated service account credentials for: [cft@<PROJECT_ID>.iam.gserviceaccount.com]
Instance                  Driver     Provisioner  Verifier   Transport  Last Action  Last Error
multiple-buckets-default  Terraform  Terraform    Terraform  Ssh        Verified     <None>
- يمكنك تشغيل
kitchen_do create <EXAMPLE_NAME>لإعداد دليل العمل لنموذج وحدة.
تقوم هذه الخطوة بتهيئة المطبخ وتهيئة التضاريس في مساحة العمل.
سيظهر الناتج أدناه في الوحدة الطرفية.
[root@<CONTAINER_ID> workspace]# kitchen_do create multiple-buckets-default
Automatically setting inputs from outputs of test/setup
Found test/source.sh. Using it for additional explicit environment configuration.
Activated service account credentials for: [cft@<PROJECT_ID>.iam.gserviceaccount.com]
-----> Starting Kitchen (v1.24.0)
-----> Creating <multiple-buckets-default>...
       Terraform v0.12.12
       + provider.google v3.10.0

       Your version of Terraform is out of date! The latest version
       is 0.12.21. You can update by downloading from www.terraform.io/downloads.html
$$$$$$ Running command `terraform init -input=false -lock=true -lock-timeout=0s  -upgrade -force-copy -backend=true  -get=true -get-plugins=true -verify-plugins=true` in directory /workspace/test/fi
xtures/multiple_buckets
       Upgrading modules...
       - example in ../../../examples/multiple_buckets
       - example.cloud_storage in ../../..

       Initializing the backend...

       Initializing provider plugins...
       - Checking for available provider plugins...
       - Downloading plugin for provider "google" (hashicorp/google) 2.18.1...
       - Downloading plugin for provider "random" (hashicorp/random) 2.2.1...

       Terraform has been successfully initialized!
$$$$$$ Running command `terraform workspace select kitchen-terraform-multiple-buckets-default` in directory /workspace/test/fixtures/multiple_buckets
       Finished creating <multiple-buckets-default> (0m11.01s).
-----> Kitchen is finished. (0m12.62s)
- شغِّل
kitchen_do converge <EXAMPLE_NAME>لتطبيق نموذج الوحدة.
تطبّق هذه الخطوة مساحة عمل الشكل السطحي التي تم إنشاؤها في الخطوة السابقة على مشروع Google Cloud Platform الذي تم إنشاؤه مسبقًا في الدرس التطبيقي حول الترميز.
سيظهر الناتج أدناه في الوحدة الطرفية.
[root@<CONTAINER_ID> workspace]# kitchen_do converge multiple-buckets-default
Automatically setting inputs from outputs of test/setup
Found test/source.sh. Using it for additional explicit environment configuration.
Activated service account credentials for: [cft@<YOUR_PROJECT_ID>.iam.gserviceaccount.com]
-----> Starting Kitchen (v1.24.0)
-----> Converging <multiple-buckets-default>...
       Terraform v0.12.20
       + provider.google v3.9.0

       Your version of Terraform is out of date! The latest version
       is 0.12.21. You can update by downloading from https://www.terraform.io/downloads.html
$$$$$$ Running command `terraform workspace select kitchen-terraform-multiple-buckets-default` in directory /workspace/test/fixtures/multiple_buckets
$$$$$$ Running command `terraform get -update` in directory /workspace/test/fixtures/multiple_buckets
       - example in ../../../examples/multiple_buckets
       - example.cloud_storage in ../../..
$$$$$$ Running command `terraform validate   ` in directory /workspace/test/fixtures/multiple_buckets
       Success! The configuration is valid.

$$$$$$ Running command `terraform apply -lock=true -lock-timeout=0s -input=false -auto-approve=true  -parallelism=10 -refresh=true  ` in directory /workspace/test/fixtures/multiple_buckets
       random_pet.main: Creating...
       random_pet.main: Creation complete after 0s [id=<BUCKET-ID>]
       module.example.module.cloud_storage.google_storage_bucket.buckets[0]: Creating...
       module.example.module.cloud_storage.google_storage_bucket.buckets[1]: Creating...
       module.example.module.cloud_storage.google_storage_bucket.buckets[1]: Creation complete after 3s [id=<BUCKET-ID-01>]
       module.example.module.cloud_storage.google_storage_bucket.buckets[0]: Creation complete after 3s [id=<BUCKET-ID-02>]

       Apply complete! Resources: 3 added, 0 changed, 0 destroyed.

       Outputs:

       names = {
         "one" = "<BUCKET-ID-01>"
         "two" = "<BUCKET-ID-02>"
       }
       names_list = [
         "<BUCKET-NAME-01>",
         "<BUCKET-NAME-02>",
       ]
       project_id = ci-cloud-storage-ae79
       Finished converging <multiple-buckets-default> (0m7.17s).
-----> Kitchen is finished. (0m8.77s)
- شغِّل
kitchen_do verify <EXAMPLE_NAME>لاختبار نموذج الوحدة.
سيتم تنفيذ هذه الخطوة من خلال ملف gsutils.rb الذي يحتوي على اختبارات لوحدة Multi_buckets. يحتوي كل اختبار على أمر gsutil الذي سيتم تشغيله في المشروع التجريبي الذي أنشأته سابقًا باستخدام إعداد بيانات اعتماد حساب الخدمة.
إذا ظهرت لك أي أخطاء، سترى ما كان متوقّعًا وما تلقّاه الأمر من أجل الاختبار.
سيظهر الناتج أدناه في الوحدة الطرفية.
multiple_buckets local: Verifying

Profile: multiple_buckets
Version: (not specified)
Target:  local://

  ✔  gsutil: gsutil
     ✔  Command: `gsutil ls -p <PROJECT_ID>` exit_status should eq 0
     ✔  Command: `gsutil ls -p <PROJECT_ID>` stderr should eq ""
     ✔  Command: `gsutil ls -p <PROJECT_ID>` stdout should include "multiple-buckets-mzgy-eu-one"
     ✔  Command: `gsutil ls -p <PROJECT_ID>` stdout should include "<BUCKET-ID-01>"
     ✔  Command: `gsutil bucketpolicyonly get gs://<BUCKET-ID-01>` exit_status should eq 0
     ✔  Command: `gsutil bucketpolicyonly get gs://<BUCKET-ID-01>` stderr should eq ""
     ✔  Command: `gsutil bucketpolicyonly get gs://<BUCKET-ID-01>` stdout should include "Enabled: True"
     ✔  Command: `gsutil bucketpolicyonly get gs://<BUCKET-ID-02>` exit_status should eq 0
     ✔  Command: `gsutil bucketpolicyonly get gs://<BUCKET-ID-02>` stderr should eq ""
     ✔  Command: `gsutil bucketpolicyonly get gs://<BUCKET-ID-02>` stdout should include "Enabled: False"
     ✔  Command: `gsutil label get gs://<BUCKET-ID-01>` exit_status should eq 0
     ✔  Command: `gsutil label get gs://<BUCKET-ID-01>` stderr should eq ""
     ✔  Command: `gsutil label get gs://<BUCKET-ID-01>` bucket_1 has label
     ✔  Command: `gsutil label get gs://<BUCKET-ID-02>` exit_status should eq 0
     ✔  Command: `gsutil label get gs://<BUCKET-ID-02>` stderr should eq ""
     ✔  Command: `gsutil label get gs://<BUCKET-ID-02>` bucket_2 has label
     ✔  Command: `gsutil lifecycle get gs://<BUCKET-ID-01>` should eq "NEARLINE"
     ✔  Command: `gsutil lifecycle get gs://<BUCKET-ID-01>` should eq "SetStorageClass"
     ✔  Command: `gsutil lifecycle get gs://<BUCKET-ID-01>` should eq 10
     ✔  Command: `gsutil lifecycle get gs://<BUCKET-ID-01>` should eq false
     ✔  Command: `gsutil lifecycle get gs://<BUCKET-ID-01>` should eq ["MULTI_REGIONAL", "STANDARD", "DURABLE_REDUCED_AVAILABILITY"]
     ✔  Command: `gsutil lifecycle get gs://<BUCKET-ID-01>` exit_status should eq 0
     ✔  Command: `gsutil lifecycle get gs://<BUCKET-ID-01>` stderr should eq ""
     ✔  Command: `gsutil lifecycle get gs://<BUCKET-ID-02>` should eq "NEARLINE"
     ✔  Command: `gsutil lifecycle get gs://<BUCKET-ID-02>` should eq "SetStorageClass"
     ✔  Command: `gsutil lifecycle get gs://<BUCKET-ID-02>` should eq 10
     ✔  Command: `gsutil lifecycle get gs://<BUCKET-ID-02>` should eq false
     ✔  Command: `gsutil lifecycle get gs://<BUCKET-ID-02>` should eq ["MULTI_REGIONAL", "STANDARD", "DURABLE_REDUCED_AVAILABILITY"]
     ✔  Command: `gsutil lifecycle get gs://<BUCKET-ID-02>` exit_status should eq 0
     ✔  Command: `gsutil lifecycle get gs://<BUCKET-ID-02>` stderr should eq ""


Profile Summary: 1 successful control, 0 control failures, 0 controls skipped
Test Summary: 30 successful, 0 failures, 0 skipped
       Finished verifying <multiple-buckets-default> (0m8.83s).
-----> Kitchen is finished. (0m16.61s)
- يمكنك تشغيل
kitchen_do destroy <EXAMPLE_NAME>لإتلاف مثال حالة الوحدة.
تؤدي هذه الخطوة إلى إتلاف مساحة العمل التي أنشأتها في الخطوات أعلاه. ستؤدي هذه الخطوة أيضًا إلى إتلاف حِزم GCS التي تم إنشاؤها في المشروع إلى جانب التصنيف الذي أضفته إلى وحدة GCS.
يمكنك الاطّلاع على الناتج أدناه في الوحدة الطرفية.
[root@<CONTAINER_ID> workspace]# kitchen_do destroy multiple-buckets-default
Automatically setting inputs from outputs of test/setup
Found test/source.sh. Using it for additional explicit environment configuration.
Activated service account credentials for: [ci-cloud-storage@ci-cloud-storage-54ab.iam.gserviceaccount.com]
-----> Starting Kitchen (v1.24.0)
-----> Destroying <multiple-buckets-default>...
       Terraform v0.12.12
       + provider.google v3.10.0

       Your version of Terraform is out of date! The latest version
       is 0.12.21. You can update by downloading from www.terraform.io/downloads.html
$$$$$$ Running command `terraform init -input=false -lock=true -lock-timeout=0s  -force-copy -backend=true  -get=true -get-plugins=true -verify-plugins=true` in directory /workspace/test/fixtures/mu
ltiple_buckets
       Initializing modules...

       Initializing the backend...

       Initializing provider plugins...

       Terraform has been successfully initialized!
$$$$$$ Running command `terraform workspace select kitchen-terraform-multiple-buckets-default` in directory /workspace/test/fixtures/multiple_buckets
$$$$$$ Running command `terraform destroy -auto-approve -lock=true -lock-timeout=0s -input=false  -parallelism=10 -refresh=true  ` in directory /workspace/test/fixtures/multiple_buckets
       random_string.prefix: Refreshing state... [id=mzgy]
       module.example.module.cloud_storage.google_storage_bucket.buckets[0]: Refreshing state... [id=<BUCKET-ID-01>]
       module.example.module.cloud_storage.google_storage_bucket.buckets[1]: Refreshing state... [id=<BUCKET-ID-02>]
       module.example.module.cloud_storage.google_storage_bucket.buckets[0]: Destroying... [id=<BUCKET-ID-01>]
       module.example.module.cloud_storage.google_storage_bucket.buckets[1]: Destroying... [id=<BUCKET-ID-02>]
       module.example.module.cloud_storage.google_storage_bucket.buckets[0]: Destruction complete after 1s
       module.example.module.cloud_storage.google_storage_bucket.buckets[1]: Destruction complete after 2s
       random_string.prefix: Destroying... [id=mzgy]
       random_string.prefix: Destruction complete after 0s

       Destroy complete! Resources: 3 destroyed.
$$$$$$ Running command `terraform workspace select default` in directory /workspace/test/fixtures/multiple_buckets
       Switched to workspace "default".
$$$$$$ Running command `terraform workspace delete kitchen-terraform-multiple-buckets-default` in directory /workspace/test/fixtures/multiple_buckets
       Deleted workspace "kitchen-terraform-multiple-buckets-default"!
       Finished destroying <multiple-buckets-default> (0m6.49s).
-----> Kitchen is finished. (0m8.10s)
9. إنشاء وثائق للمدخلات والمخرجات
يتم تلقائيًا إنشاء جدولَي "الإدخالات" و"المخرجات" في الملفات بتنسيق README للوحدة الجذر والوحدات الفرعية ونماذج الوحدات استنادًا إلى variables وoutputs للوحدات المعنيّة. يجب إعادة تحميل هذه الجداول في حال تغيير واجهات الوحدات.
التشغيل:
make generate_docs
# This will generate new Inputs and Outputs tables
10. تنفيذ اختبارات الوبر في CFT
linter هي أداة تحلِّل رمز المصدر لوضع علامة على الأخطاء البرمجية والأخطاء في الأسلوب والتركيبات المريبة.
يمكن استخدام الوبر أو تنسيق العديد من الملفات في المستودع للحفاظ على معايير الجودة. لضمان الجودة في CFT، يجب استخدام اختبار الوبر.
التشغيل:
make docker_test_lint
# This will run all lint tests on your repo
11. تقديم مسؤول العلاقات العامة على جيت هب
الآن بعد أن غيّرت رمزك محليًا واختبرته من خلال اختبارات الدمج، ستحتاج إلى نشر هذا الرمز في المستودع الرئيسي.
لإتاحة الرمز في المستودع الرئيسي، عليك إجراء تغييرات على الرمز في الفرع وإرساله إلى المستودع الرئيسي. لإضافة الرمز إلى المستودع الرئيسي الذي أجريته في بداية "الدرس التطبيقي حول الترميز"، عليك تقديم "طلب سحب" (PR) في المستودع الرئيسي بعد تطبيق الرمز عليه.
وعند تقديم عرض عام، سيتم إشعار مشرف Repo لمراجعة التغييرات المقترَحة في الرمز. بالإضافة إلى ذلك، يمكنك إضافة مستخدمين آخرين كمراجعين للحصول على ملاحظات حول التغييرات التي أجريتها على الرمز البرمجي. سيؤدّي مسؤول العلاقات العامة إلى إطلاق Cloud Build الذي سيُجري اختبارات على المستودع.
استنادًا إلى التغييرات التي أجريتها على الرمز، سيقدم مراجعو الرموز تعليقات على الرمز الخاص بك ويطلبون منك إجراء تعديلات في حال كان هناك حاجة إلى التغيير بناءً على أفضل الممارسات والوثائق. سيراجع المشرف التغييرات التي أجريتها على الرمز، ويتأكّد من امتثال الرمز البرمجي للمستودع، وقد يطلب منك مرة أخرى إجراء بعض التغييرات قبل دمج الرمز في المستودع الرئيسي.
اتّبِع الخطوات التالية لإضافة الرمز إلى الفرع المتشعّب لإرسال الرمز إلى الفرع المتشعّب:
- الخطوة الأولى هي إضافة الملفات التي تم تغييرها إلى المستودع المحلي.
$ git add main.tf
$ git add README.md
$ git add variables.tf
$ git add examples/multiple-buckets/main.tf
$ git add test/integration/multiple-buckets/controls/gsutil.rb
# The ‘git add' command adds the file in the local repository and
# stages the file for commit. To unstage a file, use git reset HEAD YOUR-FILE
- يتم الآن تنظيم ملفاتك، وبعد ذلك ستنفّذ التغييرات.
$ git commit -m "First CFT commit"
# This will commit the staged changes and prepares them to be pushed
# to a remote repository. To remove this commit and modify the file,
# use 'git reset --soft HEAD~1' and commit and add the file again.
- يمكنك دفع التغييرات الملتزمة في مستودعك المحلي إلى GitHub لإنشاء طلب سحب (PR).
$ git push -u origin master
# Pushes the changes in your local repository up to the remote
# repository you specified as the origin
تغييرات التعليمات البرمجية جاهزة الآن لطلب سحب
اتّبِع الخطوات التالية لرفع مسؤول العلاقات العامة إلى مستودع terraform-google-modules/terraform-google-cloud-storage :
- في متصفّح الويب، انتقِل إلى صفحة المستودع الرئيسية.
- في قائمة "الفرع"، اختَر الشوكة التي تحتوي على التعهدات.
- على يمين "الفرع" انقر فوق "طلب سحب جديد".

- استخدام القاعدة "الأساسية" القائمة المنسدلة لتحديد الفرع الذي تريد دمج تغييراتك فيه، وعادةً ما يكون هذا هو "الرئيسي" نظرًا لأنك أجريت تغييرات على الرمز في الشوكة.
- أدخِل عنوانًا ووصفًا لطلب السحب لوصف التغييرات في الرمز البرمجي. كن محددًا قدر الإمكان في حين أن تكون موجزًا.
- لإنشاء طلب سحب جاهز للمراجعة، انقر على "إنشاء طلب سحب".
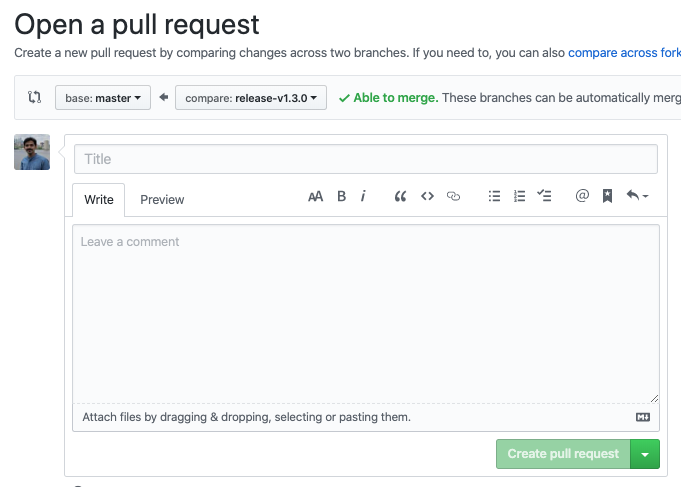
- ستظهر لك "مشغِّلات Cloud Build" التي يتم تشغيلها بسبب "PR".
لقد نجحت في تطبيق أول تغيير لك على الرمز في فرعك المتشعّب ورفعت أول إصدار CFT PR مقابل الفرع الرئيسي.
12. تهانينا
تهانينا، لقد أضفت بنجاح ميزة إلى وحدة CFT وأرسلت "معايير العلاقات العامة" لمراجعتها.
لقد أضفت ميزة إلى وحدة CFT، واختبرتها محليًا من خلال مثال، وأجريت اختبارات قبل تطبيق التعليمة البرمجية على GitHub. وأخيرًا، جمعتم العلاقات العامة لمراجعتها والدمج النهائي في CFT.
أنت تعرف الآن الخطوات المهمة لبدء استخدام مجموعة أدوات Cloud Foundation.


