
1. Introdução
Python é uma linguagem de programação de código aberto muito usada por cientistas de dados, desenvolvedores de aplicativos da Web, administradores de sistemas e muito mais.
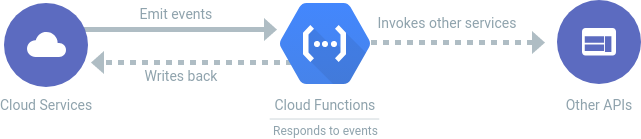
O Cloud Functions é uma plataforma de computação sem servidor orientada a eventos. Com o Cloud Functions, você escreve seu código sem se preocupar com o provisionamento de recursos ou o escalonamento para lidar com requisitos em constante mudança.
Há dois tipos de Funções do Cloud:
- As funções HTTP respondem a solicitações HTTP. Você vai criar um casal neste codelab.
- As funções de segundo plano são acionadas por eventos, como a publicação de uma mensagem no Cloud Pub/Sub ou o upload de um arquivo no Cloud Storage. Não vamos abordar isso neste laboratório, mas você pode ler mais na documentação.
Neste codelab, você vai aprender a criar suas próprias Funções do Cloud em Python.
O que você vai criar
Neste codelab, você vai publicar uma Função do Cloud que, quando invocada via HTTP, mostra o logotipo"Python Powered":
O que você vai aprender
- Como escrever uma função do Cloud HTTP.
- Como escrever uma função do Cloud HTTP que recebe argumentos.
- Como testar uma função do Cloud HTTP.
- Como executar um servidor HTTP local do Python para testar a função.
- Como escrever um Cloud Function HTTP que retorna uma imagem.
2. Configuração e requisitos
Configuração de ambiente personalizada
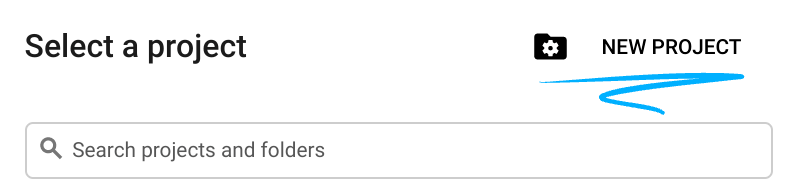
- Faça login no Console do Google Cloud e crie um novo projeto ou reutilize um existente. Crie uma conta do Gmail ou do Google Workspace, se ainda não tiver uma.


- O Nome do projeto é o nome de exibição para os participantes do projeto. É uma string de caracteres não usada pelas APIs do Google e pode ser atualizada quando você quiser.
- O ID do projeto precisa ser exclusivo em todos os projetos do Google Cloud e não pode ser mudado após a definição. O console do Cloud gera automaticamente uma string exclusiva. Em geral, não importa o que seja. Na maioria dos codelabs, é necessário fazer referência ao ID do projeto, normalmente identificado como
PROJECT_ID. Se você não gostar do ID gerado, crie outro aleatório. Se preferir, teste o seu e confira se ele está disponível. Ele não pode ser mudado após essa etapa e permanece durante o projeto. - Para sua informação, há um terceiro valor, um Número do projeto, que algumas APIs usam. Saiba mais sobre esses três valores na documentação.
- Em seguida, ative o faturamento no console do Cloud para usar os recursos/APIs do Cloud. A execução deste codelab não vai ser muito cara, se tiver algum custo. Para encerrar os recursos e evitar cobranças além deste tutorial, exclua os recursos criados ou exclua o projeto. Novos usuários do Google Cloud estão qualificados para o programa de US$ 300 de avaliação sem custos.
Iniciar o Cloud Shell
Embora o Google Cloud possa ser operado remotamente do seu laptop, neste codelab usaremos o Cloud Shell, um ambiente de linha de comando executado no Cloud.
Ativar o Cloud Shell
- No Console do Cloud, clique em Ativar o Cloud Shell
 .
.

Se esta for a primeira vez que você inicia o Cloud Shell, uma tela intermediária vai aparecer com a descrição dele. Se isso acontecer, clique em Continuar.
Leva apenas alguns instantes para provisionar e se conectar ao Cloud Shell.

Essa máquina virtual contém todas as ferramentas de desenvolvimento necessárias. Ela oferece um diretório principal persistente de 5 GB, além de ser executada no Google Cloud. Isso aprimora o desempenho e a autenticação da rede. Neste codelab, quase todo o trabalho pode ser feito com um navegador.
Depois de se conectar ao Cloud Shell, você vai ver que sua conta já está autenticada e que o projeto está configurado com o ID do seu projeto.
- Execute o seguinte comando no Cloud Shell para confirmar se a conta está autenticada:
gcloud auth list
Resposta ao comando
 Credentialed Accounts
ACTIVE  ACCOUNT
*       <my_account>@<my_domain.com>

To set the active account, run:
    $ gcloud config set account `ACCOUNT`
- Execute o comando a seguir no Cloud Shell para confirmar se o comando gcloud sabe sobre seu projeto:
gcloud config list project
Resposta ao comando
[core]
project = <PROJECT_ID>
Se o projeto não estiver configurado, configure-o usando este comando:
gcloud config set project <PROJECT_ID>
Resposta ao comando
Updated property [core/project].
Verificar se as APIs Cloud Functions e Cloud Build estão ativadas
Execute o seguinte comando no Cloud Shell para garantir que as APIs Cloud Functions e Cloud Build estejam ativadas:
gcloud services enable \
  cloudfunctions.googleapis.com \
  cloudbuild.googleapis.com
Observação: o Cloud Build será chamado pelo comando gcloud functions deploy e criará automaticamente seu código em uma imagem de contêiner.
Faça o download do código-fonte
No terminal do Cloud Shell, execute os comandos a seguir:
REPO_NAME="codelabs"
REPO_URL="https://github.com/GoogleCloudPlatform/$REPO_NAME"
SOURCE_DIR="cloud-functions-python-http"

git clone --no-checkout --filter=blob:none --depth=1 $REPO_URL
cd $REPO_NAME
git sparse-checkout set $SOURCE_DIR
git checkout
cd $SOURCE_DIR
Confira o conteúdo do diretório de origem:
ls
Você precisa ter os seguintes arquivos:
main.py python-powered.png test_main.py web_app.py
3. Apresentação do HTTP Cloud Functions
As funções HTTP do Cloud Functions em Python são escritas como funções regulares do Python. A função precisa aceitar um único argumento flask.Request, geralmente chamado de request.
main.py
import flask


def hello_world(request: flask.Request) -> flask.Response:
    """HTTP Cloud Function.

    Returns:
    - "Hello World! 👋"
    """
    response = "Hello World! 👋"

    return flask.Response(response, mimetype="text/plain")

# ...
Abra o arquivo com o editor de linha de comando que preferir (nano, vim ou emacs). Você também pode abrir no editor do Cloud Shell depois de definir o diretório de origem como um espaço de trabalho:
cloudshell open-workspace .
Vamos implantar essa função como uma função do Cloud HTTP usando o comando gcloud functions deploy:
FUNCTION_NAME="hello_world"

gcloud functions deploy $FUNCTION_NAME \
  --runtime python312 \
  --trigger-http \
  --allow-unauthenticated
Saída de comando:
...
Deploying function (may take a while - up to 2 minutes)...done.
availableMemoryMb: 256
...
entryPoint: FUNCTION_NAME
httpsTrigger:
  url: https://REGION-PROJECT_ID.cloudfunctions.net/FUNCTION_NAME
...
Observações sobre as opções de gcloud functions deploy:
--runtime: especifica o ambiente de execução da linguagem. No Python, isso pode serpython37,python38,python39,python310oupython312. Consulte Tempos de execução.--trigger-http: a função vai receber um endpoint. As solicitações HTTP (POST, PUT, GET, DELETE e OPTIONS) para o endpoint acionam a execução da função.--allow-unauthenticated: a função será pública, permitindo todos os chamadores, sem verificar a autenticação.- Para saber mais, consulte gcloud functions deploy.
Para testar a função, clique no URL httpsTrigger.url mostrado na resposta ao comando acima. Também é possível recuperar o URL de maneira programática e chamar a função com os seguintes comandos:
URL=$(gcloud functions describe $FUNCTION_NAME --format "value(httpsTrigger.url)")
curl -w "\n" $URL
Você vai receber este resultado:
Hello World! 👋
4. Como escrever uma função do Cloud HTTP que recebe argumentos
As funções são mais versáteis quando aceitam argumentos. Vamos definir uma nova função hello_name que seja compatível com um parâmetro name:
main.py
# ...

def hello_name(request: flask.Request) -> flask.Response:
    """HTTP Cloud Function.

    Returns:
    - "Hello {NAME}! 🚀" if "name=NAME" is defined in the GET request
    - "Hello World! 🚀" otherwise
    """
    name = request.args.get("name", "World")
    response = f"Hello {name}! 🚀"

    return flask.Response(response, mimetype="text/plain")

# ...
Vamos implantar essa nova função:
FUNCTION_NAME="hello_name"

gcloud functions deploy $FUNCTION_NAME \
  --runtime python312 \
  --trigger-http \
  --allow-unauthenticated
Saída de comando:
...
Deploying function (may take a while - up to 2 minutes)...done.
availableMemoryMb: 256
...
entryPoint: FUNCTION_NAME
httpsTrigger:
  url: https://REGION-PROJECT_ID.cloudfunctions.net/FUNCTION_NAME
...
Para testar a função, clique no URL httpsTrigger.url mostrado na resposta ao comando acima. Também é possível recuperar o URL de maneira programática e chamar a função com os seguintes comandos:
URL=$(gcloud functions describe $FUNCTION_NAME --format "value(httpsTrigger.url)")
curl -w "\n" $URL
Você vai receber o resultado padrão:
Hello World! 🚀
Você está recebendo o resultado padrão porque o argumento name não está definido. Adicione um parâmetro ao URL:
curl -w "\n" $URL?name=YOUR%20NAME
Desta vez, você vai receber sua resposta personalizada:
Hello YOUR NAME! 🚀
A próxima etapa é adicionar testes de unidade para garantir que as funções continuem funcionando conforme o esperado quando o código-fonte for atualizado.
5. Gravar testes
As funções HTTP do Cloud Functions em Python são testadas usando o módulo unittest da biblioteca padrão. Você não precisa executar um emulador ou outra simulação para testar sua função, apenas o código Python normal.
Confira como é um teste das funções hello_world e hello_name:
test_main.py
import unittest
import unittest.mock

import main


class TestHello(unittest.TestCase):
    def test_hello_world(self):
        request = unittest.mock.Mock()

        response = main.hello_world(request)
        assert response.status_code == 200
        assert response.get_data(as_text=True) == "Hello World! 👋"

    def test_hello_name_no_name(self):
        request = unittest.mock.Mock(args={})

        response = main.hello_name(request)
        assert response.status_code == 200
        assert response.get_data(as_text=True) == "Hello World! 🚀"

    def test_hello_name_with_name(self):
        name = "FirstName LastName"
        request = unittest.mock.Mock(args={"name": name})

        response = main.hello_name(request)
        assert response.status_code == 200
        assert response.get_data(as_text=True) == f"Hello {name}! 🚀"
- Os testes em Python são escritos da mesma forma que outros arquivos dessa linguagem. Eles começam com um conjunto de importações e depois definem classes e funções.
- A declaração de teste tem o formato
class TestHello(TestCase). Ela precisa ser uma classe herdada deunittest.TestCase. - A classe de teste tem métodos, cada um deles precisa começar com
test_, que representam casos de teste individuais. - Cada caso de teste testa uma das nossas funções simulando o parâmetro
request(ou seja, substituindo-o por um objeto falso com os dados específicos necessários para o teste). - Depois de invocar cada função, o teste verifica a resposta HTTP para garantir que ela é o que esperávamos.
Como o main.py depende do flask, verifique se o framework Flask está instalado no seu ambiente de teste:
pip install flask
A instalação do Flask gera um resultado semelhante a este:
Collecting flask
...
Successfully installed ... flask-3.0.2 ...
Execute estes testes localmente:
python -m unittest
Os três testes de unidade precisam ser aprovados:
...
----------------------------------------------------------------------
Ran 3 tests in 0.001s

OK
Em seguida, você vai criar uma nova função que retorna o logotipo "Python Powered".
6. Como escrever a função do Cloud HTTP "Python Powered"
Vamos criar uma função um pouco mais divertida retornando a imagem "Python Powered" para cada solicitação:
A listagem a seguir mostra o código para fazer isso:
main.py
# ...

def python_powered(request: flask.Request) -> flask.Response:
    """HTTP Cloud Function.

    Returns:
    - The official "Python Powered" logo
    """
    return flask.send_file("python-powered.png")
Implante uma nova função python_powered:
FUNCTION_NAME="python_powered"

gcloud functions deploy $FUNCTION_NAME \
  --runtime python312 \
  --trigger-http \
  --allow-unauthenticated
Saída de comando:
...
Deploying function (may take a while - up to 2 minutes)...done.
availableMemoryMb: 256
...
entryPoint: FUNCTION_NAME
httpsTrigger:
  url: https://REGION-PROJECT_ID.cloudfunctions.net/FUNCTION_NAME
...
Para testar a função, clique no URL httpsTrigger.url mostrado na resposta ao comando acima. Se tudo estiver funcionando corretamente, o logotipo "Python Powered" vai aparecer em uma nova guia do navegador.
Em seguida, crie um app para executar e testar a função localmente antes da implantação.
7. Como executar a função localmente
É possível executar uma função HTTP localmente criando um app da Web e chamando a função em uma rota. Você pode adicioná-lo no mesmo diretório da sua função. O arquivo chamado web_app.py tem o seguinte conteúdo:
web_app.py
import flask

import main

app = flask.Flask(__name__)


@app.get("/")
def index():
    return main.python_powered(flask.request)


if __name__ == "__main__":
    # Local development only
    # Run "python web_app.py" and open http://localhost:8080
    app.run(host="localhost", port=8080, debug=True)
- Esse arquivo cria um aplicativo Flask.
- Ele registra uma rota no URL base, que é processada com uma função chamada
index(). - A função
index()chama a funçãopython_powered, transmitindo a solicitação atual.
Verifique se o framework Flask está instalado no ambiente de desenvolvimento:
pip install flask
A instalação do Flask gera um resultado semelhante a este:
Collecting flask
...
Successfully installed ... flask-3.0.2 ...
Para executar o aplicativo localmente, execute o seguinte comando:
python web_app.py
Use a visualização na Web do Cloud Shell para testar o app da Web no navegador. No Cloud Shell, clique no botão "Visualização da Web" e selecione "Visualizar na porta 8080":
O Cloud Shell abre o URL de visualização no serviço de proxy dele em uma nova janela do navegador. A visualização na web restringe o acesso HTTPS apenas à sua conta de usuário. Se tudo estiver funcionando corretamente, você verá o logotipo "Python Powered".
8. Parabéns!
Você implantou funções HTTP do Cloud Functions usando funções idiomáticas que processam solicitações da Web com o framework Flask.
Os preços do Cloud Functions são baseados na frequência com que sua função é invocada, incluindo um nível sem custo financeiro para funções que não são executadas com frequência. Depois de testar as funções do Cloud, você pode excluí-las usando gcloud:
gcloud functions delete hello_world --quiet
gcloud functions delete hello_name --quiet
gcloud functions delete python_powered --quiet
Também é possível excluir as funções do console do Google Cloud.
Esperamos que você goste de usar o Cloud Functions em Python!