
1. Overview
Last Updated: 2023-10-10
What you'll build
In this codelab, you'll use Vertex AI Conversation and Dialogflow CX to build, deploy and configure a virtual agent to assist people who want to donate blood and ensure they meet the required eligibility requirements. The agent will use real public data and Google's generative large language models (LLMs) during Dialogflow CX fulfillment.
What features you'll use
To complete the codelab you'll be configuring and using three distinct features:
Data store agents
The Vertex AI Conversation feature creates a special Dialogflow agent, called a data store agent.
With this feature, you provide a website URL, structured data or unstructured data (data stores), then Google parses your content and creates a virtual agent that is powered by data stores and large language models. Your customers and end users can then have conversations with the agent and ask questions about the content. Refer to the Vertex AI Conversation introduction for information about this type of agent.
Generators
The generator feature is a Dialogflow CX feature that allows developers to use Google's latest generative large language models (LLMs) and custom prompts to generate agent responses at runtime. A generator can handle generic responses that involve general knowledge from a large textual dataset it was trained on or context from the conversation.
Generative fallback
The generative fallback feature uses Google's latest generative large language models (LLMs) to generate virtual agent responses when end-user input does not match an intent or parameter for form filling. The feature can be configured with a text prompt that instructs the LLM how to respond. You can use a predefined text prompt or add your own prompts. You can enable generative fallback on no-match event handlers used in flows, pages, or during parameter filling. When generative fallback is enabled for a no-match event, whenever that event triggers, Dialogflow will attempt to produce a generated response that will be said back to the user. If the response generation is unsuccessful, the regular prescribed agent response will be issued instead. If you're keen to learn more about generative fallback try out this codelab!
What you'll learn
- How to create a data store agent from unstructured data
- How to use knowledge handlers to allow end-users to have conversations with a virtual agent about the content added to a data store.
- How to configure a generator text prompt and make it contextual by using built-in generator prompt placeholders.
- How to mark words as generator prompt placeholders and later associate them with session parameters in fulfillment to use their values during execution.
- How to configure a generator to handle responses that involve knowledge from a large textual dataset and context from the current conversation.
- How to generate a formal email using generators
- How to test your agent and simulate customer questions that trigger generated responses
What you'll need
- A Google Cloud Project
- A browser such as Chrome
2. Enable APIs
Before you can create a data store agent in Vertex AI Conversation, you need to enable the Dialogflow as well as the Vertex AI Search and Conversation APIs.
To enable the Dialogflow API, follow these steps:
- In your browser, navigate to the Dialogflow API Service Details page.
- Click the Enable button to enable the Dialogflow API in your Google Cloud project.
To enable the Vertex AI Search and Conversation API, follow these steps:
- In the Google Cloud console, navigate to the Vertex AI Search and Conversation console.
- Read and agree to the Terms of Service, then click Continue and activate the API.
3. Create a new chat app and a data store for your app
Now, you'll create a new chat app for your virtual agent and configure it with a data source. The purpose of the agent that you'll build is to assist customers who have questions about blood eligibility. You will use the Australian Red Cross Lifeblood as the source of truth and you will create a data store based on unstructured data from the blood eligibility website.
- To create a new chat app in Vertex AI Conversation, you can either:
- Navigate to the Vertex AI Conversation console, then click +New app near the top of the console.
- Navigate to the Dialogflow CX console, click +Create new agent then selecting the Auto-generate option, then you'll be redirected to the following step in the Vertex AI Conversation console.
- From the Vertex AI Conversation console, select Chat as the type of app that you want to create.
- Input a Company name of
Save a Life. This parameter is used to define the company that your agent represents and the scope of your agent. - Specify an Agent name of
Blood Donation Agent. - Click Continue.
- Click Create new data store.
- Select Cloud Storage as the data source for your data store.
- Specify the following Google Cloud Storage folder that contains sample data for this codelab, and note that the
gs://prefix is not required:cloud-samples-data/dialogflow-cx/arc-lifeblood - Select Unstructured documents as the type of data you are importing.
- Click Continue.
- Specify a Data store name of
Australian Red Cross Lifeblood Unstructured. - Click Create to create the data store.
- In the list of data stores, select the newly created
Australian Red Cross Lifeblood Unstructured. - Click Create to create your chat app.
Congratulations! You are finished building your knowledge-powered chat app that's ready to help potential donors, so take a moment to celebrate!
But there's still more work to do to make the agent accessible to your users. In the next section, you'll use a knowledge handler to enable conversations between the agent and end-users about eligibility requirements.
4. Configure the agent to answer blood eligibility FAQs
Provide the date store prompt
While the document collection process is running in the background, let's give the agent a brand by editing the data store prompt.
- From the Vertex AI Conversation console, click the name of your chat app, which will redirect you to the Dialogflow CX console for further testing and customization.
- In the Dialogflow CX console and from within your agent, click Agent settings (top right corner of the page), then go to the ML tab and lastly open the Generative AI tab.

- Fill out the form as below to generate the following data store prompt: Your name is
Donate, and you are a helpful and politechatbotatSave a life, a fictitious organization. Your task is to assisthumans with eligibility information.

Enable generative fallback for the Default Start Flow's no-match event
- Switch to the Build tab and open the Start Page.
- Click the sys.no-match-default event handler. Unless the box is already checked, enable the generative fallback feature.

Check the agent's data store
On the Start Page click Edit data stores to look into the Data store settings.

The data store you have previously created has been already selected for you by Dialogflow.

Scroll down to Agent Responses under Fulfillment. A fulfillment is the agent response to the end user. Dialogflow has pre populated Agent says with the parameter $request.knowledge.answers[0] which at run time contains the top answer to the user's question.

5. Test the agent
Once the documents are available and ready for use by your agent, check out how good the answers are.
Click Test Agent to open the Simulator again.

Ask questions that you expect to find in the FAQ page of the website:
What age do I need to be to donate?Can pregnant women donate?I've just come back from a trip to Africa. Can I donate?How can I schedule an appointment?
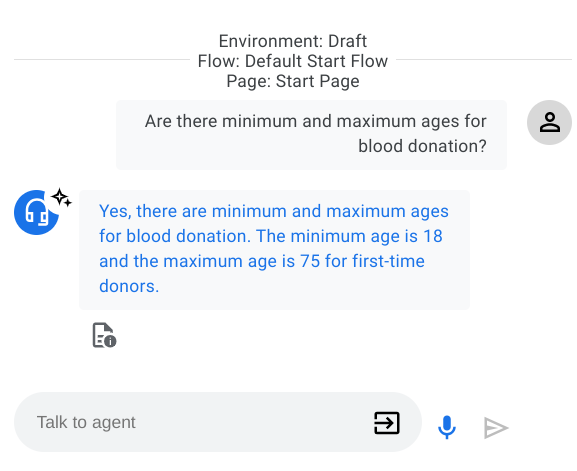
Notice the answers are retrieved from the Australian Red Cross Lifeblood site. As stated on this page there are minimum and maximum ages for blood donation. The minimum age is 18 and the maximum age is 75 for first-time donors. Further evidence of the fact we are pulling information from the data store is given by the little star icon appearing on the agent response and by the original JSON response.

Lastly, let's try and challenge the agent with a question totally unrelated to blood donation.
User: "What's the weather like in Melbourne?"
Agent: "I'm sorry, I can't help you with that. How can I help you with eligibility information?"
This answer has AI generated content in it and derives from the text prompt that Dialogflow has created starting from the knowledge connector setting provided before: "Your name is Donate, and you are a helpful and polite chatbot at Save a Life. Your task is to assist humans with eligibility information". This text prompt contains the company name, the agent name and most importantly what is in its scope which is used by Dialogflow to generate the agent response.
Well done! So far you are using the data store to assist people with frequently asked questions related to blood donation. In the next part of the codelab we will look at how to bind a generator text prompt to the same content to make informed decisions.
6. Set up the agent for the eligibility quiz
Our next task is to design the agent to determine the user's eligibility to donate blood. There are strict requirements donors must meet such as age, weight, existing conditions, recent travels, etc. For the scope of this codelab we will only consider age and weight. A generator will use Google's large language models (LLMs) to dynamically make an informed decision based on the context of the conversation and the knowledge base.
Configure new routes and parameters
- Open the Start Page and click Edit data stores
- Change the existing agent's response to
$request.knowledge.answers[0] Would you like to take the eligibility quiz to find out if you can donate blood, and start changing lives?.

- Click the Save button
- We now need to design the agent to handle "yes" and "no" responses. To begin with, create a confirmation.yes intent and a confirmation.no intent. Follow these guidelines about intent reuse.
- Then on the Start Page create a route for the confirmation.yes intent that transitions to a new page Eligibility Quiz.


- As mentioned before, we will simplify the quiz and we will only consider the age and the weight of the user to determine whether or not they're eligible to donate. Open the Eligibility Quiz page and add a new form parameter age-weight, pick
@sys.anyas the entity type. Provide"What is your age and weight?"as the initial prompt fulfillment. We want to collect both age and weight in one go. Save all the changes.

Create and configure the eligibility generator
The generator feature is a Dialogflow CX feature that allows developers to use Google's latest generative large language models (LLMs) during Dialogflow CX fulfillment. Generators to generate agent responses at runtime. A generator can handle generic responses that involve general knowledge from a large textual dataset it was trained on or context from the conversation.
We shall create a new generator that will compare the information provided by the user (such as age and weight) with the eligibility requirements to determine whether the user can donate.
- On the Dialogflow CX console go to the Manage tab, select Generators and click Create new.

- Next, provide a descriptive display name and write the text prompt. Leave the default model quality control settings. Then click Save to create the generator.
- Display name:
Blood Donation Eligibility - Text prompt:
Check the users eligibility against the following criteria: the minimum age is 18 and the maximum age is 75. Weight should be above 50 Kg. The user age and weight is $last-user-utterance. Be nice and tell the user if they are eligible to donate (also tell them why not in case)
- Display name:
The text prompt is sent to the generative model during fulfillment at runtime. It should be a clear question or request in order for the model to generate a satisfactory response. You can use special built-in generator prompt placeholders in your text prompt:
$conversationThe conversation between the agent and the user, excluding the very last user utterance.$last-user-utteranceThe last user utterance.
The text prompt you have configured expects the user to provide age and weight in one conversational turn (the `$last-user-utterance``).
Use the generator in fulfillment and configure all the required parameters
- On the Eligibility Quiz page, add a new route which will occur when all parameters have been filled. Enter the condition requirement
$page.params.status = "FINAL"and click Save.

- Go to the Generators section of the Fulfillment pane and expand it. Then, click Add generator and select the Blood Donation Eligibility generator. After selecting the generator you need to define the output parameter that will contain the result of the generator after execution.

- Use the output parameter in the agent response and save the route. You are now ready to test it all.

7. Retest your agent
Click Test Agent to open the Simulator again.
On the Simulator start a new conversation with the agent. First ask about age requirements and then proceed to the eligibility quiz. Test the "eligible" path first, so enter an age between 18-75 and a weight above 50 Kg.

Then check the eligibility check fails when one or both the requirements are not met.

Great, the generator works as expected! Or does it? What happens if the user provides the age but not the weight (or the other way around)?

8. Generator prompt tuning
Collecting age and weight in one ago doesn't seem to work unless both age and weight are provided. We should instead create a form that collects both values as entity parameters. To make the prompt contextual of all the eligibility requirements (such as the age and the weight) we can use placeholders by adding a $ before the word. We will later associate these generator prompt placeholders with session parameters in fulfillment and they will be replaced by the session parameter values during execution.
- Open the Eligibility Quiz page and add two separate form parameters: one for weight and one for age. Pick
@sys.number-integeras the entity type and mark the parameters required. Provide the initial prompt fulfillments such asHow old are you?andWhat is your correct weight?. Save all the changes.

- Before we can change the text prompt of the generator since we are going to add two new custom placeholders we first need to remove the generator from the route fulfillment. Click Save.

- Go to the Manage tab, select Generators and update the text prompt of the Blood Donation Eligibility generator with:
Check the users eligibility against the following criteria: the minimum age is 18 and the maximum age is 75. The weight must be at least 50 kg. The user is $age years old and weighs $weight Kg. Craft an email and politely explain to the user if they're eligible to donate and if not why.. Click Save.
Notice that we haven't just made the text prompt contextual of the age and weight form parameters, we have also changed the last sentence to be able to generate a formal email to the user which contains the official outcome of the eligibility quiz.

- On the Eligibility Quiz page, select the route and expand the Generators section of the Fulfillment pane. Then, click Add generator and select the Blood Donation Eligibility generator. After selecting the generator you need to associate the new prompt placeholders with the respective session parameters. Moreover, you need to re-set the output parameter. Click Save.

- Retest the agent again. The eligibility check takes now into account both age and weight and the wording has changed from a conversational tone to a more polite response that is ready to be sent out without any potential human in the loop.


9. Congratulations
Well done on completing this codelab!

Today we've investigated generators in the context of eligibility quizzes. You have seen that generators use LLMs to generate agent responses and when powered by a knowledge base they can also make well-informed decisions. Surely there are many other use cases that can be implemented leveraging generators and data stores and we can't wait to get to know them!
Clean Up
You can perform the following cleanup to avoid incurring charges to your Google Cloud account for the resources used in this codelab:
- To avoid unnecessary Google Cloud charges, use the Google Cloud console to delete your project if you do not need it.
- If you used an existing Google Cloud project, delete the resources you created to avoid incurring charges to your account. For more information, refer to the steps to Delete an app.
- If you want to disable the APIs for Vertex AI Conversation and Dialogflow, navigate to the Discovery Engine API Service Details page and click Disable API and confirm, and navigate to the Dialogflow API Service Details page and click Disable API and confirm.
Learn More
Continue learning about Conversational AI and Generative AI with these guides and resources:
- Documentation for Dialogflow CX
- Introduction to Vertex AI Conversation
- Create and use a data store agent
- Documentation for Vertex AI Conversation
- Generative AI in Google Cloud
License
This work is licensed under a Creative Commons Attribution 2.0 Generic License.