
1. ก่อนเริ่มต้น
ในโค้ดแล็บนี้ คุณจะได้เรียนรู้วิธีเปลี่ยนงานใน Google Workspace ให้เป็นระบบอัตโนมัติด้วยฟีเจอร์การเรียกใช้ฟังก์ชันและความสามารถหลายรูปแบบของ Gemini API
ข้อกำหนดเบื้องต้น
- มีความคุ้นเคยพื้นฐานกับ Apps Script, JavaScript หรือภาษาโปรแกรมที่คล้ายกัน
สิ่งที่คุณจะได้เรียนรู้
- วิธีใช้ประโยชน์จากฟีเจอร์การเรียกใช้ฟังก์ชันและฟีเจอร์มัลติโมดัลของ Gemini API
- วิธีเชื่อมโยงการเรียก Gemini API หลายรายการเข้าด้วยกัน
- วิธีทำให้งานใน Google Workspace เป็นแบบอัตโนมัติด้วย Gemini API
สิ่งที่ต้องมี
- เว็บเบราว์เซอร์
- บัญชี Gmail หรือบัญชี Google Workspace ที่ใช้การตั้งค่าเฉพาะของ Gemini API
- การเชื่อมต่อจากภูมิภาคที่รองรับสำหรับ Gemini API
- ไม่บังคับ: อินเทอร์เฟซบรรทัดคำสั่งที่มีโปรแกรม
curlเพื่อทดสอบคำขอ API โดยตรง
โค้ดทั้งหมดสำหรับ Codelab นี้มีอยู่ในสูตรการแก้ปัญหาของ Gemini API บน GitHub โปรดดูหากต้องการโค้ดที่เสร็จสมบูรณ์
2. ตั้งค่า Gemini API
เกี่ยวกับ Gemini
โมเดล Gemini เป็นกลุ่มโมเดล AI ที่ใหญ่ที่สุดและมีความสามารถมากที่สุดของ Google หากต้องการใช้ประโยชน์จากโมเดลเหล่านี้ในแอป คุณสามารถใช้ Gemini API นอกจากนี้ คุณยังทดลองใช้ Gemini API ใน Google AI Studio ซึ่งเป็นอินเทอร์เฟซเว็บสำหรับ API ที่คุณสามารถลองใช้พรอมต์ ปรับแต่งการตั้งค่าโมเดล และปรับแต่งโมเดลที่กำหนดเองได้โดยไม่ต้องเขียนโค้ด
รับคีย์
- หากต้องการใช้ Gemini API ให้สร้างคีย์ API ใน Google AI Studio
ไม่บังคับ: ทดสอบคีย์
หากคุณมีสิทธิ์เข้าถึงบรรทัดคำสั่งด้วย curl ให้เพิ่มคีย์ของคุณในบรรทัดแรกของบล็อกต่อไปนี้ จากนั้นเรียกใช้ในเทอร์มินัลเพื่อทดสอบคีย์ API
export GOOGLE_API_KEY=Paste_your_API_key_here

curl "https://generativelanguage.googleapis.com/v1beta/models?key=${GOOGLE_API_KEY}"
คุณควรเห็นรายการโมเดลในรูปแบบ JSON เช่น models/gemini-1.0-pro ซึ่งหมายความว่าการดำเนินการสำเร็จ
3. ไม่บังคับ: ส่งคำขอไปยัง Gemini API
ในขั้นตอนนี้ (ไม่บังคับ) คุณจะส่งคำขอไปยัง Gemini API เพื่อทำความเข้าใจวิธีการทำงานของการสร้างเนื้อหาให้ดียิ่งขึ้นก่อนที่จะเพิ่มลงในแอป Apps Script
เกี่ยวกับโมเดล
Gemini API มีโมเดลหลายโมเดลที่มีความสามารถและข้อจำกัดแตกต่างกัน โมเดลแต่ละรายการจะแสดงพร้อมกับความสามารถของโมเดลในหน้าโมเดล Gemini
การส่งคำขอแรก
หากต้องการให้ Gemini API ทำให้พรอมต์ข้อความสมบูรณ์ คุณต้องสร้างคำขอ JSON แล้วส่งไปยังปลายทาง REST API
โดยทำตามขั้นตอนต่อไปนี้
- ในไฟล์ใหม่ ให้ป้อนคำขอ JSON ต่อไปนี้
{
  contents: [
   {
     parts: [
       { text: 'The most important aspects of a persuasive presentation are:' }
     ]
   }
 ]
}
คำขอ JSON มีพรอมต์ต่อไปนี้ The most important aspects of a persuasive presentation are: โมเดลจะทำตามคำสั่งนี้และแสดงผลลัพธ์ให้คุณโดยตรง
คำขอ JSON มีฟิลด์ระดับบนสุด 3 รายการที่ต้องกรอก ได้แก่ contents, generationConfig และ safetySettings โดยมีเพียง contents เท่านั้นที่จำเป็น ส่วนที่เหลือมีกลไกในการควบคุมเอาต์พุต
- บันทึก JSON นี้ในไฟล์
presentation.txtแล้วส่งไปยังcurlโดยตรงดังนี้
curl -H 'Content-Type: application/json' -X POST -d @presentation.txt \
  'https://generativelanguage.googleapis.com/v1beta/models/gemini-1.0-pro-latest:generateContent?key='${GOOGLE_API_KEY}
ในตัวอย่างนี้ คุณตั้งค่าต่อไปนี้ใน URL
v1betaระบุเวอร์ชัน APIgemini-1.0-pro-latestระบุ Gemini 1.0 Pro เป็นโมเดลและใช้สแนปชอตล่าสุดgenerateContentระบุเมธอดของ API ที่คุณเรียกใช้
คุณควรเห็นผลลัพธ์ที่คล้ายกับต่อไปนี้
{
  "candidates": [
    {
      "content": {
        "parts": [
          {
            "text": "* **Credibility:** The audience must trust that you are an expert on the subject matter and that you have their best interests at heart.\n* **Clearness:** Your message must be easy to understand and follow. Avoid using jargon or technical terms that your audience may not be familiar with.\n* **Concreteness:** Use specific examples and data to support your arguments. Avoid making vague or general claims.\n* **Emotional appeal:** In addition to appealing to the audience's logical side, you should also try to connect with them on an emotional level. Use storytelling, humor, and personal anecdotes to make your points more memorable and engaging.\n* **Strong closing:** End your presentation with a strong call to action. Tell the audience what you want them to do and why it is important for them to do it."
          }
        ],
        "role": "model"
      },
      "finishReason": "STOP",
      "index": 0,
      "safetyRatings": [...]
    }
  ],
  "promptFeedback": {
    "safetyRatings": [...]
  }
}
เพื่อให้อ่านง่ายขึ้น เราจึงจัดรูปแบบเอาต์พุตของเทอร์มินัลเป็นประจำดังนี้
- ความน่าเชื่อถือ: ผู้ชมต้องเชื่อว่าคุณเป็นผู้เชี่ยวชาญในหัวข้อนั้นๆ และคุณคำนึงถึงประโยชน์สูงสุดของผู้ชม
- ความชัดเจน: ข้อความต้องเข้าใจและปฏิบัติตามได้ง่าย หลีกเลี่ยงการใช้คำศัพท์เฉพาะทางหรือคำศัพท์ทางเทคนิคที่ผู้ชมอาจไม่คุ้นเคย
- ความชัดเจน: ใช้ตัวอย่างและข้อมูลที่เฉพาะเจาะจงเพื่อสนับสนุนข้อโต้แย้ง หลีกเลี่ยงการกล่าวอ้างที่คลุมเครือหรือทั่วไป
- การอุทธรณ์ทางอารมณ์: นอกเหนือจากการดึงดูดด้านตรรกะของผู้ชมแล้ว คุณควรพยายามเชื่อมต่อกับผู้ชมในระดับอารมณ์ด้วย ใช้การเล่าเรื่อง อารมณ์ขัน และเรื่องราวส่วนตัวเพื่อทำให้ประเด็นของคุณน่าจดจำและน่าสนใจยิ่งขึ้น
- การปิดท้ายที่หนักแน่น: ปิดท้ายการนำเสนอด้วยคำกระตุ้นให้ดำเนินการที่หนักแน่น บอกให้ผู้ชมทราบสิ่งที่คุณต้องการให้พวกเขาทำและเหตุผลที่พวกเขาควรทำ
ดูข้อมูลเพิ่มเติมเกี่ยวกับการตั้งค่าอื่นๆ รวมถึง generationConfig และ safetySettings ได้ในคำแนะนำเกี่ยวกับพรอมต์และความปลอดภัย
4. เรียกใช้ Gemini API จาก Apps Script
- ไปที่ script.new แล้วระบบจะสร้างไฟล์
code.gsApps Script ให้คุณโดยอัตโนมัติ - วางเคอร์เซอร์เหนือไฟล์
code.gsแล้วคลิก > เปลี่ยนชื่อ
 - เปลี่ยนชื่อไฟล์เป็น
utils.gs - ในไฟล์ ให้นำฟังก์ชัน
myFunctionออกเพื่อให้ไฟล์ว่างเปล่า
เพิ่มคีย์ API ลงในโปรเจ็กต์
- เลือกการตั้งค่าโปรเจ็กต์ในเมนูการนำทาง
- ในส่วนพร็อพเพอร์ตี้ของสคริปต์ ให้คลิกเพิ่มพร็อพเพอร์ตี้ของสคริปต์
- ในส่วนพร็อพเพอร์ตี้ ให้ป้อน
GOOGLE_API_KEY - ในส่วนค่า ให้ป้อนคีย์ API จาก Google AI Studio
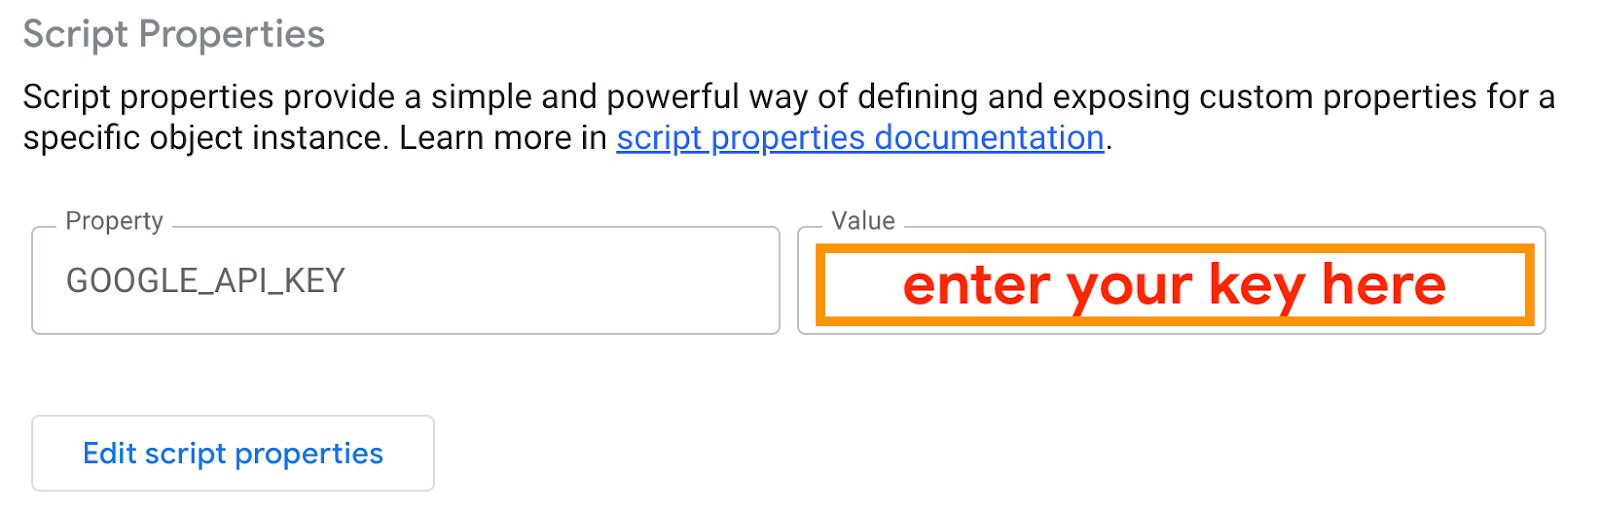
- คลิกบันทึกพร็อพเพอร์ตี้ของสคริปต์
- กลับไปที่เครื่องมือแก้ไข
เพิ่มโค้ด Gemini API
ในไฟล์ utils.gs ให้ทำตามขั้นตอนต่อไปนี้
ตั้งค่าคีย์ API และปลายทาง
const properties = PropertiesService.getScriptProperties().getProperties();
const geminiApiKey = properties['GOOGLE_API_KEY'];
const geminiEndpoint = `https://generativelanguage.googleapis.com/v1beta/models/gemini-1.0-pro-latest:generateContent?key=${geminiApiKey}`;
- เพิ่มฟังก์ชันต่อไปนี้ที่เรียกใช้ Gemini API ด้วยพรอมต์ที่เฉพาะเจาะจง
function callGemini(prompt, temperature=0) {
  const payload = {
    "contents": [
      {
        "parts": [
          {
            "text": prompt
          },
        ]
      }
    ],
    "generationConfig":  {
      "temperature": temperature,
    },
  };

  const options = {
    'method' : 'post',
    'contentType': 'application/json',
    'payload': JSON.stringify(payload)
  };

  const response = UrlFetchApp.fetch(geminiEndpoint, options);
  const data = JSON.parse(response);
  const content = data["candidates"][0]["content"]["parts"][0]["text"];
  return content;
}
- เพิ่มฟังก์ชันต่อไปนี้ที่ตั้งค่าพรอมต์
function testGemini() {
  const prompt = "The best thing since sliced bread is";
  const output = callGemini(prompt);
  console.log(prompt, output);
}
ทดสอบ
- คลิก
 บันทึก
 - เลือก
testGeminiในรายการแบบเลื่อนลงของฟังก์ชัน แล้วคลิก
- ยอมรับสิทธิ์ที่จำเป็น โค้ดควรทํางานและคุณควรเห็นเอาต์พุตคอนโซลบางอย่างพร้อมผลลัพธ์ในบันทึกการดำเนินการ
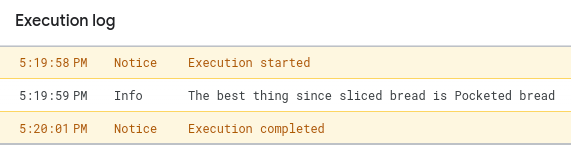
ใช้งานได้แล้ว
5. เรียกใช้ Gemini API ด้วยรูปภาพ
ฟีเจอร์ที่มีประสิทธิภาพมากที่สุดอย่างหนึ่งของโมเดลในตระกูล Gemini คือการรองรับอินพุตหลายรูปแบบ ซึ่งหมายความว่าคุณสามารถระบุอินพุตได้มากกว่าข้อความเพียงอย่างเดียว ในส่วนนี้ คุณจะเพิ่มฟังก์ชันที่เรียกใช้ Gemini API ด้วยรูปภาพ
- ที่ด้านบนของไฟล์
utils.gsหลังจากประกาศconst geminiEndpointที่มีอยู่ ให้เพิ่มบรรทัดต่อไปนี้
const geminiProVisionEndpoint = `https://generativelanguage.googleapis.com/v1beta/models/gemini-1.0-pro-vision-latest:generateContent?key=${geminiApiKey}`;
เพิ่มโค้ด Gemini Vision
- เพิ่มฟังก์ชันลงในไฟล์
utils.gsเพื่อเรียกใช้ปลายทางที่เพิ่มใหม่นี้
function callGeminiProVision(prompt, image, temperature=0) {
  const imageData = Utilities.base64Encode(image.getAs('image/png').getBytes());

  const payload = {
    "contents": [
      {
        "parts": [
          {
            "text": prompt
          },
          {
            "inlineData": {
              "mimeType": "image/png",
              "data": imageData
            }
          }
        ]
      }
    ],
    "generationConfig":  {
      "temperature": temperature,
    },
  };

  const options = {
    'method' : 'post',
    'contentType': 'application/json',
    'payload': JSON.stringify(payload)
  };

  const response = UrlFetchApp.fetch(geminiProVisionEndpoint, options);
  const data = JSON.parse(response);
  const content = data["candidates"][0]["content"]["parts"][0]["text"];
  return content;
}
- เพิ่มฟังก์ชันการทดสอบต่อไปนี้
function testGeminiVision() {
  const prompt = "Provide a fun fact about this object.";
  const image = UrlFetchApp.fetch('https://storage.googleapis.com/generativeai-downloads/images/instrument.jpg').getBlob();
  const output = callGeminiProVision(prompt, image);
  console.log(prompt, output);
}
ฟังก์ชันนี้จะโหลดรูปภาพทดสอบจากอินเทอร์เน็ตและส่งไปยังฟังก์ชันที่คุณกำหนด จากนั้นคุณจะเชื่อมต่อเพื่อใช้แผนภูมิจากสเปรดชีต ดังนั้นนี่จึงเป็นการทดสอบเท่านั้น
ทดสอบ
- บันทึกและเรียกใช้ฟังก์ชัน
testGeminiVisionจากนั้นตรวจสอบเอาต์พุต

6. เรียกใช้ Gemini API ด้วยเครื่องมือ
นอกจากข้อความและรูปภาพแล้ว คุณยังให้สิทธิ์เข้าถึงเครื่องมือในพรอมต์ได้ด้วย
เพิ่มโค้ดการจัดการเครื่องมือ
- เพิ่มฟังก์ชันลงในไฟล์
utils.gsที่ยอมรับข้อกำหนดของเครื่องมือ
function callGeminiWithTools(prompt, tools, temperature=0) {
  const payload = {
    "contents": [
      {
        "parts": [
          {
            "text": prompt
          },
        ]
      }
    ],
    "tools" : tools,
    "generationConfig":  {
      "temperature": temperature,
    },
  };

  const options = {
    'method' : 'post',
    'contentType': 'application/json',
    'payload': JSON.stringify(payload)
  };

  const response = UrlFetchApp.fetch(geminiEndpoint, options);
  const data = JSON.parse(response);
  const content = data["candidates"][0]["content"]["parts"][0]["functionCall"];
  return content;
}
ดูข้อมูลเพิ่มเติมเกี่ยวกับสคีมานี้และฟิลด์ที่มีได้ที่FunctionDeclarationเอกสารอ้างอิง API
ทดสอบ
- กำหนดเครื่องมือที่โมเดลใช้ค้นหาวันที่และเวลาปัจจุบันได้
function testGeminiTools() {
  const prompt = "Tell me how many days there are left in this month.";
  const tools = {
    "function_declarations": [
      {
        "name": "datetime",
        "description": "Returns the current date and time as a formatted string.",
        "parameters": {
          "type": "string"
        }
      }
    ]
  };
  const output = callGeminiWithTools(prompt, tools);
  console.log(prompt, output);
}
รูปแบบที่ใช้ที่นี่คือสคีมา FunctionDeclaration คุณไม่ต้องเรียกใช้ฟังก์ชันวันที่และเวลาจริงๆ คุณจะเห็นเพียงข้อบ่งชี้ว่าโมเดลขอการเรียกใช้ฟังก์ชัน คุณจะจัดการการเรียกใช้ฟังก์ชันในขั้นตอนถัดไป
- บันทึกและเรียกใช้ฟังก์ชัน
testGeminiToolsเพื่อดูเอาต์พุต

7. ภาพรวมของการผสานรวมการสาธิตกับ Google Workspace
เมื่อเข้าใจวิธีการเรียกใช้ฟังก์ชันแล้ว คุณจะขยายความสามารถของโมเดล Gemini ไปยังบริการอื่นๆ ได้อย่างง่ายดาย ใน 2-3 ส่วนถัดไป คุณจะสร้างการผสานรวมกับผลิตภัณฑ์ Google Workspace เช่น Google ไดรฟ์, Google สไลด์ และ Google ชีต แผนภาพแบบย่อมีดังนี้

ในระดับสูง เมื่อมีคำค้นหาของผู้ใช้เข้ามา คุณจะใช้การเรียกใช้ฟังก์ชันของ Gemini API เพื่อพิจารณาว่าจะใช้เครื่องมือใด คุณสร้างเครื่องมือ 3 อย่างที่ทำสิ่งต่อไปนี้ได้
- สร้างการประชุม ฟังก์ชัน
setupMeeting()ในไดอะแกรมจะเรียกใช้ Gemini 1.0 Pro API เพื่อสรุปบล็อกใน Google ไดรฟ์และเพิ่มสรุปนั้นลงในการประชุมที่สร้างขึ้นใหม่ใน Google ปฏิทิน - ร่างอีเมลตามข้อมูลเชิงลึกจากแผนภูมิ ฟังก์ชัน
draftEmail()ในไดอะแกรมจะเรียกใช้ Vision ของ Gemini 1.0 Pro เพื่อวิเคราะห์แผนภูมิใน Google ชีตและเขียนอีเมลใน Gmail โดยอิงตามการวิเคราะห์ - สร้างชุดสไลด์โครงร่าง ฟังก์ชัน
createDeck()ในไดอะแกรมจะเรียกใช้ Gemini 1.0 Pro เพื่อระดมความคิดเกี่ยวกับหัวข้อย่อยสำหรับชุดสไลด์ใน Google สไลด์
สำหรับเครื่องมือแต่ละอย่าง คุณต้องทำ 3 สิ่งต่อไปนี้
- พิจารณาว่าการเรียกใช้ฟังก์ชันของ Gemini API จะขอให้เรียกใช้เครื่องมือนั้นในบล็อก
if...elseหรือไม่ - เพิ่มฟังก์ชันจริงเพื่อใช้ฟังก์ชันการทำงานของเครื่องมือ
- ประกาศเครื่องมือด้วย Gemini API เพื่อให้โมเดล Gemini ทราบว่ามีเครื่องมืออยู่และสามารถแสดงการตอบกลับการเรียกใช้ฟังก์ชันที่ถูกต้องได้
8. ตั้งค่าการประชุมด้วย Apps Script
ก่อนอื่น คุณจะตั้งค่าการประชุมใน Google ปฏิทินโดยอัตโนมัติ แต่คุณยังเพิ่มคำอธิบายซึ่งเป็นข้อมูลสรุปของไฟล์ใน Google ไดรฟ์ได้ด้วย
โดยทำตามขั้นตอนต่อไปนี้
- ดาวน์โหลดไฟล์ข้อความนี้ ซึ่งเป็นสำเนาข้อความของบล็อกการเปิดตัว Gemini 1.5 Pro
- อัปโหลดไฟล์ไปยังโฟลเดอร์รูทใน Google ไดรฟ์
- ในเครื่องมือแก้ไข ให้สร้างไฟล์
main.gsแล้วเพิ่มโค้ดต่อไปนี้
function main() {
  const userQuery = "Set up a meeting at 10AM tomorrow with Helen to discuss the news in the Gemini-blog.txt file.";

  var tool_use = callGeminiWithTools(userQuery, WORKSPACE_TOOLS);
  Logger.log(tool_use);

  if(tool_use['name'] == "setupMeeting") {
    setupMeeting(tool_use['args']['time'], tool_use['args']['recipient'], tool_use['args']['filename']);
    Logger.log("Your meeting has been set up.");
 }
  else
    Logger.log("no proper tool found");
}
ในที่นี้ คุณจะเรียกใช้ความสามารถในการเรียกใช้ฟังก์ชันของ Gemini API จากนั้นคุณต้องกำหนดฟังก์ชันเครื่องมือ
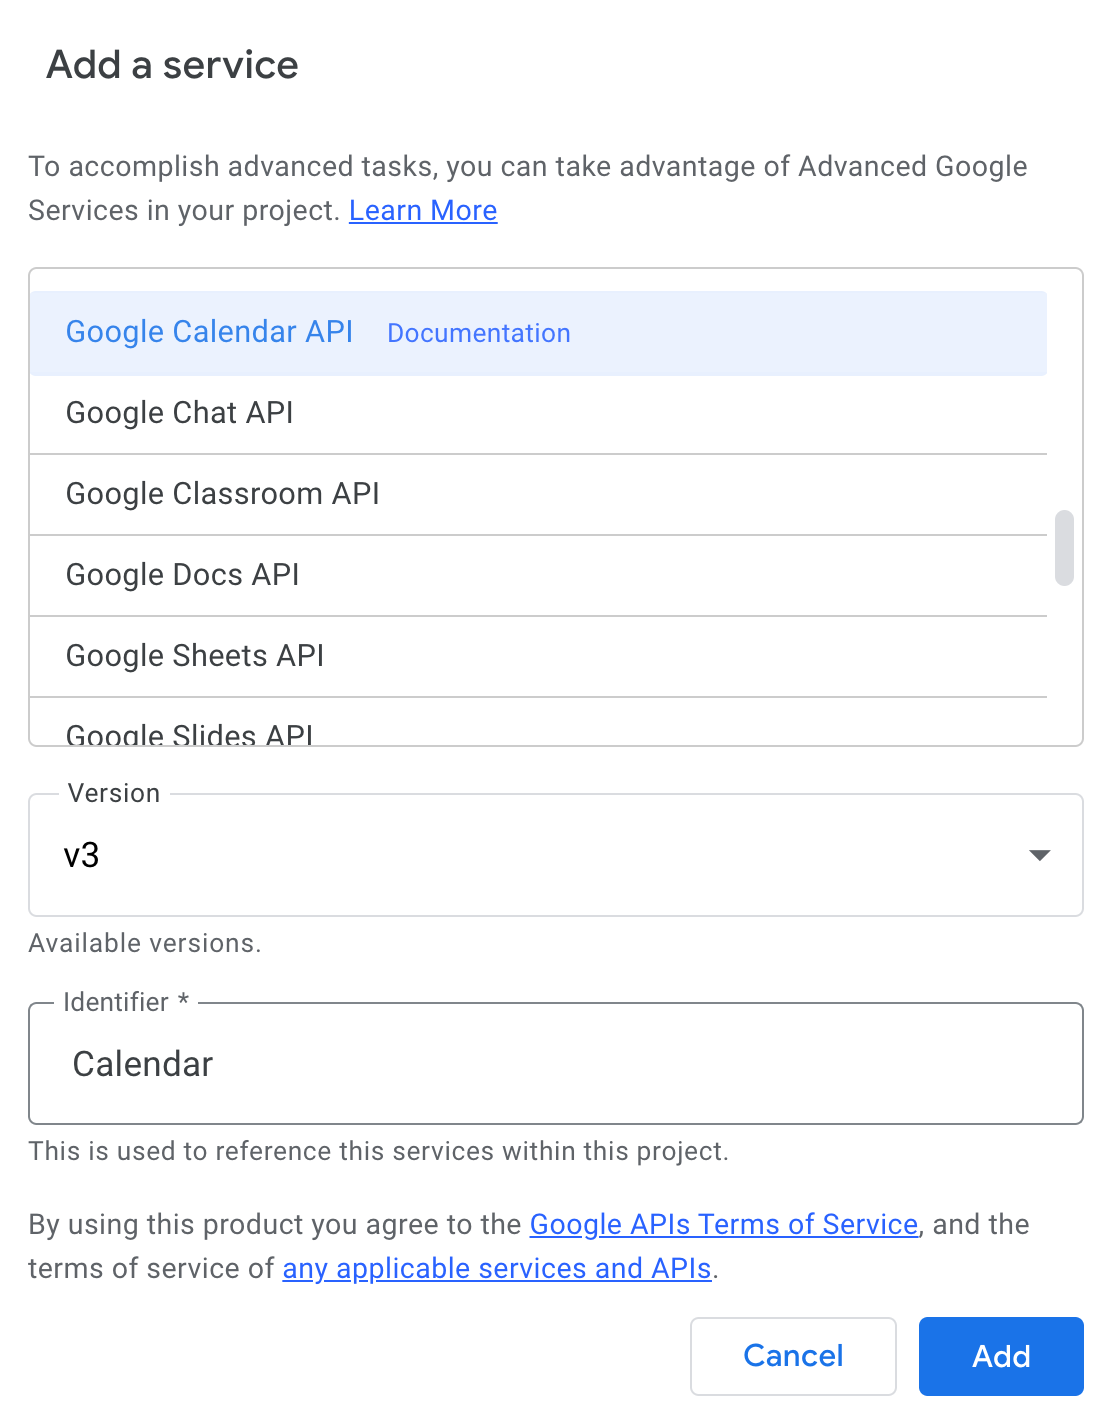
- ทางด้านซ้ายของตัวแก้ไข ให้คลิก + เพิ่มบริการ > Google Calendar API > เพิ่ม ข้างบริการ ซึ่งจะเปิดใช้บริการขั้นสูงของ Google ปฏิทิน ซึ่งคุณต้องใช้สำหรับ API ขั้นสูงบางรายการในภายหลัง
- เพิ่มโค้ดต่อไปนี้ในไฟล์
utils.gs
function attachFileToMeeting(event, file, fileName) {
  // Get the iCal ID for the event.
  const iCalEventId = event.getId();

  // Log the ID and title for debugging.
  console.log(`iCal event ID: ${iCalEventId}`);
  console.log(`event Title: ${event.getTitle()}`);

  // Set up the options for listing the event with the advanced Google Calendar service.
  const options = {
      iCalUID: iCalEventId,
    };

  // Use the primary calendar as the calendar ID to list events.
  const calendarId = 'primary';

  // Use the advanced Google Calendar service to list the event.
  const calEvents = Calendar.Events.list(calendarId, options);

  // Get the Calendar ID used by the advanced Google Calendar service.
  const eventId = calEvents.items[0].id;

  // Get the file URL for the attachment.
  const fileUrl = file.getUrl();

    // Set up the patch options to add the file.
    var patch = {
      attachments: [{
        'fileUrl': fileUrl,
        'title': fileName
      }]
    };

    // Patch the event to add the file as an attachment.
    Calendar.Events.patch(patch, 'primary', eventId, {"supportsAttachments": true});
}

function setupMeeting(time, recipient, filename) {
  const files = DriveApp.getFilesByName(filename);
  const file = files.next();
  const blogContent = file.getAs("text/*").getDataAsString();

  var geminiOutput = callGemini("Give me a really short title of this blog and a summary with less than three sentences. Please return the result as a JSON with two fields: title and summary. \n" +  blogContent);
  // The Gemini model likes to enclose the JSON with ```json and ```
  geminiOutput = JSON.parse(geminiOutput.replace(/```(?:json|)/g, ""));
  const title = geminiOutput['title'];
  const fileSummary = geminiOutput['summary'];

  const event = CalendarApp.getDefaultCalendar().createEventFromDescription(`meet ${recipient} at ${time} to discuss "${title}"`);
  event.setDescription(fileSummary);
  attachFileToMeeting(event, file, filename);
}
โค้ดนี้จะทำสิ่งต่อไปนี้
setupMeeting()ฟังก์ชันจะไปที่ Google ไดรฟ์และค้นหาไฟล์Gemini-blog.txtAPI ของ Gemini จะแสดงชื่อไฟล์นี้โดยอัตโนมัติเมื่อเรียกใช้ฟังก์ชันในขั้นตอนที่ 3setupMeeting()ฟังก์ชันจะเรียกใช้ Gemini API เพื่อสรุปเนื้อหาของไฟล์ ตั้งค่าการประชุมด้วย CalendarApp โดยใช้คำอธิบายแบบอิสระ และเพิ่มข้อมูลสรุปในการประชุม- ฟังก์ชัน
setupMeeting()จะเรียกใช้ฟังก์ชันattachFileToMeeting()เพื่อใช้บริการ Google ปฏิทินขั้นสูงในการแนบไฟล์บล็อกกับการประชุม
- เพิ่มโค้ดต่อไปนี้ที่ด้านบนของไฟล์
utils.gs
const WORKSPACE_TOOLS = {
 "function_declarations": [
   {
     "name": "setupMeeting",
     "description": "Sets up a meeting in Google Calendar.",
     "parameters": {
       "type": "object",
       "properties": {
         "time": {
           "type": "string",
           "description": "The time of the meeting."
         },
         "recipient": {
           "type": "string",
           "description": "The name of the recipient."
         },
         "filename": {
           "type": "string",
           "description": "The name of the file."
         },
       },
       "required": [
         "time",
         "recipient",
         "filename"
       ]
     }
   },
   // You add tools here.
 ]
};
- ในโปรแกรมแก้ไข ให้กลับไปที่ไฟล์
main.gsแล้วคลิก - หาก Google Workspace ขอสิทธิ์ให้คุณเรียกใช้สคริปต์ ให้คลิกตกลง
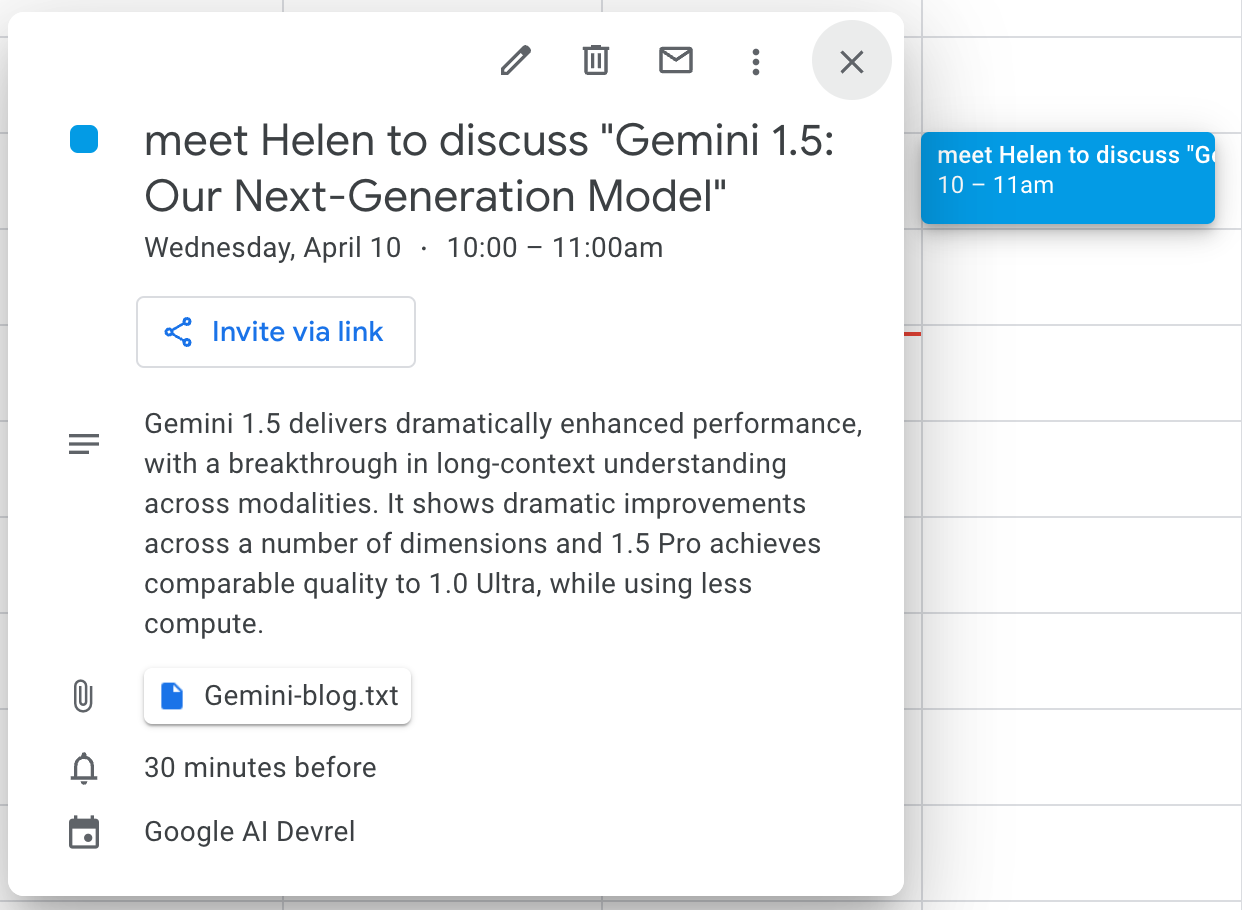
ในอีกไม่กี่วินาที บันทึกการดำเนินการจะแสดงข้อความที่แจ้งให้คุณทราบว่าระบบได้ตั้งค่าการประชุมแล้ว
- ในการประชุมใน Google ปฏิทิน ให้มองหาการประชุมที่มีสรุปและไฟล์แนบ
9. ร่างอีเมลด้วย Apps Script
จากนั้นก็ตั้งค่าการร่างอีเมลใน Gmail ให้เป็นแบบอัตโนมัติ สถานการณ์สมมติ: สมมติว่าคุณทำการวิเคราะห์ข้อมูลใน Google ชีต คุณใส่ตัวเลขทั้งหมดและสร้างแผนภูมิ คุณต้องการใช้ Gemini Pro Vision API เพื่อร่างอีเมลตามแผนภูมิ
โดยทำตามขั้นตอนต่อไปนี้
- เปิดชีตนี้ แล้วคลิกไฟล์ -> ทำสำเนา
- ในกล่องโต้ตอบคัดลอกเอกสาร ให้แทนที่ชื่อเริ่มต้น
Copy of CollegeExpensesด้วยCollegeExpensesในกล่องข้อความชื่อ - ในไฟล์
main.gsให้แทนที่คําค้นหาของผู้ใช้ก่อนหน้าด้วยคําค้นหาใหม่ แล้วเพิ่มโค้ดต่อไปนี้ลงในคําสั่งif...else
function main() {
  // const userQuery = "Set up a meeting at 5PM with Helen to discuss the news in the Gemini-1.5-blog.txt file.";
  const userQuery = "Draft an email for Mary with insights from the chart in the CollegeExpenses sheet.";

  if(...) {...}
  // Add this code
  else if(tool_use['name'] == "draftEmail") {
    draftEmail(tool_use['args']['sheet_name'], tool_use['args']['recipient']);
    Logger.log("Check your Gmail to review the draft");
  }
  else {...}

}
- เพิ่มโค้ดต่อไปนี้ในไฟล์
utils.gs
function draftEmail(sheet_name, recipient) {

  const prompt = `Compose the email body for ${recipient} with your insights for this chart. Use information in this chart only and do not do historical comparisons. Be concise.`;

  var files = DriveApp.getFilesByName(sheet_name);
  var sheet = SpreadsheetApp.openById(files.next().getId()).getSheetByName("Sheet1");
  var expenseChart = sheet.getCharts()[0];

  var chartFile = DriveApp.createFile(expenseChart.getBlob().setName("ExpenseChart.png"));
  var emailBody = callGeminiProVision(prompt, expenseChart);
  GmailApp.createDraft(recipient+"@demo-email-provider.com", "College expenses", emailBody, {
      attachments: [chartFile.getAs(MimeType.PNG)],
      name: 'myname'
  });
}
ฟังก์ชันนี้จะดึงแผนภูมิค่าใช้จ่ายในวิทยาลัยจากชีตและส่งไปยัง Gemini Pro Vision เพื่อร่างอีเมล Gemini Pro Vision จะดึงข้อมูลจากแผนภูมิและร่างเนื้อหาอีเมลในนามของคุณ
- ในไฟล์
utils.gsให้เพิ่มโค้ดต่อไปนี้ลงในออบเจ็กต์WORKSPACE_TOOLSหลังจากความคิดเห็นYou add tools here
  WORKSPACE_TOOLS = {
    "function_declarations": [
      // You add tools here.

      {
        "name": "draftEmail",
        "description": "Write an email by analyzing data or charts in a Google Sheets file.",
        "parameters": {
          "type": "object",
          "properties": {
            "sheet_name": {
              "type": "string",
              "description": "The name of the sheet to analyze."
            },
            "recipient": {
              "type": "string",
              "description": "The name of the recipient."
            },
          },
          "required": [
            "sheet_name",
            "recipient"
          ]
        }
      },


    ]
  };
- ในโปรแกรมแก้ไข ให้กลับไปที่ไฟล์
main.gsแล้วคลิก - หลังจากผ่านไป 10-20 วินาที ให้เปิด Gmail คุณควรเห็นฉบับร่างอีเมลดังนี้
คุณสามารถแก้ไขฉบับร่างอีเมลก่อนส่งได้ อีเมลนี้เขียนโดย Gemini Pro Vision ทั้งหมดหลังจากที่คุณให้พรอมต์สั้นๆ และแผนภูมิ
10. สร้างโครงร่างของชุดสไลด์ด้วย Apps Script
จากนั้นคุณจะทำให้การสร้างชุดสไลด์โครงร่างใน Google สไลด์เป็นแบบอัตโนมัติด้วย Apps Script
โดยทำตามขั้นตอนต่อไปนี้
- ในไฟล์
main.gsให้แทนที่คําค้นหาของผู้ใช้ก่อนหน้าด้วยคําค้นหาใหม่ และเพิ่มโค้ดต่อไปนี้ลงในคําสั่งif...else
function main() {
  // const userQuery = "Draft an email for Mary with insights from the chart in the CollegeExpenses sheet.";
  const userQuery = "Help me put together a deck about water conservation.";

  if(...) {...}
  // Add this code
  else if(tool_use['name'] == 'createDeck') {
    deckURL = createDeck(tool_use['args']['topic']);
    Logger.log("Deck URL: " + deckURL);
  }
  else {...}

}
- เพิ่มโค้ดต่อไปนี้ในไฟล์
utils.gs
function createDeck(topic) {
  const prompt = `I'm preparing a ${NUM_SLIDES}-slide deck to discuss ${topic}. Please help me brainstorm and generate main bullet points for each slide. Keep the title of each slide short. Please produce the result as a valid JSON so that I can pass it to other APIs.`;

  var geminiOutput = callGemini(prompt, 0.4);
  // The Gemini model likes to enclose the JSON with ```json and ```
  geminiOutput = geminiOutput.replace(/```(?:json|)/g, "");
  const bulletPoints = JSON.parse(geminiOutput);

  // Create a Google Slides presentation.
  const presentation = SlidesApp.create("My New Presentation");

  // Set up the opening slide.
  var slide = presentation.getSlides()[0];
  var shapes = slide.getShapes();
  shapes[0].getText().setText(topic);

  var body;
  for (var i = 0; i < NUM_SLIDES; i++) {
      slide = presentation.appendSlide(SlidesApp.PredefinedLayout.TITLE_AND_BODY);
      shapes = slide.getShapes();
      // Set title.
      shapes[0].getText().setText(bulletPoints['slides'][i]['title']);

      // Set body.
      body = "";
      for (var j = 0; j < bulletPoints['slides'][i]['bullets'].length; j++) {
        body += '* ' + bulletPoints['slides'][i]['bullets'][j] + '\n';
      }
      shapes[1].getText().setText(body);
  }

  return presentation.getUrl();
}
ฟังก์ชันนี้เรียกใช้ Gemini API เพื่อระดมสมองในหัวข้อหนึ่งๆ และแสดงผลหัวข้อย่อยในรูปแบบ
ของ JSON แล้วใช้ Apps Script เพื่อกรอกข้อมูลในโครงร่างของงานนำเสนอ
- ในไฟล์
utils.gsให้เพิ่มโค้ดต่อไปนี้ลงในออบเจ็กต์WORKSPACE_TOOLSหลังจากความคิดเห็นYou add tools here
  WORKSPACE_TOOLS = {
    "function_declarations": [
      // You add tools here.

      {
        "name": "createDeck",
        "description": "Build a simple presentation deck with Google Slides and return the URL.",
        "parameters": {
          "type": "object",
          "properties": {
            "topic": {
              "type": "string",
              "description": "The topic that the presentation is about."
            },
          },
          "required": [
            "topic"
          ]
        }
      },


    ]
  };
- ที่ด้านบนของไฟล์
utils.gsให้กำหนดค่าคงที่ต่อไปนี้
const NUM_SLIDES = 3;
นี่คือจำนวนสไลด์ที่โมเดล Gemini สร้างขึ้นนอกเหนือจากสไลด์เปิด
- ในโปรแกรมแก้ไข ให้กลับไปที่ไฟล์
main.gsแล้วคลิก ในอีกไม่กี่วินาที คุณจะเห็น URL ของงานนำเสนอในบันทึกการดำเนินการ - ใช้เบราว์เซอร์เพื่อเปิด URL คุณควรเห็นโครงร่างของงานนำเสนอที่มีหัวข้อย่อย

11. ไอเดียที่น่าสำรวจ
นอกเหนือจากการผสานรวมทั้ง 3 รายการนี้ คุณยังลองใช้ไอเดียต่อไปนี้ได้ด้วย
- สร้างแชทบ็อตใน Google Chat กรณีการใช้งานโมเดลภาษาขนาดใหญ่ (LLM) ที่ได้รับความนิยมมากที่สุดอย่างหนึ่งคือการสร้างแชทบ็อต Gemini API ช่วยให้สร้างแชทบ็อตสำหรับ Google Chat ได้อย่างง่ายดาย ดูข้อมูลเพิ่มเติมได้ที่ Google Chat API และ Codelab สร้างแอปสำหรับ Google Chat ด้วย Gemini
- การสร้างแบบดึงข้อมูลเสริม (RAG) ด้วยข้อมูลของคุณเองใน Google ไดรฟ์หรือ Keep ในโค้ดแล็บนี้ คุณจะใช้ไฟล์ข้อความเพียงไฟล์เดียวสำหรับการสรุป อย่างไรก็ตาม คุณยังใช้เนื้อหาจาก Google ไดรฟ์ส่วนตัวและโน้ตที่คล้ายกับ Keep, PDF และรูปภาพกับ Gemini API, ฐานข้อมูลเวกเตอร์ และเครื่องมือจัดระเบียบ (ไม่บังคับ) เช่น LangChain เพื่อทำ RAG และปรับคำตอบของโมเดลให้เหมาะกับคุณโดยอิงตามข้อมูลของคุณได้ด้วย
- ใช้ความสามารถในการเรียกใช้ฟังก์ชันแบบหลายรอบของ Gemini API การเรียกใช้ฟังก์ชันของ Gemini API ไม่ได้จำกัดไว้ที่ 1 รอบ และคุณสามารถใช้การเรียกใช้ฟังก์ชันแบบหลายรอบสำหรับงานที่ซับซ้อนยิ่งขึ้นได้
- ใช้ Google Workspace ให้ได้มากกว่าเดิม ตอนนี้คุณเข้าใจวิธีผสานรวม Gemini API กับ Google Workspace แล้ว คุณจึงสามารถขยายขอบเขตการใช้งาน Google Workspace และใช้ประโยชน์จาก API อื่นๆ ในโลกได้
12. ขอแสดงความยินดี
คุณได้เรียนรู้เกี่ยวกับความสามารถด้านมัลติโมดัลและการเรียกใช้ฟังก์ชันของ Gemini API คุณใช้ฟีเจอร์นี้เพื่อทำให้งานบางอย่างใน Google Workspace เป็นแบบอัตโนมัติด้วย Apps Script