
১. শুরু করার আগে
এই কোডল্যাবটি ‘অ্যাডভান্সড অ্যান্ড্রয়েড ইন কোটলিন’ কোর্সের একটি অংশ। আপনি যদি কোডল্যাবগুলো ক্রমানুসারে সম্পন্ন করেন তবে এই কোর্স থেকে সবচেয়ে বেশি উপকৃত হবেন, তবে এটি বাধ্যতামূলক নয়। কোর্সের সমস্ত কোডল্যাব ‘অ্যাডভান্সড অ্যান্ড্রয়েড ইন কোটলিন’ কোডল্যাবস ল্যান্ডিং পেজে তালিকাভুক্ত করা আছে।
MotionLayout হলো একটি লাইব্রেরি যা দিয়ে আপনি আপনার অ্যান্ড্রয়েড অ্যাপে রিচ মোশন যোগ করতে পারেন। এটি ConstraintLayout, এবং এটি ব্যবহার করে আপনি ConstraintLayout দিয়ে যা কিছু তৈরি করতে পারেন, তার সবকিছুকে অ্যানিমেট করতে পারবেন।
আপনি MotionLayout ব্যবহার করে একই সাথে একাধিক ভিউয়ের অবস্থান, আকার, দৃশ্যমানতা, আলফা, রঙ, উচ্চতা, ঘূর্ণন এবং অন্যান্য অ্যাট্রিবিউট অ্যানিমেট করতে পারেন। ডিক্লারেটিভ এক্সএমএল ব্যবহার করে আপনি একাধিক ভিউকে অন্তর্ভুক্ত করে এমন সমন্বিত অ্যানিমেশন তৈরি করতে পারেন, যা কোডের মাধ্যমে করা কঠিন।
অ্যাপের অভিজ্ঞতা উন্নত করার জন্য অ্যানিমেশন একটি দারুণ উপায়। আপনি নিম্নলিখিত কাজগুলোর জন্য অ্যানিমেশন ব্যবহার করতে পারেন:
- পরিবর্তনগুলি দেখান — বিভিন্ন অবস্থার মধ্যে অ্যানিমেশন ব্যবহারকারীকে আপনার UI-এর পরিবর্তনগুলি স্বাভাবিকভাবে অনুসরণ করতে সাহায্য করে।
- দৃষ্টি আকর্ষণ করুন — গুরুত্বপূর্ণ UI উপাদানগুলোর প্রতি দৃষ্টি আকর্ষণ করতে অ্যানিমেশন ব্যবহার করুন।
- সুন্দর ডিজাইন তৈরি করুন — ডিজাইনে কার্যকর মোশন অ্যাপগুলোকে পরিশীলিত করে তোলে।
পূর্বশর্ত
এই কোডল্যাবটি এমন ডেভেলপারদের জন্য ডিজাইন করা হয়েছে যাদের অ্যান্ড্রয়েড ডেভেলপমেন্টে কিছুটা অভিজ্ঞতা আছে। এই কোডল্যাবটি সম্পন্ন করার চেষ্টা করার আগে, আপনার যা যা জানা উচিত:
- অ্যান্ড্রয়েড স্টুডিও ব্যবহার করে কীভাবে একটি অ্যাক্টিভিটি ও বেসিক লেআউট সহ একটি অ্যাপ তৈরি করতে হয় এবং ডিভাইস বা এমুলেটরে তা চালাতে হয়, তা জানুন।
ConstraintLayoutসম্পর্কে পরিচিত হন।ConstraintLayoutসম্পর্কে আরও জানতে এর কোডল্যাবটি পড়ুন।
আপনি যা করবেন
-
ConstraintSetsএবংMotionLayoutব্যবহার করে একটি অ্যানিমেশন নির্ধারণ করুন। - ড্র্যাগ ইভেন্টের উপর ভিত্তি করে অ্যানিমেট করুন
-
KeyPositionদিয়ে অ্যানিমেশন পরিবর্তন করুন -
KeyAttributeদিয়ে অ্যাট্রিবিউট পরিবর্তন করুন - কোড দিয়ে অ্যানিমেশন চালান
-
MotionLayoutব্যবহার করে সংকোচনযোগ্য হেডারগুলোকে অ্যানিমেট করুন
আপনার যা যা লাগবে
- অ্যান্ড্রয়েড স্টুডিও ৪.০ (
MotionLayoutএডিটরটি শুধুমাত্র অ্যান্ড্রয়েড স্টুডিওর এই সংস্করণে কাজ করে।)
২. শুরু করা
নমুনা অ্যাপটি ডাউনলোড করতে, আপনি নিম্নলিখিত যেকোনো একটি করতে পারেন:
... অথবা নিম্নলিখিত কমান্ডটি ব্যবহার করে কমান্ড লাইন থেকে গিটহাব রিপোজিটরিটি ক্লোন করুন:
$ git clone https://github.com/googlecodelabs/motionlayout.git
৩. মোশনলেআউট ব্যবহার করে অ্যানিমেশন তৈরি করা
প্রথমে, আপনাকে এমন একটি অ্যানিমেশন তৈরি করতে হবে যা ব্যবহারকারীর ক্লিকের প্রতিক্রিয়ায় একটি ভিউকে স্ক্রিনের উপরের প্রান্ত থেকে নিচের প্রান্তে নিয়ে যাবে।
স্টার্টার কোড থেকে একটি অ্যানিমেশন তৈরি করতে আপনার নিম্নলিখিত প্রধান অংশগুলির প্রয়োজন হবে:
-
MotionLayout,হলোConstraintLayoutএর একটি সাবক্লাস। যে ভিউগুলোকে অ্যানিমেট করতে চান, সেগুলোকেMotionLayoutট্যাগের ভেতরে নির্দিষ্ট করে দেন। -
MotionScene,যাMotionLayout. - ট্রানজিশন হলো
MotionSceneএকটি অংশTransition,যা অ্যানিমেশনের সময়কাল, ট্রিগার এবং ভিউগুলোকে কীভাবে সরানো হবে তা নির্দিষ্ট করে। - একটি
ConstraintSetযা ট্রানজিশনের শুরু এবং শেষের সীমাবদ্ধতা উভয়ই নির্দিষ্ট করে।
চলুন, MotionLayout থেকে শুরু করে একে একে এগুলোর প্রত্যেকটি দেখে নেওয়া যাক।
ধাপ ১: বিদ্যমান কোডটি অন্বেষণ করুন
MotionLayout হলো ConstraintLayout এর একটি সাবক্লাস, তাই এটি অ্যানিমেশন যোগ করার পাশাপাশি ConstraintLayout-এর সমস্ত বৈশিষ্ট্যই সমর্থন করে। MotionLayout ব্যবহার করতে হলে, যেখানে আপনি ConstraintLayout. ব্যবহার করতেন, সেখানে একটি MotionLayout ভিউ যোগ করতে হয়।
-
res/layoutমধ্যেactivity_step1.xml.এখানে একটিConstraintLayoutআছে, যার ভেতরে একটি তারারImageViewরয়েছে এবং সেটির উপর একটি টিন্ট প্রয়োগ করা হয়েছে।
activity_step1.xml
<!-- initial code -->
<androidx.constraintlayout.widget.ConstraintLayout
       ...
       android:layout_width="match_parent"
       android:layout_height="match_parent"
       >

   <ImageView
           android:id="@+id/red_star"
           ...
   />

</androidx.constraintlayout.motion.widget.MotionLayout>
এই ConstraintLayout টিতে কোনো কনস্ট্রেইন্ট নেই, তাই আপনি যদি এখন অ্যাপটি চালান, তাহলে দেখবেন তারাগুলো কনস্ট্রেইন্ট ছাড়া প্রদর্শিত হচ্ছে, যার অর্থ হলো সেগুলো একটি অজানা স্থানে অবস্থান করবে। অ্যান্ড্রয়েড স্টুডিও আপনাকে কনস্ট্রেইন্টের অভাব সম্পর্কে একটি সতর্কবার্তা দেবে।
ধাপ ২: মোশন লেআউটে রূপান্তর করুন
MotionLayout, আপনাকে ConstraintLayout কে MotionLayout এ রূপান্তর করতে হবে।
আপনার লেআউটে মোশন সিন ব্যবহার করতে হলে, সেটিকে অবশ্যই সেটির দিকে নির্দেশ করতে হবে।
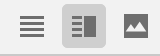
- এটি করার জন্য, ডিজাইন সারফেসটি খুলুন। অ্যান্ড্রয়েড স্টুডিও ৪.০-তে, একটি লেআউট XML ফাইল দেখার সময় উপরের ডানদিকে থাকা স্প্লিট বা ডিজাইন আইকনটি ব্যবহার করে ডিজাইন সারফেসটি খোলা হয়।
- ডিজাইন সারফেসটি খোলার পর, প্রিভিউটির উপর রাইট ক্লিক করে ‘Convert to MotionLayout’ নির্বাচন করুন।
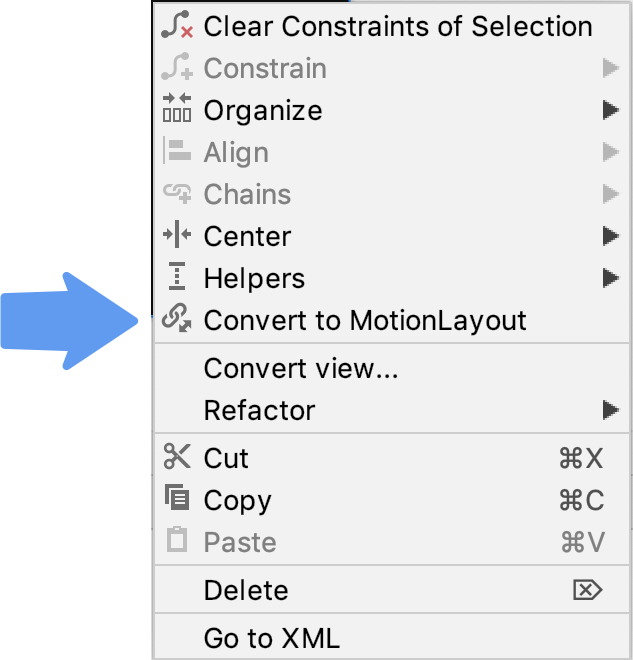
এটি ConstraintLayout ট্যাগটিকে একটি MotionLayout ট্যাগ দিয়ে প্রতিস্থাপন করে এবং MotionLayout ট্যাগটিতে একটি motion:layoutDescription যোগ করে যা @xml/activity_step1_scene.
activity_step1**.xml**
<!-- explore motion:layoutDescription="@xml/activity_step1_scene" -->
<androidx.constraintlayout.motion.widget.MotionLayout
       ...
       motion:layoutDescription="@xml/activity_step1_scene">
মোশন সিন হলো একটি একক XML ফাইল যা একটি MotionLayout অ্যানিমেশন বর্ণনা করে।
আপনি MotionLayout এ রূপান্তর করার সাথে সাথেই ডিজাইন সারফেসে Motion Editor প্রদর্শিত হবে।
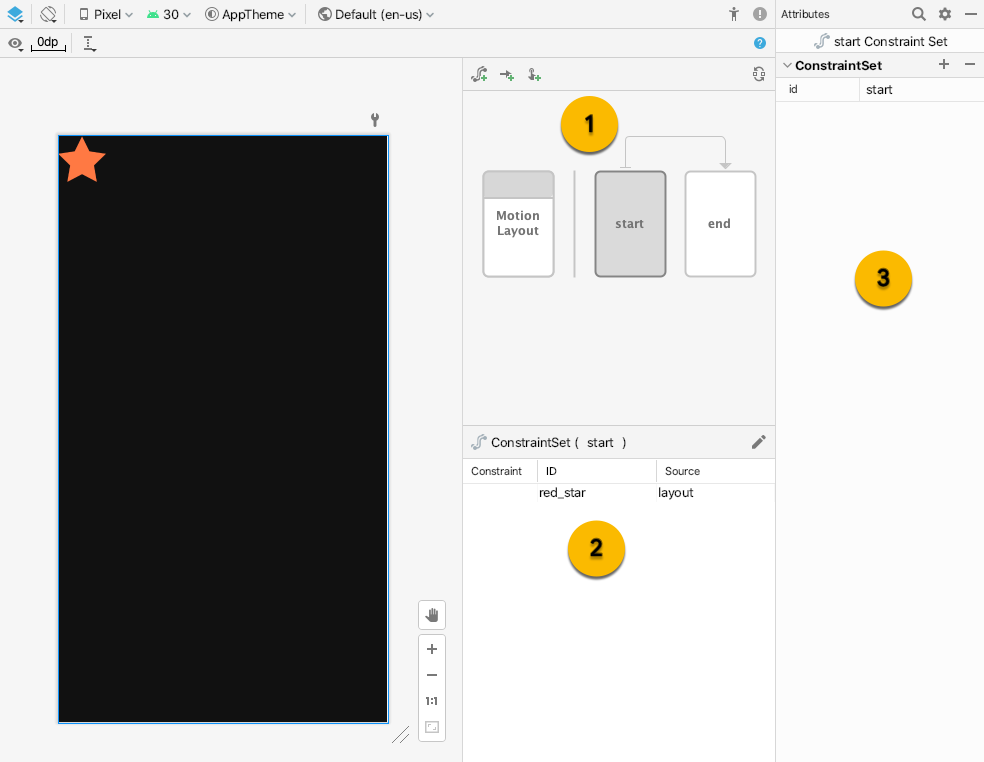
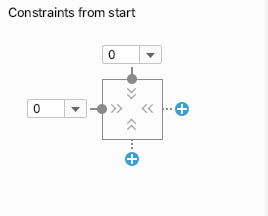
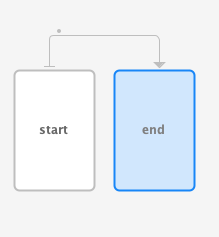
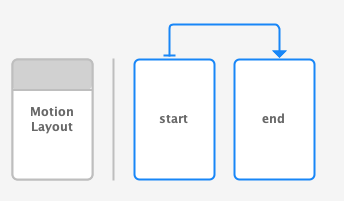
মোশন এডিটরে তিনটি নতুন UI এলিমেন্ট রয়েছে:
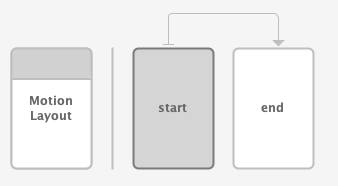
- ওভারভিউ – এটি একটি মোডাল সিলেকশন যা আপনাকে অ্যানিমেশনের বিভিন্ন অংশ নির্বাচন করতে দেয়। এই ছবিতে
startConstraintSetনির্বাচিত আছে। আপনিstartএবংendমাঝের তীরচিহ্নে ক্লিক করে তাদের মধ্যকার ট্রানজিশনও নির্বাচন করতে পারেন। - সেকশন – ওভারভিউ-এর নিচে একটি সেকশন উইন্ডো থাকে যা বর্তমানে নির্বাচিত ওভারভিউ আইটেমের উপর ভিত্তি করে পরিবর্তিত হয়। এই ছবিতে, সিলেকশন উইন্ডোতে
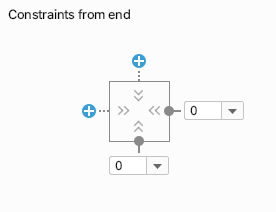
startConstraintSetতথ্য প্রদর্শিত হচ্ছে। - অ্যাট্রিবিউট – অ্যাট্রিবিউট প্যানেলটি ওভারভিউ বা সিলেকশন উইন্ডো থেকে বর্তমানে নির্বাচিত আইটেমের অ্যাট্রিবিউটগুলো দেখায় এবং সম্পাদনা করার সুযোগ দেয়। এই ছবিতে, এটি স্টার্ট
ConstraintSetstartConstraintSet)-এর অ্যাট্রিবিউটগুলো দেখাচ্ছে।
ধাপ ৩: শুরু এবং শেষের সীমাবদ্ধতা নির্ধারণ করুন
সমস্ত অ্যানিমেশনকে একটি শুরু এবং একটি শেষের ভিত্তিতে সংজ্ঞায়িত করা যায়। শুরুটি বর্ণনা করে যে অ্যানিমেশনের আগে স্ক্রিনটি কেমন দেখায়, এবং শেষটি বর্ণনা করে যে অ্যানিমেশনটি সম্পূর্ণ হওয়ার পরে স্ক্রিনটি কেমন দেখায়। সময়ের সাথে সাথে শুরু এবং শেষ অবস্থার মধ্যে কীভাবে অ্যানিমেট করতে হবে, তা নির্ধারণ করার দায়িত্ব MotionLayout ।
MotionScene শুরু এবং শেষ অবস্থা নির্ধারণ করতে একটি ConstraintSet ট্যাগ ব্যবহার করে। ConstraintSet হলো ঠিক তেমনই, যা হলো কিছু সীমাবদ্ধতার সমষ্টি যা ভিউ-এর উপর প্রয়োগ করা যায়। এর মধ্যে width, height, এবং ConstraintLayout মতো সীমাবদ্ধতা অন্তর্ভুক্ত। এতে alpha মতো কিছু অ্যাট্রিবিউটও থাকে। এতে ভিউগুলো নিজে থাকে না, শুধু সেই ভিউগুলোর উপর থাকা সীমাবদ্ধতাগুলো থাকে।
একটি ConstraintSet এ নির্দিষ্ট করা যেকোনো সীমাবদ্ধতা লেআউট ফাইলে নির্দিষ্ট করা সীমাবদ্ধতাগুলোকে বাতিল করে দেবে। যদি আপনি লেআউট এবং MotionScene উভয় স্থানেই সীমাবদ্ধতা নির্ধারণ করেন, তবে শুধুমাত্র MotionScene এর সীমাবদ্ধতাগুলোই প্রয়োগ করা হবে।
এই ধাপে, আপনি স্টার ভিউটিকে স্ক্রিনের একেবারে ওপর থেকে শুরু হয়ে নিচের প্রান্তে শেষ হওয়ার জন্য সীমাবদ্ধ করবেন।
আপনি এই ধাপটি মোশন এডিটর ব্যবহার করে অথবা সরাসরি activity_step1_scene.xml ফাইলের টেক্সট সম্পাদনা করে সম্পন্ন করতে পারেন।
- ওভারভিউ প্যানেলে
startকনস্ট্রেইন্টসেট নির্বাচন করুন।
- সিলেকশন প্যানেলে,
red_starনির্বাচন করুন। বর্তমানে এটিlayoutদেখাচ্ছে – এর মানে হলো এটি এইConstraintSetমধ্যে সীমাবদ্ধ (constrainted) নয়। Constraint তৈরি করতে উপরের ডানদিকের পেন্সিল আইকনটি ব্যবহার করুন।
- নিশ্চিত করুন যে ওভারভিউ প্যানেলে স্টার্ট
ConstraintSetstartConstraintSet) নির্বাচন করা হলেred_starএর সোর্স (Source) হিসেবেstartদেখাচ্ছে। - অ্যাট্রিবিউটস প্যানেলে,
startConstraintSetএred_starসিলেক্ট করা অবস্থায়, একদম উপরে একটি কনস্ট্রেইন্ট যোগ করুন এবং নীল + বাটনগুলোতে ক্লিক করে সেটি চালু করুন।
- এই কনস্ট্রেইন্টটির জন্য মোশন এডিটর যে কোড তৈরি করেছে তা দেখতে
xml/activity_step1_scene.xmlখুলুন।
activity_step1_scene.xml
<!-- Constraints to apply at the start of the animation -->
<ConstraintSet android:id="@+id/start">
   <Constraint
           android:id="@+id/red_star"
           android:layout_width="wrap_content"
           android:layout_height="wrap_content"
           motion:layout_constraintStart_toStartOf="parent"
           motion:layout_constraintTop_toTopOf="parent" />
</ConstraintSet>
ConstraintSet টির id হলো @id/start , এবং এটি MotionLayout এর সমস্ত ভিউতে প্রয়োগ করার জন্য সমস্ত সীমাবদ্ধতা নির্দিষ্ট করে। যেহেতু এই MotionLayout কেবল একটি ভিউ আছে, তাই এতে কেবল একটি Constraint প্রয়োজন।
ConstraintSet এর ভেতরের Constraint সেই ভিউ-এর আইডি নির্দিষ্ট করে, যাকে এটি সীমাবদ্ধ করছে; যেমন @id/red_star , যা activity_step1.xml ফাইলে সংজ্ঞায়িত। এটা মনে রাখা গুরুত্বপূর্ণ যে Constraint ট্যাগগুলো শুধুমাত্র সীমাবদ্ধতা এবং লেআউটের তথ্য নির্দিষ্ট করে। Constraint ট্যাগটি জানে না যে এটি একটি ImageView উপর প্রয়োগ করা হচ্ছে।
এই সীমাবদ্ধতাটি red_star ভিউটিকে তার প্যারেন্টের শীর্ষবিন্দুতে আবদ্ধ করার জন্য প্রয়োজনীয় উচ্চতা, প্রস্থ এবং অন্য দুটি সীমাবদ্ধতা নির্দিষ্ট করে।
- ওভারভিউ প্যানেলে
endConstraintSet-টি নির্বাচন করুন।
-
endConstraintSetএred_starএর জন্য একটিConstraintযোগ করতে আগের মতোই একই ধাপগুলো অনুসরণ করুন। - এই ধাপটি সম্পন্ন করতে মোশন এডিটর ব্যবহার করার জন্য, নীল + বোতামগুলিতে ক্লিক করে
bottomএবংendএকটি কনস্ট্রেইন্ট যোগ করুন।
- XML-এ কোডটি দেখতে এইরকম:
activitiy_step1_scene.xml
<!-- Constraints to apply at the end of the animation -->
<ConstraintSet android:id="@+id/end">
   <Constraint
           android:id="@+id/red_star"
           android:layout_width="wrap_content"
           android:layout_height="wrap_content"
           motion:layout_constraintEnd_toEndOf="parent"
           motion:layout_constraintBottom_toBottomOf="parent" />
</ConstraintSet>
@id/start মতোই, এই ConstraintSet @id/red_star উপর একটিমাত্র Constraint রয়েছে। এবার এটি এটিকে স্ক্রিনের নিচের প্রান্তে সীমাবদ্ধ করে।
এগুলোর নাম @id/start এবং @id/end রাখার প্রয়োজন নেই, কিন্তু তা করলে সুবিধা হয়।
ধাপ ৪: একটি রূপান্তর নির্ধারণ করুন
প্রতিটি MotionScene অবশ্যই অন্তত একটি ট্রানজিশন অন্তর্ভুক্ত থাকতে হবে। একটি ট্রানজিশন একটি অ্যানিমেশনের শুরু থেকে শেষ পর্যন্ত প্রতিটি অংশকে সংজ্ঞায়িত করে।
একটি ট্রানজিশনের জন্য অবশ্যই একটি শুরু এবং শেষের ConstraintSet নির্দিষ্ট করতে হয়। একটি ট্রানজিশন অন্যান্য উপায়েও অ্যানিমেশনটি কীভাবে পরিবর্তন করা হবে তা নির্দিষ্ট করতে পারে, যেমন অ্যানিমেশনটি কতক্ষণ চলবে বা ভিউ টেনে কীভাবে অ্যানিমেট করা হবে।
- মোশন এডিটর যখন MotionScene ফাইলটি তৈরি করে, তখন এটি ডিফল্টভাবে আমাদের জন্য একটি ট্রানজিশন তৈরি করে দেয়। তৈরি হওয়া ট্রানজিশনটি দেখতে
activity_step1_scene.xmlফাইলটি খুলুন।
activity_step1_scene.xml
<!-- A transition describes an animation via start and end state -->
<Transition
   motion:constraintSetEnd="@+id/end"
   motion:constraintSetStart="@id/start"
   motion:duration="1000">
  <KeyFrameSet>
  </KeyFrameSet>
</Transition>
একটি অ্যানিমেশন তৈরি করতে MotionLayout যা যা প্রয়োজন, তা সবই এখানে রয়েছে। প্রতিটি অ্যাট্রিবিউটের দিকে তাকালে দেখা যায়:
- অ্যানিমেশন শুরু হওয়ার সাথে সাথে ভিউগুলোতে
constraintSetStartপ্রয়োগ করা হবে। - অ্যানিমেশনের শেষে ভিউগুলোতে
constraintSetEndপ্রয়োগ করা হবে। -
durationনির্দেশ করে যে অ্যানিমেশনটি কতক্ষণ সময় নেবে, যা মিলিসেকেন্ডে পরিমাপ করা হয়।
এরপর MotionLayout শুরু এবং শেষের কনস্ট্রেইন্টগুলোর মধ্যে একটি পথ খুঁজে বের করবে এবং নির্দিষ্ট সময়কাল ধরে সেটিকে অ্যানিমেট করবে।
ধাপ ৫: মোশন এডিটরে অ্যানিমেশনটির প্রিভিউ দেখুন
অ্যানিমেশন: মোশন এডিটরে একটি ট্রানজিশন প্রিভিউ চলার ভিডিও।
- মোশন এডিটর খুলুন এবং ওভারভিউ প্যানেলে
startওendমাঝের তীরচিহ্নে ক্লিক করে ট্রানজিশনটি নির্বাচন করুন।
- যখন কোনো ট্রানজিশন নির্বাচন করা হয়, তখন সিলেকশন প্যানেলে প্লেব্যাক কন্ট্রোল এবং একটি স্ক্রাব বার দেখা যায়। অ্যানিমেশনটি প্রিভিউ করার জন্য প্লে-তে ক্লিক করুন অথবা বর্তমান অবস্থানটি ড্র্যাগ করুন।

ধাপ ৬: একটি অন ক্লিক হ্যান্ডলার যোগ করুন
অ্যানিমেশনটি শুরু করার জন্য আপনার একটি উপায় প্রয়োজন। এটি করার একটি উপায় হলো, MotionLayout কে @id/red_star এর ক্লিক ইভেন্টগুলোতে সাড়া দেওয়ার উপযোগী করে তোলা।
- মোশন এডিটরটি খুলুন এবং ওভারভিউ প্যানেলে শুরু ও শেষের মাঝখানে থাকা তীরচিহ্নে ক্লিক করে ট্রানজিশনটি নির্বাচন করুন।
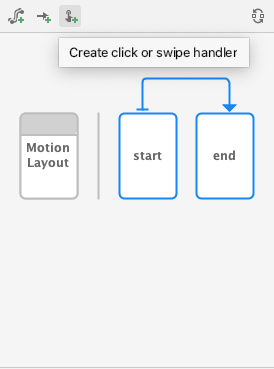
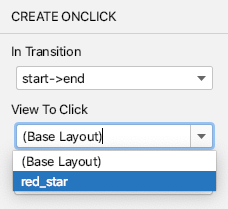
- ক্লিক করুন
 ওভারভিউ প্যানেলের জন্য টুলবারে একটি ক্লিক বা সোয়াইপ হ্যান্ডলার তৈরি করুন । এটি এমন একটি হ্যান্ডলার যুক্ত করবে যা একটি ট্রানজিশন শুরু করবে।
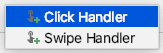
 - পপআপ থেকে ক্লিক হ্যান্ডলার নির্বাচন করুন
- ক্লিক করার জন্য ভিউটি
red_starএ পরিবর্তন করুন।
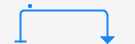
- অ্যাড -এ ক্লিক করলে, মোশন এডিটরের ট্রানজিশন অংশে ক্লিক হ্যান্ডলারটি একটি ছোট বিন্দু দ্বারা চিহ্নিত করা হয়।
- ওভারভিউ প্যানেলে ট্রানজিশনটি সিলেক্ট করা অবস্থায়, অ্যাট্রিবিউটস প্যানেলে এইমাত্র যোগ করা OnClick হ্যান্ডলারটিতে
toggleনামের একটিclickActionঅ্যাট্রিবিউট যোগ করুন।

- মোশন এডিটর দ্বারা তৈরি কোডটি দেখতে
activity_step1_scene.xmlফাইলটি খুলুন।
activity_step1_scene.xml
<!-- A transition describes an animation via start and end state -->
<Transition
    motion:constraintSetStart="@+id/start"
    motion:constraintSetEnd="@+id/end"
    motion:duration="1000">
    <!-- MotionLayout will handle clicks on @id/red_star to "toggle" the animation between the start and end -->
    <OnClick
        motion:targetId="@id/red_star"
        motion:clickAction="toggle" />
</Transition>
<OnClick> ট্যাগ ব্যবহার করে Transition অ্যাট্রিবিউটটি MotionLayout ক্লিক ইভেন্টের প্রতিক্রিয়ায় অ্যানিমেশনটি চালানোর নির্দেশ দেয়। প্রতিটি অ্যাট্রিবিউটের দিকে তাকালে দেখা যায়:
-
targetIdহলো সেই ভিউ, যেটিতে ক্লিকের জন্য নজর রাখতে হবে। -
toggle-এরclickActionক্লিক করলে শুরু এবং শেষ অবস্থার মধ্যে পরিবর্তন হবে। আপনি ডকুমেন্টেশনেclickActionএর অন্যান্য অপশনগুলো দেখতে পারেন।
- আপনার কোডটি রান করুন, ধাপ ১-এ ক্লিক করুন, তারপর লাল তারকাটিতে ক্লিক করে অ্যানিমেশনটি দেখুন!
ধাপ ৫: অ্যানিমেশনগুলো কার্যকর অবস্থায়
অ্যাপটি চালান! তারকাটিতে ক্লিক করলে আপনার অ্যানিমেশনটি চলতে দেখবেন।
সম্পূর্ণ মোশন সিন ফাইলটিতে একটি Transition সংজ্ঞায়িত করা আছে, যা একটি শুরু এবং শেষ ConstraintSet নির্দেশ করে।
অ্যানিমেশনের শুরুতে ( @id/start ) তারকা আইকনটি স্ক্রিনের উপরের প্রান্তে সীমাবদ্ধ থাকে। অ্যানিমেশনের শেষে ( @id/end ) তারকা আইকনটি স্ক্রিনের নিচের প্রান্তে সীমাবদ্ধ থাকে।
<?xml version="1.0" encoding="utf-8"?>

<!-- Describe the animation for activity_step1.xml -->
<MotionScene xmlns:app="http://schemas.android.com/apk/res-auto"
            xmlns:android="http://schemas.android.com/apk/res/android">
   <!-- A transition describes an animation via start and end state -->
   <Transition
           motion:constraintSetStart="@+id/start"
           motion:constraintSetEnd="@+id/end"
           motion:duration="1000">
       <!-- MotionLayout will handle clicks on @id/star to "toggle" the animation between the start and end -->
       <OnClick
               motion:targetId="@id/red_star"
               motion:clickAction="toggle" />
   </Transition>

   <!-- Constraints to apply at the end of the animation -->
   <ConstraintSet android:id="@+id/start">
       <Constraint
               android:id="@+id/red_star"
               android:layout_width="wrap_content"
               android:layout_height="wrap_content"
               motion:layout_constraintStart_toStartOf="parent"
               motion:layout_constraintTop_toTopOf="parent" />
   </ConstraintSet>

   <!-- Constraints to apply at the end of the animation -->
   <ConstraintSet android:id="@+id/end">
       <Constraint
               android:id="@+id/red_star"
               android:layout_width="wrap_content"
               android:layout_height="wrap_content"
               motion:layout_constraintEnd_toEndOf="parent"
               motion:layout_constraintBottom_toBottomOf="parent" />
   </ConstraintSet>
</MotionScene>
৪. ড্র্যাগ ইভেন্টের উপর ভিত্তি করে অ্যানিমেট করা
এই ধাপে আপনাকে এমন একটি অ্যানিমেশন তৈরি করতে হবে যা ব্যবহারকারীর ড্র্যাগ ইভেন্টের (যখন ব্যবহারকারী স্ক্রিন সোয়াইপ করে) প্রতিক্রিয়ায় চালু হবে। MotionLayout ভিউ সরানোর জন্য টাচ ইভেন্ট ট্র্যাক করা সমর্থন করে, সেইসাথে গতিকে সাবলীল করার জন্য ফিজিক্স-ভিত্তিক ফ্লিং জেসচারও সমর্থন করে।
ধাপ ১: প্রাথমিক কোডটি পরিদর্শন করুন
- শুরু করার জন্য,
activity_step2.xmlলেআউট ফাইলটি খুলুন, যেটিতে আগে থেকেই একটিMotionLayoutরয়েছে। কোডটি দেখুন।
activity_step2.xml
<!-- initial code -->

<androidx.constraintlayout.motion.widget.MotionLayout
       ...
       motion:layoutDescription="@xml/step2" >

   <ImageView
           android:id="@+id/left_star"
           ...
   />

   <ImageView
           android:id="@+id/right_star"
           ...
   />

   <ImageView
           android:id="@+id/red_star"
           ...
   />

   <TextView
           android:id="@+id/credits"
           ...
           motion:layout_constraintTop_toTopOf="parent"
           motion:layout_constraintEnd_toEndOf="parent"/>
</androidx.constraintlayout.motion.widget.MotionLayout>
এই লেআউটটি অ্যানিমেশনের জন্য সমস্ত ভিউ নির্ধারণ করে। তিনটি তারার আইকন লেআউটে সীমাবদ্ধ নয়, কারণ সেগুলোকে মোশন সিনে অ্যানিমেট করা হবে।
ক্রেডিট TextView কনস্ট্রেইন্ট প্রয়োগ করা আছে, কারণ এটি সম্পূর্ণ অ্যানিমেশন জুড়ে একই জায়গায় থাকে এবং কোনো অ্যাট্রিবিউট পরিবর্তন করে না।
ধাপ ২: দৃশ্যটিকে অ্যানিমেট করুন
আগের অ্যানিমেশনটির মতোই, এই অ্যানিমেশনটিও একটি শুরু ও শেষের ConstraintSet, এবং একটি Transition দ্বারা নির্ধারিত হবে।
প্রারম্ভিক সীমাবদ্ধতা সেট সংজ্ঞায়িত করুন
- অ্যানিমেশনটি নির্ধারণ করতে মোশন সিন
xml/step2.xmlফাইলটি খুলুন। - প্রারম্ভিক সীমাবদ্ধতা
startএর জন্য শর্তগুলো যোগ করুন। শুরুতে, তিনটি তারাই স্ক্রিনের নীচে কেন্দ্রে অবস্থিত থাকে। ডান এবং বাম তারারalphaমান0.0, যার অর্থ হলো সেগুলো সম্পূর্ণ স্বচ্ছ এবং লুকানো।
ধাপ২.এক্সএমএল
<!-- TODO apply starting constraints -->

<!-- Constraints to apply at the start of the animation -->
<ConstraintSet android:id="@+id/start">
   <Constraint
           android:id="@+id/red_star"
           android:layout_width="wrap_content"
           android:layout_height="wrap_content"
           motion:layout_constraintStart_toStartOf="parent"
           motion:layout_constraintEnd_toEndOf="parent"
           motion:layout_constraintBottom_toBottomOf="parent" />

   <Constraint
           android:id="@+id/left_star"
           android:layout_width="wrap_content"
           android:layout_height="wrap_content"
           android:alpha="0.0"
           motion:layout_constraintStart_toStartOf="parent"
           motion:layout_constraintEnd_toEndOf="parent"
           motion:layout_constraintBottom_toBottomOf="parent" />

   <Constraint
           android:id="@+id/right_star"
           android:layout_width="wrap_content"
           android:layout_height="wrap_content"
           android:alpha="0.0"
           motion:layout_constraintStart_toStartOf="parent"
           motion:layout_constraintEnd_toEndOf="parent"
           motion:layout_constraintBottom_toBottomOf="parent" />
</ConstraintSet>
এই ConstraintSet এ আপনি প্রতিটি তারার জন্য একটি করে Constraint নির্দিষ্ট করবেন। অ্যানিমেশনের শুরুতে MotionLayout দ্বারা প্রতিটি Constraint প্রয়োগ করা হবে।
প্রতিটি তারার দৃশ্যকে স্টার্ট, এন্ড এবং বটম কনস্ট্রেইন্ট ব্যবহার করে স্ক্রিনের নীচে কেন্দ্রে স্থাপন করা হয়েছে। @id/left_star এবং @id/right_star উভয় তারারই একটি অতিরিক্ত আলফা ভ্যালু রয়েছে যা সেগুলোকে অদৃশ্য করে রাখে এবং এটি অ্যানিমেশনের শুরুতে প্রয়োগ করা হবে।
start এবং end কনস্ট্রেইন্ট সেটগুলো অ্যানিমেশনের শুরু এবং শেষ নির্ধারণ করে। স্টার্টের উপর একটি কনস্ট্রেইন্ট, যেমন motion:layout_constraintStart_toStartOf একটি ভিউ-এর শুরুকে অন্য একটি ভিউ-এর শুরুর সাথে সীমাবদ্ধ করে। এটি প্রথমে বিভ্রান্তিকর হতে পারে, কারণ start নামটি উভয়ের জন্যই ব্যবহৃত হয় এবং উভয়ই কনস্ট্রেইন্টের প্রসঙ্গে ব্যবহৃত হয়। পার্থক্যটি স্পষ্ট করার জন্য, layout_constraintStart এর start বলতে ভিউ-এর "স্টার্ট" বোঝায়, যা বাম থেকে ডানে লেখা ভাষায় লেফট এবং ডান থেকে বামে লেখা ভাষায় রাইট। start কনস্ট্রেইন্ট সেটটি অ্যানিমেশনের শুরুকে নির্দেশ করে।
শেষ সীমাবদ্ধতা সেট সংজ্ঞায়িত করুন
-
@id/creditsনিচে তিনটি তারকাকে একসাথে স্থাপন করার জন্য একটি চেইন ব্যবহার করে প্রান্তিক সীমাবদ্ধতাটি সংজ্ঞায়িত করুন। এছাড়াও, এটি বাম এবং ডান তারারalphaশেষ মান1.0-এ সেট করবে।
ধাপ২.এক্সএমএল
<!-- TODO apply ending constraints -->

<!-- Constraints to apply at the end of the animation -->
<ConstraintSet android:id="@+id/end">

   <Constraint
           android:id="@+id/left_star"
           android:layout_width="wrap_content"
           android:layout_height="wrap_content"
           android:alpha="1.0"
           motion:layout_constraintHorizontal_chainStyle="packed"
           motion:layout_constraintStart_toStartOf="parent"
           motion:layout_constraintEnd_toStartOf="@id/red_star"
           motion:layout_constraintTop_toBottomOf="@id/credits" />

   <Constraint
           android:id="@+id/red_star"
           android:layout_width="wrap_content"
           android:layout_height="wrap_content"
           motion:layout_constraintStart_toEndOf="@id/left_star"
           motion:layout_constraintEnd_toStartOf="@id/right_star"
           motion:layout_constraintTop_toBottomOf="@id/credits" />

   <Constraint
           android:id="@+id/right_star"
           android:layout_width="wrap_content"
           android:layout_height="wrap_content"
           android:alpha="1.0"
           motion:layout_constraintStart_toEndOf="@id/red_star"
           motion:layout_constraintEnd_toEndOf="parent"
           motion:layout_constraintTop_toBottomOf="@id/credits" />
</ConstraintSet>
এর ফলে, দৃশ্যগুলো অ্যানিমেট হওয়ার সাথে সাথে কেন্দ্র থেকে বাইরের দিকে ও উপরের দিকে ছড়িয়ে পড়বে।
এছাড়াও, যেহেতু উভয় ConstraintSets @id/right_start এবং @id/left_star এ alpha প্রপার্টি সেট করা আছে, তাই অ্যানিমেশনটি এগোনোর সাথে সাথে উভয় ভিউই ফেড-ইন হবে।
ব্যবহারকারীর সোয়াইপের উপর ভিত্তি করে অ্যানিমেশন
MotionLayout ব্যবহারকারীর ড্র্যাগ ইভেন্ট বা সোয়াইপ ট্র্যাক করে একটি পদার্থবিদ্যা-ভিত্তিক "ফ্লিং" অ্যানিমেশন তৈরি করতে পারে। এর মানে হলো, ব্যবহারকারী ভিউগুলোকে ফ্লিং করলেও সেগুলো চলতে থাকবে এবং কোনো তলের উপর দিয়ে গড়িয়ে যাওয়া বাস্তব বস্তুর মতো ধীর হয়ে যাবে। আপনি Transition এর মধ্যে একটি OnSwipe ট্যাগ ব্যবহার করে এই ধরনের অ্যানিমেশন যোগ করতে পারেন।
-
OnSwipeট্যাগ যোগ করার জন্য TODO-টি<OnSwipe motion:touchAnchorId="@id/red_star" />দিয়ে প্রতিস্থাপন করুন।
ধাপ২.এক্সএমএল
<!-- TODO add OnSwipe tag -->

<!-- A transition describes an animation via start and end state -->
<Transition
       motion:constraintSetStart="@+id/start"
       motion:constraintSetEnd="@+id/end">
   <!-- MotionLayout will track swipes relative to this view -->
   <OnSwipe motion:touchAnchorId="@id/red_star" />
</Transition>
OnSwipe কয়েকটি অ্যাট্রিবিউট থাকে, যার মধ্যে সবচেয়ে গুরুত্বপূর্ণ হলো touchAnchorId ।
-
touchAnchorIdহলো সেই ট্র্যাক করা ভিউ যা স্পর্শের প্রতিক্রিয়ায় নড়াচড়া করে।MotionLayoutএই ভিউটিকে সোয়াইপ করা আঙুল থেকে একই দূরত্বে রাখবে। -
touchAnchorSideনির্ধারণ করে যে ভিউটির কোন দিকটি ট্র্যাক করা হবে। যেসব ভিউয়ের আকার পরিবর্তন হয়, জটিল পথ অনুসরণ করে, বা যেগুলোর একটি দিক অন্যটির চেয়ে দ্রুত চলে, তাদের জন্য এটি গুরুত্বপূর্ণ। -
dragDirectionনির্ধারণ করে এই অ্যানিমেশনের জন্য কোন দিকটি গুরুত্বপূর্ণ (উপরে, নিচে, বামে বা ডানে)।
যখন MotionLayout ড্র্যাগ ইভেন্টের জন্য লিসেন করে, তখন লিসেনারটি MotionLayout ভিউতেই রেজিস্টার করা হয়, touchAnchorId দ্বারা নির্দিষ্ট ভিউতে নয়। যখন একজন ব্যবহারকারী স্ক্রিনের যেকোনো জায়গায় কোনো জেসচার শুরু করেন, তখন MotionLayout তাদের আঙুল এবং touchAnchorId ভিউয়ের touchAnchorSide এর মধ্যেকার দূরত্ব স্থির রাখে। উদাহরণস্বরূপ, যদি তারা অ্যাঙ্কর সাইড থেকে 100dp দূরে স্পর্শ করেন, তাহলে MotionLayout পুরো অ্যানিমেশন জুড়ে সেই দিকটিকে তাদের আঙুল থেকে 100dp দূরে রাখবে।
চেষ্টা করে দেখুন
- অ্যাপটি আবার চালান এবং ধাপ ২ স্ক্রিনটি খুলুন। আপনি অ্যানিমেশনটি দেখতে পাবেন।
-
MotionLayoutকীভাবে সাবলীল পদার্থবিদ্যা-ভিত্তিক অ্যানিমেশন প্রদর্শন করে তা অন্বেষণ করতে, অ্যানিমেশনের মাঝপথে আপনার আঙুলটি দ্রুত ছেড়ে দিয়ে দেখুন!
MotionLayout ConstraintLayout এর বৈশিষ্ট্যগুলো ব্যবহার করে অত্যন্ত ভিন্ন ভিন্ন ডিজাইনের মধ্যে অ্যানিমেট করার মাধ্যমে সমৃদ্ধ ইফেক্ট তৈরি করতে পারে।
এই অ্যানিমেশনে, শুরুতে তিনটি ভিউই স্ক্রিনের নীচে তাদের প্যারেন্টের সাপেক্ষে অবস্থান করে। শেষে, তিনটি ভিউকে @id/credits এর সাপেক্ষে একটি চেইন আকারে অবস্থান করানো হয়।
এই অত্যন্ত ভিন্ন লেআউটগুলো থাকা সত্ত্বেও, MotionLayout শুরু এবং শেষের মধ্যে একটি সাবলীল অ্যানিমেশন তৈরি করবে।
৫. একটি পথ পরিবর্তন করা
এই ধাপে আপনি এমন একটি অ্যানিমেশন তৈরি করবেন যা চলার সময় একটি জটিল পথ অনুসরণ করবে এবং চলার পথে ক্রেডিটগুলোও অ্যানিমেট করবে। MotionLayout একটি KeyPosition ব্যবহার করে শুরু এবং শেষের মধ্যে একটি ভিউয়ের চলার পথ পরিবর্তন করতে পারে।
ধাপ ১: বিদ্যমান কোডটি অন্বেষণ করুন
- বিদ্যমান লেআউট এবং মোশন সিন দেখতে
layout/activity_step3.xmlএবংxml/step3.xmlদুটি খুলুন। একটিImageViewএবংTextViewচাঁদ এবং ক্রেডিট টেক্সট প্রদর্শিত হচ্ছে। - মোশন সিন ফাইলটি (
xml/step3.xml) খুলুন। আপনি দেখতে পাবেন যে@id/startথেকে@id/endপর্যন্ত একটিTransitionসংজ্ঞায়িত করা আছে। অ্যানিমেশনটি দুটিConstraintSetsব্যবহার করে চাঁদের ছবিটিকে স্ক্রিনের নিচের বাম দিক থেকে নিচের ডান দিকে নিয়ে যায়। চাঁদটি চলার সাথে সাথে ক্রেডিটের লেখাটিalpha="0.0"থেকেalpha="1.0"পর্যন্ত ধীরে ধীরে ভেসে ওঠে। - এখন অ্যাপটি চালান এবং ধাপ ৩ নির্বাচন করুন। আপনি দেখতে পাবেন যে, চাঁদের উপর ক্লিক করলে এটি শুরু থেকে শেষ পর্যন্ত একটি সরলরৈখিক পথ (বা একটি সোজা রেখা) অনুসরণ করে।
ধাপ ২: পাথ ডিবাগিং সক্ষম করুন
চাঁদের গতিতে বৃত্তচাপ যোগ করার আগে, MotionLayout এ পাথ ডিবাগিং চালু করে নেওয়া সহায়ক।
MotionLayout ব্যবহার করে জটিল অ্যানিমেশন তৈরি করতে, আপনি প্রতিটি ভিউ-এর অ্যানিমেশন পাথ আঁকতে পারেন। এটি তখন সহায়ক হয় যখন আপনি আপনার অ্যানিমেশনটি কল্পনা করতে চান এবং গতির ছোটখাটো বিবরণগুলো নিখুঁত করতে চান।
- ডিবাগিং পাথ সক্রিয় করতে,
layout/activity_step3.xmlখুলুন এবংMotionLayoutট্যাগেmotion:motionDebug="SHOW_PATH"যোগ করুন।
activity_step3.xml
<!-- Add motion:motionDebug="SHOW_PATH" -->

<androidx.constraintlayout.motion.widget.MotionLayout
       ...
       motion:motionDebug="SHOW_PATH" >
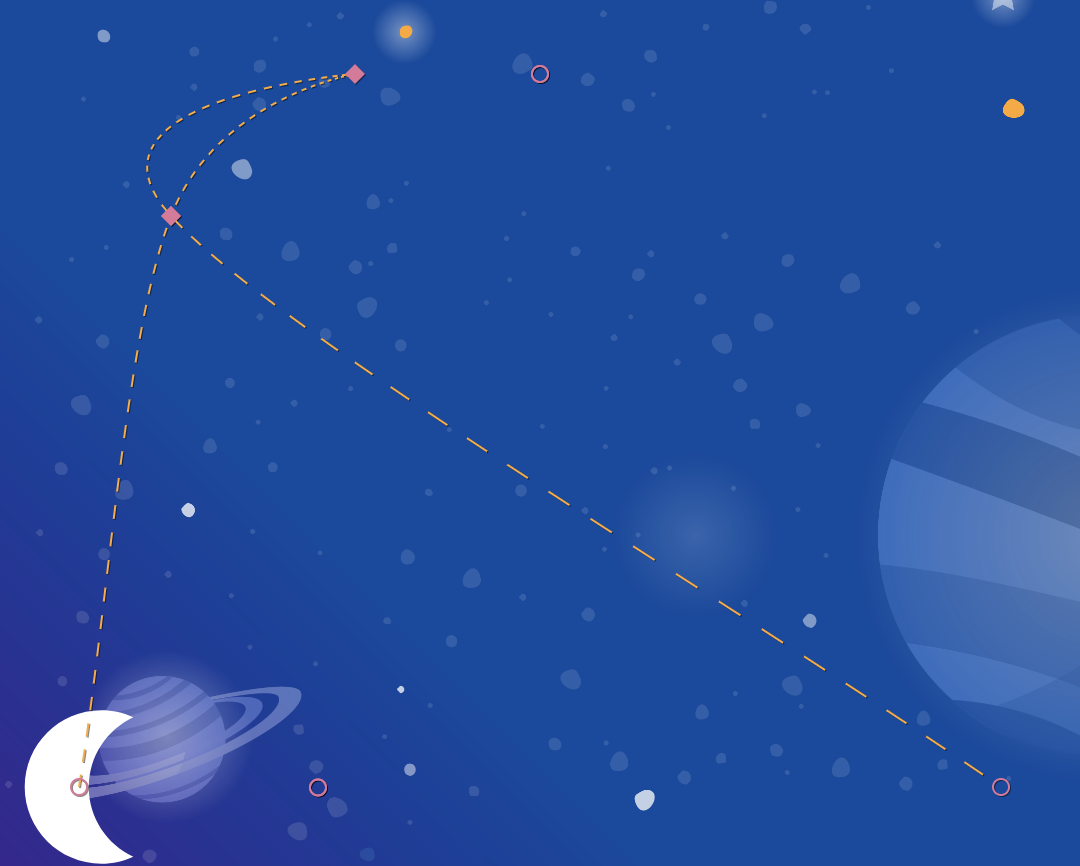
পাথ ডিবাগিং চালু করার পর, আপনি যখন অ্যাপটি আবার চালাবেন, তখন সমস্ত ভিউয়ের পাথগুলো একটি ডটেড লাইন দিয়ে দেখানো দেখতে পাবেন।
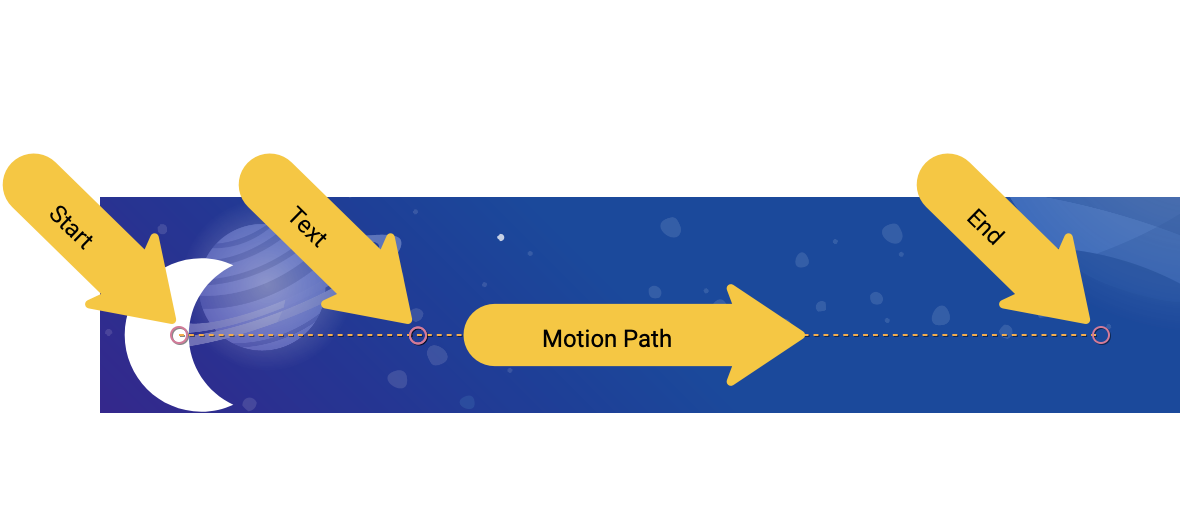
- বৃত্তগুলো একটি দৃশ্যের শুরু বা শেষ অবস্থান নির্দেশ করে।
- রেখাগুলো একটি দৃশ্যের পথ নির্দেশ করে।
- ডায়মন্ডগুলো এমন একটি
KeyPositionনির্দেশ করে যা পথটিকে পরিবর্তন করে।
উদাহরণস্বরূপ, এই অ্যানিমেশনটিতে মাঝের বৃত্তটি হলো ক্রেডিট টেক্সটের অবস্থান।
ধাপ ৩: একটি পথ পরিবর্তন করুন
MotionLayout এর সমস্ত অ্যানিমেশন একটি স্টার্ট এবং একটি এন্ড ConstraintSet দ্বারা নির্ধারিত হয়, যা ঠিক করে দেয় অ্যানিমেশন শুরু হওয়ার আগে এবং শেষ হওয়ার পরে স্ক্রিনটি কেমন দেখাবে। ডিফল্টরূপে, MotionLayout অবস্থান পরিবর্তনকারী প্রতিটি ভিউ-এর শুরু এবং শেষ অবস্থানের মধ্যে একটি রৈখিক পথ (একটি সরলরেখা) অঙ্কন করে।
এই উদাহরণে চাঁদের বৃত্তচাপের মতো জটিল পথ তৈরি করতে, MotionLayout একটি ভিউয়ের শুরু এবং শেষের মধ্যবর্তী পথ পরিবর্তন করার জন্য KeyPosition ব্যবহার করে।
-
xml/step3.xmlখুলুন এবং সিন-এ একটিKeyPositionযোগ করুন।KeyPositionট্যাগটিTransitionট্যাগের ভিতরে রাখতে হবে।
ধাপ ৩.এক্সএমএল
<!-- TODO: Add KeyFrameSet and KeyPosition -->
<KeyFrameSet>
   <KeyPosition
           motion:framePosition="50"
           motion:motionTarget="@id/moon"
           motion:keyPositionType="parentRelative"
           motion:percentY="0.5"
   />
</KeyFrameSet>
একটি KeyFrameSet হলো একটি Transition এর চাইল্ড, এবং এটি সেই সমস্ত KeyFrames এর (যেমন KeyPosition ) একটি সেট, যা ট্রানজিশনের সময় প্রয়োগ করা উচিত।
MotionLayout যখন শুরু এবং শেষের মধ্যে চাঁদের পথ গণনা করে, তখন এটি KeyFrameSet এ নির্দিষ্ট করা KeyPosition উপর ভিত্তি করে পথটি পরিবর্তন করে। অ্যাপটি আবার চালালে আপনি দেখতে পাবেন এটি কীভাবে পথটি পরিবর্তন করে।
একটি KeyPosition বেশ কিছু অ্যাট্রিবিউট থাকে যা বর্ণনা করে এটি কীভাবে পাথকে পরিবর্তন করে। সবচেয়ে গুরুত্বপূর্ণগুলো হলো:
-
framePositionহলো ০ থেকে ১০০-এর মধ্যে একটি সংখ্যা। এটি নির্ধারণ করে যে অ্যানিমেশনের কোন পর্যায়ে এইKeyPositionপ্রয়োগ করা হবে, যেখানে ১ মানে অ্যানিমেশনের ১% সম্পন্ন হয়েছে এবং ৯৯ মানে অ্যানিমেশনের ৯৯% সম্পন্ন হয়েছে। সুতরাং, যদি এর মান ৫০ হয়, তবে এটি ঠিক মাঝখানে প্রয়োগ করতে হবে। -
motionTargetহলো সেই ভিউ, যার পাথ এইKeyPositionপরিবর্তন করে। -
keyPositionTypeহলো এইKeyPositionকীভাবে পাথটিকে পরিবর্তন করে। এটিparentRelative,pathRelative, বাdeltaRelativeহতে পারে (যেমনটি পরবর্তী ধাপে ব্যাখ্যা করা হয়েছে)। -
percentX | percentYহলোframePositionএ পাথটিকে কতটা পরিবর্তন করতে হবে তার পরিমাণ (মান ০.০ থেকে ১.০-এর মধ্যে, এবং ঋণাত্মক ও ১-এর চেয়ে বড় মানও অনুমোদিত)।
আপনি বিষয়টিকে এভাবে ভাবতে পারেন: " framePosition এ keyPositionType দ্বারা নির্ধারিত স্থানাঙ্ক অনুযায়ী motionTarget এর পথকে percentX বা percentY সরিয়ে পরিবর্তন করুন ।"
ডিফল্টরূপে, পাথ পরিবর্তন করার ফলে সৃষ্ট যেকোনো কোণাকে MotionLayout গোলাকার করে দেয়। আপনি এইমাত্র তৈরি করা অ্যানিমেশনটি দেখলে দেখতে পাবেন যে, চাঁদটি বাঁকের কাছে একটি বক্র পথ অনুসরণ করছে। বেশিরভাগ অ্যানিমেশনের জন্য এটাই কাম্য, এবং যদি তা না হয়, তবে আপনি এটিকে কাস্টমাইজ করার জন্য curveFit অ্যাট্রিবিউটটি নির্দিষ্ট করে দিতে পারেন।
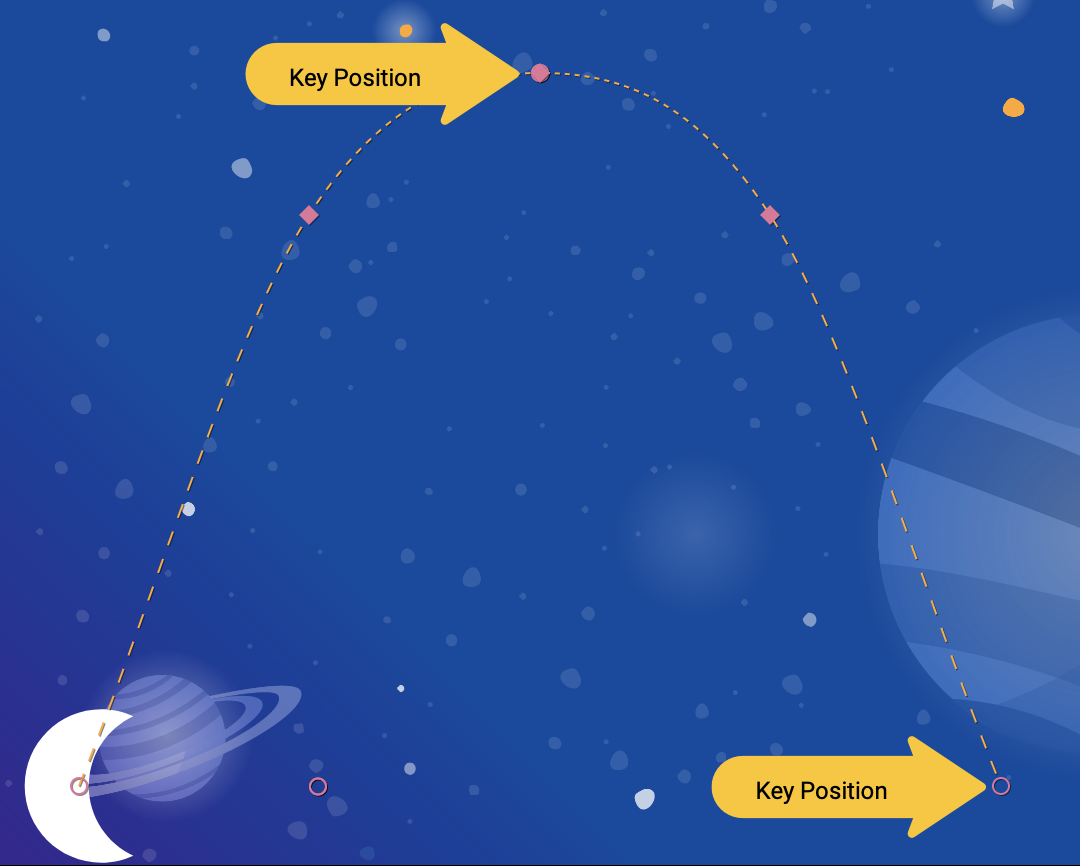
চেষ্টা করে দেখুন
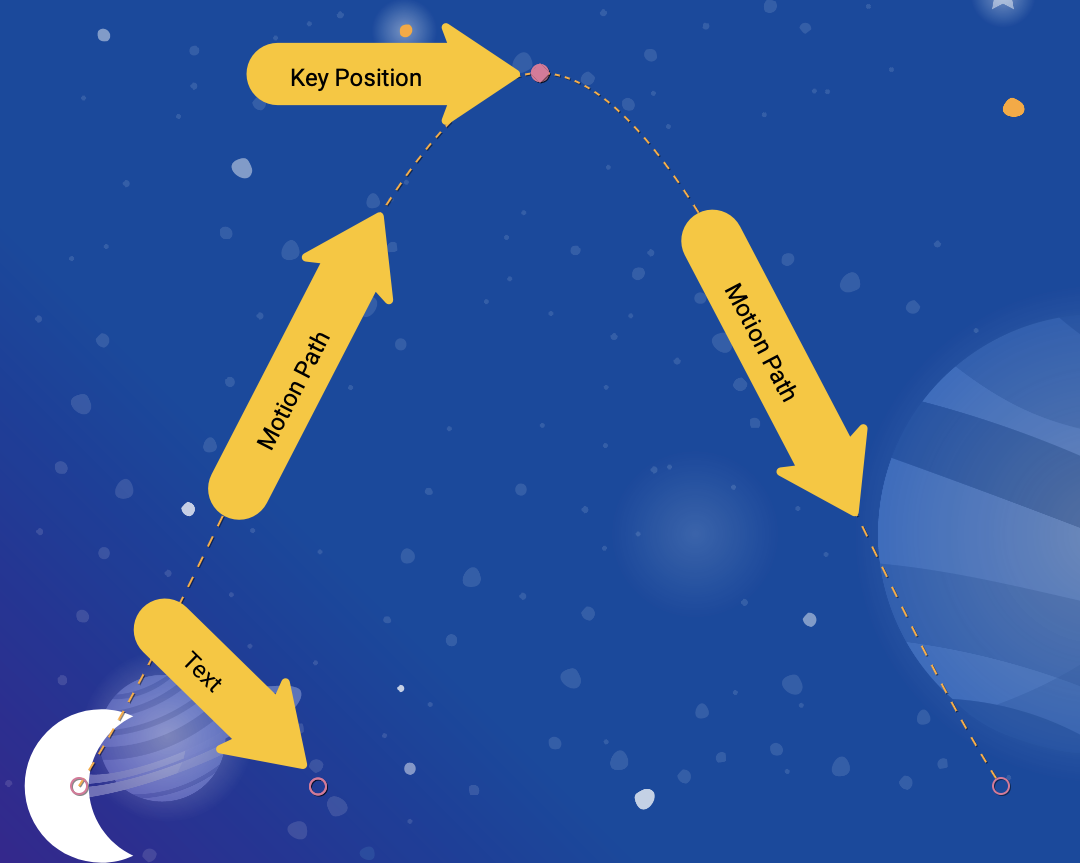
অ্যাপটি আবার চালালে আপনি এই ধাপের অ্যানিমেশনটি দেখতে পাবেন।
চাঁদ একটি বৃত্তচাপ অনুসরণ করে, কারণ এটি Transition নির্দিষ্ট করা একটি KeyPosition মধ্য দিয়ে যায়।
<KeyPosition
       motion:framePosition="50"
       motion:motionTarget="@id/moon"
       motion:keyPositionType="parentRelative"
       motion:percentY="0.5"
/>
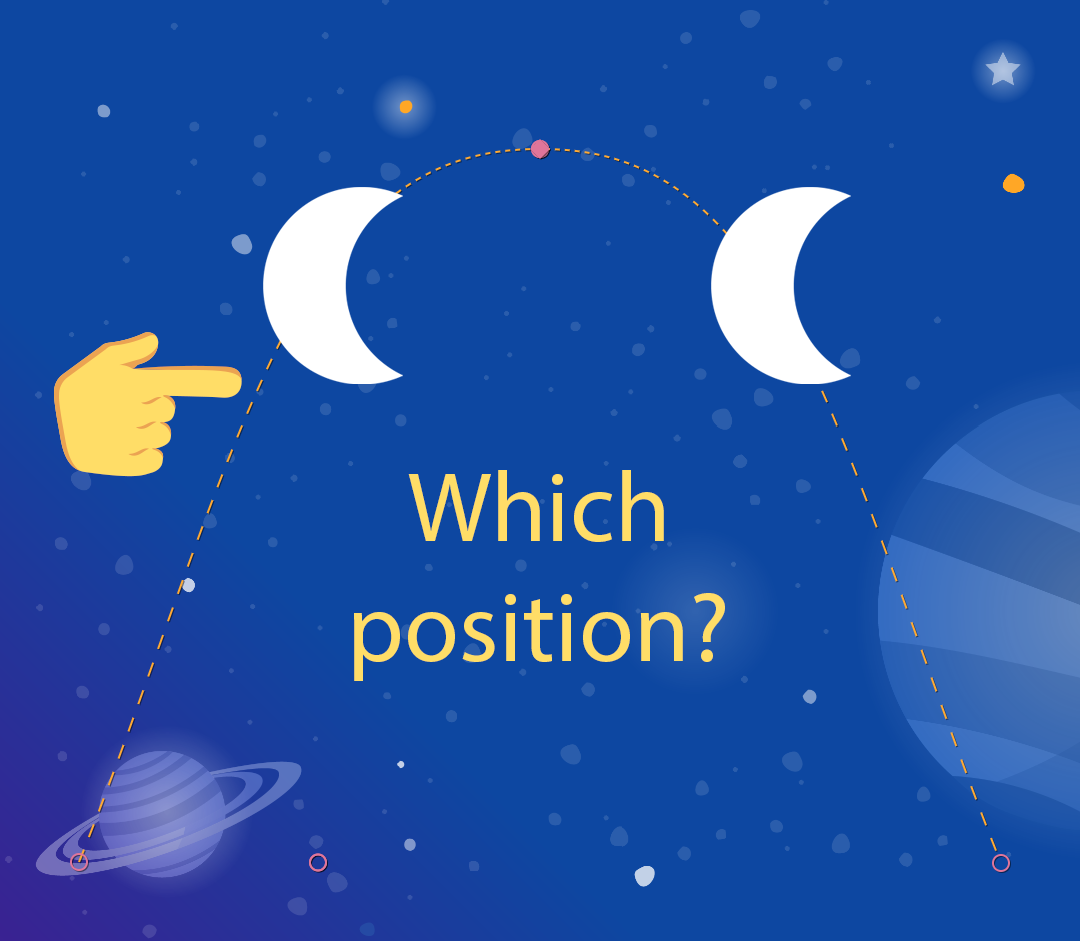
আপনি এই KeyPosition এভাবে পড়তে পারেন: " framePosition 50 -এ (অ্যানিমেশনের মাঝামাঝি সময়ে), parentRelative (সম্পূর্ণ MotionLayout ) দ্বারা নির্ধারিত স্থানাঙ্ক অনুযায়ী motionTarget @id/moon এর পথকে 50% Y (স্ক্রিনের অর্ধেক নিচে) সরিয়ে পরিবর্তন করুন।"
সুতরাং, অ্যানিমেশনের মাঝপথে, চাঁদটিকে অবশ্যই স্ক্রিনের ৫০% নিচের একটি KeyPosition মধ্যে দিয়ে যেতে হবে। এই KeyPosition X-গতিকে মোটেও পরিবর্তন করে না, তাই চাঁদটি শুরু থেকে শেষ পর্যন্ত আনুভূমিকভাবেই যাবে। MotionLayout শুরু এবং শেষের মধ্যে যাওয়ার সময় এই KeyPosition মধ্যে দিয়ে যাওয়া একটি মসৃণ পথ খুঁজে বের করবে।
ভালো করে দেখলে বোঝা যায়, ক্রেডিটের লেখাটি চাঁদের অবস্থান দ্বারা সীমাবদ্ধ। এটি উল্লম্বভাবেও সরছে না কেন?

<Constraint
       android:id="@id/credits"
       ...
       motion:layout_constraintBottom_toBottomOf="@id/moon"
       motion:layout_constraintTop_toTopOf="@id/moon"
/>
দেখা যাচ্ছে, যদিও আপনি চাঁদের চলার পথ পরিবর্তন করছেন, চাঁদের শুরু এবং শেষের অবস্থান এটিকে উল্লম্বভাবে মোটেও সরায় না। KeyPosition শুরু বা শেষের অবস্থান পরিবর্তন করে না, তাই ক্রেডিটের লেখাটি চাঁদের চূড়ান্ত শেষ অবস্থানে সীমাবদ্ধ থাকে।
যদি আপনি চান যে ক্রেডিটগুলো চাঁদের সাথে সাথে সরুক, তাহলে আপনি ক্রেডিটগুলোতে একটি KeyPosition যোগ করতে পারেন, অথবা @id/credits এর স্টার্ট কনস্ট্রেইন্টগুলো পরিবর্তন করতে পারেন।
পরবর্তী অংশে আপনি MotionLayout এর বিভিন্ন ধরনের keyPositionType সম্পর্কে বিস্তারিত জানবেন।
৬. keyPositionType বোঝা
শেষ ধাপে আপনি পাথটিকে স্ক্রিনের ৫০% অফসেট করার জন্য parentRelative টাইপের একটি keyPosition ব্যবহার করেছেন। keyPositionType অ্যাট্রিবিউটটি নির্ধারণ করে যে MotionLayout, percentX বা percentY অনুযায়ী পাথটিকে কীভাবে পরিবর্তন করবে।
<KeyFrameSet>
   <KeyPosition
           motion:framePosition="50"
           motion:motionTarget="@id/moon"
           motion:keyPositionType="parentRelative"
           motion:percentY="0.5"
   />
</KeyFrameSet>
তিন ধরনের keyPosition সম্ভব: parentRelative , pathRelative , এবং deltaRelative । একটি ধরন নির্দিষ্ট করলে, percentX এবং percentY গণনা করার স্থানাঙ্ক ব্যবস্থা পরিবর্তিত হবে।
স্থানাঙ্ক ব্যবস্থা কাকে বলে?
স্থানাঙ্ক ব্যবস্থা মহাকাশে একটি বিন্দু নির্দিষ্ট করার একটি উপায় প্রদান করে। এগুলি পর্দায় কোনো অবস্থান বর্ণনা করার জন্যও উপযোগী।
MotionLayout স্থানাঙ্ক ব্যবস্থা হলো একটি কার্টেসিয়ান স্থানাঙ্ক ব্যবস্থা । এর মানে হলো, এতে দুটি লম্ব রেখা দ্বারা সংজ্ঞায়িত একটি X এবং একটি Y অক্ষ থাকে। এদের মধ্যে মূল পার্থক্য হলো স্ক্রিনের কোথায় X অক্ষটি থাকে (Y অক্ষ সর্বদা X অক্ষের সাথে লম্বভাবে থাকে)।
MotionLayout এর সমস্ত কোঅর্ডিনেট সিস্টেমে X এবং Y উভয় অক্ষেই 0.0 থেকে 1.0 এর মধ্যে মান ব্যবহৃত হয়। এগুলোতে ঋণাত্মক মান এবং 1.0 এর চেয়ে বড় মানও ব্যবহার করা যায়। সুতরাং, উদাহরণস্বরূপ, percentX এর মান -2.0 হলে তার অর্থ হবে, X অক্ষের বিপরীত দিকে দুইবার যেতে হবে।
এই সবকিছু যদি বীজগণিত ক্লাসের মতো একটু বেশি কঠিন মনে হয়, তাহলে নিচের ছবিগুলো দেখুন!
পিতামাতার আপেক্ষিক স্থানাঙ্ক
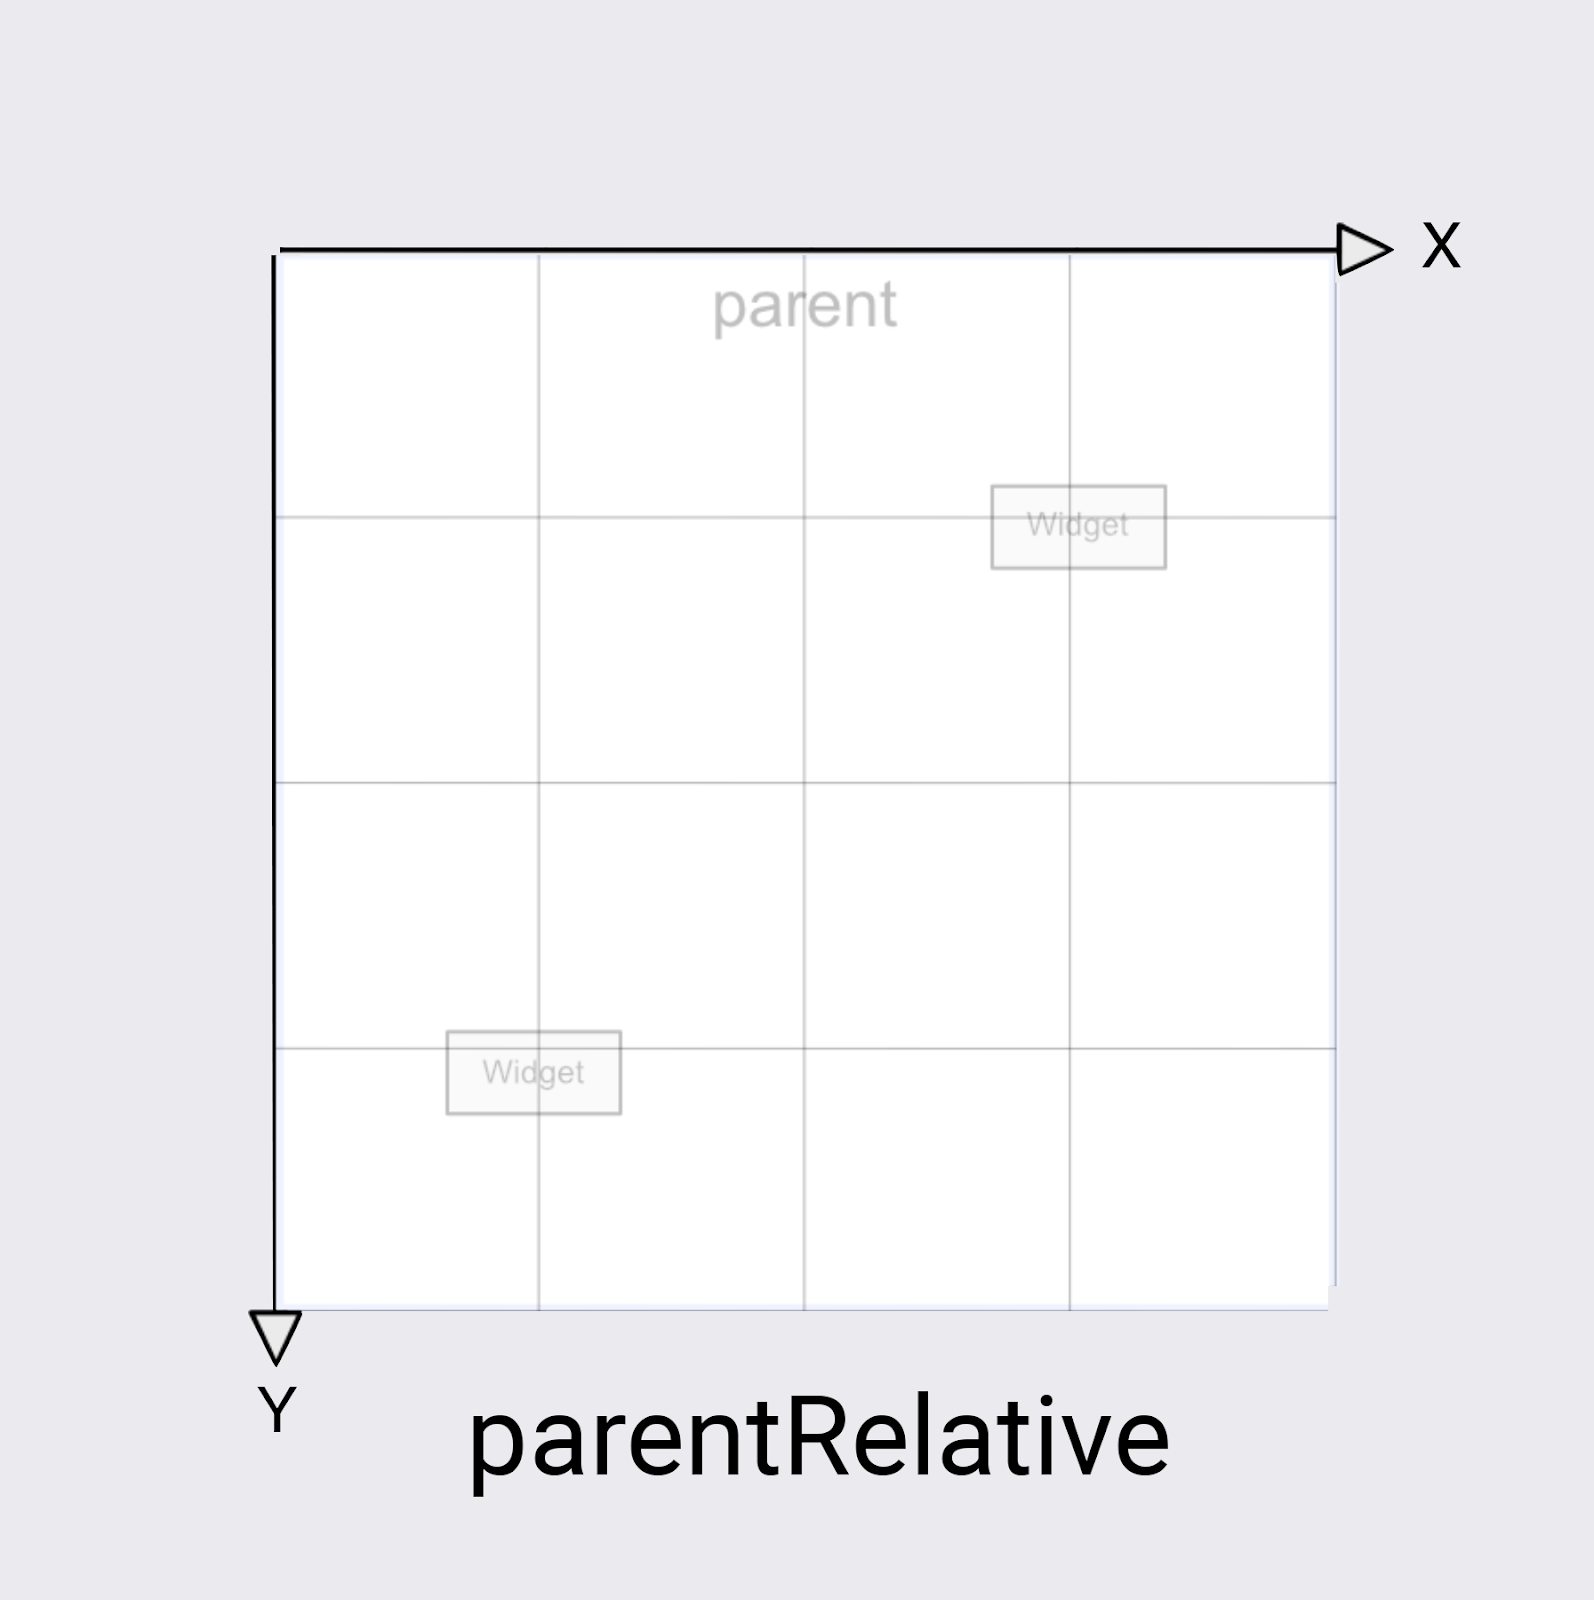
parentRelative এর keyPositionType স্ক্রিনের মতোই একই স্থানাঙ্ক ব্যবস্থা ব্যবহার করে। এটি সম্পূর্ণ MotionLayout এর উপরের বাম দিকে (0, 0) এবং নিচের ডান দিকে (1, 1) নির্ধারণ করে।
যখনই আপনি এমন কোনো অ্যানিমেশন তৈরি করতে চান যা সম্পূর্ণ MotionLayout জুড়ে চলে – যেমন এই উদাহরণে চাঁদের বৃত্তাকার গতি – তখন আপনি parentRelative ব্যবহার করতে পারেন।
তবে, যদি আপনি গতির সাপেক্ষে কোনো পথ পরিবর্তন করতে চান, যেমন এটিকে সামান্য বাঁকাতে চান, তাহলে অন্য দুটি স্থানাঙ্ক ব্যবস্থা একটি ভালো বিকল্প।
ডেল্টা আপেক্ষিক স্থানাঙ্ক
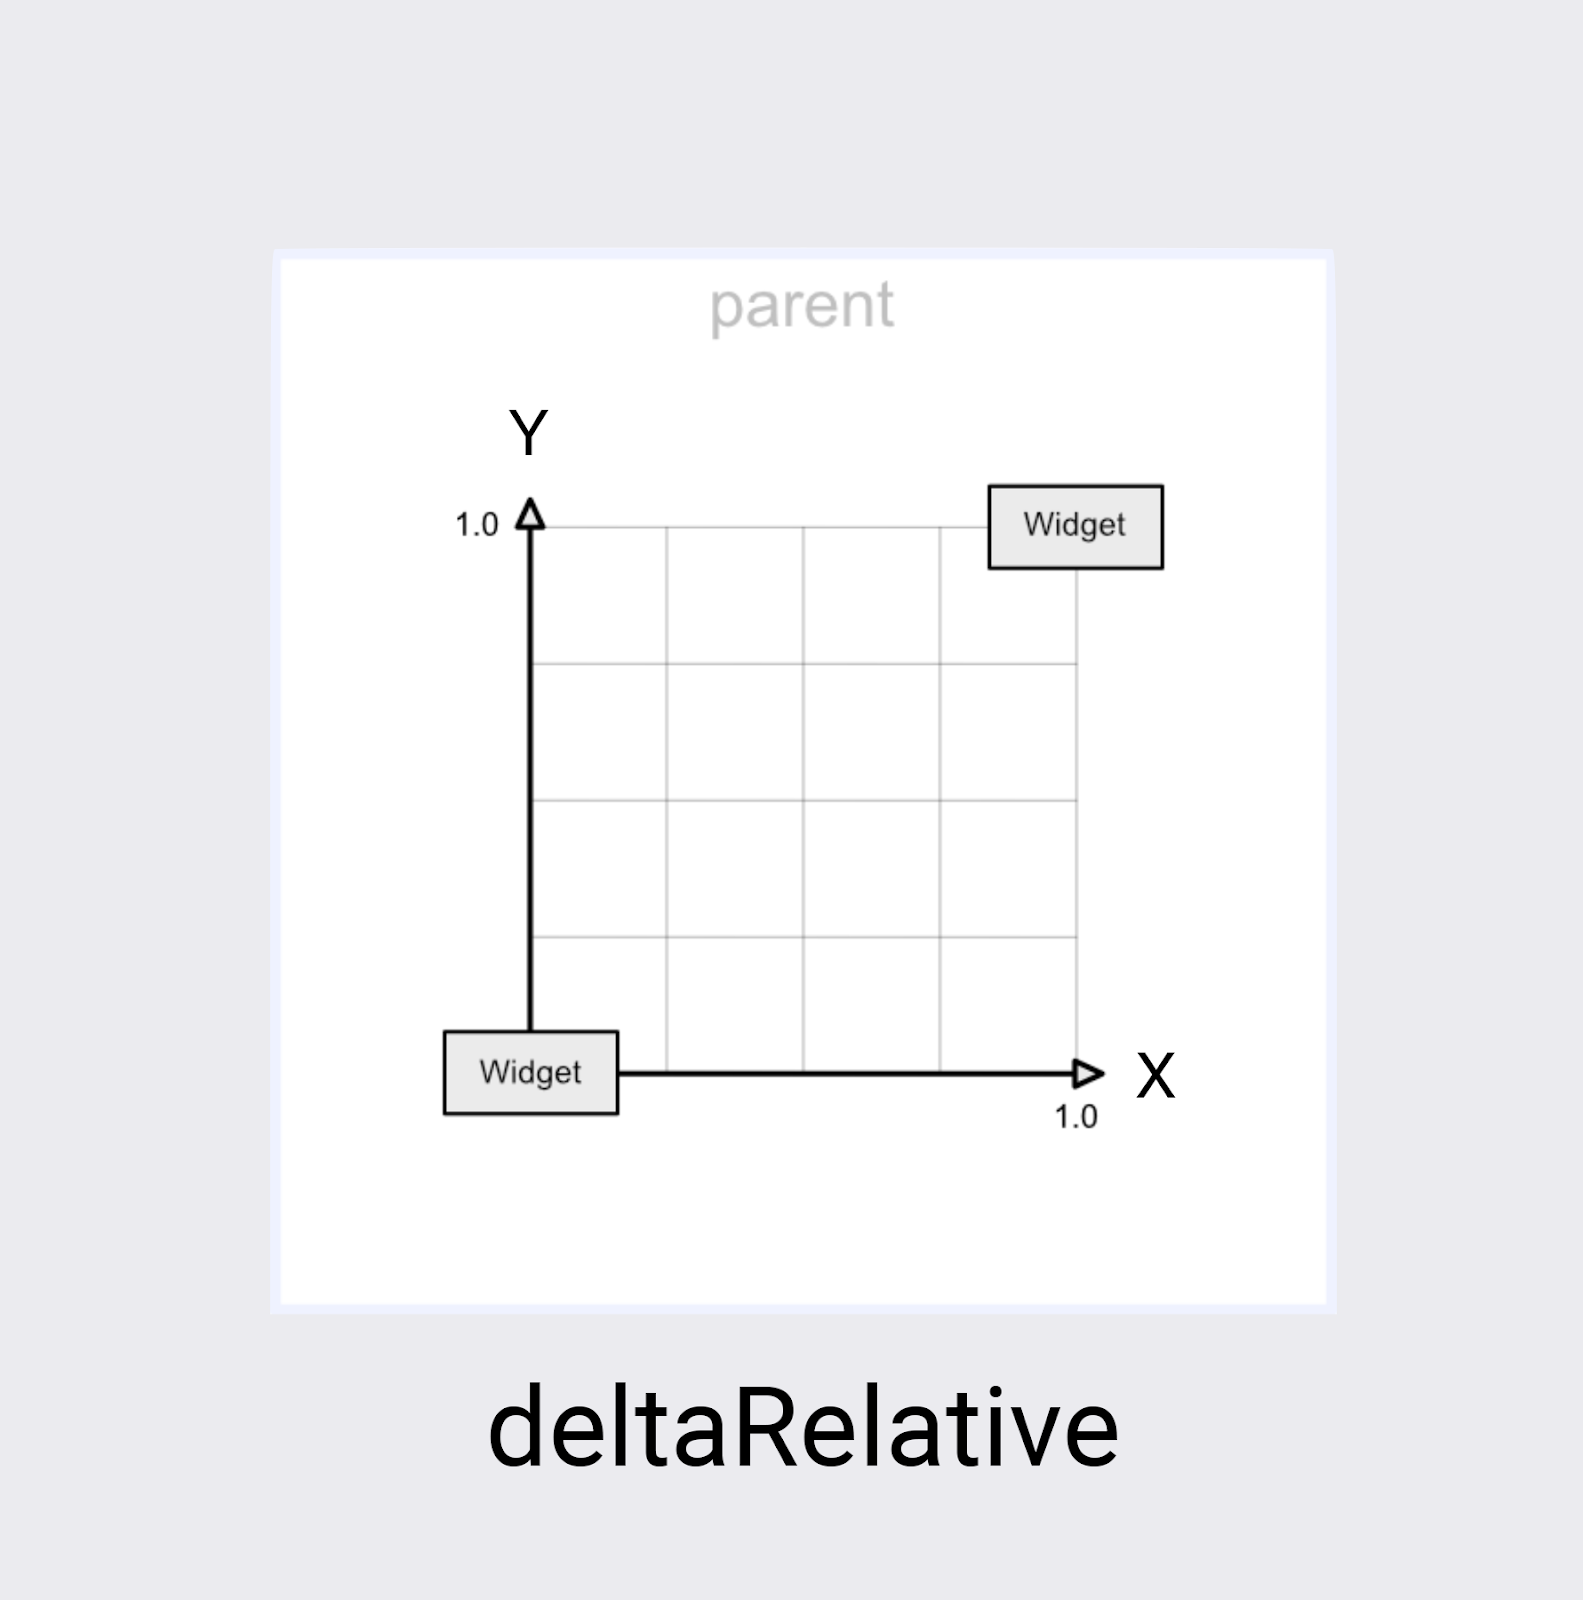
ডেল্টা হলো পরিবর্তনের একটি গাণিতিক পরিভাষা, তাই deltaRelative বলতে বোঝায় "আপেক্ষিক পরিবর্তন"। deltaRelative স্থানাঙ্কে (0,0) হলো ভিউটির শুরুর অবস্থান এবং (1,1) হলো শেষের অবস্থান। X এবং Y অক্ষ স্ক্রিনের সাথে সারিবদ্ধ থাকে।
স্ক্রিনে X অক্ষ সর্বদা আনুভূমিক এবং Y অক্ষ সর্বদা উল্লম্ব থাকে। parentRelative এর তুলনায় প্রধান পার্থক্য হলো, স্থানাঙ্কগুলো স্ক্রিনের কেবল সেই অংশকে বর্ণনা করে যেখানে ভিউটি চলাচল করবে।
deltaRelative হলো অনুভূমিক বা উল্লম্ব গতিকে আলাদাভাবে নিয়ন্ত্রণ করার জন্য একটি চমৎকার স্থানাঙ্ক ব্যবস্থা। উদাহরণস্বরূপ, আপনি এমন একটি অ্যানিমেশন তৈরি করতে পারেন যা ৫০% গতিতে শুধু তার উল্লম্ব (Y) সরণ সম্পন্ন করে এবং অনুভূমিকভাবে (X) চলতে থাকে।
পথের আপেক্ষিক স্থানাঙ্ক
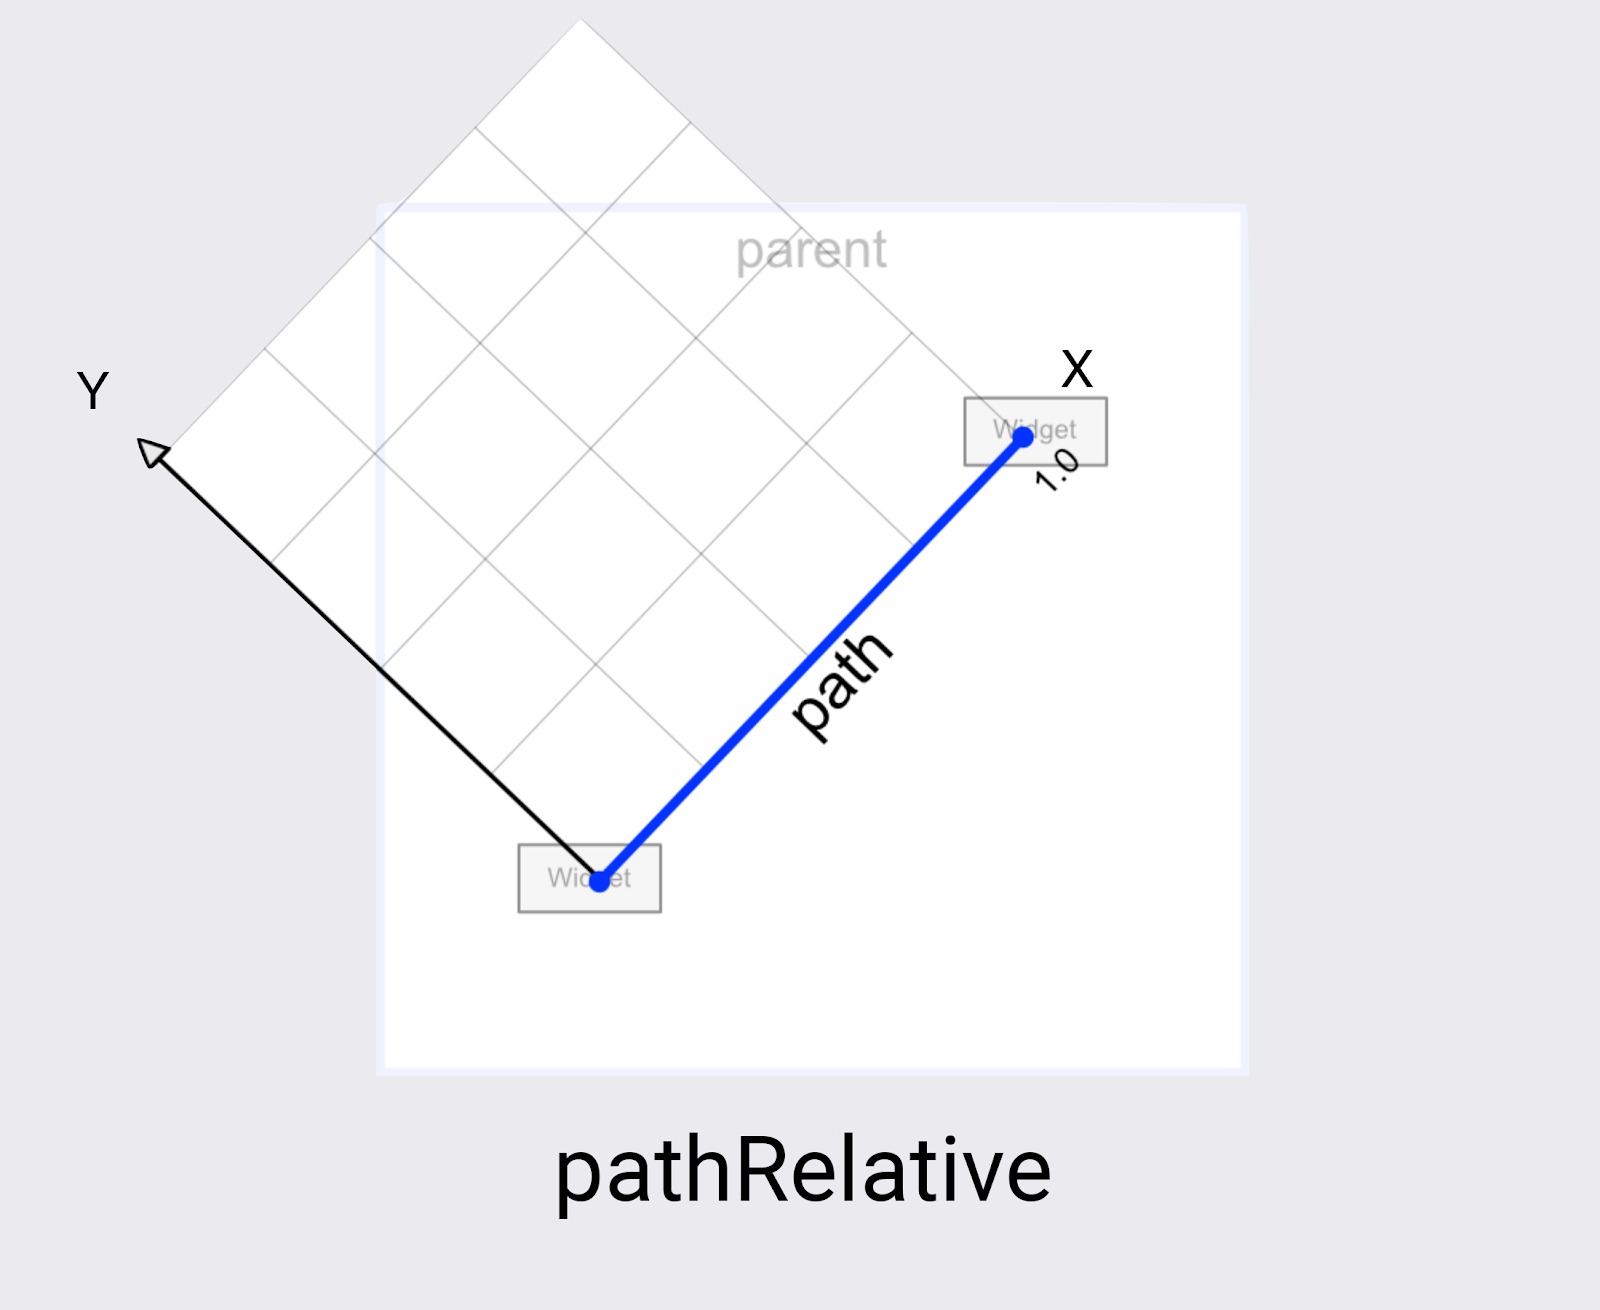
MotionLayout এর সর্বশেষ স্থানাঙ্ক ব্যবস্থাটি হলো pathRelative । এটি অন্য দুটি থেকে বেশ আলাদা, কারণ এর X-অক্ষ শুরু থেকে শেষ পর্যন্ত গতিপথ অনুসরণ করে। তাই (0,0) হলো শুরুর অবস্থান এবং (1,0) হলো শেষের অবস্থান।
আপনি এটা কেন চাইবেন? প্রথম দর্শনে এটা বেশ আশ্চর্যজনক, বিশেষ করে যেহেতু এই স্থানাঙ্ক ব্যবস্থাটি স্ক্রিন স্থানাঙ্ক ব্যবস্থার সাথেও সামঞ্জস্যপূর্ণ নয়।
দেখা যাচ্ছে যে pathRelative কয়েকটি ক্ষেত্রে বেশ দরকারি।
- অ্যানিমেশনের কোনো অংশে একটি ভিউ-এর গতি বাড়ানো, কমানো বা থামানো। যেহেতু X ডাইমেনশনটি সর্বদা ভিউ-এর নেওয়া পথের সাথে হুবহু মিলে যায়, তাই আপনি সেই পথের একটি নির্দিষ্ট বিন্দু কোন
framePositionএ পৌঁছাবে তা পরিবর্তন করতে একটিpathRelativeKeyPositionব্যবহার করতে পারেন। সুতরাং,framePosition="50"এবংpercentX="0.1"এর একটিKeyPositionব্যবহার করলে, অ্যানিমেশনটি তার গতির প্রথম ১০% অতিক্রম করতে ৫০% সময় নেবে। - কোনো পথে একটি সূক্ষ্ম বক্রতা যোগ করা। যেহেতু Y মাত্রা সর্বদা গতির সাথে লম্ব, তাই Y পরিবর্তন করলে পথটি সামগ্রিক গতির সাপেক্ষে বক্র হয়ে যাবে।
-
deltaRelativeকাজ না করলে দ্বিতীয় ডাইমেনশন যোগ করা যায় না। সম্পূর্ণ আনুভূমিক এবং উল্লম্ব গতির জন্য,deltaRelativeকেবল একটি কার্যকর ডাইমেনশন তৈরি করে। তবে,pathRelativeসর্বদা ব্যবহারযোগ্য X এবং Y স্থানাঙ্ক তৈরি করবে।
In the next step you'll learn how to build even more complex paths using more than one KeyPosition .
7. Building complex paths
Looking at the animation you built in the last step, it does create a smooth curve, but the shape could be more "moon like."
Modify a path with multiple KeyPosition elements
MotionLayout can modify a path further by defining as many KeyPosition as needed to get any motion. For this animation you will build an arc, but you could make the moon jump up and down in the middle of the screen, if you wanted.
- Open
xml/step4.xml. You see it has the same views and theKeyFrameyou added in the last step. - To round out the top of the curve, add two more
KeyPositionsto the path of@id/moon, one just before it reaches the top, and one after.

step4.xml
<!-- TODO: Add two more KeyPositions to the KeyFrameSet here -->
<KeyPosition
       motion:framePosition="25"
       motion:motionTarget="@id/moon"
       motion:keyPositionType="parentRelative"
       motion:percentY="0.6"
/>
<KeyPosition
       motion:framePosition="75"
       motion:motionTarget="@id/moon"
       motion:keyPositionType="parentRelative"
       motion:percentY="0.6"
/>
These KeyPositions will be applied 25% and 75% of the way through the animation, and cause @id/moon to move through a path that is 60% from the top of the screen. Combined with the existing KeyPosition at 50%, this creates a smooth arc for the moon to follow.
In MotionLayout , you can add as many KeyPositions as you would need to get the motion path you want. MotionLayout will apply each KeyPosition at the specified framePosition , and figure out how to create a smooth motion that goes through all of the KeyPositions .
চেষ্টা করে দেখুন
- Run the app again. Go to Step 4 to see the animation in action. When you click on the moon, it follows the path from start to end, going through each
KeyPositionthat was specified in theKeyFrameSet.
Explore on your own
Before you move on to other types of KeyFrame , try adding some more KeyPositions to the KeyFrameSet to see what kind of effects you can create just using KeyPosition .
Here's one example showing how to build a complex path that moves back and forth during the animation.
step4.xml
<!-- Complex paths example: Dancing moon -->
<KeyFrameSet>
   <KeyPosition
           motion:framePosition="25"
           motion:motionTarget="@id/moon"
           motion:keyPositionType="parentRelative"
           motion:percentY="0.6"
           motion:percentX="0.1"
   />
   <KeyPosition
           motion:framePosition="50"
           motion:motionTarget="@id/moon"
           motion:keyPositionType="parentRelative"
           motion:percentY="0.5"
           motion:percentX="0.3"
   />
   <KeyPosition
           motion:framePosition="75"
           motion:motionTarget="@id/moon"
           motion:keyPositionType="parentRelative"
           motion:percentY="0.6"
           motion:percentX="0.1"
   />
</KeyFrameSet>
Once you're done exploring KeyPosition , in the next step you'll move on to other types of KeyFrames .
8. Changing attributes during motion
Building dynamic animations often means changing the size , rotation , or alpha of views as the animation progresses. MotionLayout supports animating many attributes on any view using a KeyAttribute .
In this step, you will use KeyAttribute to make the moon scale and rotate. You will also use a KeyAttribute to delay the appearance of the text until the moon has almost completed its journey.
Step 1: Resize and rotate with KeyAttribute
- Open
xml/step5.xmlwhich contains the same animation you built in the last step. For variety, this screen uses a different space picture as the background. - To make the moon expand in size and rotate, add two
KeyAttributetags in theKeyFrameSetatkeyFrame="50"andkeyFrame="100"
step5.xml
<!-- TODO: Add KeyAttributes to rotate and resize @id/moon -->

<KeyAttribute
       motion:framePosition="50"
       motion:motionTarget="@id/moon"
       android:scaleY="2.0"
       android:scaleX="2.0"
       android:rotation="-360"
/>
<KeyAttribute
       motion:framePosition="100"
       motion:motionTarget="@id/moon"
       android:rotation="-720"
/>
These KeyAttributes are applied at 50% and 100% of the animation. The first KeyAttribute at 50% will happen at the top of the arc, and causes the view to be doubled in size as well as rotate -360 degrees (or one full circle). The second KeyAttribute will finish the second rotation to -720 degrees (two full circles) and shrink the size back to regular since the scaleX and scaleY values default to 1.0.
Just like a KeyPosition , a KeyAttribute uses the framePosition and motionTarget to specify when to apply the KeyFrame , and which view to modify. MotionLayout will interpolate between KeyPositions to create fluid animations.
KeyAttributes support attributes that can be applied to all views. They support changing basic attributes such as the visibility , alpha , or elevation . You can also change the rotation like you're doing here, rotate in three dimensions with rotateX and rotateY , scale the size with scaleX and scaleY , or translate the view's position in X, Y, or Z.
Step 2: Delay the appearance of credits
One of the goals of this step is to update the animation so that the credits text doesn't appear until the animation is mostly complete.
- To delay the appearance of credits, define one more
KeyAttributethat ensures thatalphawill remain 0 untilkeyPosition="85".MotionLayoutwill still smoothly transition from 0 to 100 alpha, but it will do it over the last 15% of the animation.
step5.xml
<!-- TODO: Add KeyAttribute to delay the appearance of @id/credits -->

<KeyAttribute
       motion:framePosition="85"
       motion:motionTarget="@id/credits"
       android:alpha="0.0"
/>
This KeyAttribute keeps the alpha of @id/credits at 0.0 for the first 85% of the animation. Since it starts at an alpha of 0, this means it will be invisible for the first 85% of the animation.
The end effect of this KeyAttribute is that the credits appear towards the end of the animation. This gives the appearance of them being coordinated with the moon settling down in the right corner of the screen.
By delaying animations on one view while another view moves like this, you can build impressive animations that feel dynamic to the user.
চেষ্টা করে দেখুন
- Run the app again and go to Step 5 to see the animation in action. When you click on the moon, it'll follow the path from start to end, going through each
KeyAttributethat was specified in theKeyFrameSet.
Because you rotate the moon two full circles, it will now do a double back flip, and the credits will delay their appearance until the animation is almost done.
Explore on your own
Before you move on to the final type of KeyFrame , try modifying other standard attributes in the KeyAttributes . For example, try changing rotation to rotationX to see what animation it produces.
Here's a list of the standard attributes that you can try:
-
android:visibility -
android:alpha -
android:elevation -
android:rotation -
android:rotationX -
android:rotationY -
android:scaleX -
android:scaleY -
android:translationX -
android:translationY -
android:translationZ
9. Changing custom attributes
Rich animations involve changing the color or other attributes of a view. While MotionLayout can use a KeyAttribute to change any of the standard attributes listed in the previous task, you use a CustomAttribute to specify any other attribute.
A CustomAttribute can be used to set any value that has a setter. For example, you can set the backgroundColor on a View using a CustomAttribute . MotionLayout will use reflection to find the setter, then call it repeatedly to animate the view.
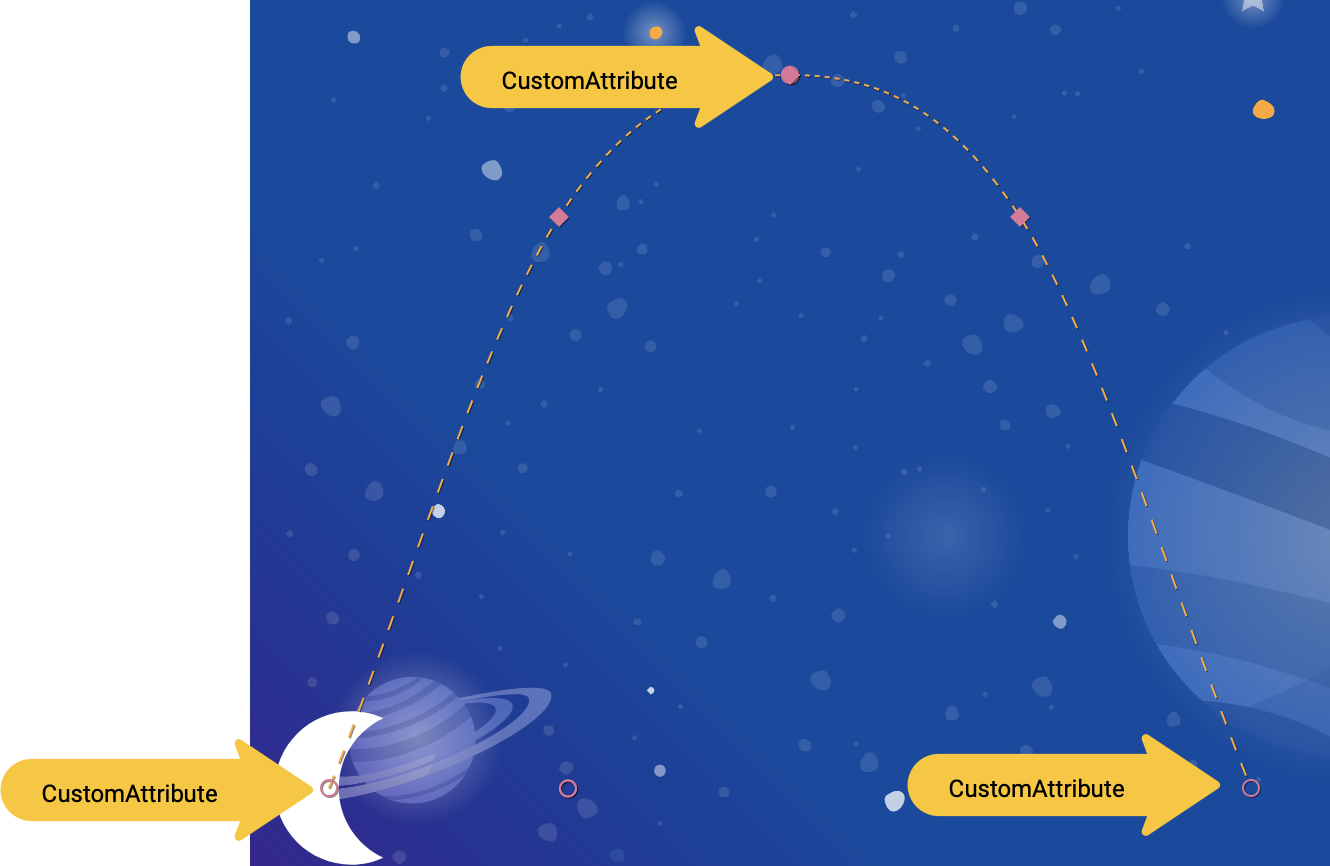
In this step, you will use a CustomAttribute to set the colorFilter attribute on the moon to build the animation shown below.
Define custom attributes
- To get started open
xml/step6.xmlwhich contains the same animation you built in the last step. - To make the moon change colors, add two
KeyAttributewith aCustomAttributein theKeyFrameSetatkeyFrame="0",keyFrame="50"andkeyFrame="100".
step6.xml
<!-- TODO: Add Custom attributes here -->
<KeyAttribute
       motion:framePosition="0"
       motion:motionTarget="@id/moon">
   <CustomAttribute
           motion:attributeName="colorFilter"
           motion:customColorValue="#FFFFFF"
   />
</KeyAttribute>
<KeyAttribute
       motion:framePosition="50"
       motion:motionTarget="@id/moon">
   <CustomAttribute
           motion:attributeName="colorFilter"
           motion:customColorValue="#FFB612"
   />
</KeyAttribute>
<KeyAttribute
       motion:framePosition="100"
       motion:motionTarget="@id/moon">
   <CustomAttribute
           motion:attributeName="colorFilter"
           motion:customColorValue="#FFFFFF"
   />
</KeyAttribute>
You add a CustomAttribute inside a KeyAttribute . The CustomAttribute will be applied at the framePosition specified by the KeyAttribute .
Inside the CustomAttribute you must specify an attributeName and one value to set.
-
motion:attributeNameis the name of the setter that will be called by this custom attribute. In this examplesetColorFilteronDrawablewill be called. -
motion:custom*Valueis a custom value of the type noted in the name, in this example the custom value is a color specified.
Custom values can have any of the following types:
- রঙ
- Integer
- ভাসা
- স্ট্রিং
- মাত্রা
- বুলিয়ান
Using this API, MotionLayout can animate anything that provides a setter on any view.
চেষ্টা করে দেখুন
- Run the app again and go to Step 6 to see the animation in action. When you click on the moon, it'll follow the path from start to end, going through each
KeyAttributethat was specified in theKeyFrameSet.
When you add more KeyFrames , MotionLayout changes the path of the moon from a straight line to a complex curve, adding a double backflip, resize, and a color change midway through the animation.
In real animations, you'll often animate several views at the same time controlling their motion along different paths and speeds. By specifying a different KeyFrame for each view, it's possible to choreograph rich animations that animate multiple views with MotionLayout .
10. Drag events and complex paths
In this step you'll explore using OnSwipe with complex paths. So far, the animation of the moon has been triggered by an OnClick listener and runs for a fixed duration.
Controlling animations that have complex paths using OnSwipe , like the moon animation you've built in the last few steps, requires understanding how OnSwipe works.
Step 1: Explore OnSwipe behavior
- Open
xml/step7.xmland find the existingOnSwipedeclaration.
step7.xml
<!-- Fix OnSwipe by changing touchAnchorSide →

<OnSwipe
       motion:touchAnchorId="@id/moon"
       motion:touchAnchorSide="bottom"
/>
- Run the app on your device and go to Step 7 . See if you can produce a smooth animation by dragging the moon along the path of the arc.
When you run this animation, it doesn't look very good. After the moon reaches the top of the arc, it starts jumping around.
To understand the bug, consider what happens when the user is touching just below the top of the arc. Because the OnSwipe tag has an motion:touchAnchorSide="bottom" MotionLayout will try to make the distance between the finger and the bottom of the view constant throughout the animation.
But, since the bottom of the moon doesn't always go in the same direction, it goes up then comes back down, MotionLayout doesn't know what to do when the user has just passed the top of the arc. To consider this, since you're tracking the bottom of the moon, where should it be placed when the user is touching here?
Step 2: Use the right side
To avoid bugs like this, it is important to always choose a touchAnchorId and touchAnchorSide that always progresses in one direction throughout the duration of the entire animation.
In this animation, both the right side and the left side of the moon will progress across the screen in one direction.
However, both the bottom and the top will reverse direction. When OnSwipe attempts to track them, it will get confused when their direction changes.
- To make this animation follow touch events, change the
touchAnchorSidetoright.
step7.xml
<!-- Fix OnSwipe by changing touchAnchorSide →

<OnSwipe
       motion:touchAnchorId="@id/moon"
       motion:touchAnchorSide="right"
/>
Step 3: Use dragDirection
You can also combine dragDirection with touchAnchorSide to make a side track a different direction than it normally would. It's still important that the touchAnchorSide only progresses in one direction, but you can tell MotionLayout which direction to track. For example, you can keep the touchAnchorSide="bottom" , but add dragDirection="dragRight" . This will cause MotionLayout to track the position of the bottom of the view, but only consider its location when moving right (it ignores vertical motion). So, even though the bottom goes up and down, it will still animate correctly with OnSwipe .
- Update
OnSwipeto track the moon's motion correctly.
step7.xml
<!-- Using dragDirection to control the direction of drag tracking →

<OnSwipe
       motion:touchAnchorId="@id/moon"
       motion:touchAnchorSide="bottom"
       motion:dragDirection="dragRight"
/>
চেষ্টা করে দেখুন
- Run the app again and try dragging the moon through the entire path. Even though it follows a complex arc,
MotionLayoutwill be able to progress the animation in response to swipe events.
11. Running motion with code
MotionLayout can be used to build rich animations when used with CoordinatorLayout . In this step, you'll build a collapsible header using MotionLayout .
Step 1: Explore the existing code
- To get started, open
layout/activity_step8.xml. - In
layout/activity_step8.xml, you see that a workingCoordinatorLayoutandAppBarLayoutis already built.
activity_step8.xml
<androidx.coordinatorlayout.widget.CoordinatorLayout
       ...>
   <com.google.android.material.appbar.AppBarLayout
           android:id="@+id/appbar_layout"
           android:layout_width="match_parent"
           android:layout_height="180dp">
       <androidx.constraintlayout.motion.widget.MotionLayout
               android:id="@+id/motion_layout"
               ... >
           ...
       </androidx.constraintlayout.motion.widget.MotionLayout>
   </com.google.android.material.appbar.AppBarLayout>

   <androidx.core.widget.NestedScrollView
           ...
           motion:layout_behavior="@string/appbar_scrolling_view_behavior" >
           ...
   </androidx.core.widget.NestedScrollView>
</androidx.coordinatorlayout.widget.CoordinatorLayout>
This layout uses a CoordinatorLayout to share scrolling information between the NestedScrollView and the AppBarLayout . So, when the NestedScrollView scrolls up, it will tell the AppBarLayout about the change. That's how you implement a collapsing toolbar like this on Android—the scrolling of the text will be "coordinated" with the collapsing header.
The motion scene that @id/motion_layout points to is similar to the motion scene in the last step. However, the OnSwipe declaration was removed to enable it to work with CoordinatorLayout .
- Run the app and go to Step 8 . You see that when you scroll the text, the moon does not move.
Step 2: Make the MotionLayout scroll
- To make the
MotionLayoutview scroll as soon as theNestedScrollViewscrolls, addmotion:minHeightandmotion:layout_scrollFlagsto theMotionLayout.
activity_step8.xml
<!-- Add minHeight and layout_scrollFlags to the MotionLayout -->

<androidx.constraintlayout.motion.widget.MotionLayout
       android:id="@+id/motion_layout"
       android:layout_width="match_parent"
       android:layout_height="match_parent"
       motion:layoutDescription="@xml/step8"
       motion:motionDebug="SHOW_PATH"
       android:minHeight="80dp"
       motion:layout_scrollFlags="scroll|enterAlways|snap|exitUntilCollapsed"  >
- Run the app again and go to Step 8 . You see that the
MotionLayoutcollapses as you scroll up. However, the animation does not progress based on the scroll behavior yet.
Step 3: Move the motion with code
- Open
Step8Activity.kt. Edit thecoordinateMotion()function to tellMotionLayoutabout the changes in scroll position.
Step8Activity.kt
// TODO: set progress of MotionLayout based on an AppBarLayout.OnOffsetChangedListener

private fun coordinateMotion() {
    val appBarLayout: AppBarLayout = findViewById(R.id.appbar_layout)
    val motionLayout: MotionLayout = findViewById(R.id.motion_layout)

    val listener = AppBarLayout.OnOffsetChangedListener { unused, verticalOffset ->
        val seekPosition = -verticalOffset / appBarLayout.totalScrollRange.toFloat()
        motionLayout.progress = seekPosition
    }

    appBarLayout.addOnOffsetChangedListener(listener)
}
This code will register a OnOffsetChangedListener that will be called every time the user scrolls with the current scroll offset.
MotionLayout supports seeking its transition by setting the progress property. To convert between a verticalOffset and a percentage progress, divide by the total scroll range.
চেষ্টা করে দেখুন
- Deploy the app again and run the Step 8 animation. You see that
MotionLayoutwill progress the animation based on the scroll position.
It's possible to build custom dynamic collapsing toolbar animations using MotionLayout . By using a sequence of KeyFrames you can achieve very bold effects.
১২. অভিনন্দন
This codelab covered the basic API of MotionLayout .
To see more examples of MotionLayout in practice, check out the official sample . And be sure to check out the documentation !
আরও জানুন
MotionLayout supports even more features not covered in this codelab, like KeyCycle, which lets you control paths or attributes with repeating cycles, and KeyTimeCycle, which lets you animate based on clock time. Check out the samples for examples of each.
For links to other codelabs in this course, see the Advanced Android in Kotlin codelabs landing page .