
۱. قبل از شروع
این آزمایشگاه کد بخشی از دوره پیشرفته اندروید در کاتلین است. اگر آزمایشگاههای کد را به ترتیب انجام دهید، بیشترین بهره را از این دوره خواهید برد، اما اجباری نیست. تمام آزمایشگاههای کد دوره در صفحه اصلی آزمایشگاههای کد اندروید در کاتلین پیشرفته فهرست شدهاند.
MotionLayout کتابخانهای است که به شما امکان میدهد حرکت غنی را به برنامه اندروید خود اضافه کنید. این کتابخانه بر اساس ConstraintLayout, ساخته شده است و به شما امکان میدهد هر چیزی را که میتوانید با استفاده از ConstraintLayout بسازید، متحرکسازی کنید.
شما میتوانید از MotionLayout برای متحرکسازی مکان، اندازه، قابلیت مشاهده، آلفا، رنگ، ارتفاع، چرخش و سایر ویژگیهای چندین نما به طور همزمان استفاده کنید. با استفاده از XML اعلانی میتوانید انیمیشنهای هماهنگی ایجاد کنید که شامل چندین نما هستند و دستیابی به آنها در کد دشوار است.
انیمیشنها راهی عالی برای بهبود تجربه کاربری یک اپلیکیشن هستند. میتوانید از انیمیشنها برای موارد زیر استفاده کنید:
- نمایش تغییرات — انیمیشنسازی بین حالتها به کاربر اجازه میدهد تا به طور طبیعی تغییرات رابط کاربری شما را دنبال کند.
- جلب توجه — از انیمیشنها برای جلب توجه به عناصر مهم رابط کاربری استفاده کنید.
- طرحهای زیبا بسازید — حرکت مؤثر در طراحی، ظاهر برنامهها را جذاب میکند.
پیشنیازها
این آزمایشگاه کد برای توسعهدهندگانی که تا حدودی تجربه توسعه اندروید دارند طراحی شده است. قبل از تلاش برای تکمیل این آزمایشگاه کد، باید:
- بدانید که چگونه یک برنامه با یک فعالیت، یک طرح اولیه ایجاد کنید و آن را با استفاده از اندروید استودیو روی یک دستگاه یا شبیهساز اجرا کنید. با
ConstraintLayoutآشنا باشید. برای کسب اطلاعات بیشتر در موردConstraintLayout، آزمایشگاه کد Constraint Layout را مطالعه کنید.
کاری که انجام خواهید داد
- تعریف انیمیشن با
ConstraintSetsوMotionLayout - متحرکسازی بر اساس رویدادهای درگ
- تغییر انیمیشن با استفاده از
KeyPosition - تغییر ویژگیها با
KeyAttribute - اجرای انیمیشنها با کد
- متحرکسازی هدرهای تاشو با
MotionLayout
آنچه نیاز دارید
- اندروید استودیو ۴.۰ (ویرایشگر
MotionLayoutفقط با این نسخه از اندروید استودیو کار میکند.)
۲. شروع کار
برای دانلود نمونه برنامه، میتوانید یکی از روشهای زیر را انجام دهید:
... یا با استفاده از دستور زیر، مخزن GitHub را از خط فرمان کلون کنید:
$ git clone https://github.com/googlecodelabs/motionlayout.git
۳. ساخت انیمیشن با MotionLayout
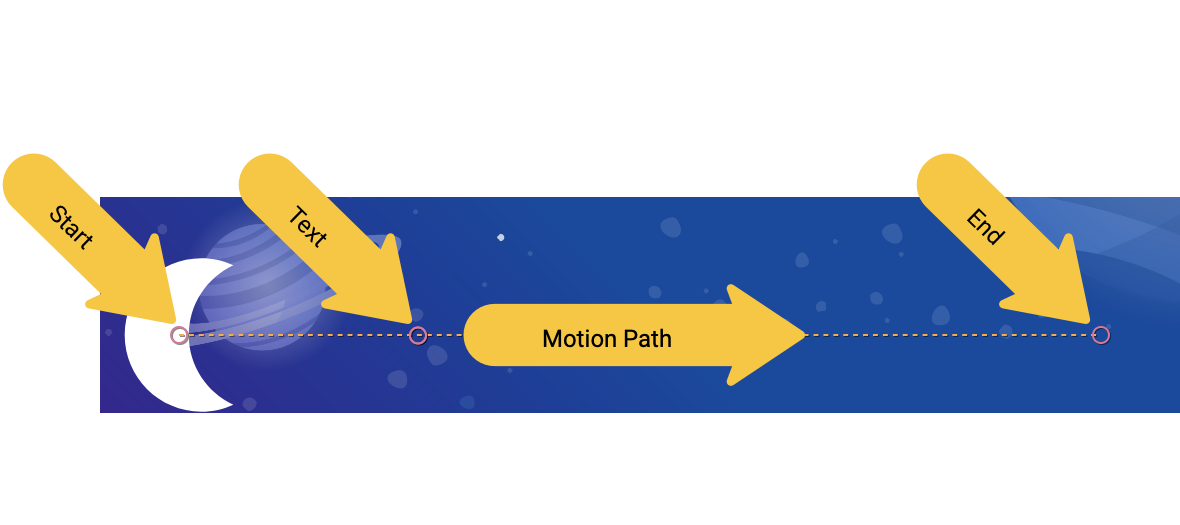
ابتدا، یک انیمیشن خواهید ساخت که در پاسخ به کلیکهای کاربر، یک نما را از بالای صفحه به پایین صفحه منتقل میکند.
برای ایجاد یک انیمیشن از کد اولیه، به قطعات اصلی زیر نیاز دارید:
- یک
MotionLayout,که زیرکلاسی ازConstraintLayoutاست. شما تمام نماهایی را که قرار است متحرک شوند، درون تگMotionLayoutمشخص میکنید. - یک
MotionScene,که یک فایل XML است که یک انیمیشن را برایMotionLayout. - یک
Transition,که بخشی ازMotionSceneاست و مدت زمان انیمیشن، تریگر (trigger) و نحوه حرکت نماها (views) را مشخص میکند. - یک
ConstraintSetکه محدودیتهای شروع و پایان انتقال را مشخص میکند.
بیایید به ترتیب به هر یک از این موارد نگاهی بیندازیم، و با MotionLayout شروع میکنیم.
مرحله ۱: بررسی کدهای موجود
MotionLayout یک زیرکلاس از ConstraintLayout است، بنابراین از تمام ویژگیهای مشابه هنگام اضافه کردن انیمیشن پشتیبانی میکند. برای استفاده MotionLayout ، یک نمای MotionLayout اضافه میکنید که در آن ConstraintLayout.
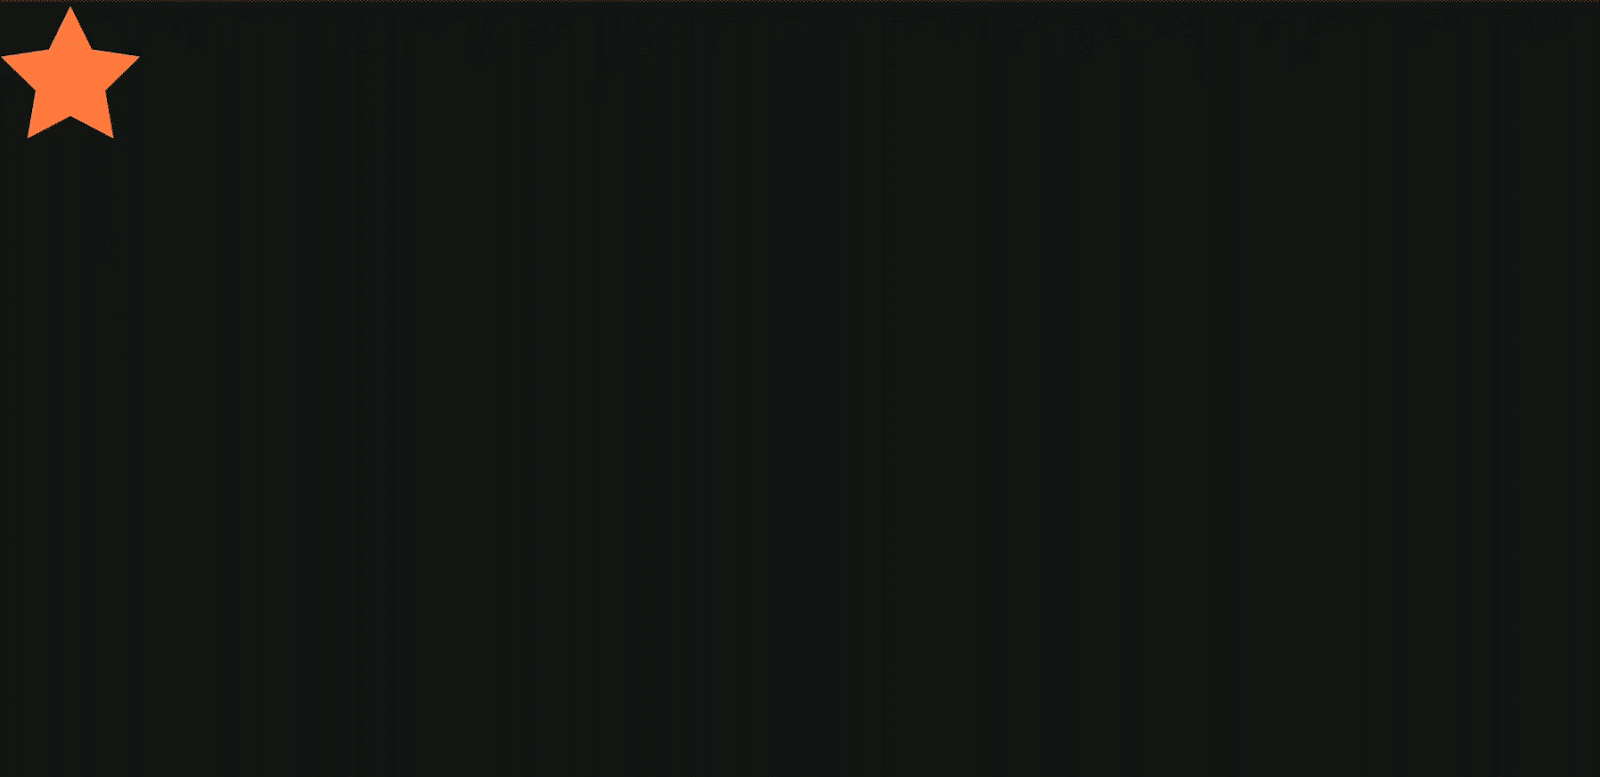
- در
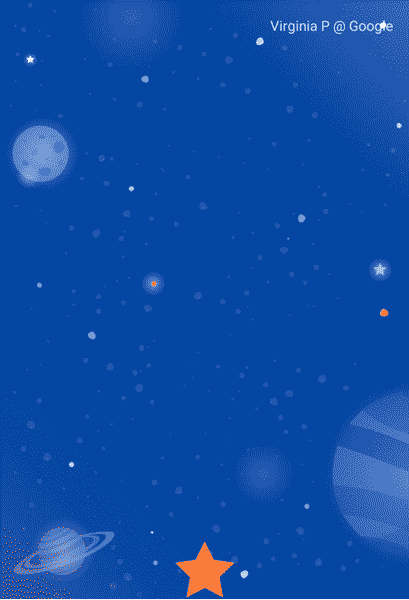
res/layout، فایلactivity_step1.xml.در اینجا یکConstraintLayoutبا یکImageViewاز یک ستاره دارید که یک رنگ (tint) درون آن اعمال شده است.
activity_step1.xml
<!-- initial code -->
<androidx.constraintlayout.widget.ConstraintLayout
       ...
       android:layout_width="match_parent"
       android:layout_height="match_parent"
       >

   <ImageView
           android:id="@+id/red_star"
           ...
   />

</androidx.constraintlayout.motion.widget.MotionLayout>
این ConstraintLayout هیچ قیدی ندارد، بنابراین اگر اکنون برنامه را اجرا کنید، خواهید دید که ستارهها بدون قید نمایش داده میشوند، به این معنی که در مکانی نامعلوم قرار دارند. اندروید استودیو در مورد عدم وجود قید به شما هشدار میدهد.
مرحله ۲: تبدیل به طرحبندی متحرک
برای متحرکسازی با استفاده از MotionLayout, باید ConstraintLayout را به MotionLayout تبدیل کنید.
برای اینکه طرحبندی شما از صحنهی متحرک استفاده کند، باید به آن اشاره کند.
- برای انجام این کار، سطح طراحی را باز کنید. در اندروید استودیو ۴.۰، هنگام مشاهده یک فایل XML طرحبندی، با استفاده از نماد تقسیم یا طراحی در بالا سمت راست، سطح طراحی را باز میکنید.
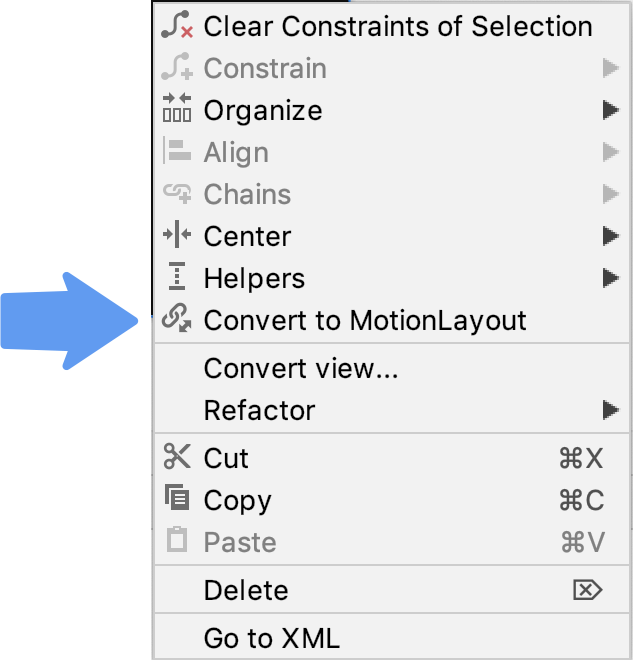
- وقتی محیط طراحی را باز کردید، روی پیشنمایش کلیک راست کرده و گزینه Convert to MotionLayout را انتخاب کنید.
این کد، تگ ConstraintLayout با تگ MotionLayout جایگزین میکند و یک motion:layoutDescription به تگ MotionLayout اضافه میکند که به @xml/activity_step1_scene.
activity_step1**.xml**
<!-- explore motion:layoutDescription="@xml/activity_step1_scene" -->
<androidx.constraintlayout.motion.widget.MotionLayout
       ...
       motion:layoutDescription="@xml/activity_step1_scene">
یک صحنه متحرک، یک فایل XML واحد است که یک انیمیشن را در MotionLayout توصیف میکند.
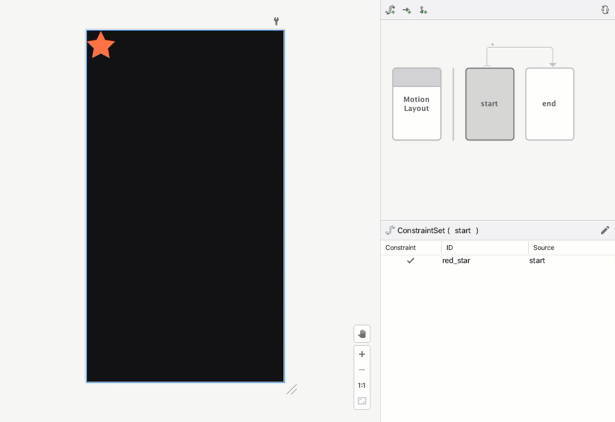
به محض اینکه به MotionLayout تبدیل شوید، سطح طراحی، Motion Editor را نمایش خواهد داد.
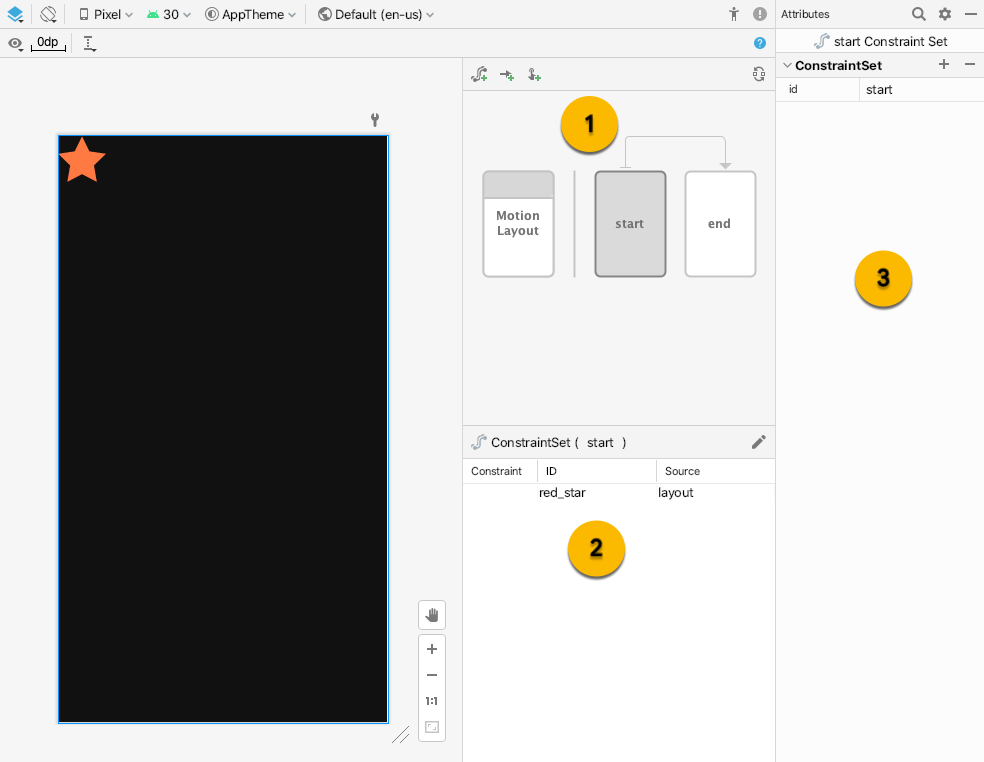
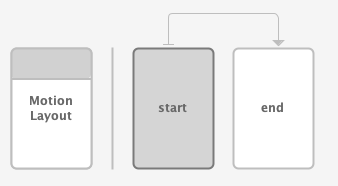
سه عنصر رابط کاربری جدید در ویرایشگر حرکت وجود دارد:
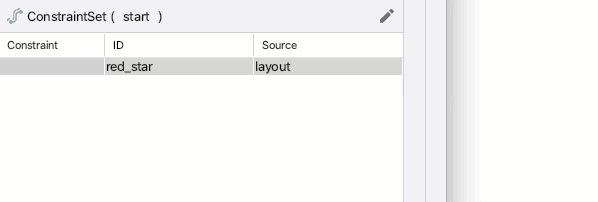
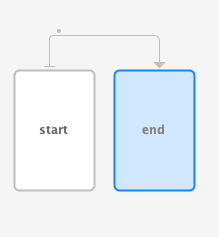
- مرور کلی - این یک انتخاب مدال است که به شما امکان میدهد قسمتهای مختلف انیمیشن را انتخاب کنید. در این تصویر،
startConstraintSetانتخاب شده است. همچنین میتوانید با کلیک روی فلش بینstartوend، گذار بین آنها را انتخاب کنید. - بخش - در زیر نمای کلی، یک پنجره بخش وجود دارد که بر اساس مورد نمای کلی انتخاب شده فعلی تغییر میکند. در این تصویر، اطلاعات
startConstraintSetدر پنجره انتخاب نمایش داده میشود. - ویژگی (Attribute ) - پنل ویژگیها، ویژگیهای آیتم انتخاب شده فعلی را از پنجره مرور کلی (overview) یا انتخاب (selection) نشان میدهد و به شما امکان ویرایش آنها را میدهد. در این تصویر، ویژگیهای
ConstraintSetstartنمایش داده شده است.
مرحله ۳: محدودیتهای شروع و پایان را تعریف کنید
همه انیمیشنها را میتوان بر اساس شروع و پایان تعریف کرد. شروع، ظاهر صفحه نمایش قبل از انیمیشن را توصیف میکند و پایان، ظاهر صفحه نمایش پس از اتمام انیمیشن را توصیف میکند. MotionLayout مسئول تشخیص نحوه انیمیشنسازی بین حالت شروع و پایان (در طول زمان) است.
MotionScene از یک تگ ConstraintSet برای تعریف حالتهای شروع و پایان استفاده میکند. ConstraintSet همان چیزی است که از نامش پیداست، مجموعهای از محدودیتها که میتوانند روی نماها اعمال شوند. این شامل محدودیتهای عرض، ارتفاع و ConstraintLayout میشود. همچنین شامل برخی ویژگیها مانند alpha نیز میشود. این شامل خود نماها نمیشود، فقط محدودیتهای مربوط به آن نماها را شامل میشود.
هر قیدی که در ConstraintSet مشخص شود، قیدهای مشخص شده در فایل layout را لغو میکند. اگر قیدهایی را هم در layout و هم در MotionScene تعریف کنید، فقط قیدهای موجود در MotionScene اعمال میشوند.
در این مرحله، نمای ستارهها را طوری تنظیم میکنید که از بالای صفحه شروع شود و در پایین صفحه تمام شود.
شما میتوانید این مرحله را یا با استفاده از ویرایشگر حرکت (Motion Editor) یا با ویرایش مستقیم متن activity_step1_scene.xml انجام دهید.
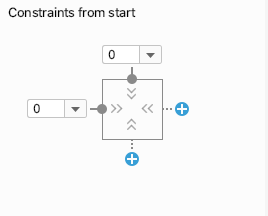
- در پنل overview، گزینه
startConstraintSet را انتخاب کنید.
- در پنل انتخاب ،
red_starرا انتخاب کنید. در حال حاضر، منبعlayoutنمایش داده میشود - این بدان معناست که در اینConstraintSetمحدود نشده است. از آیکون مداد در بالا سمت راست برای ایجاد محدودیت (Create Constraint) استفاده کنید.
- تأیید کنید که
red_starهنگام انتخابstartConstraintSetدر پنل overview، منبعstartرا نشان میدهد. - در پنل Attributes، در حالی که
red_starدرstartConstraintSetانتخاب شده است، یک Constraint در بالا اضافه کنید و با کلیک روی دکمههای آبی + شروع کنید.
- برای مشاهده کدی که Motion Editor برای این قید تولید کرده است،
xml/activity_step1_scene.xmlرا باز کنید.
activity_step1_scene.xml
<!-- Constraints to apply at the start of the animation -->
<ConstraintSet android:id="@+id/start">
   <Constraint
           android:id="@+id/red_star"
           android:layout_width="wrap_content"
           android:layout_height="wrap_content"
           motion:layout_constraintStart_toStartOf="parent"
           motion:layout_constraintTop_toTopOf="parent" />
</ConstraintSet>
ConstraintSet دارای id @id/start است و تمام محدودیتهایی را که باید به تمام نماهای موجود در MotionLayout اعمال شود، مشخص میکند. از آنجایی که این MotionLayout فقط یک نما دارد، فقط به یک Constraint نیاز دارد.
Constraint درون ConstraintSet ، شناسهی view ای که آن را محدود میکند، @id/red_star که در activity_step1.xml تعریف شده است، را مشخص میکند. توجه به این نکته مهم است که تگهای Constraint فقط محدودیتها و اطلاعات طرحبندی را مشخص میکنند. تگ Constraint نمیداند که روی یک ImageView اعمال میشود.
این قید، ارتفاع، عرض و دو قید دیگر مورد نیاز برای محدود کردن نمای red_star به ابتدای بالای والدش را مشخص میکند.
- در پنل overview،
endConstraintSet را انتخاب کنید.
- برای اضافه کردن یک
Constraintبرایred_starدرendConstraintSet، همان مراحلی را که قبلاً انجام دادید، دنبال کنید. - برای استفاده از ویرایشگر حرکت (Motion Editor) جهت تکمیل این مرحله، یک قید (constraint) به
bottomاضافه کنید و با کلیک روی دکمههای آبی + کارend.
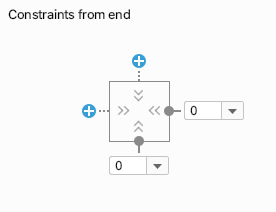
- کد در XML به این شکل است:
activitiy_step1_scene.xml
<!-- Constraints to apply at the end of the animation -->
<ConstraintSet android:id="@+id/end">
   <Constraint
           android:id="@+id/red_star"
           android:layout_width="wrap_content"
           android:layout_height="wrap_content"
           motion:layout_constraintEnd_toEndOf="parent"
           motion:layout_constraintBottom_toBottomOf="parent" />
</ConstraintSet>
درست مانند @id/start ، این ConstraintSet یک Constraint واحد روی @id/red_star دارد. این بار آن را به انتهای پایین صفحه محدود میکند.
لازم نیست آنها را @id/start و @id/end نامگذاری کنید، اما انجام این کار راحتتر است.
مرحله ۴: تعریف یک گذار
هر MotionScene باید حداقل شامل یک گذار (transition) نیز باشد. یک گذار، هر بخش از یک انیمیشن را از ابتدا تا انتها تعریف میکند.
یک گذار باید یک ConstraintSet شروع و پایان برای گذار مشخص کند. یک گذار همچنین میتواند نحوه تغییر انیمیشن را به روشهای دیگر، مانند مدت زمان اجرای انیمیشن یا نحوه متحرکسازی با کشیدن نماها، مشخص کند.
- Motion Editor به طور پیشفرض هنگام ایجاد فایل MotionScene یک گذار برای ما ایجاد کرده است. برای مشاهده گذار ایجاد شده
activity_step1_scene.xmlرا باز کنید.
activity_step1_scene.xml
<!-- A transition describes an animation via start and end state -->
<Transition
   motion:constraintSetEnd="@+id/end"
   motion:constraintSetStart="@id/start"
   motion:duration="1000">
  <KeyFrameSet>
  </KeyFrameSet>
</Transition>
این تمام چیزی است که MotionLayout برای ساخت یک انیمیشن نیاز دارد. نگاهی به هر ویژگی:
-
constraintSetStartبا شروع انیمیشن روی نماها اعمال خواهد شد. -
constraintSetEndدر پایان انیمیشن به نماها اعمال خواهد شد. -
durationمشخص میکند که انیمیشن باید بر حسب میلیثانیه چقدر طول بکشد.
سپس MotionLayout مسیری بین محدودیتهای شروع و پایان پیدا میکند و آن را برای مدت زمان مشخص شده متحرکسازی میکند.
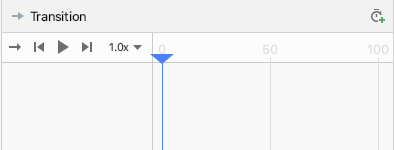
مرحله ۵: پیشنمایش انیمیشن در Motion Editor
انیمیشن: ویدیوی پخش پیشنمایش انتقال در ویرایشگر حرکت
- ویرایشگر حرکت (Motion Editor) را باز کنید و با کلیک روی پیکان بین
startوendدر پنل مرور کلی، گذار (transition) را انتخاب کنید.
- پنل انتخاب، کنترلهای پخش و یک نوار پیمایش را هنگام انتخاب یک گذار نشان میدهد. برای پیشنمایش انیمیشن، روی پخش کلیک کنید یا موقعیت فعلی را بکشید.
مرحله 6: یک کنترل کننده کلیک اضافه کنید
شما به روشی برای شروع انیمیشن نیاز دارید. یک راه برای انجام این کار این است که MotionLayout طوری تنظیم کنید که به رویدادهای کلیک روی @id/red_star پاسخ دهد.
- ویرایشگر حرکت را باز کنید و با کلیک روی پیکان بین شروع و پایان در پنل مرور کلی، انتقال را انتخاب کنید.
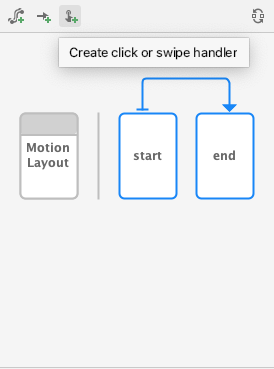
- کلیک
 در نوار ابزار پنل overview، یک کنترلکننده کلیک یا سوایپ ایجاد کنید . این یک کنترلکننده اضافه میکند که یک گذار را شروع میکند.
 - از پنجره باز شده، Click Handler را انتخاب کنید.
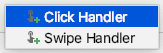
- نمای کلیک را به
red_starتغییر دهید.
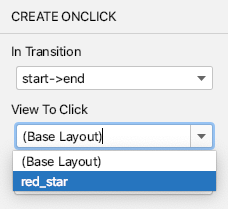
- روی «افزودن» کلیک کنید. کنترلکنندهی کلیک با یک نقطهی کوچک در ویرایشگر گذار در حرکت نمایش داده میشود.
- با انتخاب گذار در پنل overview، یک ویژگی
clickActionازtoggleبه کنترلکنندهی OnClick که به تازگی در پنل attributes اضافه کردهاید، اضافه کنید.

- برای مشاهده کدی که Motion Editor تولید کرده است،
activity_step1_scene.xmlرا باز کنید.
activity_step1_scene.xml
<!-- A transition describes an animation via start and end state -->
<Transition
    motion:constraintSetStart="@+id/start"
    motion:constraintSetEnd="@+id/end"
    motion:duration="1000">
    <!-- MotionLayout will handle clicks on @id/red_star to "toggle" the animation between the start and end -->
    <OnClick
        motion:targetId="@id/red_star"
        motion:clickAction="toggle" />
</Transition>
Transition به MotionLayout میگوید که انیمیشن را در پاسخ به رویدادهای کلیک با استفاده از تگ <OnClick> اجرا کند. با نگاهی به هر ویژگی:
-
targetIdنمایی است که باید کلیکها را زیر نظر داشته باشیم. -
clickActionمربوط بهtoggleبا کلیک، بین حالت شروع و پایان تغییر میکند. میتوانید گزینههای دیگر مربوط بهclickActionرا در مستندات مشاهده کنید.
- کد خود را اجرا کنید، روی مرحله ۱ کلیک کنید، سپس روی ستاره قرمز کلیک کنید و انیمیشن را ببینید!
مرحله ۵: انیمیشنها در عمل
برنامه را اجرا کنید! وقتی روی ستاره کلیک میکنید، باید شاهد اجرای انیمیشن خود باشید.
فایل صحنه حرکت تکمیلشده، یک Transition تعریف میکند که به یک ConstraintSet شروع و پایان اشاره دارد.
در شروع انیمیشن ( @id/start )، آیکون ستاره به ابتدای بالای صفحه محدود میشود. در پایان انیمیشن ( @id/end ) آیکون ستاره به انتهای پایین صفحه محدود میشود.
<?xml version="1.0" encoding="utf-8"?>

<!-- Describe the animation for activity_step1.xml -->
<MotionScene xmlns:app="http://schemas.android.com/apk/res-auto"
            xmlns:android="http://schemas.android.com/apk/res/android">
   <!-- A transition describes an animation via start and end state -->
   <Transition
           motion:constraintSetStart="@+id/start"
           motion:constraintSetEnd="@+id/end"
           motion:duration="1000">
       <!-- MotionLayout will handle clicks on @id/star to "toggle" the animation between the start and end -->
       <OnClick
               motion:targetId="@id/red_star"
               motion:clickAction="toggle" />
   </Transition>

   <!-- Constraints to apply at the end of the animation -->
   <ConstraintSet android:id="@+id/start">
       <Constraint
               android:id="@+id/red_star"
               android:layout_width="wrap_content"
               android:layout_height="wrap_content"
               motion:layout_constraintStart_toStartOf="parent"
               motion:layout_constraintTop_toTopOf="parent" />
   </ConstraintSet>

   <!-- Constraints to apply at the end of the animation -->
   <ConstraintSet android:id="@+id/end">
       <Constraint
               android:id="@+id/red_star"
               android:layout_width="wrap_content"
               android:layout_height="wrap_content"
               motion:layout_constraintEnd_toEndOf="parent"
               motion:layout_constraintBottom_toBottomOf="parent" />
   </ConstraintSet>
</MotionScene>
۴. انیمیشنسازی بر اساس رویدادهای درگ
برای این مرحله، شما یک انیمیشن خواهید ساخت که به رویداد کشیدن کاربر (زمانی که کاربر صفحه را میکشید) برای اجرای انیمیشن پاسخ میدهد. MotionLayout از ردیابی رویدادهای لمسی برای جابجایی نماها و همچنین از حرکات پرتابی مبتنی بر فیزیک برای روان کردن حرکت پشتیبانی میکند.
مرحله ۱: بررسی کد اولیه
- برای شروع، فایل طرحبندی
activity_step2.xmlرا که دارایMotionLayoutموجود است، باز کنید. به کد آن نگاهی بیندازید.
activity_step2.xml
<!-- initial code -->

<androidx.constraintlayout.motion.widget.MotionLayout
       ...
       motion:layoutDescription="@xml/step2" >

   <ImageView
           android:id="@+id/left_star"
           ...
   />

   <ImageView
           android:id="@+id/right_star"
           ...
   />

   <ImageView
           android:id="@+id/red_star"
           ...
   />

   <TextView
           android:id="@+id/credits"
           ...
           motion:layout_constraintTop_toTopOf="parent"
           motion:layout_constraintEnd_toEndOf="parent"/>
</androidx.constraintlayout.motion.widget.MotionLayout>
این طرحبندی تمام نماهای انیمیشن را تعریف میکند. آیکونهای سه ستاره در طرحبندی محدود نمیشوند زیرا در صحنه متحرک متحرک خواهند شد.
در متن اصلی، محدودیتهایی برای TextView اعمال شده است، زیرا در کل انیمیشن در همان مکان باقی میماند و هیچ ویژگیای را تغییر نمیدهد.
مرحله ۲: صحنه را متحرک کنید
درست مانند انیمیشن قبلی، این انیمیشن توسط یک ConstraintSet, شروع و پایان و یک Transition تعریف خواهد شد.
تعریف مجموعه محدودیت شروع (Start ConstraintSet)
- برای تعریف انیمیشن،
xml/step2.xmlرا باز کنید. - قیدهای مربوط به قید شروع
startاضافه کنید. در شروع، هر سه ستاره در پایین صفحه نمایش قرار دارند. ستارههای راست و چپ مقدارalpha0.0دارند، به این معنی که کاملاً شفاف و پنهان هستند.
مرحله ۲.xml
<!-- TODO apply starting constraints -->

<!-- Constraints to apply at the start of the animation -->
<ConstraintSet android:id="@+id/start">
   <Constraint
           android:id="@+id/red_star"
           android:layout_width="wrap_content"
           android:layout_height="wrap_content"
           motion:layout_constraintStart_toStartOf="parent"
           motion:layout_constraintEnd_toEndOf="parent"
           motion:layout_constraintBottom_toBottomOf="parent" />

   <Constraint
           android:id="@+id/left_star"
           android:layout_width="wrap_content"
           android:layout_height="wrap_content"
           android:alpha="0.0"
           motion:layout_constraintStart_toStartOf="parent"
           motion:layout_constraintEnd_toEndOf="parent"
           motion:layout_constraintBottom_toBottomOf="parent" />

   <Constraint
           android:id="@+id/right_star"
           android:layout_width="wrap_content"
           android:layout_height="wrap_content"
           android:alpha="0.0"
           motion:layout_constraintStart_toStartOf="parent"
           motion:layout_constraintEnd_toEndOf="parent"
           motion:layout_constraintBottom_toBottomOf="parent" />
</ConstraintSet>
در این ConstraintSet ، برای هر یک از ستارهها یک Constraint تعیین میکنید. هر Constraint توسط MotionLayout در شروع انیمیشن اعمال میشود.
هر نمای ستاره با استفاده از محدودیتهای شروع، پایان و پایین، در پایین صفحه نمایش قرار میگیرد. دو ستاره @id/left_star و @id/right_star هر دو یک مقدار آلفای اضافی دارند که آنها را نامرئی میکند و در شروع انیمیشن اعمال خواهد شد.
مجموعههای قید start و end ، شروع و پایان انیمیشن را تعریف میکنند. یک قید روی شروع، مانند motion:layout_constraintStart_toStartOf شروع یک نما را به شروع نمای دیگر محدود میکند. این موضوع در ابتدا میتواند گیجکننده باشد، زیرا نام start برای هر دو استفاده میشود و هر دو در زمینه قیدها استفاده میشوند. برای کمک به درک تمایز، start در layout_constraintStart به "شروع" نما اشاره دارد که در زبانهای چپ به راست، left و در زبانهای راست به چپ، right است. مجموعه قید start به شروع انیمیشن اشاره دارد.
تعریف پایان ConstraintSet
- محدودیت پایانی را طوری تعریف کنید که از یک زنجیره برای قرار دادن هر سه ستاره در کنار هم زیر
@id/creditsاستفاده کند. علاوه بر این، مقدار پایانیalphaستارههای چپ و راست را روی1.0تنظیم میکند.
مرحله ۲.xml
<!-- TODO apply ending constraints -->

<!-- Constraints to apply at the end of the animation -->
<ConstraintSet android:id="@+id/end">

   <Constraint
           android:id="@+id/left_star"
           android:layout_width="wrap_content"
           android:layout_height="wrap_content"
           android:alpha="1.0"
           motion:layout_constraintHorizontal_chainStyle="packed"
           motion:layout_constraintStart_toStartOf="parent"
           motion:layout_constraintEnd_toStartOf="@id/red_star"
           motion:layout_constraintTop_toBottomOf="@id/credits" />

   <Constraint
           android:id="@+id/red_star"
           android:layout_width="wrap_content"
           android:layout_height="wrap_content"
           motion:layout_constraintStart_toEndOf="@id/left_star"
           motion:layout_constraintEnd_toStartOf="@id/right_star"
           motion:layout_constraintTop_toBottomOf="@id/credits" />

   <Constraint
           android:id="@+id/right_star"
           android:layout_width="wrap_content"
           android:layout_height="wrap_content"
           android:alpha="1.0"
           motion:layout_constraintStart_toEndOf="@id/red_star"
           motion:layout_constraintEnd_toEndOf="parent"
           motion:layout_constraintTop_toBottomOf="@id/credits" />
</ConstraintSet>
نتیجه نهایی این است که نماها همزمان با متحرکسازی، از مرکز به سمت بالا پخش میشوند.
علاوه بر این، از آنجایی که ویژگی alpha در هر دو ConstraintSets روی @id/right_start و @id/left_star تنظیم شده است، هر دو نما با پیشرفت انیمیشن محو میشوند.
انیمیشن بر اساس کشیدن انگشت کاربر
MotionLayout میتواند رویدادهای کشیدن کاربر یا کشیدن انگشت روی صفحه (swipe) را ردیابی کند تا یک انیمیشن "fling" مبتنی بر فیزیک ایجاد کند. این بدان معناست که اگر کاربر آنها را پرتاب کند، نمایشها به کار خود ادامه میدهند و مانند یک جسم فیزیکی هنگام غلتیدن روی یک سطح، کند میشوند. میتوانید این نوع انیمیشن را با تگ OnSwipe در Transition اضافه کنید.
- TODO مربوط به افزودن تگ
OnSwipeرا با<OnSwipe motion:touchAnchorId="@id/red_star" />جایگزین کنید.
مرحله ۲.xml
<!-- TODO add OnSwipe tag -->

<!-- A transition describes an animation via start and end state -->
<Transition
       motion:constraintSetStart="@+id/start"
       motion:constraintSetEnd="@+id/end">
   <!-- MotionLayout will track swipes relative to this view -->
   <OnSwipe motion:touchAnchorId="@id/red_star" />
</Transition>
OnSwipe شامل چند ویژگی است که مهمترین آنها touchAnchorId است.
-
touchAnchorIdنمای ردیابی شدهای است که در پاسخ به لمس حرکت میکند.MotionLayoutاین نما را در همان فاصله از انگشتی که در حال کشیدن است، نگه میدارد. -
touchAnchorSideتعیین میکند که کدام سمت نما باید ردیابی شود. این برای نماهایی که تغییر اندازه میدهند، مسیرهای پیچیدهای را دنبال میکنند یا یک سمت آنها سریعتر از سمت دیگر حرکت میکند، مهم است. -
dragDirectionتعیین میکند که کدام جهت برای این انیمیشن مهم است (بالا، پایین، چپ یا راست).
وقتی MotionLayout به رویدادهای کشیدن گوش میدهد، شنونده در نمای MotionLayout ثبت میشود و نه در نمای مشخص شده توسط touchAnchorId . وقتی کاربر در هر جایی از صفحه حرکتی را شروع میکند، MotionLayout فاصله بین انگشت خود و touchAnchorSide نمای touchAnchorId را ثابت نگه میدارد. به عنوان مثال، اگر آنها 100dp از سمت لنگر فاصله بگیرند، MotionLayout آن سمت را در کل انیمیشن 100dp از انگشت آنها دور نگه میدارد.
امتحانش کن.
- برنامه را دوباره اجرا کنید و صفحه مرحله ۲ را باز کنید. انیمیشن را خواهید دید.
- برای اینکه ببینید
MotionLayoutچگونه انیمیشنهای مبتنی بر فیزیک سیالات را نمایش میدهد، سعی کنید انگشت خود را در نیمه راه انیمیشن «پرتاب» کنید یا رها کنید!
MotionLayout میتواند با استفاده از ویژگیهای ConstraintLayout ، طرحهای بسیار متفاوتی را متحرکسازی کند و جلوههای غنی ایجاد کند.
در این انیمیشن، هر سه نما نسبت به والد خود در پایین صفحه نمایش برای شروع موقعیت یابی شدهاند. در پایان، سه نما نسبت به @id/credits به صورت زنجیرهای موقعیت یابی میشوند.
با وجود این طرحبندیهای بسیار متفاوت، MotionLayout یک انیمیشن روان بین شروع و پایان ایجاد میکند.
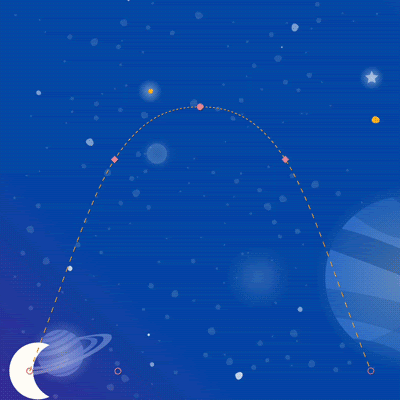
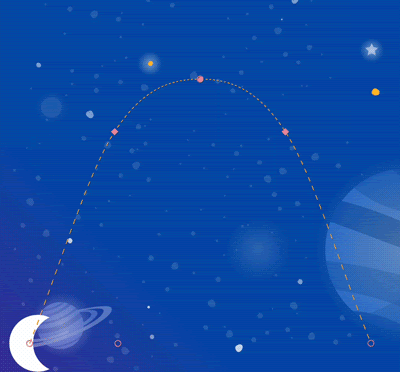
۵. اصلاح یک مسیر
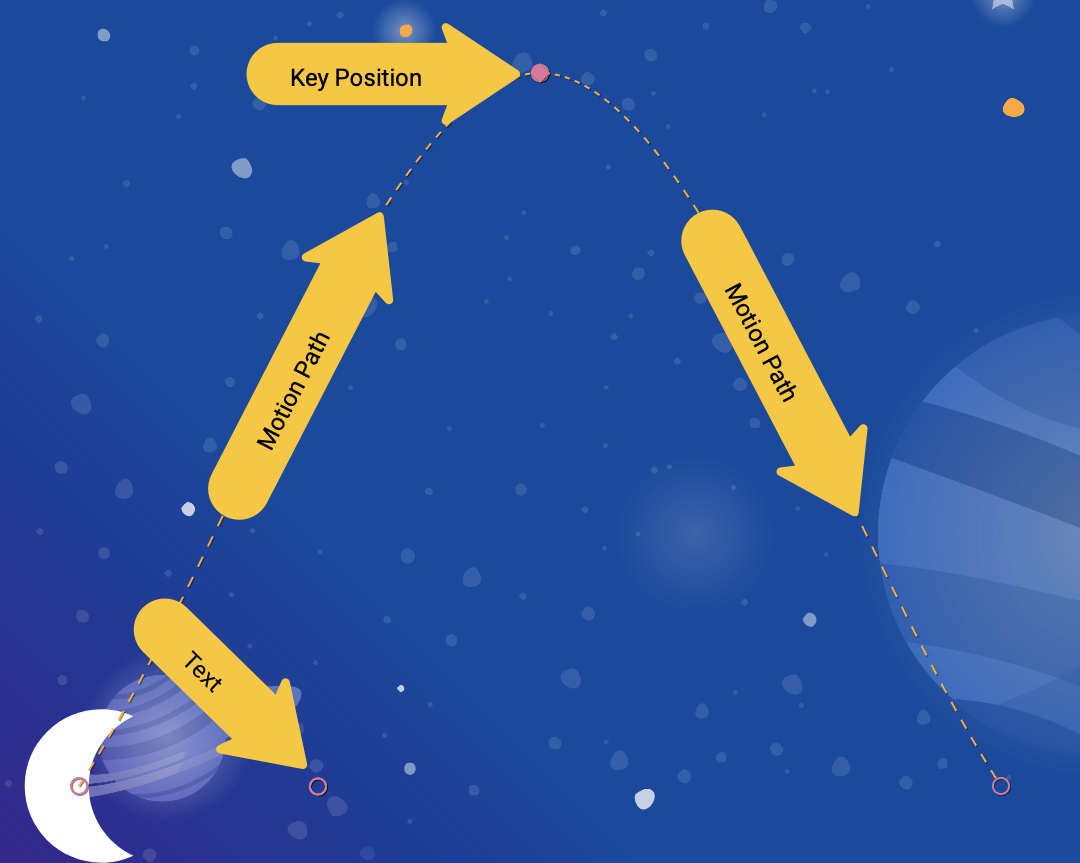
در این مرحله شما یک انیمیشن خواهید ساخت که در طول انیمیشن یک مسیر پیچیده را دنبال میکند و تیتراژ را در طول حرکت متحرک میکند. MotionLayout میتواند مسیری را که یک نما بین شروع و پایان با استفاده از KeyPosition طی میکند، تغییر دهد.
مرحله ۱: بررسی کدهای موجود
- برای مشاهدهی طرحبندی و صحنهی متحرک موجود،
layout/activity_step3.xmlوxml/step3.xmlرا باز کنید. یکImageViewوTextViewماه و متن مربوط به اعتبارنامه را نمایش میدهند. - فایل صحنه متحرک (
xml/step3.xml) را باز کنید. میبینید که یکTransitionاز@id/startبه@id/endتعریف شده است. انیمیشن با استفاده از دوConstraintSetsتصویر ماه را از پایین سمت چپ صفحه به پایین سمت راست صفحه منتقل میکند. متن عنوانبندی با حرکت ماه ازalpha="0.0"بهalpha="1.0"محو میشود. - اکنون برنامه را اجرا کنید و مرحله ۳ را انتخاب کنید. خواهید دید که وقتی روی ماه کلیک میکنید، ماه از ابتدا تا انتها یک مسیر خطی (یا یک خط مستقیم) را دنبال میکند.
مرحله ۲: فعال کردن اشکالزدایی مسیر
قبل از اینکه به حرکت ماه قوس اضافه کنید، فعال کردن اشکالزدایی مسیر در MotionLayout مفید است.
برای کمک به توسعه انیمیشنهای پیچیده با MotionLayout ، میتوانید مسیر انیمیشن هر نما را رسم کنید. این کار زمانی مفید است که میخواهید انیمیشن خود را تجسم کنید و جزئیات کوچک حرکت را به دقت تنظیم کنید.
- برای فعال کردن مسیرهای اشکالزدایی،
layout/activity_step3.xmlرا باز کنید وmotion:motionDebug="SHOW_PATH"را به تگMotionLayoutاضافه کنید.
activity_step3.xml
<!-- Add motion:motionDebug="SHOW_PATH" -->

<androidx.constraintlayout.motion.widget.MotionLayout
       ...
       motion:motionDebug="SHOW_PATH" >
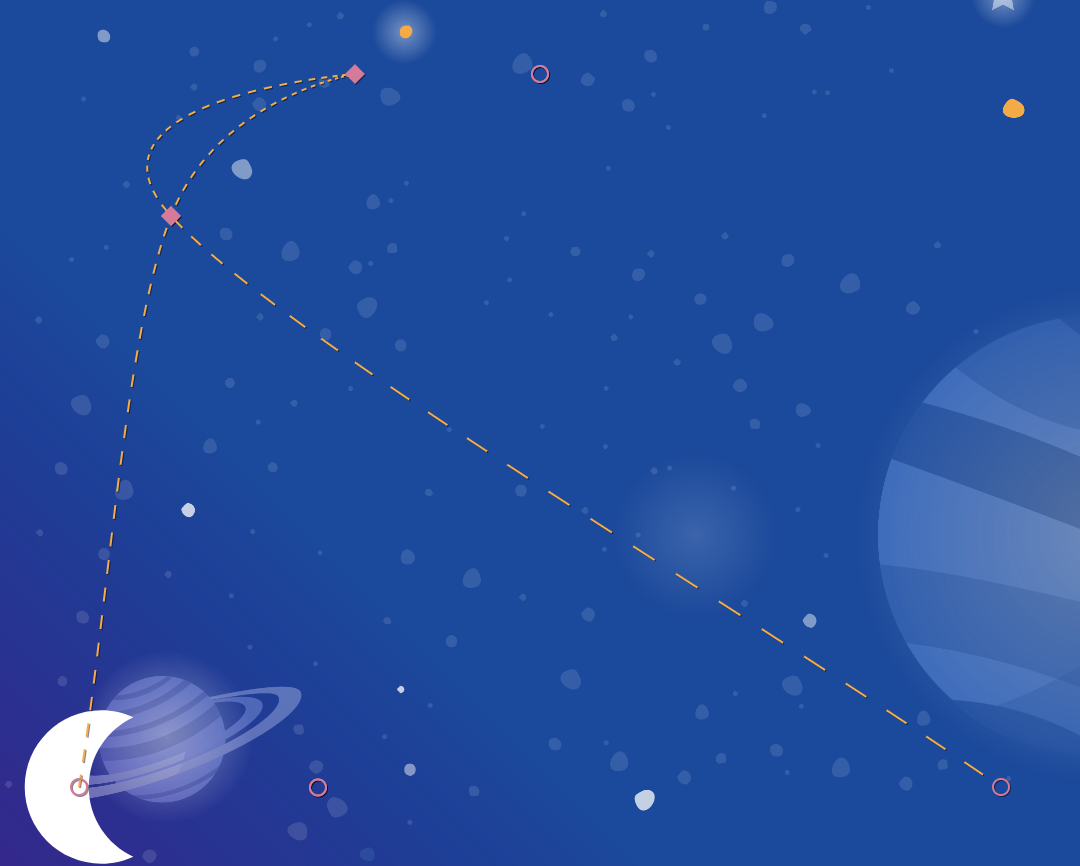
بعد از اینکه اشکالزدایی مسیر را فعال کردید، وقتی دوباره برنامه را اجرا کنید، مسیرهای همه نماها را با یک خط نقطهچین مشاهده خواهید کرد.
- دایرهها نشاندهندهی موقعیت شروع یا پایان یک نما هستند.
- خطوط، مسیر یک نما را نشان میدهند.
- الماسها نشان دهنده یک
KeyPositionهستند که مسیر را تغییر میدهد.
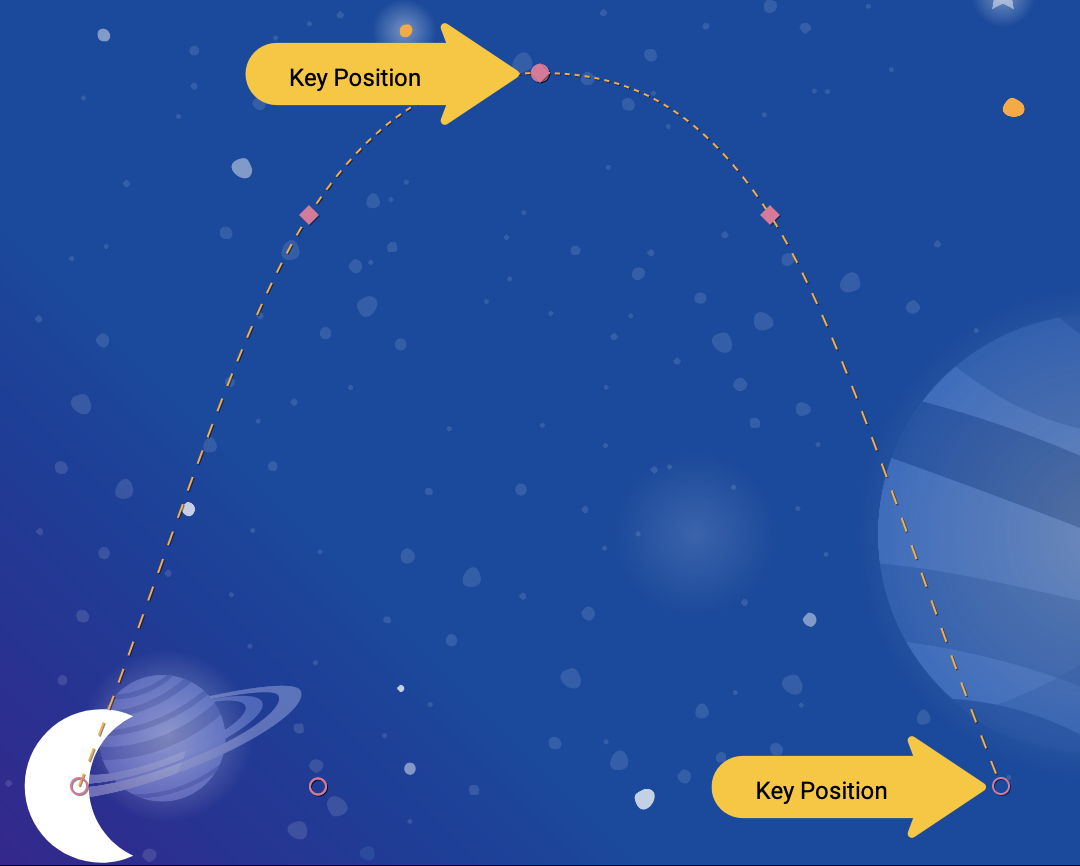
برای مثال، در این انیمیشن، دایره وسط، محل قرارگیری متن تیتراژ است.
مرحله ۳: تغییر مسیر
تمام انیمیشنها در MotionLayout توسط یک ConstraintSet شروع و پایان تعریف میشوند که ظاهر صفحه را قبل از شروع انیمیشن و بعد از اتمام انیمیشن تعریف میکند. به طور پیشفرض، MotionLayout یک مسیر خطی (یک خط مستقیم) بین موقعیت شروع و پایان هر نمایی که موقعیت را تغییر میدهد، رسم میکند.
برای ساخت مسیرهای پیچیده مانند قوس ماه در این مثال، MotionLayout از یک KeyPosition برای تغییر مسیری که یک نما بین ابتدا و انتها طی میکند، استفاده میکند.
-
xml/step3.xmlرا باز کنید و یکKeyPositionبه صحنه اضافه کنید. تگKeyPositionدرون تگTransitionقرار میگیرد.
مرحله 3.xml
<!-- TODO: Add KeyFrameSet and KeyPosition -->
<KeyFrameSet>
   <KeyPosition
           motion:framePosition="50"
           motion:motionTarget="@id/moon"
           motion:keyPositionType="parentRelative"
           motion:percentY="0.5"
   />
</KeyFrameSet>
یک KeyFrameSet فرزند یک Transition است و مجموعهای از تمام KeyFrames مانند KeyPosition است که باید در طول transition اعمال شوند.
همانطور که MotionLayout در حال محاسبه مسیر ماه بین ابتدا و انتها است، مسیر را بر اساس KeyPosition مشخص شده در KeyFrameSet تغییر میدهد. میتوانید با اجرای مجدد برنامه، نحوه تغییر مسیر را مشاهده کنید.
یک KeyPosition چندین ویژگی دارد که نحوه تغییر مسیر را توصیف میکند. مهمترین آنها عبارتند از:
-
framePositionعددی بین ۰ تا ۱۰۰ است. این پارامتر مشخص میکند که اینKeyPositionچه زمانی در انیمیشن باید اعمال شود، که عدد ۱ نشاندهندهی ۱٪ در طول انیمیشن و عدد ۹۹ نشاندهندهی ۹۹٪ در طول انیمیشن است. بنابراین اگر مقدار آن ۵۰ باشد، آن را درست در وسط انیمیشن اعمال میکنید. -
motionTargetنمایی است که اینKeyPositionمسیر را برای آن تغییر میدهد. -
keyPositionTypeنحوهی تغییر مسیرKeyPositionرا نشان میدهد. این KeyPosition میتواندparentRelative،pathRelativeیاdeltaRelativeباشد (همانطور که در مرحلهی بعدی توضیح داده خواهد شد). -
percentX | percentYمیزان تغییر مسیر درframePositionاست (مقادیر بین 0.0 و 1.0، مقادیر منفی و مقادیر >1 مجاز است).
میتوانید اینطور به آن فکر کنید: «در framePosition مسیر motionTarget را با حرکت دادن آن به اندازهی percentX یا percentY طبق مختصات تعیینشده توسط keyPositionType تغییر دهید .»
به طور پیشفرض MotionLayout هر گوشهای را که با تغییر مسیر ایجاد شود، گرد میکند. اگر به انیمیشنی که تازه ایجاد کردهاید نگاه کنید، میتوانید ببینید که ماه در خمیدگی، مسیری منحنی را دنبال میکند. برای اکثر انیمیشنها، این همان چیزی است که شما میخواهید، و اگر نه، میتوانید ویژگی curveFit را برای سفارشیسازی آن مشخص کنید.
امتحانش کن.
اگر دوباره برنامه را اجرا کنید، انیمیشن مربوط به این مرحله را خواهید دید.
ماه یک کمان را دنبال میکند زیرا از یک KeyPosition مشخص شده در Transition عبور میکند.
<KeyPosition
       motion:framePosition="50"
       motion:motionTarget="@id/moon"
       motion:keyPositionType="parentRelative"
       motion:percentY="0.5"
/>
میتوانید این KeyPosition به این صورت بخوانید: «در framePosition 50 (در اواسط انیمیشن) مسیر motionTarget را با جابجایی 50% Y (در اواسط صفحه) مطابق با مختصات تعیین شده توسط parentRelative (کل MotionLayout ) تغییر @id/moon .»
بنابراین، در اواسط انیمیشن، ماه باید از یک KeyPosition که ۵۰٪ پایینتر از صفحه نمایش است، عبور کند. این KeyPosition به هیچ وجه حرکت X را تغییر نمیدهد، بنابراین ماه همچنان از ابتدا تا انتها به صورت افقی حرکت خواهد کرد. MotionLayout یک مسیر هموار را که از این KeyPosition عبور میکند، هنگام حرکت بین ابتدا و انتها، تعیین میکند.
اگر دقت کنید، متن تیتراژ توسط موقعیت ماه محدود شده است. چرا به صورت عمودی هم حرکت نمیکند؟

<Constraint
       android:id="@id/credits"
       ...
       motion:layout_constraintBottom_toBottomOf="@id/moon"
       motion:layout_constraintTop_toTopOf="@id/moon"
/>
معلوم شد، حتی با اینکه شما مسیر حرکت ماه را تغییر میدهید، موقعیتهای شروع و پایان ماه به هیچ وجه آن را به صورت عمودی حرکت نمیدهند. KeyPosition موقعیت شروع یا پایان را تغییر نمیدهد، بنابراین متن تیتراژ به موقعیت پایانی ماه محدود میشود.
اگر میخواستید تیتراژ با حرکت ماه جابجا شود، میتوانستید یک KeyPosition به تیتراژ اضافه کنید، یا محدودیتهای شروع را در @id/credits تغییر دهید.
در بخش بعدی به بررسی انواع مختلف keyPositionType در MotionLayout خواهید پرداخت.
۶. درک نوع موقعیت کلید
در مرحلهی قبل، از نوع keyPosition از parentRelative برای جابجایی مسیر به اندازهی ۵۰٪ صفحه استفاده کردید. ویژگی keyPositionType تعیین میکند که MotionLayout چگونه مسیر را بر اساس percentX یا percentY تغییر دهد.
<KeyFrameSet>
   <KeyPosition
           motion:framePosition="50"
           motion:motionTarget="@id/moon"
           motion:keyPositionType="parentRelative"
           motion:percentY="0.5"
   />
</KeyFrameSet>
سه نوع مختلف از keyPosition امکانپذیر است: parentRelative ، pathRelative و deltaRelative . مشخص کردن یک نوع، سیستم مختصاتی را که percentX و percentY بر اساس آن محاسبه میشوند، تغییر میدهد.
سیستم مختصات چیست؟
یک سیستم مختصات راهی برای مشخص کردن یک نقطه در فضا ارائه میدهد. آنها همچنین برای توصیف موقعیت روی صفحه نمایش مفید هستند.
سیستمهای مختصات MotionLayout یک سیستم مختصات دکارتی هستند. این بدان معناست که آنها دارای یک محور X و یک محور Y هستند که توسط دو خط عمود بر هم تعریف میشوند. تفاوت کلیدی بین آنها در محل قرارگیری محور X روی صفحه نمایش است (محور Y همیشه عمود بر محور X است).
تمام سیستمهای مختصات در MotionLayout از مقادیر بین 0.0 تا 1.0 در هر دو محور X و Y استفاده میکنند. آنها مقادیر منفی و مقادیر بزرگتر از 1.0 را نیز مجاز میدانند. بنابراین برای مثال، مقدار -2.0 برای percentX به این معنی است که دو بار در جهت مخالف محور X حرکت کن.
اگر همه اینها کمی شبیه کلاس جبر به نظر میرسد، به تصاویر زیر نگاهی بیندازید!
مختصات نسبی والد
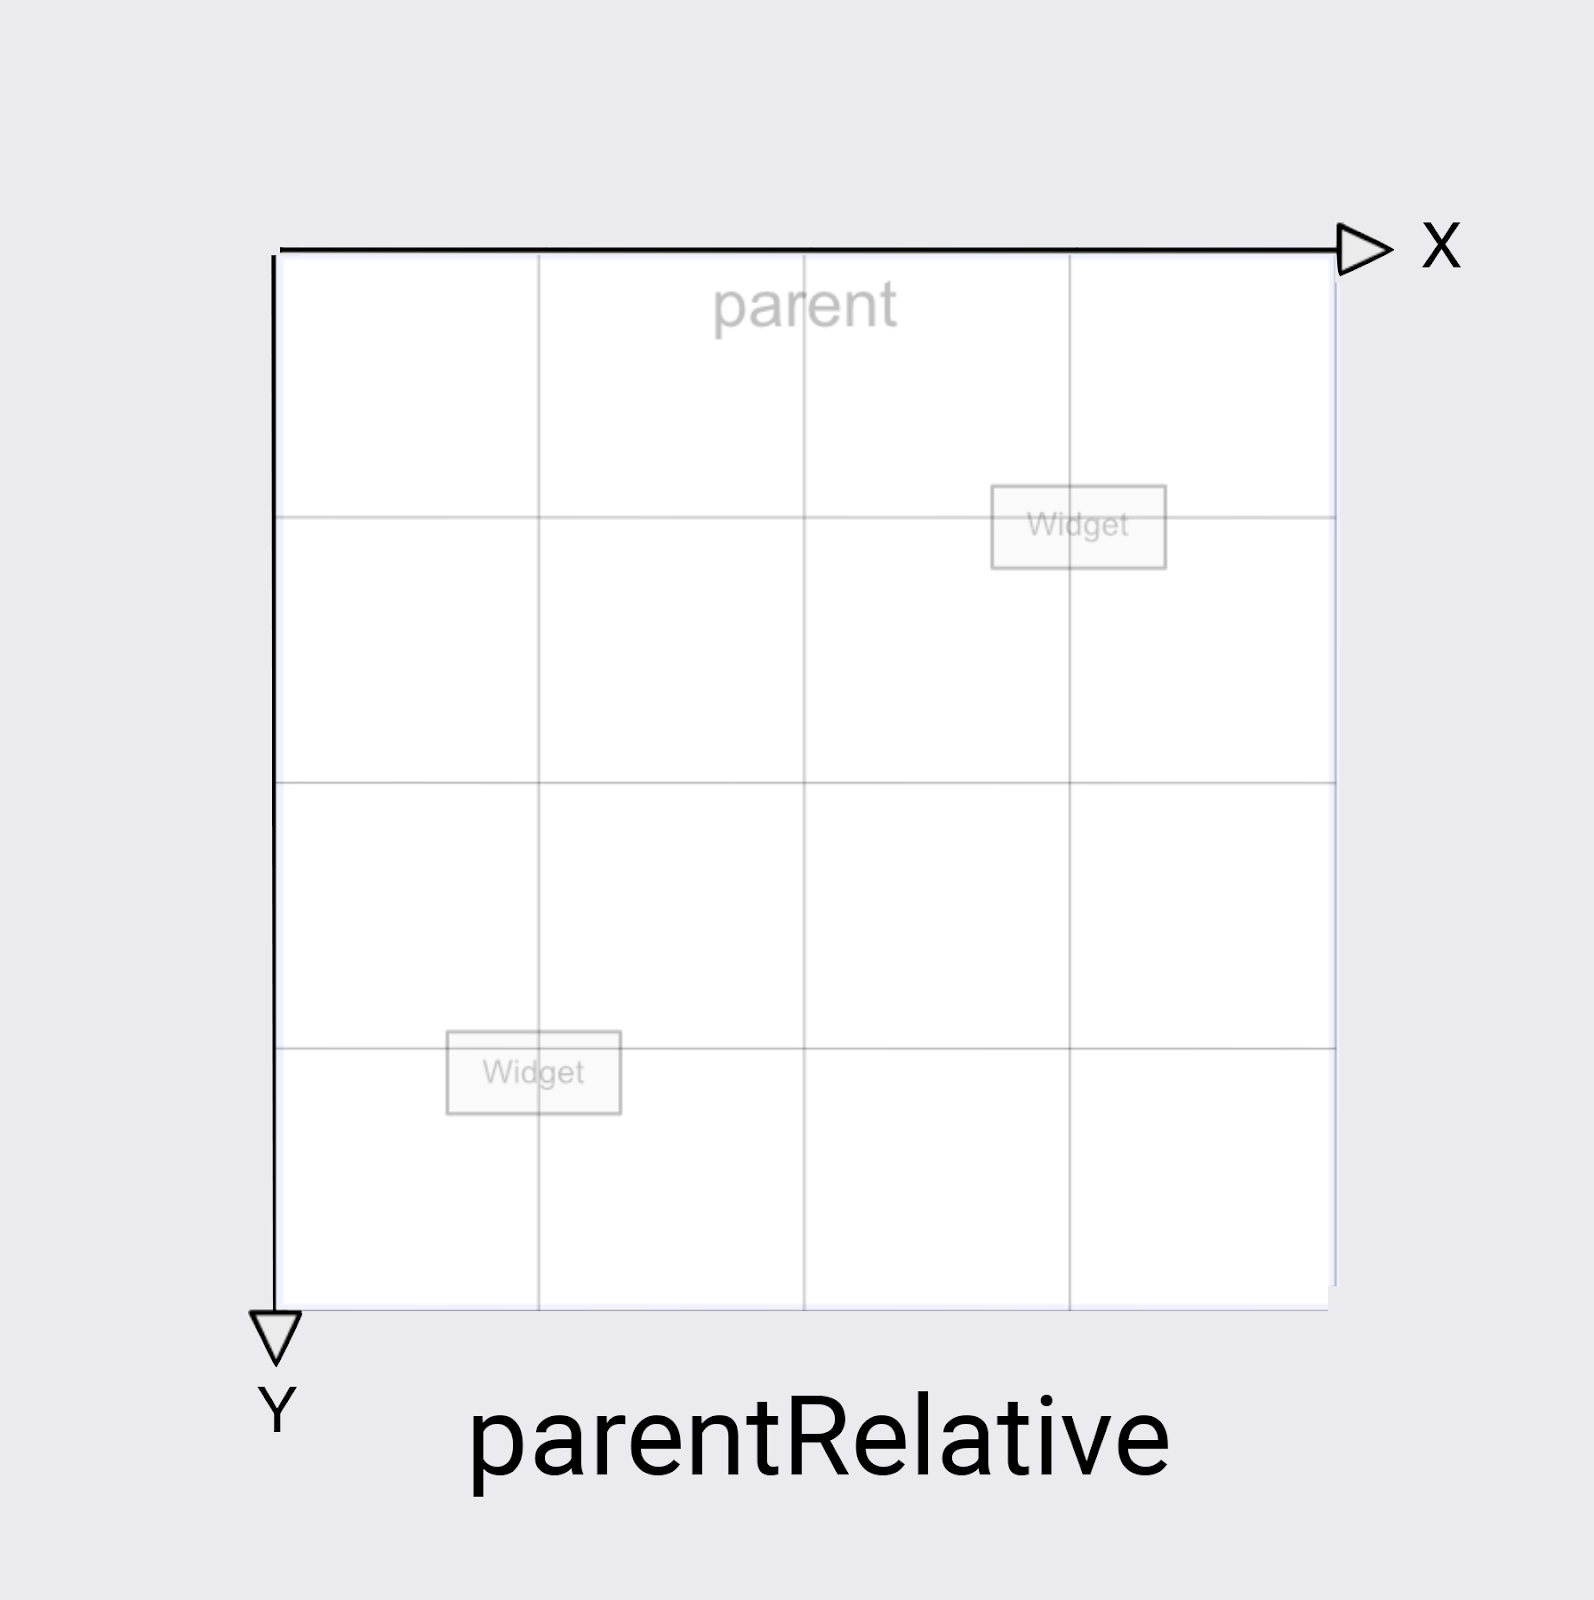
keyPositionType از parentRelative از همان سیستم مختصات صفحه نمایش استفاده میکند. (0, 0) را در سمت چپ بالای کل MotionLayout و (1, 1) را در سمت راست پایین تعریف میکند.
هر زمان که بخواهید انیمیشنی بسازید که در کل MotionLayout حرکت کند - مانند قوس ماه در این مثال - میتوانید parentRelative استفاده کنید.
با این حال، اگر میخواهید یک مسیر را نسبت به حرکت تغییر دهید، مثلاً آن را کمی منحنی کنید، دو سیستم مختصات دیگر انتخاب بهتری هستند.
مختصات نسبی دلتا
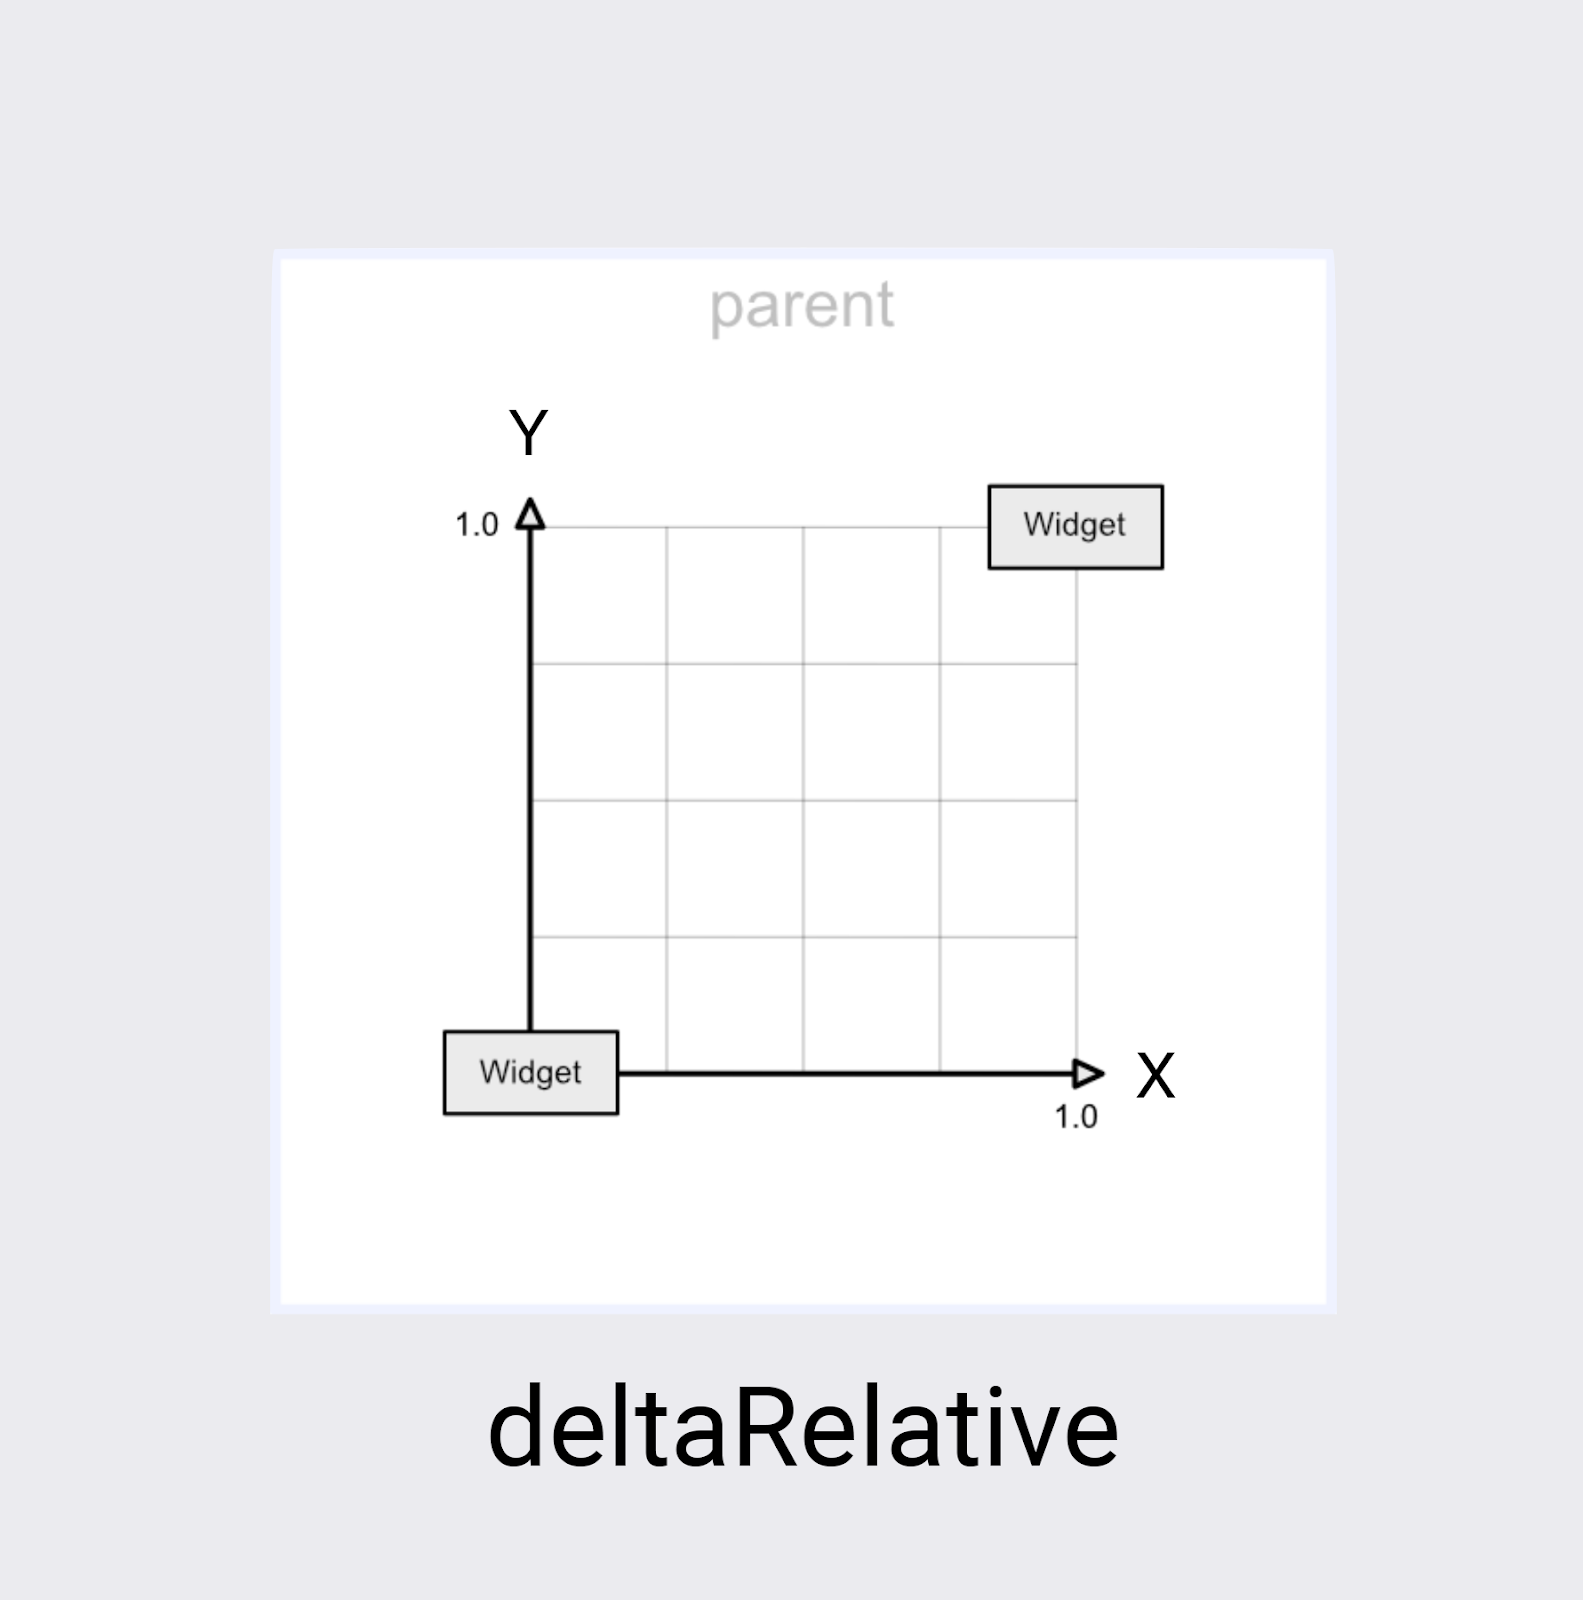
دلتا یک اصطلاح ریاضی برای تغییر است، بنابراین deltaRelative روشی برای گفتن "تغییر نسبی" است. در deltaRelative مختصات (0,0) موقعیت شروع نما و (1,1) موقعیت پایان آن است. محورهای X و Y با صفحه نمایش تراز شدهاند.
محور X همیشه روی صفحه نمایش افقی و محور Y همیشه روی صفحه نمایش عمودی است. در مقایسه با parentRelative ، تفاوت اصلی این است که مختصات فقط بخشی از صفحه نمایش را توصیف میکنند که نما در آن حرکت خواهد کرد.
deltaRelative یک سیستم مختصات عالی برای کنترل حرکت افقی یا عمودی به صورت جداگانه است. برای مثال، میتوانید انیمیشنی بسازید که فقط حرکت عمودی (Y) خود را با ۵۰٪ کامل کند و به صورت افقی (X) به حرکت خود ادامه دهد.
مختصات نسبی p ath
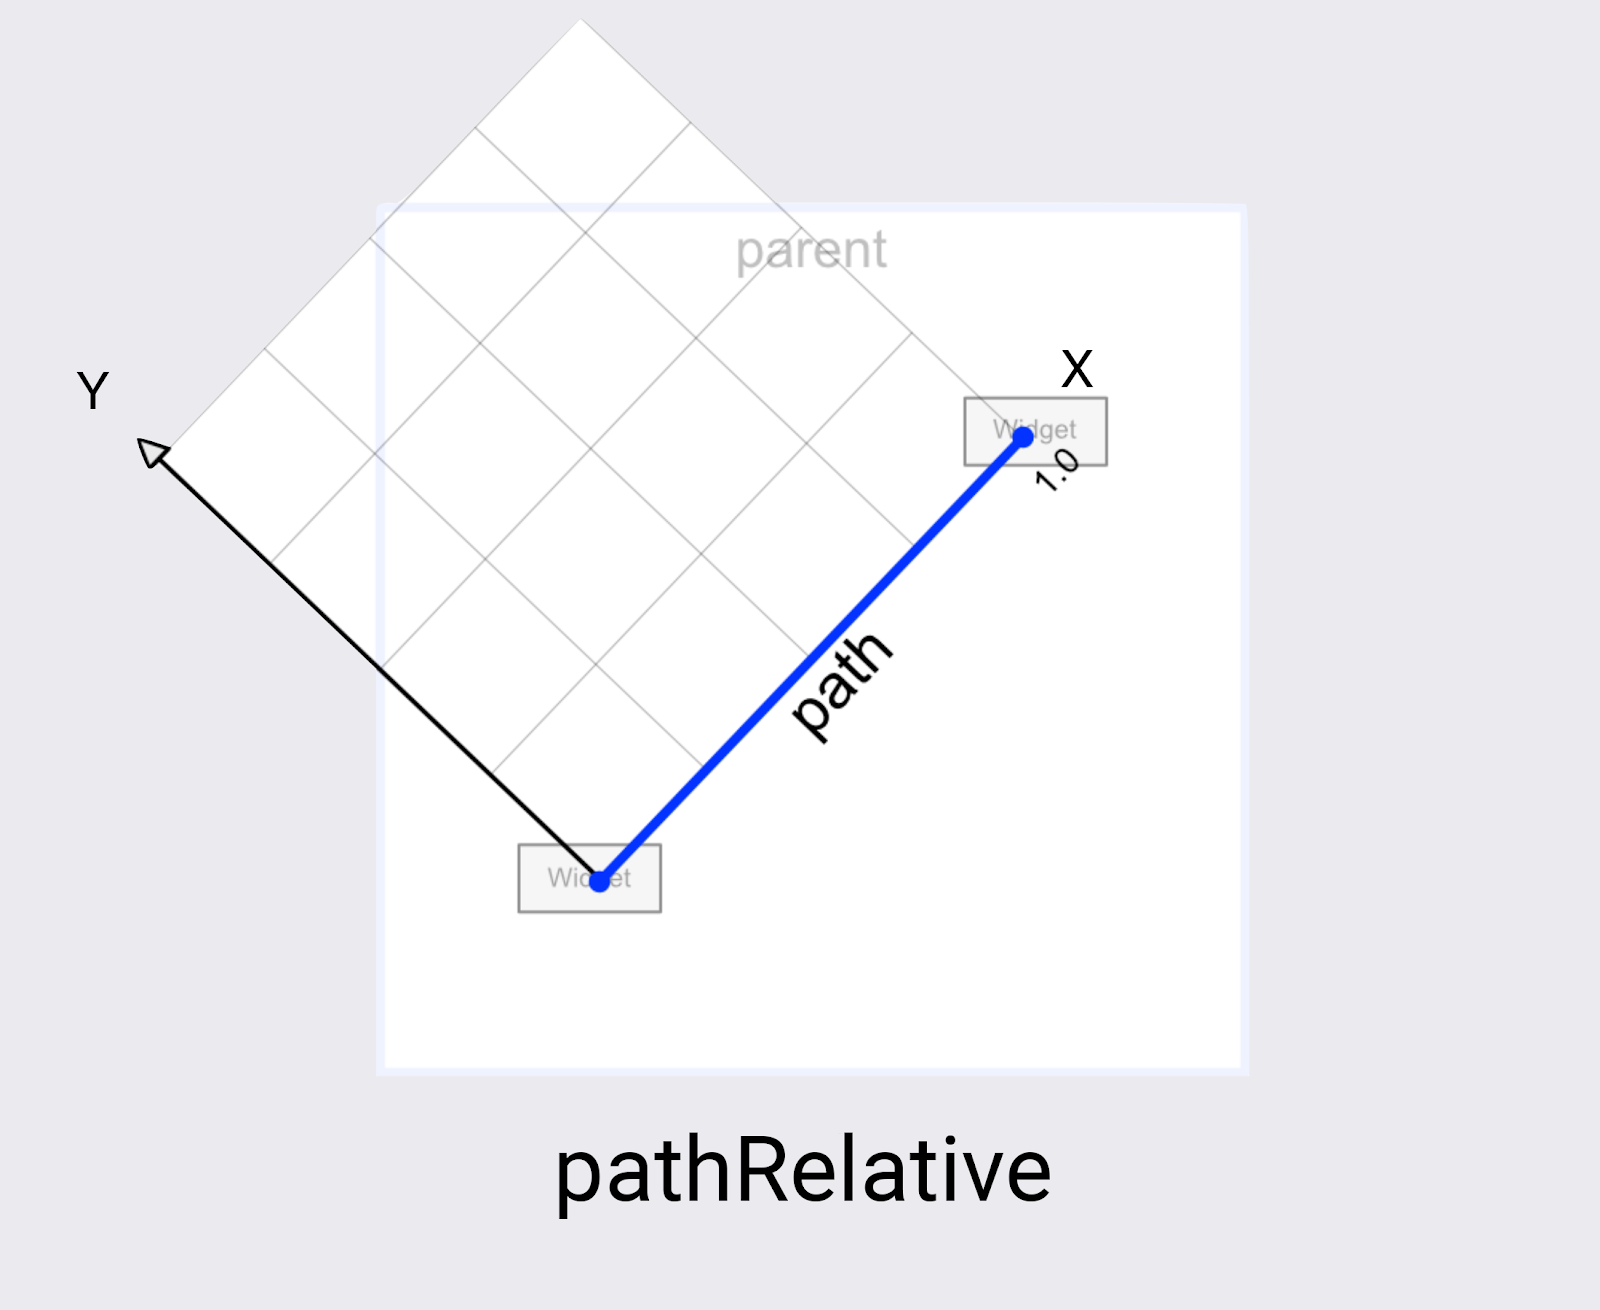
آخرین سیستم مختصات در MotionLayout ، pathRelative است. این سیستم با دو سیستم مختصات دیگر کاملاً متفاوت است، زیرا محور X مسیر حرکت را از ابتدا تا انتها دنبال میکند. بنابراین (0,0) موقعیت شروع و (1,0) موقعیت پایان است.
چرا باید این را بخواهید؟ در نگاه اول کاملاً تعجبآور است، به خصوص که این سیستم مختصات حتی با سیستم مختصات صفحه نمایش همتراز نیست.
معلوم شد که pathRelative برای چند چیز واقعاً مفید است.
- افزایش سرعت، کاهش سرعت یا توقف یک نما در طول بخشی از انیمیشن. از آنجایی که بُعد X همیشه دقیقاً با مسیری که نما طی میکند مطابقت دارد، میتوانید از یک
pathRelativeKeyPositionبرای تغییرframePositionکه به یک نقطه خاص در آن مسیر میرسد استفاده کنید. بنابراین یکKeyPositionدرframePosition="50"باpercentX="0.1"باعث میشود انیمیشن 50٪ از زمان لازم برای طی کردن 10٪ اول حرکت را صرف کند. - اضافه کردن یک قوس ظریف به یک مسیر. از آنجایی که بُعد Y همیشه عمود بر حرکت است، تغییر Y مسیر را نسبت به حرکت کلی به منحنی تغییر میدهد.
- اضافه کردن بُعد دوم وقتی
deltaRelativeکار نمیکند. برای حرکت کاملاً افقی و عمودی،deltaRelativeفقط یک بُعد مفید ایجاد میکند. با این حال،pathRelativeهمیشه مختصات X و Y قابل استفاده را ایجاد میکند.
In the next step you'll learn how to build even more complex paths using more than one KeyPosition .
7. Building complex paths
Looking at the animation you built in the last step, it does create a smooth curve, but the shape could be more "moon like."
Modify a path with multiple KeyPosition elements
MotionLayout can modify a path further by defining as many KeyPosition as needed to get any motion. For this animation you will build an arc, but you could make the moon jump up and down in the middle of the screen, if you wanted.
- Open
xml/step4.xml. You see it has the same views and theKeyFrameyou added in the last step. - To round out the top of the curve, add two more
KeyPositionsto the path of@id/moon, one just before it reaches the top, and one after.
step4.xml
<!-- TODO: Add two more KeyPositions to the KeyFrameSet here -->
<KeyPosition
       motion:framePosition="25"
       motion:motionTarget="@id/moon"
       motion:keyPositionType="parentRelative"
       motion:percentY="0.6"
/>
<KeyPosition
       motion:framePosition="75"
       motion:motionTarget="@id/moon"
       motion:keyPositionType="parentRelative"
       motion:percentY="0.6"
/>
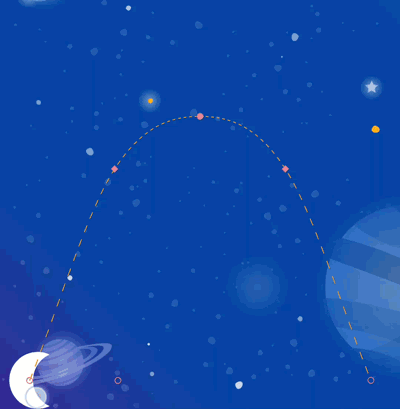
These KeyPositions will be applied 25% and 75% of the way through the animation, and cause @id/moon to move through a path that is 60% from the top of the screen. Combined with the existing KeyPosition at 50%, this creates a smooth arc for the moon to follow.
In MotionLayout , you can add as many KeyPositions as you would need to get the motion path you want. MotionLayout will apply each KeyPosition at the specified framePosition , and figure out how to create a smooth motion that goes through all of the KeyPositions .
امتحانش کن.
- Run the app again. Go to Step 4 to see the animation in action. When you click on the moon, it follows the path from start to end, going through each
KeyPositionthat was specified in theKeyFrameSet.
Explore on your own
Before you move on to other types of KeyFrame , try adding some more KeyPositions to the KeyFrameSet to see what kind of effects you can create just using KeyPosition .
Here's one example showing how to build a complex path that moves back and forth during the animation.
step4.xml
<!-- Complex paths example: Dancing moon -->
<KeyFrameSet>
   <KeyPosition
           motion:framePosition="25"
           motion:motionTarget="@id/moon"
           motion:keyPositionType="parentRelative"
           motion:percentY="0.6"
           motion:percentX="0.1"
   />
   <KeyPosition
           motion:framePosition="50"
           motion:motionTarget="@id/moon"
           motion:keyPositionType="parentRelative"
           motion:percentY="0.5"
           motion:percentX="0.3"
   />
   <KeyPosition
           motion:framePosition="75"
           motion:motionTarget="@id/moon"
           motion:keyPositionType="parentRelative"
           motion:percentY="0.6"
           motion:percentX="0.1"
   />
</KeyFrameSet>
Once you're done exploring KeyPosition , in the next step you'll move on to other types of KeyFrames .
8. Changing attributes during motion
Building dynamic animations often means changing the size , rotation , or alpha of views as the animation progresses. MotionLayout supports animating many attributes on any view using a KeyAttribute .
In this step, you will use KeyAttribute to make the moon scale and rotate. You will also use a KeyAttribute to delay the appearance of the text until the moon has almost completed its journey.
Step 1: Resize and rotate with KeyAttribute
- Open
xml/step5.xmlwhich contains the same animation you built in the last step. For variety, this screen uses a different space picture as the background. - To make the moon expand in size and rotate, add two
KeyAttributetags in theKeyFrameSetatkeyFrame="50"andkeyFrame="100"
step5.xml
<!-- TODO: Add KeyAttributes to rotate and resize @id/moon -->

<KeyAttribute
       motion:framePosition="50"
       motion:motionTarget="@id/moon"
       android:scaleY="2.0"
       android:scaleX="2.0"
       android:rotation="-360"
/>
<KeyAttribute
       motion:framePosition="100"
       motion:motionTarget="@id/moon"
       android:rotation="-720"
/>
These KeyAttributes are applied at 50% and 100% of the animation. The first KeyAttribute at 50% will happen at the top of the arc, and causes the view to be doubled in size as well as rotate -360 degrees (or one full circle). The second KeyAttribute will finish the second rotation to -720 degrees (two full circles) and shrink the size back to regular since the scaleX and scaleY values default to 1.0.
Just like a KeyPosition , a KeyAttribute uses the framePosition and motionTarget to specify when to apply the KeyFrame , and which view to modify. MotionLayout will interpolate between KeyPositions to create fluid animations.
KeyAttributes support attributes that can be applied to all views. They support changing basic attributes such as the visibility , alpha , or elevation . You can also change the rotation like you're doing here, rotate in three dimensions with rotateX and rotateY , scale the size with scaleX and scaleY , or translate the view's position in X, Y, or Z.
Step 2: Delay the appearance of credits
One of the goals of this step is to update the animation so that the credits text doesn't appear until the animation is mostly complete.
- To delay the appearance of credits, define one more
KeyAttributethat ensures thatalphawill remain 0 untilkeyPosition="85".MotionLayoutwill still smoothly transition from 0 to 100 alpha, but it will do it over the last 15% of the animation.
step5.xml
<!-- TODO: Add KeyAttribute to delay the appearance of @id/credits -->

<KeyAttribute
       motion:framePosition="85"
       motion:motionTarget="@id/credits"
       android:alpha="0.0"
/>
This KeyAttribute keeps the alpha of @id/credits at 0.0 for the first 85% of the animation. Since it starts at an alpha of 0, this means it will be invisible for the first 85% of the animation.
The end effect of this KeyAttribute is that the credits appear towards the end of the animation. This gives the appearance of them being coordinated with the moon settling down in the right corner of the screen.
By delaying animations on one view while another view moves like this, you can build impressive animations that feel dynamic to the user.
امتحانش کن.
- Run the app again and go to Step 5 to see the animation in action. When you click on the moon, it'll follow the path from start to end, going through each
KeyAttributethat was specified in theKeyFrameSet.
Because you rotate the moon two full circles, it will now do a double back flip, and the credits will delay their appearance until the animation is almost done.
Explore on your own
Before you move on to the final type of KeyFrame , try modifying other standard attributes in the KeyAttributes . For example, try changing rotation to rotationX to see what animation it produces.
Here's a list of the standard attributes that you can try:
-
android:visibility -
android:alpha -
android:elevation -
android:rotation -
android:rotationX -
android:rotationY -
android:scaleX -
android:scaleY -
android:translationX -
android:translationY -
android:translationZ
9. Changing custom attributes
Rich animations involve changing the color or other attributes of a view. While MotionLayout can use a KeyAttribute to change any of the standard attributes listed in the previous task, you use a CustomAttribute to specify any other attribute.
A CustomAttribute can be used to set any value that has a setter. For example, you can set the backgroundColor on a View using a CustomAttribute . MotionLayout will use reflection to find the setter, then call it repeatedly to animate the view.
In this step, you will use a CustomAttribute to set the colorFilter attribute on the moon to build the animation shown below.
Define custom attributes
- To get started open
xml/step6.xmlwhich contains the same animation you built in the last step. - To make the moon change colors, add two
KeyAttributewith aCustomAttributein theKeyFrameSetatkeyFrame="0",keyFrame="50"andkeyFrame="100".
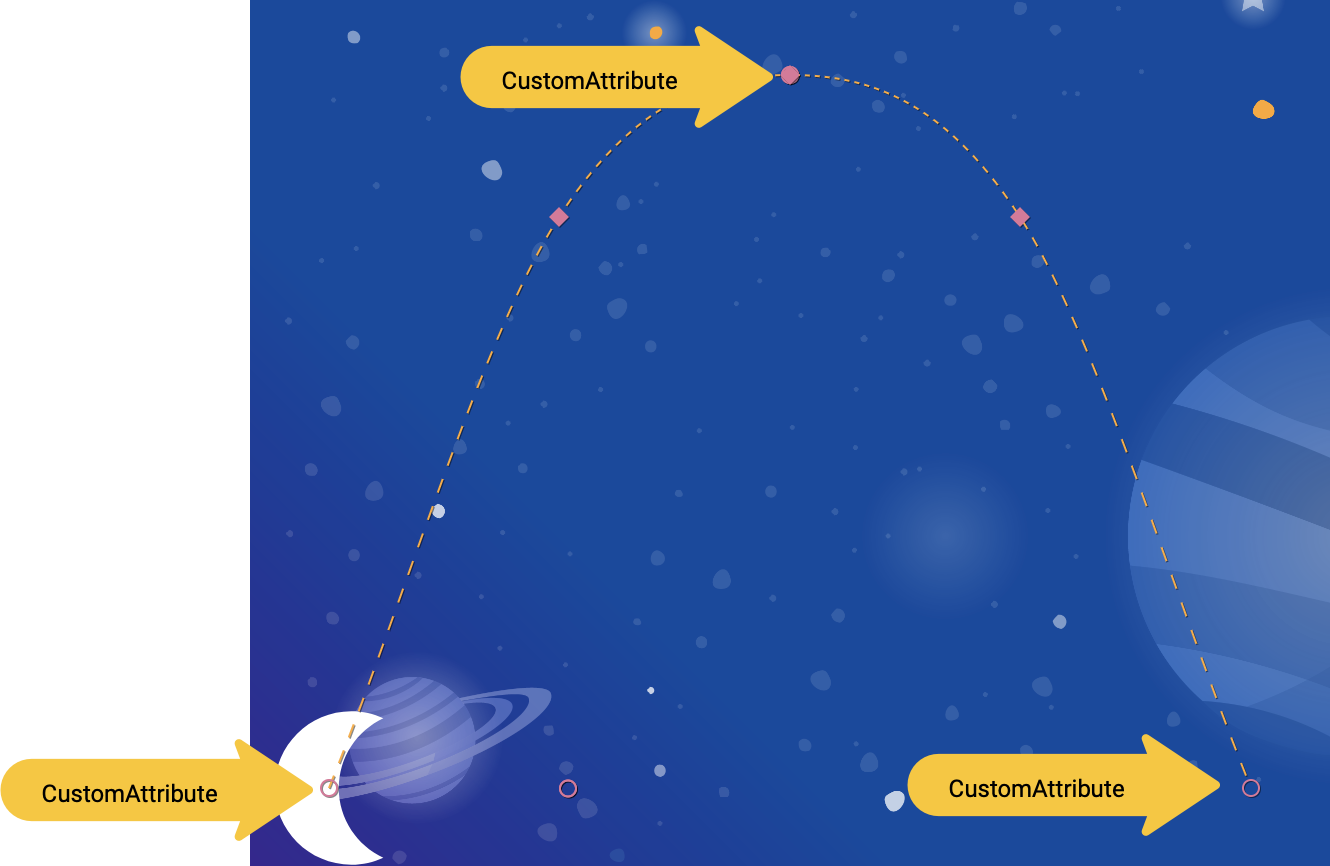
step6.xml
<!-- TODO: Add Custom attributes here -->
<KeyAttribute
       motion:framePosition="0"
       motion:motionTarget="@id/moon">
   <CustomAttribute
           motion:attributeName="colorFilter"
           motion:customColorValue="#FFFFFF"
   />
</KeyAttribute>
<KeyAttribute
       motion:framePosition="50"
       motion:motionTarget="@id/moon">
   <CustomAttribute
           motion:attributeName="colorFilter"
           motion:customColorValue="#FFB612"
   />
</KeyAttribute>
<KeyAttribute
       motion:framePosition="100"
       motion:motionTarget="@id/moon">
   <CustomAttribute
           motion:attributeName="colorFilter"
           motion:customColorValue="#FFFFFF"
   />
</KeyAttribute>
You add a CustomAttribute inside a KeyAttribute . The CustomAttribute will be applied at the framePosition specified by the KeyAttribute .
Inside the CustomAttribute you must specify an attributeName and one value to set.
-
motion:attributeNameis the name of the setter that will be called by this custom attribute. In this examplesetColorFilteronDrawablewill be called. -
motion:custom*Valueis a custom value of the type noted in the name, in this example the custom value is a color specified.
Custom values can have any of the following types:
- رنگ
- عدد صحیح
- شناور
- رشته
- ابعاد
- Boolean
Using this API, MotionLayout can animate anything that provides a setter on any view.
امتحانش کن.
- Run the app again and go to Step 6 to see the animation in action. When you click on the moon, it'll follow the path from start to end, going through each
KeyAttributethat was specified in theKeyFrameSet.
When you add more KeyFrames , MotionLayout changes the path of the moon from a straight line to a complex curve, adding a double backflip, resize, and a color change midway through the animation.
In real animations, you'll often animate several views at the same time controlling their motion along different paths and speeds. By specifying a different KeyFrame for each view, it's possible to choreograph rich animations that animate multiple views with MotionLayout .
10. Drag events and complex paths
In this step you'll explore using OnSwipe with complex paths. So far, the animation of the moon has been triggered by an OnClick listener and runs for a fixed duration.
Controlling animations that have complex paths using OnSwipe , like the moon animation you've built in the last few steps, requires understanding how OnSwipe works.
Step 1: Explore OnSwipe behavior
- Open
xml/step7.xmland find the existingOnSwipedeclaration.
step7.xml
<!-- Fix OnSwipe by changing touchAnchorSide →

<OnSwipe
       motion:touchAnchorId="@id/moon"
       motion:touchAnchorSide="bottom"
/>
- Run the app on your device and go to Step 7 . See if you can produce a smooth animation by dragging the moon along the path of the arc.
When you run this animation, it doesn't look very good. After the moon reaches the top of the arc, it starts jumping around.
To understand the bug, consider what happens when the user is touching just below the top of the arc. Because the OnSwipe tag has an motion:touchAnchorSide="bottom" MotionLayout will try to make the distance between the finger and the bottom of the view constant throughout the animation.
But, since the bottom of the moon doesn't always go in the same direction, it goes up then comes back down, MotionLayout doesn't know what to do when the user has just passed the top of the arc. To consider this, since you're tracking the bottom of the moon, where should it be placed when the user is touching here?
Step 2: Use the right side
To avoid bugs like this, it is important to always choose a touchAnchorId and touchAnchorSide that always progresses in one direction throughout the duration of the entire animation.
In this animation, both the right side and the left side of the moon will progress across the screen in one direction.
However, both the bottom and the top will reverse direction. When OnSwipe attempts to track them, it will get confused when their direction changes.
- To make this animation follow touch events, change the
touchAnchorSidetoright.
step7.xml
<!-- Fix OnSwipe by changing touchAnchorSide →

<OnSwipe
       motion:touchAnchorId="@id/moon"
       motion:touchAnchorSide="right"
/>
Step 3: Use dragDirection
You can also combine dragDirection with touchAnchorSide to make a side track a different direction than it normally would. It's still important that the touchAnchorSide only progresses in one direction, but you can tell MotionLayout which direction to track. For example, you can keep the touchAnchorSide="bottom" , but add dragDirection="dragRight" . This will cause MotionLayout to track the position of the bottom of the view, but only consider its location when moving right (it ignores vertical motion). So, even though the bottom goes up and down, it will still animate correctly with OnSwipe .
- Update
OnSwipeto track the moon's motion correctly.
step7.xml
<!-- Using dragDirection to control the direction of drag tracking →

<OnSwipe
       motion:touchAnchorId="@id/moon"
       motion:touchAnchorSide="bottom"
       motion:dragDirection="dragRight"
/>
امتحانش کن.
- Run the app again and try dragging the moon through the entire path. Even though it follows a complex arc,
MotionLayoutwill be able to progress the animation in response to swipe events.
11. Running motion with code
MotionLayout can be used to build rich animations when used with CoordinatorLayout . In this step, you'll build a collapsible header using MotionLayout .
Step 1: Explore the existing code
- To get started, open
layout/activity_step8.xml. - In
layout/activity_step8.xml, you see that a workingCoordinatorLayoutandAppBarLayoutis already built.
activity_step8.xml
<androidx.coordinatorlayout.widget.CoordinatorLayout
       ...>
   <com.google.android.material.appbar.AppBarLayout
           android:id="@+id/appbar_layout"
           android:layout_width="match_parent"
           android:layout_height="180dp">
       <androidx.constraintlayout.motion.widget.MotionLayout
               android:id="@+id/motion_layout"
               ... >
           ...
       </androidx.constraintlayout.motion.widget.MotionLayout>
   </com.google.android.material.appbar.AppBarLayout>

   <androidx.core.widget.NestedScrollView
           ...
           motion:layout_behavior="@string/appbar_scrolling_view_behavior" >
           ...
   </androidx.core.widget.NestedScrollView>
</androidx.coordinatorlayout.widget.CoordinatorLayout>
This layout uses a CoordinatorLayout to share scrolling information between the NestedScrollView and the AppBarLayout . So, when the NestedScrollView scrolls up, it will tell the AppBarLayout about the change. That's how you implement a collapsing toolbar like this on Android—the scrolling of the text will be "coordinated" with the collapsing header.
The motion scene that @id/motion_layout points to is similar to the motion scene in the last step. However, the OnSwipe declaration was removed to enable it to work with CoordinatorLayout .
- Run the app and go to Step 8 . You see that when you scroll the text, the moon does not move.
Step 2: Make the MotionLayout scroll
- To make the
MotionLayoutview scroll as soon as theNestedScrollViewscrolls, addmotion:minHeightandmotion:layout_scrollFlagsto theMotionLayout.
activity_step8.xml
<!-- Add minHeight and layout_scrollFlags to the MotionLayout -->

<androidx.constraintlayout.motion.widget.MotionLayout
       android:id="@+id/motion_layout"
       android:layout_width="match_parent"
       android:layout_height="match_parent"
       motion:layoutDescription="@xml/step8"
       motion:motionDebug="SHOW_PATH"
       android:minHeight="80dp"
       motion:layout_scrollFlags="scroll|enterAlways|snap|exitUntilCollapsed"  >
- Run the app again and go to Step 8 . You see that the
MotionLayoutcollapses as you scroll up. However, the animation does not progress based on the scroll behavior yet.
Step 3: Move the motion with code
- Open
Step8Activity.kt. Edit thecoordinateMotion()function to tellMotionLayoutabout the changes in scroll position.
Step8Activity.kt
// TODO: set progress of MotionLayout based on an AppBarLayout.OnOffsetChangedListener

private fun coordinateMotion() {
    val appBarLayout: AppBarLayout = findViewById(R.id.appbar_layout)
    val motionLayout: MotionLayout = findViewById(R.id.motion_layout)

    val listener = AppBarLayout.OnOffsetChangedListener { unused, verticalOffset ->
        val seekPosition = -verticalOffset / appBarLayout.totalScrollRange.toFloat()
        motionLayout.progress = seekPosition
    }

    appBarLayout.addOnOffsetChangedListener(listener)
}
This code will register a OnOffsetChangedListener that will be called every time the user scrolls with the current scroll offset.
MotionLayout supports seeking its transition by setting the progress property. To convert between a verticalOffset and a percentage progress, divide by the total scroll range.
امتحانش کن.
- Deploy the app again and run the Step 8 animation. You see that
MotionLayoutwill progress the animation based on the scroll position.
It's possible to build custom dynamic collapsing toolbar animations using MotionLayout . By using a sequence of KeyFrames you can achieve very bold effects.
12. Congratulations
This codelab covered the basic API of MotionLayout .
To see more examples of MotionLayout in practice, check out the official sample . And be sure to check out the documentation !
اطلاعات بیشتر
MotionLayout supports even more features not covered in this codelab, like KeyCycle, which lets you control paths or attributes with repeating cycles, and KeyTimeCycle, which lets you animate based on clock time. Check out the samples for examples of each.
For links to other codelabs in this course, see the Advanced Android in Kotlin codelabs landing page .